IAN 78986 - Fitness Equipment CRIVIT - Free user manual and instructions
Find the device manual for free IAN 78986 CRIVIT in PDF.

| Brand | CRIVIT |
| Model | IAN 78986 |
| Product type | Slackline System |
| Use | Outdoor, private use |
| Maximum length | Approx. 15 m |
| Webbing width | Approx. 5 cm |
| Maximum installation height | 50 cm |
| Maximum user weight | 150 kg |
| Number of users | 1 |
| Main material | Polyester and metal |
| Anchor point load capacity | 9000 N (max 25 kN recommended) |
| Maximum tension force | 400 N (by hand) |
| Box contents | Storage bag, 2 tree protectors, 1 auxiliary rope, 1 balancing rope, 1 ratchet, instructions, DVD |
| Main features | Walking and balancing on webbing |
| Safety | Tree protectors, ratchet cover, limited height |
| Cleaning | Dry cloth, no harsh products |
| Storage | Dry place, room temperature |
| Warranty | 3 years |
| Repairability | Repairs possible after warranty at cost |
| Disposal | Recycling according to regulations |
| Included accessories | Auxiliary rope, tree protectors |
| Prohibited use | Acrobatic jumps, flips |
| Installation conditions | Soft ground (lawn, sand), anchor point distance max 12 m, tree circumference min 1 m |
| Recommended age | From 6 years old |
| Not recommended | Under alcohol, medication, fatigue, darkness |
Frequently Asked Questions - IAN 78986 CRIVIT
User questions about IAN 78986 CRIVIT
0 question about this device. Answer the ones you know or ask your own.
Ask a new question about this device
Download the instructions for your Fitness Equipment in PDF format for free! Find your manual IAN 78986 - CRIVIT and take your electronic device back in hand. On this page are published all the documents necessary for the use of your device. IAN 78986 by CRIVIT.
USER MANUAL IAN 78986 CRIVIT
text_image
www.lidl-service.com PDF onlineSLACKLINE
DE AT CH
SLACKLINE
Bedienungsanleitung
IT CH
SLACKLINE
Istruzioni d'uso
GB
SLACKLINE
Instructions for use
FR CH
SLACKLINE
GB Instructions for use 35
DE AT CH
Bedienungsanleitung
natural_image
Simple line drawing of two smokestacks above a horizontal beam with arrows indicating direction (no text or symbols)natural_image
Simple line drawing of a symmetrical object with two rounded squares, enclosed by vertical lines (no text or symbols)natural_image
Diagram showing a rope knot being twisted, with no text or symbols presentnatural_image
Line drawing of a cable being inserted into a connector (no text or symbols)natural_image
Diagram of a mechanical device with a handle and belt, showing a force or movement direction (no text or symbols)natural_image
Illustration of a hand using a power tool to lift a wire, with a letter F in the corner (no text or symbols on the diagram itself)natural_image
Diagram of a car engine with exhaust pipe and fan, showing airflow direction (no text or symbols)Installation....14 - 16
natural_image
Simple line drawing of a symmetrical object with two rounded squares, no text or symbols presentnatural_image
Diagram showing a rope knot being twisted, with no text or symbols presentnatural_image
Line drawing of a cable being inserted into a mechanical clamp (no text or symbols)natural_image
Line drawing of a hand holding a tool, with a letter F in the corner (no text or symbols on the diagram itself)natural_image
Diagram of a hand holding a tool with a directional arrow indicating motion (no text or symbols)natural_image
Illustration of a hand holding a tool with a black arrow indicating rotation (no text or symbols)natural_image
Diagram of a cable connector with a cable being inserted, showing internal components and motion direction (no text or symbols)3.) Corde auxiliaire
natural_image
Technical line drawing of a mechanical assembly with directional arrows indicating motion (no text or symbols)natural_image
Simple line drawing of two smokestacks with a horizontal bar, no text or symbols presentnatural_image
Simple line drawing of a symmetrical object with two rounded rectangular shapes, no text or symbols present.2.) Nastro d'equilibrismo e arpionismo
natural_image
Diagram showing two rope knotting steps, one with a magnified inset (no text or symbols)natural_image
Line drawing of a cable being inserted into a connector (no text or symbols)natural_image
Illustration of a hand using a power tool to lift a wire, with a letter F in the corner (no text or symbols on the diagram itself)natural_image
Diagram of a mechanical device with a handle and lever, showing internal components and motion direction (no text or symbols)natural_image
Diagram of a mechanical device emitting exhaust, showing fan blades and internal components (no text or labels)natural_image
Simple line drawing of two smokestacks with a horizontal double-headed arrow between them, no text or symbols present.natural_image
Simple line drawing of a symmetrical object with two rounded squares, enclosed by vertical lines (no text or symbols)2.) Balanceerband en ratel
natural_image
Diagram showing two steps of tying a knot, with no text or symbols present.natural_image
Line drawing of a cable being inserted into a connector (no text or symbols)natural_image
Illustration of a hand holding a tool with a forceps, no text or symbols presentnatural_image
Diagram of a mechanical device with a lever and cable, showing internal components and motion direction (no text or symbols)3.) Hulpkoord
natural_image
Diagram of a mechanical device with directional arrows indicating motion or flow (no text or symbols)Instructions for use
Contents 36
Technical data.... 36
Symbols used 36
Terminology....36
Intended Use....36
Safety instructions....37
Assembly....38-40
Use / Exercises 41
Disassembly. 42
Care, Storage 42
Disposal information 42
3-year warranty 42

Congratulations!
With your purchase you have decided on a high-quality product. Get to know the product before you start to use it. Carefully read the following operating instructions. Use the product only as described and only for the given areas of application. Keep these instructions safe. When passing the product on to a third party, always make sure that the documentation is included.
Contents
A 1 x Storage bag / protective cover
B 2x Treeskin
C 1 x Auxiliary rope
D 1 x Balance band with retaining screw
E 1 x Ratchet with retaining screw
1 x Instructions for use
1 x Training DVD with mounting instructions and application examples
Technical data
Maximum number of users: 1
Maximum user weight: 150kg
Maximum height of use: 50cm
Total length: approx. 15m
Balance band width: approx. 5cm
Auxiliary rope length: approx. 15m
Maximum attachment point load: 9000N
Maximum tensioning element
operating force: 400N
Symbols used

Refer to instructions for use

Maximum user weight
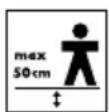
Maximum height of use

Maximum number of users

Year of manufacture
Terminology
Slackline system
Sports equipment for balancing, consisting of a walkable, non-rigid element including fastener and tensioning element, secured between two attachment points
Slackline
Walkable element of the slackline system
Attachment point
Force absorbing fastener for securing the slackline system
Height of use
Clearance between the unloaded slackline and the area of impact
Attachment height
Vertical distance from the attachment point for tensioning or supporting the retaining element
Maximum attachment point load
Resistance of the attachment point against the increased nominal load
Maximum tensioning element operating force
Maximum force the user may apply to the tensioning element
Intended use
This product was developed as a sporting good for private use to balance in outdoor areas. This product may only be used by one person at a time with a weight of up to 150kg, not multiple persons. Not suitable for children under 6 years.

Safety instructions
Risk of injury!
- Only use this product for the purpose described in these instructions and in the specified manner!
- This product is not for use by children or persons unable to safely use it based on their physical, sensory or mental capacity or their lack of experience or knowledge!
- This product must always be assembled by adults. Keep product out of reach of children at all other times!
• Always fully assemble the product as described before use! - Before every use verify the product's perfect condition. Discontinue use if cuts in the balance band, ruptures in the seams, or deformation or corrosion of metal parts are detected, or product parts are missing!
- Children must be supported and supervised by an adult whilst using this product!
- Persons not directly supporting the balancing individual must keep a distance of at least two metres as a rebounding balance band can cause serious injuries!
• The product may only be used by one person at a time! - Only use the product barefoot!
- Do not perform tricks or flips! Especially warn children of the dangers!
- Be sure the balance band is always clean and dry!
-
Do not use the balance band in rainy or windy conditions! Immediately disassemble the product if there are indications of a storm!
-
During use the protective cover must always be over the ratchet to prevent injuries in the event of a fall!
- Do not use the product under the influence of alcohol, medications or drugs or when fatigued! Immediately stop balancing if you feel unwell or light-headed!
- Do not use this product in the dark! The balance band must always be clearly visible!
• Always disassemble the balance band at dusk to prevent others from tripping over it! - Be sure to wear appropriate clothing. Remove jewellery and piercings, eye-wear, rucksacks, shoulder bags, belt buckles, etc.!
- Remove items such as keys or pocket knives from trouser pockets!
- Crushing hazard when using the ratchet!
- Only tension the ratchet by hand. Never use extensions or other tools!
Assembly
Assembly conditions
natural_image
Simple line drawing of two smokestacks emitting vapor, with a horizontal tube and arrows indicating direction (no text or symbols)- Never set up the product higher than 50cm, at a maximum one hand width below the step. Setup at knee height recommended.
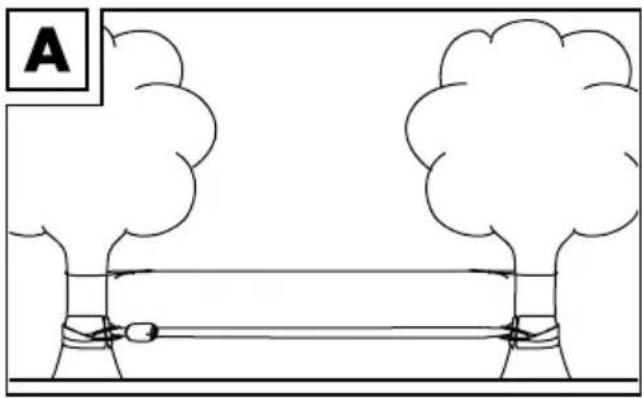
- The balance band must be suspended horizontally and tightly tensioned. The more the band sags, the more difficult it is to balance.
- Never assemble the product over hard surfaces such as tarmac or paved surfaces. Risk of injury. Always assemble the product over soft surfaces such as grass or sand.
- Keep an area of 2 metres to each side of the product clear of any objects (e.g. stones or roots).
- Firmly anchored posts or trees are suitable for securing the product. The maximum distance between the anchoring points is 12 metres. The trees/posts must have a circumference of one metre at the attachment height. The attachment points must be able to withstand at least 25kN.
- Use the tree skin to protect the tree bark.
- Use an edge guard when assembling the product between square posts.
- Only tension the slackline by hand. Never use extensions or other tools.
- Never use the slackline between cars or other tools, as the initial load can then become uncontrollable.
1.) Tree skin
- Always attach one tree skin to both trees with hook and loop fastener.

natural_image
Simple line drawing of a symmetrical object with two rounded corners, no text or symbols present2.) Balance band and ratchet
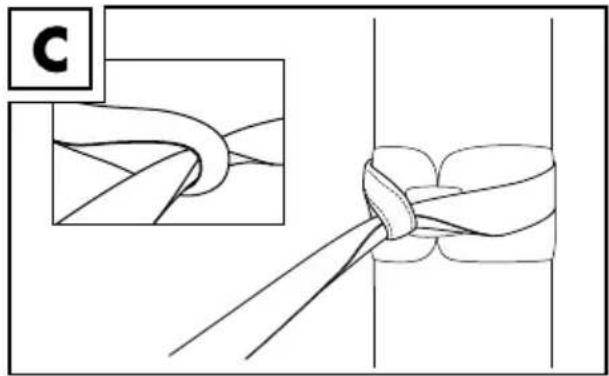
- Place the balance band flat around the first tree and feed through the retaining screw. Fold the balance band at the middle so it will not twist when it is later tensioned.
natural_image
Diagram showing two rope knotting steps, one with a magnified inset and the other with a close-up detail (no text or symbols)- Without twisting, place the ratchet around the second tree and feed it through the retaining screw. Make sure that ratchet points downwards. Fold the band at the middle so it will not twist when it is later tensioned.
natural_image
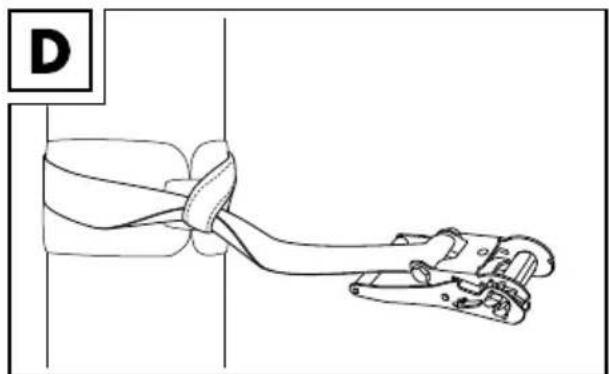
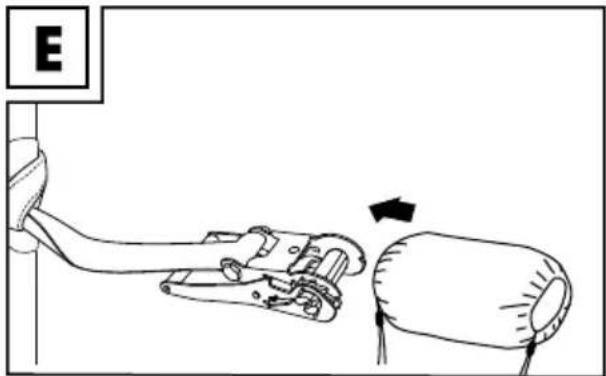
Line drawing of a mechanical clamp or connector with no visible text or symbols- The storage bag is also the protective cover. Open the strap of the protective cover at each side and pull the protective cover out over the ratchet. Do not pull the protective cover completely over the ratchet until the slackline is tensioned.
natural_image
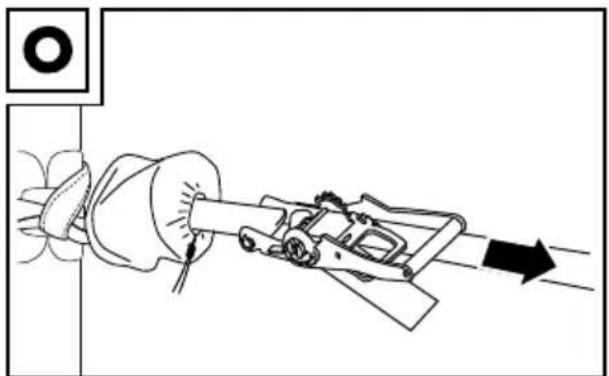
Diagram of a mechanical device with a handle and belt, showing a force or movement direction (no text or symbols)- With the ratchet closed, feed the balance band through the slit in the shaft.
natural_image
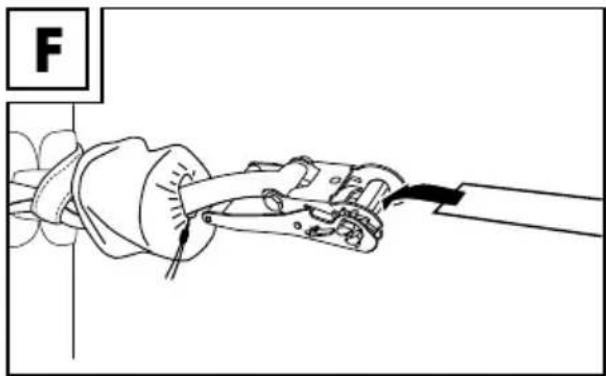
Line drawing of a robotic arm gripping a tool, no text or symbols present- Pull the balance band as far through as possible, until it is taut.
natural_image
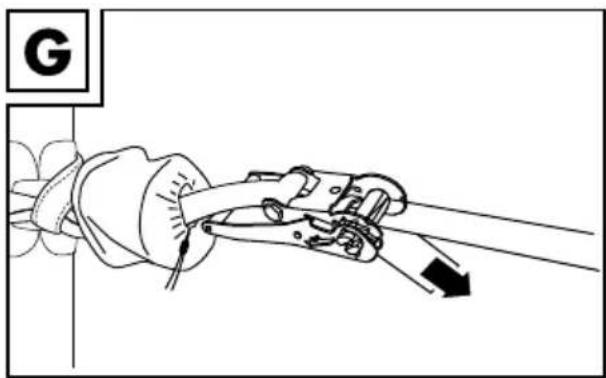
Diagram of a robotic arm gripping a cable, with a directional arrow indicating motion (no text or symbols)- Turn the ratchet over to tension the balance band.
text_image
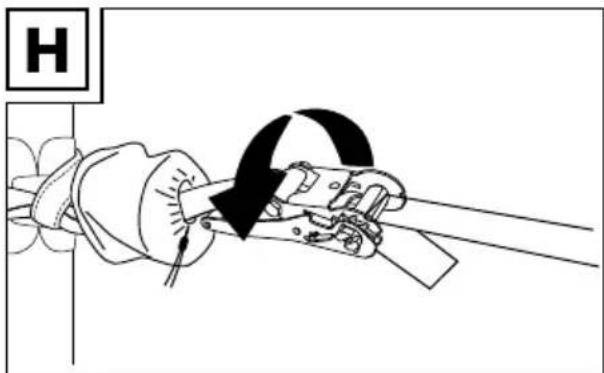
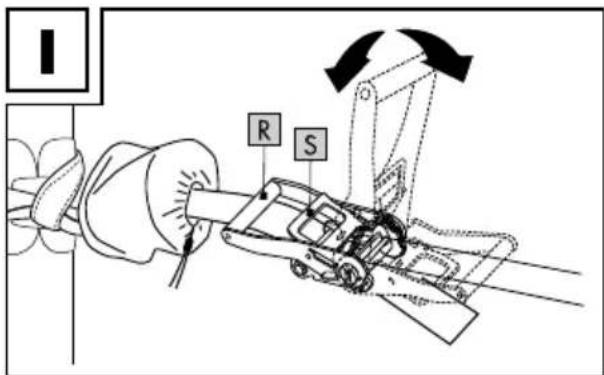
H- Pull the safety catch (S) upwards to release the ratchet. Move the ratchet catch (R) towards the balance band, then move it in the opposite direction to tension the balance band.
IMPORTANT: The band must be wrapped at least one and a half times but no more than two and a half times around the shaft. Only tension the band as much as possible with normal manual force. Never use a power booster!
text_image
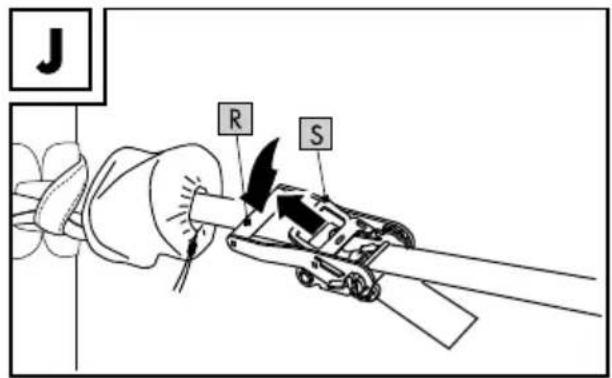
I R S- To secure the ratchet draw the safety catch (S) upwards and press the ratchet catch (R) completely downwards.
Release the safety catch and check whether the safety catch and pin are properly locked in place in the gears.
text_image
J R S
text_image
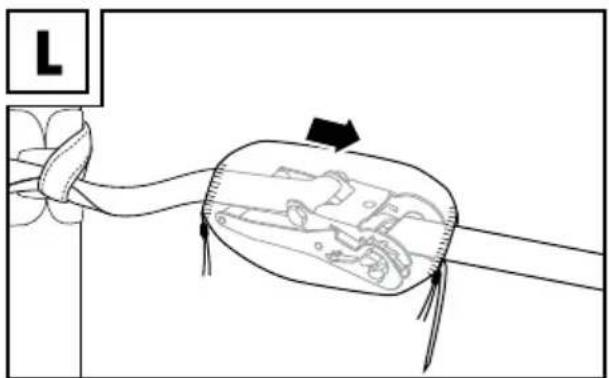
K Safety catch Safety pin- Then turn the ratchet over again. Draw the protective cover over the ratchet and close it on both sides.
natural_image
Diagram of a mechanical component with arrows indicating motion or force direction (no text or symbols)3.) Auxiliary rope
For further support whilst balancing you can secure the auxiliary rope just above head height so as to prevent becoming tangled in it in the event of a fall.
Secure the rope with two knots as shown in illustration M.

text_image
M 1. 2. 3.Use / Exercises
Check before every use
• Is the product damaged?
- Is the surface below free from pointy or hard objects?
- Is the balance band secured at a maximum height of 50 cm?
- Is the protective cover pulled over the ratchet?
• Is the ratchet closed and secured?
- Is the balance band twisted and is it securely tensioned?
Notices
- The balance band is under great tension when assembled. Uncontrolled, excessive and careless movements can result in falls. Do not perform tricks or flips!
Especially instruct children of the dangers! - The more the band sags, the more difficult it is to balance.
- We recommend beginners use the auxiliary rope. It will help you maintain your balance. Optionally, a second person may support the person balancing.
Basics
Mounting the balance band
- Stand at the end of the slackline opposite the ratchet. Place one leg on the ground up against the balance band so that your leg is touching the balance band, allowing it to minimise swaying to some extent.
- Place your other leg on the balance band, straighten the bent leg and use it to push yourself to an upright position. Shift your centre of gravity, to bring it over the rope and put your other foot one step ahead.
- Focus on a fixed point at the end of the balance band. Doing so, rather than looking
down at your feet, will make it easier to keep your balance.
Walking along the balance band
- Focus on the fixed point and carefully place your feet one in front of the other. As you do so, keep your arms outstretched; this makes it easier to keep your balance.
Turning on the balance band
- Reposition your feet gently to turn 180 degrees to the left or the right.
- If your left leg is in front, turn to the right; if your right leg is in front, turn to the left.
- As soon as you have turned, return your focus to the fixed point as quickly as possible.
Beginners
- We recommend for beginners to position themselves as described in the basics using the support of another person.
- When walking and turning on the balance band use the auxiliary rope or another person for support.
Advanced users
Only perform the exercises for advanced users once you are proficient in the basics. Do not overestimate your skills.
- With a little practice you will be able to walk backwards as well as forwards on the slackline. Keep your balance by extending your arms.
- Position yourself on the balance band. One leg is bent, your foot on the balance band, your arms outstretched. The other leg is straightened next to the slackline for counterbalance. Place the foot of the bent leg closer to your body. From this position you straighten your leg to push yourself to a standing position.
Disassembly

Since the slackline is tensioned you must be careful as it is very easy to injure your fingers when opening the ratchet.
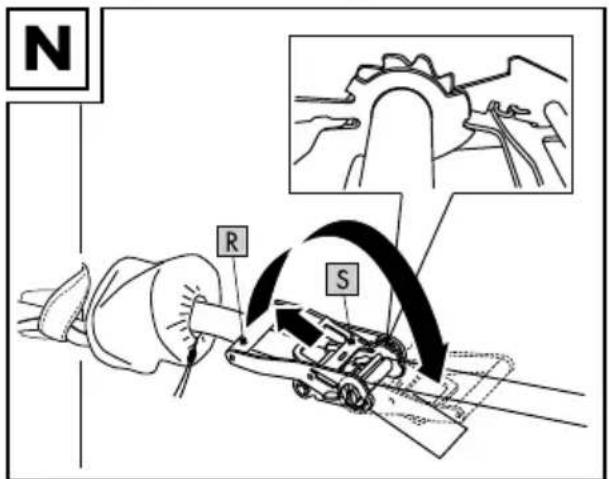
- Pull the safety catch (S) upward to release the ratchet. Move the ratchet catch (R) in the direction of the balance band until the safety catch locks into place in the rear guide.
text_image
N R S- Next, pull the balance band out of the ratchet.
natural_image
Technical line drawing of a mechanical assembly with directional arrows indicating motion (no text or symbols)- Release the ratchet and balance band, as well as the auxiliary rope and tree skin.
Care, Storage
Always store the dry and clean product in a tempered room. Never clean with harsh detergents, only wipe clean with a dry cleaning cloth.
Disposal information
Please dispose of packaging and the product in an environmentally friendly, correctly sorted manner! Dispose of the product through an approved waste management facility or through your municipality. Please note the current applicable regulations.
3-year warranty
The product was produced with great care and under constant supervision. You receive a three-year warranty for this product from the date of purchase. Please retain your receipt.
The warranty applies only to material and workmanship and does not apply to misuse or improper handling. Your statutory rights, especially the warranty rights, are not affected by this warranty.
With regard to complaints, please contact the following service hotline or contact us by e-mail. Our service employees will advise as to the subsequent procedure as quickly as possible. We will be personally available to discuss the situation with you.
Any repairs under the warranty, statutory guarantees or through goodwill do not extend the warranty period. This also applies to replaced and repaired parts.
Repairs after the warranty are subject to a charge.
IAN: 78986
GB Service Great Britain
Tel.: 0871 5000 720 (£ 0.10/Min.)
E-Mail: deltasport@lidl.co.uk
DELTA-SPORT HANDELSKONTOR GMBH
Wragekamp 6
D-22397 Hamburg
Version: 02/2013