
CDS303 - Cd player/recorder YAMAHA - Free user manual and instructions
Find the device manual for free CDS303 YAMAHA in PDF.
| Product type | Vinyl turntable |
| Brand | YAMAHA |
| Model | CDS303 |
| Dimensions (W × H × D) | 450 × 136 × 368 mm (including feet and protrusions) |
| Weight | 4.8 kg |
| Power supply | AC adapter: input AC 100-240 V, 50/60 Hz; output 12 V, 0.5 A |
| Power consumption | On: 1.5 W; standby: 0.1 W |
| Rotation speed | 33 1/3 rpm and 45 rpm (switchable) |
| Drive mechanism | Belt drive |
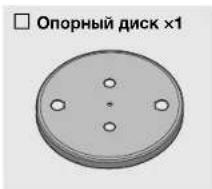
| Platter | Die-cast aluminum, 30 cm diameter |
| Tonearm | Static balance straight tonearm, effective length 223.5 mm |
| Cartridge | MM type, output voltage 2.5 mV (1 kHz, 3.54 cm/s) |
| Stylus pressure | 3.5 g ± 0.5 g (adjustable from 0 to 4 g) |
| Audio outputs | PHONO OUT (RCA) with PHONO EQ selector (ON/THRU) |
| Built-in phono preamp | Yes (switchable) |
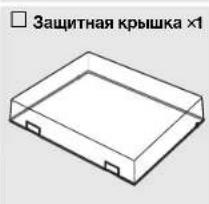
| Dust cover | Yes, removable with hinges |
| Isolation feet | Yes, vibration damping |
| Spare parts | Replacement belt, replacement stylus Audio-Technica ATN3600L |
| Maintenance and cleaning | Soft dry cloth; brush stylus; clean records with antistatic brush |
| Safety | Do not expose to water, do not disassemble, use the supplied adapter |
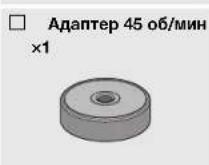
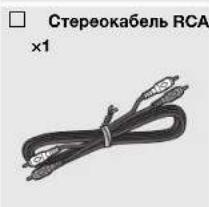
| Included accessories | AC adapter, stereo RCA cable, 45 rpm adapter, stylus guard |
Frequently Asked Questions - CDS303 YAMAHA
User questions about CDS303 YAMAHA
0 question about this device. Answer the ones you know or ask your own.
Ask a new question about this device
Download the instructions for your Cd player/recorder in PDF format for free! Find your manual CDS303 - YAMAHA and take your electronic device back in hand. On this page are published all the documents necessary for the use of your device. CDS303 by YAMAHA.
USER MANUAL CDS303 YAMAHA
TURNABLE/PLATINE VINYLE
BHHIOBbI npOnrpbBaTeJIb
TT-S303
Owner's Manual
Mode d'emploi
Bedienungsanleitung
Bruksanvisning
This product is designed for use at home to enjoy listening to audio.
PRECAUTIONS
PLEASE READ CAREFULLY BEFORE USE. BE SURE TO FOLLOW THESE INSTRUCTIONS.
The precautions listed below are to prevent risk of harm to the user and others, as well as to prevent property damage, and to help the user use this unit properly and safely. Be sure to follow these instructions.
After reading this manual, be sure to keep it in a safe place where it can be referenced at any time.
- Be sure to request inspections or repairs from the dealer where you purchased the unit or from qualified Yamaha service personnel.
- Yamaha cannot be held responsible for injury to you or damage of the products caused by improper use or modifications to the unit.
- This product is for ordinary homes. Do not use for applications requiring high reliability, such as managing lives, health care or high-value assets.

WARNING
This content indicates "risk of serious injury or death."
If you notice any abnormality
If any of the following abnormalities occur, immediately turn off the power and disconnect the power plug.
- The power cord/plug is damaged
- An unusual smell, unusual sound or smoke is emitted from the unit.
- Foreign material or water gets into the interior of the unit.
- There is a loss of sound during use.
- There is a crack or damage in the unit.
Continued use could cause electric shocks, a fire, or malfunctions. Immediately request an inspection or repair from the dealer where you purchased the unit or from qualified Yamaha service personnel.
Power supply
- Do not do anything that could damage the power cord.
-Do not place it near a heater. - Do not bend it excessively or alter it.
-Do not scratch it. - Do not place it under a heavy object. Using the power cord with the core of the cord exposed could cause electric shocks or a fire.
- Do not touch the power plug or cord if there is a chance of lightning. Failure to observe this may cause electric shocks.
- Use this unit with the power supply voltage printed on it. Failure to connect to an appropriate AC outlet may cause a fire, electric shocks, or malfunctions.
- Be sure to use the supplied AC adaptor. Failure to observe the above may cause a fire, burns, or malfunctions.
- Do not use the supplied AC adaptor for other units. Failure to observe the above may cause a fire, burns, or malfunctions.
-
Check the electric plug periodically and remove any dirt or dust which may have accumulated on it. Failure to observe this may cause a fire or electric shocks.
-
When setting up the unit, make sure that the AC outlet you are using is easily accessible. If some trouble or malfunction occurs, immediately turn off the power switch and disconnect the plug from the AC outlet. Even when the power switch is turned off, as long as the power cord is not unplugged from the wall AC outlet, the unit will not be disconnected from the power source.
If you hear thunder or suspect approaching lightning, quickly turn off the power switch and pull the power plug from the AC outlet. Failure to observe this may cause a fire or malfunctions. - If not using the unit for long periods of time, be sure to pull the power plug from the AC outlet. Failure to observe this may cause a fire or malfunctions.
Do not disassemble
- Do not disassemble or modify this unit. Failure to observe this may cause a fire, electric shocks, injury, or malfunctions.
Water warning
- Do not expose the unit to rain, use it near water or in damp or wet conditions, or place on it any containers (such as vases, bottles or glasses) containing liquids which might spill into any openings or places where water may drop. A liquid such as water getting into the unit may cause a fire, electric shocks, or malfunctions.
- Never insert or remove an electric plug with wet hands. Do not handle this unit with wet hands. Failure to observe this may cause electric shocks or malfunctions.
Fire warning
- Do not place any burning items or open flames near the unit, since they may cause a fire.
Handling caution
- Be careful not to drop or apply strong impact to this unit or the AC adaptor. Failure to observe this may cause electric shocks, a fire, or malfunctions.

CAUTION
This content indicates "risk of injury."
Power supply
- Do not cover or wrap the AC adaptor with a cloth or blanket. Failure to observe this may trap heat, causing deformation in the case or a fire.
- Do not use an AC outlet where the power plug fits loosely when inserted. Failure to observe this may cause a fire, electric shocks, or burns.
- When disconnecting the power plug, always hold the plug itself and not the cord. Pulling by the cord can damage it and cause electric shocks or a fire.
- Insert the power plug firmly all the way into the AC outlet. Using the unit when it is not plugged in sufficiently can cause dust to accumulate on the plug, causing a fire or burns.
Installation
- Do not place the unit in an unstable position where it might accidentally drop or fall over and cause injuries.
- Do not install the unit in places where it may come into contact with corrosive gases or salt air or places that have excessive smoke or steam. Doing so may result in malfunction.
- Before moving this unit, be sure to turn off the power switch and disconnect all connection cables. Failure to observe this may damage the cables or cause you or someone else to trip and fall.
Hearing loss
- Before connecting the unit to other devices, turn off the power for all devices. Failing to do so may result in hearing loss, electric shock, or device damage.
- When turning on the AC power in your audio system, always turn on the amplifier or receiver LAST, to avoid hearing loss and speaker damage. When turning the power off, the amplifier or receiver should be turned off FIRST for the same reason. Failure to observe the above may cause hearing impairment or speaker damage.
Maintenance
- Remove the power plug from the AC outlet before cleaning the unit. Failure to observe this may cause electric shocks.
Handling caution
- Keep small parts out of the reach of infants. Your children may accidentally swallow them.
-
Do not do the following:
-
Stand on or sit on the equipment.
- Put heavy items on top of the equipment.
- Place the equipment in a stack.
- Apply unreasonable force to buttons, switches, input/output terminals, etc.
Failure to observe this may cause injuries or damage to the equipment. - Avoid pulling the connected cables to prevent injuries or damage to the unit by causing it to fall.
Notice
Indicates points that you must observe in order to prevent product failure, damage or malfunction and data loss.
Power supply
- If you plan not to use this product for a long period of time, be sure to unplug the product from the AC outlet. A small amount of current continues to flow after you turn off this product using the [O] (power).
Installation
- Do not use this unit in the vicinity of other electronic equipment, such as a TV, radio, or mobile phone. Failure to observe this may cause this unit or the TV or radio to produce noise.
- Do not use this unit in a location that is exposed to direct sunlight that becomes extremely hot, such as near a heater, or extremely cold, or that is subject to excessive dust or vibration. Failure to observe this may cause the unit's panel to become deformed, the internal components to malfunction, or for operation to become unstable.
Connections
- If connecting external units, be sure to thoroughly read the manual for each unit and connect them in accordance with the instructions. Failure to properly handle a unit in accordance with the instructions could cause malfunctions.
Handling
- Do not place plastic, or rubber products on this unit. Failure to observe this may cause discoloration or deformation in the panel of this unit.
- If the ambient temperature changes drastically (such as during unit transportation or under rapid heating or cooling) and there is a chance condensation may have formed in the unit, leave the unit for several hours without turning on the power until it is completely dry before use. Using the unit while there is condensation can cause malfunctions.
Maintenance
- If the temperature or humidity changes drastically, water droplets (condensation) may form on the unit surface. If water droplets form, immediately wipe them off with a soft cloth. If water droplets are left on the unit, they may be absorbed into the wooden parts, causing deformation.
- When cleaning the unit, use a dry, soft cloth. Using chemicals such as benzine or thinner, cleaning agents, or chemical scrubbing cloths can cause discoloration or deformation.
Disposal or transfer
If you plan to transfer ownership of this product, include this document and the supplied accessories along with the product.
- Follow the rules of your local authority to dispose of this product and its accessories.
Information
About content in this manual
The illustrations and screens in this manual are for instructional purposes only.
The company names and product names in this manual are the trademarks or registered trademarks of their respective companies.
About the name plate of the unit
The model number, serial number, power requirements, etc., may be found on or near the name plate, which is at the bottom of the unit. You should note this serial number in the space provided below and retain this manual as a permanent record of your purchase to aid identification in the event of theft.
Model No.
Serial No.
Information for users on collection and disposal of old equipment:


This symbol on the products, packaging, and/or accompanying documents means that used electrical and electronic products should not be mixed with general household waste.
For proper treatment, recovery and recycling of old products, please take them to applicable collection points, in accordance with your national legislation.
By disposing of these products correctly, you will help to save valuable resources and prevent any potential negative effects on human health and the environment which could otherwise arise from inappropriate waste handling.
For more information about collection and recycling of old products, please contact your local municipality, your waste disposal service or the point of sale where you purchased the items.
For business users in the European Union:
If you wish to discard electrical and electronic equipment, please contact your dealer or supplier for further information.
Information on Disposal in other Countries outside the European Union:
This symbol is only valid in the European Union. If you wish to discard these items, please contact your local authorities or dealer and ask for the correct method of disposal.
Contents
Before you start 7
Features of this unit. 7
About this manual 7
Check the supplied accessories. 8
Handling records 8
Parts and their functions 9
Top panel. 9
Back panel. 10
Getting ready 11
Location 11
Assembly 11
Assembling the unit 11
Attaching the dust cover 13
Making connections 14
Making adjustments 15
Adjusting the stylus pressure 15
Adjusting the anti-skating 17
Turning the power on 17
Playback 18
When necessary 21
Care. 21
Replacement 21
Replacing the belt 21
Replacing the record stylus. 22
Moving this unit 22
Troubleshooting 23
Specifications. 25
Before you start
Features of this unit
This is a tumtable for playing analog records.
Wooden cabinet with a gloss finish
Provides both beauty and practical advantages such as high rigidity and vibrational damping
Highly rigid straight tone arm virtually eliminates any effect on the delicate musical signal
- Easy switching between LINE output equipped with a high-quality PHONO EQ circuit and PHONO direct output, giving you flexibility when setting up your record playback system
High rotational stability is achieved by using an aluminum die cast platter belt-driven by a high-torque DC motor
Feedback margin is maintained by insulators (feet) that feature excellent absorption of vibration and shock
About this manual
When reading this manual, please note the following.
- Specifications and appearance are subject to change without notice in order to improve the product.
-
Explanation of graphic symbols used in this manual:
-
"WARNING" indicates points that you must observe to avoid risk of death or serious injury.
CAUTION" indicates points that you must observe to avoid risk of injury.
-INDICNOTICEsthatyoumustobservetoavoid
damaging the product or causing it to malfunction.
- indicATePplementary information that you will find
useful.
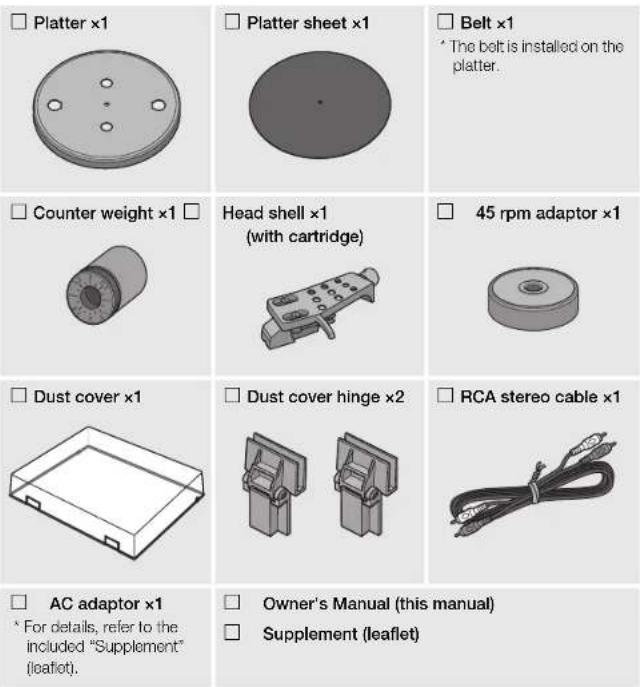
Check the supplied accessories
Make sure that all items are present.
Handling records
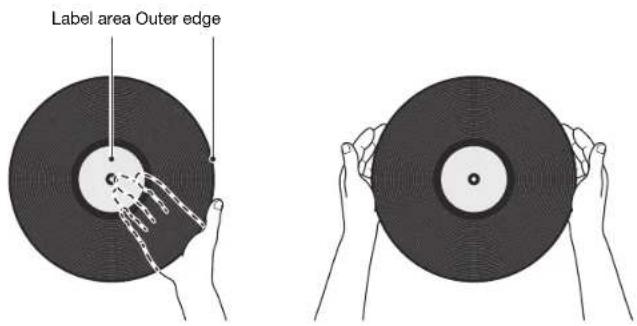
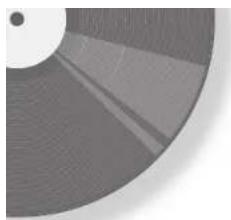
When you hold a record, you should either support the record's label area and its outer edge, or hold the record's outer edges between your two hands.
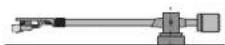
Parts and their functions
us16ug3
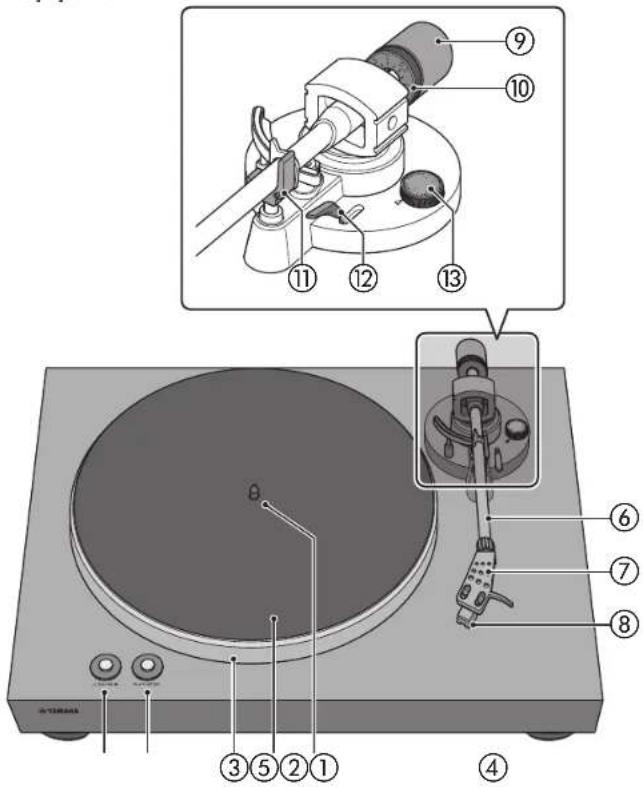
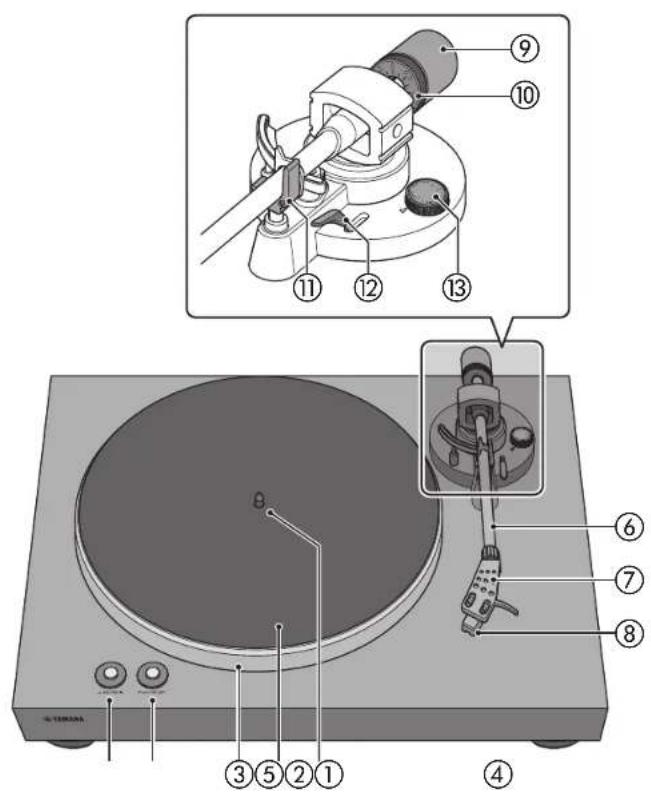
Top panel
① 33/45 (speed) (⇒ page 18)
② PLAY/STOP (play/stop) ( page 18)
③ Platter (→ page 11)
④ Platter sheet (⇒ page 12)
⑤ Center spindle (⇒ page 11)
⑥ Tone arm (→ page 12)
⑦ Head shell (→ page 12)
⑧Cartridge
Counter weight ( 一 page 12
10 Counter ring ( page 16)
⑪ Arm rest (⇒ page 15)
Lift lever ( page 19)
⑬ Anti-skating (→ page 17)
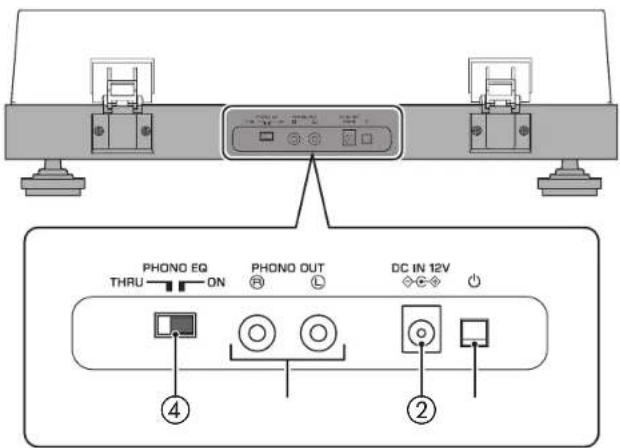
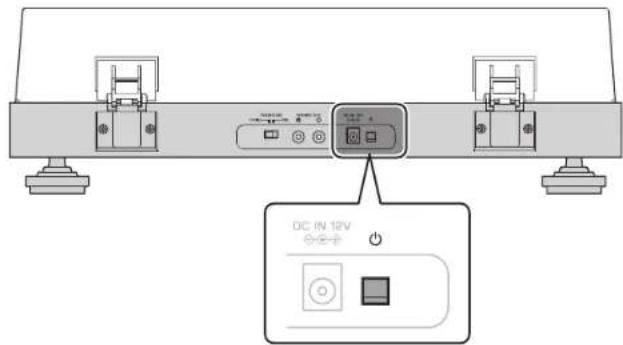
Back panel

① (power)
This turns the unit's power on/off. (→ page 17)

: on : off

②DC IN jack
Connect the AC adaptor (supplied) to this jack. ( page 14)
③PHONO OUT jacks
These jacks output the playback audio of the record. ( page 14)
④PHONO EQ (phono equalizer) switch
As appropriate for the device that is connected, set this to switch the signal that is output from the PHONO OUT jacks. (→ page 14)
Getting ready
Location
Because record playback is easily affected by vibration, you should place the unit in a level location that is not subject to external vibration. Place it sufficiently far from your speaker system so that it will not be affected by sound pressure or vibration.
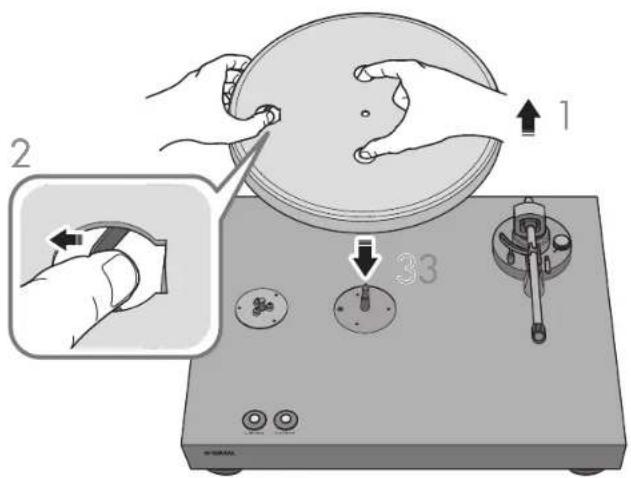
Assembly
Assembling the unit
1 Lift up the platter.
2 Reaching through the round hole in the platter, pull the belt outward, hooking it over your finger.
3 Insert the platter onto the center spindle.

CAUTION
Take care not to drop the platter. Dropping it might cause injury, or might damage the unit.
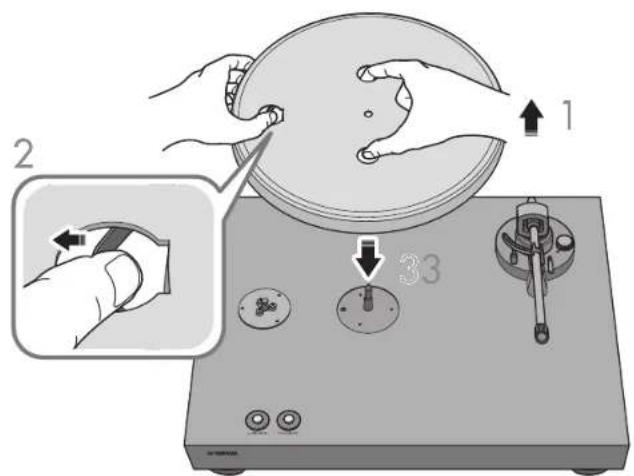
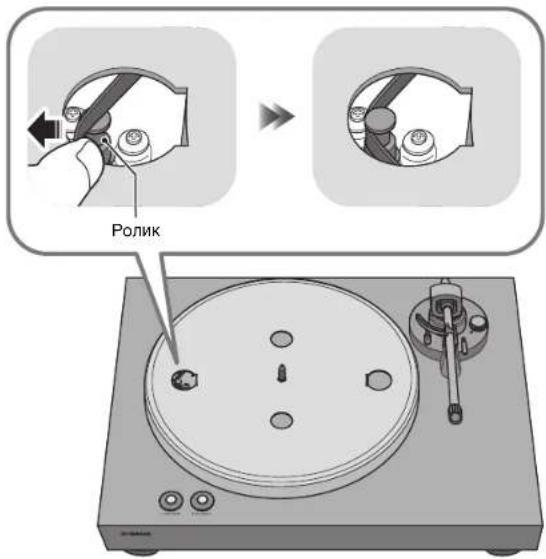
4 Align the round hole of the platter with the pulley.
Use your finger to hook the belt onto the pulley.
Take care that the belt is not twisted. After hooking the belt onto the pulley, rotate the platter several times to ensure that the belt is smoothly in place.

6 Place the platter sheet on the platter.
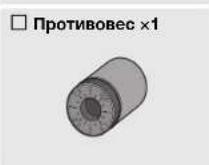
7 Attach the counter weight to the tone arm.
With the markings on the counter weight facing you, slide it onto the back end of the tone arm.

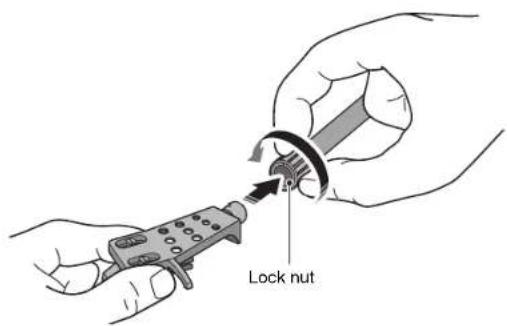
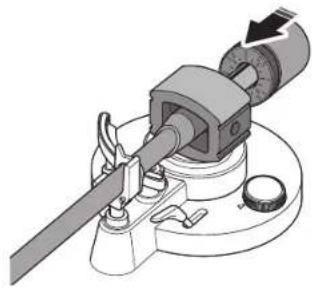
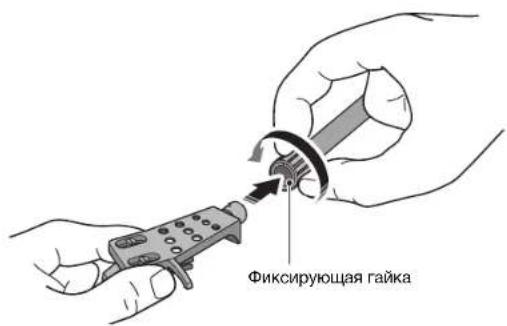
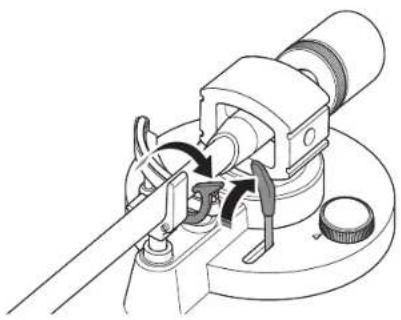
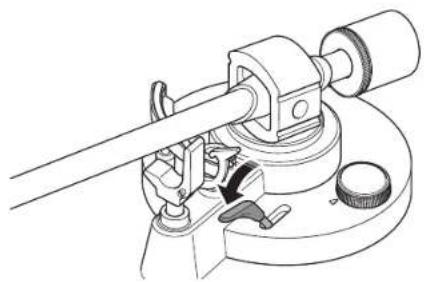
8 Attach the head shell to the tone arm.
Insert the head shell into the front end of the tone arm, and turn the lock nut to secure it.
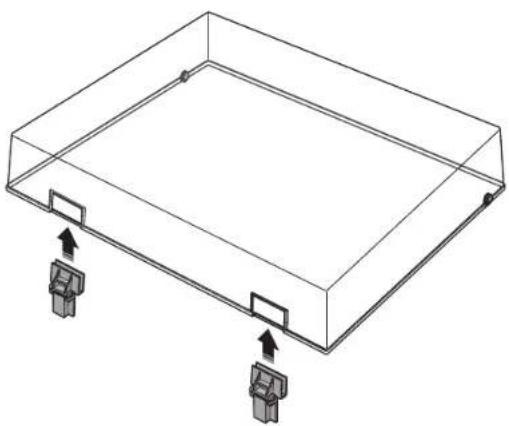
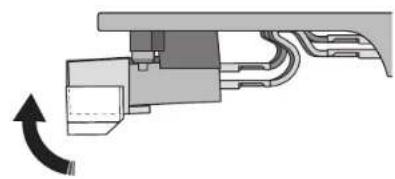
Attaching the dust cover
The dust cover protects this unit from dust etc.
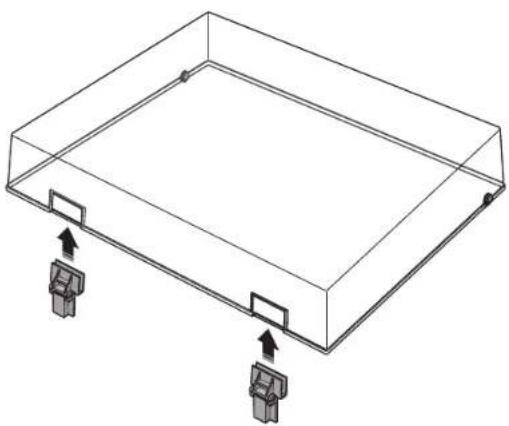
Insert the hinges into the appropriate locations at two sides of the dust cover.
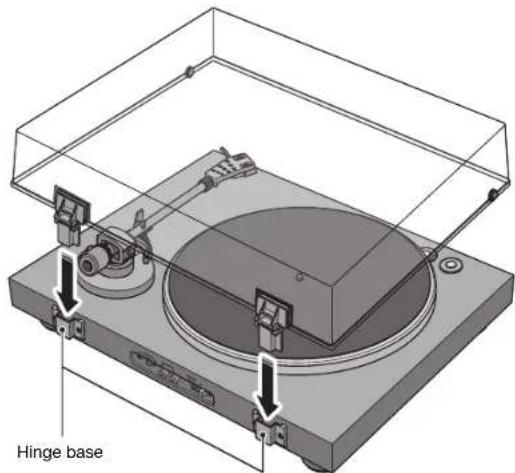
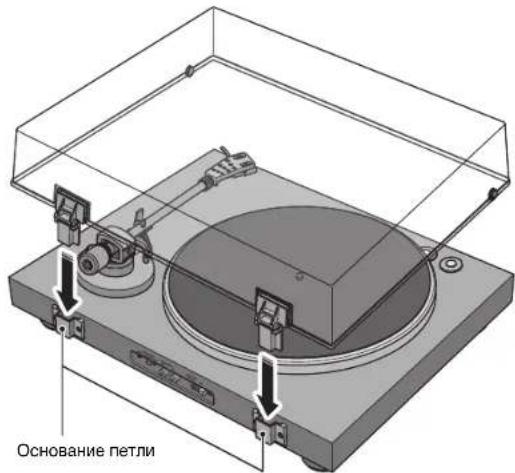
2 Attach the dust cover by inserting the hinges into the hinge bases located on the back panel of the unit.
NOTE
To remove the dust cover, grasp the two sides of the dust cover and slowly lift upward to remove the cover together with its hinges.
CAUTION
Take care not to pinch your hands or fingers when opening or closing the dust cover
Making connections

CAUTION
Finish making all other connections before you connect the AC adaptor (supplied) to an AC outlet.
| Connected devices | Devices not equipped with PHONO input jacks This unit (back panel) RCA stereo cable (supplied) Pre-main amplifier or component (external input jacks) | Devices equipped with PHONO input jacks This unit (back panel) RCA stereo cable (supplied) Pre-main amplifier (PHONO input jacks) | Devices equipped with PHONO input jacks This unit (back panel) RCA stereo cable (supplied) Pre-main amplifier (PHONO input jacks) | |
| PHONO EQ switch setting | ON (default) THRU | |||
| This unit's equalizer function | Enabled | The signal from the cartridge is amplified by the phono equalizer that is built into this unit, and is output from the PHONO OUT jacks. | Disabled | The signal from the cartridge is output directly from the PHONO OUT jacks. |
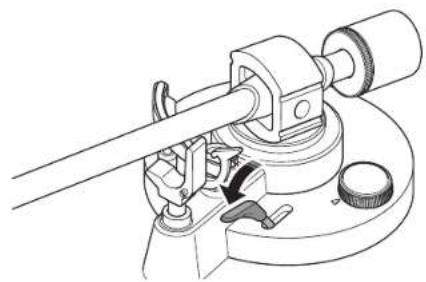
Making adjustments
Adjusting the stylus pressure
Adjust the tone arm so that the appropriate stylus pressure is applied to the record.
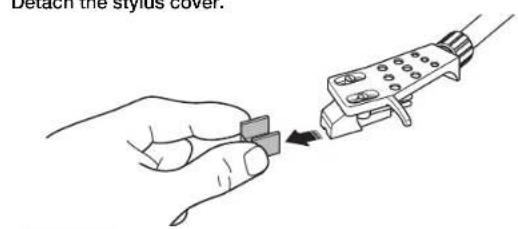
1 Detach the stylus cover.
NOTICE
Take care that the stylus cover or your finger do not contact the stylus.
2 Set the anti-skating adjustment to the "0" position.
3 Release the tone arm lock.
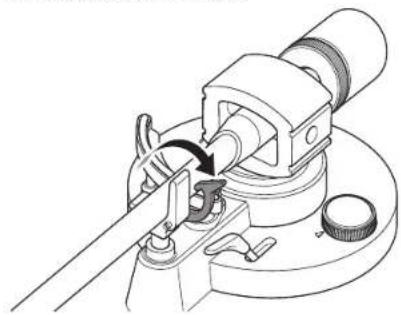
4 Move the tone arm off of the arm rest and slightly to the left.

NOTICE
Take care that the needle does not contact any part of the unit.
Getting ready | Making adjustments
5 Tum the counter weight so that the tone arm is horizontal.
Toward ①: Counter weight moves forward on the tone arm.
Toward ②: Counter weight moves backward on the tone arm.
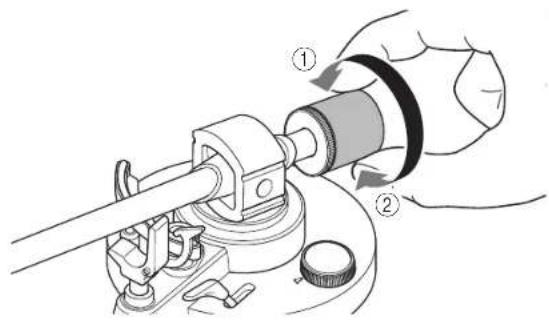
Correct
Incorrect
Tone arm is horizontal (balanced)
Counter weight is too far forward
Incorrect
Counter weight is too far backward
6 Return the tone arm to the arm rest, and lock it in place.
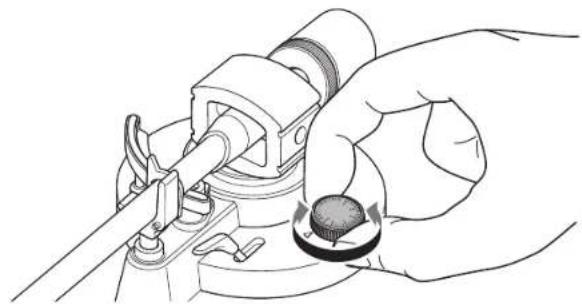
7 Turn the counter ring so that the "0" marking is aligned with the center line on the back end of the tone arm.
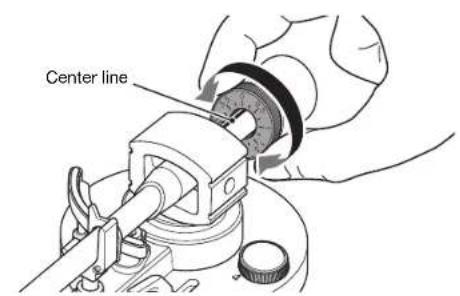
NOTE
When turning the counter ring, use your fingers to press the counter weight so that it does not rotate.
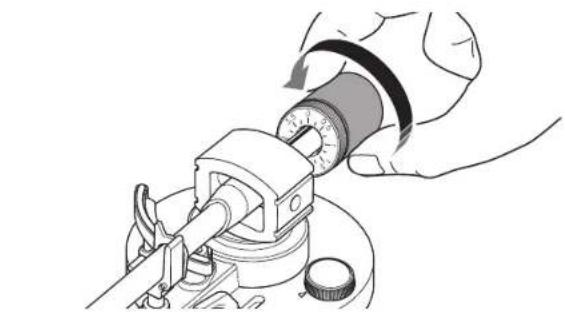
8 By turning the counter weight, set the counter weight markings to the stylus pressure specified for the cartridge.
The specified stylus pressure for the supplied cartridge is 3.5g
NOTE
Tuming the counter weight also turns the counter ring.
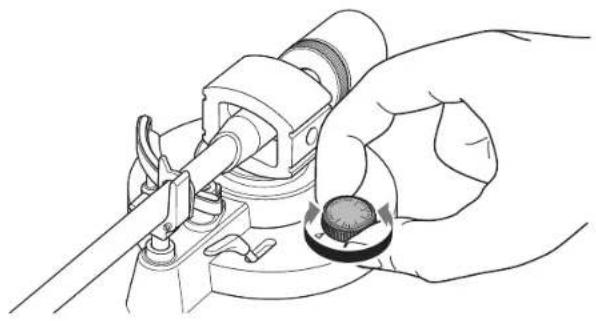
Adjusting the anti-skating
As the platter rotates, the tip of the stylus generates a force that pulls it toward the center of rotation. If the anti-skating value is set to the same value as the stylus pressure, a force is generated that pulls the tip of the stylus outward away from the center of rotation, and the two forces cancel each other.
Turn the anti-skating adjustment to the same value as the stylus pressure of the cartridge.
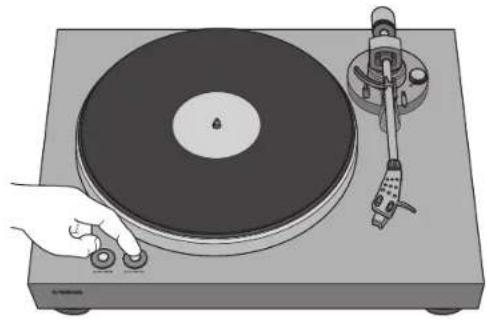
Turning the power on
On the back panel of the unit, press (power) to turn on the power of the unit.


Playback
Starting playback

CAUTION
If you play back a record without sufficiently lowering the volume of your amplifier, a loud sound might occur when the tip of the stylus contacts the record. This can cause hearing loss and might damage your amplifier and speaker, so be sure to lower the volume of your amplifier.
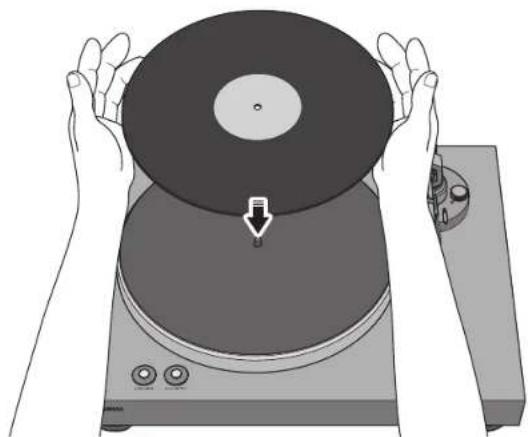
1 Open the dust cover, and place the record on the platter.
If you're playing a 45 rpm record, use the supplied 45 rpm adaptor.
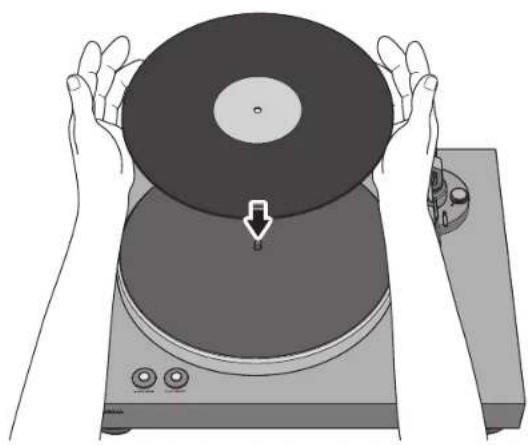
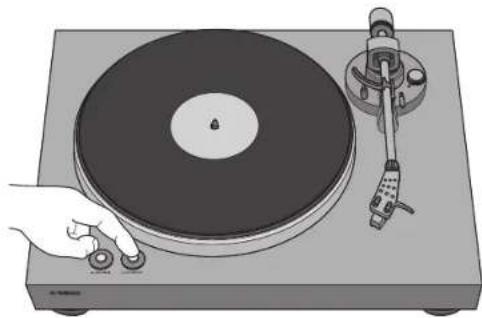
2 Press 33/45 (speed) to select the appropriate speed for the record.

:331/3rpm:45 rpm
3 Press PLAY/STOP (play/stop).
The platter rotates.
4 Release the tone arm lock, and raise the lift lever.

6 Lower the lift lever.
The tone arm is lowered, and playback starts.
5 Move the tone arm to the playback position of the record.
Playback
eannnnn
Pausing playback
If you raise the lift lever, the tone arm rises and playback pauses.
When you lower the lift lever, playback resumes.
Stopping playback
1 Raise the lift lever.
2 Return the tone arm to the arm rest.
3 Lower the lift lever.
4 Press PLAY/STOP (play/stop). The platter stops rotating.
5 Lock the tone arm.
NOTE
The tone arm does not automatically rise when the record finishes playing.
If you will not be using the unit for a time, attach the cover to the stylus to protect it.

When necessary
Care
Caring for this unit
Wipe it with a soft dry cloth. Do not use chemicals such as benzine or thinner, since they might damage the surface.
Caring for the record stylus
The tip of the record stylus is extremely delicate. Handle it with care so that it is not damaged. If dust should adhere to the tip of the stylus, use a soft pointed brush to wipe it off starting at the base of the stylus and moving toward the tip, or use a commercially available cleaner made for that purpose.
Caring for records
Dirt adhering to a record can cause skips or noise. Use a commercially available record cleaner to remove dirt.
Replacement
Replacing the belt
Depending on the conditions of use, the belt can wear out or break. If this occurs, replace the belt. For a replacement belt, contact your nearest authorized Yamaha dealer or service center.
Turn off the power of this unit and of the connected devices, and disconnect this unit's AC adaptor from the AC outlet.
2 Remove the platter sheet from the platter.
3 Detach the belt from the pulley.
4 Insert your fingers into the round holes of the platter, and lift up the platter.
CAUTION
Take care not to drop the platter. Dropping it might cause injury, or might damage the unit.
5 Turn the platter over, and remove the belt.
6 Install the replacement belt on the platter.
Take care that the belt is not twisted.
7 Install the platter on this unit.
For details on installation, refer to "Assembly" on page 11.
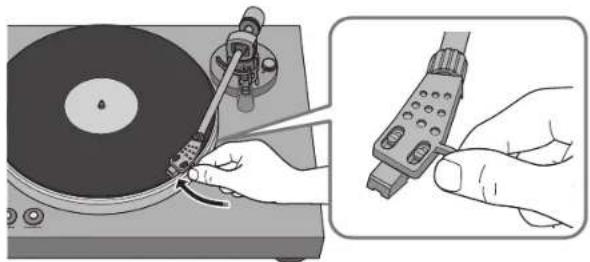
Replacing the record stylus
When the tip of the record stylus becomes worn down or damaged, replace it immediately.
As the replacement stylus, please purchase an ATN3600L replacement stylus made by Audio-Technica.

CAUTION
Attach the stylus cover before replacing the stylus. The tip of the stylus might injure you, or it might become damaged.
Take care that children do not swallow the stylus when it is removed.
Turn off the power of this unit and of the connected devices, and disconnect this unit's AC adaptor from the AC outlet.
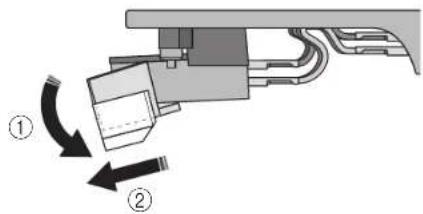
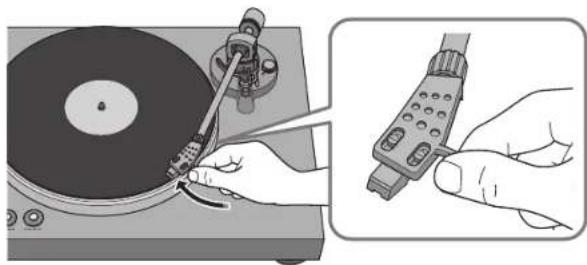
2 While using your fingers to hold the body of the cartridge, press the stylus down in the direction of ①, and pull it in the direction of ② to remove it.
3 While using your fingers to hold the body of the cartridge, insert the tab of the replacement stylus into the groove on the underside of the cartridge.

4 Press the stylus upward until you hear a click.
Moving this unit
When moving this unit, lock the tone arm so that it does not move.
Troubleshooting
If the unit stops operating correctly, check the following points.
If taking the appropriate action does not solve the problem, or if there is a problem not listed below, press the (power) button located on the unit's back panel to turn off the power, disconnect the power cord, and contact your nearest authorized Yamaha dealer or service center.
| Problem Cause Action | Reference page | ||
| Pressing (power) does not turn on the power. | The AC adaptor has come unplugged from this unit's DC IN jack or from the AC outlet, or is not firmly plugged in. | Firmly plug the AC adaptor into this unit's DC IN jack and into an AC outlet. | 14 |
| The platter does not rotate. | The belt is not correctly positioned on the platter and pulley, or the belt has come off. | Attach the belt correctly to the platter and the pulley. 11 | |
| ( power) is not on. | Turn ( power) on. | 17 | |
| No sound. | The head shell is not correctly attached to the tone arm. | Attach the head shell correctly to the tone arm. | 12 |
| The RCA stereo cable is not connected correctly. Connect the RCA stereo cable correctly. 14 | |||
| The mute setting of the amplifier is on. | Turn off the mute setting of the amplifier. | - | |
| Volume is too weak or too loud. | The cartridge setting of the amplifier or phono equalizer is incorrect. | Set the cartridge setting of the amplifier or phono equalizer correctly for the type of cartridge that you're using (MM or MC). | - |
| The PHONO EQ switch is set incorrectly. | Set the PHONO EQ switch correctly for the device that is connected. | 14 | |
| Something is wrong with the left/right balance of the sound. | The turntable is tilted. | Place the turntable on a level location. | - |
| Playback speed is wrong. | The speed setting is incorrect. | Set the 33/45 (speed) setting correctly. This unit does not support playback of SP records (78 rpm). | 18 |
| Hum is audible. | The RCA stereo cable is not connected correctly. Connect the RCA stereo cable correctly. 14 | ||
| The head shell is not firmly secured to the tone arm. | Use the lock nut to firmly secure the head shell to the tone arm. | 12 | |
| Problem | Cause | Action | Reference page |
| Skipping Noise occurs. The sound is distorted. | The stylus pressure is not adjusted correctly. | Set the counter weight markings to the stylus pressure specified for the cartridge. | 15 |
| The record is scratched or warped. Do not used scratched or warped records. - | |||
| The record is dirty. | Use a commercially available record cleaner to clean the record. | - | |
| The record is statically charged. Use an anti-static brush to remove the static charge. - | |||
| The stylus is dirty. Remove the dirt from the stylus. 21 | |||
| The stylus is worn down. Replace the stylus. 22 | |||
| The unit is placed in a location that is subject to vibration. | Place the unit in a level location that is not subject to vibration. | - | |
| Feedback occurs. | The unit is too close to the speakers. Locate the unit farther away from the speakers. - | ||
| The playback volume is too high. Adjust the volume of the amplifier. - | |||
Specifications

The specifications of this unit are as follows.
Platter section
Drive method Belt drive
Motor. DC motor
Rotation Speed 33 1/3 rpm, 45 rpm
Rotation Speed Variation. ±2%
Wow and flutter .0.2%
Platter. Aluminium die-casting
Diameter 30 cm
Tone arm section
Type Static balance straight tone arm
Effective arm length. 223.5 mm
Stylus pressure adjustment range 0-4 g
Acceptable cartridge weight 15.5-19 g (including head shell)
Overhang. 19 mm
Cartridge section
Type MM type
Output voltage. 2.5 mV (1 kHz, 3.54 cm/sec)
Stylus pressure .3.5 ± 0.5 g
Cartridge weight .5.0 ±0.3 g
Cartridge Height 17.0 ±0.7 mm
Head shell weight 10 g (including screws, nuts, and wires)
Audio section
Output level PHONO EQ THRU (1 kHz, 3.54 cm/sec). 2.5 mV ±3 dBV PHONO EQ ON 140 mV (-17 dBV)
Signal to Noise Ratio (A-weighted, 20 kHz LPF) .67 dB or higher
Output jack. PHONO OUT × 1 (RCA unbalanced)
General
AC adaptor power supply
Input AC 100-240 V 50/60 Hz
Output 12 V 0.5A
Power consumption While powered on. 1.5 W
While powered off. .0.1 W
Weight 4.8 kg
Dimensions (width × height × depth). 450 × 136 × 368 mm (including legs and protrusions)
- The contents of this manual apply to the latest specifications as of the publishing date. To obtain the latest manual, access the Yamaha website then download the manual file.

LAS NOGGRANT INNAN ANVANDNING. FOLJ DESSA INSTRUKTIONER.
④Knappen for PHONO EQ (phono equalizer)
Method for drift. Remdrift
Motor. Likstroms motor
Rotationshastighet. 33 1/3 varv/minut, 45 varv/minut
Variation i rotationshastighet ± 2%
Lagfrekvent svaj .0,2%
Tallrik. Pressgiutning i aluminium
Matt 30 cm
Correct
Draaiafelarm is horizontal (in balans)
De anti-skating instellen
Toerental 33 1/3 rpm, 45 rpm
PnUyTeHn DaHHoro pyKOBoDCTBa o6paTne BHMaHHe Ha cNedyuOee.
TexHueckne xapaKTepeNk IN BHeuHn BmOryT 6bIb N3MeHehB6e3 yBeOMnHn BcJx nyUyWeHn npOyKta.
- PpaHueckne 06o3haeHn, nCIOb3yEmbE B daHHOM pyKOBOcTBE.
“PNEpyNPExDEHNE"O6o3haaetnykTbI,KOTOpBie CneNyET CO6nOaTb,HTo6blN66xatbpuCKa CmePTu nnCepbe3HO TpaBMbl.
BHIMAHHE" 0603HaAeT NyHKtbl, KOTOpBie CneDyET COIIOaTb, YTO6bI N36ExaTb PmCKa TpaBMbl.
-068e0mHbKtbl, KOToPbIe cIedyET COBIOaTb, 106bIi366kaTb NOBExdHnpoDyKa IIN erO HnpeabNboHn paobTo.
-OBMMAHNEONHHTeBHyIOHFOpMaCIO, KOTOPAR MOKET 6bItb None3Ha.
Поберka komплектуи
PpOBepeTe Hauuue BCex 3JeMeHToB.


Kak depkaTb nlaCTnHky?
Korda bI depknte nactnky, Heo6xodmo noepknuBaBte 3a o6naCTb 3TKeTK N BHeuHm Kpa Jn6o depkaTb nactnky 3a BHeuHme Kpa DByMpyKaMn.

KOMHOHEtBI IN IX yHKcIM
Bepxnaheb
① 33/45 (ckopoctb) () ctp.18)
② PLAY/STOP (Bocnpoun3BeHeHme/OctaHOBka) ( cTp.18)
③ OnopHbIДиCK( cTp.11)
④Пл actnHa onopHoro ducka ( ctrp.12)
⑤ ΚεntpαnbHbπuHηdβn (⇒ ctp. 11)
⑥ ToHApM (⇒ cTp. 12)
⑦ Kapkac roJOBKN (→ ctp. 12)
⑧KaptpnDx
⑨ ΠροτινOBεc (⇔ cTp. 12)
10 PnuxmHoe KJbzo (CTp. 16)
⑪ Onopa ToHApMa (⇒ cTp. 15)
② PbHar noDbema () ctp.19
13 ANTNUHr (CTP.17)
3aHnaHnB
①O(nntaHne)
BkIOueHne/BbKIOueHne nTaHn annapata. ( cTp.17)

:BKJIOYEOHO

②ΓηεδDOCIN
IIOKJIIOHTe aanTep nepeMeHHORo TOKa (BXOJIT B KOMJIeKT) K 3TOMy rHe3dy. ( cTp.14)
③Гиэда PHONO OUT
Yepe3 3TNrHe3a BbBOIDTCB OBCnpon3BOOMbI ayINOCnHAn C nlaCTnHK. () cTp.14
④NepeKluHaTeIb PHONO EQ (ΦoHo3KBaIau3ep)
B COOTBETCTBM C NOJIKHOUHBBIM YCPTPOIYCBOM YCCTAHOBITE nepeKIOHATeB H yHKHOE NIOJOHENE DRA BbIBOa CUNHana Hepe3 rHe3A PHONO OUT. (→ ctp. 14)

ПодгOTOBka
PacnoJoxeHne
Bocnpou3BeHHe nactnHKu YBCTBntelbHO K Bn6paun, noTOMy cneDyET paCNOXHTb annapat Ha POBHO NOBepxHOCTN, KOtopa He noDBepKeHa BHeHne Bn6paun.
Pacnooxteero doctatoHO daJeKO OT aycTnecko CNTembl, Yo6bHa Hero He BnnaNo daBleHne 3Byka nn BnbaPuaia.
C6opka
C6opka annapata
IpoHMMTeOnOpHbI nnck.
2 PpOyCTMpeMeHb uepe3 Kpyrnoe OTBepCTne Ha onOpHOM dncke, BbITaHHTe ero HApJyK, 3aenNB ero 3a naneu.
3 YcTaHOBnTe OOnpHbI dNcK Ha ceHTpaNbHbI wMnHdJIb.

BybTe aKKypaTbI, He poHraTe onOpHbI dNcK.3To MoXeT npBecTn K TpaME HIN NOBpeNTb Annapat.
Pyynnn
NoroToBbKa C6OpKa
4 COBmectHTe KpyrIoe OTBepCTne Ha ONOpHOM duCKe c pOJIHKoM.
5 C nomoubu nabua 3aenuite peMeHb 3a pounk.
CneHTE 3a TEM, YTO6bI pEmeH He nepeKpyBnAcn. 3aenINB pEmeH 3a pONIK, NOBepHNTe ONOPHbI DnCK HECKoBko pa3, YTO6bI y6eHTbcr, YTO pEmeH IIaBHO BCTaI Ha MeCTO.
6 NomeCTHe pnaCTnHy ha onOpHb nnck.
7 PnncoeunHne npotnbOBec K ToHapMy.
BCTaBbTe npOTnBOBeC (MapKIpOBKO K c6e) B 3aJHn KOHeu TOHaPMa.
8 PnncoeunHte KapKac roNoBKn K ToHaPMy.
BCTabTe KapKac roJIOBKn B nepeHn KOHeu ToHApMa n NobepHnTe 0nkCpIyOuyo raiKy, YTO6bI erO 3aKpENITb.
KpenJIeHne 3aunTHoN KpbIuKN
3aunTHa KpbIka npedoxpaharet annapat OT nbinn T.D.
BCTabTe neTIN B COOTBeTCTByIOUne MeCTa C DByx CTopoH 3auTHoN KpbuKn.
2 PnKpEnHte 3aunTHyU KpbIuK, BCTaBbN neTINB COOTBeTCTByIOUne OCHOBaHn Ha 3aHei NaHei annapata.
PIMMEAHME
4 T06bI CHrTb 3aunTHyko KpbuKyo, BO3bMNTecb 3a Hee Cdyx CTOpOH MeDHeHHO NOHNMTBe BBeP, YTO6bI CHrTb eBMeCTe C nETJAMN.
BHUMAHNE
Bydte ocToPOXHb, He npuIeMHTpe pyKn nn nnaBbbl, oTKpbBaNn 3aKpbBa 3aunTHyO KpbIky.

YCTaHOBka NOdKJIIOueHn
BkJIIOUeHnE nITaHnIa
Ha 3aHHe naHEn annapata HaxMnte KhONky (NITaHne), YTO6bl BkIOHHTb NITaHne annapata.
Bocnpon3VeJeHne
3anyck Bocnpon3BedeHn
BHUMAHME
EcnnnnaactnHkBAocpnno3BODHTcBe3doctatoyHoro yMehhueneHH rpoMKoCTN yCNIITeJI,BO3MOXHO BO3HNKHOBEHNE rpoMKoRTO 3ByKa npn cOpnKOCOHeEH KOHKeI Nfblc nNaCTnHKOJ.3To MoKET npNBcK N oTepeC JNYA NOBpeDntb ycNITeJI K OJOHKN, NO3OMY 68a3aTeJIbHO yMeHbuaTe rpoMKoCTb yCNlNTeJI.
OTKpoIe 3aunTHyIO KpbIuKy u yCTaHOBnTe PnactNHky Ha onOpHbI dNCK.
PnBocpOIm3BeHmPiactHKn4506/MnHNCnoIb3yIe npnaembl aanTep nckopctn 4506/MnH.
2 HaxMHTe KONky 33/45 (cKOpocTb),YTo6bl Bb6paTb COOTBETCTByIOUyIO CKOpocTb dIaNTHKn.

3 Haxmte KhoNky PLAY/STOP (Bocnpoun3BeHeHne/octaHObKa). OnopnDnck 6ydt Bpaatcb.
Bocnpn03eDneHme
4 Ocna6bte qnkcatop TohapMa n noHnMnte pbyar noBema.
Onyctte puyar nojbema. TohApM onyctTcR n HauHETcB Oocnpon3BeHeHe.
5 NpeMeCTnTe ToHApM B noLoXeHne BocnpOn3BeDeHna HnnactnHke.
PcKMM
Bocnpn3BeDHeHne
PpnoocTaHOBkaBOcnpOn3BeDeHn
Korda BbI NOHMaTe Pbyar NoDbema, TohApM NOHMaETcN BOcnpo3BedeHne npOCTaHabNbaeTcR.
Korda Bby onyckaete pbyar noDbema, Bocpon3BedeHne Bo306HOBnTcra.
OctahOBKa Bocnpoun3BedeHn
I OndHmnte pbuHaar noDbeMa.
2 BepHTe ToHApM Ha onopy.
3 Onyctute pbHar noAbema.
4 Haxmnte KhoNky PLAY/STOP (Bocnpoun3BeHne/octaHObKa). OnopnB dyck nepectaHet Bpaatbca.
5 3aФИКСИРУТЕ TOHAPM.
PIMMEYAHNE
ToHAp m ATOMaTmUeCckn He NoDnHMaetcR, KOrJa 3aKaHnBaEtcR BocPon3BeHeHne PAnCTMHKn.
EcnnBHe IpanHpyTe HcNpIb3oBaTb annapat B TeueHne onpeJenHoro BpeMeHH, pIKNPENITE KpbIky K nJIe, 106bl ee 3auiNTNb.
Ponck nyctpaHHe HeNCnPaBHOCTeI
Ecn annapat nepectaet pa60taTb npabnIbHo, npoBepte cnekyouee.
EcmBbnoHHee COOTBeCTByoIero DeIcTBn He peWaeT npOblemy, IIN npOblema He yka3aHa B cIncke HJke, HaxMNTe KONky (NtAHome), pacnoLooKeHHyo Ha 3adHe naneHn annapata, TTo6bY BbIKIOHTb NITAHme, OTOeHNITE CNOBOI Ka6ebN IOpaTNTecb K bNxaHMey ABTOpN3OBAHOMy dInepy Yamaha IIN B cepBChbI ueHr.
Ckopoctb BpaueHn 331/306/MnH,4506/MnH
13meHHeCKOpOCTnBpaueHn. 2%
Ko3ΦnueHT deToHaun 0,2%
OnopHbI DNCK. AIOHMnHeBbl JITOn IOd DaBHeHMe
DnameTp 30 cm
ToHapM
Ttn. CtaTueeckn c6aanacnpoBaHHb npraMoToHapM
235 MM
Duaan3oh perynipOBKn daBHeHn irbl 0-4
COOTBETCTBYOuM BEKAPTpNJa . 15,5-19 r (BKnIOyA KApKac roNoBkn)
BbInr 19 MM
KaptpdJx
Tun MM
BbIXoHoe HapRaeKeHne 2,5MB(1KΓ,3,54cm/c)
Bec Kapkaca roNoBKn 10 r (BKNIOHAR BnHTbI, raIKN npOBOda)
Aydno
YpOBeHb BbIXoHoro CnHana PHONO EQ THRU (1 KfU, 3,54 cm/c) 2,5 MB ±3 dB PHONO EQ ON 140 MB (-17 dB)
CoOTHoWeHHe CnHn/Um(B3BeWeHHbI NO KpNBoA,20KrΦHc. 67dE mnn6oone
BbIXOHOHeIe3do...PHONO OUT × 1 (RCA He6BaJHcnpoBaHbH)
06xue xapaKTepeNCTnKn
Питанеадапетерапесмehног�ToKa Bxod 100-240BпесмehногуToKa50/60TbixoD 12B0,5A
ПOTpe6IeMaMoUHocTb BO BKIOUeHHOM COCTOHN 1,5BT B BbIKIOUeHHOM COCTOHN 0,1BT
Bec 4,8 K
Pa3mepb(HnpHa×Bicota×rny6Ha) 450×136×368MM (BKIOHARHOKKN BbICTyIb)
B codepkaan daHoro pykoobcTaBa npBeDeHbI nocneHme Ha MOMENT ny6bnkauin TeHHueckHe xapaKtepncTkn. IaI noNpyehnna nocpeHien Bepcn pykoobcTaBa nocetnte Be6-caITkopnpaunn YamaHa u3arpy3InTe paHn c pykoobcTbOM.

YAMAHA CORPORATION
10-1 Nakazawa-cho, Naka-ku, Hamamatsu, 130-8650 Japan
Yamaha Global Site
https://www.yamaha.com/
Yamaha Downloads
https://download.yamaha.com/
© 2023 Yamaha Corporation
Published 07/2023
IPOD-A0
AV23-0056