
PDSP 1000 D4 - Sander PARKSIDE - Free user manual and instructions
Find the device manual for free PDSP 1000 D4 PARKSIDE in PDF.
| Product Type | Pneumatic sandblasting gun |
| Brand | Parkside |
| Model | PDSP 1000 D4 |
| Maximum working pressure | 6.3 bar |
| Air consumption | 320 l/min |
| Tank capacity | 0.91 litre |
| Required air quality | Filtered and oil-free compressed air |
| Sound pressure level (LpA) | 94 dB(A) (uncertainty 3 dB) |
| Sound power level (LWA) | 105 dB(A) |
| Vibration emission value (ah) | < 2.5 m/s² |
| Blasting material grain size | 0.2 mm - 0.8 mm (max 0.8 mm) |
| Delivery contents | Gun, 4 nozzles (surface, spot, outer edge, inner edge), collection bag, hose clamp, 2 kg blasting material, instruction manual |
| Main functions | Removal of rust and paint from metal surfaces |
| Maintenance and cleaning | Clean with compressed air after use, store in a dry room |
| Safety instructions | Wear goggles, hearing protection, gloves, dust mask, protective clothing; do not aim at people or animals; do not use with oxygen or flammable gases; max pressure 6.3 bar |
| Spare parts and repairability | List of 33 spare parts available, repairs by specialist or retailer |
| Warranty | 3 years from date of purchase |
| Weight (estimated) | Approximately 1.5 kg |
| Dimensions (estimated) | Approximately 25 x 15 x 10 cm |
| Power supply | Compressed air (compressor) |
Frequently Asked Questions - PDSP 1000 D4 PARKSIDE
User questions about PDSP 1000 D4 PARKSIDE
0 question about this device. Answer the ones you know or ask your own.
Ask a new question about this device
Download the instructions for your Sander in PDF format for free! Find your manual PDSP 1000 D4 - PARKSIDE and take your electronic device back in hand. On this page are published all the documents necessary for the use of your device. PDSP 1000 D4 by PARKSIDE.
USER MANUAL PDSP 1000 D4 PARKSIDE
DRUCKLUFT-SANDSTRAHLPISTOLE/AIR SAND BLASTER GUN/PISTOLET DE SABLAGE PNEUMATIQUE PDSP 1000 D4
DE AT CH
DRUCKLUFT-SANDSTRAHLPISTOLE
Operation and Safety Notes Translation of the original instructions
NL BE
PERSLUCHT-ZANDSTRAALPISTOOL
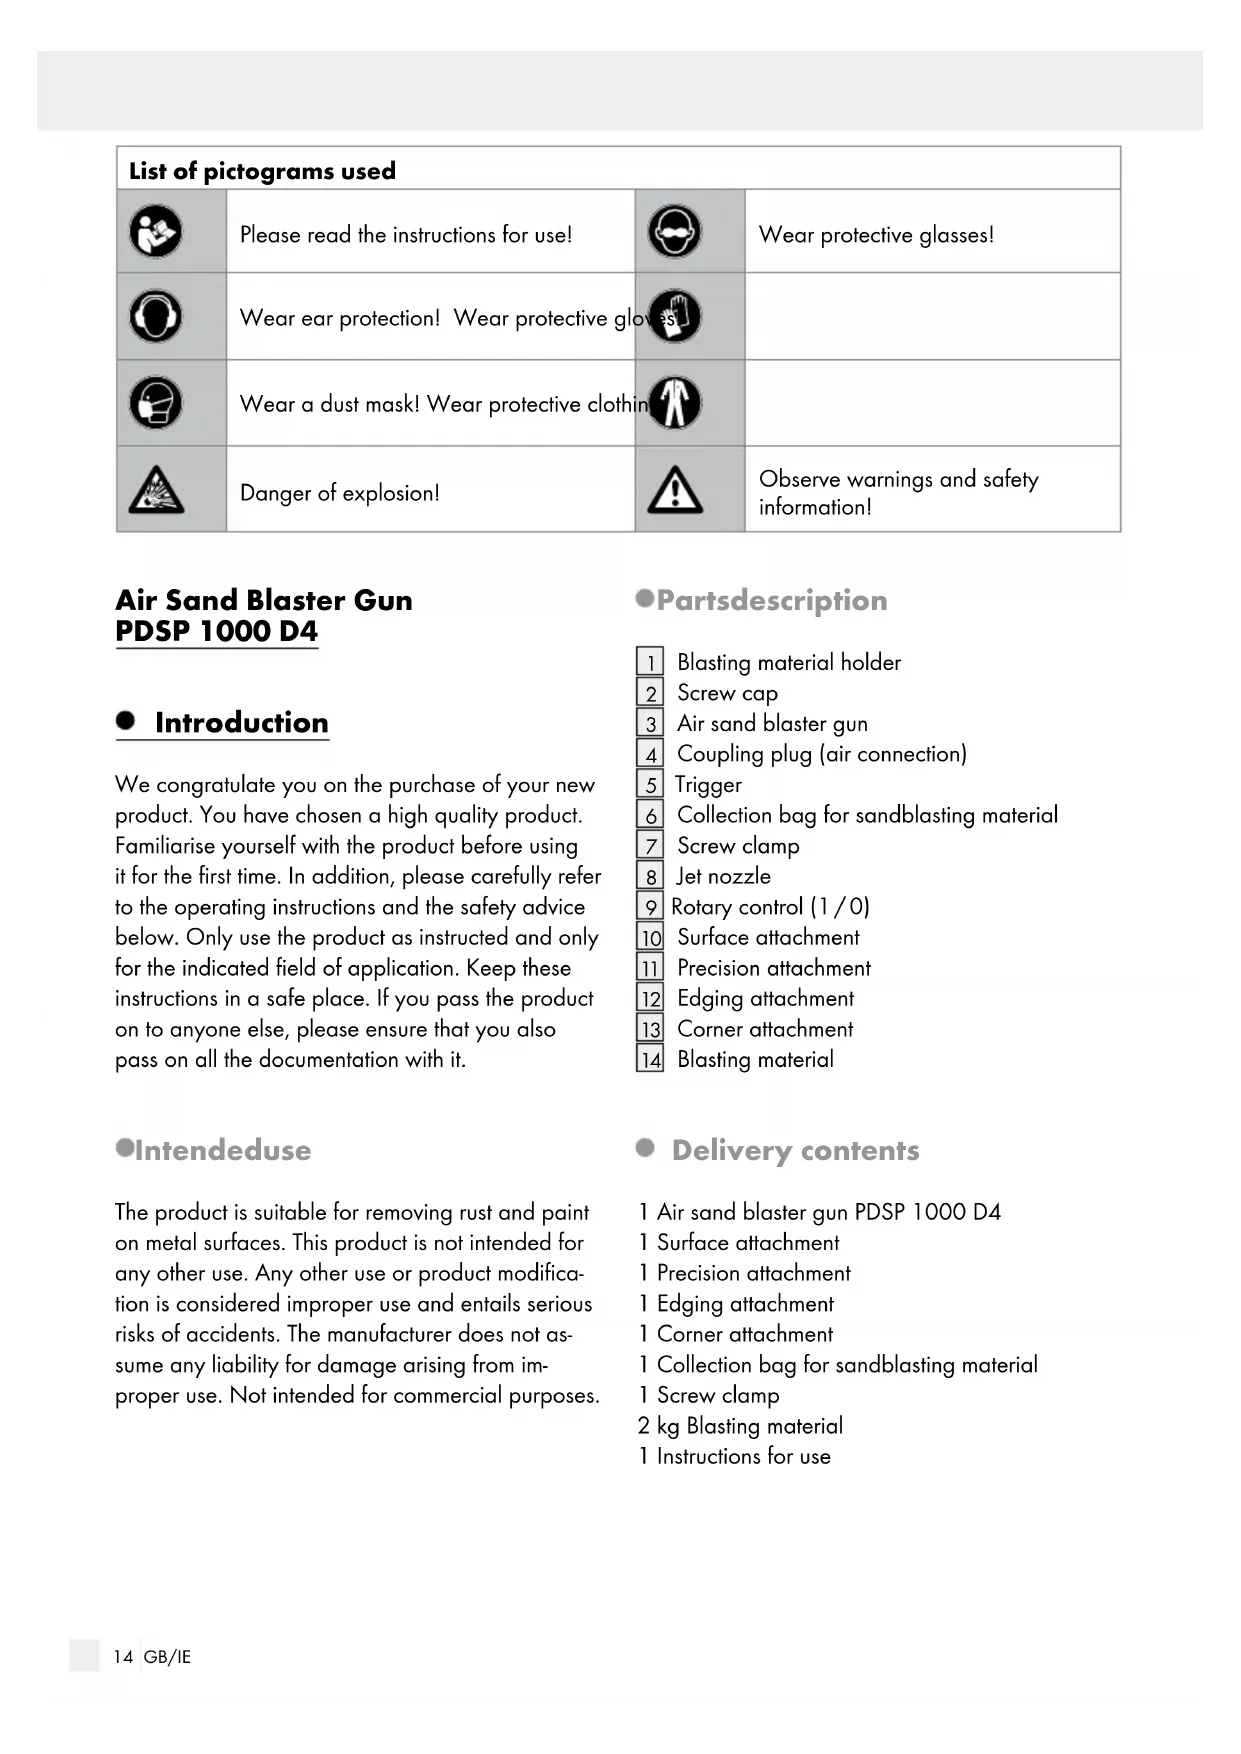
List of pictograms used
Introduction
Intended use
Parts description.
Delivery contents.. Page 14
Technical data.. Page 15
General safety information.. Page 15
Workplace safety.. Page 15
Tool-specific safety information for the compressed air sandblaster. Page 15
Operation
Connecting the compressed air source.. Page 16
Filling the blasting material holder.. Page 16
Assembling the collection bag for sandblasting material.. Page 17
Selecting and assembling an attachment.. Page 17
Using the air sand blaster gun . Page 17
Emptying the collection bag for sandblasting material Page 18
Troubleshooting
Parts Page 19
Maintenance and cleaning.. Page 19
Disposal
Information
Translation of the original declaration of conformity.. Page 19
Warranty
| List of pictograms used | |||
| Please read the instructions for use! | Wear protective glasses! | ||
| Wear ear protection! Wear protective gloves | |||
| Wear a dust mask! Wear protective clothing | |||
| Danger of explosion! | Observe warnings and safety information! | ||
Air Sand Blaster Gun PDSP 1000 D4
Introduction
We congratulate you on the purchase of your new product. You have chosen a high quality product. Familiarise yourself with the product before using it for the first time. In addition, please carefully refer to the operating instructions and the safety advice below. Only use the product as instructed and only for the indicated field of application. Keep these instructions in a safe place. If you pass the product on to anyone else, please ensure that you also pass on all the documentation with it.
Intendeduse
The product is suitable for removing rust and paint on metal surfaces. This product is not intended for any other use. Any other use or product modification is considered improper use and entails serious risks of accidents. The manufacturer does not assume any liability for damage arising from improper use. Not intended for commercial purposes.
- Partsdescription
1 Blasting material holder
Screw cap
3 Air sand blaster gun
4 Coupling plug (air connection)
5 Trigger
6 Collection bag for sandblasting material
7 Screw clamp
8 Jet nozzle
9 Rotary control (1/0)
10 Surface attachment
11 Precision attachment
12 Edging attachment
13 Corner attachment
14 Blasting material
Delivery contents
1 Air sand blaster gun PDSP 1000 D4
1 Surface attachment
1 Precision attachment
1 Edging attachment
1 Corner attachment
1 Collection bag for sandblasting material
1 Screw clamp
2 kg Blasting material
1 Instructions for use
Technical data
Operating pressure: 6.3 bar
Air consumption: 3201/min
Container volume: 0.9 l
Air quality required: purified and oil-free
Setting values
for work: set operating pressure on
the pressure regulator or filter pressure gauge max. 6.3 bar.
Noise emission value:
Measured sound value determined according to EN 1265. The A-rated noise level of the air tool is typically:
Sound pressure level: L_PA = 94 dB(A)
Uncertainty: K pA = 3 dB(A)
Sound power level: L WA = 105 dB(A)
Uncertainty: K WA = 3 dB(A)

Wear ear protection!
Vibration emission value:
Total vibration value determined according to EN ISO 20643: ah < 2.5m / s
AWARNING! The vibration level specified in these instructions was measured in accordance with an EN ISO 20643 standardised measurement process and can be used to compare tools. The vibration emission value specified can also serve as a preliminary assessment of the exposure. Different uses of the air tool give rise to different vibration levels and in many cases they may exceed the values given in these instructions. It is easy to underestimate the vibration load if the air tool is used regularly in particular circumstances. If you wish to make an accurate assessment of the vibration loads experienced during a particular period of work, you should also take into account the periods when the product is switched off or is running but is not actually in use. This can result in a much lower vibration load over the whole of the period of working.
Note: If you wish to make an accurate assessment of the vibration loads experienced during a particular period of working, you should also take into account the intervening periods of time when the product is switched off or is running but is not actually in use. This can result in a much lower vibration load over the whole of the period of working.

Generalsafety information
AWARNING! Please read all safety information and instructions. Failure to observe the safety information and instructions may result in electric shock, fire, and/or serous injuries.
KEEP ALL SAFETY INFORMATION AND INSTRUCTIONS FOR FUTURE REFERENCE.
Workplace safety
a) Keep your work area clean and well lit. Untidy or poorly lit work areas can result in accidents.
b) Do not use the product in explosive environments with flammable liquids, gasses or dust. The product can create sparks which can ignite dusts or fumes.
c) Keep children and other people away from the product during use. You could lose control of the product if you are distracted.
- Tool-specific safety information for the compressed air sandblaster
RISK OF INJURY! IMPROPER USE!
Check the product for damage before use. Refrain from using the product if it is defective.
- Keep children and other people away from the product during use. You could lose control of the product if you are distracted.
Never point the product at people and/or animals.

ust mask!
We
Protective glasses!
We

protection!
We
Protective gloves!
We

ective clothing!
EXPLOSION HAZARD! Do not

use the air sand blaster gun in environments containing gases, open
flames, fires or gas-operated water heaters.
SMOKING PROHIBITED!
Only work in well ventilated spaces.
Never use oxygen or other flammable gases as an energy source.
Never exceed the maximum permitted operating pressure of 6.3 bar.

WJSKIOB:ECOIL
FORCES! High operating pressures can give rise to recoil forces that under certain conditions can result in danger from continuous loading.
RISK OF INJURY! Remove the product from the compressed air source before repair and maintenance work and before transport.
RISK OF INJURY! Remove the product from the compressed air source to fill the product with blasting material.
NOTE! Please note the safety information of the manufacturer of the blasting material.
Only use suitable materials for the air sand blaster gun. Use a suitable blasting material!

ATTENTION! Heavy dust forma
Make sure that the sandblasting material is collected so that you can dispose of it in an environmentally-friendly way.
Do not remove any markings/type plates. These are safety-relevant.
If you are inexperienced in the use of this type of product, you should seek training to learn how to handle it safely.
WARNING! NOXIOUS DUST! Working on materials which can produce harmful / toxic dusts presents a health risk to the user and people within close vicinity.
CAUTIONEnsure that the product is disconnected from the air supply when it is not in use, when replacing accessories or when carrying out repair work. The air hose must not be pressurised.
Operation
- Connecting the compressed air source
Note: The air sand blaster gun 3 may only be operated using purified, oil-free and condensate-free compressed air with a maximum pressure of 6.3 bar. To regulate the compressed air you should use a pressure regulator and filter.
Note: Ensure that the rotary control 9 is at 0^ before connecting the product to the compressed air source.
Connect the air sand blaster g to a suitable compressed air source. Now connect the supply pipe using the quick coupling to the coupling plug 4 on the air sand blaster gun 3. This automatically locks into place.
- Filling the blasting material holder
CAUTION Before opening the
screw cap 2 of the blasting material holder 1 or configuring other set
tings, the pressure must always be fully relieved and the air sand blaster gun disconnected from the compressed air source (i.e. compressor).
Only use a suitable blasting material for your work [14].
Note:We recommend sandblasting material (ground blast furnace slag) which does not
cause silicosis with a grain size of 0.2mm-0.8mm .
Ensure that the blasting material is completely dry and that it is not too coarse.
Note: The maximum grain size is 0.8 mm .
Open the screw cap of the blasting material holder by turning it counterclockwise.
Pour the desired amount of blasting material 14 into the blasting material holder 1.
Ensure that the maximum holder contents do not exceed 0.9 l.
Then close the screw of the blasting material holder by turning it clockwise.
Ensure that the screw cap 2 is closed tightly.
Note on grain size of the blasting material:
The bigger/the coarser the grain size of the blasting material used, the coarser the contamination you are trying to remove by using it. The blasting material contained is small and is highly suitable for removing materials such as flash rust or impurities. The material surface is spared by using a small blasting material and this only results in superficial wear. A coarser grain size for the blasting material, which you can get in a specialist shop, is suitable for coarser rust.
Caution: Observe the maximum grain size.
- Assembling the collection bag for sandblasting material
Use the screw clamp included in the delivery contents and a screwdriver to assemble the collection bag on the product. - Selecting and assembling an attachment
First, select the attachment[10], [11], [12], [13]) which is suitable for your work.
Place the attachment you have selected onto the jet nozzle 8 and ensure that no air can leak from the sides.
Using the air sand blaster gun
Prepare the material to be sandblasted by degreasing and cleaning it.
Note: Dust and grease deposits significantly impair the result.
Carefully cover or mask everything which will not be sandblasted.
The distance between the attachment and the surface to be processed is crucial for the result. Hold it as low as possible so that the blasting material [14] can be collected by the collection bag [6].
The closer you go with the product to the work piece, the smaller the blasting pattern and vice versa.
If necessary, do a test run beforehand on a work piece you no longer need. By doing so you will figure out the correct distance/operating pressure and prevent excessive blasting.
Switching on:
Open the air passage by setting the rotary control to 1^
Introduce the air sand blaster gun 3 to the surface to be processed.
Activate the trigger to operate the air sand blaster gun 3.
Switching off:
Release the trigg to switch off the air sand blaster gun 3.
Set the rotary control to 0^ to close the air passage.
Disconnect the product from the compressed air source after finishing work.
Note: First, remove the hose from the compressed air source, and then remove the supply hose from the product. Following these instructions will stop the supply pipe from twirling around uncontrollably or recoiling.
- Emptying the collection bag for sandblasting material
Note: Do not reuse excess sandblasting material from the collection bag 6 before it has been purified.
You can remove excess sandblasting material which has collected in the collection bag 6 through the zip. Alternatively, you can loosen the screw clamp 7 using a screwdriver and remove the collection bag 6 from the product.
- Troubleshooting
| Error Possible cause Solution | ||
| No material flow The air is not dry enough. Install a water separator in your compressed air system. | ||
| Air pressure is too low. Increase the pressure of the compressor. | ||
| The attachment is not fitted correctly. | Ensure that the attachment fits tightly on the product and that no air can leak from the sides. | |
| Blocked sandblasting material lines. | Check that there are no lumps of sandblasting material blocking the lines. For best results use a blow-out gun to clean blocked lines (wear protective glasses!). Also check the outlet of the tank. | |
| The sandblasting pattern is not as desired. | The air is not dry enough. Install a water separator in your compressed air system. | |
| Replace the sandblasting material. | ||
| Purify/replace the sandblasting material. | ||
| The attachment is worn-out. Replace the attachment. | ||
| Other errors Contact a specialist or retailer. | ||
- Parts (see Figure A)
| Pos. No. | Description Amount | |
| 01 Housing | 1 | |
| 02 Screw 2 | ||
| 03 Screw 1 | ||
| 04 O-ring 1 | ||
| 05 Pin 1 | ||
| 06 Air valve spring 1 | ||
| 07 O-ring 1 | ||
| 08 Nut 1 | ||
| 09 Spring 1 | ||
| 10 Outlet 1 | ||
| 11 Air intake 1 | ||
| 12 Socket 1 | ||
| 13 Nozzle | 1 | |
| 14 O-ring 1 | ||
| 15 Container ring | 1 | |
| 16 Connector | 1 | |
| 17 Nozzle | 1 | |
| 18 Control lever | 1 | |
| 19 O-ring 1 | ||
| 20 Connection lever | 1 | |
| 21 Pin 1 | ||
| 22 Adjustment knob | 1 | |
| 23 Screw 1 | ||
| 24 Container | 1 | |
| 25 Nut 1 | ||
| 26 O-ring 1 | ||
| 27 Protective cover | 1 | |
| 28 Screw 1 | ||
| 29 Screw cap | 1 | |
| 30 Handle cover | 1 | |
| 31 Nozzle | 1 | |
| 32 Nozzle | 1 | |
| 33 Nozzle | 1 |
- Maintenance and cleaning
WARNING! DANGER OF INJURY!
Disconnect the product fully from the compressed air supply before cleaning.
Clean the air sand blaster gun 3 and the blasting material holder 1 after you have finished using them. To do so, blow out the air sand blaster gun 3 and blasting material holder 1 using compressed air.
Only store the air sand blaster gun 3 in dry enclosed rooms.
Disposal
The packaging is made entirely of recyclable materials, which you may dispose of at local recycling facilities.
Contact your local refuse disposal authority for more details of how to dispose of your worn-out product.
Information
Translation of the original declaration of conformity
We, OWIM GmbH & Co. KG Stiftsbergstraße 1, DE-74167 Neckarsulm, GERMANY, hereby declare under our sole responsibility the product: Air Sandblaster Gun PDSP 1000 D4, model no.: HG03803, Version: 05/2018, to which this declaration refers, complies with Directive 2006/42/EC.
Harmonised standard applied:
EN ISO 12100:2010
EN ISO 4414:2010
EN 1248:2001+A1
Serial number: IAN 298505

Tobias Koenig
Division Manager / Responsible for documentation
OWIM GmbH & Co. KG, Stiftsbergstraße 1,
DE-74167 Neckarsulm, GERMANY
Neckarsulm, 13 Dec 2017
The declaration of conformity is also available at: www.owim.com
Warranty
The product has been manufactured to strict quality guidelines and meticulously examined before delivery. In the event of product defects you have legal rights against the retailer of this product. Your legal rights are not limited in any way by our warranty detailed below.
The warranty for this product is 3 years from the date of purchase. Should this product show any fault in materials or manufacture within 3 years from the date of purchase, we will repair or replace it - at our choice - free of charge to you.
The warranty period begins on the date of purchase. Please keep the original sales receipt in a safe location. This document is required as your proof of purchase. This warranty becomes void if the product has been damaged, or used or maintained improperly.
The warranty applies to defects in material or manufacture. This warranty does not cover product parts subject to normal wear, thus possibly considered consumables (e.g. batteries) or for damage to fragile parts, e.g. switches, rechargeable batteries or glass parts.

Incertitude: K WA = 3 dB(A)

$$ p A = 3 d B (A) $$
Geluidsvermogen:
$$ \mathrm {L} _ {\mathrm {W A}} = 1 0 5 \mathrm {d B (A)} $$
Onzekerheid: K
$$ w A = 3 d B (A) $$

WAARSCHUWING! GIFTIGE STOFFEN!
WAARSCHUWING! GEVAAR VOOR
REPULSION! Al trabajo con gran presiónSEO.SEOSEOSEOSEOSEOSEOSEOSEOSEOSEOSEOSEOSEOSEOSEOSEOSEOSEOSEOSEOSEOSEOSEOSEOSEOSEOSEOSEOSEOSEOSEOSEOSEOSEOSEOSEOSEOSEOSEOSEOSEOSEOSEOSEOSEOSEOSEOSEOSEOSEOSEOSEOSEOSEOSEOSEOSEOSEOSEOSEOSEOSEOSEOSEOSEOSEOSEOSEOSEOSEOSEOSEOSEOSEOSEOSEOSEOSEOSEOSEOSEOSEOSEOSEOSEOSEOSEOSEOSEOSEOSEOSEOSEOSEOSEOSEOSEOSEOSEOSEO SEOEO SEOEO SEOEO SEOEO SEOEO SEOEO SEOEO SEOEO SEOEO SEOEO SEOEO SEOEO SEOEO SEOEO SEOEO SEOEO SEOEO SEOEO SEOEO SEOEO SEOEO SEOEO SEOEO SEOEO SEOEO SEOEO SEOEO SEOEO SEOEO SEOEO SEOEO SEOEO SEOEO SEOEO SEOEO SEOEO SEOEO SEOEO SEOEO SEOEO SEOEO SEOEO SEOEO SEOEO SEOEO SEOEO SEOEO SEOEO SEOEO SEOEO SEOEQ
