
5B50P8590 - Oven BLAUPUNKT - Free user manual and instructions
Find the device manual for free 5B50P8590 BLAUPUNKT in PDF.
| Product type | Built-in oven |
| Brand | Blaupunkt |
| Model | 5B50P8590 |
| Rated voltage | 220-240 V~ |
| Rated frequency | 50-60 Hz |
| Total power | 2.9 kW |
| Net weight | 42 kg |
| Cooking modes | Natural convection, Fan-assisted, ECO, Natural convection + forced air, Radiant heat, Double grill + forced air, Double grill, Pizza mode, Bottom heat, Defrost, Dough rising, Automatic pyrolytic cleaning |
| Cleaning | Automatic pyrolytic cleaning (door locked during cycle) |
| Additional functions | Rapid preheating, Timer, Child lock, End time setting |
| Interior lighting | Halogen lamp 25 W, 230 V (replaceable) |
| Number of shelf positions | 5 |
| Supplied accessories | Oven rack, Drip tray |
| Installation type | Built-in (requires installation according to user manual) |
| Maintenance | Pyrolytic cleaning, enameled surfaces, non-removable door gaskets, removable side racks and door |
| Safety | Door lock during pyrolysis, child lock, automatic shut-off after 9 hours, cooling ventilation |
| Spare parts and repairability | Lamp, accessories, telescopic rails; Blaupunkt after-sales service for repairs |
| General information | Compliant with standards IEC/EN 60335-1 and 60335-2-6 |
Frequently Asked Questions - 5B50P8590 BLAUPUNKT
User questions about 5B50P8590 BLAUPUNKT
0 question about this device. Answer the ones you know or ask your own.
Ask a new question about this device
Download the instructions for your Oven in PDF format for free! Find your manual 5B50P8590 - BLAUPUNKT and take your electronic device back in hand. On this page are published all the documents necessary for the use of your device. 5B50P8590 by BLAUPUNKT.
USER MANUAL 5B50P8590 BLAUPUNKT
2 SAFETY INFORMATION
3 Warning
5 Causes of damage
6 INSTALLATION
7 OPERATING THE APPLIANCE
7 Operating elements
8 Before using the appliance
9 Operating modes
10 Using your appliance
13 ACCESSORIES
15 ENERGY-EFFICIENT USE
15 ENVIRONMENT
15 HEALTH
16 MAINTENANCE OF YOUR APPLIANCE
18 PYROLYTIC SELF-CLEANING
26 APPLIANCE DOOR
27 TROUBLESHOOTING
30 CUSTOMER SERVICE
31 TIPS AND TRICKS
33 RECIPES
33 Cakes
34 Bread and pizza
35 Meat
35 TEST FOOD ACCORDING TO EN 60350-1
36 ENERGY EFFICIENCY ACCORDING TO EN 60350-1
37 COOKING IN "ECO" MODE
37 DATA SHEET (EU 65/2014 & EU 66/2014)
SAFETY INSTRUCTIONS
Thank you for choosing a built-in oven from Blaupunkt. Please read this manual thoroughly before unpacking your new appliance. Only then will you be able to operate your appliance safely and correctly. We strongly recommend that you keep the manual and installation instructions for future use or for future owners.
- According to the wiring rules, shutdown devices must be installed in the fixed wiring. A shutdown device integrated into the fixed wiring must be provided.
- The insulation of the fixed wiring must be protected, for example by insulating tubes of a suitable temperature class.
- The shutdown integrated into the fixed wiring must be in accordance with AS/NZS 3000.
- The appliance and its accessible parts become hot during use. Small children should be kept away from the appliance.
- The appliance becomes hot during use. Do not touch the heating elements inside the oven.
- This appliance may be used by children over 8 years of age and by persons with reduced physical, sensory or mental abilities or lack of experience and knowledge provided that they have been instructed in the use of the appliance by a person responsible for them and that they understand and appreciate the risks and dangers involved.
- Children under 8 years of age must be monitored constantly or kept away from the appliance. Children must not play with the appliance. This appliance must not be used by persons (including children) with reduced physical, sensory or intellectual capabilities or a lack of experience and knowledge, unless they are supervised or have received instruction in the safe use of the appliance.
- Children must not play with the appliance.
- Do not use sharp abrasive cleaning agents or sharp metal scrapers to clean the glass in the oven door, as these can scratch the surface, which can cause the glass to shatter. Do not use a steam cleaner to clean the appliance.
- Children may only clean and maintain this appliance under supervision.
- Spilled food must be removed before cleaning.
- When cleaning, the surfaces can become hotter than usual. The oven must be switched off before removing the protective device, and the protective device must be replaced after cleaning according to the instructions.
- After unpacking the appliance, check it for possible damage. Do not connect the appliance if it is damaged. Only an authorised technician may connect appliances without a plug. Damage caused by incorrect connection is not covered by the warranty.
- Ensure that the appliance is switched off before replacing the bulb to avoid the risk of electric shock.
- Use this appliance indoors only. The appliance may only be used to prepare food and beverages. The appliance must be monitored during operation.
- Please always push any accessories into the oven the right way round.
- The above information is provided according to IEC 60335-1 / EN 60335-1 / IEC 60335-2-6 / EN 60335-2-6.
WARNING
Danger of electric shock!
- Incorrectly performed repairs are hazardous. Repairs and the replacement of damaged power cables may only be carried out by one of our trained service technicians. If the appliance is defective, disconnect it from the mains or switch off the circuit breaker in the fuse box. Contact customer service.
- The cable insulation of electrical appliances can melt if they come into contact with hot appliance parts. Never allow the cables of electrical appliances to come into contact with hot appliance parts.
- Do not use high-pressure cleaners or steam cleaners, as this can cause an electric shock.
- A defective appliance can cause an electric shock. Never switch on a defective appliance. If the appliance is defective, disconnect it from the mains or switch off the circuit breaker in the fuse box. Contact customer service.
Risk of fire!
- Flammable objects stored in the cooking chamber may ignite. Do not store flammable objects in the cooking chamber. Never open the appliance door if there is smoke inside. If this happens, switch off the appliance and unplug the power plug from the power outlet or turn off the circuit breaker in the fuse box.
- Opening the appliance door creates a draught. This can cause the oven paper to come into contact with the heating element and catch fire. Do not place any oven paper loosely over the accessories while preheating. Always weigh down the oven paper with a tray or baking tray. Only cover the required area with oven paper. The oven paper must not project over the accessories.
Risk of injury!
- Scratched glass in the appliance door can cause cracks. Do not use glass scrapers, strong or abrasive cleaning agents.
- The hinges of the appliance door move when the door is opened and closed. In the process, you could trap your fingers or other parts of your body. Keep your hands away from the hinges.
Risk of burns!
- The appliance becomes very hot. Never touch the inner surfaces of the appliance or the heating elements.
- Always let the appliance cool down.
- Always keep children at a safe distance.
- Accessories and ovenware become very hot. Always use oven gloves to remove accessories or ovenware from the cooking chamber.
- Alcoholic vapours can ignite in the hot cooking chamber. Never prepare food that contains large quantities of liquids with a high alcohol content. Only use small amounts of liquids with a high alcohol content. Always open the appliance door carefully.
Risk of scalding!
- Accessible parts become hot during operation. Never touch the hot parts. Always keep children at a safe distance.
- Hot steam may escape when the appliance door is opened. Depending on the temperature, the steam may not be visible. Do not stand too close to the appliance when opening it. Always open the appliance door carefully. Keep your children away from the hob.
- Water in the hot cooking chamber can produce hot steam. Never pour water into the hot cooking chamber.
Danger from magnetism!
Permanent magnets are used in the control panel or control elements. They can interfere with electronic implants such as pacemakers or insulin pumps. Carriers of electronic implants must maintain a distance of at least 10cm from the control panel.
Causes of damage
- Accessories, foil, oven paper or ovenware on the cooking chamber floor: Do not place any accessories on the cooking chamber floor. Do not cover the cooking chamber floor with any kind of foil or oven paper. Do not place any ovenware on the cooking chamber floor if the temperature is set above 50^ . This will result in heat accumulation. This will damage the enamel.
- Aluminium foil: Aluminium foil in the cooking chamber must not come into contact with the door glass. This could lead to a permanent discolouration of the door glass.
- Silicone pans: Do not use pans, mats, covers or accessories containing silicone. This could damage the oven sensor.
- Water in the hot cooking chamber: Do not pour water into the cooking chamber when it is hot. This will produce steam. The change in temperature may damage the enamel.
- Moisture in the cooking chamber: Over a long period of time, moisture in the cooking chamber can lead to corrosion. Allow the appliance to dry after use. Do not keep moist foods in the closed cooking chamber for long periods of time. Do not store food in the cooking chamber.
- Cooling with the appliance door open: After using the appliance at high temperatures, only allow it to cool down with the door closed. Do not allow anything to become jammed in the appliance door. Even if the door is left open only a crack, the fronts of adjacent appliances may be damaged over time. Only allow the appliance to dry with the door open if a lot of moisture has been produced while operating the oven.
- Fruit juice: When baking particularly juicy fruit cakes, do not cover the baking tray too generously. Fruit juice dripping from the baking tray leaves stains that cannot be removed. If possible, use a deep universal baking tray.
- Heavily soiled seal: If the seal is heavily soiled, the appliance door will not close properly. This could damage the fronts of adjacent appliances. Always keep the seal clean.
- Using the appliance door as a seat, shelf or worktop: Do not sit on the appliance door, do not place anything on it, and do not hang anything from it. Do not place cookware or accessories on the appliance door.
- Inserting accessories: Depending on the appliance model, accessories may scratch the door panel when the appliance door is closed. Always insert the accessory into the cooking chamber as far as it will go.
- Carrying the device: Do not carry or hold the device by the door handle. The door handle cannot support the weight of the appliance and may break off.
- If you use the residual heat of the switched-off oven to keep food warm, a great deal of moisture can build up in the cooking chamber. This can lead to the formation of condensation water and cause corrosion damage to your appliance as well as damaging your kitchen. Avoid the formation of condensation water by opening the door or using "Defrost" mode.
INSTALLATION
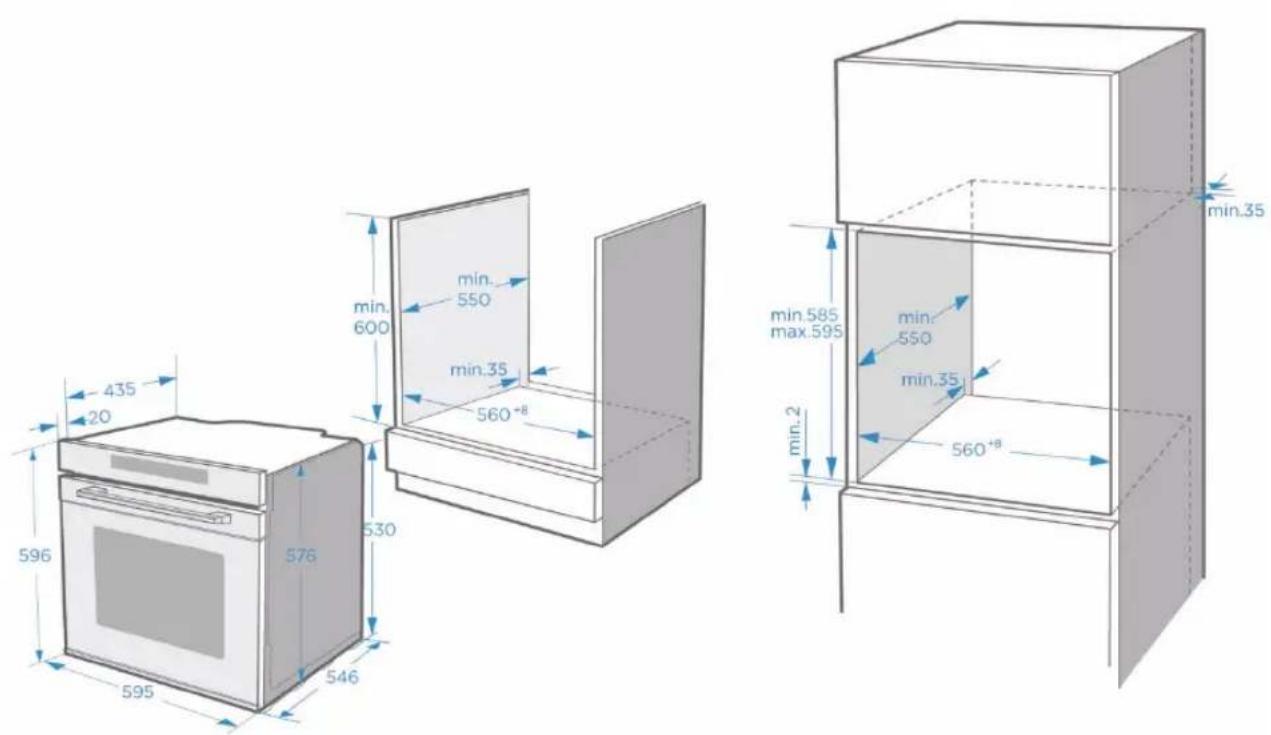
To ensure the safe operation of this appliance, it must be properly installed in accordance with the installation instructions. Damage caused by incorrect installation is not covered by the warranty.
Wear protective gloves during installation to prevent cuts from sharp edges.
Check the appliance for damage before installation. Do not connect it if it is damaged.
Remove all packing material and adhesive foil before turning on the appliance.
The above dimensions are given in mm.
To disconnect the appliance from the power supply if necessary after installation, the plug must be accessible or a switch must be integrated into the fixed wiring.
Warning: To prevent overheating, the appliance must not be installed behind a decorative door.
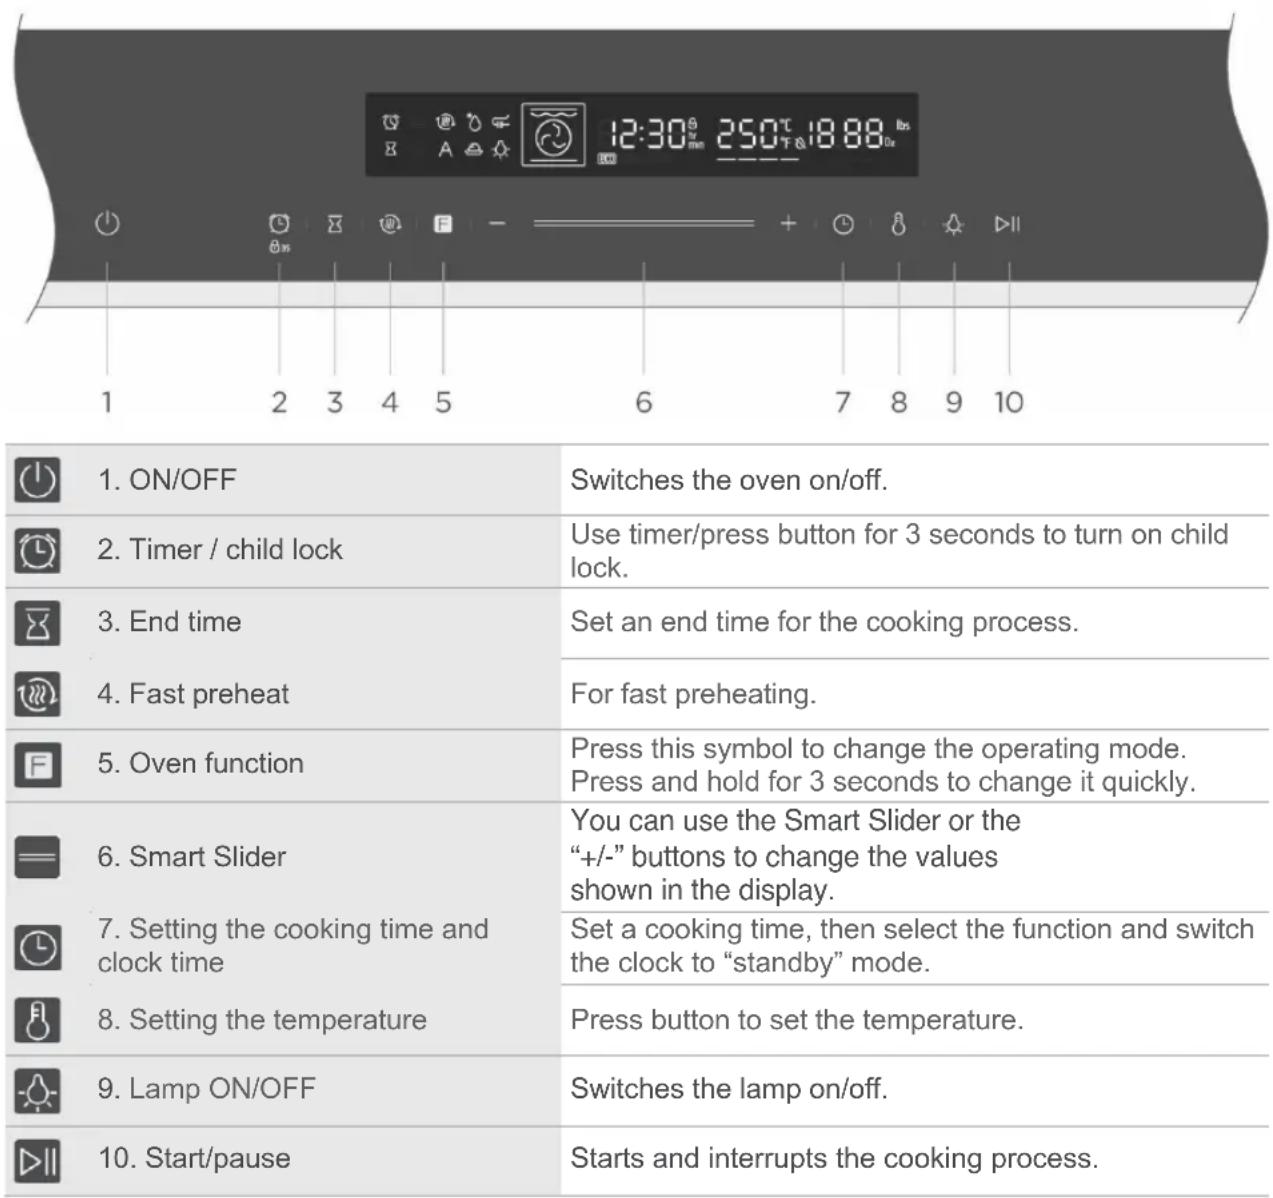
OPERATING THE APPLIANCE
OPERATING ELEMENTS
First-time use
Before you use the appliance for the first time to prepare food, you must clean the cooking chamber and accessories.
- Remove all stickers, surface protection films and transport protection parts.
- Remove all accessories and the slide-in strips from the cooking chamber.
- Thoroughly clean the accessories and the guide rails with soapy water and a cloth or soft brush.
- Make sure that the cooking chamber does not contain any packaging residue such as polystyrene balls or pieces of wood, as these can pose a fire hazard.
- Wipe the smooth surfaces in the cooking chamber and on the door with a soft, damp cloth.
- To remove the new odour from the appliance, heat the appliance while it is empty and with the oven door closed.
- Thoroughly ventilate the kitchen when heating the appliance for the first time. Keep children and pets away from the kitchen during this time. Close the door to adjacent rooms.
- Adjust the displayed settings. Please see the next section on how to set the operating mode and temperature.
"Using your appliance" on Page 10
Settings
Operating mode

Time
2h
After the appliance has cooled down:
- Clean the smooth surfaces and the door with soapy water and a cloth.
- Dry all surfaces.
- Put the guide rails back in place.
Setting the clock time
Before the oven can be used, the clock time should be set.
- After the oven is plugged in, tap the clock symbol to select the time in hours. Use the Smart Slider or the +/- buttons to select the time.
- Tap the clock symbol again. Now use the Smart Slider or the +/- buttons to set the time in minutes.
- Tap the clock symbol again to end the setting process.
NOTE: The clock has a 24-hour display.
Your appliance has various operating modes. To help you choose the right type of heating for your dish, we will now explain the differences and areas of application.
| Operating modes | Temperature | Use | |
| Top/bottom heat | 30~250 °C | For traditional baking and roasting at one level. Especially suitable for cakes with a moist topping. | |
| Hot air | 50~250 °C | For baking and roasting on one or more levels. The heat comes from the ring heater, which evenly surrounds the fan. | |
| ECO | 140~240 °C | For energy-saving cooking. | |
| Top/bottom heat + circulation | 50~250 °C | For baking and roasting on one or more levels. The heat from the heating elements in the cooking chamber is evenly distributed by a fan. | |
| Radiant heat | 150~250 °C | For grilling small quantities of food and for browning. Please place the food to be grilled in the middle section under the grill heating element. | |
| Dual grill + circulation | 50~250 °C | For grilling flat food and browning. The fan distributes the heat evenly in the cooking chamber. | |
| Dual grill | 150~250 °C | For grilling flat food and browning. | |
| Pizza mode | 50~250 °C | For pizza and dishes that require a lot of heat from below. The bottom heat and the ring heater are switched on. | |
| Bottom heat | 30~220 °C | For the additional browning of the bases of pizzas, cakes and pastries. The heat comes from the bottom heat. | |
| Defrosting | - | For the gentle defrosting of frozen food. | |
| Dough process | 30~45 °C | For the preparation of yeast and sourdough and for the cultivation of yoghurt. | |
| Additional functions | Temperature | Use | |
| Pyrolytic self-cleaning | Not adjustable | The oven heats up to a very high temperature. This may result in the burning of any residues. | |
Notes
To defrost large portions of food, you can remove the guide rails and place the container on the cooking chamber floor.
- To preheat dishes, remove the guide rails and select the "Hot air grill" and "Circulation" modes with a temperature of 50^ . "Hot air grill" mode should be used if more than half of the cooking chamber floor is covered with the dishes.
- In "Circulation" mode, the fan switches on at certain times during the heating process to ensure optimum heat distribution in the cooking chamber.
Caution
- If you open the appliance door while a process is running, the process will be stopped. In this case there is a risk of burns!
- Do not cover the ventilation slots. This may cause the unit to overheat. To make the unit cool down faster, the fan may continue to run for a while.
Fan
The fan switches on and off as required. Hot air escapes above the door.
USING YOUR APPLIANCE
Cooking with the oven
- After the oven is plugged in electrically, tap the "Oven function" symbol to select functions and use the Smart Slider or the +/- keys to set the cooking temperature.
- Tap the symbol. The oven will start working. If you do not tap the symbol, the oven will display the time again after 5 minutes.
- If you tap during the cooking process, the process will be cancelled, and if you tap it will be paused.
NOTE: After setting the temperature, tap the clock symbol to set the cooking time.
Fast preheat
You can shorten the preheating time by using the Fast Preheat function. Select a function, and tap the symbol for Fast Preheat. The symbol for Fast Preheat will light up on the display. If Fast Preheat is not available for the selected function, a beep will be heard. Fast Preheat is not available with the "Defrost" and "Dough process" functions.
Set end time
You can set the time at which the cooking process is to be ended here.
- Tap 串 . Move the Smart Slider or tap the + / - symbol to set the end time in hours. Tap again to set the end time in minutes. When you have finished setting, tap 串 to save the setting.
- If you set the end time, you must also set the cooking time. For information on how to set the cooking time, refer to the section "Cooking with the oven".
- For example, if you set the end time to 10 o'clock and the cooking time to 1 hour, the oven will heat up at 9 o'clock and be ready at 10 o'clock.
Changes while cooking
When the appliance is switched on, you can change the operating mode and temperature using the oven function control or the Smart Slider. If no further action is taken after the change for 6 seconds, the oven will accept the change.
If you want to change the cooking time while cooking, tap on and change it using the Smart Slider or the + / - symbol. If no further action is taken after the change for 6 seconds, the oven will accept the change. You cannot make any changes during a cooking process with a specified end time.
If you want to cancel the cooking process, tap
Notes
Changing the operating modes/temperature/remaining cooking time can have a number of negative effects on the cooking result. We recommend that you avoid doing this – unless you are an experienced cook.
Caution!
After switching on the appliance, it will become very hot, especially inside. Never touch the inner surfaces of the appliance or the heating elements. Use oven gloves to remove accessories or ovenware from the cooking chamber and let the appliance cool down. Keep children at a safe distance to avoid burns.
Timer
Tap to use the timer function. When the set time is up, the oven will signal this with a beep. The first time you tap the symbol, the hours are set. Then tap the symbol again to set the minutes. Tap the symbol once more to end the setting process.
You can set the timer before and during cooking, but if you select the function and temperature, the timer will not be available.
Child protection
Your appliance has a child lock so that children cannot accidentally turn it on or change settings. Press and hold the button for 3 seconds to activate the child lock. Press and hold the button again for 3 seconds to unlock the appliance.
You can activate and deactivate the child lock at any time, regardless of whether the oven is switched on or not. Press and hold the button for 3 seconds to turn the child lock on and off. When the child lock is on, the symbol is shown in the display.
ACCESSIONS
Your appliance is supplied with several accessories. Here you will find an overview of the accessories supplied and information on their correct use.
Accessories included
Your appliance is equipped with the following accessories:
Baking rack
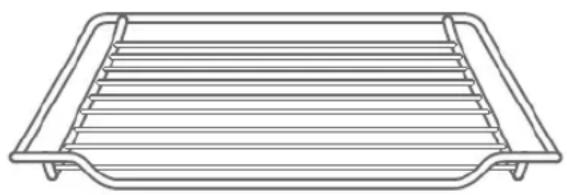
For ovenware, cake tins and ovenproof plates. For roasts and grilled dishes.
Baking tray
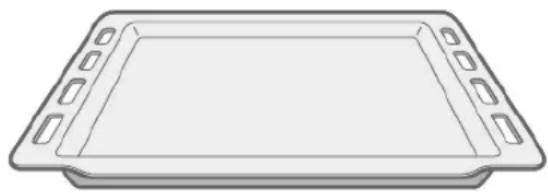
For sheet cakes and small baked goods.
Use only original accessories. It is specially designed for your appliance.
You can find the right accessories in our online shop at
www.blaupunkt-einbaugeraete.com or from your specialist dealer.
Note
The accessories can become deformed when hot. This does not affect their function. Once they have cooled down, they will return to their original shape.
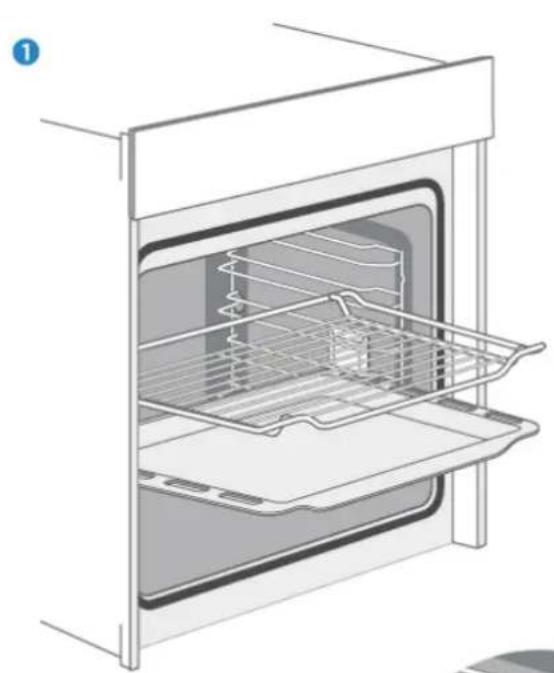
Inserting accessories
The cooking chamber has five guide rails. The guide rails are counted from bottom to top. The accessories can be pulled out about halfway without tilting.
Notes
- Make sure that you always insert the accessories the right way round in the cooking chamber as illustrated below.
- Always push the accessories completely into the cooking chamber so that they do not touch the appliance door.
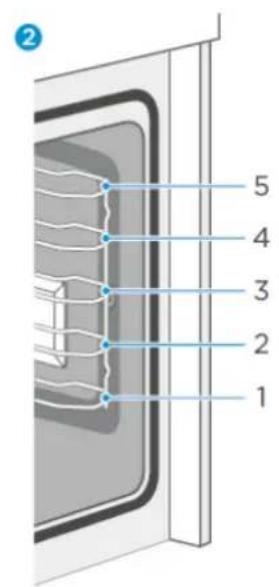

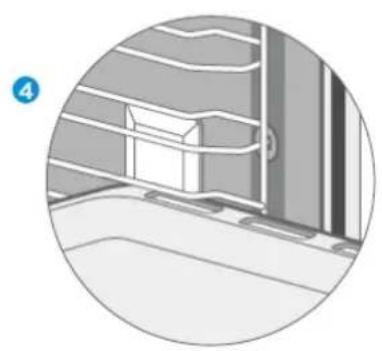
Locking function
The accessory can be pulled out about halfway until it locks into place. The locking function prevents the accessory from tilting due to the gravity of the food and the accessory itself when it is pulled out. The accessories should be correctly inserted into the cooking chamber to ensure proper tilt protection. When inserting the baking rack, make sure that it points in the right direction, as shown in the illustrations 1 3
When inserting the baking tray, make sure that it points in the right direction, as shown in the illustrations 1 4
ENERGY-EFFICIENT USE
- Remove all accessories that are not necessary during the cooking process.
- Do not open the door while cooking is in progress
- If you open the door while cooking, switch the operating mode to "light" (without changing the temperature setting)
- In the case of operating modes with no fan, reduce the temperature setting to 50^ 5min to 10min before the end of the cooking process. This will allow you to use the heat of the cooking chamber to complete the cooking process.
- If possible, use the circulation function. This will allow you to reduce the temperature by 20^ to 30^ .
- With the hot air function, you can cook and bake on several levels at the same time.
- If it is not possible to cook and bake different dishes at the same time, you can cook them one after the other to make use of the preheated oven.
- Do not preheat the empty oven if it is not needed. Place the food in the oven immediately after it has reached the desired temperature. The control light will switch off once the desired temperature is reached.
- Do not use reflective foil such as aluminium foil to cover the bottom of the cooking chamber.
- If possible, use the timer and/or a temperature sensor.
- Use dark and matt baking tins and containers. Do not use heavy accessories with shiny surfaces, such as stainless steel or aluminium.
ENVIRONMENT
The packaging is intended to protect your new appliance from damage in transit. The materials used have been carefully selected and should be recycled. Recycling reduces the use of raw materials and waste. Electrical and electronic devices often contain valuable materials. Please do not dispose of them with your household waste.

HEALTH
Acrylamide is formed especially when starchy foods (e.g. potatoes, chips, bread) are heated to very high temperatures for a long time.
Tips
- Select short cooking times.
- Cook the food until it has a golden yellow surface colour. Do not let food burn until it has a dark brown colour.
- Larger portions have less acrylamide.
- Use the hot air function if possible.
- Chips: Cook more than 450g per tray. Distribute them on the tray evenly and turn them from time to time. Read the product information if necessary to achieve the best cooking result.
MAINTENANCE OF YOUR APPLIANCE
Cleaning agents
With good care and cleaning, your appliance will retain its appearance and remain fully functional for a long time. We will now explain to you how to properly care for and clean your appliance.
Please follow the instructions in the table so that the different surfaces are not damaged by using the wrong cleaning agents. Depending on your appliance model, not all of the areas listed may be on/in your appliance.
Caution!
Risk of surface damage
Do not use:
- Sharp or abrasive cleaning agents.
- Detergents with high alcohol content.
- Hard scouring or cleaning sponges.
- High-pressure or steam cleaners.
- Special cleaners for cleaning hot equipment.
Wash new sponges and cloths thoroughly before use.
| Oven area | Cleaning |
| Stainless steel front | Warm soapy water: Clean with a tea towel and then dry off with a soft cloth. Remove lime spots, grease, starch and albumin (e.g. protein) immediately. Rust can form under such spots. Special stainless steel cleaning agents for cleaning hot surfaces are available from specialist dealers. Apply a very thin layer of the cleaning agent with a soft cloth. |
| Plastic | Warm soapy water: Clean with a tea towel and then dry off with a soft cloth. Do not use glass cleaner or a glass scraper. |
| Painted surfaces | Warm soapy water: Clean with a tea towel and then dry off with a soft cloth. |
| Operating panel | Warm soapy water: Clean with a tea towel and then dry off with a soft cloth. Do not use glass cleaner or a glass scraper. |
| Oven area | Cleaning |
| Door panel | Warm soapy water:Clean with a tea towel and then dry off with a soft cloth.Do not use a glass scraper or stainless steel scouring pad. |
| Door handle | Warm soapy water:Clean with a tea towel and then dry off with a soft cloth.If the door handle comes into contact with descaling agent, wipe it off immediately. Otherwise, any stains cannot be removed. |
| Enamel surfaces and self-cleaning surfaces | Follow the instructions for the surfaces of the cooking chamber in the table. |
| Glass cover for the interior lighting | Warm soapy water:Clean with a tea towel and then dry off with a soft cloth.If the cooking chamber is very dirty, use oven cleaner. |
| Door sealShould never be removed. | Warm soapy water:Clean with a tea towel. Do not scrub. |
| Stainless steel door cover | Stainless steel cleaner:Please observe the respective manufacturer's instructions.Do not use stainless steel care products.Remove the door cover for cleaning. |
| Accessories | Warm soapy water:Soak and clean with a tea towel or brush.In case of heavy dirt deposits, a stainless steel scouring pad can be used. |
| Racks | Warm soapy water:Soak and clean with a tea towel or brush. |
Pull-out system
Warm soapy water:
Clean with a tea towel or brush.
Do not remove the lubricant when they are pulled out. It is best to clean them when they are pushed in.
Do not clean them in a dishwasher.
Notes
- Slight differences in colour on the front of the device are due to the use of different materials such as glass, plastic and metal.
- The enamel is applied at very high temperatures. This can lead to slight colour variations. This is normal and does not affect performance. The edges of thin sheets cannot be completely enamelled. As a result, these edges can be rough. The corrosion protection is not impaired by this.
- Always keep the appliance clean and remove dirt immediately to prevent the formation of stubborn dirt deposits.
Tips
- Clean the cooking chamber after each use. This prevents dirt from caking on.
- Always remove any lime deposits, grease, starch and albumin (e.g. protein) immediately.
- Remove spots from sugary foods as soon as possible while the spot is still warm.
- For roasting, use suitable oven utensils, e.g. a roaster.
PYROLYTIC SELF-CLEANING
Your unit has an operating mode for "pyrolytic self-cleaning". This mode allows you to clean the cooking chamber effortlessly.
The cooking chamber is heated to a very high temperature. Residues from roasting, grilling and baking are burned. For your safety, we only offer one cleaning setting in this mode. The temperature and operating time cannot be set in this mode.
Notes
The cooking chamber locks the door automatically for your safety. It can only be opened when the temperature has fallen to a relatively safe level. The interior lighting remains switched off during the cleaning process.
WARNING
Risk of burns!
- The cooking chamber becomes extremely hot during pyrolysis. Never open the appliance door. Always let the appliance cool down. Keep children and persons with limited capabilities away from the appliance.
- The appliance becomes very hot from the outside during the cleaning process. Never touch the appliance door. Always let the appliance cool down. Keep children and persons with limited capabilities away from the appliance.
Danger to health!
In "Pyrolysis" mode, the cooking chamber heats up to a very high temperature, so that roasting, grilling and baking residues etc. are burned. This process releases vapours which may irritate the mucous membranes. The kitchen must be well-ventilated while the cleaning function is running. Do not stay in the room for a long time. Keep children and pets away and always follow the instructions given in the manual or by the specialist.
Before starting the pyrolysis process
Caution!
- Remove accessories and cookware, including guide rails and pull-out systems, from the cooking chamber. There must be nothing left in the cooking chamber. This not only ensures good cleaning results throughout the cooking chamber, but also that the accessories have a long service life.
- Before you start the cleaning function, remove the heaviest soiling manually.
- Clean the inside of the appliance door and along the edges of the cooking chamber in the area of the seal. Do not scrub or remove the seal.
- Leave the oven off during this time.
WARNING
Risk of fire!
- Many types of food residues, fat and meat juices can ignite during pyrolysis. Before starting the cleaning function, always remove the coarsest food residues and soiling from the cooking chamber. Do not use the pyrolysis function to clean accessories.
-
The appliance becomes very hot from the outside during the pyrolysis process. Never hang flammable objects, such as dish towels, on the door handle. Do not lean against the front of the appliance. Keep children away from the appliance.
-
If the door seal is damaged, a lot of heat will be generated around the door. Do not scrub or remove the seal. Never operate the appliance if the seal is damaged or missing.
Danger of serious damage to health!
The appliance becomes very hot during pyrolysis. The coating on baking trays and tins is destroyed and harmful gases are released. Never clean baking trays and tins in "Pyrolysis" mode. Never use pyrolysis to clean accessories.
Setting pyrolytic self-cleaning
- Switch on the oven by pressing the button.
- Select the "pyrolytic self-cleaning" mode by pressing the button.
When the display changes to, pyrolytic self-cleaning has been switched on.
- Check that you have removed all accessories and food and close the door.
- Press the "Start/Pause" button to start the self-cleaning process.
Ventilate the kitchen when the cleaning is running.
The door will lock shortly after starting. It can only be opened when the temperature has fallen to a relatively safe level.
When self-cleaning is finished
A continuous acoustic signal will sound and the oven will stop heating. This means that the pyrolytic self-cleaning process is finished. You can press the button to turn off the signal. However, it will also switch off automatically later. If you want to start any operating mode afterwards, you must keep the button pressed for 3 seconds, as the control panel of the oven is locked for safety reasons during pyrolytic self-cleaning.
Pausing and cancelling pyrolytic self-cleaning
As soon as the self-cleaning function is started, the oven automatically locks the function. If you want to pause or cancel the operating mode, you must first unlock the control panel. Press and hold the
button for 3 seconds to unlock the function. Then press the button to pause or cancel the operating mode. Pressing once means "Pause" and pressing twice means "Stop". The door can only be opened when the temperature is low enough and the door lock is opened.
Setting self-cleaning mode
Once self-cleaning has started, you cannot change any settings. You can only pause or cancel the operating mode.
When self-cleaning is finished
Once the cooking chamber has cooled down, wipe off the ashes in the cooking chamber and around the appliance door with a damp cloth.
After cleaning, replace the protective device according to the manual.
Notes
- During self-cleaning, the frame on the inside of the appliance may become discoloured. This is normal and does not affect its function. The discoloration can be removed with the help of a stainless steel cleaning agent.
- Heavy soiling may leave white deposits on the enamel surfaces. These are residues from the food and they are harmless. They do not affect performance. If required, you can remove these residues with lemon juice or other cleaning agents.
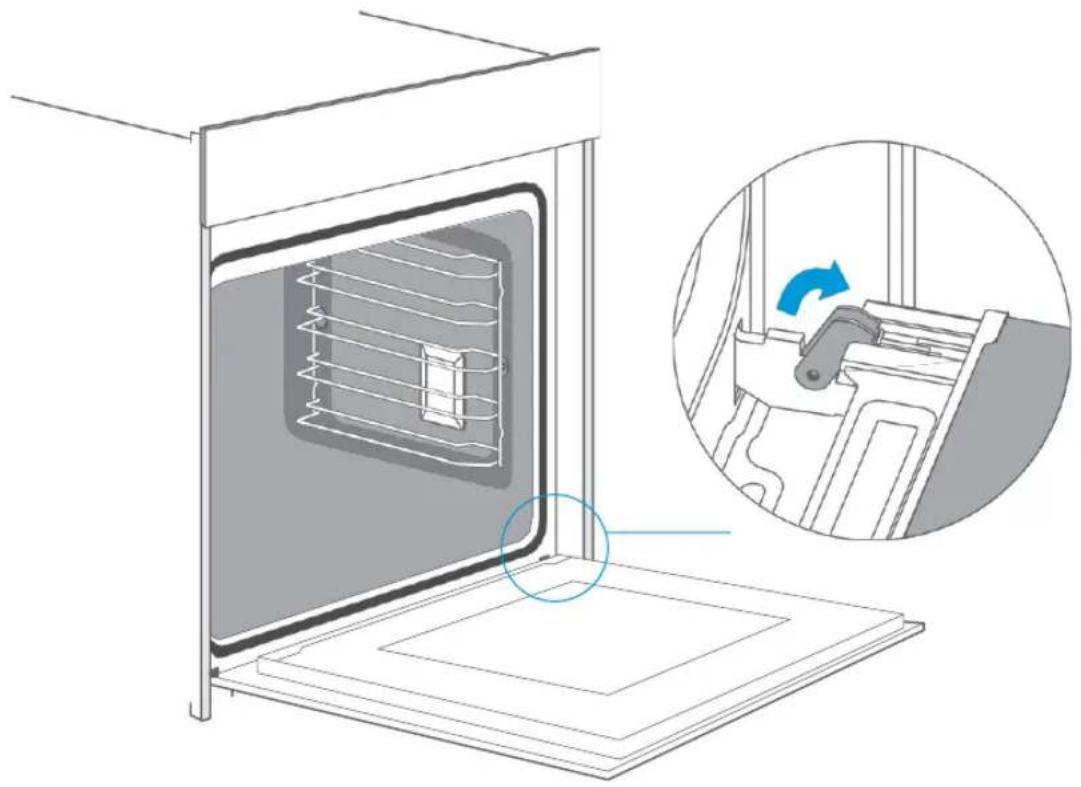
Removing the appliance door
- Open the appliance door completely.
- Open the two locking levers on the left and right.
- Close the appliance door completely.
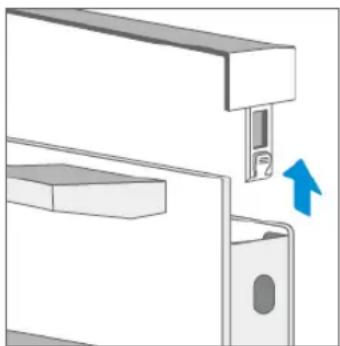
- Grip the door with both hands on the left and right and pull it out in an upward direction.
Installing the appliance door
Reattach the appliance door in the reverse order of removal.
- When attaching the appliance door, ensure that both hinges are placed directly on the mounting holes in the front panel of the cooking chamber.
Ensure that the hinges are inserted in the correct position. They must fit easily and without resistance. If you feel any resistance, check that the hinges are correctly inserted in the holes.
- Open the appliance door completely. You can check again that the hinges are in the correct position when opening the appliance door. If they are mounted the wrong way round, you will not be able to open the appliance door fully.
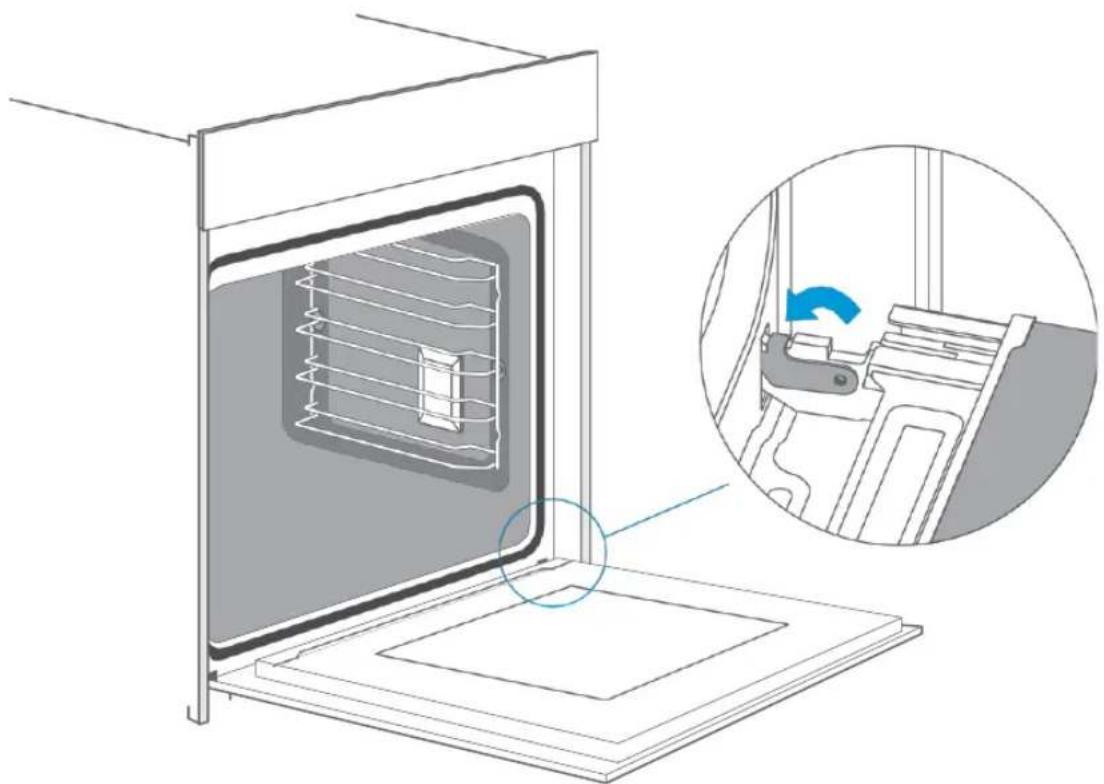
Close both locking levers again.
- Close the oven door. Check again that the door is in the correct position and that the ventilation slots are not half covered.
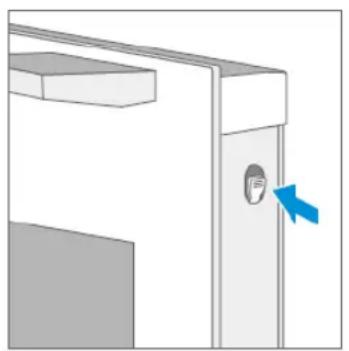
Removing the door cover
The plastic layer in the door cover can become discoloured. You can remove the cover to clean it thoroughly.
Remove the appliance door as described above.
- Press the right and left side of the cover.
- Remove the cover.
- When you have removed the door cover, the remaining parts of the appliance door can be easily removed so that you can continue cleaning. When you have finished cleaning the appliance door, replace the cover and press it until you hear it click into place.
- Reinstall the appliance door and close it.

Caution!
If the appliance door is well installed, you will also be able to remove the door cover.
- Removing the door cover will cause the inner glass of the appliance door to become loose. The glass may move easily and cause damage or injury.
- Removing the door cover and inner glass can reduce the total weight of the appliance door. The hinges move more easily when closing the door and you might get your fingers caught. Keep your hands away from the hinges.
Because of the two points mentioned above, you should only remove the door cover if the appliance door has also been removed. Damage caused by incorrect handling is not covered by the warranty.
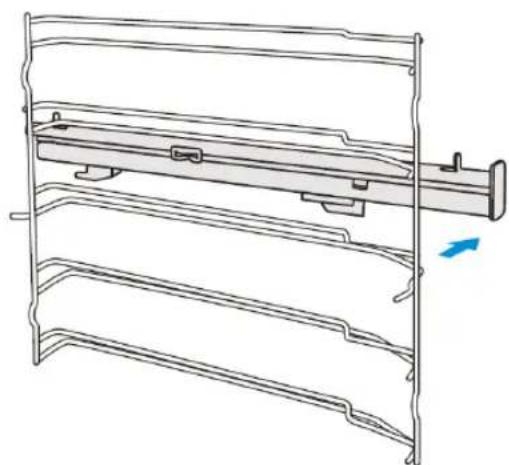
Guide Rails
If you want to clean the guide rails and cooking chamber thoroughly, you can remove the guide rails and clean it. With good care and cleaning, your appliance will retain its appearance and remain fully functional for a long time.
-
Pull out the front part of the guide rails horizontally. Then you can remove the guide rails as illustrated in the figure below.
-
To push the guide rails back into the cooking chamber, the rear part of the guide rails must first be inserted correctly into the holes of the cooking chamber. Then the guide rails can be pushed back into the cooking chamber.

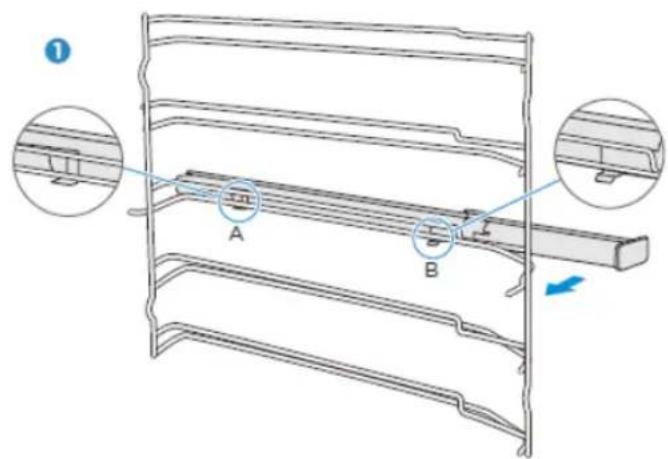
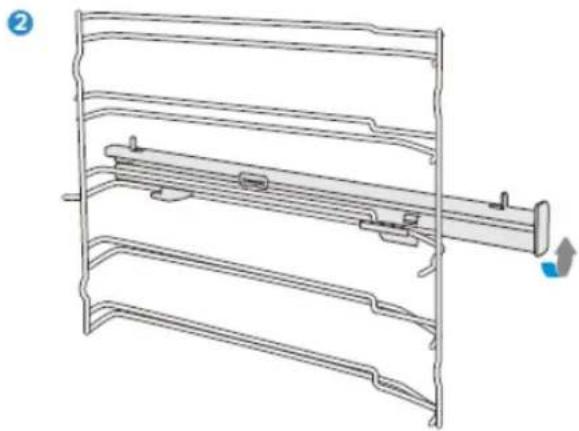
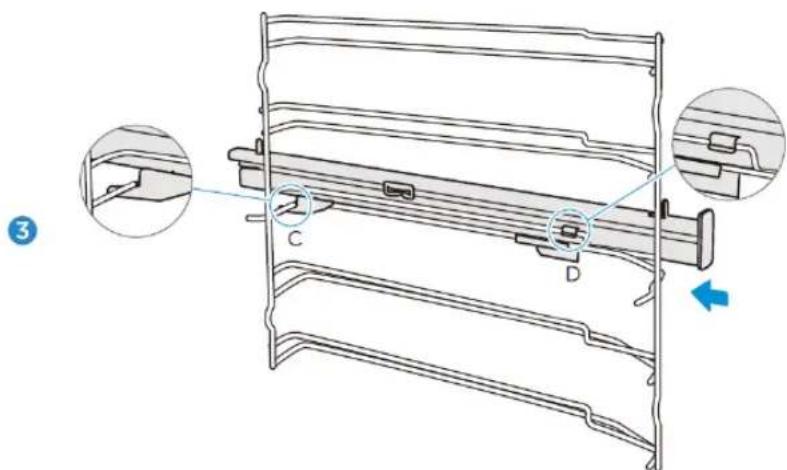
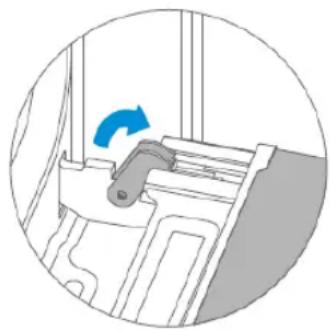
Fastening telescopic rails
(The left side is used here as an example. The right side works analogously).
- Place points A and B of the telescopic rails horizontally on the outer guide rail.
- Turn the telescopic rails counter-clockwise (for the right side: clockwise) by 90 degrees.
- Slide the telescopic rails forward, pushing point C onto the lower guide rail and point D onto the upper guide rail.
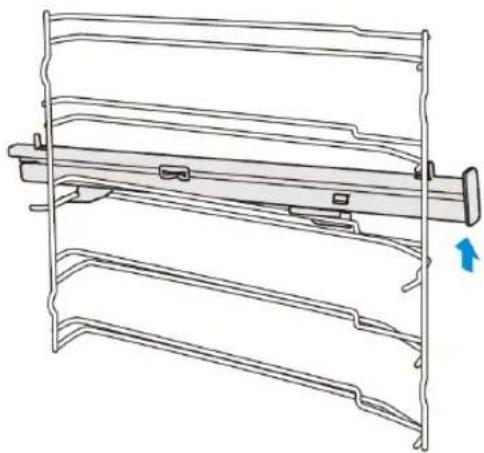
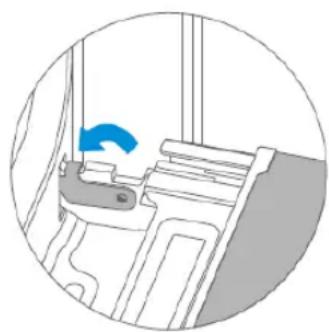
Removing the telescopic rails
(The left side is used here as an example. The right side works analogously).
- Lift one end of the telescopic rails strongly.
- Lift the entire telescopic rail and remove it.
1
2
APPLIANCE DOOR
With good care and cleaning, your appliance will retain its appearance and remain fully functional for a long time. Here you will learn how to remove and clean the appliance door.
You can remove the appliance door for cleaning and to remove the door panels. The hinges of the appliance door each have a locking lever.
When the locking levers are closed, the appliance door is secured. It cannot be released. When the locking levers for releasing the appliance door are open, the hinges are locked. They cannot snap shut.
Caution! - Risk of injury!
- If the hinges are not locked, they can snap shut with great force. Make sure that the locking levers are always fully closed or fully open when the appliance door is released.
- The hinges of the appliance door move when the door is opened and closed. In the process, you could trap your fingers or other parts of your body. Keep your hands away from the hinges.
TROUBLESHOOTING
If a fault occurs, be sure that it is not due to incorrect operation before calling customer service. First, try to correct the fault yourself using the following overview. You can often easily correct technical problems with the appliance yourself.
If a dish does not turn out exactly as you would like it to, you will find many cooking tips and instructions at the end of the operating manual.
| Fault | Possible cause | Comments/remedy |
| The appliance does not work. | Defective fuse | Check the circuit breaker in the fuse box. |
| Power failure | Check that the kitchen lamp or other kitchen appliances are working. | |
| The fan is not always switched on in circulation mode. | This is a normal process, ensuring the best possible distribution of heat and the best possible performance of the oven. | |
| After a cooking process, you can hear a noise and observe a flow of air near the control panel. | The fan is still running to prevent high levels of humidity in the cooking chamber and to cool the oven down. The fan will switch off automatically. | |
| Food is not sufficiently cooked in the time specified in the recipe. | A temperature other than that specified in the recipe has been used. Check the temperature setting. The ingredient quantities differ from the recipe. Check the recipe. | |
| Uneven browning | The temperature setting is too high or the dish has not been placed on the correct guide rail. Check the recipe and the settings. The surface finish and/or colour and/or material of the ovenware was not the best choice for the selected oven function. If you use radiant heat, such as in the “Top and bottom heat” mode, you should use matt, dark-coloured, light ovenware. | |
| The lamp does not switch on. | The lamp must be replaced. | |
Warning - Danger of electric shock!
Incorrectly performed repairs are hazardous. Repairs and the replacement of damaged power cables may only be carried out by one of our trained service technicians. If the appliance is defective, disconnect it from the mains or switch off the circuit breaker in the fuse box. Contact customer service.
Maximum operating time
The maximum operating time of this appliance is 9 hours, in case you forget to switch it off.
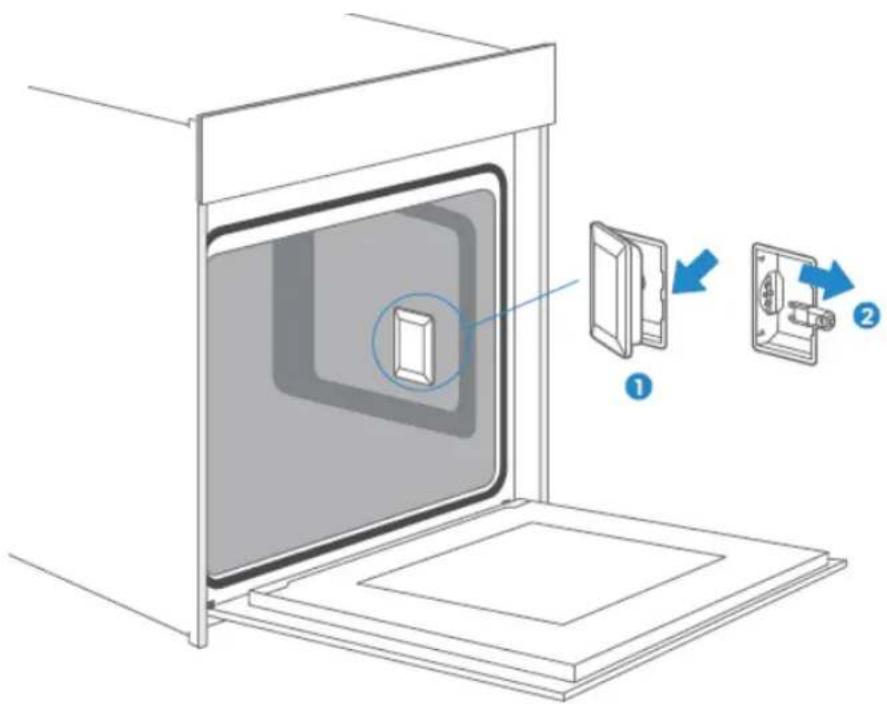
Replacing the lamp in the cooking chamber
If the lamp in the cooking chamber goes out, it must be replaced. Heat-resistant halogen lamps with 25 watts and 230V are available from specialist dealers.
Hold the halogen lamp with a dry cloth. This will increase the service life of the lamp.
WARNING
Danger of electric shock!
When replacing the lamp, the contacts of the lamp socket are live. Before replacing the lamp, disconnect the power plug or turn off the circuit breaker in the fuse box.
Risk of burns!
The appliance becomes very hot. Never touch the inner surfaces of the appliance or the heating elements. Always let the appliance cool down. Always keep children at a safe distance.
- Place a towel in the cold cooking chamber to avoid damage.
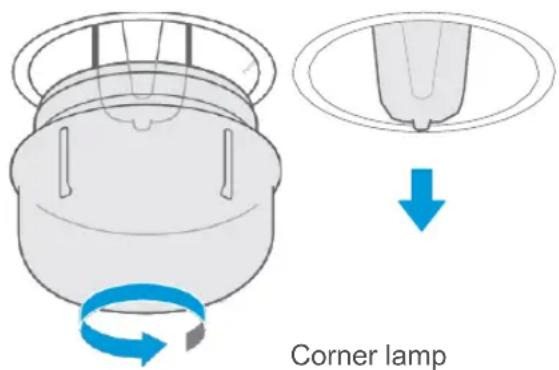
- Corner lamp: Turn the glass cover counter-clockwise to remove it.
Side lamp: Pull out the guide rails and lever the glass cover slightly using a tool with a flat head.
- Pull out the lamp - do not turn it.
- Put the glass cover back in place.
- Remove the towel and turn on the circuit breaker to check if the lamp is lit.
- If the side lamp works after replacement, reinsert the guide rails.
Side lamp
CUSTOMER SERVICE
If your appliance needs to be repaired, our customer service is there for you. We always find the right solution. Please contact the dealer where you purchased this appliance or contact Blaupunkt customer service directly. You will find contact information on the back of this operating manual. When you call, please include the model number and serial number so that we can advise you correctly. You will find the type plate with these numbers if you open the appliance door.
Rated voltage: 220-240V~
Rated frequency: 50Hz-60Hz
Power: 2.9kW

To save time in case of an emergency, you can note the model of your appliance and the telephone number of customer service in the following field.
MAINTENANCE CARD
| Model number | Date of purchase |
| Serial number | Dealer business |
Warning
This appliance must be installed in accordance with current regulations and used only in a well-ventilated room. Please read this manual carefully before installing or using this appliance.
TIPS AND TRICKS
| You want to prepare your own recipe | First try to use settings of similar recipes and optimise the cooking process based on the result. |
| Is the cake ready-baked? | Insert a wooden stick into the cake about 10 minutes before the specified baking time. If there is no more raw dough on the stick after pulling it out, the cake is ready. |
| The cake loses a considerable amount of volume when it cools down after baking. | Lower the temperature setting to 10 °C and check the recipe concerning the mechanical handling of the dough. |
| The cake is much higher in the middle than on the outer edge. | Do not grease the outer ring of the springform pan. |
| The cake is too brown on top. | Use a lower guide rail and/or a lower temperature (this may result in a longer cooking time). |
| The cake is too dry. | Increase the temperature by 10°C (this may result in a shorter cooking time). |
| The food looks good, but it is too moist inside. | Reduce the temperature by 10°C (this may result in a longer cooking time) and check the recipe. |
| The browning is uneven. | Reduce the temperature by 10 °C (this may result in a longer cooking time). Use the top and bottom heat. |
| The bottom of the cake is not browned enough. | Position it one level lower. |
| Baking on several levels simultaneously: The browning result varies on the different levels. | To bake on more than one level, use an operating mode with fan and remove the trays one by one when they are ready. It is not necessary for all trays to be finished at the same time. |
| Condensation while baking | Steam is part of the cooking process and normally travels out of the oven together with the cooling air flow. This steam can condense on various surfaces on or near the oven and form water droplets. This is a physical process and cannot be completely avoided. |
| What type of ovenware can be used? | Any heat-resistant ovenware can be used. Aluminium should not come into direct contact with food, especially if the food is acidic. Please ensure that the container and lid close well. |
| How is the grill function used? | Preheat the oven for 5 minutes and place the food in the level indicated in this manual. Do not use the oven when the door is open except to place/remove/check the food. |
| How do I keep the oven clean while grilling? | Slide a tray filled with 2 litres of water onto level 1. Almost all liquids dripping from the food standing on the grille will be collected by the tray. |
| The heating element switches on and off in all operating modes with grill. | This is a normal process and depends on the temperature setting. |
| How do you calculate the oven settings if the weight of a roast is not specified by a recipe? | Select the settings next to the roast weight and change the time slightly. If possible, use a meat thermometer to determine the temperature in the meat. Carefully place the tip of the meat thermometer into the meat according to the manufacturer's instructions. Make sure that the tip of the meat thermometer is in the middle of the bulk of the meat, but not near a bone or cavity. |
| What happens if a liquid is poured onto a food in the oven during the cooking process? | The liquid will boil, producing steam as a normal physical process. Please be careful, as the steam is hot. See also “Condensation while baking” for more information. If the liquid contains alcohol, the cooking process will be faster and flames may appear in the cooking chamber. Make sure that the oven door is closed during such processes. Please monitor the cooking process carefully. Only open the door when necessary and with great care. |
| RECIPIES | |||||
| CAKES | Mould | Level | Operating mode | Temp. in °C | Duration in minutes: Seconds |
| Sponge cake (single) in box mould | Box mould | 2 | Top/bottom heat + circulation | 170 | 50 |
| Sponge cake (single) in box mould | Box mould | 1 | Top/bottom heat | 140 | 70 |
| Sponge cake (single) in springform pan | Springform pan | 1 | Top/bottom heat + circulation | 150 | 50 |
| Sponge cake with fruits on baking tray | Baking tray | 1 | Top/bottom heat | 140 | 70 |
| Raisin Brioche Muffins (yeast dough) | Muffin tin | 2 | Top/bottom heat | 220 | Preheat time: 19:00 Baking time: 11:00 |
| Ring cake (yeast dough) | Baking tray | 1 | Top/bottom heat | 150 | Preheat time: 11:00 Baking time: 60:00 |
| Muffins | Muffin tin | 1 | Top/bottom heat | 160 | Preheat time: 08:30 Baking time: 30:00 |
| Muffins | Muffin tin | 1 | Top/bottom heat + circulation | 150 | Preheat time: 08:30 Baking time: 30:00 |
| Apple tart with yeast dough on a baking tray | Baking tray | 1 | Top/bottom heat + circulation | 160 | Preheat time: 10:00 Baking time: 42:30 |
| Water sponge cake (6 eggs) | Springform pan | 1 | Top/bottom heat | 160 | Preheat time: 09:30 Baking time: 41:00 |
| Water sponge cake (4 eggs) | Springform pan | 1 | Top/bottom heat | 160 | Preheat time: 09:00 Baking time: 26:00 |
| Water sponge cake | Springform pan | 1 | Hot air | 160 | 35 |
| Apple tart with yeast dough on a baking tray | Baking tray | 2 | Top/bottom heat + circulation | 150 | Preheat time: 08:00 Baking time: 42:00 |
| Braided yeast bun | Baking tray | 2 | Top/bottom heat + circulation | 150 | 40 |
| CAKES | Mould | Level | Operating mode | Temp. in °C | Duration in minutes: Seconds |
| Small cakes, 20 pcs | Baking tray | 2 | Hot air | 150 | 36 |
| Small cakes, 40 pcs | Baking tray | 2+4 | Hot air | 150 | Preheat time: 10:00 Baking time: 34:00 |
| Butter cake (yeast dough) | Baking tray | 2 | Top/bottom heat | 150 | Preheat time: 08:00 Baking time: 30:00 |
| Shortcrust pastry | Baking tray | 2 | Top/bottom heat | 170 | Preheat time: 08:00 Baking time: 13:00 |
| Shortcrust pastry, 2 baking trays | Baking tray | 2+4 | Top/bottom heat + circulation | 160 | Preheat time: 08:20 Baking time: 12:00 |
| Biscuits | Baking tray | 2 | Top/bottom heat | 160 | Preheat time: 08:00 Baking time: 10:00 |
| Biscuits | Baking tray | 2+4 | Top/bottom heat + circulation | 150 | Preheat time: 08:00 Baking time: 14:00 |
| BREAD | Mould | Level | Operating mode | Temp. in °C | Duration in minutes: Seconds |
| White bread (1 kg flour), box mould | Box mould | 1 | Top/bottom heat | 170 | Preheat time: 09:20 Baking time: 50:00 |
| White bread (1 kg flour), box mould | Box mould | 1 | Top/bottom heat + circulation | 170 | Preheat time: 12:00 Baking time: 45:00 |
| Fresh pizza (thin) | Baking tray | 2 | Top/bottom heat | 170 | Preheat time: 09:30 Baking time: 21:00 |
| Fresh pizza (thick) | Baking tray | 2 | Top/bottom heat | 170 | Preheat time: 10:00 Baking time: 45:00 |
| Fresh pizza (thick) | Baking tray | 2 | Top/bottom heat + circulation | 170 | Preheat time: 08:00 Baking time: 41:00 |
| Bread | Baking tray | 1 | Hot air | 190 | Preheat time: 09:00 Baking time: 30:00 |
| MEAT | Mould | Level | Operating mode | Temp. in °C | Duration in minutes: Seconds |
| Fillet of beef, 1.6 kg | Baking tray | 2 | Dual grill + circulation | 180 | 55 |
| Meat loaf, 1 kg | Baking tray | 1 | Top/bottom heat | 180 | 75 |
| Chicken, 1 kg | Baking tray | Level 2: Baking rack, level 1: Baking tray | Dual grill + circulation | 180 | 50 |
| Fish (2.5 kg) | Baking tray | 2 | Top/bottom heat | 170 | 70 |
| Spare ribs | Baking tray | 3 | Top/bottom heat | 120 | 85 |
| Roast neck of pork | Baking tray | 1 | Top/bottom heat | 160 | 85 |
| Chicken, 1.7kg | Baking tray | Level 2: Baking rack, level 1: Baking tray | Top/bottom heat | 180 | 78 |
TEST FOOD ACCORDING TO EN 60350-1
| RECIPES | Accessories | F | °C | Level | Time (min) | Preheating |
| Sponge cake | Springform pan, Φ26cm | 170 | 1 | 30-35 | NO | |
| Sponge cake | Springform pan, Φ26cm | 160 | 1 | 30-35 | NO | |
| Small cake | 1 baking tray | 150 | 2 | 30-40 | YES | |
| Small cake | 1 baking tray | 150 | 2 | 40-50 | YES | |
| Small cake | 2 baking trays | 150 | Level 2 & level 4 | 30-35 | YES | |
| Cheesecake | Springform pan, Φ26cm | 150 | 1 | 70-80 | NO | |
| Apple tart | Springform pan, Φ20cm | 170 | 1 | 80-85 | NO | |
| Apple tart | Springform pan, Φ20cm | 160 | 1 | 70-80 | NO | |
| Bread | 1 baking tray | 210 | 1 | 30-35 | YES | |
| Bread | 1 baking tray | 190 | 1 | 30-35 | YES | |
| Toast | Baking rack | Max. | 5 | 6-8 | YES, 5 min | |
| Chicken | Baking rack & baking tray | 180 | Backing rack: Level 2 Baking tray: Level 1 | 75-80 | YES |
ENERGY EFFICIENCY ACCORDING TO EN 60350-1
Please note the following information:
- The measurement to determine the data for forced-air operation and the type plate is performed in "ECO" mode.
- The measurement to determine the data for conventional operation is performed in "Top and bottom heat" mode.
- During the measurement, only the necessary accessories are in the cooking chamber. All other parts must be removed.
- The oven is installed as described in the installation instructions and placed in the centre of the cabinet
- For the measurement, the appliance door must be closed as in normal household use, even if the measuring cable interferes with the sealing function of the seal.
To ensure that the impaired seal has no negative effect on the energy data, the door must be closed carefully during the measurement. It may be necessary to use a tool to ensure that the seal is sealed as in household use, where no cable interferes with the sealing function.
- The determination of the cooking chamber volume for the "Defrost" application is carried out as described on page 14. To ensure efficient use of the oven, remove all accessories including the guide rails.
COOKING IN "ECO" MODE
In "ECO" mode, the heat comes from the bottom heat and the ring heater. This operating mode allows you to save energy during cooking.
| RECIPES | Accessories | °C | Level | Time (min) | Preheating |
| Braided yeast bun | 1 baking tray | 180 | 1 | 45-50 | NO |
| Roast pork | 1 baking tray | 200 | 1 | 80-85 | NO |
| Cherry cake | Springform pan | 200 | 1 | 55-60 | NO |
| Roast beef, 1.3 kg | 1 baking tray | 200 | 1 | 80-85 | NO |
| Brownies | Baking rack and glass plate | 180 | 1 | 55-60 | NO |
| Potato gratin | Baking rack and round plate | 180 | 1 | 65-70 | NO |
| Lasagne | Baking rack and glass plate | 180 | 1 | 75-80 | NO |
| Cheesecake | Springform pan, Φ20cm | 160 | 1 | 80-90 | NO |
DATA SHEET (EU 65/2014 & EU 66/2014)
| Mass of the oven | 42 kg |
| Number of cooking chambers | 1 |
| Heat source | Electrical |
| Useful volume | 72 l |
| ECElectric, cooking chamber (conventional operating mode) | 1.06 kWh/cycle |
| ECElectric, cooking chamber (circulation) | 0.69 kWh/cycle |
| EEICavity | 81.9 |
| Energy efficiency class (A+++ to D) | A+ |
Note
All the operating modes described on page 9 are main functions of the oven.
TABLE DES MATIÈRES
2 CONSIGNES DE SECURITE
3 Avertissement
5 Causes de dommages
6 MONTAGE
7 UTILISATION DE L'APPAREIL
7 Éléments de commande
8 Avant d'utiliser l'appareil
9 Modes de cuisson
10 Utilisation de l'appareil
13 ACCESSORIES
15 UTILISATION ÉCONOME EN ÉNERGIE
15 ENVIRONNEMENT
15 SANTÉ
16 ENTRETIEN DE VOTRE APPAREIL
18 NETTOYAGE AUTOMATIQUE PAR PYROLYSE
26 PORTE DE L'APPAREIL
27 DÉPANNAGE
30 SERVICE APRES-VENTE
31 CONSEILS ET ASTUCES
33 RECETTES
33 Gâteaux
35 Pains et pizzas
36 Viandes
36 PLATS TESTS SELON EN 60350-1
37 EFFICACITE ÉNERGÉTIQUE SELON EN 60350-1
38 CUISSON AVEC LE MODE « ECO »
38 FICHE DE DONNÉES (UE 65/2014 et UE 66/2014)
CONSIGNES DE SECURITE
Affinché"This is a good idea, but it's not enough. I'm sure that you can find a way to get the information from your local authorities."
INNEHÄLLSFÖRTECKNING
2 SAKERHETSANVISNINGAR
3 Varning
5 Skadeorsaker
6 MONTERING
7 ANVANDA PRODUKTEN
7 Manoverelement
8 Innanprodukten anvands
9 Driflagen
10 Användning av Produkten
13 TILLBEHÖR
15 ENERGIEFFEKTIV ANVÄNDNING
15 MILJÖ
15 HÄLSA
16 UNDERHÄLL AV PRODUKTEN
18 PYROLYTISK SJÄLVRENGÖRING
26 UGSNLUCKA
27 ATGARDANDE AV FEL
30 KUNDTJANST
31 TIPS OCH KNEP
33 RECEPT
33 Kakor
34 Bröd och pizza
35Kott
35 TESTLIVSMEDEL ENLIGHT EN 60350-1
36 ENERGIEEFFEKFIVITET ENLIGHT 60350-1
37 MATLAGNING I DRIFTLÄGET "ECO"
37 DATABLAD (EU 65/2014 OCH EU 66/2014)
SÄKERHETSANVISNINGAR
INNAN PRODUKTEN ANVÄNDS
Första användning
Innan du anvander ugnen for fanta gangen for alt laga mat maste du renogra