
5RZ34410 - Cooker BLAUPUNKT - Free user manual and instructions
Find the device manual for free 5RZ34410 BLAUPUNKT in PDF.
| Product type | Ceramic hob |
| Brand | Blaupunkt |
| Model | 5RZ34410 |
| Number of cooking zones | 2 |
| Control type | Touch |
| Supply voltage | 220-240 V ~ 50/60 Hz |
| Total electrical power | 3000 W |
| Product dimensions (W x D x H) | 520 x 288 x 55 mm |
| Cutout dimensions (W x D) | 500 x 268 mm |
| Minimum worktop thickness | 30 mm |
| Weight (approx) | 5 kg |
| Heating type | By resistance |
| Surface material | Vitroceramic |
| Main functions | Timer (0-99 min), child lock, automatic shut-off, overheating protection, residual heat indicator |
| Cleaning | Scraper and specific cleaner for ceramic glass |
| Safety | Automatic shut-off, control lock, overheating protection, residual heat indication |
| Installation | Built-in, connection by qualified electrician |
| Spare parts | Available through authorized after-sales service |
| Repairability | Intervention by qualified technician recommended |
| General information | Complies with electromagnetic safety standards; domestic use |
Frequently Asked Questions - 5RZ34410 BLAUPUNKT
User questions about 5RZ34410 BLAUPUNKT
0 question about this device. Answer the ones you know or ask your own.
Ask a new question about this device
Download the instructions for your Cooker in PDF format for free! Find your manual 5RZ34410 - BLAUPUNKT and take your electronic device back in hand. On this page are published all the documents necessary for the use of your device. 5RZ34410 by BLAUPUNKT.
USER MANUAL 5RZ34410 BLAUPUNKT
1.1 Safety information 25
1.2 Installation 25
1.2.1 Risk of electric shock 25
1.2.2 Cutting hazard 25
1.2.3 Important safety information 25
1.3 Operation and maintenance 27
1.3.1 Risk of electric shock 27
1.3.2 Health hazards 27
1.3.3 Danger due to hot surfaces 27
1.3.4 Cutting hazard 27
1.3.5 Important safety information 28
2. Introduction to the product 29
2.1 Top view 29
2.2 Operating panel 30
2.3 Product information 30
2.4 Functional principle 30
2.5 Before using your new ceramic hob 30
2.6 Technical specifications 30
3. Operating the product 31
3.1 Touch operating elements 31
3.2 Selecting the right cookware 31
3.3 Use 32
3.3.1 Starting cooking 32
3.3.2 Finishing cooking 32
3.3.3 Locking the operating elements 33
3.3.4 Timer 34
3.3.5 Excess temperature protection 37
3.3.6 Residual heat warning 37
3.3.7 Standard operating times 37
4. Notes on cooking 37
4.1 Cooking tips 37
4.1.1 Simmering, cooking rice 38
4.1.2 Searing steaks 38
4.1.3 Stir-frying 38
5. Temperature settings 38
6. Care and cleaning 39
7. Tips and tricks 40
8. Installation 41
8.1 Selecting installation accessories 41
8.2 Before positioning the attachment bracket 43
8.3Precautionary measures 44
8.4 Connecting the hob to the mains power 44
1. Preface
1.1 Safety information
Your safety is important to us. Please read this information carefully before using your hob.
1.2 Installation
1.2.1 Risk of electric shock
- Unplug the appliance from the power supply before completing work or maintenance.
- Effective grounding is essential, and must be ensured.
- Modifications may only be made to the installation by a trained electrician.
- Failure to observe this requirement may result in an electrical shock or even death.
1.2.2 Cutting hazard
- Caution - edges are sharp.
- Failure to take precautionary measures may result in injuries or cuts.
1.2.3 Important safety information
- Please read this manual carefully before installing or using this appliance.
- Never place flammable materials or products on this appliance.
- Please provide this information to the person responsible for installing the appliance, since this may reduce your installation costs.
- To avoid danger, the appliance must be installed according to this operating manual.
-
This appliance may only be installed and grounded by a properly qualified technician.
-
This appliance should be connected to a circuit with a circuit breaker which allows it to be fully disconnected from the power supply.
- Installing the appliance improperly may result in the forfeiture of all warranty or liability claims.
- This appliance can be used by children 8 years of age or older and persons with restricted physical, sensory or intellectual capabilities or a lack of experience and knowledge, if they are observed by a responsible person or if they have received instructions on how to use the appliance safely, and understand the associated hazards.
- Children must not play with the appliance. Children may only clean and maintain this appliance under supervision.
- If the power cable is damaged, it must be replaced by the manufacturer, the manufacturer's service partner, or a similarly qualified technician to avoid hazards.
- Warning: If the surface is damaged, switch off the appliance to avoid an electrical shock from live components on hobs made of glass ceramics or similar materials.
- Metal objects like knives, forks, spoons and lids should not be placed on the hob, since they may become hot.
- Steam cleaners may not be used.
- Do not use a steam cleaner to clean your hob.
- The appliance is not designed for operation via an external timer or separate remote control.
- WARNING: Fire hazard: Do not place objects on the cooking surface.
- The cooking process must be monitored. Even short cooking processes must be monitored continuously.
- WARNING: Cooking with grease or oil without monitoring the cooking process can be hazardous and may cause a fire. NEVER try to put out a fire using water; instead, switch off the appliance and cover the flames, for instance with a lid or fire blanket.
1.3 Operation and maintenance
1.3.1 Risk of electric shock
- Do not cook on a broken or damaged hob. If the cooking surface becomes broken or cracked, immediately switch off the appliance on the mains power (wall switch) and contact a qualified technician.
- Unplug the hob from the mains power before cleaning or maintaining it.
- Failure to observe this requirement may result in an electrical shock or even death.
1.3.2 Health hazards
- This appliance fulfils electromagnetic safety standards.
- Persons with pacemakers or other electrical implants (such as insulin pumps), however, must contact their doctor or the implant manufacturer before using this appliance, in order to ensure that their implant will not be affected by the electromagnetic field.
- Failure to observe this requirement may result in an electrical shock or death.
1.3.3 Danger due to hot surfaces
- Accessible parts of the appliance become so hot during operation that they can cause burns.
- Do not allow your body, clothing or other objects (except for suitable cookware) to come into contact with the hob until the surface has cooled.
- Keep your children away from the hob.
- The handles on cookware may become hot. Ensure that the handles of your cookware do not protrude over other cooking zones. Keep handles out of the reach of children.
- Failure to observe this information may result in burns or scalding.
1.3.4 Cutting hazard
- Removing the guard exposes the blade of the hob scraper, which is razor sharp. Use it with great caution, and always
store it in a safe location outside of the reach of children.
- Failure to take precautionary measures may result in injuries or cuts.
1.3.5 Important safety information
- Never leave the appliance unattended when in operation. If pots or pans boil over, this may cause smoke and grease spatter that could catch fire.
- Never use your appliance as a worktop or storage surface.
- Never leave objects or utensils on the appliance.
- Do not place magnetised objects (such as credit cards, memory cards) or electronic devices (such as computers, MP3 players) near the appliance, since they may be affected by its electromagnetic field.
- Never use your appliance to warm or heat a room.
- Always switch off the cooking zones and hob after use as described in this manual (e.g. using the touch operating elements). Do not rely on the pot detection feature to turn off the cooking zones.
- Do not allow children to play with, sit on, stand on or climb on the appliance.
- Do not place objects which may be of interest to children in cabinets above the appliance. Children who climb on the appliance may be severely injured.
- Do not leave children alone or unattended in the area where the appliance is in use.
- Children or persons with a disability that restricts their use of the appliance should be instructed in how to use the appliance by a responsible and competent person. This person should ensure that the child or person with disabilities can use the appliance without posing a danger to themselves or their surroundings.
- Do not repair or replace parts of the appliance, unless this is expressly recommended in the operating manual. All other maintenance work should be carried out by a qualified technician.
- Do not place heavy objects on the hob.
- Do not sit or stand on the hob.
- Do not use cookware with sharp edges. Do not drag
cookware across the hob, since it may scratch the glass.
- Do not use abrasives or other harsh cleaning agents to clean your cooking surface, since this may scratch the induction glass.
- This appliance is designed for household use and similar applications, such as: - Staff kitchens in companies, offices and other work environments; - farmhouses; - guests in hotels, motels and other inns or hostels; - facilities with overnight lodging and breakfast.
- WARNING: The appliance and its accessible parts become hot during use.
- Do not touch the heating elements.
- Children under 8 years of age must be monitored constantly or kept away from the appliance.
Congratulations on the purchase of your new ceramic hob.
Please read this manual / installation handbook thoroughly to understand how to install and operate your ceramic hob correctly. Please read the "Installation" section for installation.
Before using your hob, read all safety information carefully and store this operating and installation manual for later consultation.
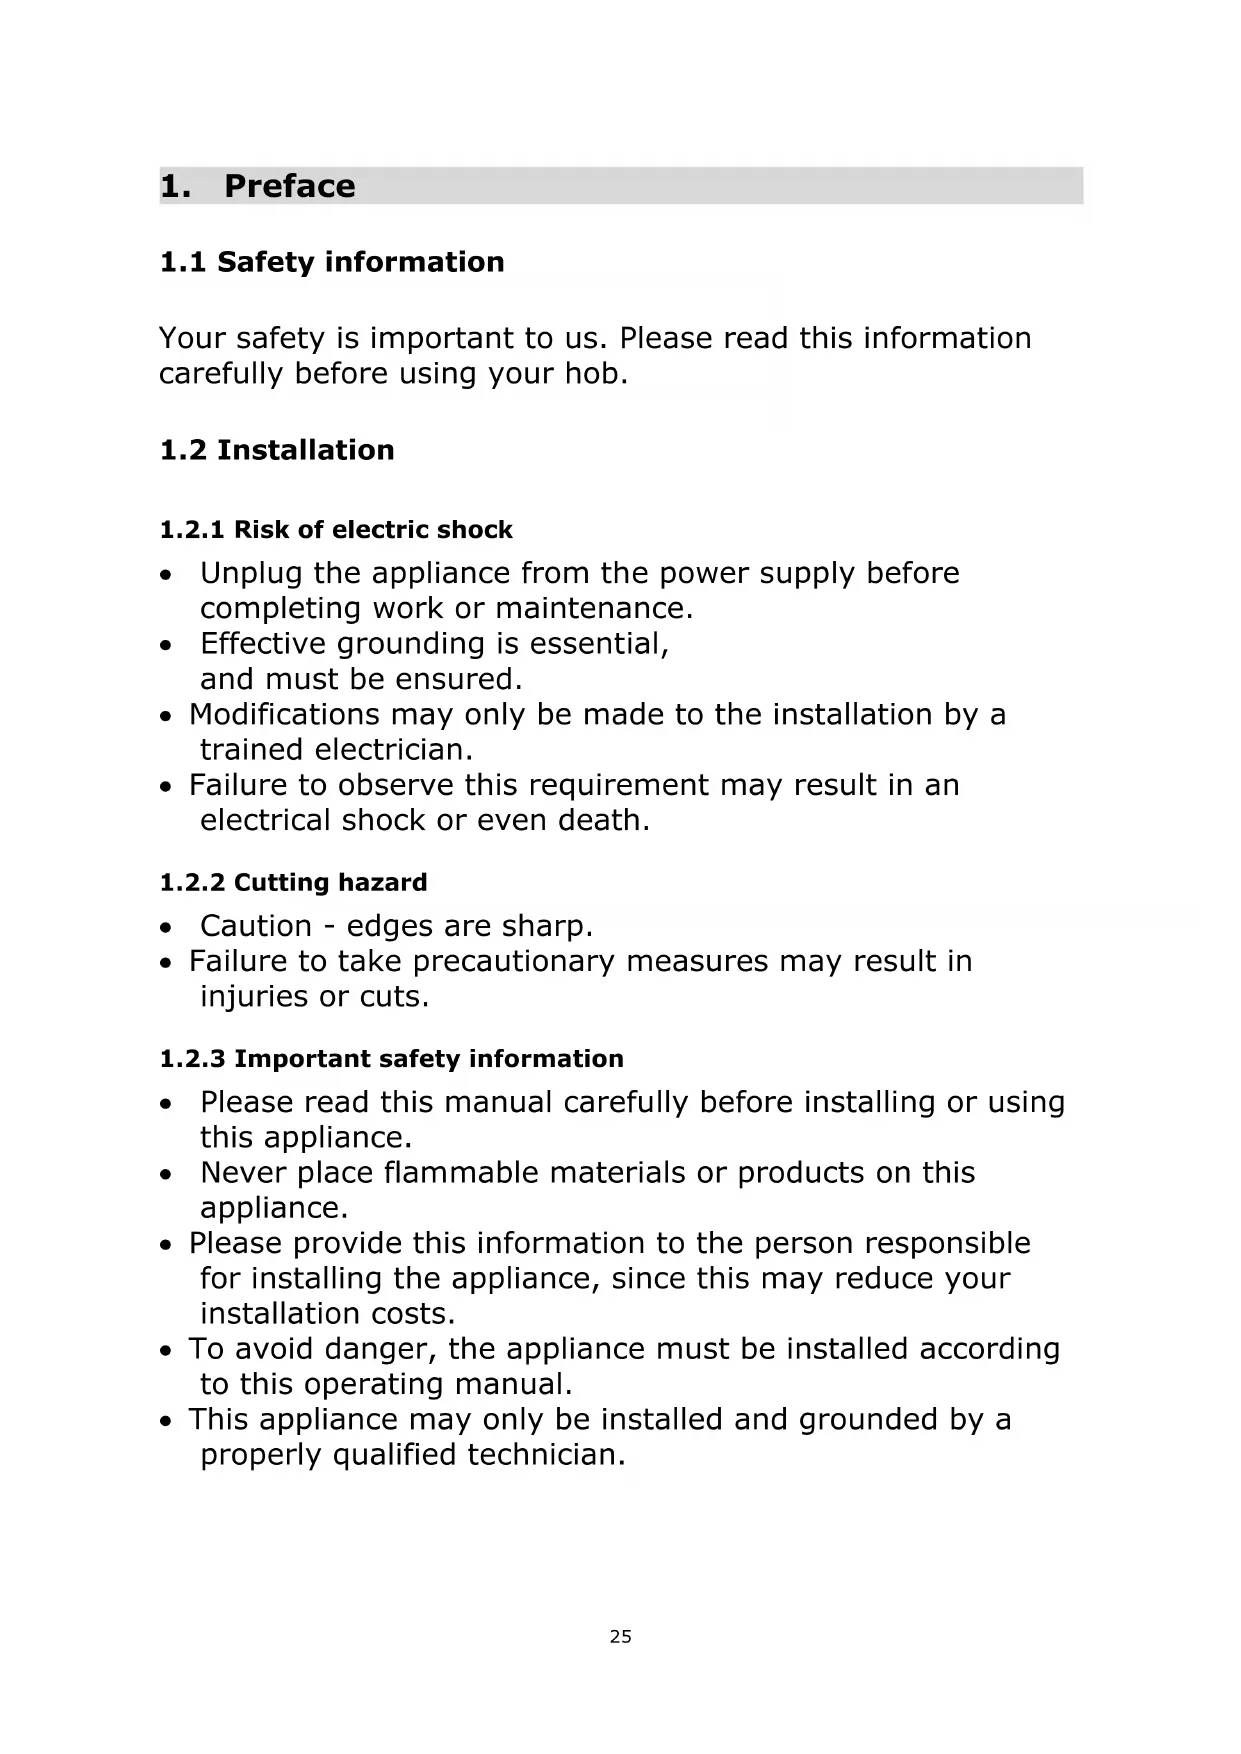
2. Introduction to the product
2.1 Top view
- Zone with max. 1800 W
- Zone with max. 1200 W
- Glass plate
- ON/OFF
- Operating panel
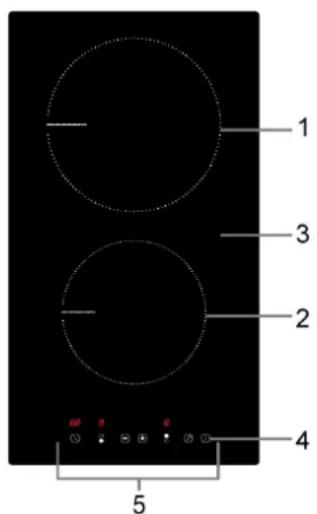
2.2 Operating panel
- ON/OFF control
- Power controller / timer setting
- Heating zone control
- Timer
- Button lock
2.3 Product information
Thanks to its resistance heating, its microcomputer-controlled operating panel and its different power levels, the ceramic hob can fulfil a variety of requirements in the kitchen. This makes it an excellent choice for the modern family.
The ceramic hob can be adapted to the individual customer's needs. The hob offers safe and reliable performance, allowing you to enjoy your life in full.
2.4 Functional principle
This ceramic hob uses resistance heating. The initial power can be adjusted using the touch operating elements.
2.5 Before using your new ceramic hob
- Read this manual and specifically observe the "Safety information" section.
- Remove the protective foil from your ceramic hob.
2.6 Technical specifications
| Hob | 5RZ34410 |
| Cooking zones | 2 zones |
| Supply voltage | 220-240V~ 50/60Hz |
| Electrical power | 3000 W |
| Product dimensions DxWxH (mm) | 288 X 520 X 55 |
| Installation dimensions AxB (mm) | 268 X 500 |
Weight and dimensions are approximate values. Since we are constantly working to improve our products, we may change specifications and designs without prior notification.
3. Operating the product
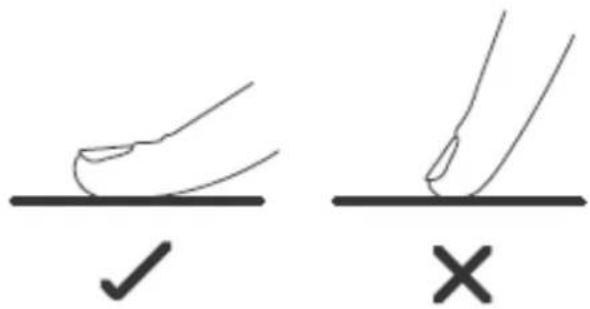
3.1 Touch operating elements
The operating elements react to your touch, so you do not need to use any pressure.
You will hear a beep each time a touch is registered.
- Ensure the operating elements are always clean and dry, and that they are never covered by other objects (such as dishes or a towel). Even a thin film of water may make operation more difficult.
3.2 Selecting the right cookware
Do not use cookware with sharp edges or a curved base.
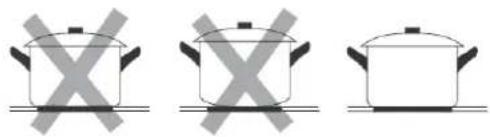
Ensure the base of your cookware is straight, lies flat on the glass, and is the same size as the cooking zone. Always centre your cookware over the cooking zone.
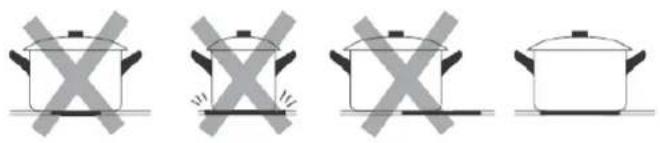
Always lift the cookware from the ceramic hob. Do not push it over the hob, as it may scratch the glass.

3.3 Use
3.3.1 Starting cooking
After switching on the appliance, you will hear one beep, and all displays will be illuminated for 1 second and then go out, indicating that the ceramic hob has switched to Standby mode.
| Touch the ON/OFF controller. All displays will show "-". | |
| Place a suitable pot or pan on the cooking zone you would like to use. • Ensure the base of the cookware and surface of the cooking zone are clean and dry. | |
| Touch the cooking zone controller. | |
| Select a temperature setting by touching the "-" or "+" controls. • If you do not select a temperature setting within 1 minute, the ceramic hob will switch off automatically. In this case, you will have to start over with step 1. • You can change the temperature setting at any time during the cooking process. • If you have pressed one of these buttons, the value will be adjusted up or down. |
3.3.2 Finishing cooking
| Touch the controller for the cooking zone you would like to switch off. | 6 |
| Switch off the cooking zone by scrolling down to "0" or touching the "--" and "+" controls at the same time. | OR |
| Switch off the entire hob by touching the ON/OFF button. | 1 |

Caution: hot surfaces
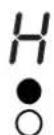
"H" indicates which cooking zones are too hot to touch. The "H" disappears once the surface cools down to a safe temperature. This can also be used as an energy saving function if you would like to keep pots or pans warm. In this case, you can use the cooking zone which is still warm.


3.3.3 Locking the operating elements
You can lock the operating elements against accidental activation (such as by children accidentally switching on the cooking zones).
- When operating elements are locked, all elements except for the ON/OFF controller are deactivated.
| Lock operating elements | |
| Touch the button lock. The timer will display "Lo". | |
| Unlock operating elements | |
| Ensure the hob is switched on.Hold down the button lock briefly. |

When the hob is locked, all operating elements except for the ON/OFF switch are deactivated. You can switch off the hob using the ON/OFF switch in an emergency at any time, but you must unlock it as a next step.
3.3.4 Timer
You can use the timer in two ways:
a) As a minutes display. In this case, the timer will not switch off a cooking zone once the set time has expired.
b) You can set one or more cooking zones to switch off after the set time.
The maximum time for the timer is 99 minutes.
Using the timer as a minutes display
If you do not select a cooking zone
| Ensure the hob is switched on. Note: You can also use the minutes display if you do not select a cooking zone. | |
| Touch the timer. It will start flashing. Set the timer by touching “-” or “+”. The minutes display will start flashing and appear on the timer display. | |
| If you touch “+” and “-” at the same time, the timer will be cancelled and “--” will appear on the minutes display. | |
| Once the time is set, it will start to run immediately. The remaining time will appear on the display, and the timer display will flash for 5 seconds. | |
| A beep will sound for 30 seconds and the timer will display“- - ” once the set time has expired. | -- |
Note:
a) Touch the " - " or " + " controller on the timer once to reduce or increase it by one minute.
a) Hold down the " - " or " + " controller on the timer to reduce or increase it by 10 minutes.
c) If the set time exceeds 99 minutes, the timer will automatically reset to 0 minutes.
b) Setting the timer to switch off one or more cooking zones
| Set a cooking zone | |
| Touch the zone you would like to set. | 6 |
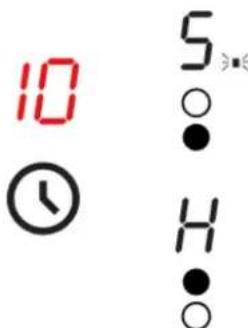
| Touch the time controller. The time display will show "10". | 10 |
| Set the time by touching the“-”or“+” controller of the timer. | - + |
| If you touch“+”and“-”at the same time, the timer will be cancelled and“-”will appear on the minutes display. | - - |
| Once the time is set, it will start to run immediately. The remaining time will appear on the display, and the timer will flash for 5 seconds. | ÷17÷ |
| After the cook time has expired, the selected cooking zone will automatically switch off. | - |
| ● | |
| ○ | |
Setting the timer to switch off more than one cooking zone
a). If more than one cooking zone uses this function, the timer will display the shortest time.
(e.g. Zone 1: Set time of 5 minutes, Zone 2: Set time of 15 minutes, the timer display shows "5".)
NOTE: The red dot beside the power controller flashes.
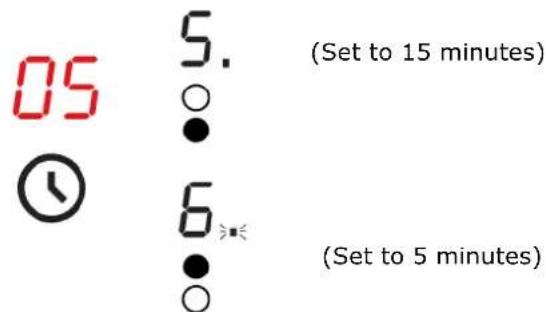
b). After the timer runs out, the selected zone will switch off. Then the new minute timer will be displayed and the dot for the set zone will flash.
c). After the cook time has expired, the selected cooking zone will automatically switch off.
Note:
d) The red dot beside the power controller will light up to indicate that the zone is selected.


e) If you would like to change the time once again after setting the timer, you must begin with step 1.
f) The process for setting two zones is the same as described above.
3.3.5 Excess temperature protection
A temperature sensor monitors the temperature inside the ceramic hob.
If the temperature is found to be too high, the ceramic hob automatically stops operating.
3.3.6 Residual heat warning
When the hob has been in operation for some time, it will generate residual heat. The letter "H" appears to warn you of this residual heat.
3.3.7 Standard operating times
Another safety function the hob offers is automatic shutdown. The hob shuts off automatically if you forget to switch off a cooking zone. The standard shutdown times are listed in the following table:
| Power level | 1 | 2 | 3 | 4 | 5 | 6 | 7 | 8 | 9 |
| Standard working time (in hours) | 8 | 8 | 8 | 4 | 4 | 4 | 2 | 2 | 2 |
4. Notes on cooking

Be careful when frying foods, since oil and grease can heat up very quickly, especially if you use PowerBoost mode. At extremely high temperatures, oil and grease will spontaneously combust, creating a serious fire hazard.
4.1 Cooking tips
Once food in a pot or pan is boiling, reduce the temperature setting.
If you use a lid, this will shorten cooking times and save energy, since the lid holds in heat.
- Minimise your quantity of liquid or grease to shorten cooking times.
- Start cooking on a high level, and reduce the heat once food is warmed through.
4.1.1 Simmering, cooking rice
- Food simmers below the boiling point, at around 85^ , when bubbles only reach the surface of the liquid occasionally. This method can be used to cook delicious soups and stews, allowing the aroma to develop slowly and avoiding overcooking the food. You should also cook egg-based sauces and thickened sauces under the boiling point.
- Some tasks, like cooking rice using the absorption method, may require a slightly higher setting so that food can be cooked within the recommended time.
4.1.2 Searing steaks
To sear juicy, delicious steaks:
- Let the meat sit at room temperature for approx. 20 minutes before cooking.
- Heat up a heavy pan.
- Coat both sides of the steak with oil. Add a small amount of oil to the hot pan, then place the meat in the pan.
- Turn the steak only once during searing. The exact time required to sear the steak will depend on its thickness and on how well done you would like it to be. Times may range from approx. 2 - 8 minutes per side. Press on the steak to see how well cooked it is. The firmer it feels, the more the meat is cooked through.
- Let the steak rest on a warm plate for several minutes before serving it.
4.1.3 Stir-frying
- Choose a wok with a flat base that is compatible with ceramic hobs, or a large frying pan.
- Get all of your ingredients and equipment ready. You should stir-fry the food quickly. If you are cooking a large quantity of food, cook dishes in several smaller portions.
- Heat the pan up briefly and add two tablespoons of oil.
- First, fry the meat. Then set it aside and keep it warm.
- Stir-fry the vegetables. Once vegetables are hot but still crispy, turn down the cooking zone power to a lower level. Add the meat back to the pan, then the sauce.
- Stir the ingredients carefully to warm them through.
- Serve the dish immediately.
5. Temperature settings
The following settings are only approximate values. The exact setting will depend on multiple factors, including your cookware and the quantity of food you are cooking. Experiment with your ceramic hob to find the settings that best meet your needs.
| Temperature settings | Suitable for |
| 1 - 2 | • carefully warming small amounts of food • melting chocolate, butter and foods that burn quickly • careful simmering • slow warming |
| 3 - 4 | • warming • quick simmering • cooking rice |
| 5 - 6 | • pancakes |
| 7 - 8 | • sautéing • cooking noodles |
| 9 | • stir-frying • searing • bringing soup to a boil • boiling water |
6. Care and cleaning
| What? | How? | Important note! |
| Everyday contamination on the glass (fingerprints, traces and spots of food, or contamination that does not contain sugar) | 1. Switch off the power supply to the hob. 2. Apply a hob cleaner while the glass is still warm (but not hot!). 3. Wipe an dry the glass with a clean dish towel or paper towel. 4. Switch the power supply to the hob back on. | ·If the power supply to the hob has been switched off, the indicator “Hot surface” may not be displayed, but the cooking zone may still be hot! Be extremely careful. ·Steel wool, some nylon scouring pads and abrasive cleaning agents can scratch the glass. Always read the label to check whether your cleaner or scouring pad is suitable. ·Never leave cleaning residue on the hob: This may create spots on the glass. |
| Burnt-on grease, melted foods and liquids containing sugar on the glass | Remove these immediately with a scraper, spatula or razor blade scraper suitable for glass ceramic hobs. Caution with hot cooking zones: 1. Switch off the power supply to the hob. 2. Hold the blade or device at a 30° angle and scratch the dirt to a cool area of the hob. 3. Clean the dirt with a dish towel or paper towel. 4. Complete steps 2 through 4 for “Everyday contamination on glass”. | ·Remove spots of melted and sugary foods as quickly as possible. If these cool on the glass, they can be difficult to remove or even permanently damage the glass surface. ·Cutting hazard: Removing the safety guard exposes the blade of the hob scraper, which is razor sharp. Use the hob scraper with great caution, and always store it in a safe location outside of the reach of children. |
| Contamination on touch operating elements | 1. Switch off the power supply to the hob. 2. Wipe the contamination off. 3. Wipe the touch operating elements with a clean, moist sponge or cloth. 4. Wipe the surface with a paper towel until it is completely dry. 5. Switch the power supply to the hob back on. | ·The hob may beep and turn itself off. The touch operating elements also may not work as long as there is liquid on them. Ensure the touch area is wiped dry before switching the hob back on. |
7. Tips and tricks
| Problem | Possible causes | What to do |
| The hob cannot be switched on. | No power. | Ensure the ceramic hob is connected to the mains power and switched on. Check whether there is a power outage at your house or in your area. If you have checked everything and the problem still persists, call a qualified technician. |
| The touch operating elements do not react. | The touch operating elements are locked. | Unlock the operating elements. See the section “Using your ceramic hob” for more information. |
| The touch operating elements are difficult to operate. | There may be a slight film of water on the operating elements or you may be using your entire fingertip to touch the operating elements. | Ensure the touch operating elements area is dry and that you are only using the very end of your finger to operate the touch operating elements. |
| The glass is scratched. | Cookware with sharp edges. Inappropriate, abrasive pot cleaners or cleaning agents were used. | Use cookware with a flat, smooth base. See “Selecting the right cookware”. See “Care and cleaning”. |
| Some pans make crackling or clicking noises. | This may be due to the structure of your cookware (layers of different metals vibrate at different frequencies). | This is normal for this type of cookware and does not indicate a fault. |
8. Installation
8.1 Selecting installation accessories
- Cut out the worktop using the dimensions indicated in the drawing. Leave a gap of at least 50mm around the cut-out for the purpose of installation and use.
Ensure the worktop is at least 30~mm thick. To avoid an electrical shock and major deformation due to heat radiating from the hot hob, only use non-conductive, heat resistant work surface materials (wood and similar fibrous or hygroscopic materials may only be used as worktop materials if they are impregnated). As shown in the following:

Note: The safety distance between the sides of the hob and insides of the worktop should be at least 3 mm.
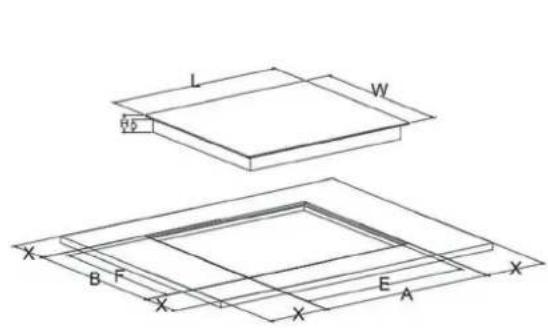
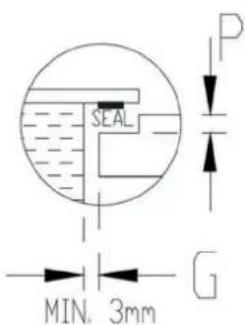
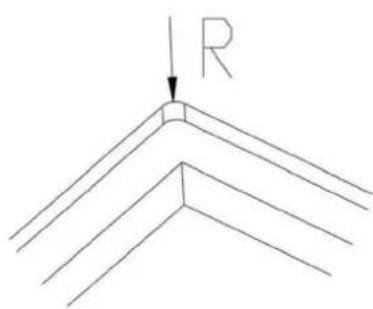
| L W E F H D A B X P R | ||||||||||
| 288mm | 520mm | 268mm | 500mm | 65mm | 61mm | 292(+1/0)mm | 524(+1-0)mm | Min. 50mm | 5.5mm | 7mm |
Always ensure that the ceramic hob is well ventilated, and that air inlets and outlets are not blocked. Ensure the ceramic hob is in proper operation condition without faults. As shown in the following:

Note: The safety distance specified by the hood manufacturer must be observed between the appliance and an exhaust hood installed above it. Please observe the instructions of the hood manufacturer.
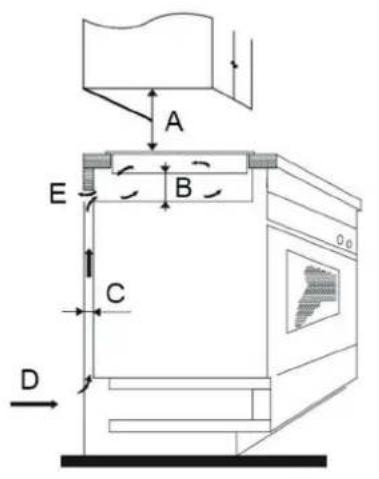
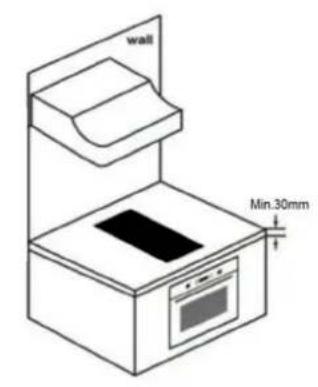
| A (mm) B (mm) C (mm) D E | ||||
| check with the hood manufacturer | min. 50 | min. 20 | Air inlet | 550 x 30mm |
WARNING: ensure sufficient ventilation
Ensure that the ceramic hob is well ventilated, and that air inlets and outlets are not blocked. To prevent accidentally touching the hot base of the hob or an unexpected electrical shock during use, install an insert via screws at least 10mm from the base of the hob.

Ventilation openings are distributed across the outside of the hob. These may NEVER be blocked by the worktop after inserting the hob.

Please note that the glue used to join wood or plastic in your furnishings must withstand temperatures of at least 150^ . Otherwise, there is a danger that layers may separate.
Therefore, the rear wall and adjacent and surrounding surfaces must also withstand 90^ temperatures.
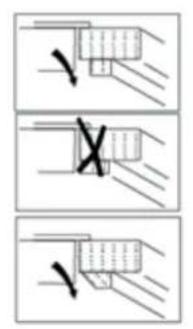
8.2 Before positioning the attachment bracket
Place the unit on a sturdy, even surface (use the packaging). Do not exercise force on the operating elements which protrude from the hob.
Mount the hob on the worktop by screwing four brackets onto the base of the hob after installation (cf. image). When positioning the attachment brackets, note the different thicknesses of the worktops.

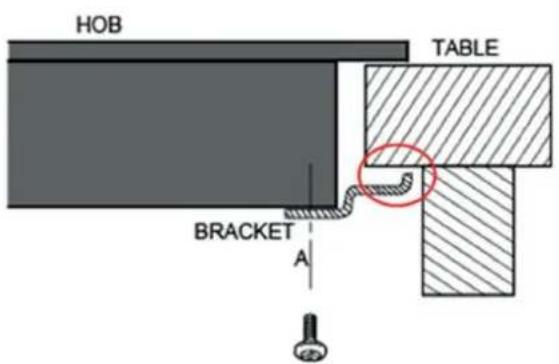
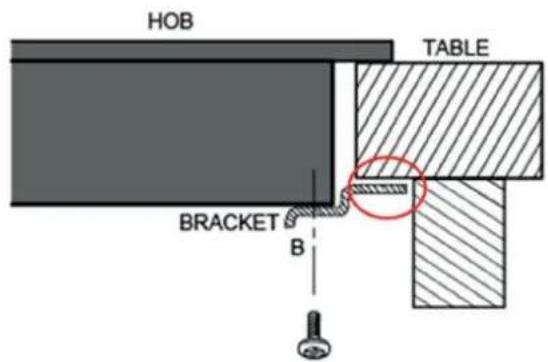
Never allow the attachment brackets to touch the insides of the worktop after installation (cf. image).
8.3 Precautionary measures
- The ceramic hob must be installed by qualified personnel or a technician. We can provide you with the names of suitable technicians. Please never complete this work yourself.
- The ceramic hob may not be mounted beside refrigerators, dishwashers or rotary dryers.
- The ceramic hob must be installed so that heat radiation is ensured, guaranteeing its reliability.
- The wall and heating zone above the worktop must be able to withstand the heat.
- To avoid damage, the sandwich layer and glue must be heat resistant.
- Steam cleaners may not be used.
- This ceramic hob may only be connected to a power supply with an impedance of 0.427 Ohm. Contact your utility company if necessary for more information on impedance.
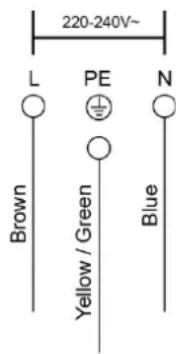
8.4 Connecting the hob to the mains power
The appliance should be connected to the power supply according to the relevant standards or using a single pole disconnector. The connection is illustrated in the following.
- If the cable is damaged or needs to be replaced, this should be handled by a customer service technician with the correct tools, to avoid accidents.
- If the appliance is connected directly to mains power, a single pole disconnector must be installed with a minimum distance of 3mm between the contacts.
- The technician must ensure that the electrical installation is completed correctly and that safety regulations are observed.
- The cable may not be bent or compressed.
- The cable must be checked regularly and may only be replaced by a qualified individual.
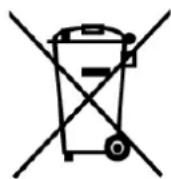

DISPOSAL: The appliance may never be disposed of with household garbage. Instead, it must be delivered for separate processing.
This appliance is labelled in accordance with European directive 2012/19/EC for Waste Electrical and Electronic Equipment (WEEE). When you ensure this appliance is disposed of properly, you help avoid potential damage to the environment and to human health that could occur if it was disposed of improperly.
The symbol on the product indicates that it may not be treated like regular household garbage. It should be delivered to a collection point which recycles electrical and electronic equipment.
This appliance requires proper disposal. For further information on handling, recovery and recycling of this product, please contact your local government, your household garbage disposal company or the company where you purchased the appliance.
For further information on handling, recovery and recycling of this product, please contact your local government, your household garbage disposal company or the company where you purchased the product.
Table des matieres
1. Préambule 47
Attention aux surfaces chaudes

- Introduction to the product 29
- Operating the product 31
- Notes on cooking 37
- Temperature settings 38
- Care and cleaning 39
- Tips and tricks 40
- Installation 41
- Preface
- Safety information
- Installation
- Risk of electric shock
- Cutting hazard
- Important safety information
- Operation and maintenance
- Risk of electric shock
- Health hazards
- Danger due to hot surfaces
- Cutting hazard
- Important safety information
- Introduction to the product
- Top view
- Operating panel
- Product information
- Functional principle
- Before using your new ceramic hob
- Technical specifications
- Operating the product
- Touch operating elements
- Selecting the right cookware
- Use
- Starting cooking
- Finishing cooking
- Caution: hot surfaces
- Locking the operating elements
- Timer
- Using the timer as a minutes display
- If you do not select a cooking zone
- Note:
- b) Setting the timer to switch off one or more cooking zones
- Setting the timer to switch off more than one cooking zone
- Excess temperature protection
- Residual heat warning
- Standard operating times
- Notes on cooking
- Cooking tips
- Simmering, cooking rice
- Searing steaks
- Stir-frying
- Temperature settings
- Care and cleaning
- Tips and tricks
- Installation
- Selecting installation accessories
- WARNING: ensure sufficient ventilation
- Before positioning the attachment bracket
- Precautionary measures
- Connecting the hob to the mains power
- Table des matieres
- Préambule 47
- Attention aux surfaces chaudes
Brand : BLAUPUNKT
Model : 5RZ34410
Category : Cooker