
DVR 410 - Surveillance Camera SWANN - Free user manual and instructions
Find the device manual for free DVR 410 SWANN in PDF.

| Brand | Swann |
| Model | DVR 410 (RemoteCam) |
| Product Type | Miniature surveillance camera / digital recorder |
| Dimensions | 50 mm x 30 mm x 13 mm |
| Weight | Approximately 30 g |
| Power Supply | Built-in rechargeable lithium-ion battery |
| Charging Method | USB via included mini-USB cable |
| Charging Time | 3 to 4 hours |
| Recording Autonomy | Approximately 60 minutes |
| Video Resolution | 720 x 480 pixels |
| Photo Resolution | 1280 x 1024 pixels (interpolated) |
| Video Format | AVI |
| Photo Format | JPEG |
| Audio Sensor | Built-in microphone (range ~3 m) |
| Storage | microSD card (up to 8 GB) |
| Interface | USB 2.0 (mini-USB) |
| Functions | Video recording, photo capture, webcam |
| Recording Mode | Manual (button) |
| Frame Rate | 30 fps |
| Date/Time Setting | Via settime.txt text file on SD card |
| Auto Shutdown | After 35 seconds of inactivity |
| Maintenance | Clean the lens with alcohol and special cloth |
| Warranty | 1 year (parts and labor) |
| Phone Support (USA) | 1-800-627-2799 (hours vary) |
Frequently Asked Questions - DVR 410 SWANN
YYYY.MM.DD HH.MM.SS (e.g., 2009.12.04 09.33.20), copy it to the microSD card, then turn on the device. The date and time will appear as a watermark on the videos.User questions about DVR 410 SWANN
0 question about this device. Answer the ones you know or ask your own.
Ask a new question about this device
Download the instructions for your Surveillance Camera in PDF format for free! Find your manual DVR 410 - SWANN and take your electronic device back in hand. On this page are published all the documents necessary for the use of your device. DVR 410 by SWANN.
USER MANUAL DVR 410 SWANN
NOTE: This equipment has been tested and found to comply with the limits for Class B digital device, pursuant to part 15 of the FCC Rules. These limits are designed to provide reasonable protection against harmful interference in a residential installation. This equipment generates, uses and can radiate radio frequency energy and, if not installed and used in accordance with the instructions, may cause harmful interference to radio or television reception, which can be determined by turning the equipment off and on, the user is encouraged to try to correct the interference by one or more of the following measures:
- Reorient or relocate the receiving antenna
· Increase the separation between the equipment and the receiver - Connect the equipment into an outlet on a circuit different from that to which the receiver is connected
- Consult the dealer or an experienced radio/TV technician for help
IMPORTANT NOTE: Prohibition against eavesdropping
Except for the operations of law enforcement officers conducted under lawful authority, no person shall use, either directly or indirectly, a device operated pursuant to the provisions of this Part for the purpose of overhearing or recording the private conversations of others unless such use is authorized by all of the parties engaging in the conversation.
■ WARNING: Modifications not approved by the party responsible for compliance could void user's authority to operate the equipment.
Table of Contents
Before You Begin 2
Table of Contents 3
Package Contents 3
Overview 4
Operating Guidelines 5
Before Using the RemoteCam 5
Layout 6
Turning on the RemoteCam 8
Operating the RemoteCam 9
Setting the Date and Time 1 0
Shooting Guide 1 1
Connecting to your PC 1 2
Using the RemoteCam as a WebCam 13
Troubleshooting 1 4
Technical Specifications 1 5
Technical Support / Warranty Information Rear Cover
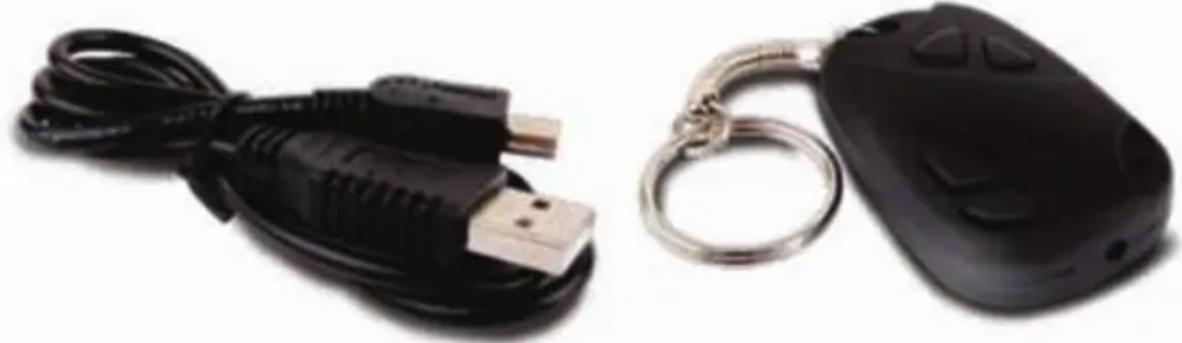
Package Contents
RemoteCam Video Recorder
USB 2.0 Cable
Overview
Congratulations on your purchase of the RemoteCam, a miniature self-contained digital video recorder which, as the name suggests, looks like a remote control. With an included rechargeable lithium-ion battery which will give up an hour of recording time and recording video directly to microSD card, the RemoteCam is a convenient and adaptable camera/recorder, with as many applications as you can imagine for it.
The RemoteCam is an ideal solution for covert surveillance (see the Note Regarding Law below before engaging in this) as well as a very convenient solution for people who feel like they never have a camera on-hand when they need one. Feeling like a spy is a bonus.
IMPORTANT - A Note Regarding Law
As noted on the inside cover in the 'Prohibition Against Eavesdropping' section, the use of covert recording equipment is illegal in many countries and localities. In some areas, the law only relates to public spaces, whilst in others it extends to private spaces also. The laws regarding video recording and audio recording can differ as well - sometimes dramatically.
The RemoteCam is used on the condition that you, the user, research the law as it applies to you in your locality. Make sure you know the law and thoroughly follow it whilst using the RemoteCam or any other recording device. If the legality of recording is at all ambiguous, we strongly suggest obtaining the express permission of your subjects to do so.
Operating Guidelines
These are just a couple of points to keep in mind whilst using the RemoteCam:
- Do not point the RemoteCam towards exceedingly bright light sources such as the sun, high-powered headlights or stadium lights. The bright light may damage the image sensor, either leaving a permanent 'shadow' on your videos where the light source has damaged the sensor, or rendering the sensor completely inoperable.
- Avoid adverse weather conditions. Excessive heat (direct or ambient) and moisture (such as rain or humidity) will cause the RemoteCam to behave erratically or not work at all.
- Do not dispose of in fire. When exposed to significant heat lithium-ion batteries can explode. That, and burning plastic isn't particularly kind to the environment.
- The small lens on the RemoteCam can be difficult to clean. Rather than having to clean it, avoiding dusty or dirty environments is preferable. It also helps if you clean the lint out of your pockets, as this tends to get lodged in the lens cavity.
- If the lens does become dirty, clean with cleaning alcohol and/or a specialized lens cleaning cloth (these are available from all good camera stores).
- Follow proper disposal guidelines in your locality if you intend to dispose of the RemoteCam. Many localities have strict guidelines as to the disposal of electronic items, particularly those with built-in rechargeable batteries.
Before Using the RemoteCam
The RemoteCam has a built-in lithium ion battery (the same sort of battery as most mobile phones use, only smaller). We charge them up before we send them out - however, due to time in transit, you'll need to top it up before using it.
To charge the RemoteCam:
Locate the mini-USB port on the side of the 1. RemoteCam.
Using the supplied USB-A to Mini-USB-A cable, attach the 2. RemoteCam to a spare USB port on your computer, or to a stand-alone USB charger.
Whilst charging the orange LED will ash.3.
The RemoteCam takes 3 4 hours to achieve a full charge. It is important to 4. leave it for the full duration, particularly during the first charge. You can just leave it plugged into the USB power - it'll stop charging once it's full.
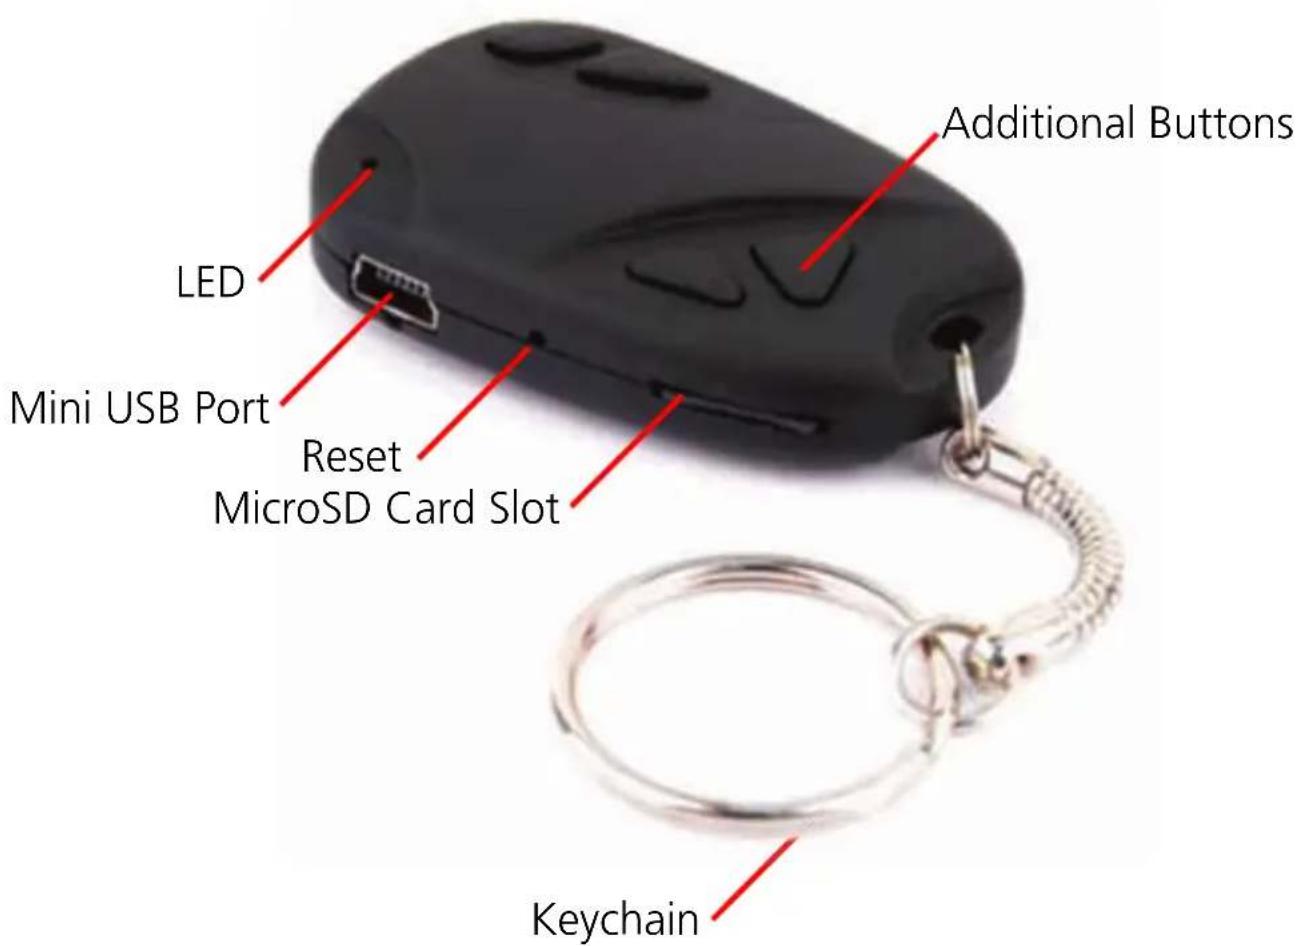
LED: A small orange light which will indicate the current state and function of the RemoteCam. In bright light (such as sunlight) this might be difficult to see.
Mini USB Port: A Mini-USB-A port. Use the supplied USB cable to attach the RemoteCam to a computer or USB charger.
Reset Button: Used to quickly return the RemoteCam to it's initial booted state. This is typically used only if the RemoteCam freezes and needs to be reset.
MicroSD Card Slot: The slot for inserting the microSD card which the RemoteCam records to. To insert a card, simply push it into the slot. To remove it, push it in again, and it will 'pop' right out. Pictured with microSD card inserted.
Keychain: Used to attach keys. Adds to the concealability of the camera, as remote controls for cars or garage doors are commonplace on keychains.
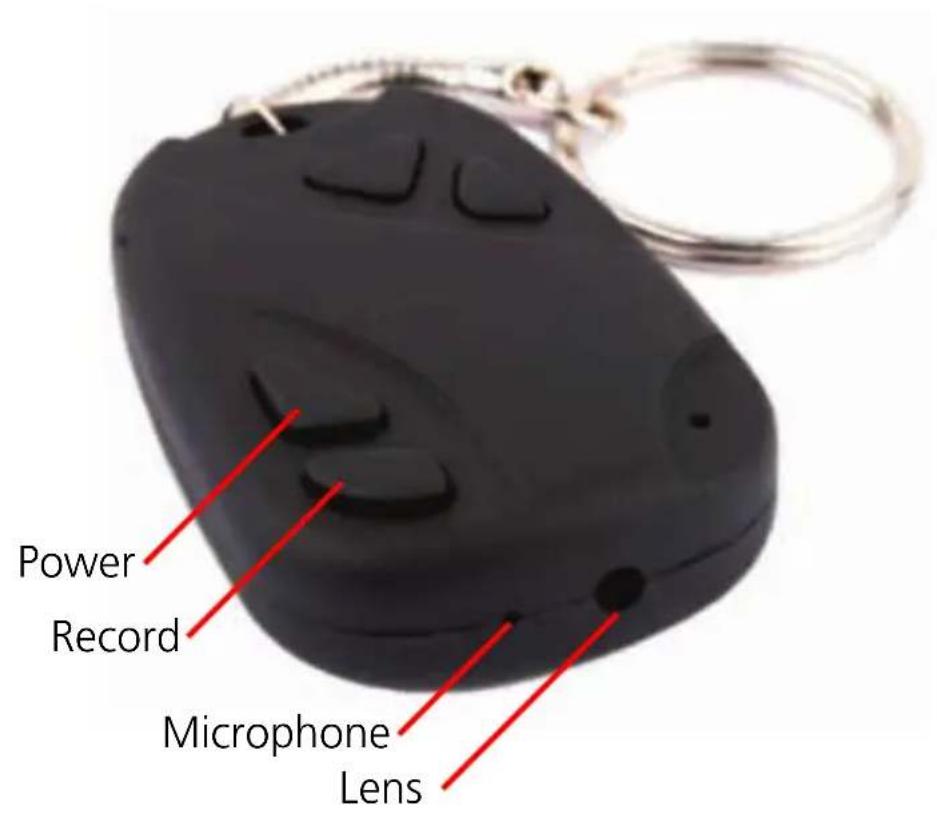
Power: Press to turn the RemoteCam on and off. Do not turn off the RemoteCam whilst recording, or immediately after recording.
Record: Starts and stops the RemoteCam recording. Press quickly to take a photograph. Press and hold to start recording video, and press again to stop.
Microphone: The device which records sound. If this hole is blocked, then the range and quality of the audio recording will be significantly reduced.
Lens: The business-end of the camera, used to focus light on to the image sensor. For best results, ensure the lens is clean and free from debris.
Additional Buttons: The RemoteCam only needs two buttons to operate - however, the majority of remote controls have more than two buttons! To keep up the illusion, we included these two additional buttons. They're just there for looks, and won't do anything at all.
To turn the RemoteCam ON:
Press and hold the Power Button for approximately one second.
- The LED will turn on, indicating that the RemoteCam is now turned on.
To turn the RemoteCam OFF:
Press the Power button for approximately two seconds.
- Do NOT turn the RemoteCam off whilst recording video, or immediately after recording video.
- The RemoteCam needs several seconds after stopping a recording to write the video the microSD card - turning the RemoteCam off during the writing to card process will corrupt the data, and render the video file unusable.
Automatic Shutdown:
To conserve battery power, the RemoteCam will automatically shut itself down after 35 seconds of inactivity. If you want to continue using the RemoteCam after this time, simply turn it on again as detailed above.
Important Notes:
- When you stop a recording, it takes several seconds for the RemoteCam to write video data to the microSD card. If the Record/Stop button is pressed again or the power is turned off whilst the RemoteCam is writing data to the microSD card then the video data may be corrupted, resulting in either an corrupt file or corrupted file structure on the microSD card. If this happens, the video quality will be greatly reduced, if the file works at all.
See the Shooting Guide (page 11) for more information.
Resetting the RemoteCam:
Occasionally, particularly during long periods of constant use, the RemoteCam may freeze and stop working correctly. If this happens, the RemoteCam needs to be reset.
To reset the RemoteCam:
- Locate the Reset button, located immediately below the microSD card slot.
- Using a thin (not sharp!) object such as an unfolded paper clip or hair pin, press and hold the Reset button for approximately one second.
- Wait whilst the RemoteCam resets. The procedure is the same as when it is first turned on.
- Once you've reset the RemoteCam, you'll need to set the Time & Date again.
Operating the RemoteCam
To Capture a Photograph:
When you use the RemoteCam to take a photograph, you'll be capturing a single image at the highest quality that the RemoteCam can deliver (1280 x 1024 pixels, the resolution of a mid-level LCD computer monitor). Taking a photo takes approximately two to three seconds as the RemoteCam processes the data.
Each photo is approximately 350KB in size (about 0.35MB). This means that, if you have a 1GB microSD card in the RemoteCam, it would take slightly more than 2000 photographs to fill (less if there is also video or other data on the card).
Turn the RemoteCam on.
- Wait several seconds for the RemoteCam to properly initialize.
Press the record button once.
The RemoteCam will take a single photograph.
While the image is being recorded, the light will go out for a moment, then come back on.
When the light comes back on, the process has been completed, and your photograph has been saved.
To Capture Video:
Once the RemoteCam start shooting video, it will continue to do so until you press stop, the microSD card fills up or the battery runs out - whichever comes first. Whilst recording video, the LED will no longer be lit - this is intended to complement the stealth of the design.
Each minute of video captured requires up to 100MB of space. This means that a 1GB microSD card can store slightly more than 10 minutes of video.
Turn the RemoteCam on.
- Wait several seconds for the RemoteCam to properly initialize.
- When the yellow light comes on, the RemoteCam is ready to record.
To start recording video, press and hold the Record/Stop button until the LED ashes quickly, then goes out.
Whilst video is being recorded, the yellow light will go out.
To stop the recording, press the Record/Stop button. The yellow light will come back on when the saving process is complete.
Setting the Date and Time
You can setup the RemoteCam to print the date and time that a recording was taken directly onto the video, like a watermark. To enable this function, you'll just need to set the time and date - the RemoteCam will keep track of it from there.
To set the Date and Time:
- Open Notepad. It's usually located in the Accessories folder in the Start Menu (assuming you're using Microsoft Windows®). If you don't have Notepad, any plain text editor will work fine (but not a word processor, and these do not create plain .txt files).
Write out the date and time, in the following format:
YYYY.MM.DD HH.MM.SS
So, if it was thirty-three minutes past nine in the morning on the fourth of December 2009, then the file would read:
2009.12.04 09.33.20
Save this file, naming it "settime.txt".
Copy this file to the microSD card.
- With the microSD card already inserted into RemoteCam, turn the RemoteCam ON.
- The RemoteCam will read the text in the file, and update it's internal clock to match the date and time as set by you.
Notes:
- The date and time will be updated to the RemoteCam's internal clock when it is turned on. Before this, the time will not be updated to 'keep up' with realtime. Thus, if you set the time accurately in the settime.txt file and copy it to the microSD card, but then leave it an hour before turning on the RemoteCam, the time stored in the RemoteCam will be one hour behind.
- You may need to reset the time (i.e. go through this procedure again) if the internal battery in the RemoteCam is completely drained of charge, or you reset the RemoteCam by pushing the Reset button.
Shooting Guide
Framing:
The RemoteCam has a fixed lens (a vari-focal lens would, simply, not fit) – so the size of subjects in your shots depends only on how close to the subject you hold the camera.
Typically, about 3 feet (1m) is about right if filming a shot of someone's face - this way, their face will occupy approximate half the vertical space in frame.
To get a whole person in frame (assuming they're approximately six feet tall) then you'll need to be about 10ft (3m) away from them.
Focus:
- The RemoteCam has a fixed focus lens, which means you'll never need to adjust focus.
The wide angled fixed lens will achieve focus within approximately 30cm (1½ • ft) from the lens, varying slightly depending on the amount of available light. It will hold focus to infinity.
Basically, keep everything more than two feet from the lens, and you'll have no worries!
Exposure:
The RemoteCam will adjust exposure automatically, varying its gain setting automatically, reacting to the amount of available light. There are a couple of things to bear in mind, however:
Shooting a dark subject in front of a bright background can cause the auto-exposure feature of the RemoteCam to become confused, and drop the exposure down so that the background is correctly exposed whilst the subject becomes a silhouette. Avoid brightly lit backgrounds, unless you want this effect.
- To decrease exposure, the RemoteCam shortens its electronic shutter speed, thus exposing each frame for a shorter time. This means that you'll get better high-speed photographic performance in bright light – useful for shooting fast events, like sports.
On the other hand, in low-light, each frame needs to be exposed longer to get enough light into the (very small) lens. This can be effect can be minor (such as shooting in a shopping mall or a stadium under lights) or particularly serious (in situations such as shooting under a street lamp).
The image quality, depth of field and exposure range will all improve dramatically as more light is available.
Tips & Tricks: Photography is an art - there is no right or wrong way to shoot. Practice really does make perfect - or, at least, better. The best way to get better results is just to keep using the RemoteCam. Besides, it's not like you'll be wasting film; just delete the old data off the microSD card now and then, and you'll be set!
Connecting to your PC
You can read the data on the microSD card in the RemoteCam by connecting the RemoteCam to your computer. To do this:
- Locate the mini-USB plug on the side of the RemoteCam.
Find a spare USB port on your computer....
For maximum speed, find a free USB 2.0 port on your computer, and avoid using USB extension cables or hubs.
Connect the spare USB port on your computer to the mini-USB port on the RemoteCam using the supplied USB 2.0 cable.
- The RemoteCam will be detected as a USB storage device, and can be accessed in the same way as you would any other USB ash drive.
- On this drive you will find a folder named "DCIM" - an acronym of Digital Camera IMages.
In this folder there are a series of folders, arranged chronologically, named 100MEDIA, 101MEDIA, 102MEDIA and so on. The number of folders depends on how many photos and videos you have taken with the RemoteCam.
These folders contain all the recordings (both photos and videos) captured by the RemoteCam in chronological order.
If it is more convenient you can use an SD card reader (either built into your PC or attached via USB) to access your pictures and video. To do so:
If necessary, attach the SD card reader to your PC.
- Remove the microSD card from the RemoteCam by pushing it in and releasing so that it pops out.
- Insert the microSD card into your SD card reader. You might need to use an SD-to-microSD card adaptor, if your card reader does not have a microSD card slot.
Using the RemoteCam as a WebCam
You can use the RemoteCam as a webcam. To do so, you'll need to grab the drivers from our website, and install them to your PC. Then, you just have to change the mode of the RemoteCam once it's connected to your PC.
Go to http://www.swannsecurity.com/downloads/drivers/
Open the folder called "RemoteCam".
Download and run the file named "SPCA1528_V2220_MultiLan_090217".
Follow the onscreen prompts. This program will install the drivers for the webcam. If you get any "User Account Control" messages, allow the installation to proceed (or the webcam functions won't work).
- Once the installation is completed, attach the RemoteCam to your computer as detailed above.
- When the computer detects the RemoteCam as an external storage device, press and hold the power button for one second.
- Your PC will automatically finalize installing the webcam.
- The RemoteCam will appear in lists of available video devices as "SPCA1528 Video Camera Device".
System Requirements for Webcam Functions:
Interface Type
Processor
RAM
Video Card
Hard Drive Space
Operating System(s)
USB 2.0
Pentium IV or above
1GB or greater
Intel 945 or greater
Minimum 1GB free
Microsoft Windows XP®
Microsoft Windows Vista®
Microsoft Windows 7®
The drivers for the webcam functions are not compatible with Mac-based systems. Windows is a trademark of Microsoft Corporation in the United States and other countries. Mac is a registered trademark in the United States and other countries.
Troubleshooting
Problem: I've recorded videos, but the microSD card seems to be blank.
Solution: Chances are that this problem is caused by turning the RemoteCam off before the video files have been properly saved to the microSD card. Always use the Rec/Pause button to stop recordings and waiting until the LED has come back on before turning the RemoteCam off.
Problem: The RemoteCam won't turn on.
Solution: The most likely culprit is the battery. Check out the instructions on page 5 regarding charging the battery. Try completely charging the battery. When doing so, avoid using a USB hub - some USB hubs will not provide a full 5V to attached devices and thus will not charge the battery properly. You can also charge the RemoteCam from a stand-alone USB charger.
Problem: My videos and pictures seem blurry.
Solution: If the lens becomes dirty or obstructed, this can cause the RemoteCam's videos to be distorted, soft and/or blurred. The lens on the RemoteCam is tiny - so even small particles of dust and grit can have a profound effect.
Problem: My videos seem too shaky.
Solutions: As a general rule, this usually indicates that the mount you've used for the camera (or arm, if you're shooting hand-held) needs to be more stable. Generally, this will occur if you are moving or travelling in a vehicle which is moving. Generally, you'll achieve the best results holding the RemoteCam with both hands in front of you, resting your elbows on your torso. That way, your body and both arms form a kind of rudimentary tripod, greatly steadying your videos.
Technical Specifications
Video
Video Format AVI
Video Resolution 720 x 480
Video Size Variable (avg. >10 000kbps)
Photo Format JPEG
Photo Resolution 1280 x 1024 (Interpolated)
Photo Size Approx. 350KB
Audio
Microphone Yes (built in)
Audio Range 3m (typical)
Recording
Recording Mode Manual
Frame Rate 30fps
Storage Type MicroSD Card
Storage Capacity Up to 8GB
Storage Time >10min/GB
General
Battery Type Rechargeable
Lithium-ion
Record Time per Charge 60 mins
Charging Method USB
Dimensions 2.0'' × 1.2'' × 0.5''
50mm x 30mm x 13mm
François
Vérification FCC
Specifications techniques 2
Informations de garantie 3 0
Photo Size approx. 350KB
Audio
Swann Communications USA Inc.
12636 Clark Street
Santa Fe Springs CA
90670
USA
Swann Communications
PTY.LTD. Building 4,650
Church Street,
Richmond, Victoria 3121
Australia
Arise-Europe
Raheen Business Park
Parse Road
Raheen, Limerick
Ireland
You can use the RemoteCam as a webcam. To do so, you'll need to grab the drivers from our website, and install them to your PC. Then, you just have to change the mode of the RemoteCam once it's connected to your PC.
Vaya a http://www.swannsecurity.com/downloads/drivers/
Abra la carpeta llamada "RemoteCam".
Swann Communications
USA Inc.
12636 Clark Street
Santa Fe Springs CA
90670
USA
Swann Communications
PTY.LTD. Building 4,650
Church Street,
Richmond, Victoria 3121
Australia
Arise-Europe
Raheen Business Park
Parse Road
Raheen, Limerick
Ireland
Helpdesk / Technical Support Details
Swann Technical Support
All Countries E-mail: tech@swannsecurity.com
Telephone Helpdesk
USA toll free
1-800-627-2799
(Su, 2pm-10pm US PT)
(M-Th, 6am-10pm US PT)
(F 6am-2pm US PT)
USA Exchange & Repairs
1-800-627-2799 (Option I)
(M-F, 9am-5pm US PT)
AUSTRALIA toll free
1300 138 324
(M 9am-5pm AUS ET)
(Tu-F I am-5pm AUS ET)
(Sa I am-9am AUS ET)
NEW ZEALAND toll free
0800479266
INTERNATIONAL
+61384124610
See http://www.worldtimeserver.com for information on time zones and the current time in Melbourne, Australia compared to your local time.
Warranty Information
Swann Communications
USA Inc.
12636 Clark Street
Santa Fe Springs CA
90670
USA
Swann Communications
PTY.LTD.Building4,650
Church Street,
Richmond, Victoria 3121
Australia
Arise-Europe
Raheen Business Park
Parse Road
Raheen, Limerick
Ireland
Swann Communications warrants this product against defects in workmanship and material for a period of one (I) year from its original purchase date. You must present your receipt as proof of date of purchase for warranty validation. Any unit which proves defective during the stated period will be repaired without charge for parts or labour or replaced at the sole discretion of Swann. The end user is responsible for all freight charges incurred to send the product to Swann's repair centres. The end user is responsible for all shipping costs incurred when shipping from and to any country other than the country of origin.
The warranty does not cover any incidental, accidental or consequential damages arising from the use of or the inability to use this product. Any costs associated with the fitting or removal of this product by a tradesman or other person or any other costs associated with its use are the responsibility of the end user. This warranty applies to the original purchaser of the product only and is not transferable to any third party. Unauthorized end user or third party modifications to any component or evidence of misuse or abuse of the device will render all warranties void.
By law some countries do not allow limitations on certain exclusions in this warranty. Where applicable by local laws, regulations and legal rights will take precedence.