
CoreCam - Surveillance Camera SWANN - Free user manual and instructions
Find the device manual for free CoreCam SWANN in PDF.

| Product Type | Wireless Surveillance Camera |
| Brand | Swann |
| Model | CoreCam |
| Power Supply | Rechargeable battery, charging via micro USB (DC5V, 2.1A recommended) |
| Battery Life | Up to 6 hours for full charge (charging time may vary) |
| Night Vision | Yes, with infrared LEDs |
| Motion Detection | PIR sensor (passive infrared) |
| Adjustable viewing angle | Yes, via adjustment ring |
| Connectivity | 2.4 GHz Wi-Fi |
| Internal Storage | 32 GB microSD card pre-installed |
| Maximum Storage | 128 GB (microSD card) |
| Mobile App | Swann Security (iOS and Android) |
| Audio | Built-in microphone and speaker |
| LED Indicator | Blue (charging, pairing), red (recording) |
| Mounting | Wall mount included, adjustable orientation |
| Compatible Network | 2.4 GHz Wi-Fi only |
| Certifications | Compliant with IC and EU (directive 2014/93/EU) |
| RF Safety Distance | 20 cm between antenna and body |
| Maintenance and Cleaning | Clean the lens with a soft, dry cloth. Close the rubber cap after use. |
Frequently Asked Questions - CoreCam SWANN
User questions about CoreCam SWANN
0 question about this device. Answer the ones you know or ask your own.
Ask a new question about this device
Download the instructions for your Surveillance Camera in PDF format for free! Find your manual CoreCam - SWANN and take your electronic device back in hand. On this page are published all the documents necessary for the use of your device. CoreCam by SWANN.
USER MANUAL CoreCam SWANN
text_image
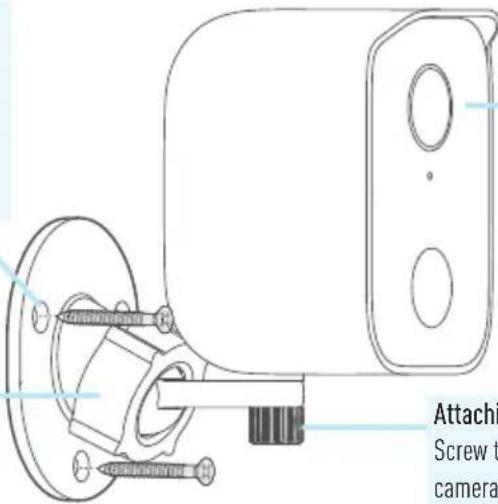
Infrared LEDs (for night vision) Microphone Night detection sensor Passive infrared motion sensor LED indicator Rubber cap Speaker OR code (for device pairing) Threaded screw hole (attaches to the included wall-mount bracket) Pull rubber cap gently from the bottom to access: • ON/OFF switch • MicroSD card slot 32GB card pre-installed, Max. 128GB card supported • Micro USB charging port • Reset button — Press and hold for 5 seconds to enter pairing mode — Press and hold for 10 seconds to factory reset the camera Threaded mounting post Locking knob Bracket screw hole (x3)GETTING STARTED
Charging the camera
Before using the camera for the first time, fully charge it with the included micro USB charging cable.
1 Pull open the rubber cap on the bottom of the camera.
2 Slide the ON/OFF switch to the ON position. Note: You can also charge the camera with the switch OFF but you won't be able to check the LED indicator for the charging status.
3 Insert the smaller end of the micro USB charging cable into the micro USB port on the camera.
4 Insert the other end of the micro USB charging cable into a USB wall charger such as the USB power adapter for your smartphone.
5 The LED indicator on the front of the camera will turn solid blue indicating that the camera is charging. When the camera is fully charged, the LED indicator will turn off. Actual charging times may vary depending on the USB power supply (DC5V 2.1A is recommended for faster charging) and the remaining battery level. A full charge may take up to 6 hours.
6 After charging is finished, unplug the micro USB charging cable from the camera and make sure to close the rubber cap tightly to keep out water and dust.
Replacing the microSD card
The camera comes with a 32GB microSD card pre-installed for recording events and performing firmware updates. You can easily replace the microSD card with a new one (max. 128GB card supported), if needed in the future. Simply open the rubber cap on the bottom of the camera, eject the current microSD card (push in until it clicks) from the microSD card slot, and then insert the new microSD card (with the label side facing the front of the camera) into the slot until it clicks into place. You should format the microSD card the first time it is used. From the Swann Security app, go to Device Settings > [your camera] > Advanced Settings and tap Format.
GET THE SWANN SECURITY APP
1 Download the latest version of the Swann Security app from the Apple App Store® or Google Play™ Store on your iOS or Android device. Simply search for "Swann Security".
2 Open the app and create your Swann Security account by tapping "Not yet registered? Sign Up" at the bottom of the screen. Then, activate your Swann Security account by confirming the verification email that is sent to the registered email address.
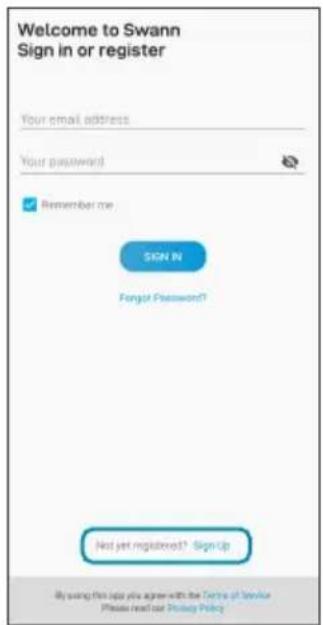
text_image
Welcome to Swann Sign in or register Your email address Your password! ✓ Remember me SIGN IN Forgot Password? Not yet registered? Sign Up By using this info you agree with the Centre of Service Please read out Privacy Policy
text_image
Sign Up Let's get started. First name Last name Enter your email address Enter a password Please confirm password NEXTSET UP THE CORECAM
Launch the Swann Security app and sign in. Tap the Pair Device button on the screen (or tap the menu icon ≡ in the top left and select "Pair Device"). The app will now guide you through the pairing process to set up the camera with your Wi-Fi network.
Before you begin, have the camera with you and be close to your router. Please note that the camera is only compatible with the 2.4GHz network. If your router is using the 5GHz band, please ensure it is operating in mixed mode.
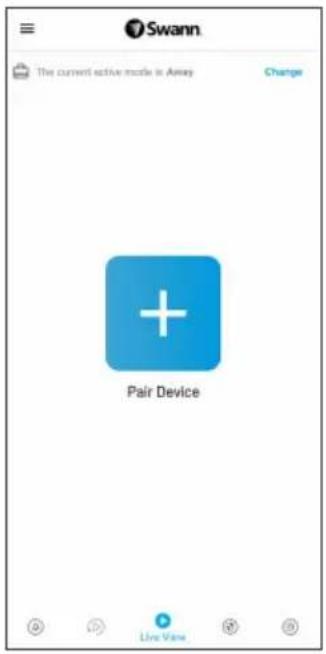
text_image
Swann The current active mode in Away Change Pair Device Live View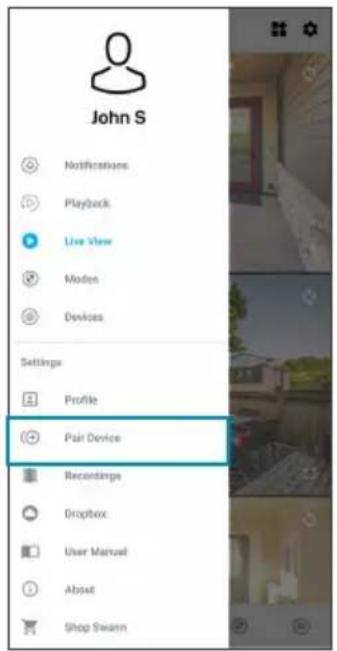
text_image
John S Notifications Playback Live View Modes Devices Settings Profile Pair Device Recordings Dropbox User Manual About Shop Swann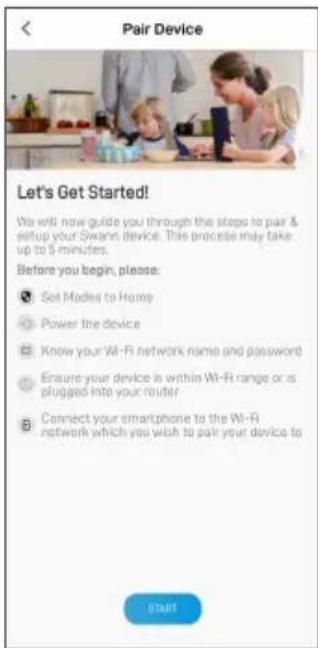
text_image
Pair Device Let's Get Started! We will now guide you through the steps to pair & setup your Swani device. This process may take up to 5 minutes. Before you begin, please: ● Set Modes to Home ○ Power the device ○ Know your Wi-Fi network name and password ○ Ensure your device is within Wi-Fi range or is plugged into your router ● Connect your smartphone to the Wi-Fi network which you wish to pair your device to STARTCAMERA PLACEMENT
The camera can be conveniently placed on a table or shelf, or mounted on a flat surface using the included bracket. Because the camera is completely wire-free, you'll have a lot of flexibility on where you can install it. Choose a location with strong, reliable Wi-Fi reception to ensure best video streaming and battery performance. The easiest way to check is to use your smartphone. Connect your smartphone to your Wi-Fi network at the spot you have chosen and see if you get 2 bars of Wi-Fi signal or more. As a general rule, the nearer the camera is to your router, the better the wireless connection quality. If you're finding the wireless signal is too weak or out of range, consider installing a Wi-Fi range extender.
Mounting the bracket
If mounting to a wooden surface, screw bracket directly to the surface. If mounting to a masonry surface (brick, concrete), mark and drill holes, insert wall plugs, and screw bracket to the surface.
Adjusting the viewing angle
Loosen the adjustment ring slightly by turning counter-clockwise. Swivel or tilt the camera as needed then tighten the adjustment ring to lock the position.
text_image
Attach Screw t cameraAfter installation, make sure to remove the protective plastic film covering the camera lens.
Attaching the camera to the bracket
Screw the threaded hole at the bottom of the camera onto the threaded post of the bracket by turning the locking knob clockwise until the camera is securely attached.
HELP AND RESOURCES
Motion detection
The camera's PIR motion sensor detects heat signatures of moving objects. You'll generally get good detection results by pointing the camera downwards at an angle where people will be moving across the coverage area before heading directly towards the camera. You can turn motion detection on or off, as well as adjust the motion detection sensitivity settings using the Swann Security app.
LED indicator guide
The LED light on the front of your camera helps inform you of what is happening with the device.
| Solid Blue USB Charging | Fast Blinking Blue Connecting to Wi-Fi | |
| Solid Red Live streaming / Motion recording | Infrared LEDs Blinking Firmware update in progress | |
| Slow Blinking Blue Wi-Fi | Pairing mode | |
Rebooting the camera
On rare occasions, it might be necessary to reboot your camera if it becomes unresponsive. A simple reboot can also fix connectivity issues quickly. To reboot the camera, open the rubber cap on the bottom of the camera, slide the ON/OFF switch to the OFF position, wait for 60 seconds, then slide the ON/OFF switch back to the ON position.
Swann Security app manual
To better understand the Swann Security App's interface and features, access the app manual (Menu > User Manual). You can learn about navigating the various app screens to view live camera stream, enable 2-way talk, playback recordings, configure modes, check battery level, and more.
Have questions?
Visit our Support Center at support.swann.com. You can register your product for dedicated technical support, find troubleshooting articles, and more. Or email us at any time via: tech@swann.com
natural_image
Pure diagram of a mechanical component with no text, numbers, or symbolsThis equipment has been tested and found to comply with the limits for Class B digital device, pursuant to part 15 of the FCC Rules. These limits are designed to provide reasonable protection against harmful interference in a residential installation. This equipment generates, uses and can radiate radio frequency energy and, if not installed and used in accordance with the instructions, may cause harmful interference to radio communications. However, there is no guarantee that interference will not occur in a particular installation. If this equipment does cause harmful interference to radio or television reception, which can be determined by turning the equipment off and on, the user is encouraged to try to correct the interference by one or more of the following measures: • Reorient or relocate the receiving antenna • Increase the separation between the equipment and the receiver • Connect the equipment into an outlet on a circuit different from that to which the receiver is connected • Consult the dealer or an experienced radio/TV technician for help. This device complies with Part 15 of the FCC Rules. Operation is subject to the following two conditions: (1) this device may not cause harmful interference, and (2) this device must accept any interference received, including interference that may cause undesired operation.
FCC RF Radiation Exposure Statement Caution: To maintain compliance with the FCC's RF exposure guidelines, place the product at least 20cm from nearby persons.
WARNING: Modifications not approved by the party responsible for compliance could void user's authority to operate the equipment.
Frequency: 2412MHz-2472MHz, Maximum radio-frequency power: <=17dBm
IC STATEMENT
This device complies with Industry Canada license-exempt RSS standard(s). Operation is subject to the following two conditions: [1] this device may not cause interference, and [2] this device must accept any interference, including interference that may cause undesired operation of the device.
The device is compliance with RF field strength limits, users can obtain Canadian information on RF exposure and compliance.
This Class B digital apparatus complies with Canadian ICES-003. This equipment complies with IC radiation exposure limits set forth for an uncontrolled environment. This equipment should be installed and operated with minimum distance 20cm between the radiator & your body.
CE DECLARATION OF CONFORMITY
Hereby, Swann Communications, declares that this product is in compliance with the essential requirements and other relevant provisions of Directive 2014/53/EU. The full test of the EU declaration of conformity is available at the following internet address: www.swann.com/uk/compliance
DÉCLARATION DE CONFORMITÉ CE
This product bears the selective sorting symbol for Westa electrical and electronic equipment (WEEE). This means that this product must be handled pursuant to European directive 2012/19/LU in order to be recycled or dismantled to minimize its impact on the environment. User has the choice to give his product to a competent recycling organization or to the retailer when he buys a new electrical or electronic equipment.
A BUILT-IN BATTERY CAUTION
- Do not leave in an extremely low air pressure environment - Do not leave in an extremely high-temperature environment - Do not attempt to replace the battery or disassemble the product. There are no user-serviceable parts inside. Doing so will void the warranty and can result in a safety hazard
This product is rated at IP65 (waterproof)
The symbol indicates DC voltage

Swann.
Model: SWIFI-CORECAM
QSGSWIFICORECAMVER15L
© Swann Communications 2022