
Siena - Fireplace Euromac - Free user manual and instructions
Find the device manual for free Siena Euromac in PDF.
| Product type | Ambiance electric fireplace |
| Brand | Euromac |
| Model | Siena |
| Dimensions (WxHxD) | 65.5 x 11.7 x 52 cm |
| Weight | 12.5 kg |
| Power supply voltage | 220-240 V ~ 50 Hz |
| Maximum power | 1800 W |
| Adjustable power | 0 / 900 / 1800 W |
| Bulb type | Halogen G9, 40 W |
| Ambiance lighting | Yes, with dimmer |
| Heating | Forced convection (fan) |
| Remote control | Yes (AAA batteries not included) |
| Safety | Double overheat protection |
| Installation | Wall-mounted, wall bracket included |
| Minimum distance from floor | 30 cm (recommended 60 cm) |
| Minimum distance from side walls | 20 cm |
| Minimum distance from ceiling | 100 cm |
| Minimum distance from flammable objects | 1 m |
| Minimum room area | 9 m² |
| Maintenance | Clean with a soft cloth; avoid abrasive products |
| User-replaceable parts | Bulb only |
| Certifications | CE (LVD 2006/95/EC, EMC 2004/108/EC) |
Frequently Asked Questions - Siena Euromac
User questions about Siena Euromac
0 question about this device. Answer the ones you know or ask your own.
Ask a new question about this device
Download the instructions for your Fireplace in PDF format for free! Find your manual Siena - Euromac and take your electronic device back in hand. On this page are published all the documents necessary for the use of your device. Siena by Euromac.
USER MANUAL Siena Euromac
EN This symbol on your device means: do not cover!
Maximum capacity Watt 1800
Settings 0-900-1800W
Bulb Halogen, G9 - 40W
Dimensions cm 11,7 x 65,5 x 52
Weight kg 12,5
Batteries remote control 2 x AAA (not provided)
General safety instructions
- Read this instruction booklet carefully and fully before use.
- Before use, check your new fireplace (including cable and plug) for any visible damage. Never use a damaged fireplace but take it back to the supplier for a replacement.
- This fireplace may only be used once it has been hung. Do not use until it has been installed as per instructions!
- This fireplace is exclusively intended for normal, household usage. Only use for providing additional heating in your home.
- This fireplace is not suitable for use in wet or damp spaces such as bathrooms, wash rooms etc. Do not place in the direct vicinity of a tap, water source or similar and ensure that it cannot fall into water and that water cannot enter the device. If the cable falls into water make sure you remove the plug from the socket! Do not use a fireplace that is wet inside but take it to be repaired. Never immerse the fireplace, cable or plug in water or any other fluid and never touch the fireplace with wet hands.
- The connection voltage and frequency, as given on the device, must correspond to that of the socket to be used. The electrical installation must be protected via an earth leakage circuit breaker (max. 30 mAmp.).
- Extend the electric cable fully before inserting plug into socket and ensure that it does not come into contact with the fireplace or get hot. Do not place the cable under carpet, cover with mats or similar and do not place in areas that are walked on frequently. Ensure that it cannot be stepped on and that no furniture is placed on top of it. Do not bend the cable around sharp corners and do not roll up too tightly after use.
- The use of an extension cable is not advised as this can lead to overheating and fire. If the use of an extension cable is unavoidable, make sure that it is not damaged and that it is an approved extension cable with a minimum diameter of 3 × 1.5 ~mm^2 . Always fully extend the cable in order to prevent overheating!
- To avoid fuses being blown, do not use any other equipment on the same socket or electrical group as the one used for the fireplace.
- Do not use the fireplace outdoors or in areas that are smaller than 9m^2
- A fireplace contains hot and/or glowing and sparking components. Do not, therefore, use where fuels, paint, flammable fluids and/or gases are stored.
- Never place the fireplace nearby, under or facing a socket or in the vicinity of an open fire or heat source.
- Do not use the fireplace nearby or facing furniture, animals, curtains, paper, clothing, bedding or other flammable materials. Keep at least 1 metre from the fireplace!
- Never cover the fireplace! Inlet and outlet openings should never be blocked as this may pose a fire risk. Never use the fireplace to dry clothing or place anything on it.
- Air around the fireplace must be able to circulate freely. Never install it too close to walls or large objects and never under a shelf, cupboard or similar.
-
Prevent foreign objects entering ventilation or outlet openings on the fireplace. This may cause electric shock, fire or damage.
-
Never leave a working fireplace unattended but switch off and then remove the plug from the socket. Always remove the plug from the socket if the fireplace is not in use! Remove plug by pulling on the plug itself; never pull on the cord!
- Always switch the fireplace off, remove plug from socket and let the fireplace cool down before you:
clean the fireplace
- carry out maintenance on the fireplace
-
touch or move the fireplace
-
The fireplace gets hot during use. In order to avoid burns, never touch the hot surfaces with bare hands!
- Do not use a timer or similar to switch the fireplace on automatically. You must always check for safe conditions before using the fireplace!
- Make sure there is close supervision if this device is used when there are children, incapacitated person or pets present. Do not allow children to play with the device. This device is not suitable to be operated by children or those with physical, sensory or mental disabilities or by anyone who does not have knowledge about or experience with the device.
- Keep the fireplace clean. Dust, dirt and/or deposits in the fireplace often lead to overheating. Ensure that this type of build-up is regularly removed. Do not use aggressive products or metal scourers for cleaning the device as this will damage the housing and parts of the metal may find their way into the electrical parts and lead to short circuiting.
- Never switch the device on if you have noticed damage to the device itself, the cable or plug or if it does not work properly, has fallen or shows any other signs of failure. Take the entire device back to your supplier or a recognised electrician to be checked and/or repaired. Always ask for original parts to be used.
- Do not lift the fireplace using the glass plate.
- Do not use accessories that have not been supplied or approved by the manufacturer.
- The bulbs are the only parts of this device that the user may replace themselves. Any other repairs to the fireplace, cable or plug must always be carried out by qualified personnel. Repairs that have not been carried out correctly may pose a risk!
- If the supply cord or plug is damaged, it must be replaced by the manufacturer, its service agent or similar qualified body or person in order to avoid hazard.
- Only use the fireplace for its intended purpose and as stipulated in this instruction booklet.
Failing to adhere to instructions 25, 26, 27 and 28 could lead to damage, fire and/or personal injury. This will invalidate the guarantee and the supplier, importer and/or manufacturer will take no responsibility for the consequences!
Description
The SIENA comprises an atmospheric fireplace (containing a heating element and ventilator which blows warm air out of the top of the fireplace), wall supports, a remote control and this instruction booklet.
The atmospheric fireplace is covered with a rounded glass plate at the front. There is a metal cabinet behind this which contains the atmospheric elements at the front, air grilles at the sides and, on top, the grille which is used to blow out warm air and the operating panel. The hanging bracket is located at the back and the technical aspects are housed internally.
The wall supports must be attached to the wall so that the fireplace can be hung on them. Screws, plugs, a spacer bracket and self-tapping screws are supplied.
There are four buttons on the remote control; one red and three black. The red button switches the atmospheric screen on; the two upper black buttons are for setting heat levels (900 and 1800 Watt respectively) and the lower black button (the dimmer) is used to regulate the clarity of the screen.
Please keep the instruction booklet somewhere safe for reference or for providing with the device if it is sold on.
Location and Connection
- Remove all packaging material and keep out of reach of children. After removing packaging, check the appliance for damage or other signs that could indicate a fault/defect/malfunction. In case of doubt, do not use the appliance, but contact your vendor for inspection or replacement.
- Do not use the fireplace before it has been completely installed according to the instructions and you have read the instruction booklet fully!
This device was designed to be permanently hung on a wall. Ensure the wall is sturdy, completely vertical, is not sensitive to vibration and is not flammable. Make sure it is not made of synthetic material and or covered with flammable material. Be aware of pipes that may be contained within the walls when drilling holes. - Choose a suitable location for the fireplace, at least one metre from all obstructions, walls and flammable materials (see safety instructions) and in the vicinity of a 16 Amp (at least) fused, earthed electrical socket (protected by a 30mA earth leakage circuit breaker). This socket must be located to the right of the fireplace.
- There must be at least 30~cm distance between the base of the fireplace and the ground, however, you are advised to place the fireplace at a height of 60~cm for the best sight. There must be at least 20~cm distance
between the fireplace and the side walls, at least 100cm between the fireplace and the ceiling. Do not hang the device directly under or in front of an electrical socket (see diagram 1).
The wall supports must be attached horizontally (use a spirit level!) to the wall. Determine the location of the wall supports (take the above into account), mark the location of the screws and drill 4 holes at the marked places using a 6mm drill. Put the plugs into the holes and then screw the wall supports to the wall. Be aware of pipes that may be contained within the walls when drilling holes!
- Attach the spacer bracket with both self-tapping screws underneath the fireplace in the holes provided. The flat side of the bracket must be placed against the underside of the fireplace; the other must rest against the wall so that the wall piece sticks out under the fireplace (diagram 3). This bracket will be hidden from sight once the glass screen has been installed.
- Now hang the fireplace carefully on the central wall support with the hanging bracket (see diagram 2). The bracket should not stick out from the support! The electrical cable comes out at the right hand, lower side of the fireplace and must be placed out of range of the heat.
- Now mark the location at which the spacer bracket must be screwed to the wall. Remove the fireplace from the wall, drill both holes and insert a plug. Hang the fireplace on the bracket and screw the spacer bracket to the wall.
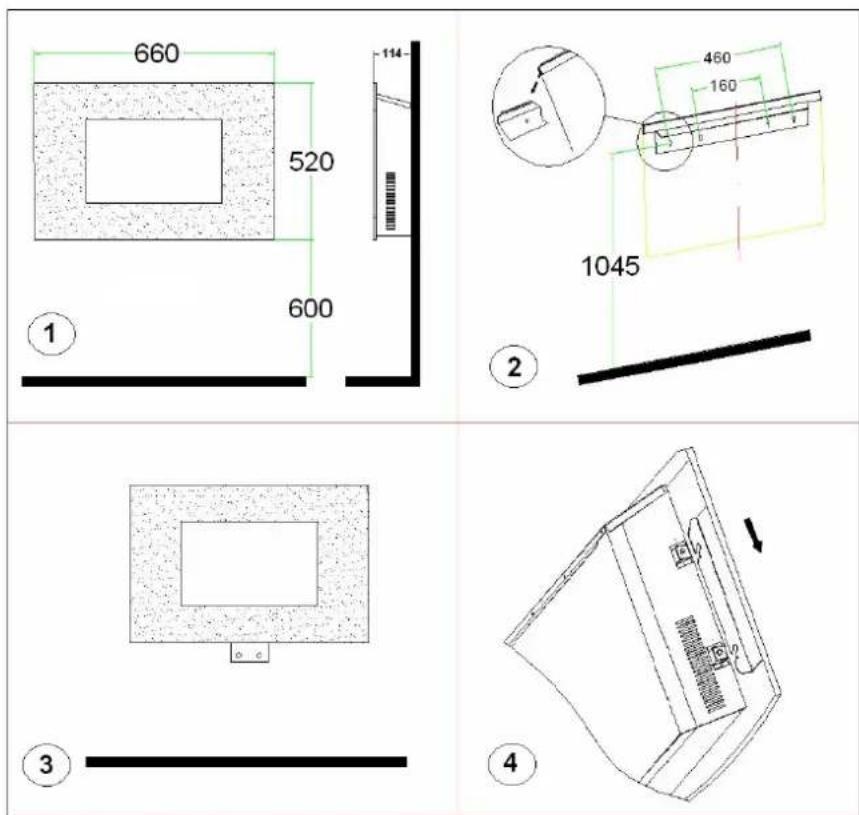
- Hang the glass plate (two people are needed for this job!) with the four hooks over the four knobs on the sides of the fireplace and check that all four hooks are correctly attached (see diagram 4). Secure the glass plate by tightening the screw that goes through the bracket (which sits on the glass plate).
- Installation is now complete.
Note: ensure that the weight of the fireplace hangs on the wall supports and not on the spacer bracket!
Operating
- Check that the details on the data plate correspond to those of the electrical supply which you wish to use for the fireplace. Do not use the same connection for any other equipment.
- Install two AAA batteries in the remote control.
- Check that the main ON/OFF switch on the right hand, upper side of the fireplace is 'off' (the side with the circle is depressed).
- Now insert the plug into the socket.
- Switch the fireplace on with the main ON/OFF switch (depress the side with the stripe). You can now further operate the fireplace with the remote control or with the buttons on the fireplace itself.
Operating with the buttons:
- Pressing the button switches the atmospheric lighting on. The red light next to the button will be illuminated. Pressing this button again will switch the atmospheric lighting off. If you press the button for longer than three seconds, the dimmer function will start to work: the brightness of the light will gradually increase and then decrease. Release the button when the lighting reaches the desired intensity.
- Pressing the '900W' button sets the heating at half capacity (900 Watt). The red light next to the button will be illuminated and the ventilator will start to distribute warm air via the upper grille. Don't forget! This function only works if the atmospheric screen is working! Pressing this button again will switch the heating off but the atmospheric lighting will continue to work.
- Pressing the '1800W' button sets the heating at full capacity (1800 Watt). The red light next to the button will be illuminated and the ventilator will start to distribute warm air via the upper grille. Don't forget! This function only works if the atmospheric screen is working! Pressing this button again will switch the heating off but the atmospheric lighting will continue to work.
Every time you press a button you will hear a 'beep' and this indicates that the fireplace has 'picked up' the command.
Operating using the remote control:
It takes a little time before the receiver responds to a signal transmitted from the remote control. Do not press a button more frequently than once per two seconds as this will disrupt the function.
You switch the atmospheric lighting on and off using the red button on the remote control.
The black buttons '900W' and '1800W' have the same function as the '900W' and '1800W' buttons on the fireplace (see above).
- Pressing and holding the black 'dimmer' button increases and decreases the brightness of the light. Release the button when the lighting reaches the desired intensity.
Every time you press a button you will hear a 'beep' and this indicates that the fireplace has 'picked up' the command.
- When you switch a particular function on using the remote control, the red light next to the corresponding button on the fireplace will be illuminated.
Warning: This heater is not equipped with a device to control the room temperature. Do not use this heater in small rooms when they are occupied by persons not capable of leaving the room on their own, unless constant supervision is provided.
Replacing a bulb
Always unplug the fireplace before replacing a bulb!
The bulbs get hot during use; allow plenty of time for them to cool down before touching them!
- Two people are required to replace a bulb.
- Carefully remove the glass plate in front of the fireplace by lifting it off its hooks. Put it somewhere safe.
We advise you to now take the fireplace off the wall. In order to do so, the two screws which attach the fireplace to the lower spacer bracket must be removed. Lie the fireplace down on a flat, clean surface.
- Under the 'fire' there is a cover place which covers the bulbs. Remove the 5 screws from this cover plate and remove cover plate.
- You must remove the flexible rotator in order to gain access to the bulbs. Pinch the clamp on the right hand side and move to the left, away from the rubber. Now slide the rubber off the axle (to the left). Once this is free of the axle, gently pull forwards and slide/pull gently to the right (out of the left hand side attachment point).
- Remove the broken bulb and replace with a 40Watt G9 halogen bulb. Never touch a halogen bulb with bare hands!
- Replace the rotator by following the instructions above in reverse order.
- Screw on the cover plate, hang the fireplace on the wall supports and screw in the screws which attach the fireplace to the spacer bracket. Finally, replace the glass plate on the hooks, in front of the fireplace.
- The lamp may only be replaced by a person qualified to do so.
Safety feature
The Siena atmospheric fireplace is equipped with a double overheating safeguard.
One overheating safeguard switches the heater off if it overheats internally. This may occur if the heater cannot give off enough heat or if it cannot draw in enough fresh air. As mentioned above, this is generally caused by (partially) covering the heater, obstructing the air intake and/or outlet grills or installing the heater too close to a wall or something similar.
If this happens, turn the fireplace off by switching the main switch to O and remove the plug from the socket. Leave the fireplace to cool down for at least 15 minutes and remove the cause of overheating. You can then switch the fireplace back on.
If the device overheats again or you cannot ascertain the reason for this, take the fireplace to your service point to be checked/ repaired.
Caution: In order to avoid a hazard due to inadvertent resetting of the thermal cut-out, this appliance must not be supplied through an external switching device, such as a timer, or connected to a circuit that is regularly switched on and off by the utility.
The other overheating safeguard switches the heater off definitively: it can no longer be reset. Refer to your supplier for repairs.
Cleaning and maintenance
Always remove the plug from the socket and let the fireplace cool down before cleaning or touching.
The Siena atmospheric fireplace does not need much maintenance. Always keep the in- and outlet openings clean and dust-free. Use a soft cloth or a soft brush to clean the outside of the metal case. The glass plate can also be cleaned with a soft cloth. Do not use abrasive cleaning fluids or special glass cleaners!
Apart from the bulbs, the fireplace contains no parts which need to be replaced by the user. If the device malfunctions, immediately remove the plug from the socket and take to a service point. Do not carry out repairs yourself and always ask for original parts to be used.
If the fireplace is to be stored after the winter period, clean it, pack it in original packaging if possible and store it in a cool, dry and clean place. Make sure the fireplace is kept upright.
Problems and solutions
If the fireplace will not work check the electrical supply. Is the socket working properly? Has the fuse blown?
If the fireplace stops working suddenly, it may mean that the overheating safeguard has been triggered (see under 'Safeguards').
If the atmospheric lighting is not working or does not work properly, one or more of the bulbs may need to be replaced (see 'Replacing a bulb').
In the event of other defects, immediately switch the fireplace off, remove the plug from the socket and consult a supplier or recognised electrician. Never carry out repairs yourself as this invalidates the guarantee and may be dangerous!
CE Statement
The undersigned Euromac bv., Kokosstraat 20, 8281 JC Genemuiden hereby declares that the product below: electric ventilator fireplace with atmospheric screen (220-240V, 1800W) known under the brand EUROM, type Siena, meets the requirements of the LVD 2006/95/EC and EMC 2004/108/EC.
Norms applied:
EN 60335-1:2002+A1+A11+A12 EN 55014-1:2006
+A2+A13 EN 55014-2:1997+A1
EN60335-2-30:2003+A1+A2 EN 6900-3-2:2006
EN 62233 :2008 EN 6900-3-3 :1995+A1+A2
Genemuiden, 11-05-2011
W.J. Bakker, alg.dir.
Français
Données techniques
Type Siena
Tension Volts/Hz 220-240\~50
Puissance max. Watts 1800
Possibilities de réglage 0-900-1800W
Ampoule Halogène, G9-40W
Dimensions cm 11,7 x 65,5 x 52
Poids kg 12,5
Piles telecommande 2xAAA(non incluses)