Realimove AC5000 - Camcorder AGFA - Free user manual and instructions
Find the device manual for free Realimove AC5000 AGFA in PDF.

| Product type | Action camcorder |
| Brand | Agfa |
| Model | Realimove AC5000 |
| Dimensions | 59.27 x 41.13 x 29.28 mm |
| Power supply | DC 5V 1A |
| Screen | LCD 2.0 inches |
| Lens | High-resolution wide-angle class A+ |
| Maximum video resolution | 1080P (1920x1080) at 30fps |
| Video format | AVI |
| Maximum photo resolution | 12M (4032x3024) |
| Photo format | JPG |
| Memory card | Micro SDHC, Class 10 or higher, up to 32 GB |
| Connectivity | Wi-Fi, USB 2.0 |
| Battery | Removable, rechargeable |
| Waterproof | Up to 30 meters |
| Webcam function | Yes |
| Available languages | English, French, German, Spanish, Italian, Portuguese, Dutch, Polish, Czech, Hungarian, Russian, Chinese |
| Shooting modes | Video, Photo, Playback, Settings |
| Self-timer | 3 / 5 / 10 / 20 seconds |
| Remote control | Via GoTrack app (Wi-Fi) |
| Care and cleaning | Clean with a soft dry cloth. Store in a cool, dry place. |
| Safety | Disconnect immediately if overheating. Keep USB cable out of reach of children. |
Frequently Asked Questions - Realimove AC5000 AGFA
User questions about Realimove AC5000 AGFA
0 question about this device. Answer the ones you know or ask your own.
Ask a new question about this device
Download the instructions for your Camcorder in PDF format for free! Find your manual Realimove AC5000 - AGFA and take your electronic device back in hand. On this page are published all the documents necessary for the use of your device. Realimove AC5000 by AGFA.
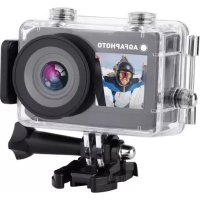
USER MANUAL Realimove AC5000 AGFA
- This action camera is a high-precision product to be handled with care, do not drop or damage it in any way.
- Keep the camera apart from anything having strong magnetism or emitting strong radio waves. A strong magnetic field could cause the product to malfunction or damage the image and sound quality.
- Select well-known micro SD card brand, basic cards do not guarantee the proper functioning of the camera.
- Do not use micro SD card in or near magnetic place to avoid losing its data storage.
-
During the charging process, if there is overheating, smoke, or odor, plug out the USB cable immediately and stop power supply to avoid fire.
-
When charging, keep the USB cable out of the reach of children to avoid the risk of suffocation or electric shock.
- Keep the product in a cool and dry place.
prodUc FEatUrEs
- Thanks to its waterproof case, the camera is water-resistant up to 30 meters depth.
Real-time preview and long-distance remote control via Wi-Fi with a smartphone or tablet. - Easy battery removal and replacement.
Video recording possible during loading. - Web camera function.
Supports up to 32GB memory cards. - Multiple video recording resolutions: 1080P [30fps] / 720P [30fps] / VGA [30fps].
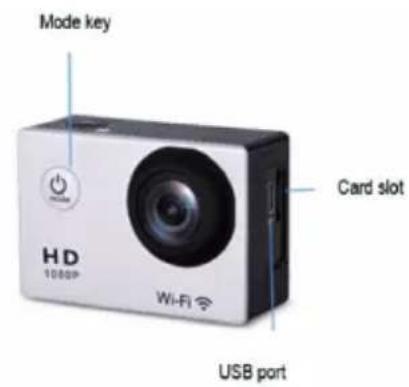
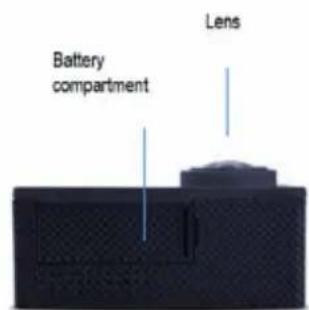
caM era oVErVIEW


INSTRUCTIONS
1. Inserting a micro SD card
You cannot use the camera without first inserting a micro SD card in the corresponding slot on its left side. Preferably choose a well-known brand micro SD card with up to 32GB storage capacity having been formatted on a computer before use.
Note: basic memory cards do not guarantee the proper functioning of the camera.
2. Installing and removing the battery
A. Pull the battery cover out.
B. In accordance with the direction of the positive and negative symbols marked on the battery, insert the battery into the slot with the correct polarity until it is well seated.
C. A battery icon will show up at the top right of the screen indicating the charging level status.
Note: To remove the battery, pull its slot cover out and gently extract it by catching the little tab.
3. Battery charging
A. Plug in the camera with the USB cable to a computer or a power adapter for charging.
B. The camera can also be charged in a car by plugging it into a USB car charger.
Note: Photo and video shooting are possible while camera charging.
4. Power on and off
A. To switch on the camera, press the Power key for about 3 seconds until the screen lights up.
B. To shut down the camera, press the Power key for about 3 seconds until the screen turns off.
5. Mode switching
Once the camera is on, short press the Mode key [same the Power one] to successively switch from a mode to another: video / photo / playback / setting menu.
5.1. Video mode
A. First press the Mode key [same as the Power one] until moving to video mode [first mode to appear on the screen as it is the default one].
B. Then press the OK key to start recording and press it again to stop.
C. The red spot icon in the upper left of the screen will blink yellow indicating that recording is in progress.
5.2. Photo mode
A. First press the Mode key [same as the Power one] until moving to photo mode.
B. Then press the OK key to take a picture.
C. A yellow spot icon will appear in the upper left of the screen until the picture taken is saved.
5.3.Playback mode
A. First press the Mode key [same as the Power one] until moving to playback mode.
B. Press the Up/Down keys to select a video or a photo.
C. Then press the OK key to play or display the selected file in full screen.
EN
5.4. Setting menu
A. First press the Mode key (same as the Power one) until moving to setting mode and access to the setting menu.
B. Press the Up/Down keys to select the setting you want to modify.
C. Press the OK key to enter the sub-menu.
D. Select one of the setting options and press the OK key again to confirm your choice.
6. Wi-Fi connection
The camera can be connected in Wi-Fi to Android or iOS smartphone or tablet by following these steps:
A. First install the GoTrack application on your smartphone/ tablet via Google Play Store for Android or App Store for iOS.
B. Turn on the camera and press the Wi-Fi key (also the Up key).
C. The Wi-Fi logo will then appear on the screen in blue with the AGFA_xxxxxxxxxxx SSID [Wi-Fi name with a 12-digit random serial number] and the PWA2 (password) 12345678.
D. Enter the Wi-Fi settings of your smartphone/tablet and search the camera Wi-Fi SSID to connect it.
E. Open "GoTrack" application on your smartphone/tablet to control the camera remotely and download videos or photos taken this way directly on your device.
6.1. Wi-Fi SSD setting
A. First press the Mode key (same as the Power one) until moving to setting mode and access to the setting menu.
B. Press the Down key until selecting the Wi-Fi SSID setting and then press the OK key to show the name of the Wi-Fi network.
C. When a letter/figure is in red, it means you can change it by scrolling through the different characters with the Up/Down keys.
D. Once the right character is selected, press the OK key to confirm your choice and move to next character.
E. Finally, press twice the Mode key to exit and return to video mode.
6.2. Wi-Fi password setting
A. First press the Mode key [same as the Power one] until moving to setting mode and access to the setting menu.
B. Press the Down key until selecting the Wi-Fi PASSWORD setting and then press the OK key to show the password of the Wi-Fi network.
C. When a letter/figure is in red, it means you can change it by scrolling through the different characters with the Up/Down keys.
D. Once the right character is selected, press the OK key to confirm your choice and move to next character.
E. Finally, press twice the Mode key to exit and return to video mode.
6.3. Wi-Fi power off
Shortly press the Up key to turn off the Wi-Fi connection.
SPECIFICATIONS
| LCD screen | 2.0 inches |
| Lens | A + grade high-resolution wide-angle lens |
| Languages | English/French/German/Spanish/Italian/Portuguese/Dutch/Polish/Czech/Hungarian-Russian/Chinese |
| Video resolution | 1080FHD (1920 x 1080) 30fps 720P (1280 x 720) 30fps VGA (848 x 480) 30fps |
| Video format | AVI |
| Photo format | JPG |
| Photo resolution | 12M (4032 x 3024) 10M (3648 x 2736) 8M (3264 x 2448) 5M (2592 x 1944) 3M (2048 x 1536) 2M (1920 x 1080) 1.3 (1280 x 720) |
| Memory card | Micro SDHC, Class 10 or above |
| Photo mode | Single shot/self-timer (3/5/10/20 seconds) |
| USB | 2.0 |
| Power supply | DC 5V 1A |
| Dimensions | 59.27 x 41.13 x 29.28 mm |
Note: Certain practices or environments may affect the proper operation of the camera. Occasional breakdowns are so likely to occur after sustained activity. If this happens, remove the battery and wait for it to cool before reinserting it into the camera. The camera should reset automatically after this handling.
prÉcaUtloNs
Notice of compliance for the European Union : products bearing the CE mark comply with the applicable European directives and associated harmonised European standards.

Disposal of waste equipment by users in the European Union: this symbol means that according to local laws and regulations, it is prohibited to dispose of this product with household waste. Instead, it is your responsibility to protect the environment and human health by handing over your used device to a designated collection point for the recycling of waste electrical and electronic equipment. For more information about where you can drop off your waste equipment for recycling, please contact your local city office, your household waste disposal service or the shop where you purchased the product.
After sales service / service après vente / Kundendienst / servicio postventa /Serviço pos venda /servizio post vendita /Serviço pos venda / serwis posprzedażowy / poprodejni servis / értékesités utáni szolgáltagtas / Dienst na verkoop / noclemenpodažkHOe obcncykVBaHne :
@: aftersaleservice@gtcompany.fr
Tel. : + 33 [0] 1.85.49.10.26
Product manufactured for and distributed by :
GT COMPANY - 5 rue de la Galmy - 77700 Chessy -
France - +33 [0] 1.61.10.09.25 - www.gtcompany.fr
AgfaPhoto is used under license of Agfa-Gevaert NV. For this product a sub license has been granted by AgfaPhoto Holding GmbH (www.agfaphoto.com). Neither Agfa-Gevaert NV nor AgfaPhoto Holding GmbH manufacture this product or provide any product warranty or support. For service, support and warranty information, contact the distributor or manufacturer.