DV-1005 - Camcorder AGFA - Free user manual and instructions
Find the device manual for free DV-1005 AGFA in PDF.


| Product Type | HD Digital Camcorder |
| Model | DV-1005 |
| Brand | Agfa |
| Dimensions (W x H x D) | 57 x 70 x 129 mm |
| Weight (without batteries) | Approx. 292 ± 5 g |
| Power Supply | Li-Ion battery NP-120 / DC-in via USB |
| Optical Zoom | 5X |
| Digital Zoom | 10X |
| LCD Screen | 3.0" TFT (960 x 240 pixels), touch screen |
| Video Resolution | 1080i/60FPS, 1080P/30FPS, 720P/60FPS, 720P/30FPS, WVGA/60FPS, WVGA/30FPS, WQVGA/240FPS |
| Still Image Resolution | Up to 12 Megapixels (interpolated), 10M, 5M, 2M |
| Image Sensor | 1/2.3" CMOS 10.0 Megapixel |
| Storage Media | Internal: 128MB Flash; External: SD/SDHC up to 16GB Class 6 |
| White Balance | Auto, Sunny, Cloudy, Tungsten, Fluorescent |
| Color Effects | Natural, B&W, Sepia |
| Stabilizer | Electronic Image Stabilizer (EIS) |
| Macro Mode | Yes, up to 2 cm (Wide) |
| Self-Timer | Off, 5 sec, 10 sec |
| LED Light (Video) | Effective range 0.5 m - 1 m |
| Flash (Camera) | Auto / Forced / Off |
| Dual Video Mode | Records two resolutions simultaneously (1080P/WQVGA or 720P/WQVGA) |
| PC Interface | USB 2.0 (Mass Storage) |
| TV Output | Composite (AV) and HDMI |
| Software Included | Presto! Video Works, Presto! Mr. Photo, QuickTime |
| Care and Cleaning | Wipe with a slightly damp soft cloth. Do not use harsh chemicals. |
| Safety Precautions | Do not disassemble. Avoid high temperatures, dust, and strong vibration. Keep flash at least 1 m from eyes. |
| Spare Parts and Repairability | Contact qualified service center for repairs. No user-serviceable parts inside. |
| General Information | Operating temperature 0°C to 40°C. Compatible with Windows Vista/XP. |
Frequently Asked Questions - DV-1005 AGFA
User questions about DV-1005 AGFA
0 question about this device. Answer the ones you know or ask your own.
Ask a new question about this device
Download the instructions for your Camcorder in PDF format for free! Find your manual DV-1005 - AGFA and take your electronic device back in hand. On this page are published all the documents necessary for the use of your device. DV-1005 by AGFA.
USER MANUAL DV-1005 AGFA
APDV-1005 HD Camcorder

natural_image
Line drawing of a cylindrical mechanical component with mounting holes and a side clip (no text or symbols)User's Manual

natural_image
Abstract geometric shape with curved gray and white elements, no text or symbols presentAbout this manual ....v
Copyright......v
Precautions......vi
Before You Start......viii
1 Introducing the camcorder...... 1
1.1 System requirements....1
1.2 Features....1
1.3 Unpacking the camcorder....2
1.4 About the camcorder....3
1.4.1 Front view....3
1.4.2 Top view....3
1.4.3 Bottom view....4
1.4.4 Right view....4
1.4.5 Left view....5
1.4.6 Back view 5
1.4.7 Control Panel 6
1.4.8 Adjusting the LCD display....7
1.4.9 About the LEDs....12
2 Getting started.... 13
2.1 Inserting an SD card....13
2.2 Inserting the batteries....15
2.3 Charging the battery....17
2.4 Turning on/ off the camcorder....17
2.5 Changing modes....17
2.6 Before you start....18
2.6.1 Setting the date and time....18
2.6.2 Setting the language....19
2.6.3 Setting the beep....20
2.7 Shoot/Playback video....21
2.7.1 Shooting a video clip 21
2.7.2 Playing the video clip 23
2.8 Taking/viewing pictures 24
2.8.1 Taking a still picture....24
2.8.2 Viewing images 25
2.9 Connecting to a computer....26
2.10 Connecting to a standard TV....26
2.11 Connecting to a HDTV....27
3 Using the camcorder.... 28
3.1 Camcorder mode....28
3.1.1 Camcorder mode....28
3.1.2 Using the macro function....29
3.1.3 Using the zoom function....29
3.1.4 Using the LED light....30
3.1.5 Using the Flash module, auto and force30
3.1.6 Using the Stabilizer function....30
3.1.7 Quick access controls....30
3.2 Camera mode....31
3.2.1 Camera mode icons ....31
3.2.2 Using the macro function....32
3.2.3 Using the zoom function....32
3.2.4 Using the LED light module ....32
3.2.5 Quick access controls....32
3.3 Camcorder Playback mode....33
3.3.1 Camcorder Playback mode icons......33
3.4 Camera Playback mode...... 35
3.4.1 Camera Playback mode icons ....35
3.5 Thumbnail mode......36
4 Using the menus...... 37
4.1 Camcorder menu 37
4.1.1. Video resolution....37
4.1.2. Video quality....38
4.1.3. White balance....40
4.1.4. Color effect....41
4.1.5. Stabilizer....42
4.1.6. Dual Video mode....43
4.2 Camcorder playback menu.... 44
4.2.1 Delete....44
4.2.2 Protect....46
4.2.3 Autoplay 47
4.3 Camera menu....48
4.3.1 Resolution 48
4.3.2 Photo Quality....49
4.3.3 White balance....49
4.3.4 Color effect....50
4.3.5 Selftimer 51
4.3.6 Aspect Ratio 52
4.4 Camera playback menu....53
4.4.1 Delete....53
4.4.2 Protect....55
4.4.3 Autoplay 56
4.5 System menu....57
4.5.1 Setting the beep....57
4.5.2 Auto power off....57
4.5.3 TV standard....58
4.5.4 Format....59
4.5.5 Default....60
4.5.6 Language....60
4.5.7 Frequency....61
4.5.8 Date/time....61
5 Installing the software and drivers ..... 62
5.1 Presto! Video Works......62
5.2 Presto! Mr. Photo....63
5.3 Quick Time....64
Appendix 65
Specifications....65
Troubleshooting...... 68
Preface
Congratulations on your purchase of this advanced camcorder. Ensure that you read this manual carefully and keep it in a safe place for future reference.
About this manual
Every effort has been made to ensure that the contents of this manual are correct and up to date. However, no guarantee is made regarding the accuracy of the contents. If the contents of this manual do not tally with the camcorder, please take the camcorder as a criterion, and our company reserves the right to change the contents or technical rules without notice in advance. Also, the manufacturer reserves the right to change the technical specification in advance without notice.
If the accessories do not tally with the actual package, please take the actual package as a criterion.
Copyright
© Copyright 2008.
All rights reserved. No part of this publication may be reproduced, transmitted, transcribed, stored in a retrieval system or translated into any language or computer language, in any form or by any means, electronic, mechanical, magnetic, optical, manual or otherwise, without the prior written permission of the manufacturer.
Precautions
General precautions
- Do not use or store the product in dusty, dirty, or sandy areas, as its components may be damaged.
- Do not store the product in a hot environment. High temperatures can shorten the life of electronic devices, damage batteries and warp or melt certain plastics.
- Do not store the product in cold areas. When the product warms up to its normal temperature, moisture can form inside, which may damage the electronic circuits.
- Do not attempt to open the casing or attempt your own repairs. High-voltage internal components create the risk of electric shock when exposed.
- Do not drop or knock the product. Rough handling may damage the internal components.
- Do not use harsh chemicals, cleaning solvents or strong detergents to clean the product. Wipe the product with a slightly damp soft cloth.
- Do not fire the flash while it is too close to the subject's eyes. Intense light from the flash can cause eye damage if it is fired too close to the eyes. When using the flash, the camcorder should be at least one meter from the eyes of the subject.
- Do not open battery cover while an image is being recorded. Doing so will not only make storage of the current image impossible, it can also corrupt other image data already stored in file.
- If the product or any of its accessories are not working properly, take them to your nearest qualified service center. The personnel there will assist you and if necessary, arrange for the product to be repaired.
• Test for proper operation before using the camcorder.
Notes on the LCD Screen
Be very careful to ensure the fluid contained in the LCD screen does not escape if the screen becomes cracked or damaged. If this occurs, follow these steps:
- If the fluids make contact with skin, wipe it with a clean cloth then rinse with a large amount of water.
- If the fluid makes contact with eyes, wash eyes with clean water for at least 15 minutes and go to the hospital as soon as possible.
- If the fluid is swallowed, first rinse mouth with water, then drink a large amount of water and induce vomiting. Go to the hospital as soon as possible.
Operation conditions
- This camcorder is designed for use in temperatures ranging from 0°C to 40°C (32°F to 104°F).
- Do not use or keep the camcorder in the following areas:
- In areas subject to direct sunlight
- In areas subject to high humidity or dust
- Near air conditioners, heaters, or other areas subject to temperature extremes
- Inside of a closed vehicle, especially one parked in the sun.
- In areas subject to strong vibration
Power supply
- Use only the type of battery that came with your camcorder. Using any other type of battery may damage the equipment and invalidate the warranty.
-
Ensure the battery is inserted correctly. Inserting the battery incorrectly can cause damage to the product and possibly start a fire.
-
Remove the battery to avoid the fluid leakage if the camcorder is not going to be used for a long time.
- If the battery is crushed or damaged, remove it immediately to avoid the battery fluid leakage and abnormal expansion.
Before You Start
Take some test shots before performing a formal recording.
Before taking pictures with this camcorder in any important occasion (such as a wedding ceremony or an overseas trip), do test the camcorder beforehand to ensure that it functions properly. Any additional loss caused by the malfunction of this product (such as costs of photography or any loss of benefit generated by the photography) is not the responsibility of the manufacturer and no compensation will be given for it.
Copyright information
Take care to observe "No Photography" notices in certain locations. In these cases, you cannot record any live performance, improvisation or exhibits, even for personal purposes. Any transfer of pictures or memory card data must be conducted under the constraints of copyright law.
1 Introducing the camcorder
Read this section to learn about the features and functions of the camcorder. This chapter also covers system requirements, package contents, and descriptions of the hardware components.
1.1 System requirements
The camcorder requires a PC with the following specifications:
- Windows® Vista / XP operating system
Intel® Pentium 4 2.8GHz CPU or higher (3GHz recommended) - At least 1GB of RAM or higher (1GB recommended)
• 64MB or Greater Video Card
• Standard USB 1.1 port or higher
• At least 200MB of available disk space
Note:
A USB 1.1 port may enable you to transfer files to and from your host PC, but transfer speeds may be much faster with a USB 2.0 port.
1.2 Features
The camcorder offers a variety of features and functions including:
• HD Digital camcorder
• Digital camera (max. 12 Megapixels)
Additionally, the camcorder also features 5X optical zoom, 10X digital zoom, USB mass storage, a LCD touch screen and EIS function.
1.3 Unpacking the camcorder
The following items should be present in the package. If any item is missing or appears damaged, contact your dealer immediately.

natural_image
Line drawing of a cylindrical mechanical component with flanged ends and a central hub (no text or symbols)Camcorder

natural_image
Line drawing of a mailbox with handle and spout (no text or symbols)Pouch

User manual

USB cable
DC-in a dapter (optional)

Battery charger

Power cord

AV cable

HDMI cable (optional)

natural_image
Line drawing of a remote control with buttons (no text or symbols)Remote control (optional)

natural_image
Simple line drawing of a rectangular electronic component with no text or symbolsLi-ion battery NP-120
natural_image
Simple concentric circle diagram with no text or symbolsCD-ROM (Application software)
1.4 About the camcorder
Refer to the following illustrations to familiarize yourself with the buttons and controls of this camcorder.
1.4.1 Front view
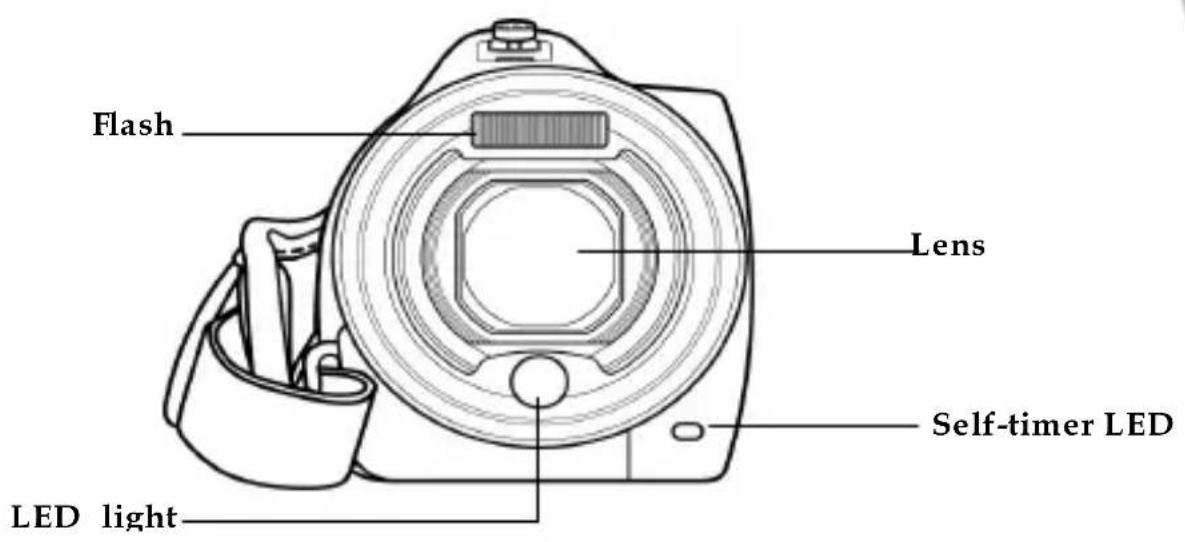
1.4.2 Top view
1.4.3 Bottom view

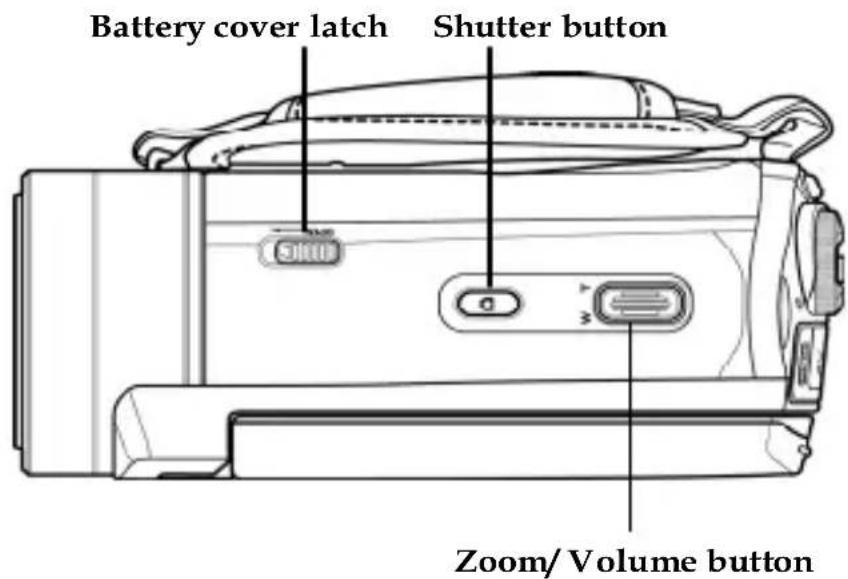
1.4.4 Right view

1.4.5 Left view

1.4.6 Back view

1.4.7 Control Panel

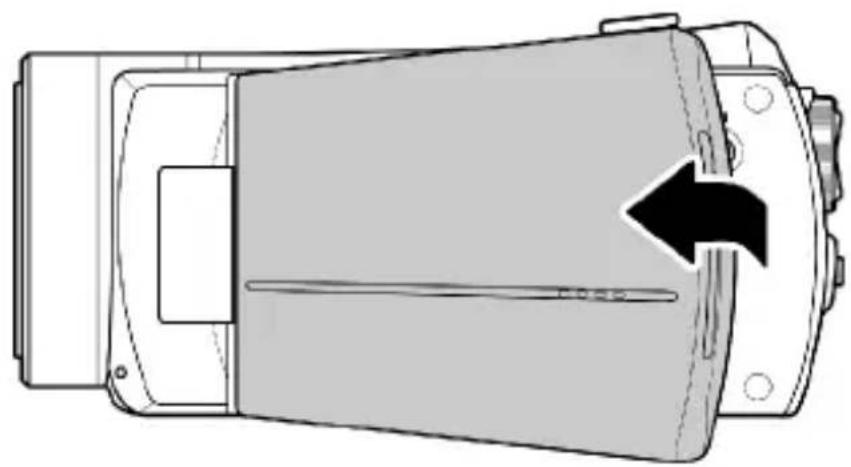
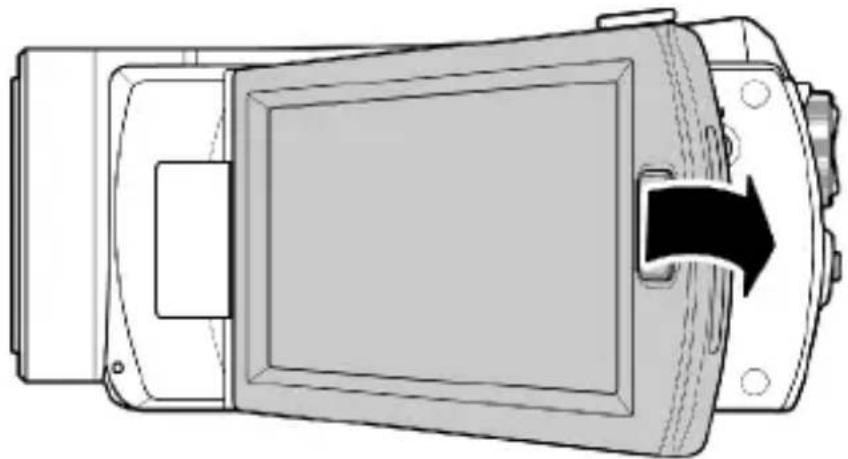
1.4.8 Adjusting the LCD display
Flip and twist the LCD screen as shown while capturing a still image or recording a video clip.
natural_image
Diagram of a mechanical device with a black arrow indicating rotation or movement (no text or symbols present)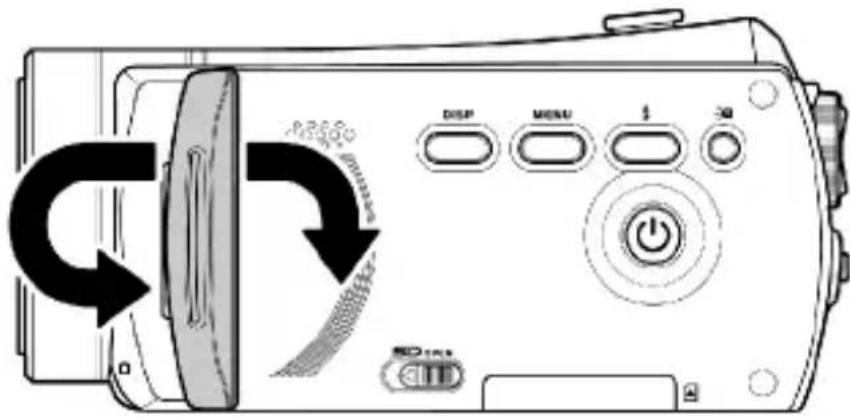
natural_image
Diagram of a digital camera module with an arrow indicating direction (no text or symbols present)See the table below for a description of each button's function.
| Button | Name | Function |
 | Power button | Press to turn power on/off. |
 | Menu button | Press to display main OSD menus. |
 | Mode dial | Use to turn Camcorder, Camera, and SET modes. |
 | Joystick | ● In Camcorder and Camera mode:1. Move up/ down to adjust the exposure settings.2. Move right to enable the macro function. Aicon appears on the LCD screen when enabled.3. Move left to adjust the white balance settings.● In Camera Playback mode:1. Move right and left to view the stored images.2. When the image is zoomed in, the LCD screen appears up/down direction keys. You may press the |
joystick to move the image. Then you may press the center joystick button to switch the moving directions (up/down ↔ left/right).
-
Move the joystick up to enter the Thumbnail mode.
-
In the Thumbnail mode, move up, down, left, right to select the thumbnail images and then press the center joystick button to view the image in full screen mode.
● In Camcorder Playback mode:
-
Press right and left to view the stored video clips and press the center joystick button to play/stop the video clips.
-
In Playing mode, move right to fast-forward a video clip and move left to rewind a video clip.
-
Move the joystick up to enter the Thumbnail mode.
-
In the Thumbnail mode, move up, down, left, right to select a desired video clip and then press the center joystick button to show the video clip.
- In SET mode, press left and right to highlight menu items and press the
| center joystick button to confirm. | ||
 | Shutter button | ● In Camera mode, press to take a photo.● In Camcorder mode, you can also press to take a photo before and during recording a video clip. |
 | REC/Stop button | ● In Camcorder mode, press to start recording a video clip. |
 | Playback button | In Camcorder and Camera mode, press to enter playback mode. |
 | Display button | Press once to turn off all OSD icons and press again to display all OSD icons off. |
 | Zoom button | ● In Camcorder and Camera modes, press right/ left to zoom in and out.● In Camera Playback mode, press right to zoom in your photo.● In Camcorder Playback mode, press left/ right to increase or decrease the volume of the video clip you are playing. |
 | LED light button | ● In Camcorder and Camera modes, press the button to turn on/ off the increase light. |
 | Flash button | ● In Camera modes, press the button to switch between the flash modes. |
 | SD card cover latch | ● Slide the latch to open the SD card cover when you insert/remove the SD card. |
 | Battery cover latch | ● Slide the latch to open the battery card cover when you insert/remove the battery. |
1.4.9 About the LEDs
The following table describes the camcorder LEDs:
| LED | Color | Definition |
| Power/Rec/Camcorder Status | Green | Power-on |
| Green/ Red Blinking | Recording | |
| Red | Camcorder busy | |
| Self-timer | Red Blinking | Self-timer is activated. |
| Red Blinking Rapidly | 2 seconds self-timer remaining. |
2 Getting started
Read this section to learn how to start using the camcorder. This section covers basic functions such as switching on, inserting the battery and memory cards, and configuring preliminary settings. See later chapters for advanced functions.
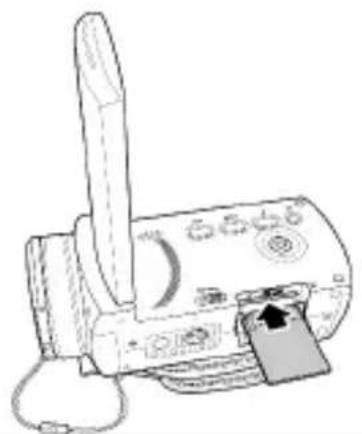
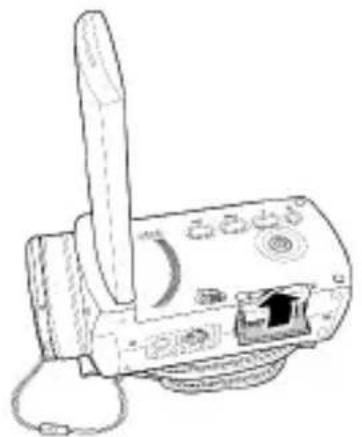
2.1 Inserting an SD card
An SD card can be installed in the camcorder to provide additional storage space for still images, video clips, or other files.
- Open the LCD screen cover and move the SD card cover latch in the direction of the arrow to open the SD card compartment cover.

natural_image
Line drawing of a handheld device with a circular button and pointer, no text or symbols present- Insert an SD card, making sure the contacts are facing upwards.
natural_image
Line drawing of a portable radio device with a cable and a scroll, no text or symbols present- Close the SD card compartment cover.
natural_image
Line drawing of a handheld electronic device with a scroll wheel and cable (no text or symbols)2.2 Inserting the batteries
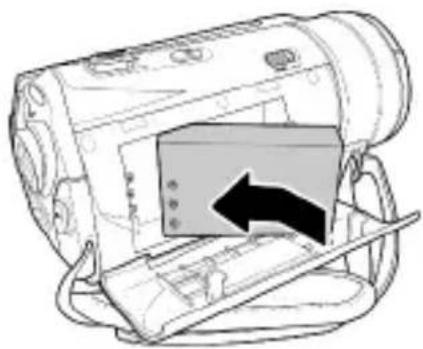
This camcorder is designed to use a rechargeable Li-ion battery. Only use the batteries supplied or similar batteries recommended by the manufacturer or your dealer.
- Note:
Install the battery exactly as described here. Installing the battery incorrectly could cause damage to the camcorder and possibly start a fire.
- Slide the battery cover latch as shown and then the battery cover opens automatically.

natural_image
Line drawing of a portable electronic device with handle and control panel (no text or symbols)- Insert the battery as shown.
natural_image
Diagram of a computer monitor with an open screen and a black arrow indicating the left side (no text or symbols present)- Close the battery cover as shown.

natural_image
Diagram of a device with an arrow indicating direction, showing internal components (no text or symbols)2.3 Charging the battery
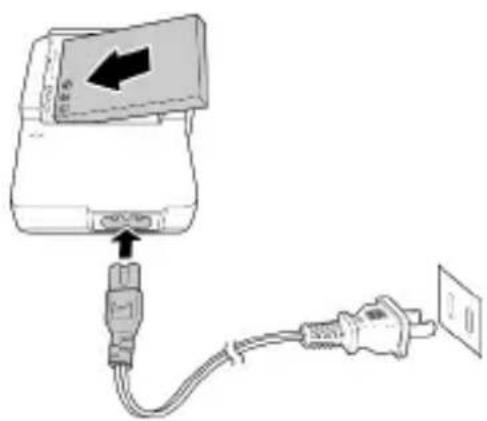
You can charge the battery with the charging unit provided. Follow the below steps to charge your battery.
-
Insert the Li-ion battery into the charging bay. Connect one end of the power cord to the charging unit and then plug the other end to the wall outlet as shown.
-
The red LED will light up for proper charging.
-
After full charge, the LED turns to green.
-
It takes about 290 minutes to achieve full charge. Actual charging time depends on current battery capacity and charging conditions.
natural_image
Diagram of a device with an attached plug and cable, showing no text or symbols2.4 Turning on/ off the camcorder
Press and hold the power button to turn the camcorder on/off.
2.5 Changing modes
The camcorder can operate in three modes, Camcorder, Camera, and SET. Move the mode dial to toggle different modes.

2.6 Before you start
Before you start using the camcorder, some basic settings such as date and time, languages and beep function need to be configured.
2.6.1 Setting the date and time
- Turn on the camcorder, and move the mode dial to SET. Move the joystick left and right or tap the screen to highlight Date / Time. Press the center joystick button to confirm.

- Move the joystick left and right or tap the screen to highlight each field.

-
Adjust each value by moving the joystick up, down, or tap the △ / ▽. Press the center joystick button or tap ▼ to save your changes and leave the Date/Time menu.
-
Press the Enter button to exit the menu.
2.6.2 Setting the language
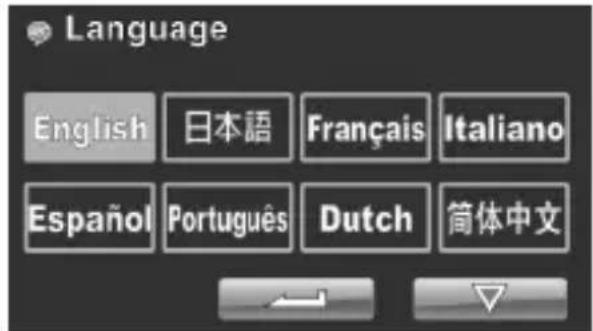
- Turn on the camcorder, and move the mode dial to SET. Move the joystick left and right or tap the screen to highlight Language. Press the center joystick button to enter the Language menu.

- Move the joystick left and right or tap the screen to select the following languages: English, Japanese, French, Italian, Spanish, Portuguese, Dutch, Simplified Chinese, Traditional Chinese, Korean, Turkish, German, Russian, and Arabic. Move the joystick up and down or tap △/▽ to go to the previous/next page. After the language is selected, press the center joystick button or tap ▼ to confirm.
- Press the Enter button to exit the menu.
2.6.3 Setting the beep
- Turn on the camcorder, and move the mode dial to SET. Move the joystick left and right or tap the screen to highlight Beep. Press the center joystick button to enter the Beep menu.

- Move the joystick left and right to select Beep Off or Beep On options. Pess the center joystick button or tap to confirm.

- Press the Enter button to exit the menu.
Notes:
Remove the LCD protective film to increase the sensitivity of the touch panel.
2.7 Shoot/Playback video
2.7.1 Shooting a video clip
- Turn on the camcorder and move the mode dial to Camcorder mode.
Camcorder mode

natural_image
Black-and-white close-up of blooming flowers with no visible text or symbols-
Use the LCD screen to frame the video.
-
Press the REC/STOP button to start recording.
-
Press the REC/STOP button again to stop recording.
-
The video clip is automatically saved with a unique file name.
Notes:
-
The maximum length of each video recording file is approximately 3.75 GB.
-
The high-resolution settings result in larger files, and therefore shorter length.
-
The LCD preview and the ratio of a still-image capture can vary depending on the different video resolution settings. See the following table:
Video resolution
Preview
Taking pictures and focusing
WQVGA
WVGA
720P
1080P
16:9 ratio

natural_image
Black and white close-up of a flower cluster (no text or symbols visible)4:3 ratio

natural_image
Black and white close-up of a flowering plant with visible petals and leaves (no text or symbols)- Before shooting a video clip, you can still take a photo in Camcorder mode.
2.7.2 Playing the video clip
- In Camcorder mode, press the Playback button. The most recent file displays on the LCD screen.
Camcorder playback mode indicator

natural_image
Black-and-white photo of flowers with blurred background, no visible text or symbols-
Move the joystick right and left to or tap select a desired video clip and press the center joystick button or ▶ The video clip starts playing.
-
Move the joystick left or tap 🏠 to rewind the video clip and move the joystick right or tap 🏠 to fast forward.
-
Press the REC/ STOP button or tap 📄 to pause the video playback. Press the REC/ STOP button again or tap 📋 to resume the video playback.
-
When viewing the video clip, move the Zoom button left or right to adjust the volume.
-
Press the center joystick button or tap ☐ to stop playing. Tap SLOW to view the video clip in 1/2 x slow playback. Tap SLOW twice to toggle between 1/2x and 2x speeds. Tap SLOW then tap ▶ to toggle among 1/4, 1/8 & 1/16 speeds.
-
Press the Playback button again to return to Camcorder mode.
2.8 Taking/viewing pictures
2.8.1 Taking a still picture
- Turn on the camcorder and move the Mode Dial to Camera mode.
Camera mode
natural_image
Black-and-white close-up of blooming flowers with no visible text or symbols-
Use the LCD screen to frame the picture.
-
Press the Shutter button to capture the image.
-
The picture is automatically saved with a unique file name.
2.8.2 Viewing images
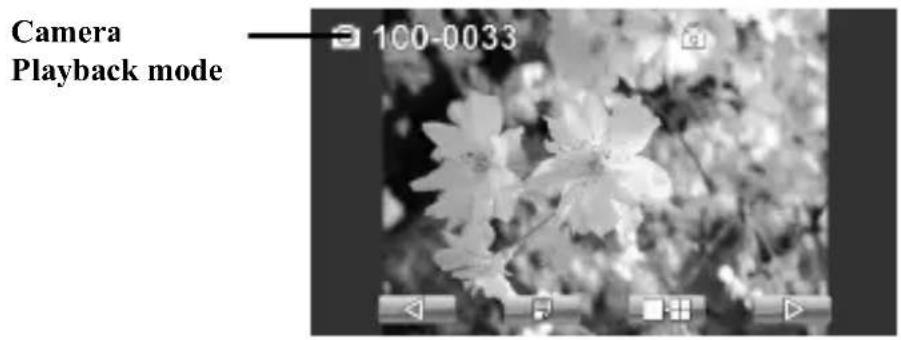
- In Camera mode, press the Playback button. The most recent image displays on the LCD screen.
-
Press the joystick right and left or tap △/ ▶ to scroll through the images.
-
Move the Zoom button right to zoom in the picture. There are four direction keys appears on the LCD screen. You may use the joystick to pan across the picture.
-
Move the joystick up fully or tap to view the thumbnails of all stored images.
-
Move the joystick left and right to select an image. Move the joystick up and down or tap △/▽ to go to the previous/next page
-
Press the center joystick button or tap to view the image in full screen mode.
-
Press the Playback button again to return to Camera mode.
2.9 Connecting to a computer
Read this section to learn how to transfer files to a PC, show the video clips or photos on a TV.
Connect the camcorder to a computer with the USB cable provided.

natural_image
Line drawing of a desktop computer connected to a tower via cable, with an inset showing a hand inserting a component (no text or symbols present)2.10 Connecting to a standard TV
Connect the camcorder to a standard TV as shown with the AV cable provided.

2.11 Connecting to a HDTV
Read this section to learn how to show the video clips or photos on a HDTV. Connecting to a HDTV offers the high resolution for displaying the video clips or photos.
Connect the camcorder to a HD TV as shown with the HDMI cable provided.

Notes:
When connected to an HDTV, dual video output is supported. You can view videos on the TV and operate the LCD panel at the same time.
3 Using the camcorder
Read this section to learn how to use the camcorder.
3.1 Camcorder mode
Use this mode to capture video clips or record voice and store them on an SD card.
3.1.1 Camcorder mode
Use the following picture to familiarize yourself with the Camcorder mode icons and symbols.
Camcorder mode

Camcorder mode:
See the table below for a description of each icon and symbol.
| 1 |  | Recording time elapsed |
| 2 |  | Memory status indicator: SD card in |
| 3 |  | Stabilizer indicator |
| 4 |  | Dual video indicator |
| 5 |  | Color effect indicator |
| 6 |  | Quality indicator |
| 7 |  | Macro indicator |
| 8 |  | LED light indicator |
| 9 |  | Menu indicator. Tap to enter the video menu. |
| 10 |  | Battery indicator |
| 11 |  | EV compensation indicator |
| 12 |  | White balance indicator |
| 13 |  | Video resolution indicator |
| 14 |  | Camcorder mode indicator |
| 15 | Zoom indicator |
3.1.2 Using the macro function
This function can capture subjects close to the lens. In macro mode, subjects can be as close as 5 cm.
While in Camera or Camcorder modes, move the joystick right to activate the macro function, and a 🤊 icon displays on the LCD screen.
Move the joystick again to return to normal mode.
3.1.3 Using the zoom function
The camcorder is equipped with 5x optical zoom and 10X digital zoom.
Move the Zoom button right to get closer to a subject.
Move the Zoom button left to move away from a subject.
3.1.4 Using the LED light
Use the LED light to illuminate subjects in dark environments.
Press the LED Light button to switch on the flash light and press again to switch it off.
3.1.5 Using the Flash module, auto and force
Use the auto and force flash module to illuminate subjects in dark environments when press the shutter button.
You may switch the auto and force flash module by toggling the Flash button. The 🎨 or 🔊 displays on your camcorder when activated.
3.1.6 Using the Stabilizer function
Use the Stabilizer function to reduce vibration caused by camcorder shanks during a video shoot.
See section 4.1.5 "Stabilizer".
3.1.7 Quick access controls
You can also make adjustments to exposure by pressing the joystick up and down.
In Camcorder and Camera modes, press the joystick up and down to adjust the EV compensation settings. Press the joystick left to choose white balance settings.
3.2 Camera mode
Use Camera mode to capture still pictures and store them in the on an SD card.
3.2.1 Camera mode icons
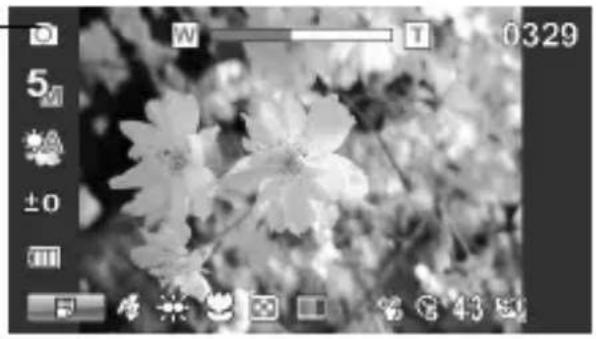
Use the following picture to familiarize yourself with the Camera mode icons and symbols.

See the table below for a description of each icon and symbol.
| 1 | 0329 | Remaining number of photos |
| 2 |  | Memory status indicator: SD card in |
| 3 |  | Aspect ratio indicator |
| 4 |  | Self-timer indicator |
| 5 |  | Stabilizer indicator |
| 6 |  | Color effect indicator |
| 7 |  | Quality indicator |
| 8 |  | Macro indicator |
| 9 |  | LED light indicator |
| 10 |  | Flash indicator |
| 11 |  | Menu indicator. Tap to enter the camera menu. |
| 12 |  | Battery indicator |
| 13 |  | EV compensation indicator |
| 14 |  | White balance indicator |
| 15 |  | Video resolution indicator |
| 16 |  | Camera mode indicator |
| 17 |  | Zoom indicator |
3.2.2 Using the macro function
See section 3.1.2 "Using the macro function".
3.2.3 Using the zoom function
See section 3.1.3" Using the zoom function".
3.2.4 Using the LED light module
See section 3.1.4 "Using the LED light".
3.2.5 Quick access controls
See section 3.1.7"Quick access controls".
3.3 Camcorder Playback mode
Use Camcorder Playback mode to review all the movie files stored on the SD card.
3.3.1 Camcorder Playback mode icons
Refer to the following picture to familiarize yourself with the Camcorder Playback mode icons and symbols.
Camcorder playback mode

Camcorder mode:
See the table below for a description of each icon and symbol.
| 1 | 00:00:18 | Displays the elapsed time while playing the video clip |
| 2 |  | Volume level indicator |
| 3 |  | Fast forward icon. Tap to fast forward the video clip |
| 4 |  | Slow motion icon. Tap to play the video in slow motion |
| 5 |  | Stop icon. Tap to stop the video. |
| 6 |  | Pause icon. Tap to pause the video. |
| 7 |  | Rewind icon. Tap to rewind the video. |
| 8 |  | File protect indicator |
| 9 | [DDSD] | Camcorder playback mode icon |
| 10 | 100-0034 | Displays the file number of the video clip |
3.4 Camera Playback mode
Use Camera Playback mode to review all the image files stored in the camcorder.
3.4.1 Camera Playback mode icons
Refer to the following picture to familiarize yourself with the Camera Playback mode icons and symbols.
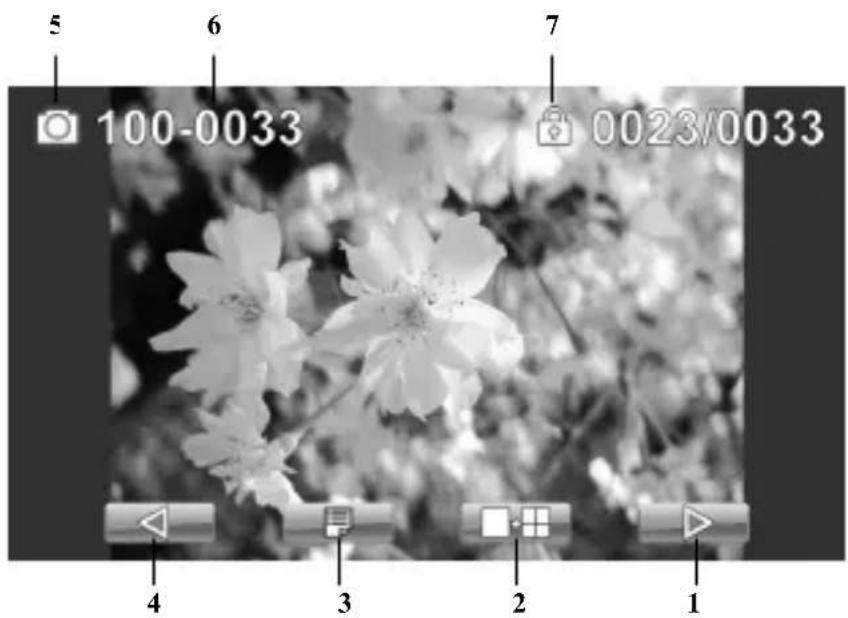
See the table below for a description of each icon and symbol.
| 1 |  | Next icon. Tap to go to the next image. |
| 2 |  | Thumbnail icon. Tap to display images in thumbnail. |
| 3 |  | Menu icon. Tap to display the playback menu. |
| 4 |  | Back icon. Tap to return to the previous image. |
| 5 |  | Camera playback mode icon. |
| 6 |  | File number indicator |
| 7 |  | File protect indicator |
3.5 Thumbnail mode
When in Camera Playback or Camcorder Playback modes, move the joystick up or tap to show images as thumbnails.
-
Turn on the camcorder and make sure it is in Camera Playback or Camcorder Playback mode.
-
The most recent image /video clip displays on the screen. Move the joystick up or tap to view six thumbnail images /video clips on the LCD screen.

natural_image
Grid of six grayscale satellite images showing natural scenes, displayed within a digital interface with control buttons at the bottom (no readable text or symbols on images)-
Move the joystick left and right or tap the screen highlight an image or a video clip. Move the joystick up and down or tap △ / ▽ to go to the previous/next page.
-
Press the center joystick button or tap to view the image or playback the video clip in full screen mode.
-
Move the joystick up or tap to return to thumbnail view.
Read this section to learn how to configure the camcorder settings and use the advanced features.
4.1 Camcorder menu
When in Camcorder mode, press the Menu button or tap to show the camcorder options menu.
4.1.1. Video resolution
Use the resolution option to determine the resolution of the captured video. The larger screen size requires more memory storage space.
- Turn the camcorder on and ensure it is in Camcorder mode.
- Press the Menu button or tap 📋 to enter the Camcorder menu.
- Move the joystick left and right or tap the screen to highlight the Resolution option. Press the center joystick button to display the submenu.
- Press the joystick left and right to select 1080i/60FPS, 1080P/30FPS, 720P/60FPS, 720P/30FPS, WVGA/60FPS, WVGA/30FPS, or WQVGA/240FPS. Press the center joystick button or tap 📄 to confirm and exit the submenu.

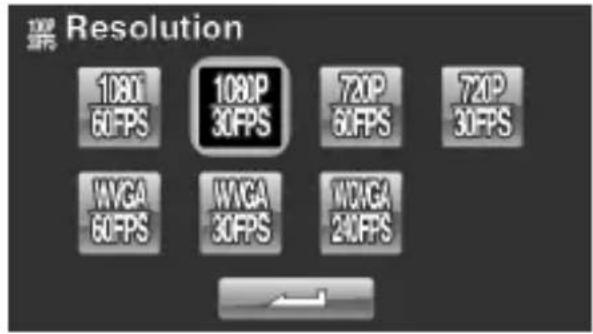
- Press the Enter button to exit the menu.
- Note:
In 1080P mode, you can capture a photo when the video is recording. The still image resolution is 2560*1440.
4.1.2. Video quality
There are two different levels of video quality setting. Higher quality video needs more memory storage space.
-
Turn the camcorder on and ensure it is in Camcorder mode.
-
Press the Menu button or tap to enter the Camcorder menu.
-
Move the joystick left and right or tap the screen to highlight the Quality option. Press the center joystick button to display the submenu.
-
Press the joystick left and right or tap the screen to select the desired option. Press the center joystick button or tap to confirm and exit the submenu.


- Press the Enter button to exit the menu.
4.1.3. White balance
Use this option to correct color difference for different lighting conditions. When white balance is set to Auto, the camcorder automatically compensates for different lighting conditions.
-
Turn the camcorder on and ensure it is in Camcorder mode.
-
Press the Menu button or tap to enter the Camcorder menu
-
Move the joystick left and right or tap the screen to highlight the White Balance menu. Press the center joystick button to display the submenu.
-
Move the joystick left and right or tap to select Auto, Sunny, Cloudy, Tungsten, or Fluorescent. Press the center joystick button or tap 📋 to confirm and exit the submenu.

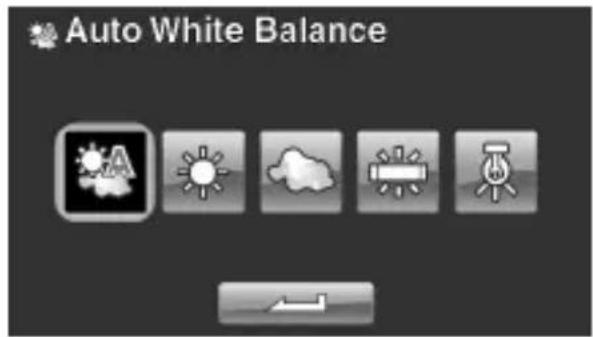
- Press the Enter button to exit the menu.
4.1.4.Color effect
The camcorder can capture standard color images, black and white images, or sepia tone to give an old-fashioned look.
-
Turn the camcorder on and ensure it is in Camcorder mode.
-
Press the Menu button or tap to enter the Camcorder menu
-
Move the joystick left and right or tap the screen to highlight the Effect menu. Press the center joystick button to display the submenu.
-
Move the joystick left and right or tap to select Natural, B&W, or Sepia. Press the center joystick button or tap to confirm and exit the submenu.


- Press the Enter button to exit the menu.
4.1.5. Stabilizer
Use this function to reduce vibration caused by camcorder shakes during a video shoot.
-
Turn the camcorder on and ensure it is in Camcorder mode.
-
Press the Menu button or tap to enter the Camcorder menu
-
Move the joystick left and right or tap the screen to highlight the Stabilizer menu. Press the center joystick button to display the submenu.
-
Move the joystick left and right or tap to select Off or Stabilizer options. Press the center joystick button or tap to confirm and exit the submenu.

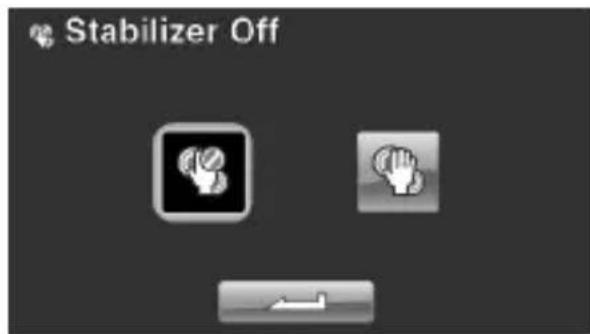
-
Press the Enter button to exit the menu.
-
An icon 📋 displays on the screen.
4.1.6. Dual Video mode
Use this function to record two deferent resolution video clips at same time.
-
Turn the camcorder on and ensure it is in Camcorder mode.
-
Press the Menu button or tap to enter the Camcorder menu
-
Move the joystick left and right or tap the screen to highlight the Dual Video menu. Press the center joystick button to display the submenu.
-
Move the joystick left and right or tap to select Off, 1080P/WQVGA, or 720P/WQVGA. Press the center joystick button or tap 📄 to confirm and exit the submenu.


- Press the Enter button to exit the menu.
- Note:
When this dual video function is enabled, the still image resolution of PIV is 1280*720. When dual video function is off, the still image resolution is 1920*1080.
4.2 Camcorder playback menu
Use the playback menu to manage the files stored on the SD card.
4.2.1 Delete
Use this function to delete files.
- Turn the camcorder on and ensure it is in Camcorder mode. Press the Playback button and then press the Menu button or tap to display the Camcorder Playback menu.
- Move the joystick left and right or tap the screen to select Delete One or Delete All options.
If you select Delete One, the playback screen appears again.
Move the joystick right and left or tap 🏠/ 🏠 to locate the file you want to delete and press the center joystick button or tap 🏠 to confirm.

natural_image
Black-and-white photo of white flowers with no visible text or symbols
natural_image
Black-and-white photo of flowers with blurred background, no visible text or symbolsIf you select Delete All, a prompt appears on screen for confirmation. Move the joystick left and right or tap the screen to select the desired option. Press the center joystick button or tap 📄 to confirm. All files stored in memory will be deleted.

natural_image
Black-and-white photo of white flowers with blurred background, no visible text or symbols
- Press the Menu button or tap to exit the menu.
- Note:
Once deleted, files cannot be recovered so make sure you have a backup before you delete. Files that have been protected will not be deleted. You have to unlock the files first before deleting them.
4.2.2 Protect
Use this function to lock files to prevent accidental deletion.
-
Turn the camcorder on and ensure it is in Camcorder mode. Press the Playback button and then press the Menu button or tap to display Camcorder Playback menu.
-
Move the joystick left and right or tap the screen to select Protect menu. Press the center joystick button or tap to display the submenu.
-
Then playback screen appears again. Move the joystick or tap 🏠/ 🏠 to locate the file you want to protect. Press the center joystick button or tap 🔒 to protect or unprotect the file. A lock 🔒 icon is displayed to show that the file is protected.

natural_image
Black-and-white photo of white flowers with no visible text or symbols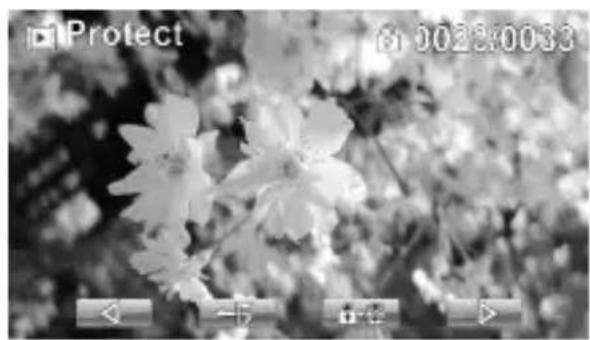
natural_image
Black-and-white photo of white flowers with blurred background, no visible text or symbols- Press the Menu button again or tap to exit the menu.
- Note:
To unlock a file, repeat the above steps. The lock icon disappears when the file is unlocked.
4.2.3 Autoplay
This camcorder includes an Autoplay function, which plays each video clip in turn.
-
Turn the camcorder on and ensure it is in Camcorder mode. Press the Playback button and then press the Menu button or tap to display Camcorder Playback menu.
-
Move the joystick left and right or tap the screen to select Autoplay menu. Press the center joystick button or tap to display the submenu.
-
Move the joystick right and left or tap the screen to select the desired options. Press the center joystick button or tap to confirm.

natural_image
Black-and-white photo of white flowers with app icons in the corner (no readable text or symbols on the flower image)
- Press the Menu button again or tap to exit the menu.
4.3 Camera menu
In Camera mode, press the Menu button to show the Camera Options menu.
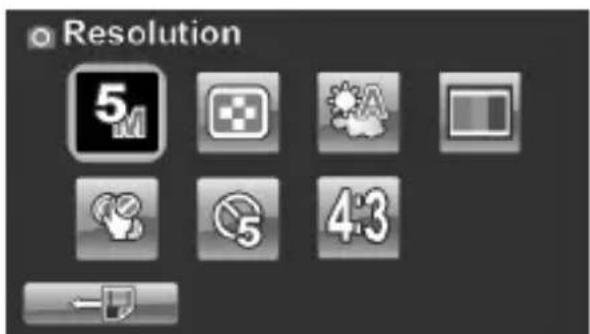
4.3.1 Resolution
Use this option to set the size of the captured image. Larger images contain more detail and therefore use more memory space.
-
Turn the camcorder on and ensure it is in Camera mode.
-
Press the Menu button or tap 📋 to enter the Camera menu
-
Move the joystick left and right or tap the screen to highlight the Resolution menu. Press the center joystick button to display the submenu.
-
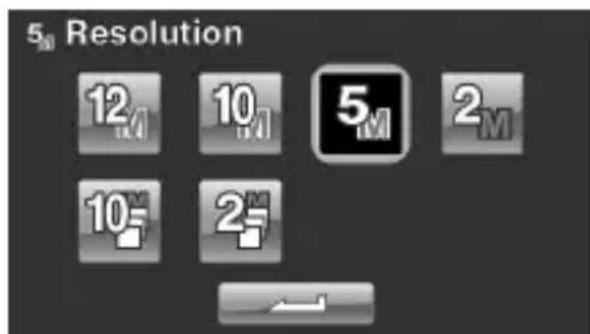
Move the joystick left and right to select from 12M, 10M, 5M, 2M, 10M burst or 2M burst. Press the center joystick button or tap 📄 to confirm.
- Press the Enter button to exit the menu.
4.3.2 Photo Quality
There are two different levels of video quality setting. Higher quality video needs more memory storage space.
- Turn the camcorder on and ensure it is in Camera mode.
- Press the Menu button or tap 📋 to enter the Camera menu.
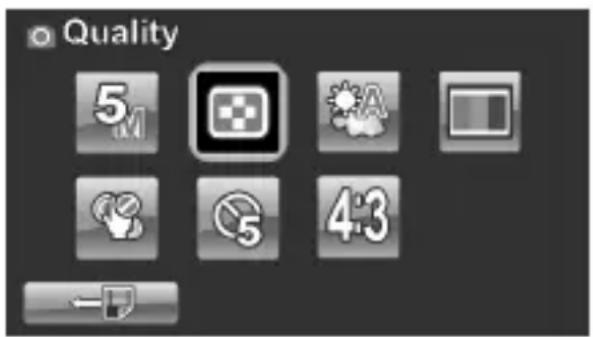
- Move the joystick left and right or tap the screen to highlight the Quality option. Press the center joystick button to display the submenu.
- Press the joystick left and right or tap the screen to select the desired option. Press the center joystick button or tap to confirm and exit the submenu.

- Press the Enter button to exit the menu.
4.3.3 White balance
Use this option to correct color difference due to lighting conditions.
- Turn the camcorder on and ensure it is in Camera mode.
-
Press the Menu button or tap 📋 to enter the Camera menu.
-
Move the joystick left and right or tap the screen to highlight the White Balance option. Press the center joystick button to display the submenu.
-
Move the joystick left and right to select Auto, Sunny, Cloudy, Tungsten, or Fluorescent. Press the center joystick button or tap 📁 to confirm.
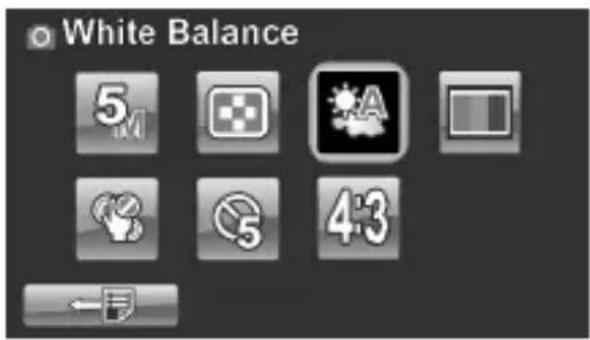

- Press the Enter button to exit the menu.
4.3.4 Color effect
The camcorder can capture standard color images, black and white images, or sepia tone to give an old-fashioned look.
-
Turn the camcorder on and ensure it is in Camera mode.
-
Press the Menu button or tap to enter the Camera menu.
-
Move the joystick left and right or tap the screen to highlight the Effect menu. Press the center joystick button to display the submenu.
-
Move the joystick left and right or tap to select Natural, B&W, or Sepia. Press the center joystick button or tap to confirm and exit the submenu.


- Press the Enter button to exit the menu.
4.3.5 Selftimer
Use the self timer function to take a photo of yourself.
-
Turn the camcorder on and ensure it is in Camera mode.
-
Press the Menu button or tap to enter the Camera menu.
-
Move the joystick left and right or tap the screen to highlight the Selftimer menu. Press the center joystick button to display the submenu.
-
Move the joystick left and right or tap to select Off, 5 seconds, or 10 seconds options. Press the center joystick button or tap 📋 to confirm.

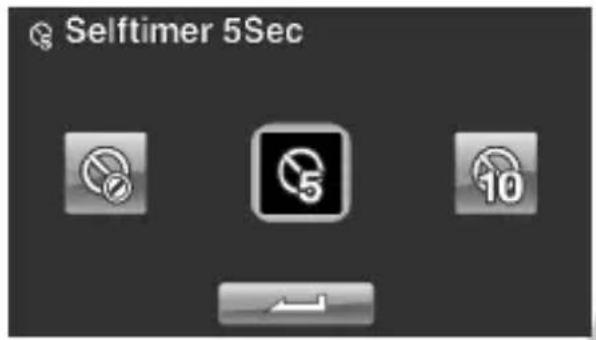
- Press the Enter button to exit the menu.
4.3.6 Aspect Ratio
Use the aspect ratio function to adjust the aspect ratio of the display.
-
Turn the camcorder on and ensure it is in Camera mode.
-
Press the Menu button or tap 📋 to enter the Camera menu.
-
Move the joystick left and right or tap the screen to highlight the Aspect Ratio menu. Press the center joystick button to display the submenu.
-
Move the joystick left and right or tap to select 4:3, 16:9, or 3:2 options. Press the center joystick button or tap to confirm.
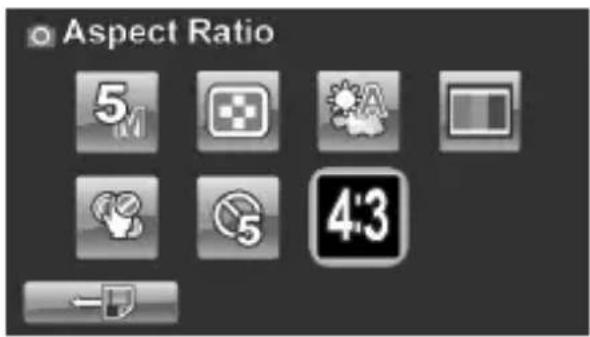
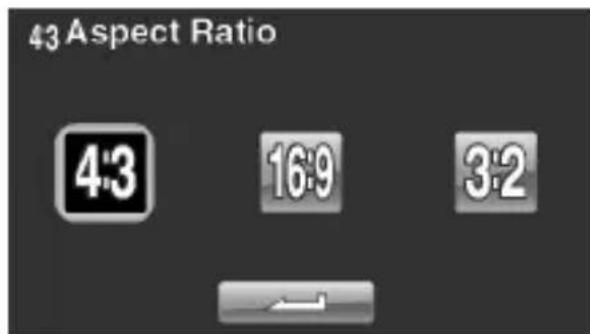
- Press the Enter button to exit the menu.
4.4 Camera playback menu
4.4.1 Delete
Use this function to delete files.
- Turn the camcorder on and ensure it is in Camera mode. Press the Playback button and then press the Menu button or tap to display the Camera Playback menu.
- Move the joystick left and right or tap the screen to select Delete One or Delete All options.
If you select Delete One, the playback screen appears again.
Move the joystick right and left or tap 🏠/ 🏠 to locate the file you want to delete and press the center joystick button or tap 🏠 to confirm.

natural_image
Black-and-white photo of flowers with no visible text or symbols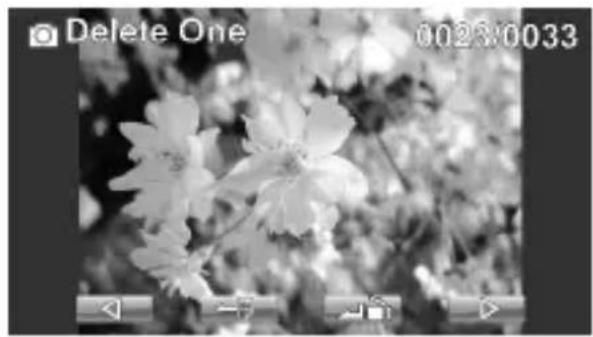
natural_image
Black-and-white close-up of white flowers with blurred background, no visible text or symbolsIf you select Delete All, a prompt appears on screen for confirmation. Move the joystick left and right or tap the screen to select the desired option. Press the center joystick button or tap 📄 to confirm. All files stored in memory will be deleted.
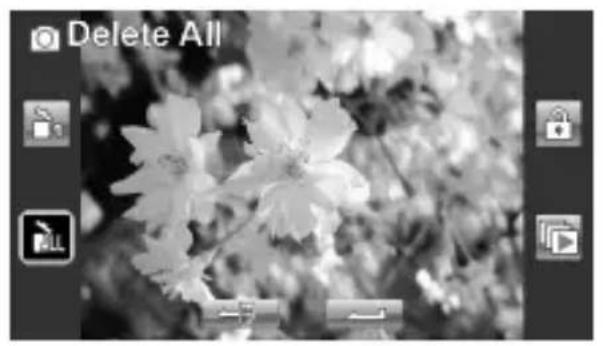
natural_image
Black-and-white photo of flowers with no visible text or symbols
- Press the Menu button or tap → to exit the menu.
- Note:
Once deleted, files cannot be recovered so make sure you have a backup before you delete. Files that have been protected will not be deleted. You have to unlock the files first before deleting them.
4.4.2 Protect
Use this function to lock files to prevent accidental deletion.
-
Turn the camcorder on and ensure it is in Camera mode. Press the Playback button and then press the Menu button or tap to display Camera Playback menu.
-
Move the joystick left and right or tap the screen to select Protect menu. Press the center joystick button or tap to display the submenu.
-
Then playback screen appears again. Move the joystick or tap 🏠/ 🏠 to locate the file you want to protect. Press the center joystick button or tap 🔒 to protect or unprotect the file. A lock 🔒 icon is displayed to show that the file is protected.

natural_image
Black-and-white photo of flowers with camera lock icons in the corner (no text or symbols on the flower image itself)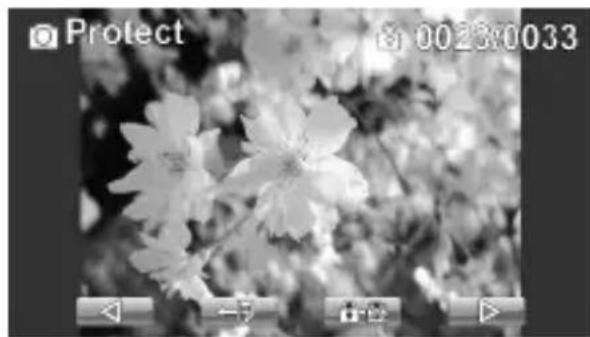
natural_image
Black-and-white photo of white flowers with blurred background, no visible text or symbols- Press the Menu button again or tap to exit the menu.
- Note: To unlock a file, repeat the above steps. The lock icon disappears when the file is unlocked.
4.4.3 Autoplay
The camcorder includes a slide show function, which displays each image in turn with a regular interval between pictures.
-
Turn the camcorder on and ensure it is in Camera mode. Press the Playback button and then press the Menu button or tap to display Camera Playback menu.
-
Move the joystick left and right or tap the screen to select Autoplay menu. Press the center joystick button or tap to display the submenu.
-
Move the joystick right and left or tap the screen to select the desired options. Press the center joystick button or tap to confirm. The images are displayed automatically.

natural_image
Black-and-white photo of flowers with no visible text or symbols
- Press the Menu button again or tap to exit the menu.
4.5 System menu
The system menu is used to configure miscellaneous camcorder functions.
4.5.1 Setting the beep
See section 2.6.3 "Setting the Beep".
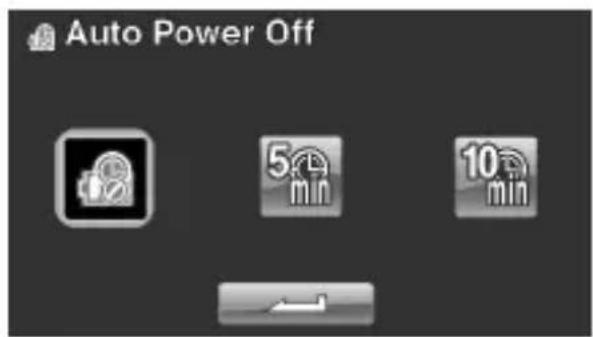
4.5.2 Auto power off
Use this function to switch the camcorder off automatically after a period of inactivity for power saving.
- Turn on the camcorder and switch to SET mode.
- Move the joystick left and right or tap highlight the Auto Power Off option. Press the center joystick button to display the submenu.
- Move the joystick left and right or tap to select Off, 5 minute, or 10 minutes. Press the center joystick button or tap 📋 to confirm.

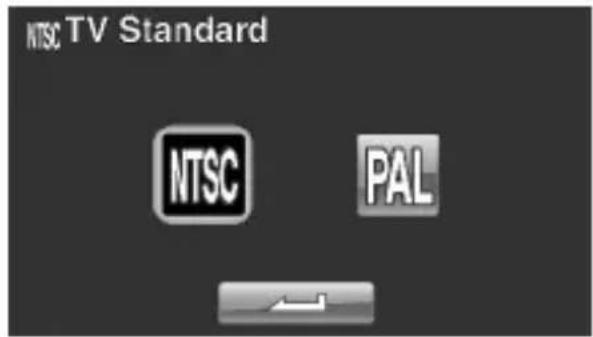
4.5.3 TV standard
Use the TV option to set the TV system for the area.
-
Turn on the camcorder and switch to SET mode.
-
Move the joystick left and right or tap to highlight the TV standard option. Press the center joystick button to display the submenu.
-
Move the joystick left and right or tap to select NTSC or PAL, and press the center joystick button or tap to confirm.

4.5.4 Format
Use this function to format the current storage media. This format action will delete everything on the media.
-
Turn on the camcorder and switch to SET mode.
-
Move the joystick left and right or tap to highlight the Format option. Press the center joystick button to display the submenu.
-
Move the joystick left and right or tap to select X or √, and press the center joystick button or tap 📄 to confirm.


- The current media (memory card) is formatted.
4.5.5 Default
Use this option to reset all settings to the default settings.
-
Turn on the camcorder and switch to SET mode.
-
Move the joystick left and right highlight the Default option. Press the center joystick button to display the submenu.
-
Move the joystick left and right to select X or √, and press the center joystick button to confirm.


4.5.6 Language
See section 2.6.2 "Setting the language".
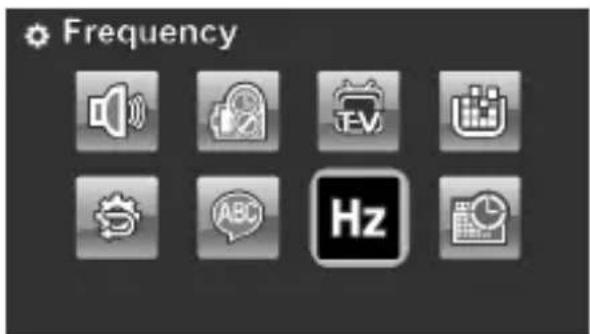
4.5.7 Frequency
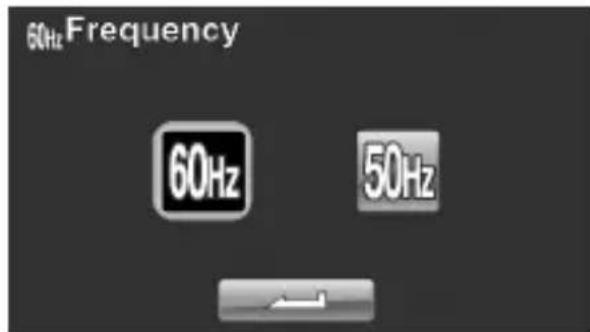
Use the Frequency option to set the frequency system for your area. To set the frequency:
-
Turn on the camcorder and switch to SET mode.
-
Move the joystick left and right to highlight the Frequency option. Press the center joystick button to display the submenu.
-
Move the joystick left and right to select 50 Hz or 60 Hz. Press the center joystick button or tap 📄 to confirm.
4.5.8 Date/time
See section 2.6.1 "Setting the date and time".
5 Installing the software and drivers
Read this section to learn how to install the software for the camcorder.
5.1 Presto! Video Works
Presto! Video Works is an advanced software application for editing video.
To install Presto! Video Works:
- Insert the supplied CD into the CD-ROM drive.
- If the CD-ROM does not automatically boot, use Windows Explorer to execute the InstallMgr.exe file in the root directory.
The following screen is displayed.
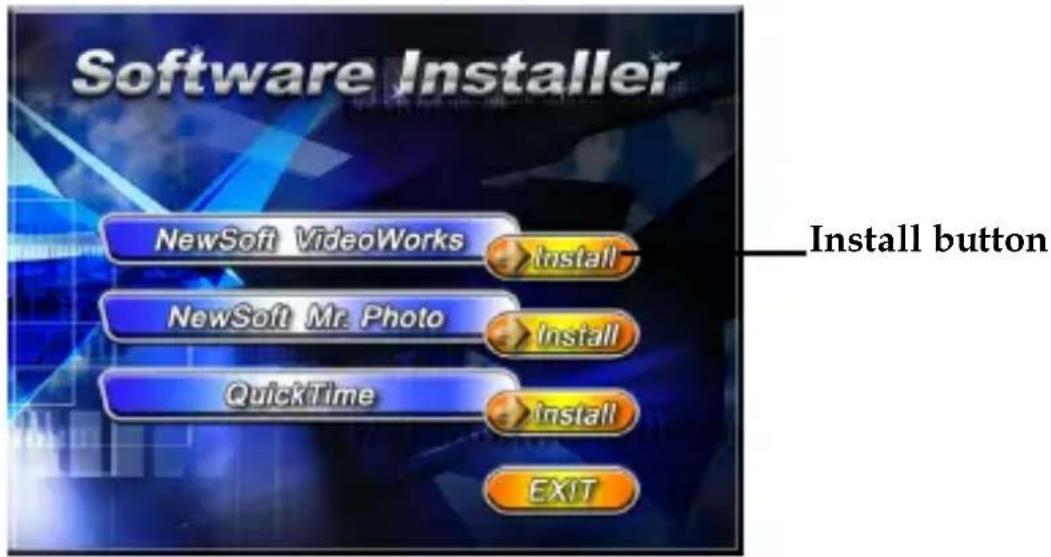
- Click the Install button to begin the installation process and follow the instructions on-screen.
More information about Presto! Video Works 6 can be found in the help files when the application is started.
5.2 Presto! Mr. Photo
Presto! Mr. Photo is an advanced photo editing software application.
To install Presto! Mr. Photo:
-
Insert the supplied CD into the CD-ROM drive.
-
If the CD-ROM does not automatically boot, use Windows Explorer to execute the InstallMgr.exe file in the root directory.
The following screen is displayed.

- Click the Install button to begin the installation process and follow the instructions on-screen.
More information about Presto! Mr. Photo can be found in the help files when the application is started.
5.3 Quick Time
Quick Time is an easy-to-use application for playing the video clips stored in the camcorder or on the SD/MMC card.
To install the Quick Time:
-
Insert the supplied CD into the CD-ROM drive.
-
If the CD-Rom doesn't automatically boot, use Window Explore to execute the InstalMgr.exe file in the root directory.
The following screen is displayed:
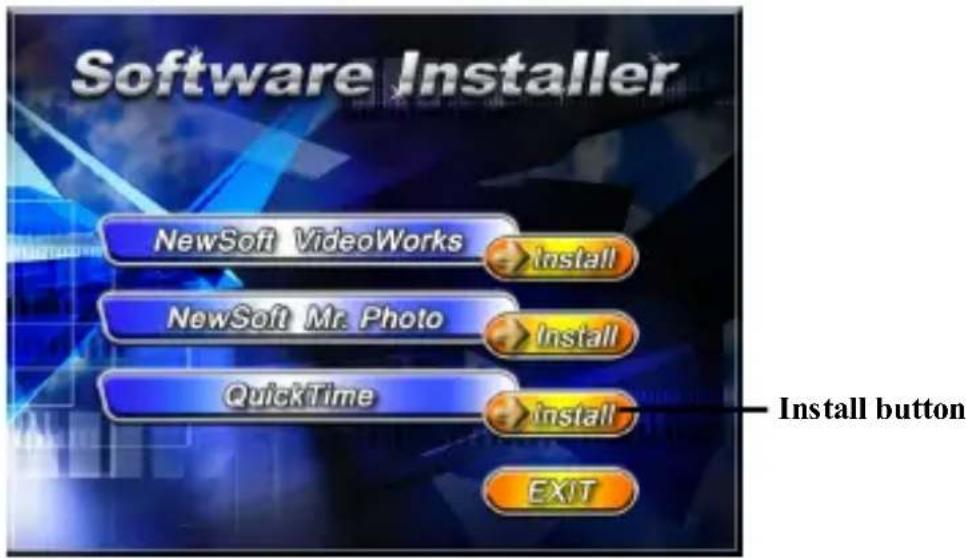
- Click the Install button to begin the installation process and follow the instructions on-screen.
More information about Quick Time can be found in the help files when the application is started.
Appendix Specifications
| General | |
| Imaging sensor | 1/2.3" CMOS 10.0 Megapixel sensor |
| Active pixels | 10.0 Megapixel |
| Storage media | Internal: Built-in 128MB Flash Memory External: SD Card (Up to SDHC 16GB Class6) |
| Sensor sensitivity | Auto |
| Color effects | Natural/B&W/Sepia |
| Lens | 5X Optical zoom lens Wide: F3.5~F32, f=6.8mm Tele: F3.7~F33.8, f=34mm (38-190mm equivalent to 35mm) 8G11E with ND filter |
| Focus range | Normal: 10cm ~ inf. (Wide) 1m ~inf. (tele) Macro: 2cm ~ 80cm (Wide) |
| Still image | Formats: JPEG (EXIF2.2), DCFResolution: 2M, 5M, 10M, 12M (Firmware interpolation)Continuous Shots: 10M, Max. 7 photos/sec; 2M, Max. 30 photos/sec. |
| Movie clips | Format: H.264 (MOV)Resolution: WQVGA (240fps), WVGA (30fps), WVGA (60fps), 720p (30fps), 720p (60fps), 1080p (30fps), 1080i (60fps) |
| Zoom | Movie: 5X Optical Zoom, 10X Digital ZoomCamera: 5X Optical zoom, 10X Digital zoomPlayback: Still Image (8X) |
| TFT Monitor | 3.0” TFT (960 x 240 pixels) (16:9) |
| LED light (Video) | Effective Range: 0.5m ~ 1mMode: On / Off |
| Strobe (Camera) | Mode: Auto / Forced / Off |
| White balance | Auto/Sunny/Cloudy/Tungsten/Fluorescent |
| EVcompensation | -2.0 EV~+2.0 EV |
| Self-timer | Off, 5, 10 seconds |
| PC interface | MSDC: USB 2.0 (high speed) |
| TV out format | NTSC/PAL/ HDMI |
| Shutter | Still: 1/2-1/2000Video: 1/30-1/4000 |
| Auto power off | Off, 5 min., 10 min |
| Power supply | Li-Ion battery NP-120 battery/DC-in via USB |
| Dimension | 57 (W) x 70 (H) x 129 (D) mm |
| Weight | Approx. 292±5g (without batteries) |
Troubleshooting
| Problem | Possible Cause | Solution |
| Cannot turn on the camcorder. | The batteries are not inserted correctly.The batteries have no power. | Insert the batteries correctly. (See 2.2 Inserting the batteries.)Please charge the battery. (See 2.3 Charging the battery.) |
| The camcorder suddenly turns off. | The auto power off function was enabled.The camcorder is running out of battery power. | Turn the power on again.Please charge the battery. (See 2.3 Charging the battery.) |
| The captured image is not stored in memory. | Before the image is saved the power has been cut off. | When battery indicator turns empty (without green bars), replace the battery immediately. |
| The camcorder turns off when capturing image using self-timer. | The camcorder is running out of battery power. | • Please charge the battery. (see 2.3 Charging the battery) |
| The image is out of focus. | The subject is beyond focus range. | • Please take a picture within the available focus range and choose normal or macro mode. (See 3.2.2 Using the macro function). |
| Memory card cannot be used. | The memory card is protected.The memory card contains non-DCF images taken by other camcorders.The SD card speed is too low. | Unlock the memory card.Format the memory card. (See 4.5.4 Format.) Before formatting the card, ensure you back up the files.You can set the video or photo to lower quality. (See 4.1.2 Video quality) |
| All buttons are inactive. | Short circuit occurred when connecting the camcorder with other devices. | Remove the batteries from the camcorder and insert again. |

natural_image
Abstract grayscale gradient background with concentric white arcs and a black base (no text or symbols)
- APDV-1005 HD Camcorder
- Introducing the camcorder...... 1
- Getting started.... 13
- Before you start....18
- Shoot/Playback video....21
- Taking/viewing pictures 24
- Connecting to a computer....26
- Using the camcorder.... 28
- Camcorder mode....28
- Camera mode....31
- Camcorder Playback mode....33
- Camera Playback mode...... 35
- Thumbnail mode......36
- Using the menus...... 37
- Camcorder menu 37
- Camcorder playback menu.... 44
- Camera menu....48
- Camera playback menu....53
- System menu....57
- Installing the software and drivers ..... 62
- Preface
- About this manual
- Copyright
- Precautions
- General precautions
- Notes on the LCD Screen
- Operation conditions
- Power supply
- Before You Start
- Copyright information
- Introducing the camcorder
- System requirements
- Note:
- Features
- Unpacking the camcorder
- About the camcorder
- Front view
- Top view
- Bottom view
- Right view
- Left view
- Back view
- Control Panel
- Adjusting the LCD display
- About the LEDs
- Getting started
- Inserting an SD card
- Inserting the batteries
- - Note:
- Charging the battery
- Turning on/ off the camcorder
- Changing modes
- Before you start
- Setting the date and time
- Setting the language
- Setting the beep
- Notes:
- Shoot/Playback video
- Shooting a video clip
- Playing the video clip
- Taking/viewing pictures
- Taking a still picture
- Viewing images
- Connecting to a computer
- Connecting to a standard TV
- Connecting to a HDTV
- Using the camcorder
- Camcorder mode
- Camcorder mode
- Camcorder mode:
- Using the macro function
- Using the zoom function
- Using the LED light
- Using the Flash module, auto and force
- Using the Stabilizer function
- Quick access controls
- Camera mode
- Camera mode icons
- Using the macro function
- Using the zoom function
- Using the LED light module
- Quick access controls
- Camcorder Playback mode
- Camcorder Playback mode icons
- Camera Playback mode
- Camera Playback mode icons
- Thumbnail mode
- Camcorder menu
- Video resolution
- Video quality
- White balance
- 4.1.4.Color effect
- Stabilizer
- Dual Video mode
- Camcorder playback menu
- Delete
- Protect
- Autoplay
- Camera menu
- Resolution
- Photo Quality
- White balance
- Color effect
- Selftimer
- Aspect Ratio
- Camera playback menu
- Delete
- Protect
- Autoplay
- System menu
- Setting the beep
- Auto power off
- TV standard
- Format
- Default
- Language
- Frequency
- Date/time
- Installing the software and drivers
- Presto! Video Works
- Presto! Mr. Photo
- Quick Time
- Appendix Specifications
- Troubleshooting
Brand : AGFA
Model : DV-1005
Category : Camcorder