DV-1002 - Camcorder AGFA - Free user manual and instructions
Find the device manual for free DV-1002 AGFA in PDF.


| Product Type | Camcorder |
| Brand | Agfa |
| Model | DV-1002 |
| Dimensions (W x H x D) | Approx. 5.5 x 2.5 x 4.3 inches (14 x 6.3 x 11 cm) |
| Weight | Approx. 12.3 oz (350 g) without battery |
| Power Supply | Rechargeable lithium-ion battery (7.4V, 1100mAh) or AC adapter |
| Recording Media | SD/SDHC memory card (up to 32GB) |
| Video Resolution | 1920x1080 Full HD at 30 fps |
| Photo Resolution | 16 megapixels (interpolated) |
| Optical Zoom | 15x optical zoom |
| Digital Zoom | 120x digital zoom |
| Display | 3.0-inch LCD touchscreen |
| Connectivity | USB 2.0, HDMI mini, AV out |
| Image Stabilization | Electronic image stabilization |
| Main Functions | Video recording, photo capture, playback, digital zoom, scene modes, white balance, self-timer |
| Maintenance & Cleaning | Clean lens with soft dry cloth; keep away from dust and moisture; recharge battery regularly if not used |
| Safety Precautions | Do not disassemble; avoid extreme temperatures; use only approved charger; keep out of reach of children |
| Spare Parts & Repairability | Battery and charger available separately; lens housing may be replaceable by authorized service center |
| General Information | User manual available for download; 188 pages; language: English |
Frequently Asked Questions - DV-1002 AGFA
User questions about DV-1002 AGFA
0 question about this device. Answer the ones you know or ask your own.
Ask a new question about this device
Download the instructions for your Camcorder in PDF format for free! Find your manual DV-1002 - AGFA and take your electronic device back in hand. On this page are published all the documents necessary for the use of your device. DV-1002 by AGFA.
USER MANUAL DV-1002 AGFA
natural_image
Line drawing of a digital camera with lens and screen (no text or symbols)Contents
Disclaimer....5
Precautions ......6
1 Overall Introduction ......8
1.1 System Requirements ....8
1.2 Features ....8
1.3 Accessories....9
1.4 External View....10
1.5 Adjusting LCD Display.... 11
2 Getting Started ....12
2.1 Inserting SD Card....12
2.2 Loading the battery....13
2.3 Charging the Battery....15
2.4 The gestures of using the touch screen ...15
2.4.1 Single touch....15
2.4.2 Slide.... 16
2.4.3 Rotate.... 16
2.5 Buttons & Functions....17
2.6 About LED Indicators 18
2.7 Initial settings before use....19
2.7.1 Setting Date and Time....19
3 LCD Display Information......20
3.1 In Movie Clip Mode......20
3.2 In Voice Recording Mode ......22
3.3 In DSC Mode......23
4 Using the Camera....25
4.1 Shooting a Movie Clip....25
4.2 Capturing a still image from a movie .....27
4.3 Capturing a still image in video mode.....28
4.4 Voice Recording: 29
4.5 Movie Clip / Voice Clip Playback......30
4.6 Shooting / Playback images....33
4.6.1 Taking a picture 33
4.6.2 Images Playback 34
5 LCD Display Information......36
5.1 Movie Clip Recording Mode: 36
5.2 Voice Recording Mode: 38
5.3 DSC Playback Mode....39
6 Menu Mode 41
6.1 Menu options of Movie Clip Mode ....41
6.1.1 Movie Clip Resolution....41
6.1.2 White Balance 42
6.1.3 Effect 43
6.1.4 Metering....44
6.1.5 Backlight....45
6.1.6 Night Mode 46
6.1.7 Motion Detection....47
6.1.8 EV Compensation....48
6.1.9 Multi shot 49
6.2 Menus of Movie Clip/Voice Playback......50
6.2.1 Delete 50
6.2.2 Protect 52
6.3 Menu options of Camera Mode......53
6.3.1 Still Image Resolution....53
6.3.2 White Balance 54
6.3.3 Effect 55
6.3.4 Metering.... 56
6.3.5 Backlight....57
6.3.6 Night Mode 58
6.3.7 Self-timer 59
6.3.8 Continuous Shot....60
6.3.9 EV compensation 61
6.4 Menus of Playback....62
6.4.1 Delete 62
6.4.2 Protect 64
6.4.3 Auto play.... 65
6.4.4 Rotate....66
6.4.5 DPOF 67
6.5 Setting Menu....69
6.5.1 Information.... 69
6.5.2 Date / Time 69
6.5.3 Beep 70
6.5.4 Default 71
6.5.5 TV standard....72
6.5.6 USB 73
6.5.7 Auto Power Off 74
6.5.8 Frequency.... 75
6.5.9 Language....76
6.5.10 Format 77
6.5.11 File Number(Default: Series) .....78
6.5.12 LCD brightness....79
6.5.13 Instant Review....80
6.5.14 Volume....81
6.5.15 Start-up LOGO....82
7 PC and TV Connection....83
7.1 Connecting to the Computer......83
7.2 Connecting to a Standard TV....83
7.3 Connecting to a HD TV 84
8 Installing the Software 85
9 Editing Software......86
10 Appendix......87
Specifications 87
Troubleshooting 89
Thank you for purchasing this Digital Video Camera. Please make sure to read this manual thoroughly before using it and keep this manual in a safe place for future reference.
Disclaimer
This company will endeavor to make sure the contents of this manual are correct and up to date. However, we do not guarantee the accuracy of the contents of this manual. In case there is any discrepancy between this manual and the Digital Video Camera, please use this camera as the basis. We reserve the right to change any content or technical rule without prior notification. In addition, the manufacturer reserves the right to change technical specifications and package contents without prior notification.
Precautions
General precautions
- Do not try to disassemble the product by yourself, which may damage the product or cause electric shock.
- Keep the Digital Video Camera away from the reach of children or animals to prevent them from swallowing the batteries or small accessories.
- Stop using the Digital Video Camera if any kind of liquid or foreign object enters the Digital Video Camera. If it happens, power off the Digital Video Camera and contact your dealer for help.
- Do not operate the Digital Video Camera with wet hands; it may cause electric shock.
- The Digital Video Camera may be damaged in an environment of high temperature. This camera is designed for use in the temperature between 0°C and 40°C (32°F and 104°F).
- Do not use or store the product in dusty, dirty, sandy or the area that is close to air conditioner or heater.
- It is normal that the temperature of the Digital Video Camera body rises if the Digital Video Camera works for a long period of time.
- Do not open the battery cover while an image is being recorded. Doing so will not only make storage of the current image impossible, it can also corrupt other image data already stored in file.
- Before using this Digital Video Camera for important occasions (such as wedding or overseas trip), be sure to test this Digital Video Camera in order to ensure proper operations of this product.
Power Supply
- Be sure to use the type of battery or battery charger attached to this Digital Video Camera. Using any other type of battery or battery charger might damage the equipment and render the guarantee void.
• Make sure the batteries are placed in the correct position. Error in the orientation of batteries might damage this product and result in fire. - Please remove the batteries to avoid leaking of battery fluid if the camera is not to be used for a long period of time.
- Please remove the crashed or damaged battery immediately to avoid leaking of battery fluid or abnormal expansion.
1 Overall Introduction
Please read this chapter carefully to understand the features and functions of this Digital Video Camera. The description of this chapter also includes the description of system requirement, package contents, and hardware components.
1.1 System Requirements
This Digital Video Camera requires a unit of computer with the following specifications:
- Windows® Vista / XP operating system or Mac OS 10.3 \~10.4
- A CPU of at least the equivalent of Intel® Pentium 4 2.8GHz
- At least 512 MB of RAM
- Standard USB 1.1 connection port or higher
- At least 64MB of display card
Note: USB 1.1 allows you to transmit files to the host, but using USB 2.0 connection port could increase the transmission speed far faster.
1.2 Features
This Digital Video Camera provides many features and functions including:
• High resolution pixel camera (maximum 12 million pixels)
- Touch screen
- Slow motion Playback
• Capturing a still image from a movie
- Capturing a still image in video mode
In addition, this video camera has USB mass storage hard disk, and SD card reader.
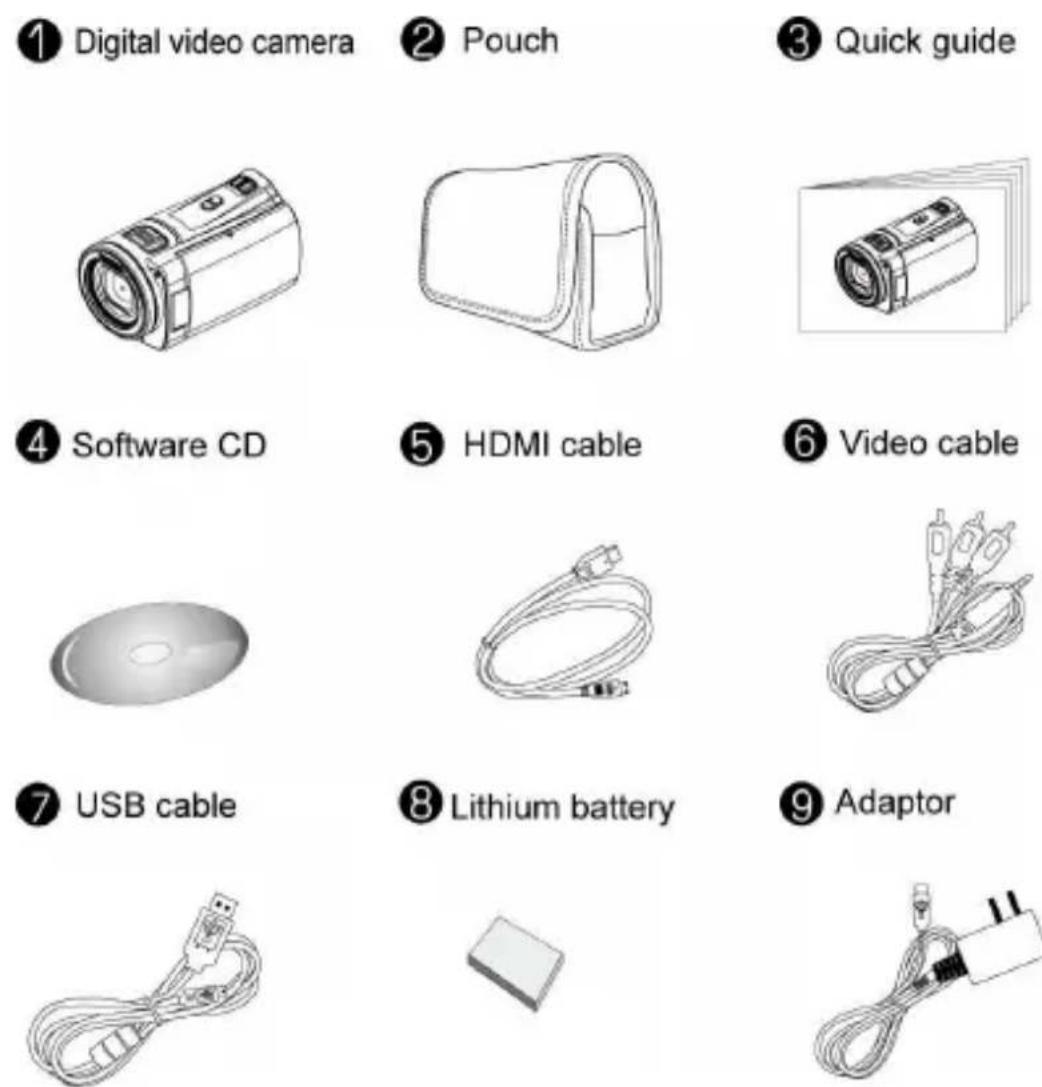
1.3 Accessories
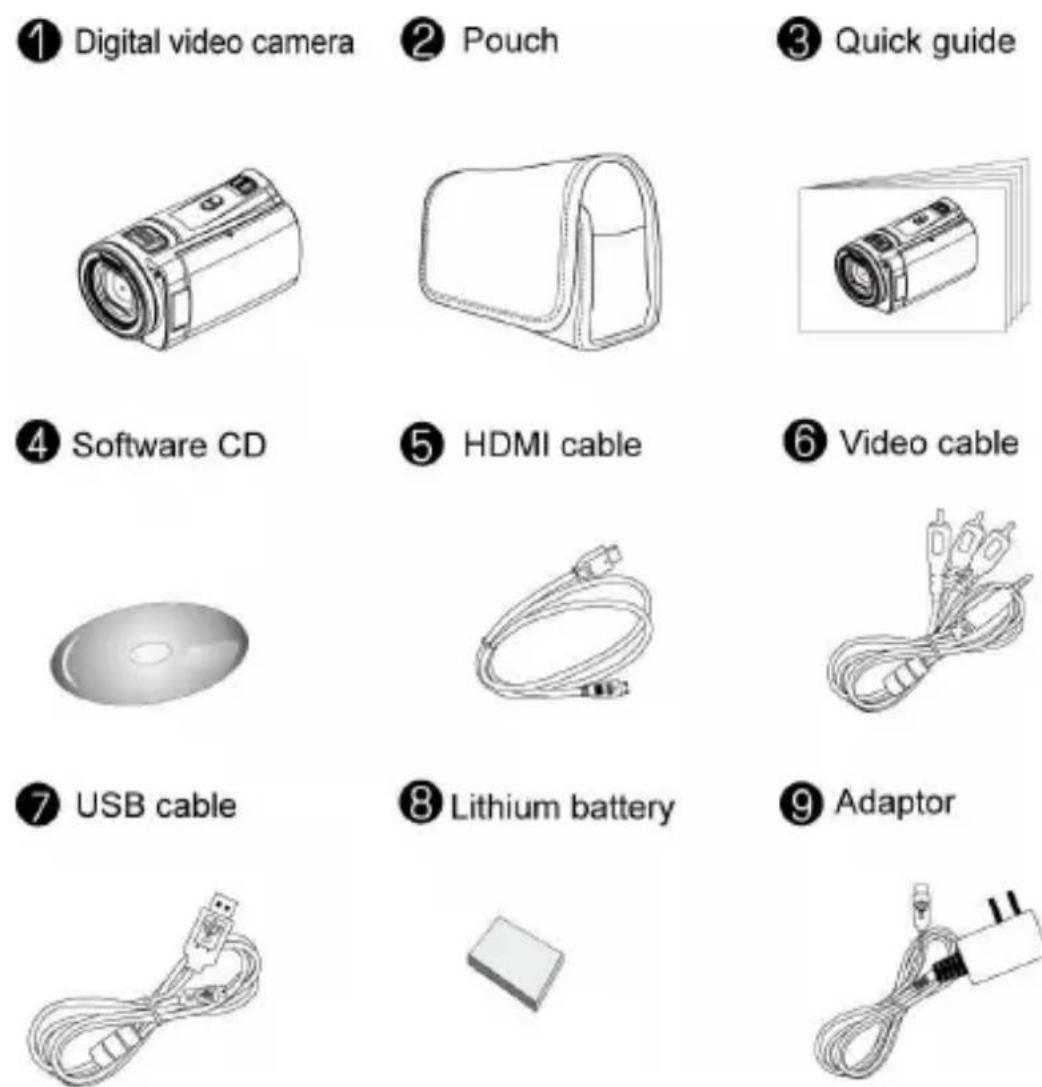
This package should contain the following items. In case there is any missing or damaged item, please contact your dealer immediately.
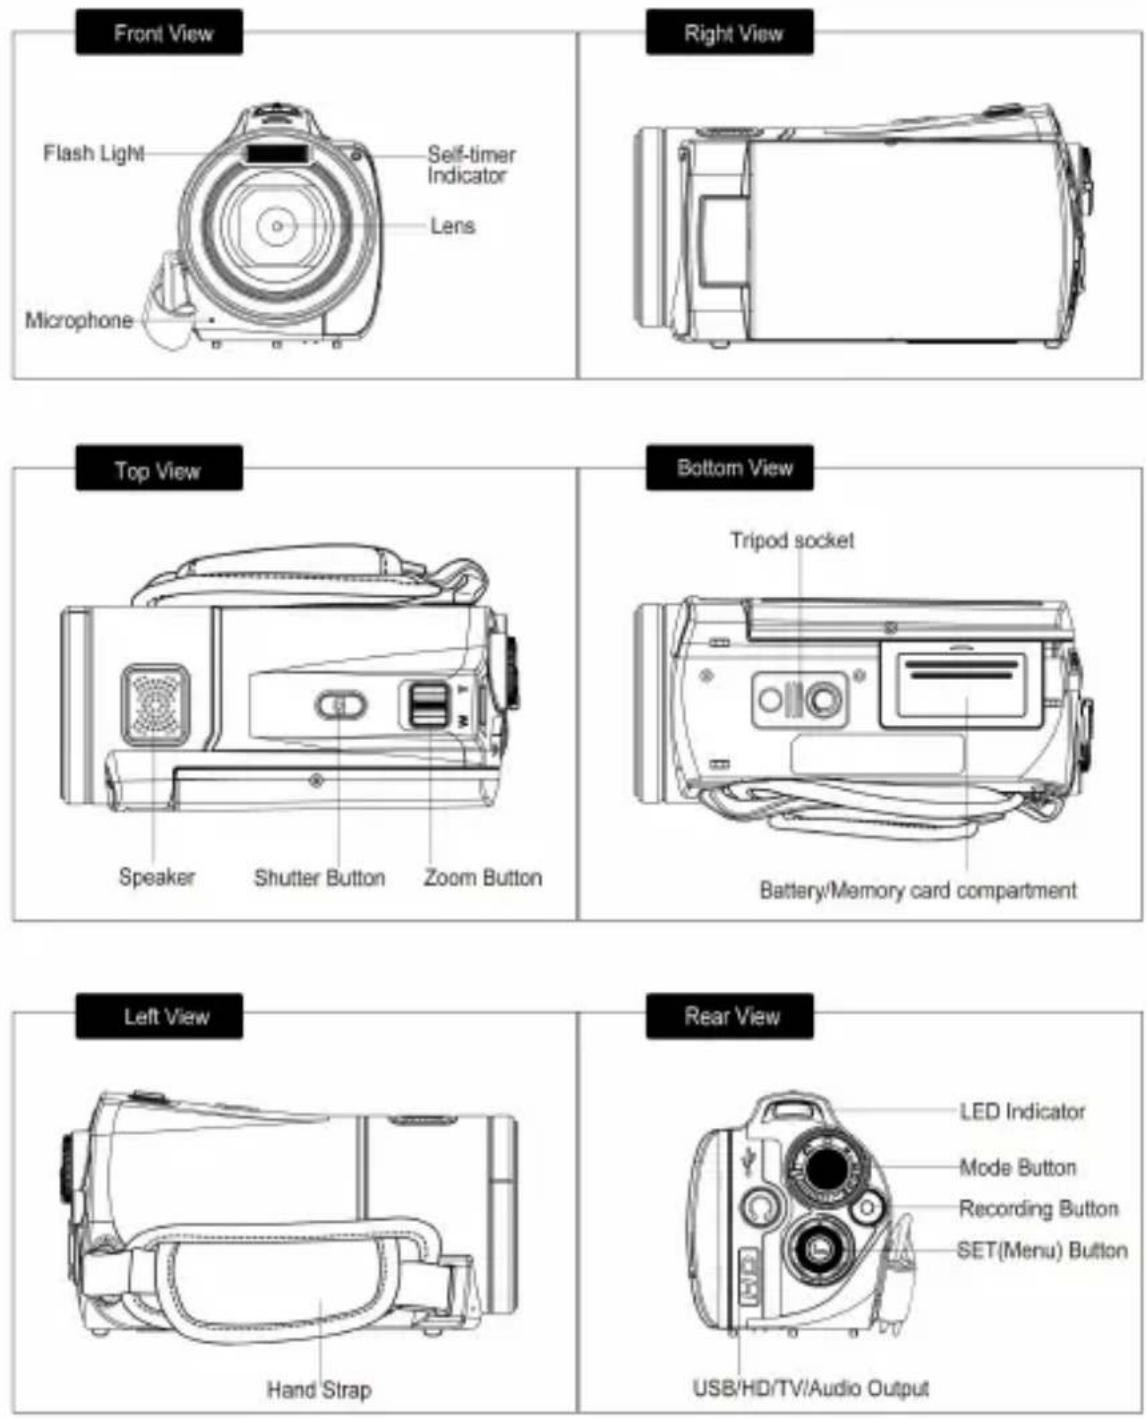
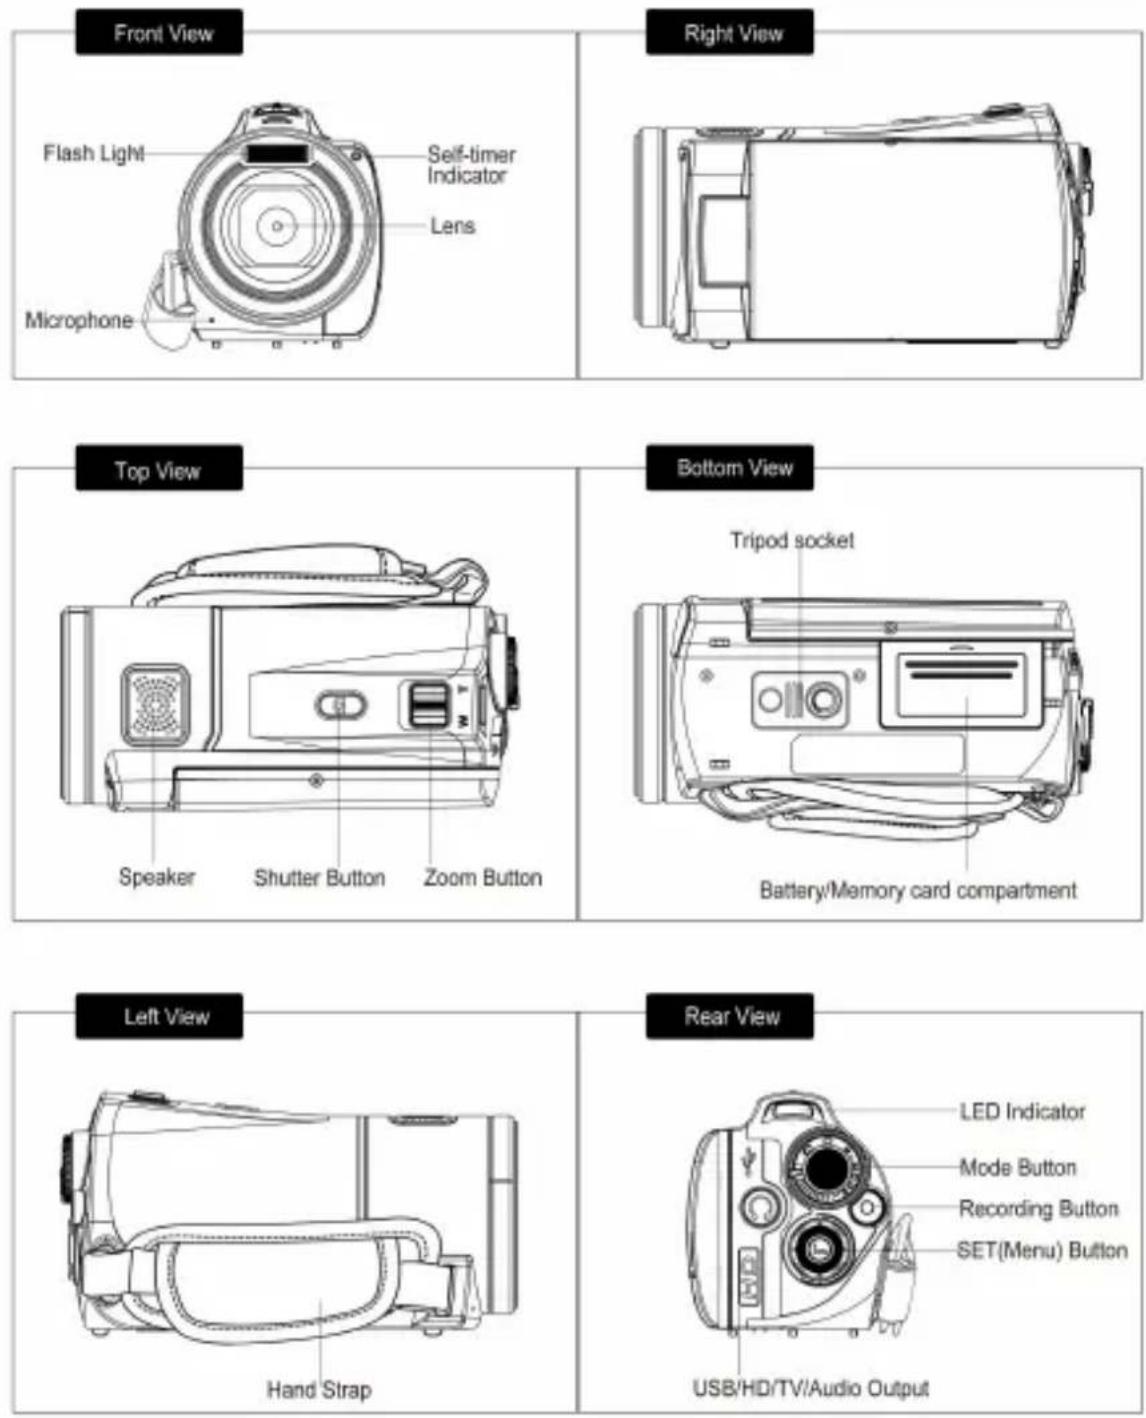
1.4 External View
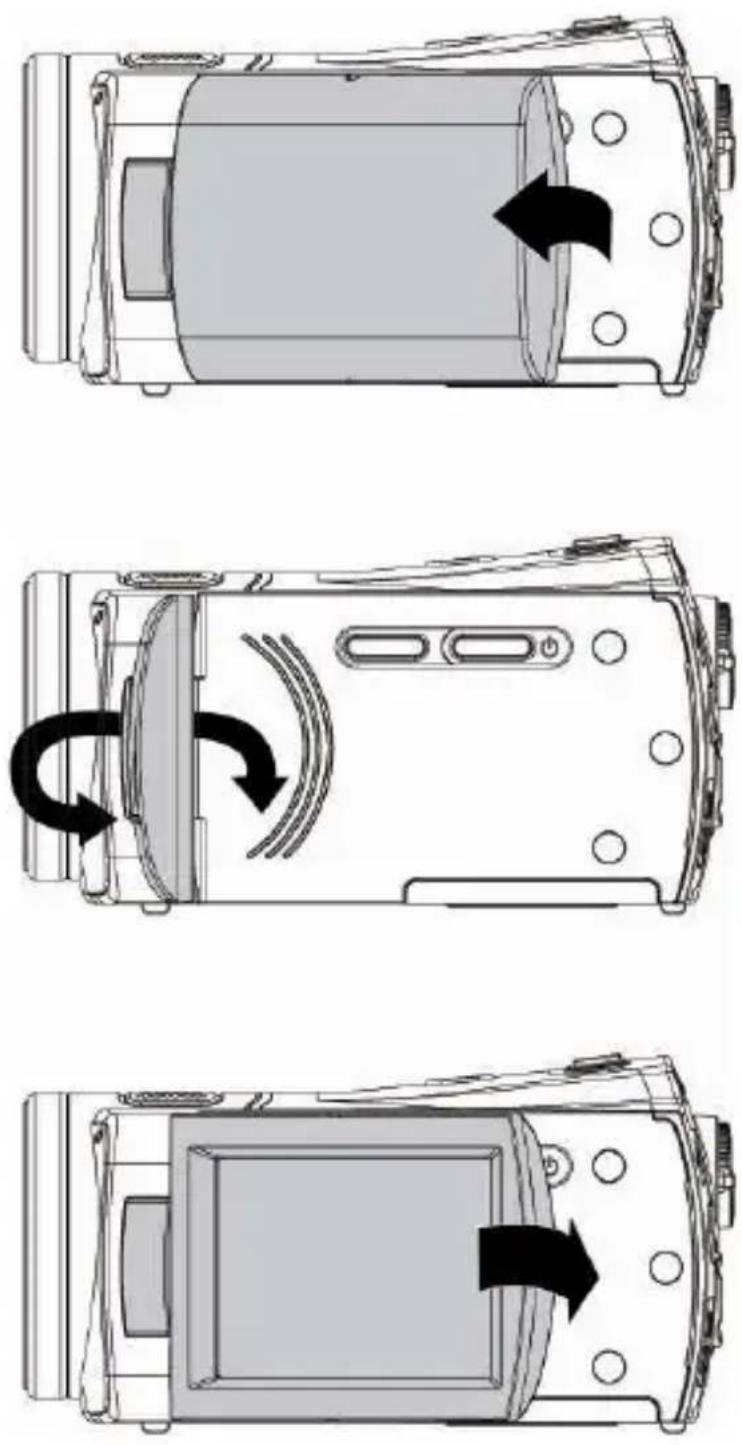
1.5 Adjusting LCD Display
Before taking picture or recording movie clips, please rotate according to the illustrations below.
2 Getting Started
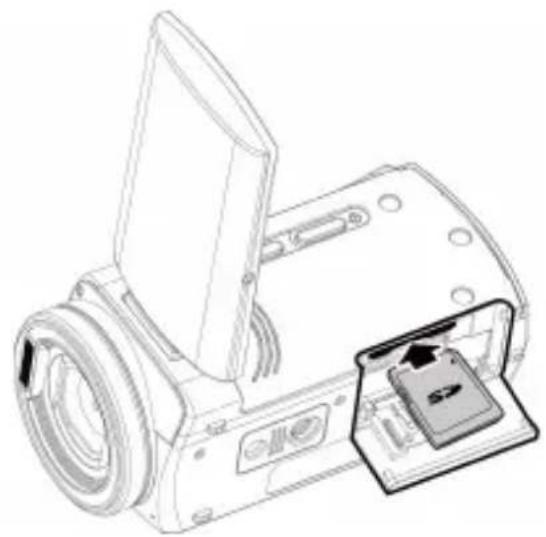
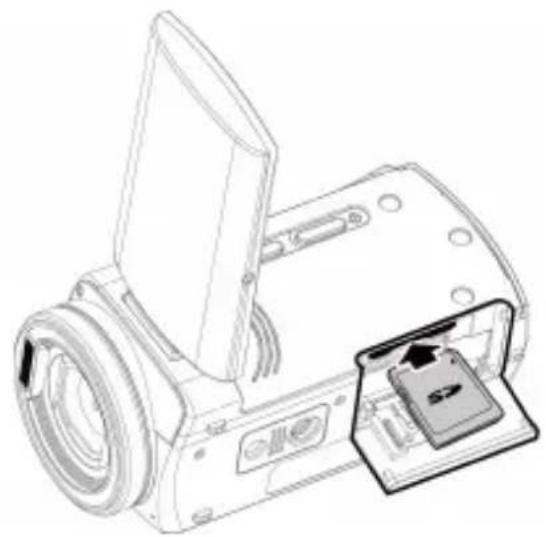
2.1 Inserting SD Card
- Open LCD panel and open the battery cover.

natural_image
Line drawing of a digital camera with an open lid and a gray panel showing the internal structure (no text or symbols)- Insert an SD card and make sure facing the touching face downward.
natural_image
Line drawing of a digital camera with an inset showing the internal component (no text or symbols)Note: Do not remove or insert SD cards when the power of the Digital Video Camera is on to avoid damaging files.
2.2 Loading the battery
Please use only the battery provided or recommended by the manufacturer or dealer.
Note: Insert batteries correctly according to this description. Error in inserting batteries could result in non-repairable damage to this Digital Video Camera
- Open LCD panel and open battery cover.

natural_image
Line drawing of a digital camera with an upward arrow indicating the camera's direction (no text or symbols present)Battery Status Indicator:
 | Batteries full |
 | Batteries half full |
 | Battery empty |
 | Charging battery (A new battery should be charged at least 2 hours.) |
 | The device power is supplied by DC input. (No batteries inside.) |
- Insert batteries according to the illustration.

natural_image
Line drawing of a digital camera with an open screen and a paper clip inserted (no text or symbols)- Close battery cover.

natural_image
Diagram showing a device being processed from a left-side component to a right-side component, with no visible text or symbols.2.3 Charging the Battery
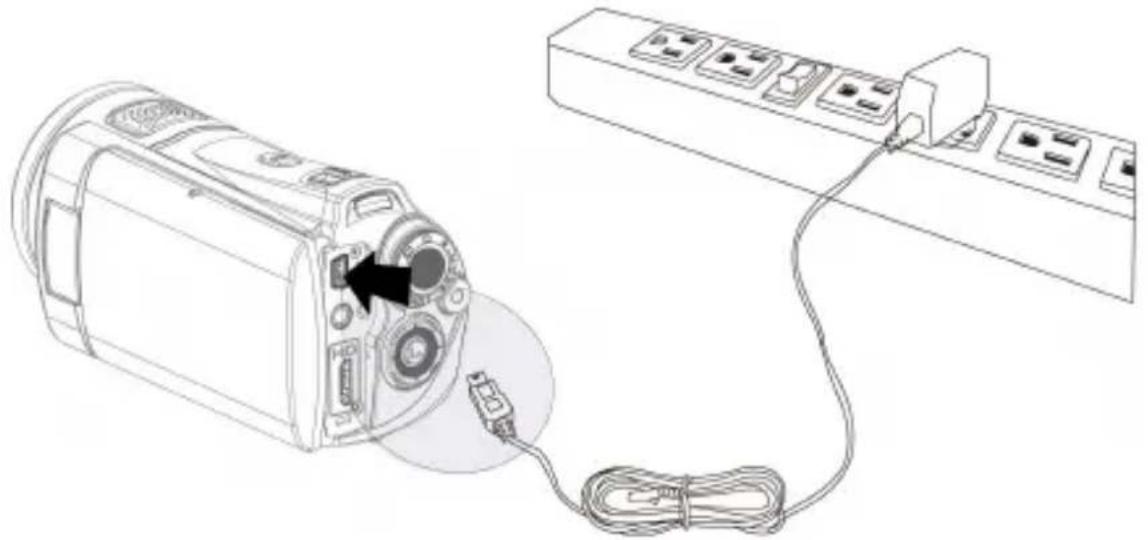
You can use the adaptor attached to charge the lithium battery. Insert the lithium battery into the Digital Video Camera and connect to the cable of the adaptor.

natural_image
Line drawing of a camera module connected to a power strip with cable (no text or symbols)2.4 The gestures of using the touch screen
2.4.1 Single touch
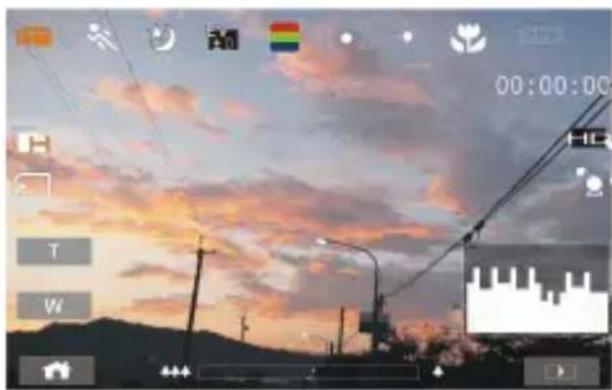
Single touch for the below touchable hotkeys:
- Resolution change (FHD, HD, WVGA, WEB or 12M, 8M, 5M, 3M)
natural_image
Sunset over a hillside with power lines and sky, no visible text or symbols
natural_image
Sunset over a hillside with utility poles and power lines, captured via camera interface (no text or symbols on main scene)2.4.2 Slide
Slide right or left to view the previous file or the next file under the Playback Mode.

2.4.3 Rotate
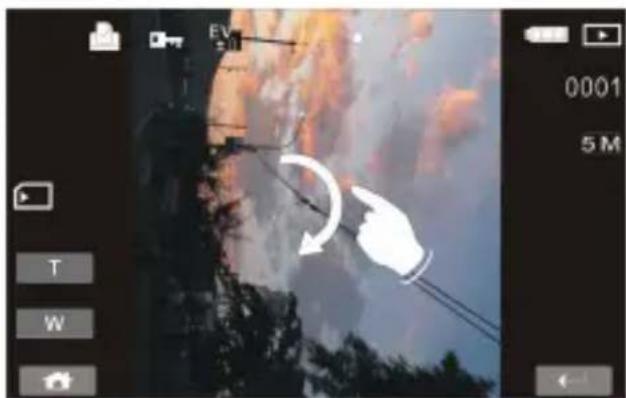
Under Playback Mode, you can rotate the image by 90^ /step as shown below.
natural_image
Exterior view of a mountainous landscape with smoke and power lines, showing a hand pointing at a curved arrow (no text or symbols)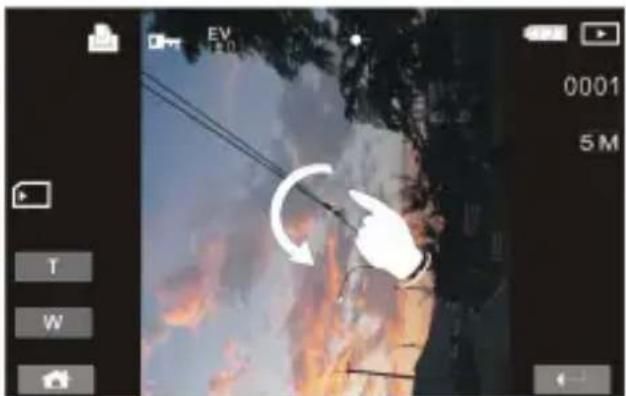
natural_image
Fire incident scene with smoke and fire, showing a hand holding a tool near a tree (no readable text or symbols)2.5 Buttons & Functions
| Description | Button Function | |
| Power Button |  | Press the button to turn ON/OFF the Digital Video Camera. |
| SET (Menu) Button |  | Press the button to display the main OSD menu. |
| MODE Button |  | There are three operating modes for the Digital Video Camera: DV Mode, DSC Mode, and Voice Recording Mode. Press the Mode button to change to different modes. |
| 4-Way Direction Button |  | Press the 4-Way Direction Button UP to turn on/off the flash light: off, auto, fill-in; press DOWN to delete the file when it's in Playback mode. |
| Zoom button |  W T W T | This Digital Video Camera is equipped with, 4X Digital zoom( For 720p & below) and a 5X Optical Zoom function. Press the Zoom button Right (T) to pull in the distance of the subject, or press the button Left (W) to move away the distance from the object |
| Shutter button |  | Press the button to take images. |
| Recording button |  | Press the button to take movie clip and voice recording |
| Playback Button |  | Press the Playback button to enter Playback mode and playback the last file. |
2.6 About LED Indicators
Below table describes the meaning of the camera LED indicators:
| Indicator Color | Definition | |
| Power | Green Turning power on. | |
| Red blinking Flash is charging. | ||
| Recording | Red blinking Recording | |
| Self-timer | Red blinking Start of Self-timer. | |
2.7 Initial settings before use
2.7.1 Setting Date and Time
- Turn on the Digital Video Camera to set up the date and time for the first time. Set the date and time by moving up/down button or touch the screen to select.

- Press the 4-Way Direction Button left/right to highlight each column. Then press up/down or touch the screen to select the column.
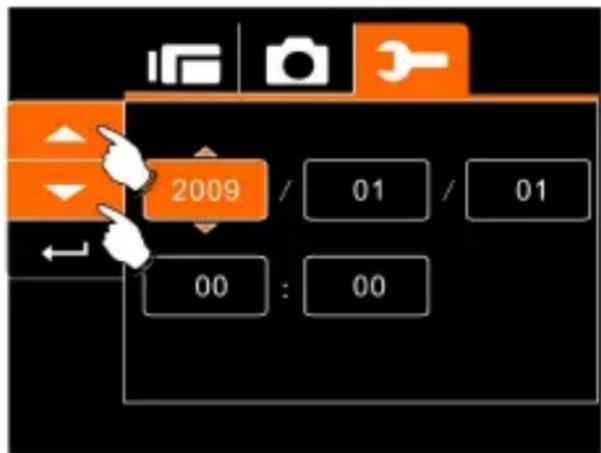
- Press the 4-Way Direction Button Up/Down to adjust the value. Press SET (Menu) Button to store the value you change or touch the screen to adjust the Year, Date and Time before pressing the Return Button (←) to store the value and leave the setting.
3 LCD Display Information
3.1 In Movie Clip Mode
The following table regarding the description of each icon and symbol will be shown when the Digital Video Camera is in DV Mode


| 1 |  | Movie Clip recording indicator |
| 2 |  | Motion Detection |
| 3 |  | Night Mode indicator |
| 4 |  | Exposure compensation indicator |
| 5 |  | Color effect indicator |
| 6 |  | Metering Mode |
| 7 |  | White balance indicator |
| 8 |  | Macro indicator |
| 9 |  | Battery status indicator |
| 10 |  | Remaining recording time indicator |
| 11 |  | Resolution indicator |
| 12 |  | Compensation indicator |
| 13 |  | Histogram indicator |
| 14 |  | Playback indicator |
| 15 |  | Digital Zoom indicator |
| 16 |  | Menu Button |
| 17 |  | Memory Status indicator: SD card indicatorINT: Internal memory indicator (displayed when there is no SD card) |
| 18 |  | Multi shot |
3.2 In Voice Recording Mode
The following table regarding the description of each icon and symbol will be shown when the Digital Video Camera is in Voice Recording Mode ().
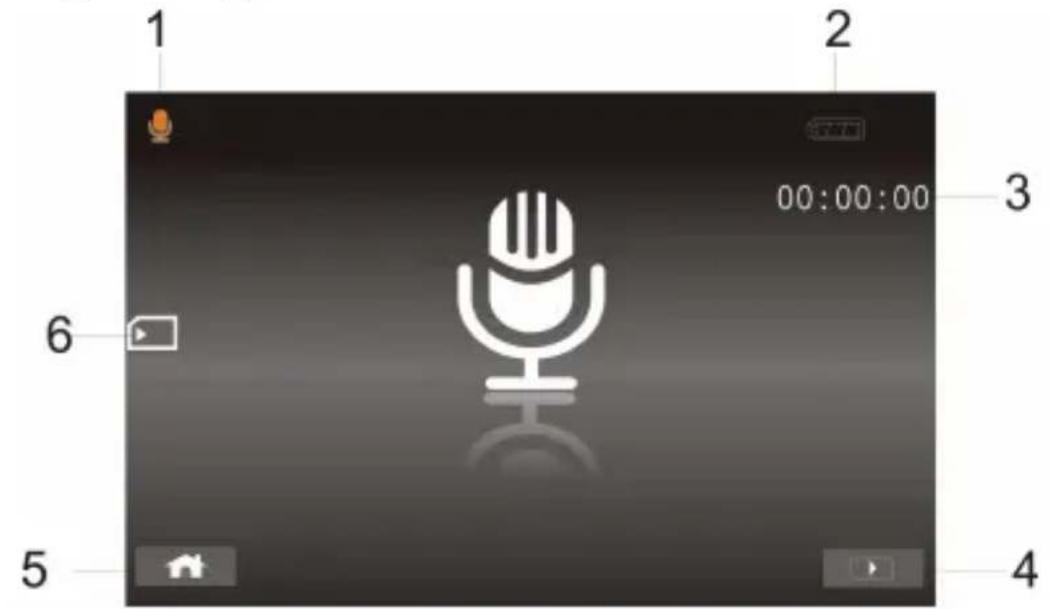
| 1 |  | Voice Recording Mode indicator |
| 2 |  | Battery status indicator |
| 3 |  | Recording time left indicator |
| 4 |  | Playback Button |
| 5 |  | Menu Button |
| 6 |  | Memory Status indicator: SD card indicatorINT: Internal memory indicator (displayed when there is no SD card) |
3.3 In DSC Mode
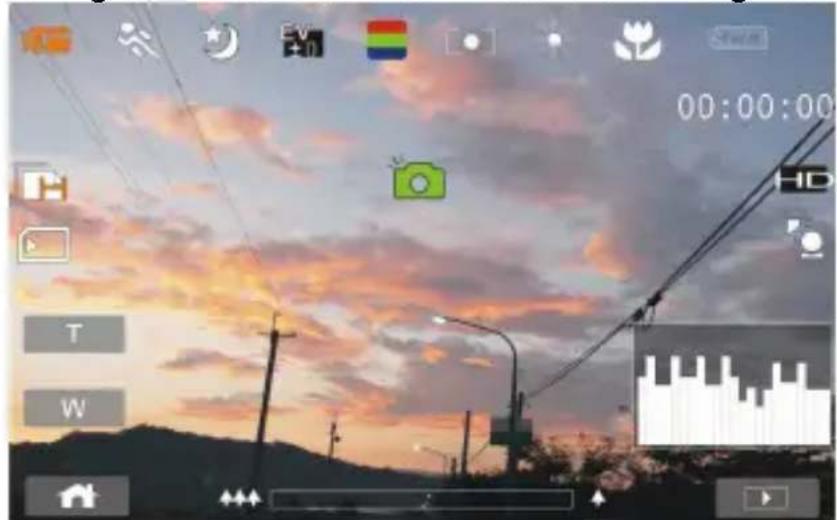
The following table regarding the description of each icon and symbol will be shown when the Digital Video Camera is in DSC Mode ().

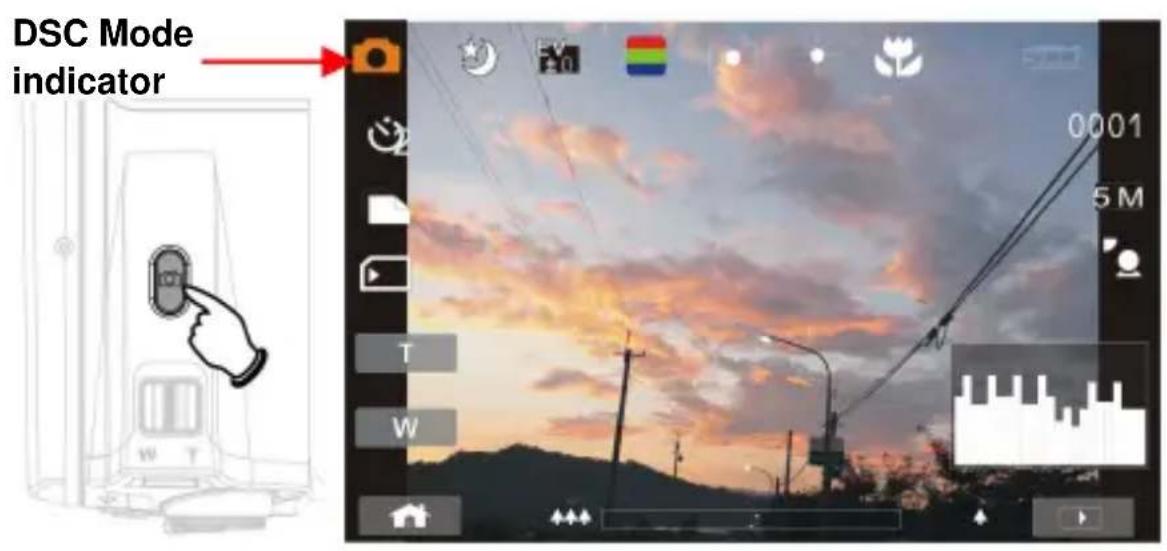
| 1 |  | DSC Mode indicator |
| 2 |  | Night Mode indicator |
| 3 |  | EV compensation indicator |
| 4 |  | Effect indicator |
| 5 |  | Metering Mode |
| 6 |  | White balance indicator |
| 7 |  | Macro indicator |
| 8 |  | Battery indicator |
| 9 |  | Number of pictures left. |
| 10 |  | Resolution indicator |
| 11 |  | Backlight compensation |
| 12 |  | Histogram indicator |
| 13 |  | Playback Button |
| 14 |  | Digital zoom indicator |
| 15 |  | Menu Button |
| 16 |  | Memory Status indicator: SD card indicatorINT: Internal memory indicator (displayed when there is no SD card) |
| 17 |  | Continuous Shot Mode |
| 18 |  | Self-timer indicator |
4 Using the Camera
4.1 Shooting a Movie Clip
- DV mode is the default setting after you power on the Digital Video Camera.
- Press the Recording button to start or stop moving recording.
- The Digital Video Camera will store the Movie clip automatically.

- LCD screen ratio will be different depending on the setting of Movie Clip resolution. Please refer to the table shown below:
Video Resolution
Preview
FHD (1920 x 1080)
HD (1280 x 720)
WVGA (848×480)
16:9 ratio

natural_image
Silhouette of utility poles against a vibrant sunset sky with pink and orange clouds (no text or symbols visible)WEB (320 x 240)
4:3 ratio

natural_image
Sunset over a hillside with power lines and silhouetted trees (no text or symbols visible)4.2 Capturing a still image from a movie
You can save a selected frame from a recorded movie as a still image. Select the video clip, and press the shutter button at an interested frame.
- DV mode is the default setting after you power on the Digital Video Camera.
- Press the Recording button to start or stop video recording.
- While filming video, still image can be taken by pressing the shutter button.
- The Digital Video Camera will store the image automatically.
| Image resolution | |
| FHD | 1920 x 1080 |
| HD | 1280 x 720 |
| WVGA | 848 x 480 |
| WEB | 320 x 240 |
Note: the image size is fixed depending on the image quality of the video clip.
-
When setting to FHD, HD or WVGA resolution, the LCD display aspect ratio is 16:9.
-
When setting to WEB video resolution, the LCD display aspect ratio is 4:3.
4.3 Capturing a still image in video mode
You can save a selected frame in the video mode as a still image. Press shutter button at an interested preview image to save the interested frame. It is also workable during recording a video clip.
- Press the shutter button in movie clip during playback.
- The Digital Video Camera will store the image automatically.
| Image resolution | |
| FHD | 1920 x 1080 |
| HD | 1280 x 720 |
| WVGA | 848 x 480 |
| WEB | 320 x 240 |
| Note: the image size is fixed depending on the image quality of the video clip.1. When setting to FHD, HD or WVGA resolution, the LCD display aspect ratio is 16:9.2. When setting to WEB video resolution, the LCD display aspect ratio is 4:3. | |
4.4 Voice Recording:
- Turn on the Digital Video Camera.
- Press the MODE button to enter Voice Recording mode.
- Press the Recording button to start or stop Voice recording.


natural_image
Generic video player interface with a microphone icon and playback controls (no readable text or symbols)4.5 Movie Clip / Voice Clip Playback
- In Movie/Voice Recording Mode, press Playback Button to display recently stored file on the LCD screen.

Playback Mode indicator

natural_image
Generic video player interface with microphone icon and playback controls (no readable text or symbols)Playback Mode indicator
- Press 4-Way Direction Button up/down, left/right to view the stored file. Press SET (Menu) Button to playback or touch the screen to select Playback of the file.

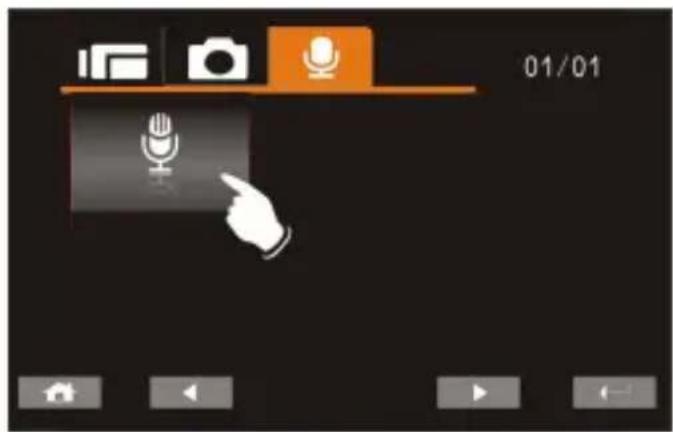
- To pause the Playback of file, press the Recording button or touch the screen icon ().

natural_image
Sunset over a cityscape with power lines and trees, no visible text or symbols
natural_image
Generic video player interface with microphone icon and playback controls (no readable text or symbols)-
Press the Playback Button to return to Movie/Voice Recording Mode.
-
You can also playback the movie clip by different speed by touching (ON/OFF) the screen icon ().

Playback speed is as below when the Slow Motion is “OFF”:

Rewind Rewind Rewind Rewind
2X play 4X play 8X play 16X play
Forward Forward Forward Forward
Playback speed is as below when the Slow Motion is "ON":

Rewind Rewind Rewind Rewind
1/2X play 1/4X play 1/8X play 1/16X play

Forward Forward Forward Forward
4.6 Shooting / Playback images
4.6.1 Taking a picture
-
Turn on the power and adjust the Mode Button to DSC Mode.
-
Press Shutter Button to capture images.
4.6.2 Images Playback
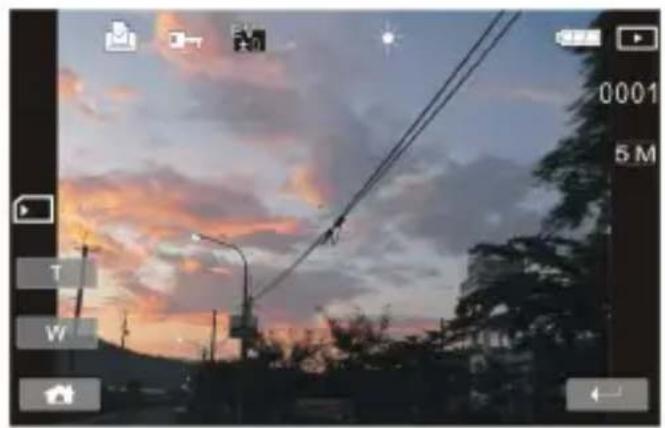
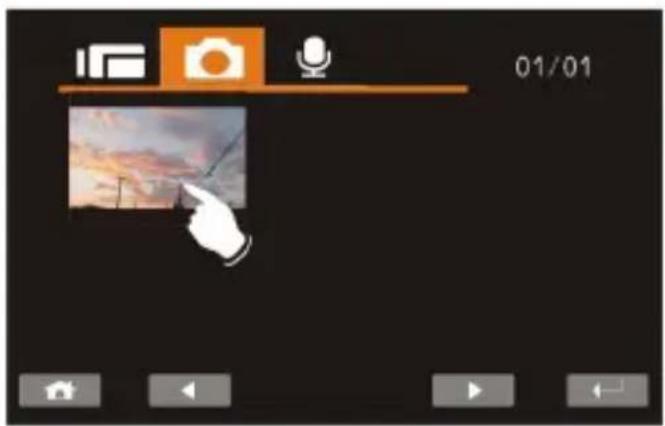
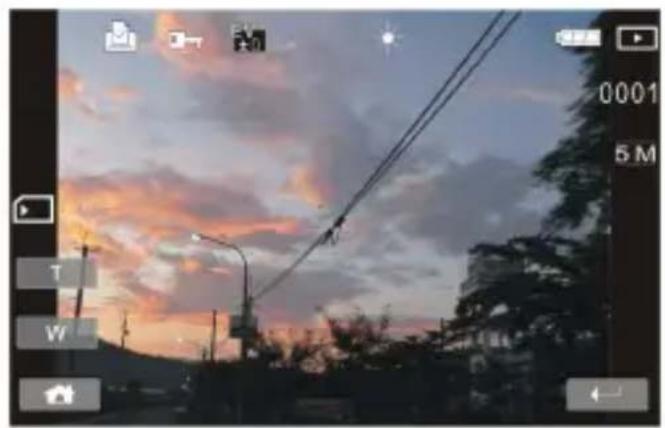
- In DSC Mode, press Playback Button to display the images on the LCD screen.

- Press 4-Way Direction Button up/down, or left/right to view the stored files. Press SET (Menu) Button to replay or touch the screen to playback.

natural_image
Sunset over a cityscape with utility poles and trees, no visible text or symbols- Press SET(Menu) Button or touch the screen to return to full screen for viewing images.

natural_image
Sunset over a cityscape with power lines and silhouetted trees (no visible text or symbols)
natural_image
Sunset over a cityscape with trees and utility poles, no visible text or symbols- Touch the panel icon (or) to enlarge or shrink the image. Then, you can move the image up/down or left/right.

natural_image
Silhouette of a city at sunset with power lines and trees, no visible text or symbols- Press Playback Button again to return to DSC Mode.
5 LCD Display Information
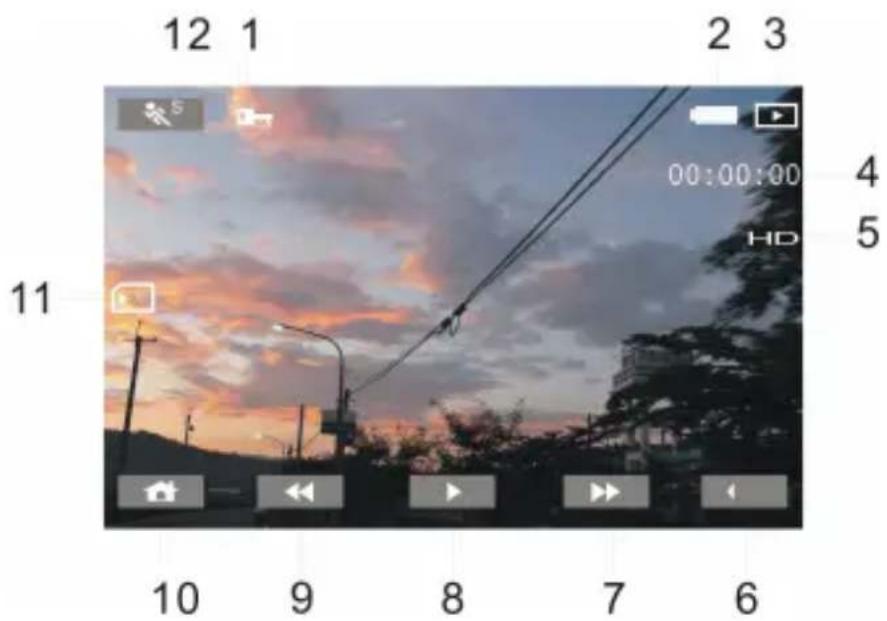
5.1 Movie Clip Recording Mode:
Please refer to the following table regarding the description of each icon and symbol.

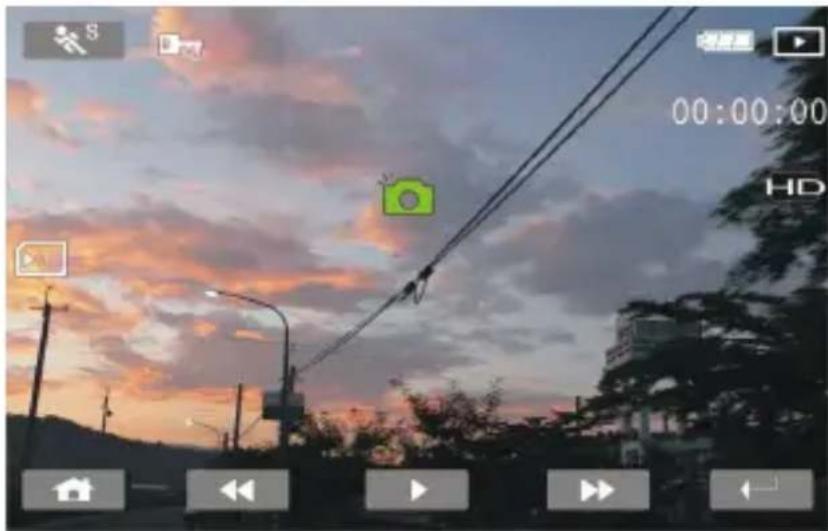
| 1 |  | File Protect indicator |
| 2 |  | Battery status indicator |
| 3 |  | Playback Mode icon |
| 4 |  | Length of each Movie Clip |
| 5 |  | Resolution indicator |
| 6 |  | Return Button |
| 7 |  | Fast forward Playback Button |
| 8 |  | Playback/Pause button |
| 9 |  | Fast rewind Playback Button |
| 10 |  | Menu Button |
| 11 |  | Memory Status indicator: SD card indicatorINT: Internal memory indicator (displayed when there is no SD card) |
| 12 |  | Slow motion Playback |
5.2 Voice Recording Mode:
Please refer to the following table regarding the description of each icon and symbol.

| 1 |  | File Protect indicator |
| 2 |  | Battery status indicator |
| 3 |  | Playback Mode icon |
| 4 |  | Length of each voice recording. |
| 5 |  | Playback mode indicator |
| 6 |  | Playback/Pause Button |
| 7 |  | Menu Button |
| 8 |  | Memory Status indicator: SD card indicatorINT: Internal memory indicator (displayed when there is no SD card) |
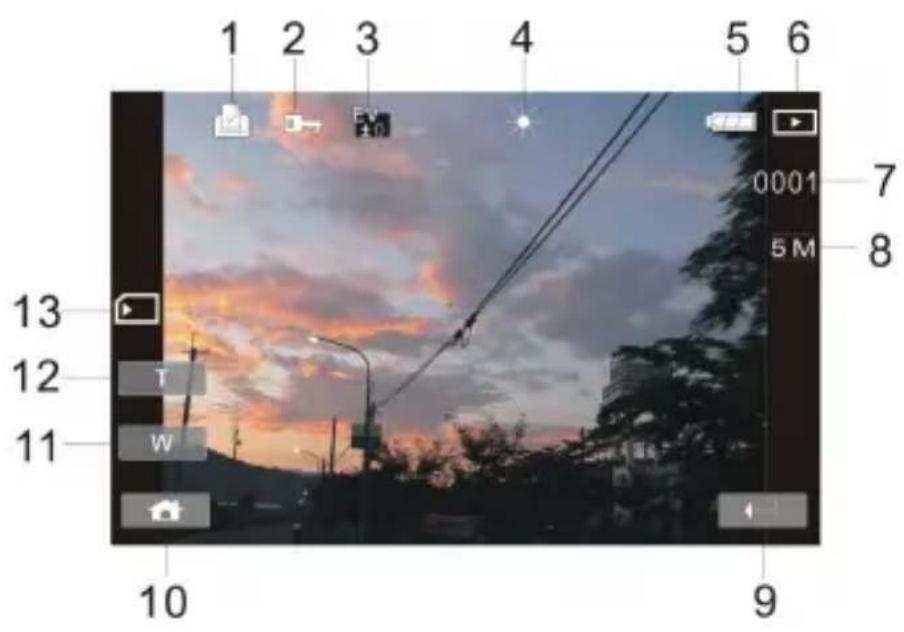
5.3 DSC Playback Mode
Please refer to the following illustration to familiarize yourself with icons and symbols of DSC Playback Mode.

| 1 |  | DPOF ( Digital Print Order Format ) indicator |
| 2 |  | File Protect indicator |
| 3 |  | Exposure compensation indicator |
| 4 |  | White balance |
| 5 |  | Battery status indicator |
| 6 |  | Image Playback Mode icon |
| 7 |  | Number of pictures left |
| 8 |  | Resolution indicator |
| 9 |  | Return Button |
| 10 |  | Menu Button |
| 11 |  | Zoom- Out indicator |
| 12 |  | Zoom- In indicator |
| 13 |  | Memory Status indicator: SD card indicatorINT: Internal memory indicator (displayed when there is no SD card) |
6 Menu Mode
When the menu appears on the LCD display, the SET (Menu) button is used to move through the highlighted items in the submenu or to select a menu item.
6.1 Menu options of Movie Clip Mode
When in Movie Clip mode, press the SET(Menu) Button to show the Movie options menu.
6.1.1 Movie Clip Resolution
- Turn on the Digital Video Camera and make sure it is in the DV Mode.
- Press SET (Menu) Button and press the 4-Way Direction Button to highlight the Resolution item. Press SET (Menu) Button to display submenu; or touch the screen to select the item.
- Press 4-Way Direction Button to select FHD, HD, WVGA or WEB. Press SET (Menu) Button to confirm; or touch the screen to select the item.


| FHD | 1920 x 1080 |
| HD | 1280 x 720 |
| WVGA | 848 x 480 |
| WEB | 320 x 240 |
Note: 1. When setting to FHD, HD or WVGA resolution, the LCD display aspect ratio is 16:9.
2. When setting to WEB video resolution, the LCD display aspect ratio is 4:3.
6.1.2 White Balance
- Turn on the Digital Video Camera and make sure it is in the DV Mode.
- Press SET (Menu) Button and move the 4-Way Direction Button to highlight the White Balance item. Press SET (Menu) Button to display submenu; or touch the screen to select the item.
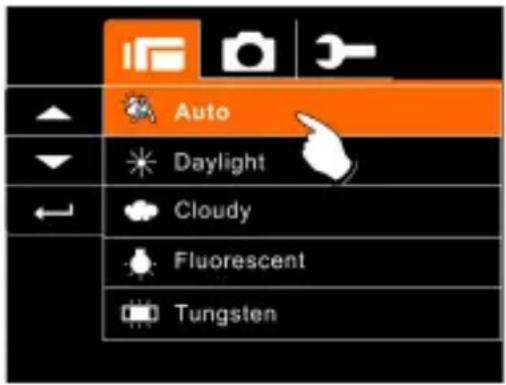
- Press 4-Way Direction Button to select Auto, Daylight, Cloudy, Fluorescent or Tungsten. Press SET (Menu) Button to confirm; or touch the screen to select the item.
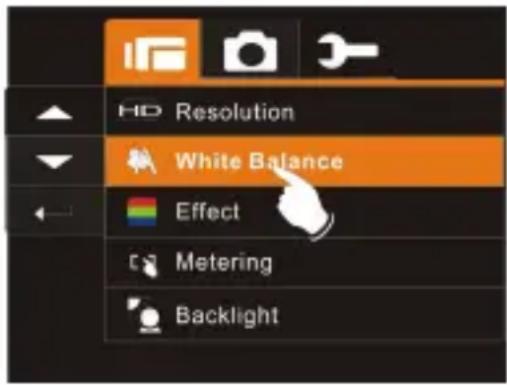

 Auto Auto | The Digital Video Camera automatically adjusts white balance. |
 Daylight Daylight | The setting is suitable for outdoor recording in daylight. |
 Cloudy Cloudy | The setting is suitable for recording in cloudy or shady environments. |
 Fluorescent Fluorescent | The setting is suitable for indoor with fluorescent lamp lighting, or environments with high color temperature. |
 Tungsten Tungsten | The setting is suitable for indoor with incandescent lamp light, or environments with low color temperature. |
6.1.3 Effect
- Turn on the Digital Video Camera and make sure it is in the DV Mode.
- Press SET (Menu) Button and press the 4-Way Direction Button to highlight the Effect item. Press SET (Menu) Button to display submenu; or touch the screen to select the item.
- Press 4-Way Direction Button to select Normal, B/W or Sepia. Press SET (Menu) Button to confirm; or touch the screen to select the item.

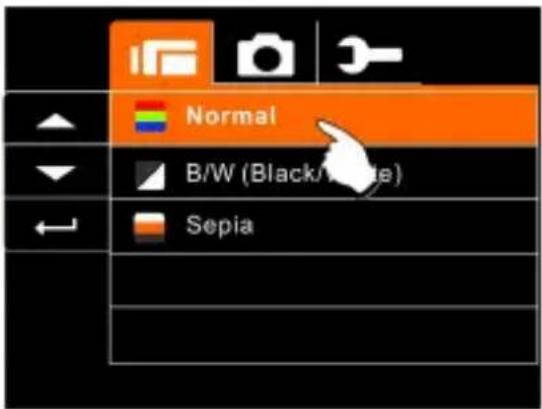
| Normal | Make recordings in nature color |
| B&W | Make recordings in B&W (Black and White) color |
| Sepia | Make recordings in Sepia-toned color |
6.1.4 Metering
- Turn on the Digital Video Camera and make sure it is in the DV Mode.
- Press SET (Menu) Button and move the 4-Way Direction Button to highlight the Metering item. Press SET (Menu) Button to display submenu; or touch the screen to select the item.
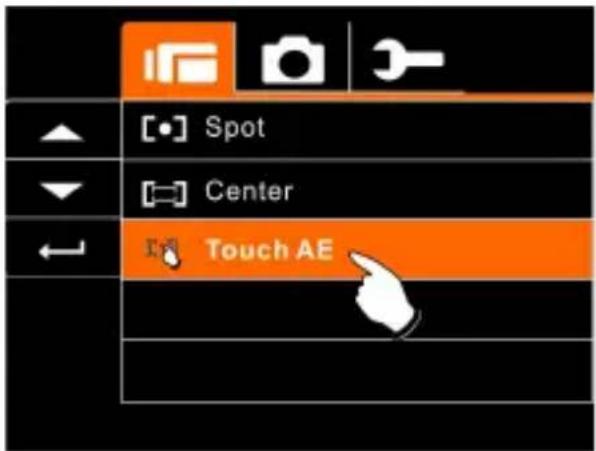
- Press 4-Way Direction Button to select Spot, Center or Touch AE. Press SET (Menu) Button to confirm; or touch the screen to select the item.


| [○] Spot | This setting is to ensure correct exposure for the object even if the background is very bright or very dark. |
| Center | Use this setting to preserve background details while letting lighting conditions at the center of the frame define exposure. |
| Touch AE | Touch the object to make it with suitable light. |
6.1.5 Backlight
- Turn on the Digital Video Camera and make sure it is in the DV Mode.
- Press SET (Menu) Button and move the 4-Way Direction Button to highlight the Backlight item. Press SET (Menu) Button to display submenu; or touch the screen to select the item.
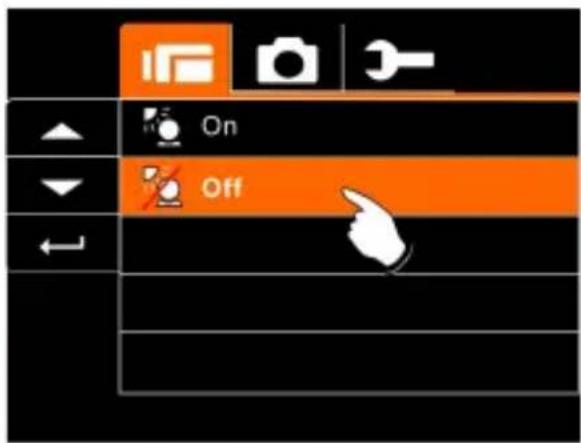
- Press 4-Way Direction Button to select On or Off. Press SET (Menu) Button to confirm; or touch the screen to select the item.


6.1.6 Night Mode
- Turn on the Digital Video Camera and make sure it is in the DV Mode.
- Press SET (Menu) Button and press the 4-Way Direction Button to highlight the Night Mode item. Press SET (Menu) Button to display submenu; or touch the screen to select the item.
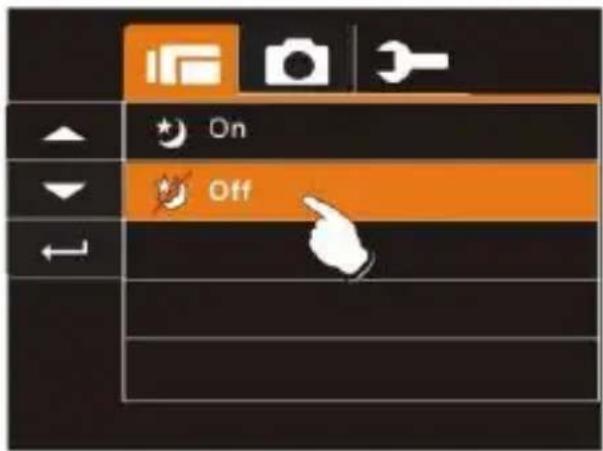
- Press 4-Way Direction Button to select On or Off. Press SET (Menu) Button to confirm; or touch the screen to select the item.
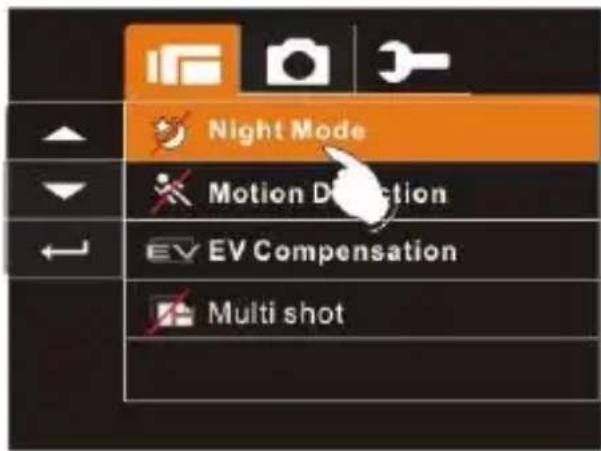

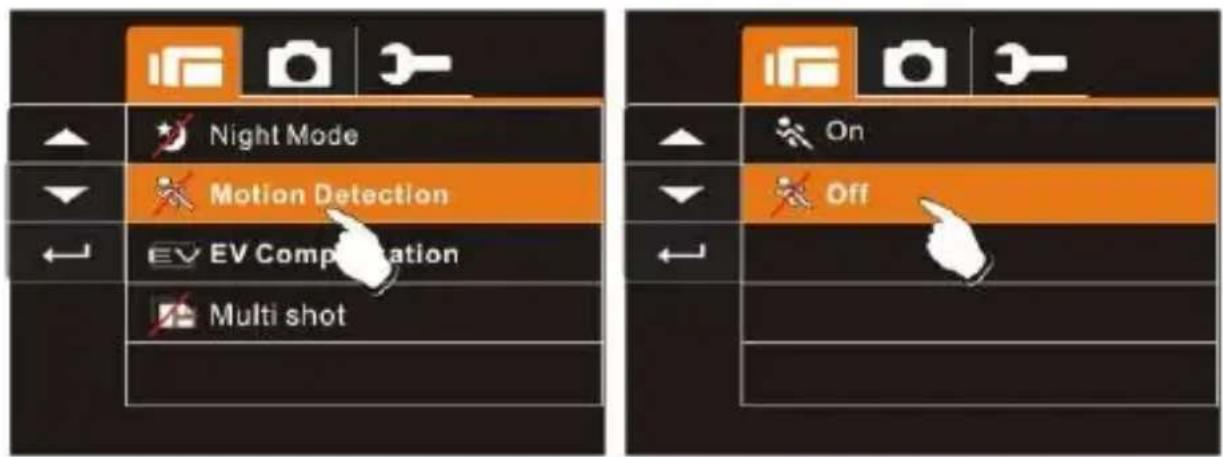
6.1.7 Motion Detection
When Motion Detection is turned on, the camera will detect the motion for Movie Clip recording without human intervention. When the AE variation is detected, the recording will start immediately.

natural_image
Sunset over power lines with sky and distant hills, no visible text or symbols-
Turn on the Digital Video Camera and make sure it is in the DV Mode.
-
Press SET (Menu) Button and move the 4-Way Direction Button to highlight the Motion Detection item. Press SET (Menu) Button to display submenu; or touch the screen to select the item.
-
Press 4-Way Direction Button to select On or Off. Press SET (Menu) Button to confirm; or touch the screen to select the item.
6.1.8 EV Compensation
You can adjust the value of the exposure compensation which is ranged from -2.0EV to +2.0EV (at 0.5EV increment). The higher the EV value, the brighter the image will be.
- Turn on the Digital Video Camera and make sure it is in the DV Mode.
- Press SET (Menu) Button and move the 4-Way Direction Button to highlight the EV Compensation item. Press SET (Menu) Button to display submenu; or touch the screen to select the item.
- Press 4-Way Direction Button to adjust the Exposure value (-2.0 \~ + 2.0). Press SET (Menu) Button to confirm; or touch the screen to select the item.


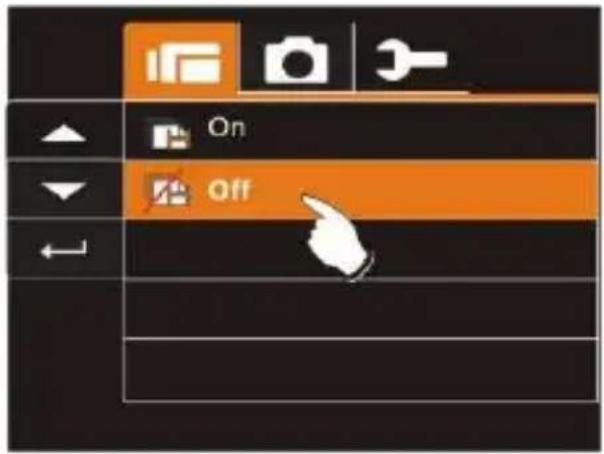
6.1.9 Multi shot
- Turn on the Digital Video Camera and make sure it is in the DV Mode.
- Press SET (Menu) Button and press the 4-Way Direction Button to highlight the Multi shot item. Press SET (Menu) Button to display submenu; or touch the screen to select the item.
- Press 4-Way Direction Button to select On or Off. Press SET (Menu) Button to confirm; or touch the screen to select the item.

| Image resolution | |
 FHD FHD | 1920 x 1080 |
 HD HD | 1280 x 720 |
 WVGA WVGA | 848 x 480 |
 WEB WEB | 320 x 240 |
| Note: the image size is fixed depending on the image quality of the video clip.1. When setting to FHD, HD or WVGA resolution, the LCD display aspect ratio is 16:9.2. When setting to WEB video resolution, the LCD display aspect ratio is 4:3. | |
6.2 Menus of Movie Clip/Voice Playback
When in Movie Clip mode, press the SET(Menu) Button to show the Movie Clip options menu.
6.2.1 Delete
- Turn on the Digital Video Camera and make sure it is in the Movie Clip/Voice Playback Mode.
- Press SET (Menu) Button and move the 4-Way Direction Button to highlight the Delete item. Press SET (Menu) Button to display submenu; or touch the screen to select the item.
- Use 4-Way Direction Button to select Delete One or Delete All. Press SET (Menu) Button to confirm; or touch the screen to select the item.


- Press 4-Way Direction Button to select "O" Yes or "X" NO. Press SET (Menu) Button to confirm; or touch the screen to select the item.

 Delete One Delete One | Delete the current file |
 Delete All Delete All | Delete all files stored in the Digital Video Camera |
| Note: The file cannot be recovered once it is deleted. Therefore, please make sure you have backed up the file before Delete. Protect files cannot be deleted. Before delete, you must unlock the file. | |
6.2.2 Protect
- Turn on the Digital Video Camera and make sure it is in the Movie Clip/Voice Playback Mode.
- Press SET (Menu) Button and move the 4-Way Direction Button to highlight the Protect item. Press SET (Menu) Button to display submenu; or touch the screen to select the item.
- Use 4-Way Direction Button to select Lock One, Local All, Unlock One or Unlock All. Press SET (Menu) Button to confirm; or touch the screen to select the item.

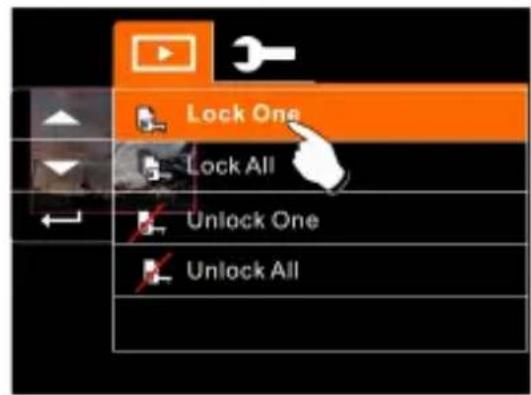

Note: To unlock the file from Protect, repeat steps stated above. When the Protection is relieved from Protect mode, the locked icon will disappear.
6.3 Menu options of Camera Mode
When in DSC Mode, press SET (Menu) Button to display camera mode option Menu.
6.3.1 Still Image Resolution
- Turn on the Digital Video Camera and make sure it is in the DSC Mode.
- Press SET (Menu) Button and move the 4-Way Direction Button to highlight the Resolution item. Press SET (Menu) Button to display submenu; or touch the screen to select the item.
- Press 4-Way Direction Button to select 12M, 8M, 5M or 3M. Press SET (Menu) Button to confirm; or touch the screen to select the item.

| 12M 12M | 4000 x 3000 pixels (Interpolation) |
| 3M 8M | 3200 x 2400 pixels (Interpolation) |
| 5M 5M | 2592 x 1944 pixels |
| 3M 3M | 2048 x 1536 pixels |
6.3.2 White Balance
- Turn on the Digital Video Camera and make sure it is in the DSC Mode.
- Press SET (Menu) Button and move the 4-Way Direction Button to highlight the White Balance item. Press SET (Menu Button) to display submenu; or touch the screen to select the item.
- Use 4-Way Direction Button to select Auto, Daylight, Cloudy, Fluorescent or Tungsten. Press SET (Menu) Button to confirm; or touch the screen to select the item.


6.3.3 Effect
This Digital Video Camera can take standard color images, Black and White images, or Sepia color tone images.
- Turn on the Digital Video Camera and make sure it is in the DSC Mode.
- Press SET (Menu) Button and move the 4-Way Direction Button to highlight the Effect item. Press SET (Menu) Button to display submenu; or touch the screen to select the item.
- Use 4-Way Direction Button to select Normal, B/W or Sepia. Press SET (Menu) Button to confirm; or touch the screen to select the item.


6.3.4 Metering
- Turn on the Digital Video Camera and make sure it is in the DSC Mode.
- Press SET (Menu) Button and move the 4-Way Direction Button to highlight the Metering item. Press SET (Menu) Button to display submenu; or touch the screen to select the item.
- Press 4-Way Direction Button to select Spot, Center or Touch AE. Press SET (Menu) Button to confirm; or touch the screen to select the item.

![[•] Spot [=] Center Touch AE](/content/2026/05/1059760/images/57da3170ceddcdd8a5595d7b1116fd3cdc760bcde8701f1f5985d9ebc5dfe59a.jpg)
6.3.5 Backlight
- Turn on the Digital Video Camera and make sure it is in the DSC Mode.
- Press SET (Menu) Button and move the 4-Way Direction Button to highlight the Backlight item. Press SET (Menu) Button to display submenu; or touch the screen to select the item.
- Press 4-Way Direction Button to select ON or OFF. Press SET (Menu) Button to confirm; or touch the screen to select the item.


6.3.6 Night Mode
-
Turn on the Digital Video Camera and make sure it is in the DSC Mode.
-
Press SET (Menu) Button and move the 4-Way Direction Button to highlight the Night Mode item. Press SET (Menu) Button to display submenu; or touch the screen to select the item.
-
Press 4-Way Direction Button to select On or Off. Press SET (Menu) Button to confirm; or touch the screen to select the item.


6.3.7 Self-timer
- Turn on the Digital Video Camera and make sure it is in the DSC Mode.
- Press SET (Menu) Button and use the 4-Way Direction Button to highlight the Self-timer item. Press SET (Menu Button) to display submenu; or touch the screen to select the item.
- Press 4-Way Direction Button to select OFF, 2 Sec or 10 sec. Press SET (Menu) Button to confirm; or touch the screen to select the item.

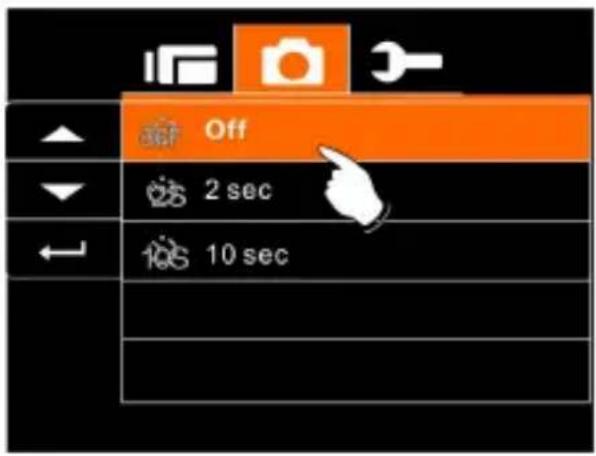
With 2 sec. Self-timer:
The image will be taken 2 seconds after the shutter is released.
With 10 sec. Self-timer:
The image will be taken 10 seconds after the shutter is released.
6.3.8 Continuous Shot
You can continuously shooting three pictures by this function, started by pressing and holding the Shutter Button and ending automatically by taken three pictures.
-
Turn on the Digital Video Camera and make sure it is in the DSC Mode
-
Press SET (Menu) Button and press the 4-Way Direction Button to highlight the Continuous Shot item. Press SET (Menu) Button to display submenu; or touch the screen to select the item.
-
Press 4-Way Direction Button to select OFF or ON. Press SET (Menu) Button to confirm; or touch the screen to select the item.

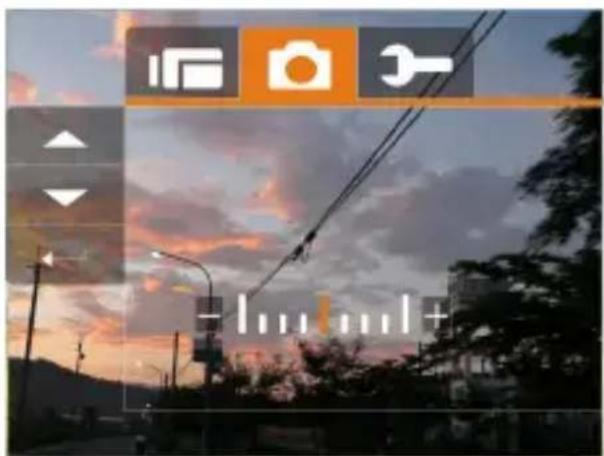
6.3.9 EV compensation
You can adjust the value of the exposure compensation which is ranged from -2.0EV to +2.0EV (at 0.5EV increment). The higher the EV value, the brighter the image will be.
- Turn on the Digital Video Camera and make sure it is in the DSC Mode.
- Press SET (Menu) Button and press the 4-Way Direction Button to highlight the EV Compression item. Press SET (Menu) Button to display submenu; or touch the screen to select the item.
- Press 4-Way Direction Button to adjust the exposure value (-2.0 \~ +2.0). Press SET (Menu) Button to confirm; or touch the screen to select the item.

6.4 Menus of Playback
6.4.1 Delete
Use this function to delete the files.
- Turn on the Digital Video Camera and make sure it is in the Playback Mode.
- Press SET (Menu) Button and press the 4-Way Direction Button Down; or touch the screen to select the file to be deleted or to delete all files.

- Press the 4-Way Direction Button or touch the screen to select "Delete one" or "Delete All" to display submenu.

- Press 4-Way Direction Button or touch the screen to select "O" YES or "X" No and press SET (Menu) Button to delete file(s).

Note: The files cannot be recovered once deleted. Therefore, please make sure you have a backup file before delete. The protect files will not be able to delete. Before delete of Protected file, you must unlock the file.
6.4.2 Protect
- Turn on the power of Digital Video Camera and make sure it is in the Playback Mode.
- Choose the file which you want to protect.
- Press SET (Menu) Button and move the 4-Way Direction Button to highlight the Protect item. Press SET (Menu) Button to display submenu; or touch the screen to select the item.
- Press 4-Way Direction Button or touch the screen to select item. Press SET (Menu) Button or touch the screen to confirm. The Locked icon will be displayed to indicate the file is Protected.


Note: Repeat above steps to unlock the file. When the file is unlocked, the locked icon will disappear.
6.4.3 Auto play
This Digital Video Camera includes a slide show function that could playback each picture at a regular interval.
-
Turn on the power of Digital Video Camera and make sure it is in the Playback Mode.
-
Press SET (Menu) Button and move the 4-Way Direction Button to highlight the Auto play item. Press SET (Menu) Button to display submenu; or touch the screen to select the item.
-
Press 4-Way Direction Button or touch the screen to select "Off", 1sec., or "3 sec", The images will be displayed automatically.


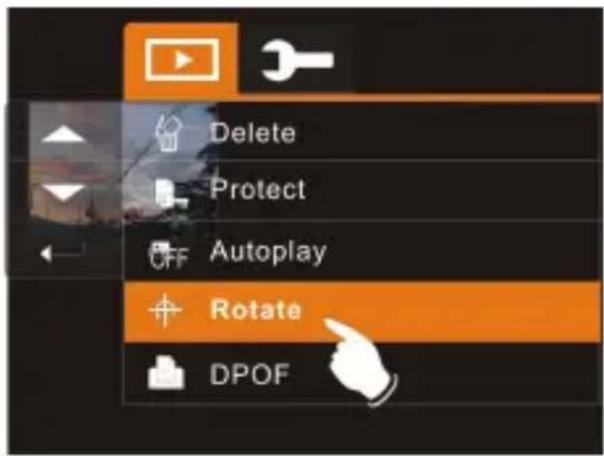
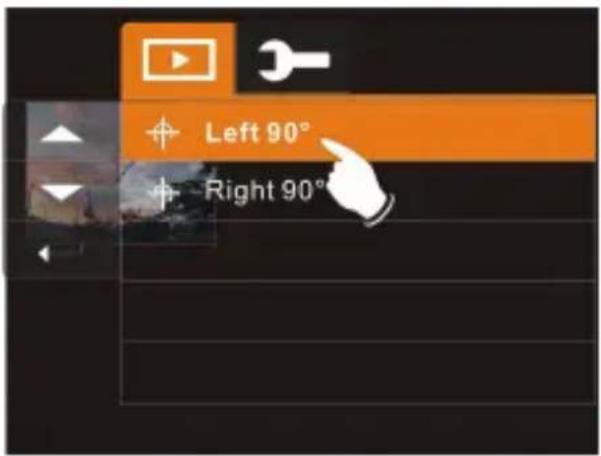
6.4.4 Rotate
-
Turn on the power of the Digital Video Camera and make sure it is in the Playback Mode.
-
Use 4-Way Direction Button to highlight Rotate item and press SET (Menu) Button; or touch the screen to select the Left 90 or Right 90.
6.4.5 DPOF
Use DPOF (Digital Print Order Format) function to indicate the printing information stored in the memory card.
-
Turn on the power of the Digital Video Camera and make sure it is in the Playback Mode. Press Playback Button and press SET (Menu) Button to display Image Playback Menu; or touch the screen to select the item.
-
Use 4-Way Direction Button to highlight the DPOF item. Press SET (Menu) Button; or touch the screen to display submenu.

- Use the 4-Way Direction Button and press SET (Menu) Button; or touch the screen to select the item. The DPOF icon will be shown to indicate the files that are ordered for printing.

- Press the Playback Button or touch the screen to exit the image.
Note:1. A memory card is required for the DPOF function.
2. If DPOF is set, the pictures to be printed are ordered to print.
6.5 Setting Menu
Setting Menu can be used to select all kinds of the Digital Video Camera settings.
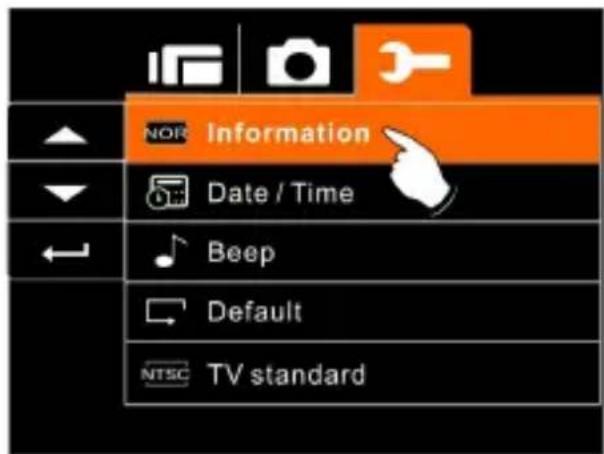
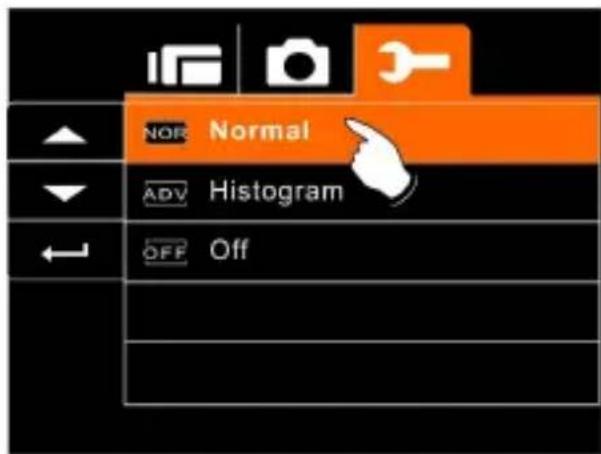
6.5.1 Information
This function can be used to display information on the LCD screen to help you in capturing best images and movie clips.
-
Turn On the Digital Video Camera and switch to SET Mode.
-
Press 4-Way Direction Button to highlight Information item. Press SET (Menu) Button to display submenu; or touch the screen to select the item.
-
Press 4-Way Direction Button to select Normal, Histogram, or OFF. Press SET (Menu) Button to confirm; or touch the screen to select the item.
6.5.2 Date / Time
Please refer to 2.7.1 the Setting of Date and time on page 21.
6.5.3 Beep
- Turn on the power of Digital Video Camera and switch to SET Mode. Press the 4-Way Direction Button up or down to highlight the Beep and press SET (Menu) selection Button to confirm or touch the screen to select.
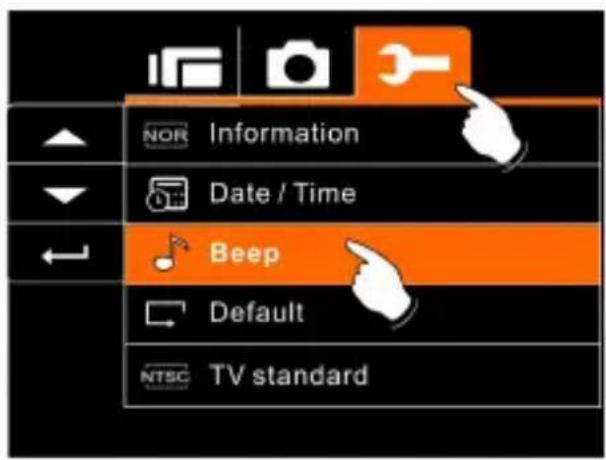
- Use 4-Way Direction Button or touch the screen to select On or Off.

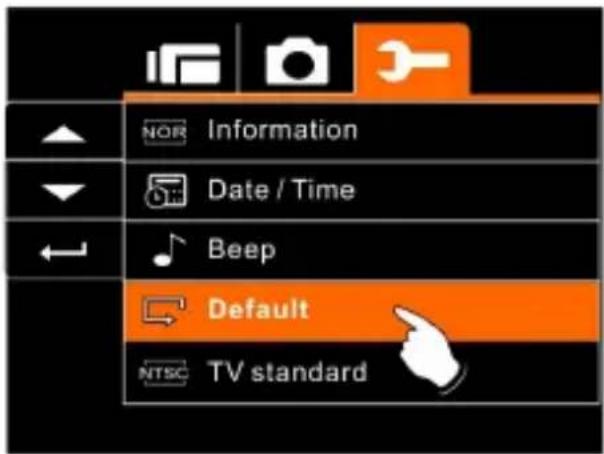
6.5.4 Default
Use this function to reset all settings to default settings.
- Turn on the power of Digital Video Camera and switch to SET Mode.
- Press 4-Way Direction Button to highlight Default item. Press SET (Menu) Button to display submenu; or touch the screen to select the item.
- Use 4-Way Direction Button or touch the screen to select "O" YES or "X" NO. Press SET(Menu) Button to confirm; or touch the screen to select the item.

6.5.5 TV standard
Use the TV standard to set the TV system for your area.
- Turn on the power of Digital Video Camera and switch to SET Mode.
- Use 4-Way Direction Button to highlight the TV standard item. Press SET (Menu) Button to display submenu; or touch the screen to select the item.
- Use 4-Way Direction Button to select NTSC or PAL. Press SET (Menu) Button to confirm; or touch the screen to select the item.


| TV out standard setting reference | |
| NTSC NTSC | USA, Canada, Japan, Korea, Taiwan, Mexico |
| PAL | Australia, Austria, Belgium, China, Denmark, Finland, Germany, UK, Italy, Kuwait, Malaysia, New Zealand, Singapore, Spain, Sweden, Switzerland, Thailand, Norway |
6.5.6 USB
This setting is for USB output function. You can select an external device to connect the Digital Video Camera by using the supplied USB cable.
- Turn on the Digital Video Camera and switch to SET Mode.
- Press 4-Way Direction Button to highlight the USB item. Press SET (Menu) Button to display submenu; or touch the screen to select the item.
- Use 4-Way Direction Button to select PC Camera or Mass Storage. Press SET (Menu) Button to confirm; or touch the screen to select the item.


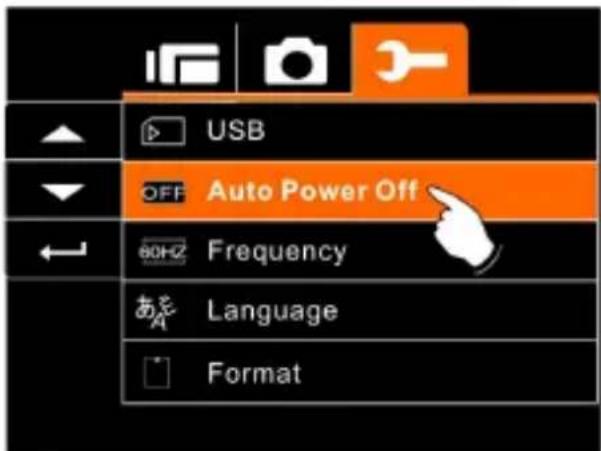
6.5.7 Auto Power Off
This function can be used to turn off the Digital Video Camera automatically after a period of time not using the Digital Video Camera.
- Turn on the Digital Video Camera and switch to SET Mode.
- Press 4-Way Direction Button to highlight Auto Power Off item. Press SET(Menu) Button to display submenu; or touch the screen to select the item.
- Press 4-Way Direction Button to select OFF, 3 mins, or 5 mins; or touch the screen to select the item.

6.5.8 Frequency
Use the Frequency option to set the frequency system for your area.
-
Turn on the power of Digital Video Camera and switch to SET Mode.
-
Use 4-Way Direction Button to highlight the Frequency selection item. Press SET (Menu) Button to display submenu; or touch the screen to select the item.
-
Use 4-Way Direction Button to select 50 Hz or 60 Hz. Press SET (Menu) Button to confirm; or touch the screen to select the item.
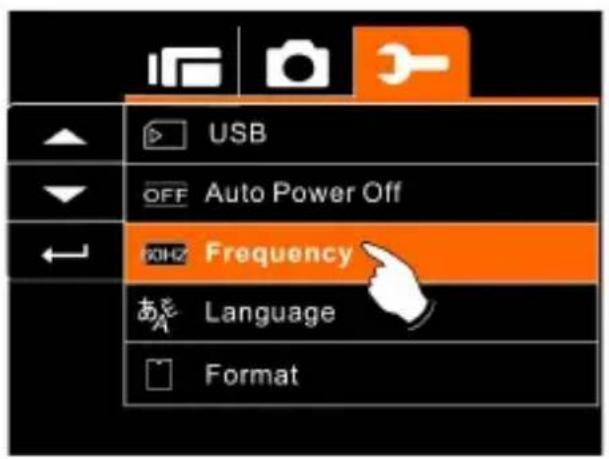

| Frequency setting reference: | |
| 50HZ 50HZ | UK, Germany, Spain, Italy, France, Netherlands, Portugal, Russia, China, Japan |
| 60HZ 60HZ | USA, Taiwan, Korea, Japan |
6.5.9 Language
- Turn on the power of the Digital Video Camera. Then select the Mode Button to "SET". Move 4-Way Direction Button up and down to highlight the Language and press SET (Menu) button to confirm or touch the screen to select.
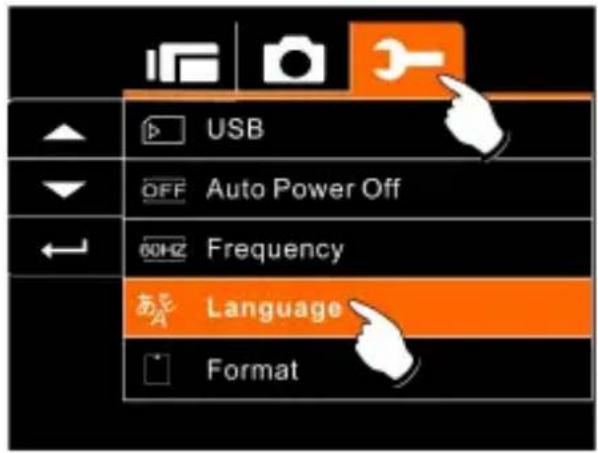
- Press 4-Way Direction Button or touch the screen to select the following languages: English, German, French, Italian, Japanese, Spanish, Portuguese, Traditional Chinese, Simplified Chinese, Turkish, Russian, Thai, or Arabian.

6.5.10 Format
This function allows you to format the memory card or the built-in memory.
- Turn on the power of Digital Video Camera and switch to SET Mode.
- Press 4-Way Direction Button to highlight Format item. Press SET (Menu) Button or touch the screen to display submenu.
- Press 4-Way Direction Button to select "O" Yes or "X" NO. Press SET (Menu) Button to confirm; or touch the screen to select the item.


- The format of the current storage media (memory card or internal memory) is now completed.
Note: All the data stored in the memory card or flash memory will be deleted after formatting.
6.5.11 File Number(Default: Series)
This setting allows you to name the files.
If "Series" is selected, the file name will follow the latest stored file instead.
If “Reset” is selected, the next file name will start from 0001 even after formatting, deleting or inserting a new memory card.
-
Turn on the power of Digital Video Camera and switch to SET Mode.
-
Press 4-Way Direction Button to highlight File Number item. Press SET (Menu) Button to display submenu; or touch the screen to select the item.
-
Use 4-Way Direction Button to select Series or Reset. Press SET (Menu) Button to confirm; or touch the screen to select the item.

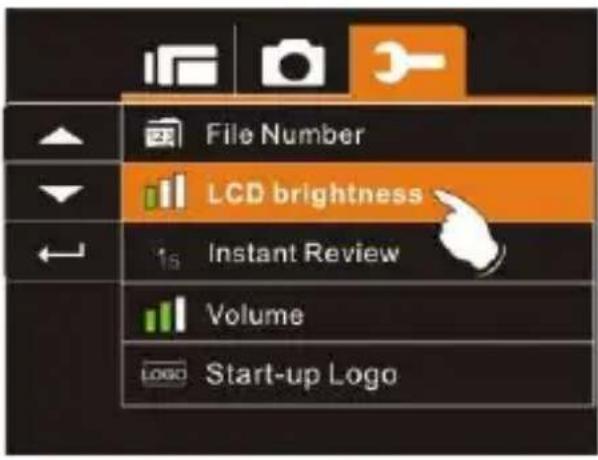
6.5.12 LCD brightness
This function can be used to adjust the brightness of the screen.
-
Turn on the Digital Video Camera and switch to SET Mode.
-
Use 4-Way Direction Button to highlight LCD brightness item. Press SET (Menu) Button to display submenu; or touch the screen to select the item.
-
Press 4-Way Direction Button to select High, Medium, or Low. Press SET (Menu) Button to confirm; or touch the screen to select the item.

6.5.13 Instant Review
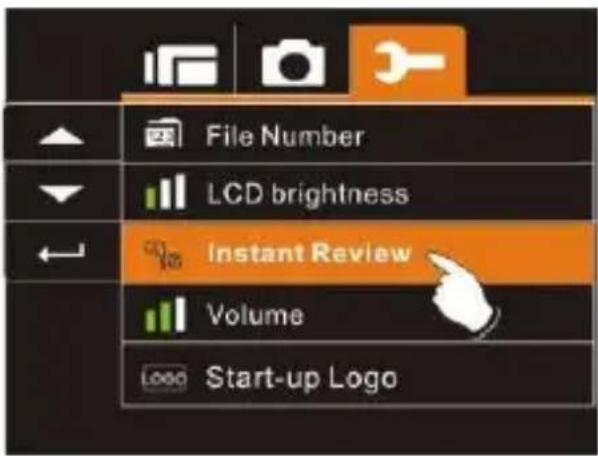
This function can be used to instantly browse the files after taking the picture.
-
Turn on the Digital Video Camera and switch to SET Mode.
-
Press 4-Way Direction Button to highlight Instant Review item. Press SET (Menu) Button to display submenu; or touch the screen to select the item.
-
Press 4-Way Direction Button to select 1 sec, 3 sec, or 5 sec. Press SET (Menu) Button to confirm; or touch the screen to select the item.

6.5.14 Volume
Use this function to adjust the volume of sound.
-
Turn on the Digital Video Camera and switch to SET Mode.
-
Press the 4-Way Direction Button to highlight Volume item. Press SET (Menu) Button to display submenu; or touch the screen to select the item.
-
Press the 4-Way Direction Button to select High, Medium, or Low. Press SET (Menu) Button to confirm; or touch the screen to select the item.


6.5.15 Start-up LOGO
Use this function to the image that is displayed on the LCD when the digital camcorder is turned on.
-
Turn on the Digital Camcorder and switch to Setup Menu.
-
Press the 4-Way Direction Button to highlight the Star-up Logo item. Press the SET Button or touch the icon on the screen to display the submenu.
-
Press the 4-Way Direction Button to select Default or User Setting. Press the SET Button or touch the screen to select the item.


7 PC and TV Connection
7.1 Connecting to the Computer
As shown in the illustration, use the USB cable provided to connect the Digital Video Camera to a PC for file transmission, or use the Digital Video Camera as a Web camera for conferencing purpose.

natural_image
Line drawing of a device with an attached cable and connector, showing no text or symbols7.2 Connecting to a Standard TV
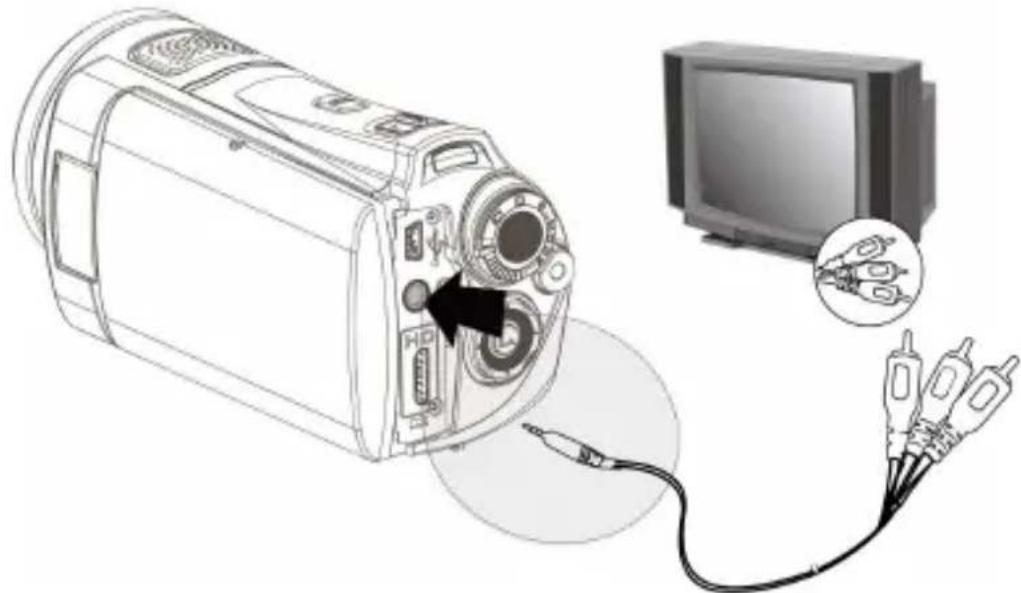
As shown in the illustration, use the video cable to connect the Digital Video Camera to a standard TV.
natural_image
Line drawing of a vintage camera module connected to a TV, showing cable and cable connector (no text or symbols)7.3 Connecting to a HD TV
As shown in the illustration, use the HDMI cable provided to connect the Digital Video Camera to a HD TV for high resolution picture display.

natural_image
Diagram showing a camera module connected to a TV via cable, with an inset close-up of the cable connector (no text or symbols present)8 Installing the Software
- Place the CD ROM attached into the CD player.
- If the CD is not executed automatically, please use Windows File Manager to execute the Install_CD.exe file in the CD.
The following screen will be displayed.

- Press the Menu item and follow the Installation process and follow the instructions on-screen.
9 Editing Software
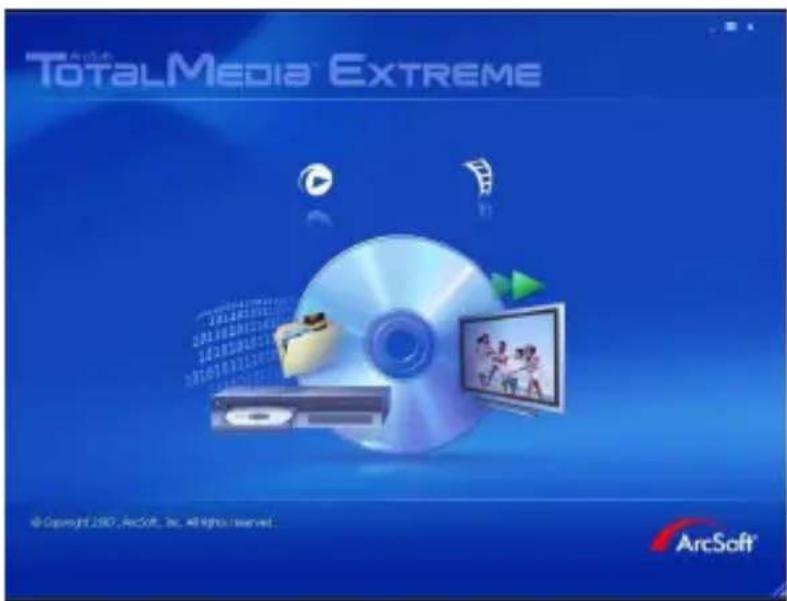
ArcSoft Total Media Extreme(TME) ™ manages your media for you, and gives you tons of fun and exciting ways to create and share projects featuring your photo, video, and music files. Edit, enhance and add creative effects to your photos. You can
● Create your own movies or photo slide shows complete with soundtrack.
- Upload your files easily to YouTube™!
- Or share them through simple email attachments or popular photo printing.
- You can go to http://www.arcsoft.com/ for more information.
10 Appendix
Specifications
| Image sensor 1/2.5 inch. 5.0 mega pixels CMOS sensor | |
| Effective pixels | 5.03 Mega pixels (2592 x 1944) |
| Storage media | Built-in 32 MB Flash memorySD card and SDHC card Supported. |
| ISO Equipment | Auto |
| Color effect Normal/BW/Sepia | |
| Lens | 5x ZOOM LENS |
| Focus range | Normal: 80cmMacro: 10~80cm |
| Still image | Format: JPEG (DPOF, EXIF)Resolution: 3MP, 5MP, 8MP, 12MP (Firmware interpolation)Scene Mode: Auto |
| Movie Clip | Format: H.264 (MOV)Resolution: FHD (1920 x 1080 / 30fps)HD (1280 x 720 / 30 fps)WVGA (848 x 480 / 60 fps)WEB (320 x 240 / 30 fps.) |
| Digital zoom | Still Image mode: 4X(720P)Play mode: 8X (depends on image size) |
| Audio Audio for | Voice Recording: AAC |
| LCD Display 3.0" Touch Panel screen(16:9) | |
| Flash light | Range: < 2 m off, auto, fill-in |
| White balance Auto / Daylight / Cloudy / Tungsten / Fluorescent | |
| Exposure -2.0 EV~+2.0 EV | |
| Self-Timer Off, 2 seconds, 10 seconds. | |
| Interface | Digital output connector: USB 2.0 high- speed (480Mbps Max.)MIC Input, SpeakerHDMIUSB DC IN |
| TV output NTSC/PAL | |
| Shutter | Electronic shutter2~1/4000 second |
| Auto Power Off | Off, 3 minutes, 5 minutes |
| Power Source | CNP-40 Lithium battery |
| Dimensions 121(L) x 64 (H) x 54 (W) mm | |
| Weight | About 300g (without battery) |
Troubleshooting
| Problem Possible Cause Solution | ||
| Can not turn on the power of Digital Video Camera. | 1. Batteries are not inserted correctly.2. Batteries are exhausted. | 1. Please insert batteries correctly.2. Replace the batteries. |
| Camera shutdown suddenly. | 1. Power saving mode already activated.2. Battery exhausted. | 1. Please turn on the power again.2. Replace the batteries. |
| Pictures are not stored in the memory. | Power off before storing the images. | Please change to new batteries when the battery indicator turns to red color. |
| Camera shutdown when using Self-timer shooting picture. | Batteries in camera are exhausted. | Change new batteries. |
| Images are out of focus | Object exceeds the range of focus. | Please take the picture within the focusing range and select normal or Macro Mode. |
| Unable to use the external memory card. | 1. Memory card is Protected.2. Memory card contains non-DCF images taken by other cameras. | 1. Unlock the memory card.2. Reformat the memory card. Please make sure to backup the file before reformatting memory card. |
| All Buttons can not work or camera hangs. | Short circuit occurred when connecting the camera to other device. | Take out batteries in the camera and re-insert again. |

natural_image
Decorative gray scrollwork corner with swirling patterns and swirls (no text or symbols)
natural_image
Line drawing of a digital camera with lens and screen (no text or symbols)User's Manual
User's Manual

natural_image
Line drawing of a digital camera with lens and screen (no text or symbols)Contents
Disclaimer....5
Precautions ......6
1 Overall Introduction ......8
1.1 System Requirements ....8
1.2 Features ....8
1.3 Accessories....9
1.4 External View....10
1.5 Adjusting LCD Display.... 11
2 Getting Started ....12
2.1 Inserting SD Card....12
2.2 Loading the battery....13
2.3 Charging the Battery....15
2.4 The gestures of using the touch screen ...15
2.4.1 Single touch....15
2.4.2 Slide.... 16
2.4.3 Rotate.... 16
2.5 Buttons & Functions....17
2.6 About LED Indicators 18
2.7 Initial settings before use....19
2.7.1 Setting Date and Time....19
3 LCD Display Information......20
3.1 In Movie Clip Mode......20
3.2 In Voice Recording Mode ......22
3.3 In DSC Mode......23
4 Using the Camera....25
4.1 Shooting a Movie Clip....25
4.2 Capturing a still image from a movie .....27
4.3 Capturing a still image in video mode.....28
4.4 Voice Recording: 29
4.5 Movie Clip / Voice Clip Playback......30
4.6 Shooting / Playback images....33
4.6.1 Taking a picture 33
4.6.2 Images Playback 34
5 LCD Display Information......36
5.1 Movie Clip Recording Mode: 36
5.2 Voice Recording Mode: 38
5.3 DSC Playback Mode....39
6 Menu Mode 41
6.1 Menu options of Movie Clip Mode ....41
6.1.1 Movie Clip Resolution....41
6.1.2 White Balance 42
6.1.3 Effect 43
6.1.4 Metering....44
6.1.5 Backlight....45
6.1.6 Night Mode 46
6.1.7 Motion Detection....47
6.1.8 EV Compensation....48
6.1.9 Multi shot 49
6.2 Menus of Movie Clip/Voice Playback......50
6.2.1 Delete 50
6.2.2 Protect 52
6.3 Menu options of Camera Mode......53
6.3.1 Still Image Resolution....53
6.3.2 White Balance 54
6.3.3 Effect 55
6.3.4 Metering.... 56
6.3.5 Backlight....57
6.3.6 Night Mode 58
6.3.7 Self-timer 59
6.3.8 Continuous Shot....60
6.3.9 EV compensation 61
6.4 Menus of Playback....62
6.4.1 Delete 62
6.4.2 Protect 64
6.4.3 Auto play.... 65
6.4.4 Rotate....66
6.4.5 DPOF 67
6.5 Setting Menu....69
6.5.1 Information.... 69
6.5.2 Date / Time 69
6.5.3 Beep 70
6.5.4 Default 71
6.5.5 TV standard....72
6.5.6 USB 73
6.5.7 Auto Power Off 74
6.5.8 Frequency.... 75
6.5.9 Language....76
6.5.10 Format 77
6.5.11 File Number(Default: Series) .....78
6.5.12 LCD brightness....79
6.5.13 Instant Review....80
6.5.14 Volume....81
6.5.15 Start-up LOGO....82
7 PC and TV Connection....83
7.1 Connecting to the Computer......83
7.2 Connecting to a Standard TV....83
7.3 Connecting to a HD TV 84
8 Installing the Software 85
9 Editing Software......86
10 Appendix......87
Specifications 87
Troubleshooting 89
Thank you for purchasing this Digital Video Camera. Please make sure to read this manual thoroughly before using it and keep this manual in a safe place for future reference.
Disclaimer
This company will endeavor to make sure the contents of this manual are correct and up to date. However, we do not guarantee the accuracy of the contents of this manual. In case there is any discrepancy between this manual and the Digital Video Camera, please use this camera as the basis. We reserve the right to change any content or technical rule without prior notification. In addition, the manufacturer reserves the right to change technical specifications and package contents without prior notification.
Precautions
General precautions
- Do not try to disassemble the product by yourself, which may damage the product or cause electric shock.
- Keep the Digital Video Camera away from the reach of children or animals to prevent them from swallowing the batteries or small accessories.
- Stop using the Digital Video Camera if any kind of liquid or foreign object enters the Digital Video Camera. If it happens, power off the Digital Video Camera and contact your dealer for help.
- Do not operate the Digital Video Camera with wet hands; it may cause electric shock.
- The Digital Video Camera may be damaged in an environment of high temperature. This camera is designed for use in the temperature between 0°C and 40°C (32°F and 104°F).
- Do not use or store the product in dusty, dirty, sandy or the area that is close to air conditioner or heater.
- It is normal that the temperature of the Digital Video Camera body rises if the Digital Video Camera works for a long period of time.
- Do not open the battery cover while an image is being recorded. Doing so will not only make storage of the current image impossible, it can also corrupt other image data already stored in file.
- Before using this Digital Video Camera for important occasions (such as wedding or overseas trip), be sure to test this Digital Video Camera in order to ensure proper operations of this product.
Power Supply
- Be sure to use the type of battery or battery charger attached to this Digital Video Camera. Using any other type of battery or battery charger might damage the equipment and render the guarantee void.
• Make sure the batteries are placed in the correct position. Error in the orientation of batteries might damage this product and result in fire. - Please remove the batteries to avoid leaking of battery fluid if the camera is not to be used for a long period of time.
- Please remove the crashed or damaged battery immediately to avoid leaking of battery fluid or abnormal expansion.
1 Overall Introduction
Please read this chapter carefully to understand the features and functions of this Digital Video Camera. The description of this chapter also includes the description of system requirement, package contents, and hardware components.
1.1 System Requirements
This Digital Video Camera requires a unit of computer with the following specifications:
- Windows® Vista / XP operating system or Mac OS 10.3 \~10.4
- A CPU of at least the equivalent of Intel® Pentium 4 2.8GHz
- At least 512 MB of RAM
- Standard USB 1.1 connection port or higher
- At least 64MB of display card
Note: USB 1.1 allows you to transmit files to the host, but using USB 2.0 connection port could increase the transmission speed far faster.
1.2 Features
This Digital Video Camera provides many features and functions including:
• High resolution pixel camera (maximum 12 million pixels)
- Touch screen
- Slow motion Playback
• Capturing a still image from a movie
- Capturing a still image in video mode
In addition, this video camera has USB mass storage hard disk, and SD card reader.
1.3 Accessories
This package should contain the following items. In case there is any missing or damaged item, please contact your dealer immediately.
1.4 External View
1.5 Adjusting LCD Display
Before taking picture or recording movie clips, please rotate according to the illustrations below.

2 Getting Started
2.1 Inserting SD Card
- Open LCD panel and open the battery cover.

natural_image
Line drawing of a digital camera with an open lid and a gray panel showing the internal structure (no text or symbols)- Insert an SD card and make sure facing the touching face downward.
natural_image
Line drawing of a digital camera with an inset showing the internal component (no text or symbols)Note: Do not remove or insert SD cards when the power of the Digital Video Camera is on to avoid damaging files.
2.2 Loading the battery
Please use only the battery provided or recommended by the manufacturer or dealer.
Note: Insert batteries correctly according to this description. Error in inserting batteries could result in non-repairable damage to this Digital Video Camera
- Open LCD panel and open battery cover.

natural_image
Line drawing of a digital camera with an upward arrow indicating the camera's direction (no text or symbols present)Battery Status Indicator:
| Batteries full |
| Batteries half full |
| Battery empty |
| Charging battery (A new battery should be charged at least 2 hours.) |
| The device power is supplied by DC input. (No batteries inside.) |
- Insert batteries according to the illustration.

natural_image
Line drawing of a digital camera with an open screen and a paper clip, showing no text or symbols.- Close battery cover.

natural_image
Diagram showing a device being processed from a left-side panel to a right-side panel, with no visible text or symbols.2.3 Charging the Battery
You can use the adaptor attached to charge the lithium battery. Insert the lithium battery into the Digital Video Camera and connect to the cable of the adaptor.
natural_image
Line drawing of a camera module connected to a power strip with cable (no text or symbols)2.4 The gestures of using the touch screen
2.4.1 Single touch
Single touch for the below touchable hotkeys:
- Resolution change (FHD, HD, WVGA, WEB or 12M, 8M, 5M, 3M)

natural_image
Sunset over a hillside with power lines and sky, no visible text or symbols
natural_image
Sunset over a hillside with utility poles and power lines, captured via camera interface (no text or symbols on main scene)2.4.2 Slide
Slide right or left to view the previous file or the next file under the Playback Mode.

2.4.3 Rotate
Under Playback Mode, you can rotate the image by 90^ /step as shown below.

natural_image
Exterior view of a mountainous landscape with smoke and power lines, showing a hand pointing at a curved arrow (no text or symbols)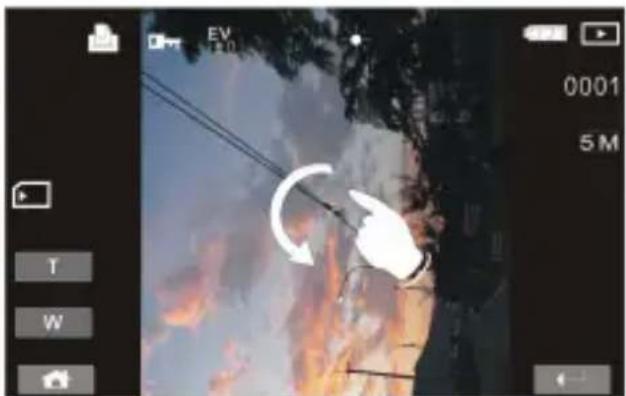
natural_image
Fire incident scene with smoke and fire, showing a hand holding a tool near a tree (no readable text or symbols)2.5 Buttons & Functions
| Description | Button Function | |
| Power Button | | Press the button to turn ON/OFF the Digital Video Camera. |
| SET (Menu) Button | | Press the button to display the main OSD menu. |
| MODE Button | | There are three operating modes for the Digital Video Camera: DV Mode, DSC Mode, and Voice Recording Mode. Press the Mode button to change to different modes. |
| 4-Way Direction Button | | Press the 4-Way Direction Button UP to turn on/off the flash light: off, auto, fill-in; press DOWN to delete the file when it's in Playback mode. |
| Zoom button | 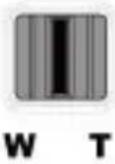 | This Digital Video Camera is equipped with, 4X Digital zoom( For 720p & below) and a 5X Optical Zoom function. Press the Zoom button Right (T) to pull in the distance of the subject, or press the button Left (W) to move away the distance from the object |
| Shutter button |  | Press the button to take images. |
| Recording button | | Press the button to take movie clip and voice recording |
| Playback Button | | Press the Playback button to enter Playback mode and playback the last file. |
2.6 About LED Indicators
Below table describes the meaning of the camera LED indicators:
| Indicator Color | Definition | |
| Power | Green Turning power on. | |
| Red blinking Flash is charging. | ||
| Recording | Red blinking Recording | |
| Self-timer | Red blinking Start of Self-timer. | |
2.7 Initial settings before use
2.7.1 Setting Date and Time
- Turn on the Digital Video Camera to set up the date and time for the first time. Set the date and time by moving up/down button or touch the screen to select.
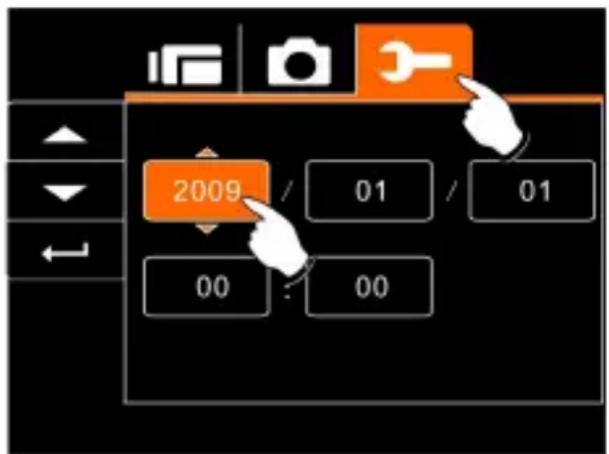
- Press the 4-Way Direction Button left/right to highlight each column. Then press up/down or touch the screen to select the column.
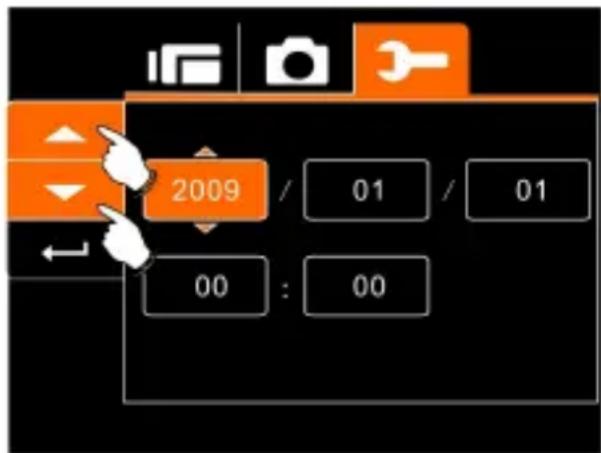
- Press the 4-Way Direction Button Up/Down to adjust the value. Press SET (Menu) Button to store the value you change or touch the screen to adjust the Year, Date and Time before pressing the Return Button (←) to store the value and leave the setting.
3 LCD Display Information
3.1 In Movie Clip Mode
The following table regarding the description of each icon and symbol will be shown when the Digital Video Camera is in DV Mode


| 1 | | Movie Clip recording indicator |
| 2 | | Motion Detection |
| 3 |  | Night Mode indicator |
| 4 |  | Exposure compensation indicator |
| 5 |  | Color effect indicator |
| 6 |  | Metering Mode |
| 7 | | White balance indicator |
| 8 | | Macro indicator |
| 9 | | Battery status indicator |
| 10 | | Remaining recording time indicator |
| 11 | | Resolution indicator |
| 12 | | Compensation indicator |
| 13 | | Histogram indicator |
| 14 | | Playback indicator |
| 15 | | Digital Zoom indicator |
| 16 | | Menu Button |
| 17 |  | Memory Status indicator: SD card indicatorINT: Internal memory indicator (displayed when there is no SD card) |
| 18 | | Multi shot |
3.2 In Voice Recording Mode
The following table regarding the description of each icon and symbol will be shown when the Digital Video Camera is in Voice Recording Mode ().
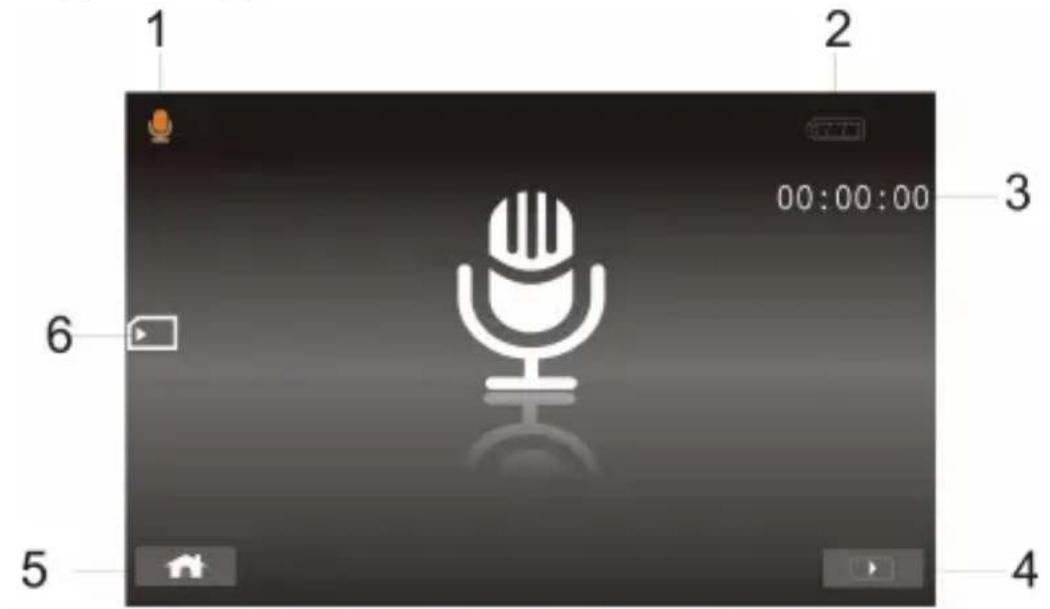
| 1 | | Voice Recording Mode indicator |
| 2 | | Battery status indicator |
| 3 | | Recording time left indicator |
| 4 | | Playback Button |
| 5 | | Menu Button |
| 6 | | Memory Status indicator: SD card indicatorINT: Internal memory indicator (displayed when there is no SD card) |
3.3 In DSC Mode
The following table regarding the description of each icon and symbol will be shown when the Digital Video Camera is in DSC Mode ().
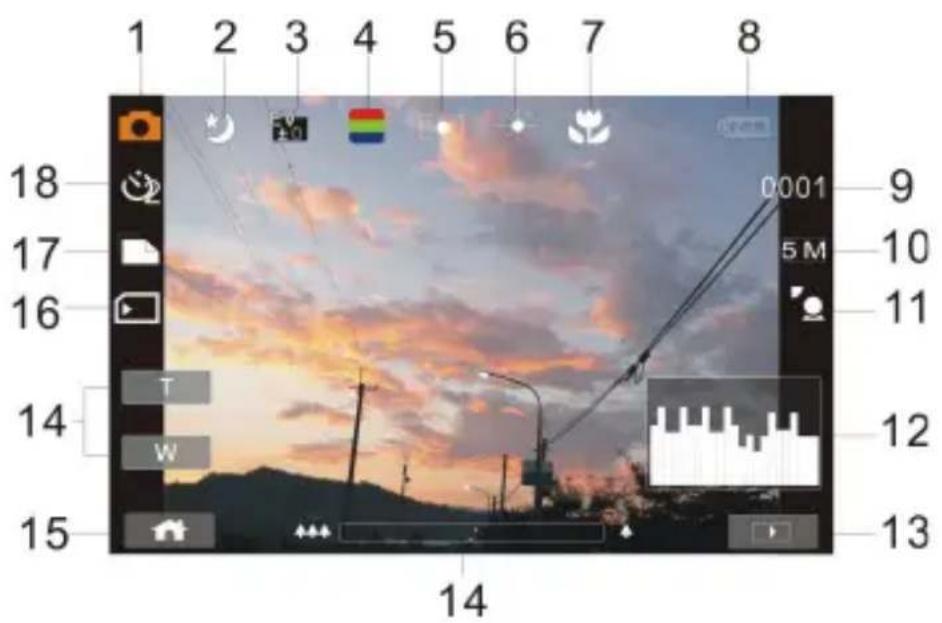
| 1 | | DSC Mode indicator |
| 2 | | Night Mode indicator |
| 3 | | EV compensation indicator |
| 4 | | Effect indicator |
| 5 | | Metering Mode |
| 6 | | White balance indicator |
| 7 | | Macro indicator |
| 8 | | Battery indicator |
| 9 | | Number of pictures left. |
| 10 | | Resolution indicator |
| 11 | | Backlight compensation |
| 12 | | Histogram indicator |
| 13 | | Playback Button |
| 14 | | Digital zoom indicator |
| 15 | | Menu Button |
| 16 | | Memory Status indicator: SD card indicatorINT: Internal memory indicator (displayed when there is no SD card) |
| 17 | | Continuous Shot Mode |
| 18 | | Self-timer indicator |
4 Using the Camera
4.1 Shooting a Movie Clip
- DV mode is the default setting after you power on the Digital Video Camera.
- Press the Recording button to start or stop moving recording.
- The Digital Video Camera will store the Movie clip automatically.

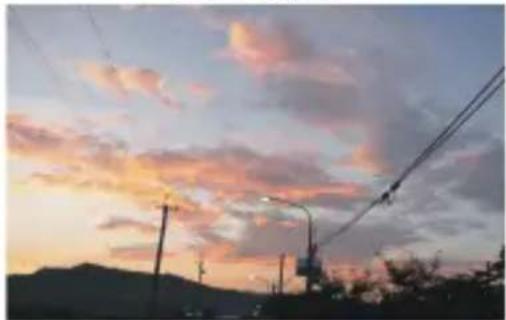
- LCD screen ratio will be different depending on the setting of Movie Clip resolution. Please refer to the table shown below:
Video Resolution
Preview
FHD (1920 x 1080)
HD (1280 x 720)
WVGA (848×480)
16:9 ratio
natural_image
Silhouette of utility poles and power lines against a sunset sky with pink and orange clouds (no text or symbols visible)WEB (320 x 240)
4:3 ratio

natural_image
Sunset over a hillside with power lines and silhouetted trees (no text or symbols visible)4.2 Capturing a still image from a movie
You can save a selected frame from a recorded movie as a still image. Select the video clip, and press the shutter button at an interested frame.
- DV mode is the default setting after you power on the Digital Video Camera.
- Press the Recording button to start or stop video recording.
- While filming video, still image can be taken by pressing the shutter button.
- The Digital Video Camera will store the image automatically.

| Image resolution | |
 FHD FHD | 1920 x 1080 |
 HD HD | 1280 x 720 |
 WVGA WVGA | 848 x 480 |
 WEB WEB | 320 x 240 |
| Note: the image size is fixed depending on the image quality of the video clip.1. When setting to FHD, HD or WVGA resolution, the LCD display aspect ratio is 16:9.2. When setting to WEB video resolution, the LCD display aspect ratio is 4:3. | |
4.3 Capturing a still image in video mode
You can save a selected frame in the video mode as a still image. Press shutter button at an interested preview image to save the interested frame. It is also workable during recording a video clip.
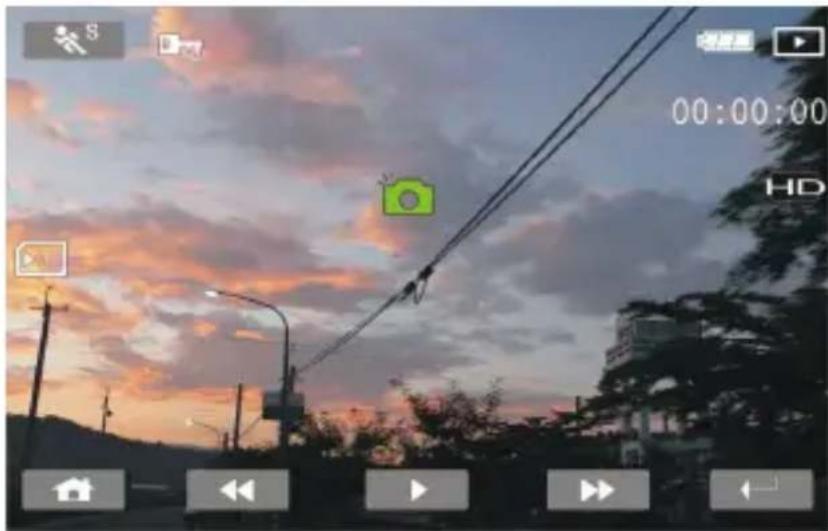
- Press the shutter button in movie clip during playback.
- The Digital Video Camera will store the image automatically.
| Image resolution | |
| FHD | 1920 x 1080 |
| HD | 1280 x 720 |
| WVGA | 848 x 480 |
| WEB | 320 x 240 |
| Note: the image size is fixed depending on the image quality of the video clip.1. When setting to FHD, HD or WVGA resolution, the LCD display aspect ratio is 16:9.2. When setting to WEB video resolution, the LCD display aspect ratio is 4:3. | |
4.4 Voice Recording:
- Turn on the Digital Video Camera.
- Press the MODE button to enter Voice Recording mode.
- Press the Recording button to start or stop Voice recording.


natural_image
Generic video player interface with a microphone icon and playback controls (no readable text or symbols)4.5 Movie Clip / Voice Clip Playback
- In Movie/Voice Recording Mode, press Playback Button to display recently stored file on the LCD screen.
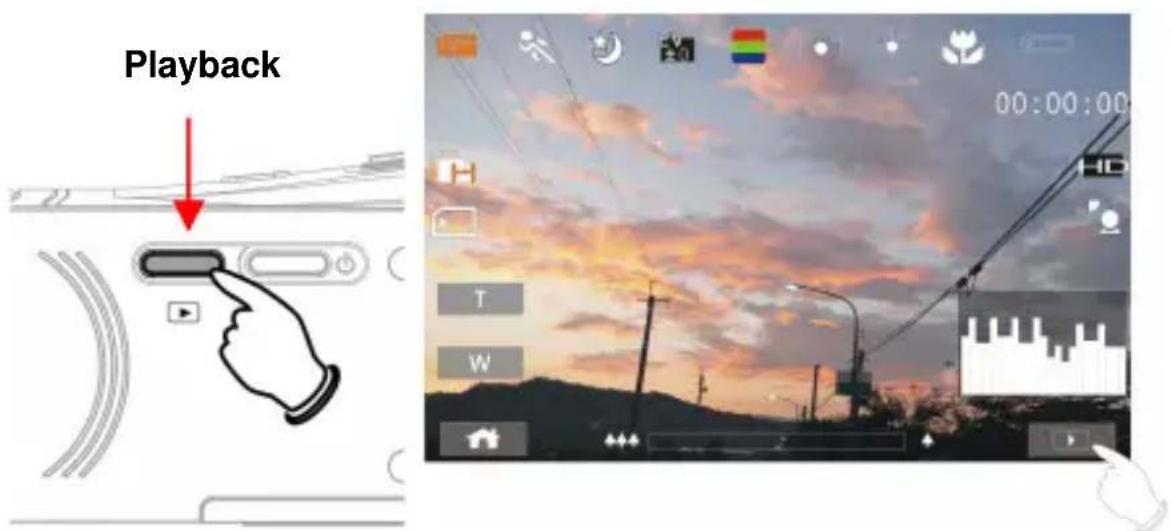
Playback Mode indicator

natural_image
Generic video player interface with microphone icon and playback controls (no readable text or symbols)Playback Mode indicator
- Press 4-Way Direction Button up/down, left/right to view the stored file. Press SET (Menu) Button to playback or touch the screen to select Playback of the file.


- To pause the Playback of file, press the Recording button or touch the screen icon ().

natural_image
Sunset over a cityscape with power lines and trees, no visible text or symbols
natural_image
Generic video player interface with microphone icon and playback controls (no readable text or symbols)-
Press the Playback Button to return to Movie/Voice Recording Mode.
-
You can also playback the movie clip by different speed by touching (ON/OFF) the screen icon ().

Playback speed is as below when the Slow Motion is “OFF”:

Rewind Rewind Rewind Rewind
2X play 4X play 8X play 16X play
Forward Forward Forward Forward
Playback speed is as below when the Slow Motion is "ON":

Rewind Rewind Rewind Rewind
1/2X play 1/4X play 1/8X play 1/16X play

Forward Forward Forward Forward
4.6 Shooting / Playback images
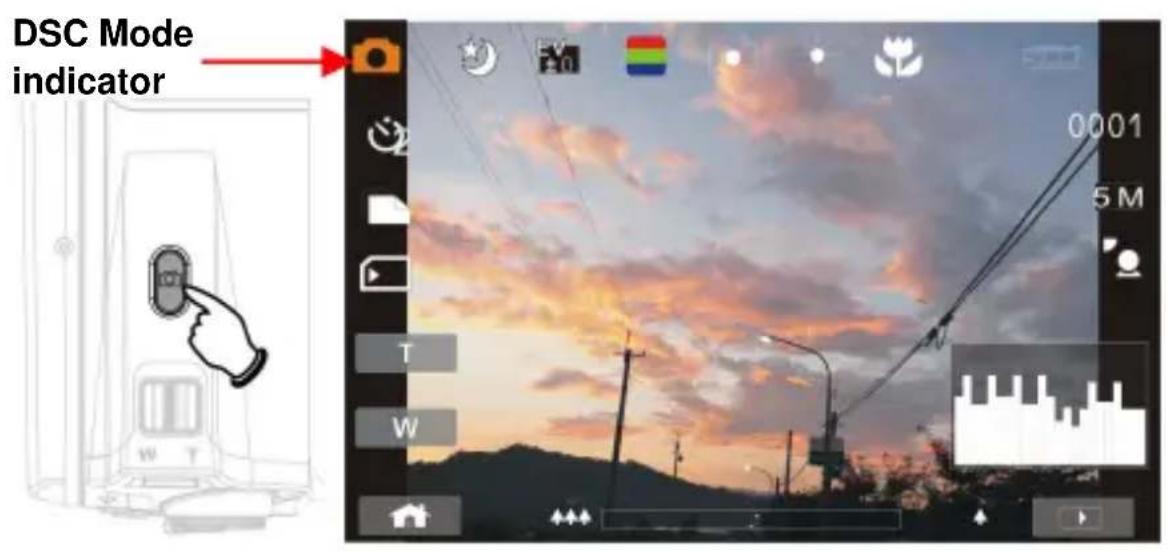
4.6.1 Taking a picture
-
Turn on the power and adjust the Mode Button to DSC Mode.
-
Press Shutter Button to capture images.
4.6.2 Images Playback
- In DSC Mode, press Playback Button to display the images on the LCD screen.

- Press 4-Way Direction Button up/down, or left/right to view the stored files. Press SET (Menu) Button to replay or touch the screen to playback.
natural_image
Sunset over a cityscape with utility poles and trees, no visible text or symbols- Press SET(Menu) Button or touch the screen to return to full screen for viewing images.

natural_image
Sunset over a cityscape with power lines and silhouetted trees (no visible text or symbols)
natural_image
Sunset over a cityscape with trees and utility poles, no visible text or symbols- Touch the panel icon (or) to enlarge or shrink the image. Then, you can move the image up/down or left/right.

natural_image
Silhouette of a city at sunset with power lines and trees, no visible text or symbols- Press Playback Button again to return to DSC Mode.
5 LCD Display Information
5.1 Movie Clip Recording Mode:
Please refer to the following table regarding the description of each icon and symbol.
| 1 | | File Protect indicator |
| 2 | | Battery status indicator |
| 3 | | Playback Mode icon |
| 4 | | Length of each Movie Clip |
| 5 | | Resolution indicator |
| 6 |  | Return Button |
| 7 |  | Fast forward Playback Button |
| 8 | | Playback/Pause button |
| 9 | | Fast rewind Playback Button |
| 10 | | Menu Button |
| 11 | | Memory Status indicator: SD card indicatorINT: Internal memory indicator (displayed when there is no SD card) |
| 12 | | Slow motion Playback |
5.2 Voice Recording Mode:
Please refer to the following table regarding the description of each icon and symbol.

| 1 | | File Protect indicator |
| 2 | | Battery status indicator |
| 3 | | Playback Mode icon |
| 4 | | Length of each voice recording. |
| 5 | | Playback mode indicator |
| 6 | | Playback/Pause Button |
| 7 | | Menu Button |
| 8 | | Memory Status indicator: SD card indicatorINT: Internal memory indicator (displayed when there is no SD card) |
5.3 DSC Playback Mode
Please refer to the following illustration to familiarize yourself with icons and symbols of DSC Playback Mode.
| 1 | | DPOF ( Digital Print Order Format ) indicator |
| 2 | | File Protect indicator |
| 3 | | Exposure compensation indicator |
| 4 | | White balance |
| 5 | | Battery status indicator |
| 6 | | Image Playback Mode icon |
| 7 | | Number of pictures left |
| 8 | | Resolution indicator |
| 9 | | Return Button |
| 10 | | Menu Button |
| 11 | | Zoom- Out indicator |
| 12 | | Zoom- In indicator |
| 13 | | Memory Status indicator: SD card indicatorINT: Internal memory indicator (displayed when there is no SD card) |
6 Menu Mode
When the menu appears on the LCD display, the SET (Menu) button is used to move through the highlighted items in the submenu or to select a menu item.
6.1 Menu options of Movie Clip Mode
When in Movie Clip mode, press the SET(Menu) Button to show the Movie options menu.
6.1.1 Movie Clip Resolution
- Turn on the Digital Video Camera and make sure it is in the DV Mode.
- Press SET (Menu) Button and press the 4-Way Direction Button to highlight the Resolution item. Press SET (Menu) Button to display submenu; or touch the screen to select the item.
- Press 4-Way Direction Button to select FHD, HD, WVGA or WEB. Press SET (Menu) Button to confirm; or touch the screen to select the item.


| FHD | 1920 x 1080 |
| HD | 1280 x 720 |
| WVGA | 848 x 480 |
| WEB | 320 x 240 |
Note: 1. When setting to FHD, HD or WVGA resolution, the LCD display aspect ratio is 16:9.
2. When setting to WEB video resolution, the LCD display aspect ratio is 4:3.
6.1.2 White Balance
- Turn on the Digital Video Camera and make sure it is in the DV Mode.
- Press SET (Menu) Button and move the 4-Way Direction Button to highlight the White Balance item. Press SET (Menu) Button to display submenu; or touch the screen to select the item.
- Press 4-Way Direction Button to select Auto, Daylight, Cloudy, Fluorescent or Tungsten. Press SET (Menu) Button to confirm; or touch the screen to select the item.

| Auto | The Digital Video Camera automatically adjusts white balance. |
 Daylight Daylight | The setting is suitable for outdoor recording in daylight. |
 Cloudy Cloudy | The setting is suitable for recording in cloudy or shady environments. |
 Fluorescent Fluorescent | The setting is suitable for indoor with fluorescent lamp lighting, or environments with high color temperature. |
 Tungsten Tungsten | The setting is suitable for indoor with incandescent lamp light, or environments with low color temperature. |
6.1.3 Effect
- Turn on the Digital Video Camera and make sure it is in the DV Mode.
- Press SET (Menu) Button and press the 4-Way Direction Button to highlight the Effect item. Press SET (Menu) Button to display submenu; or touch the screen to select the item.
- Press 4-Way Direction Button to select Normal, B/W or Sepia. Press SET (Menu) Button to confirm; or touch the screen to select the item.


| Normal | Make recordings in nature color |
| B&W | Make recordings in B&W (Black and White) color |
| Sepia | Make recordings in Sepia-toned color |
6.1.4 Metering
- Turn on the Digital Video Camera and make sure it is in the DV Mode.
- Press SET (Menu) Button and move the 4-Way Direction Button to highlight the Metering item. Press SET (Menu) Button to display submenu; or touch the screen to select the item.
- Press 4-Way Direction Button to select Spot, Center or Touch AE. Press SET (Menu) Button to confirm; or touch the screen to select the item.

| [○] Spot | This setting is to ensure correct exposure for the object even if the background is very bright or very dark. |
| Center | Use this setting to preserve background details while letting lighting conditions at the center of the frame define exposure. |
| Touch AE | Touch the object to make it with suitable light. |
6.1.5 Backlight
- Turn on the Digital Video Camera and make sure it is in the DV Mode.
- Press SET (Menu) Button and move the 4-Way Direction Button to highlight the Backlight item. Press SET (Menu) Button to display submenu; or touch the screen to select the item.
- Press 4-Way Direction Button to select On or Off. Press SET (Menu) Button to confirm; or touch the screen to select the item.

6.1.6 Night Mode
- Turn on the Digital Video Camera and make sure it is in the DV Mode.
- Press SET (Menu) Button and press the 4-Way Direction Button to highlight the Night Mode item. Press SET (Menu) Button to display submenu; or touch the screen to select the item.
- Press 4-Way Direction Button to select On or Off. Press SET (Menu) Button to confirm; or touch the screen to select the item.

6.1.7 Motion Detection
When Motion Detection is turned on, the camera will detect the motion for Movie Clip recording without human intervention. When the AE variation is detected, the recording will start immediately.

natural_image
Sunset over power lines with sky and distant hills, no visible text or symbols-
Turn on the Digital Video Camera and make sure it is in the DV Mode.
-
Press SET (Menu) Button and move the 4-Way Direction Button to highlight the Motion Detection item. Press SET (Menu) Button to display submenu; or touch the screen to select the item.
-
Press 4-Way Direction Button to select On or Off. Press SET (Menu) Button to confirm; or touch the screen to select the item.

6.1.8 EV Compensation
You can adjust the value of the exposure compensation which is ranged from -2.0EV to +2.0EV (at 0.5EV increment). The higher the EV value, the brighter the image will be.
- Turn on the Digital Video Camera and make sure it is in the DV Mode.
- Press SET (Menu) Button and move the 4-Way Direction Button to highlight the EV Compensation item. Press SET (Menu) Button to display submenu; or touch the screen to select the item.
- Press 4-Way Direction Button to adjust the Exposure value (-2.0 \~ + 2.0). Press SET (Menu) Button to confirm; or touch the screen to select the item.


6.1.9 Multi shot
- Turn on the Digital Video Camera and make sure it is in the DV Mode.
- Press SET (Menu) Button and press the 4-Way Direction Button to highlight the Multi shot item. Press SET (Menu) Button to display submenu; or touch the screen to select the item.
- Press 4-Way Direction Button to select On or Off. Press SET (Menu) Button to confirm; or touch the screen to select the item.
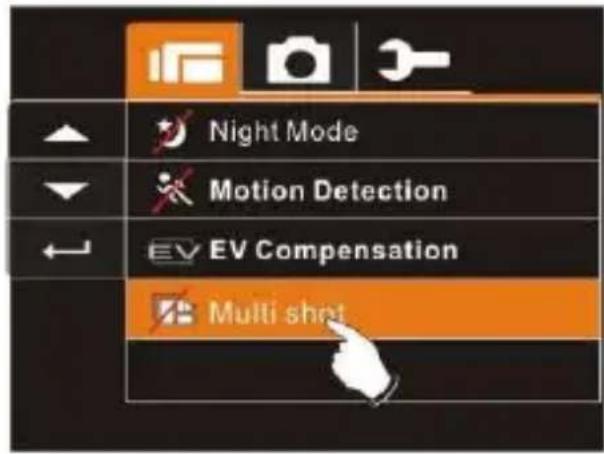

| Image resolution | |
| FHD | 1920 x 1080 |
 HD HD | 1280 x 720 |
 WVGA WVGA | 848 x 480 |
 WEB WEB | 320 x 240 |
| Note: the image size is fixed depending on the image quality of the video clip.1. When setting to FHD, HD or WVGA resolution, the LCD display aspect ratio is 16:9.2. When setting to WEB video resolution, the LCD display aspect ratio is 4:3. | |
6.2 Menus of Movie Clip/Voice Playback
When in Movie Clip mode, press the SET(Menu) Button to show the Movie Clip options menu.
6.2.1 Delete
- Turn on the Digital Video Camera and make sure it is in the Movie Clip/Voice Playback Mode.
- Press SET (Menu) Button and move the 4-Way Direction Button to highlight the Delete item. Press SET (Menu) Button to display submenu; or touch the screen to select the item.
- Use 4-Way Direction Button to select Delete One or Delete All. Press SET (Menu) Button to confirm; or touch the screen to select the item.

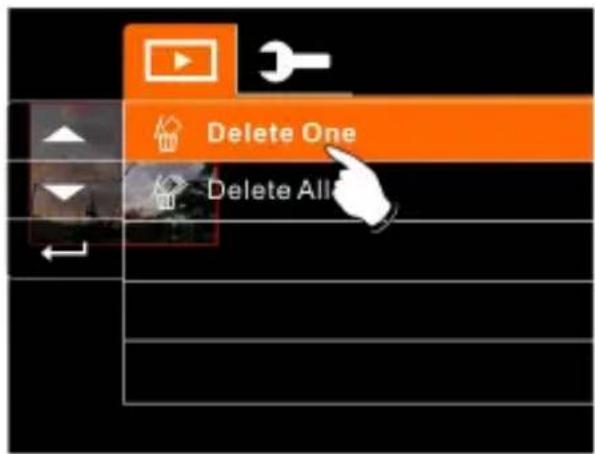
- Press 4-Way Direction Button to select "O" Yes or "X" NO. Press SET (Menu) Button to confirm; or touch the screen to select the item.

| Delete One | Delete the current file |
| [S4XH] Delete All | Delete all files stored in the Digital Video Camera |
| Note: The file cannot be recovered once it is deleted. Therefore, please make sure you have backed up the file before Delete. Protect files cannot be deleted. Before delete, you must unlock the file. | |
6.2.2 Protect
- Turn on the Digital Video Camera and make sure it is in the Movie Clip/Voice Playback Mode.
- Press SET (Menu) Button and move the 4-Way Direction Button to highlight the Protect item. Press SET (Menu) Button to display submenu; or touch the screen to select the item.
- Use 4-Way Direction Button to select Lock One, Local All, Unlock One or Unlock All. Press SET (Menu) Button to confirm; or touch the screen to select the item.


Note: To unlock the file from Protect, repeat steps stated above. When the Protection is relieved from Protect mode, the locked icon will disappear.
6.3 Menu options of Camera Mode
When in DSC Mode, press SET (Menu) Button to display camera mode option Menu.
6.3.1 Still Image Resolution
- Turn on the Digital Video Camera and make sure it is in the DSC Mode.
- Press SET (Menu) Button and move the 4-Way Direction Button to highlight the Resolution item. Press SET (Menu) Button to display submenu; or touch the screen to select the item.
- Press 4-Way Direction Button to select 12M, 8M, 5M or 3M. Press SET (Menu) Button to confirm; or touch the screen to select the item.

| 12M 12M | 4000 x 3000 pixels (Interpolation) |
| 3M 8M | 3200 x 2400 pixels (Interpolation) |
| 5M 5M | 2592 x 1944 pixels |
| 3M 3M | 2048 x 1536 pixels |
6.3.2 White Balance
- Turn on the Digital Video Camera and make sure it is in the DSC Mode.
- Press SET (Menu) Button and move the 4-Way Direction Button to highlight the White Balance item. Press SET (Menu Button) to display submenu; or touch the screen to select the item.
- Use 4-Way Direction Button to select Auto, Daylight, Cloudy, Fluorescent or Tungsten. Press SET (Menu) Button to confirm; or touch the screen to select the item.


6.3.3 Effect
This Digital Video Camera can take standard color images, Black and White images, or Sepia color tone images.
- Turn on the Digital Video Camera and make sure it is in the DSC Mode.
- Press SET (Menu) Button and move the 4-Way Direction Button to highlight the Effect item. Press SET (Menu) Button to display submenu; or touch the screen to select the item.
- Use 4-Way Direction Button to select Normal, B/W or Sepia. Press SET (Menu) Button to confirm; or touch the screen to select the item.
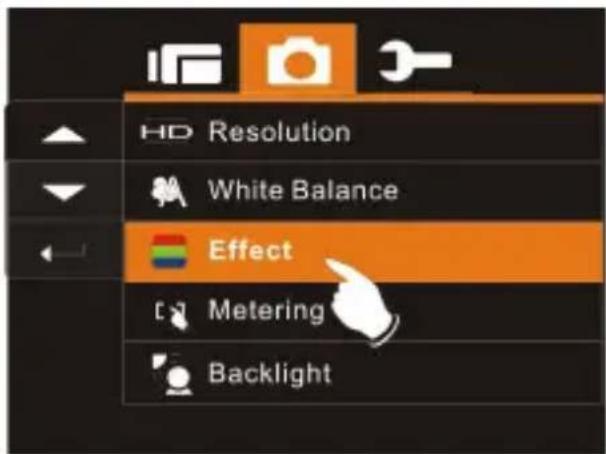

6.3.4 Metering
- Turn on the Digital Video Camera and make sure it is in the DSC Mode.
- Press SET (Menu) Button and move the 4-Way Direction Button to highlight the Metering item. Press SET (Menu) Button to display submenu; or touch the screen to select the item.
- Press 4-Way Direction Button to select Spot, Center or Touch AE. Press SET (Menu) Button to confirm; or touch the screen to select the item.
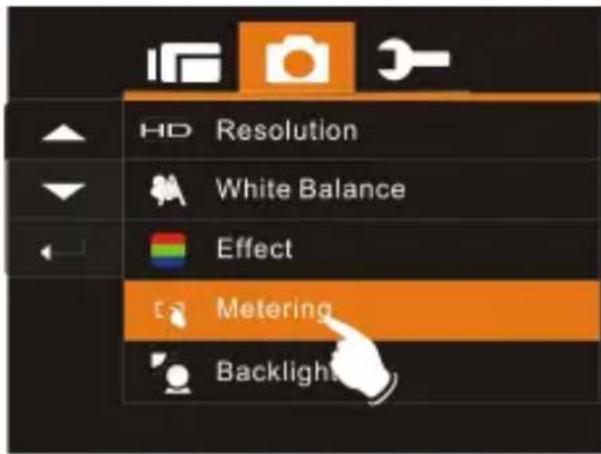

6.3.5 Backlight
- Turn on the Digital Video Camera and make sure it is in the DSC Mode.
- Press SET (Menu) Button and move the 4-Way Direction Button to highlight the Backlight item. Press SET (Menu) Button to display submenu; or touch the screen to select the item.
- Press 4-Way Direction Button to select ON or OFF. Press SET (Menu) Button to confirm; or touch the screen to select the item.
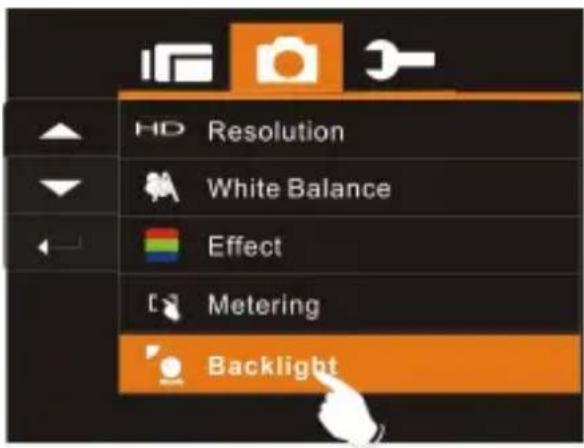

6.3.6 Night Mode
-
Turn on the Digital Video Camera and make sure it is in the DSC Mode.
-
Press SET (Menu) Button and move the 4-Way Direction Button to highlight the Night Mode item. Press SET (Menu) Button to display submenu; or touch the screen to select the item.
-
Press 4-Way Direction Button to select On or Off. Press SET (Menu) Button to confirm; or touch the screen to select the item.
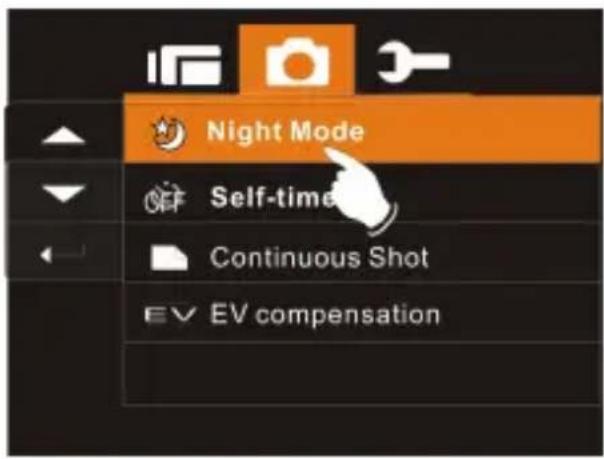
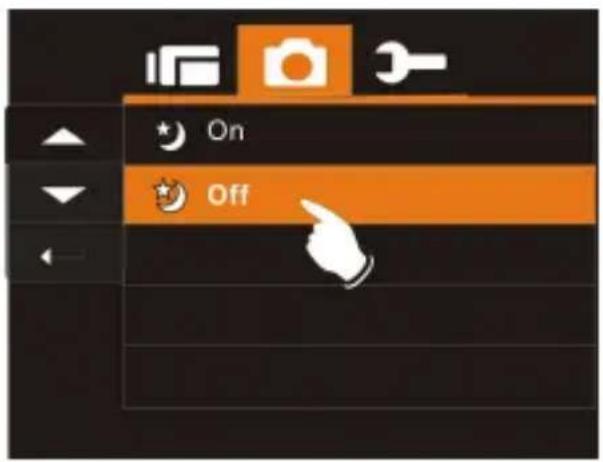
6.3.7 Self-timer
- Turn on the Digital Video Camera and make sure it is in the DSC Mode.
- Press SET (Menu) Button and use the 4-Way Direction Button to highlight the Self-timer item. Press SET (Menu Button) to display submenu; or touch the screen to select the item.
- Press 4-Way Direction Button to select OFF, 2 Sec or 10 sec. Press SET (Menu) Button to confirm; or touch the screen to select the item.

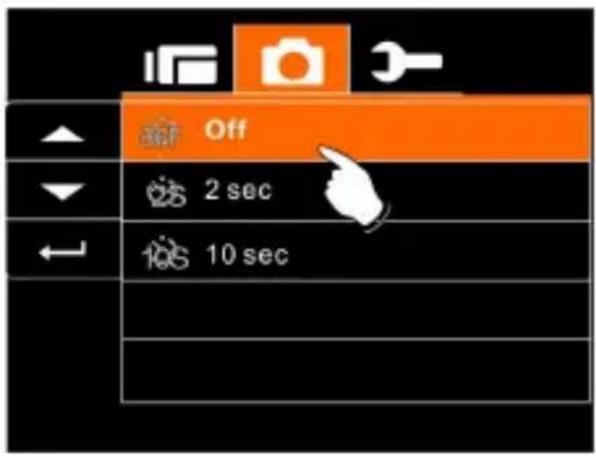
With 2 sec. Self-timer:
The image will be taken 2 seconds after the shutter is released.
With 10 sec. Self-timer:
The image will be taken 10 seconds after the shutter is released.
6.3.8 Continuous Shot
You can continuously shooting three pictures by this function, started by pressing and holding the Shutter Button and ending automatically by taken three pictures.
-
Turn on the Digital Video Camera and make sure it is in the DSC Mode
-
Press SET (Menu) Button and press the 4-Way Direction Button to highlight the Continuous Shot item. Press SET (Menu) Button to display submenu; or touch the screen to select the item.
-
Press 4-Way Direction Button to select OFF or ON. Press SET (Menu) Button to confirm; or touch the screen to select the item.
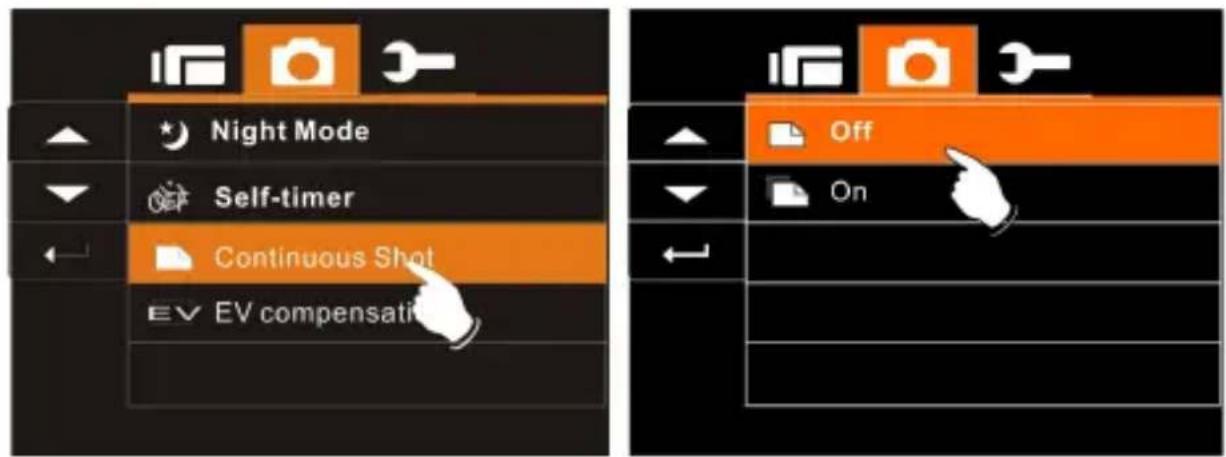
6.3.9 EV compensation
You can adjust the value of the exposure compensation which is ranged from -2.0EV to +2.0EV (at 0.5EV increment). The higher the EV value, the brighter the image will be.
- Turn on the Digital Video Camera and make sure it is in the DSC Mode.
- Press SET (Menu) Button and press the 4-Way Direction Button to highlight the EV Compression item. Press SET (Menu) Button to display submenu; or touch the screen to select the item.
- Press 4-Way Direction Button to adjust the exposure value (-2.0 \~ +2.0). Press SET (Menu) Button to confirm; or touch the screen to select the item.


6.4 Menus of Playback
6.4.1 Delete
Use this function to delete the files.
- Turn on the Digital Video Camera and make sure it is in the Playback Mode.
- Press SET (Menu) Button and press the 4-Way Direction Button Down; or touch the screen to select the file to be deleted or to delete all files.
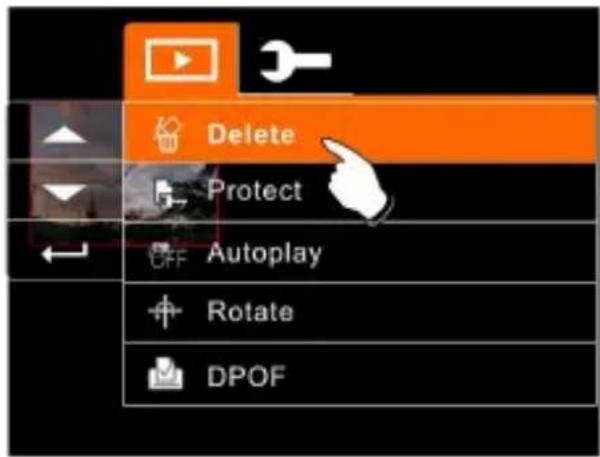
- Press the 4-Way Direction Button or touch the screen to select "Delete one" or "Delete All" to display submenu.

- Press 4-Way Direction Button or touch the screen to select "O" YES or "X" No and press SET (Menu) Button to delete file(s).

Note: The files cannot be recovered once deleted. Therefore, please make sure you have a backup file before delete. The protect files will not be able to delete. Before delete of Protected file, you must unlock the file.
6.4.2 Protect
- Turn on the power of Digital Video Camera and make sure it is in the Playback Mode.
- Choose the file which you want to protect.
- Press SET (Menu) Button and move the 4-Way Direction Button to highlight the Protect item. Press SET (Menu) Button to display submenu; or touch the screen to select the item.
- Press 4-Way Direction Button or touch the screen to select item. Press SET (Menu) Button or touch the screen to confirm. The Locked icon will be displayed to indicate the file is Protected.


Note: Repeat above steps to unlock the file. When the file is unlocked, the locked icon will disappear.
6.4.3 Auto play
This Digital Video Camera includes a slide show function that could playback each picture at a regular interval.
-
Turn on the power of Digital Video Camera and make sure it is in the Playback Mode.
-
Press SET (Menu) Button and move the 4-Way Direction Button to highlight the Auto play item. Press SET (Menu) Button to display submenu; or touch the screen to select the item.
-
Press 4-Way Direction Button or touch the screen to select "Off", 1sec., or "3 sec", The images will be displayed automatically.
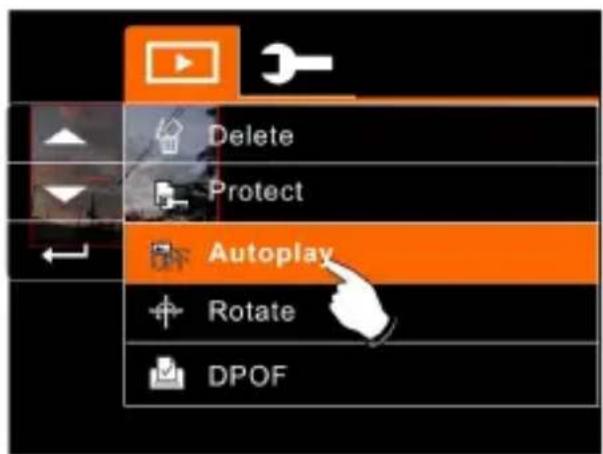
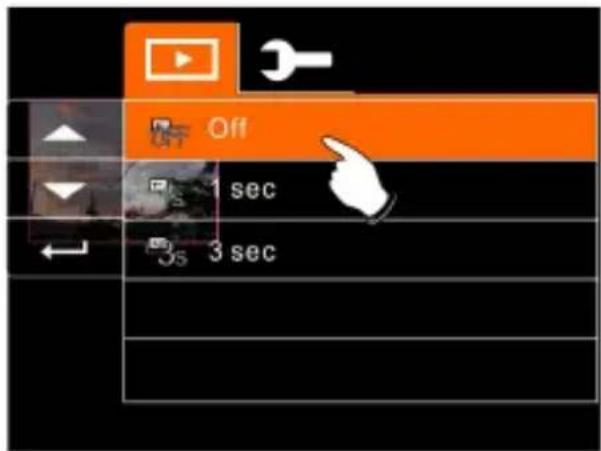
6.4.4 Rotate
-
Turn on the power of the Digital Video Camera and make sure it is in the Playback Mode.
-
Use 4-Way Direction Button to highlight Rotate item and press SET (Menu) Button; or touch the screen to select the Left 90 or Right 90.
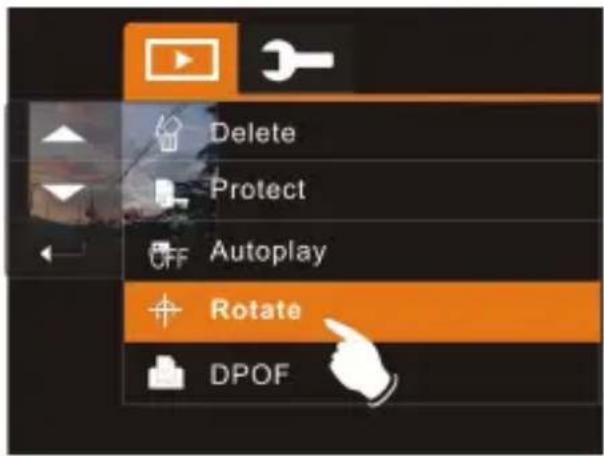

6.4.5 DPOF
Use DPOF (Digital Print Order Format) function to indicate the printing information stored in the memory card.
- Turn on the power of the Digital Video Camera and make sure it is in the Playback Mode. Press Playback Button and press SET (Menu) Button to display Image Playback Menu; or touch the screen to select the item.
- Use 4-Way Direction Button to highlight the DPOF item. Press SET (Menu) Button; or touch the screen to display submenu.

- Use the 4-Way Direction Button and press SET (Menu) Button; or touch the screen to select the item. The DPOF icon will be shown to indicate the files that are ordered for printing.
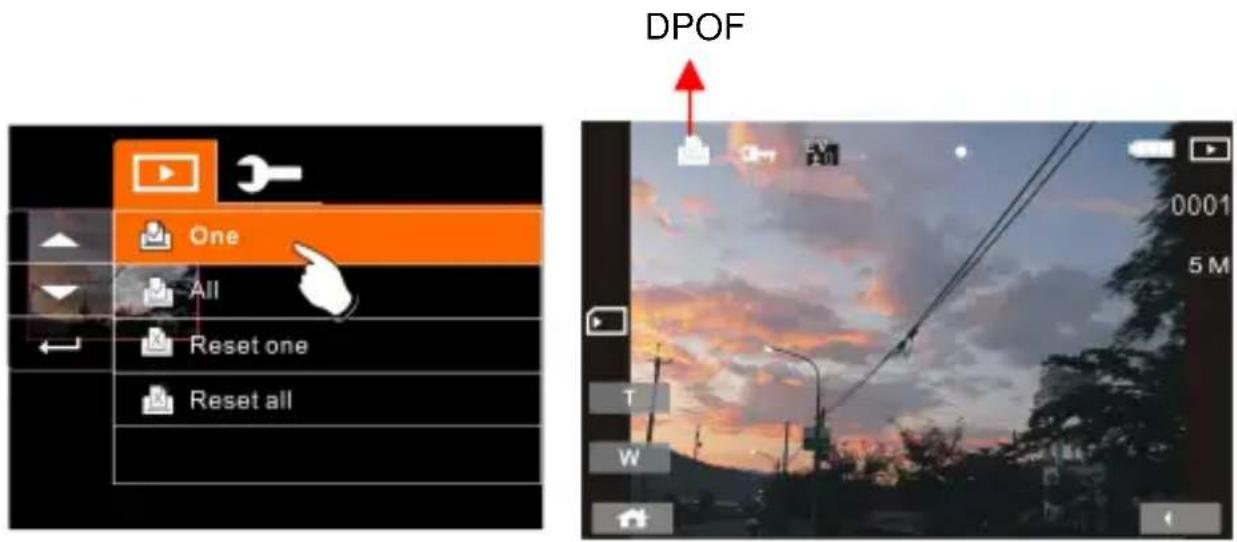
- Press the Playback Button or touch the screen to exit the image.
Note:1. A memory card is required for the DPOF function.
2. If DPOF is set, the pictures to be printed are ordered to print.
6.5 Setting Menu
Setting Menu can be used to select all kinds of the Digital Video Camera settings.
6.5.1 Information
This function can be used to display information on the LCD screen to help you in capturing best images and movie clips.
-
Turn On the Digital Video Camera and switch to SET Mode.
-
Press 4-Way Direction Button to highlight Information item. Press SET (Menu) Button to display submenu; or touch the screen to select the item.
-
Press 4-Way Direction Button to select Normal, Histogram, or OFF. Press SET (Menu) Button to confirm; or touch the screen to select the item.


6.5.2 Date / Time
Please refer to 2.7.1 the Setting of Date and time on page 21.
6.5.3 Beep
- Turn on the power of Digital Video Camera and switch to SET Mode. Press the 4-Way Direction Button up or down to highlight the Beep and press SET (Menu) selection Button to confirm or touch the screen to select.

- Use 4-Way Direction Button or touch the screen to select On or Off.

6.5.4 Default
Use this function to reset all settings to default settings.
- Turn on the power of Digital Video Camera and switch to SET Mode.
- Press 4-Way Direction Button to highlight Default item. Press SET (Menu) Button to display submenu; or touch the screen to select the item.
- Use 4-Way Direction Button or touch the screen to select "O" YES or "X" NO. Press SET(Menu) Button to confirm; or touch the screen to select the item.

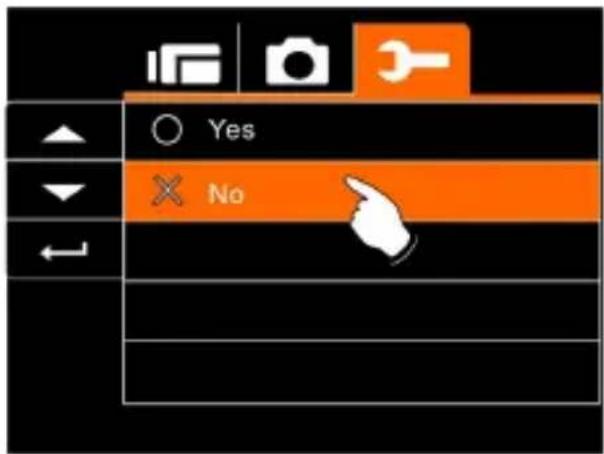
6.5.5 TV standard
Use the TV standard to set the TV system for your area.
- Turn on the power of Digital Video Camera and switch to SET Mode.
- Use 4-Way Direction Button to highlight the TV standard item. Press SET (Menu) Button to display submenu; or touch the screen to select the item.
- Use 4-Way Direction Button to select NTSC or PAL. Press SET (Menu) Button to confirm; or touch the screen to select the item.
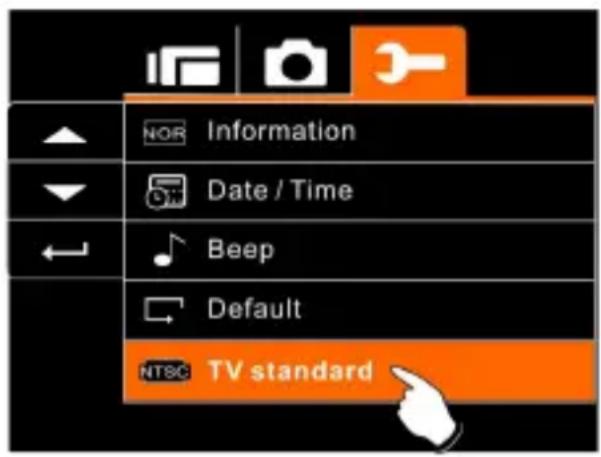

| TV out standard setting reference | |
| NTSC NTSC | USA, Canada, Japan, Korea, Taiwan, Mexico |
| PAL | Australia, Austria, Belgium, China, Denmark, Finland, Germany, UK, Italy, Kuwait, Malaysia, New Zealand, Singapore, Spain, Sweden, Switzerland, Thailand, Norway |
6.5.6 USB
This setting is for USB output function. You can select an external device to connect the Digital Video Camera by using the supplied USB cable.
- Turn on the Digital Video Camera and switch to SET Mode.
-
Press 4-Way Direction Button to highlight the USB item. Press SET (Menu) Button to display submenu; or touch the screen to select the item.
-
Use 4-Way Direction Button to select PC Camera or Mass Storage. Press SET (Menu) Button to confirm; or touch the screen to select the item.


6.5.7 Auto Power Off
This function can be used to turn off the Digital Video Camera automatically after a period of time not using the Digital Video Camera.
- Turn on the Digital Video Camera and switch to SET Mode.
- Press 4-Way Direction Button to highlight Auto Power Off item. Press SET(Menu) Button to display submenu; or touch the screen to select the item.
- Press 4-Way Direction Button to select OFF, 3 mins, or 5 mins; or touch the screen to select the item.
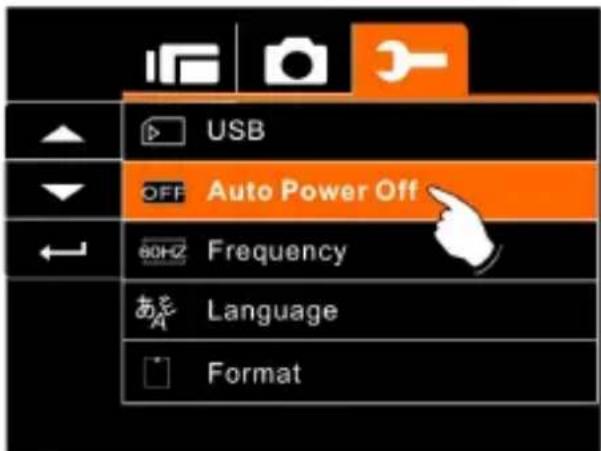

6.5.8 Frequency
Use the Frequency option to set the frequency system for your area.
-
Turn on the power of Digital Video Camera and switch to SET Mode.
-
Use 4-Way Direction Button to highlight the Frequency selection item. Press SET (Menu) Button to display submenu; or touch the screen to select the item.
-
Use 4-Way Direction Button to select 50 Hz or 60 Hz. Press SET (Menu) Button to confirm; or touch the screen to select the item.
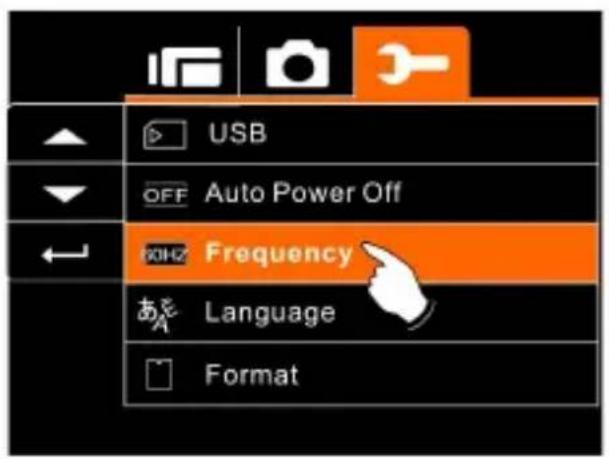

| Frequency setting reference: | |
| 50HZ 50HZ | UK, Germany, Spain, Italy, France, Netherlands, Portugal, Russia, China, Japan |
| 60HZ 60HZ | USA, Taiwan, Korea, Japan |
6.5.9 Language
- Turn on the power of the Digital Video Camera. Then select the Mode Button to "SET". Move 4-Way Direction Button up and down to highlight the Language and press SET (Menu) button to confirm or touch the screen to select.

- Press 4-Way Direction Button or touch the screen to select the following languages: English, German, French, Italian, Japanese, Spanish, Portuguese, Traditional Chinese, Simplified Chinese, Turkish, Russian, Thai, or Arabian.
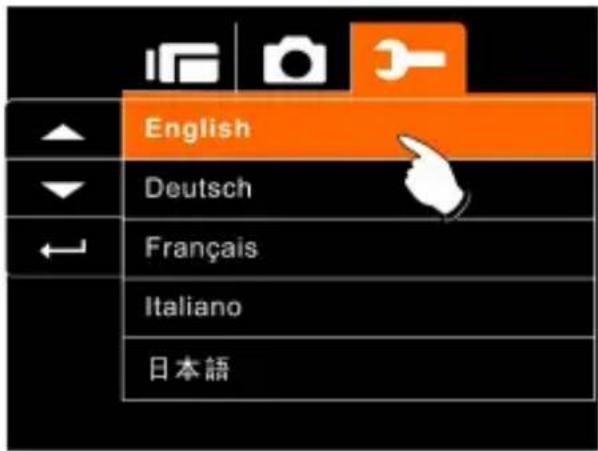
6.5.10 Format
This function allows you to format the memory card or the built-in memory.
- Turn on the power of Digital Video Camera and switch to SET Mode.
- Press 4-Way Direction Button to highlight Format item. Press SET (Menu) Button or touch the screen to display submenu.
- Press 4-Way Direction Button to select "O" Yes or "X" NO. Press SET (Menu) Button to confirm; or touch the screen to select the item.

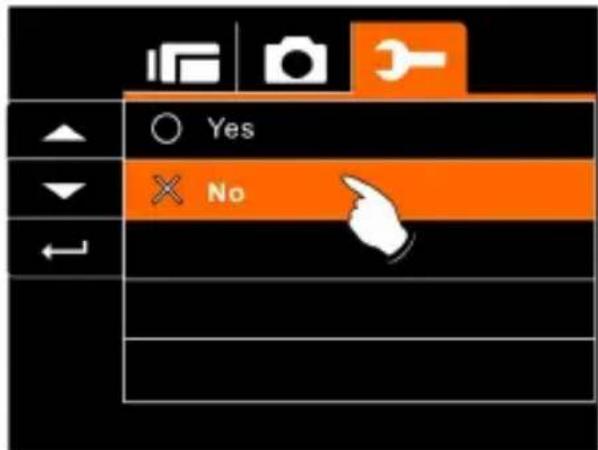
- The format of the current storage media (memory card or internal memory) is now completed.
Note: All the data stored in the memory card or flash memory will be deleted after formatting.
6.5.11 File Number(Default: Series)
This setting allows you to name the files.
If "Series" is selected, the file name will follow the latest stored file instead.
If “Reset” is selected, the next file name will start from 0001 even after formatting, deleting or inserting a new memory card.
-
Turn on the power of Digital Video Camera and switch to SET Mode.
-
Press 4-Way Direction Button to highlight File Number item. Press SET (Menu) Button to display submenu; or touch the screen to select the item.
-
Use 4-Way Direction Button to select Series or Reset. Press SET (Menu) Button to confirm; or touch the screen to select the item.

6.5.12 LCD brightness
This function can be used to adjust the brightness of the screen.
-
Turn on the Digital Video Camera and switch to SET Mode.
-
Use 4-Way Direction Button to highlight LCD brightness item. Press SET (Menu) Button to display submenu; or touch the screen to select the item.
-
Press 4-Way Direction Button to select High, Medium, or Low. Press SET (Menu) Button to confirm; or touch the screen to select the item.
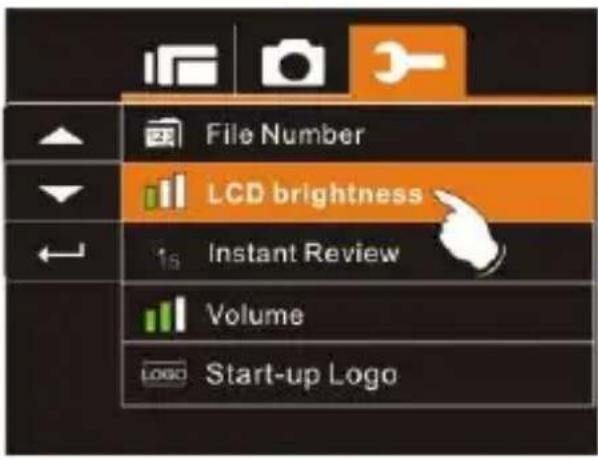

6.5.13 Instant Review
This function can be used to instantly browse the files after taking the picture.
-
Turn on the Digital Video Camera and switch to SET Mode.
-
Press 4-Way Direction Button to highlight Instant Review item. Press SET (Menu) Button to display submenu; or touch the screen to select the item.
-
Press 4-Way Direction Button to select 1 sec, 3 sec, or 5 sec. Press SET (Menu) Button to confirm; or touch the screen to select the item.

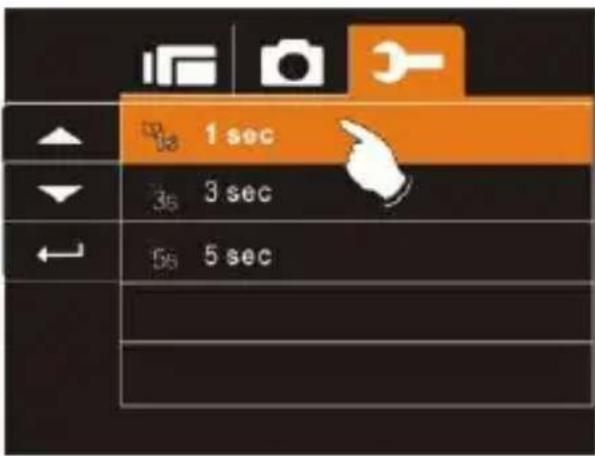
6.5.14 Volume
Use this function to adjust the volume of sound.
-
Turn on the Digital Video Camera and switch to SET Mode.
-
Press the 4-Way Direction Button to highlight Volume item. Press SET (Menu) Button to display submenu; or touch the screen to select the item.
-
Press the 4-Way Direction Button to select High, Medium, or Low. Press SET (Menu) Button to confirm; or touch the screen to select the item.
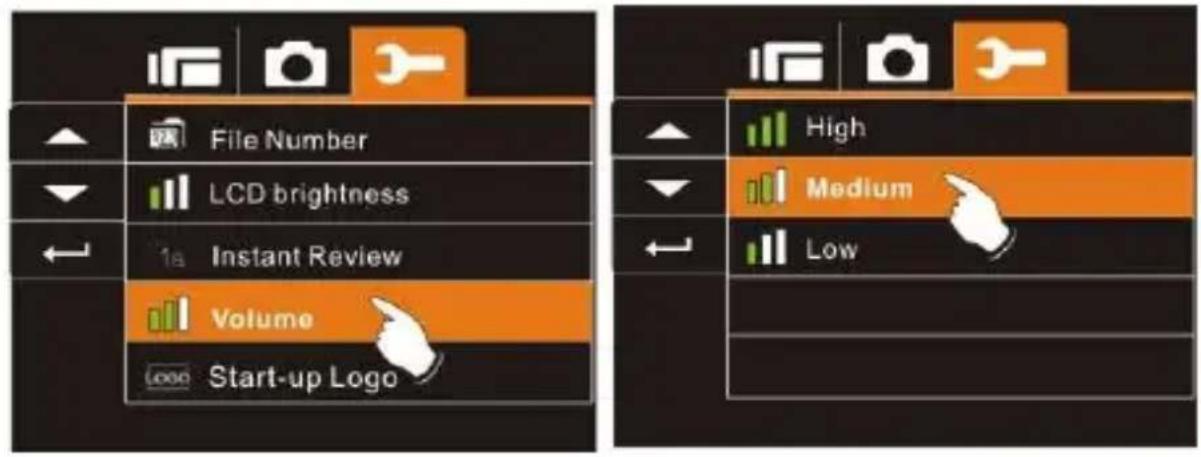
6.5.15 Start-up LOGO
Use this function to the image that is displayed on the LCD when the digital camcorder is turned on.
-
Turn on the Digital Camcorder and switch to Setup Menu.
-
Press the 4-Way Direction Button to highlight the Star-up Logo item. Press the SET Button or touch the icon on the screen to display the submenu.
-
Press the 4-Way Direction Button to select Default or User Setting. Press the SET Button or touch the screen to select the item.

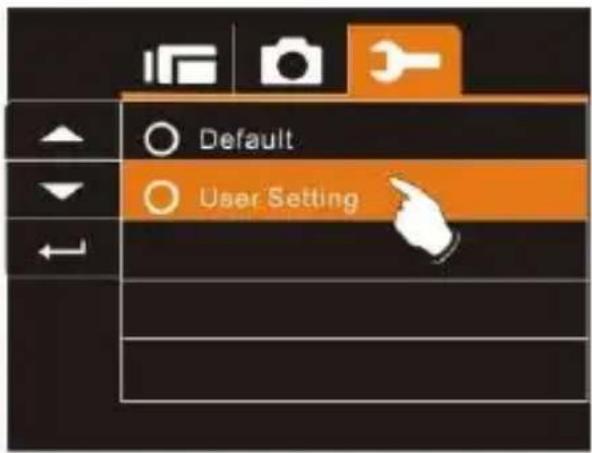
7 PC and TV Connection
7.1 Connecting to the Computer
As shown in the illustration, use the USB cable provided to connect the Digital Video Camera to a PC for file transmission, or use the Digital Video Camera as a Web camera for conferencing purpose.

natural_image
Line drawing of a device with an attached cable and connector, showing no text or symbols7.2 Connecting to a Standard TV
As shown in the illustration, use the video cable to connect the Digital Video Camera to a standard TV.
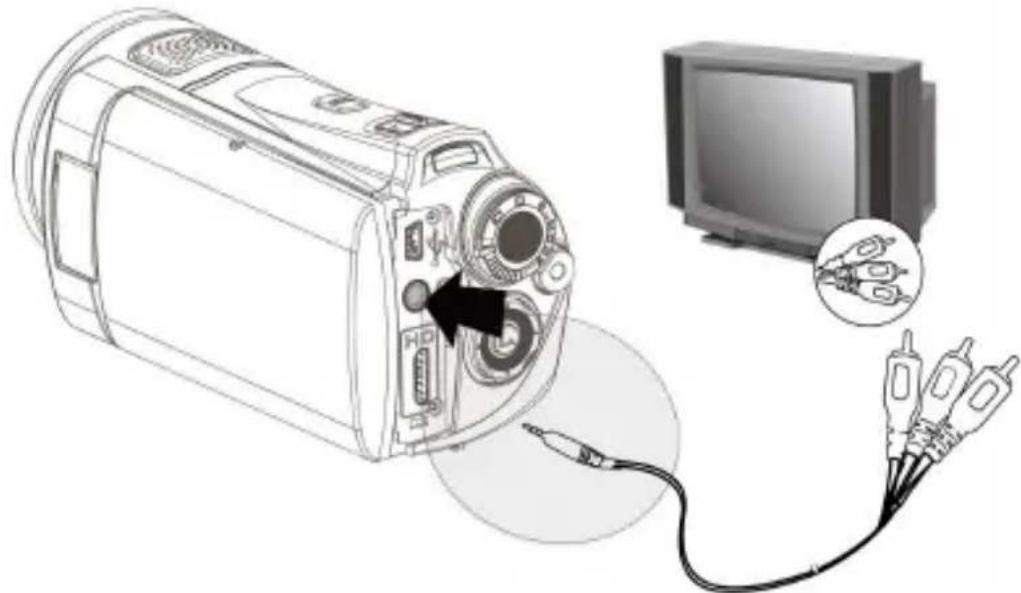
natural_image
Line drawing of a vintage camera with attached cable and TV, showing internal components and wiring (no text or symbols)7.3 Connecting to a HD TV
As shown in the illustration, use the HDMI cable provided to connect the Digital Video Camera to a HD TV for high resolution picture display.

natural_image
Diagram showing a camera module connected to a TV via cable, with an inset close-up of the cable connector (no text or symbols present)8 Installing the Software
- Place the CD ROM attached into the CD player.
- If the CD is not executed automatically, please use Windows File Manager to execute the Install_CD.exe file in the CD.
The following screen will be displayed.

- Press the Menu item and follow the Installation process and follow the instructions on-screen.
9 Editing Software

ArcSoft Total Media Extreme(TME) ™ manages your media for you, and gives you tons of fun and exciting ways to create and share projects featuring your photo, video, and music files. Edit, enhance and add creative effects to your photos. You can
● Create your own movies or photo slide shows complete with soundtrack.
- Upload your files easily to YouTube™!
- Or share them through simple email attachments or popular photo printing.
- You can go to http://www.arcsoft.com/ for more information.
10 Appendix
Specifications
| Image sensor 1/2.5 inch. 5.0 mega pixels CMOS sensor | |
| Effective pixels | 5.03 Mega pixels (2592 x 1944) |
| Storage media | Built-in 32 MB Flash memorySD card and SDHC card Supported. |
| ISO Equipment | Auto |
| Color effect Normal/BW/Sepia | |
| Lens | 5x ZOOM LENS |
| Focus range | Normal: 80cmMacro: 10~80cm |
| Still image | Format: JPEG (DPOF, EXIF)Resolution: 3MP, 5MP, 8MP, 12MP (Firmware interpolation)Scene Mode: Auto |
| Movie Clip | Format: H.264 (MOV)Resolution: FHD (1920 x 1080 / 30fps)HD (1280 x 720 / 30 fps)WVGA (848 x 480 / 60 fps)WEB (320 x 240 / 30 fps.) |
| Digital zoom | Still Image mode: 4X(720P)Play mode: 8X (depends on image size) |
| Audio Audio for | Voice Recording: AAC |
| LCD Display 3.0" Touch Panel screen(16:9) | |
| Flash light | Range: < 2 m off, auto, fill-in |
| White balance Auto / Daylight / Cloudy / Tungsten / Fluorescent | |
| Exposure -2.0 EV~+2.0 EV | |
| Self-Timer Off, 2 seconds, 10 seconds. | |
| Interface | Digital output connector: USB 2.0 high- speed (480Mbps Max.)MIC Input, SpeakerHDMIUSB DC IN |
| TV output NTSC/PAL | |
| Shutter | Electronic shutter2~1/4000 second |
| Auto Power Off | Off, 3 minutes, 5 minutes |
| Power Source | CNP-40 Lithium battery |
| Dimensions 121(L) x 64 (H) x 54 (W) mm | |
| Weight | About 300g (without battery) |
Troubleshooting
| Problem Possible Cause Solution | ||
| Can not turn on the power of Digital Video Camera. | 1. Batteries are not inserted correctly.2. Batteries are exhausted. | 1. Please insert batteries correctly.2. Replace the batteries. |
| Camera shutdown suddenly. | 1. Power saving mode already activated.2. Battery exhausted. | 1. Please turn on the power again.2. Replace the batteries. |
| Pictures are not stored in the memory. | Power off before storing the images. | Please change to new batteries when the battery indicator turns to red color. |
| Camera shutdown when using Self-timer shooting picture. | Batteries in camera are exhausted. | Change new batteries. |
| Images are out of focus | Object exceeds the range of focus. | Please take the picture within the focusing range and select normal or Macro Mode. |
| Unable to use the external memory card. | 1. Memory card is Protected.2. Memory card contains non-DCF images taken by other cameras. | 1. Unlock the memory card.2. Reformat the memory card. Please make sure to backup the file before reformatting memory card. |
| All Buttons can not work or camera hangs. | Short circuit occurred when connecting the camera to other device. | Take out batteries in the camera and re-insert again. |

natural_image
Decorative gray scrollwork corner with swirling patterns and swirls (no text or symbols)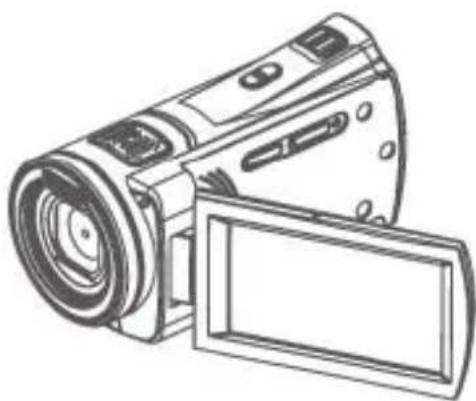
natural_image
Line drawing of a digital camera with lens and screen (no text or symbols)User's Manual
- Contents
- Overall Introduction ......8
- Getting Started ....12
- LCD Display Information......20
- Using the Camera....25
- LCD Display Information......36
- Menu Mode 41
- Menus of Movie Clip/Voice Playback......50
- Menu options of Camera Mode......53
- Menus of Playback....62
- Setting Menu....69
- PC and TV Connection....83
- Installing the Software 85
- Editing Software......86
- Appendix......87
- Disclaimer
- Precautions
- General precautions
- Power Supply
- Overall Introduction
- System Requirements
- Features
- Accessories
- External View
- Adjusting LCD Display
- Getting Started
- Inserting SD Card
- Loading the battery
- Charging the Battery
- The gestures of using the touch screen
- Single touch
- Slide
- Rotate
- Buttons & Functions
- About LED Indicators
- Initial settings before use
- Setting Date and Time
- LCD Display Information
- In Movie Clip Mode
- In Voice Recording Mode
- In DSC Mode
- Using the Camera
- Shooting a Movie Clip
- Video Resolution
- Preview
- Capturing a still image from a movie
- Capturing a still image in video mode
- Voice Recording:
- Movie Clip / Voice Clip Playback
- Shooting / Playback images
- Taking a picture
- Images Playback
- LCD Display Information
- Movie Clip Recording Mode:
- Voice Recording Mode:
- DSC Playback Mode
- Menu Mode
- Menu options of Movie Clip Mode
- Movie Clip Resolution
- White Balance
- Effect
- Metering
- Backlight
- Night Mode
- Motion Detection
- EV Compensation
- Multi shot
- Menus of Movie Clip/Voice Playback
- Delete
- Protect
- Menu options of Camera Mode
- Still Image Resolution
- White Balance
- Effect
- Metering
- Backlight
- Night Mode
- Self-timer
- With 2 sec. Self-timer:
- With 10 sec. Self-timer:
- Continuous Shot
- EV compensation
- Menus of Playback
- Delete
- Protect
- Auto play
- Rotate
- DPOF
- Setting Menu
- Information
- Date / Time
- Beep
- Default
- TV standard
- USB
- Auto Power Off
- Frequency
- Language
- Format
- File Number(Default: Series)
- LCD brightness
- Instant Review
- Volume
- Start-up LOGO
- PC and TV Connection
- Connecting to the Computer
- Connecting to a Standard TV
- Connecting to a HD TV
- Installing the Software
- Editing Software
- Appendix
- User's Manual
Brand : AGFA
Model : DV-1002
Category : Camcorder