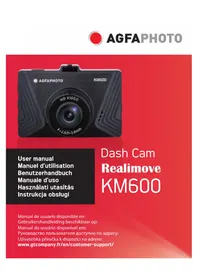
Realimove AC9000 - Camcorder AGFA - Free user manual and instructions
Find the device manual for free Realimove AC9000 AGFA in PDF.
| Product type | Action camcorder |
| Brand | Agfa |
| Model | Realimove AC9000 |
| Dimensions | 59,27 x 41,13 x 29,28 mm |
| Weight | Approximately 100 g (with battery) |
| Power | Rechargeable battery 1050 mAh, 3,7 V |
| Battery life | Approximately 70 minutes of recording |
| Charging time | Approximately 3 hours |
| Waterproof rating | Up to 30 meters with waterproof case |
| Video resolution | 4K (3840x2160) @30fps, 2.7K, 1440p, 1080p, 720p |
| Photo resolution | 20 Mpx, 12 Mpx, 8 Mpx, 5 Mpx, 3 Mpx |
| Screen | 2.0 inch LTPS LCD |
| Storage | Micro SD card up to 128 GB (not included) |
| Connectivity | Wi-Fi (Yutupro app), HDMI, USB 2.0 |
| Viewing angle | 170° wide angle |
| Video formats | MP4, H.264/H.265 |
| Main functions | Video recording, photo, time-lapse, webcam, remote control |
| Care and cleaning | Store in a cool, dry place, avoid magnetic fields |
| Safety | Disconnect in case of overheating or suspicious odor |
| Spare parts and repairability | Contact after-sales service for any repairs |
Frequently Asked Questions - Realimove AC9000 AGFA
User questions about Realimove AC9000 AGFA
0 question about this device. Answer the ones you know or ask your own.
Ask a new question about this device
Download the instructions for your Camcorder in PDF format for free! Find your manual Realimove AC9000 - AGFA and take your electronic device back in hand. On this page are published all the documents necessary for the use of your device. Realimove AC9000 by AGFA.
USER MANUAL Realimove AC9000 AGFA
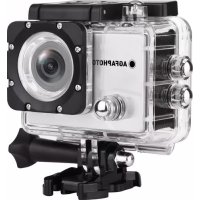
This action camera is a high-definition product having the industry-leading HD digital video and photo shooting, sound recording, video playback and other functions. It is mainly intended for shooting aquatic and outdoor activities, extreme sports, driving records and home security. Besides, this product has a number of patents.
PrecaUtions
- This action camera is a high-precision product to be handled with care, do not drop or damage it in any way.
- Keep the camera apart from anything having strong magnetism or emitting strong radio waves. A strong magnetic field could cause the product to malfunction or damage the image and sound quality.
- Do not expose the camera to high temperatures or direct sunlight.
- Select well-known micro SD card brand, basic cards do not guarantee the proper functioning of the camera.
- Do not use micro SD card in or near magnetic place to avoid losing its data storage.
- During the charging process, if there is overheating, smoke, or odor, please plus out the USB cable immediately and stop power supply to avoid fire.
- When charging, keep the USB cable out of the reach of children to avoid the risk of suffocation or electric shock.
-
Put the product in a cool and dry place.
-
If there are product upgrades, please contact customer service for an exchange.
Product FeatUres
- Waterproof action camera up to 30 meters depth thanks to its waterproof shell.
- 4K UHD high-speed shooting function.
- 2.0-inch ultra HD display screen for real-time display and quality video playback.
- Easy battery removal and replacement.
- Recording possible during loading.
- 13 million high-definition wide-angle lens.
- HDMI HD output.
- Web camera function.
- Support up to 128GB memory cards.
- Multiple video recording resolutions.
- MP4 video recording format.
- H.264 video decoding format.
- Various shooting modes: single shot, automatic, continuous, time-lapse.
- Ultra-small and sober design.
- Wi-Fi latest remote-control technology via Android or iOS smartphone with Yutupro app (available on Google Play Store and App Store).
caMera overview
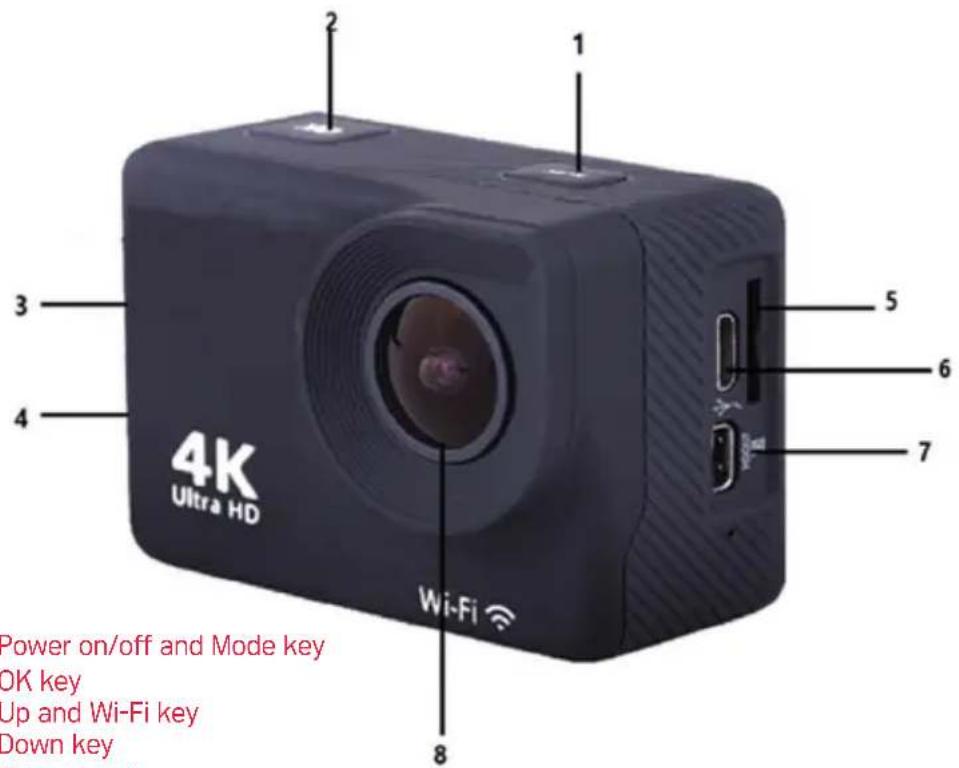
- Power on/off and Mode key
- OK key
- Up and Wi-Fi key
- Down key
- TF card slot
- USB slot
7.HDMI - Lens
accessories assembly diagram
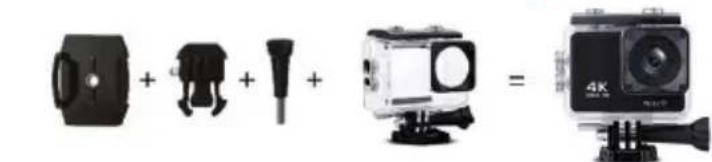
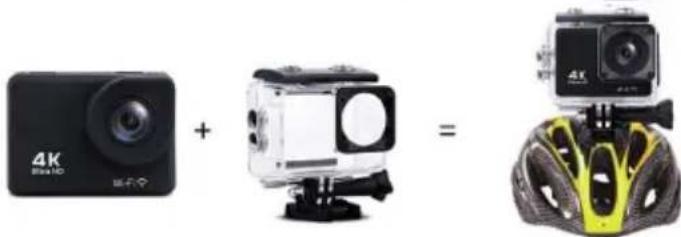

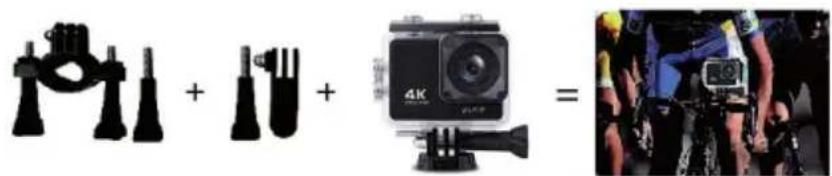
For reference only
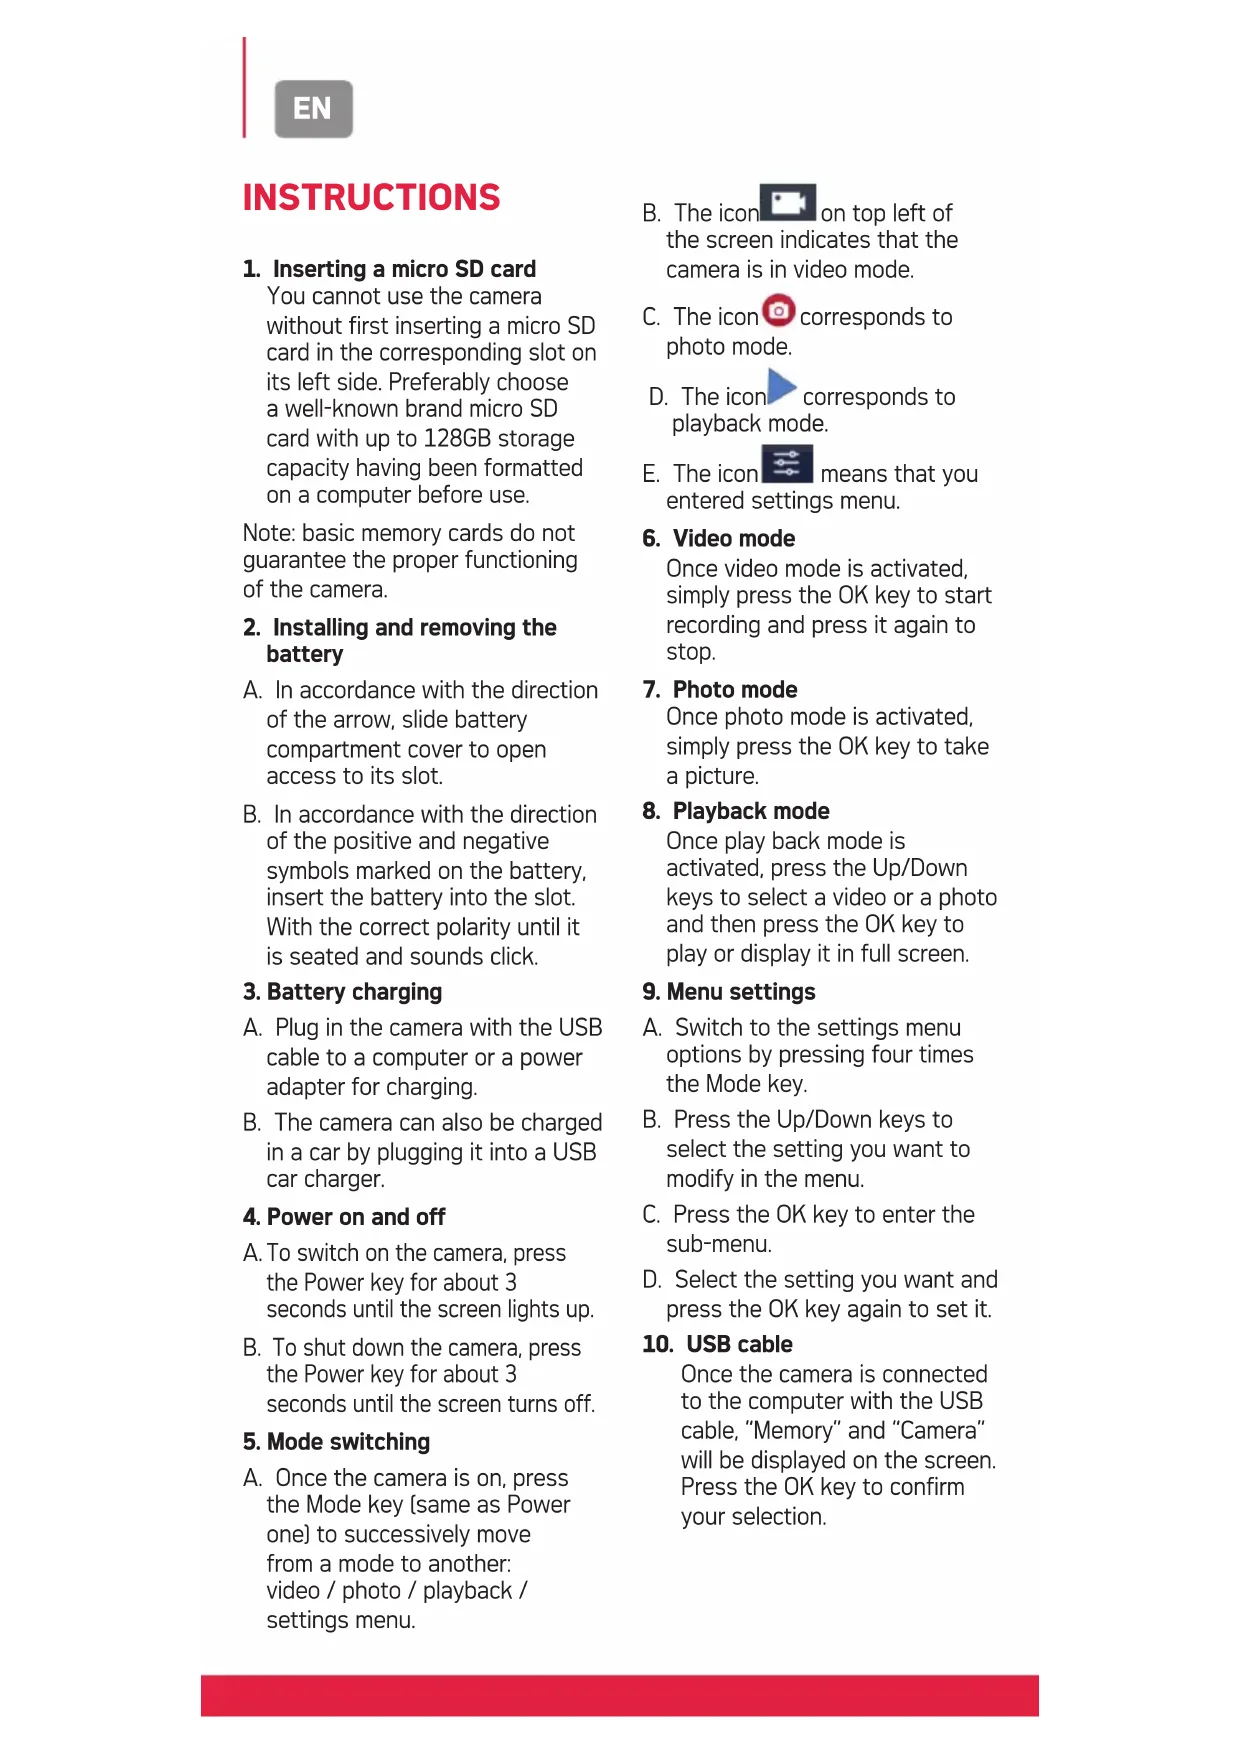
INSTRUCTIONS
1. Inserting a micro SD card
You cannot use the camera without first inserting a micro SD card in the corresponding slot on its left side. Preferably choose a well-known brand micro SD card with up to 128GB storage capacity having been formatted on a computer before use.
Note: basic memory cards do not guarantee the proper functioning of the camera.
2. Installing and removing the battery
A. In accordance with the direction of the arrow, slide battery compartment cover to open access to its slot.
B. In accordance with the direction of the positive and negative symbols marked on the battery, insert the battery into the slot. With the correct polarity until it is seated and sounds click.
3. Battery charging
A. Plug in the camera with the USB cable to a computer or a power adapter for charging.
B. The camera can also be charged in a car by plugging it into a USB car charger.
4. Power on and off
A. To switch on the camera, press the Power key for about 3 seconds until the screen lights up.
B. To shut down the camera, press the Power key for about 3 seconds until the screen turns off.
5. Mode switching
A. Once the camera is on, press the Mode key [same as Power one] to successively move from a mode to another: video / photo / playback / settings menu.
B. The icon on top left of the screen indicates that the camera is in video mode.
C. The icon corresponds to photo mode.
D. The icon corresponds to playback mode.
E. The icon means that you entered settings menu.
6. Video mode
Once video mode is activated, simply press the OK key to start recording and press it again to stop.
7. Photo mode
Once photo mode is activated, simply press the OK key to take a picture.
8. Playback mode
Once play back mode is activated, press the Up/Down keys to select a video or a photo and then press the OK key to play or display it in full screen.
9. Menu settings
A. Switch to the settings menu options by pressing four times the Mode key.
B. Press the Up/Down keys to select the setting you want to modify in the menu.
C. Press the OK key to enter the sub-menu.
D. Select the setting you want and press the OK key again to set it.
10. USB cable
Once the camera is connected to the computer with the USB cable, "Memory" and "Camera" will be displayed on the screen. Press the OK key to confirm your selection.
A. After choosing "Memory", the computer will display a removable disk window to transfer data saved on the memory card.
B. After choosing "Camera", the device can be used as web camera for any video communication on computer.
11. Wi-Fi connection
The camera can be connected in Wi-Fi to Android or iOS smartphone or tablet by following these steps:
A. First install «YUTUPRO» application on your smartphone/ tablet via Google Play Store for Android or App Store for iOS.
B. Turn on the camera and press the Wi-Fi key (also the Up key). The Wi-Fi logo will then appear on the screen and then the AGFA_xxxxx SSID (Wi-Fi name) will be displayed along with the PWA2 (password) 12345678.
C. Enter the Wi-Fi settings of your smartphone/tablet and search the camera Wi-Fi SSID to connect it.
D. Open "YUTUPRO" application on your smartphone/tablet to control the camera remotely and download videos or photos taken this way directly on your device.
12. HDMI output
If you plug in the camera with a special HDMI cable on TV input, it automatically switches to HDMI mode, so that you can play back the files recorded on the memory card on your TV.
SPECIFICATIONS
| LCD Screen | 2.0 inch LTPS |
| Camera shot | 170 degrees A + grade high-resolution wide-angle lens |
| Languages | English/French/German/Spanish/Italian/ Portuguese/Dutch/Polish/Czech/Hungarian/ Russian |
| Video resolution | 4K [3840 x 2160] 30fps 2.7K (2704 x 1520) 30fps 1440P (1920 x 1440) 60fps/30fps 1080P (1920 x 1080) 60fps/30fps 720P (1280 x 720) 120fps/60fps/30fps |
| Video format | MP4 |
| Video compression formats | H.265/H.264 |
| Photo resolution | 20M/12M/8M/5M/3M |
| Storage card | Micro SD(TF) |
| Camera mode | Single shot/Self-timer (3/5/10/20 seconds) |
| Frequency of the light source | 50Hz/60Hz |
| USB port | 2.0 |
| Battery capacity | 1050MAH |
| Power consumption | 400mA@4.2V |
| Recording time | About 70 minutes |
| Charging time | About 3 hours |
| Operating system | Windows/Linux/Unix/Win7/Mac OS |
| Dimensions | 59.27 x 41.13 x 29.28 mm |
Note: Specifications may vary depending on product upgrades, updates and other reasons requiring changes to the camera.
FAQ
1. The camera bugs and the screen crashes suddenly switching to black/white during use
Certain practices or environments may affect the proper operation of the camera. Occasional breakdowns are so likely to occur after sustained activity. If this happens, remove the battery and wait for it to cool before reinserting it into the camera.
2. The camera does not turn on because the battery does not seem to have been recharged
Make sure that the camera recharges the battery when it is connected to your computer or a power source via the USB cable. If charging starts but the battery remains discharged then it needs to be changed. Otherwise, check that the camera is properly connected or that the USB cable is not damaged.
3. Camera overheating during use
It is normal for the camera to overheat a little during prolonged use because its design does not allow it to dissipate the heat emitted.
4. No or very little sound during video recording and playback
Please note that when the camera is equipped with its waterproof shell, the sound is lower as it is airtight. Also check that the sound has not been muted in the menu setting options.
5. Video is not smooth, sometimes blurred and red and green spots appear on the screen
Make sure to use genuine high-speed recording TF card which has been previously formatted on your computer or in the camera.
6. The keys no longer respond after a few uses
When using the camera with its waterproof shell, avoid pressing the buttons too hard as this may damage them and cause the internal system to malfunction. If this problem occurs, we recommend you to contact our after-sales service for a better expertise of the repair to be carried out.
7. Wi-Fi signal instability
Other signals transmissions can interfere in the Wi-Fi connection of the camera. It is therefore best to hold your smartphone/ tablet close to the camera so that no obstacles hinder the Wi-Fi connection.
8. Impossibility to activate Wi-Fi connection
First of all, make sure that the camera Wi-Fi connection has been well activated, then that you have chosen the right Wi-Fi name and correctly entered the associated password in your smartphone/tablet settings to allow the connection. If this does not work, then check that the version of the application is the most recent and update it if necessary.
Fr
IntroUction
Notice of compliance for the European Union : products bearing the CE mark comply with the applicable European directives and associated harmonised European standards.

Disposal of waste equipment by users in the European Union: this symbol means that according to local laws and regulations, it is prohibited to dispose of this product with household waste. Instead, it is your responsibility to protect the environment and human health by handing over your used device to a designated collection point for the recycling of waste electrical and electronic equipment. For more information about where you can drop off your waste equipment for recycling, please contact your local city office, your household waste disposal service or the shop where you purchased the product.
After sales service / service après vente / Kundendienst / servicio postventa /Serviço pos vendalservizio post vendita / Dienst na verkoop / serwisposprzedażowy / ertekesités utani szolgóltatatas /poprodejni servis / nocenpodaЖhoe obслжванne :
@: aftersaleservice@gtcompany.fr
Tel.: +33 [0] 1.85.49.10.26
Product manufactured for and distributed by :
GT COMPANY - 5 rue de la Galmy - 77700 Chessy -
France - +33 [0] 1.61.10.09.25 - www.gtcompany.fr
AgfaPhoto is used under license of Agfa-Gevaert NV. For this product a sub license has been granted by AgfaPhoto Holding GmbH [www.agfaphoto.com].
Neither Agfa-Gevaert NV nor AgfaPhoto Holding GmbH manufacture this product or provide any product warranty or support. For service, support and warranty information, contact the distributor or manufacturer.