Indra500 TTL - Lamp Phottix - Free user manual and instructions
Find the device manual for free Indra500 TTL Phottix in PDF.

| Product Type | Portable Studio Flash TTL |
| Brand and Model | Phottix Indra500 TTL |
| Maximum Power | 500 Ws |
| Power Levels | 8 levels (4-500 Ws), in 1/3 EV steps |
| Flash Modes | TTL Auto, Manual (M), Multi Stroboscopic |
| Beam Angle | 60° |
| Guide Number | 45 (ISO 100, in meters) |
| Color Temperature | 5600 ± 200 K |
| Flash Duration | 1/250 s to 1/12000 s |
| Stroboscopic Flash | Frequency: 1-100 Hz, number of flashes: 1-100 |
| Power Supply | AC mains adapter 220 V/110 V, 50/60 Hz or external battery 14.8 V (5 Ah / 10 Ah) |
| Recycle Time (1/1, mains adapter) | 0.9 s (1 flash) / 1.7 s (2 flashes) |
| Recycle Time (1/1, 10 Ah battery) | 1 s (1 flash) / 2.3 s (2 flashes) |
| Modeling Light | LED 4.5 W, OFF and manual modes (9 levels) |
| Wireless Communication | Radio and optical, 4 channels, Odin-C, Odin-N, Strato II, Opt-Slave, RX OFF modes |
| Radio Range | 100 m and more |
| Accessory Mount | Bowens |
| Display | LCD TFT 320×240, 3 colors, orientation detection |
| Dimensions | Diameter 180 mm, length 266 mm |
| Weight | 2.1 kg (without power cable) |
| Synchronization | High-speed sync (HSS) and second-curtain sync (SCS) depending on trigger |
| Ports | Sync 3.5 mm, USB (firmware update), external power |
| Thermal Dissipation | Automatic fan |
| Safety | Overheat protection, auto power off |
Frequently Asked Questions - Indra500 TTL Phottix
User questions about Indra500 TTL Phottix
0 question about this device. Answer the ones you know or ask your own.
Ask a new question about this device
Download the instructions for your Lamp in PDF format for free! Find your manual Indra500 TTL - Phottix and take your electronic device back in hand. On this page are published all the documents necessary for the use of your device. Indra500 TTL by Phottix.
USER MANUAL Indra500 TTL Phottix
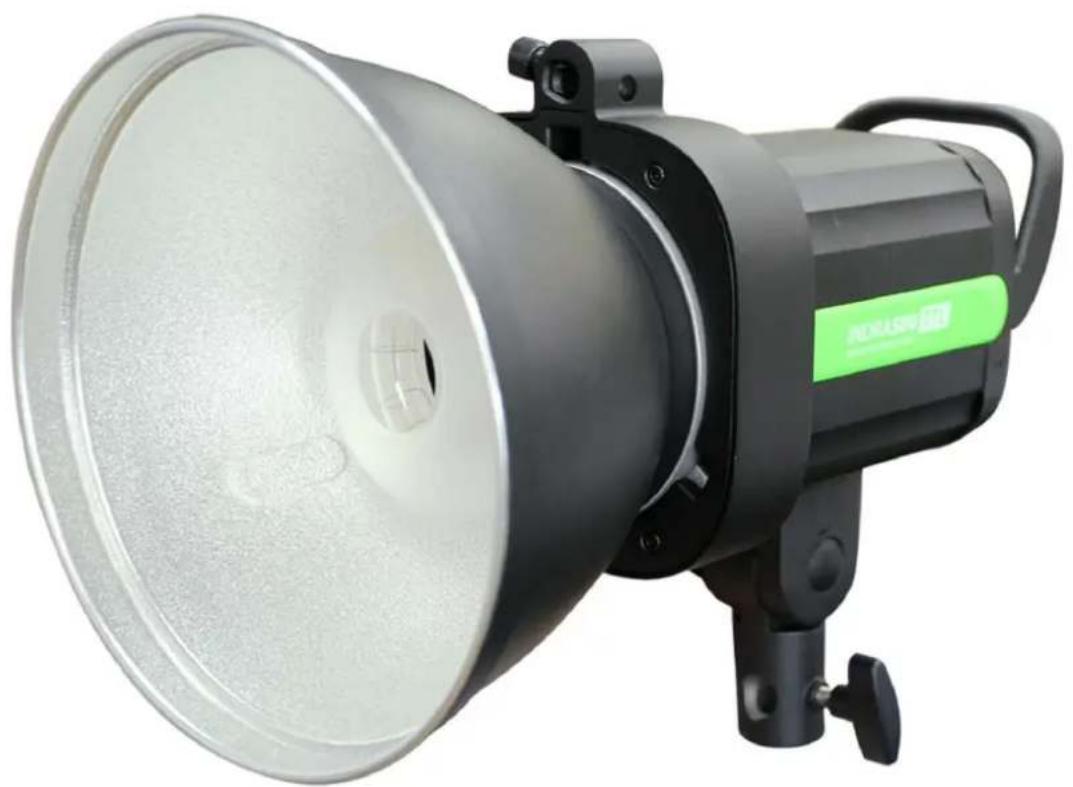
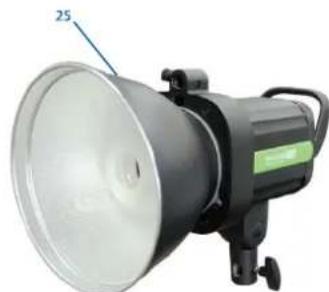
Phottix Indra500 TTL Studio Light
| En | INSTRUCTION MANUAL |
| De | BENUTZERHANDBUCH |
| Fr | MANUEL D'UTILISATION |
| Es | MANUAL DE INSTRUCCIONES |
| It | ISTRUZIONI D'USO |
| PI | INSTRUKCJ A OBSLUGI |
| Ru | PYKOBODCTBO ПОЛьЗВATEЛЯ |
| Cn Simp | 说明书 |
| Cn Trad | 說明書 |
Thank you for purchasing a Phottix product
Note: Before using the Phottix Indra500 TTL Studio Light, please read this instruction manual carefully.
The Phottix Indra500 TTL is a battery and AC powered portable studio light with a built-in radio and optical pulse wireless receiving function. It offers TTL, Manual and Multi Stroboscopic modes, as well as high speed sync and second curtain sync functions. The Phottix Indra500 TTL Studio Light is compatible with many existing Phottix products.
Safety instructions

- The Indra500 contains high voltage electronic parts. Do not disassemble or attempt to repair the Indra500. Keep this product out of the reach of children.
- Never use this product near combustible gases, solvents or in an environment with a high electrical charge.
- Make sure all plugs and cables are well connected during charging and use.
- Disconnect the Indra500 TTL Studio light from a power source for 10 minutes before changing the flash tube. Use caution, the flash tube can get very hot.
- Do not touch the external power port and ensure it does not have contact with any metal objects – this could cause electric shocks and serious injury.
- The external power source should not exceed the technical specifications in this manual.

- The external power should be used in an environment with good ventilation. Do not use this product in dusty or sandy conditions.
This product is not waterproof. Keep it away from rain, snow and high humidity conditions. - Do not clean the product with organic solvent or alcohol-based liquid.
- Do not put opaque objects in front of the studio flash head when firing the studio light. The heat energy emitted by the Indra500 may cause objects to burn, or cause damage to the studio flash tube.
- Use your studio light safely. Do not fire the Indra500 into the eyes of people or animals at short distances this may cause damage to the eyes and/or blindness.
- Do not leave the studio light in a hot location (direct sunlight, in a closed car, etc.).
- Should you notice smoke or an unusual smell coming from this product, immediately turn off the power switch on the studio light.
- Turn off the power switch on the studio light when not being used for an extended period of time.
- Remove the front cover before operating the studio light. Otherwise, the front cover will get deformed or cause a fire due to the high temperature of the studio light.

- Use caution in touching the studio flash head after use. It may still be hot and could cause burns.

- Consult local authorities on the proper disposal or recycling of a Phot-tix Indra500 TTL Studio Light.
Table of Content
Parts and Functions 2
Flash Modes 8
Wireless Receiving Modes 9
CustomFunctions. 12
Technical Specs 13
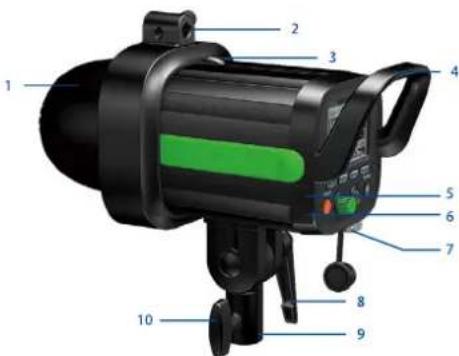
Parts
Full View
- Front Cover
- Umbrella Holder
- Quick-Release Locking Latch
- Handle
5.3.5mm Sync Port - USB Output Port
- External Power Port
- Angle Adjustment Ratchet Handle
- Mounting Column
- Clamp Screw
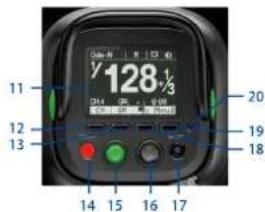
Back View
- LCD Display
- Function Button 1
- Function Button 2
14.Test/ReadyButton - Adjust/Set Knob
- Power Switch
- Modeling Light Switch
- Function Button 3
- Function Button 4
- Optical Signal Sensor
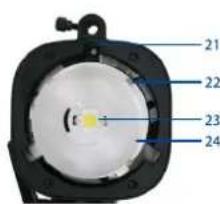
Front View
- Mounting Slot
- Glass Dome
- LED Modeling Light
- Flash Tube
- Reflector
External Power Port
The Indra500 TTL Studio Light can be connected to the Phottix Indra AC Adapter or the Phottix Indra Battery Pack through the external power port.
Please note:
When connecting the external power source, only use Phottix flash power cords designed for use with the Indra500 TTL Studio Light.
Connecting the Indra500 to the external power source
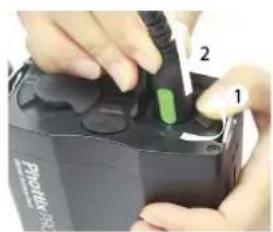
Using the Phottix Indra Battery Pack
- Insert one end of the included flash power cord into the external power port on the Indra500 TTL Studio Light. (See picture 1)
Note: To insert properly, please align the red dots on the cable and port.

Picture 1
- Insert the other end into the output port on the Phottix Indra Battery Pack. (See picture 2)

Picture 2
- Turn on the Output Toggle Switch on the Battery Pack.
- Turn on the power switch on the Phottix Indra500 TTL Studio Light.
Using the Phottix Indra AC Adapter
- Insert one end of the included flash power cord into the external power port on the Indra500 TTL Studio Light. (See picture 1)
Note: To insert properly, please align the red dots on the cable and port. - Insert the other end into the output port on the Phottix Indra AC Adapter. (See picture 3)

Picture 3
- Connect the AC Adapter to the mains supply.
- Turn on the main power switch and the output power switch on the AC Adapter.
- Turn on the power switch on the Phottix Indra500 TTL Studio Light.
Disconnecting the Indra500 from the external power source
Disconnecting the Phottix Indra Battery Pack
- Turn off the power switch on the Indra500 TTL Studio Light.
- Move the output toggle switch on the battery pack to the "OFF" position.
- Unplug the flash power cord according to picture 4.
Picture 4
- Unplug the other end according to picture 6.
Disconnecting the Phottix Indra AC Adapter
- Turn off the power switch on the Indra500 TTL Studio Light.
- Turn off the main power switch and output power switch on the AC Adapter. Unplug the flash power cord according to picture 5.

Picture 5
- Unplug the flash power cable from the Phottix Indra Studio Light (picture 6).

Picture 6
Attaching and removing the Reflector
To attach the reflector
- Hold the Indra500 with one hand.
- Align the reflector with the mounting slot using your other hand.
- Insert and rotate the reflector clockwise following the direction of the arrow in the diagram until the lock engages with a click. This ensures the reflector is
locked. (See picture7)

Picture 7
- If using an umbrella, make sure the umbrella pass-through hole in the reflector is aligned with the umbrella holder on the Indra studio light.
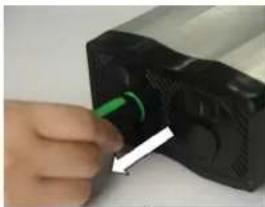
To remove the reflector
-
Push the quick-release locking latch with one hand.
-
Rotate the reflector anti-clockwise in the same direction as the arrow in the diagram and remove it from the Indra500 with the other hand. (See picture 8)

Picture 8
Note: Please be aware to keep the reflector parallel to the mount of the studio light while removing the reflector to prevent it touches the glass dome and incur damage.
Using the Umbrella Holder
The Phottix Indra500 TTL has an umbrella holder on the top of the light, making it easy to mount umbrellas and umbrella-style softboxes. Using the umbrella mount is simple: Insert the umbrella shaft into the umbrella holder on the Phottix Indra Studio Light. Turn the screw on the umbrella holder to tighten against the umbrella shaft.
Using the Softbox Mount
The Phottix Indra500 TTL features a Bowen's-compatible locking ring for softboxes, and other light modifying accessories. Using the Softbox Mount is the same as mounting and removing the Phottix Indra Reflector (above).
To attach: Align the softmax speed ring with the mounting slot on the Indra500. Insert and rotate the softmax mount clockwise following the direction of the arrow in the diagram until the lock engages with a click. (See picture7)
To remove: Push the quick-release locking latch backwards, and rotate the soft-box mount anti-clockwise to remove it from the Indra500. (See picture 8)
Sync and USB Ports
-
A Phottix flash trigger (Phottix Odin TTL, Strato II Multi and Strato TTL) or camera can be connected to the Indra's 3.5mm sync port using a compatible cable. The device will then be able to trigger the Indra500 TTL Studio Light.
-
The USB port is used for firmware upgrades. Firmware announcements and instructions will be made available on Phottix websites.
Please note:
Only the manual mode is supported when a flash trigger is connected via the sync port.
Transmission Channels
The Phottix Indra500 TTL Studio Light Wireless system has four channels; 1, 2, 3, and 4. The same channel needs to be set on the Indra500 TTL Studio Light when in wireless receiving mode as on the triggering device or flashes used to trigger the Indra.
Quick Flash Function
The Quick Flash function allows the studio light to fire when it is not fully charged, i.e. the status LED is still flashing green. Quick Flash recycle times are faster; this helps for snap photography at short distances.
Quick Flash can be used for continuous drive modes, Quick Flash for continuous shot function can be enabled or disabled in the Menu (See the Menu section below).
Please note:
The Quick Flash Function makes flash firing a priority. Under-exposure could result if the subject is located too far from the camera.
Flash Exposure Bracketing - FEB
Flash Exposure Bracketing (FEB) can be used to automatically change the flash power over a series of photos. The camera will record a series of images with different exposures. FEB is useful in run-and-gun situations as well as when shooting scenes with different lighting conditions to help ensure a properly exposed photo. FEB can also be used for HDR photography.
The FEB function is supported but cannot be set on the Indra500 TTL Studio Light. The availability of this function depends on whether the trigger or camera is equipped with an FEB function. See your camera manual for more information on Flash Exposure Bracketing.
Flash Exposure Lock - FEL/FV Lock
Flash Exposure Lock (FEL, also FV Lock in Nikon camera) can be used to lock the flash exposure before a photo is taken. This is useful when manual spot metering is being used in a scene with different lighting conditions. While in TTL mode, press the camera's function button to use this function. See your camera user manual for more information on FEL functions and usage.
The FEL function is supported but cannot be set on the Indra500 TTL Studio Light. The availability of this function depends on whether the trigger or camera is equipped with an FEL function. See you camera manual for more information on Flash Exposure Lock.
High Speed Sync - HSS/Auto FP
High Speed Sync (HSS) mode is used to shoot at shutter speeds higher than a camera's set flash sync speed (typically 1/200-1/250s). This is useful when using aperture priority mode and in limiting ambient light. HSS results may vary with different camera models – refer to your camera user manual for more details.
Please note:
- HSS function is supported by the Phottix Indra500 TTL Studio Light, but it cannot be set on the studio light itself.
- The camera, flash trigger and receiving mode can greatly affect HSS mode. For best results in HSS mode please use recommended Photix flash triggers. Please see the "Compatibility Table" below and refer to your flash trigger and camera user manuals for more details.
- HSS function will not work in Manual and Multi Stroboscopic mode.
- Use the HSS mode frequently will shorten the flash tube life.
- Nikon's flash protocols may limit the maximum sync speed of some Nikon camera bodies.
Compatibility Table
| Odin-C Radio Receiving Mode | Compatible with Phottix Odin TTL Flash Trigger for Canon, Phottix Mitros+ TTL Transceiver Flash for Canon. |
| Odin-N Radio Receiving Mode | Compatible with Phottix Odin TTL Flash Trigger for Nikon, Phottix Mitros+ TTL Transceiver Flash for Nikon. |
| Strato II Radio Receiving Mode | Compatible with Phottix Odin TTL Flash Trigger for Canon/Nikon, Phottix Mitros+ TTL Transceiver Flash for Canon/Nikon, Phottix Strato II Multi Trigger for Canon/Nikon. |
| Opt-Slave Optical Pulse Receiving Mode | In this mode, any other nearby fired flashes and studio lights will trigger the Indra500 TTL Studio Light. |
| Please note: All the triggering devices mentioned in this manual refer to the products listed in this table. | |
Second Curtain Sync - SCS
The Phottix Indra500 TTL Second Curtain Sync function makes the studio light fire at the end of an exposure, not the beginning. This helps capture special effects when using slow shutter speeds.
Please note:
- SCS function is supported by the Phottix Indra500 TTL Studio Light, but it cannot be set on the studio light itself. Instead please set the SCS function on your camera or flash trigger. For more details, please refer to your flash trigger and camera user manuals.
- SCS function will not work in Multi Stroboscopic mode.
Test/Ready Button
- Pressing the test button will trigger the studio light. This can be used for metering in Manual mode.
- This button also offers a Flash-ready indication function. The LED indicator on
the button will flash green when the light has the minimum recycle charge. It will flash red when fully charged.
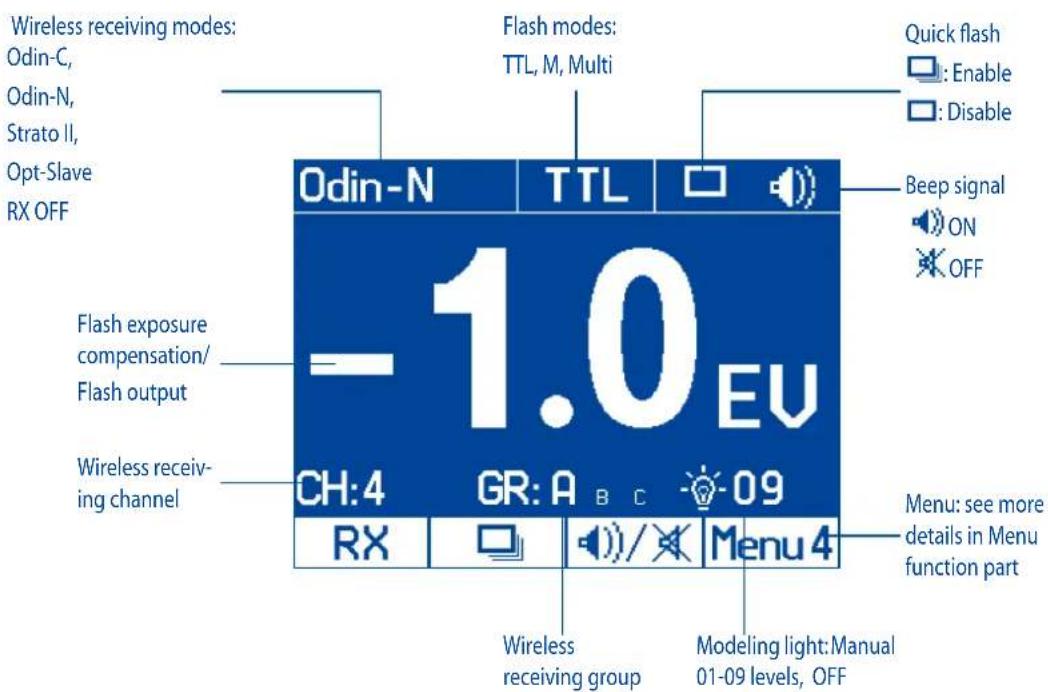
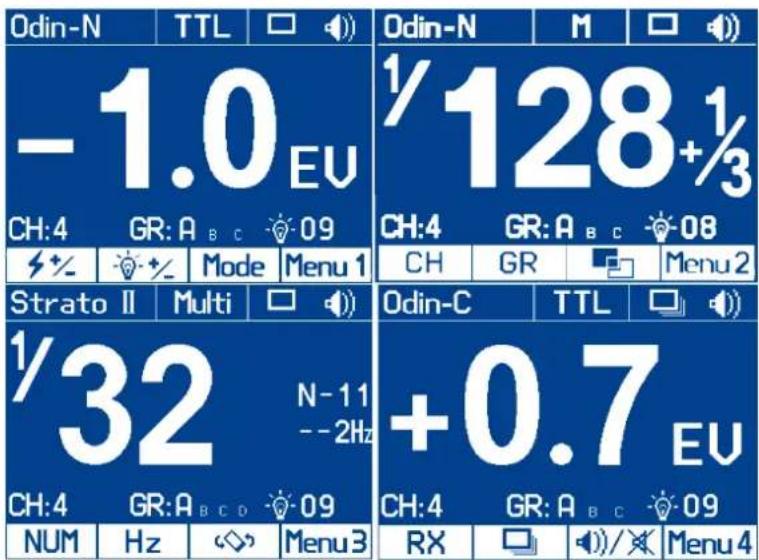
Menu
| Menu 1 | 1 - | Flash Compensation | TTL Mode | EV Compensation: ±3EV (in 1/3 stop increments) |
| Manual (M) Mode | Set from 1/128 to 1/1 (full power) – 8 stops of adjustments in 1/3 stop increments | |||
| Multi Mode | Set from 1/128 to 1/4 – 6 stops of adjustments in 1/1 stop increments | |||
| 2 - | Modeling Lamp | Enable | 9 levels of adjustment | |
| Disable | Disable | |||
| 3 - | Flash Modes | TTL | Auto Flash | |
| M | Manual Flash | |||
| Multi | Multi Flash | |||
| Menu 2 | 1 - CH | Wireless Receiving Channel | Adjustable through channels 1-4 | |
| 2 - GR | Wireless Receiving Group | Adjustable through groups A, B or C | ||
| 3 - | LCD Color Screen Setting | Classic | Black and White | |
| Dynamic | Fluorescent Green | |||
| Elegant | Phantom Blue | |||
| Menu 3 | 1 - NUM | Multi Stroboscopic Flash Numbers | 1-100 times | |
| 2 - Hz | Multi Stroboscopic Flash Frequency | 1-100Hz | ||
| 3 - | LCD Display Sensor Setting | Regular | ||
| Upside-down | ||||
| Auto by sensor | ||||
| Menu 4 | 1 - RX | Wireless Receiving Mode | Otin-C, Odin-N, Strato II, Opt-Slave, RX OFF | |
| 2 - | Quick flash mode | Enable | Allow to fire when the light is not fully charged (but the light has the minimum recycle charge - the Flash-ready indicator flashes green) | |
| Disable | Allow to fire only when the light is fully charged (the Flash-ready indicator flashes red) | |||
| 3 - | Button Beep Confirm | Enable | ||
| Disable | ||||
Menu Settings
Use the four function buttons below the LCD display to select the corresponding function setting options. You can edit each setting when the selected function is highlighted. Depending on the LCD color screen settings this will be in either: red, white, or yellow (The LCD color screen setting and the LCD display sensor setting will be shown in the Menu list).
-
Turn the "Adjust/Set knob" to change the setting.
-
When finished press the corresponding function button, or the "Adjust/Set knob" to confirm and exit.
The LCD Display
Menu Screen
Auto-Save Functions
The Indra500 TTL will remember studio light settings. Previous settings will be retained each time it is turned on.
Modeling Flash
- Pressing the camera depth-of-field preview button (if available) will fire the studio light continuously for 1 second. The modeling flash allows you to see the lighting effects and balance on the subject. (Please see your camera manual for more information on the DOF button and button assignment.)
- The modeling flash is available in all modes, TTL, Manual and Multi.
Modeling Light
The Phottix Indra500 TTL is equipped with an LED modeling light. This is helpful for both previewing lighting set-ups and assisting with focusing in dimly lit environments.
The Modeling Light has two modes
- Manual mode: 9 brightness levels from 01 to 09 are available.
- OFF mode: The modeling light will be turned off.
Please note:
- When the studio light is firing, the modeling light will not turn off automatically.
- Using the modeling light uses a lot of battery power.
Adjusting the brightness of the Modeling Light
The modeling light can be turned on/off via menu option in Menu 1 or with the modeling light swtich
Via Menu option
- Press Function Button 4 until Memn on the LCD display.
- Press the corresponding function button to
- When the modeling light option - is selected, it will be highlighted on the LCD display.
- Turn the "Adjust/Set knob" to change the modeling light mode from Manual (01-09 stop) or OFF.
- Press the function button corresponding to 或的“Adjust/Set knob” to confirm the settings and exit the editing mode.
Via Modeling Light Switch
- Press the modeling light switch to turn on/off the modeling light.
-
When the modeling light is turned on the modeling light icon will be highlighted on the LCD display.
-
Turn the "Adjust/Set knob" to change the modeling light mode from Manual (01-09 stop) or OFF.
- Press "Adjust/Set knob" to confirm the settings and exit the editing mode.
Flash Modes
The Phottix Indra500 TTL Studio Light has three flash modes: TTL Auto, Manual and Multi.
TTL Flash Mode
When the Phottix Indra500 TTL Studio Light is set to TTL mode, the studio light will fire at the selected flash mode and flash power, as set on a Phottix Odin or other Phottix compatible flash trigger featuring power control.
Flash Exposure Compensation-FEC
The Phottix Indra500 TTL Studio Light can be used to adjust Flash Exposure Compensation (FEC) from-3 to +3 in 1/3rd stops. This is useful in environments where fine-tuning of the TTL system is needed.
Please note:
- If both the triggering device (if TTL mode is available) and the studio light are set to TTL modes and EV adjustment is set on both units, then the final exposure value will be the sum of the two Flash Exposure Compensation Values.
- If the triggering device is set to Manual mode (if available) and the studio light is set to TTL mode with Flash Exposure Compensation Value, then the Flash EV Value will be used to calculate the final flash output.
Manual Flash Mode
In Manual mode the studio light will fire at the power levels set. The Phottix Indra500 TTL Studio Light can be adjusted from 1/128 to 1/1 in 1/3 stop increments (1/128, 1/64, 1/32, 1/16, 1/8, 1/4, 1/2, and 1/1). Flash modes and power of the studio light cannot be adjusted and controlled on the triggering device.
Multi Stroboscopic Flash Mode
With Multi Stroboscopic mode a series of rapid flashes will be fired. The flash count, frequency and power of these flashes can be programmed on the Phottix Indra500 TTL Studio Light. Multi mode is useful for capturing multiple images of a moving subject in the same photo and for other special effects.
In Multi Stroboscopic mode, the studio light will be fired at the programmed manual flash power, flash counts (1-100), and frequency (1-100Hz). The flash power can be set from 1/128 to 1/4 in 1/1 stop increments (1/128, 1/64, 1/32, 1/16, 1/8, and 1/4). Flash modes and power of the studio light cannot be adjusted and controlled on the triggering device.
Please note:
- Overheating and even damage to the flash tube can be resulted from excessive use of the Multi Stroboscopic mode.
- If overheated the flash will automatically increase charging time. If the temperature continues to rise, the light will stop firing.
Wireless Receiving Mode
The Phottix Indra500 TTL Studio Light is equipped with 5 wireless receiving modes: Odin-C, Odin-N, Strato II, Opt-Slave and RX OFF. Please see below for more details.
Supported Flash Modes
| Wireless Receiving Mode | Supported Flash Modes |
| Odin-C | TTL, Manual(M), Multi |
| Odin-N | TTL, Manual(M), Multi |
| Strato II | Manual(M), Multi |
| Opt-Slave | Manual(M) |
| RX-OFF | Manual(M), Multi |
Odin-C Radio Frequency Receiving Mode
This mode allows the Indra500 TTL Studio Light to be triggered by a Phottix Odin TTL Flash Trigger TCUs for Canon or by a Phottix Mitros+ TTL Transceiver Flash for Canon in Odin TX mode. To work correctly they must be set to the same channel and in the same group.
How to use:
- Press Function Button 4 or turn the "Adjust/Set Knob" until Menu 4 appears on the LCD display.
- Press the corresponding function button to RX. The wireless receiving function option will be highlighted on the LCD display.
- Turn the "Adjust/Set Knob" to change the wireless mode to Odin-C.
- Press the "Adjust/Set Knob" to confirm the setting.
- Press the corresponding function button to Mode in Menu 1 to adjust from TTL, Manual or Multi.
Odin-N Radio Frequency Receiving Mode
This mode allows the Indra500 TTL Studio Light to be triggered by a Phottix Odin TTL Flash Trigger TCUs for Nikon or by a Phottix Mitros+ TTL Transceiver Flash for Nikon in ODIN TX mode. To work correctly they must be set to the same channel and in the same group.
How to use:
- Press Function Button 4 or turn the "Adjust/Set Knob" until Menu 4 appears on the LCD display.
- Press the corresponding function button to RX. The wireless receiving function option will be highlighted on the LCD display.
- Turn the "Adjust/Set Knob" to change the wireless mode to Odin-N.
- Press the "Adjust/Set Knob" to confirm the setting.
- Press the corresponding function button to Mode in Menu 1 to adjust from TTL, Manual or Multi.
Strato II Radio Frequency Receiving Mode
This mode allows the Indra500 TTL Studio Light to be triggered by the Phottix Odin TTL Flash Trigger TCUs for Canon/Nikon, the Phottix Mitros+ TTL Transceiver Flash for Canon/Nikon in Odin Tx mode, the Phottix Strato TTL transmitter for Canon/Nikon or by the Phottix Strato II Multi transmitter for Canon/Nikon. To work correctly they must be set to the same channel and in the same group.
Please note:
HSS, SCS, and TTL are not supported in Strato II Radio Frequency Receiving Mode.
How to use:
- Press Function Button 4 or turn the "Adjust/Set Knob" until Menu 4 appears on the LCD display.
- Press the corresponding function button to RX. The wireless receiving function option will be highlighted on the LCD display.
- Turn the "Adjust/Set Knob" to change the wireless mode to Strato II.
- Press the "Adjust/Set Knob" to confirm the setting.
- Press the corresponding function button to Mode in Menu 1 to adjust from Manual and Multi.
Opt-Slave Optical Pulse Receiving Mode
In this mode any other studio lights or flashes fired nearby will trigger the Indra500 TTL Studio Light.
Please note:
Pre-flashes from nearby TTL flashes will trigger the Phottix Indra if set in Opt-Slave mode. Please take care when using this mode that nearby TTL flashes do not trigger the Phottix Indra before you are ready.
How to use:
- Press Function Button 4 or turn the "Adjust/Set Knob" until Manu 4 pears on the LCD display.
- Press the corresponding function button to RX. The wireless receiving function option will be highlighted on the LCD display.
- Turn the "Adjust/Set Knob" to change the wireless mode to Opt-Slave.
- Press the "Adjust/Set Knob" to confirm the setting.
RX OFF Mode
In this mode wireless receiving is turned off.
How to use:
- Press Function Button 4 or turn the "Adjust/Set Knob" until Menu 4 appears on the LCD display.
- Press the corresponding function button to RX. The wireless receiving function option will be highlighted on the LCD display.
- Turn the "Adjust/Set Knob" to change the wireless mode to RX OFF.
-
Press the "Adjust/Set Knob" to confirm the setting.
-
Press the corresponding function button to Mode in Menu 1 to adjust from Manual and Multi.
For Odin-C/Odin-N/Strato II
Functions in Multi mode
- Press the corresponding function button to in Menu 1. Turn the "Adjust/Set knob"to adjust the flash power from 1/4 to 1/128-6 stops.
- Press the corresponding function button to in Menu 1. Turn the "Adjust/Set knob" to adjust the Modeling Light mode (OFF/01-09).
- Press the corresponding function button to CH in Menu2. Turn the "Adjust/Set knob"to adjust the Chanel from 1-4.
- Press the corresponding function button to GR in Menu 2. Turn the "Adjust/Set knob" to adjust the Group from A, B to C.
- Press the corresponding function button to in Menu 2. Turn the "Adjust/Set knob"to adjust the LCD Color Screen Setting (Classic, Dynamic, El- egant).
- Press the corresponding function button to NUM in Menu 3. Turn the "Adjust/Set knob" to adjust the flash count from 1-100 times (based on the flash frequency and flash output).
- Press the corresponding function button to Hz in Menu3. Turn the "Adjust/Set knob" to adjust the flash frequency from 1-100Hz.
- Press the corresponding function button to in Menu3. Turn the "Adjust/Set knob"to adjust the LCD Display Sensor Setting (Regular, Upside-down and Auto by sensor).
- Press the corresponding function button to in Menu 4, the Continuous flash mode option will be highlighted on the LCD screen. Turn the "Adjust/ Set knob" to turn the Quick Continuous flash mode on/off.
- Press the corresponding function button to l in Menu 4. Turn the "Adjust/Set knob"to turn the sound on/off.
For Odin-C/Odin-N
Functions in TTL mode
- Press the corresponding function button to in Mein the "Adjust/Set knob"to adjust the Flash Exposure Compensation Value from -3.0EV to +3.0EV.
- Press the corresponding function button to in Menu 1. Turn the "Adjust/Set knob" to adjust the Modeling Light mode (OFF/01-09).
- Press the corresponding function button to CH in [Menu 2]. Turn the "Adjust/Set knob" to adjust the Chanel from 1-4.
- Press the corresponding function button to GR in [Menu 2]. Turn the "Adjust/Set knob" to adjust the Group from A, B to C.
- Press the corresponding function button to in Menu2. Turn the "Adjust/Set knob"to adjust the LCD Color Screen Setting (Classic, Dynamic, El-egant).
- Press the corresponding function button to in Menu3. Turn the "Adjust/Set knob"to adjust the LCD Display Sensor Setting (Regular, Up
side-down and Auto by sensor).
- Press the corresponding function button to in Menu 4 . the continuous flash mode option will be highlighted on the LCD screen. Turn the "Adjust/Set knob" to turn the Quick Continuous flash mode on/off.
- Press the corresponding function button to in Menu 4. Turn the "Adjust/Set knob"to turn the sound on/off.
For Odin-C/Odin-N/Strato II
Functions in Manual mode
- Press the corresponding function button to 32 urn menu 1 "Adjust/Set knob" to adjust the flash power from 1/1 to 1/128 in 1/3rd stop increments.
- Press the corresponding function button to in MeMa The "Adjust/Set knob" to adjust the Modeling Light mode (OFF/01-09).
- Press the corresponding function button to CH in Menu?the "Adjust/Set knob" to adjust the Chanel from 1-4.
- Press the corresponding function button to GR in the "Adjust/Set knob" to adjust the Group from A, B to C.
- Press the corresponding function button to in Menu2the "Adjust/Set knob"to adjust the LCD Color Screen Setting (Classic, Dynamic, El-egant).
- Press the corresponding function button to in Menu the "Adjust/Set knob" to adjust the LCD Display Sensor Setting (Regular, Upside-down and Auto by sensor).
- Press the corresponding function button to in Menu 4 . the Continuous flash mode option will be highlighted on the LCD screen. Turn the "Adjust/Set Knob" to turn the Quick Continuous flash mode on/off.
- Press the corresponding function button to in Menu 4. Turn the "Adjust/Set knob"to turn the sound on/off.
For Opt-Slave/RX OFF
Functions in Manual mode
- Press the corresponding function button to 4 % TurnMenu 1 the "Adjust/Set knob"to adjust the flash power from 1/1 to 1/128 in 1/3rd stop increments.
- Press the corresponding function button to in Menu 1. Turn the "Adjust/Set knob" to adjust the Modeling Light mode (OFF/01-09).
- Press the corresponding function button to in MeHNRthe "Adjust/Set knob"to adjust the LCD Color Screen Setting (Classic, Dynamic, El-egant).
- Press the corresponding function button to in Menu3. Turn the "Adjust/Set knob"to adjust the LCD Display Sensor Setting (Regular, Upside-down and Auto by sensor).
-
Press the corresponding function button to in Menu4, the Continuous flash mode option will be highlighted on the LCD screen. Turn the "Adjust/ Set knob" to turn the Quick Continuous flash mode on/off.
-
Press the corresponding function button to in Menu 4. Turn the "Adjust/Set knob"to turn the sound on/off.
For RX OFF
Functions in Multi mode
- Press the corresponding function button to in Menu 1. Turn the "Adjust/Set knob" to adjust the flash power from 1/4 to 1/128-6 stops.
- Press the corresponding function button to in Menu 1. Turn the "Adjust/Set knob" to adjust the Modeling Light mode (OFF/01-09).
- Press the corresponding function button to in Menu2. Turn the "Adjust/Set knob"to adjust the LCD color screen setting (Classic, Dynamic, Elegant).
- Press the corresponding function button to NUM in Menu 3 to adjust the flash count from 1-100 times (based on the flash frequency and flash output).
- Press the corresponding function button to Hz in Menu 3 . Turn the "Adjust/Set knob" to adjust the flash frequency from 1 - 100Hz .
- Press the corresponding function button to in Menu3. Turn the "Adjust/Set knob"to adjust the LCD Display Sensor Setting (Regular, Upside-down and Auto by sensor).
- Press the corresponding function button to in Menu 4, the Continuous flash mode option will be highlighted on the LCD screen. Turn the "Adjust/Set Knob" to turn the Quick Continuous flash mode on/off.
- Press the corresponding function button to /in Menu 4. Turn the "Adjust/Set knob"to turn the sound on/off.
Remarks:
If the "Adjust/Set knob" or the corresponding function button is not pressed to confirm the selected parameter, the selected parameter will be confirmed by default within 10 seconds.
Custom Functions
The Phottix Indra500 TTL Studio Light comes with a number of programmable custom functions. To edit these functions (see below):
-
Press and hold Function button 4 and the "Adjust/Set knob" for 3 seconds to enter the C.Fn Menu Screen.
-
Press Function button 1 or Function button 2 to cycle through the menu items - C.Fn 00 to 03.
- Turn the "Adjust/Set knob" to change the functions within the menu.
- Press Function button 4 to exit the C.Fn menu.
Custom Functions Chart
| Custom Function No. | Functions | Setting No. | Settings and descriptions |
| C.Fn 00 | CCT (Correlated Color Temperature) Adjustment – HSS is not supported | 0: Enable | In manual mode, color temperature will auto change to be more stable. |
| 1: Disable | In manual mode, color temperature will not auto change but the light will have a more stable flash power in Continuous shooting Mode | ||
| C.Fn 01 | Test Firing | 0: 1/32 | at 1/32 power |
| 1: Full Output | Full Output | ||
| C.Fn 02 | Recycle cfm | 0: Enable | The studio light Beep when the recycle is finished |
| 1: Disable | No beep when the recycle is finished | ||
| C.Fn 03 | Temp for Fan | 0: 40°C | Activate Cooling Fan when the internal temperature of the studio light is above 40°C |
| 1: 60°C | Activate Cooling Fan when the internal temperature of the studio light is above 60°C |
Replacing the flash tube
- Disconnect the Indra500 TTL Studio light from a power source for 10 minutes before changing the flash tube.
- Remove the Reflector as shown above.
- Gently separate the Glass Dome from the snap mount, remove the Glass Dome. (Picture 9)

Picture 9
- Gently hold the flash tube to remove it from the snap slot. (Picture 10)

Picture 10
- Insert a new flash tube into the snap slot. (Picture 11)

Picture 11
- Mount the Glass Dome align the snap mount. (Picture 12)

Picture 12
- Attach the Reflector as shown above.
Note: Please wear gloves instead of touching the flash tube directly when replacing the flash tube.
Resetting to Factory Defaults
The Indra500 TTL Studio Light can be reset to factory defaults.
Press and hold both Function button 1 and the "Adjust/Set knob" for 3 seconds. This will reset all function settings to factory defaults.
Checking the Studio Light Information
Pressing the combination keys can check the Phottix Indra500 TTL Studio Light information: Hardware, software, icon library, and product serial number.
- Press and hold Function button 2 and "Adjust/Set Knob" for 3 seconds. The information display screen will show the hardware, software, icon library, and product serial number.
- Press any button to exit the information display screen and return back to the standard screen.
- Triggering the studio light or camera focusing, or taking photos when the studio light is displaying the version information will cause the studio light to exit the version display screen and return back to the standard screen.
Changes to the Studio Light Capacitor
If the Indra500 is not used for some time physical changes will take place within the flash's capacitor. Make sure to turn on the flash for a minimum of 10 minutes every three months to prevent any changes.
Technical Specification
Max power: 500Ws
Adjustable power stops: 8 Stops (4-500Ws)
Power adjustment: In 1/3stop or full stop increment
Flash modes: TTL Auto, Manual (M), Multi
Light angle: 60^
Guide Number: 45/147.6 (ISO100, m/ft)
Color temperature: 5600 ± 200K (Color temperature may vary at low power settings)
Flash duration time: t = 1 1/250s - 1/12000s
Stroboscopic flash: Frequency: 1-100Hz, Flash Count: 1-100 times
HSS&SCS: Support*
Recycling time(at 1/1 flash power levels; the indicator will light red)
Photrix Indra AC Adapter: Single/Two flashes: 0.9s/1.7s
Photrix Indra Battery Pack (10AH): H mode Single/Two flashes: 1s/2.3s
S mode Single/Two flashes: 1.4s/5.4s
Phottix Indra Battery Pack (5AH) H mode Single/Two flashes: 1.4s/4.9s
Smode Single/Two flashes:2.6s/10.9s
Input power:
Photrix Indra AC Adapter: AC 220V/110V, 50HZ/60HZ
Photix Indra Battery Pack: 14.8V/5Ah, 400 full power flashes
14.8V/10Ah, 800 full power flashes
Modeling Light Power: about 4.5W
Modeling Light Modes: OFF, Manual 1-9 levels
Wireless connectivity method: Radio Frequency and Optical pulse
Channel: 4
Wireless receiving modes: Odin-C, Odin-N, Strato II, Opt-Slave, RX OFF (Can only be fired via 3.5mm sync port)
Receiving range (Approx.): Radio: 100m+
Display: 320X240 TFT LCD display, Support 3 color screen settings
LCD Display Senor Setting: Sense direction automatically and make a 180-degree turn according to the direction
Heat Dissipation Method: Automatically turn on according to the temperature
Recycle confirm: Can be enabled or disabled
Firmware Upgrade: Upgrade of firmware is made via the USB mini port
Dimension:Length*Diameter:266mm*180mm
Weight: 2.1kg (Excluding the Studio Light Power Cable)
Please note: Product specifications and external design are subject to change without further notice.
*On compatible cameras
Abbrennzeit: t=1 1/250s - 1/12000s
HSS & SCS: supportes
Mode S Un/Deux flashes: 1.4s/5.4s
Alimentation exter Phottix Indra (5AH): Mode H Un/Deux flashes:1.4s/4.9s
Mode S Un/Deux flashes: 2.6s/10.9s
Puissance d'entrée:
Tiempo del flash: t = 1 1/250s - 1/12000s
Tempodel flash:t=1 1/250s-1/12000s
- OtknIOUHTe DpyroI KOHeI KabeJIa (pnc.6)
OmkHouenue om adanmepa cemeo0 numanua Phottix Indra
- BbIKIOHTe NtAHHe OCBETNTEnI Indra500 TTL.
2.BbKIOUHTe NITAHNE INpeekNIOATEB BixOHO MOUHCTN CTeBOA aIaTepa. OTKIOUHTe KaEBbc CETBOrO NITAHNA (PNC.5)
PNC.5
- OTKHIOHTe Ka6eIb NITAHmOTOCBETnTea Phottix Indra (puc 6).

pnc.6
Iodknquene u cnaue ompaxamena
Todknouehepefnekmopa
1.YdepkmbaTe Indra500B oDho npyke.
2.Пи римоши другий рукь ВьровяптЕ отужать на у探测су轼HABOUHIM CNOTOM.
3.BCTabteI NOBepHnte OTPaKATEb NO HApBaNHeHIO YacOBIO CTpeKNIO ⅡeUka 3anopa.Y6eNTecb,TO OTPaKATEb NIOTHO 3aKpenn.(pnc.7)

PNC.7
4.Bcnyae ecnn nCnoB3yETcra 3OHT, y6eNTecb B TOM, YTO OTBepCTne BOTpaxatele coBnaaet C dpeXataenem 3OHToCBETeTlra Indra.
Jn chaumu ompaxamena
- Haxmte Ha 3auejky 3anopa oHno pykoJ.
2.ПовернiteОТражATENB pOITNв acOBо CTpeKNI NO haPpABNeHn CTpeKNHa dAnrpaMMe n CHIMITE erococbetnteI Indra500.(pnc8)

pnc.8
BHMaHHe: PnCHrTN OtpaxKeTEnypeKbAte ero BnapaIeNBHom NIOXKeHm OTHOCHTeBHO CTyIMHOJ lamMbI 36eRa ero npNKoCBOHeHc CO CTEKJIHHbIM KynolOM, YTO MOKeT pNBeCTN K NOBpeKDeHIO NocJeHero.
IcnoJb30aHue KpennEnu 3ohmo8
OcbTeTneb Phottix Indra500 TTL Ocaaueh KpeIeHemm 3oHTOB Ha BepxHeuactnOCBETeJI. OH NERKO ypeKnaBaet 3oHT n6o 3oHTOBOn CoT6OKC. IcnoJb3ObaTb KpeIeHne MoKHO npocTo: BCTaBBte pyKoRTky 3oHTa B KpeIeHne CtydunHoro OCBeTneJI, N 3aΦuKcPuyTe erO 3aTHyB BNHT.
Ucnonb30BaHue KpennneHua dna coqm6okco8
OcbTeTb Phottix Indra500 TTL BkIIOuaET CoMBeCTUMb C Bowen's KOJIbueBOI aAnTeP dIa COfTO6KOB IN DpyINx AkCECCyapOB dIaMOINHnKaUIMCBETA. IpoUeYpa yCTAHOBKn IN CHrTNa aAnTePa dIaCOfTO6KOB TaKaJX Ke, KaN I dIy YCTAHOBKn IN CHrTNa OTpaxaTeN (CM.BblIe)..
IyctahOBKn:BbipOBHnTe KOJIeBOJ aanTep dNcof60Ka n KpeNTeJIbHOE OTBepCTne Ha Indra500.BcTabte NpOBepHTe no yacOB
ctpeKe KpeHne coΦt6okca no ctepeKe do ueuka 3anopa. (pnc 7)
Длг chтma: Haxmte Ha 3aшьку 3aTbopa, И повернп Te крелене coФtбokca npotNB yacobov CTpeknkдг chтma eroc Indra500. (pnc 8)
Iopmbi cunxponu3aquu (Sync) u USB
- HeKToOpBie cHnXpOHHaTOpbI pa6oTb BCnblweK Phottix (Phottix Odin TTL, Strato II Multi n Strato TLI) IIn6o KaMepa MOrTy 6bItb NOnKnIOueHb K NopTy cHnXpOHnHa3aun 3.5MM OCBeTInTeIa Indra500 npn NOMOUn CoBMeCTmOrO ka6eJIy. UcTpoJcTBcO MoKeT npOn3BeCTn Cpa6aTbIbAHne OCBeTInTeIa.
- IopT USB port nCIOIb3yETc4 IJIy o6HOBLeHnI PO. INHOpMaIgO BepCNI 6HOBLeHnI PO n e HNCTpyKUg 6yEt IOCTyTNHa Na Be6-CTpaHuax Phottix.
BHHMaHHe:
PnnoKIOHcHxPOH3aTopa K NoTpY cHxPOH3aun BCbIuKN 6ydet IOCTyNEH TOJIbKO peXIM pyHOn HAcTPOKn (MaHaJIbHbI).
Kahalbinepeadau
CnCTema 6ecnpoBODHoro ynpabNeHna BCnbIuKnPhottix Indra500 TTL NMeet 4 KaHana:1,2,3 n 4. OInHaKOBbI KaHaN DoJnxen 6bTb yCTaHOBJIe H Ka NaOCBeNTeIe Indra500 TTL B pexNMe 6ecnpoBODHoro npmEMNHka, Ta K Ha YcTpoiCTBe CnHXPOHN3aTopa (Tprrrepa), NIOBO BCNbIuKn, KOtopar NCNoB3yETcBAckCTBe Tprrrepa cnUcKa Indra.
Функцяобсmpоьbcnbiuku
Функця 6bICTpo BCnblkN NO3BOJAE TcYHINHO BCnblKKe cpa6aTbIbTaB B MOMHe, KOrda OHa eue He NpIHOCbIIO nepe3apdInacb, T.e. NaMNoKa CTaTyCa 6yET CBETbCZeHbIM ZbETOM. Bpemr nepe3apdKn B pexKmE 6bICTPOB BCnblkN KOPOe - 3TO MOxET PnIRoDITbCra Dnla 6bICTPOB CbEMKn Ha KOPOTKOM paCCTOAHIN.
Функлua 6bICTPOn BCnbluKMOKET 6bITb NcNOLb3ObaHaДЯ СЕРИНОВ CBEMKn. ДаHHaФунклua MOKET 6bITb BKJIIOUeHa И ВБКЛIOUeHa B MeHIO (CM. HIXe CekUma MeHIO).
BhumaHue:
ФункшьбICTpoi BCNbIKUcTaHABnBaet npOpNTET cpa6aTbHaHNA BCNbIKN. HeOCTaOTHAR 3KcNO3uIN MOKTe 6bITpe3yIbTAOM TORO, YTO 06bEKT HxOHTCnIbKOM daleko OT KamepbI.
BpekemuH2 npu cbeMke co 8cnbIwko - FEB
BpekeHr npCbEke Co BCbIkwKo (FEB) no3BOJAE TcHb cepIO KaPOB CO BCbIkwKo C aBTOMaTneCKm N3MeHeHnEM MOUHOCTN BCbIkwK, KaMepa npOn3BeTeT cepIO CHIMKO B pa3nHNO 3KcNo3nue. FyHKuJRA FEB POJIe3Ha npCbEke B cHTyaunx, KOrDa y BaC HET DOCTaTOHORO BpemeHn DnnoTROBKn, n6o npn N3MeHnAOxxCyCNOBnx OCBSeHnX DnnoDcTINKeHn ONTMaJIbHO rOpyOBn EKcNo3nUn CHIMKO.B. TaKKe FyHKuJRA FEB MoKeT 6bITb MCNoB3OBAHa dJa fOToRaΦn HDR.
Функця FEB function noДерхиBaetс, Ho He moKet 6bIb yCTaHOBneHa Na CTyDnHOM OCBeTInTe Indra500 TTL. DoCTyINHOCTb DaHHoI ΦUnKzIM3aBNCIT OT TORO 6bNaAeTЛN 3ToI ΦUnKzIe CnHXPOHn3aTOp LIn60KaMepa. O3NaKoMbTeCb c NoDpo6HoCTaMn ΦUnKzIM FEB B pyKobOdCTBe nO3KcPnyatauIM Baew KaMepbl.
ФukcaцuaэКсно3uцuu npucbemke co BCnbIuKoJ - FEL /FV Lock
ФИКСАЦЯ ЭКСПОЗИЦИ рпс CBЕМКЕ CO BCПБИКоI (FEL,ТаЖе FV Lock Na KaMepax Nikon) obecneчнBaET ФИКСАЦЮ ЗСПОЗИЦИ рпс CBЕМKE CO BCПБИКоИ Истовозане данно ФункцииnomoraeТпru ИстовозаниpyHOrO 3aMepa NO TOUKe Ha сцHe C ИЗМЕнJOUIMMIC RAСПОВЯМN OCBETЛЕNHIA.
HaxoJcB b pexmme TTL, haxmnte KhoNk Ky kamepbI dny nCNoIb3OBAHnA daHHo fynKcM. Ioppo6Ho 03HaKOMbTeCb C nCNoIb3OBAHnEm daHHo fynKcM FEL B pykoBODCTBe NO EKnPlyatauM daHHo BCblIKoN.
ФункцЯ FEL NOдерхиBaetса, Ho He Moжет 6bTb yctaHOBHeHa Ha CTyDNiHOM OCBetnte Indra500 TTL. DocTyHOCtB daHNof fynKzim 3abNCt OT TORO obIaAet mTof fynKznei CnHXPOH3aTop nI6o KaMepa. O3HaKoMbTeCb c noPpO6HocTAm fynKzim FEL B pykoBoDCTBe no EKcNpyaTuu N BaWei KaMepbl.
BbICOKOCKOPoCmHa cunxpoHu3aua - HSS/ Auto FP
Pekim Bicokocopoctho CnHxOHN3aun (HSS) nCOnb3yeTc dIa CbEMKn pN CKOPoCTX BIdepKKn 6Onee BICOKNX cEm O6bUHARCKOpoc TcHxPOHN3aun pa60t b KaMepb CO BCbUHKO (O6bUHO 1/200-1/250ceK). IcNoB3OBaHne daHHoH fYHKUn NOMORAET pN CbEMe B peXIMe npOpHTa BIdepKkn, a TaKke dIra OrpAHueHnPa caccEHORo CBeta. Bo3MOxHOCTn HSS mOrTy 6bItb pa3bIMn, n 3aBNCrT o MOnEn foToaannapata -O3HaKOMbTeCb C daHHbIMn TexHNUeCKmN BO3MOxHOCTMn B pyKOBOdCTBe No EKcNpyataun BaWero foToaannapata.
BhumaHue:
1.Функци HSS noДржкBaetс, Ho He moKet 6bItb yctaHOBNeHa Ha CTydnHOM oCBtntene Indra500 TTL.
2. KaMepa, cHxpoHn3aTOp BCbIweK n pexim npiEHHKa Moryt
HMeTb 3aHuTeJIbHoe BInaHne Ha pexim HSS. ДяdoctnxKeHnA
JyUWeRo pe3yIbTaT a Peximme HSS peKoMeHdyetcnaCNoJIb3ObaHne
cHxpoHn3aTOpOB Ipon3BODCTBa Phottix. Пожал'ta, O3HaKoMbTeCb C
«TabIuceoi CoBMecTMMOCTN» HnXe, a TAnXe NopDpO6HOCTM MoXHo y3HaTb B
HnCTpyKuIrxI dЯ BaIe WBCbIwKи KaMepbl.
3.ФункцЯHSS He pa6oTaET B MyIbTu-CTpo6OckOnuueckOM m MaHyaIbHOM pexKIme.
4. Yactoe nCnoJb3ObaHne pexkma HSS npBBeT K yMeHbIeHIO cpoKa cnJkbblnMb BcNbIKN.
5. IpoTOKoJIb BCnbluKNI Nikon MOrTy ORpaHmUvBaTb MaKcMmaIbHyO CKOpocTb CnHXPOHn3a4nn Ha HeKoTOpBx KaMepax Nikon.
Ta6nua CoBmecmumocmu
Smode單/雙燈:2.6s/10.9s
輸入電源:
Phottix Indra 交流電源適配器: AC 220V/110V, 50HZ/60HZ