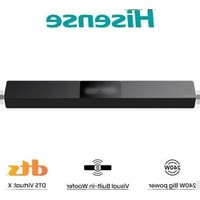
HS214 - Soundbar HISENSE - Free user manual and instructions
Find the device manual for free HS214 HISENSE in PDF.
| Product Type | 2.1 Soundbar with built-in subwoofer |
| Brand / Model | Hisense HS214 |
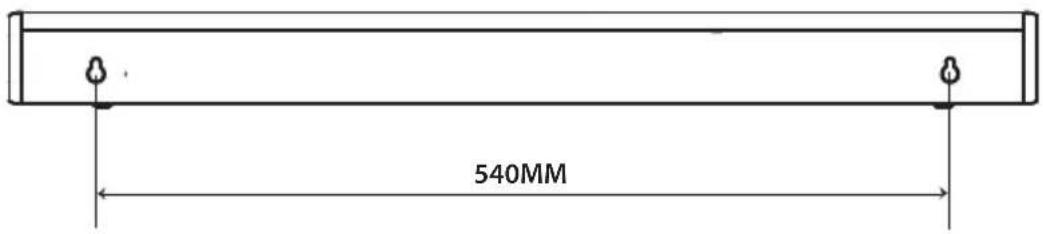
| Dimensions (W × D × H) | 650 × 95 × 61.5 mm (25.59 × 3.74 × 2.42 inches) |
| Net Weight | 2.17 kg (4.78 lbs) |
| Power Supply | 100-240 V AC, 50/60 Hz |
| Power Consumption | 20 W (standby: 0.45 W) |
| Total Output Power | 108 W (54 W + 27 W × 2) |
| Frequency Response | 40 Hz – 20 kHz |
| Impedance | 4 Ω + 8 Ω × 2 |
| Audio Inputs | HDMI ARC, Optical, Coaxial, AUX (RCA / 3.5 mm), USB |
| Bluetooth | Version 4.2, range 8 m, codecs SBC |
| USB Audio Formats | MP3, WAV, WMA, FLAC (FAT32, up to 64 GB) |
| Audio Technologies | Dolby Audio, surround effects, EQ modes (Movie, Music, News) |
| Practical Functions | Auto power on, auto standby (15 min), remote control included |
| Wall Mounting | Possible (fixings not included, integrated wall bracket) |
| Cleaning | Dry soft cloth, no chemical solvents |
| Operating Temperature | Temperate or tropical climate |
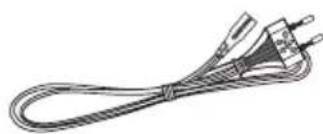
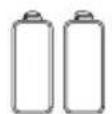
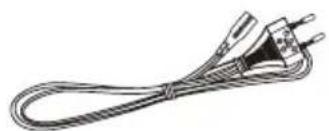
| Package Contents | Soundbar, remote control, AAA batteries (×2), EU power cord, user manual |
Frequently Asked Questions - HS214 HISENSE
User questions about HS214 HISENSE
0 question about this device. Answer the ones you know or ask your own.
Ask a new question about this device
Download the instructions for your Soundbar in PDF format for free! Find your manual HS214 - HISENSE and take your electronic device back in hand. On this page are published all the documents necessary for the use of your device. HS214 by HISENSE.
USER MANUAL HS214 HISENSE
2.1 Channel Sound Bar Home Theater System
Model: HS214


Dolby Audio
HDMI
HNS-DESIGNATION MULTINODAL INTERFACE

Bluetooth
USER MANUAL

Before using the sound bar, please read this manual thoroughly and retain it for future reference.
ENFR
DEIT
SP SL HR
NL
CZ SK
HUPT
SR MK
sq
Contents
Important Safety Instructions 3
Safety 3
EN
Warning. 4
Package Contents 5
Product Diagram 6
Main Unit 6
Remote Control 7
Instructions 7
Prepare the Remote Control 7
Replace the Remote Control Battery. 7
Precautions Concerning Batteries 7
Placement and Mounting. 8
Wall Mounting (if using option-B) 8
Connections 9
Connect to COAXIAL Socket 9
Connect to HDMI ARC Socket 9
Connect to AUX Socket 9
Connect to OPTICAL Socket 10
Connect Power 10
Basic Operation 10
Standby/On 10
Auto Wake 10
How to Enable Auto Wake 10
Automatic Power Off Function 10
Select Modes 10
Adjust the Volume 11
Select a Preset Sound Effect 11
OPTICAL / COAXIAL / HDMI ARC / AUX Operation 11
Bluetooth Operation 11
Pair Bluetooth-enabled Devices 11
Listen to Music from Bluetooth Device 12
USB Operation 12
Troubleshooting 13
Specifications 14
| CAUTION RISK OF ELECTRIC SHOCK DO NOT OPEN | |
| AVIS | |
| RISQUE DE CHOC ÉLECTRIQUE NE PAS PUVRIR |
The lightning flash with arrowhead symbol, within an equilateral triangle, is intended to alert the user to the presence of uninsulated "dangerous voltage" within the product's enclosure that may be of sufficient magnitude as to constitute a risk of electric shock to persons.
The exclamation point within an equilateral triangle is intended to alert the user to the presence of important operating and maintenance (servicing) instructions in the literature accompanying the appliance.
Safety
1 Read these instructions - All the safety and operating instructions should be read before this product is operated.
2 Keep these instructions - The safety and operating instructions should be retained for future reference.
3 Heed all warnings - All warnings on the appliance and in the operating instructions should be adhered to.
4 Follo w all instructions - All operating and usage instructions should be followed.
5 Do not use this apparatus near water - The appliance should not be used near water or moisture - for example, in a wet basement or near a swimming pool and the like.
6 Clean only with a dry cloth.
7 Do not block any ventilation openings. Install in accordance with the manufacturer's instructions.
8 Do not install near any heat sources such as radiators, heaters, stoves, or other apparatus (including amplifiers) that produce heat.
9 Do not defeat the safety purpose of the polarized or grounding plug. A polarized plug has two blades with one wider than the other. A grounding plug has two blades and a
third grounding prong. The wide blade or the third prong is provided for your safety. If the provided plug does not fit into your outlet, consult an electrician for replacement of the obsolete outlet.
10 Protect the power cord from being walked on or pinched particularly at plugs, convenience receptacles, and the point where they exit from the apparatus.
11 Only use attachments/accessories specified by the manufacturer.
12 Use only with the cart, stand, tripod, bracket or table specified by the manufacturer, or sold with the apparatus. When a cart or rack is used, use caution when moving the cart/ apparatus combination to avoid injury from tip-over.
13 Unplug the apparatus during lightning storms or when unused for long periods of time.
14 Refer all servicing to qualified personnel. Servicing is required when the apparatus has been damaged in any way, such as power supply cord or plug is damaged, liquid has been spilled or objects have fallen into the apparatus, the unit has been exposed to rain or moisture, does not operate normally, or has been dropped.
15 This equipment is a Class II or double insulated electrical appliance. It has been designed in such a way that it does not require a safety connection to electrical earth.
16 The apparatus shall not be exposed to dripping or splashing. No objects filled with liquids, such as vases, shall be placed on the apparatus.
17 Minimum distance around the apparatus for sufficient ventilation is 5cm
18 The ventilation should not be impeded by covering the ventilation openings with items, such as newspapers, table-cloths, curtains, etc.
19 No naked flame sources, such as lighted candles, should be placed on the apparatus.
20 Batteries should be recycled or disposed of as per state and local guidelines.
21 The use of apparatus in moderate or tropical climates.
Caution:
- Use of controls or adjustments or performance of procedures other than those described herein, may result in hazardous radiation exposure or other unsafe operation.
To reduce the risk of fire or electric shock, do not expose this apparatus to rain or moisture. The apparatus must not be exposed to dripping or splashing and objects filled with liquids, such as vases, must not be placed on apparatus.
The mains plug/appliance coupler is used as the disconnect device, the disconnect device must remain readily operable.
Danger of explosion if battery is incorrectly replaced. Replace only with the same or equivalent type.
Warning
The battery (batteries or battery pack) shall not be exposed to excessive heat such as sunshine, fire or the like.
- Before operating this system, check the voltage of this system to see if it is identical to the voltage of your local power supply.
- Do not place this unit close to strong magnetic fields.
- Do not place this unit on the amplifier or receiver.
- Do not place this unit close to damp areas as the moisture will affect the life of the laser head.
If any solid object or liquid falls into the system, unplug the system and have it checked by qualified personnel before operating it any further.
- Do not attempt to clean the unit with chemical solvents as this may damage the finish. Use a clean, dry or slightly damp cloth.
- When removing the power plug from the wall outlet, always pull directly on the plug, never yank on the cord.
Changes or modifications to this unit not expressly approved by the party responsible for compliance will void the user's authority to operate the equipment.
- The rating label is pasted on the bottom or back of the equipment.
Dolby Audio
Manufactured under license from Dolby Laboratories. Dolby, Dolby Audio, and the double-D symbol are trademarks of Dolby Laboratories.
Bluetooth
The Bluetooth word mark and logos are registered trademarks owned by Bluetooth SIG., Inc.
WARNING
DO NOT INGEST BATTERY, CHEMICAL BURN HAZARD
If you think batteries might have been swallowed or placed inside any part of the body, seek immediate medical attention. Keep new and used batteries away from children. If the battery compartment does not close securely, stop using the product and keep it away from children. The remote control supplied with this product contains a coin/button cell battery. If the coin/button cell battery is swallowed, it can cause severe internal burns in just 2 hours and lead to death.
WARNING: This product contains chemicals known to the State of California to cause cancer and birth defects or other reproductive harm. For more information: www.watts.com/prop65
Correct Disposal of this product. This marking indicates that this product should not be disposed with other household wastes throughout the EU.
To prevent possible harm to the environment or human health from uncontrolled waste disposal, recycle it responsibly to promote the sustainable reuse of material resources. To return your used device, please use the return and collection systems or contact the retailer where the product was purchased. They can take this product for environmental safe recycling.
Europe-European Union Notice
Radio products with the CE alert marking comply with the RED Directive (2014/53/EU) issued by the Commission of the European Community.
Frequency range: 2402-2480MHz
Versions of software or firmware affecting compliance with essential requirements:
HW: HS214-01-A0F
Maximum RF output power of the product: +9dBm
Accessories/components marketed together:
Remote control
Hereby, Hisense International Co., Ltd declares that the 2.1 channel sound bar with built in subwoofer is in compliance with Directive 2014/53/EU.

HOMI HIGH-DEFINITION MULTIMEDIA INTERFACE
HDMI is a trademark or registered trademark of HDMI Licensing, LLC in the United States and/or other countries.
Package Contents
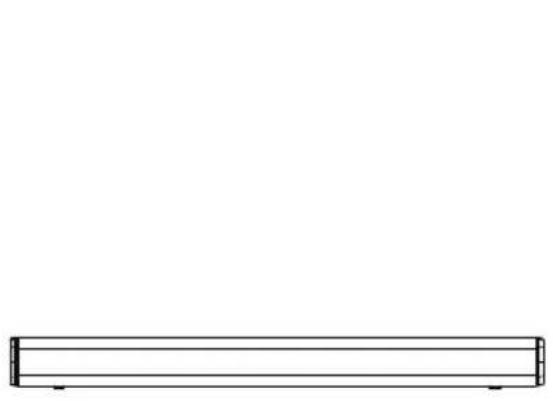
Main Unit Remote Control
R03(Size AAA)Battery x2

HDMI Cable

Wall Mounting Kit
AC Power Cord
User Manual/Quick Start Guide
- Design and specifications are subject to change without notice.
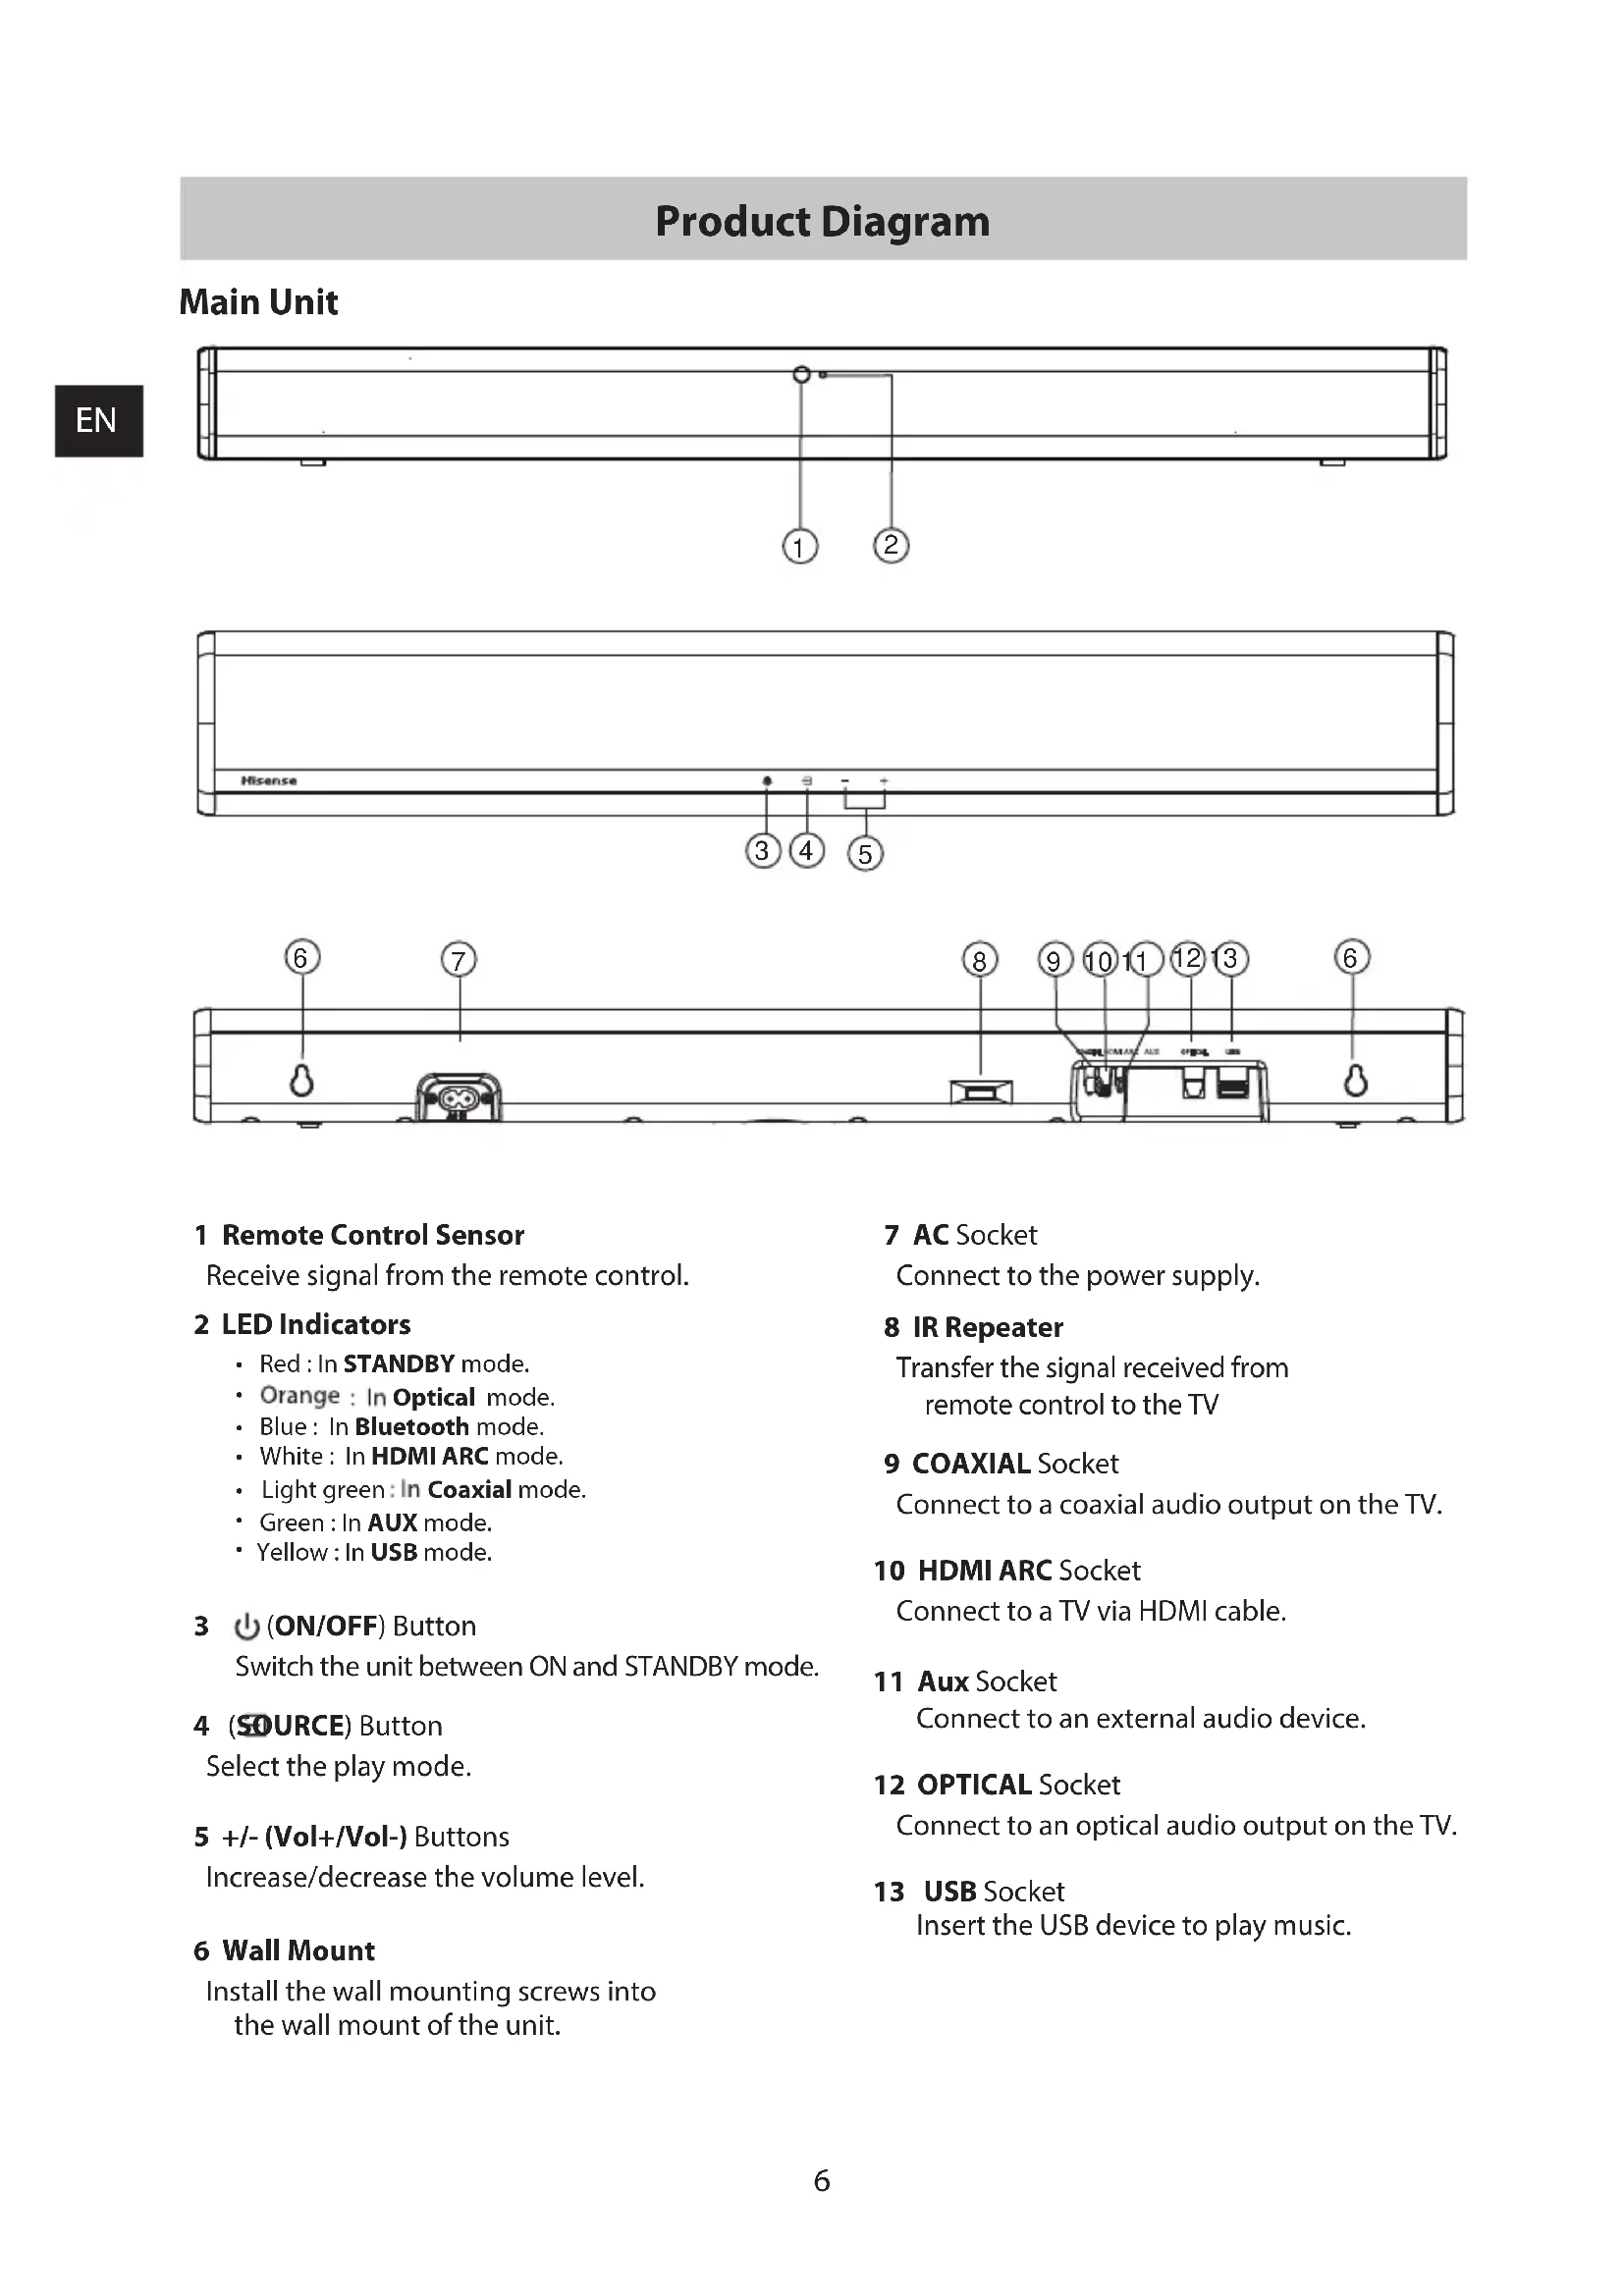
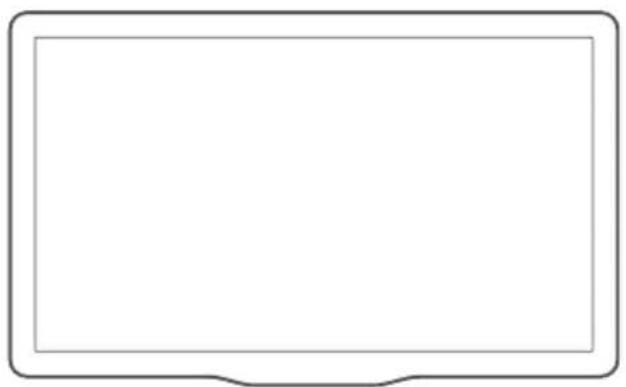
Product Diagram
Main Unit


1 Remote Control Sensor
Receive signal from the remote control.
2 LED Indicators
Red:In STANDBY mode.
- Orange: In Optical mode.
- Blue: In Bluetooth mode.
- White: In HDMI ARC mode.
Light green: In Coaxial mode.
- Green: In AUX mode.
- Yellow: In USB mode.
3 (ON/OFF) Button
Switch the unit between ON and STANDBY mode.
4 (SOURCE) Button
Select the play mode.
5 +/- (Vol+/Vol-) Buttons
Increase/decrease the volume level.
6 Wall Mount
Install the wall mounting screws into the wall mount of the unit.
7 AC Socket
Connect to the power supply.
8 IR Repeater
Transfer the signal received from remote control to the TV
9 COAXIAL Socket
Connect to a coaxial audio output on the TV.
10 HDMI ARC Socket
Connect to a TV via HDMI cable.
11 Aux Socket
Connect to an external audio device.
12 OPTICAL Socket
Connect to an optical audio output on the TV.
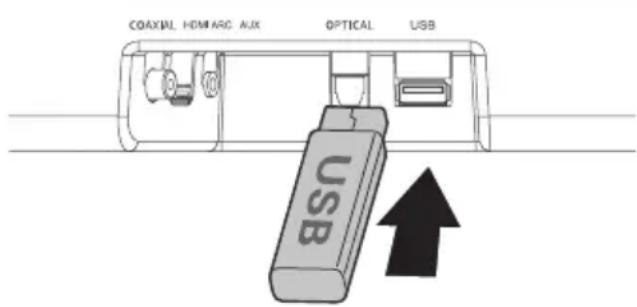
13 USB Socket
Insert the USB device to play music.
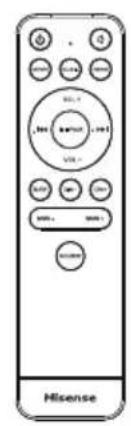
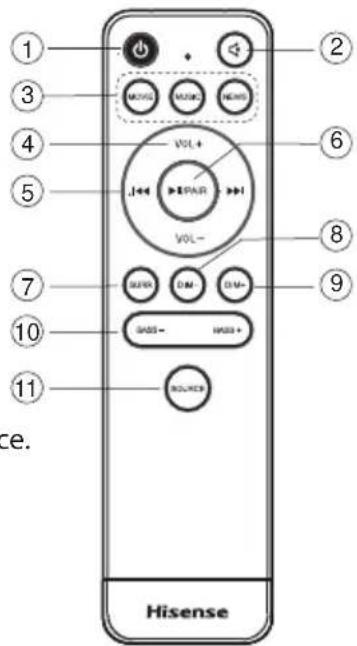
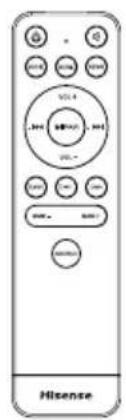
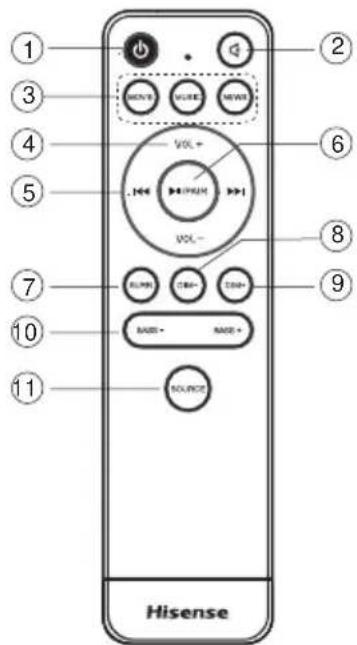
Remote Control
1 (ON/OFF) Switch the unit between ON and STANDBY mode.
2 (MUTE) Mute or resume volume.
3 EQ buttons Select MOVIE/MUSIC/NEWS sound effect.
4 VOL+/VOL- Increase/decrease the volume level.
In Bluetooth/USB mode:
Skip to previous/next track.
6 II/PAIR Play/pause/resume playback in Bluetooth/ USB mode. Press and hold to activate the pairing function in Bluetooth mode or disconnect the existing paired Bluetooth device.
7 SURR Adjust the surround ON/OFF.
8 DIM - Decrease the display brightness.
9 DIM + Increase the display brightness.
10 BASS+,BASS- Increase/decrease the bass level.
11 SOURCE Select the play mode.
Instructions
Prepare the Remote Control
The Remote Control allows the unit to be operated from a distance.
- Even if the Remote Control is operated within the effective range 26.2 feet (8m) inch, remote control operations may be disrupted if there are any obstacles between the unit and the remote control.
If the Remote Control is operated near other products that generate infrared rays, or if other remote control devices using infrared rays are used near the unit, it may operate incorrectly. Conversely, the other products may operate incorrectly.
First-time Use:
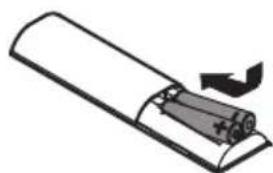
Put the 2 × AAA batteries (included) into the remote control before use.
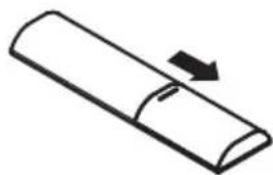
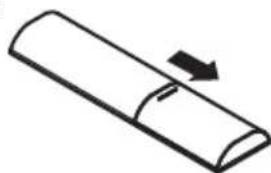
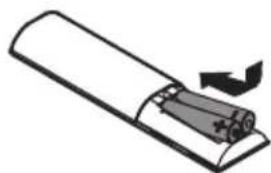
Replace the Remote Control Battery
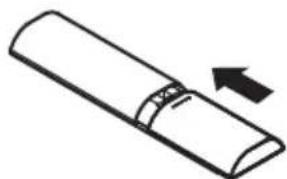
- Push the tab on the side of the battery tray towards the tray and then pull the battery tray out of the remote control.
- Remove the old batteries. Place 2 × new AAA batteries into the battery tray with the correct polarity (+/-) as indicated.
- Slide the battery tray back into the slot in the remote control.
Precautions Concerning Batteries
- When the remote control is not to be used for a long time (more than a month), remove the batteries from the remote control to prevent it from leaking.
- If the batteries leak, wipe away the leakage inside the battery compartment and replace the batteries with new ones.
- Do not use any batteries other than those specified.
- Do not heat or disassemble batteries.
- Keep away from heat or moisture.
- Do not carry or store batteries with other metallic objects. Doing so could cause batteries to short circuit, leak or explode.
- Never recharge a battery unless it is confirmed to be a rechargeable type.
①
②
③
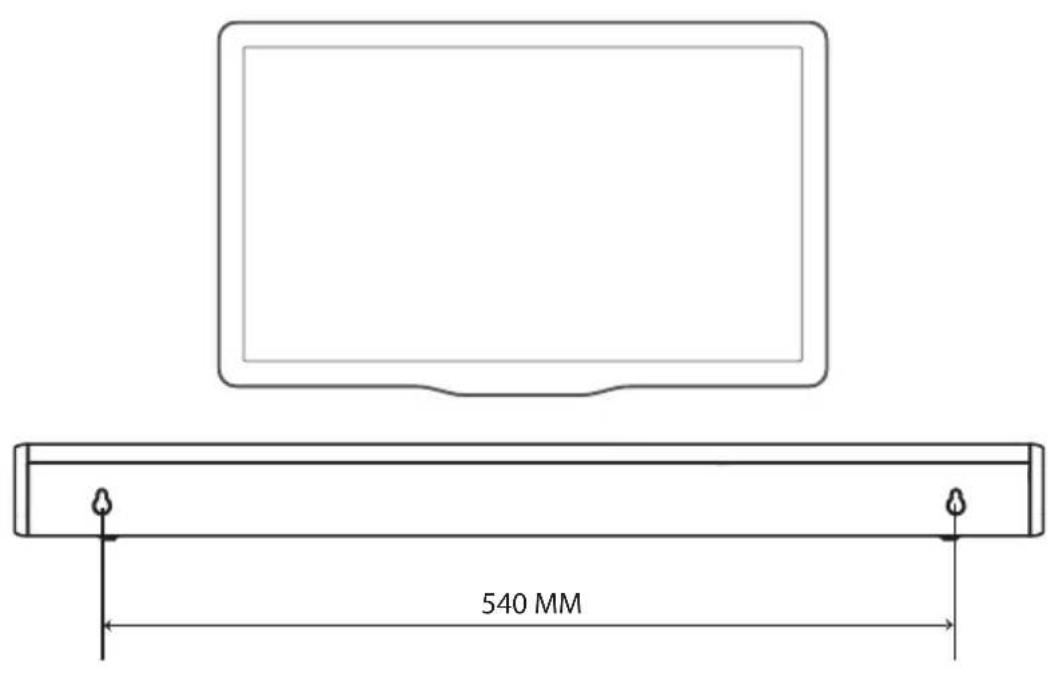
Placement and Mounting
Placement
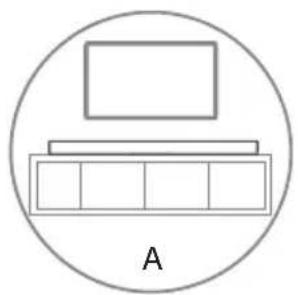
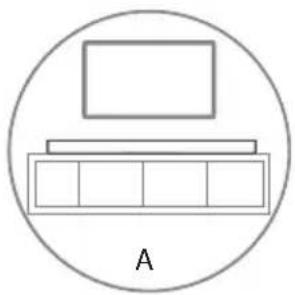
A If your TV is placed on a table, you can place the unit on the table directly in front of the TV stand, centered with the TV screen.
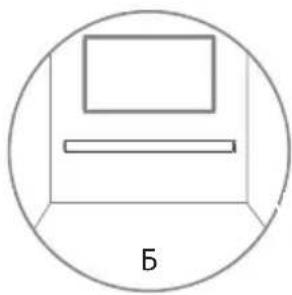
B If your TV is attached to a wall, you can mount the unit on the wall directly below the TV screen.
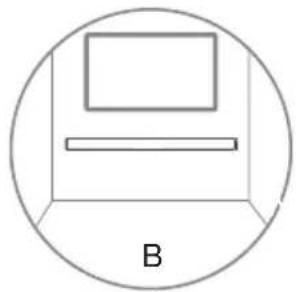
Wall Mounting (if using option-B)
Note:
- Installation must be carried out by qualified personnel only. Incorrect assembly may result in severe personal injury and property damage (if you intend to install this product yourself, you must check for installations such as electrical wiring and plumbing that may be buried inside the wall). It is the installer's responsibility to verify that the wall will safely support the total load of the unit and wall brackets.
- Additional tools (not included) are required for the installation.
- Do not overtighten screws.
- Keep this instruction manual for future reference.
Use an electronic stud finder to check the wall type before drilling and mounting.
Connections
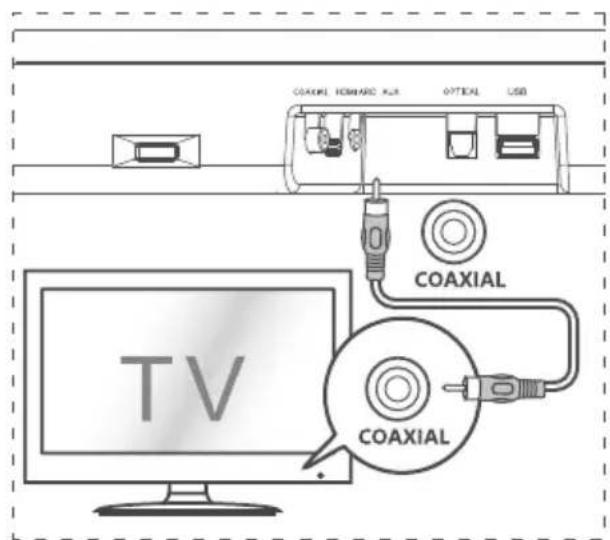
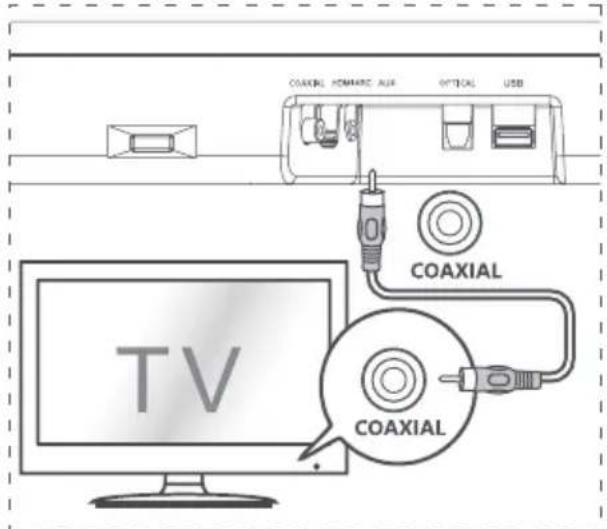
Connect to COAXIAL Socket
- You can use a COAXIAL cable (not included) to connect the TV's COAXIAL OUT socket and the COAXIAL socket on the unit.
Tip:
- While in OPTICAL, HDMI ARC or COAXIAL mode, if there's no sound output from the unit, you may need to activate PCM signal output on your source device (eg. TV, DVD or Blu-ray player).
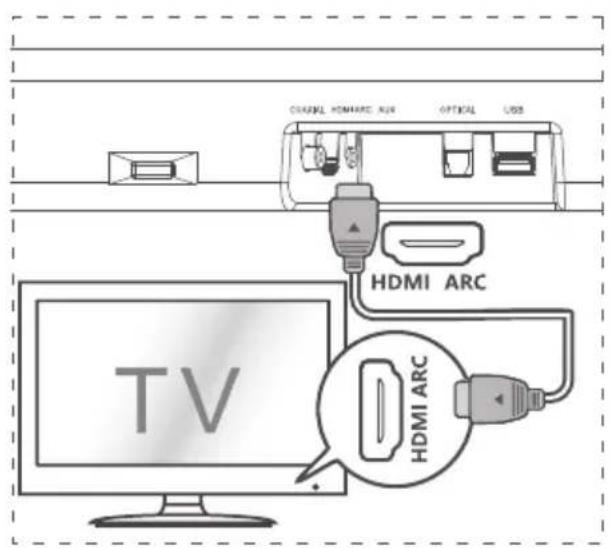
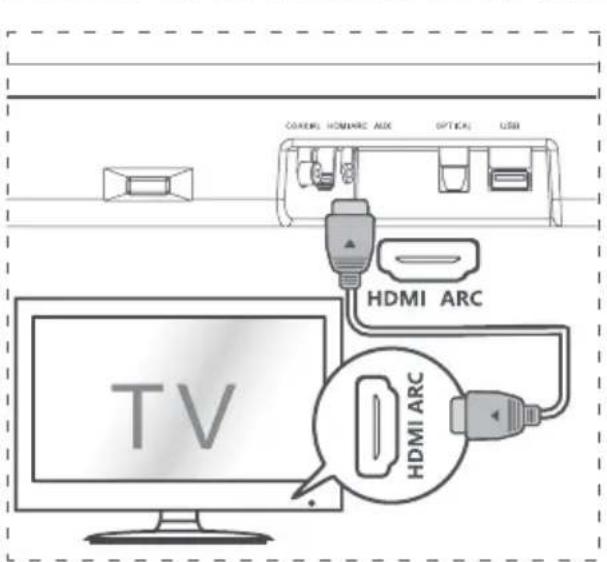
Connect to HDMI ARC Socket
Your Soundbar supports HDMI with Audio Return Channel (ARC). If your TV is HDMI ARC compliant, you can hear the TV audio through your Soundbar by using a single HDMI cable.
1 Use a High Speed HDMI cable to connect the HDMI ARC connector on your Soundbar and the HDMI ARC connector on the TV.
- The HDMI ARC connector on the TV might be labelled differently. For details, see the TV user manual.
2 On your TV, turn on HDMI-CEC operations. For details, see the TV user manual.
Tips:
- Your TV must support the HDMI-CEC and ARC function. HDMI-CEC and ARC must be set to On.
The setting method of HDMI-CEC and ARC may differ depending on the TV. For details about ARC function, please refer to your TV user manual.
Only HDMI 1.4 compatible cables can support the ARC function.
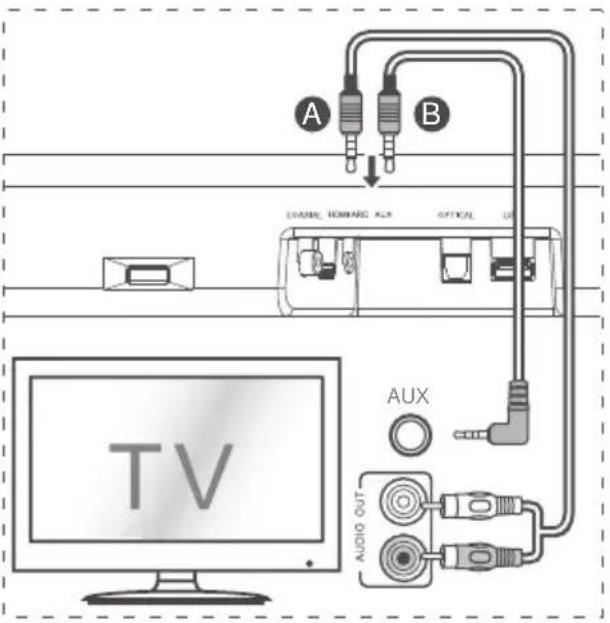
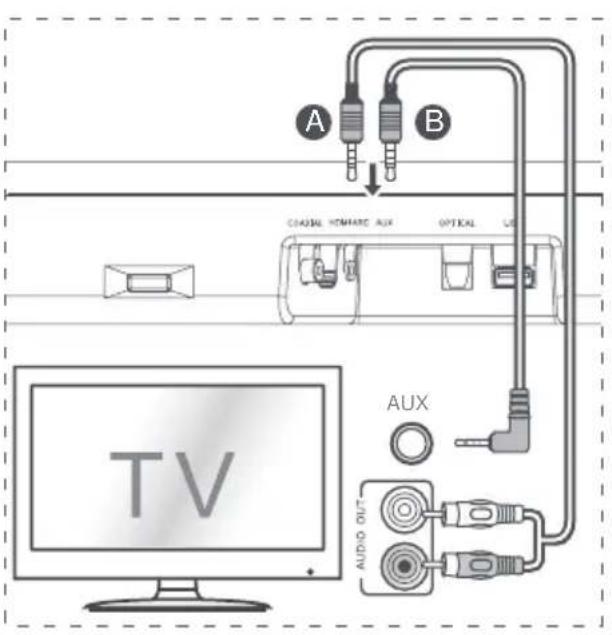
Connect to AUX Socket
A Use a RCA to 3.5mm audio cable (not included) to connect the TV's audio output socket and the AUX socket on the unit.
B Use a 3.5mm to 3.5mm audio cable (not included) to connect the TV's or external audio device Aux socket to the Aux socket on the unit.
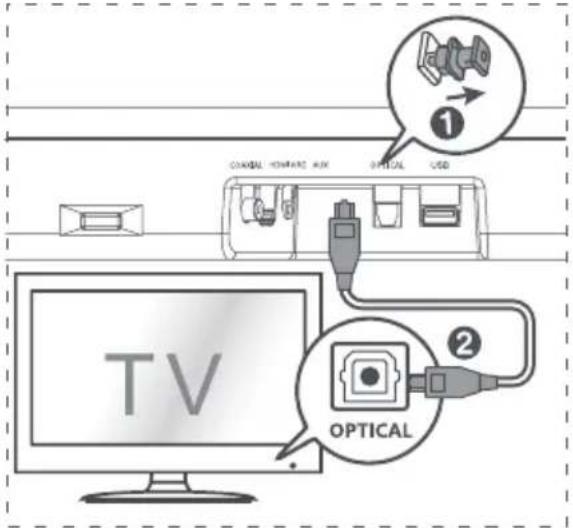
Connect to OPTICAL Socket
- Remove the protective cap of the OPTICAL socket, then connect an OPTICAL cable to the TV's OPTICAL OUT socket and the OPTICAL socket on the unit.

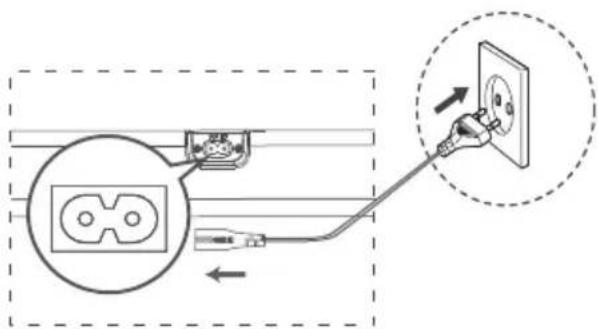
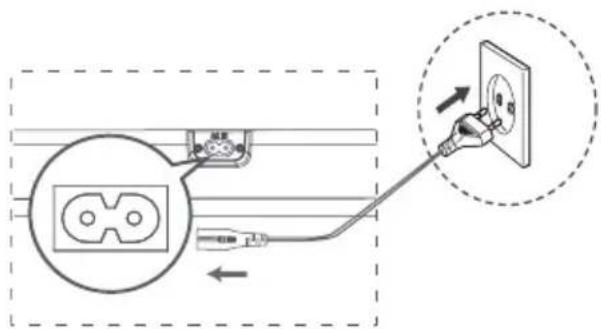
Connect Power
Risk of product damage!
- Ensure that the power supply voltage corresponds to the voltage printed on the back or the underside of the unit.
Before connecting the AC power cord, ensure you have completed all other connections. - Connect the mains cable to the AC Socket of main unit and then into a mains socket.
Basic Operation
Standby/On
When you first connect the main unit to the mains socket, the main unit will be in STANDBY mode.
- Press the button on the unit or on the remote control to switch the unit ON.
- Press the button again to switch the unit back to STANDBY mode.
- Disconnect the mains plug from the mains socket if you want to switch the unit OFF completely.
Auto Wake
If a TV or an external device is connected (AUX / OPTICAL / COAXIAL / HDMI ARC), the unit will switch on automatically when the TV or the external device is switched on.
How to Enable Auto Wake
- Short press the (SOURCE) button and + (VOL +) button on the unit to enable or disable Auto Wake function.
- Auto Wake On: white and green LED blink twice
sequentially. While in STANDBY mode, the RED LED is breathing.
- Auto Wake Off: white and red LED blink twice sequentially. While in STANDBY mode, the LED is in solid red.
Automatic Power Off Function
The unit automatically turns to STANDBY mode after about 15 minutes if the TV or the external unit is disconnected or switched off.
- To switch the unit off completely, disconnect the mains plug from the mains socket.
- Please turn the unit off completely to save energy when not in use.
Select Modes
Press the (SOURCE) button repeatedly on the unit or the SOURCE button on the remote control to select the desired mode. The LED indicator on the front of the main unit will show which mode is currently in use.
Adjust the Volume
Press the + / - buttons on the unit or VOL+/VOLon the remote control to adjust the volume.
If you wish to turn the sound off, press the × button on the remote control. Press the × button again or press the + / - buttons on the unit or VOL+ / VOL- on the remote control to unmute.
Note: While adjusting the volume, the status LED indicator will flash once. When the volume has hit maximum/minimum value level, the status LED indicator will flash quickly.
Select a Preset Sound Effect
While playing, press the NEWS/MOVIE/MUSIC buttons on the remote control to select the preset equalizers:
MOVIE (recommended for watching movie)
MUSIC (recommended for listening to music)
NEWS (recommended for listening to news)
OPTICAL/ COAXIAL/HDMI ARC /AUX Operation
1 Ensure that the unit is connected to the TV or audio device.
2 Press the button repeatedly on the unit or the SOURCE button on the remote control to select the OPTICAL, COAXIAL, HDMI ARC, AUX mode.
3 Operate your audio device directly for playback features.
4 Press the + / - button on the unit or VOL + /VOL- on the remote control to adjust the volume to your desired level.
Tip:
While in OPTICAL, HDMI ARC or COAXIAL mode, if there's no sound output from the unit, you may need to activate PCM signal output on your source device (eg. TV, DVD or Blu-ray player).
For the digital audio out that the unit do not support, the LED light would be purple and blink three times.
Bluetooth Operation
Pair Bluetooth-enabled Devices
The first time you connect your bluetooth device to this unit, you need to pair your device to this unit.
Note:
The operational range between this unit and a Bluetooth device is approximately 26 feet (8m) (without any object between the Bluetooth device and the unit).
Before you connect a Bluetooth device to this unit, ensure you know the device's capabilities.
- Compatibility with all Bluetooth devices is not guaranteed.
Any obstacle between this unit and a Bluetooth device can reduce the operational range.
If the signal strength is weak, your Bluetooth receiver may disconnect, but it will re-enter pairing mode automatically.
1 During ON mode, press the button repeatedly on the unit or the SOURCE button on the remote control to select Bluetooth mode. The Blue indicator light will flash.
2 Activate your Bluetooth device and select the search mode. "Hisense HS214" will appear on your Bluetooth device list.
If you cannot find the unit, press and hold the II/PAIR button on the remote control to enter into pairing mode again.
You will hear audio prompt from the unit and the Bluetooth indicator will flash quickly.
3 Select "Hisense HS214" in the pairing list. After audio prompt, the system is successfully connected and the Bluetooth indicator will light up solidly.
4 Play music from the connected Bluetooth device.
To disconnect the Bluetooth function, you can :
- Switch to another source on the unit.
- Disable the function from your Bluetooth device. The Bluetooth device will be disconnected from the unit after audio prompt.
- Press and hold the /PAIR button on the remote control.
Tips:
- Enter "0000" for the password if necessary.
- If no other Bluetooth device pairs with this unit within two minutes, the unit will recover its previous connection.
- The unit will also be disconnected when your device is moved beyond the operational range.
If you want to reconnect your device to this unit, place it within the operational range. -
If the device is moved beyond the operational range, when it is brought back, please check if the device is still connected to the unit.
-
If the connection is lost, follow the instructions above to pair your device to the unit again.
Listen to Music from Bluetooth Device
- If the connected Bluetooth device supports Advanced Audio Distribution Profile (A2DP), you can listen to the music stored on the device through the unit.
- If the device also supports Audio Video Remote Control Profile (AVRCP), you can use the unit's remote control to play music stored on the device.
1 Pair your device with the unit.
2 Play music via your device (if it supports A2DP).
3 Use supplied remote control to control play (if it supports AVRCP).
- To play/pause, press the button on the remote control.
- To skip a track, press the 140 100 100 100 100 100 100 100 100 100 100 100 100 100 100 100 100 100 100 100 100 100 100 100 100 100 1
USB Operation
1 Insert an USB device.
2 Press the button repeatedly on the unit or press the SOURCE button on the remote control to select USB mode.
3 During playback:
- To play/pause, press the PAIR button on the remote control.
- To skip to the previous/next track, press the 144 , >> buttons on the remote control.
Tip:
The unit can support USB devices with up to 64 GB memory.

This unit can play MP3.
This unit can support WAV/WMA/FLAC.
The unit support FAT32.
- Embedded USB full speed host for USB applications should not exceed 6.5Mbps.
For the file in FLAC format, the max block size 8107/8109 can support 4608 as the maximum.
Troubleshooting
To keep the warranty valid, never try to repair the unit yourself. If you encounter problems when using this unit, check the following points before requesting service.
No power
- Ensure that the AC power cord of the unit is properly connected.
- Ensure that there is power at the AC outlet.
- Press standby button to turn the unit on.
Remote control does not work
Before you press any playback control button, first select the correct source.
- Reduce the distance between the remote control and the unit.
- Insert the batteries with its polarities (+/-) aligned as indicated.
- Replace the batteries.
- Aim the remote control directly to the sensor in the front of the unit and there is no obstacle between the remote control and the unit.
No sound
- Increase the volume. Press VOL+ on the remote control or + on the unit.
- Press on the remote control to ensure the soundbar is not muted.
- Press SOURCE button to select a different input source.
- When using either of the Digital inputs, if there is no audio:
Try setting the TV output to PCM or Connect directly to your Blu-ray/other source, some TVs do not pass through digital audio.
- Your TV may be set to variable audio output. Ensure that the audio output setting is set to FIXED or STANDARD, not VARIABLE. Refer to your TV's user manual for more detailed information.
- If using Bluetooth, ensure that the volume on your source device is turned up and the device is not muted.
I can't find the Bluetooth name of this unit on my Bluetooth device for Bluetooth pairing
- Ensure the Bluetooth function is activated on your Bluetooth device.
- Ensure you have paired the unit with your Bluetooth device.
This is a 15 mins power off function, one of the ERPII standard requirement for saving power
- When the unit's external input signal level is too low, the unit will be turned off automatically in 15 minutes. Please increase the volume level of your external device.
Specifications
Model Name HS214
EN
Soundbar
| Power Supply 100-240V~ 50/60Hz | |
| Power Consumption 20W | |
| Standby Power 0.45W | |
| USB Port for Playback USB Compatibility USBPlayback Support/File Formats | 5V Hi-Speed USB (2.0) / FAT32 WAV、MP3、WMA、FLAC |
| Dimension (WxDxH) 25.59 x 3.74 x 2.42 inches / (650 x 95 x 61.5 mm) | |
| Net Weight 4.78 lbs (2.17kg) | |
| Impedance 4Ω+8Ω x 2 | |
| Frequency Response 40Hz-20KHz | |
Wireless Specification
Remote Control
| Bluetooth Version V4.2 | |
| Bluetooth Maximum Power Transmitted (EU) | 9dBm |
| Frequency Bands 2402 ~ 2480 MHz |
Amplifier(Output power)
Total 108W
54W + 27W× 2
Distance/Angle 8m / ± 30^;90^
Battery Type AAA Zn-Mn battery

Kit du support mural
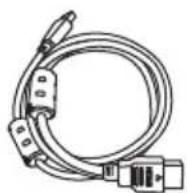
Cable HDMI
2.1 Sistem Channel Sound Bar Home Theater Model: HS214

Dolby Audio
HOMI HIG-HDEFINITION MULTIMEDIA INTERFACE
Bluetooth
UPORABNIŠKI PRIROČNIK

Pred uporabo zvočnika sound bar pazljivo preberite ta priročnik in ga shranite za bodočo uporabo.
Vsebina
MaKcImaHa RF n3Ie3Ha MOkHOCT Ha npOn3BOdoT: +9 dBm
IOnaToUcN/KOMNoHEHTN KOI CE npOJaBAaT 3aeHNO: IaJeuHcKn ynpaByBaay
Co oba, Hisense International Co., Ltd n3jabyba deka 2.1 kaHaHnnot cayndap co Bpraden cy6Byepe ycoIaCeH co DInpeKtNbata 2014/53/EU.

HOMI
HDMI e 3awtnten 3nak nIn npertpnpaH 3awntte Hnak Ha HDMI Licensing, LLC Bo CoedinHeTne Dpxkabn n/nn npyrgn 3emjn.
CopxHa Ha nakeToT
MK

IaJIeunHcN ynpabByBaYrIaHaepJrR03 (roJeMnHa AAA) × 2
KomnIeT 3a MOHTnpaHe Ha snI

HDMI ka6eJ
Ka6eI 3a Han3MeHnUHa cTpya co EU cTaHdapd
Kopinchu Ko yNaTCTBO / KpaTKo yNaTCTBO
-Ди3ajHot n CneuФнkaunTe ce npedMeT Ha npomeHa 6e3 npetXoHn 13BecTyBaHbE.
Дијагам на позьогот
Tnabha eHnHa

MK


1 Cen30p Ha daJIeHHcN ynpaByBa
Pnma cunhaN Od daJeuHcKnOT ynpaByBa.
2 JELIHNKAtOpN
LpBeH:BopeXnMHaNOIROTBEHOCT.
-Порtokалов:BoOnTuKpexm.
CIN:BopeKIMHaBluetooth.
- Ben: Bo HDMI ARC pexum.
CBeTIO 3eneHO:Bo KoakcnjaneH pexm.
3eH:BoAUXpexum.
KoT:BoYcBpeXm.
3 Konue (BKJYUHEHO/MCKJYUHEO)
Ja npeopna eHnHuaTa nomety peKmnte BKNUyeHO u NOIΓOTBEHOCT.
4 Konque (SOURCE)
I36npa I3BOpn Ha BHeCyBaHBe.
5 Konue + / - (Vol+/Vol-)
Ja 3rOlenMyBa/HaMaIyBa jaUHaTa Ha 3ByK.
6 MoHTnpaBe Ha sND
HCTanipajTe rI wpafoBnte 3a MOHTnpaHe Ha SNI BO DpKaOTo3a SNI Ha eINHnCaTa.
7 PnKnyok 3a Han3MeHnHa cTpyja
Iobp3yBa Ha eNeKtpnHo HanojyBaHe.
8 MIO nobTopyBa
To npehecyBa cnHaIOT npimEn od daJeHHcknOT ynpabByBaH Ha TeJebN3OpOT Ha TeJebN3OpOT.
9 KOACKNJAJIEH npKnyok
Iobp3yBa co KoakcnjaneH aydno n3ne3 Ha TeJeBn3OpOT.
10HDMIARCnpuknyok
To nobp3yBa TeIeBn3OpoT npeky HDMI ka6en.
11 AUX npnKJyQoK
Nobp3yBaHBe HaHaBOpeseH ayDnO ypeI.
12 ONTNUKN npnKnyOc
Iobp3yBa co ONTuKn ayDNo n3ne3 Ha TeNeBn3OpoT.
13 YCb npknlyoc
CTabete YCb-ypeen da penpOdyu npa My3nka.
MK
ДалачнскуnpаByBaY
1 (BKJUYEHO/NCKJUYEHO)Ja npeΦpna eHnHuaTa nomery peXmUTe BKJUYEHO IIOIΓOTBEHOCT.
2 (NCKJYyBAHbE 3BYK) To ncknyBa nn NOBtOHO BknyBa 3ByKOT.
3 EQ konuHa 36npa 3ByHn eekTu 3a FIM/MY3NKA/ BECTU.
4 VOL+/VOL- Ja 3rolemyBa/HamanyBa jaunHaTa Ha 3ByK.
5 Bo Bluetooth/USB pexm: PpeckokHyBa Ha npetXoHa/CneHa Hymepa.
6 PAPnpoykuja/nay3a/npoJpnpe npoykuja BO Bluetooth/USB pexm. PnTnche Te 3aipxeTe da ja akTbnpaTe fynKcuJaTa Ha cnapyBaHe BO pexm Ha Bluetooth nnn Ncknyte rnoctoeuknte cnapen ypein co Bluetooth.
7 SURr TnpnilarOyBa onKpyXyBauchKnOT 3Byk BKJLYEHO/INCKJIYUHEHO.
8 DIM- Ja HamaNyBa OCBetneHOCTa Ha ekpaHOT.
9 DIM+Ja 3rOlenMyBa OCBETJeHOCTa Ha ekpaHOT.
10 BASS+,BASS- To 3rOJIeMyBa/HaMaIyBa HbBOTo Ha 6ac.
11 SOURCE Ito n3bnpa n3BopoT Ha BheCyBaHbe.
yntctba
IodrotByBaHbe Ha daJeHHcknOT ynpaByBa
IaeneHHcknoT ynpabyBa OBO3MOxByBa co eHNHuaTa da ce ynpabyBa oI daJeHHa.
-Дури и akо сдалачнcknot упарыва чупарыва bo pamкnte Ha eфektubeh oncer od 26,2 CTAPK (8 M), onepaunite co daneluHcknot ynpabvbaMоже дс capyseHn ako nma npeykn nomeу edHHuata N daileuHcknot uypabvba.
Ako co daeneHHcknoynpaBvBaCe ynpaBvBa BO 6n3Ha Ha npyrn npoN3BOOn KO nreHepnpaat HpapBeH 3paun,nn dpyn ypeu Co daeneHHckn npaBvBaKoN Kopctat HHpauPbeH 3paun Ce KOpNCtAT BO 6n3Ha Ha eDInHuaTa, nCTNO T MoKe Da He pa60Tu npabUlnHO. CnpotNBHO, n Dpyrnt PpOIN3BOOn MoKe Da He pa60Tu npabUlnHO.
KopncTeHe 3a npB naT:
CTaBeTe 2 x AAA 6aTePnN (BKnIyueHn) Bo daJeuHcKnOT ynpaByBaY nped da ro KOpuctnte.
①
②
3aMeHa Ha 6aTepuJa Ha daJeHHcknOT ynpaByBaU
- Tpyhete ro ja3nueTo Ha cTpaHata Ha OTBOPOT 3a 6atepna KOH OTBOPOT n noToa n3BneyeTe ja nOKATA 3a 6atepnn HnBOp OD daJeHHCKNOT ynpaByBaq.
2.ИЗbaДeTe Г STapnte 6aTePnN.CTabeTe 2×HOBN AAA 6aTePnN BO ΦиOKaTа 3a 6aTePnN co ToUHNot nOJaPntET (+/-) kaKo wTo e HabeDeHo.
3.ЛизHeTe ja ФиOKaTа 3a 6aTePnHa3aД BO OTbOpOT Ha daJIeUnHCKNOT ynpaByBaY.
MepknHa npetna3nVBOCT 3a6aTepnnte
③
Kora daneeHHcknOT ynpaByBaH Hema da ce KOpNCTn DOJRO BpeMe (noBeKe od Meceu), n3BaTe Te r6bATEPnnte OD daneeHHcknOT ynpaByBaH da cnpeHTe da nCTeuaT.
Ako 6aTepuNTe nCTeuyat, n36pniuTe ro nCTeueHOTo BO denot 3a 6aTePNn 3ameHeTe r6aTePUNTE CO HOBn.
- He yonptpe6ybajte 6aTePNN nonHaKBN oD OHne wTO ce HabeDeHn.
He 3arpeBaJJTe rH n He OUsTeYbajTe rH 6aTepuNTe.
- UyBaJTe rno nOdaNeky oD TOnnHa nnBnra.
He hocete n Hn He cknaipajte ng 6atepuinte co dpyr MeTaJIHn IpedmTe.
Toa moKe da npedn3Bnka kpaTOK cnoj kaj 6aTepuNTe, nCTeKyBaHbe nnEKCnNo3nJa.
Hnkoraawhe nonheja 6aTepujata oceh ako He e nOTBpeHO deKa e od TIN TO NOBTOPOCe noHN.
NocTaByBaHbe MOnHTnpaHbe
NocTaByBaHbe
A Ako Baunot TeneBn3Op e noctabeh Ha nojIora, MoKe Da ja cTabnte eDHHucaTa Ha noJloraTa INpeKTHO nped dpxaOT 3a TeneBn3Op, cHTpnpaHo CO ekpaHOT Ha TeneBn3OpOT.
B Ako TeIeBn3OpOT e 3aKaueH ha sUd, MoXe da ja maMOHTnPaTe eINHncaTa Ha SNDOT DnpeKTHO NOEkpahOT Ha TeIeBn3OpOT.
MK
MOnTnpaBe Ha sUd (ako ja KopncTe onuja-5)
3a6eneuka:
- INHCTaIpaHbETo Mopa Da Ce I3BpUc Camo OJ KBaIIuNkUyBaH NepcoHaJI. HnPaBUNHO To MOHTnpaBe MoXe Da IpeDIN3BnKa CepNo3Ha IInuHa NOBpeJa N OwTeTyBaHbe Ha NMOTo (aKO CaKaTe Da rO INHCTaIpaTe Ipon3BOoT Camte, Mopa Da IPOBepuTE 3a INHCTaIauCNIte KaKo UTo e EneKTPuHa INHCTaIauJa N BODOBdHa INHCTaIauJa KOn MoXe Da Ce 3aKoNaHn BHaTpe Bo SuDoT). OndroBOPHOCT e Ha INHCTaIaTePOT Da OCrypa DeKa SInOT 6e36eHNO Ke Ro NODPrxByBa BKynHOTO ONTOBapYBaHe OD EINHuaTa N DpKaUnTE 3a Ha SuD.
- 3a MOHTupaheTo ce notpe6Hn DOponHnTeHNn aIaTn (He ce BkJyueHn).
-He npe3aterHybajTe rpaΦobnte. - Uybaje ro Oba ynaTCTBO 3a noHaTaMoUHa ynotpe6a.
- Kopnctete npohaoaay Ha cton6obn da ro npOBepnte TINOT Ha snd nped da 6yunte mONTnpate.
MK
Pobp3yBaBe Ha COAXIAL npnKnyoku
- Moxe da kopincte COAXIAL ka6en (he e BknyeH) 3a da rnoBp3eTe npNKnyOKOT 3a COAXIAL n3Je3 Ha TeNeBu3OpOT u COAXIAL OUT (KOAKCNJALHNOT) npNKnyok Ha eINHuaTa.
Cobet:
-Додака e BO pexиM OPTICAL, HDMI ARC nnn COAXIAL, aKO HeMa n3JIeRyBaIbe Ha 3ByK od eINHnIcATA, MoKe6n Ke Tpe6a da AKTNBpuTe PCM n3JIe3 Na CnHaN Ha BaIuNOT n3BOpeH ypei (np. TeIeBn3Op, DVD nnn Blu-ray penpoDyKTOp).
ПоврзуваthesesHDMIARCприкneysok
Caynd6apot noDpKyBa HDMcno NobpaTeH aynokahan (ARC).Ako Baunot TeleBnzOp e HDMl ARC ycornaCeH, moKeTe da cnUwate TB aydno npeky Caynd6apOT co KopncTeHe Ha eEnneH HDMk6en.
1 KopncTeHDMI Ka6eN co Bucoka 6p3nHa da ro nOBp3eTc HDMl ARC KOHeKTopoT Ha Baunot Cayndap u KOHeKTopoT HDMl ARC Ha TeJIeBn3OpOT.
- KoheKTOpOT HDMI ARC Ha TeJeBn3OpOT MoKe Da 6nide O3NaueH nonHaKy. 3a DeTaJIn, BnDeTe Ro KOpNCnUKOTO yNaTCTBO 3a TeJeBn3OpOT.
2 Ha Baunot TB Bknyute rno onepaunnte HDMICEC.3a deTaN, Bndete ro KOpncnKOTO ynatCTBO 3a TeJeBn3OpOT.
Cobetm:
-TeJIeBn3OpOT Mopa Da rN NOdPrKyBa yHKuInTe HDMI-CEC n ARC.HDMI-CEC n ARC Mopa Da ce NoCTaBeHn Ha BKnUyeHo.
- Haunhot ha noctabyahe ha HDMI-CEC n ARC moke da ce pa3nkyba BO 3aBnchoCT od TeleBn3opot. 3a Detan 3a yHKnjaTa ARC, norneHHeTo ro KopncnKoTo ynatCTBO 3a TB.
- CamoHDMI.4 komnata6nHn Ka6n MoKe da ja noDpKaT yHKunjata ARC.
Pobp3yBaHe ha AUX npKnyuok
A KopncTeTe RCA co 3,5 MM aydno ka6eI (He e BknyueH) 3a da ro noBp3eTe npKnyokuOT 3a aydno n3ne3 Ha TB n npKnyokuT AUX Ha eINHncaTa.
B Kopnctete 3,5 MM co 3,5 MM aydno ka6en (He e BknyeH) 3a da rN NOBp3eTe Aux npNKnyOKOT Ha TeNeBn3OpOT nIN Ha HAdBopeWeH ayDNO ypeI co npNKnyOKOT Aux Ha eINHnCata.
Pobp3yBaHe Ha OTNUKn npNKnyOk
-ИЗвадеюзawtntHOTOKanaueHa ONTNUKNOT npNKnyO,notoa nobp3eTe ONTUKN Ka6eBo npNKnyOkoT 3a ONTUKN I3JIe3Ha TeIeBn3OpOT n ONTNUKNOT npNKnyOKa eDInHuaTa.
Pobp3yBaBe co HanojyBaBe
Pn3nk od owTeTyBaHe Ha npOn3BoDoT!
- YBepTe ce deKa HANOHOT Ha CTpyjata COOdBETCTByBa CO HANOHOT OTneuAten Ha HaneHHaTa CO TEXHnUKNoDaTOUKN Koja e 3aJIeHeHa Ha DOJIHHOT NIN 3aADHNO TdN Od edHHuaTa.
- PpeI da ro nobp3e Te Ka6enot 3a Han3MeHnUHO HanojyBaHe, yBepTe ce deKa CTe rN 3aBpuInne CHTe dpyrN NOBp3yBaHa.
Iobp3eTo eNeKtpnHnot Ka6en BO npNKnyuHncaTa 3a HAn3MeHnHa cTpyJa Ha rnaBHHaTa eINHu, Na NOToA Bo npNKlyuHnCaTa 3a eNeKtpnuHo HanojyBaHe.
OchOBHo pa6oTeHe
IodrotBeHocr/BknyuyeHo
Kora 3a npB naT ke ja noBp3eTe rnaBHaTa eDHHuCA BO npNKnyHnUcTa 3a eEneKtpnH0 HanojyBaHe, rnaBHATA eDHHuCA Ke 6nDe BO pexm Ha IODIOTBEHOCT.
- PnTNCHeTe ro KOnyeto Ha eINHuaTa nnHa daJeunHcKnOT ynpaByBaay 3a da ja npepnte eHNHuaTa Ha BKnyEHO.
- PnTNCHeTe ro KonUeTo NOBTOpHo, 3a Ja ja npEoPpInTe eINHnCaTa Ha3aD Ha peKIM Ha IOIOTBEHOCT.
- I3BaTeToe eKTPnHNO TpNKLyUOK O npNKLyUHNcaTa 3a eKTPnuHo HanojyBaHe aKO caKaTe cIocHO da ja NCKJyUHTE eHnuaTata.
ABTomatcko 6ydehe
- Ako TeLeBn3Op nIu HaBOpweH ypeI e noBp3aH (AUX / OPTICAL / COAXIAL / HDMI ARC), eDHHuata aBtOMaTcK Ke ce Bknyu Kora TeLeBn3OpOT nIu HaBOpwHnot ypeI Ke ce BKnyu.
Kako da OBO3MOXnTe aBTOMaTcKO 6ydeHe
KpaTKO npHTncHeTe ro konueTo (SOURCE) n KOnyeTo ^+ (VOL +) Ha eHnHuaTa da ja OBO3MOXKeTne Hn OHeBO3MOXKeTte yHKuJaTa ABtOMaTcKO 6ynde.
- ABTomatcko 6ydeHe BknyeHo: 6eNo n 3eNeHO IED TpeHnBa DbaNatn NocJeDoBaTeNHO. DoKe a BO peKm Ha IOIΓOTBEHOCT, CBetKa LIPBEHO JEL.
- ABTomatcko 6yndeHe IcknyeHo: 6eNo n cpBeHo JED TpeHnBya DbaNatn NocneDoBateHNo. DoKeKa e Bo peKm Ha IODΓOTBEHOCT, JEd e noctoJahO CpBeHo.
HNBOTO Ha MaKcImaJIHa/MnHIMaJIHa BpeIHOCT,JIED INHdNKaTOPOT 3a CTAlyc 6p30 Ke CBeTKa.
I36npaIbe npedeOpdeH 3ByeH eEeK
Iodeka penpojnuipa, npntncheTe rKoNnHaTa NEWS/MOVIE/MUSICHa daJeuHCKnot ynpabvBaay da rH n36epe Te npedopedeHnte ekBnaj3epn:
MOVIE (npenopauhaNo 3a rIeJaHe M
MUSIC (npenopaHaNo 3a cnUshaHe My3nKa)
NEWS (npenopauHaNo 3a cnyuhaBe BcTeN)
OPTICAL / COAXIAL / HDMI ARC / AUX Pa60TeHe
1 OcnrgypeTe ce deKa eHnuaTa e nobp3aHa Ha TeJeBn3OpOT nIi Ha ayDIO ypeI.
2 Hekonky nATn npNTncHeTe ro konyeTo Ha eINHuaTa nn KOnyeTo SOURCE Ha daJeunHcKnOT ynpaByBaU da n36epeTe pexIM OPTICAL, COAXIAL, HDMI ARC, AUX.
3ДиpeKTHO pa6oTeTe co BaIIOr ayIIO ypeI 3a yHKuHnHa penpoDyKuJna.
4ПиТиСеTe ro konTuTeTo +/Ha eHnUcaTa nnVOL+/VOL- Ha daJIeunHcKnOT ynpaByBaU da ja npIlaRoIte jaUnHaTa Ha 3ByK Ha NOCaKyBaHOTo HNBO.
Cobertn:
-Додака e BO peхим OPTICAL, HDMI ARC nnn COAXIAL, ako HeMa n3neRyBaHbe Ha 3Byk od eInnucata, moKe6n Ke Tpe6a da aKTHBnpaTe PCM n3ne3 Ha cnHan Ha Baunot n3Bopeh ypei (np. TeleBn3Op, DVD nnn Blu-ray penpoDyKTOp).
Ako e OTKpneH HeNoDpXaH DnTaNHe H BJe3, JEД nHdkaTopOT Ke ce CMeHN BO BNOJeTOB N Ke TpeHHe HnpeKHaTo 6p3O TprN NaTn.
Pa6oTeIbe co Bluetooth
Cnapn ypeu co oBO3MOxKeH Bluetooth
Ipbnot nat kora ro nobp3yBaTe Baunot bluetooth ypei co OBaa eHnua, Tpe6a da ro cnapnte ypeodT co eHNuata.
3a6euleka:
- OnpaTnBnOTo nOceI nomery eunHnUcaTa n Bluetooth ypeE npu6nJxHo 26 cTAnKn (8m) (6e3 HnKaKOB npEaMeT nomery Bluetooth ypeoT n eunHnUcaTa).
- ПпсддаюрзeteBluetoothуpeн ha OBaa eINHua,yBepTe ce deka rN 3HaTe MOxHOCHTe Ha ypeDToT.
- Komnata6nHocT co cnte Bluetooth ypei He e rapaHTnpaHa.
- Cekoja npecka nomery obaa edinHua nypeed co Bluetooth moke da ro hamann onepaTnBnOT oncer.
- Ako jaunhaTHa hCnHAnot e cna6a,Bluetooth npneMHKOT MOKe Da ce NcKnyu, Ho NOBtOpHo aBTOMaTCKn Ke BJe3e BO peKIM Ha cnapyBaHe.
1 Kora eHnHaTa e BknyeHa, HeKoNky NaTn npuTncHeTe ro KonueTo Ha eHnHaTa Hn KOnueTo SOURCE Ha daJeuncknot ynpaBvBaU da n36epe Te Bluetooth pexm.Ke cBeTHe CnHOTcBTNo Ha HnDnKaTOPOT.
2 AktuBupajTe ro Baunot Bluetooth ypei n 36epeTe peKIM 3a nppe6apyBaHbe. Hisense HS214" Ke ce nojabn Ha BaWata Jncta co Bluetooth ypei.
Ako He mokeTe da ja HajdeTe eDHHucaTa, npNTnCHeTe ro n 3aApKeTe ro KOnYeTo PAIR Ha daJeunHcknOT ynpabBya3a NOBTOHa BnE3e BO pexm Ha cnapyBaHe.
Ke cnyuushene aydno notceYBaBe od eHnuaTa, a HdkaTopoT 3a Bluetooth Ke cBeTk6p30.
3ИЗберTe,Hisense HS214"BO JIиCTaTa 3a cnapyBaHbe.По aydno NOTceTyBaHbeTo, CnCTeMOT e yCneSHO NOBp3aH INHДИKaTOpOT 3a Bluetooth Ke cBETn nocTojaHo.
4 PenuyupaHe My3nKa OJ NOBp3aHNOBTeoth ype.
Ja ja ncknyuTe yHKnjuTa Bluetooth, MoKTe Da:
- PpeΦpIne Ha npyr n3BOp Ha eHNHuaTa.
Ja OHeBO3MOXnTe yHKuJaTa OBaHnOT Bluetooth ypeI. Bluetooth ypeoT Ke 6nIe ncknyeH oEHNuCaTa I0 aydno NOTcTeYBaHbeto.
-Путисеюзаджete ro konqueto II /PAIraeunHcknot ynpaByBa.
Cobetm:
BheceTe "0000" ako e noTpe6Ha lo3nHka.
Ako npyr Bluetooth ypei He ce cnapyBa CO OBaa eINHua BO pOK OJ DBe MNHyTu, eINHuaTa Ke ro 6HOBn npeTXoHOTO NOBp3yBaHe.
- Ednuata NaTo TaKa Ke ce NcKnyu Kora Baunot YpeKe Ce npemecn HndBOp od Oncerot Ha pa6oTeHe.
Ako cakate NOBTOPO Da ro NOBp3eTe BaunotypeHa OBaa eHnua,CTaBeTe Ro BO ONcerOT Ha pa6oTeHe.
Ako ypeoTe npemecTeHnBOp od oncerot Ha pa6oTeHe, Kora Ke ro BpaTne, npOBepTe daHypeoTe yuTe NOBp3aH co eHNHcata.
Ako noBp3yBaHbTeO ce n3ry6n, cneJeTe rN
yNaTCTBaTa nOrope 3a NOBTOpHO Da rO cnapnte BaIINOT ypeD co eINHncaTa.
CnyuhaBe my3nka od Bluetoothype
-Ako noBp3aHnOt Bluetooth ypeI noDprKyBa HanpeDen npoФIN 3aДиСТрИБуИЯ Ha ayINO (A2DP), moKeJa cIywaTe My3Nka cklaInpaHa Na ypeIoT npeky eDInHuaTa.
-Ako ypeoT nTo TaKa noDpKyBa IpoΦnHa daJeHHcKa KOHTpOHa Ha ayDnO BnDeo (AVRCP), moKe da ro Kopnstte daJeHHckNtU npaByBaH a edHnCaTa da penpOduuPaTe My3nka cKnAnpaHa Ha ypeoT.
1 Cnapete ro ypeoT co eHHnuaTa.
2 Penuuapjte My3nka npeky Baunot ypei (ako noDprkvyBa A2DP).
3 KopncTeTe ro doctaBeHnot daJeunHcKn ynpaByBaJa ja KOHTpOJnPape pe npoDyKuJata (ako noDprjyBa AVRCP).
-Да penpoDyu npa/ny3npa, npTncHeTe ro konyeTo IVPAIraJeHcKnOT ynpaByBa.
-Да пессокне Нумера,причichte ГИ
КоюньаТа |«,» | И далецнскnot
уразувач.
Pa6oTeIbe co YCb
1 CTabeTe YCb-ypeπ.
2 HeKoNky nATn npTncHete ro KOnyeTo Ha eINHnCata Nn npTncHete ro KOnyeTO SOURCE Ha daLeuHcKnOT ynpaBvBaay da n36epTe YCB peKM.
3 Bo tekot Ha penpodykujeta:
-Да penpoуцupa/nay3upa, npntncheTe ro konueTo II/PAIR Ha daJIeunHCKnOT ynpaByBaU
-Да песkokне на петхODнa/следна Нумера,пптисе ГКОПЧИБаТа |«,» |Надалецнскnot уралыв.
Cobet:
- Ednuata Moke da noDpXn YCb-ypeNi co Memopna do 64 GB.
- Obaa eunHua moKe da pe npOduupa MP3.
- Obaa eunHnua noDpKyuBa WAV/WMA/FLAC.
- EdnucaTa noDpKyBa FAT32.
BrrpaedHnOT YCB-xocT co nolna 6p3nHa 3a YCB npimEn He Tpe6a da HaamHyBa 6,5 Mbps. - FonemHaTa Ha 6IOKOT Ha IaToteKaTa BO FLAC oopMaT He MoKe Da HAdMHe 4608 6uTa, Bo cnpotnBHO 6n DoBeno Do NcnpeKHaT 3ByK ININ HemaBe 3ByK.
MK
3a rapaunjata da 6nde BaxeueKa, HNKORAw He
0bnyBajTe ce da ja nonpaBaTe eHHuata camnte. Ako ce coooyBate co npo6lemn kora ja KopncTnte OBaa eHNHua, npOBepTe rN cIeHNBe CTABKn nped da no6apate cepBvC.
Hema HanojyBaHe
OcunypeTe ce deka Ka6eNoT 3a HauN3MeHnUHO hanojyBaHe Ha eDHHuTa e npabnHo NOBp3aH.
- YBepete ce deka nMa eNeKtpnHa eHeprna BO npNKnyuHncaTa 3a eNeKtpnHo HanojyBaHe.
-ПуТиСHTe ro KOnчTo 3a noДrOTbeHocT 3a ja ja BKJyUHTe eINHnCtA.
Далачнскnot упаByBaч He pa6otn
- Празда ппшстete кoe 6илкоче за КОHTрола на ретюкида,првизберete ro TOUHNOTИЗВОР.
- HamaneTe ro pactoJaHneTo nomery daJeunHcknOT ynpaByBaU n eINHuaTa.
- CtabeTe r6aTePunTe co nolapnteTne (+ / - ) NOCTaBeHn KaKo UTo e HabeJeHO.
3aMeHeTe r6aTepuNTe.
Hacouete ro daneynHcknoT ynpaByBaU nipeKTHO KOH cEH3OpOT Ha npedHnot DeI Ha eHNucaTa I HeKa Hema npeKn NomeIy daJeHHcknoT ynpaByBaU n eHNucaTa.
Hema 3ByK
3rolemete ja jaunHaTa Ha 3Byk. PnTncHeTe VOL+ Ha daJeHHckNt ynpaByBaHn +Ha eHNuata.
- Путушени
- На далецнскnot упавьач
- за ce осигуразе дека на сayндбарот не му有很大rockлунецн 3BYKOT.
- Пи捜нсhte ro konчeto SOURCE da n36epepe pa3nueH n3BOp Ha BHeC.
Kora KopinCTte KOn 6nlo od dInrTaHnTe BHecoBn, aKO HeMa ayDIO:
- 06nndeTe ce da ro noctabte n3ne3OT Ha TeJebu3opot Ha PCM nn
- NOBp3eTe ro dIpeKTHo Ha BaIuNOT Blu-ray/Дуг n3BOP, HeKOn TeJIeBn3Opn HemaaTДИNTaJIHOb aydno.
Baunot TeJeBn3Op MoKe Da e NocTaBeH Ha npOMeHNb ayDIO n3JIe3. YBepTe ce deKa noCTaBkata Ha ayDIO n3JIe3 e NocTaBeHa Ha ΦNKCHA nn CTAHdAPHA, He Ha IPNOMEHJIIBA. 3a noTeaJHi nHΦopMauIn nOrIeHHeTo ro KOpNCnUKOTO yNaTCTBO 3a TB.
- Ako kopructute Bluetooth, ocnyperte ce deka jaunhata Ha 3Byk Ha Baunot n3Bopen ypee e 3rolemeha n Ha ypeoT He My e NCKnyuen 3ByKOT.
He moxam da ro hajdam Bluetooth mMeTo Ha OBaa edHnua Ha mojot Bluetooth ypeD 3a cnapyBahe co Bluetooth
- OcnnypeTe ce deKa fynKunjata Bluetooth e aKtNBnPaHa Ha BaAnOT Bluetooth ypei.
- OcnnypeTe ce deka cTe ja cnapnne edHnuaTa co BawnoT Bluetooth ypeI.
Oba e Функциja 3a Исклучыbe HanojoyBaIbe no 15 мнун, edno od стандарднITE 6apаьа на ERPII 3a штete徴е eheprиja
KORA HNBOTO Ha NaIBOpeweh BHe3eH CnHaHa Ha eINHnCaTa e npEnCKo, eINHnCaTa aBTOMaTcKn Ke ce nckny 3a 15 MNHyTu. 3roJeMeTe ja jauHnTa Ha 3ByK Ha BaunOT HaIBOpeweh ypei.
Cneunkaaun
| Изма мodyен HS214 |
| Сayндбар | |
| Еlektрично наоюваные 100-240 V~50/60 | Hz |
| ПOTROшувачka на[elektрична[eheprиja 20] | W |
| Еlektрична[eheprиja bo podrotbehocst 0,45] | W |
| UCB-Порта за ретрodieкциja Компатибулочь со уCB Посадшика за уCB-ретрodieкциja/Формати на датerteka | 5V UCB co roлема брзINA (2.0) / FAT32 WAV, MP3, WMA, FLAC |
| Димензи (Ш × Д × В) 25,59 × 3,74 × 2,42 и НetoTeXина 4,78 ФунтNi (2,17 кг) | |
| Импесанca 4 Ω+8 Ω × 2 | |
| Φразковциски одровор 40 Hz-20 KHz | |
MK
| Бeзшии спецфikаци | |
| Вероза на Bluetooth V4.2 | |
| Мakсимална(emittува на мokhoeст наBluetooth (ЕY) | 9 dBm |
| Ф配电вenuickи oncesи 2402 ~ 2480 MHz | |
7 Priza e rymes alternative
Lidheni me energjine elektrike.
8 Perseritesi IR
Transferoni sinjalin e marre nga telekomanda e televizorit tek televizori.
9 Priza COAXIAL
Lidheni me njedalje audioje koaksiale netelevizor.
10 Priza HDMI ARC
Lidhei me një televator permes kabllos HDMI.