
GDL3661X - Range hood GRUNDIG - Free user manual and instructions
Find the device manual for free GDL3661X GRUNDIG in PDF.
| Product type | Kitchen hood |
| Brand | Grundig |
| Model | GDL3661X |
| Power supply | 220-240 V ~ |
| Number of speeds | 4 (1, 2, 3, intensive) |
| Control | Push buttons |
| Lighting | Integrated |
| Filter type | Aluminum grease filter, optional charcoal filter |
| Minimum installation height (electric) | 55 cm |
| Minimum installation height (gas) | 65 cm |
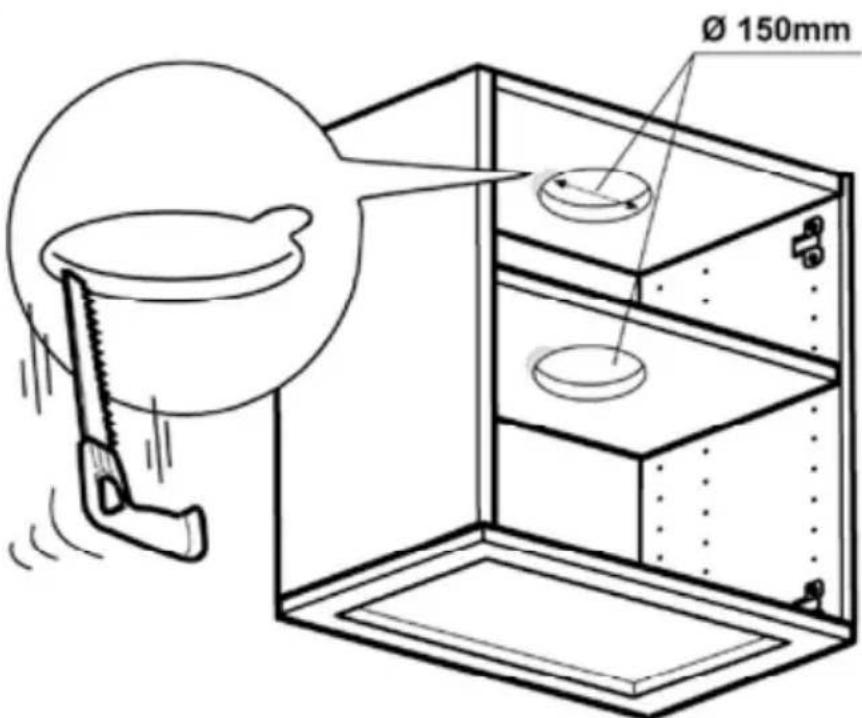
| Air outlet diameter | 120 mm or 150 mm |
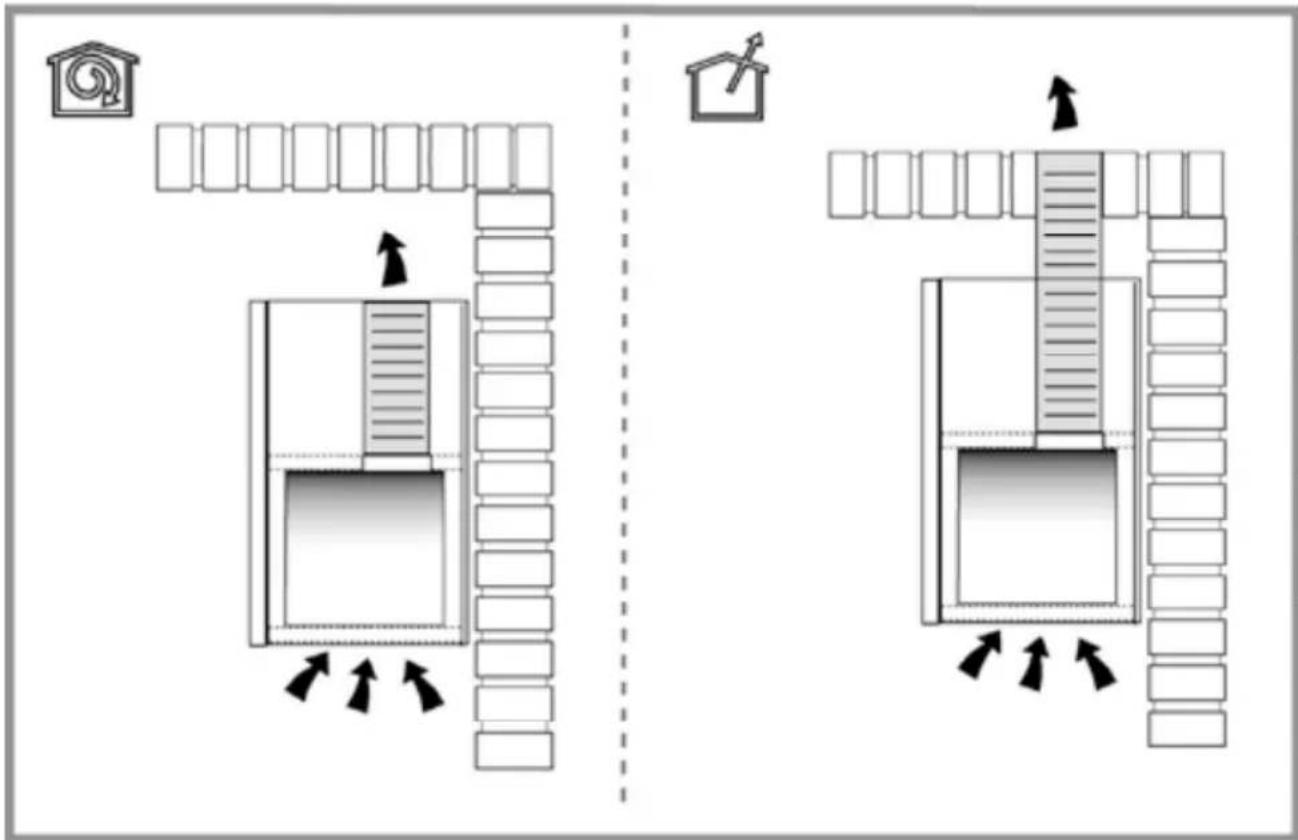
| Extraction mode | External evacuation or recirculation |
| Timer function | Yes, adjustable timer (20, 15, 10, 5 min) |
| Filter saturation indicator | Yes, LED L5 after 40 hours |
| Intensive speed | Yes, automatic return to speed 2 after 5 min |
| Grease filter maintenance | Monthly cleaning recommended |
| Charcoal filter replacement | Every 3 to 6 months depending on use |
| Availability of spare parts | 10 years after purchase |
| Environmental compliance | WEEE and RoHS |
Frequently Asked Questions - GDL3661X GRUNDIG
User questions about GDL3661X GRUNDIG
0 question about this device. Answer the ones you know or ask your own.
Ask a new question about this device
Download the instructions for your Range hood in PDF format for free! Find your manual GDL3661X - GRUNDIG and take your electronic device back in hand. On this page are published all the documents necessary for the use of your device. GDL3661X by GRUNDIG.
USER MANUAL GDL3661X GRUNDIG
natural_image
Abstract white page corner with curled corner, no text or symbols present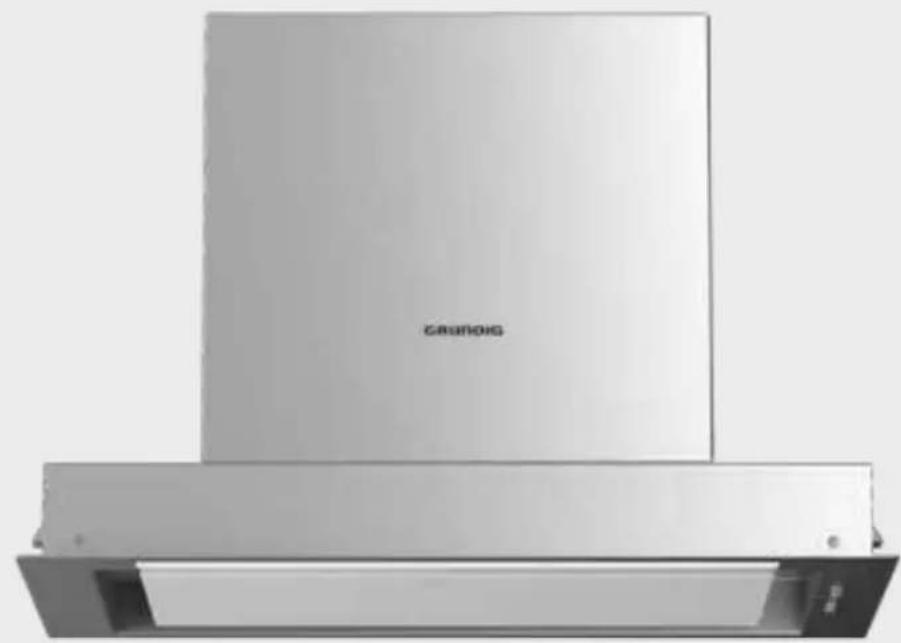
natural_image
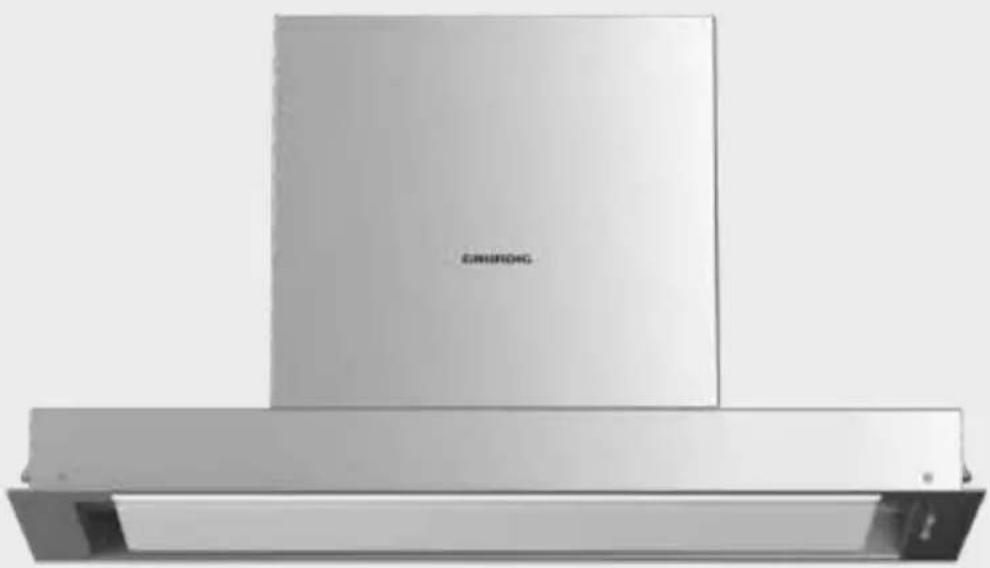
Exterior view of a stainless steel industrial chimney (no visible text or symbols)GDL 2661 X
natural_image
Exterior view of a stainless steel kitchen range hood (no signage or text visible)GDL 3661 X
ENGLISH 16-26
DEUTSCH 27-38
NORSK 39-49
DANSK 50-60
SVENSKA 61-71
SUOMI 72-83
POLIS 85-98
FRENCH 99-104
NEDERLANS 104 -111
natural_image
Line drawing of a cabinet with a saw and handle, showing mechanical advantage (no text or symbols)60cm

90cm
2
natural_image
Technical line drawing of a mechanical assembly with a base, showing internal components and a curved component (no text or symbols)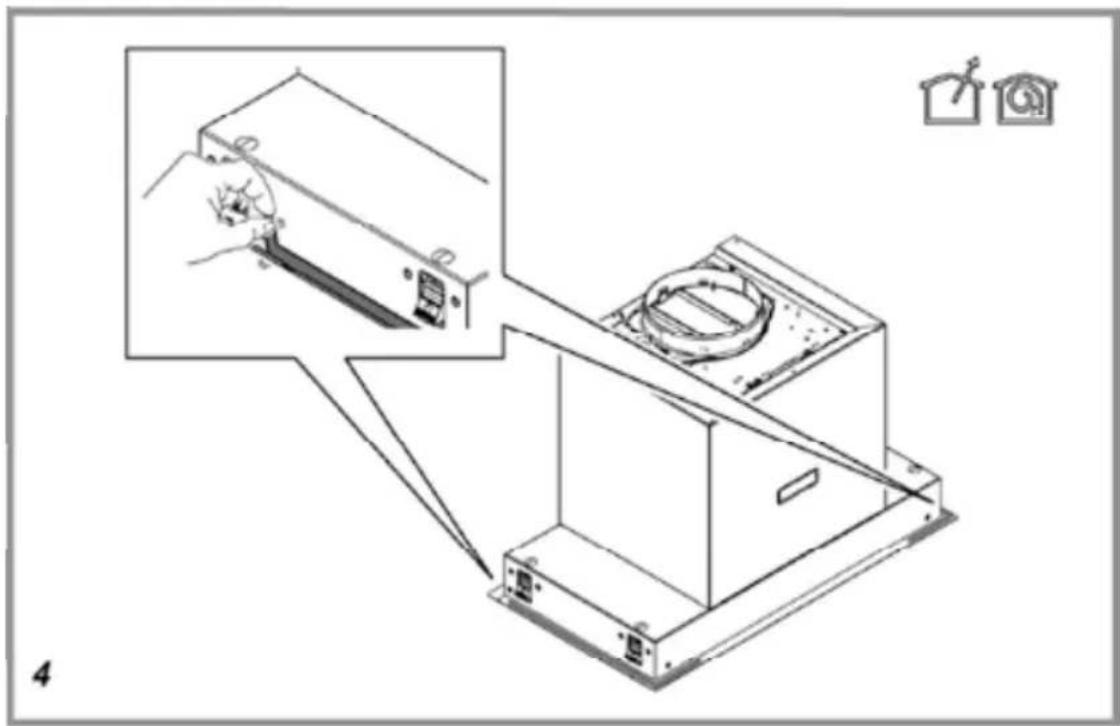
natural_image
Line drawing of a mechanical device with an upward arrow and three circular components, no text or symbols present.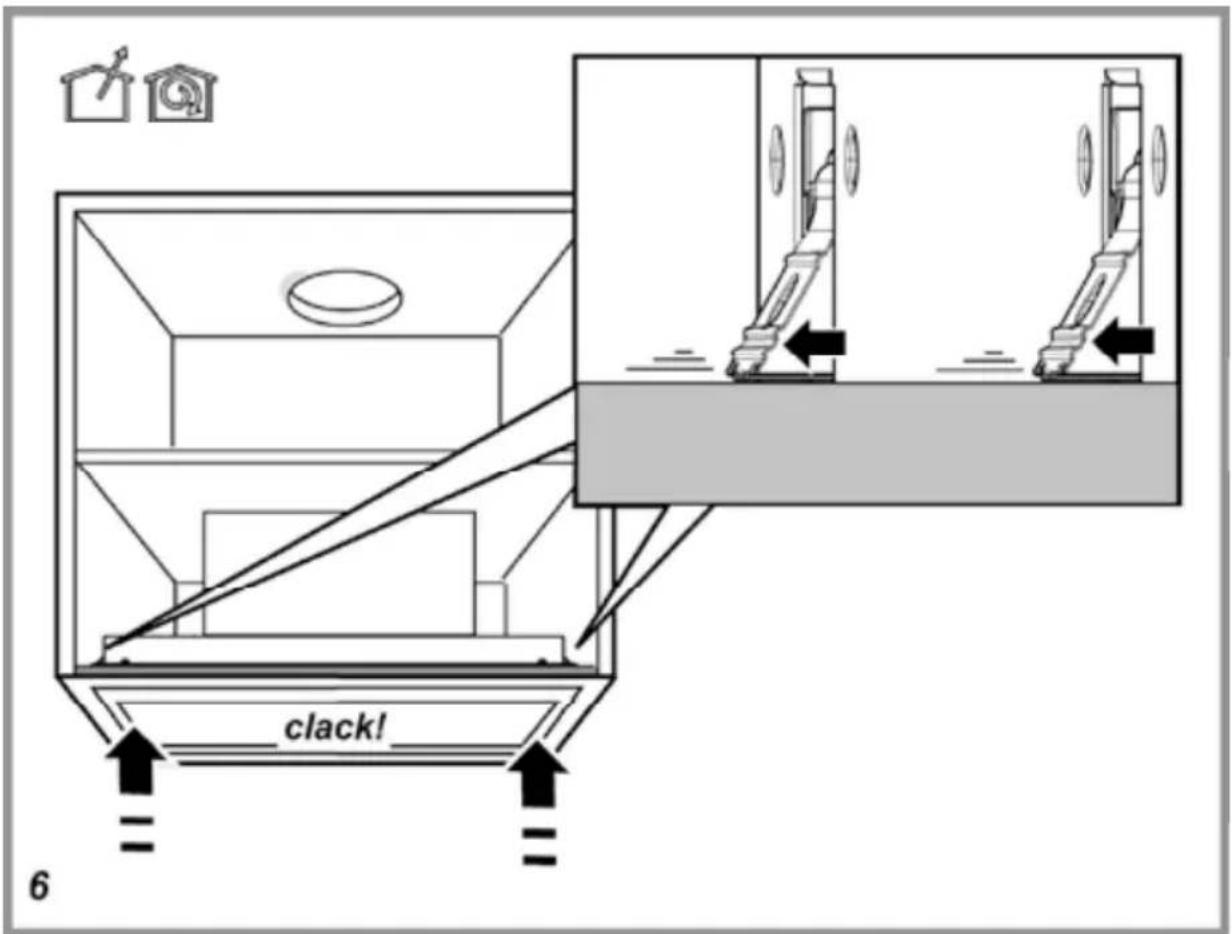


natural_image
Line drawing of a hand using a tool to clean or inspect a rectangular object inside a transparent container (no text or symbols)

natural_image
Technical line drawing of a mechanical bracket with mounting holes and a shaded base (no text or symbols)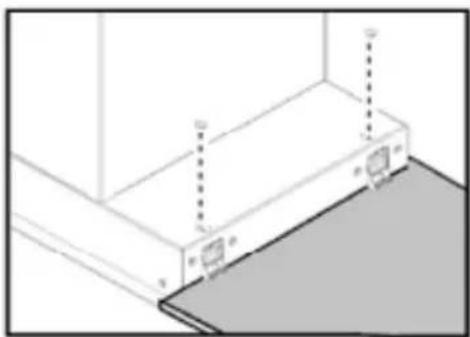
natural_image
Technical line drawing of a mechanical assembly with mounting brackets and a shaded base (no text or symbols)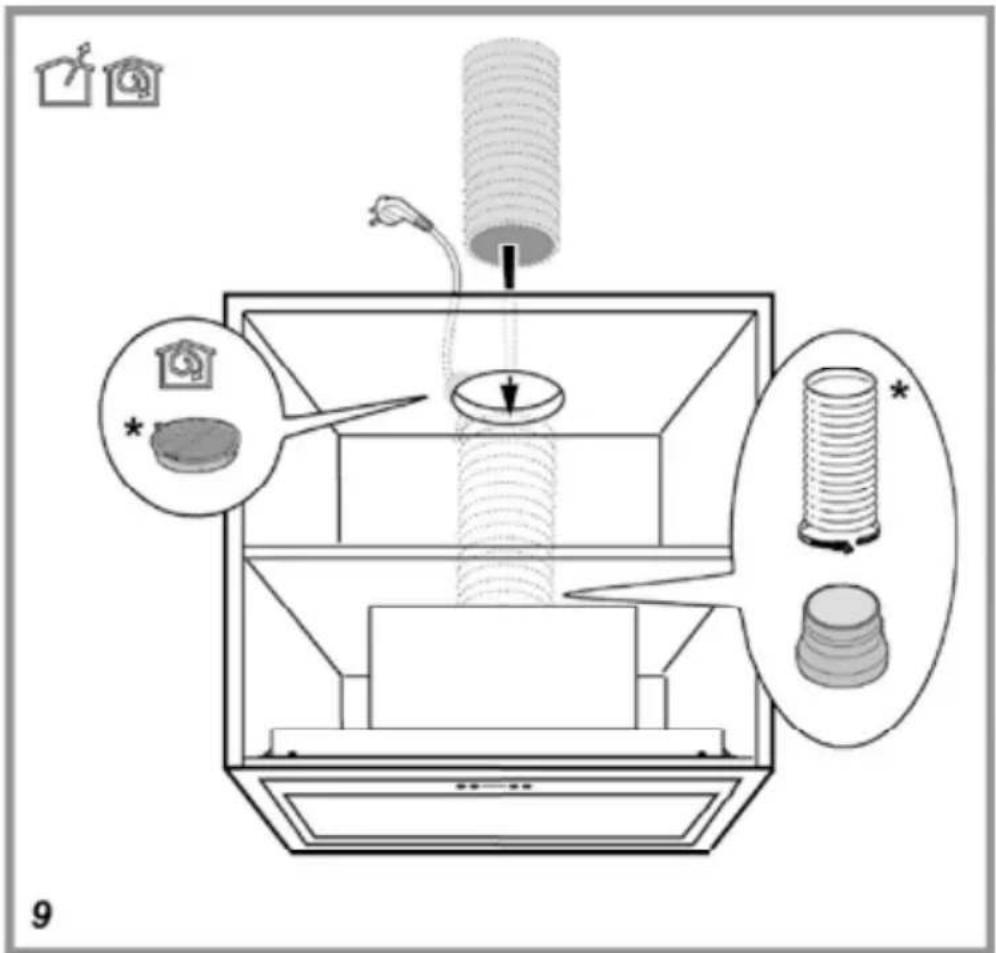
SAFETY WARNINGS
This section contains safety instructions that will help protect from risk of personal injury or property damage. Failure to follow these instructions invalidates the granted warranty.
1.1 General safety
■Always have the installation and repairing procedures carried out by the Authorized Service Agent. Manufacturing firm shall not be held responsible for damages that may be caused by unauthorized persons.
■This appliance is not intended for use by persons (including children) with reduced physical, sensory or mental capabilities, or lack of experience and knowledge. Children should be supervised to ensure that they do not play with the appliance.
■Always unplug the appli- ance from the mains sup- ply during installation, maintenance, cleaning and repair operations.
If the power cable is faulty, it should be replaced by a qualified person certified by the manufacturer, after-sales service or similar (preferably an electrician) or a person described by the importer.
■Operating voltage is 220 to 240 volts.
If the appliance has a failure, it should not be operated unless it is repaired by the Authorized Service Agent. There is the risk of electric shock!
- Do not route power cable close to hobs. Otherwise power cable may cause fire since it melts down easily.
■Never plug the hood before installation is completed.
In order to obtain the best performance, external conductor must not be longer than 4 m. It must not contain more than 2 perpendicular (90°) angles and its diameter must be min. ∅120 mm.
SAFETY WARNINGS
■Disconnect the appliance from mains before any intervention to the internal parts of the appliance.
Use the appliance with a grounded outlet only.
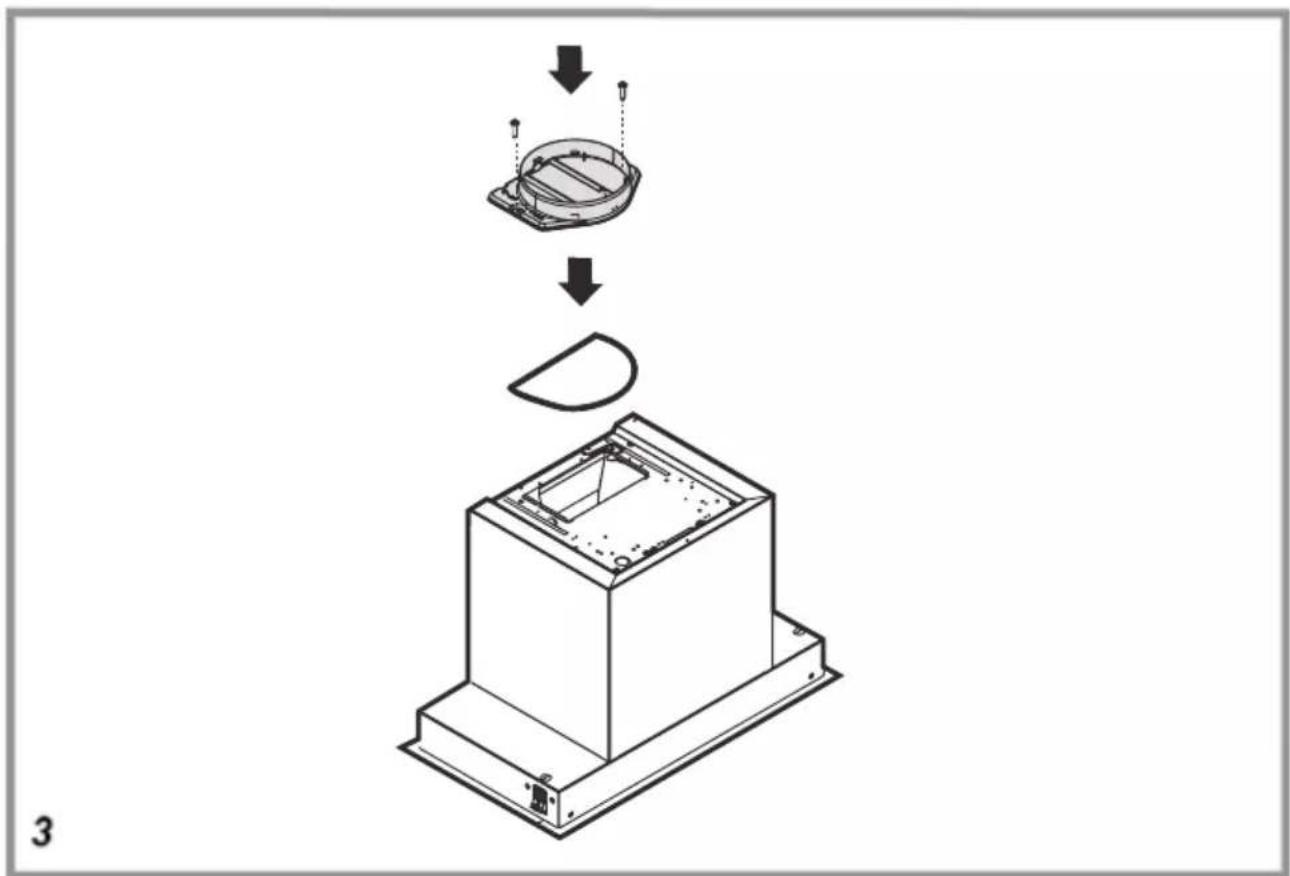
You can use a pipe with a diameter of 120 mm or 150 mm on the flue connection of the hood.
Do not make connections to the flues connected with stoves, exhaust shafts or flues with rising flames. Observe the rules set by authorities on the discharge of exhaust air.
The height between the lower surface of the hood and upper surface of the stove/oven should not be less than 65 cm for gas hobs and 55 cm for electric hobs.
Do not operate the hood without aluminum filters and do not remove the filters while it is operated.
Never touch the hood's lamps after they are operated for a long time. Hot lamps may burn your hand.
Avoid large flames beneath the product. Otherwise, particles on oil filter may ignite and lead to a fire.
Turn on the hobs after placing pans or pots on it. Otherwise, rising heat may deform certain parts of your product.
■Turn off the hobs before taking away pans or pots.
Avoid inflammable materials under the hood.
Oil may ignite while frying foods. Therefore, be careful about cloths and curtains.
Never leave the cooker unattended when frying foods; otherwise hot oil may cause fire.
■There is the risk of fire if your hood is not cleaned in the specified periods.
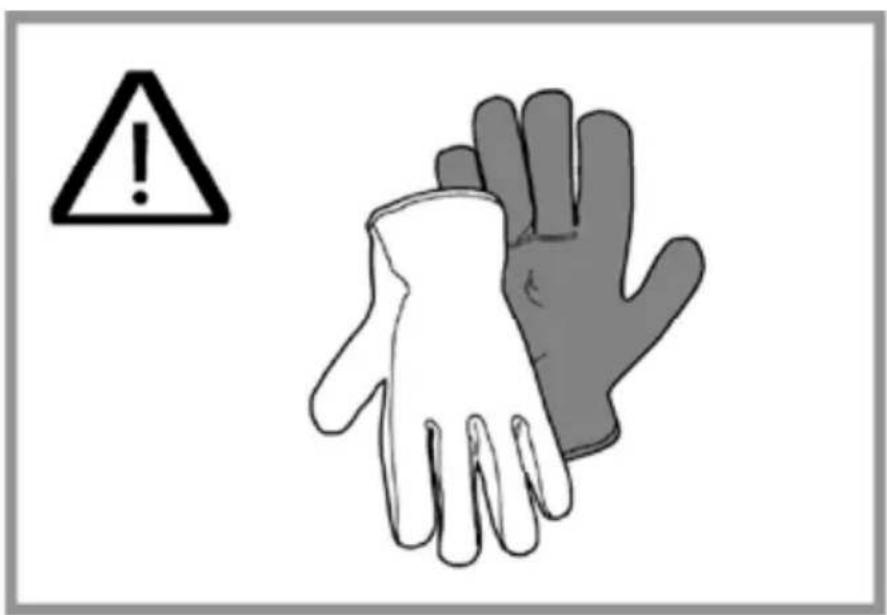
- Be extremely careful and wear gloves when cleaning the hood.
SAFETY WARNINGS
■The minimum distance between the supporting surface for the cooking equipment on the hob and the lowest part of the range hood must be not less than 55cm from electric cookers and 65cm from gas or mixed cookers.
We advise you to operate the appliance a few minutes before starting to cook in order to increase the suction power. Thus, you shall have a continuous and stable suction power when the vapors arise.
Operate your hood for 15 minutes more after the end of cooking or frying in order to remove the smell and cooking vapor in the kitchen.
When the hood is in use, especially together with gas cookers, make sure that environment is ventilated with clean air.
Pay attention not to connect the appliance to the flues used by non-electrical devices. (E.g.: Heater flue).
Simultaneous and smooth operation of the hood and another device that require air is only possible when a low pressure of 4 Pa (0.04 mbar) is reached, and thus the reabsorption of the gas is avoided. This can only be achieved by means of air coming from uncovered openings (door, window, ventilation openings or other technical measures). Pay utmost attention to provide sufficient air flow. A flue that provides air ingress/egress is not enough for this purpose.
Packaging materials are dangerous to children. Keep packaging materials in a safe place out of reach of children.
Electrical appliances are dangerous to children. Keep children away from the product. Do not allow children play with the appliance.
SAFETY WARNINGS
■This appliance can be used by the children who are at the age of 8 or over and by the people who have limited physical, sensory or mental capacity or who do not have knowledge and experience, as long as they are supervised with regard to safe use of the product or they are instructed accordingly and understand the risks of using the product. Children should not play with the appliance.
CAUTION: Accessible parts may heat up when used with a cooking device.
■This appliance is intended for domestic use. It is not suitable for commercial use and it must not be used out of its intended use.
■The manufacturer shall not be liable for any damage caused by improper use or handling.
■Service life of your appliance is 10 years. This is the period required for availability of spare parts for proper functioning of the product.
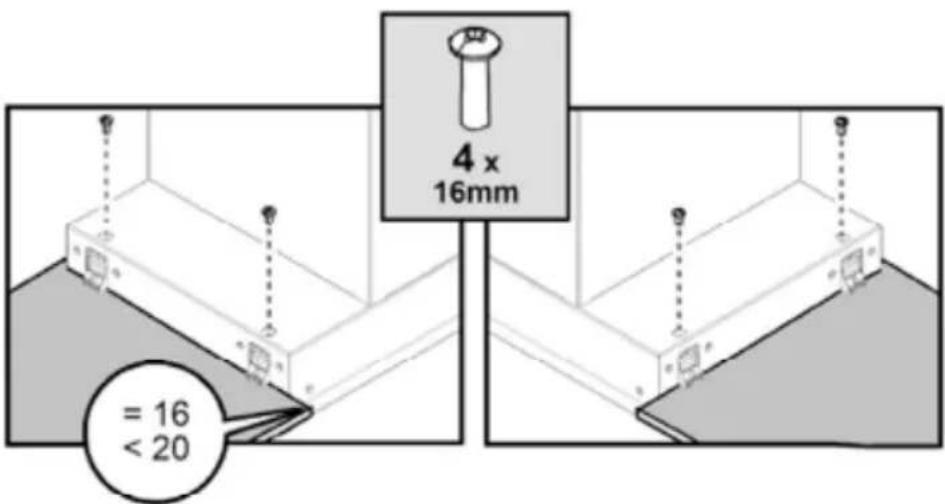
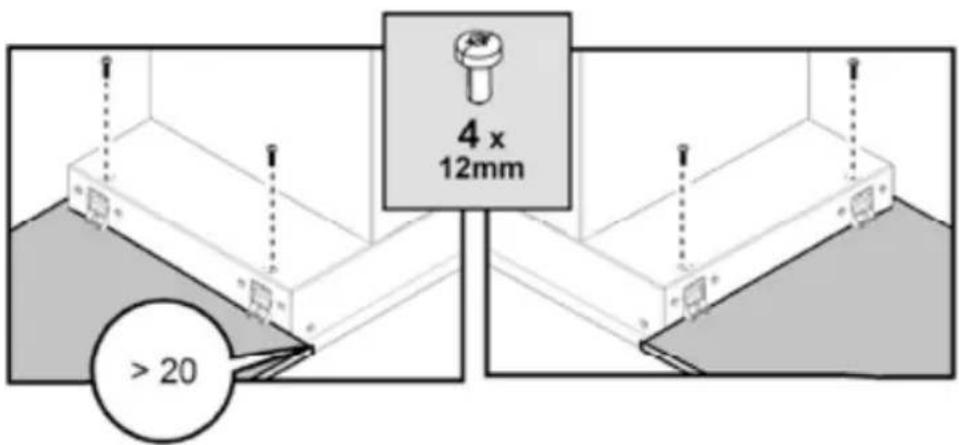
WARNING: Failure to fix the screws in concordance with the instructions provided in the manual may lead to electrical hazards.
1.3 Compliance with WEEE Directive and disposing of the waste product
This product complies with EU WEEE Directive (2012/19/EU). This product bears a classification symbol for waste electrical and electronic equipment (WEEE).
This product has been manufactured with high quality parts and materials which can be reused and are suitable for recycling. Do not dispose of the waste product with normal domestic and other wastes at the end of its service life. Take it to the collection center for the recycling of electrical and electronic equipment. Please consult your local authorities to learn about these collection centers.
Compliance with RoHS Directive:
The product you have purchased complies with EU RoHS Directive (2011/65/EU). It does not contain harmful and prohibited materials specified in the Directive.
1.4 Package information
Package of the product is made of recyclable materials in accordance with our National Legislation. Do not dispose of the packaging materials together with the domestic or other wastes. Take them to the packaging material collection points designated by the local authorities.
INSTALLATION OF THE APPLIANCE
The minimum distance between the supporting surface for the cooking equipment on the hob and the lowest part of the range hood must be not less than 50cm from electric cookers and 65cm from gas or mixed cookers.
If the instructions for installation for the gas hob specify a greater distance, this must be adhered to.
Electrical connection
The mains power supply must correspond to the rating indicated on the plate situated inside the hood. If provided with a plug connect the hood to a socket in compliance with current regulations and positioned in an accessible area, after installation. If it not fitted with a plug (direct mains connection) or if the plug is not located in an accessible area, after installation, apply a double pole switch in accordance with standards which assures the complete disconnection of the mains under conditions relating to over-current category III, in accordance with installation instructions.
Warning: Before re-connecting the hood circuit to the mains supply and checking the efficient function, always check that the mains cable is correctly assembled.
Warning: If the power cable is faulty, it should be replaced by a qualified person certified by the manufacturer, after sales service or similar (preferably an electrician) or a person described by importer.
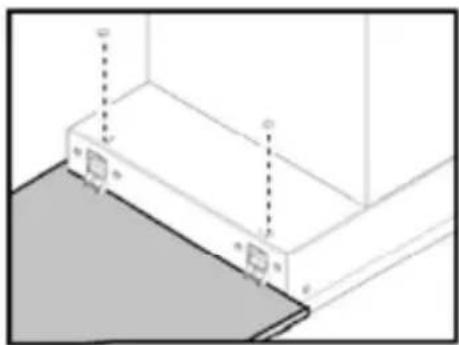
Mounting
Before you start:
Check that the product purchased has appropriate sizes for mounting area.
Remove the charcoal (*) filter/s if supplied (see also relative paragraph). This/these is/are to be mounted only if you want to use the hood in the filtering version.
Check (for transport reasons) that there is no other supplied material inside the hood (e.g. packets with screws (*), guarantees (*), etc.), eventually removing them and keeping them.
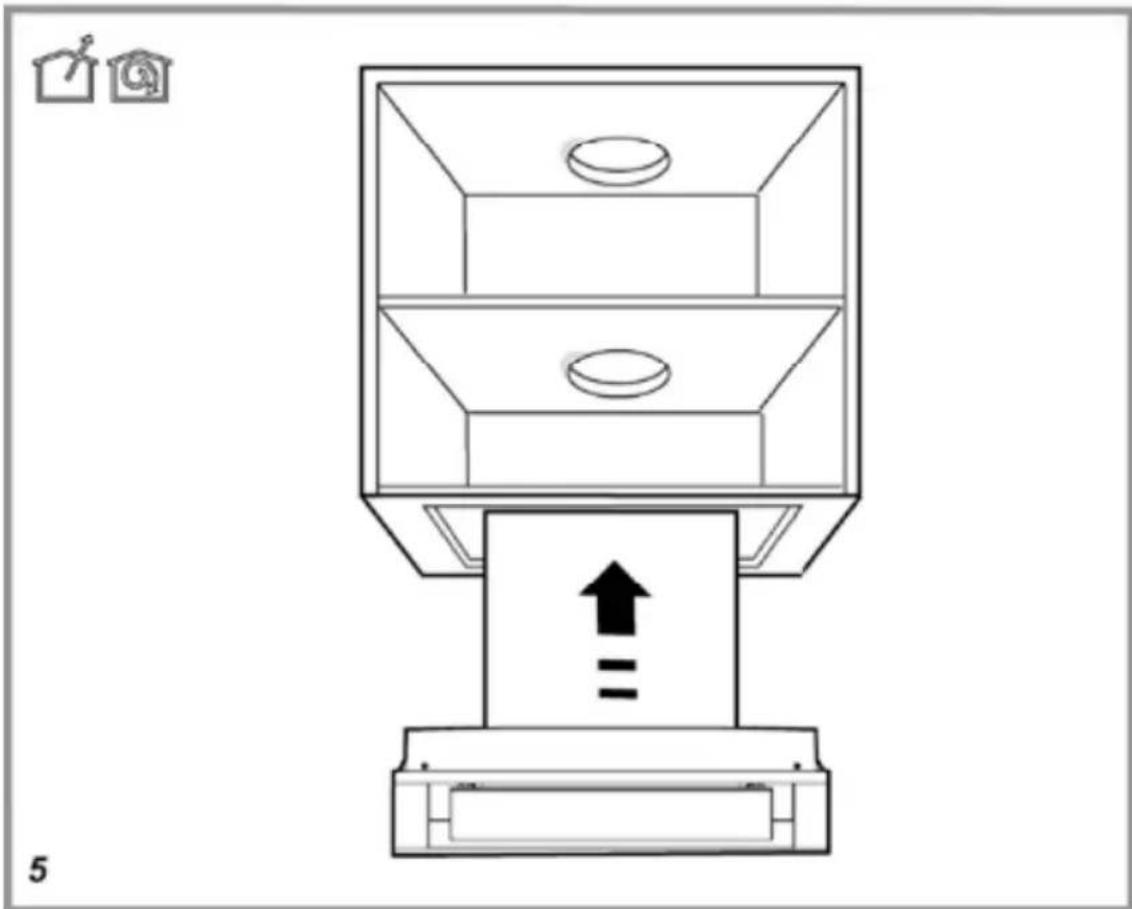
If possible, disconnect and move freestanding or slide-in range from cabinet opening to provide easier access to rear wall/ceiling. Otherwise put a thick, protective covering over countertop, cooktop or range to protect from damage and debris. Select a flat surface for assembling the unit. Cover that surface with a protective covering and place all canopy hood parts and hardware in it.
In addition check whether near the installation area of the hood (in the area accessible also with the hood mounted) an electric socket is available and it is possible to connect a fumes discharge device to the outside (only suction version).
INSTALLATION OF THE APPLIANCE
Carry out all the masonry work necessary (e.g. 19 installation of an electric socket and/or a hole for the passage of the discharge tube).
In the case of the presence of panels and/or walls and/or lateral wall units check that there is sufficient space to install the hood and that access to the command panel is easy.
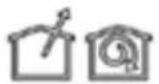
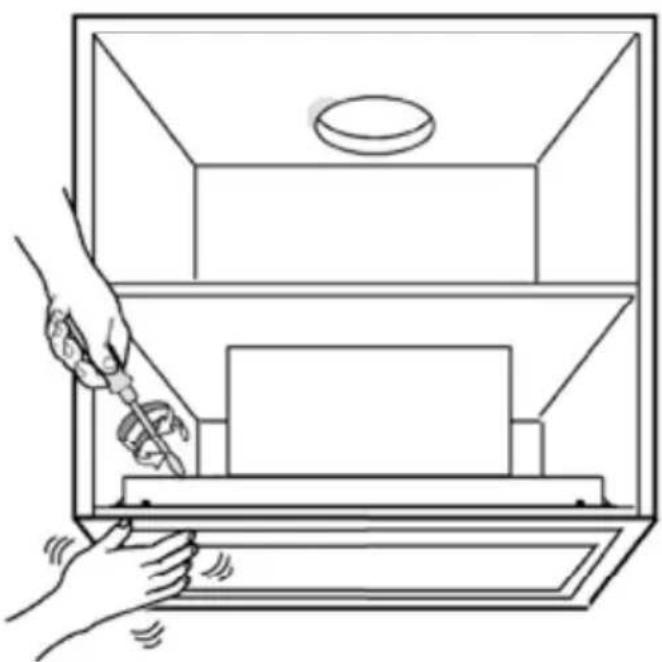
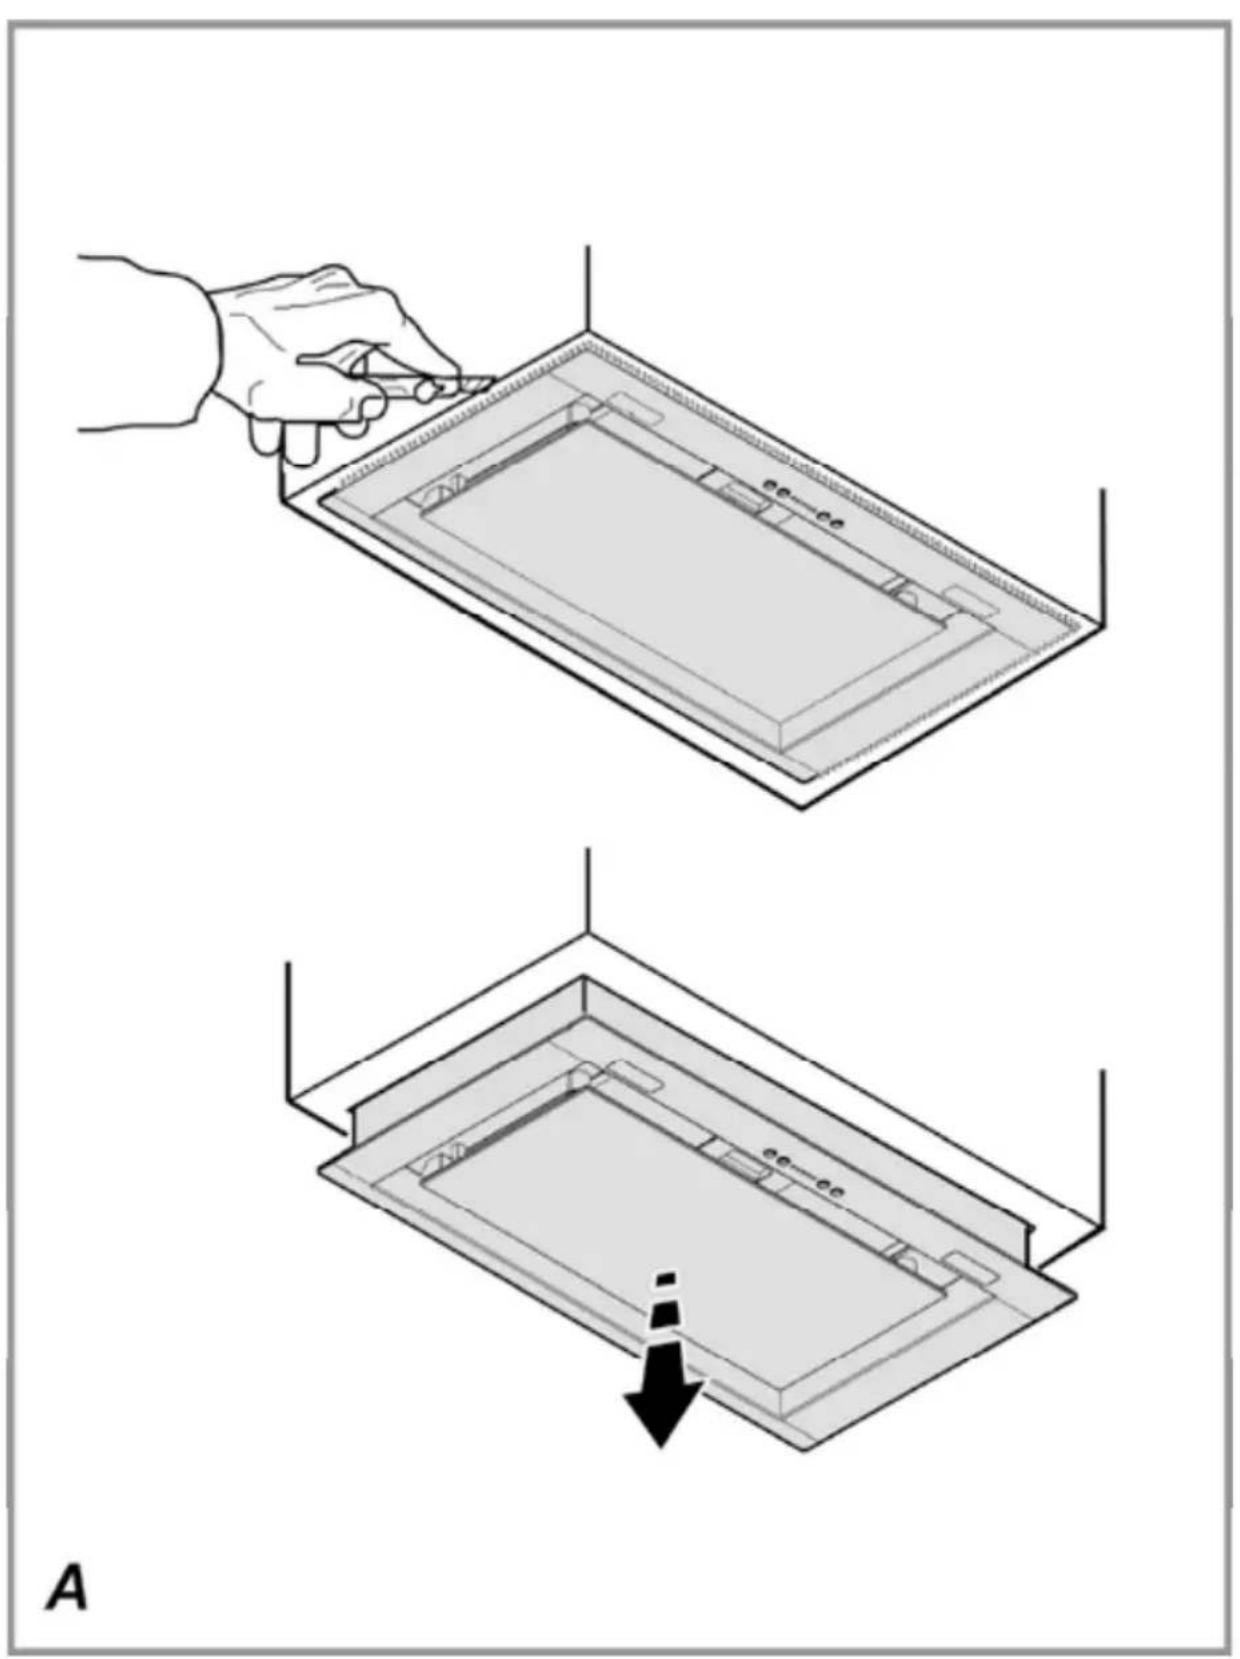
To remove the hood from the wall unit, perform the mounting steps in reverse order.
Caution: Use suitable cut resistant gloves.
Start detaching the hood from the double-sided adhesive that keeps it adherent to the bottom of the wall unit (see also Fig. 4)
Therefore, use a cutter that can be slipped between the sheet metal of the hood and the bottom of the wall unit on the right and left sides. Fig. A
OPERATING THE APPLIANCE
Operation
Use high suction power if excessive vapour is formed in kitchen. It is recommended that furnace hood suction unit is opened 5 minutes before beginning cooking and is left in operation during and for 15 minutes after cooking.
Control with levels

1 ON/OFF motor
Pressing the button, the hood turns on at speed 1. Pressing the button during functioning, the hood turns OFF.
2 Speed Increase
Pressing the button the hood passes from the OFF state to speed 1.
Pressing the button (hood in ON state) the motor speed is increased from speed 1 to intensive.
To each speed corresponds the ignition of the respective led.
Speed 1 led L1
Speed 2 led L2
Speed 3 led L3
Intensive Speed led L4 (flashing)
The intensive speed is timed. The standard timing is 5', at the end of which the hood positions itself to speed 2.
To deactivate the function before the time expires press key 2, the hood positions itself to speed 1, pressing key 1 the hood will turn off.
3 ON/OFF lights
4 Speed timing
5 Function state indicator
Speed Timing
The timing of the speed is enabled by pressing key 4, once the timing expires the hood turns off.
The timing is subdivided as follows:
Speed 1 - 20 minutes (led L1 flashing)
Speed 2 - 15 minutes (led L2 flashing)
Speed 3 - 10 minutes (led L3 flashing)
Intensive Speed - 5 minutes (led L4 flashing)
During the timed functioning pressing key 1 the hood turns off, if you press key 2 or key 4 the hood returns to the set speed.
Grease trap Signal
After 40 hours of operation the led L5 turns on.
When such signal appears the installed grease trap needs to be washed.
To reset the signal hold down key 1 for 3".
OPERATING THE APPLIANCE
Carbon filter Signal
After 160 hours of operation the led L5 flashes.
When such signal appears the installed carbon filter must be substituted.
To reset the signal hold down key 1 for 3".
In the case of both filters signalling at the same time, the led L5 will indicate the alarms alternately remaining on for 3" and subsequently flashing 3 times.
The reset takes place by carrying out the procedure described above 2 times.
The first time resets the grease trap signal, the second resets In the standard mode the carbon filter signal is not active.
In case one uses the hood in filter version is it necessary to enable the carbon filter signal.
Carbon filter signal activation:
Position the hood in OFF and simultaneously hold down keys 1 and 4 for 3".
The led L1 and L2 will flash for 5".
Carbon filter signal deactivation:
Position the hood in OFF and simultaneously hold down keys 1 and 4 for 3".
Temperature Alarm
The hood is equipped with a temperature sensor that activates the motor to speed 3 in the case that the temperature in the control panel zone becomes too elevated.
The alarm condition is indicated with the sequential flash of the leds L1, L2, L3.
This condition remains until the temperature falls below the alarm threshold.
You can get out of this mode by pressing key 1 or 2.
Every 30" the sensor checks the environmental temperature of the control panel zone.
MAINTENANCE AND CLEANING
ATTENTION! Before performing any maintenance operation, isolate the hood from the electrical supply by switching off at the connector and removing the connector fuse.
Or if the appliance has been connected through a plug and socket, then the plug must be removed from the socket.
Cleaning
The cooker hood should be cleaned regularly (at least with the same frequency with which you carry out maintenance of the fat filters) internally and externally. Clean using the cloth dampened with neutral liquid detergent. Do not use abrasive products. DO NOT USE ALCOHOL!
WARNING: Failure to carry out the basic cleaning recommendations of the cooker hood and replacement of the filters may cause fire risks.
Therefore, we recommend observing these instructions.
The manufacturer declines all responsibility for any damage to the motor or any fire damage linked to inappropriate maintenance or failure to observe the above safety recommendations.
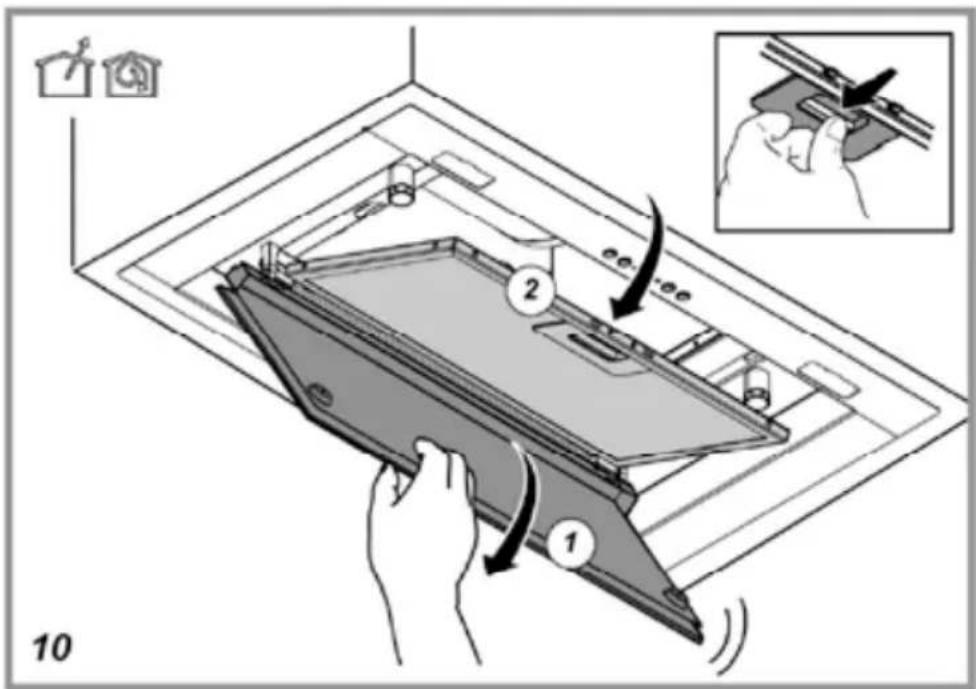
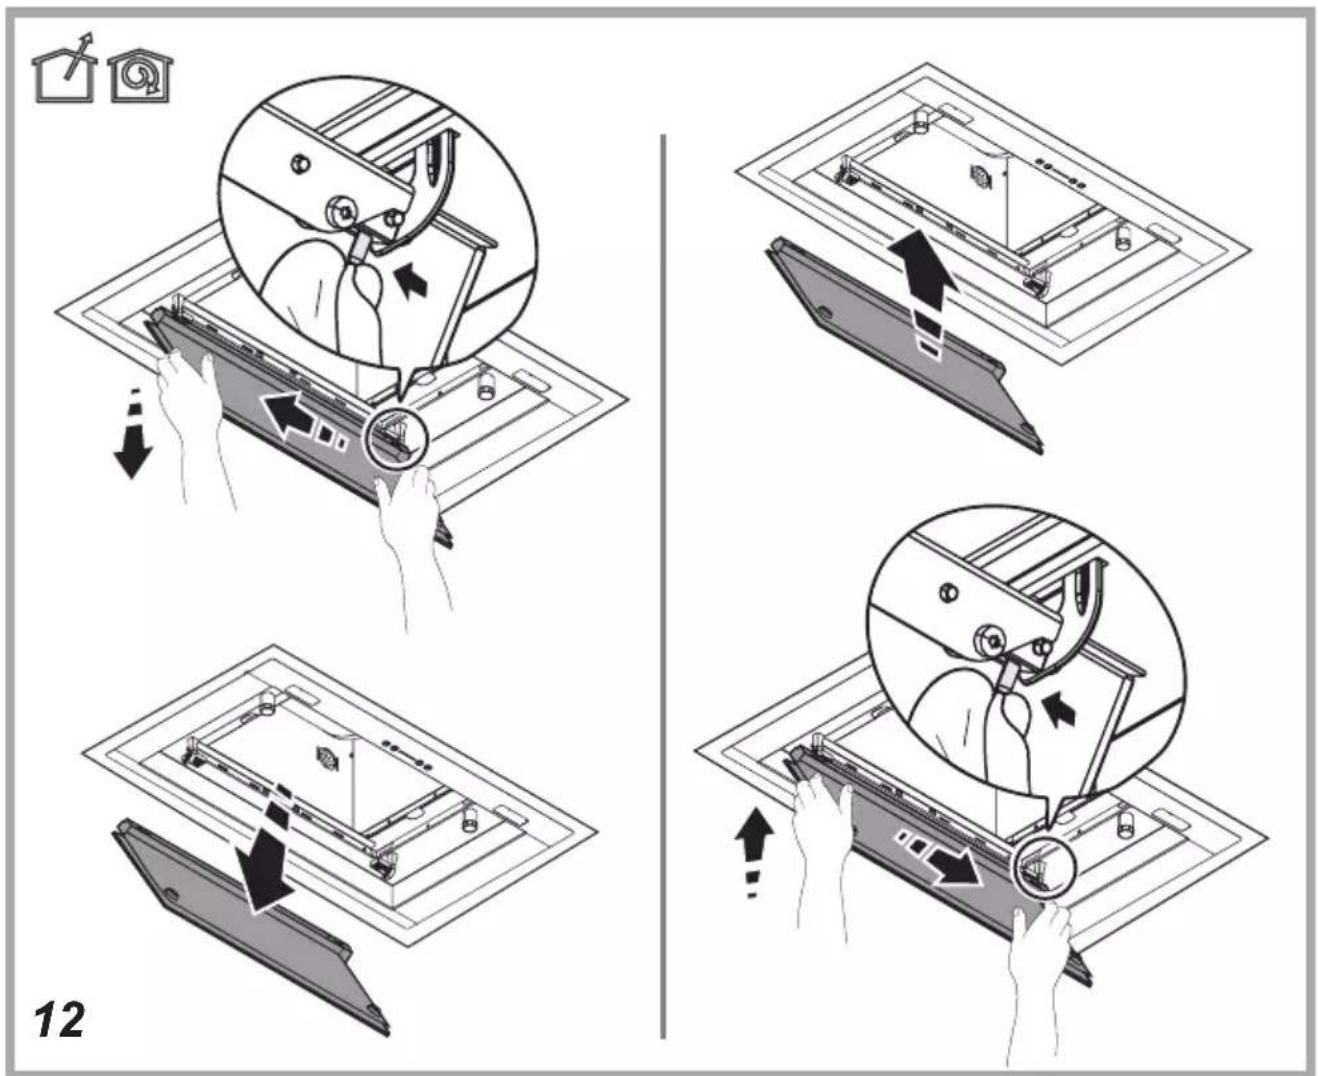
Panel
Fig. 12
Dismantling:
Pull the panel down and remove it from all the connecting points.
Cleaning:
The panel should be cleaned with the same frequency as the fat filters, using a cloth soaked in neutral liquid detergents.
Avoid the use of products containing abrasives. DO NOT USE ALCOHOL!
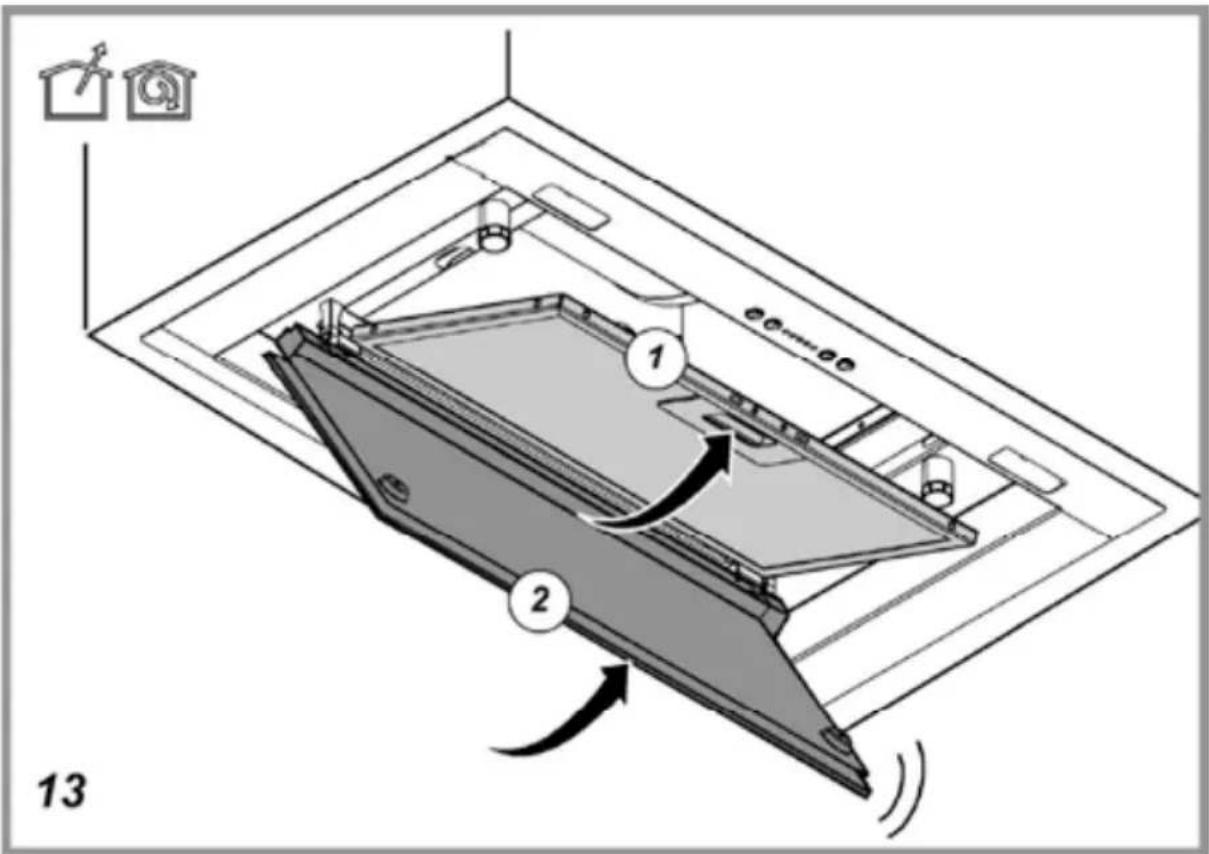
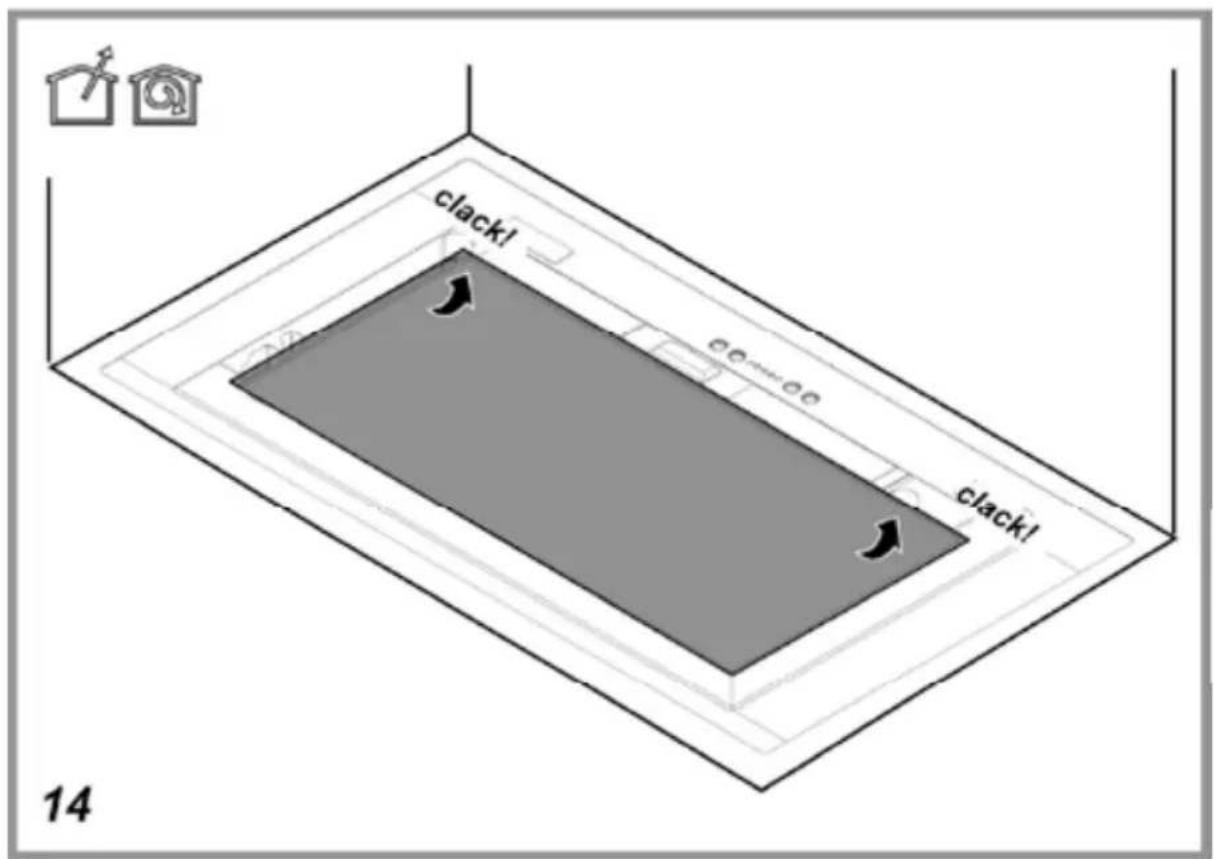
Montage:
The panel should be fixed between the connecting points placed for this reason on the surface of the hood.
Attention! Always check that the panel is fixed in its place well.
Grease filter
Fig. 10-13
Traps cooking grease particles.
The grease filter must be cleaned once a month using non aggressive detergents, either by hand or in the dishwasher, which must be set to a low temperature and a short cycle.
When washed in a dishwasher, the grease filter may discolour slightly, but this does not affect its filtering capacity. To remove the grease filter, pull the spring release handle.
MAINTENANCE AND CLEANING
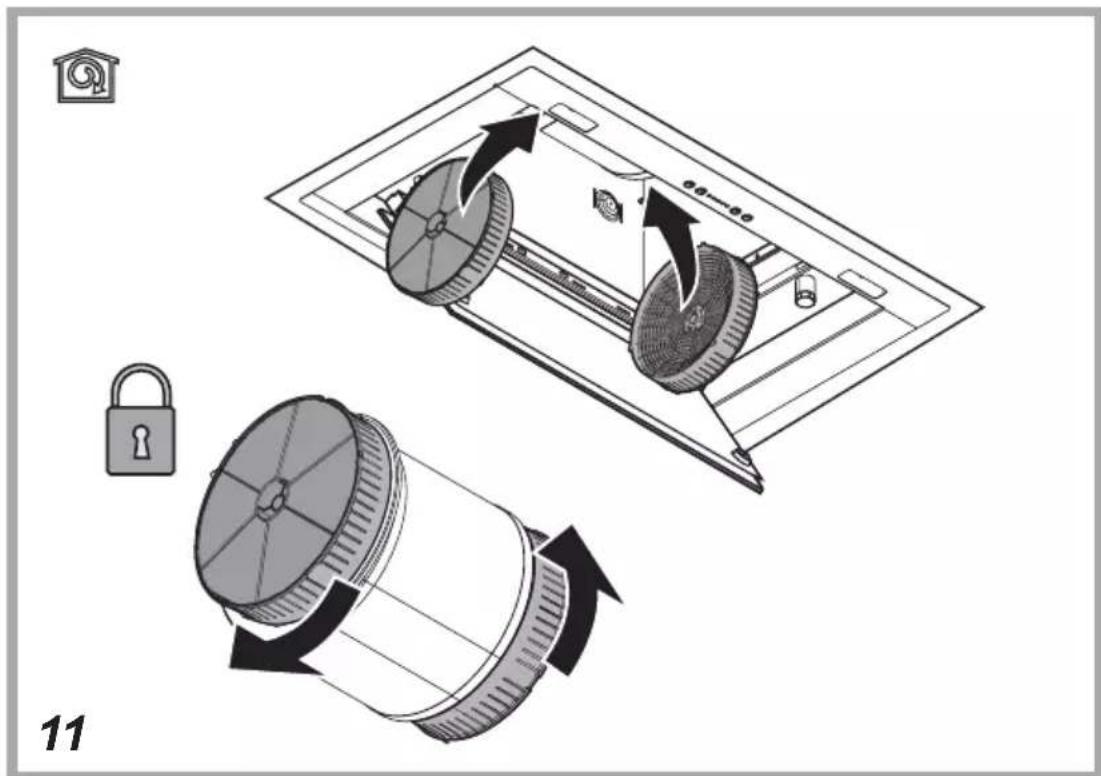
Charcoal filter (filtered version only)
Fig. 11
It absorbs unpleasant odours caused by cooking.
The saturation of the charcoal filter occurs after more or less prolonged use, depending on the type of cooking and the regularity of cleaning of the grease filter.
In any case it is necessary to replace the cartridge at least every four mounths.
The charcoal filter may NOT be washed or regenerated.
Circular charcoal filter
Apply one on each side as cover to both the shield grids of the motor impeller, then turn clockwise.
For the disassembly, turn counterclockwise.
Replacing lamps
The hood is equipped with a lighting system based on LED technology.
The LEDs guarantee an optimum lighting, a duration up to 10 times as long as the traditional lamps and allow to save 90% electrical energy.
For replacement, contact the technical service.
INFORMATION
Technical data
This product fulfils the European directives 2014/30/EU, 2014/35/EU, 2009/125/EC and 2011/65/EU.
Power source: 220 - 240 V, 50 Hz
Rights to make technical and design changes are reserved.
Kullfilter (bare for filtervers-jon)
Fig. 11
Kullfilteret absorberer ubehagelig lukt under matlaging.
INSTALLATION AF APPARATET
INSTALLATION AF APPARATET
Signal for fedtfilter
Signal for kulfilter
After 160 timers drift begynder LED L5 at blinke.
VEILIGHEIDSWAARSCHUWINGEN
VEILIGHEIDSWAARSCHUWINGEN
VEILIGHEIDSWAARSCHUWINGEN
VEILIGHEIDSWAARSCHUWINGEN
INSTALLATIE VAN HET APPARAAT
INSTALLATIE VAN HET APPARAAT
1 Motor AAN/UIT (ON/OFF)
Compliance with the WEEE Directive and Disposing of the Waste Product:
This product complies with EU WEEE Directive (2012/19/EU). This product bears a classification symbol for waste electrical and electronic equipment (WEEE).
This symbol indicates that this product shall not be disposed with other household wastes at the end of its service life. Used device must be returned to official collection point for recycling of electrical and electronic devices. To find these collection systems please contact to your local authorities or retailer where the product was purchased. Each household performs important role in recovering and recycling of old appliance. Appropriate disposal of used appliance helps prevent potential negative consequences for the environment and human health.
Compliance with RoHS Directive
The product you have purchased complies with EU RoHS Directive (2011/65/EU). It does not contain harmful and prohibited materials specified in the Directive.
Package information
Packaging materials of the product are manufactured from recyclable materials in accordance with our National Environment Regulations. Do not dispose of the packaging materials together with the domestic or other wastes. Take them to the packaging material collection points designated by the local authorities.
- SAFETY WARNINGS
- General safety
- Compliance with WEEE Directive and disposing of the waste product
- Compliance with RoHS Directive:
- Package information
- INSTALLATION OF THE APPLIANCE
- Electrical connection
- Mounting
- Before you start:
- OPERATING THE APPLIANCE
- Operation
- Control with levels
- ON/OFF motor
- Speed Increase
- ON/OFF lights
- Speed timing
- Function state indicator
- Speed Timing
- Grease trap Signal
- Carbon filter Signal
- Carbon filter signal activation:
- Temperature Alarm
- MAINTENANCE AND CLEANING
- Cleaning
- Panel
- Fig. 12
- Dismantling:
- Cleaning:
- Montage:
- Grease filter
- Fig. 10-13
- Traps cooking grease particles.
- Charcoal filter (filtered version only)
- It absorbs unpleasant odours caused by cooking.
- Circular charcoal filter
- Replacing lamps
- INFORMATION
- Technical data
- INSTALLATION AF APPARATET
- Signal for fedtfilter
- Signal for kulfilter
- VEILIGHEIDSWAARSCHUWINGEN
- INSTALLATIE VAN HET APPARAAT
- Motor AAN/UIT (ON/OFF)
- Compliance with the WEEE Directive and Disposing of the Waste Product:
- Compliance with RoHS Directive
- Package information
Brand : GRUNDIG
Model : GDL3661X
Category : Range hood