
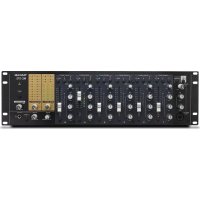
MX8A - Mixer TASCAM - Free user manual and instructions
Find the device manual for free MX8A TASCAM in PDF.
| Product Type | Matrix mixing console, 8 mic/line inputs, 8 line outputs |
| Brand | Tascam |
| Model | MX-8A |
| Dimensions (W x H x D) | 483 x 45 x 304.1 mm (including protrusions) |
| Weight | 3.0 kg |
| Power Supply | AC 100-240 V, 50/60 Hz, 21 W |
| Main Features | Built-in DSP, 4-band input EQ & 10-band output EQ, compressor, ducking, ANC (ambient noise compensation), delay, limiter, matrix routing, USB 2.0 audio interface (2 channels), Ethernet control, RS-232C, RS-485 |
| Input Connectors | 8 x balanced Euroblock (3.81 mm pitch), max level +26 dBu (MIC) / +24 dBu (LINE) |
| Output Connectors | 8 x balanced Euroblock (3.81 mm pitch), max level +24 dBu |
| USB Interface | USB 2.0 type B, 44.1/48 kHz, 16/24 bit |
| Network Connectivity | Ethernet 100BASE-TX (RJ-45), control via TASCAM MX CONNECT app |
| Serial Connectivity | RS-232C (D-sub 9-pin) and RS-485 (RJ-45) for external control |
| Rack Mounting | 1U (mounting kit included) |
| Operating Temperature | 0 °C to 40 °C |
| Supplied Accessories | Power cord, cable tie kit, rack mounting kit, instruction manual, warranty |
| Maintenance and Cleaning | Wipe with a dry, soft cloth. Do not use chemicals, thinner, or alcohol. |
| Safety | Warning symbols (lightning, exclamation mark). Use only with grounded outlet. Do not expose to water. Disconnect during thunderstorms. |
| Repairability | All repairs must be performed by qualified personnel. Contact TEAC for assistance. |
| Disposal Instructions | In accordance with the WEEE directive – do not dispose with household waste. Recycle at an authorized collection point. |
| Warranty | Legal warranty in the country of purchase. Contact the dealer in case of defects. |
| General Information | Specifications and appearance are subject to change without notice. Keep the manual for future reference. |
Frequently Asked Questions - MX8A TASCAM
User questions about MX8A TASCAM
0 question about this device. Answer the ones you know or ask your own.
Ask a new question about this device
Download the instructions for your Mixer in PDF format for free! Find your manual MX8A - TASCAM and take your electronic device back in hand. On this page are published all the documents necessary for the use of your device. MX8A by TASCAM.
USER MANUAL MX8A TASCAM
• TASCAM is a registered trademark of TEAC Corporation.
• Android, Google Play and Google Maps are trademarks or registered trademarks of Google Inc
- Microsoft, Windows, Windows Vista and Windows are either registered trademarks or trademarks of Corporation in the United States and/or other countries.
• Apple, Mac, Mac OS, macOS, iPad, iPod touch, Lightning, App Store and iTunes are trademarks of Apple Inc.
• IOS is a trademark or registered trademark of Cisco in the U.S. and other countries and is used under license.
- Other company names, product names and logos in this document are the trademarks or registered trademarks of their respective owners.
TEAC CORPORATION
https://tascam.com/us/
Phone: +1-323-726-0303
10410 Pioneer Blvd., Unit #1 and #4, Santa Fe Springs, CA 90640, U.S.A.
TEAC UK Ltd.
https://www.tascam.eu/en/
Phone: +44-1923-797205
Meridien House, 69-71 Clarendon Road, Watford, Herts, WD17
1DS, United Kingdom
TEAC EUROPE GmbH
https://www.tascam.eu/en/
Phone: +49-611-71580
Room 817, Block A, Hailrun Complex, 6021 Shennan Blvd., Futian
District, Shenzhen 518040, China
IMPORTANT SAFETY INSTRUCTIONS

CAUTION
RISK OF ELECTRIC SHOCK
DO NOT OPEN


CAUTION: TO REDUCE THE RISK OF ELECTRIC SHOCK, DO NOT REMOVE COVER (OR BACK). NO USER-SERVICEABLE PARTS INSIDE. REFER SERVICING TO QUALIFIED SERVICE PERSONNEL.
The lightning flash with arrowhead symbol, within equilateral triangle, is intended to alert the user to the presence of uninsulated “dangerous voltage” within the product’s enclosure that may be of sufficient magnitude to constitute a risk of electric shock to persons.
The exclamation point within an equilateral triangle is intended to alert the user to the presence of important operating and maintenance (servicing) instructions in the literature accompanying the appliance.
WARNING: TO PREVENT FIRE OR SHOCK HAZARD, DO NOT EXPOSE THIS APPLIANCE TO RAIN OR MOISTURE.
For U.S.A.
Declaration of Conformity
Model Number: MX-8A
Trade Name: TASCAM
Responsible party: TEAC AMERICA, INC.
Address: 10410 Pioneer Blvd., Unit #1 and #4, Santa Fe Springs, CA 90640, U.S.A.
Telephone number: 1-323-726-0303
This device complies with Part 15 of the FCC Rules. Operation is subject to the following two conditions: (1) this device may not cause harmful interference, and (2) this device must accept any interference received, including interference that may cause undesired operation.
INFORMATION TO THE USER
This equipment has been tested and found to comply with the limits for a Class B digital device, pursuant to Part 15 of the FCC Rules. These limits are designed to provide reasonable protection against harmful interference in a residential installation. This equipment generates, uses, and can radiate radio frequency energy and, if not installed and used in accordance with the instruction manual, may cause harmful interference to radio communications. However, there is no guarantee that interference will not occur in a particular installation. If this equipment does cause harmful interference to radio or television reception, which can be determined by turning the equipment off and on, the user is encouraged to try to correct the interference by one or more of the following measures.
a) Reorient or relocate the receiving antenna.
b) Increase the separation between the equipment and receiver.
c) Connect the equipment into an outlet on a circuit different from that to which the receiver is connected.
d) Consult the dealer or an experienced radio/TV technician for help.
CAUTION
Changes or modifications to this equipment not expressly approved by TEAC CORPORATION for compliance could void the user's authority to operate this equipment.
IN USA/CANADA, USE ONLY ON 120 V SUPPLY.
For Canada
THIS CLASS B DIGITAL APPARATUS COMPLIES WITH CANADIAN ICES-003.
CET APPAREIL NUMERIQUE DE LA CLASSE B EST CONFORME A LA NORME NMB-003 DU CANADA.


This product complies with the European Directives request and the other Commission Regulations.
CE Marking Information
EN55103-2
a) Applicable electromagnetic environment: E1, E2, E3, E4
- Read these instructions.
- Keep these instructions.
- Heed all warnings.
- Follow all instructions.
- Do not use this apparatus near water.
- Clean only with dry cloth.
- Do not block any ventilation openings. Install in accordance with the manufacturer's instructions.
- Do not install near any heat sources such as radiators, heat registers, stoves, or other apparatus (including amplifiers) that produce heat.
- Do not defeat the safety purpose of the polarized or grounding-type plug. A polarized plug has two blades with one wider than the other. A grounding type plug has two blades and a third grounding prong. The wide blade or the third prong are provided for your safety. If the provided plug does not fit into your outlet, consult an electrician for replacement of the obsolete outlet.
- Protect the power cord from being walked on or pinched particularly at plugs, convenience receptacles, and the point where they exit from the apparatus.
-
Only use attachments/accessories specified by the manufacturer.
-
Use only with the cart, stand, tripod, bracket, or table specified by the manufacturer, or sold with the apparatus. When a cart is used, use caution when moving the cart/ apparatus combination to avoid injury from tip-over.

natural_image
Symbolic icon of a person lifting a large object inside a circle (no text or symbols)- Unplug this apparatus during lightning storms or when unused for long periods of time.
-
Refer all servicing to qualified service personnel. Servicing is required when the apparatus has been damaged in any way, such as power-supply cord or plug is damaged, liquid has been spilled or objects have fallen into the apparatus, the apparatus has been exposed to rain or moisture, does not operate normally, or has been dropped.
-
The apparatus draws nominal non-operating power from the AC outlet with its POWER or STANDBY/ON switch not in the ON position.
- The mains plug is used as the disconnect device, the disconnect device shall remain readily operable.
- Caution should be taken when using earphones or headphones with the product because excessive sound pressure (volume) from earphones or headphones can cause hearing loss.
- If you are experiencing problems with this product, contact TEAC for a service referral. Do not use the product until it has been repaired.
CAUTION
- Do not expose this apparatus to drips or splashes.
- Do not place any objects filled with liquids, such as vases, on the apparatus.
- Do not install this apparatus in a confined space such as a book case or similar unit.
- The apparatus should be located close enough to the AC outlet so that you can easily grasp the power cord plug at any time.
- If the product uses batteries (including a battery pack or installed batteries), they should not be exposed to sunshine, fire or excessive heat.
- CAUTION for products that use replaceable lithium batteries: there is danger of explosion if a battery is replaced with an incorrect type of battery. Replace only with the same or equivalent type.
WARNING
- Products with Class I construction are equipped with a power supply cord that has a grounding plug. The cord of such a product must be plugged into an AC outlet that has a protective grounding connection.
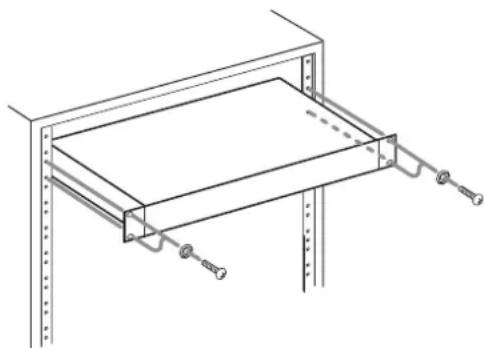
RACK-MOUNTING THE UNIT
Use the supplied rack-mounting kit to mount the unit in a standard 19-inch rack, as shown below.
Remove the feet of the unit before mounting.
natural_image
Technical line drawing of a mechanical assembly with mounting brackets and spring-loaded components (no text or symbols)ATTENTION
- Leave 1U of space above the unit for ventilation.
- Allow at least 10 cm (4 in) at the rear of the unit for ventilation.
For European Customers
Disposal of electrical and electronic equipment and batteries and/or accumulators
(a) All electrical/electronic equipment and waste batteries/accumulators should be disposed of separately from the municipal waste stream via collection facilities designated by the government or local authorities.
(b) By disposing of electrical/electronic equipment and waste batteries/accumulators correctly, you will help save valuable resources and prevent any potential negative effects on human health and the environment.
(c) Improper disposal of waste electrical/electronic equipment
and batteries/accumulators can have serious effects on the environment and human health because of the presence of hazardous substances in the equipment.
(d) The Waste Electrical and Electronic Equipment (WEEE) symbols, which show wheeled bins that have been crossed out, indicate that electrical/electronic equipment and batteries/accumulators must be collected and disposed of separately from household waste.
(e) Return and collection systems are available to end users. For more detailed information about the disposal of old electrical/electronic equipment and waste batteries/accumulators, please contact your city office, waste disposal service or the shop where you purchased the equipment.

Contents
IMPORTANT SAFETY INSTRUCTIONS .... 3
Introduction....5
Features......5
Included items 5
Conventions used in this manual 6
Precautions for placement and use....6
Notes about power supplies....6
Beware of condensation 6
Cleaning the unit 6
Using the TEAC Global Site 6
Product registration....6
About TASCAM customer support service....6
Names of parts....7
Front panel....7
Rear panel....8
Connecting Euroblock plugs 9
DSP overview 9
Input channels....9
Mixer....9
Output channels 9
Application overview 10
Connecting with Ethernet....10
USB audio interface functions....10
Installing the Windows dedicated software....10
Uninstalling the Windows dedicated software....11
Using the operation mode switches 11
Factory settings mode 11
Specifications....12
General 12
Input/output ratings....12
Audio performance....12
Other 12
Introduction
Thank you very much for purchasing the TASCAM MATRIX MIXER MX-8A.
Before using this unit, read this Owner's Manual carefully so that you will be able to use it correctly and enjoy working with it for many years. After you have finished reading this manual, please keep it in a safe place for future reference.
You can also download this Owner's Manual from the TEAC Global Site (http://teac-global.com/).
Features
● Matrix mixer with eight mic/line input channels and eight line output channels
- Euroblock terminals, which are optimal for permanent installations, used for input/output connectors
- Extensive onboard DSP for audio processing according to application and conditions
● Remote control via Ethernet possible
- USB audio interface supports easy recording and background music playback with a computer
● Support for serial control systems possible with built-in RS-232C connector
● RS-485 connector enables connection of a dedicated external controller
● Compact 1U rackmount size
Included items
This product includes the following items.
Take care when opening the package to avoid damaging the items. Keep the box and packing materials for transportation in the future.
Please contact the store where you purchased this unit if any of these items are missing or have been damaged during transportation.
● Main unit .......× 1
● Power cord....×1
- Euroblock plug....× 16
● Cable band kit .......× 1
- Rackmount screw kit....×1
● Owner's Manual (this document) including warranty....×1
Conventions used in this manual
In this manual, we use the following conventions:
- When we refer to buttons, connectors and other parts of this unit and other equipment, we use a bold font like this: POWER switch.
● As necessary, additional information is provided under TIP, NOTE and CAUTION headings.
TIP
These are tips about how to use the unit.
NOTE
These provide additional explanations and describe special cases.
ATTENTION
Failure to follow these instructions could result in damage to equipment or lost data, for example.
CAUTION
Failure to follow these instructions could result in injury.
Precautions for placement and use
● The operating temperature range of this unit is 0–40 °C.
- Do not install this unit in the following types of locations. Doing so could make the sound quality worse or cause malfunction.
Places with significant vibrations
Next to a window or in another location exposed to direct sunlight
Near heaters or other extremely hot places
Extremely cold places
Very humid or poorly ventilated places
Very dusty places
● To enable good heat dissipation, do not place anything on top of the unit.
- Do not place this unit on top of a power amplifier or other device that generates heat.
Notes about power supplies
- Insert the included power cord all the way into the AC IN connector.
- Do not connect a power supply other than one that is AC100V - 240V (50/60Hz).
- Hold the power cord by its plug when connecting or disconnecting it.
Beware of condensation
Condensation could occur if the unit is moved from a cold place to a warm place, it is used immediately after a cold room has been heated or it is otherwise exposed to a sudden temperature change.
To prevent this, or if this occurs, let the unit sit for one or two hours at the new room temperature before using it.
Cleaning the unit
Use a dry soft cloth to wipe the unit clean. Do not wipe with chemical cleaning cloths, thinner, alcohol or other chemical agents. Doing so could damage the surface or cause discoloration.
Using the TEAC Global Site
You can download updates for this unit from the TEAC Global Site:
http://teac-global.com/
In the TASCAM Downloads section, select the desired language to open the Downloads website page for that language.
Product registration
Customers in the USA, please visit the following TASCAM website to register your TASCAM product online.
https://tascam.com/us/
About TASCAM customer support service
TASCAM products are supported and warranted only in their country/region of purchase.
To receive support after purchase, on the TASCAM Distributors list page of the TEAC Global Site (http://teac-global.com/), search for the local company or representative for the region where you purchased the product and contact that organization.
When making inquiries, the address (URL) of the shop or web shop where it was purchased and the purchase date are required.
Moreover, the warranty card and proof of purchase might also be necessary.
Names of parts
Front panel

① POWER switch and indicators
Press to turn the unit on and off.
② USB port
This is a B-type USB port.
Use a USB cable (Type-A to Type-B) to connect the unit to a computer or iOS/Android device. (See "USB audio interface functions" on page 10.)
This unit can be used as a 2-channel audio interface with 44.1/48kHz and 16/24-bit resolution.
ATTENTION
The unit should be connected directly with the computer instead of via a USB hub.
NOTE
You will need a Lightning to USB Camera Adapter and the USB cable included with this unit to connect an iOS device.
③ STATUS indicator
The blue STATUS indicator shows the status of the unit by lighting, blinking and turning off.
See "Explanation of STATUS indicator status (lit/blinking/un-lit)" on page 7.
Explanation of STATUS indicator status (lit/blinking/unlit)
| STATUS indicator Note | ||
| Starting up Blinking mode 1 Slow blinking | (at 0.5-second intervals) | |
| Ordinary operation Lit | ||
| Error Blinking mode 3 Fast blinking (at 0.1-second intervals) | ||
| Responding to application Blinking mode 1 | Slow blinking (at 0.5-second intervals) | |
| Initializing Blinking mode 2 | Repeatedly blinks three times quickly, followed by one time slowly (3 times at 0.1-second intervals and 1 time at a 0.5-second interval) | |
| Initializing complete Lit | ||
| Initializing error Blinking mode 3 Fast blinking | (at 0.1-second intervals) | |
| Updating unit firmware Blinking mode 2 | Repeatedly blinks three times quickly, followed by one time slowly (3 times at 0.1-second intervals and 1 time at a 0.5-second interval) | |
| Updating unit firmware complete Lit |
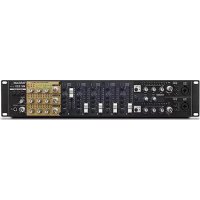
Rear panel

④ ANALOG input/output connectors
These are balanced Euroblock analog input/output connectors. (HOT, COLD, GND from the left)
⑤ RS-232C connector
This is a 9-pin D-sub RS-232C control input/output connector.
| Pin No. Signal | |
| 1 | |
| 2 | RD |
| 3 | TD |
| 4 | |
| 5 GND | |
| 6 | |
| 7 | |
| 8 | |
| 9 | |
NOTE
You cam download the TASCAM Mixer protocol for MX-8A from the TEAC Global Site (http://teac-global.com/).
⑥ RS-485 connector
Use this to connect an external controller.
Use a cable that is category 5e or higher for connection.
| Pin No. Signal | |
| 1 | B |
| 2 | A |
| 3 | |
| 4 DC24V | |
| 5 GND | |
| 6 | |
| 7 | |
| 8 GND | |
| 9 | |
ATTENTION
- The RS-485 connector is not an Ethernet (LAN) connector. Never connect a cable that is connected to a network to this unit. Connecting such a cable mistakenly could cause this unit or another device connected to the cable to malfunction.
- Always turn the unit power off before connecting or disconnecting a cable. Connecting and disconnecting while the power is on could cause malfunction.
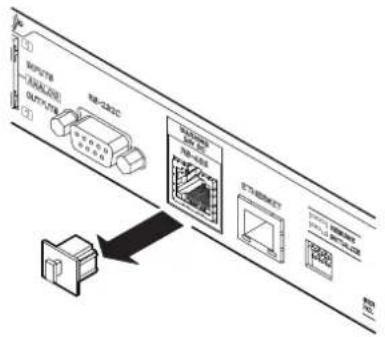
NOTE
A cover is attached to the RS-485 connector to prevent accidental insertion of an Ethernet LAN cable. Remove this cover before use.
flowchart
graph TD
    A["INPUTS"] --> B["ANALYZE"]
    B --> C["OUTPUTS"]
    D["ANALYZE"] --> E["RB-C200C"]
    F["Network Equipment"] --> G["PC1/DC1"]
    G --> H["PC2/DC2"]
    H --> I["PC3/DC3"]
    I --> J["PC4/DC4"]
    J --> K["PC5/DC5"]
    K --> L["PC6/DC6"]
    L --> M["PC7/DC7"]
    M --> N["PC8/DC8"]
    N --> O["PC9/DC9"]
    O --> P["PC10/DC10"]
    P --> Q["PC11/DC11"]
    Q --> R["PC12/DC12"]
    R --> S["PC13/DC13"]
    S --> T["PC14/DC14"]
    T --> U["PC15/DC15"]
    U --> V["PC16/DC16"]
    V --> W["PC17/DC17"]
    W --> X["PC18/DC18"]
    X --> Y["PC19/DC19"]
    Y --> Z["PC20/DC20"]
⑦ Ethernet connector
This is an Ethernet port. Use this to connect to a network and control the unit externally.
NOTE
You can download the TASCAM Mixer protocol for MX-8A from the TEAC Global Site (http://teac-global.com/).
⑧ Link status/activity indicator
Green indicates that a link is established between the devices. Blinking indicates that signals are being transmitted between the devices.
⑨ 100Mbps link status indicator
Orange indicates that a 100Mbps Ethernet link has been established.
⑩ Operation mode switches
Use these switches to change the operation mode of the unit. See "Using the operation mode switches" on page 11.
⑪ AC IN connector
Plug the included power cord in here.
Connecting Euroblock plugs
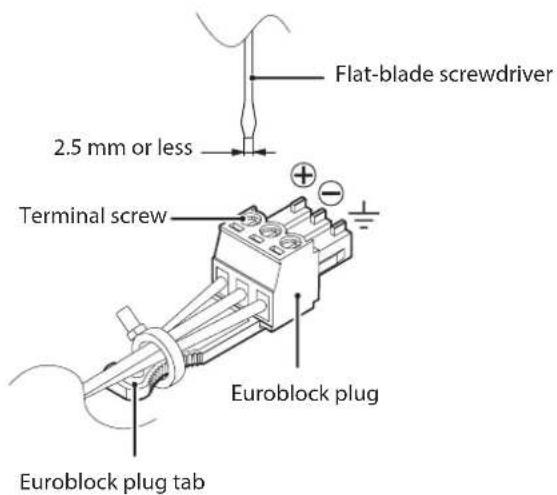
- Loosen the Euroblock plug terminal screws.
NOTE
Use a flat-blade screwdriver with a width of 2.5mm or less.
- Insert wires.
NOTE
AWG16–AWG28 wires are compatible with the included Euroblock plugs. Using wires within the compatible range, trim about 7 mm of the protective sheaths from their ends.
- Tighten the Euroblock plug terminal screws.
NOTE
Confirm that the wires cannot be pulled out.
- Use an included wire band to attach the wires to the Euroblock plug tab.
DSP overview
Input channels
Input polarity setting
Set according to the polarity of the input channel signal.
Compressor
When the input volume exceeds the THRESHOLD level, the input volume is compressed, reducing output volume variation.
Input equalizer
This unit has 4-band equalizers for the input channels.
Use the equalizer to increase or decrease the levels of specific frequency ranges. This can be used, for example, to enhance the sound of individual instruments, to adjust the balance of a wide frequency range and to cut specific unwanted frequencies.
Automatic level control function
When the input sound level is too low or too high, the input level will be increased or decreased automatically to an appropriate level.
Input channel fader
Adjust the level sent to the matrix and USB buses.
Input mute
Mute the input channel signal.
Mixer
Matrix mixer
This unit has simple matrix mixer functions.
Ducking function
When a mic signal is input, the ducking function can automatically lower the volume of background music or other sound input through the line input channels.
Ambient noise compensator (ANC) function
The ANC function can measure ambient noise and automatically adjust the volume to make the main sound source easier to hear.
Routing setting
Audio can be routed to multiple output channels through the matrix mixer, the ducking function and the ANC function.
Output channels
Output equalizer
This unit has 10-band equalizers for the output channels.
Use the equalizer to increase or decrease the levels of specific frequency ranges. This can be used, for example, to enhance the sound of individual instruments, to adjust the balance of a wide frequency range and to cut specific unwanted frequencies.
Delay function
Use to adjust the delay of output channel signals.
Output channel fader
Use to adjust the level sent to the output jack.
Output mute
Mute the output channel signal.
Output limiter function
This prevents distortion caused by sudden excessive output signal levels.
Output polarity setting
Set according to the polarity of the output channel signal.
Application overview
Using the TASCAM MX CONNECT remote control application, you can operate the unit from a distance.
For details about the application, please see its Owner's Manual. You can download the application Owner's Manual from the TEAC Global Site (http://teac-global.com/).
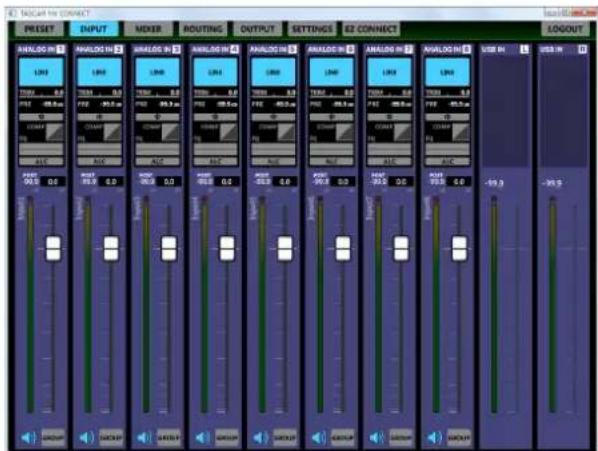
INPUT screen
Connecting with Ethernet
Connect a LAN cable to the ETHERNET connector on this unit.
Requirements for LAN cables used for connections with the connectors on this unit
Use STP cables that are at least category 5e. Both crossover and straight cables can be used.
USB audio interface functions
To use this unit as a USB audio interface with a Windows computer, dedicated software must be installed on the computer.
Download the latest software from the TEAC Global Site (http://teac-global.com/).
Installing the dedicated software will install a driver.
ATTENTION
- Before starting to install software, quit other applications.
- With a Mac, iOS or Android, the standard OS driver will be used, so there is no need to install any software.
Installing the Windows dedicated software
Follow the procedures below to install the Windows dedicated software.
ATTENTION
- Complete installation of the Windows dedicated software on the computer before connecting the unit to it with the USB cable.
- If you connected the unit to the computer using the USB cable before installing the Windows dedicated software and the "Found New Hardware Wizard" launched, close the Wizard and disconnect the USB cable.
Windows dedicated software installation procedures
- Download the latest Windows dedicated software from the TEAC Global Site (http://teac-global.com/) and save it on the computer to be used with the unit.
- Uncompress the saved software (zip file) on the computer desktop or another location.
- Double-click the "TASCAM_MX-8A_Installer_x.xx.exe" file in the folder that appears after uncompression to launch the installation software.
ATTENTION
If you open a zip file without decompressing it and double-click the "TASCAM_MX-8A_Installer_x.xx.exe" file in the folder that opens, installation will not start. Right-click the zip file and select "Extract All", for example, to decompress it and then try again.
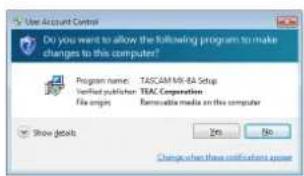
- When a Security Warning or User Account Control screen appears, click the Yes button.
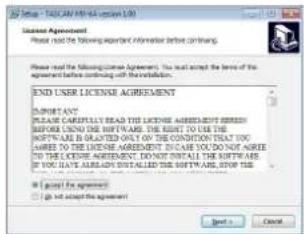
- Read the contents of the User License Agreement, and select "I accept the agreement" if you agree to the terms. Then, click the Next > button.
- Next, click the Install button.
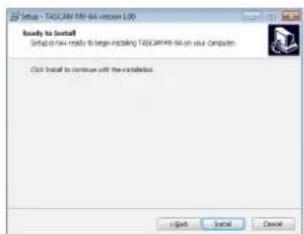
- Next, click the Install button to start installation. (Windows 7 only)

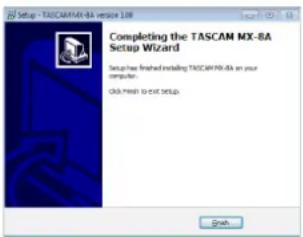
- The following screen appears when installation has completed. The following screen appears when installation has completed.
Click the Finish button.
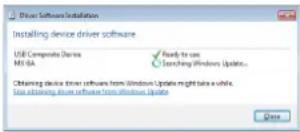
NOTE
The first time you connect the unit by USB to the computer after installing the software, installation of the device driver will be executed. Some time might be necessary before the unit is recognized because Windows Update will be automatically searched at this time. If the unit is still not recognized after a while, open the software installation screen from the notification area at the bottom right of the computer display, and click "Skip obtaining driver software from Windows Update" to stop the search.
Uninstalling the Windows dedicated software
Uninstalling from the Programs and Features Control Panel
NOTE
Normally, there is no need to uninstall the dedicated software. Follow these procedures if a problem occurs or you no longer intend to use the unit with the computer.
- From the Start menu, open the Control Panel and launch Programs and Features.
NOTE
- In Windows 10, right-click the Start button and click Control Panel when it appears.
-
In Windows 8.1, click the button ⬆ that appears at the bottom left of the Start screen to open the Apps screen, and click Control Panel.
-
If View by: is set to Category, click Uninstall a program under the Program item.
If View by: is set to Large icons or Small icons, click Programs and Features. - Select "TASCAM MX-8A version x.xx" from the list, and double click it.
- Then, follow the instructions that appear on the screen.
Using the operation mode switches
Use these switches to change the operation mode of the unit. Set these switches when the power is off to set the operation mode of the unit when it is turned on again with the POWER switch.
| Operation mode switches | |
| Ordinary mode | I---I RESUME |
| Factory settings mode | I---I INITIALIZE |
ATTENTION
- Set this to RESUME unless otherwise necessary. Do not set the switches to any setting other than those shown in this table. Doing so could cause this unit or a connected device to malfunction.
- Do not change the settings of the operation mode switches when the unit power is on.
Factory settings mode
When various settings have been changed using the dedicated application, use this mode to restore them to their factory default values.
- Turn the unit off.
- Set the operation mode switches.
| Operation mode switches | |
| Factory settings mode | I==I INITIALIZE |
- Turn the unit on.
The STATUS indicator blinks while the settings are being reset to their defaults.
See "Explanation of STATUS indicator status (lit/blinking/un-lit)" on page 7.
- The STATUS indicator will stop blinking and stay lit when resetting completes.
- Turn the unit off.
ATTENTION
Do not turn the power off while the settings are being reset.
This completes restoring default settings.
Set the operation mode switches back to ordinary mode (RE-SUME) before using the unit.
Specifications
General
FORMAT
44.1 k/48 kHz, 16 bit/24 bit
Input/output ratings
USB port
Connector: 4-pin USB B-type
Transfer rate: USB 2.0 High Speed (480 Mbps)
ANALOG IN connectors
Connector: Euroblock (balanced) 3.81 mm pitch
Minimum input level: -77.5 dBu
Maximum input level: +26 dBu (MIC)
Maximum input level: +24 dBu (LINE)
Input impedance: 2.2 kΩ or higher
ANALOG OUT connectors
Connector: Euroblock (balanced) 3.81 mm pitch
Nominal output level:
+4 dBu (when Ref.Level set to other than -9 dBFS)
+6 dBu (when Ref.Level set to -9 dBFS)
Maximum output level (switchable):
+15 dBu (Ref.Level: -9 dBFS)
+18 dBu (Ref.Level: -14 dBFS)
+20 dBu (Ref.Level: -16 dBFS)
+22 dBu (Ref.Level: -18 dBFS)
+24 dBu (Ref.Level: -20 dBFS)
Output impedance: 200 Ω or lower
RS-232C connector
D-sub 9-pin (female, inch-standard)
RS-485 connector
Connector: RJ-45
Cables: category 5e or faster STP cables
Ethernet connector
Connector: RJ-45
Transmission protocol: TCP/IP
Ethernet standard: 100BASE-TX
Cables: category 5e or faster STP cables
● 0 dBu=0.775 Vrms
Audio performance
Mic amp EIN (equivalent input noise)
-126 dBu or less (MIC IN → LINE OUT, Input impedance: 150 Ω,
22 kHz LPF, A-weighted, JEITA)
Frequency response
±0.5 dB: 20 Hz – 20 kHz
(+24 dBu input, MIC IN → LINE OUT, GAIN MIN, JEITA)
Distortion (THD+N)
0.005 % or less
(+24 dBu input, 1 kHz, MIC IN → LINE OUT, GAIN MIN, JEITA)
S/N ratio
106 dB or higher
(+24 dBu input, 44.1 k/48 kHz sampling frequency, MIC IN → LINE OUT, GAIN MIN, JEITA)
Crosstalk
106 dB or higher
(+24 dBu input, 1 kHz, MIC IN → LINE OUT, GAIN MIN, JEITA)
Dynamic range
106 dB or higher
(MIC IN → LINE OUT, GAIN MIN, JEITA)
Note: JEITA indicates compliance with JEITA CP-2150
Other
Power
AC100-240 V, 50/60 Hz
Power consumption
21 W
Dimensions
483 × 45 × 304.1 mm (W x H x D, including protrusions)
Weight
3.0 kg
Operating temperature range
0^ C-40^ C
- See the back of this manual for dimensional drawings and level and block diagrams.
● Illustrations in this manual might differ in part from the actual product. - Specifications and external appearance might be changed without notification to improve the product.
INSTRUCTIONS DE SÉCURITÉ IMPORTANTES

CAUTION
RISK OF ELECTRIC SHOCK
DO NOT OPEN


ATTENTION : POUR RÉDUIRE LE RISQUE D'ÉLECTROCUTION, NE RETIREZ PAS LE CAPOT (OU L'ARRIÈRE). AUCUNE PIÈCE INTERNE N'EST RÉPARABLE PAR L'UTILISATEUR. CONFIEZ TOUTE RÉPARATION À UN SERVICE APRÈS-VENTE QUALIFIÉ.
THIS CLASS B DIGITAL APPARATUS COMPLIES WITH CANADIAN ICES-003.
CET APPAREIL NUMÉRIQUE DE LA CLASSE B EST CONFORME À LA NORME NMB-003 DU CANADA.
CET APPAREIL NUMÉRIQUE DE LA CLASSE A EST CONFORME À LA NORME NMB-003 DU CANADA.


natural_image
Symbolic icon of a person pushing a large object, enclosed in a circle with a diagonal line (no text or symbols)natural_image
Technical line drawing of a mechanical assembly with mounting brackets and hanging sensors (no text or symbols)ATTENTION
Performances audio....22
Autres....22
Introduction
Barrette Euroblock....×16
44,1 k/48 kHz, 16 bit/24 bit
natural_image
Symbolic icon of a person lifting a large object, enclosed in a circle with no text or symbolsnatural_image
Technical line drawing of a mechanical assembly with a rectangular frame and attached fasteners (no text or symbols)ATENCIÓN
Conector Euroblock....× 16
④ Conectores de entrada/salida ANALOG
44.1/48 kHz, 16/24 bits
Entrada/salida
Puerto USB
(MIC IN → LINE OUT, GAIN MIN, JEITA)
natural_image
Technical line drawing of a mechanical assembly with mounting holes and a rectangular frame (no text or symbols)Kondensation vermeiden
④ Anschlüsse ANALOG INPUT/OUTPUT
44,1/48 kHz, 16/24 Bit
natural_image
Symbolic icon of a person lifting a ladder inside a circle with a diagonal line (no text or symbols)natural_image
Technical line drawing of a mechanical assembly with mounting brackets and spring-loaded components (no text or symbols)ATTENZIONE
Spina Euroblock....× 16
44.1k/48kHz, 16bit/24bit
(ingresso +24dBu, 1 kHz, MIC IN → LINE OUT, GAIN MIN, JEITA)
Rapporto S/N
106 dB o superiore
(ingresso +24dBu, 1kHz, MIC IN → LINE OUT, GAIN MIN, JEITA)
Gamma dinamica
106 dB o superiore
(LINE IN → LINE OUT, GAIN MIN, JEITA)
natural_image
Technical line drawing of a mechanical assembly with hanging weights and a rectangular frame (no text or symbols)電源について
④ ANALOG入出力端子
line
| Category | Power (dBu) | Frequency (dBfs) | | :--- | :--- | :--- | | PAD-ON-GAIN L/VOL MIN | -26.0 | 24.0 | | PAD-OFF-GAIN L/VOL MIN | -7.0 | 36.0 | | PAD-ON-GAIN L/VOL MAX | -10.0 | 20 | | PAD-OFF-GAIN H/VOL MIN | -21.5 | 21.5 | | PAD-OFF-GAIN L/VOL MAX | -34.0 | 57.5 | | PAD-OFF-GAIN II/VOL MAX | -77.5 | 90 | | NIM1195 | -1.5 | 21.5 | | AK5534 | +4.5 | 15.5 | | AK4454 | +8.15 | 11.8 | | AK4454 | +9.0 | 10.2 | | AK4454 | +24.0 | 4.0 |
flowchart
graph TD
    subgraph Inputs
        INPUT1["46V"] --> PHASE
        INPUT2["46V"] --> PHASE
        INPUT3["46V"] --> PHASE
        INPUT4["46V"] --> PHASE
        INPUT5["46V"] --> PHASE
        INPUT6["46V"] --> PHASE
        INPUT7["46V"] --> PHASE
        INPUT8["46V"] --> PHASE
    end

    PHASE --> CONTROL
    CONTROL --> MODE1
    MODE1 --> MUTE1
    MUTE1 --> MUTE2
    MUTE2 --> MUTE3
    MUTE3 --> MUTE4
    MUTE4 --> MUTE5
    MUTE5 --> MUTE6
    MUTE6 --> MUTE7
    MUTE7 --> MUTE8
    MUTE8 --> MUTE9
    MUTE9 --> MUTE10

    MUTE10 --> USB
    MUTE10 --> USBMUTE
    MUTE10 --> USBLMUTE

    USB --> US2
    USBMUTE --> US2
    US2 --> MUXBUS1-10

    MUXBUS1-10 --> MUTE1
    MUTE1 --> MUTE2
    MUTE2 --> MUTE3
    MUTE3 --> MUTE4
    MUTE4 --> MUTE5
    MUTE5 --> MUTE6
    MUTE6 --> MUTE7
    MUTE7 --> MUTE8
    MUTE8 --> MUTE9
    MUTE9 --> MUTE10

    MUXBUS1-10 --> MUTE10
    MUTE10 --> USB
    USBMUTE --> USBLMUTE

    USB --> US2

    US2 --> MUXBUS1-10

    MUXBUS1-10 --> MUTE10
    MUTE10 --> MUTE2
    MUTE2 --> MUTE3
    MUTE3 --> MUTE4
    MUTE4 --> MUTE5
    MUTE5 --> MUTE6
    MUTE6 --> MUTE7
    MUTE7 --> MUTE8
    MUTE8 --> MUTE9

    MUXBUS1-10 --> MUTE10

    MUSE1["46V"] --> PHASE
    PHASE --> CONTROL
    CONTROL --> MODE10
    MODE10 --> MODE20
    MODE20 --> MODE30
    MODE30 --> MODE40
    MODE40 --> MODE50
    MODE50 --> MODE60
    MODE60 --> MODE70
    MODE70 --> MODE80

    MODE10 --> USB
    MODE80 --> USBMUTE

    USB --> US2

    US2 --> MUSE1

    US2 --> MUSE2

    US2 --> MUSE3

    US2 --> MUSE4

    US2 --> MUSE5

    US2 --> MUSE6

    US2 --> MUSE7

    US2 --> MUSE8

    US2 --> MUSE9

    US2 --> MUSE10

    US2 --> USB

    USB --> US2

    US2 --> USBMUTE

    USBMUTE --> USBLMUTE

    USBLMUTE --> USBRMUTE

    USBLMUTE --> USBSP

    USBSP --> OUTPUT1["OUTPUT1"]
    USBSP --> OUTPUT2["OUTPUT2"]
    USBSP --> OUTPUT3["OUTPUT3"]
    USBSP --> OUTPUT4["OUTPUT4"]
    USBSP --> OUTPUT5["OUTPUT5"]
    USBSP --> OUTPUT6["OUTPUT6"]
    USBSP --> OUTPUT7["OUTPUT7"]
    USBSP --> OUTPUT8["OUTPUT8"]

    US2 --> OUTPUT1
    US2 --> OUTPUT2
    US2 --> OUTPUT3
    US2 --> OUTPUT4
    US2 --> OUTPUT5
    US2 --> OUTPUT6
    US2 --> OUTPUT7
    US2 --> OUTPUT8

    US2 --> OUTPUT1
    US2 --> OUTPUT2
    US2 --> OUTPUT3
    US2 --> OUTPUT4
    US2 --> OUTPUT5
    US2 --> OUTPUT6
    US2 --> OUTPUT7
    US2 --> OUTPUT8

    US2 --> OUTPUT1
    US2 --> OUTPUT2
    US2 --> OUTPUT3
    US2 --> OUTPUT4
    US2 --> OUTPUT5
    US2 --> OUTPUT6
    USA_10["46V"] --> PHASE
    PHASE --> CONTROL
    CONTROL --> MODE10
    MODE10 --> MODE20
    MODE20 --> MODE30
    MODE30 --> MODE40
    MODE40 --> MODE50
    MODE50 --> MODE60
    MODE60 --> MODE70

    style INPUT fill:#f9f,stroke:#333,stroke-width:2px

    style INPUT1 fill:#ccf,stroke:#333,stroke-width:2px

    style INPUT2 fill:#ccf,stroke:#333,stroke-width:2px

    style INPUT3 fill:#ccf,stroke:#333,stroke-width:2px

    style INPUT4 fill:#ccf,stroke:#333,stroke-width:2px

    style INPUT5 fill:#ccf,stroke:#333,stroke-width:2px

    style INPUT6 fill:#ccf,stroke:#333,stroke-width:2px

    style INPUT7 fill:#ccf,stroke:#333,stroke-width:2px

    style INPUT8 fill:#ccf,stroke:#333,stroke-width:2px

    style INPUT9 fill:#ccf,stroke:#333,stroke-width:2px

    style INPUT10 fill:#ccf,stroke:#333,stroke-width:2px
ソフトウェアに関する重要なお知らせ
http://teac-global.com/support/opensource/form/
To request the source codes, please access the following URL and fill in the registration form.
http://teac-global.com/support/opensource/form/
Please note that we are unable to answer any inquiries or questions about the contents of the source codes.
Software Licensing
IwIP (v2.0.3)
http://savannah.nongnu.org/projects/lwip/
lwIP is licenced under the BSD licence:
Copyright (c) 2001-2004 Swedish Institute of Computer Science.
All rights reserved.
Redistribution and use in source and binary forms, with or without modification, are permitted provided that the following conditions are met:
-
Redistributions of source code must retain the above copyright notice, this list of conditions and the following disclaimer.
-
Redistributions in binary form must reproduce the above copyright notice, this list of conditions and the following disclaimer in the documentation and/or other materials provided with the distribution.
-
The name of the author may not be used to endorse or promote products derived from this software without specific prior written permission.
THIS SOFTWARE IS PROVIDED BY THE AUTHOR 'AS IS' AND ANY EXPRESS OR IMPLIED WARRANTIES, INCLUDING, BUT NOT LIMITED TO, THE IMPLIED WARRANTIES OF MERCHANTABILITY AND FITNESS FOR A PARTICULAR PURPOSE ARE DISCLAIMED. IN NO EVENT SHALL THE AUTHOR BE LIABLE FOR ANY DIRECT, INDIRECT, INCIDENTAL, SPECIAL, EXEMPLARY, OR CONSEQUENTIAL DAMAGES (INCLUDING, BUT NOT LIMITED TO, PROCUREMENT OF SUBSTITUTE GOODS OR SERVICES; LOSS OF USE, DATA, OR PROFITS; OR BUSINESS INTERRUPTION) HOWEVER CAUSED AND ON ANY THEORY OF LIABILITY, WHETHER IN CONTRACT, STRICT LIABILITY, OR TORT (INCLUDING NEGLIGENCE OR OTHERWISE) ARISING IN ANY WAY OUT OF THE USE OF THIS SOFTWARE, EVEN IF ADVISED OF THE POSSIBILITY OF SUCH DAMAGE.
FreeRTOS (v6.0.4)
This warranty gives you specific legal rights and you may also have other rights which vary from state to state. This warranty is only valid within the country the unit was originally purchased.
WHAT IS AND IS NOT COVERED
Except as specified below, this warranty covers all defects in materials and workmanship in this product. The following are not covered by the warranty:
- Damage to or deterioration of the external cabinet.
- Damages resulting from accident, misuse, abuse or neglect.
- Damage resulting from failure to perform basic daily maintenance and/or calibration or otherwise resulting from failure to follow instructions contained in your owner's manual.
- Damage occurring during shipment of the product. (Claims must be presented to the carrier)
- Damage resulting from repair or attempted repair by anyone other than TEAC or an authorized TASCAM service station.
- Damage resulting from causes other than product defects, including lack of technical skill, competence, or experience of the user.
- Damage to any unit which has been altered or on which the serial number has been defaced, modified or is missing.
WHO IS COVERED UNDER THE WARRANTY
This warranty may be enforced only by the original purchaser. This warranty is not valid if the product was purchased through an unauthorized dealer.
LENGTH OF WARRANTY
All parts except heads and disk drives are warranted for one (1) year from the date of original purchase. Heads and disk drives are warranted to ninety (90) days from date of original purchase. Labor is warranted for ninety (90) days from date of original purchase.
WHAT WE WILL PAY FOR
We will pay all labor and material expenses for items covered by the warranty. Payment of shipping charges is discussed in the next section of this warranty.
HOW YOU CAN GET WARRANTY SERVICE
Your unit must be serviced by an authorized TASCAM service station in the United States. (This warranty is not enforceable outside the U.S.) If you are unable to locate an authorized TASCAM service station in your area, please contact us. We either will refer you to an authorized service station or instruct you to return the unit to the factory. Whenever warranty service is required, you must present a copy of the original dated sales receipt from an Authorized TASCAM Dealer.
You must pay any shipping charges if it is necessary to ship the product to service. However, if the necessary repairs are covered by the warranty, we will pay return surface shipping charges to any destination within the United States.
LIMITATION OF IMPLIED WARRANTIES
Any implied warranties, INCLUDING WARRANTIES OF MERCHANTABILITY AND FITNESS FOR A PARTICULAR PURPOSE, are limited in duration to the length of this warranty.
EXCLUSION OF DAMAGES
TEAC's liability for any defective product is limited to repair or replacement of the product, at TEAC's option. TEAC shall not be liable for:
-
Damages based upon inconvenience, loss of use of the product, loss of time interrupted operation or commercial loss; or
-
Any other damages, whether incidental, consequential or otherwise.
Some states do not allow limitations on how long an implied warranty lasts and/or do not allow the exclusion or limitation of incidental or consequential damages, so the above limitations and exclusions may not apply to you.
To locate an Authorized Service Center in Your Area
CALL 1-800-447-8322
This product is subject to the legal warranty regulations of the country of purchase. In case of a defect or a problem, please contact the dealer where you bought the product.
These warranty provisions in Japanese are valid only in Japan.
< In other countries/areas >
This warranty gives you specific legal rights, and you may also have other rights that vary by country, state or province. If you have a warranty claim or request, please contact the dealer where you bought the product.
If you require repair services for your TASCAM equipment, please contact the dealer where the product was purchased from or the TASCAMDistributor in your country. A list of TASCAMD distributors can be found on our website at http://teac-global.com/
- TEAC CORPORATION
- TEAC UK Ltd.
- TEAC EUROPE GmbH
- IMPORTANT SAFETY INSTRUCTIONS
- For U.S.A.
- Declaration of Conformity
- INFORMATION TO THE USER
- CAUTION
- For Canada
- CE Marking Information
- WARNING
- RACK-MOUNTING THE UNIT
- ATTENTION
- For European Customers
- Disposal of electrical and electronic equipment and batteries and/or accumulators
- Contents
- Introduction
- Features
- Included items
- Conventions used in this manual
- TIP
- NOTE
- Precautions for placement and use
- Notes about power supplies
- Beware of condensation
- Cleaning the unit
- Using the TEAC Global Site
- Product registration
- About TASCAM customer support service
- Names of parts
- Front panel
- ① POWER switch and indicators
- ② USB port
- ③ STATUS indicator
- Rear panel
- ④ ANALOG input/output connectors
- ⑤ RS-232C connector
- ⑥ RS-485 connector
- ⑦ Ethernet connector
- ⑧ Link status/activity indicator
- ⑨ 100Mbps link status indicator
- ⑩ Operation mode switches
- ⑪ AC IN connector
- Connecting Euroblock plugs
- DSP overview
- Input channels
- Input polarity setting
- Compressor
- Input equalizer
- Automatic level control function
- Input channel fader
- Input mute
- Mixer
- Matrix mixer
- Ducking function
- Ambient noise compensator (ANC) function
- Routing setting
- Output channels
- Output equalizer
- Delay function
- Output channel fader
- Output mute
- Output limiter function
- Output polarity setting
- Application overview
- Connecting with Ethernet
- Requirements for LAN cables used for connections with the connectors on this unit
- USB audio interface functions
- Installing the Windows dedicated software
- Windows dedicated software installation procedures
- Uninstalling the Windows dedicated software
- Using the operation mode switches
- Factory settings mode
- Specifications
- General
- FORMAT
- Input/output ratings
- USB port
- ANALOG IN connectors
- ANALOG OUT connectors
- RS-232C connector
- RS-485 connector
- Ethernet connector
- Audio performance
- Mic amp EIN (equivalent input noise)
- Frequency response
- Distortion (THD+N)
- S/N ratio
- Crosstalk
- Dynamic range
- Other
- Power
- Power consumption
- Dimensions
- Weight
- Operating temperature range
- INSTRUCTIONS DE SÉCURITÉ IMPORTANTES
- I grant the agreement
- ATENCIÓN
- ④ Conectores de entrada/salida ANALOG
- Entrada/salida
- Puerto USB
- Kondensation vermeiden
- ④ Anschlüsse ANALOG INPUT/OUTPUT
- I do not accept the agreement
- ATTENZIONE
- Rapporto S/N
- Gamma dinamica
- 電源について
- ④ ANALOG入出力端子
- ソフトウェアに関する重要なお知らせ
- Software Licensing
- IwIP (v2.0.3)
- WHAT IS AND IS NOT COVERED
- WHO IS COVERED UNDER THE WARRANTY
- LENGTH OF WARRANTY
- WHAT WE WILL PAY FOR
- HOW YOU CAN GET WARRANTY SERVICE
- LIMITATION OF IMPLIED WARRANTIES
- EXCLUSION OF DAMAGES
- To locate an Authorized Service Center in Your Area
- < In other countries/areas >
Brand : TASCAM
Model : MX8A
Category : Mixer