LG15407C - Faucet Pfister - Free user manual and instructions
Find the device manual for free LG15407C Pfister in PDF.

| Product Type | Bathtub faucet with hand shower |
| Brand | Pfister |
| Model | LG15407C |
| Main functions | Hand shower with three spray modes (maximum pulsating, pulsating, maximum); diverter to alternate between spout and hand shower |
| Warranty | Lifetime warranty for homeowners (mechanical and finish); 10 years for commercial use |
| Compatibility | Designed for Pfister faucets series 0X6-140R and JX6-140R |
| Material | Available finishes: Polished Chrome, PVD Brushed Nickel, Rustic Bronze, Tuscan Bronze |
| Recommended water pressure | Minimum 172 kPa (25 PSI) |
| Connection | 13 mm (1/2 in) inner diameter and 16 mm (1/2 in) outer diameter copper tubing or Pfister flexible kit 15-136 |
| Maintenance and cleaning | Clean with a damp cloth only; avoid polishing pastes, detergents, abrasive products, solvents or acids |
| Safety | Recommended: installation of a water hammer arrestor; shut off water supply before servicing |
| Spare parts | Available from dealer or Pfister after-sales service |
| Customer service | Phone: 1-800-732-8238; Website: www.pfisterfaucets.com |
Frequently Asked Questions - LG15407C Pfister
User questions about LG15407C Pfister
0 question about this device. Answer the ones you know or ask your own.
Ask a new question about this device
Download the instructions for your Faucet in PDF format for free! Find your manual LG15407C - Pfister and take your electronic device back in hand. On this page are published all the documents necessary for the use of your device. LG15407C by Pfister.
USER MANUAL LG15407C Pfister
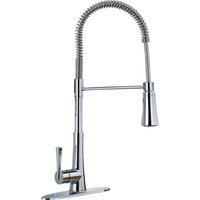
Roman Tub Hand-Held Shower with Diverter
Lifetime Limited Mechanical & Pfinish Warranty Covers Pfinish and Pffunction for as Long as You Own Your Home
(Commercial Applications Limit the Duration of the Warranties as Provided Below)
Pfister provides the following Warranties for its products. Proof of Purchase may be required in order to obtain any of the benefits set forth below.
Limited Warranties: Pfister warrants that for as long as the original purchase owns the home in which the Pfister product (the "Product") is originally installed, the Product will be free of all defects in material and workmanship that would impair the intended and proper use of the Product. If the Product is installed in a commercial application, the above mechanical warranty shall be limited for a period of ten (10) years from the date of purchase of the Product.
Pfister warrants against deterioration of the Product's finish for as long as the original purchaser owns the home in which the Product is originally installed. If the Product is installed in a commercial application, the above finish warranty for Products that do not contain the Pforever finish shall be limited to a period of five (5) years from the date of purchase.
Exclusive Remedy: In the event of any defect in the Product that breaches the foregoing warranties, Pfizer, at its option, will repair or replace the defective part of the Product. Repair or replacement of the Product is the exclusive remedy.
For any remedy under this warranty, Pfister is to be notified describing the problem. In order to notify Pfister and receive assistance or service under this warranty, the original purchaser may: (1) call 1-800-Plaecet (1-800-732-8238) for a consumer service representative who can assist you, or (2) write consumer service department e/o Pfister Inc., 19701 DaVinci, Lake Forest, CA 92610, and include a description of the problem, model number your name, address, phone number and approximate date of purchase, or (3) email Pfister's customer service department by going to www.pfisterfaecets.com, or (4) notify the location or distributor from which the Product was purchased. In any case, you may be required to return the Product to Pfister for inspection and proof of purchase may be required.
Limitations and Exclusions:
PFISTER WILL NOT BE LIABLE FOR ANY OTHER DAMAGES OR LOSSES, INCLUDING BUT NOT LIMITED TO, INCIDENTAL AND/OR CONSEQUENTIAL DAMAGES, REGARDLESS OF THE LEGAL THEORY ASSERSED, INCLUDING ANY CLAIM OR BREACH OF WARRANTY IIEREUNDER OR ANY OTTIHER CAUSE, AND WHETHER ASING IN CONTRACT OR IN TORT (including negligence and strict liability).
Pfister has the right to discontinue or modify any product at any time. Some states do not allow limitations or exclusions of incidental or consequential damages, so the above limitations or exclusions may not apply to you. This warranty gives you specific legal rights, and you may also have other rights which vary from state to state.
The above warranties do not cover damage resulting from improper maintenance, repair, cleaning or installation, misuse, abuse, alterations, accidents or acts of God.

Pfister
Thank you for purchasing this Pfister product. All Pfister products carefully engineered, and factory tested to provide long trouble-free use under normal conditions. This product is easy to install using basic tools and our easy to follow illustrated instructions. If you have any questions regarding this product, call 1-800-Pfaucet (1-800-732-8238).
1 BEFORE PROCEEDING
WARNING: Read all the instructions completely before proceeding. Pfister recommends calling a professional if you are uncertain about installing this product!
This product has been designed for use with the Pfister 0X6-140R or JX6-140R Roman Tub series rough-in. It will not work with any other product.
This product should be installed in accordance with all local and state plumbing and building codes. For optimum performance of your new Pfister faucet, a minimum water pressure of 25 PSI (172 kPa) is recommended.
Your installation will require supply tubes. To preserve the high flow characteristics of these valves, it is necessary to use 12 I.D. (%) O.D.) copper tubing or Pfister Quick Connect Hose Kit 15-136. Consult the store where you purchased your faucet for the recommended connections that you may require for your area. Before installing your Diverter Valve, Pfister recommends installation of a 12 shock arrester before each supply valve. If deck thickness exceeds 1 - 14 Pfister Stem Extension Kit 974-370 must be used.
2 SHUT OFF WATER SUPPLY
Locate water supply inlets and shut off the water supply valves. These are usually found near the water meter. If you are replacing an existing faucet, remove the faucet from the tub and clean the tub surface thoroughly.
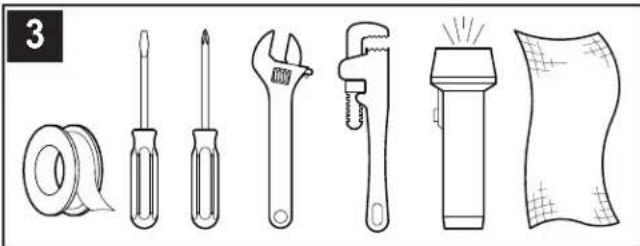
3 TOOLS RECOMMENDED:
For Iron Pipe Installation:
- PTFE Plumber's Tape - Slotted screwdriver - Phillips Screwdriver
- Adjustable wrench - Pipe Wrench - Flashlight
- Cloth
For soldered copper and non-standardized installations, some additional tools may be required.
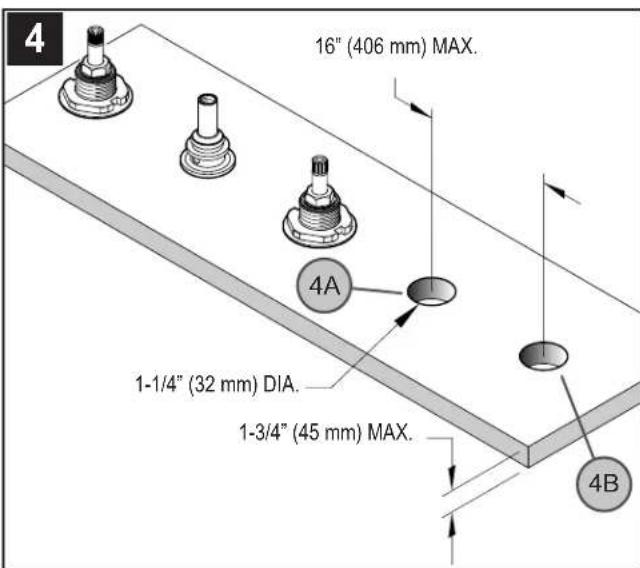
4 RECOMENDED COMPONENT LOCATIONS
Maximum distance between Diverter Valve (4A) and Spray Head Holder (4B) is not to exceed 16" (406 mm). Note: Recommended all holes to be 1 - 14 (32 mm) diameter.

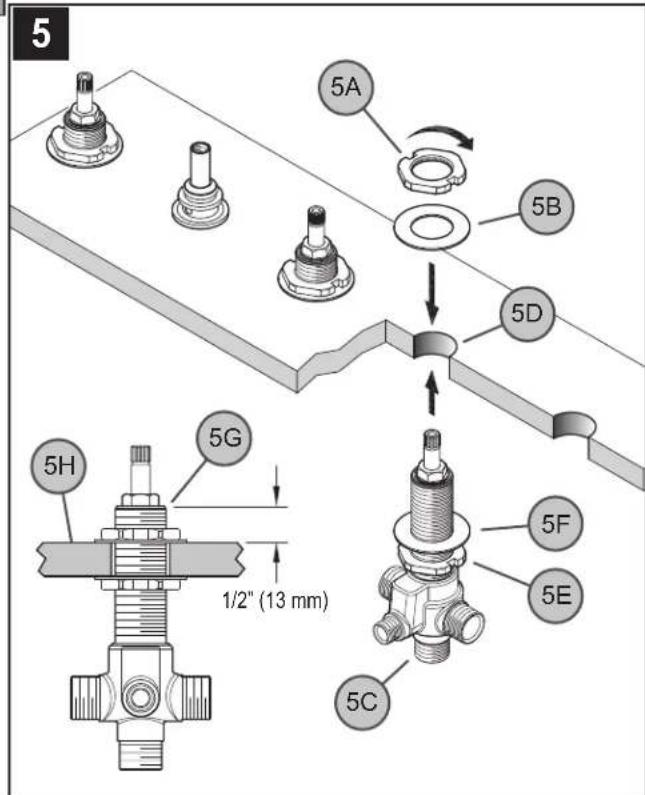
5 DIVERTER VALVE INSTALLATION
Remove upper Locknut (5A) and Washer (5B) from Diverter Valve Body (5C). From underneath deck, insert Diverter Valve Body (5C) through deck hole (5D) and adjust lower Locknut (5E) and Washer (5F) so that top of Diverter Shank (5G) is 12 " (13 mm) above Mounting Surface (5H). From above deck, place Locknut (5A) and Washer (5B) onto Diverter Shank (5G) and wrench tighten until Diverter Valve Body (5C) is firmly secured to deck.
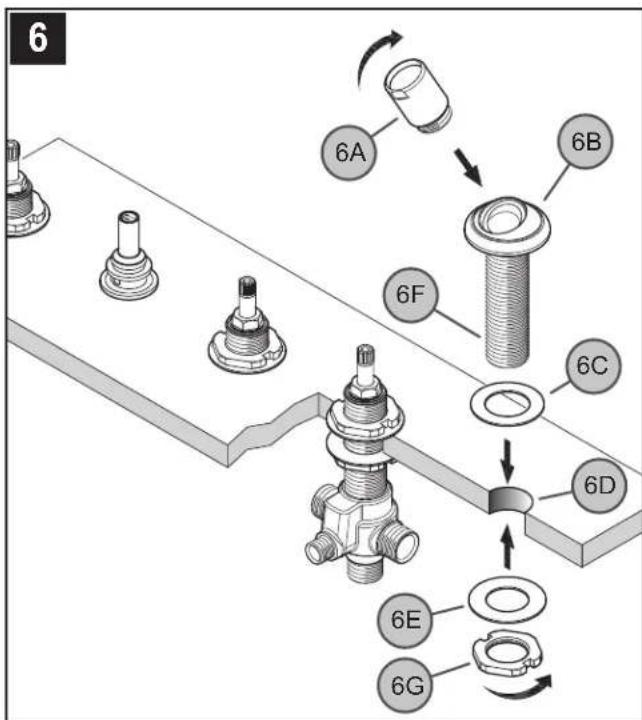
6 SPRAY BASE HOLDER INSTALLATION
Connect Spray Holder (6A) onto Spray Base (6B). Insert Spray Base (6B) trough Washer (6C) and into Deck Hole (6D). From underneath deck, place Washer (6E) onto Spray Base Shank (6F) and tighten with Locknut (6G). Be sure Spray Holder (6A) is centered and facing forward before final tightening.
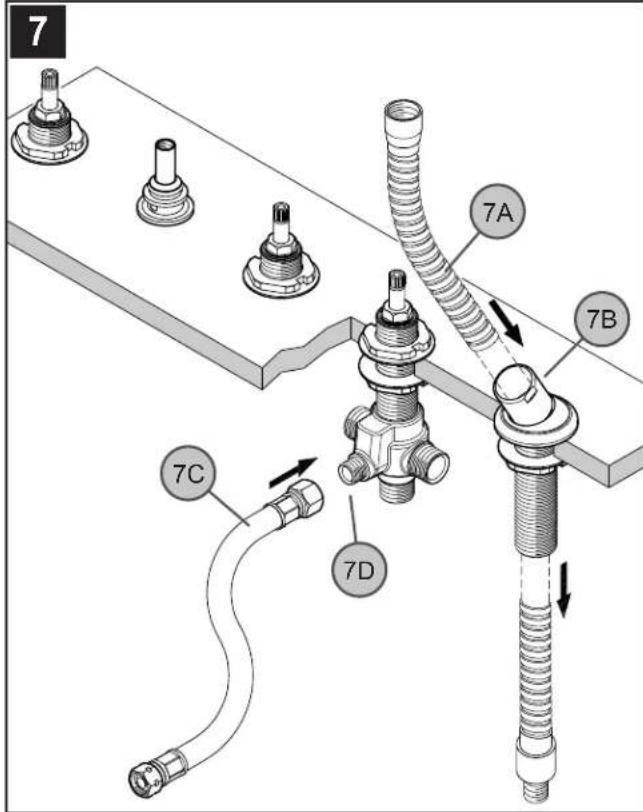
7 SPRAY HOSE INSTALLATION
From above deck, insert Decorative Hose (7A) through Spray Base Holder (7B). From underneath deck, connect one end of Service Hose (7C) to Diverter Outlet (7D).
Do not let Decorative Hose (7A) retract down into Spray Base Holder (7B).
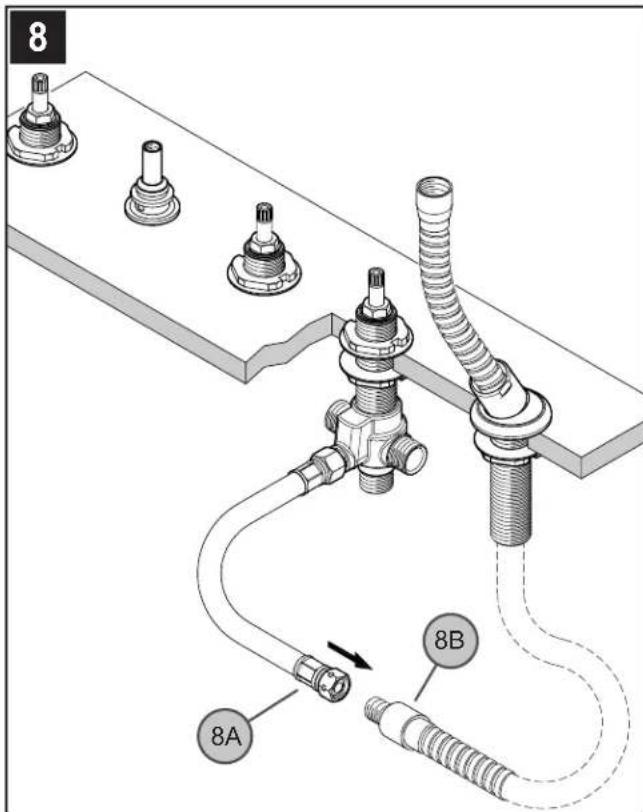
8 SPRAY HOSE CONNECTIONS
Attach Service Hose (8A) to the end of Decorative Hose (8B).
ENGLISH
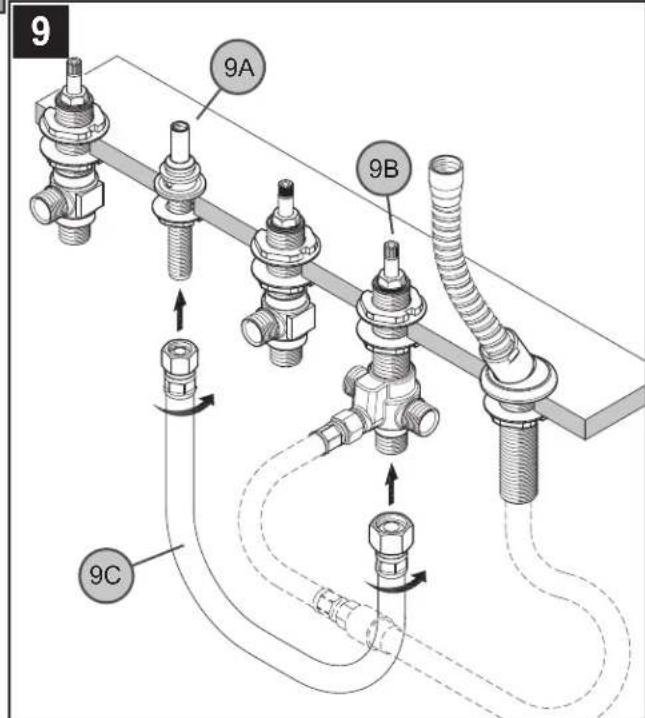
9 DIVERTER VALVE & SPOUT ADAPTER CONNECTION
Connect Diverter Tub Outlet (9A) to Spout Adapter (9B). Use either Pfister 15-136 Pipe Connect Kit (Supplied Separately) (1 / 2)^- - 14 NPSM thread) (9C) or solder 1 / 2^ (13 mm) I.D. (%) (16 mm) O.D.) copper lines (cut to length).
For threaded fittings, wrench tighten and use PTFE Plumber's tape per manufacturer's instructions.
When using copper tubing, remove all internal parts from components prior to soldering. Failure to do so can result in water damage.
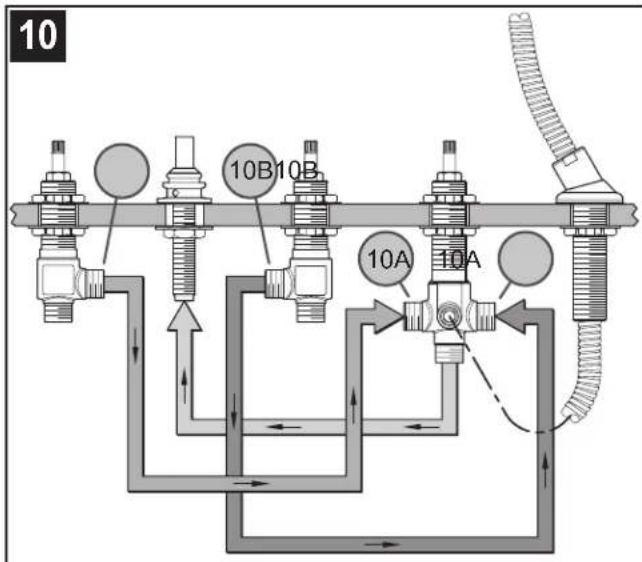
10 DIVERTER VALVE & HANDLE VALVE CONNECTIONS
Connect Diverter Inlets (10A) to Handle Valve Outlets (10B). Use either Pfister 15-136 Pipe Connect Kit (Supplied Separately) (12^ - 14 NPSM thread) or solder 12^ (13 mm) I.D. (%) (16 mm) O.D.) copper lines (cut to length).
For threaded fittings, wrench tighten and use PTFE Plumber's tape per manufacturer's instructions.
When using copper tubing, remove all internal parts from components prior to soldering. Failure to do so can result in water damage.
Be sure all pipes are securely fastened to construction to prevent vibration.
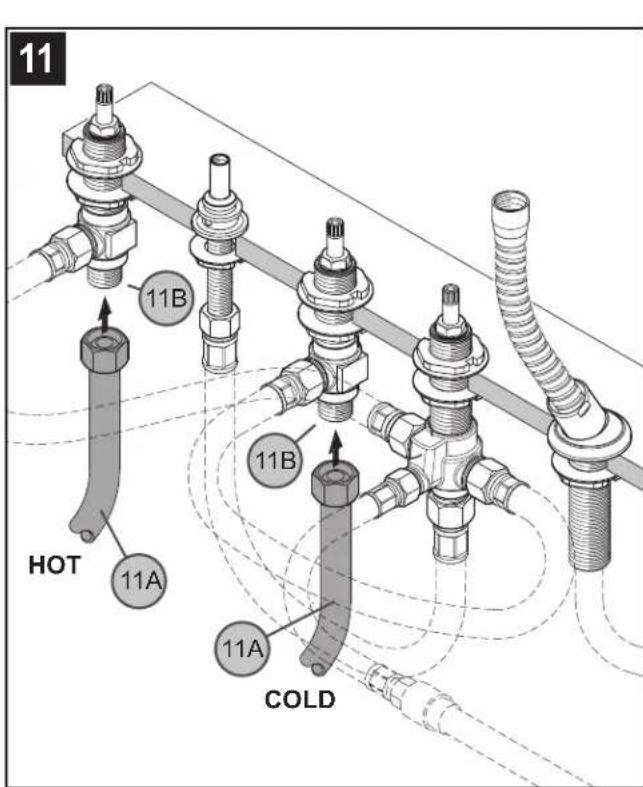
11 WATER SUPPLY CONNECTIONS
Connect water supply lines (11A) to Valve Inlets (11B) using high flow flexible lines with 12 -14 NPSM threads (Not Supplied), or solder 12 (13 mm) I.D. ( % ) (16 mm) O.D.) copper lines (cut to length). Please follow manufacturer's instructions when installing supply lines.
If any soldering has been done, reinstall all internal parts after heat has dissipated from all components.
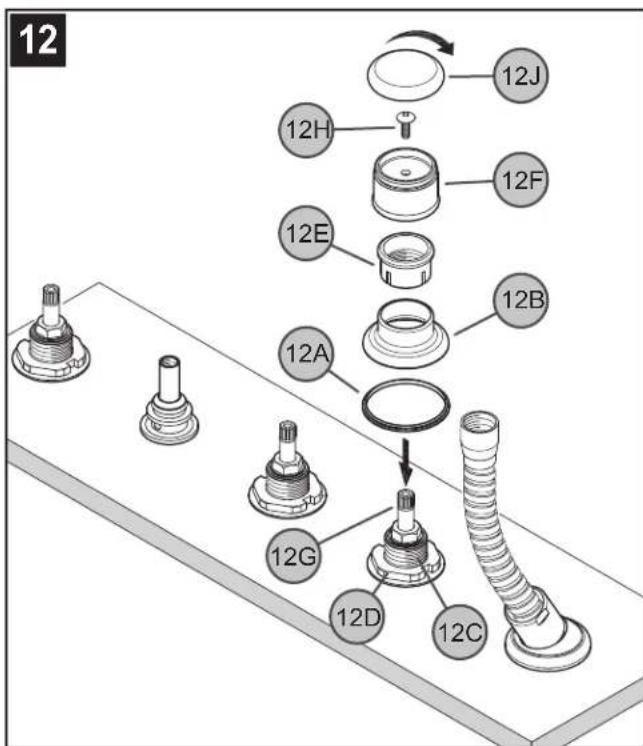
12 DIVERTER TRIM INSTALLATION
Place Plastic Ring (12A) and Flange (12B) over Valve Body (12C) covering the Valve Body Washers (12D). Secure by screwing the Plastic Nut (12E) onto the Valve Body (12C). Attach Handle Hub (12F) onto Valve Stem (12G), and secure with Screw (12H). Hand tighten Decorative Button (12J) onto Handle Hub (12F).
ENGLISH
13 UNIT START UP
Turn on hot and cold water supply valves.

Caution: Check all connections for leaks. Failure to do so can it in water damage.
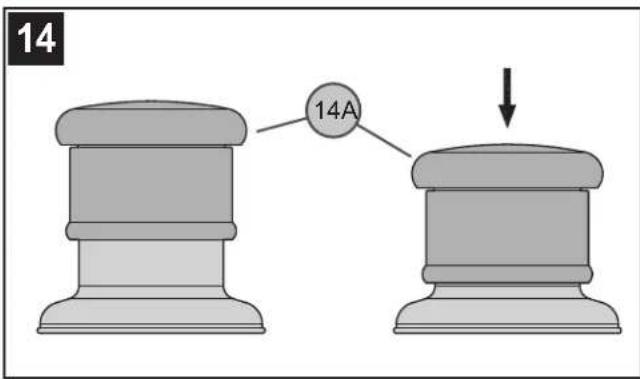
14. DIVERTER VALVE FUNCTION
To activate the handheld shower, press Handle Hub (14A) located on the diverter.
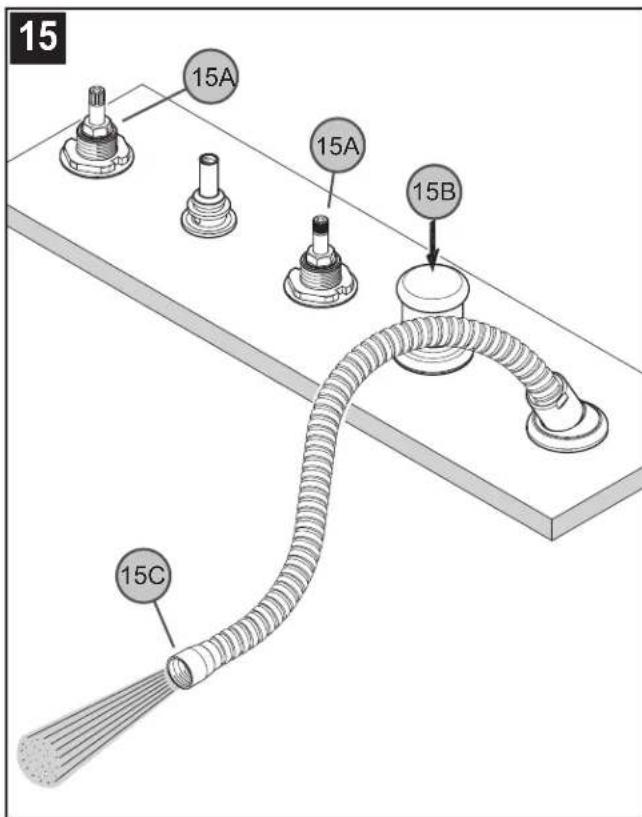
15 FLUSHING
To prevent damage to the internal parts of your faucet from debris that may have collected in the water lines, it is necessary to flush the system. Open Valves (15A) to full on position and activate Diverter Valve (15B) allowing water to flow from the Spray Hose (15C). Run water for one minute. Repeat in hot and cold positions.

16 HAND HELD SHOWER INSTALLATION
Insert Washer (16A) into Metal Hose Fitting (16B) located on the end of Decorative Hose (16C). Connect Hand Held Shower (16D) into the end of Decorative Hose (16C) by turning Metal Hose Fitting (16B) clockwise. Hand tighten.
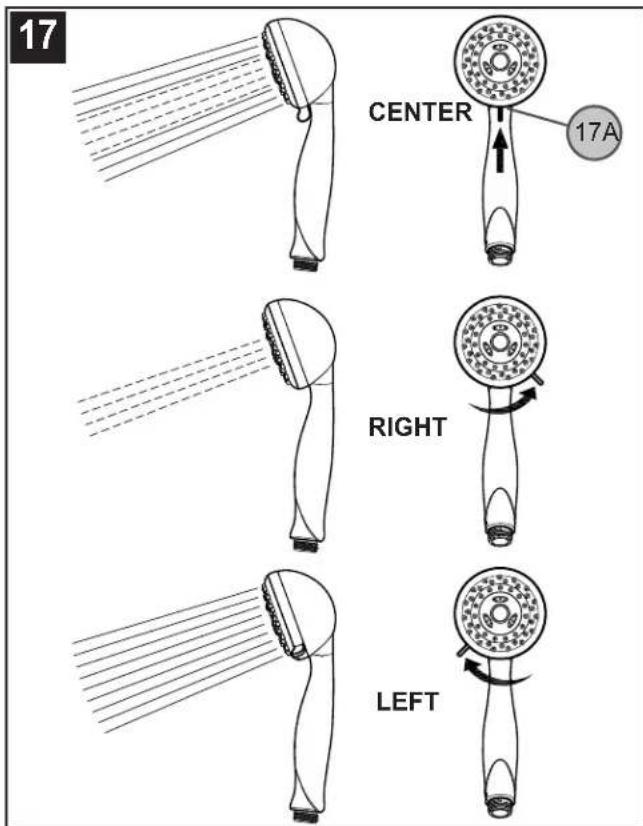
17 HAND SHOWER FUNCTION
To adjust spray, turn switch (17A) to a desired spray pattern.
Center: Pulsating with Full Spray.
Right: Pulsating.
Left: Full Spray.
ENGLISH

CAUTION: Maintenance
DISASSEMBLY
- Replacement parts may be available at the store where you purchased your faucet.
- When replacement parts are not available, please write or call Pfister Consumer Service.
- Always turn off water and relieve pressure before working on your faucet.

NOTE: Trim Care
Cleaning Instructions:
For all Handles and decorative finishes, use only a soft damp cloth to clean and shine. Use of polish, detergents, abrasive cleaners, organic solvents or acid may cause damage. Use of other than a soft damp cloth will nullify our warranty! Special Trim:
Trim products which contain Porcelain or other similar substance are not acceptable for public areas or Commercial use. Installation of Said Trim is at Users Risk!

1-800-PFAUCET (1-800-732-8238)
For Toll-Free Pfacet information call 1-800-PFAUCET (1-800-732-8238) or visit www.pfisterfaucets.com
Installation Support
Care and Warranty Information