USER MANUAL 600 MOVA
Kutting Technology (Suzhou) Co., Ltd.
Room 1182, Building 3, No. 288 Jiushenggang Road, Guoxiang Street,
Wuzhong District Economic Development Zone, Suzhou City, Jiangsu Province, P.R. China
On behalf of MOVA declare that the product
Description Robotic Lawn mower
Type MLLM1110/MLLM4110
Function Cutting grass
Complies with the following Directives
2006/42/EC, 2014/30/EU, 2014/35/EU, 2011/65/EU&(EU)2015/863, 2014/53/EU
Standards conform to,
EN 60335-1:2012+A11+A13+A1+A14+A2:2019+A15:2021, EN 50636-2-107:2015+A1+A2:2020+A3:2021,
EN 60335-2-29:2004+A2+A11:2018, EN 62233:2008, EN 55014-1:2017+A11:2020,
EN 55014-2:2015, EN IEC 61000-3-2:2019, EN 6 1000-3-3:2013+A1:2019, EN ISO 3744:2005,
EN300 328V2.2.2, EN 301 489-1V2.2.3, EN 301 489-17 V3.2.4, EN IEC 62311:2020,
EN 61558-1:2005+A1:2009, EN 61558-2-16:2009+A1:2013, EN 55011:2016+A11:2020,
EN 303 447 V1.1.1, EN 55032:2015+A11:2020, EN 55035:2017+A11:2020
Manufacturers authorized EU Representative
EUREP GmbH
Unterlettenweg 1a, 85051 Ingolstadt, Germany
eurep@eurep-gmbh.com
+4984188697744
Place of Issue: Suzhou
Date of Issue: 05/01/2024
Issuer's signature:
Name of Issuer: Bird Liu
Position of the issuer:Quality Director
Quality Director
Room 1182, Building 3, No. 288 Jiushenggang Road, Guoxiang Street,
Wuzhong District Economic Development Zone, Suzhou City, Jiangsu Province, P.R. China
Original Instructions Table of Contents
1 Safety Instructions P06
2 Product Introduction .P10
3 Installation P12
4 Preparation for First Use P15
5 Map Your Garden P19
6 Operation P26
7 MOVAhome App P28
8 Maintenance P31
9 Battery P35
10 Winter Storage P35
11 Transport P35
12 Troubleshooting P36
13 Specifications P39
1 Safety Instructions
1.1 General Safety Instructions
- Carefully read and understand the user manual before using the product.
- Only use the equipment recommended by MOVA with the product. Any other usage is incorrect.
- Do not allow children to be in the vicinity or play with the machine when it is operating.
- Do not use the product in areas where people are unaware of its presence.
- When manually operating the product with the MOVAhome app, do not run. Always walk, watch your steps on slopes, and maintain balance at all times.
- Avoid using the product when there are people, especially children or animals, in the work area.
- If operating the product in public areas, place warning signs around the work area with the following text: "Warning! Automatic lawn mower! Keep away from the machine! Supervise children!"
- Wear sturdy footwear and long trousers when operating the product.
- To prevent damage to the product and accidents involving vehicles and individuals, do not set work areas or transport paths across public pathways.
- Do not touch moving hazardous parts, such as the blade disc, before it has come to a complete stop.
- Seek medical aid in case of injury or accidents.
- Set the product to OFF before clearing blockages, performing maintenance, or examining the product. If the product vibrates abnormally, inspect it for damage before restarting. Do not use the product if any parts are defective.
- Do not install the main cable in areas where the product will cut. Follow the instructions provided for cable installation.
- Only use the charging station included in the package to charge the product. Incorrect use may result in electric shock, overheating, or corrosive liquid leakage from the battery. In case of electrolyte leakage, flush with water/neutralizing agent and seek medical aid if the corrosive liquid comes into contact with your eyes.
- When connecting the main cable to the power outlet, use a residual-current device (RCD) with a maximum tripping current of 30mA .
- Only use original batteries recommended by MOVA. The safety of the product cannot be guaranteed with nonoriginal batteries. Do not use non-rechargeable batteries.
- Keep extension cords away from moving hazardous parts to avoid damage to the cords which can lead to contact with live parts.
The illustrations used in this document are for reference only. Please refer to the actual products.
- Never allow children, persons with reduced physical, sensory or mental capabilities or lack of experience and knowledge or people unfamiliar with these instructions to use the machine, local regulations may restrict the age of the operator.
- Do not connect or touch a damaged cable until it is disconnected from the power outlet. If the cable becomes damaged during operation, disconnect the plug from the power outlet. A worn or damaged cable increases the risk of electrical shock and should be replaced by service personnel.
- Do not push the product forcefully or quickly, as this may damage the product.
- To maintain compliance with the RF exposure requirement, a separation distance of 35cm between the device and the human should be maintained.
- For the purposes of recharging the battery, only use the detachable supply unit provided with this appliance.
1.2 Safety Instructions for Installation
- Avoid installing the charging station in areas where people may trip over it.
-
Do not install the charging station in areas where there is a risk of standing water.
-
Do not install the charging station, including any accessories, within 60~cm of any combustible material. Malfunctioning or overheating of the charging station and power supply can pose a fire hazard.
1.3 Safety Instructions for Operation
- Keep your hands and feet away from the rotating blades. Do not place your hands or feet near or below the product when it is turned on.
- Do not lift or move the product when it is turned on.
- Use the park mode or set the product to OFF when there are people, especially children or animals, in the work area.
- Ensure that there are no objects such as stones, branches, tools, or toys on the lawn. Otherwise, the blades may be damaged when they come into contact with an object.
- Do not put objects on top of the product or charging station.
- Do not use the product if the STOP button is not functioning.
- Avoid collisions between the product and people or animals. If a person or animal comes in the path of the product, stop it immediately.
- Always set the product to OFF when it is not in operation.
- Do not use the product simultaneously with a pop-up sprinkler. Utilize the Schedule function to ensure that the product and pop-up sprinkler do not operate at the same time.
- Avoid placing a connection channel where pop-up sprinklers are installed.
- Do not operate the product in the presence of standing water in the work area, such as during heavy rain or water pooling.
1.4 Safety Instructions for Maintenance
- Set the product to OFF when performing maintenance.
- After washing, ensure that the product is placed on the ground in its normal orientation, not upside down.
- Do not reverse the product to clean the chassis. If you do reverse it for cleaning purposes, make sure to restore it to its proper orientation afterward. This precaution is necessary to prevent water from entering the motor and potentially affecting normal operation.
- Disconnect the plug from the charging station or operate the disabling device before cleaning or performing maintenance on the charging station.
- Do not use a high-pressure washer or solvents to clean the product.
1.5 Battery Safety
Lithium-ion batteries can explode or cause a fire if disassembled, short-circuited, exposed to water, fire, or high temperatures. Handle them with care, do not dismantle or open the battery, and avoid any form of electrical/ mechanical abuse. Store them away from direct sunlight.
- Only use the battery charger and power supply provided by the Manufacturer. The use of an inappropriate charger and power supply can cause electric shocks and / or overheating.
- DO NOT ATTEMPT TO REPAIR OR MODIFY BATTERIES! Repair attempts may result in severe personal injury, due to explosion or electrical shock. If a leak develops, released electrolytes are corrosive and toxic.
- This appliance contains batteries that are only replaceable by skilled persons.
1.6 Residual Risks
To avoid injuries, wear protective gloves when replacing the blades.
1.7 Symbols and Decals
| i | WARNING - Read user instructions before operating the machine. |
| WARNING - Keep a safe distance from the machine when operating. |
| STOP | WARNING - Operate the disabling device before working on or lifting the machine. |
| WARNING - Do not ride on the machine. |
| WARNING - It is not permitted to dispose of this product as normal household waste. Ensure that the product is recycled in accordance with local legal requirements. |
| CE | This product conforms to the applicable EC Directives. |
| III | Class III |
| Before charging, read the instructions. |
| = | Direct current |
| Class II |
INTENDED USE
The garden product is intended for domestic lawn mowing. It is designed to mow often, maintaining a healthier and better looking lawn than ever before. Depending on the size of your lawn, your mower may be programmed to operate at any time or frequency. It is impossible for digging, sweeping or snow cleaning.
C E
Hereby, Kutting Technology (Suzhou) Co., Ltd. declares that the radio equipment model MOVA MLLM1110/MLLM4110 is in compliance with Directive 2014/53/EU. The full text of the EU declaration of conformity is available at the following internet address: https://global.mova-tech.com/pages/declaration-of-conformity.
The product is in compliance with UK PSTI regulations, the full text of declaration of conformity is available at the following internet address: https://global.mova-tech.com/pages/statement-of-compliance-for-uk-psti.
For detailed e-manual, please go to https://global.mova-tech.com/pages/user-manuals-and-faqs.
2 Product Introduction
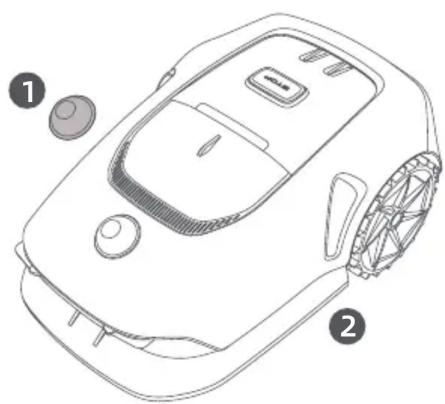
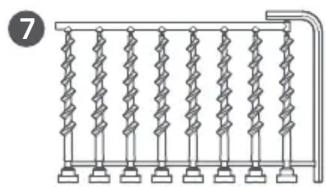
2.1 What's in the Box
8

9

10
11
LiDAR protective cover
The robot
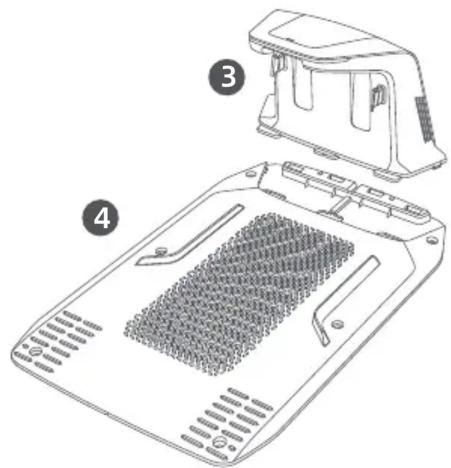
Charging tower (with a 10 m extension cable)
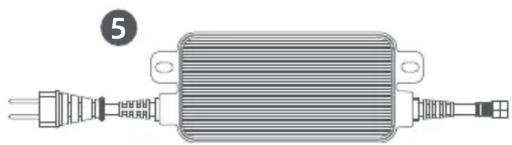
4 Baseplate Power supply
1
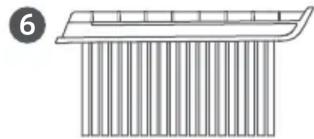
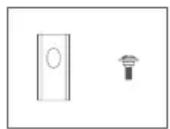
6 cleaning brush
7 screws × 8 Hex key
8 Spare blades and bolts
9User manual
10 Lint-free cloth
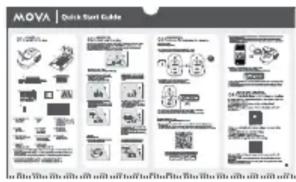
Quick start guide
- MOVA 600 and MOVA 600 Kit are equipped with a 1.5 A power supply. MOVA 1000 is equipped with a 3 A power supply.
- MOVA 600 and MOVA 1000 each come with 9 spare blades and bolts. MOVA 600 Kit includes 81 spare blades and bolts.
2.2 Product Overview
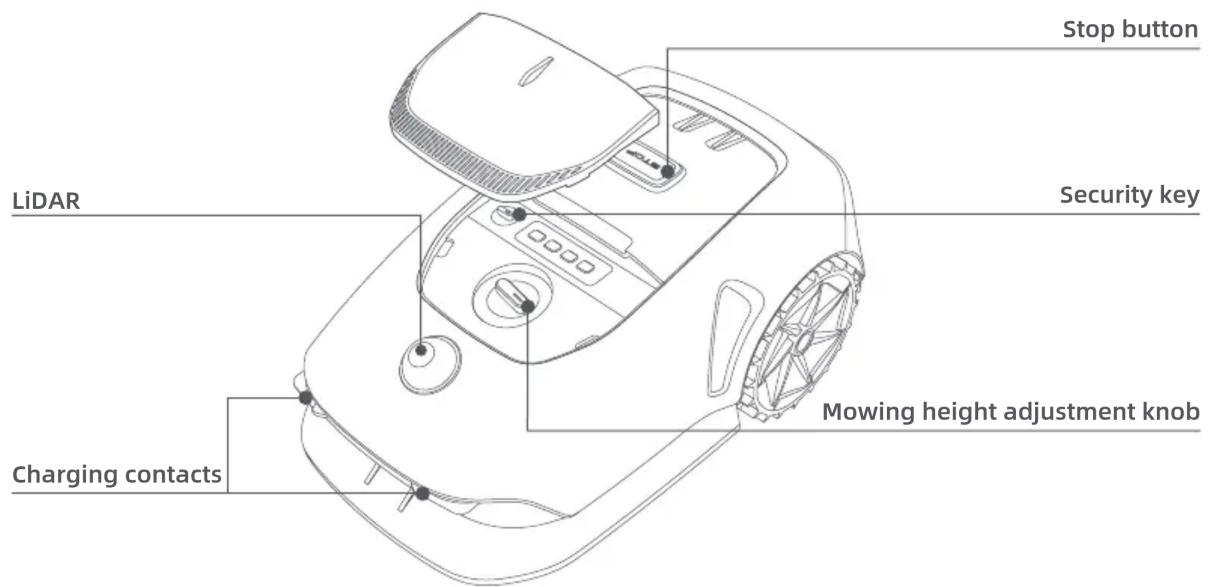
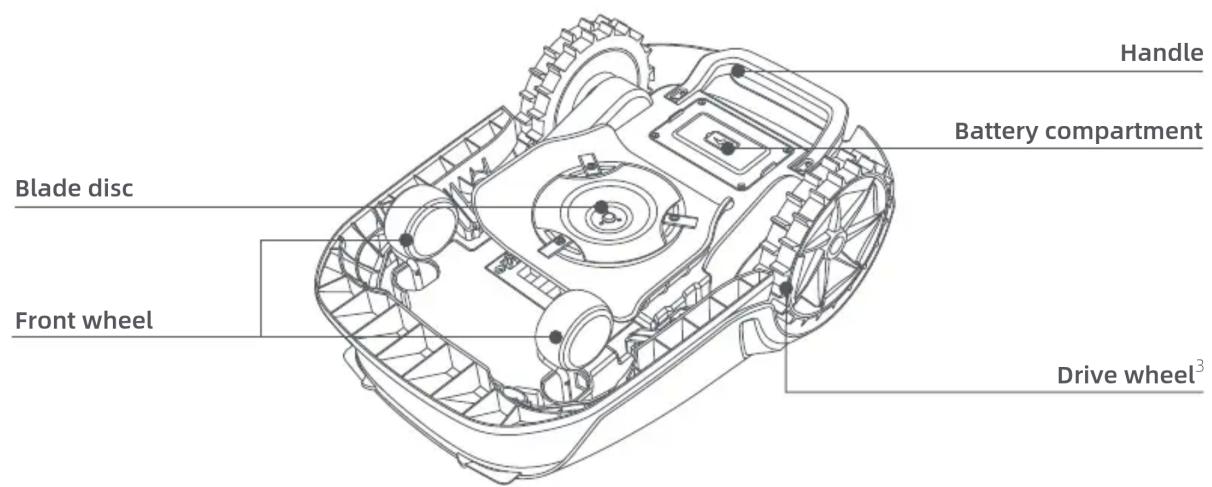
- The type of drive wheels varies by robot model. MOVA 600 and MOVA 600 Kit are equipped with standard drive wheels. MOVA 1000 is equipped with off-road wheels.
2.3 Sensor
| Name Description |
| LiDAR | Obtains environmental information and facilitates the robot's positioning, obstacle avoidance and sensing of water and dirt.
Detection range: 30 m at 10% reflectivity
Field of view: 360° (horizontal) × 59° (vertical) |
3 Installation
3.1 Select a Suitable Location
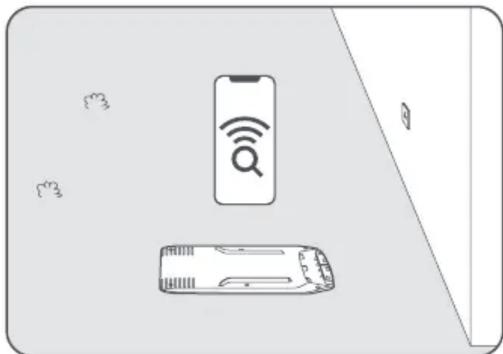
- Place the charging station on a level surface near the edge of the lawn and a power outlet. Place it in an area with a strong Wi-Fi signal.
Note: Use your mobile device to help check the Wi-Fi signal strength of the location. A good Wi-Fi signal strength ensures a stable connection between the robot and the app.
Important: Make sure the ground is soft enough to allow screw installation.
Important: If the charging station is on a slope, ensure the incline is not too steep to prevent the robot from slipping back and failing to dock.
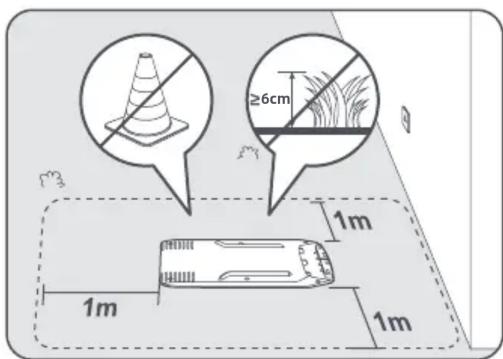
- Keep at least 1 ~m of free space with no obstacles to the left, right and in front of the charging station. Make sure that the grass around the location is shorter than 6 ~cm . If the grass is taller, please mow it with a push mower first. Tall grass may make it difficult for the robot to return to the charging station.
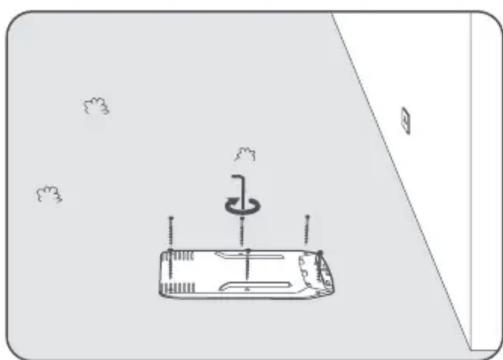
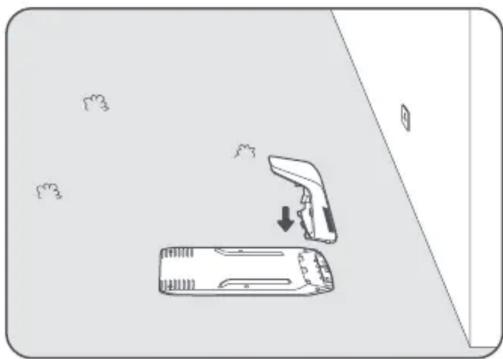
3.2 Install the Charging Station
1 Secure the baseplate to the ground with the supplied screws and hex key.
2 Insert the charging tower into the baseplate until you hear a click.
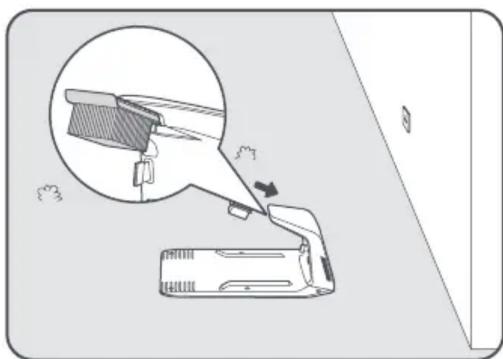
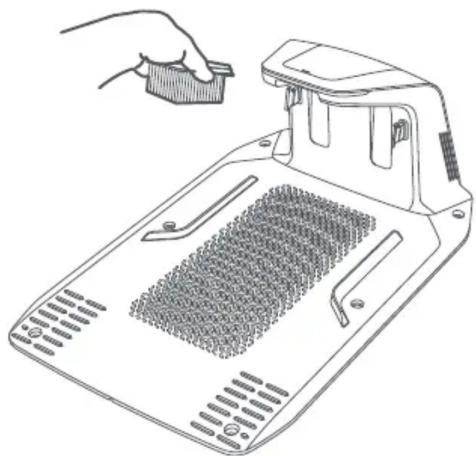
3 Insert the cleaning brush into the charging tower by aligning the tab with the slot.
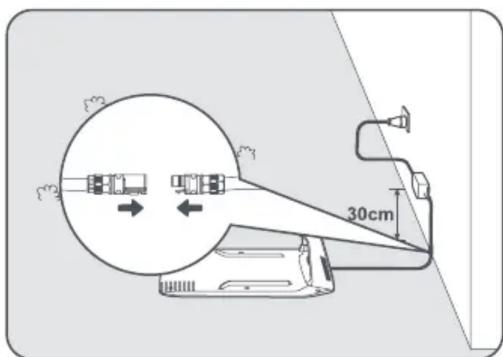
4 Connect the power supply to the extension cable and then connect to a power outlet. Please keep the power supply at least 30~cm above the ground.
Note: The LED indicator on the charging station will be constant blue when there is power.
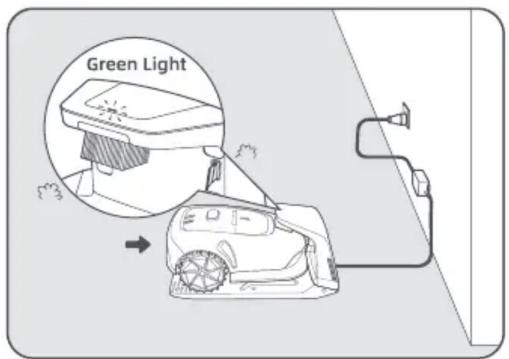
5 Remove the LiDAR protective cover.
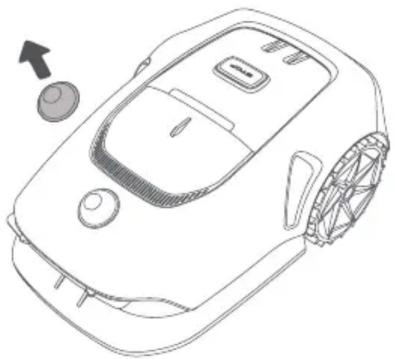
Put the robot in the charging station to charge. Make sure the charging contacts on the robot and the charging station are connected correctly.
Note: The indicator light will blink green when the robot is charging successfully in the charging station.
Note: If you're looking to add a garage for extra protection, please use the matching MOVA Garage available at local stores or online. Using a non-MOVA garage may cause issues during recharging.
LED Indicator on the Charging Station
| LED Indicator Light Colour Meaning |
| Blinking/solid red | 1. There is an issue with the charging station (such as a problem with the charging current or voltage). |
| 2. The robot docks in the charging station but the charging is abnormal (for example charging contacts have a short circuit). |
| Solid blue | The charging station has power. The robot is not in the charging station. |
| Blinking green The robot is charging in the charging station. |
| Solid green The robot is in the charging station and fully charged. |
4 Preparation for First Use
4.1 Get Familiar with the Control Panel
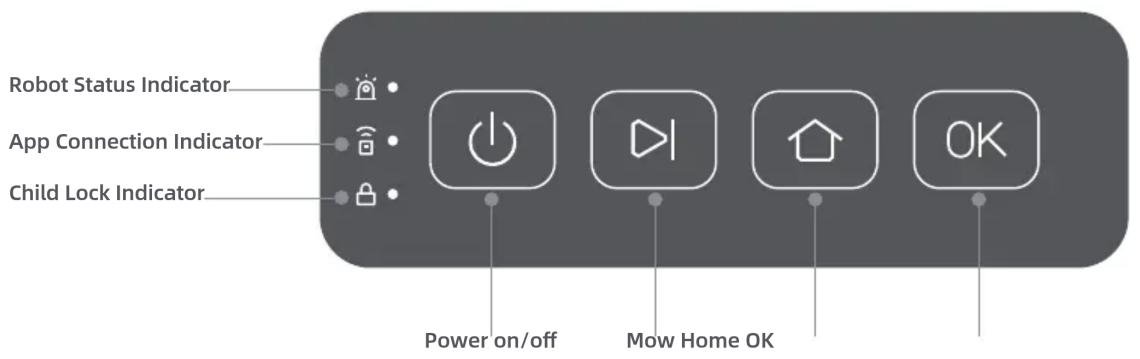
Controls
| Button Function |
| Power | To turn the robot on, install the security key and turn it to the ON position. Press and hold for 2 seconds to turn the robot on. |
| To turn off the robot, ensure it is outside the charging station. Then, press and hold for 2 seconds. Turning the security key to the OFF position will also power off the robot. |
| Mow | To start all-area mowing or resume paused tasks, press and then press the OK button in 5 seconds. |
| Home | To send the robot back to the charging station to charge, press and then press the OK button in 5 seconds. |
| OK | To deactivate the safety lock and enable app control, press the OK button twice. |
| To enable Bluetooth pairing mode, press and hold the OK button for 3 seconds. |
| To confirm an action on the control panel, press the OK button once. |
| Mow + OK | To factory reset the robot, press and hold the button and the OK button together for 3 seconds. This will not reset the countdown time of the consumables. |
| Stop | Press the Stop button to stop the robot and activate the safety lock. App control will be disabled. Press the OK button twice to deactivate the safety lock. |

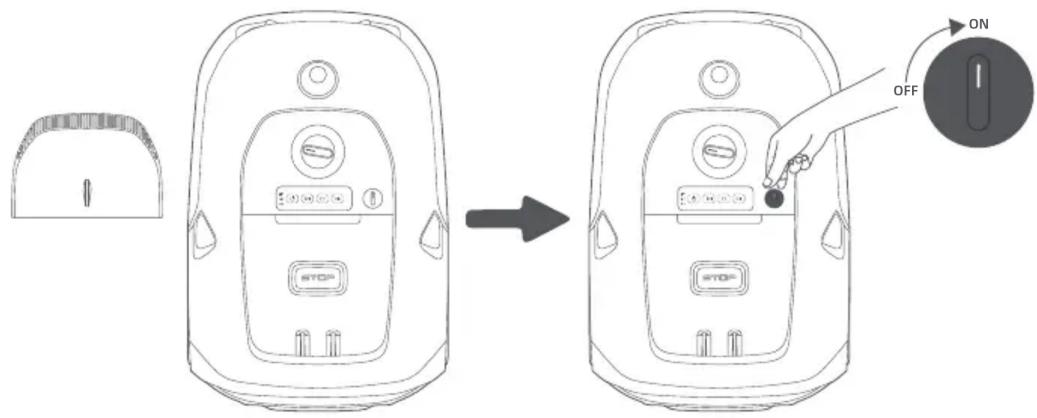
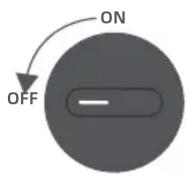
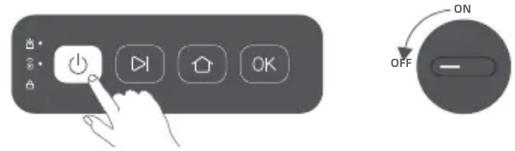
Security Key

- Rotate the security key to the ON position before turning on the robot.
- Rotate the security key to the OFF position; the robot will shut down automatically.
- You can take out the security key when it's in the OFF position. The robot cannot be turned on without the key. Note: If you lose the security key, please reach out to the after-sales team for a replacement.
Indicator Lights on the Control Panel
| Indicator Colour | Meaning | |
| Robot Status | Blinking green The robot is charging in the charging station. | |
| Solid green The battery is fully charged. | |
| Solid red An error has occurred. | |
| Blinking blue | The robot is performing a task or is paused. |
| The robot is turning on. |
| Solid blue The robot is on standby. | |
| App Connection | Solid blue The robot is connected to the app. | |
| Child Lock | Solid blue | The control panel is locked via the app. (You can enable the "Child Lock" function in the app settings.) |
4.2 Initial Settings
Before turning the robot on for the first time, there are some basic settings to do before the robot is ready to start working.
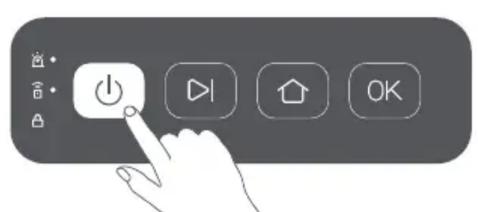
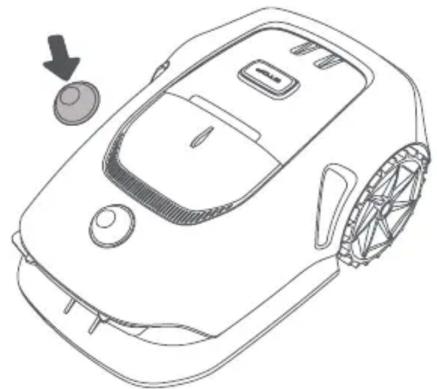
1 Open the top cover, then rotate the security key to the ON position.
Press and hold the button on the control panel for 2 seconds to turn on the robot.
Note: When the robot is on, the status indicator on the control panel will show a solid blue light.
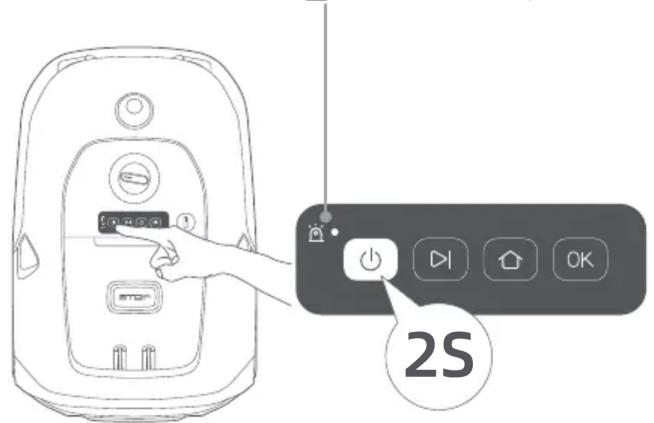
Note: The robot will automatically turn on when it docks in the charging station.
Important: To turn on the robot, ensure the security key is installed and set to the ON position. If not, the robot cannot be powered on.
3 Connect the Robot to the Internet
Please scan the QR code to download the MOVAhome app on your mobile device. After the installation, please create an account and log in.

You can also download MOVAhome app from App Store or Google Play.

Download on the App Store

Get it on Google Play
Before network setup:
a. Scan the QR Code: Go to Device and tap Scan QR code to connect. Scan the QR code located inside the robot's top cover to connect.
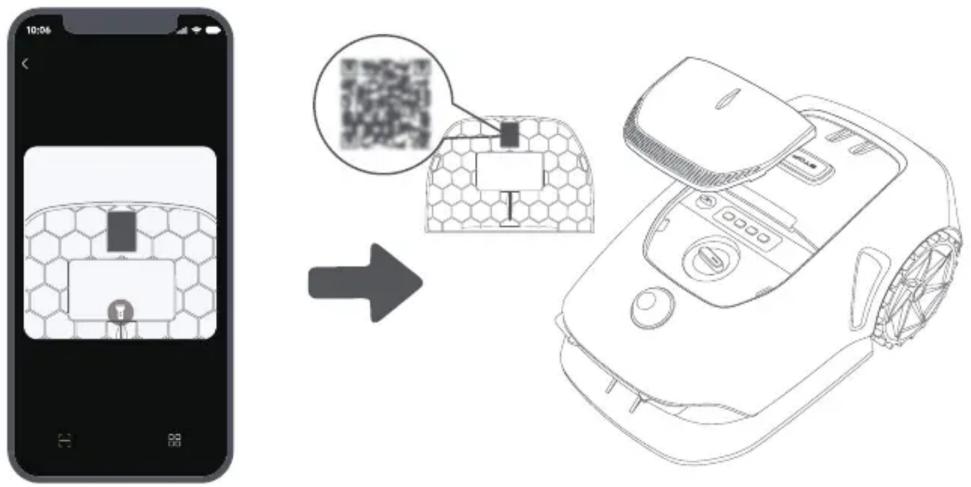
b. Add Manually: Go to Device and tap Add. Then select your robot model to connect.
c. Automatic Discovery: The robot will search for nearby devices. Tap your robot from the list of discovered devices to connect.
3. Please follow the in-app instructions to complete the Wi-Fi network connection.
Important: Please use a single-band network of 2.4 GHz frequency or dual-band network of 2.4/5 GHz frequency.
Important: Make sure your Wi-Fi network doesn't have a firewall and isn't encrypted. Otherwise, the network setup may fail.
Note: You can also purchase the Link Module to remotely control the robot without Wi-Fi connection.
- Press and hold the OK button on the control panel for 3 seconds. The robot will enter Bluetooth pairing mode.
- Please follow the in-app instructions to complete the pairing.
Note: The App Connection indicator on the control panel will show a solid blue light when the robot is successfully connected to the app.

How to unbind the robot?
The robot is automatically bound to the MOVAhome account once pairing is successful. Each device can only be bound to one account. It cannot be bound to another account at the same time.
To pair the robot with a new account, you need to unbind it first. To unbind it:
- Open the MOVAhome app. Go to Device.
- Locate your robot's name under its picture. If you have multiple robots bound to your MOVAhome account, swipe left or right to access the page of the robot you want to edit.
- Tap next to the robot's name.
- Select Delete.
How to log out of your MOVAhome account or delete it?
- Open the MOVAhome app. Go to Me > Account.
- Select Log Out or Delete Account.
How to share your robot?
- Open the MOVAhome app and go to Device.
- Locate your robot's name under its picture. If you have multiple robots bound to your MOVAhome account, swipe left or right to access the page of the robot you want to share.
- Tap next to the robot's name.
- Select Device Sharing.
5 Map Your Garden
Before mapping, please check the following:
- The battery level of the robot is more than 50% .
- The protective cover of the LiDAR is removed.

- The robot correctly docks in the charging station.
5.1 Create the Virtual Boundary
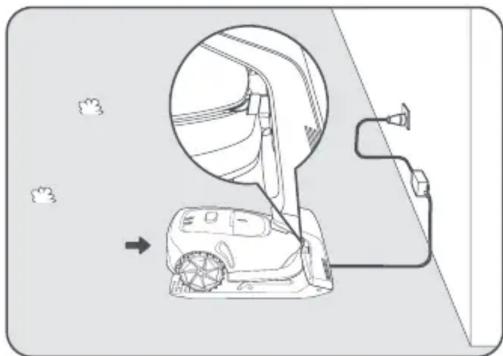
Tap Start Creating via the app, and the robot will check its status and calibrate. It will automatically leave the charging station to do the calibration. Please be careful.
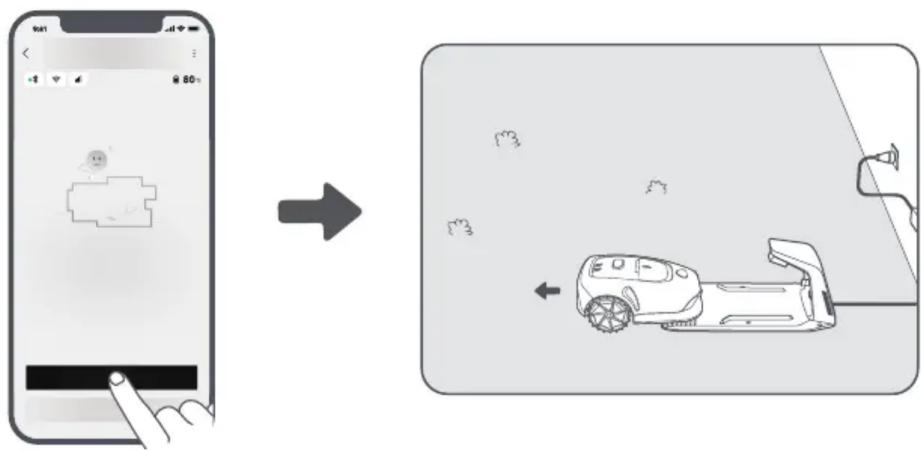
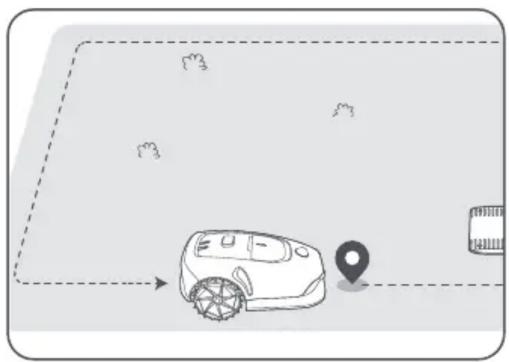
Remote control the robot to the edge of your lawn and tap Set Starting Point. The starting point of the boundary is set.
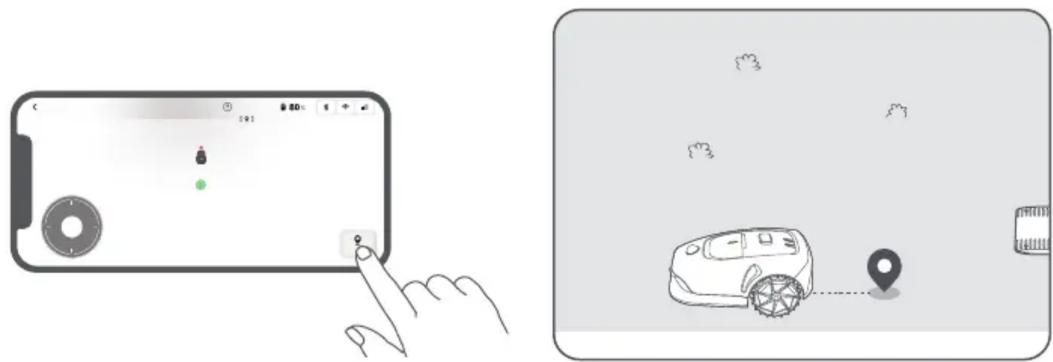
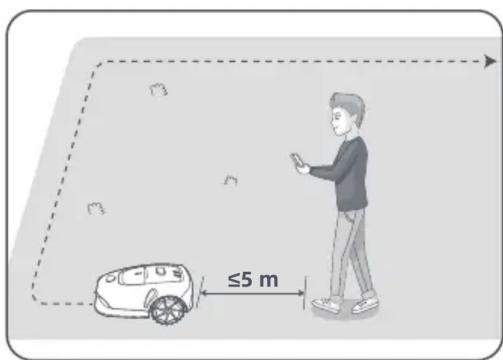
Remote control the robot to move along the perimeter of your lawn to map out the work area. During the mapping process, please bear in mind:
Important: Do not manually move the robot when creating the boundary, as this may cause the mapping to fail. Important: When the mapping begins, do not remotely dock the robot in the charging station until the mapping process is complete. Otherwise, the LiDAR may be blocked, which can cause the mapping to fail.
- Walk within 5m behind the robot during the remote control.
- The robot can navigate slopes with an incline up to 45% ( 24^ ). However, for better mowing results, it is recommended to keep the slopes of work areas below 25% ( 14^ ).

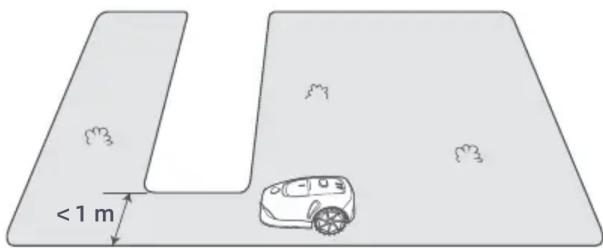
- For areas narrower than 1 ~m , please set them as paths to allow the robot to pass through (see section 5.4: Set Path).
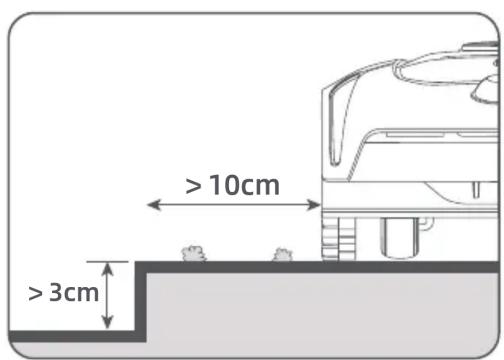
- If your lawn is more than 3cm higher than the adjacent ground, keep the robot at least 10cm away from the edge. If your lawn is level with the adjacent ground, the robot can cross the perimeter for optimal mowing results along the edges.
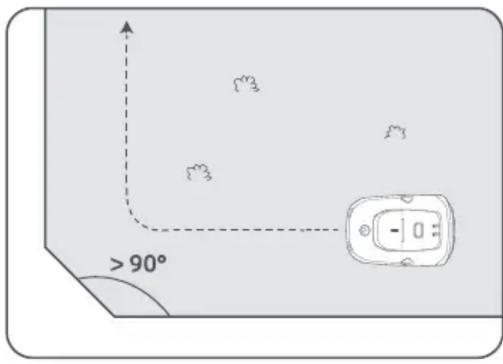
- Make sure the turning angles are greater than 90^ . Angles smaller than 90^ can make it difficult for the robot to achieve a clean cut.
4 When the robot returns to within 1m of the starting point, you can tap Close Boundary and the boundary will automatically be completed.

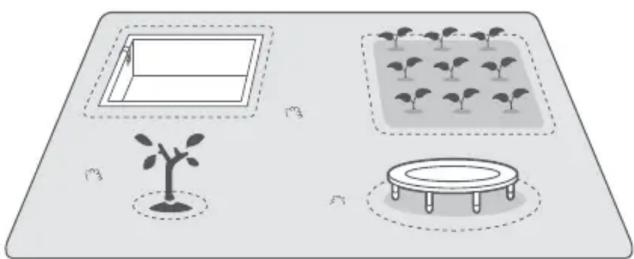
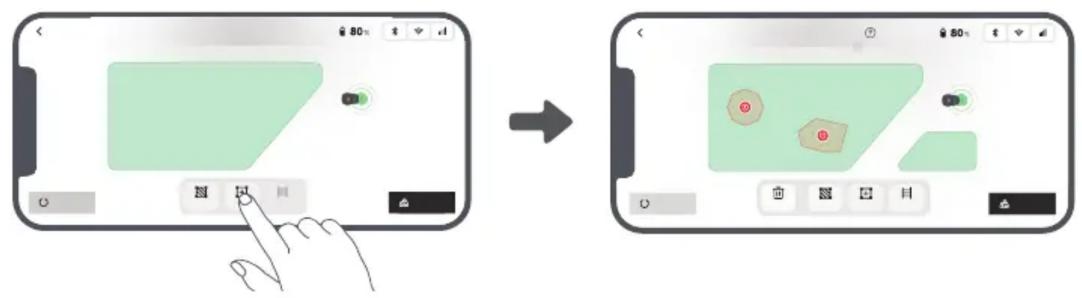
5.2 Set No-Go Zone
Though the robot can automatically avoid obstacles, it is still necessary to set areas with a risk of falling, such as swimming pools and sandpits, as no-go zones. For objects you want to protect (such as a fl overbed, a trampoline, a vegetable patch or an exposed tree root), please set them as no-go zones. You can tap No-go zone in the app to continue creating no-go zones. Alternatively, you can go to >Map Editing to create or delete the no-go zones after the map is fi nished.
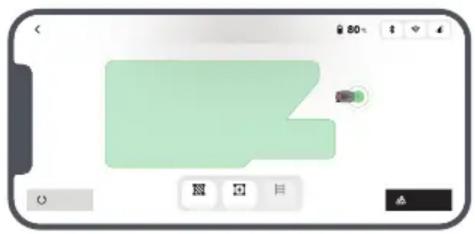
5.3 Create More Zones and Expand Existing Zones
- To Create More Zones
If your lawn is separated by roads or you have several isolated lawns, you can tap Work zone in the app to continue creating work areas via remote control. You can also add, delete or modify the zones in >Map Editing when the map is finished.
To Expand Existing Zones
To expand an existing zone, tap Work zone in the app to remotely create the area you want to include. If the two areas overlap, they will be automatically merged. Alternatively, you can go to >Map Editing >Work zone after mapping is complete to expand an existing zone.
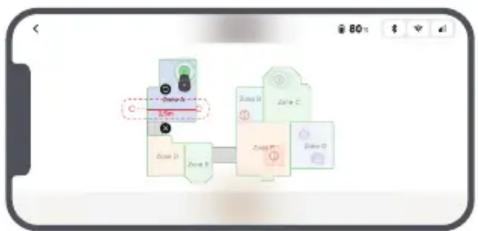
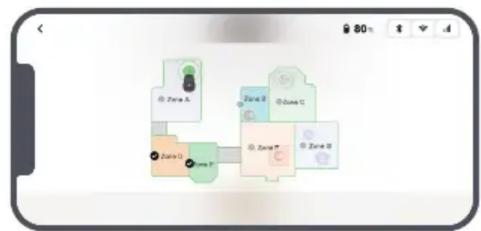
- To Separate and Combine Zones
To divide a zone into smaller ones or to merge zones that were divided using the app into a larger one, go to >Map Editing > Zone settings and tap Separate or Combine in the app.
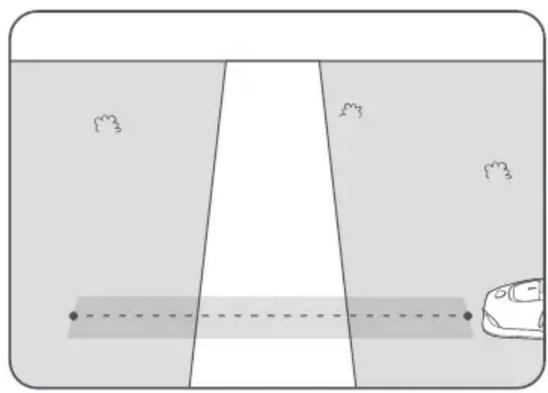
5.4 Set Path
For isolated zones, please create a path to connect them. Isolated zones without a path will be inaccessible to the robot.
Note: By default, the robot only moves along the path without mowing the grass.
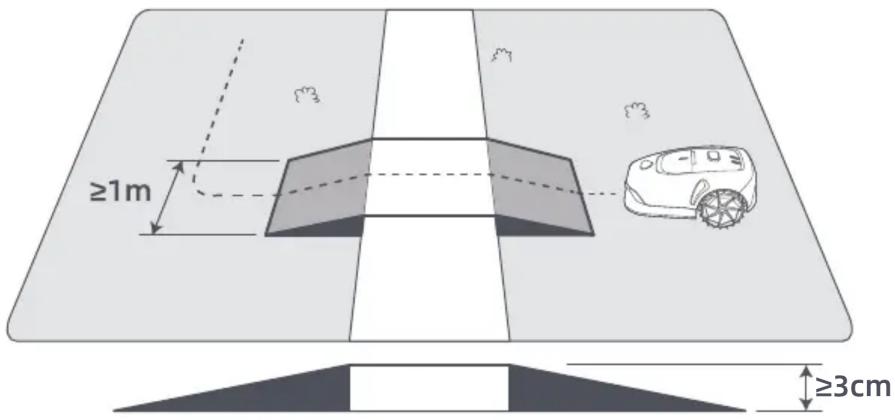
Important: If your lawn is divided by passages higher than 3 cm, place an object with a slope equal in height to the passage (such as a ramp).
- To Connect Two Isolated Work Zones
For isolated areas, please create paths to connect them, otherwise they will be inaccessible to the robot. Tap
Path and remote control the robot to create a path.
Important: Make sure the beginning and end of the path are in the work area.
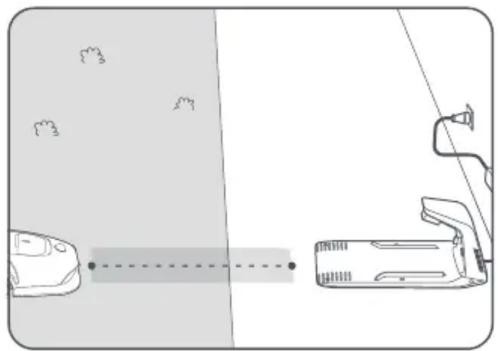
- To Connect the Work Area and the Charging Station
If your charging station is not in the work area, a path should be created to connect it to the work area. Tap
Path, and remote control the robot to create a path that allows it to return to the charging station.
Important: Ensure that one end is inside the work area, and the other end is right in front of the charging station. It's advisable to align the path with the charging station.
Important: When creating paths to connect the work area and the charging station, do not remotely dock the robot in the charging station. Otherwise, the LiDAR may be blocked, which can cause the mapping to fail.

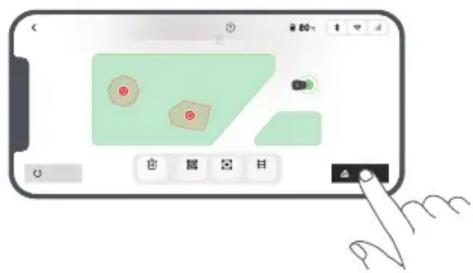
5.5 Finish Map
Tap Finish Map when work areas, paths and no-go zones are completed.
5.6 Add a Second Map
If there is no path between your front and back gardens, you can create a second map. After completing the first map, tap Add Map to continue creating the second one. Alternatively, you can navigate to >Map Editing and tap Add Map after mapping is complete. Once you have finished the second map, you can switch between maps through Map Editing.
Note: After switching the map, the schedules and mowing settings of the current map will be applied. Note: You can purchase an additional charging station to install in the second map for greater convenience. With a separate charging station installed in the second map, you only need to move the robot manually between two maps.

6 Operation
6.1 Start Mowing for the First Time
Tips before mowing:
- Use a push mower to mow the grass to a height of no more than 10cm .
- Clear the obstacles including debris, leaf piles, toys, wires and stones from the lawn. Make sure no children or pets are on the lawn when the robot is mowing.
- Fill in the holes in the Lawn.
- Set your mowing preferences in the app in advance (such as mowing efficiency, mowing height and mowing direction).

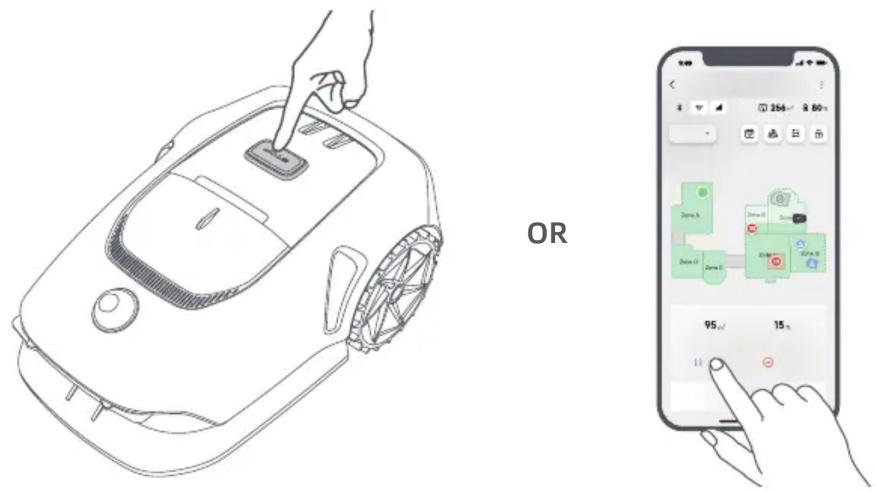
- Open the top cover to access the control panel.
- Press the button, then press the OK button in 5 seconds. The robot will leave the charging station and start all-area mowing. You can also tap Start in the app to start mowing.
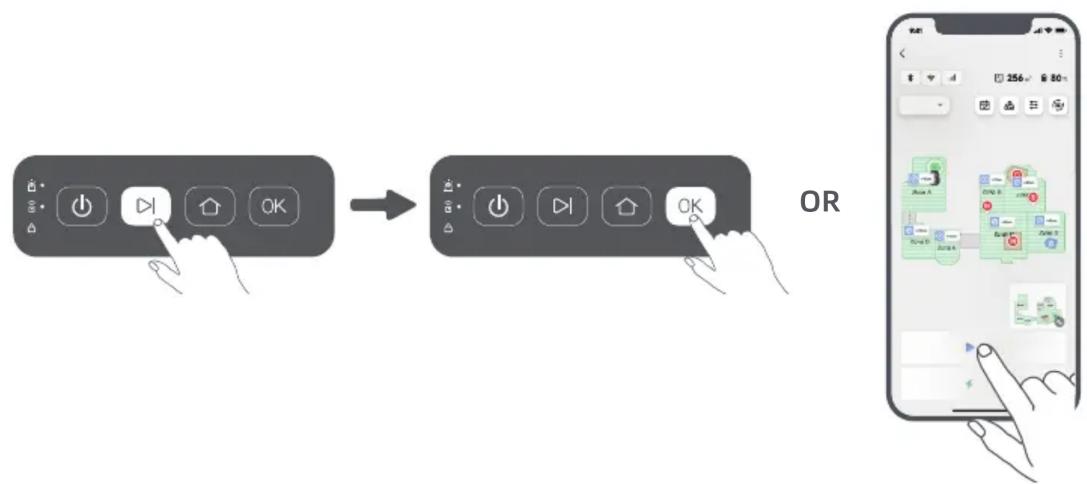
- Close the top cover.
6.2 Pause
To pause the current mowing task, you can press the Stop button on the robot or tap Pause in the app.
Note: The robot cannot be started directly through the app after the Stop button is pressed. To resume app control, press the OK button twice on the control panel to deactivate the safety lock first.
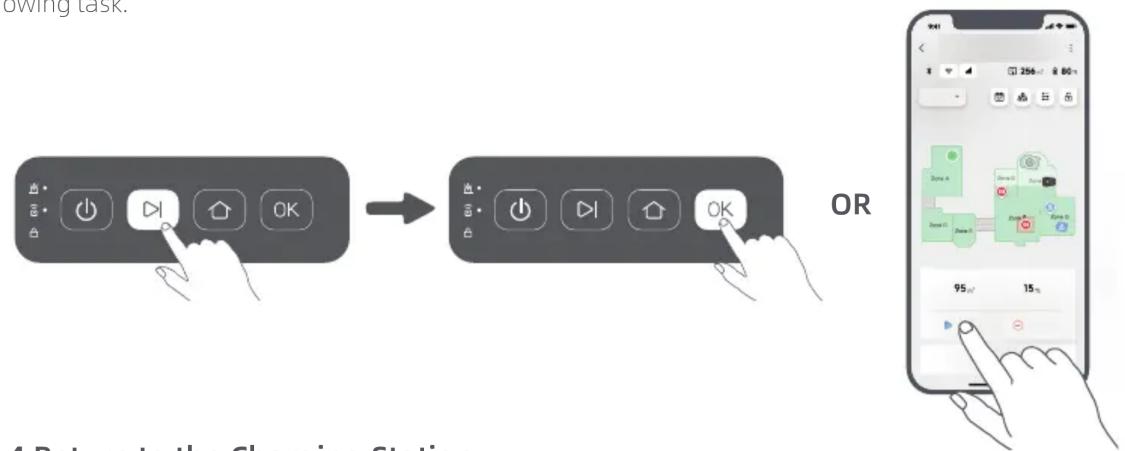
6.3 Resume
To resume the task when the robot is paused, press the button, then press the OK button in 5 seconds. The robot will resume the previous mowing task. You can also tap Continue in the app to resume the mowing task.
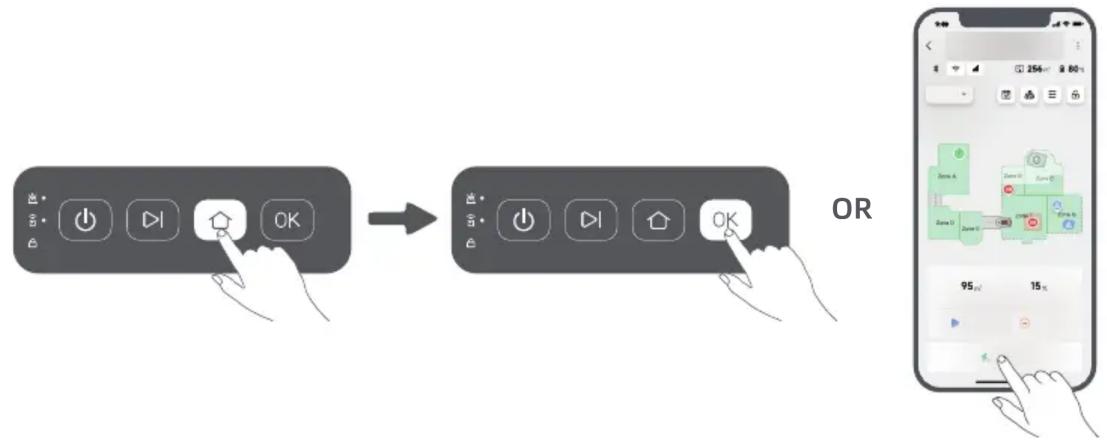
6.4 Return to the Charging Station
To stop the mowing task and send the robot back to the charging station, press the button, then press the OK button in 5 seconds on the control panel. The robot will automatically return to the charging station to charge. You can also tap Start Returning to Station in the app to send the robot back to the charging station.
7 MOVAhome App
Where You Can Explore More
MOVAhome app is more than a remote control. There are many things you can do through the app: completing various settings remotely, experiencing different mowing modes, editing the map freely and adjusting mowing schedules.
7.1 Mowing Modes
The robot offers various mowing modes. You can switch between modes through the app including All-Area Mowing, Zone Mowing, Edge Mowing, Spot Mowing and Manual Mode.

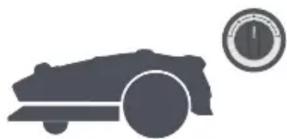
7.2 Mowing Height
To adjust the mowing height, turn the knob on the robot to set the mowing height from 20 mm to 60 mm.
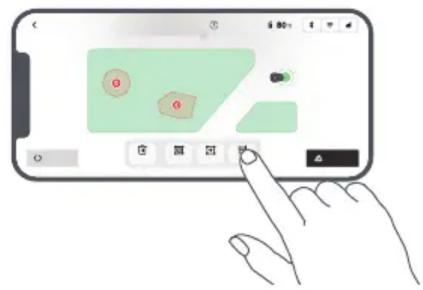
7.3 Mowing Shapes
Customise your lawn by adding shapes through >Map Editing > Shapes in the app. Defined shapes will be excluded from mowing in all mowing modes. You can modify their position, size, or remove them in Shapes.
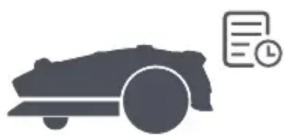
7.4 Schedule
After the first map is completed, the robot automatically creates two weekly mowing schedules according to the lawn size, which are "Spr/Sum Schedule" and "Aut/Win Schedule". You can tap in the app to do detailed schedule settings. With the schedule function, you can completely leave the daily mowing work to the robot. You only need to maintain the robot regularly.
Note: If you worry that the robot may disturb you or your neighbours when it works autonomously during certain hours, you can go to Settings > Do Not Disturb and set Do Not Disturb time in the app.
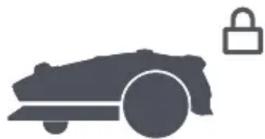
7.5 Child Lock
If you worry that children may operate the robot, navigate to Settings and enable the Child Lock function in the app. With this function enabled, the control panel will be locked. You can unlock it via the app.
7.6 Rain Protection
If you worry that adverse weather conditions may affect the mowing work, you can enable Rain Protection function in Settings in the app. When this function is enabled, the robot automatically pauses mowing and returns to the charging station when it rains. You can set the rain protection time in the app.
Note: Mowing wet grass can damage your lawn. It is advisable to extend the protection duration to allow the grass to get dry before mowing again. The default protection time is 3 hours, and you can increase it in the app.

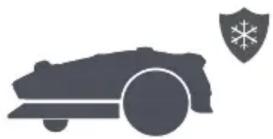
7.7 Frost Protection
When temperature is below 6 ℃ , mowing operations will cause permanent damages to the lawn. Battery will not be able to charge due to self-protection. You can enable Frost Protection function in Settings inthe app. The function enables the robot to automatically pause mowing and return to the charging stationwhen ambient temperature is ≤ 6 ℃ . It will automatically resume working when temperature is above 11 ℃ .
7.8 Security Features
The robot supports multiple anti-theft features to ensure secure operation and protect against unauthorized use.
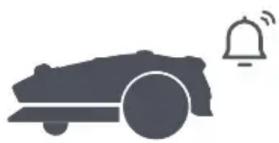
7.8.1 Lift Alarm
With this function enabled, an alarm will go off immediately when the robot is lifted, and the app control will be disabled. To resume app control, press the OK button twice on the control panel to deactivate the safety lock first.
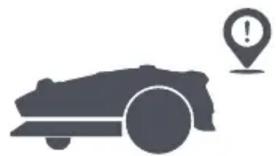
7.8.2 Off-Map Alarm
With this function enabled, the robot will be locked and alarm will go off immediately if it is away from the map. (This function requires installation of Link Module.)
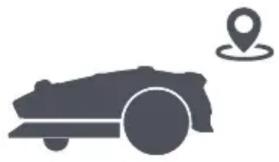
7.8.3 Real-Time Location
With Link Module, you can view the current location of the robot in Google Maps.
7.9 Custom Charging Period
To customise the robot's charging period to specific hours, you can enable the Custom Charging Period function through Settings > Charging in the app. When activated, the robot will charge itself to 20% when the battery level is low, provided there are no mowing tasks. It will complete a full charge only during the designated charging period. You can also customise the Battery Level for Auto-Recharge and Battery Level for Resuming Tasks to set the battery levels at which the robot will automatically return to the charging station or resume unfinished mowing tasks.

Note: MOVA development team will continuously conduct OTA (Over-the-Air) updates and maintenance on the firmware and app. Please check for update notifications or enable the Auto-update function to keep the firmware and app up-to-date and enjoy more features.
8 Maintenance
For better performance and lifespan of the robot, please clean it regularly and replace worn parts according to the frequency below:
| Part Replacement Frequency |
| Blades Every 6-8 weeks or sooner |
| Cleaning brush Every 12 months or sooner |
Note: You can check the remaining time for blades and the cleaning brush by navigating to Settings > Consumables & Maintenance in the app. After replacing any consumables as prompted, go to the details page for the consumable and tap I've Replaced It to reset the timer.
Note: If you have designated areas in your garden for routine robot cleaning and servicing, you can set Maintenance Points on the map by navigating to Settings > Head to Maintenance Point > Edit Point. Once the maintenance points are set, you can simply tap Go and direct the robot to the designated locations for easy servicing.
8.1 Cleaning
Regularly clean your robot to prevent grass clippings and dirt from accumulating and clogging the blade disc and drive wheels, which can affect its mowing, docking, and movement performance. We recommend using a cleaning kit, available at local stores or online.
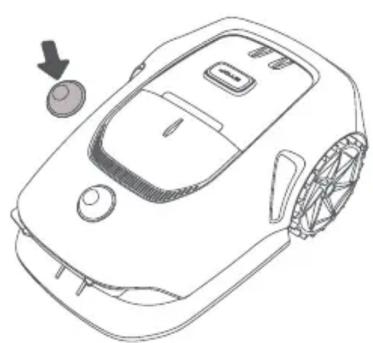
Warning: Before cleaning, please turn off the robot and rotate the security key to the OFF position. Unplug the charging station.
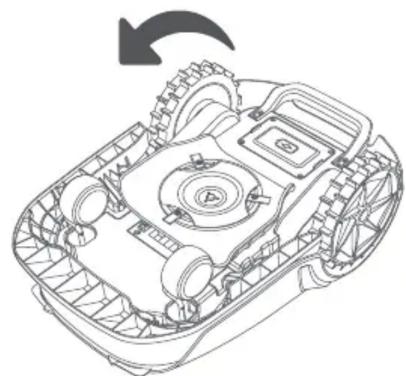
Caution: Please make sure LiDAR protective cover is on the LiDAR before turning the robot upside down to avoid damages to the LiDAR.
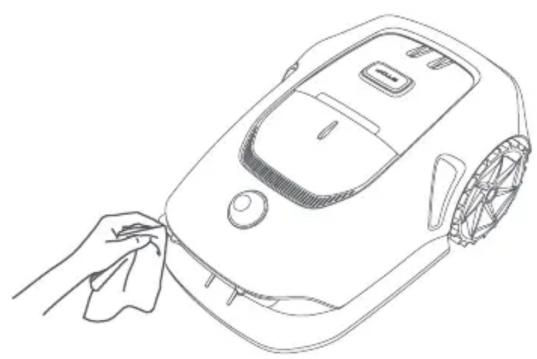
- The Housing, Chassis and Blade Disc:
- Turn the robot off and rotate the security key to the OFF position.
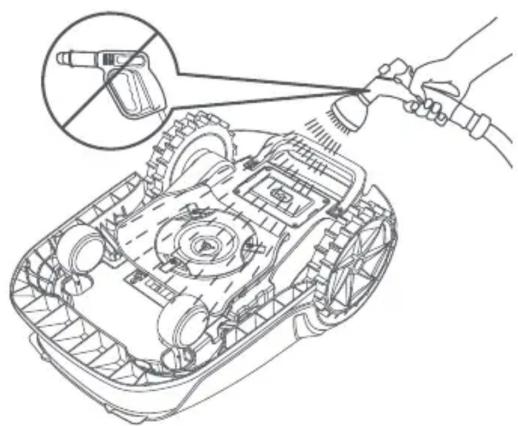
- Clean the housing, blade disc and chassis with a hose.
Warning: Do not touch the blades when cleaning the chassis. Please wear gloves when cleaning.
Caution: Please do not use a high-pressure washer for cleaning. Do not use detergents for cleaning.
- Use a lint-free cloth to carefully clean the LiDAR sensor.

Use a clean cloth to clean the charging contacts on the robot and the charging station. Keep the charging contacts dry after cleaning.

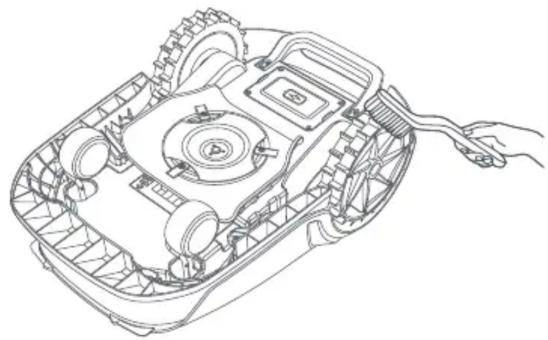
- Drive wheels:
Use a brush to remove mud from the wheels to ensure good grip.
8.2 Replacing the Components
- Replacing the Blades
To keep the blades sharp, please replace the blades regularly. It is recommended to replace the blades every 6-8 weeks or sooner. Please only use the MOVA genuine blades.
Warning: Please turn off the robot and rotate the security key to the OFF position. Wear protective gloves before replacing the blades.
Note: Please replace all three blades at the same time to ensure a balanced cutting system.
-
Turn off the robot and rotate the security key to the OFF position.
-
Cover the LiDAR with its protective cover.
-
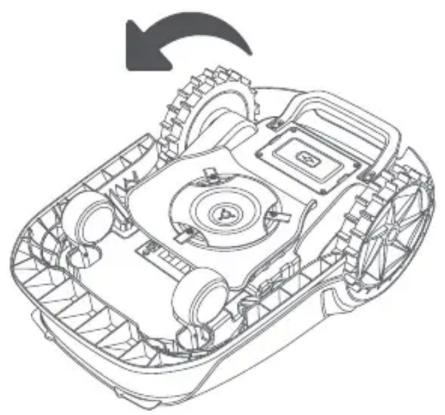
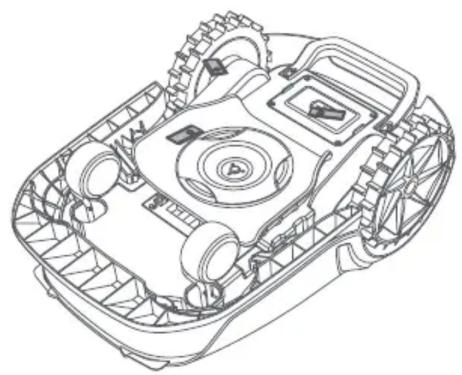
Put the robot on a soft surface and turn it upside down.
-
Loosen the bolts using a Phillips screwdriver.
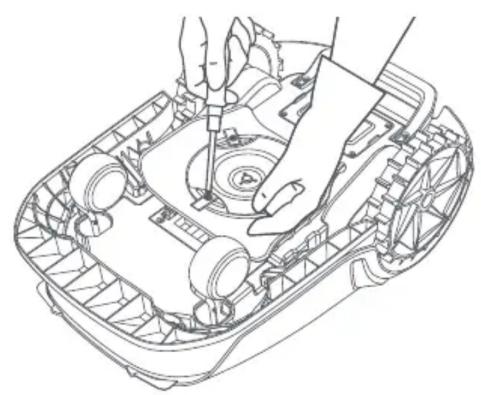
- Remove the 3 blades one at a time. 6. Align the holes of the blade and the blade
disc, then fasten the bolts to secure the blades.
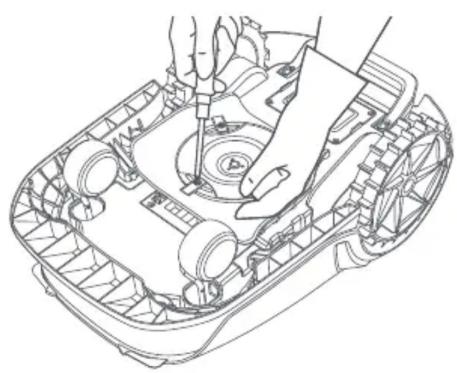
- Make sure the blades can rotate freely.
- Replacing the Cleaning Brush
When the cleaning brush for the LiDAR sensor wears out, its bristles may fray or deteriorate, affecting its cleaning performance. Please replace the cleaning brush regularly to keep a good cleaning result. It is recommended to replace the cleaning brush every 12 months or sooner.
9 Battery
For long-term storage, charge the robot every 6 months to protect the battery. Battery damage caused by over-discharge is not covered by the limited warranty. Do not charge the battery at an ambient temperature above 45^ C or below 6^ C. The long-term storage temperature for the battery should be between -10 and 35^ C. To minimize the damage, the recommended storage temperature for the battery is between 0 and 25^ C.
Note: The lifespan of the robot's battery depends on frequency of usage and hours of operation. If the battery is damaged or cannot be charged, do not dispose of the obsolete or faulty battery arbitrarily. Please obey local recycling regulations.
Low-Power Charging Mode:
With low-power charging mode on, functions not related to charging will be disabled. (Network will be turned off.)
- To enable low-power charging mode, press and hold the button and the button simultaneously, and press the OK button 5 times quickly at the same time. You will hear a voice prompt: Low-power charging mode is on.
- To disable low-power charging mode, restart the robot.
10 Winter Storage
The Robot
- Charge the battery fully. Turn the robot off and rotate the security key to the OFF position.
- Clean the robot thoroughly before putting it into storage in winter.
- Put on the LiDAR protective cover.
- Store the robot inside in a dry place, at a temperature above 0^ C.
- Charging Station
Unplug the charging station and store it in a dry and cool place, away from direct sunlight.
Note: After winter storage, please reinstall the charging station and place the robot in it to charge. If you reinstall the charging station in a different location, the robot will automatically update the station's location as soon as it charges and leaves the station. If you encounter positioning errors because of major changes in your garden, it's recommended to remap the area.
11 Transport
For long distance transport, ensure that the robot is turned off and the security key is rotated to the OFF position. It is recommended to use the original packaging. Please put on the LiDAR protective cover.
Warning: Please turn the robot off and rotate the security key to the OFF position before transporting it.
Warning: Lift the robot by the rear handle, keeping the blade disc away from your body.
12 Troubleshooting
| Issue Cause | Solution | |
| The robot is not connected to the app. | 1. The robot is not within Wi-Fi signal coverage or Bluetooth range.
2. The robot is turned off or is restarting. | 1. Check if the robot has completed the process of turning on.
2. Check if the router is working properly.
3. Move closer to the robot to establish a Bluetooth connection. |
| Robot lifted. The wheel is not on the ground. | 1. Put the robot back on flat ground.
2. Press the OK button twice to unlock the robot.
3. The robot can't cross objects higher than 3 cm. Please keep the ground even where it is working. | 1. Put the robot back on flat ground.
2. Press the OK button twice to unlock the robot.
3. The robot cannot climb slopes greater than 45% (24°). |
| Robot tilted. The robot tilts more than 37°. | 1. Put the robot back on flat ground.
2. Press the OK button twice to unlock the robot.
3. The robot cannot climb slopes greater than 45% (24°). | 1. Remove the surrounding obstacles and then retry.
2. Manually move the robot to a flat and open place inside the map and try starting the task again. If you continue to encounter this problem, please retry after the robot is in the charging station.
3. Check if there are holes in the ground. Fill in the holes before mowing to prevent the robot from being trapped.
4. Check if the surrounding grass is taller than 10 cm. You can adjust the obstacle avoidance height or use a push mower to mow the lawn in advance to prevent the robot from being trapped.
5. If the robot is often trapped in this location, you can set it as a no-go zone. |
| Robot trapped. | The robot is trapped and fails to get out. | 1. Clean the rear wheels and then retry.
2. If you continue to encounter this error, try restarting the robot.
3. If the problem persists, please contact the after-sales service. |
| Left/right rear wheel error. | The wheel cannot rotate or the wheel motor has a problem. | 1. Clean the blade disc and then retry.
2. Check if the surrounding grass is taller than 10 cm. You can use a push mower to mow the lawn in advance to prevent the blade disc from being blocked by tall grass.
3. Check if there is water under the blade disc. If there is any, move the robot to a dry place and then retry.
4. If you continue to encounter this error, try restarting the robot.
5. If the problem persists, please contact the after-sales service. |
| Blade disc can't rotate. | The blade disc cannot rotate normally or the cutting motor has a problem. | 1. Clean the blade disc and then retry.
2. Check if the surrounding grass is taller than 10 cm. You can use a push mower to mow the lawn in advance to prevent the blade disc from being blocked by tall grass.
3. Check if there is water under the blade disc. If there is any, move the robot to a dry place and then retry.
4. If you continue to encounter this error, try restarting the robot.
If the problem persists, please contact the after-sales service. |
| Bumper error. | The front bumper sensor is constantly triggered. | 1. Check if the robot is trapped somewhere.
2. Gently tap the bumper and make sure it bounces back.
3. If you continue to encounter this error, try restarting the robot.
4. If the problem persists, please contact the after-sales service. |
| Charging error. | The robot docks in the charging station, but the charging current or voltage has a problem. | 1. Check if the charging station is correctly connected to power.
2. Check if the charging contacts on the robot and the charging station are clean.
3. After checking is finished, try docking the robot in the charging station again.
4. If the problem persists, please contact the after-sales service. |
| Battery temperature too high. | Battery temperature is ≥ 60°C. | 1. Use the robot where ambient temperature is below 40°C. You can wait until the battery temperature decreases automatically.
2. You can turn off the robot and restart it after a while.
3. If the problem persists, please contact the after-sales service. |
| Battery temperature is high. Battery temperature is ≥ 45°C. | 1. Charging may fail when battery temperature is above 45°C.
2. Use the robot where ambient temperature is below 40°C. |
| Battery temperature is low. Battery temperature is ≤ 6°C. | 1. Charging may fail when battery temperature is below 6°C.
2. Use the robot where ambient temperature is above 6°C. |
| LiDAR is blocked. | LiDAR is blocked (for example the LiDAR protective cover is not removed). | 1. Remove the lidar protective cover and then retry.
2. If lidar on the top of the robot is very dirty, clean it with a lint-free cloth and then retry. |
| LiDAR malfunction. | LiDAR is very dirty or there is a sensor error. | 1. Check if the lidar is dirty. Clean it if necessary and then try again.
2. If you continue to encounter this error, try restarting the robot.
3. If the problem persists, please contact the after-sales service. |
| LiDAR is dirty. LiDAR is dirty. | | Wipe the LiDAR sensor on top of the robot with a clean cloth. Keep the LiDAR dry after cleaning. |
| LiDAR temperature is high. | The LiDAR temperature is high.
LiDAR will stop soon. | 1. The robot will automatically try to return to the charging station to cool down.
2. Ensure the robot operates at an ambient temperature below 40°C.
3. Place the robot in a shaded, cool, and well-ventilated area. The alarm will stop when the temperature drops to a normal range.
4. The robot will automatically resume operation once the alarm stops.
5. If the problem persists, please contact after-sales service. |
| LiDAR temperature is too high. | The LiDAR temperature is too high. LiDAR has stopped. | 1. The LiDAR is turned off due to high temperatures.
2. Ensure the robot operates at an ambient temperature below 40 °C.
3. Place the robot in a shaded, cool, and well-ventilated area. The alarm will stop when the temperature drops to a normal range.
4. If the problem persists, please contact after-sales service. |
| Robot is lost. Positioning is lost. | | 1. Check if the LiDAR on the top of the robot is dirty. Dirt will affect the positioning.
2. Manually move the robot to an open place inside the map and try starting the task again.
3. If the positioning is not recovered, remote control the robot back to the charging station via the app, and then start the mowing task. |
| Sensor error. Sensor error. | | 1. Restart the robot and retry.
2. If the problem persists, please contact the after-sales service. |
| The robot is in the no-go zone. | The robot is in the no-go zone. | 1. Manually move the robot out of the no-go zone and then retry.
2. Remotely control the robot through the app to move it out of the no-go zone, and then retry. |
| The robot is outside the map. | The robot is outside the map. | 1. Manually move the robot inside the map, and then retry.
2. Remote control the robot back inside the map via the app, and then retry. |
| Emergency stop is activated. | The Stop button on the robot is pressed. | Press the OK button twice to unlock the robot. |
| Low battery. The robot will shut down soon. | Battery level is ≤ 10%. Dock the robot in the charging station to charge. | |
| Failed to return to the charging station. | The robot cannot find the charging station when returning to the charging station. | 1. Check if there are obstacles blocking the robot.
Remove the obstacles and retry.
2. Remote control the robot back to the charging station via the app. |
| Failed to dock in the charging station. | The robot finds the charging station but fails to dock. | 1. Check if the reflective films on the station are dirty or blocked.
2. Check if there are obstacles in front of the station.
3. Check if the station is moved.
4. Check if the baseplate is covered with thick mud.
5. Check if the station is on a slope.
6. Check if the station has power.
7. Help the robot dock in the charging station by using the remote control or manually. |
| Positioning failed. | Positioning fails when the robot tries to start a mowing task. | 1. The lidar may be obstructed. Manually move the robot to a flat and open place inside the map and try starting the task again.
2. If you continue to encounter this error, please retry after the robot is docked in the charging station. |
| Path obstructed. Path obstructed. | | 1. Check if a no-go zone is set in the path.
2. Check if there are obstacles blocking the robot.
3. If the robot still cannot pass, delete the path in Map Editing and set a new one. |
13 Specifications
| MOVA 600 MOVA | 600 Kit MOVA 1000 | |
| Basic information | Model MLLM1110 MLLM4110 | |
| Dimensions 643.2 × 418.6 × 279.3 mm |
| Weight (battery included) | 10.1 kg 11.7 kg | |
| Mowing | Recommended working capacity | 600 m² 1,000 m² | |
| Mowing efficiency | Standard: 600 m²/dayEfficient: 1,000 m²/day | Standard: 800 m²/dayEfficient: 1,200 m²/day |
| Mowing height 20-60 mm |
| Mowing width | 20 cm |
| Charging time⁴ | 100 min 40 min | |
| Noise emissions | Sound power level LWA | 59 dB(A) |
| Sound power uncertainties KWA | 3 dB(A) |
| Sound pressure level LpA | 56 dB(A) |
| Sound pressure uncertainties KpA | 3 dB(A) |
| Working condition | Operating temperature | 0~50°Recommended: 10~35°C |
| Long-term storage temperature | -10~35°CRecommended: 0~25°C |
| IP-classification | Robot: IPX6Charging station: IPX4Power supply: IP67 |
| Maximum slope for mowing area | 45% (24°) |
| Connectivity | Bluetooth frequency range | 2400.0-2483.5 MHz |
| Max. RF Power | 802.11b:16±2dBm(@11Mbps)802.11g:14±2dBm(@54Mbps)802.11n:13±2dBm(@HT20,HT40)Bluetooth: 7.49dBm |
| Wi-Fi | Wi-Fi 2.4 GHz(2400-2483.5M) |
| MOVA 600 MOV | A 600 Kit MOVA 1000 | |
| Connectivity | Link service (optional)5 | LTE-FDD: B1/3/7/8/20/28ALTE-TDD: B38/40/41 |
| GNSS (optional)6 | GPS/GLONASS/BDS/Galileo/QZSS |
| Driving motor | Driving speed under remote control | 0.45 m/s-0.8 m/s |
| Driving speed when mowing | Standard: 0.35 m/sEfficient: 0.6 m/s |
| Cutting motor Speed | 2500/min | |
| Battery (robot) | Battery model MBPM10 | |
| Battery type Lithium-ion battery | |
| Rated capacity 2500 mAh | |
| Rated voltage 18 V DC | |
| Power supply | Charger model7 | MPAM10 MPAM20 | |
| Input voltage 100~240 V AC | |
| Output voltage 20 V DC | |
| Output current8 | 1.5 A | 3 A |
| Charging station | Charging station model9 | MCM10 | MCM11 |
| Input voltage | 20 V DC |
| Output voltage 20 V DC | |
| Input current10 | 1.5 A | 3 A |
| Output current11 | 1.5 A | 3 A |
| Accessories | Spare blades and bolts | 9 | 81 | 9 |
| Blade model | MBKM10 |
| Drive wheels | Wheel type | Standard | Off-road |
- Charging time applies when the robot automatically returns to the charging station at low battery.
- Requires the installation of Link module.
- Requires the installation of Link module.
- MOVA 600/600 Kit/1000 are compatible with both MPAM10 and MPAM20 chargers.
- MOVA 600/600 Kit/1000 are compatible with both 1.5 A and 3 A output currents.
- MOVA 600/600 Kit/1000 are compatible with both MCM10 and MCM11 charging stations.
- The MOVA 600/600 Kit/1000 charging stations are compatible with both 1.5 A and 3 A input currents.
- The MOVA 600/600 Kit/1000 charging stations are compatible with both 1.5 A and 3 A output currents.
Note: The specifications are subject to change as we continually improve our product. For the latest information, please visit our website at https://mova-tech.com.
1.7 Symbols and Decals

Download on the App Store

Get it on Google Play
Download on the App Store

Get it on Google Play