
GQ100D - Cleaning machine Vevor - Free user manual and instructions
Find the device manual for free GQ100D Vevor in PDF.

| Product Type | Pipeline cleaning / drain snake machine |
| Brand | Vevor |
| Model | GQ100D |
| Power Supply | 220-240 V AC, 50 Hz |
| Motor Power | 500 W |
| Motor Speed | 1400 RPM |
| Spring Speed | 410-500 RPM (with handle pressed) |
| Maximum Cleaning Length | 25.4 m |
| Spring Diameter | 9.5 mm |
| Compatible Pipe Diameter | 50-200 mm (with suitable springs) |
| Included Springs | 16 mm spring, 12 mm flexible spring |
| Included Cutting Heads | Flexible olive drill, straight olive drill, recycled helical drill, helical serrated cutter, type C cutter, four-edge serrated cutter, spade cutter |
| Included Accessories | Leather gloves, PVC gloves, disassembly key, spring tray |
| Net Weight | Approximately 16 kg |
| Dimensions (L x W x H) | Approximately 60 x 40 x 40 cm |
| Motor Type | Reversible universal motor |
| Reverse Function | Yes, to free the head |
| Clutch | Manual clutch handle |
| Safety Protection | Grounding, overload protection (via circuit breaker) |
| Maintenance | Cleaning with soapy water, regular lubrication |
| Warranty | 2 years (depending on retailer) |
Frequently Asked Questions - GQ100D Vevor
User questions about GQ100D Vevor
0 question about this device. Answer the ones you know or ask your own.
Ask a new question about this device
Download the instructions for your Cleaning machine in PDF format for free! Find your manual GQ100D - Vevor and take your electronic device back in hand. On this page are published all the documents necessary for the use of your device. GQ100D by Vevor.
USER MANUAL GQ100D Vevor
Affordable. Reliable. Home Improvement.
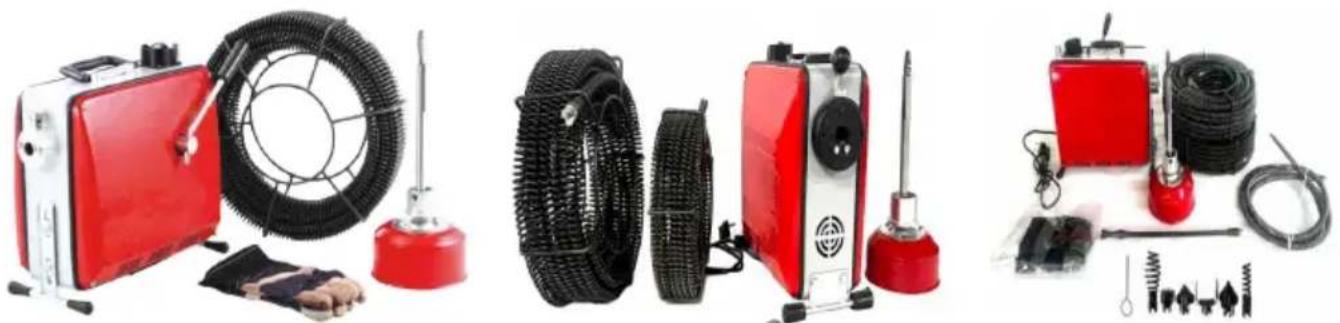
DRAIN CLEANING MACHINE
MODEL:GQ-100A
GQ-100B
GQ-100C
GQ-100D
GQ-150
MODEL: GQ-100A\ GQ-100B\ GQ-100C\ GQ-100D\ GQ-150
(The color of the gloves is random)
This is the original instruction, please read all manual instructions care before operating. VEVOR reserves a clear interpretation of our user manual. The appearance of the product shall be subject to the produ received. Please forgive us that we won't inform you again if there a technology or software updates on our product.
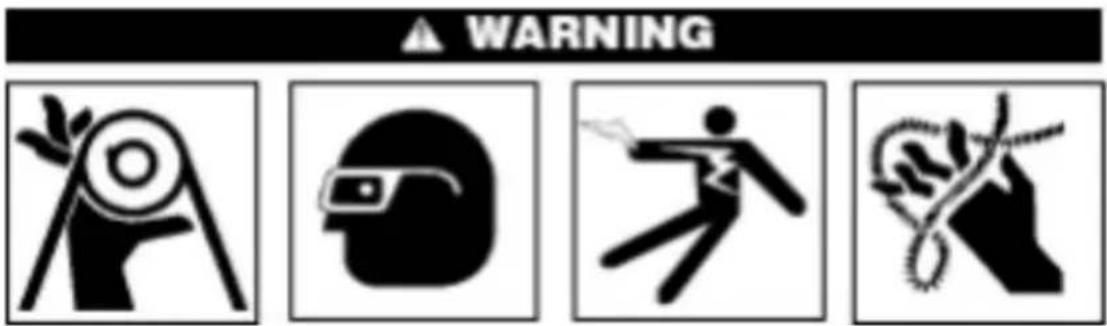
| Warning-To reduce the risk of injury, user must read instruct manual carefully. | |
| This product is subject to the provision of European Directive 2012/19/EC. The symbol showing a wheelie bin crossed throb indicates that the product requires separate refuse collection European Union. This applies to the product and all accessmarked with this symbol. Products marked as such may notdiscarded with normal domestic waste, but must be taken tocollection point for recycling electrical and electronic devices | |
| This symbol indicates that when using the machine, pleasewear safety glasses with protective plates and eye protectionto reduce the risk of eye injury. | |
| This symbol indicates the danger of hands, fingers, or ot parts getting caught in the cable of the dredging machine. | |
| The symbol indicates the danger of being involved in the be pulley. | |
| The symbol indicates the danger of having an electric shock |
INSTRUCTIONS
Safety Instruction
Please read all the safety precautions and safety instructions carefully. Failure follow these safety instructions may lead to shock, fire or serious injury. Please properly keep this safety precautions and safety guidance.
Workplace safety precautions
-
Keep the workplace clean and fully lit. Chaos and dark environment are a cause of safety accidents. Fire should be prevented.
-
Do not operate electric tools in dangerous environments such as flammable and explosive, such as flammable and explosive liquids, gases or dust. Power to may create sparks that can ignite the dust or gas.
-
When operating the machine, keep the irrelevant personnel (including children bystanders, non-staff, etc.) away from the work site. Unrelevant interference can affect your proper use of the tool.
Electrical Safety
- Tools with grounding protection should be inserted into sockets that comply with grounding regulations. Do not change the plug at any time and do use any other adapter. If you suspect that the socket does not have great protection, then you should ask a qualified electrician to inspect it. If an electrical fault occurs, grounding protection will provide a smaller resistance allowing the current to directly enter the ground without passing through it.
operator themselves.
- Tools with grounding protection should be inserted into sockets that comply with grounding regulations. Do not change the plug at any time and do use any other adapter. If you suspect that the socket does not have great protection, then you should ask a qualified electrician to inspect it. If an electrical fault occurs, grounding protection will provide a smaller resistance allowing the current to directly enter the ground without passing through the operator themselves.
- Do not expose power tools to rain and humidity, which will increase the risk of electric shock.
- Do not damage the wiring board power cord. Do not use the power cord drag or pull the power tool. Keep the power cord away from heat, oil, edges, or moving objects. Damaged power cord or involvement in other objects increases the risk of electric shock.
- Do not damage the wiring board power cord. Do not use the power cord drag or pull the power tool. Keep the power cord away from heat, oil, edges, or moving objects. Damaged power cord or involvement in other objects increases the risk of electric shock.
Personal safety precautions
- When using power tools, keep a clear head and pay attention to the worst hand. Do not use power tools when you are tired or under the influence of alcohol or drugs. If in the use of a careless, it will lead to more serious injury accidents.
- Dress up correctly. Do not wear loose clothes or wear jewelry. Keep your clothes, hair and gloves away from moving parts. Loose clothes, jewelry, and hair are easy to get involved in moving parts.
- Do not unconsciously start the machine, make sure the switch is off before inserting into the socket. When you carry a power tool, fingers accidentally touched the switch in the boot state, will lead to a safety accident.
- Any adjustment tools, such as wrenches, should be cleaned up before the machine starts. These tools are very dangerous when involved in the moving of the machine, which are easy to cause personal injury accidents.
- Keep your balance and don't lose your balance while operating the machin
This will give you a better control tool in unexpected situations.
- Use personal protective equipment correctly and always wear safety glasses. Personal protective equipment includes dust masks, anti-skid safety protective shoes, hard cushions or thermal protective devices. Appropriate use of these protective equipment will reduce the occurrence of personal injury accidents.
Use and maintenance of the tools
- Do not overuse the tools, and do the corresponding work according to the purpose of the tools. Reasonable selection of tools to complete the work acc to its designed purpose will produce twice the result with half the effort, and safe.
- If the switch of the machine does not work properly, then stop using the machine. Any equipment whose switch does not work is very dangerous and be repaired immediately.
- The power supply must be disconnected before adjusting the tools, replacing the accessories, and storing them. These measures may prevent the risk of accidentally starting the tool.
- Be careful not to store power tools for irrelevant people, especially for chi. Because power tools are very dangerous for trained people.
- Carefully maintain the tools to ensure that the head and blade is sharp. maintenance and keeping the blade sharp can reduce the knots and easily c the cables.
- Check the tools regularly to see whether the position of the moving parts correct, the parts are damaged or other damage that may affect the normal the tools. If so, be sure to repair them before use. Many accidents are due improper maintenance of the tools.
- Please use only the recommended attachments. Accessories suitable for on tool can be dangerous for another tool.
SERVE
- The machine maintenance service must be provided by the personnel who pass the assessment of the manufacturer, otherwise the injury accident will occur.
- Please strictly follow the instructions of the operation manual to use the
machine and replace the accessories specified by the manufacturer.
Otherwise, it will lead to an electric shock or an injury accident.
- Cut off all power connections before maintenance work to avoid electric sh accidents and accidental start-up operation.
This section contains important security information for this tool. Please read it safely information carefully before using the drum machine. Otherwise, it may cause electric shock, fire or serious personal injury accidents. Please pay attention to save these safety instructions!
The use of the dredge machine is safe
- Please wear the operation gloves provided randomly, and it is forbidden to trags or cotton gloves to hold the dredging cable, so that there is the risk of involved by the dredging cable and causing injury.
- Do not operate the machine when the belt cover is taken away. The fing at risk of being involved by the belt and pulley.
- Do not turn the dredge head around when the machine is running. In this case the cable stress is too large and produce torque, knot and even broken, will produce more serious injury accidents.
- Use the gloved hand to operate the cable, so that the hand can feel the movement of the cable, so as to prevent the cable torque, knot, or even br and so on, to avoid the occurrence of injury accidents.
- The machine is two feet away from the pipe inlet. Too large distance can the cables to twist and knotted.
- The machine is designed to operate by a single person, and the operator control the foot switch and the steel cable alone. Once the dredge head storating, To stop the machine, so as to prevent the cable torque, knot, and broken and so on, to avoid the occurrence of injury accidents.
- Do not reverse the machine unless specifically mentioned in the manual. It also can easily damage the cables and is usually used to remove the head blockage.
- Do not touch the running cable drum and guide pipe with your hands. Use the machine stops, the hand reaches into the drum. Otherwise, the hand will hurt by the rotating parts.
9 . Don't wear loose clothes or jewelry necklaces to keep your hair and cloth
away from moving parts. Loose clothes, jewelry necklaces, hair are easily inv by sports parts and produce danger.
- When operating and using the dredging machine, please use the appropripri personal safety protection equipment. Sewers usually contain a lot of harmful substances, harmful to people's body. Suitable personal safety protection equipment includes safety glasses, protective gloves, and any other safety equipment, such as masks, rubber gloves, protective blankets, steel head boots, etc.
- Maintain personal hygiene, wash hands and other body parts with hot so water, and do not eat or drink during dredging work to avoid inhaling toxic substances.
- Do not operate the machine in the water or use it in the water, which increase the risk of electric shock.
- To dredge the pipes that match the working capacity of the machine accident to the operating specifications. Any other use of the machine will increase the occurrence of dangerous accidents.
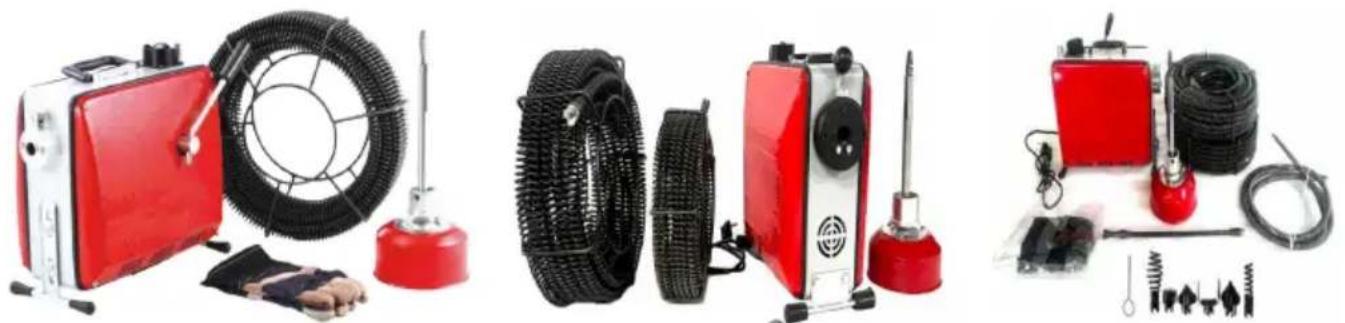
Product overview, technical parameters, and standard configuration
Product overview
Suitable for clearing various types of blocked pipes inside and outside house with an inner diameter of 50-200mm.
-
Can be used 10mm, Two sizes of springs,16mm.
-
Using 10mm soft shaft, capable of cleaning pipelines with an inner diameter range of 50- 110mm and a dredging length of up to 5m, espe suitable for complex pipelines with small diameters or backflow bends.
- Using 16mm detachable segmented spiral elastic flexible shaft, capable cleaning pipeline range 50-200mm, the flexible shaft can be arbitrarily extended and connected, and the dredging length can reach 33.9m.
Press the handle and the spring speed can reach 410-500rpm. Release the handle and the spring will stop rotating.
Various spiral elastic flexible shafts are used to clear pipelines, all of which manually fed with springs by hand.
The reversible electric motor is connected to a continuously operated clutch, allowing the machine to respond quickly in any situation.
Pipe capacity:varies according to the cable
| GQ-100A | 390W Cleaning Length:24.5m | Spring diameter | 9.5mm | Corresponding pipeline size | 50-75 mm |
| Interface blade size | 16MM spring+16MM interface blade+12MM soft spring | 75-110 mm | |||
| Olive is a spiral drill * 1 Straight spiral drill * 1 C-type cutter * 1 Spiral serrated cutter * 1 Four edge serrated cutting drill * 1 Shovel cutter * 1 Disassembly key * 1 | |||||
| GQ-100B | 450W Cleaning Length:25.4m | Spring diameter | 9.5mm | Corresponding pipeline size | 50-75 mm |
| Interface blade size | 16MM spring+16MM interface blade+12MM soft spring | 75-110 mm | |||
| Olive is a spiral drill * 1 Straight spiral drill * 1 C-type cutter * 1 Spiral serrated cutter * 1 Four edge serrated cutting drill * 1 Shovel cutter * 1 Disassembly key * 1 | |||||
| GQ-100C | 500W | Spring diameter | 9.5mm | Corresponding pipeline size | 50-75 mm |
| Interface blade size | 16MM spring+16MM interface blade+12MM soft spring | 75-110 mm | |||
| Cleaning Length:45.4m | Olive is a spiral drill * 1 Straight spiral drill * 1 C-type cutter * 1 Spiral serrated cutter * 1 Four edge serrated cutting drill * 1 Shovel cutter * 1 Disassembly key * 1 | ||||
| GQ-100D | 500W Cleaning Length:25.4m | Spring diameter | 9.5mm | Corresponding pipeline size | 50-75 mm |
| Interface blade size | 16MM spring+16MM interface blade+12MM soft spring | 75-110 mm | |||
| Flexible olive drill * 1 Olive drill * 1 Recycled spiral drill * 1 Straight spiral drill * 1 Spiral serrated cutter * 1 C-type cutter * 1 Four edge serrated cutter * 1 Shovel cutter * 1 Disassembly key * 1 | |||||
| GQ-150 | 850W Cleaning Length:33.9m | Spring diameter | 9.5mm | Corresponding pipeline size | 50-75 mm |
| Interface blade size | 16MM spring+16MM interface blade+12MM soft spring | 75-110 mm | |||
| 22MM spring+22MM interface blade+12MM soft spring | 100-200 mm | ||||
| Olive shaped spiral drill * 1 Straight spiral drill * C-shaped cutter * 1 Spiral serrated cutter * 1 Four edge serrated cutter * 2 Shovel cutter * 2 Disassembly key * 2 Horn shaped spiral drill * 1 U-shaped cutter * 1 | |||||
| Olive shaped blade Used to clear various blockages And pipeline bends, oil and greaseWell | Spiral serrated head Used to remove blockage such as trees, roots, debris, or grease from pipelines. | ||||
| Shovel type blade Shovel style cleaning of grease on pipeline walls, used to remove residual o inside pipelines Things. | Oil cutting blade Used for cleaning greas from garbage equipment or pipeline walls | ||||
| Four blade tooth cutting blade Used to clean blockages caused by hardening or clumping inside pipelines. | Straight spiral blade Used for detecting and clearing blockages or collecting samples of pipeline blockages | ||||
| Spring compartment Install 3/8 "spring | Leather gloves PvC gloves Protect hands from injur (The color of the glov random) | ||||
| 1. Straight hook spiral drill bit 2. Straight spiral drill bit 3. Double olive head spiral drill 4. Olive shaped spiral drill bit 5. Spiral serrated cutter 6. U-shaped cutter 7. four blade serrated cutter 8. Shovel cutter 9. disassembly key | |||||

MOTOR:
Type.....AC220V-240V/50Hz, inverted universal phased AC motor.
Motor speed 1400r/min
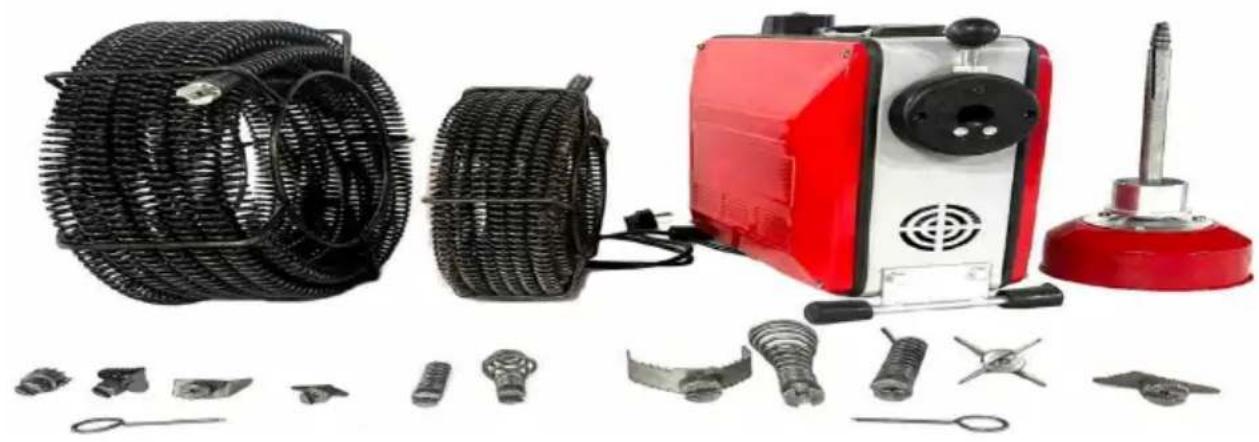
Standard Configuration (Based on the actual product received)
- Operation Gloves 1 Pay 0
- Set Of Spring Bin With 3 / 8in Spring
- Dredge The Head 1 Set
APPLIED RANGE
The type dredging machine can be used to dredge the pipe of the corresponding size. If the design, construction and installation of the pipeline are free, and blockage is not very serious, then it is effective to work and will not damaged machine. It is suggested to use the pipe endoscope to understand the blocks inside the pipe before dredging, and then use the dredge machine to dredged dredge machine can not dredge all the blockage.
MACHINE INSPECTION
Before using the machine, follow the following steps to check the machine to unnecessary accidents, such as electric shock, cable distortion, breaking and so on.
Always wear safety glasses, gloves and other suitable protection devices, such chemical protection, protective gloves, etc.
- Check the gloves for the dredging machine to confirm that there is no damage or loose parts, otherwise these parts are easily involved in the spring and bring danger. The gloves protect the hand from rotating cables. If the gloves are damaged, worn and loose, replace the new leather gloves to use the dredger machine.

Clear the machine with gloves-leather, PVC material
- Check whether the cables and plugs are in good condition . If there is adamage , please replace the intact cables and plugs for use .
- Check whether the appearance of the machine is intact, whether the pardefective and other factors affecting safety. Please confirm that the machine can be used in good condition.
- Clean the grease and dust on the handle to reduce the occurrence of vadangers and easily control the machine .
- Check whether the safety mark on the machine is affixed to the machine clearly readable. Do not operate the machine without the safety mark. (Safe identification is as shown in the figure).

Notice
To prevent the fingers or other parts of the body involved in dredging machine or winding by the flexible shaft, the wrong operation will cause personal injury.

Notice
Must be used with three hole power socket reliable grounding protection and matching with the three level of the power plug Using an incorrect extension cable and a poweroutlet without reliable grounding will result in a click.
- Clean the debris on the head and cable, check whether the spring is wet damaged, if the spring is seriously distorted or worn, stop using the scrap immediately; check the pin of the spring joint, if the spring is in danger of into the pipe.
- Check whether the dredging head edge is sharp, otherwise it is necessary to replace the sharp dredging head of the dredging edge. If the dredging head is sharp, it will affect the dredging effect, resulting in spring distortion, knot, and fracture.
- Lubricate the machine according to the operation manual, which can make normal use of the machine and prolong the service life of the machine.
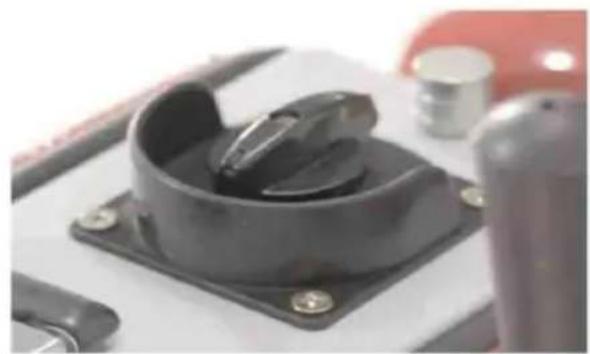
- Test the machine performance: connect to the power supply, Put the switch knob to the FOR and REV gears to see if the machine can start properly, switch knob in the OFF gear, Whether the machine can stop turning, If normal and stop, Prove that the electrical part of the machine is normal, Place the knob in the OFF gear; Pull the spring out of the spring bin beyond the fuse. Install the fuselage in the correct way in the operation manual, Press the clutch handle, Pull the spring hard, The spring cannot pull out, Release the clutch handle to bounce quickly; plug in, Place the switch in the CW position, Pres clutch handle, Spring rotation, Place the switch knob in the OFF gear, The machine stops turning, Then put the switch knob in the REV gear, Press the handle, The spring turns in the opposite direction, And the machine makes a sound, Prostrate that the machine is operating properly, Otherwise the machine has a problem, Need to repair
PAY ATTENTION TO:
A spring whose wear or damage, spring joint pin cannot bounce, can cause serious injury or fall into the pipe in use.
-
The workplace should meet the following requirements:
-
Full lighting, no flammable and explosive gas, liquid, or dust.
- The working area should be dry and the ground is flat. Do not support the machine in the water area, and the operator should not stand in the way
- A socket with ground protection.
- Clean up the area where the wire passes to ensure that there is no damage to the wire, such as heat sources, grease, sharp objects, or other moving
objects.
- The path from carrying the machine to the work site should be smooth.
- Check the dredged pipe, if possible, find the starting point, identify the elts, the clear distance, the distance to the main pipeline and the blockage, chemical substances, etc. If there is a chemical substance, to understand its composition and take safety protection measures and so on. If necessary, facilities such as birdbasins may be removed, which may hinder the operation of the machine damage the cables.
- Select the suitable dredging equipment:
dredging machine can not dredge the blockage of the sewage well pipeline
- Ensure that the machine has been checked.
- If necessary, lay protective pads on the ground because the dredging open is dirty.
- Please take the usual road. If you move up the stairs, please watch the slip and put on the appropriate protective shoes.
- The machine is two feet from the entrance, too long can cause cable dis and knots. If not, it can be connected to the inlet with the appropriate size the cable through the extension pipe .Incorrect cable protection measures can cause cable distortion, knotting or even fracture, or harm to the operator.
- Use an extension pipe to protect the steel cables
- Dredge the head selection: the correct choice is to clean the pipe with a diameter of at least 1in less than the inner diameter of the pipe.
- Access to the power supply, if the wire length is not enough, please ad extension cord.
PAY ATTENTION TO:
To avoid electric shock or fire, strictly use various extension lines with the fcc requirements.
This cable must have a ground wire.
When used outdoors, a cable with a W or W-A identification must be used. This cable shall have an insulation layer of sufficient thickness ( 16 AWG-100) Preparation work before the operation:
- Preparation before dredging the pipe with 5 / 8 " steel cables:
(1) Check the working area: With enough brightness.
Power outlet with grounding.
Dry and spacious sundry operating environment, no grease, sharp objects and damage to the cable.
Avoid dredging pipes in environments with flammable liquids, dust and steam.
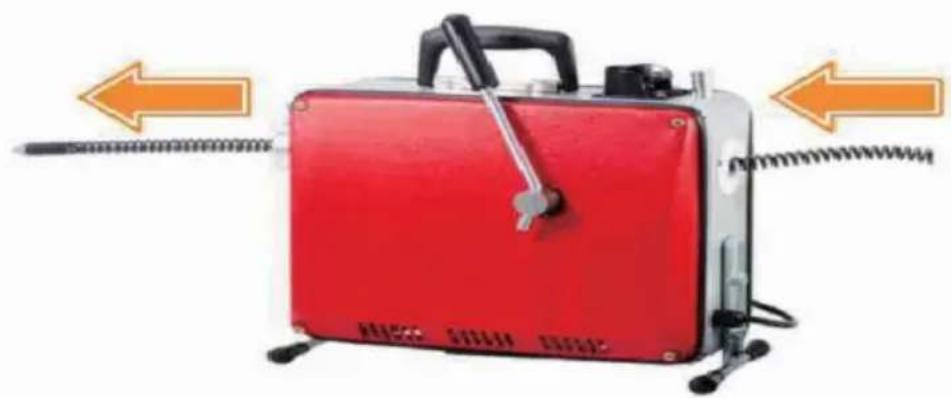
(2) Place the machine 1-2 feet from the pipe entrance, and excessive distance cause wire winding.
(3) Ensure that the switch is in the OFF position
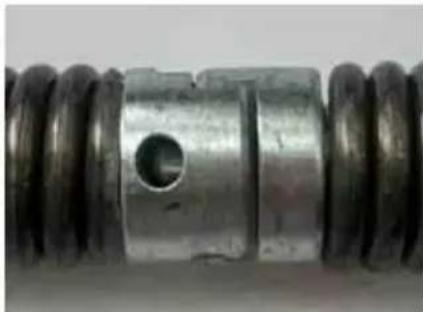
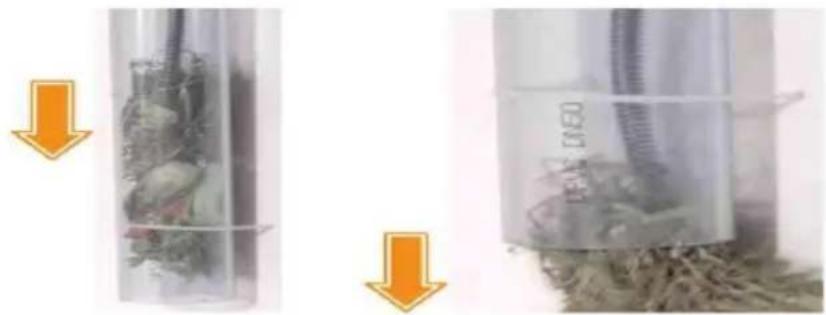
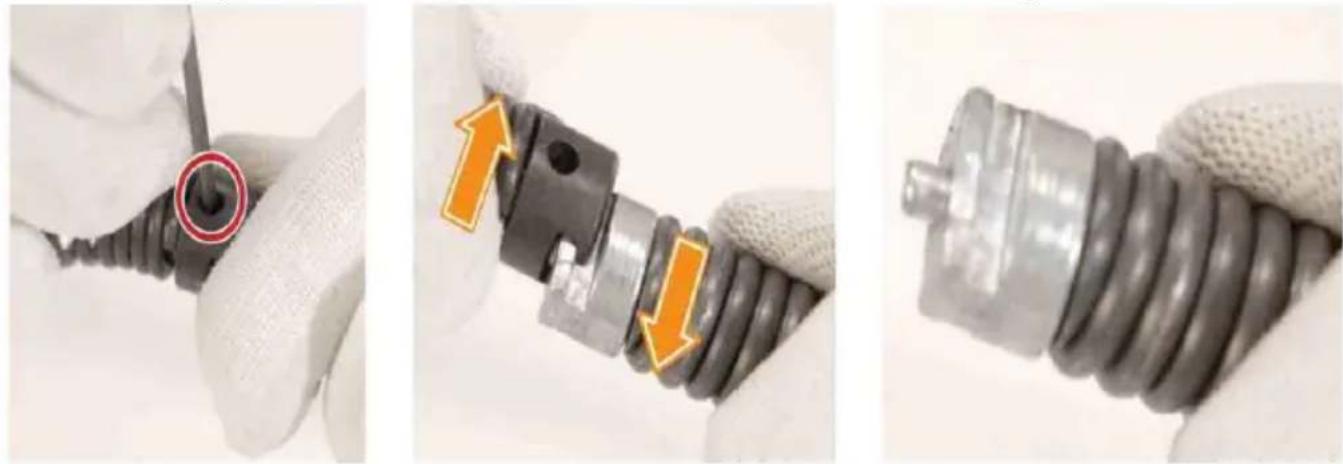
(4) Pull out spring from the spring basket, take out the key for
removing the spring from the tool kit, insert into the hole of the spring joint, vigorously along the connection groove of the joint, and remove the spring.(as shown in the figure)
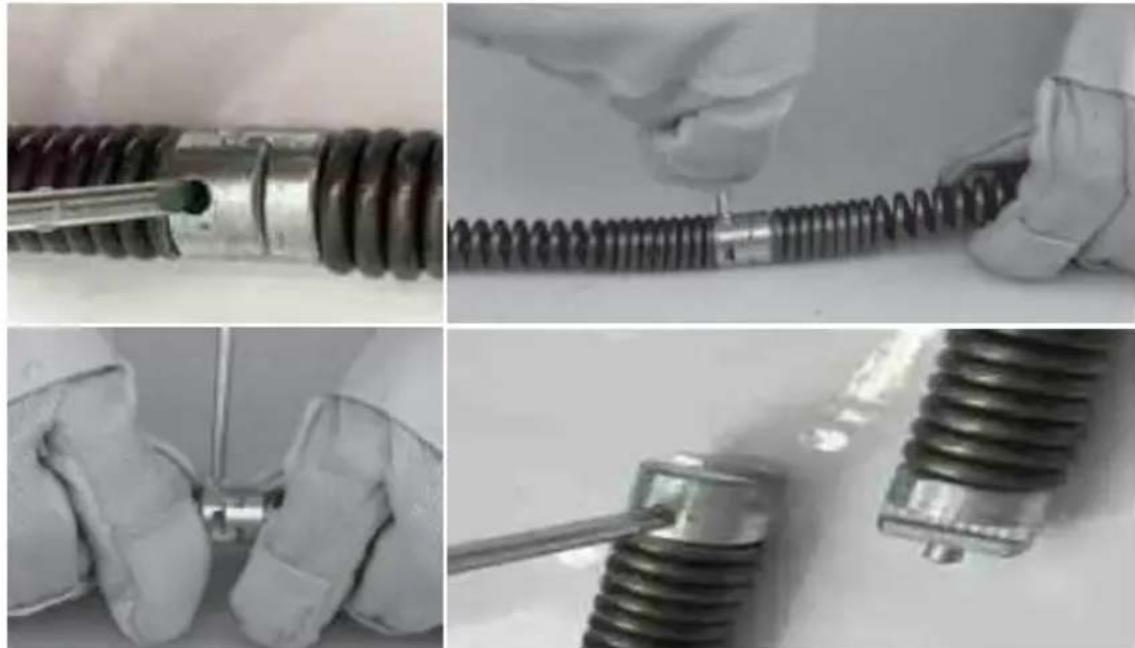
DISMANTLE
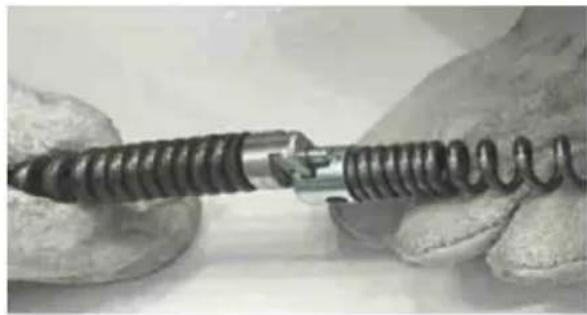
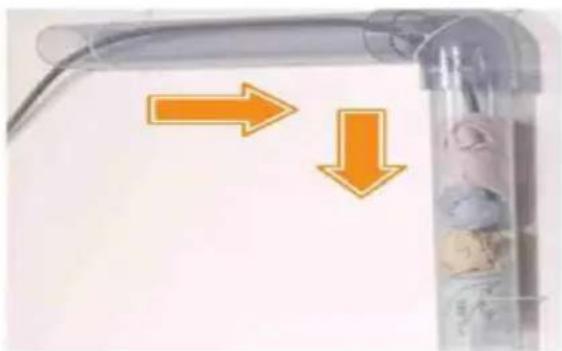
(5) Push the parent end of the spring from the front of the machine into the fuselage, and reserve 1 foot out of the machine. pay attention to: Only one can be removed from the spring basket and pushed into the fuselage. This spring flexible shaft comes with a blade, so there is no need to install a bl (6) Select the appropriate dredge head, align the T-groove of the dredge head joint at the narrow end of the spring joint, push hard, make the tool quickly connected with the spring joint, check the joint to confirm the connection is t (as shown).
- Use a 3 / 8 " spring to dredge the pipeline before the preparatic
OPERATION
- Put on the provided work gloves (L) and any other PPE necessary for your work.
- Clear the area around the drain you are going to work on, removing any obstacles to ensure enough space to work comfortably. If the bowl or tank ab the drain has excessive water, baithe water out or use a plunger to remove much as possible to prevent splashing during work.
- Turn off the water supply to your work area.
- Place the drain cleaner machine (A) on a firm, level, and dry location near drain and a welgrounded power source. For best results, restrict access to the area using appropriate physicabarriers or signage to prevent unauthorized entry and interference.
ASSEMBLY
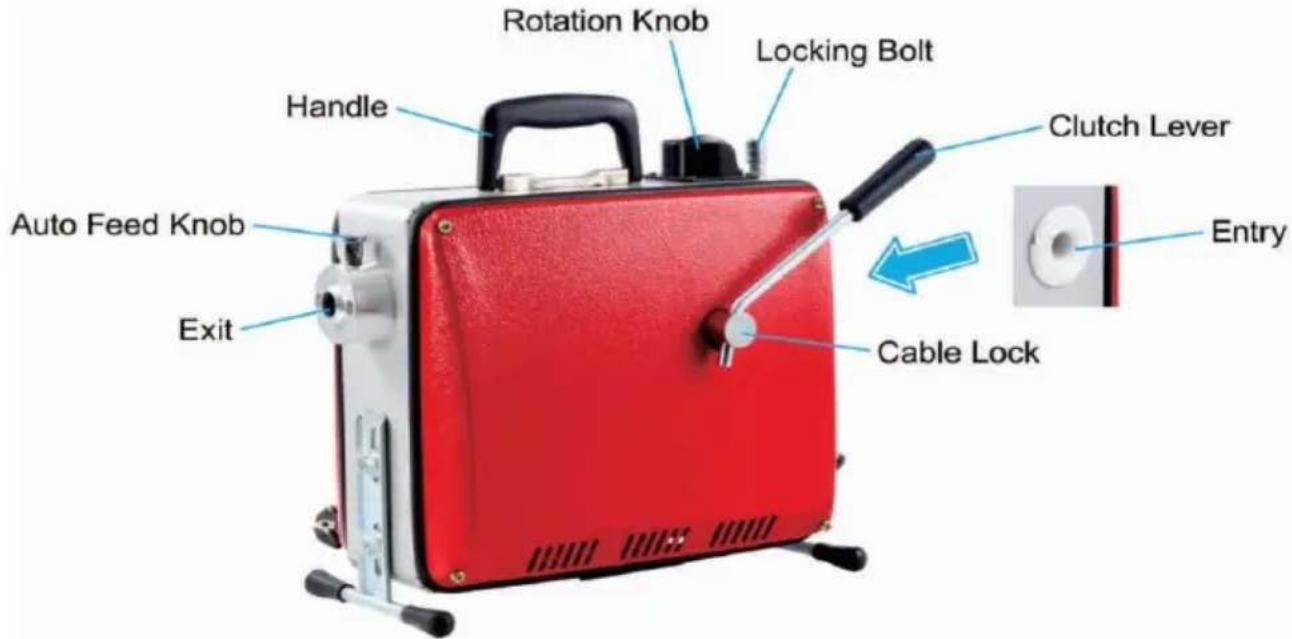
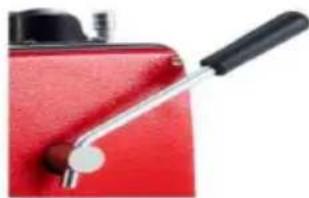
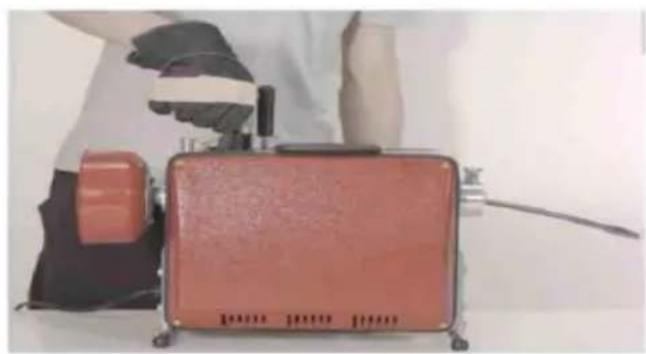
Clutch Lever
- Pass the shaft of the clutch lever (B) through the slots on the cable lock
- Turn the lever, checking it is snugly attached to the lock.
- Push down on the lever and then release it, ensuring it turns the lock s
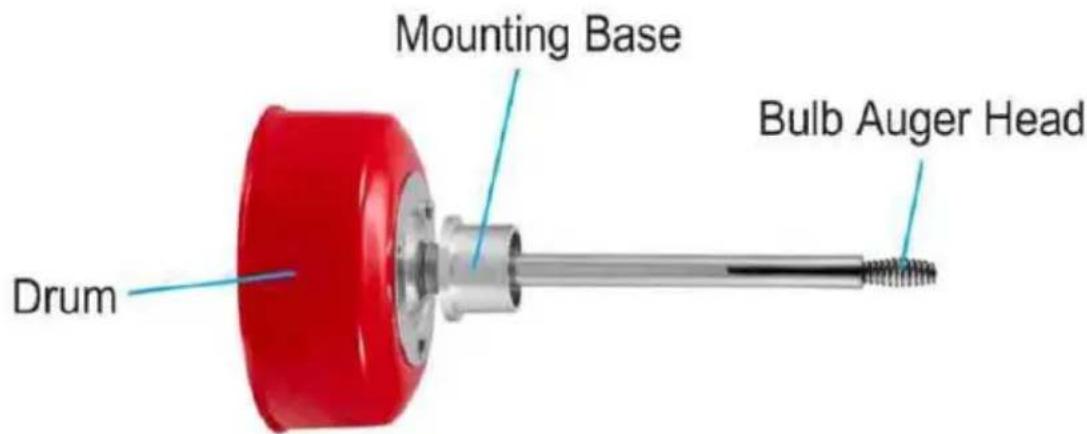
Bulb Auger Cable with Drum
This cable is 5 meters long, providing ample reach to most pipes in home systems. Equipped with a bulb auger head, this cable can efficiently navigate through bends and curves and dislodge debris and grime. The accompanying drum keeps the cable organized and tangle-free, ensuring durability when it is use.
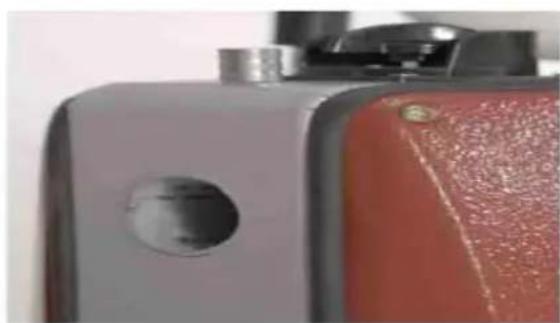
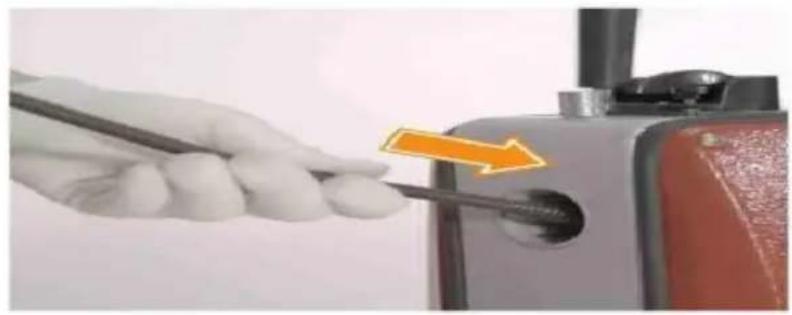
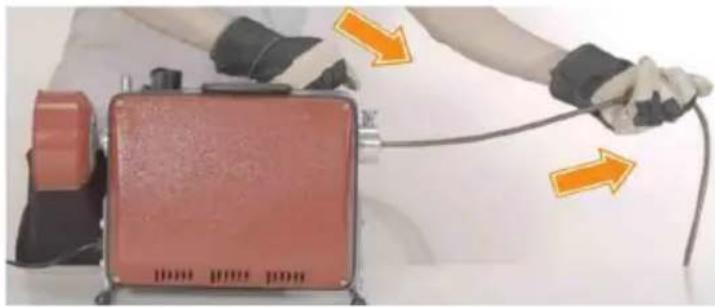
- Pry loose the protective cover around the machine's entry using a flathead screwdriver (not included) or any other similar tool and then disconnect the c from the entry.

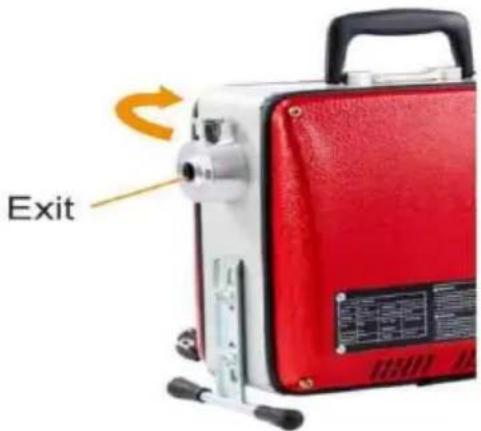
- Pull the cable out of the drum (C) and feed the cable into the entry unit out of the exit.

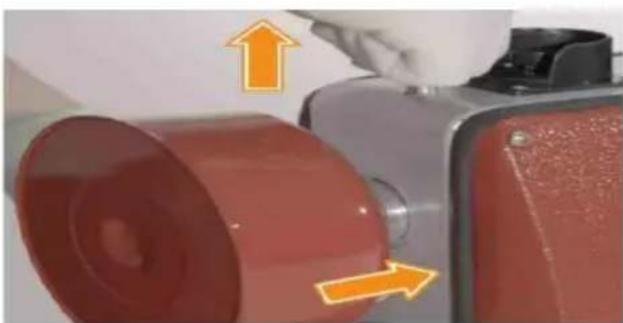
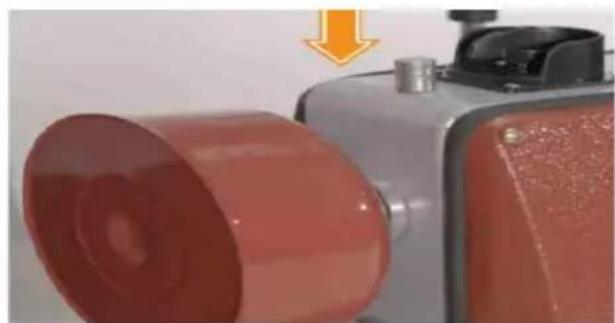
- Fit the drum onto the entry, allowing its mounting hole to face upward as

- Raise the locking bolt above the entry, pushing the entire mounting base drum into the entry. Release the bolt, dropping it into the drum's mounting hole to secure the drum to the machine.
Drain Snake Cable
This cable offers extended reach, ideal for both residential and commercial dr systems Consisting of short cables and compatible with various augers and c this innovative design allows for higher maneuverability and adaptability. When connected to the drain cleaner machine, this cable can automatically go forward and backward, making drain cleaning a quick and efficient task. Without a dr this cable ensures maximum flexibility and ease of use.
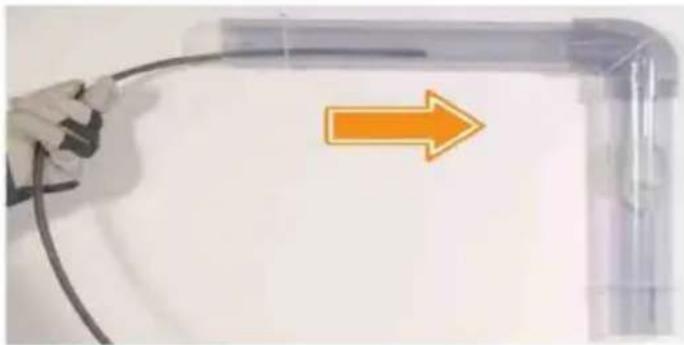
- Extend the coil (D) and feed the cable into the machine's entry direc until it comes out of the exit as shown.
- To connect the spring:
(1) When the spring is completely pulled out of the body and exposed to the machine switch knob in the OFF position.
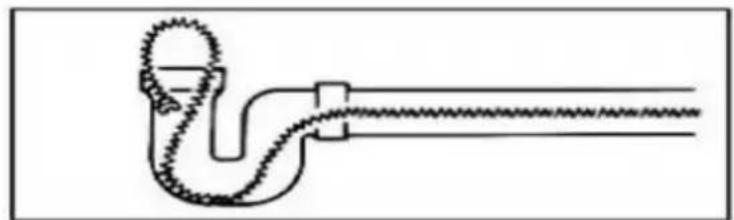
(2) The spring in the pipe is circled into an arc according to the following of and fixed in the pipe mouth to prevent the spring in the pipe from sliding in pipe.
(3) After the spring in the pipe is fixed, remove a steel cable from the spring. One end of the spring head is inserted from the front end of the machine, a foot of spring outside of the machine.
(4) Connect with the steel cables in the pipe.
- Exit the spring from the pipe:
(1) Place the machine switch in the CW position and press the clutch handle turn the spring.
(2) Gently pull the spring out of the pipe with your gloves on.
(3) When the pulled spring forms a ring, release the clutch and push the sp the machine;
(4) When the exit spring is exposed outside the machine, release the clutch, the switch knob in the OFF gear, remove the spring, so as not to damage spring exposed outside the machine and damage or hurt the operator;
(5) When the tool exits the pipe with the cable, immediately release the clutch.
handle and put the switch to the OFF gear to make the machine stop turn. (6) Pull the remaining springs and tools in the pipe out of the pipe.
- Clean up the blockage wound around the spring and the tool. If dred completed, remove the tool from the spring connector with a special key, and method of removing the tool is the same as the spring.
- Clean and close the springs and tools.
Pay attention to: After use, please thoroughly clean and dredge the springs tools, and apply the lubricating oil after drying. Note: be sure to fill the pin the spring joint with pins.
SPECIAL OPERATING INSTRUCTIONS:
Reverse operation:
The machine switch knob is placed in CCW gear and the reverse machine is cause damage to the spring, which is used to exit the tool and spring from block or pipe. Do not put the switch knob in the CCW gear to reverse the
Quick removal
Slightly bending of the spring 6'' 8'' behind the tool can quickly remove oil pipe.
Dredge with spring bin with 3 / 8 " springs
- Keep the correct posture to control your body balance.
Pay attention to:
If unexpected situations occur, the correct posture allows the operator to safe control the machine and the springs
- Draw a small spring from the machine to form a semi-circular arc between pipe and the machine.
- Place the switch in the CW position, note that the machine rotates and the spring does not rotate.
- Press the upper part of the arc spring with the glove hand, then pull down clutch handle, maintain the appropriate clamping force, the spring begins to turn and will easily enter the pipe.
- Release the clutch and pull out the spring, press the clutch handle, and constantly slowly push the spring into the pipe with your hands. Repeat the
steps until you feel the blockage.
Pay attention to:
Control the spring hand as close to the pipe inlet as possible to prevent the from twisting.
- When encountered, move the spring back and forth to remove the obstruc. In this regard, the speed of the spring advance depends on the extent of the blockage and the nature of the blockage, please slow forward.
- If the spring encounters the obstruction and struggles, please release the handle immediately to stop the spring rotation, and then slowly push the spring the block again. Repeat the above steps until the block is cleared.
3.If the spring is stuck in the block, immediately release the clutch handle, a place the machine switch in the OFF gear. When the machine is completely stopped, place the switch in CCW gear, push down the clutch handle. When tool or cable leaves the block, please release the clutch handle immediately, place the machine witch in OFF gear, and then put the machine switch in (C) for normal operation. - When the blockage is dredged, the user is advised to flush the pipe with water and repeat step 7 several times to completely dredge the pipe.
Pay attention to:
The spring is not fixed in the chamber. When the spring is pulled out of the chamber, hold the spring to prevent the spring from falling into the pipe and the spring back into the chamber by hand.
- If the spring is drawn from the pipe, place the machine switch knob in the gear, press the clutch handle, and gently remove the cable.
- Release the clutch handle, push the pulled spring into the fuselage by h a back to the spring bin.
- Release the clutch handle before the spring fully exits the pipe.
- Place the machine switch knob in the OFF gear.
5.Pull the remaining springs out of the pipe and push them into the fuselage
Special explanation:
Reverse operation:
The machine switch is reversed in CCW gear, which may cause damage to spring. This operation is only used to exit the tools and springs from the block
When the tool and spring are out of the block, immediately release the clutch handle, place the machine switch in the OFF gear, and put the machine sw the CW gear for normal operation.
Maintenance guideline:
Before maintaining the machine, confirm that the machine power cord plug is removed from the socket. Always wear safety glasses and wear machine glove for maintenance work.
Spring maintenance:
After cleaning the pipe each time, it should be washed with clean water. After spring is dry, apply RIDGID spring rust-proof agent to prevent the rust treatment the spring, and drop the joint of the spring and the gap of the pin for lubrication. The body clean
The machine can be cleaned with hot soapy water, but do not let the water motor or other electrical components. Ensure that the machine is completely closed and then plug in for use.
IUBRICATING:
If the machine is used every day, it should be lubricated every week. If the frequency is low, lubricated once a month. If the machine is not used for a time, it must be lubricated by dripping oil before use. Lubrication method: use oil can filled with lubricating oil, grease the transmission part; grease the lubricating oil between the joint and the joint of the bearing and clutch at le every year (a professional maintenance master needs to remove the maintenance). (Note: it is strictly prohibited to apply lubricating oil to the insic the clutch tile, otherwise the spring skid will not work normally.) (Fuel fueling as shown in the figure)
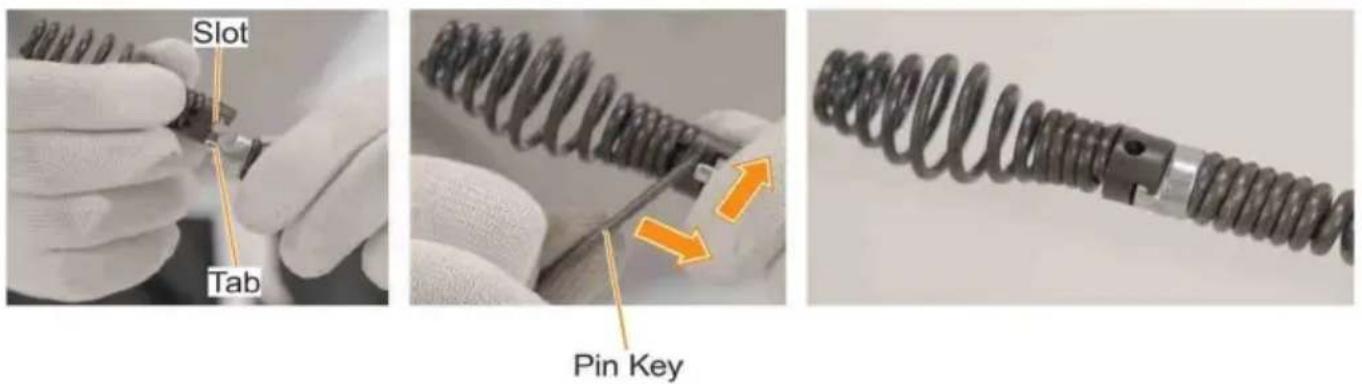
Connect the attachment to the cable's head by pushing the tab into the slot the provided pin key (K) as shown. (The four short cables are preconnected their slots and tabs in the same fashion. If needed, refer to Step 6 in Open below for how to disconnect such a tab from its corresponding slot.)
Each machine is equipped with a different blade, and the actual received physical product shall prevail
Operation
Plug in the machine and select the direction of the cable's rotation using its knob at the top. Turning this knob completely clockwise will rotate the cable clockwise and turning it completely counterclockwise will rotate the cable counterclockwise.
- Press down on the clutch lever and the cable should begin to rotate. Wh holding the lever.continue to pull this cable out of the machine's exit.
- Gently feed the rotating cable into your drain and then apply steady press while guiding the cable down the pipeline. Be cautious not to force the cable this may cause damage to the pipeline.
If using the 20-meter drain snake cable, you can turn the auto feed knob all machine's exit completely clockwise, activating this cable's automatic forward movement to save time and effort.
Without a drum, this cable will not stop running as long as such automation continues posing the risk of dropping into your drain and exacerbating the blockage. Pay attention to the cable's status during
use. Release the clutch lever to stop the automatic movement once you disc the cable is about to run out.
- As the rotating cable advances, it will break up and dislodge the clog or causing the blockage. If encountering resistance, gently maneuvering the cable back and forth or reverse its rotation direction until it works through the obst

DO NOT pull the cable by hand during automatic feeding. Turn its control knob counterclockwise to the middle position to cease its automatic movement before puling it while wearing hand protection.
In some severe cases, you may need to catch an obstruction using the cabl rotates and then pull this obstruction out of the drain by withdrawing the cab while keeping its rotation.
- When clearing the clog, gradually retract the cable from the drain while continuing its rotation so that any remaining debris can be caught, Once the is fully retracted out, release the clutch lever to stop its rotation and turn th rotation knob back to its middle position to deactivate the machine.
If using automatic feeding for the long cable, tum the auto feed knob complete counterclockwise to retract the cable and then turn it back to its middle position stop when finished.
- Withdraw the cable away from the machine's entry, pulling up the entry's locking bolt to release the drum beforehand if necessary. Clean the cable, attachment (if used), and any contaminated part of the machine thoroughly. Replace the protective cover onto the entry if it has already been removed.
To remove the attachment from the long cable, insert the pin key into the h its base, pry loose the cable's head, and slide it away from the attachment.
GQ-150 UPGRADED FULLY AUTOMATIC
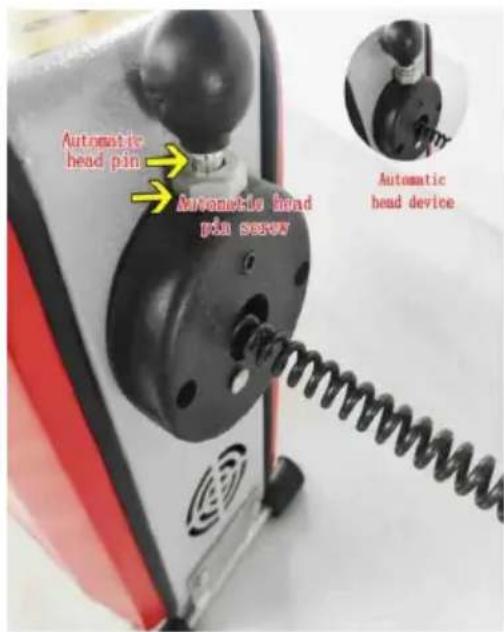
16mm and 22mm spring flexible shafts can automatically move forward and backward 10mm cannot automatically move forward or backward
Principle: The automatic head pin is stuck the gap of the spring, pressing the clutch move forward and backward(Pay attention to the degree of separation force), if the automatic head pin cannot catch the spring gap, it needs to be adjusted The screw under the pin is sufficient.
CARE INSTRUCTIONS
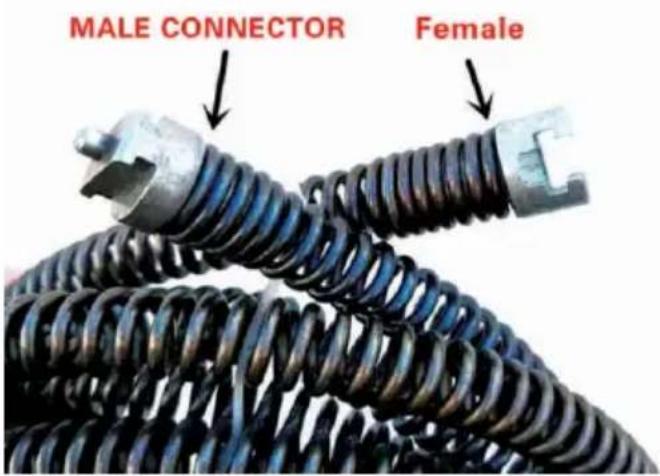
| Pin | Pin down, 16mm soft shaft can automatically forward backward, male and female head interface, the pin be raised state, here can not automatically forward backward |
| The pressure should be applied until the spring rota not press down forcefully. If the spring cannot rotat machine, release the clutch,If the spring is stuck in pipeline and cannot be moved, release the clutch, it before moving forward, and unclog it back and f | |
| Male and female head interface | |
| The section with a tight spring cannot move forward backward automatically. The pin needs to be lifted only the gaps in the spring can move forward and backward automatically. | |
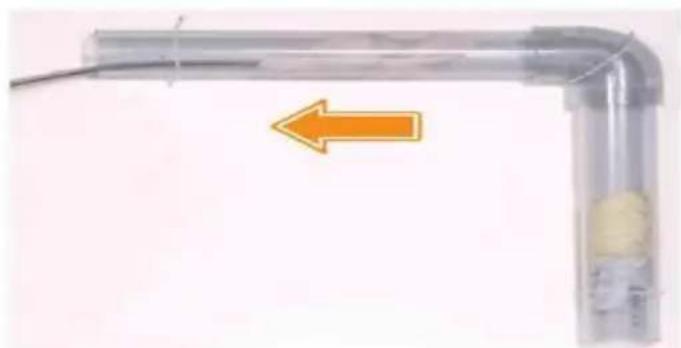
| When in use, the soft shaft in the gourd needs to out, dredge the pipeline, the 10 mm soft shaft can manually operated, can not be auto matically moved and forth | |
| When installing and using the 10mm soft shaft in gourd, the white protective cover must be removed |
MAINTENANCE AND SERVICE
If there are any repair service problems , even if not listed above , pleaseimmediately send the tools to a professional repair center for repair .
When repairing the machine , use the specified parts . Using the unconfirmedparts will cause damage to the machine or other serious injury accidents .
If you have any questions about the use and function of the tools, please the website after-sales service staff.
| Question | Reason | Handling method |
| Smoke coming from inside the capacitor bc when connected to the power supply | Capacitor damage | Replacing capacitors |
| Power on, motor does not start | Damaged switch or loose wire on the swit damaged capacitor.or damaged motor | Go to a professional repair shop for repairs |
| The motor only works on one revolution, whi the other revolution does not word | The conversion switch faulty or the motor is faulty. | Go to a professional repair shop for repairs |
| Connect the power supply and the leakage protector trips | Damaged power cord | Replacing the power cord |
| Motor short circuited du to moisture | Go to a professional repair shop for repairs | |
| Damaged switch | Change switch | |
| Damaged power socket | Replacing power sockets | |
| Connect the power and press the clutch hand but the motor rotates and the spring does rotate | 75 type: gear wear or rust on the transmission part; Type 100: Belt w or pulley wear, motor pulley key not installed or rusted transmission part | Go to a professional repair shop for repairs |
| Spring clamp not tight | The clutch is damaged or there is lubricating on the inner wall of the clutch bearing, or the gear sleeve teeth are worn | Go to a professional repair shop for repairs |
| Clutch handle rotates 360 degrees | The end spring of the clutch rack is detached or the coil spring inside the clutch is broken | Go to a professional repair shop for repairs |
| The clutch handle cannot be pressed down | Rust on the transmission par | Go to a professional repair shop for repairs |
| Pressing the clutch lever produces a clicking sound | Pressure bearing damaged | Go to a professional repair shop for repairs |
Manufacturer: Shanghaiuxinmuyeyouxianggsi
Address: Shuangchenglu 803nong11hao1602A-1609shi, baoshanqu, shanghai 200000 CN.
Imported to AUS: SIHAO PTY LTD. 1 ROKEVA STREETEASTWOOD NSW 2 Australia
Imported to USA: Sanven Technology Ltd. Suite 250, 9166 Anaheim Place, Rancho Cucamonga, CA 91730
| UK | REP |
YH CONSULTING LIMITED. C/O YH Consultin Limited Office 147, Centurion House, London Road, Staines-upon-Thames, Surrey, TW18 4A
| EC | REP |
Affordable. Reliable. Home Improvement.
MACHINE DE NETTOYAGE DE DRAINS
MODELE : GQ-100A
GQ-100 B
GQ-100 C
GQ-100 D
GQ-150
MODELE : GQ-100A\ GQ-100 B\ GQ-100 C\ GQ-100 D\ GQ-1 50
To prevent the fingers or other parts of the body involved in dredging machine or winding by the flexible shaft, the wrong operation will cause personal injury.

Notice
Must be used with three hole power socket reliable grounding protection and matching with the three level of the power plug Using an incorrect extension cable and a poweroutlet without reliable grounding will result in a click.
YH CONSULTING LIMITED. C/O YH Consultin Limited Office 147, Centurion House, London Road, Staines-upon-Thames, Surrey, TW18 4A
Affordable. Reliable. Home Improvement.
To prevent the fingers or other parts of the body involved in dredging machine or winding by the flexible shaft, the wrong operation will cause personal injury.

Notice
Must be used with three hole power socket reliable grounding protection and matching with the three level of the power plug Using an incorrect extension cable and a powerout without reliable grounding will result in a click.
YH CONSULTING LIMITED. C/O YH Consultin Limited Office 147, Centurion House, London Road, Staines-upon-Thames, Surrey, TW18 4A

Affordable. Reliable. Home Improvement.
MACCHINA PER LA PULIZIA DEGLI SCARICHI
MODELLO: GQ-100A
GQ-100 B
GQ-100 C
GQ-100 D
GQ-150
MODELLO: GQ-100A\ GQ-100 B\ GQ-100 C\ GQ-100 D\ GQ-1 50
To prevent the fingers or other parts of the body involved in dredging machine or winding by the flexible shaft, the wrong operation will cause personal injury.

Notice
Must be used with three hole power socket reliable grounding protection and matching with the three level of the power plug Using an incorrect extension cable and a poweroutlet without reliable grounding will result in a click.
Importato in AUS: SIHAO PTY LTD. 1 ROKEVA STREETEASTWOOD NSW 2122 Australia
Importato negli USA: Sanven Technology Ltd. Suite 250, 9166 Anaheim Plac Rancho Cucamonga, CA 91730

YH CONSULTING LIMITED. C/O YH Consultin Limited Office 147, Centurion House, London Road, Staines-upon-Thames, Surrey, TW18 4A
Affordable. Reliable. Home Improvement.
MAQUINA DE LIMPIEZA DE DESAGUES
MODELO: GQ-100A
GQ-100 B
GQ-100 C
GQ-100 D
GQ-150
MODELO: GQ-100A\ GQ-100 B\ GQ-100 C\ GQ-100 D\ GQ-1 50
| Advertencia: Para reducir el risgo de lesiones, el usuario de atentamente el manual de instruciones. | ||
| Este producto está sujeto a la Directiva Europea 2012/19/CE symbolo de un contendor de basura tachado indica que el requires la recogida selectiva de residuos en la Unión Europeo. Este aplica al producto y a todos los accesorios marcados symbolo. Los productos marcados con este symbolo noSEOSEOSEOSEOSEOSEOSEOSEOSEOSEOSEOSEOSEOSEOSEOSEOSEOSEOSEOSEOSEOSEOSEOSEOSEOSEOSEOSEOSEOSEOSEOSEOSEOSEOSEOSEOSEOSEOSEOSEOSEOSEOSEOSEOSEOSEOSEOSEOSEOSEOSEOSEOSEOSEOSEOSEOSEOSEOSEOSEOSEOSEOSEOSEOSEOSEOSEOSEOSEOSEOSEOSEOSEOSEOSEOSEOSEOSEOSEOSEOSEOSEOSEOSEOSEOSEOSEOSEOSEOSEOSEOSEOSEOSEOSEOSEOSEOSEOSEOSEO SEOSEOSEOSEOSEOSEOSEOSEOSEOSEOSEOSEOSEOSEOSEOSEOSEOSEOSEOSEOSEOSEOSEOSEOSEOSEOSEOSEOSEOSEOSEOSEOSEOSEOSEOSEOSEOSEOSEOSEOSEOSEOSEOSEOSEOSEOSEOSEOSEOSEOSEOSEOSEOSEOSEOSEOSEOSEOSEOSEOSEOSEOSEOSEOSEOSEOSEOSEOSEOSEOSEOSEOSEOSEOSEOSEOSEOSEOSEOSEOSEOSEOSEOSEOSEOSEOSEOSEOSEOSEOSEOSEOSEOSEOSEOSEOSEOSEOSEOSEOseoSEOSEOSEOSEOSEOSEOSEOSEOSEOSEOSEOSEOSEOSEOSEOSEOSEOSEOSEOSEOSEOSEOSEOSEOSEOSEOSEOSEOSEOSEOSEOSEOSEOSEOSEOSEOSEOSEOSEOSEOSEOSEOSEOSEOSEOSEOSEOSEOSEOSEOSEOSEOSEOSEOSEOSEOSEOSEOSEOSEOSEOSEOSEOSEOSEOSEOSEOSEOSEOSEOSEOSEOSEOSEOSEOSEOSEOSEOSEOSEOSEOSEOSEOSEOSEOSEOSEOSEOSEOSEOSEOSEOSEOSEOSEOSEOSEOSEOSEOSEQEOSEOSEOSEOSEOSEOSEOSEOSEOSEOSEOSEOSEOSEOSEOSEOSEOSEOSEOSEOSEOSEOSEOSEOSEOSEOSEOSEOSEOSEOSEOSEOSEOSEOSEOSEOSEOSEOSEOSEOSEOSEOSEOSEOSEOSEOSEOSEOSEOSEOSEOSEOSEOSEOSEOSEOSEOSEOSEOSEOSEOSEOSEOSEOSEOSEOSEOSEOSEOSEOSEOSEOSEOSEOSEOSEOSEOSEOSEOSEOSEOSEOSEOSEOSEOSEOSEOSEOSEOSEOSEOSEOSEOSEOSEOSEOSEOSEOSEOSEOEOSEOSEOSEOSEOSEOSEOSEOSEOSEOSEOSEOSEOSEOSEOSEOSEOSEOSEOSEOSEOSEOSEOSEOSEOSEOSEOSEOSEOSEOSEOSEOSEOSEOSEOSEOSEOSEOSEOSEOSEOSEOSEOSEOSEOSEOSEOSEOSEOSEOSEOSEOSEOSEOSEOSEOSEOSEOSEOSEOSEOSEOSEOSEOSEOSEOSEOSEOSEOSEOSEOSEOSEOSEOSEOSEOSEOSEOSEOSEOSEOSEOSEOSEOSEOSEOSEOSEOSEOSEOSEOSEOSEOSEOSEOSEOSEOSEOSEOEO SEOSEOSEOSEOSEOSEOSEOSEOSEOSEOSEOSEOSEOSEOSEOSEOSEOSEOSEOSEOSEOSEOSEOSEOSEOSEOSEOSEOSEOSEOSEOSEOSEOSEOSEOSEOSEOSEOSEOSEOSEOSEOSEOSEOSEOSEOSEOSEOSEOSEOSEOSEOSEOSEOSEOSEOSEOSEOSEOSEOSEOSEOSEOSEOSEOSEOSEOSEOSEOSEOSEOSEOSEOSEOSEOSEOSEOSEOSEOSEOSEOSEOSEOSEOSEOSEOSEOSEOSEOSEOSEOSEOSEOSEOSEOSEOSEOSEOSEOEO | ||
| Este=simbolo indica que alutilizar laquina,utilice siempr seguidad conplacas protectoras yfunrientes de proteccionpojos para reducir el riesgo de lesiones oculares. | ||
| Este=simbolo indica elpeligro de que las manos,los dedos partes del cuerpo queden atrapadas enel cable de la maja | ||
| El=simbolo indica elpeligro de quedar involucrado enla co polea. | ||
| El=simbolo indica elpeligro de sufrir una descargaelectrica. | ||
INSTRUCCIONES
To prevent the fingers or other parts of the body involved in dredging machine or winding by the flexible shaft, the wrong operation will cause personal injury.

Notice
Must be used with three hole power socket reliable grounding protection and matching with the three level of the power plug Using an incorrect extension cable and a poweroutlet without reliable grounding will result in a click.
YH CONSULTING LIMITED. C/O YH Consultin Limited Office 147, Centurion House, London Road, Staines-upon-Thames, Surrey, TW18 4A

Affordable. Reliable. Home Improvement.
MASZYNA DO CZYSZCZENIA ODPLYWOW
MODELE: GQ-100A
GQ-100 B
GQ-100 C
GQ-100 D
GQ-150
MODELE: GQ-100A\ GQ-100 B\ GQ-100 C\ GQ-100 D\ GQ-1 50
To prevent the fingers or other parts of the body involved in dredging machine or winding by the flexible shaft, the wrong operation will cause personal injury.

Notice
Must be used with three hole power socket reliable grounding protection and matching with the three level of the power plug Using an incorrect extension cable and a poweroutlet without reliable grounding will result in a click.
YH CONSULTING LIMITED. C/O YH Consultin Limited Office 147, Centurion House, London Road, Staines-upon-Thames, Surrey, TW18 4A
Affordable. Reliable. Home Improvement.
RIOOLREINIGINGSMACHINE
MODEL: GQ-100A
GQ- 100B
GQ-100 C
GQ- 100D
GQ-150
MODEL: GQ-100A\ GQ-100 B\ GQ-100 C\ GQ-100 D\ GQ-1 50
To prevent the fingers or other parts of the body involved in dredging machine or winding by the flexible shaft, the wrong operation will cause personal injury.
Must be used with three hole power socket reliable grounding protection and matching with the three level of the power plug Using an incorrect extension cable and a poweroutlet without reliable grounding will result in a click.
Stopcontact met aarding.
YH CONSULTING LIMITED. C/O YH Consultin Limited Office 147, Centurion House, London Road, Staines-upon-Thames, Surrey, TW18 4A
| EC | REP |
Affordable. Reliable. Home Improvement.
AVLOPPSRENSNINGSMASKIN
MODELL: GQ-100A
GQ-100 B
GQ-100 C
GQ-100 D
GQ-150
MODELL: GQ-100A\ GQ-100 B\ GQ-100 C\ GQ-100 D\ GQ-1 50
(Handskarna fär väljas slumpmässigt)
To prevent the fingers or other parts of the body involved in dredging machine or winding by the flexible shaft, the wrong operation will cause personal injury.

Notice
Must be used with three hole power socket reliable grounding protection and matching with the three level of the power plug Using an incorrect extension cable and a poweroutlet without reliable grounding will result in a click.
YH CONSULTING LIMITED. C/O YH Consultin Limited Office 147, Centurion House, London Road, Staines-upon-Thames, Surrey, TW18 4A
| EC | REP |


