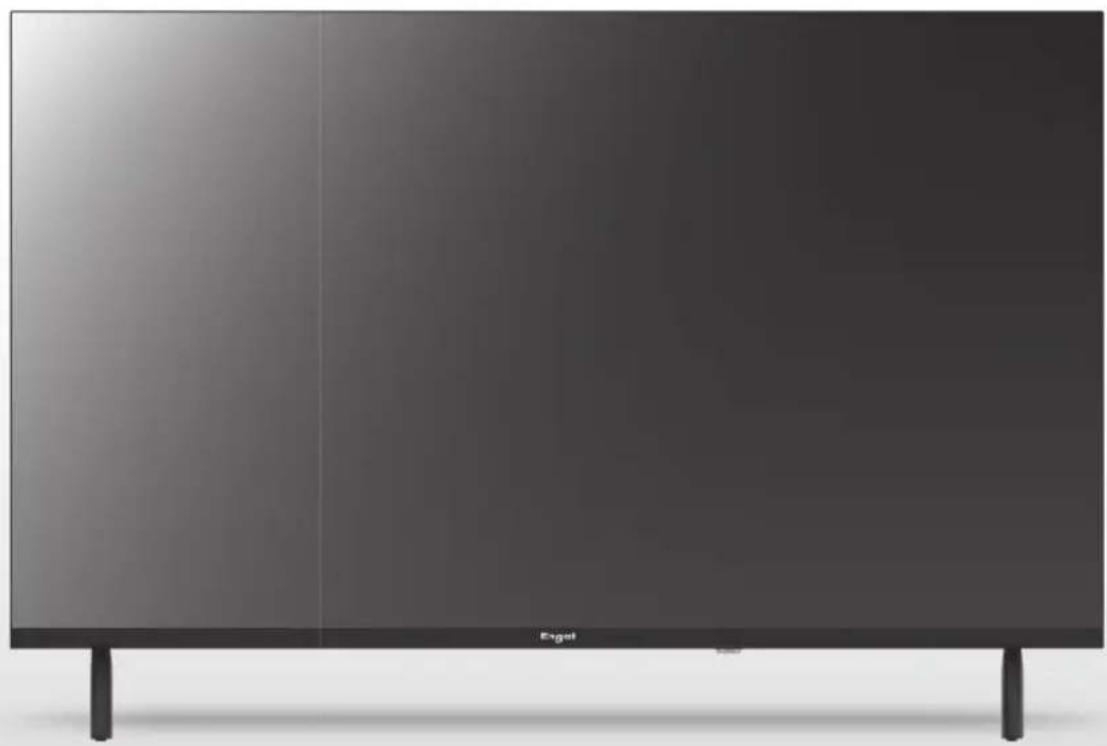
LE3295QLED - TV Engel - Free user manual and instructions
Find the device manual for free LE3295QLED Engel in PDF.
| Product Type | QLED Television |
| Brand | Engel |
| Model | LE3295QLED |
| Screen Size | 32 inches (81 cm) |
| Screen Resolution | HD (1366 x 768 pixels) |
| Screen Technology | QLED |
| Power Consumption | 60 W |
| Power Supply | 220-240 V ~ 50/60 Hz |
| Operating System | Smart TV (proprietary interface) |
| Connectivity | HDMI, USB, AV Input (RCA), Coaxial Audio Output, 75Ω Antenna, RJ45 (Ethernet), CI (Common Interface), Headphone Jack |
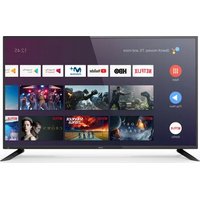
| Smart Functions | Netflix, Prime Video, YouTube, Deezer, Disney+, PLEX, Web Browser |
| Audio Functions | Dolby Audio, built-in speakers |
| Remote Control | Included with dedicated buttons for streaming services |
| Included Accessories | User manual, remote control, power cable, AAA batteries (not included) |
| Wall Mount | VESA compatible (M6 standard for 32") |
| Lifespan | 60,000 hours |
| Safety | Double insulation, surge protection, automatic standby shutdown |
| Maintenance and Cleaning | Clean with a soft, dry cloth. Do not use chemical products. |
| Spare Parts and Repairability | Parts available via after-sales service. Repairability index not provided. |
Frequently Asked Questions - LE3295QLED Engel
User questions about LE3295QLED Engel
0 question about this device. Answer the ones you know or ask your own.
Ask a new question about this device
Download the instructions for your TV in PDF format for free! Find your manual LE3295QLED - Engel and take your electronic device back in hand. On this page are published all the documents necessary for the use of your device. LE3295QLED by Engel.
USER MANUAL LE3295QLED Engel
FREE: Connettiti a FREE.
PLEX: Connettiti a PLEX.
BROWSER:aprireil browser.
Disney+: connettiti a Disney+ (è necessaria una connessione Internet).
Important Safety Precautions 53
TV Buttons and Terminal Interface 54
External Device Connection Diagram 55
Install and Connect TV 55
TV Stand Installation Instructions 56
OSD 56
First Time Installation 56
Home 57
Input 57
Initial Setup 57
System 60
Media 62
Help 63
Specifications 64
Remote Controller 65
This user manual for reference only.
SAFETY INFORMATION
CAUTION
RISK OF ELECTRIC SHOCK DO NOT OPEN
High voltages are used in the operation of this product. To reduce the risk of electric shock, do not remove cover of the cabinet, refer servicing to qualified service personal.
If the TV any changes or coarse adjustment, electric shocks to be hurt, do not attempt to open a machine-maintenance, customer contact centres needed overhaul.

The exclamation point within an equilateral triangle is intended to alert the user to the presence of important operating in the literature accompanying the appliance.
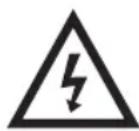
Warning The lightning flash with arrowhead symbol within an equilateral triangle, is intended to alert the user to the presence of uninsulated dangerous voltage within the products enclosure that may be of sufficient magnitude to constitute a risk of electric shock to persons.
IMPORTANT SAFETY INFORMATION
1) Read these instructions.
2) Keep these instructions.
3) Heed all warnings.
4) Follow all instructions.
5) Do not use this apparatus near water.
6) Clean only with dry cloth.
7) Do not block any ventilation openings. Install in accordance with the manufacturer's instructions.
8) Do not install near any heat sources such as radiators, heat registers, stoves, or other apparatus (including amplifiers) that produce heat.
9) Do not defeat the safety purpose of the polarized or grounding-type plug. A polarized plug has two blades with one wider than the other. A grounding type plug has two blades and a third grounding prong. The wide blade or the third prong are provided for your safety, If the provided plug does not fit into your outlet, consult an electrician for replacement of the obsolete outlet.
10) Protect the power cord from being walked on or pinched particularly at plugs, convenience receptacles, and the point where they exit from the apparatus.
11) Only use attachments /accessories specified by the manufacturer.
12) Use only with the cart, stand, tripod, bracket, or table specified by the manufacturer, or sold with the apparatus. When a cart is used caution when moving the cart/apparatus combination to avoid injury tip-over.
13) Unplug this apparatus during lightning storms or when unused for long periods of time. Caution:
14) To reduce the risk of fire or electric shock, do not expose this apparatus to rain or moisture.
15) The mains plug is used as disconnect device, the disconnect device shall remain readily operable.
16) The socket-out shall be installed near the equipment and shall be easily accessible.
17) This product should never be placed in a built-in installation such as a bookcase or rack unless proper ventilation is provided or the manufacture's instructions have been adhered to.
18) The apparatus shall not be exposed to dripping or splashing and that no objects filled with liquid, such as vases, shall be placed on the apparatus.
19) Do not place any sources of danger on the apparatus (e.g. liquid filled objects, lighted candles).
20) Wall or Ceiling Mounting - The appliance should be mounted to a wall or ceiling only as recommended by the manufacturer.
21) Never place the TV, remote control or batteries near naked flames or other heat sources, including direct sunlight. To prevent the spread of fire, keep candles or other flames away from the TV, remate control and batteries at all times.
22) The USB terminal should be loaded with 0.5 A under normal operation.
These servicing instructions are for use by qualified service personnel only. To reduce the risk of electric shock do not perform any servicing other than that contained in the operating instructions unless you are qualified to do so.
23) The battery shall not be exposed to excessive heat such as sunshine, fire or the like.
24) This equipment is a Class II or double insulated electrical appliance. It has been designed in such a way that it does not require a safety connection to electrical earth.
25) The maximum using environment temperature is 45 degrees.
The Maximum using altitude is 2000 meters.
TV BUTTONS AND TERMINAL INTERFACE
TV Buttons
Note: The following is only functional schematic, and the actual position and arrangement of different models may be different.
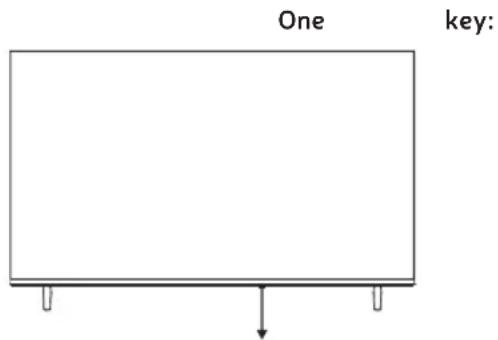
Press this button in standby mode to turn ON/OFF the TV.
Terminal Interface
Note: The following are the various terminal interface, the actual position and arrangement, the number of different models may be different.
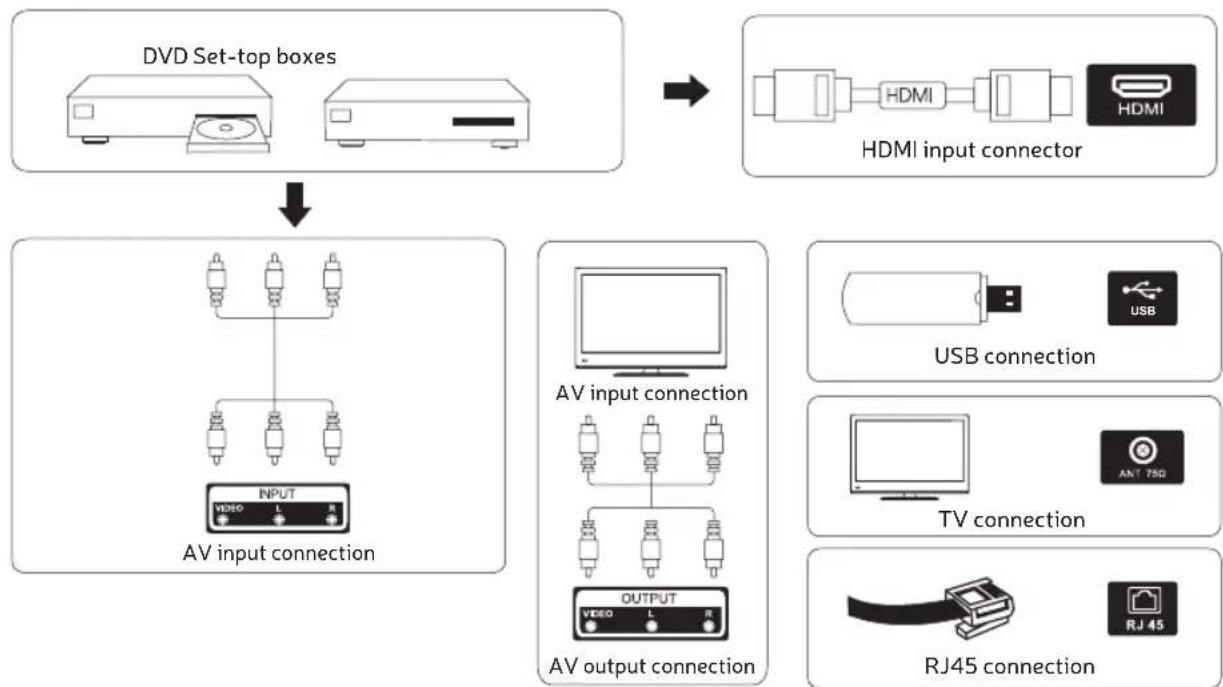
| INPUT VIDEO L R | RCA External AV signal input and relevant right/left sound channel. | USB | USB input Connect a USB device here to play its media files or to record programs via the PVR function. |
| HDMI | HDMI input Digital signal input from HDMI video connector. | COAXIAL | COAXIAL output Connect the SPDIF receiver. (some models without this interface) |
| ANT 75Ω | ANT75 Connect the antennal/cable tv input (75VHF/UHF) | RJ45 | RJ45 Connect the Internet. |
| CI | CI slot CI card reader input (common interface) this requires CAM (conditio-nal access module) used for pay TV. | EARPHONE | Earphones When headphones are connected, the speakers are disabled. |

*Do not touch or be close to the HDMI, USB terminals, and prevent electrostatic discharge to disturb these terminals while in USB operation mode, or it will cause the TV to stop working or abnormal status.
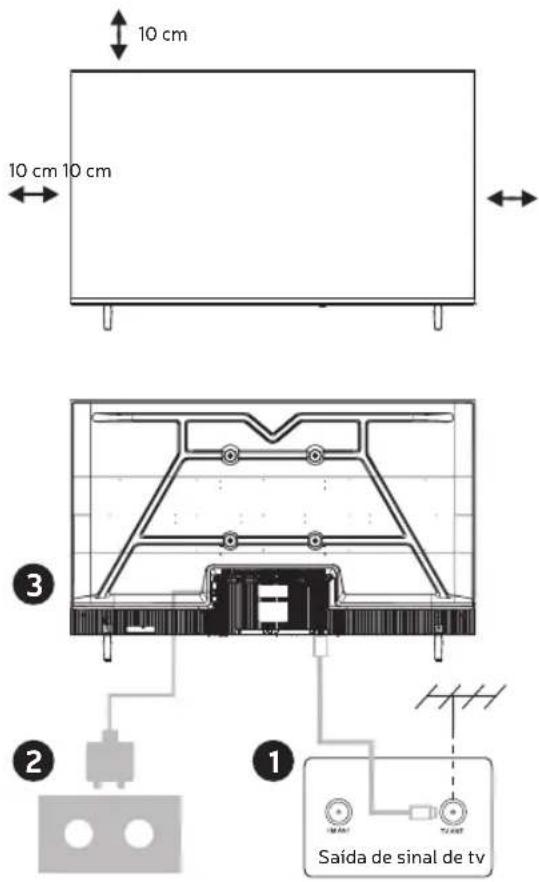
EXTERNAL DEVICE CONNECTION DIAGRAM

INSTALL AND CONNECT TV
Set your TV
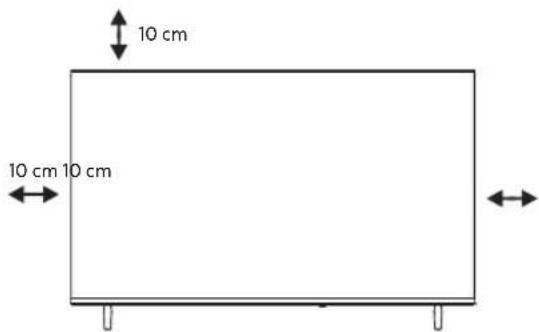
To put your TV in a firm place which can bear the weight of the TV. To avoid danger, please don't expose the TV near water or heating place (such as light, candle, heating machine), do not block the ventilation at the back of TV.
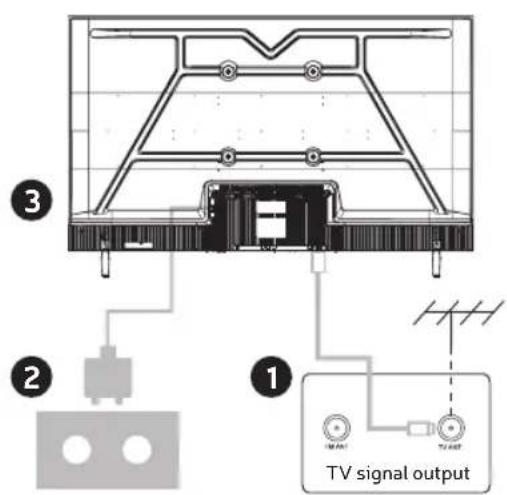
Connect antenna and power
- Connect the antenna cable to the antenna socket on the back of the TV.
- To plug the power cord of TV.
Turn on TV
- Connect the power supply, enter the standby mode (red light), press the power button of the TV or the power button on the remote control to turn on the TV.
Note: If the model has a CI card slot on its top, a silicone plug for the CI card slot can be found in the accessory bag (for models without CI card slot, there is no such silicone plug), please insert the silicone plug into the slot when the CI card is not in use.
Note: Picture for reference purposes only.
TV STAND INSTALLATION INSTRUCTIONS
- Open the carton and remove the TV and scattered accessories and base (some models without base).
- In order to avoid damaging the TV, please cover it with soft mattress, put it on the table, face down on the soft material and screw the neck of the base to the TV.
- Screw the base to the TV.
- The installation is complete.
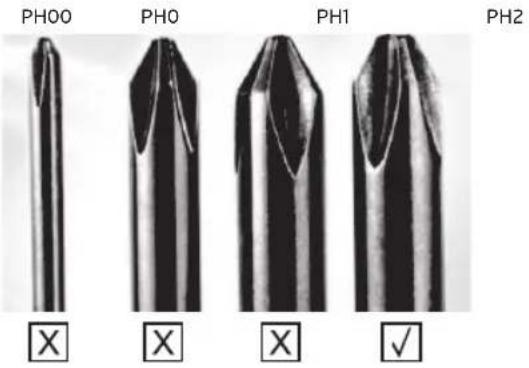
Suggestion:
To make it more convenient for base installation and to avoid any risk of scratches and damage, we advise you using the type of PH2 screwdriver.
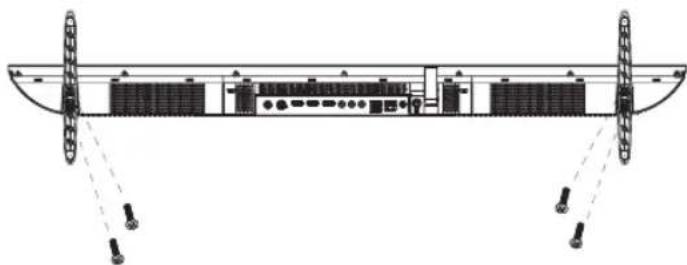
Note:
Picture for reference purposes only. Please prevail in kind.
FIRST TIME INSTALLATION
Please according to the Text Tip to First Time Setup. Press / button to select Language.
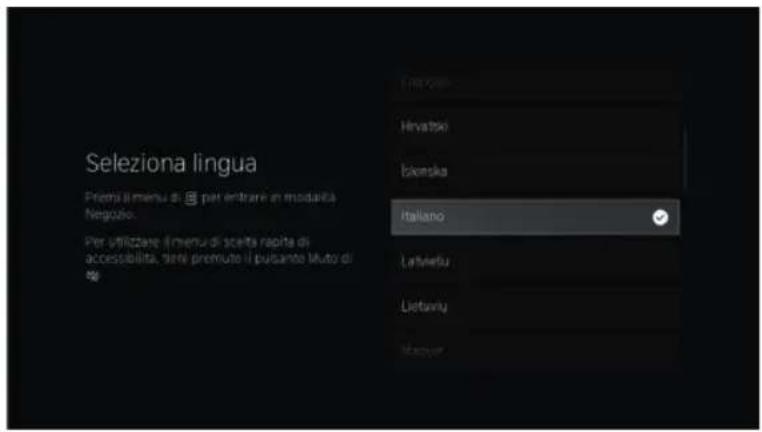
Please make sure the device has connected, then press / button to select the primary input source
HOME
Press button you can enter HOME screen.
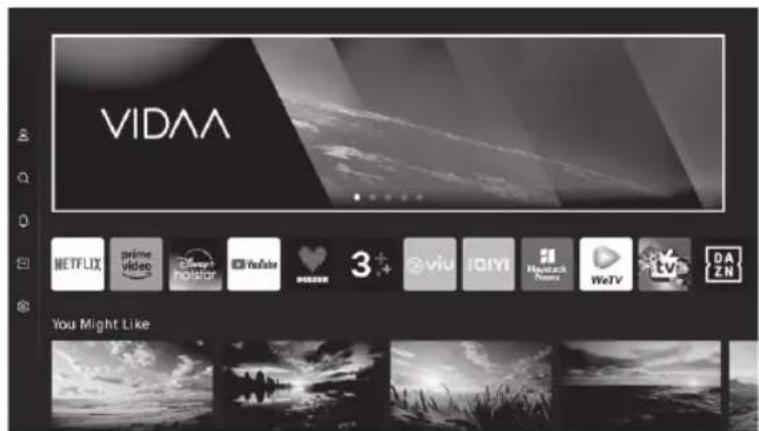
- You can always view the current time at the top of the Home screen.
If your TV is connected to the Internet through a wireless connection or an Ethernet cable, then the icon will be displayed at the top corner of the screen. - Manage apps
- Select the item you want to move, then press the button to manage.
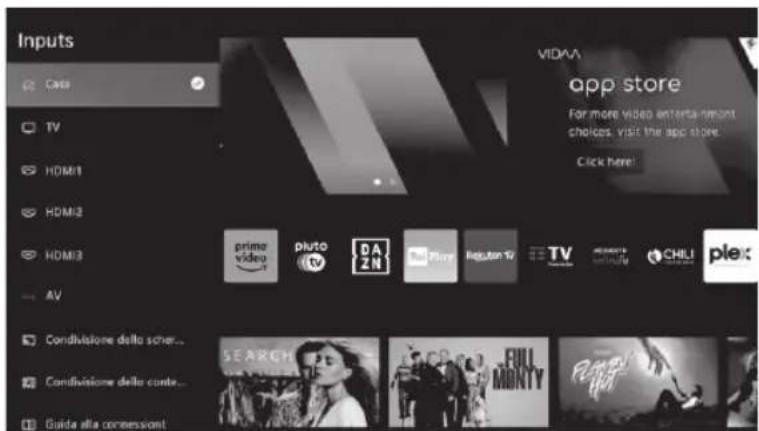
INPUTS
Press button to select
Inputs menu.
Press / button to
select.
Press ENTER to select input.
INITIAL SETUP
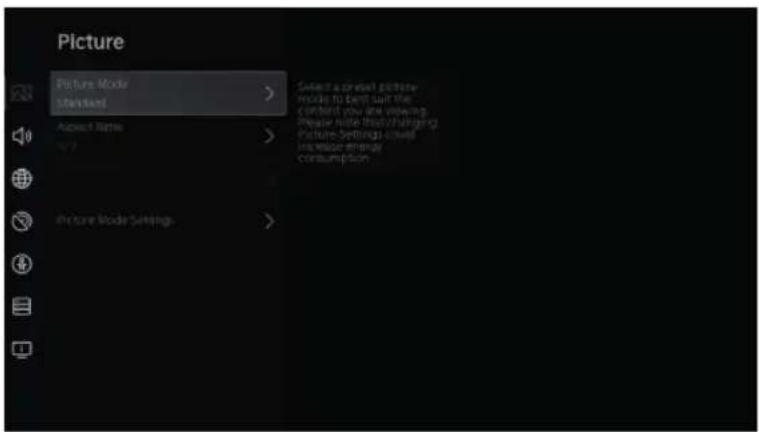
Picture
Press MENU to enter the main menu, press to select picture menu.
- Press button to select the option that you want to adjust in the PICTURE menu.
- Press Enter button to adjust.
- After finishing your adjustment. Press Enter button to save and return to the previous menu.

INITIAL SETUP

Picture Mode
Press / button to select Picture Mode, then press / & Enter button to select. (Optional: Standard / Cinema day / Cinema night / Dynamic / Sports).
Aspect Ratio
Adjust the Aspect Ratio to stretch or zoom in on your picture.
Press button to select Aspect Ratio.
Press / button to select Automatic / 16:9 / 4:3 / Panoramic / Movie Zoom / Direct.
Game Mode
Press /to select, and press /to select On/Off.
Picture Mode Settings
Press / to select, and press ENTER to enter.
INITIAL SETUP
Sound
Press MENU button to display the main menu. Press / button to select SOUND in the main menu.
- Press / button to select the option that you want to adjust in the SOUND menu.
- Press Enter button to adjust.
- After finishing your adjustment, Press Enter button to save and return to the previous menu.
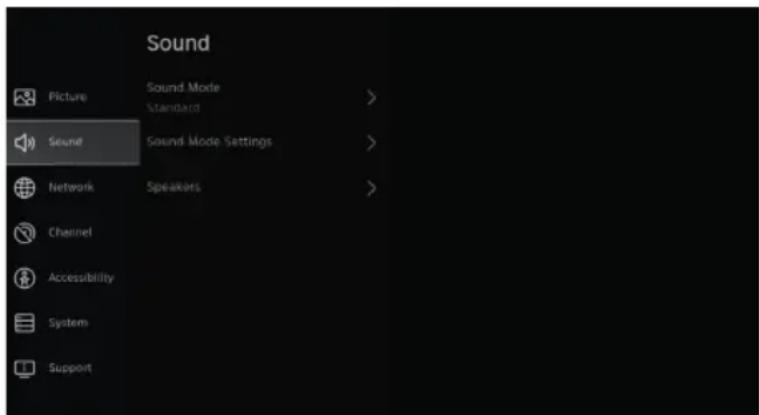
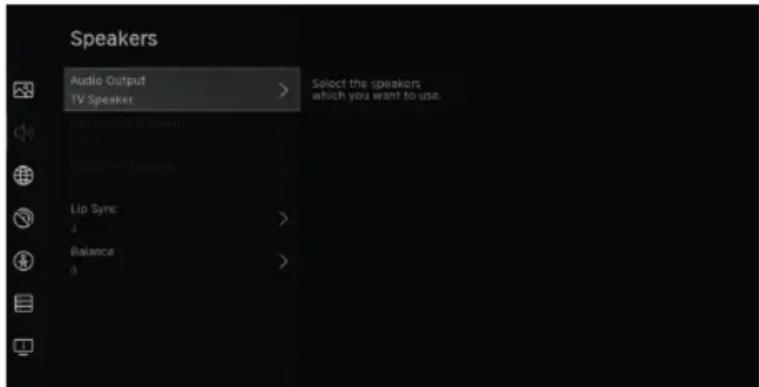
Speakers
Press button to select Speakers. Press ENTER/ button to enter sub-menu
Audio Output
Press / button to select
Speakers and enter, then press
/ button to select ARC / TV
Speaker / SPDIF Only
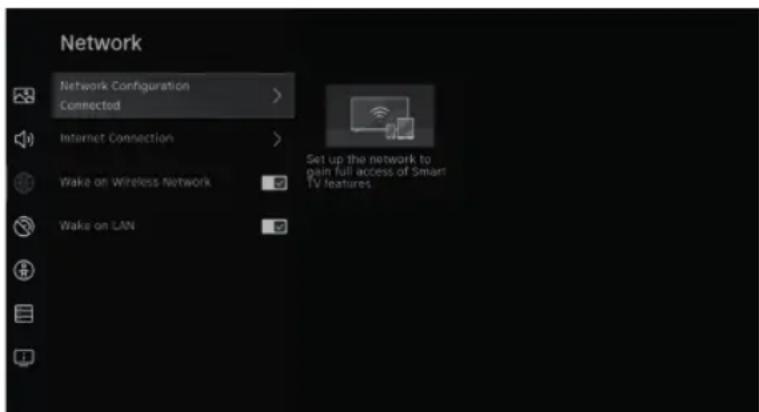
Network
Press MENU button to display the main menu. Press / button to select Network in the main menu.
Press / button to select:
Network Configuration / Internet Connection / Bluetooth / Wake on Wireless Network / Wake on LAN.
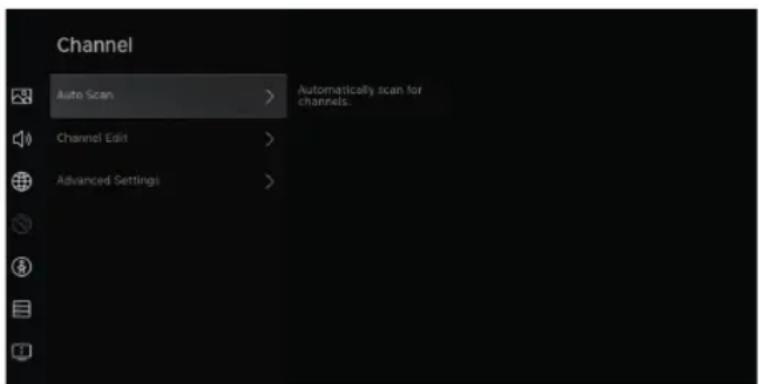
Channel
Press MENU button to display the main menu. Press / button to select Channel.
- Press / button to select the option that you want to adjust in the Channel menu
- Press Enter button to adjust.
- After finishing your adjustment, Press Enter button to save and return to the previous menu.
INITIAL SETUP
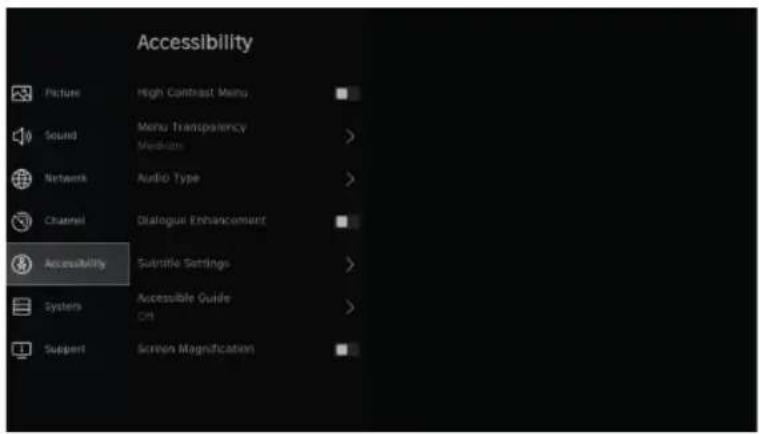
Accessibility
Press MENU button to display the main menu.
Press / button to select Accessibility in the main menu.
SYSTEM
System
Press MENU button to display the main menu.
Press / button to select System in the main menu
- Press / button to select the option that you want to adjust in the System menu.
- Press Enter button to adjust.
- Afterfinishing your adjustment, Press Enter button to save and return to the previous menu.
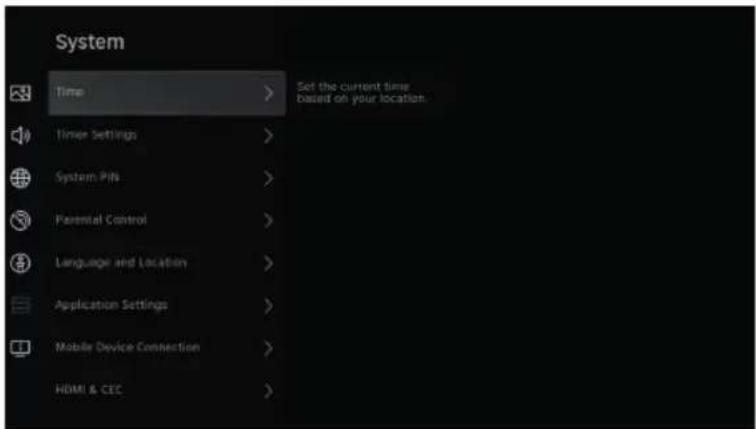
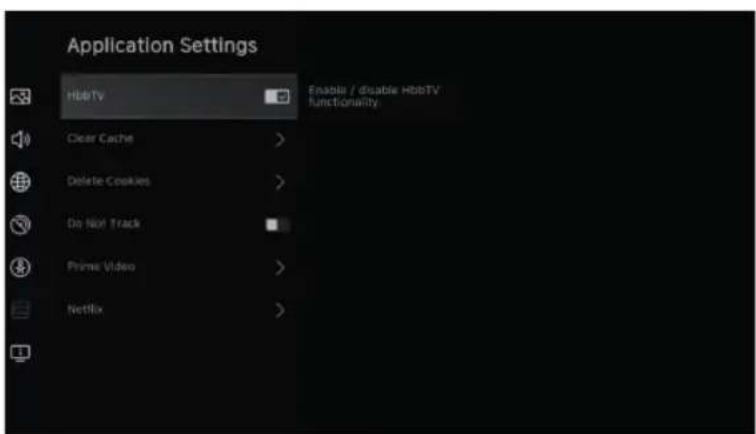
Application Settings
Press button to select Application Settings
SYSTEM
HDMI/CEC Funtion
Press button to select CEC Fun tion, then press Enter button to enter sub-menu to select.
Press / button to select CEC Control / Device Auto Power On / Device Auto Power Off / TV Auto Power On / CEC Device Lists.
Note: All the Options are available only when the CEC Control select On.
Advanced Settings
Press button to select Advanced Settings, then press ENTER / button to enter.
Support
Press button to select Support, then press ENTER / button to enter
select Media on the Home page or press MEDIA button on the remote, and press OK button to enter enter the Media Center.

Video
Press button to select Video or All, and press / button to select Movies. Press Menu button to display the setting options on the left side.

Audio
Press button to select Audio or All, and press / button to select Music.
Image
Press button to select Image or All, and press / button to select Picture.
HELP
| PROBLEM SOLUTION | |
| No power · Check if the AC cord of | TV is plugged in or not. If there's still no power, please disconnect the plug, and reconnect to the socket after 60 seconds. Turn the power back on. |
| Signal not received properly · Double | ble or phantom images may appear on your TV if there are high buildings or mountains close to where you are. You can adjust the image thru manual operation: consult instruction of vernier regulation, or adjust the direction of the external antenna. · If you use an indoor antenna, under certain circumstances signal reception may be more difficult. Adjust the direction of the antenna for optimum reception. If this does not improve reception, you may have to switch to an external! antenna. |
| No picture · Check if the antenna at | the back of the TV is connected properly. · View other channels to see if the problem still occurs. |
| Video appears with no audio · Try | increasing the volume. · Check if the TV's sound is on mute or not. |
| Audio is present, but video does not appear or is discolored | · Try adjusting the contrast and brightness. |
| Static noise affects video and audio quality | · Check if the antenna at the back of the TV is connected properly. |
| Broken lines on screen · Electrical | appliances such as hair dryers or vacuums etc. may be interfering with your TV set. Switch these appliances off. |
| Remote doesn't work · Make sure | the plastic bag which came with the remote control is removed. Try using the remote in a shorter distance from the TV. Check if the placement of the batteries is correct, or try using new batteries with the remote control. · The TV will go into Standby mode if it receives no response in a few minutes. |
| No video (PC mode) · Please check | if the cable is connected to the HDMI port correctly, or if the cable is bent in some places. |
| Screen is too bright or dark (PC Mode) | · Adjust the brightness or contrast in the main menu. |
| No response from the PC · Check if | the PC's display resolution is set to a compatible resolution for the TV. |
| Lines appearing when a device is connected to the RCA port | · Make sure you are using a cable of good quality. |
| Problems are unresolved · Unplug | the power cable and wait for 30 seconds, then reconnect to the socket. If problems still persist, do not attempt to repair the TV by yourself. Kindly contact the service center. |
Do not leave your TV displaying a static image, whether it is from a paused video, menu screen, etc. for an extended period of time, doing so will damage the display and may cause image burn-in.
SPECIFICATIONS
| Screen Size power Consumption Main accessories | |
| 24" 36W User's manual x1 | Remote controller x1 Power cord x1 AAA Batteries x2 (not included) |
| 32" 60W | |
| 43" 90W | |
| 50" 100W | |
LIFE TIME:60,000 Hrs

AUDIO
Manufactured under license from Dolby Laboratories. Dolby, Dolby Audio, and the double-D symbol are trademarks of Dolby Laboratories Licensing Corporation.

HIGH-DEFINITION MULTIMEDIA INTERFACE
The terms HDMI and HDMI High-Definition Multimedia Interface, and the HDMI logo are trademarks or registered trademarks of HDMI Licensing LLC in the United States and other countries.
WARNING
Never place a television set in an unstable location. A television set may fall, causing serious personal injury or death.
Many injuries, particularly to children, can be avoided by taking simple precautions such as:
- Using cabinets or stands recommended by the manufacturer of the television set.
- Only using furniture that can safely support the television set.
- Ensuring the television set is not overhanging the edge of the supporting furniture.
- Not placing the television set on tall furniture (for example, cupboards or bookcases) without anchoring both the furniture and the television set to a suitable support.
- Not placing the television set on cloth or other materials that may be located between the television set and supporting furniture,
- Educating children about the dangers of climbing on furniture to reach the television set or its controls.
If your existing television set is being retained and relocated, the same considerations as above should be applied.
Wall-mounted screw: 22-24inch M4, 28-70inch M6, 75inch M8.
Note: don't hang at an angle to avoid the risk of falling off.
REMOTE CONTROL
:Turn on or put the TV to sleep.
INPUT: Display/Select signal source options
0-9: The numbers "0-9" are used to directly enter the channel number.
GUIDE: Display the electronic programme guide.
CH.LIST: Access the channel list.
COLOUR BUTTONS: Use additional functions in the OSD menu.
:Display the main menu on screen.
:Play/Pause media files.
Navigation buttons: UP/LEFT/RIGHT/DOWN cursor.
OK: Confirm, select or enter.
Press to go back through the menus or go back to the previous channel.
EXIT: Exit the current menu or function.
VOL+/-: Press to increase or decrease the volume.
CH+/-: Press to increase or decrease the channel.
:Display the home screen.
Mute or restore the sound on your TV.
TEXT: Press to display Teletext when playing the programme.
SUBTITLE: Show or hide subtitles.
INFO: Display current channel information, current time and channel name.
FREE: Connect to FREE.
:Custom button to quickly launch inputs or apps.
DEZEER: Connect to deezer.
NETFLIX: Connect to NETFLIX to watch TV shows and movies online (Internet connection required).
Prime Video: Connect to Prime Video (Internet connection required).
YouTube: Connect to YouTube (Internet connection required).
PLEX: Connect to PLEX.
BROWSER: Open the browser.
Disney+: Connect to Disney+ (Internet connection required).

Note: All images in this manual are examples, for reference only, the actual product may differ from the images.
Policy on defective pixels
Due to the complexity of the technology used in the manufacture of LCD, TFT and LED screens, it is possible that some of the pixels that make up the screen may be defective. While it is desirable for all the pixels to function correctly, this is not always possible from a production perspective. For this reason, lotecnia, S.L. certies that its LED TV products meet the criteria of admissible defect described herein and certies that its LED TV screens are class A.
| Defective pixels 19"-20"-22"-24" 29"-32" 39"-40"-43" 46"-50" | |||
| Bright pixel (max.) 4 4 4 4 | |||
| Dark pixel (max.) 8 9 14 16 | |||
| Maximum permitted sum of pixels 5 7 12 12 | |||
| Double adjacent pixels (max.) 111 | 1 |
If an LED TV screen has dark or bright pixels, this is only considered to be a fault by lotecnia, S.L. when the ranges established herein for an LED panel to be considered defective are exceeded, thereby allowing lotecnia, S.L. to manage the replacement or warranty of the panel due to a product non-conformance. As a rule and except for limited exceptions, lotecnia, S.L. considered an LED TV product to be faulty when it has a considerable number of permanently bright or dark pixels. As a reference, an LCD/LED panel has more than 1 million pixels and a single defective pixel is therefore not considered to constitute a lack of conformance and cannot be catalogued as a fault, as this circumstance will not act the correct functioning of the product.
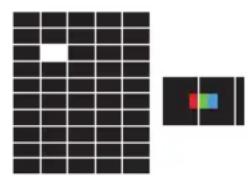
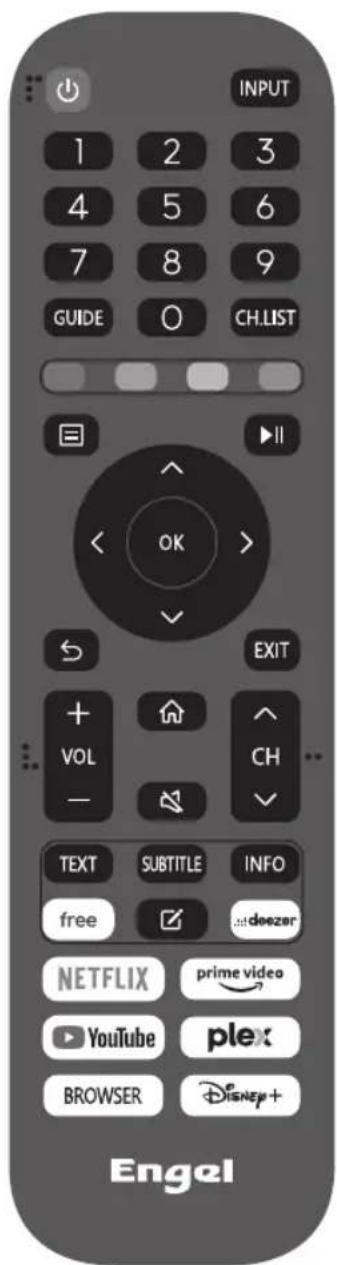
Bright pixel
Dark pixel

Composition of a pixel
Sub-pixels

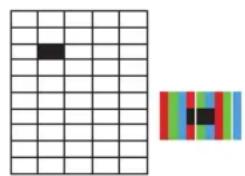
Double adjacent bright pixels
Double adjacent dark pixels
Therefore, if an LED screen meets the above criteria, it cannot be changed or repaired as this is not considered to be a lack of product conformance and cannot be catalogues as a defect or fault.
smartTv 32”
TV QLED
Engel
PORTUGUES
CONTEUDO
INSTALE E CONNECTA TV
Cologne sua tv
Distributor & manufacturer authorized representative:
Hereby, IOTECNIA, S.L. declares that these equipments are in compliance with the essential requirements and other relevant provisions of Directives 2014/53/EU (RED), 2014/35/EU (LVD), 2011/65/EU(RoHS) and 2009/125/ EC (ERP)
With the standard or other normative documents:
Legal Representative
Barcelona, 19/01/2024


Note on environmental protection:
After the implementation of the European Directive 2002/96/EU in the national legal system, the following applies: Electrical and electronic devices may not be disposed of with domestic waste. Consumers are obliged by law to return electrical and electronic devices at the end of their service lives to the public collecting points set up for this purpose or point of sale. Details to this are defined by the national law of the respective country. This symbol on the product, the instruction manual or the package indicates that a product is subject to these regulations. By recycling, reusing the materials or other forms of utilising old devices, you are making an important contribution to protecting our environment.