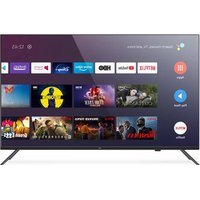
LE 4390 ATV - Television Engel - Free user manual and instructions
Find the device manual for free LE 4390 ATV Engel in PDF.


| Product Type | LED TV |
| Brand | Engel |
| Model | LE 4390 ATV |
| Screen Size | 43 inches (109 cm diagonal) |
| Screen Resolution | 1920 x 1080 pixels (Full HD) |
| Operating System | Android TV |
| Processor | Quad-core |
| RAM Memory | 1.5 GB |
| Internal Storage | 8 GB |
| Wi-Fi Connectivity | Yes, 802.11 b/g/n |
| Bluetooth | Yes, version 4.2 |
| HDMI Inputs | 4 (including 1 with ARC) |
| USB Ports | 2 |
| Other Connectors | RJ45 Ethernet, optical output, AV input, RF antenna, satellite, CI, headphone |
| Power Supply | 100-240 V~ 50/60 Hz |
| Power Consumption (max) | 75 W |
| Standby Consumption | < 0.5 W |
| Dimensions (with stand) | Approx. 970 x 620 x 200 mm |
| Weight (with stand) | Approx. 8.5 kg |
| Smart Features | Built-in Chromecast, Google Assistant, access to Google Play, Netflix, YouTube, Prime Video |
| Supported Video Formats | MPEG-2, MPEG-4, H.264, H.265, VP9 |
| Supported Audio Formats | MP3, AAC, AC3, EAC3 |
| Parental Control | Yes |
| Sleep Timer | Yes |
| Electronic Program Guide | Yes |
Frequently Asked Questions - LE 4390 ATV Engel
User questions about LE 4390 ATV Engel
0 question about this device. Answer the ones you know or ask your own.
Ask a new question about this device
Download the instructions for your Television in PDF format for free! Find your manual LE 4390 ATV - Engel and take your electronic device back in hand. On this page are published all the documents necessary for the use of your device. LE 4390 ATV by Engel.
USER MANUAL LE 4390 ATV Engel
natural_image
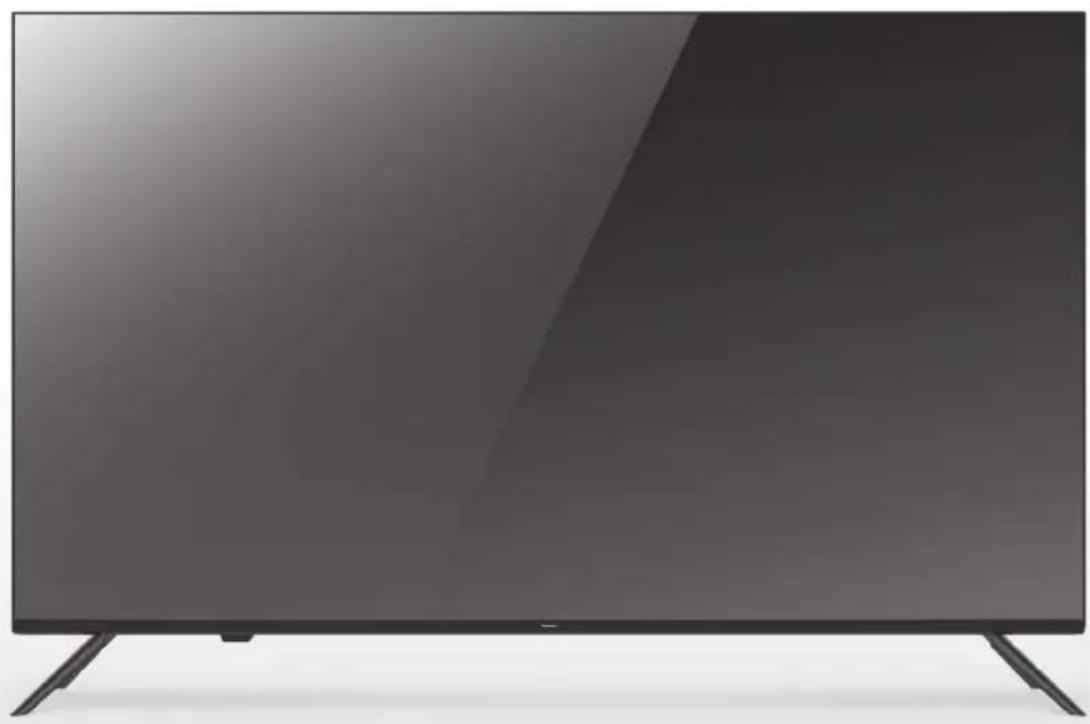
Front view of a modern flat-screen TV with black screen and stand (no visible text or symbols)LE 4390 ATV
MANUAL DE USUARIO MANUEL D'UTILISATION MANUALE D'USO USER MANUAL MANUAL DO USUÁRIO
androidtv
Television LED
natural_image
Front view of a modern flat-screen TV with black bezel and stand (no visible text or symbols)ESPAÑOL
CONTENIDOS
natural_image
Cartoon illustration of a smiling computer monitor holding a book titled 'POSTA LIB' (no text on screen or background)natural_image
Cartoon illustration of a computer monitor with a sad face and a money bag, symbolizing online shopping or digital commerce (no text present)natural_image
Illustration of a smiling man presenting to a computer monitor with a dollar bill nearby (no text or symbols)natural_image
Cartoon illustration of a computer monitor with a sad face and raised arms, surrounded by clouds and a bird (no text or symbols)natural_image
Cartoon illustration of a computer monitor with a sad face and two hands, accompanied by a printer (no text or symbols present)natural_image
Symbolic icon of a person climbing a ladder inside a circle (no text or symbols)natural_image
Cartoon illustration of a smiling computer monitor with power cord and lightning bolt, no text or symbols presentES
natural_image
Illustration of a smiling computer monitor and a worker holding a toolbox (no text or symbols)natural_image
Technical diagram showing front and side views of a server rack with indicator lights (no text or labels)PANEL FRONTAL Y TRASERO
ES
CANAL
bar
Picture | Picture Mode User | Value | |---|---| | Backlight | 100 | | Brightness | 50 | | Contrast | 50 | | Saturation | 50 | | HUE | 0 | | Sharpness | 12 | | Gamma Mode | |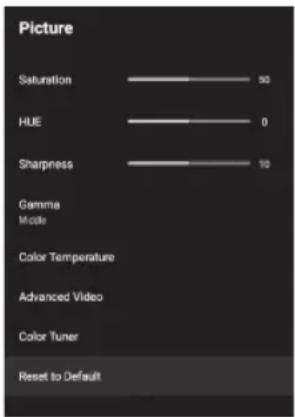
CHROMECAST INCORPORADO

natural_image
Front view of a modern flat-screen TV with black bezel and stand (no visible text or symbols)FRANÇAIS
SOMMAIRE
• AVERTISSEMENT 32
• INSTRUCTIONS DE SÉCURITÉ ...... 33
• FIXATION DE SUPPORT ...... 35
• DIAGRAMME DE PANNEAU AVANT ET ARRIÈRE ..... 37
• COMMENCEMENT....38
- CONNECTION ET CONFIGURATION .... 39
• TÉLÉCOMMANDE....40
• OPÉRATION DE BASE 42
• OPÉRATION DE MENU....43
- INSTRUCTIONS DE SÉCURITÉ .... 56
• GUIDE DE DÉPANNAGE....57
AVERTISSEMENT
INFORMATIONS RÉGLEMENTAIRES
natural_image
Cartoon illustration of a smiling computer monitor holding a book titled 'FUCHEN LIB' (no text on screen or background)natural_image
Cartoon illustration of a computer monitor with hands holding a document, surrounded by a money bag and a falling dollar sign (no text or symbols)natural_image
Illustration of a smiling man presenting to a computer monitor with a power cord (no text or symbols)natural_image
Cartoon illustration of a computer monitor with a sad face and raised arms, surrounded by clouds (no text or symbols)natural_image
Cartoon illustration of a computer monitor with an angry face and electrical plugging, showing electrical shock (no text or symbols)natural_image
Symbolic icon of a person climbing a ladder inside a circle (no text or symbols)natural_image
Cartoon illustration of a smiling computer monitor with hands and electrical components, no text or symbols present
natural_image
Illustration of a smiling computer monitor and a worker holding a toolbox (no text or symbols)LORS DE L'ÉLIMINATION
natural_image
Technical line drawing of a front panel with internal components and arrows indicating assembly (no text or symbols)natural_image
Technical diagram showing two views of a server rack with internal components and directional arrows indicating movement (no text or labels)DIAGRAMME DE PANNEAU AVANT ET ARRIÈRE
FR
CHAÎNE
Scannage RF simple: station de recherche manuelle.
SATELLITE
COMPTES & CONNECTION
bar
Picture | Picture Mode User | Value | |---|---| | Backlight | 100 | | Brightness | 50 | | Contrast | 50 | | Saturation | 50 | | HUE | 0 | | Sharpness | 12 | | Gamma Mode | |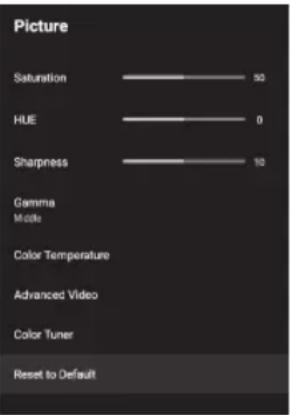

natural_image
Front view of a modern flat-screen TV with black bezel and stand (no visible text or symbols)ITALIANO
CONTENUTO
• AVVERTIMENTO....60
• ISTRUZIONI DI SICUREZZA ......61
• FISSAGGIO DEL SUPPORTO ....63
• SCHEMA DEL PANNELLO ANTERIORE / POSTERIORE ..... 65
• GUIDA INTRODUTTIVA....66
- CONNESSIONE E CONFIGURAZIONE ...... 67
• TELECOMANDO....68
• OPERAZIONE DI BASE ....70
• FUNZIONAMENTO DEL MENU....71
• ISTRUZIONI DI SICUREZZA....84
• RISOLUZIONE DEI PROBLEMI....85
AVVERTIMENTO
natural_image
Cartoon illustration of a smiling computer monitor holding a book titled 'FUCHA LIB' (no text on screen or background)natural_image
Cartoon illustration of a computer monitor with hands holding a document, emitting smoke or smoke from the screen (no text or symbols present)natural_image
Illustration of a smiling man presenting to a computer monitor with a power cord (no text or symbols)natural_image
Cartoon illustration of a computer monitor with a sad face and raised arms, surrounded by clouds (no text or symbols)natural_image
Cartoon illustration of a computer monitor with a sad face and two hands, accompanied by a printer (no text or symbols)natural_image
Cartoon illustration of a computer monitor with an angry face and a power plug, showing electrical connections (no text or symbols)natural_image
Symbolic icon of a person climbing a ladder inside a circle (no text or symbols)natural_image
Cartoon illustration of a smiling computer monitor with hands and electrical components, no text or symbols presentnatural_image
Illustration of a smiling computer monitor and a worker in a hard hat pointing at a box (no text or symbols)上
SU SMALTIMENTO
natural_image
Technical line drawing of a flat-screen monitor with internal components and mounting holes (no text or symbols)natural_image
Technical line drawing of a server rack with mounting hardware and directional arrows indicating movement (no text or symbols)SCHEMA DEL PANNELLO ANTERIORE / POSTERIORE
CANALE
bar
Picture | Picture Mode user | Value | |---|---| | Backlight | 100 | | Brightness | 50 | | Contrast | 50 | | Saturation | 50 | | HUE | 0 | | Sharpness | 12 | | Gamma Mode | |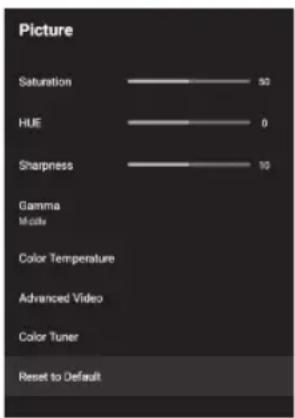
CHROMECAST INCORPORATO
flowchart
graph TD
    A["Red Block"] --> C["Bottom"]
    B["Green Block"] --> C["Bottom"]
    D["Blue Block"] --> C["Bottom"]
Pixel scuro

Sub-pixel
natural_image
Front view of a modern flat-screen TV with black bezel and stand (no visible text or symbols)ENGLISH
CONTENT
• WARNING....88
- IMPORTANT SAFETY INSTRUCTIONS ....89
• FIXING THE STAND 91
• FRONT AND REAR PANEL 93
• GETTING STARTED 94
• CONNECTION AND SET UP 95
• REMOTE CONTROL....96
• BASIC OPERATION ..... 98
• MENU OPERATION....99
• SAFETY INSTRUCTIONS....112
• TROUBLESHOOTING GUIDE....113
WARNING
REGULATORY INFORMATION
This equipment generates and user can radiate radio frequency energy and, if not installed and used in accordance with the instructions, may cause harmful interference to radio communication. However, there is no guarantee that interference will not occur in a particular installation. If this equipment does cause harmful interference to radio or television reception, which can be determined by turning the equipment off and on, the user is encouraged to try to correct the interference by one or more of the following measures:
- Relocate the receiving antenna.
- Increase the separation between the equipment and receiver.
- Connect the equipment into an outlet on a circuit different from that to which the receiver is connected.
- Consult the dealer or experienced radio/TV technician for help.
Any changes or modifications not expressly approved by the party responsible for compliance could void the user's authority to operate the equipment.
CAUTION
Do not attempt to modify this product in any way without written authorization from supplier. Unauthorized modification could void the user's authority to operate this product.
It is not recommended to keep a certain still image displayed on the screen for a long time as well as displaying extremely bright images on screen.
Figures and illustrations in this User Manual are provided only and may differ from actual product appearance. Product design and specifications may be changed without notice.
WARNING
WARNING
To reduce the risk of fire or electric shock, do not expose this apparatus to rain or moisture. Don't use the apparatus in tropical climates.
The ventilation should not be impeded by covering the ventilation openings with items, such as newspapers, table-cloths, curtains, etc.
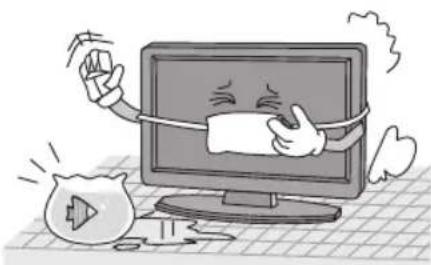
The apparatus shall not be exposed to dripping or splashing and that no objects filled with liquids, such as vases, shall be placed on the apparatus.
Attention should be drawn to the environmental aspects of battery disposal. Don't throw used batteries in dustbin. Please contact your retailer in order to protect the environment.
Keep minimum distances(5cm) around the apparatus for sufficient ventilation;
(Minimum distance around the apparatus for sufficient ventilation.)
No naked flame sources, such as lighted candles, should be placed on the apparatus;
To prevent the spread offire, keep candles or other open flames away from this product at all times.
SAFETY INSTRUCTIONS
The device may malfunction when under electrostatic discharge. It can be manually resumed by turning it off and on again.
CAUTION
Connecting the power cable.
Most devices recommend that they be placed on a specialized circuit; that is, only one plug circuit provides electricity to the appliances, without additional plugs or auxiliary circuits. Do not overload power outlets. Overloaded wall outlets, loose or damaged wall outlets, extension cords, frayed power cords, or insulation from damaged or cracked cables are dangerous. Any of these cases can cause electricity or fire. Periodically check the equipment power line and it is replaced by an accurate commercial replacement from authorized service. Protect the power cord from physical or mechanical abuse, such as being twisted, pinched, closed on a door, or stepped on. Pay particular attention to plugs, sockets, and the point where the cord exits the appliance. The mains plug is used as the disconnecting device, and the disconnecting device will remain easily operable.
IMPORTANT INFORMATION
If a television is not positioned in a sufficiently stable location, it can be potentially hazardous due to falling. Many injuries, particularly to children, can be avoided by taking simple precautions such as:
- Using cabinets or stands recommended by the manufacturer of the television.
- Only using furniture that can safely support the television.
- Ensuring the television is not overhanging the edge of the supporting furniture.
- Not placing the television on tall furniture (for example, cupboards or bookcases) without anchoring both the furniture and the television to a suitable support.
- Not standing the television on cloth or other materials placed between the television and supporting furniture.
- Educating children about the dangers of climbing on furniture to reach the television or its controls.
IMPORTANT SAFETY INSTRUCTIONS
- Read these instructions.
- Keep these instructions.
- Heed all warnings.
- Follow all instructions.

natural_image
Cartoon illustration of a smiling computer monitor holding a book titled 'FUCHEN LIB' (no text on screen or background)- Do not use this apparatus near water.
natural_image
Cartoon illustration of a computer monitor with a bandaged face and a money bag, symbolizing online shopping or digital commerce (no text present)- Clean only with a dry cloth.
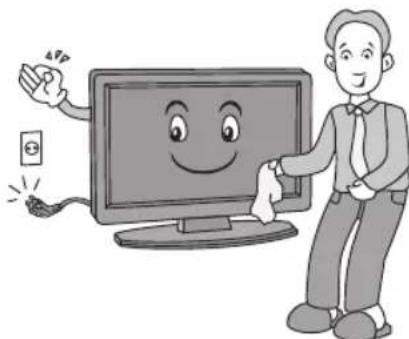
natural_image
Illustration of a smiling man holding a cloth next to a computer monitor, with a small battery and cable nearby (no text or symbols)- Do not block any of the ventilation openings. Install according to the manufacturer's instructions.
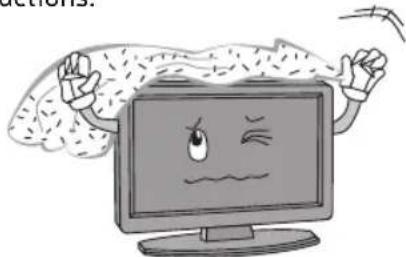
natural_image
Cartoon illustration of a computer monitor with a sad face and raised arms, surrounded by clouds (no text or symbols)- Do not install near any heat source such as radiators, heat registers, stoves, or other apparatus(including amplifiers)that produce heat.
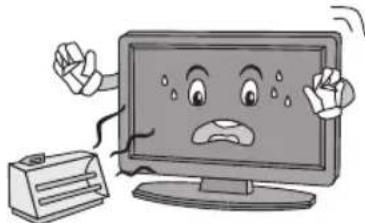
natural_image
Cartoon illustration of a computer monitor with a sad face and two people reacting, next to a printer (no text or symbols present)-
Do not defeat the safety purpose of the polarized or grounding type plug. A polarized plug has two blades with one wider than other. A grounding type plug has two blades and a third grounding prong. The wide blade or the third prong is provided for your safely. When the provided plug does not fit into your outlet, consult an electrician for replacement of the obsolete outlet.
-
Protect the power cord from being walked on or prinched particularly at plugs, convenience receptacles, and the point where they exit from the apparatus.
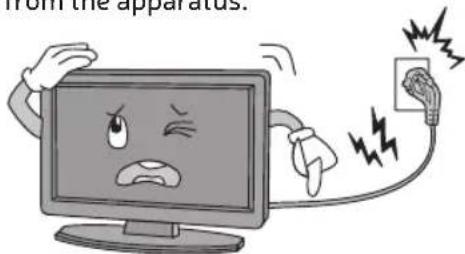
-
Only use the attachments/accessories specified by the manufacturer.
-
Use only with a cart, stand, tripod, bracket, or table specified by the manufacturer, or sold with the apparatus. When a cart is used, use caution when moving the cart/ apparatus combination to avoid injury from tip over.

natural_image
Symbolic icon of a person using a laptop inside a circle (no text or symbols)IMPORTANT SAFETY INSTRUCTIONS
- Unplug the power cord and antenna during lightning storms or when unused for long periods of time.
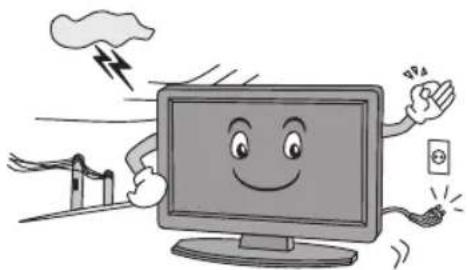
natural_image
Cartoon illustration of a smiling computer monitor with hands and electrical components, no text or symbols present- Refer all services to qualified service personnel. Maintenance is necessary when the appliance has been damaged in any way, such as the power cord or plug is damaged, liquid has been spilled, or objects have fallen into the appliance, the appliance has been exposed to rain or moisture, does not work normally, or has been discarded.
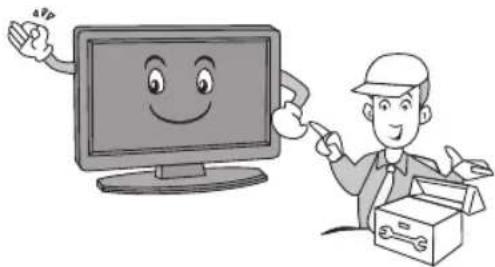
natural_image
Illustration of a smiling computer monitor and a worker pointing at a box (no text or symbols)
ON DISPOSAL
- The fluorescent lamp used in this product a small amount of mercury.
- Do not dispose of this product with general household waste.
- Disposal of this product must be carried out in accordance to regulation of your local authority.
NOTE
- If the TV feels cold to the touch, there may be a small "flicker" when it is turned on. This is normal, there is nothing wrong with TV.
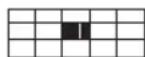
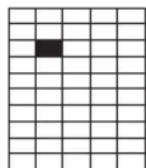
- Some minute dot defects may be visible on the screen, appearing as tiny red, green, or blue spots. However these have no adverse effect on the monitor's performance.
- Avoid touching the screen or holding your finger(s) against it for long periods of time. Doing so may produce some temporary distortion effect on the screen.
FIXING THE STAND
Your TV is packaged with the stand and the cabinet separated. Before using the TV, install the stand as described below, or if you want to mount it to wall, see page 6 for mounting advice; the wall mount itself is not supplied.
¡Important!
- Make sure the TV set is unplugged from the power supply before installing or removing the stand.
- The TV panel may be awkward to install on your own. We recommend you ask someone to help with installation and/or removal of the stand.
FIXING THE STAND
Wall mount installation
- Use the expansion bolts(4*36PWA) to fix the wall mount brackets into the wall.
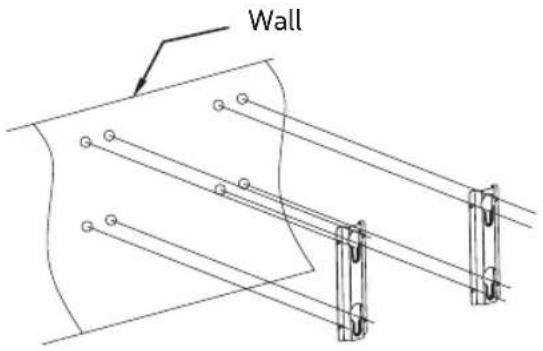
- Fix the wall mount screws (M6x12mm/4pcs) into the rear side of the LED TV, using the torque of 8kgf.cm.
* The TV appearance subject to material object.
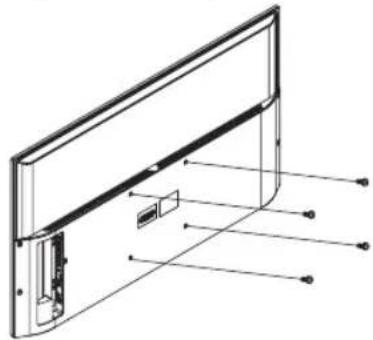
natural_image
Technical line drawing of a front panel with internal components and arrows indicating assembly (no text or symbols)- Put the LCD TV with wall mount screws onto the wall mount brackets. Warning: the angle between the TV and wall must not be bigger than 3^ .
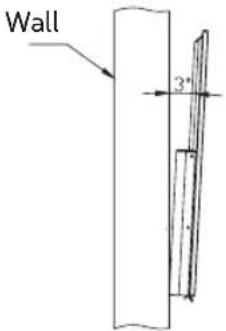
Attaching the stand
-
Place the TV with the display side down on a flat surface, Use a cloth to protect the display. Place the panel side of TV on the platform and insert the two stands into TV, making the screws holes of stands correspond to the right holes of TV.
-
The screws are attached to the bottom of the back, two on each side, and it is ready for mounting.
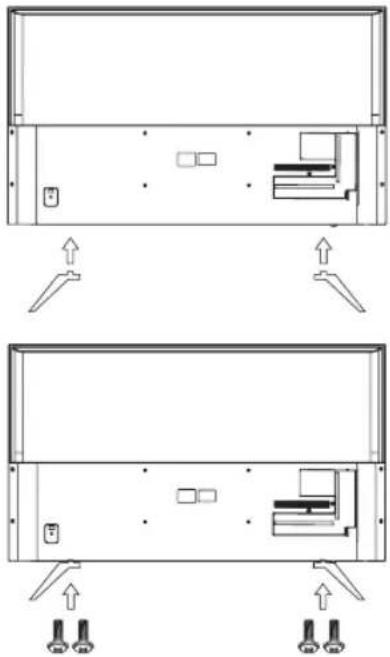
natural_image
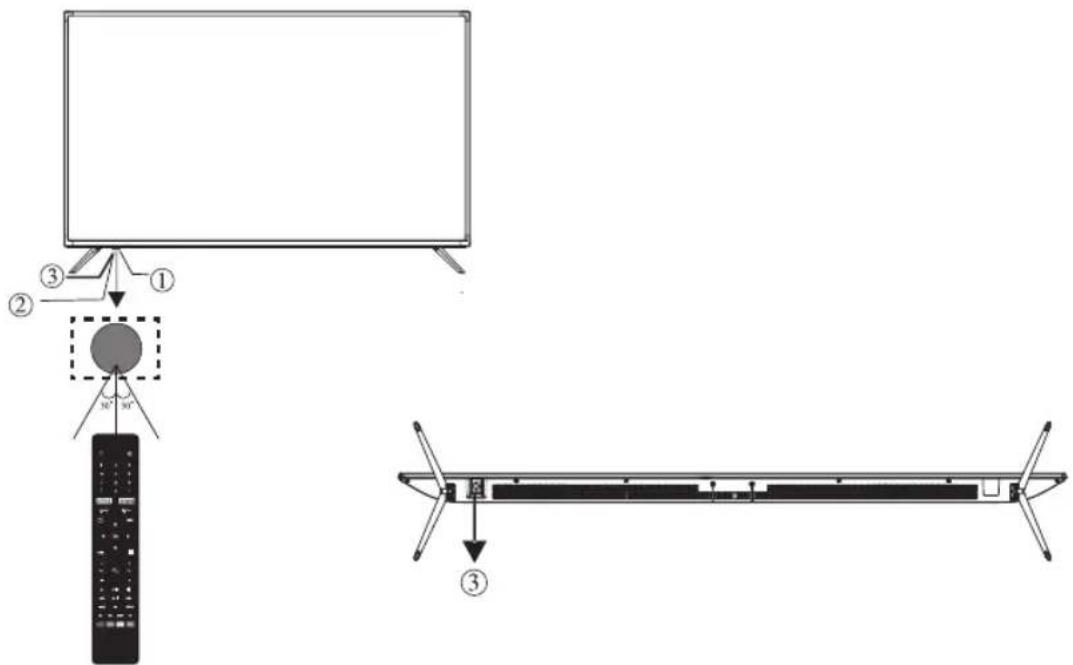
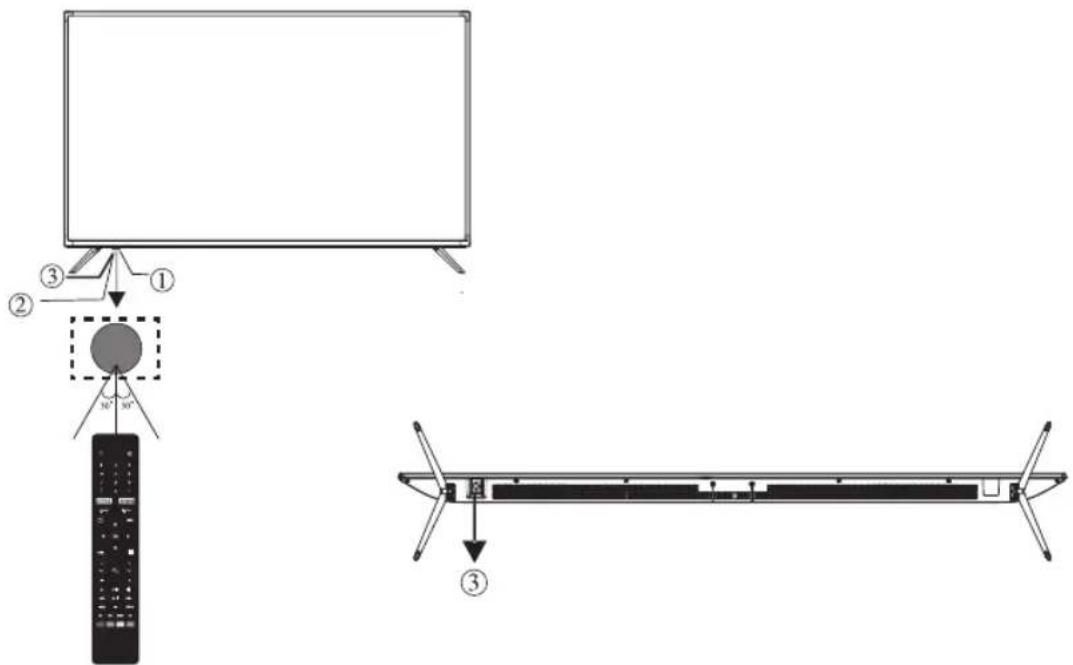
Technical diagram showing front and side views of a server rack with indicator lights (no text or labels)FRONT AND REAR PANEL
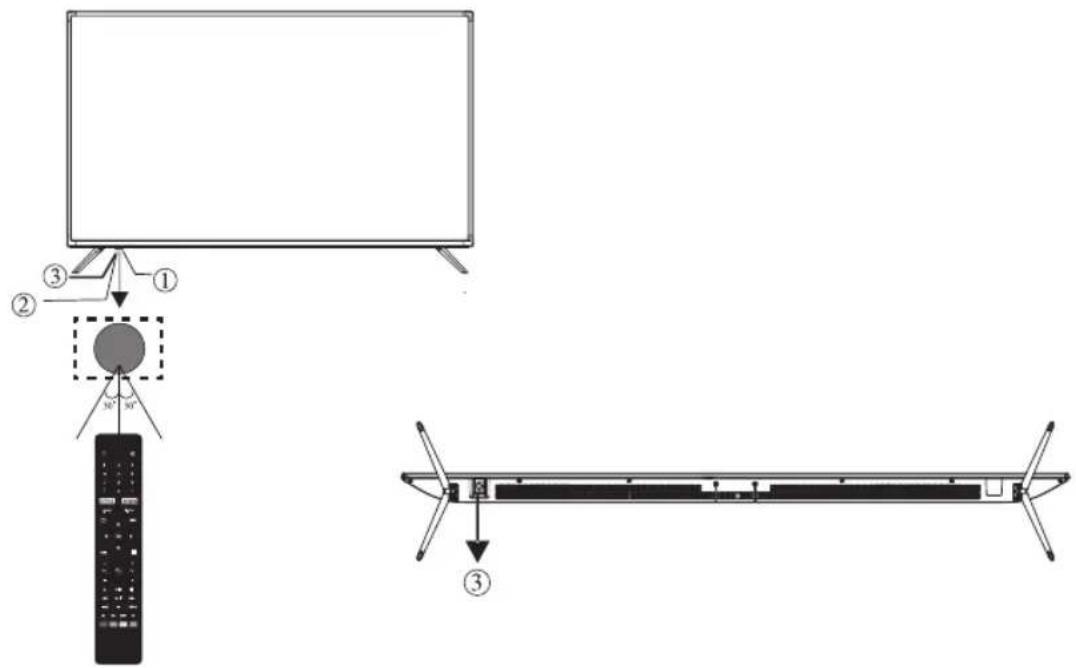
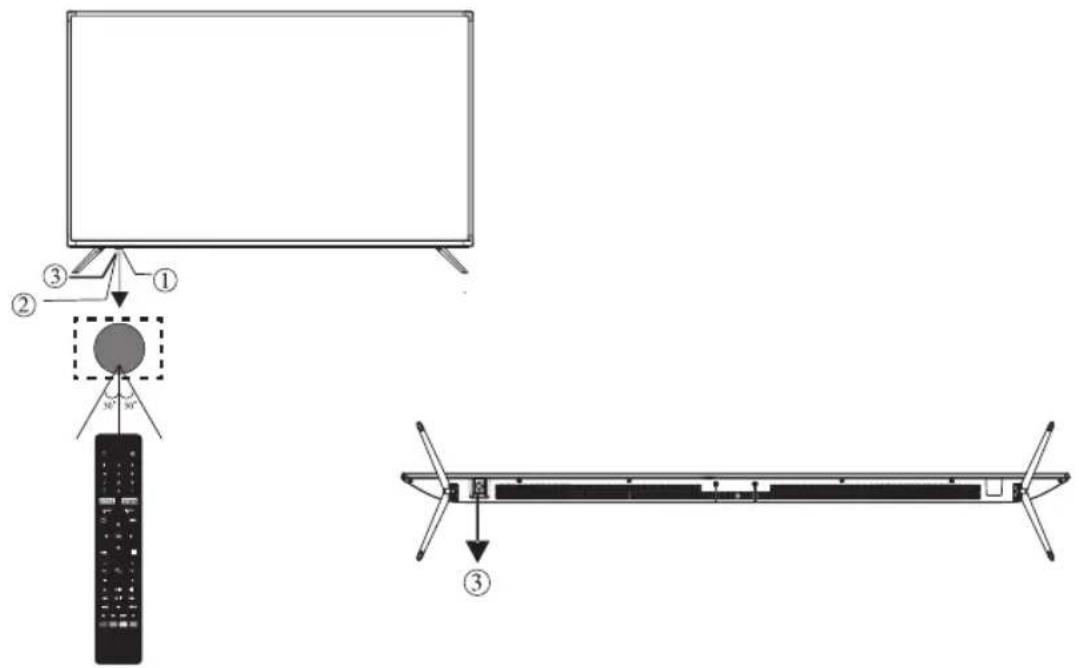
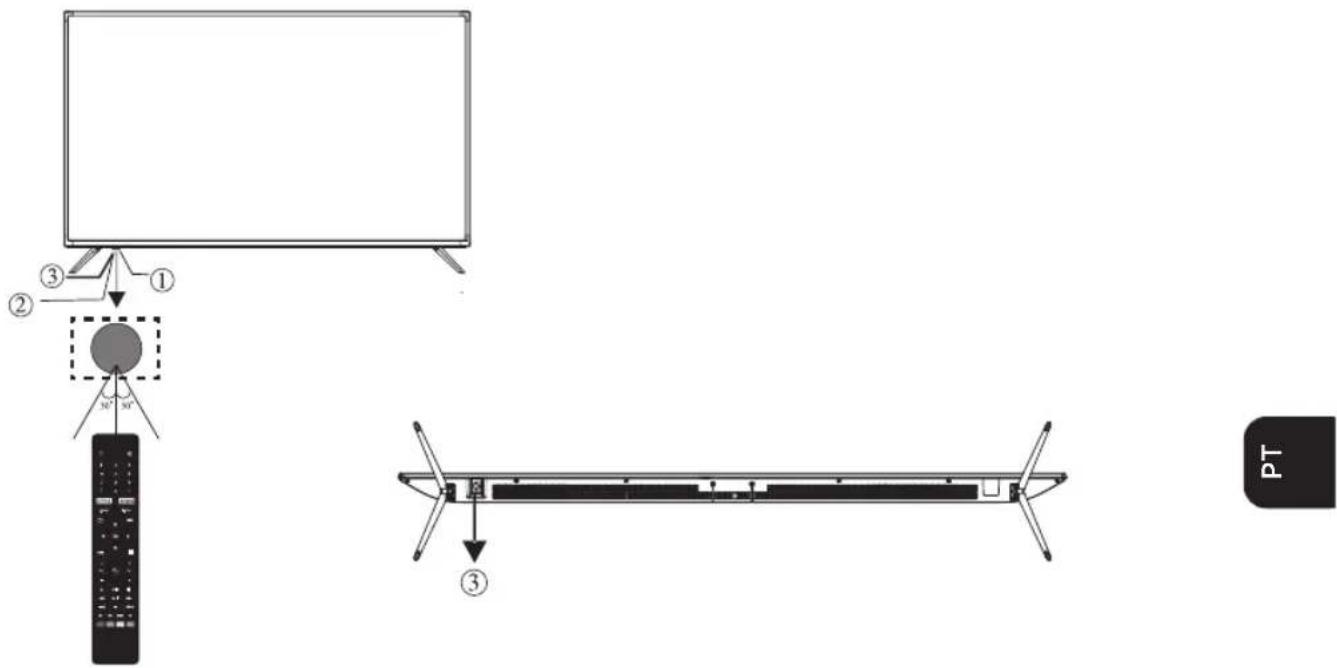
- Remote control sensor.
- LED indicator: Red STANDBY.
- “-” VOL- and move left.
“+” VOL+ and move right.
“^” CH- and move down
“♥” CH+ and move up
- Short press to confirm or enter the menu
- Long press to power off
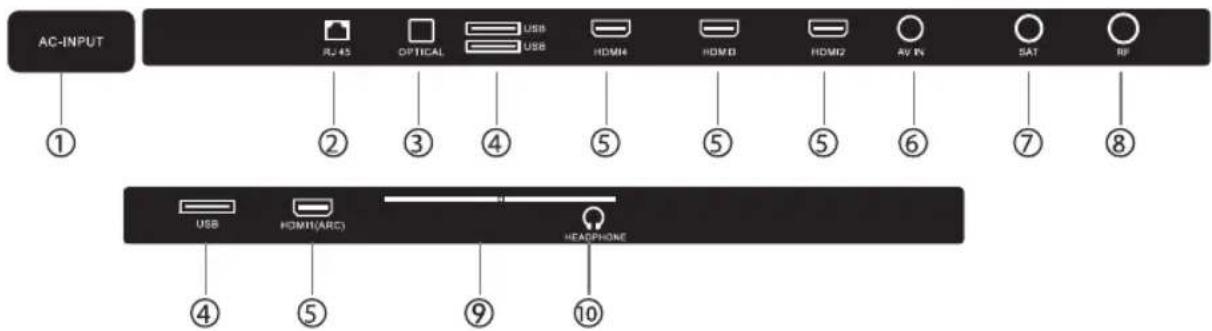
| 1. Power supply input 6. AV input: external AV signal input and relevant right / left sound channel inputs. | |
| 2. RJ45: internet port 7.SAT | |
| 3. OPTICAL audio output 8. ANT: Antenna 75Ω | |
| 4. USB port 9. Cl: Common Interface | |
| 5. HDMI connection 10. Earphone output | |
GETTING STARTED
Using the remote control
When using the remote control, aim at the remote sensor on the TV. If there is an object between the remote control and the remote sensor on the unit, the unit may not work.
- Point the remote control at the REMOTE SENSOR located on the TV.
• The infrared remote sensors may not function properly when the TV is used in a brightly lit area. - It is recommended to use the remote control at an effective distance of about 7 meters.
Installing batteries in the remote control
- Open the cover on the back of the remote control.
- Install two AAA size batteries. Make sure the “+” and ends of the battery match the diagram in the battery compartment.
- Replace the cover.
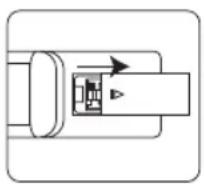
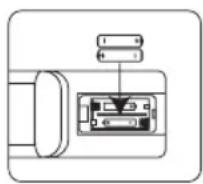
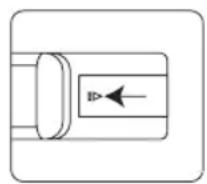
Battery replacement
You will need to install the batteries in the remote control for it to work by following the instructions below.
When the battery does not have enough power, the working distance of the remote control will be shortened considerably.
Notes on Battery Use:
Using the wrong type of batteries can cause chemical leaks and / or explosions. The following should be noted:
- Always make sure that the batteries are inserted with the + and - terminals in the correct direction as shown in the battery compartment.
- Different types of batteries have different characteristics. Do not mix different types.
- Do not mix old and new batteries. The combination of old and new batteries reduces the life of the batteries and / or leads to chemical leaks.
- If the battery does not work, replace it immediately.
- Leaking chemicals in batteries can cause skin irritation. If a chemical leaks from a battery, wipe it up immediately with a dry cloth and immediately replace the new battery.
- The life expectancy of batteries may be shorter due to storage conditions. Remove the batteries whenever you anticipate that the remote control will not be used for an extended period.
- The batteries (battery bank or batteries installed) must not be exposed to excessive heat such as sun, fire or the like.
CAUTION
- It may cause an explosion if the batteries are not replaced correctly.
- Only batteries with the same type or equivalent can be replaced.
CONNECTION AND SET UP
CABLE INSTALLATION
Carefully read the relevant content in "Maintenance and Safety Notice" before installation and use.
- Remove the TV from the retail box and place it on a secure flat surface.
NOTE:
When plugging or unplugging the TV, computer, or other equipment, you need to make sure that the AC power has already been turned off; When unplugging the power cord or signal cable, hold the plug (the insulated part), do not pull on the cable body.
- The RF output terminal can be connected to the RF input port on the TV.
- The DVD output AV terminal can be connected to the TV's AV input port through the AV cable.
- Connect one end of the HDMI cable to the HDMI output port, connect the other end of the HDMI cable to the HDMI port on the TV. It supports HDCP 2.2 on all HDMI inputs.
NOTE:
When connecting the HDMI, please insert carefully, do not press too hard so that the pin does not break.
- Check and make sure that all AV cables are properly connected with the corresponding ports.
- Connect the AV power cable to a 100-240 VAC power supply.
NOTE:
The power input range for the TV is 100-240VAC 50/60 Hz, please do not connect the power input port of the TV with the AV power out of the above range.
Keep the insulated part of the plug when you are unplugging the power cord, do not directly touch the metal part of the cord.
QUICK START GUIDE
- Connection
- Connect the electrical network and the antenna.
- Press the button on the remote control to turn on the TV from standby mode.
- Initial setup
When the TV is initially turned on, a sequence of on-screen prompts will help you configure the basic settings.
- Select the desired OSD (On Screen) language.
Press the ▲ / ▼ / ▶ button, then press the OK button.
- Select the appropriate country.
Press the ▲ / ▼ / ▶ button to select the country, and then press the OK button to Start Tuning Channels.
REMOTE CONTROL
1. LED
- Green LED lights to indicate your remote is using Bluetooth.
- Red LED will light to indicate your remote is using infrared.
2. Microphone
Speak into the microphone when using Google Assistant.
3. STANDBY Button
Press to switch between on and standby.
4. Input Button
Press to switch between inputs.
5. NUMBER Buttons
Press to select a Live TV channels.
6. GUIDE Button
Press to view the Live TV Programme Guide.
7. CHANNEL BACK Button
Press to jump to last channel viewed
8. GOOGLE PLAY button
Press to access Google Play (internet connection required).
9. YOUTUBE button
Press to access YouTube (internet connection required).
10. NETFLIX Button
Connects to Netflix for viewing online TV shows and flms (internet connection required).
11. PRIME VIDEO Button
Connects to Prime Video for viewing online TV shows and flms (internet connection required).
12. HOME Button
Press to view the home screen.
13. MENU Button
Press when viewing Live TV to access the main menu.
14. OK and NAVIGATION

- Press OK to select items in menus.
- Press ▲ / ▼ / ◀ to navigate around menus.
15. BACK Button
Press to move back through menus.
16. EXIT Button
Press to exit menus or Apps.
17. VOLUME +/- Buttons
Press to increase and decrease the volume level.
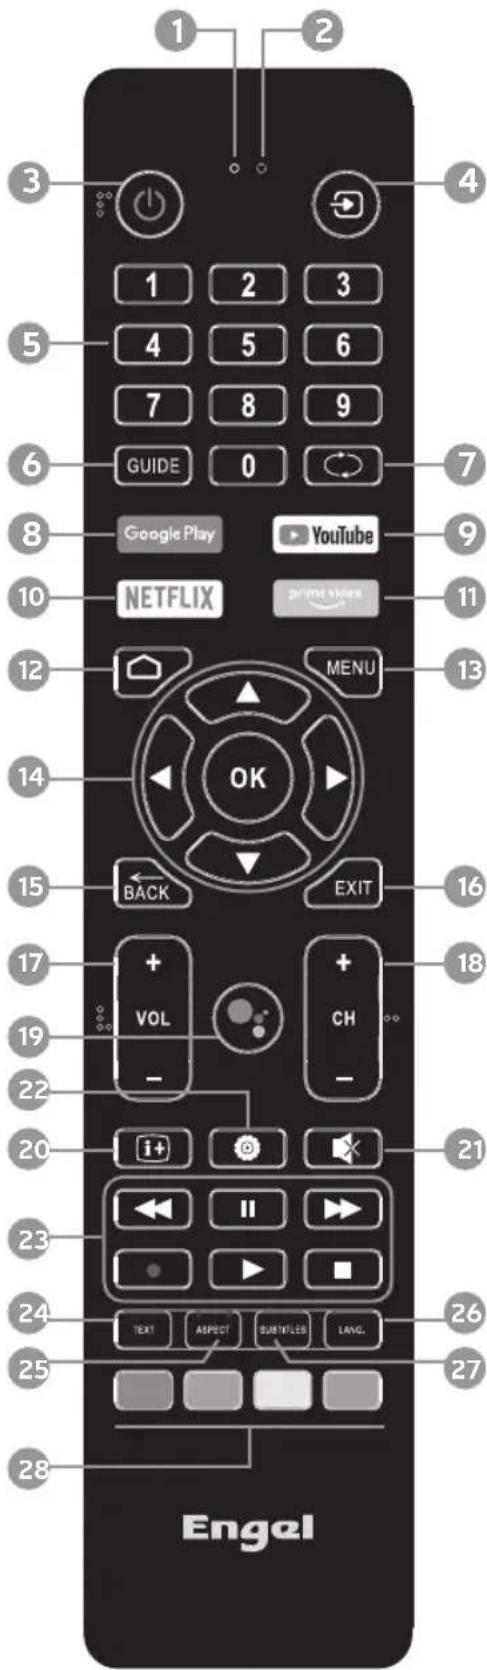
REMOTE CONTROL
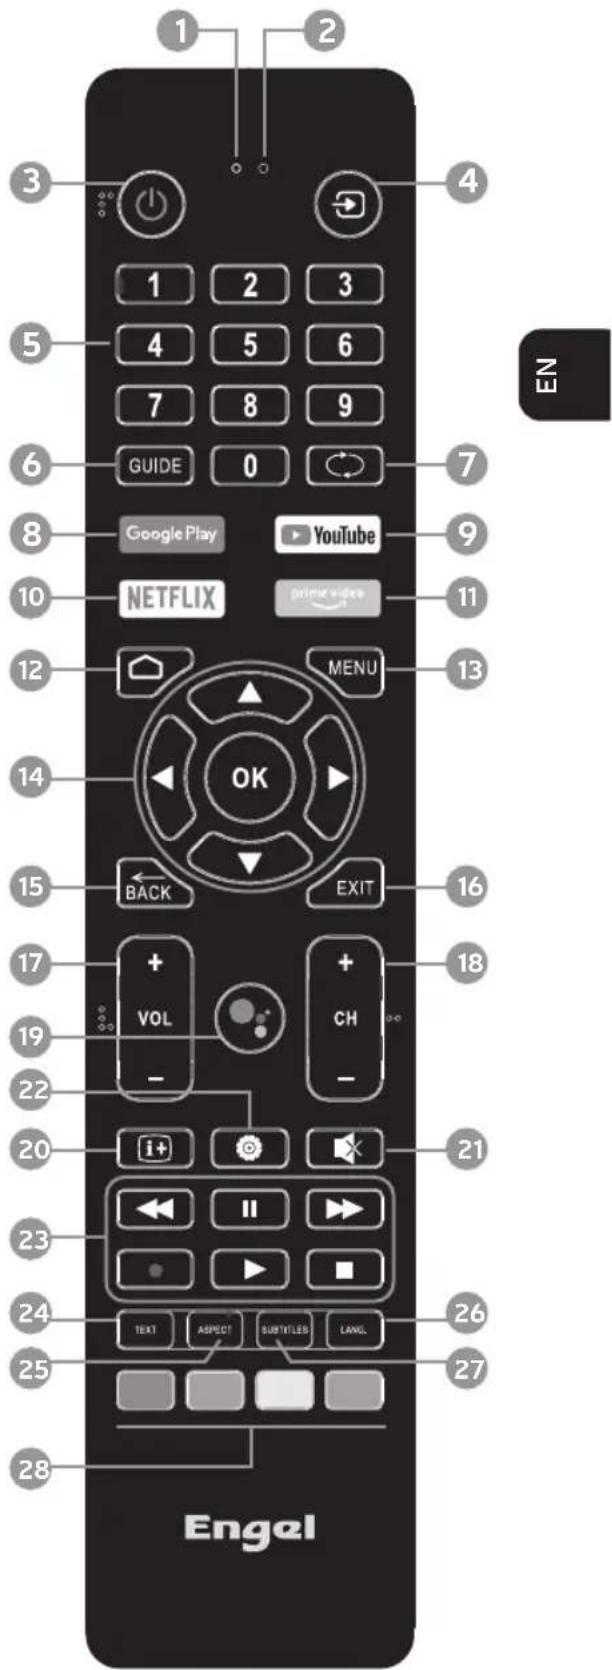
18. CHANNEL +/- Buttons
Press to scroll up and down the channel list.
19. GOOGLE ASSISTANT Button
Press the Google Assistant button, when the green LED appears on the remote ask Google a question.
20. INFORMATION Button
Press when viewing Live TV to see programme information.
21. MUTE Button
Press to mute or un-mute the volume.
22. SETTING BUTTON
Press to open the settings menu.
23. REWIND - PAUSE - FAST FORWARD - RECORD - PLAY - STOP Buttons
- Press to rewind videos.
- Press to Pause videos.
- Press the fast forward videos.
- Press to Record Live TV, a storage device must me connected.
- Press the play videos.
- Press to Stop videos.
24. TEXT Button
Press to select the teletext mode.
25. ASPECT button
Press to adjust the aspect ratio of the picture.
26. LANGUAGE Button
Press to select an alternative language if available.
27. SUBTITLE Button
Press to access the AUDIO menu where you can switch Audio Description and Subtitles on and of.
28. COLOURED Buttons
Operations according to the prompt within menu or while watching TV.
BASIC OPERATION
Turning the TV on and off
- Turn on the TV
Connect the energy cable. At this time the TV will enter standby mode, press the ⏻ button on the remote control to turn on the TV from standby mode.
- Turn off the TV
Press the ⏻ button on the remote control to enter standby mode.
Do not leave your computer in standby mode for long periods of time. It is best to disconnect the whole of the electrical network and the antenna.
- No signal
There is a No Signal menu on the screen when there is no input signal. In TV / DTV mode, if there is no signal within fifteen minutes, the TV will automatically turn off.
Program selection
- Use of CH + / CH- on the TV panel or remote control.
Press CH + to increase the channel number.
Press CH to decrease the channel number.
- Use of digital buttons 0-9.
You can select the channel number by pressing 0 to 9. (In TV, DTV mode)
Adjusting the volume
- Press the VOL +/- button to adjust the volume.
- If you want to turn off the sound, press MUTE.
- You can release the silence by pressing MUTE or increase / decrease the volume.
Changing the input source
You can select the input source by pressing the button on the remote control.
Press the ▲ /▼button to scroll through the input source and press the OK button to confirm your choice.
MENU OPERATION
INITIAL SETUP
The first you turn your TV, the setup wizard will guide you through setting up basic settings. Please according to the text tip to first time setup.
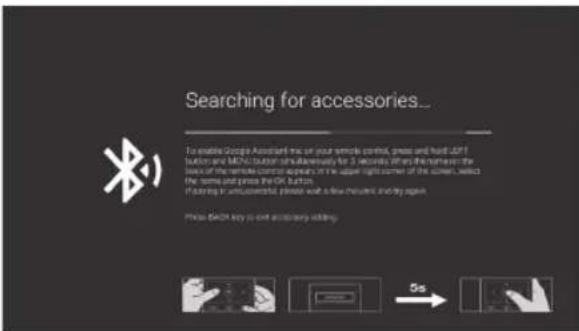
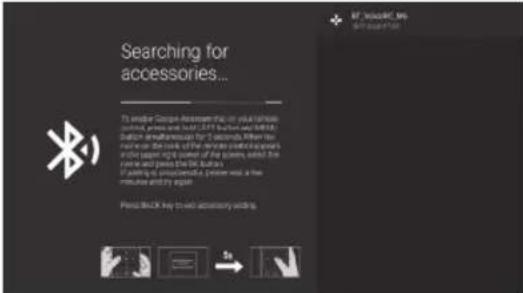
This function is used for the remote control pair code. After the code is successful, you can use the Bluetooth remote control to operate the TV. If you don't need to use the Bluetooth remote control, you can press the BACK button to skip this step.
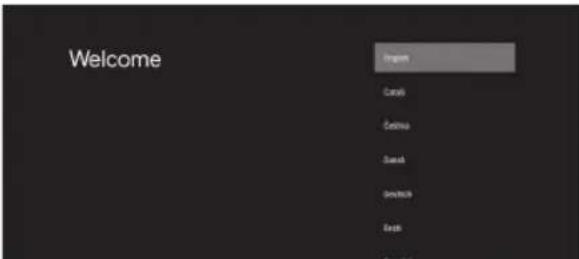
Press ▲ / ▼ to select the system language and press OK to confirm.
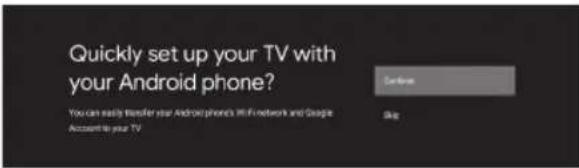
Connect your Android phone to your TV, select "Continue" to continue the connection, and choose "Skip" to skip this step.
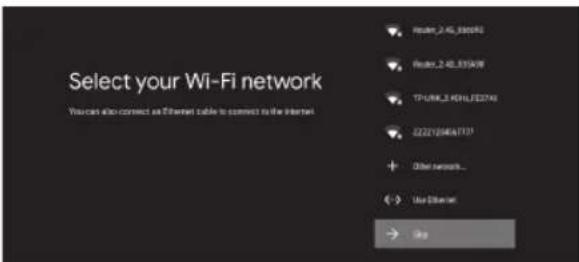
Press ▲ / ▼ to select the the Wifi to connect, press OK and enter the password to confirm the connection is successful. You can also try use Ethernet and skip select network
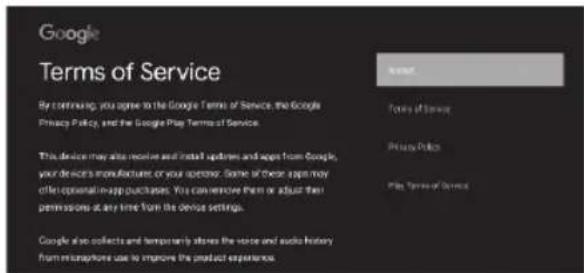

By accepting the Google Terms of Service to improve the product experience, select "Accept" to accept this condition.
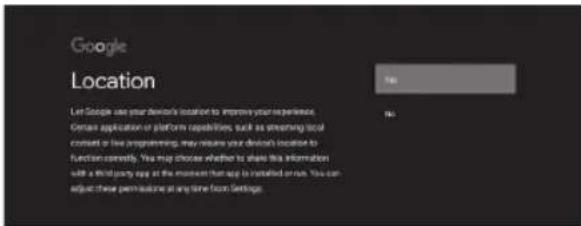
Agree to Google to get the location information of your device to get more features, choose "YES" to accept.
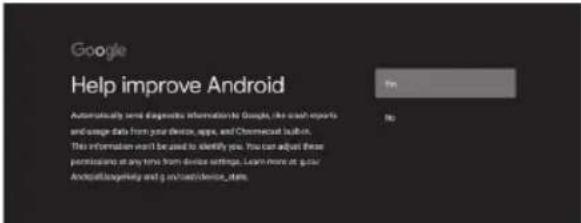
By agreeing to automatically send diagnostic information to Google to improve discriminative power, choose "YES" to accept.
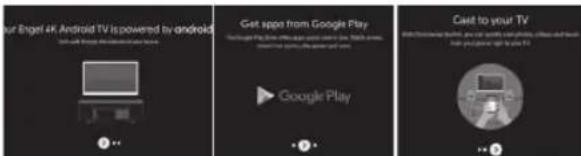
- Your device is powered by Android TV and press ▶ button to select the browsing feature.
- You can get more apps from Google Play and press the ▶ button to go to the next screen.
MENU OPERATION
- Transfer photos and other content to the TV via the built-in chromecast, press OK to complete the browsing.
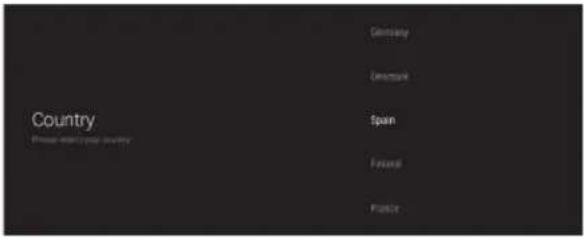
Press ▲ / ▼ to select the country of your device and press OK to confirm.
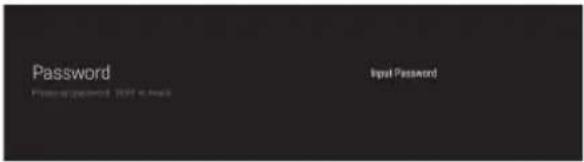
Used to set your device's password to ensure security and privacy.
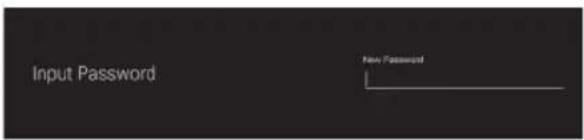
Press OK to pop up the soft keyboard, and use the remote control to enter the 4-digit password automatically jump to the next interface.
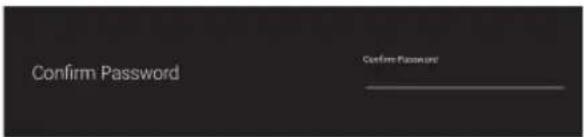
Confirm the password again and keep it consistent. Use the remote control to enter the password and complete the password confirmation.
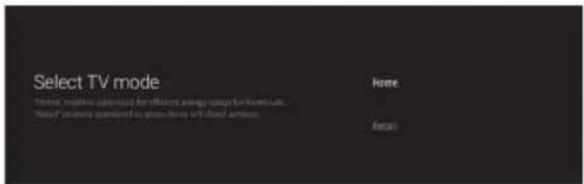
For selecting the mode, press ▲ / ▼key to select Home mode and press OK to confirm.
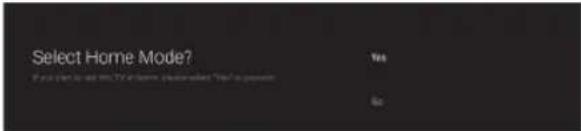
Confirm the selected mode again, select "Yes" to confirm the selected mode, and select "No" to return to the previous step.
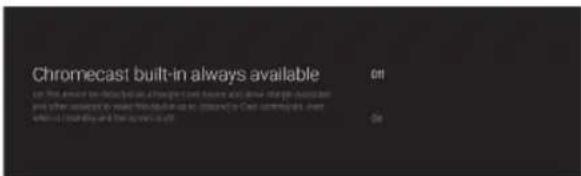
Let this device be detected as a Google Cast device and allow Google Assistant and other services to wake this device up to respond to Cast commands, even when on standby and the screen is off.
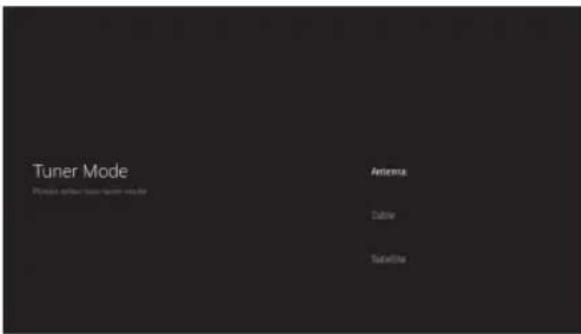
To select the Tuner mode for searching, press ▲ / ▼ to select and press OK to confirm.
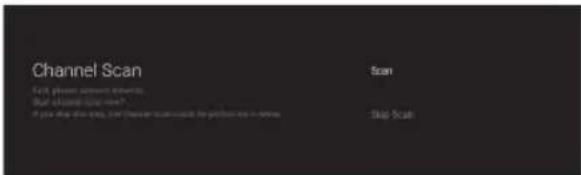
Press ▲ / ▼ to select whether to search, select "Scan" to search, select "Skip Scan" to skip the search.
MENU OPERATION
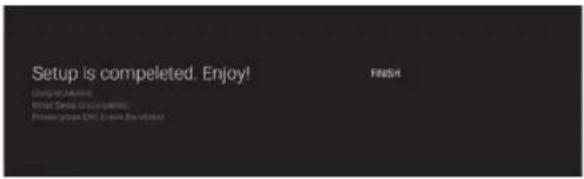
Press OK to complete the setup.
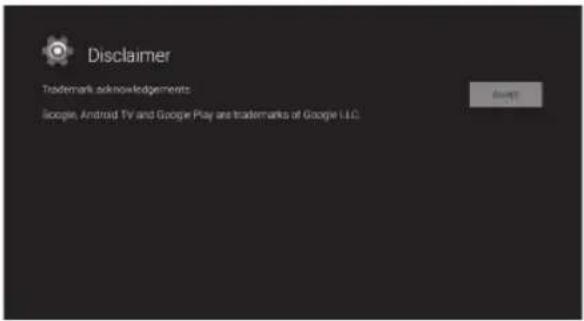
Press the OK button to agree to (Disclaimer). After setting is complete, You can watch TV.
HOME SCREEN
Press the HOME button to go to the home page.
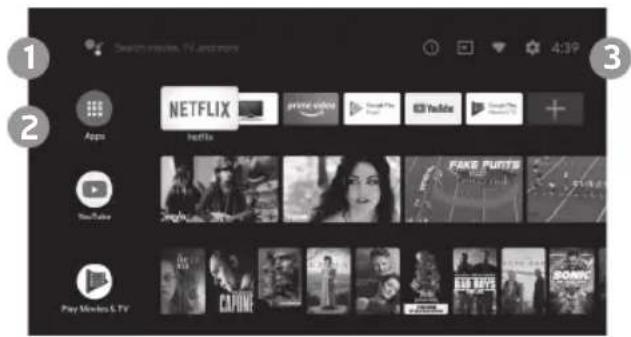
1) open the google assistant start a voice search or use keyboard search
2) Among the applications installed on the TV, the icons for the favourite applications are shown inside here.(Favourite applications can be added/deleted/ changed its order by users.)
Apps: Click to jump to Apps screen where all the installed applications are listed.
3) ① Notification: Display the notifications.
Inputs: Icon to select an input source.
Network & Internet: Icon to Setup Network, Such as wifi.
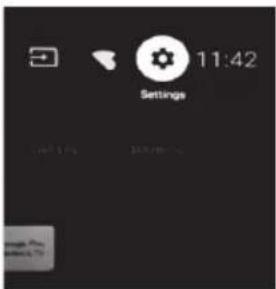
Settings: Various settings can be configured here. For details on the settings, see the next explanation.
INPUT SOURCE
1) In the HOME interface, press ▲ / ▼ / ◀ / ▶ to select the "Inputs" icon, press OK to open the input source list, then press up to highlight an input and press OK to switch.
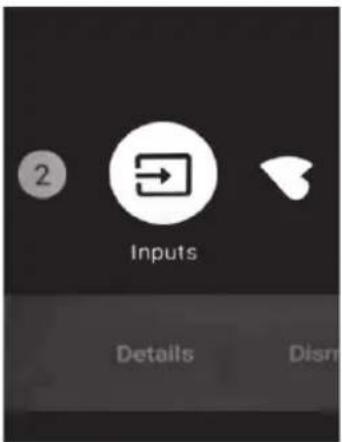
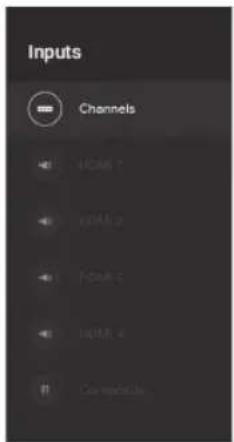
2) Under Live TV, press the SOURCE button to display the list of input sources. You can select the desired source.
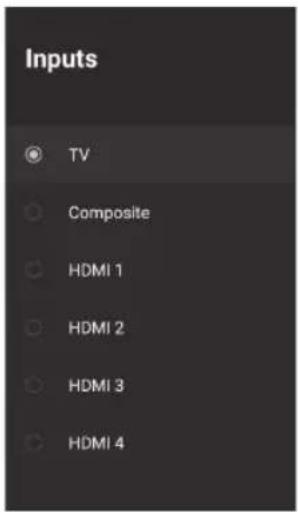
MENU OPERATION
NAVIGATING THE ON-SCREEN MENU
1) There are two ways to enter. First, in Live TV, press the menu button to display TV options, press ▲ ▼ / ▶ select the settings menu and press OK to confirm. Second, in the HOME interface, press the ▶ key to select the icon of the circular settings menu, press OK to confirm.
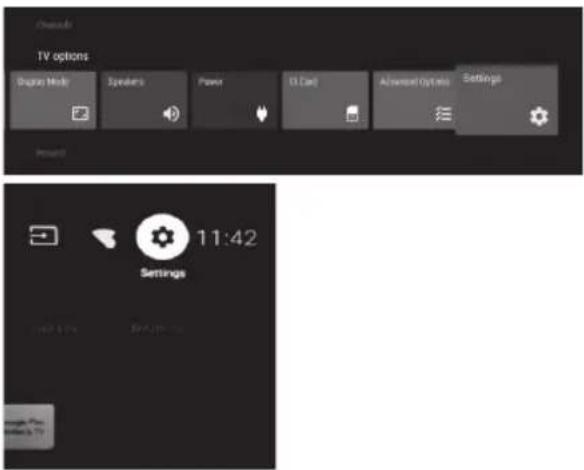
2) Press ▲ / ▼button to select what you want set.
3) Press OK to enter setting.
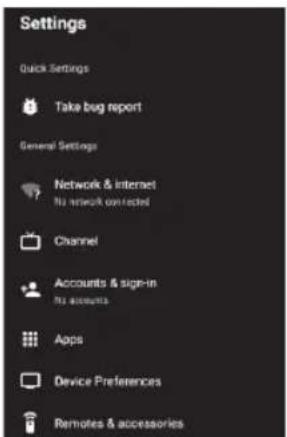
Press BACK to return to the previous menu. If the main menu is displayed, pressing BACK will close the onscreen menu.
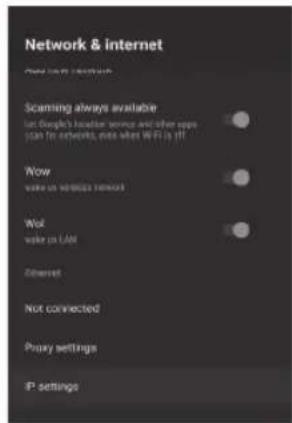
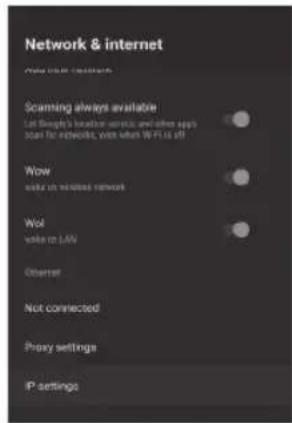
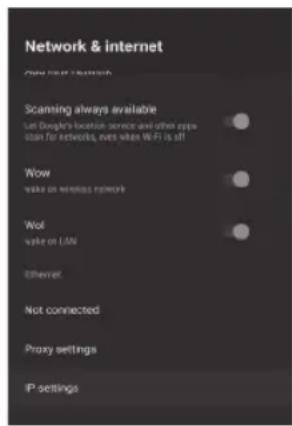
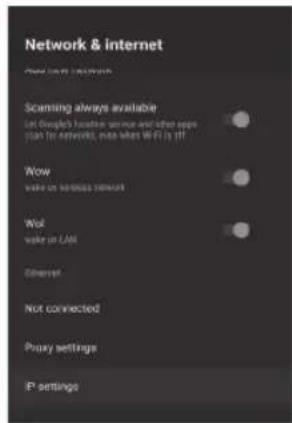
NETWORK & INTERNET
1) Press ▲ button to select what you want set.
2) Press OK button to adjust.
3) After finishing your adjustment, press OK button to save and return to the previous menu.
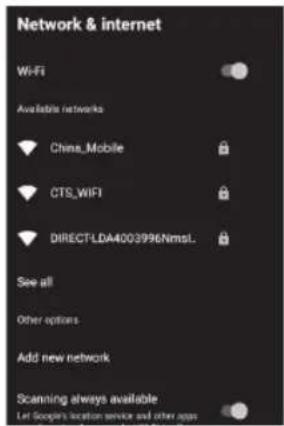
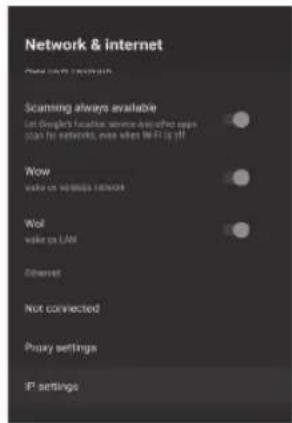
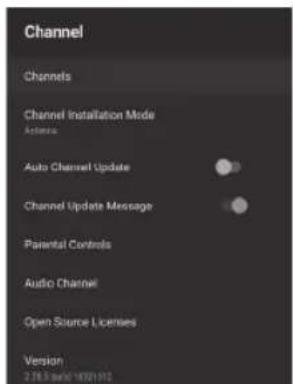
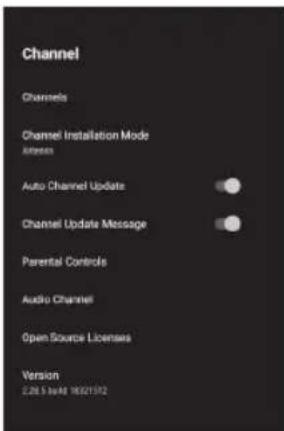
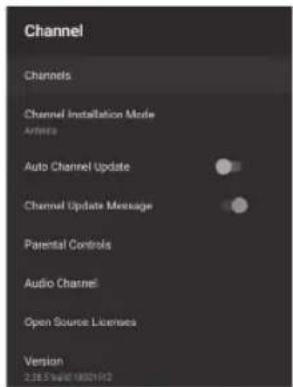
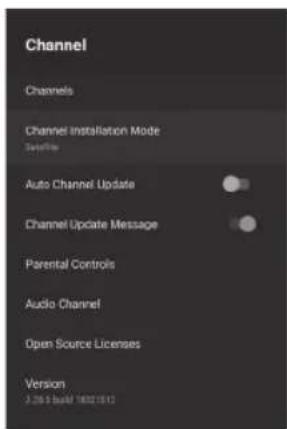
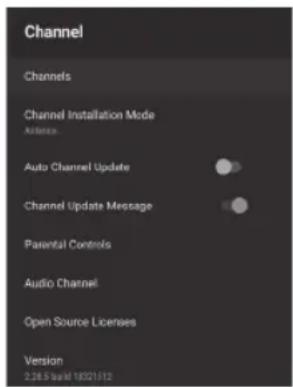
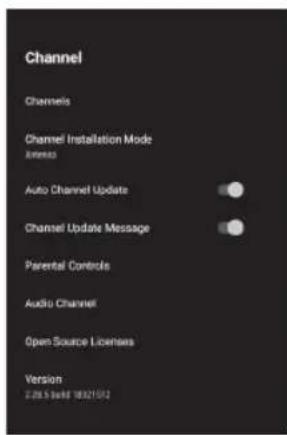
CHANNEL
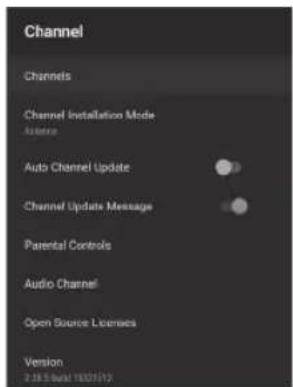
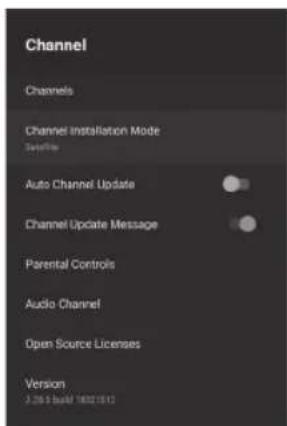
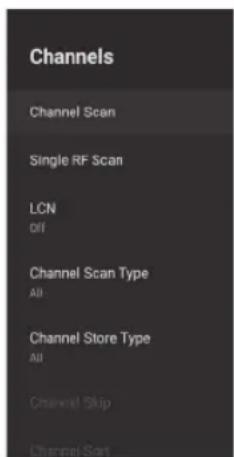
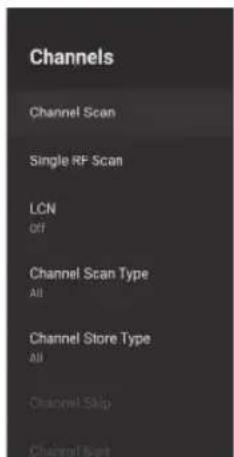
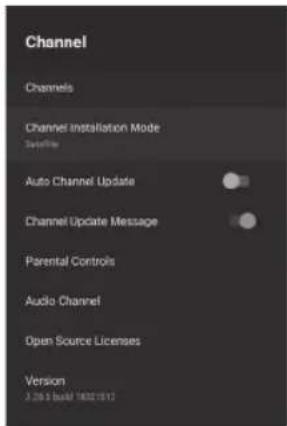
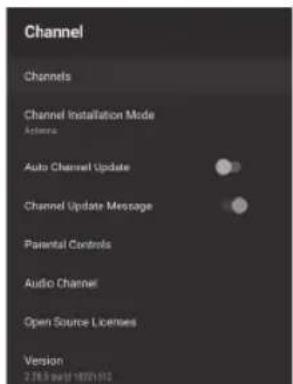
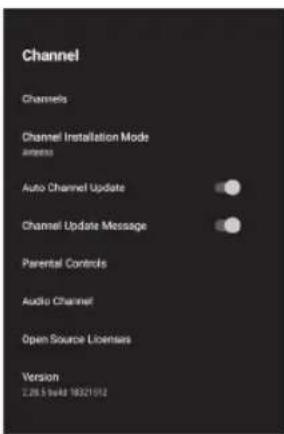
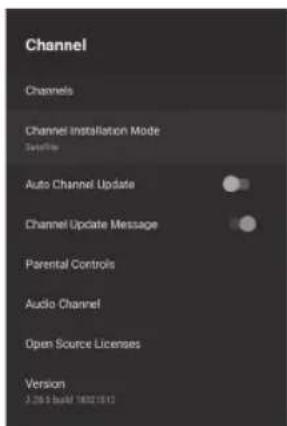
Channels: Display the scan sub-menu based on different Channel installation modes.
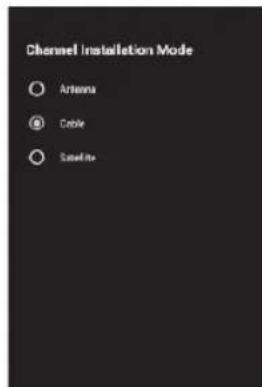
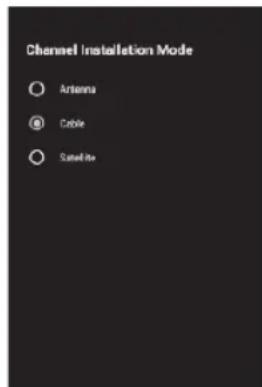
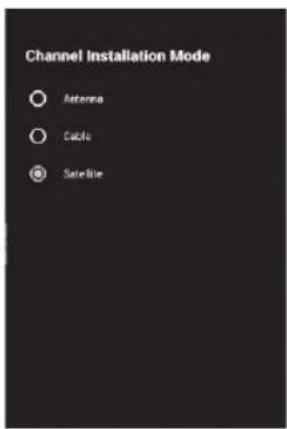
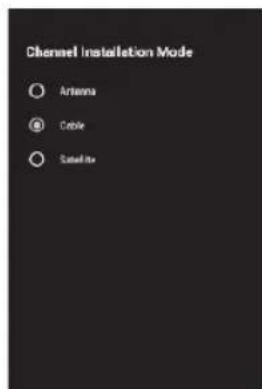
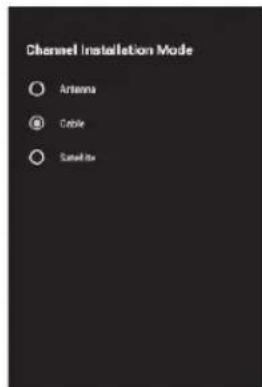
Channel installation mode: Select on-screen display channel sources. You can select the signal type.
- Antenna: Set the signal type to antenna. When set to Antenna, the TV can receive analog and digital (DVB-T/DVB-T2) broadcasting signals.
- Cable: Set the signal type to cable. When set to Cable, the TV can receive analog and QAM broadcasting signals.
- Satellite: Set the signal type to Satellite. When set to Satellite, the TV can receive Satellite broadcasting signals.
MENU OPERATION
Auto Channel Update
Parental controls: Press ▲ / ▼button to select the option then press OK button to enter the sub-menu.
Audio Channel: Press ▲ / ▼button to select the option then press OK button to enter the sub-menu.
Open source licenses: Press ▲ / ▼button to select the option then press OK button to enter the sub-menu.
Antenna
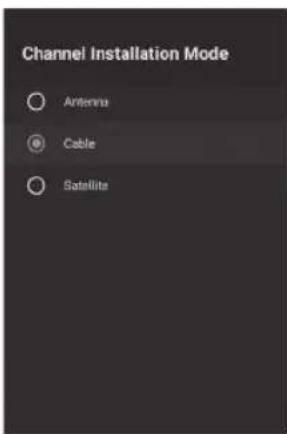
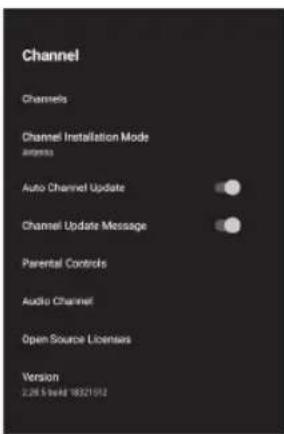
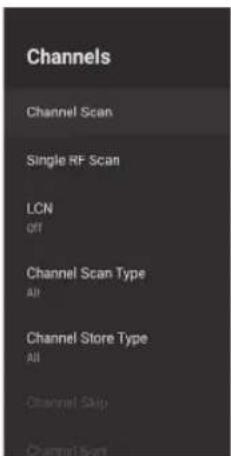
1) Menu->Settings->Channel->Channel Installation Mode enter, choose Antenna or Cable.
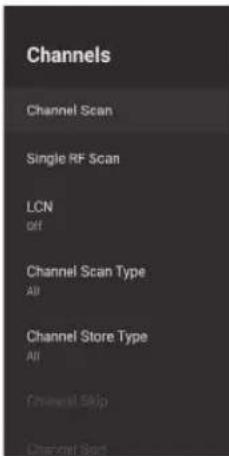
2) Enter Menu-> Settings-> Channel-> Channels.
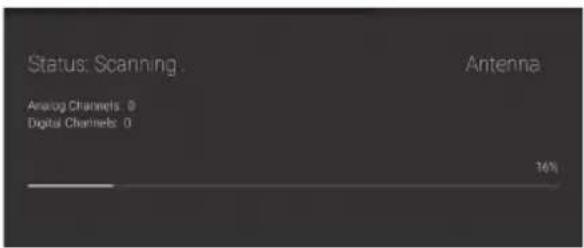
- Channel Scan directly enters the ATV+DTV automatic search platform interface of Antenna.
Update Scan: Re-automatically search for frequency points outside the station.
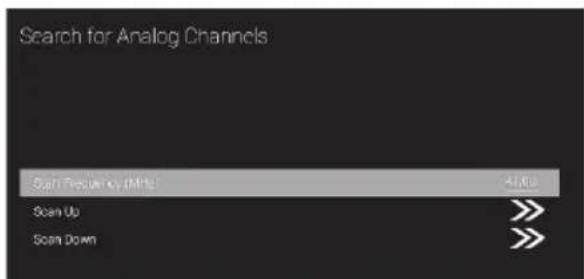
Analog Manual Scan: Manual ATV search station. After input the frequency point, you can select up or down search station.
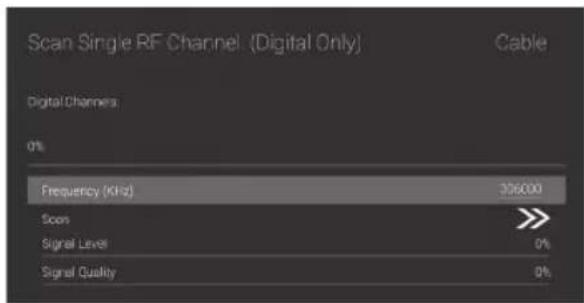
Single RF Scan: DTV manual search, left and right after selecting RF Channel, directly OK search.
Cable
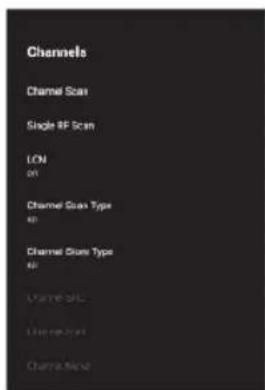
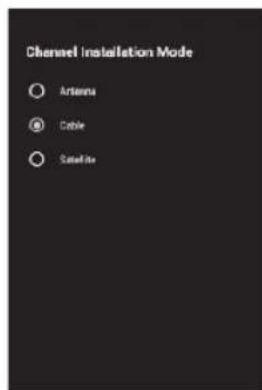
1) Menu->Settings->Channel->Channel Installation Mode, select Cable.
2) Enter Menu-> Settings-> Channel-> Channels.
MENU OPERATION
3) Enter Channel Scan, where Numericable are the local operators, and the default Scan Mode is Advance; Others have Advance, Quick and Full Scan modes.
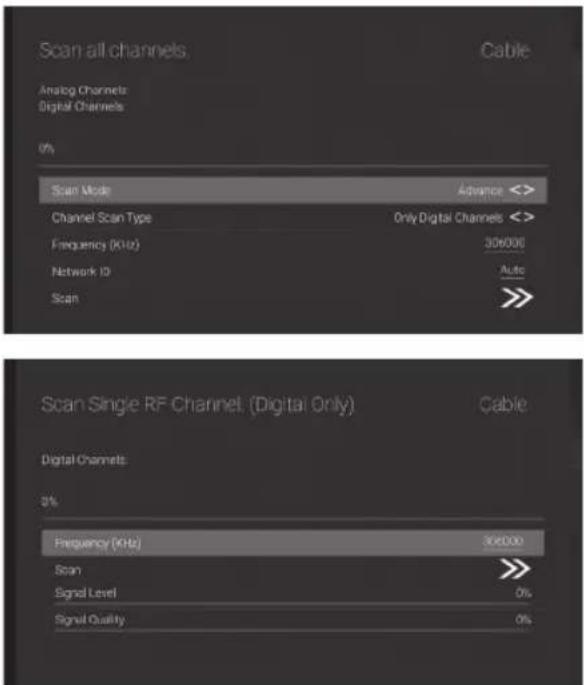
Single RF Scan: manual search station.
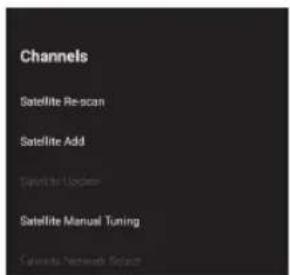
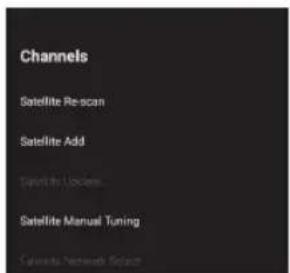
SATELLITE
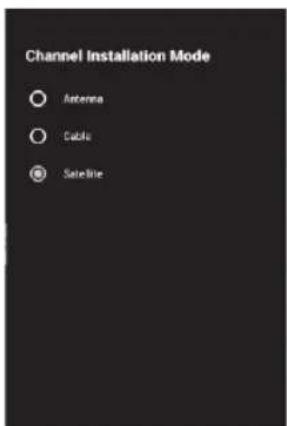
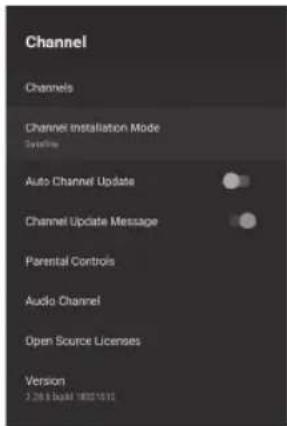
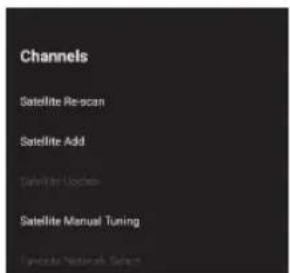
1) Menu->Configuration->Channel->Channel Installation Mode, select Preferred Satellite or General Satellite.
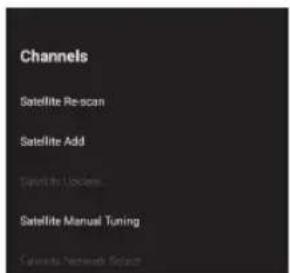
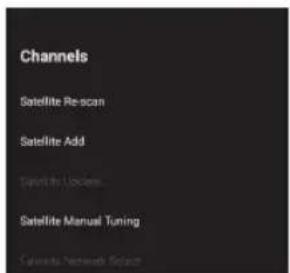
2) Enter Menu Settings-> Channel-> Channels-> Satellite Re-scan.
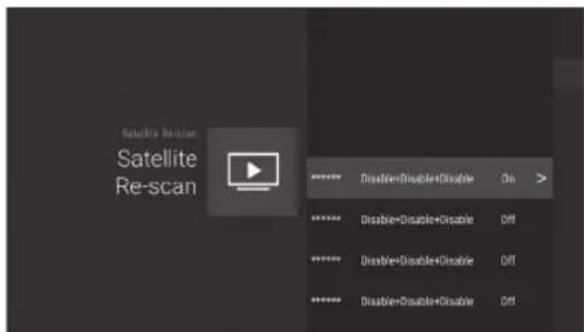
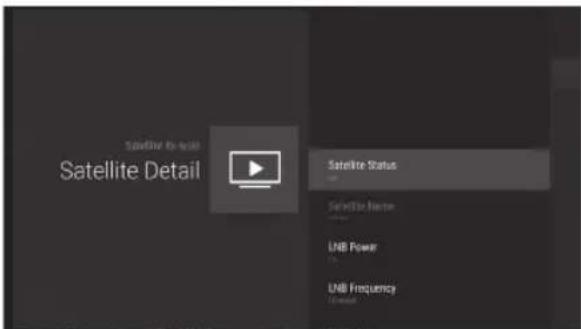
MENU OPERATION
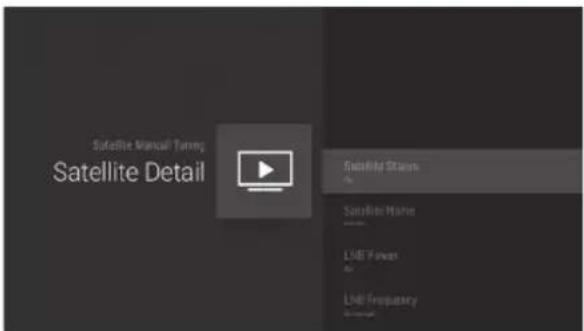
Press OK to enter the Satellite parameter Settings, which include LNB POWER, LNB Frequency, DisEqC Set, 22K and other parameters. Then go back to Satellite Re-scan and right click to enter the search menu. Then go back to Satellite Re-scan and right click to enter the search menu.
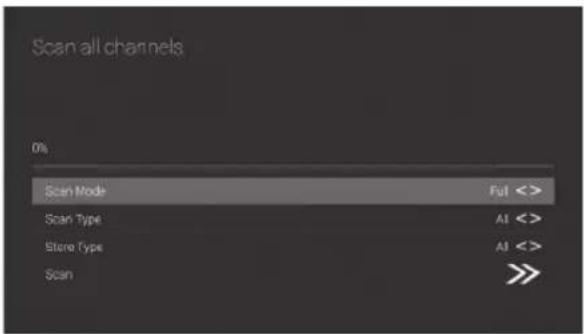
Add Satellite: Add a star broadcast signal.
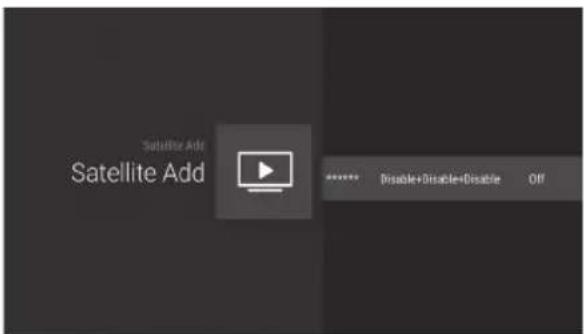
Manual Satellite Tuning: Manually search for a specific TP, which can be added by Satellite Add if necessary.
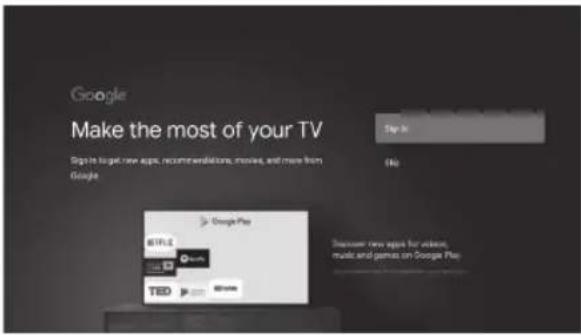
ACCOUNTS & SIGN IN
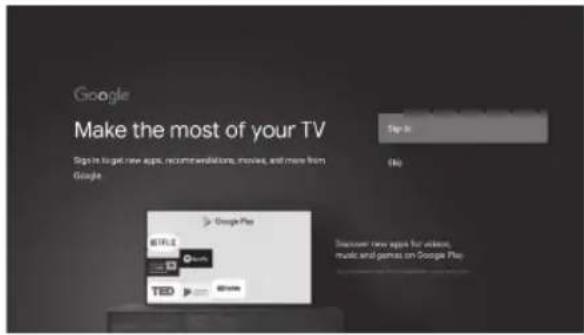
Press UP/DOWN button to select Sign in or Skip.

APPS
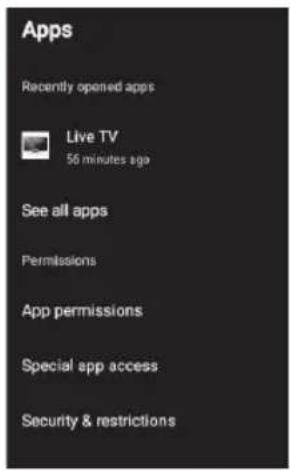
In this menu, you can set the APP permissions, and read the app lists.
- Press ▲ / ▼button to select what you want set.
- Press OK button to adjust.
- After finishing your adjustment, Press BACK button to return to the previous menu.
MENU OPERATION
DEVICE PREFERENCES
ABOUT
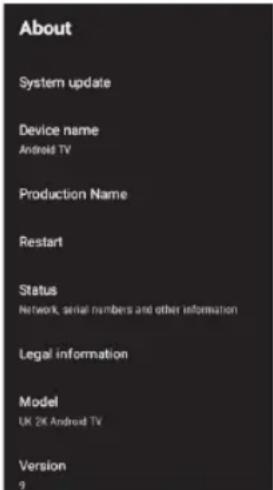
In this menu, you can read the information and settings of TV.
- Press ▲ / ▼button to select what you want set.
- Press OK button to adjust.
- After finishing your adjustment, Press BACK button to return to the previous menu.
DATE & TIME
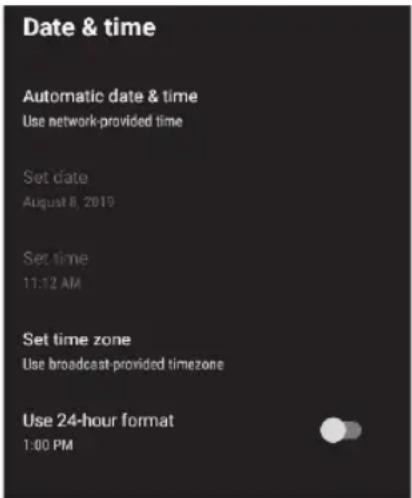
Automatic date & time: Press ▲ / ▼ button to select the option then press OK button to enter the sub-menu.(Optional:Use network-provided time,Off)
Set date: Press ▲ / ▼ button to select the
option then press OK button to enter the sub-menu.
Set time: Press ▲ / ▼ button to select the option then press OK button to enter the sub-menu.
Set time zone: Press ▲ / ▼ button to select the option then press OK button to enter the sub-menu.
Use 24-hour format: Press ▲ / ▼ button to select the option then press OK button to choose ON/OFF.
TIMER:
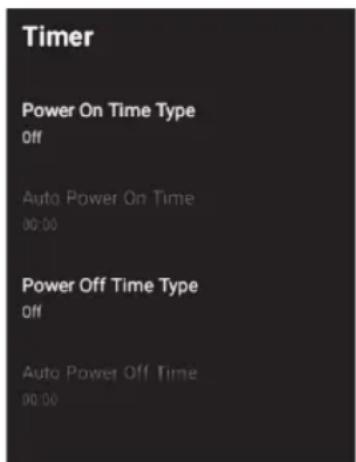
Power On Timer Type: Press ▲ / ▼button to select the option then press OK button to choose ON/OFF/ONCE.
Power On Timer: Press ▲ / ▼button to select the option then press OK button to enter the sub-menu.
Power Off Timer Type: Press ▲/▼button to select the option then press OK button to choose ON/OFF/ONCE.
Power Off Timer: Press ▲ / ▼ button to select the option then press OK button to enter the sub-menu.
MENU OPERATION
LANGUAGE:
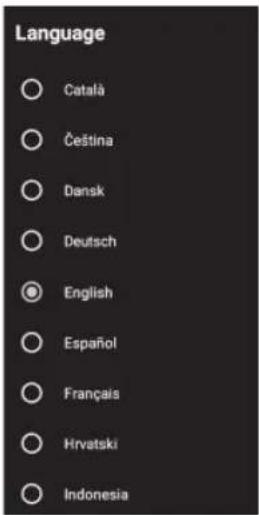
Language: Press ▲ / ▼button to select the option then press OK button to enter the select language.
KEYBOARD
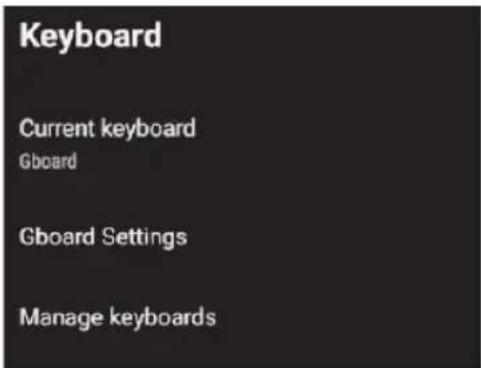
Current keyboard: Press button to select the option then press OK button to enter the sub-menu.
Gboard Settings: Press button to select the option then press OK button to enter the sub-menu.
Manage keyboards: Press button to select the option then press OK button to enter the sub-menu.
INPUTS
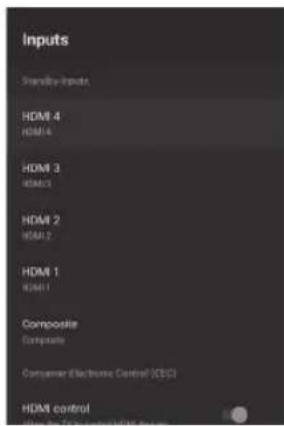
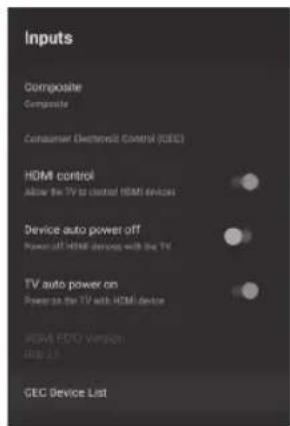

Inputs: Press button to select the option then press OK button to enter the sub-menu.
HDMI control: Press button to select the option then press OK button to choose ON/OFF.
Device auto power off: Press button to select the option then press OK button to choose ON/OFF.
TV auto power on: Press button to select the option then press OK button to choose ON/OFF.
HDMI EDID Version: show EDID version.
CEC Device List: Press button to select the option then press OK button to enter the sub-menu
POWER
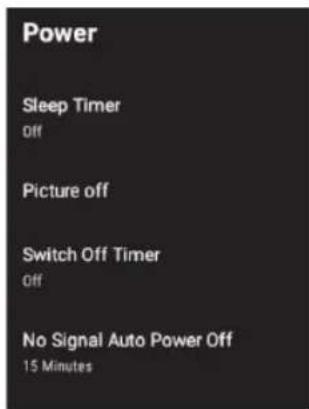
MENU OPERATION
Sleep Timer: Press button to select the option then press OK button to enter the sub-menu. (Optional: off, 10 minutes, 20 minutes, 30 minutes, 40 minutes, 50 minutes, 60 minutes, 90 minutes, 120 minutes).
Picture off: Press button to select the option then press OK button to turn off the TV.
Switch off timer: Press button to select the option then press OK button to enter sub-menu.(Optional: off, 30 minutes, 60 minutes, 90 minutes, 120 minutes, 150 minutes, 180 minutes, 210 minutes, 240 minutes).
No signal Auto Power Off: Press button to select the option then press OK button to enter sub-menu. (Optional: off, 5 minutes, 10 minutes, 15 minutes, 30 minutes, 60 minutes).
PICTURE
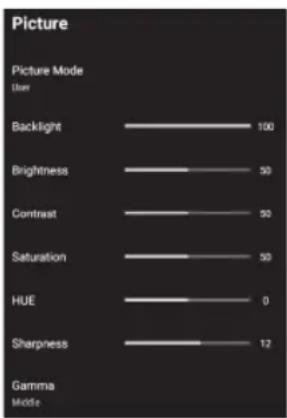
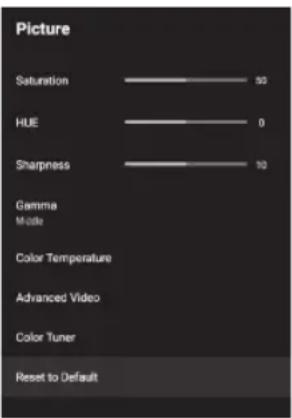
Picture Mode: Press ▲ / ▼button to select the option then press OK button to enter submenu.(Optional: user, Standard, Vivid, Sport, Movie, Game, Energy saving).
Backlight/Brightness/Contrast/Saturation/HUE/Sharpness: Press ▲ / ▼button to select the option. Press ◀ to decrease the parameter. Press ▶ to increase the parameter.
Gamma: Press ▲ / ▼button to select the option then press OK button to enter sub-menu. (Optional: Dark, middle, Bright).
Color Temperature: Press ▲ / ▼button to select the option then press OK button to enter sub-menu.
Advanced Video: Press ▲ / ▼outton to select the option then press OK button to enter the sub-menu.
Reset to Default: Reset all settings to the factory defaults.
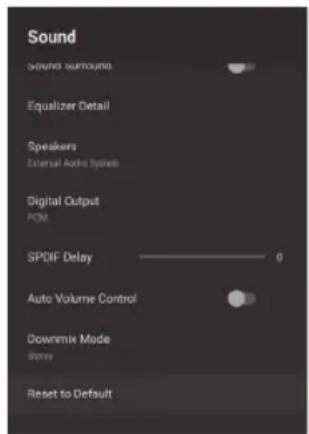
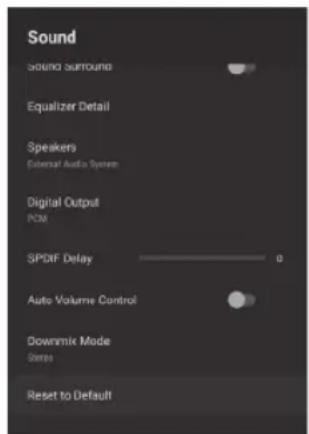
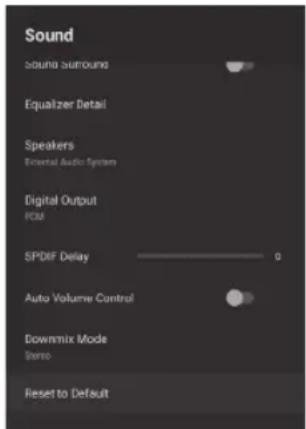
SOUND
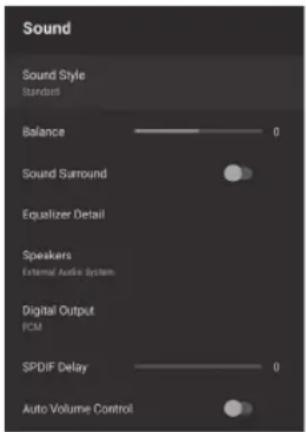
Sound style: Press ▲ / ▼button to select the option then press OK button to enter the sub-menu.
(Optional: user, Standard, Vivid, Sports, Movie, Music, News)
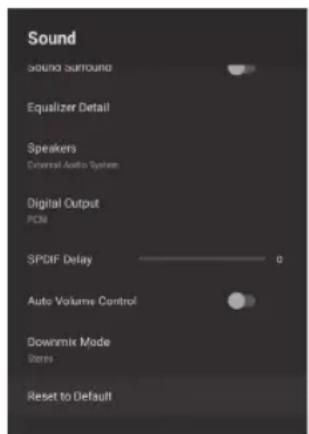
Balance/Bass/Treble: Press ▲ / ▼button to select the option.press to decrease the parameter.Press to increase the parameter.
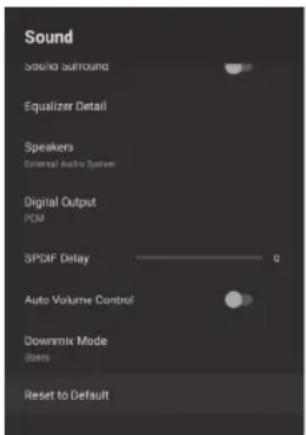
Sound Surround: Press ▲ / ▼button to select the option then press OK button to choose ON/OFF.
Equalizer Detail: Press ▲ /▼button to select the option then press OK button to enter the
MENU OPERATION
sub-menu.
Speakers: Press ▲ / ▼button to select the option then press OK button to enter the sub-menu.
(Optional: TV Speaker, External Audio System)
Digital Output: Press ▲ / ▼button to select the option then press OK button to enter the sub-menu.
(Optional: Auto,Bypass, PCM, Dolby Digital Plus, Dolby Digital)
SPDIF Delay: Press ▲ / ▼button to select the option. Press to decrease the parameter. Press to increase the parameter.
Auto Volume Control: Press ▲ / ▼button to select the option then press OK button to choose ON/OFF.
Downmix Mode: Press ▲ / ▼button to select the option then press OK button to enter the sub-menu.
(Optional: Stereo, Surround)
Reset to Default: Reset all settings to the factory defaults.
STORAGE
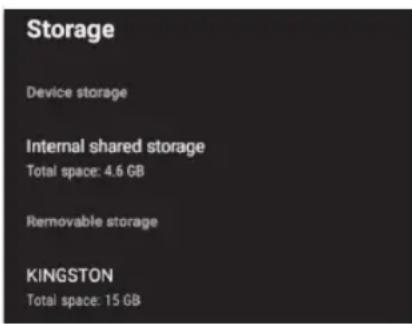
Internal shared storage: Press ▲ / ▼button to select the option then press OK button to enter the sub-menu.
Removeable Storage: Press ▲ / ▼button to select the option then press OK button to enter the sub-menu.(Note:Show external devices if available)
HOME SCREEN
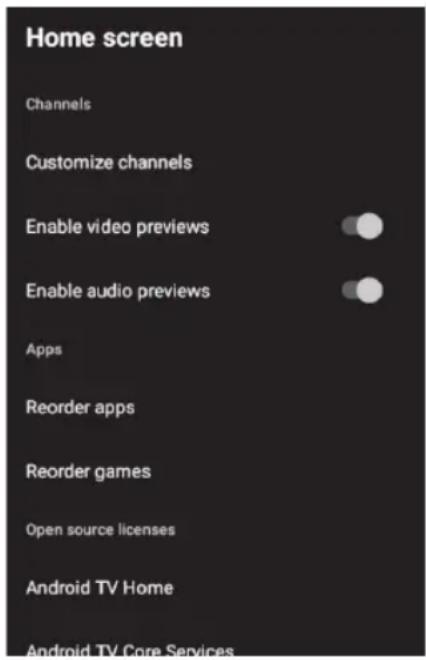
In this menu, you can set channels, apps, open source licenses.
- Press ▲ / ▼button to select what you want set.
- Press OK button to adjust.
- After finishing your adjustment, Press BACK button return to the previous menu.
RETAIL MODE
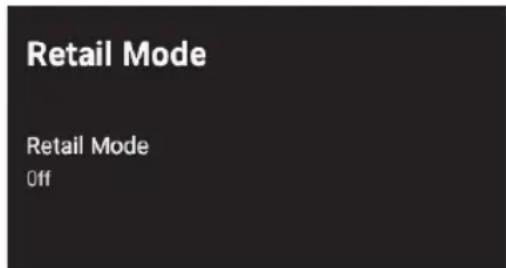
Retail mode: Press ▲ / ▼button to select the option then press OK button to choose ON/OFF.
MENU OPERATION
GOOGLE
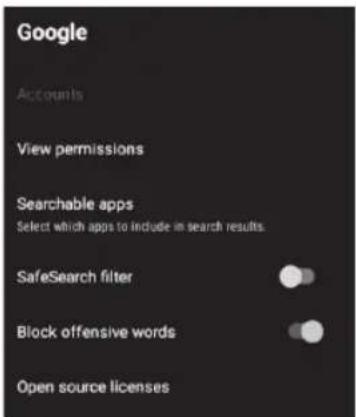
In this menu, you can set searchable apps, safe search filter, block offensive words, open source licenses.
- Press ▲ / ▼button to select what you want set.
- Press ok button to adjust.
- After finishing your adjustment, Press BACK button return to the previous menu.
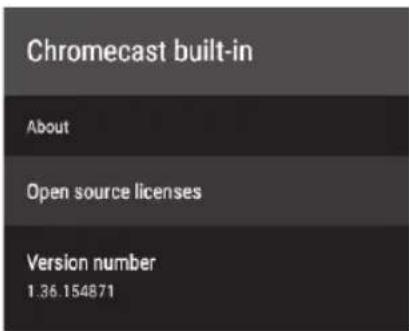
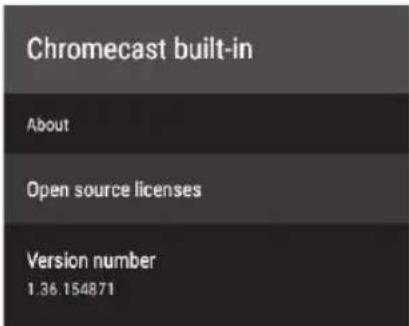
CHROMECAST BUILT-IN
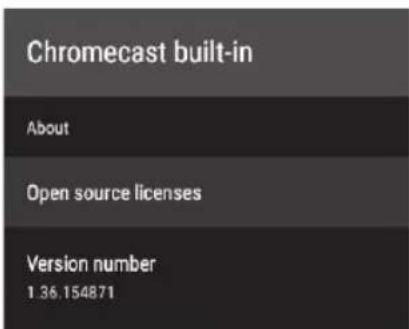
In this menu, you can read the information and settings of Chromecast.
- Press ▲ /▼button to select what you want set.
- Press ok button to adjust.
- After finishing your adjustment, Press BACK button return to the previous menu.
SCREEN SAVER
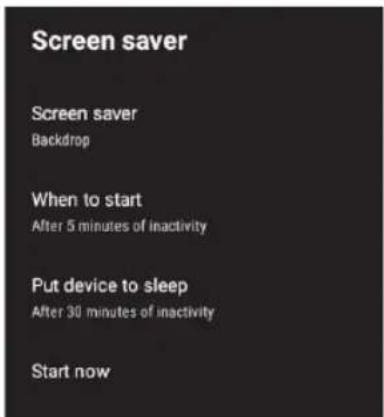
Screen saver: Press ▲ / ▼outton to select the option then press OK button to enter the sub-menu.
(Optional: Turn screen off, Backdrop, Colors).
When to Start: Press ▲ / ▼ button to select the option then press OK button to enter the sub-menu.
(Optional: 5 minutes, 15 minutes, 30 minutes, 1 hour, 2 hours).
Put device to sleep: Press ▲ / ▼button to select the option then press OK button to enter the sub-menu.
(Optional: 30 minutes, 1 hour, 3 hours, 6 hours, 12 hours, Never).
Start now: Press ▲ / ▼ button to select the option then press OK button to enter screen saver.
LOCATION
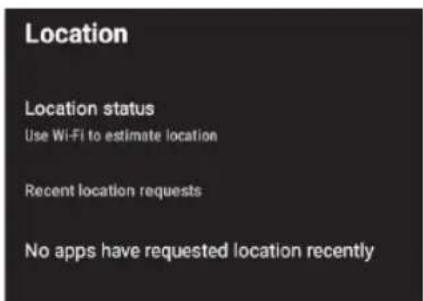
Location status: Press ▲ / ▼button to select the option then press OK button to enter the sub-menu.
(Optional:Use Wi-Fi to estimate location, Off).
MENU OPERATION
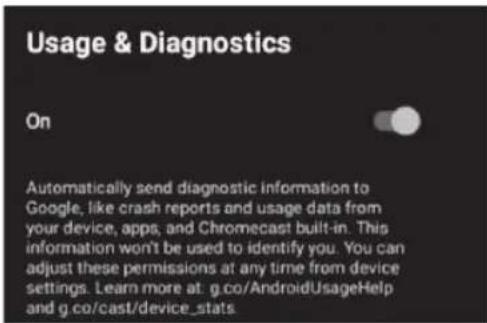
Usage & diagnostics: Press ▲/ ▼utton to select the option then press OK button to choose ON/OFF.
ACCESSIBILITY
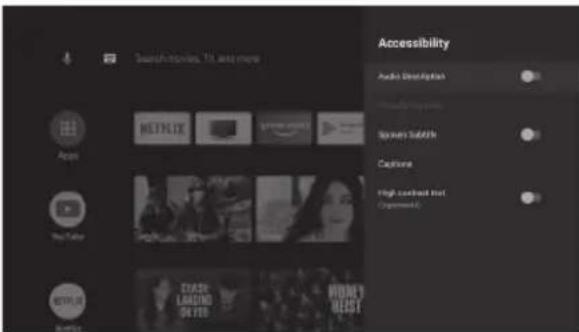
Audio Description: Press ▲ / ▼button to select the option then press OK button to choose ON/OFF.
Visually Impaired: Press ▲ / ▼button to select the option then press OK button to enter the sub-menu.
Spoken Subtitle: Press ▲ / ▼button to select the option then press OK button to choose ON/OFF.
Captions: Press ▲ / ▼button to select the option then press OK button to enter the sub-menu.
High contrast text: Press ▲ / ▼button to select the option then press OK button to choose ON/OFF.
RESET
Press OK button to enter the sub-menu. Reset-Erase everything.
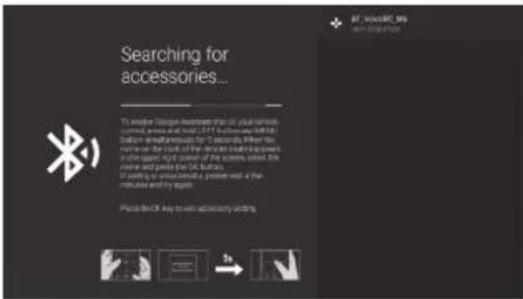
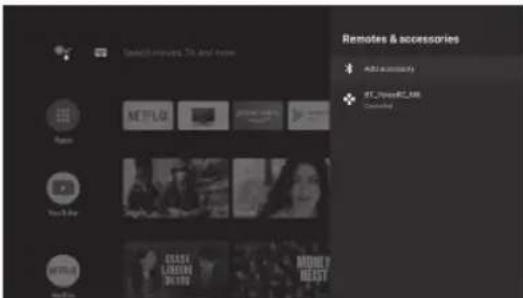
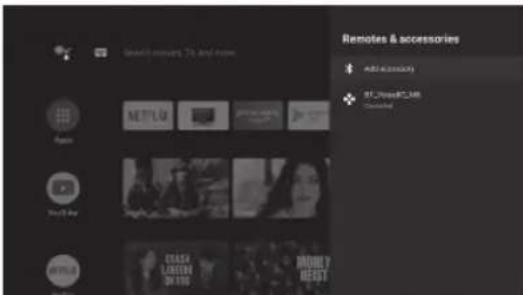
REMOTE & ACCESSORIES
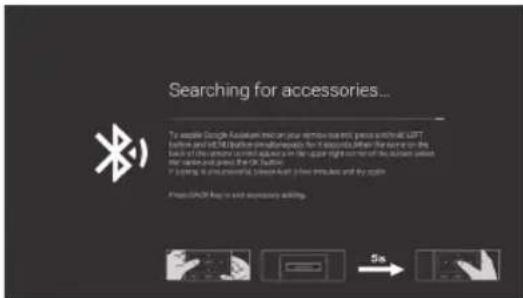
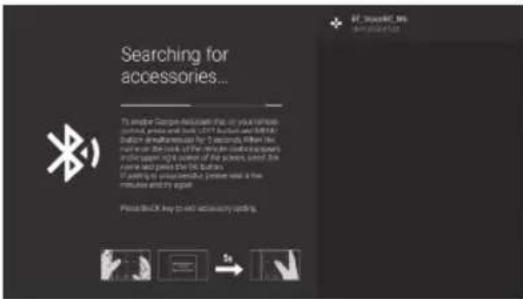
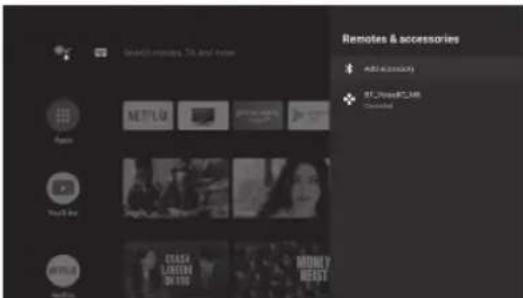
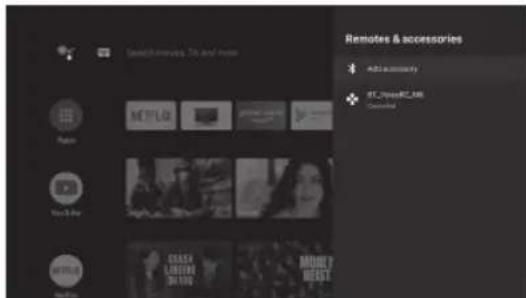
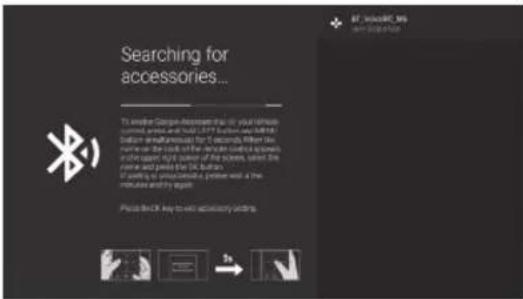
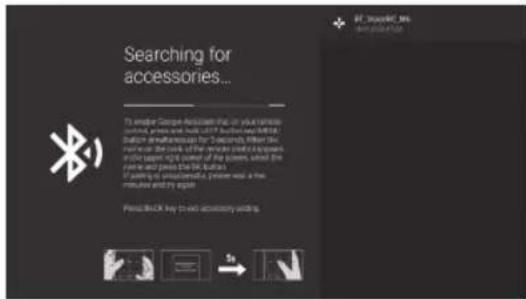
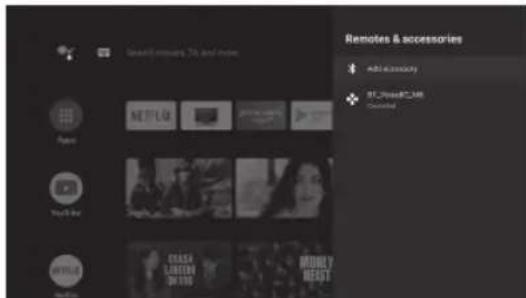
In this menu, you can pair Bluetooth devices.
- Press the "MENU" and "LEFT" buttons at the bottom of the remote control for 5 seconds.
- When the LED starts to flash, release it. The remote controller will send the pairing signal to the TV and display the information of the remote control on the right side of the screen.
- Press the OK button to display the pairing. If the paired is displayed, the connection is successful.
- If the couldn't pair appears, the connection fails. Wait 30 seconds and then press the "MENU" and "LEFT" buttons at the bottom of the remote control for 5 seconds to repeat the previous steps.
- Press BACK button return to the previous menu.

MENU OPERATION
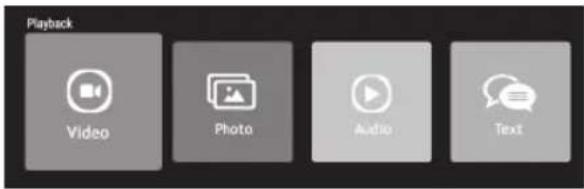
MULTIMEDIA PLAYER
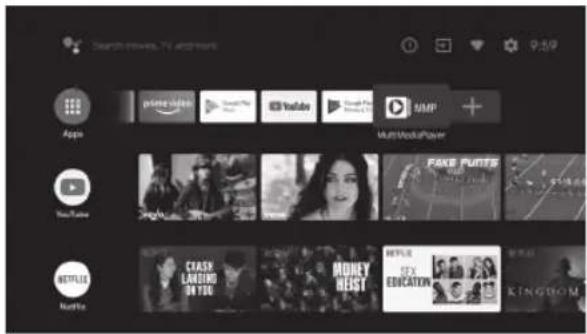
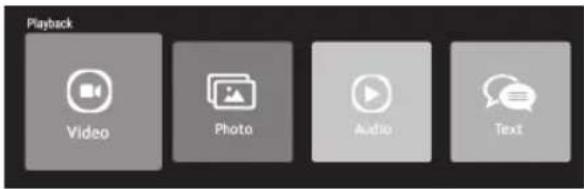
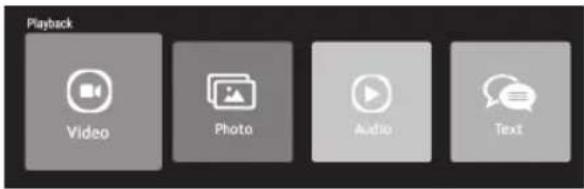
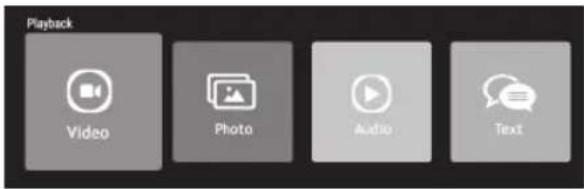
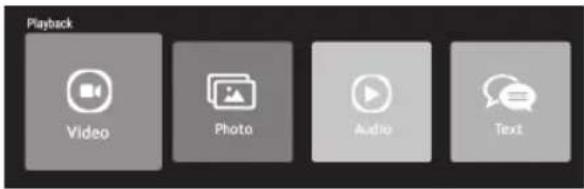
In the HOME interface, select the MMP APP to display Video, Photo, Audio, Text. After inserting the USB flash drive, you can view the corresponding files in the USB flash drive.
NOTE:
The menu may be different depending on when you purchased the TV.
SAFETY INSTRUCTIONS
MAINTENANCE
Early breakdowns can be avoided. Careful and regular cleaning can extend the amount of time your new TV will have. Be sure to turn off and unplug the power cord before beginning any cleaning.
Cleaning the screen
- It is a good way to clean the dust off your screen for a while. Dampen a soft cloth in a mixture of warm water and a little fabric softener or dish detergent. Dry the cloth until it is almost dry, and then use it to clean the screen.
- Make sure there is no excess water on the screen, and then allow it to air dry before turning on the TV.
Cabin cleaning
To remove dirt or dust, wipe the cabinet with a soft, dry, lint-free cloth. Please make sure not to use a damp cloth.
Prolonged absence

If you want the TV to remain idle for an extended period (for example, during holidays), it is best to disconnect the power source and the antenna to avoid possible damage from lightning or electric shock.
Disposal of old electrical appliances
The European Directive 2002/96 / EC on Waste from Electrical and Electronic Equipment (WEEE) requires that old household electrical appliances are not disposed of in the normal flow of unsorted municipal waste. Old appliances must be collected separately to optimize the impact on human health and the environment.
The crossed out "wheel tray" symbol on the product reminds you of your obligation, that when you dispose of the appliance, it must be collected separately. Consumers should contact local governments or retailers for information on the proper treatment of used electrical appliances.

HIGH-DEFINITION MULTIMEDIA INTERFACE
HIGH DEFINITION MULTIMEDIA INTERFACE
The terms HDMI and HDMI High Definition Multimedia Interface, and the HDMI logo are trademarks or registered trademarks of HDMI Licensing Administrator, Inc. in the United States and other countries.
TROUBLESHOOTING GUIDE
Before contacting the maintenance technician, make the following brief inspection. If the problem persists, unplug the TV and call for service
| PROBLEMA SOLUCIÓN DE PROBLEMA | |
| No sound or image - Check if the main plug is connected to an outlet.- Check if you have pressed the POWER button on the TV.- Check the contrast and brightness adjustment of the image. | |
| Normal picture, but no sound | - Check the volume.- Does it sound muted? Press the MUTE button.- Try another channel, the problem may be in the broadcast.- Is the audio cable installed correctly? |
| The remote control does not work | - Check if there is any object that causes a barrier between the product and the remote control.- Are the batteries installed with the correct polarity (+ to +, - to -)?- Has the correct remote operating mode been set: TV, VCR, etc.?- Install new batteries. |
| Sudden blackout - Is the sleep timer set?- Check the power control settings. Interrupted energy.- There is no transmission in the station tuned with automatic activation. | |
| The image appears slowly after turning on | - This is normal, the image is muted during the product startup process. Please contact your service center if the image has not appeared after five minutes. |
| Poor color or poor image - Adjust the color in the menu option.- Maintain a sufficient distance between the product and the VCR.- Try another channel, the problem may be in the broadcast.- Is the video cable installed correctly?- Activate any function to restore image brightness. | |
| Horizontal / vertical bars or image shake | - Check for local interference, such as an electrical appliance or a power tool. |
| Poor reception on some channels | - Problems with radio or cable television products. Change to another station.- The station signal is weak, redirect the antenna to receive the weakest station.- Check for sources of possible interference. |
| Lines or streaks in images - Check the antenna (Change the direction of the antenna). | |
| There is no output from one of the speakers | - Adjust the balance in the menu option. |
Policy on defective pixels
Due to the complexity of the technology used in the manufacture of LCD, TFT and LED screens, it is possible that some of the pixels that make up the screen may be defective. While it is desirable for all the pixels to function correctly, this is not always possible from a production perspective. For this reason, Ersax Trade S.L certi es that its LED TV products meet the criteria of admissible defect described herein and certi es that its LED TV screens are class A.
| Defective pixels 19"-20"-22"-24" 29"-32" 39"-40" 46"-50"-55" | ||||
| Bright pixel (max.) 4 4 4 4 | ||||
| Dark pixel (max.) 8 9 14 16 | ||||
| Maximum permitted sum of pixels 5 7 12 12 | ||||
| Double adjacent pixels (max.) | 1 | 1 | 1 | 1 |
If an LED TV screen has dark or bright pixels, this is only considered to be a fault by Ersax Trade S.L when the ranges established herein for an LED panel to be considered defective are exceeded, thereby allowing Ersax Trade S.L to manage the replacement or warranty of the panel due to a product non-conformance. As a rule and except for limited exceptions, Ersax Trade S.L considered an LED TV product to be faulty when it has a considerable number of permanently bright or dark pixels. As a reference, an LCD/LED panel has more than 1 million pixels and a single defective pixel is therefore not considered to constitute a lack of conformance and cannot be catalogued as a fault, as this circumstance will not act the correct functioning of the product.
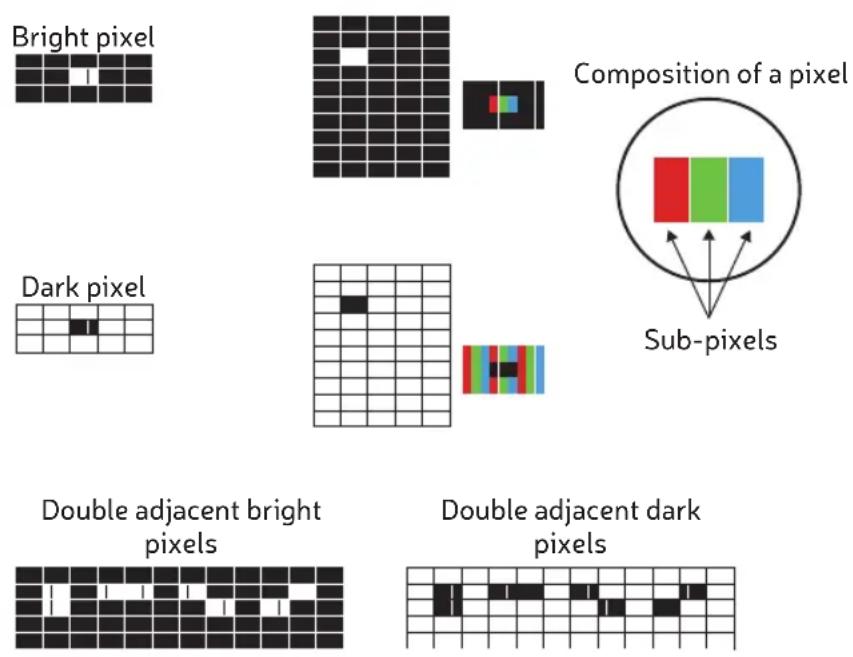
Therefore, if an LED screen meets the above criteria, it cannot be changed or repaired as this is not considered to be a lack of product conformance and cannot be catalogues as a defect or fault.
androidtv
TV LED
natural_image
Front view of a modern flat-screen TV with black bezel and stand (no visible text or symbols)PORTUGUÊS
CONTEÚDO
natural_image
Cartoon illustration of a smiling computer monitor holding a book and a document (no text or symbols present)natural_image
Cartoon illustration of a computer monitor with hands holding a document, surrounded by a money bag and a falling dollar sign (no text or symbols)natural_image
Illustration of a smiling man presenting to a computer monitor with a power cord (no text or symbols)natural_image
Cartoon illustration of a computer monitor with a sad face and crushing expression, surrounded by steam from above (no text or symbols)natural_image
Cartoon illustration of a computer monitor with a sad face and two hands, accompanied by a printer (no text or symbols present)natural_image
Cartoon illustration of a computer monitor with an angry face and electrical plugging (no text or symbols)natural_image
Symbolic icon of a person climbing a ladder inside a circle (no text or symbols)INSTRUÇÕES IMPORTANTES DE SEGURANÇA
natural_image
Cartoon illustration of a smiling computer monitor with hands and electrical components, no text or symbols presentnatural_image
Illustration of a smiling computer monitor and a worker with a toolbox, both pointing at it (no text or symbols present)
SOBRE A ELIMINAÇÃO
Fixação do suporte
natural_image
Technical line drawing of a server rack with front and side views, showing internal components and directional arrows (no text or symbols)PAINEL FRONTAL E TRASERO
CANAL
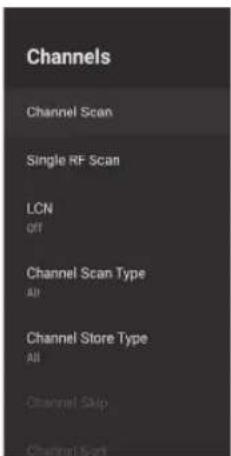
3) A varredura de canal entra diretamente na interface da plataforma de pesquisa automática ATV+ DTV da antena.

bar
Picture | Picture Mode | Value | |---|---| | Backlight | 100 | | Brightness | 90 | | Contrast | 50 | | Saturation | 50 | | HUE | 0 | | Sharpness | 12 | | Gamma Viddle | |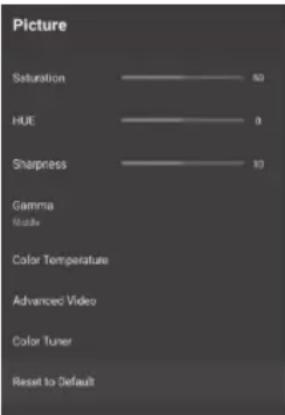
Distributor & manufacturer authorized representative:
Hereby, ERSAX TRADE, S.L. declares that these equipments are in compliance with the essential requirements and other relevant provisions of Directives 2014/53/EU (RED), 2009/125/EC (ERP)
With the standard or other normative documents:
EMC:
ETSI EN 301 489-1 V2.2.0 (2017-03)
ETSI EN 301 489-3 V2.1.1 (2017-03)
ETSI EN 301 489-17 V3.2.0 (2017-03)
EN 55032: 2015
EN 55035: 2017
EN 61000-3-2: 2014,
EN 61000-3-3: 2013
ERP:
EN 50564: 2011 + IEC 62087 Ed.2 + 642/2009/EC
RADIO:
ETSI EN 300 328 V2.1.1 (2016-11)
ETSI EN 300 440 V2.1.1 (2017-03)
ETSI EN 301 893 V2.1.1 (2017-05)
ETSI EN 303 340 V1.1.2 (2016-09)
Health:
EN 62311:2008
EN 62479: 2010
Safety:
EN 60065: 2014+A11: 2017
GB Note on environmental protection:
After the implementation of the European Directive 2002/96/EU in the national legal system, the following applies: Electrical and electronic devices may not be disposed of with domestic waste. Consumers are obliged by law to return electrical and electronic devices at the end of their service lives to the public collecting points set up for this purpose or point of sale. Details to this are defined by the national law of the respective country. This symbol on the product, the instruction manual or the package indicates that a product is subject to these regulations. By recycling, reusing the materials or other forms of utilising old devices, you are making an important contribution to protecting our environment.
- androidtv
- CONTENIDOS
- PANEL FRONTAL Y TRASERO
- SOMMAIRE
- AVERTISSEMENT
- INFORMATIONS RÉGLEMENTAIRES
- LORS DE L'ÉLIMINATION
- DIAGRAMME DE PANNEAU AVANT ET ARRIÈRE
- CONTENUTO
- AVVERTIMENTO
- SU SMALTIMENTO
- SCHEMA DEL PANNELLO ANTERIORE / POSTERIORE
- CONTENT
- WARNING
- REGULATORY INFORMATION
- CAUTION
- SAFETY INSTRUCTIONS
- IMPORTANT INFORMATION
- IMPORTANT SAFETY INSTRUCTIONS
- ON DISPOSAL
- NOTE
- FIXING THE STAND
- ¡Important!
- Wall mount installation
- Attaching the stand
- FRONT AND REAR PANEL
- GETTING STARTED
- Using the remote control
- Installing batteries in the remote control
- Battery replacement
- Notes on Battery Use:
- CONNECTION AND SET UP
- CABLE INSTALLATION
- QUICK START GUIDE
- REMOTE CONTROL
- LED
- Microphone
- STANDBY Button
- Input Button
- NUMBER Buttons
- GUIDE Button
- CHANNEL BACK Button
- GOOGLE PLAY button
- YOUTUBE button
- NETFLIX Button
- PRIME VIDEO Button
- HOME Button
- MENU Button
- OK and NAVIGATION
- BACK Button
- EXIT Button
- VOLUME +/- Buttons
- CHANNEL +/- Buttons
- GOOGLE ASSISTANT Button
- INFORMATION Button
- MUTE Button
- SETTING BUTTON
- REWIND - PAUSE - FAST FORWARD - RECORD - PLAY - STOP Buttons
- TEXT Button
- ASPECT button
- LANGUAGE Button
- SUBTITLE Button
- COLOURED Buttons
- BASIC OPERATION
- Turning the TV on and off
- - Turn on the TV
- - Turn off the TV
- - No signal
- Program selection
- Adjusting the volume
- Changing the input source
- MENU OPERATION
- INITIAL SETUP
- HOME SCREEN
- INPUT SOURCE
- NAVIGATING THE ON-SCREEN MENU
- NETWORK & INTERNET
- CHANNEL
- Auto Channel Update
- DEVICE PREFERENCES
- ABOUT
- DATE & TIME
- TIMER:
- LANGUAGE:
- KEYBOARD
- INPUTS
- POWER
- STORAGE
- RETAIL MODE
- RESET
- MULTIMEDIA PLAYER
- MAINTENANCE
- Cleaning the screen
- Cabin cleaning
- Prolonged absence
- Disposal of old electrical appliances
- HIGH DEFINITION MULTIMEDIA INTERFACE
- TROUBLESHOOTING GUIDE
- Policy on defective pixels
- CONTEÚDO
- INSTRUÇÕES IMPORTANTES DE SEGURANÇA
- SOBRE A ELIMINAÇÃO
- Fixação do suporte
- PAINEL FRONTAL E TRASERO
- GB Note on environmental protection:
Brand : Engel
Model : LE 4390 ATV
Category : Television