A200 - Car surveillance camera 70mai - Free user manual and instructions
Find the device manual for free A200 70mai in PDF.
User questions about A200 70mai
0 question about this device. Answer the ones you know or ask your own.
Ask a new question about this device
Download the instructions for your Car surveillance camera in PDF format for free! Find your manual A200 - 70mai and take your electronic device back in hand. On this page are published all the documents necessary for the use of your device. A200 by 70mai.
USER MANUAL A200 70mai
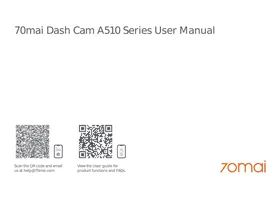
70mai Dash Cam A200 Series User Manual
Scan the QR code and email us at help@70mai.com

View the User guide for product functions and FAQs.
zomai
Contents
English 01
Espanol 09
Deutsch 15
Francais. 22
Italiano 29
Pycckn 36
Portugues 43
Polski 49
Magyar. 55
UkpaHcckn 61
Čeština 67
Romana 73
日本語 79
85
Tieng Viet 90
mynnu 96
Bahasa Indonesia. 102
Filipino 108
繁體中文 114
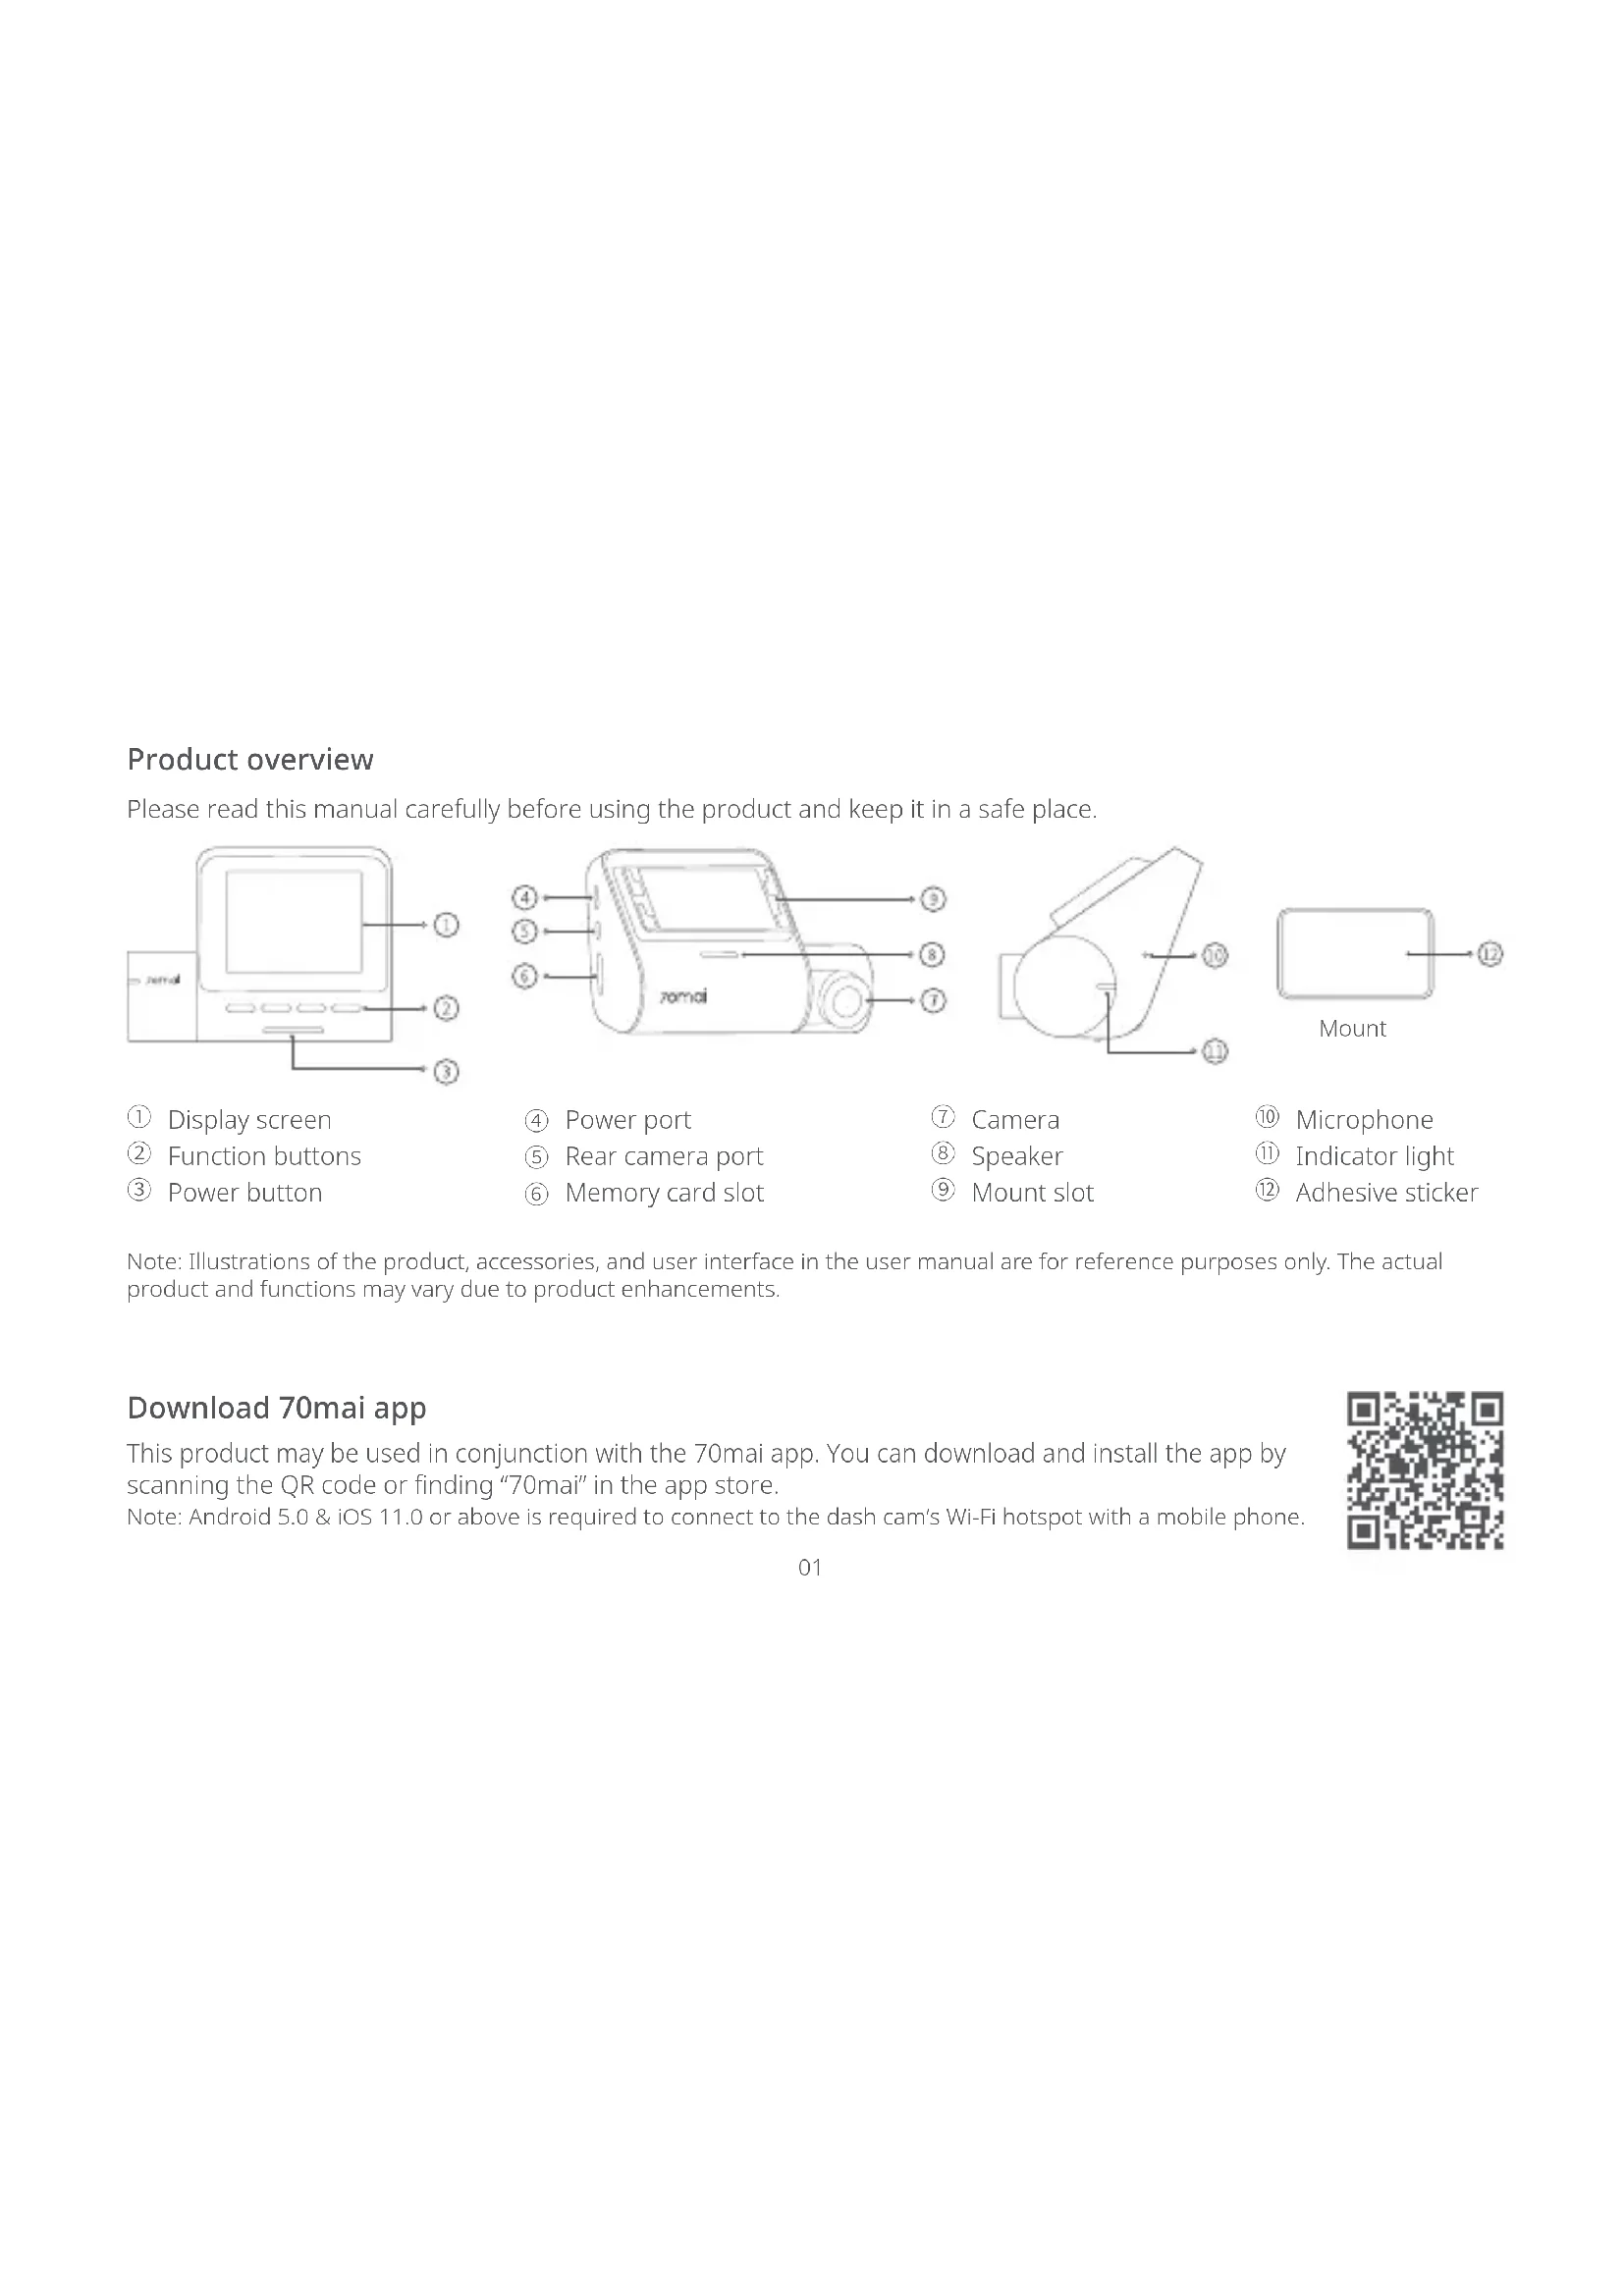
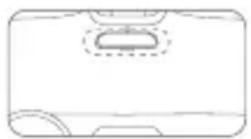
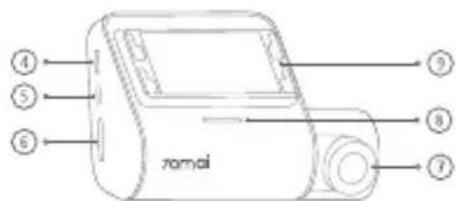
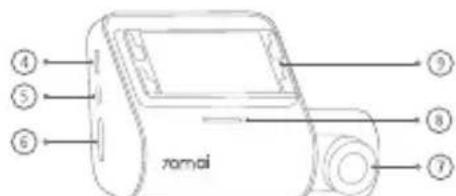
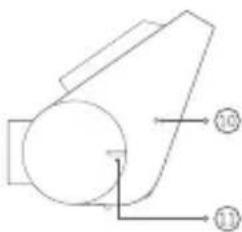
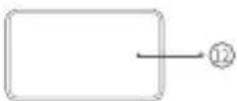
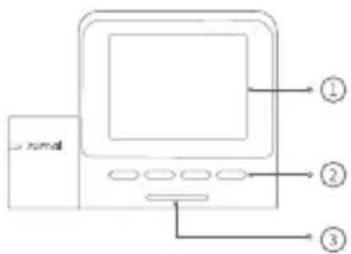
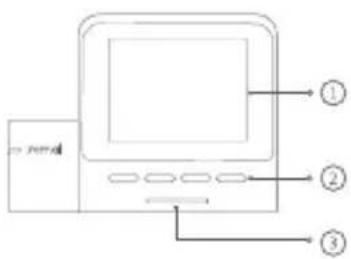
Product overview
Please read this manual carefully before using the product and keep it in a safe place.
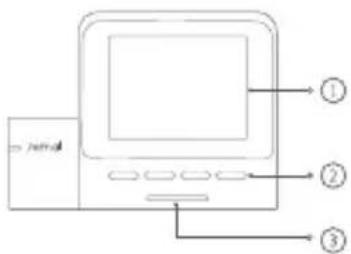
① Display screen
② Function buttons
③ Power button
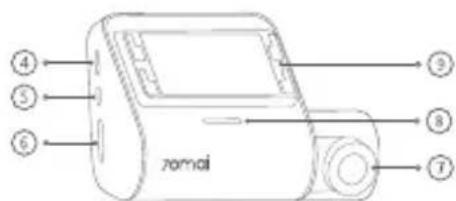
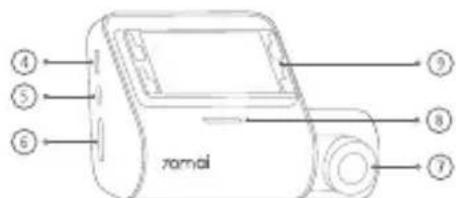
④ Power port
⑤ Rear camera port
⑥ Memory card slot
⑦ Camera
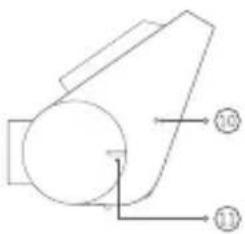
Speaker
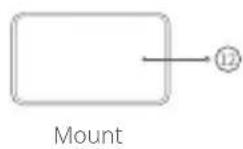
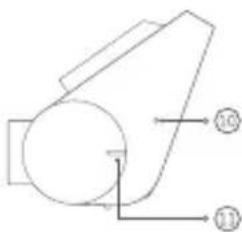
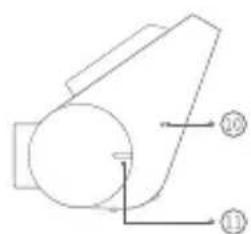
⑨ Mount slot
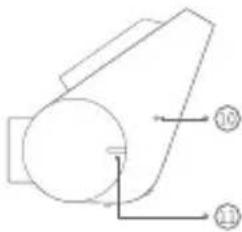
Microphone
Indicator light
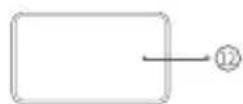
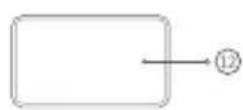
12 Adhesive sticker
Note: Illustrations of the product, accessories, and user interface in the user manual are for reference purposes only. The actual product and functions may vary due to product enhancements.
Download 70maiapp
This product may be used in conjunction with the 70mai app. You can download and install the app by scanning the QR code or finding "70mai" in the app store.
Note: Android 5.0 & iOS 11.0 or above is required to connect to the dash cam's Wi-Fi hotspot with a mobile phone.

Package contents
If you purchased the dash cam only, check the following items in the package:
- Dash Cam × 1
- Mount × 1
- Power cord × 1
- Car charger × 1
- Electrostatic sticker × 2
- Adhesive sticker × 1
- Wiring trim tool × 1
- User manual × 1
If you purchased the Dash Cam Set, check the following items in the package:
- Dash Cam × 1
- Mount × 1
- Power cord × 1
- Car charger × 1
- Electrostatic sticker × 2
- Adhesive sticker × 1
- Wiring trim tool × 1
-
User manual × 1
-
Rear camera package* × 1
-
This package contains the rear camera (integrated with lead
wire), signal wire and other accessories for the rear camera. For more information, please refer to the rear camera user manual.
Installation
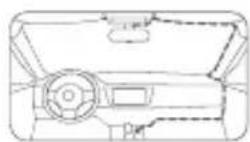
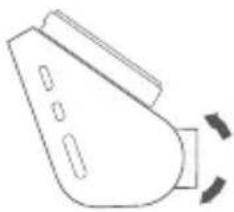
1. Installing the electrostatic sticker
Paste the electrostatic sticker on the recommended area on the front windshield. Press the sticker to remove air bubbles out.
Avoid the edge of the windshield and select the flat and smooth area for the installation.
Note: Keep the windshield clean and dry without liquid residue to prevent the sticker from losing adhesion and dash cam from dropping.
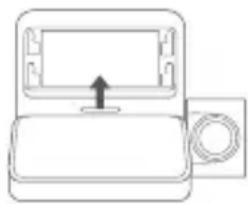
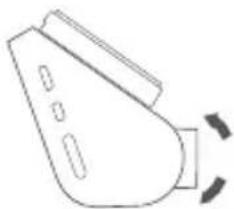
2. Installing the mount
Attach the mount to the mount slot and slide up.
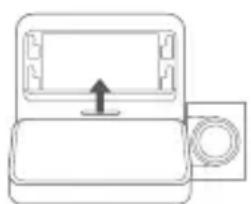
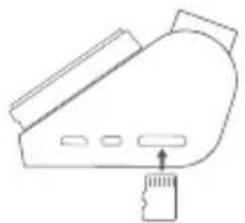
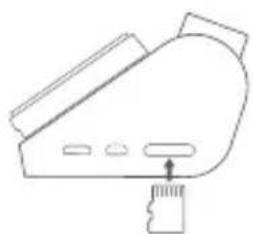
- Installing the memory card Insert the memory card into the slot.
- Mounting the dash cam Paste the dash cam onto the electrostatic sticker.

- Routing cable Route the power cord to the vehicle's power outlet and connect to power.

Start the car engine, and the dash cam will automatically turn on.
Note: Depending on the vehicle, the power outlet may be located in a different position. The provided figure is for reference only.
- Adjusting the camera angle Adjust the camera angle based on the image presented on the main screen when dash cam is turned on.
Accessories (optional)
The rear recording function of this product needs to be used with a rear camera. Scan the QR code to obtain the user guide for the rear camera.

Note: To avoid the rear camera malfunction due to device incompatibility, it is recommended to use a rear camera from the 70mai brand.
Specifications
Product: Dash Cam
Model: A200, A200-1, A200-2
Input: 5V = 2A
Battery capacity: 500mAh
Resolution: 1920× 1080
Lens: FOV 130^ / F2.0
Battery type: Li-ion battery
Power supply: Car cigarette lighter
Wireless connectivity: Wi-Fi IEEE 802.11 b/g/n 2.4GHz
Wi-Fi operation frequency: 2400-2483.5MHz
Wi-Fi maximum output: < 20dBm
Memory card instructions
-
A memory card (sold separately) must be installed in the dash cam before use.
-
The dash cam supports standard microSD cards. Please use memory cards with capacity of 32GB ~ 128GB and rating of class 10, U1 or higher.
-
The default file partition format of the memory card may be inconsistent with the format supported by the dash cam. When inserting the memory card for the first time, please format it in the dash cam before use. Formatting the memory card will delete all files on the card. Please back up important data to another device beforehand.
-
The memory card may become damaged or deteriorated after repeated cycles of overwriting, and this may affect its ability to save video and image files. If this occurs, immediately replace it with a new memory card.
-
Please use a high-quality memory card purchased from a reputable vendor. Inferior memory cards may have issues such as actual reading/writing speeds that do not match the stated speeds, and an actual storage capacity that does not match the stated storage capacity. We shall not be held liable for lost or damaged videos caused by the use of a low-quality memory card.
-
Do not insert or remove a memory card while the dash cam is turned on.
Precautions
Before using this dash cam, please read all the precautions and user guide to ensure correct and safe use.
This dash cam is a driving aid designed to record external images of the vehicle. And it does not have the function of ensuring the user's driving safety. Users must abide by local traffic rules and regulations and take driving safety as a priority consideration. Do not operate this product while driving.
- Due to differences in vehicle conditions, driving style, driving environment, and other factors, some functions may not work properly. A power failure, usage in environments outside the normal operating temperature or humidity range, a collision, or a damaged memory card may cause the dash cam to function abnormally. There is no guarantee that this dash cam will function normally under all circumstances. Videos recorded by this dash cam are for reference purposes only.
- Please install this dash cam correctly, and do not block the driver's line of sight, or block the vehicle's airbag, in order to avoid product failure or personal injury.
- If the front windshield where the dash cam is installed is covered with colored automotive film, it may affect the video recording quality or cause video distortion.
- Avoid collisions or forceful jolts to the dash cam, otherwise the product may malfunction. Keep this dash cam away from any strong magnetic fields.
- Never use chemical solvent or detergent to wash the dash cam.
- Do not use this dash cam in environments with temperatures over 60^ or below -10^ .
- When the dash cam has been operating for a period of time, the temperature of the outer casing will rise, please be careful when touching.
- Please only use this dash cam within the scope permitted by law.
- Please use the included car charger, power cord, and other accessories in order to avoid product failure due to non-conformance. We shall not be held liable for any loss or damage caused by the use of a non-genuine car charger or power cord.
If you use power adapter to charge the dash cam, only use the power adapters that comply with the local safety standards or certified and supplied by qualified manufacturers.
- The dash cam and its accessories may contain small parts. To avoid choking or other hazards or damages caused by the children, keep the dash cam out of the reach of children.
Regulatory compliance information
WEEE information

All products bearing this symbol are waste electrical and electronic equipment (WEEE as in directive 2012/19/EU) which should not be mixed with unsorted household waste. Instead, you should protect human health and the environment by handing over your waste equipment to a designated collection point for the recycling of waste electrical and electronic equipment, appointed by the government or local authorities. Correct disposal and recycling will help prevent potential negative consequences to the environment and human health. Please contact the installer or local authorities for more information about the location as well as terms and conditions of such collection points.
EU declaration of conformity

The manufacturer hereby, declares that this equipment is in compliance with the applicable Directives and European Norms, and amendments. The full text of the EU declaration of conformity is available at the following internet address: https://help.70mai.asia/1193.html

Hereby, 70mai Co., Ltd. declares that the radio equipment types A200, A200-1, A200-2 are in compliance with Radio Equipment Regulations 2017. The full text of the UKCA declaration of conformity is available at the following internet address: https://help.70mai.asia/2145.html
Cautions
- Disposal of a battery into fire or a hot oven, or mechanically crushing or cutting of a battery, that can result in an explosion.
- Leaving a battery in an extremely high temperature surrounding environment that can result in an explosion or the leakage of flammable liquid or gas.
- A battery subjected to extremely low air pressure that may result in an explosion or the leakage of flammable liquid or gas.
This device is equipped with a built-in battery that cannot be removed or replaced. Do not disassemble or modify the battery by yourself. - Replacement of a battery with an incorrect type can defeat a safeguard (for example, in the case of some lithium battery types).
FCC
15.19 Labelling requirements.
This device complies with part 15 of the FCC Rules. Operation is subject to the following two conditions: (1) This device may not cause harmful interference, and (2) this device must accept any interference received, including interference that may cause undesired operation.
15.21 Information to user.
Any Changes or modifications not expressly approved by the party responsible for compliance could void the user's authority to operate the equipment.
15.105 Information to the user.
Note: This equipment has been tested and found to comply with the limits for a Class B digital device, pursuant to part 15 of the FCC Rules. These limits are designed to provide reasonable protection against harmful interference in a residential installation. This equipment generates uses and can radiate radio frequency energy and, if not installed and used in accordance with the instructions, may cause harmful interference to radio communications. However, there is no guarantee that interference will not occur in a particular installation. If this equipment does cause harmful interference to radio or television reception, which can be determined by turning the equipment off and on, the user is encouraged to try to correct the interference by one or more of the following measures:
-Reorient or relocate the receiving antenna.
-Increase the separation between the equipment and receiver.
-Connect the equipment into an outlet on a circuit different from that to which the receiver is connected.
-Consult the dealer or an experienced radio/TV technician for help.
RF warning for Mobile device:
This equipment complies with FCC radiation exposure limits set forth for an uncontrolled environment. This equipment should be installed and operated with minimum distance 20cm between the radiator & your body.
FCC ID:2AOK9-A200
ISED compliance statement
This device contains licence-exempt transmitter(s)/receiver(s) that comply with Innovation, Science and Economic Development Canada's licence-exempt RSS(s). Operation is subject to the following two conditions:
ISED Radiation Exposure statement
This equipment complies with IC RSS-102 radiation exposure limits set forth for an uncontrolled environment. This equipment should be installed and operated with minimum distance 20cm between the radiator and your body.
For further information, please go to www.70mai.com
Manufacturer: 70mai Co., Ltd.
Address: Room 2220, Building 2, No. 588 Zixing Road, Minhang District, Shanghai, China
Resolution: 1920× 1080
Lente: FOV 130^ F2.0
Dirección: Room 2220, Building 2, No. 588 Zixing Road, Minhang District, Shanghai, China
Produktübersicht
Adresse: Room 2220, Building 2, No. 588 Zixing Road, Minhang District, Shanghai, China
Adresse: Room 2220, Building 2, No. 588 Zixing Road, Minhang District, Shanghai, China
Modello: A200, A200-1, A200-2
Ingresso: 5V-2A
Indirizzo: Room 2220, Building 2, n. 588 Zixing Road, Minhang District, Shanghai, China
0630p yctpoinCTBa
BHHMaTeIbHo npouHtae daHHoe pykoBOdCTBO nepei nCNoJIb3OBAHNem npOdykTa u XpaHnTe erO B HauJekHom MecTe.

① 3KpaHdncnpea
② ΦyHKLIOHajbHbIe KHOKN
③ KhoKa nTaHn
④ NopTəJIeKTpOuNTaHnI
⑤ NopT KaMepbI 3aHero BnDa
⑥ CnotДлЯ KapТы пamгTN
⑦ Kamepa
⑧ДИНHAmUK
⑨ CNOT JIIMOHTaKa

Kpelenne
10 MKNPOOH
11 HdkaTOp
12 HakneiKa
IpmeHne.306paXeHn npOyKta, akceccyapOB n noJIb3oBaTeNbCKOro INHTepoeCa B pyKOBOCTBe NOJIb3oBaTeJI npBedeHbToJIbKO dIg cnpaBKn. FakTnueckn BHeuHn BUD yCTpoiCTBa n erO fYHKm MOrT OTInuATbcB a peZyIbTaTe BHeceHn N3MeHeHn B yCTpoiCTBO.
3arpyka npniloxeHn70mai
JaHHoe yctpoCTBO MOxet NcNoJIb3OBAtbcra C npJIoXeHnem 70mai. Bbl moXeTe 3aIpy3ntb nIIyCTaHOBHTb npJIoXeHne,OTcKaHnpOBab QR-KoD nII BBIOJIHB NOIck "70mai" B MaIa3NIHe npJIoXeHn.
PnmeHne. Iy noKIOueHn BIneoperncpTaOpa K TouKe Doctyna Wi-Fi c nomoubmo6nbHoro TenefoHa tpe6yeTc Android 5.0 n iOS 11.0 nn Bville.

KoMnJIeKToaUra
EcnBbI npno6peNToJbKO BnDeopenctpaTOp, npOBepTe KOMnKeTaunHO:
- BundeoperncpaTop, 1 wT.
2.KpePHeHne,1T. - Ka6eJIb nITaHnI, 1 wT.
4.3apndHoe aBTOMo6nIbHoe yctpoCTBO,1 wT. - Εληκτροειατηνεκκαγ ḀκληκηΚα, 2 υτ.
- HakneiKa, 1 wT.
- JOMUK,1 WJT.
- RykoBoDcTBO noJIb3OBATeIa, 1 wT.
EcnBb npno6peN KOMnIeKT BnDeopeRncTaTopa, npOBepbTe KOMnIeKTAuH:
- BnueoperncpaTOp, 1 wT.
2.KpePHeHne,1 wT. - Ka6eJIb nITaHnI, 1 wT.
4.3apdHoe aBTOMo6nIbHoe yCTpoiCTBO,1 1tT. - ΘηεκτροσταΤηχεκλη Ḁκληίκα, 2 χιτ.
- HakneiKa, 1 wT.
- JOMUK,1 WJ.
- RykoBoDcTBo NOJIb3OBaTeTn, 1 wT.
- Komnlekt KaMepbI 3aHero Bua*, 1 wT.
- 3TOT KOMПЛЕКТ COДЕРЖNT KAMepу Зднero BИда (СВЕДУЦМ
npoBOIOB),CnHaJIbHyIPOBoDkyIpyrYeakCEccyapbl
Jra 3aJHeKamepbl.ДЯ NOlyueHINdoNoIHHTeJIbHO
HHOpMaCm.PyKOBoCTBO NoIb3OBaTeJI KaMepbl 3aJHeRo
BnJa.
YCTaHOBka
1.HaklenBaHne 3JIeKtpoCTaTnueckoHakLeiKu
YcTaHOBnTe 3NeKtPoCTaTmueckyHnHaKJIeNky B peKOMeHdyEmyH

06naCTb Ha lo6OBom CTeKne. PnIXMnte HaKneKy, UTO6bl ydaIHTb n3 Hee ny3bIPn BO3dyxa.
I36eraTe Kpa JIO6OBOrO CTeKla N BbI6npaTte NIOCKyU n rAkyo oBacty yCTaHOBKn.
PpmeaHne. PndepkNBAte YnCTOty IIO6OBOrcTeKna Hn He DonyckaTte NonaHaHa Hero BoBbl, Yo6bl HaKeIka He OTCIoNNacb N BuDeoperncTpapOp He ypa..
2.YctaHOBKa KpeIeHnA
YcTaHOBnTe KpeIeHne B CLOTdJI KpeIeHnNcDINbTe BBepx.
3.YctaHOBKa KapTbI namrtn YcTaHOBtE KapTy namrtn B CLOT

4.Kpenenne BndeopernctpaTopa
YcTaHOBtBe BnDeOpErNCtpaTop Ha 3JIeKTpOcTaTnueckyTo HaKnEynKy.

5. Ppokka Ka6eJia
PpOraHnTe Ka6eNb PtHaHnK rHe3dy PtHaHn aBTOMo6nJI N POnkIIOuHTe nITaHne.
3aynctte Dvuratel; BndeopernctpaTOp BKHouHTcA BtOMaTHueckn.
PpmeaHHe. B 3aBnCmOCTOn OT aBTOM6nIg rHe3do nITaHnMooKeT 6bItb paCnIOxKeHO B pa3HbIX MeCTax. PncyHokPpNBedeH TOnkO dJa CnpaBKn.
6. Perynnpobka yrna kamepbbl
Otperynpyte yrol kamepbi Ha oCHOBE n3o6paKeHnHa rIaBHOM ekpaHe npB KJIuoyeHHOM BnDeopErNCtpaTope.

Akeccyapbl (oonHnTeNbHO)
C KaMepo3aHrero BVda Tpe6yeTc
NCIOJIb3OBaTb yHKUHO 3aIncn 3aHrero
BndaHHOYCTPOINCTBa.OTCKAHpyTe
QR-KoD,HTO6bl NOLyHtB pyKOBOCTBO
NoIb3OBaTeJlKamepb3aHrero BVda.
PpIMeHaHne.BOn36ExaHne HeuCnpabHocTu

XapaKTepeNCTnKn
Пpoукт: Dash Cam (BndeopernctpaTop)
MoeB:A200,A200-1,A200-2
BxOa:5B=2A
EMKoCTb aKKyMyJITOpa:500MAu
Pazpeшени: 1920 × 1080
06bektub:FOV 130^ / F2.0
TnAkkymyIaTopa: NHTN-NOHHaAkkymyIaTopHa8 6atape
IcToHnK nTaNHa: aBtOMo6nJIbHbI npNKypBaTeJIb
BecnpoBoDna CBa3b:Wi-Fi IEEE 802.11 b/g/n 2,4 Ff
Pa6oua yactota Wi-Fi 2400-2483,5 Mf
MaKcMmaJIbHaB BbIXOHaH MaUcHoCTb Wi-Fi: <20 dM
UkaaHnno pa6Ote c KapToi namrT
Kapty namrtn (npoetacra OTeJIbHo) yctaHaBnBaHT B BuDeoperntpaTOp HEnocpeCTBeHNO nepeN CNoJIb3OBAHnEM.
BndeoperncpaTOp NOdepKnaeT CTaHapThbIe KapTbimicroSD, IVcnoJIb3yInTe KapTb INaMrtu eMKocTbIO 32 5\~128F6 n KnaCom 10, U1 nn BBiWe.
-ФаиLOвьнфОрмат pa3ДeЯ NOуMOLHан Ho KapTe NaМТIMMOKET 6bITb HECOBMEcTUM CфОрмATOM, NODePJKBaEMbIM BnDEOpeRrCTpaTOpOM.Пру yCTaHOBKe KapTbI NaMrtN BпeВьn pa3 OфОрмAtHyTe ee B BnDEOpeRrCTpaTope NepeД nCNoJb3OBAHnEM. ФОрмТИрОВанe KapTbI NaMrtN yHnTOxHT BCE aAJIbI Ha KapTe NaMrtN.ЗapAHee CdenaIte pe3epBHyO KOnHIO BaXhIx DaHHIx Ha dpyrom yCTpoIcTBe.
MHorokpaTbIe LKJIbI nepe3aNcM Moryr npBOnITb K NOBpeXDeHIO KapTb I NaMTu, YTO MOKeT NOBInrTa HcNoCo6HOCTb XpaHITb 0aJIb BnDEo Nn3O6paKeHN. B ATOM CnyHae HeMeDHeHNO yCTaHOBInTe HOByo KapTy NaMTN.
IcnoIb3yIte KapTy namrN BbcOKOro KauEcTBA, BblnyHcyHO ABTOPTeTHbIM IPOUN3BOOnTeJIem. Y kapT narnn TIOXORO KaueCTBa MoryT BO3HNKHyTB HeNOJIAKn, TaKne KaK fakTNueckar CKOpocBy tYeHn/3aHNCi, KOtopa He COOTBeTCTByET 3aBLeHHo, N fakTNueckar EMKOCTb XpaHnIIuHa, KOTOPa HE COOTBeTCTByET 3aBLeHHo. HaHa KOMnAHnHe Hecet OTBeTCTBeHHOCTn 3aYtePraHHbIe NIN NOBpeXDeHHbIe BNDeOMatepnaJIb IN-3-a NCNoJIb3OBaHn
HIN3KOKaHeCTBHeHHo KapTbI NaMRTN.
He BCTabIyTe H e ydaIyTe KapTy NaMByI npN BkNoHcHOM BnDeoperncTaTope.
Mepbippeoctopokxhoctn
IpeepncnoB3OBaHmEBnDeopereNCTpaTopo0HaKOMbTecbco BcEMM MepamnpedocToPOXHOCTnpykoBOdCTBaMn dna oBecepeHn npabInbHoN n 6eOanchoH eKnplyaTaun.
3ToT BnDeOpErNCtpaTop npEJaHa3HaueH dIy 3aIcN BuJeO cTuayBokpyr aBTOMo6nla. OH He npEJaHa3HaueH dIy oBeCneueHn 6e30NaChocTN pOBb30BaTeJI BO BpeM BoXJdHn. POnb30BaTeJI DoJXhbl cO6HdaTb MeCTHbIe npaBnla DopoxHO rBnKeHH n Iy oBeCneueHn 6e30NaChocTN Ha dOpore. He pONb3yITecb TmU yCTpOCTBOM BO BpeM dBNXeHHn.
I3-3a pa3nuiB KOHfrypaun ABTomO6nla, CTnle, yCIOBnX BoKDeHn I T. D. HeKOTOpbIe FyHKuIN MOrTy pa6oTaTb HePpABnIbHO.C60 NITAHNIA, INCNoB3OBAHne B YcIOBnX, BByIOAUX 3a PpeJebl HopMaIbHO pa6Oye TemNepaTypbl INI INaIa3OHa BIAJXHOCTn, YdApbl INI NOBpeXJDeHne KapTb I NaMRT MOrY TnpNBecTN K HePpABnIBHO pa6Ote BIndeoperncTpTopa. Het rapaHTn, UTO BIndeoperncTpTop 6yET HopMaIbHO FyHKUOnHpoBaTb PnI NIOb6x ObCTOReTbcTBax. BIndeopolnKn, 3aIncAHhHe 3TN M BNDEoperncTpTopOM, npEHa3HaueHb ToIbKO dIra CnpaBKn.
- UctaHOte BndeOpertncTpaTOp npabInbHo n He 6JIOKpyTe nOle 3peHn BOAnTeJI nn noDyUky 6e3OnacHocTn ABToMo6NJ, UTO6bI N36ExaT TpaBM n C6oEB Ba6oTe npOdykTa.
EepeedHee I60Boe cekIO,Ha KOTOpom yCTaHOBJIeH BIneoperncIpaTOp, NOKpblTO CBeTHOH ABtOMo6NlBHOJ INeHKO,3TO MOKeT NOBnIbTb Ha KaueCTBO BNDeO3aHcN UIN Bb3BaTb NCKaXeHne BNdeO.
- 136eRaTe CToIKNHOBeHn IIN CNbHBIX ToIYKOB BInDeoperncTpaTopa, B NpOTNBOM Clyuae yCTpoNCTBO MoKeT BbiTN I3 CTPOA. DepxNTe BNDeoperncTpaTOP NoaJIbIe OTE CNbHBIX MaHHTNbIX NOJe.
3anpeaetcncnolb3OBaTB XMMNueckne paactBopnteINIIMMOUcne cpeCTBa dIy OunctKN BundeoperntpaTopa.
He nCnoJIb3yIte BnDEoperIcTaPTop npTempepaType BblSe 60^ nnHnKe -10°C.
- Ppi pa6oTe BndeoperncTpaTopa B TeueHne HeKOToporo BpeMeHN Tempepatypa BHeuHero Kopnyca nobbiuaetc; 6ydbte octopoxhbl npkacAHN.
- IcnoIb3yIte 3OT BnDeoperncTpaTOP TOnbKO IaJIeJI, pa3peIeHHbIX 3aKOHOM.
- IcnoIb3yIte cTaNapTHoe aBtOMo6nIbHoe 3apJHoe yCTpoiCTBO, Ka6JIb nITaHnI INpyrIe KOMPJIeKTHbIe npICnOco6JIeHnI
BO n36exKaHne c6oEB, CBa3aHHbIX C HeCOOTBeTCTBnEM DeTaJIe. KOMnaHnHe HecET OTBeTCTBeHHOCHTN 3a IIO6bIy y6bITKN NIN NOBpeKdEHN, CBa3aHHbIe C INCNoJIb3OBAHnEm HeCTaHdApTHbIX ABTOMO6NJbHbIX 3apJdHbIX ycTpOcTB N Ka6eJIe NITAHN.
EcnBbIcNoJIb3yeTe aanTep nITAHnI IaI 3apAKn BIDeoperncTaTopa, NcnoJIb3yIte TOLko aanTepbl nITAHn, COOTBeCTByIOUne MeCTHbIM CTaHdApTAM 6e3ONaCHOCTN IIN CEPTuΦnIPoBAHHbIe IN NOCTaBIAReMbI KBaIINΦnIPoBAHHbIMN pON3BOJNTeJIAMN.
BnDopeRnCTpaTOp n ero akceccaybmyrcoepkaMeJKeJeTaJI.Bo n36eKaHne ydyuWeHHa, a TaKke nobpeXdHn ycTpoNCTBa DeTBMx, xpaHHTe BnDopeRnCTpaTOp B HeOcTyNHOM dIyTeMeTe.
HΦopMaζηo COOTBETCTBn Tpe6oBaHnA M
Cnpabovna cnlyx6a: help@70mai.com
Дя получени дононтеловифорmaци посerte Be6-caT www.70mai.com
PonBODntelb:70mai Co.,Ltd.
Apec: Room 2220, Building 2, No. 588 Zixing Road, Minhang District, Shanghai, China
Acessórios (optionals)
Resolucao: 1920× 1080
Lente: FOV 130°/F2.0
Endereço: Room 2220, Building 2, No. 588 Zixing Road, Minhang District, Shanghai, China
Przeglad produktu
Model: A200, A200-1, A200-2
Moc wejsciowa:5V-2A
Pojemnosć baterii: 500mAh
Adres: Room 2220, Building 2, No. 588 Zixing Road, Minhang District, Shanghai, China
A termek attekintese
Cim: Room 2220, Building 2, No. 588 Zixing Road, Minhang District, Sanghaj, Kina
Ornnpctpo
Ybaxno npouHTaTe uei Noci6HnK nepeB uKOpncTahHnM npicTpO Ta 36epiraTe Ioro B 6e3neuHomy Micci.

① EKpaH
② ΦyHKIIOHaJIbHI KHOPIKNI
③ KhoNkaXINBnEHHA
④ IopTKINBJIeHHI
⑤ NopTДЯKaMepn 3aHbOOrOOrJy
⑥ Hɪðədʒa kæpɪn nʌm'æti
KpinnienHH
10 Mikpooh
CbitnoiHdkaTop
12 Kneika Haninka
3ayBaXTe, 0o 3o6paKeHHI npncTpoIO, akcecyapIB Ta iHTeppeCy KopncTyBaHa HBeDeHO B nocihNky BnKIIIOHNO IpyNKlaNy. BuPo6Hk Ma e npaBO BDOCKOHaHOBaTI npncTpiI, i TOMy Ioro foakTNHm BNJRAID f yHKU MOKyTB BiDpIbIaHATcra.
3aBaHTaXeHHaDAtKa 70mai
Ie npncpi MoxHa BnKOpNCTOBbATn pa30m i3 doaTkom 70mai. Iio6 3aBaHTaxNTu Ta BCTaHOBTN DoaTOK, BiDcKaHyTe QR-KoD a6o 3HaJITb 70mai B Mara3HHi doaTkIB.
3aybaxTe, 0n iNkHueHH do Tocky Wi-Fi BiedeopeeCTpatopa Notpi6eH Mo6IbHn TelefoH 3 orepauiHO cTcEmoH Android 5.0 a6o iOS 11.0 (uH HOiWoeBepci).

Bmictkopo6kn
KaO Bu npu6aI JIwE BiJeopeeCpaTOp, y Kopo6ci MiCTUIMyTbCBA3aHi HNXYe KOMNoHeHTN.
- BiodeopeecTpaTop, 1 wt.
- KpiinneHHn, 1 wT.
- Ka6eIb JxNvBHeHHr, 1 wT.
4.ABTOMO6IbHn3aPdHn npunctpi,1 wt. - EneKtpocTaTuHa Hanlinka, 2 wT.
- KneiKa Haninka, 1 wT.
- IInCTpymeHTIaO6pi3aHHNДpoTIB,1Wt.
8.ПосібніК Користувача, 1шт.
KuO BV npi6aJI KOMnIeKT BiDeopeeCTpaTopa, y Kopo6ci MICTITIMyTbc8 Bka3aHI HIXXe eIemEHIn.
- BiodeopeectpaTop, 1 wt.
- KpiinneHHn, 1 wT.
- Ka6eIb XINBHeHHa, 1 wT.
4.ABTOMO6IbHn3apdHn npncTpi,1wT. - EneKtpoctaTnUHa HalInka, 2 wt.
- Klenka Haninka, 1 wT.
- IInctpymeHT dIaO6Pi3aHHN dpoTb, 1 wT.
- Noci6HnK KopncTyBaHa, 1 wT.
- Komnnekt kamepn 3aHbOro orJy*, 1 wT.
* Lcien KOMnJIeKt MICTNTb KaMepy 3aHbOro ORIydy (i3
B6yDOBaHIM CBINHcEBNM DpOTOM),CINHahbHNI PnOBI Ta iHsi akceCyapn IJRA Kamepn 3aHbTO OrJaIy. DOKlaADHi BiIDOMoCTi HabeJeHO B noci6Hnky KopNCtBuHa JnKamepn 3aHbOro ORJMy.
BctaHOBJeHH
1.Ппклеваньн eNEKtpocTaTuHoi Haninkn
Po3micitb ekeTpoCTaTuHy HanInKy Ha peKOMeHDoBaHi iinHci IIOBOrO cKa. PnTucHiB
Hainky DnBuaeHH NOBITpHnx 6yIb6aJok.
YHKaIe KpaIb lo6oBOrO cKla. O6naCTb IJIy HAKLeIOBaHHMa 6ytPiBHOI iIJaCKOIO.
3aybaxTe: 06 HaninKa He BtpTuNa KneKi BnaCTuBOcTi, a BiideopeeCTpaTOp He BnAb, no6oBe CKIO MaE 6yTN uCtTM i CyxM, 6e3 3aannkiv piHn.
2. BcTaHOBJIeHHa KpIJIeHHa
BctaBte KpInnEHH B rHizdo nIkpInnEHH i nocyHbTe NOrO Brropy.

- BCTaHOBJIeHHa KapTu nAM'rTi
BctaBte KapTy nam'rti B rHizdo.
4.ПркрпнньideopeectpaTopa
PnKneIe BiJeopeEcTpaTop Do eJekTpOcTaTuHoiHaJIINK.

5.Прokладаннka6eIo
PpoklaTbKa6eJbXnBneHHa do aBTOMo6iNbHOi po3eKn TaPiKluOHTb XnBHeHH.

3anyctitb DBNyH aBTOMo6iI; BiDeopeeCTpaTOp yBIMKHeTbcra aBTOMaTuHO.
3ayBaxTe: Micpe po3TaWyBaHHra03eTkn 3aJenntb BiD MoJeI abTomo6iHa. ManHOH KaBeHeHO n npKnaNy.
- PeryIIOBaHHa KyTa HaxnLy KaMepn
BiDperyIIOHe Kyt HaxuLy Kamepn, BIKOpNCTOBHyOu306paXeHHa HToIOBHOmy ekpaHI B MoMeHT yBIMKHeHHa BiDeopeeCTpaTopa.
Akecyapn (doataKoBO)
ДяВИКОПСТАНHAФИKHQUIцьогor псntpoJO,ЯкДаe3MORY3ДИСHIOBArN ЗлncyBaHHЯЗдОнOMOROKamepn ЗадьогOrOглЯу,Notpi6HaBIDNOBiDHa Камер.ВidckaHnyTe QR-KoJ,単б OTpIMaTIN Noci6HnK KOpNCtYBaHaДЯ КамериЗадьогOrOглЯу.

3aybaxTe: 063a06irTu HeHaIexHOMy fYHKIOHyBaHHKamepn 3aHbOrO OrJMy Hepe3 HecymiChICTb PnCtpoIB peKoMeHdyETbcBnKOpNCToByBatN KaMepy 3aHbOrO OrJMy70mai.
TexHiX xaapKTepeNCTnK
Bupi6: Dash Cam
MoeB:A200,A200-1,A200-2
Bxj:5B=2A
EMHICTbakymyIHTopa:500MA-rod
PozdijbHa 3daTHicTb:1920x1080
O6'ekTnB: none orIy 130/F2,0
Tn aKymyIaTopa: liTi-n-oHHn
KINBHeHnAaTOMo6JIbHn npkkyroBau
Be3dpoToBe 3'EDHaHnHa:Wi-Fi IEEE 802.11 b/g/n 2,4T
Po6oça yacToTa Wi-Fi: 2400-2483,5 MfU
MaKcMmaJIbHa BnXiIHa NoTsyKHiCTb Wi-Fi: < 20 6m
Ihctpykuii odo kaPTn naM'rTi
- O6OB'3KOBO BCTaHOBbIb KapTy nam'rti (npoDaεTbca OKpEmO), nepu HIX KOpNCTyBaTnCBAIeopeEcTpaTopOM.
BideopecectpaTOp nIdtpmye cTaHdapTHi Kaptn microSD. BnKopncToByTe Kaptn naM'Ati EMHcTHo 32-128 I6, kI MaHOb Tklaoc 10, U1 a6o BNue.
CTaHdapTHnI opMaT aINoBOrO po3Dluy KapTu nAM'RTMOKe He 36iraTnca 3 opMaTOM, kNIMiDTPmUYe BideopeeCtpatOp. YnepuE BCTabNBuN KApTu nAM'RTI, nepeBnKOpNCtAHNM BiDopMaTyTe IIy BideopecctpatoPI. FOpMaTyBaHH npu3BeDe Do BVdaJIeHHB Cix faJIIB Ha KapTI nAM'RTI. PaJIMo 3a3DaJIerID CTbOpNTn pe3epBHy KOIIIO BaXJINBUX daHnx Ha IHWOMy pnpCTpoI.
BaTopa3oBe nepe3aHcyBaHH MoXe npn3BecTNo NOKoKeHHy HN cyBaHH KaPTu Na'MrTi Ta BnInHyTu Ha II 3DaTHiCt b 36epiratu Bideo N 3o6paKeHH. Y Takomy pa3i CII HeraiHo 3amHHTn KapTy na'MrTi Ha HOy.
BVKOPNCOByTe kKiChi KapTn NaM'Ti, npiD6aHi B HadiHnx NoCTaayIbHNIKIB. Y pa3i BVKOpNCaHH HeKICHNX KapT na'MTI MoKyTB BUNHKATN npo6JIeMn, Jk-OT HeBiIDNoBIHicTB fakTNUHOro 06cIry Na'MTI Ta WBNDKoCTi YHTaHH/ 3aNNCyBaHHraBJIeHM 3HaueHHAM. Mn He BiNDOBIAeMO 3a BTPaTy a6o NtKWKOJKeHHB IDeo3aNNCIBYepe3 BVKOpNCaHHHeKICHOI KapTn Na'M'TI.
He BCTabIaTe I He BInMaIte KapTy NaM'Ati, KOnBideopeeecTaTOP yBIMKHeHO.
3actepexhenn
Lio6 npabnIbNo 6e3neuHO BkOpncToByBaTn BiopeoeecPaTop, yBaXHo npouHTaTe BcI 3acTepexeHH Ta noci6Hnk KopncTyBaHa.
LcB iBeopeeCTpaTOp dOnomarae BODiEbi, 3auncyuoyn 3o6paxheny 3oBHI tpaHcnpTHoro 3ac06y. BiH He npn3haueHn IJRA 3a6e3neueHHN 6e3neKn KopnctyBaay aIq uac BODiHHN. KopnctyBaay MaE DOTpmyBaTNC MlCueBx npabIN IopoxhbOrO pyxy Ta 6e3neHNO KepyBaTN ABTomO6JIeM 3a 6bI-IAkX N O6CTaBHN. 3a6OpOHETbcR KepyBaTN CIMBip06OM nIq uac BoHHN.
Ha pO60Ty DeKnx FyHKuIM MoKyTB BnINBAtN BiIMHHocTi B KOHFiIpyaCiIT ABTomO6iJI, MaHepa BoIHHH, 3OBHIshI yMOBN iHsI fakTopn. Ipe6o3 XINBHeHNM, BIKOpNCtAHH 3a MekAMn DIAIa3OHy DOynCTmOI TEMpepaTpyu pIBH RAONORcTI, 3ITKHeHH a6o NOnKOJKeHH KAPTu NaM'ti MOKyTB CnpuHHTN NopyuHHe B po6oTI BiDeopeeCTpaTopa. Bnp6HnK He rapaHTye, Uo BiDeopeeCTpaTop HopMaJIbHO FyHKUIOHyBaTUME 3a BCix yMOB. BiDeo3aIncn 3 zuoro peecTpapota HocraTb BnKluHo IHΦopMaTHBnXapakTep.
- IpaBnIbHO BCTaHOBIIHO Te BiideopeeCTpaTOp, 06 BiH He nepeKpNB aBDiEbi noJIe 3opy Ta He 6lokyBaB noDywn 6e3neKn. Lc DaCTb 3MOry 3aNo6irTu NOnOMU iPiNCTPOu Ta TpaBMam.
HaBnHcTb KoblopoBoI nIIIBKn Ha IIO6OBomy cKJI aBTOMo6Ig, De BCTaHOBJIeHO peecTpApOp, MoKe cnPnHHITn NoripueHHraKocTi 3anncaHoro BiDeo Ta NOrO cNOTBopeHH.
- Bepexitb Biedeopeeectpatop Biydpabibcypcib.BoHMOxTy cnpuHHHTn HecpapBHCb npictpo. Tpmaite BiedeopeectpaTop Ha 63neuhi BiCTaHI BiCunbHex MarHiTHNX noiB.
- He BnKOpNCToBvIe XIMiUHHi PO3uHHNkN MmIOU 3aO6b N IaMUTTBAideopeceCTpaTopa.
He BnKopncToBvIte BiideopeeCtpaTOp 3a TeMnpaTpyn BnIe 60^ i HnXkne-10°C.
Picra TpBaIoro BnKOpncTaHHa KpNyc BiedeopeeCtpaTopa Moke Harpitc. BydTe obepehHi, KoJI TopKaTecrdo HbOrO.
BukopncToByte BiideopeeCtpaTop Tlkbu Bdo3BoJeHnx 3aKoHOM Bnpankax.
L06 yHnKHyTN NOLOMK npncTpo Hye3 Hecymichictb KOMnoHEHTIB, BnKOpNCTOByTE JIe aBTOMo6iBHN 3apdHn npncTpi, Ka6JIb XnBHeHH N IHIa akceCyapn 3 KOMnLeKTy NoCTaHaHH. Bnpo6Hk He BiDnOJaac 3a 36NTKN noWkoJKeHH, cnpuHHeH BVKnOPNCaHHM HeopnIHAlhBO rABTomo6iBHO 3apdHOrp npncTpo Yn Ka6JIH XnBHeHH.
BnKOpncToByTe 3apJxKaHH BideopecctpaTopa JIe aanTepn KMBHeHH, Aki BiIOBiaOTb MlCueBm CTaHapTaM 6e3neKn H cy nceptnphiKOBaHi HadaHi KBaIIphiKOBaHM Bnpo6HkOM.
BideopeeepaTop i Ioro akcecyapn MoKyb MiCTHTi pI6Hi DeTani. TpMaTe BideopeeepaTop y HeoctynHomy dIa DteMicci, 06 BOHn He npokobTuN TaKi DeTani Ta He 3aBdann IHwO1 WkOaN cobi qu npictpoio.
Inopmaui npo BiinobiHicb BnMoram
INΦOPMaIg ΚΟΟ WEEE

Yci npodykTn, no3HaueHi cIm cIMBOIOM, BBaxaIOb8cB iDxOAMN eEKeTPuHOrTo Ta eEKeTPoHHOrO o6laHaHH (WEEE BiINOBiHO Do nipeKTHNB 2012/19/EU), kci cnid ytni3yBaTN OkpeMo BID HecopTOBaHN Xo6yTOBHX bIXoDB. Iio6 3axNCHTn 3doPob'JIoHe i HaBkoInuHcpeoBnue, NOtpi6Ho 3daBaN HeipauOooe 6bJaHaHH Do CneJIaI3oBAHnx pHyKtIB 360py, Bu3HaueHnx DepxaBHMn a6o MiCzEBMn OprHaMn BlaDi, IINaIpaIbWoI nepep6Kn. PpaBnIbHa ytni3aui Ta nepepo6Ka dOnomoxTy 3anobir HeratNBHM HaClIqam DIn HaBkoInuHbOro cepeoBnua Ta 3dopoB' JIoHe. 3a DoDAKBOIO IHOpMaucio npo Po3TaUyBaHH Ta yMOBN po6OTn Ndi6HNX PyHKTIB 360py 3BeptaNTecra do
KOMNaHJI,RAKA BUKOHaIa BCTaHOBJIeHHa,ABO DO MICcEBrX OprAHiB BlaIaN.
ДeКларачи BiNOBiHOCti ДЯ EC

Bvpo6nK 3aBnE, 10e O6laDHaHnB BiNIOBIAe 3AcTOCBHM DnpeKTHBaM, EByPoneCbKM CtAHdApTaM i NOnpaBkAm
do Hx. NobHn TeKCT 3aBn Dn EC npo BiNIOBIDHcTB HabeDeHO B INTepeHcTi 3a Tako aDpecoo:
https://help.70mai.asia/1193.html
DobikkoBa cnyk6a: help@70mai.com
ДодаTKOBа Ифорmaць: www.70mai.com
Bupo6nK:70mai Co.,Ltd.
Ampeca: Room 2220, Building 2, No. 588 Zixing Road, Minhang District, Shanghai, China
Prehled vyrobku
Pred pouzitim vyrobku si peclive prectete tento navod a uschovejte jej na bezpecnem miste.
Držák
Model: A200, A200-1, A200-2
Příkon: 5 V =2 A
Kapacita baterie: 500 mAh
Adresa: Room 2220, Building 2, No. 588 Zixing Road, Minhang District, Sanghaj, Cina
Model: A200, A200-1, A200-2
Intrare:5V=2A
Capacitate baterie: 500 mAh
Rezoluţie: 1920 × 1080
Objectiv: FOV 130°/ F2.0
Tipul bateriei: Baterie litiu-ion
Adresa: Room 2220, Building 2, No. 588 Zixing Road, Minhang District, Shanghai, China
製品概要
- 大口
- 号运 × 1
- 目的基因 Xb
- 转换用 高新机×1
- 端元机 _i = 1^n T × 2
- 井中串串串串串串串串串串串串串串串串串串串串串串串串串串串串串串串串串串串串串串串串串串串串串串串串串串串串串串串串串串串串串串串串串串串串串串串串串串串串串串串串串串串串串串串串串串串串串串串串串串串串
- 険険連連の1×1
- 拟用“姓名” × 1
9. 恩范卡默拉 1×1
MOH: A200, A200-1, A200-2
[ \text{日} = 5V = 2A ]
Bateri通用:500mAh
海 壁:1920×1080
Léns: FOV 130°/F2.0
Banerli Ugly: Rite
首元:自通站
顺丰速运:Wi-Fi IEEE 802.11 b/g/n 2.4GHz
李:Room 2220, Building 2, No. 588 Zixing Road, Minhang District, Shanghai, China
Tongquanve sanpham
Vui long doc kyy Tai lieuu hong dan nay truck hi sudung san pham va nhc cat tai lieuo chao an toan.

Ngam gan
① Manhinh hien thi
② Cac nut chu nang
③ Núnguàn
④ Cong nguon
⑤ Cng camera sau
⑥ Khe the nha
6. Dieu chinh goc camera
Dieu chinh goc camera dua tren hinh anh hiien thi tren man hinh chinh khi camera hanh trinh bat.
Phu kien (khong bat buoc)
Chuc nang ghi am phia sau cua san pham nay can duoc su dung voi camera sau. Quet ma QR de xem hong dan su dung camera sau.
Luu y: De tranh tinh tranq truc trac camera sau do khong tuong thich voi thiiet bi, ban nen su dung camera sau cua thuong hiieu 70mai.

Thong so k'thuat
San pham: Dash Cam
Kieu may: A200, A200-1, A200-2
Dien ap dau vao: 5V=2A
Dung luong pin: 500mAh
Dja chi: Room 2220, Building 2, No. 588 Zixing Road, Minhang District, Shanghai, China
W
Jia: Room 2220, Building 2, No. 588 Zixing Road, Minhang District, Shanghai, China
Ringkasanproduk
Model: A200, A200-1, A200-2
Input: 5V =2A
Kapasitas baterai: 500 mAh
Resolusi: 1.920 × 1.080
Lensa: FOV 130^ F2,0
Jenis baterai: Baterai li-ion
Alamat: Room 2220, Building 2, No. 588 Zixing Road, Minhang District, Shanghai, China
Kabuuan ng produkto
Tirahan: Room 2220, Building 2, No. 588 Zixing Road, Minhang District, Shanghai, China