
DigitRadio 1 A - Radio TECHNISAT - Free user manual and instructions
Find the device manual for free DigitRadio 1 A TECHNISAT in PDF.
| Product type | DAB+/FM Radio |
| Brand | TechniSat |
| Model | DigitRadio 1 A |
| Dimensions (W x H x D) | 15.6 cm x 9.2 cm x 3.14 cm |
| Weight | 272 g |
| Mains power supply | 100-240 V~, 50/60 Hz (mains adapter 5 V, 1 A) |
| Rechargeable battery | Li-ion 3.7 V / 1050 mAh, battery life up to 10 h (speaker, medium volume) |
| Frequency ranges | FM: 87.5-108 MHz; DAB+: 174-240 MHz |
| Station memory | 20 DAB+ stations and 20 FM stations |
| Display | OLED screen with date, time, battery level |
| Main functions | DAB+ and FM reception, RDS, auto search, 10 direct presets, 3.5 mm headphone jack, volume control with safety limit |
| Antenna | Retractable telescopic antenna |
| Connectivity | USB port (DC-IN), 3.5 mm headphone jack |
| Power consumption | Max. 6 W (including battery charge), typical 1 W, standby < 0.4 W, off < 0.3 W |
| Operating temperature | Temperate climate only |
| Maintenance and cleaning | Disconnect before cleaning. Casing: dry cloth. Screen: cotton cloth possibly with non-alkaline soapy water. Do not use alcohol, solvents, scouring powder. |
| Safety | Do not open the device. Do not expose to moisture, naked flames or heat sources. Use under adult supervision. Risk of hearing damage at high volume. |
| Spare parts and accessories | Battery (ref. TechniSat), power supply unit 5 V / 1 A, USB cable, 3.5 mm jack headphones (not supplied) |
| Repairability | Technical telephone support: +49 03925/9220 1800 (Mon-Fri 8am-8pm). Repairs only by qualified personnel. Legal warranty 24 months. |
| Disposal instructions | Device, batteries and battery must not be disposed of with household waste. Observe local collection points. |
Frequently Asked Questions - DigitRadio 1 A TECHNISAT
User questions about DigitRadio 1 A TECHNISAT
0 question about this device. Answer the ones you know or ask your own.
Ask a new question about this device
Download the instructions for your Radio in PDF format for free! Find your manual DigitRadio 1 A - TECHNISAT and take your electronic device back in hand. On this page are published all the documents necessary for the use of your device. DigitRadio 1 A by TECHNISAT.
USER MANUAL DigitRadio 1 A TECHNISAT
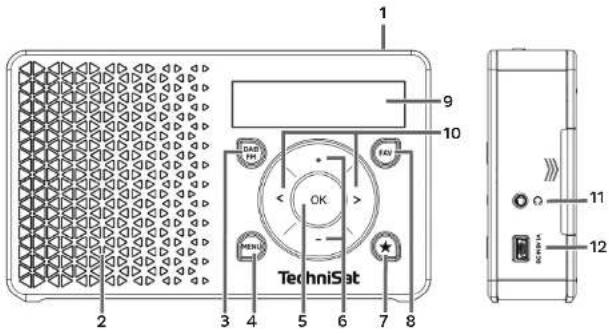
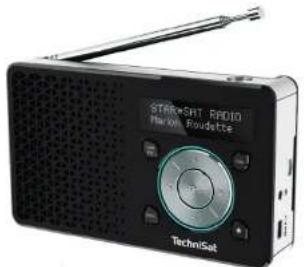
1. View from the front and side
4
1 On/Standby (Too)
2 Speaker
3 DAB/FMbutton for changing mode
4 MENU for accessing the menu
5 OK button for confirmation
6 Volume +/- buttons (loud/guilet)
7 Direct selection button
8 FAV button
9 Display
10 Selection buttons
11 Headphone socket (3.5mm jack)
12 DC-IN USB port for external
power supply
5
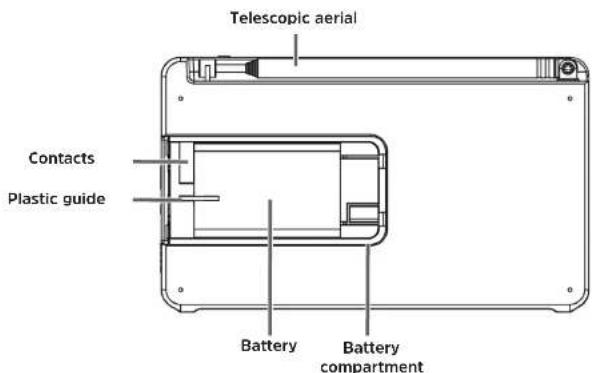
1.2 View from the back
2 Contents
1 Illustrations 4
View from the front and side 4
1.2 View from the back 6
2 Contents. 7
3 Foreword 10
31 Target group of this operating manual 10
3.1.1 Intended use 11
3.2 Important instructions 11
3.2.1 Sale 12
3.2.3 Legal notices 21
3.24 Servicing notes 22
4 Setting Up the Device 24
5 Description of the DIGITRADIO 1. 27
5.1 Scope of delivery 27
5.2 Special features of the DIGITRADIO 1. 27
5.3 Preparing the DIGITRADIO 1 for use 28
5.3.1 Inserting the battery 28
5.3.2 Connecting to the mains 30
5.3.3 Aligning the telescopic aerial.. 31
5.3.4 Using headphones.. 32
5.4 General device functions 33
5.41 Switching the driving on 33
5.4.1 Switching the device off 33
5.4.2 Switching the device off 34
5.4.3 Switching between DAB and FM mode 35
5.4.4 Setting the volume 35
5.4.5 Display 36
5.4.6 Accessing the display 36
6 Menu operation 37
7 The DAB+ (digital radio) function 38
7.1 What is DAB? 38
7.1.1 Data compression 38
71.2 Audio stream 39
72. DIP (input) -10
7.2 DAB+ (digital radio) reception 39
7.81 Corrading on a full soon 12
7.2.1 Carrying out a full scan.. 40
7.2.2 Selecting a stiction 40
7.2.2 Selecting a station 40
7.2.3 Storing DAB+ stations in a storage location 41
7.2.4 Accessing DAB+ stations in a storage location 41
7.2.5 Overwriting/deleting a stored station position 42
7.2.6 Signal strength 42
7.2.7 Manual settings 43
7.2.8 Volume adjustment (DRC) 43
7.2.9 删除 inactive stations 44
8 FM (VHF) operation 45
8.1 Switching to FM radio mode 45
8.2 FM (VHF) reception with RDS information 46
8.3 Automatic station scanning 46
8.4 Manual station scanning 47
8.4 Manual station scanning.. 47
8.5 Scan settings 47
8.6 Audio settings 48
8.6 Audio settings 48
8.7 Storing EM stations in a storage location 48
8.8 Accessing FM stations in a storage location 49
8.9 Overwriting/deleting a stored station location 49
9 System settings 50
9.1 Setting the time and date 50
9.1.1 Setting the time/date manually.. 50
9.1.2 Updating the time 51
9.1.3 Setting the time format 52
9.1.4 Setting the date format 53
9.2 Display brightness 54
9.3 Language 55
5.4 Factory settings 56
9.5 Software variations 57
10 Cleaning. 57
11 Eliminating malfunctions 59
12 Technical data / Manufacturer's notes.. 60
13 Notes 61
3 Foreword
This operating manual will help you use your radio - hereafter referred to as the DIGIRADIO or the device - safely and as intended.
3.1 Target group of this operating manual
This operating manual is intended for anyone setting up, using cleaning or disposing of the device.
3.1.1 Intended use
The device has been developed to receive DAB+/FM radio broadcasts. The device is designed for personal use and is not suitable for commercial purposes.
3.2 Important instructions
Please observe the following instructions to minimise any safety hazards, prevent damage to the device, and help protect the environment. Please read all the safety instructions carefully and store them for future reference. Always follow all the warnings and instructions in this instruction manual and on the rear of the device.
Warning - indicates an important note that you must always observe in order to avoid problems with the device, loss or abuse of data or unwanted operation.
Tip - indicates a note about the function described as well as other functions associated with it and any others to be observed with reference to the respective place in the instruction manual.
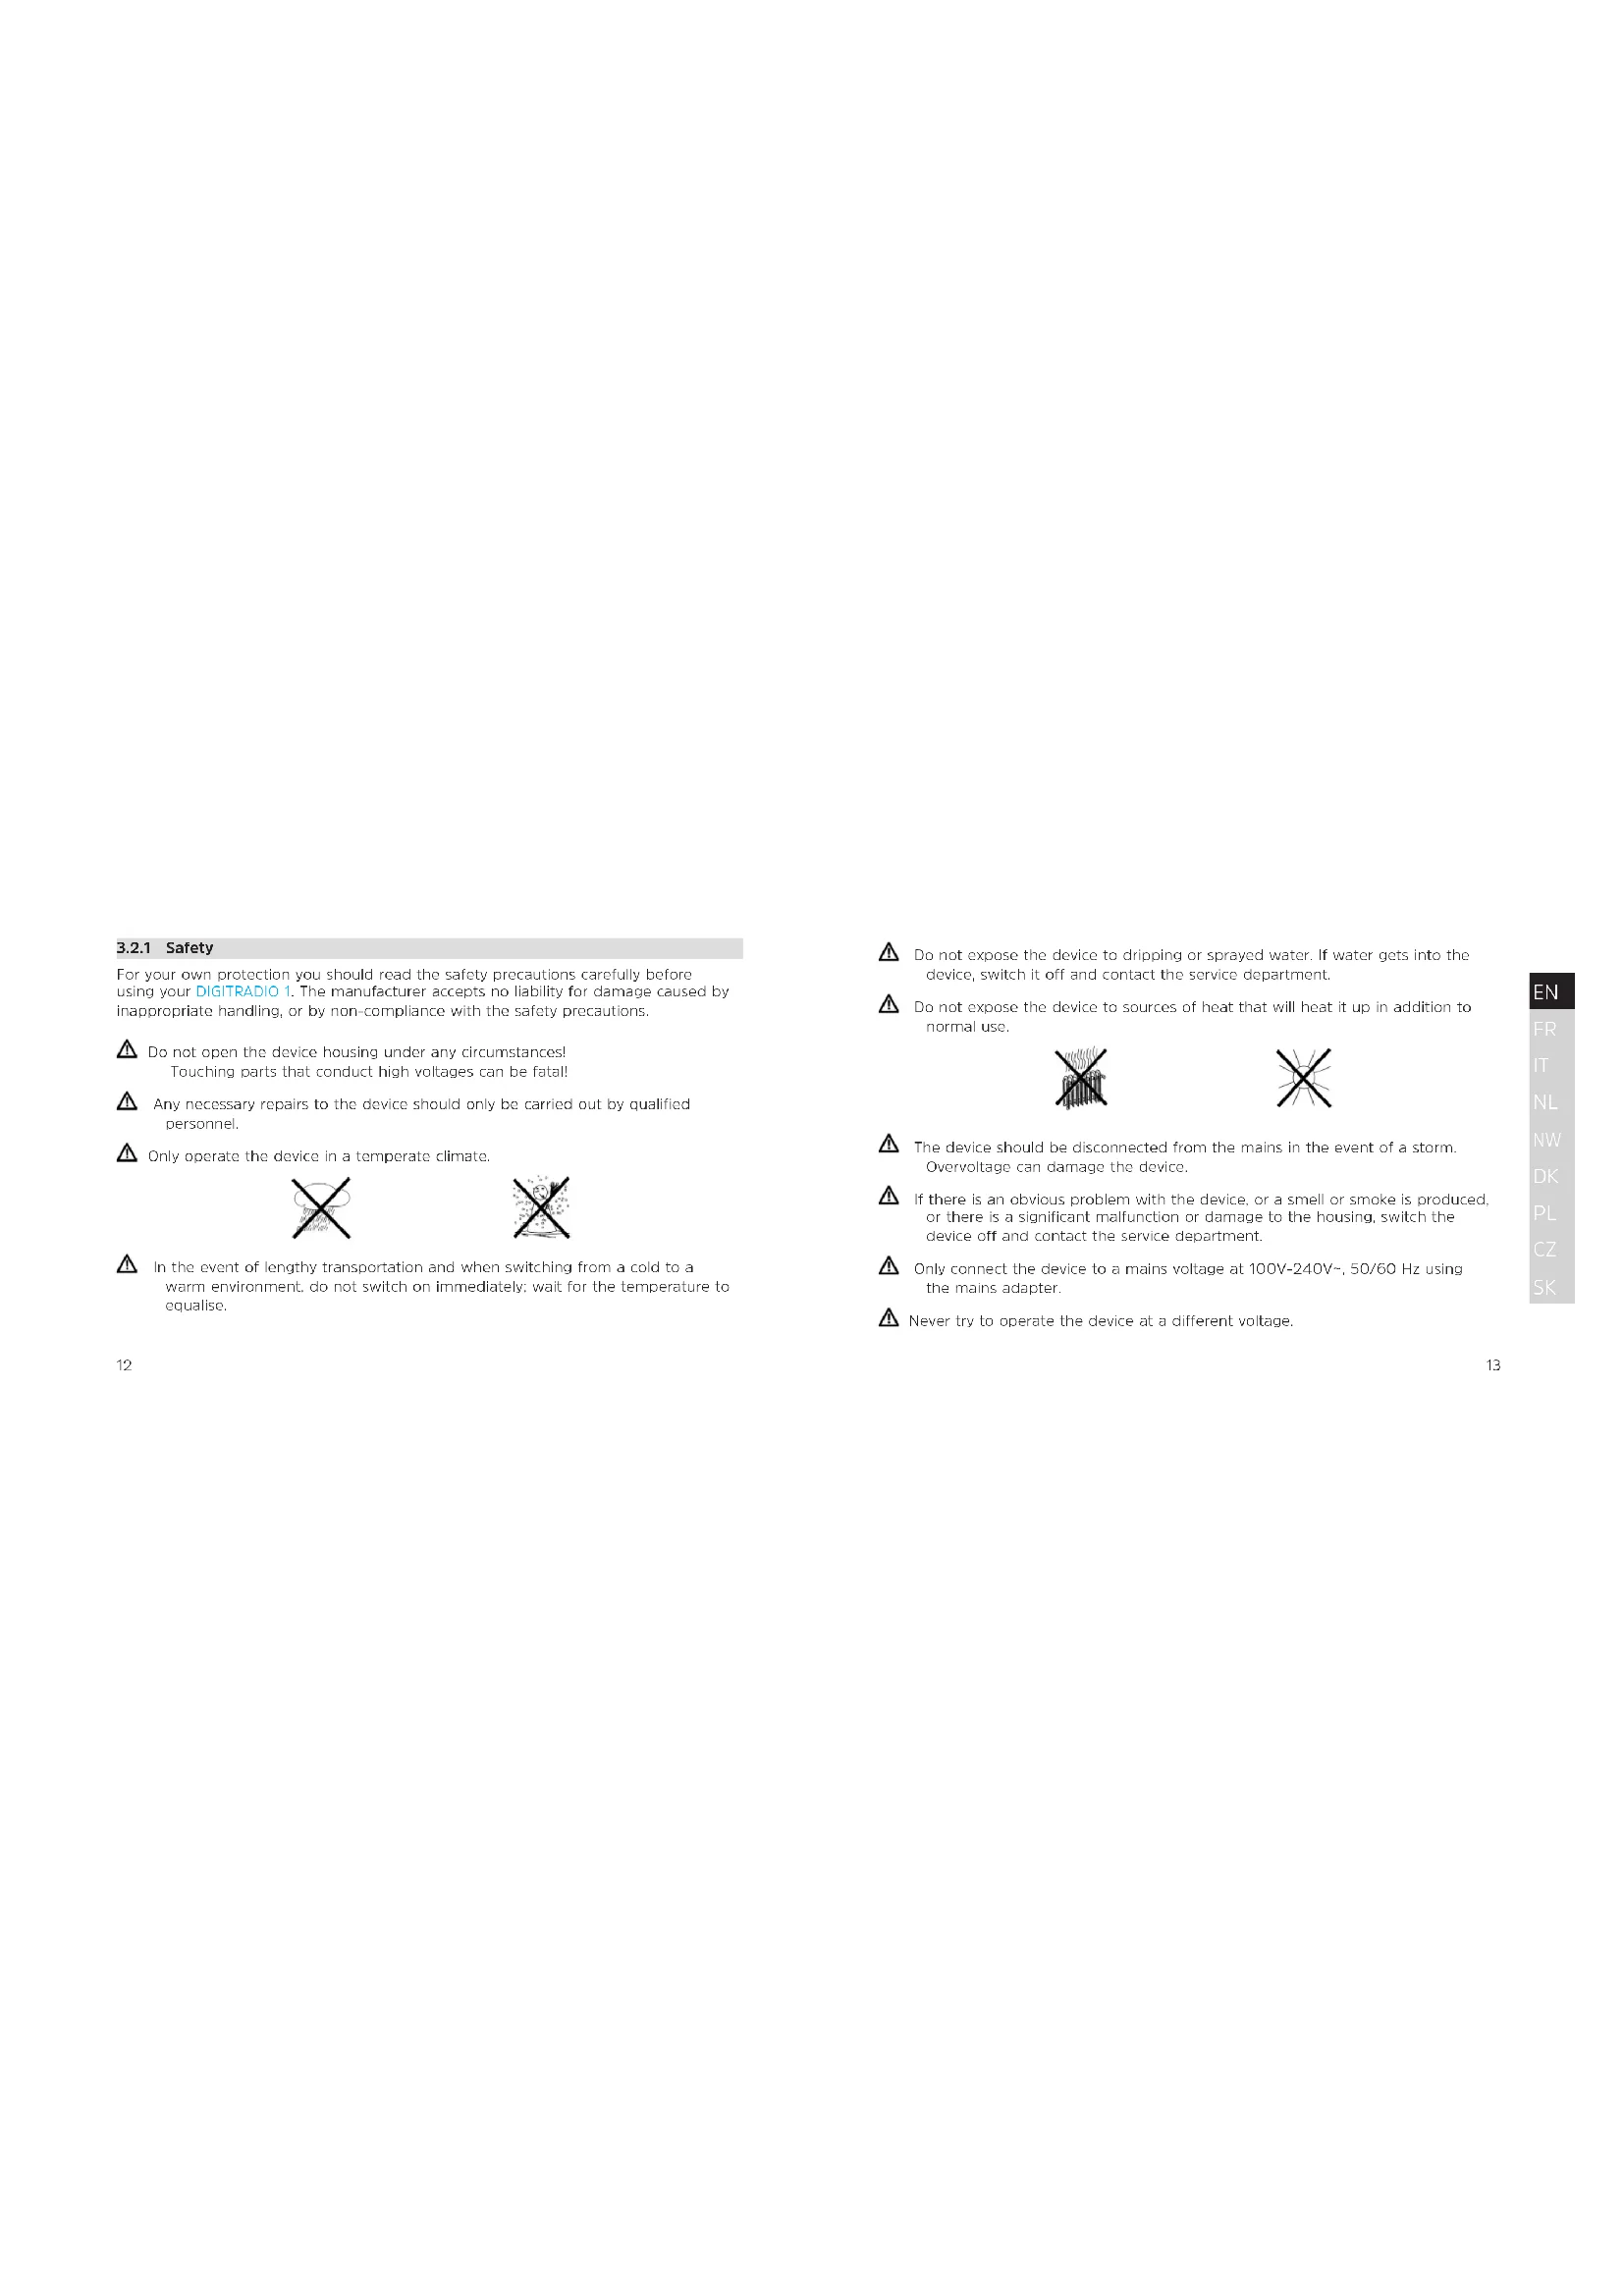
3.2.1 Safety
For your own protection you should read the safety precautions carefully before using your DIGITRADIO 1. The manufacturer accepts no liability for damage caused by inappropriate handling, or by non-compliance with the safety precautions.
Do not open the device housing under any circumstances. Touching parts that conduct high voltages can be fatal
Any necessary repairs to the device should only be carried out by qualified personnel.
Only operate the device in a temperate climate.


In the event of lengthy transportation and when switching from a cold to a warm environment, do not switch on immediately; wait for the temperature to equalise.
Do not expose the device to dripping or sprayed water, if water gets into the device, switch it off and contact the service department.
Do not expose the device to sources of heat that will heat it up in addition to normal use.


The device should be disconnected from the mains in the event of a storm. Overvoltage can damage the device.
If there is an obvious problem with the device, or a smell or smoke is produced, or there is a significant malfunction or damage to the housing, switch the device off and contact the service department.
Only connect the device to a mains voltage at 100V-240V, 50/60 Hz using the mains adapter.
Never try to operate the device at a different voltage.
The mains adapter may only be connected after completion of the Installation as instructed.
A Do not operate the device if the mains adapter is defective or the device is damaged in any other way.
When removing the mains adapter from the socket, pull on the plug not the cable.
Do not operate the device near to baths, swimming pools or where water may splash onto it during operation.
Never attempt to repair a defective device yourself. Always contact one of our customer service locations.
Foreign bodies such as nails, coins etc. should not get into the interior of the device. Do not bring metallic objects into contact with the connection points or touch them with your fingers. This may cause a short circuit.
No naked flames such as burning candles may be placed on the device.
Never allow children to use this device unsupervised.
The device is still connected to the mains when in standby mode. Unplug the mains adapter if you are not going to use the radio for some time. Only pull on the plug, not the cable.
Do not listen to music or the radio at a high volume. Doing so can cause permanent hearing damage.
This device is not intended for use by persons (including children) with restricted physical, sensory or mental facilities, or who lack the experience and/or knowledge to use it, unless they are supervised by a person responsible for their safety or have received instruction from them on how to use the device.
Children must be supervised to ensure that they are not using the device as a toy.
Making modifications to the device is forbidden.
Damaged devices or accessories may no longer be used.
Using batteries
Keep batteries out of reach of children. Children could put batteries in their mouths and swallow them. Doing so can cause serious health damage. Seek medical advice immediately if this occurs! Always keep batteries out of reach of small children.
Only operate the device with the battery permitted for it.
Standard batteries may not be charged. Rechargeable batteries may not be reactivated in any other way, may not be disassembled, heated up or thrown onto an open fire (risk of explosion!).
Clean battery contacts and device contacts before Inserting.
There is a risk of explosion if a battery is inserted incorrectly!
Only replace batteries with others of the right type and the right model number.
Caution! Do not expose batteries to extreme conditions.
Do not place on heated objects; do not expose to direct sunlight!
Leaking or damaged batteries can irritate the skin. Use suitable protective gloves. Clean the battery compartment with a dry cloth.
If the device is not used for an extended period, take the battery out.
3.2. Disposal
The packaging material used for your device consists entirely of recyclable materials. Please sort the components appropriately, and dispose of them in line with your local waste disposal regulations. At the end of its useful life span, this product may not be disposed of with your regular household waste. It must be taken to a recycling collection point for electrical and electronic equipment.
This is indicated by the symbol on the product, the operating manual or the packaging. The materials used can be re-used in accordance with their labelling. By ensuring that valuable raw materials in old equipment are re-used, you can make a valuable contribution towards protecting our environment.

Please contact your local authority for the location of the nearest recycling point. Please ensure that dead batteries/rechargeable batteries and electronic waste items are not sent to your regular household refuse site, but are correctly disposed (either taken back by a specialist company or at collection points at specialist dealers).

Batteries can contain toxic substances that are hazardous to health and the environment. Batteries are subject to European Directive 2006/66/EC. They may not be disposed of with normal household waste.
Disposal Instructions:
Disposing of packaging:
Your new device has been protected on its way to you by packaging. All the materials used are environmentally-friendly and can be re-used. Please help by disposing of the packaging in an environmentally appropriate way. Please contact your dealer or local waste disposal centre for current disposal instructions.
Risk of suffocation! Keep packaging and parts of packaging away from children. Risk of suffocation from the plastic film and other packaging materials.
Disposing of the device:
Old devices are not worthless. Valuable raw materials can be extracted from them so that they can be disposed of in an eco-friendly way. Contact your local recycling centre for information about the correct way to dispose of your radio. Batteries contained in the device must be removed prior to its disposal.
This device is marked in accordance with the Waste Electrical and Electronic
Equioment (WEEE) Directive 2012/19/EC.
At the end of its useful life span, this product may not be disposed of with your regular household waste. It must be taken to a recycling collection point for electrical and electronic equipment. The symbol on the product, the operating manual or the packaging indicates this. The materials used can be re-used in accordance with their labelling. By ensuring that valuable raw materials in old equipment are re-used, you can make a valuable contribution towards protecting our environment.
Important notice on the disposal of batteries: Batteries can contain toxic substances that are hazardous to the environment. Please ensure that batteries are disposed of in accordance with the applicable legal provisions. Never throw batteries away with normal household waste. You can dispose of used batteries with your dealer or at a dedicated waste disposal site at no charge.
3.2.3 Legal notices
i TechniSat hereby declares that the radio unit type DIGITRADIO 1 complies with Directive 2014/53/EU. The full text of the EU conformity declaration can be found at the following website:
https://www.technisat.com/de_DE/Konformitaetserklaerung/352-687/?productID=11473
TechniSat is not liable for product damage caused by external influences, wear and tear, inappropriate use, unauthorised repairs, modifications or accidental damage.
We reserve the right to make amendments and printing errors Version 03/17. Duplication and reproduction only with the publisher's approval You can find the current version of the manual in PDF format in the download area of the Techni5at home page at www.technisat.com.

DIGITRADIO 1 and TechniSat are registered trademarks of:
3.2.4 Servicing notes

This product is quality controlled and given the legal warranty period of 24 months from the date of purchase. Please retain the receipt as proof of purchase. Please contact the retailer of the product in the event of warranty claims.

Note: r questions and information, or if there is a problem with the device, our Technical Hotline Is:
Mon.-Fri.8am-8pm on:
+49(0)392592201800
If the device needs to be sent to us for any reason, please only use the following address:
39418 Stassfurt, Germany
Names of the companies, institutions or brands mentioned are trademarks or registered trademarks of the respective owner.
4 Setting Up the Device
Place the radio on a firm, secure, horizontal surface. Make sure the area is well ventilated.
Caution!
Do not place the device on soft surfaces such as carpets and blankets or near curtains and wall hangings. The ventilation holes may be covered. This can disrupt the necessary air circulation, potentially leading to the device catching fire.
Do not place the device near to sources of heat, such as radiators. Avoid direct sunlight and very dusty environments.
The device may not be placed in rooms with high humidity, e.g. kitchens or saunas, as the presence of condensation can damage it. The device is intended for use in dry environments and moderate climates and may not be exposed to droplets or water spray.Please note that the base of the device may leave coloured marks on some furniture surfaces under certain circumstances. Put a protective layer between your furniture and the device.
Keep the DIGITRADIO 1 away from devices that generate strong magnetic fields.
Do not place heavy items on the device.
If you take the device from a cold to a warm environment, condensation may collect inside it. In this case, wait around an hour before using it.
Lay the mains cable in such a way that nobody can trip over it.
Ensure that the mains cable and adapter are always easily accessible so that the device can be quickly disconnected from the mains supply!
The socket should be as close to the device as possible.
When connecting to the mains, Insert the plug fully into the socket.
Use a suitable, easily accessible mains connection and avoid using multiple sockets!Do not handle the mains adapter with wet hands, as there is a risk of electric shock!
In the event of malfunctions or the presence of smoke or smells, remove the mains adapter from the socket Immediately!
If the device is not being used for an extended period, e.g. before leaving on a lengthy trip, unplug it from the mains.
If the device is not being used for an extended period, take the battery out.
You can damage your hearing if you set the volume too high, particularly when using headphones.
5 Description of the DIGITRADIO 1
5.1 Scope of delivery
Please check that the scope of delivery is complete before set-up.
1xDIGITRADIO 1
1xBattery
1xMajors-adapter
1xUSB cable
1 x Instruction manual
5.2 Special features of the DIGITRADIO 1
The DIGITRADIO 1 is a DAB+/FM receiver with the following functions:
- You can store up to 20 DAB+ and 20 FM stations.
The radio can receive the following frequencies: FM 87.5-108 MHz (analogue) and DAB 174.9-239.2 MHz (digital).
The device has a time and date display. - Direct selection button.
- Rechargeable battery.
5.3 Preparing the DIGITRADIO 1 for use
5.3.1 Inserting the battery
Open the battery compartment at the back of the device by pushing the battery compartment cover in the direction of the arrow marked on the side. Then remove the cover.
Insert the DIGITRADIO 1 battery, paying attention to the alignment of the gold contacts with one another. Push it under the plastic guide within the battery compartment.
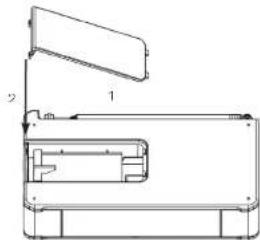
The DIGITRADIO battery can also be purchased separately in retail outlets.Place the battery compartment cover back on the battery compartment (1) and push it shut until it audiably clicks into place (2).
The battery is charged as soon as the device is connected to the mains network. The charge status is shown in the display by way of a battery symbol.
1 Replace or recharge the battery when it is dying.
5.3.2 Connecting to the mains
To do this, attach the supplied USB cable to the mains adapter and insert it into the mini-USB port marked DC-IN on the side of the DIGITRADIO 1. Then attach the mains adapter to the mains.
Ensure that the operating voltage of the mains adapter corresponds with the local mains voltage before you insert it into the wall socket.
1 Once a mains connection has been established for the first time, "TechniSat Digitalradio" appears in the display. You can then select the operating language. To do so, use the or button to select one of the available languages and confirm the selection by pressing the OK button. The DAB station scan will then be carried out for the first time. Please also note the information in Section 5.4.1.
5.3.3 Aligning the telescopic aerial
The number and quality of broadcast stations depends on the reception conditions at the location of the device. Excellent reception can be achieved with the telescopic acral.
Align the telescopic aerial and extend it to its full length,
i Precise alignment of the telescopic aerial is important, especially in the fringe areas of DAB+ reception. The position of the nearest radio mast can be quickly found on the Internet by going to www.digitalradio.de, for example.
1 Start the first scan at a window facing the radio mast.
DAB1 reception may be restricted in bad weather.
Do not touch the telescopic aerial when receiving a station. This can impede reception and lead to sound dropouts.
5.3.4 Using headphones
Damage to hearing!
Do not listen to the radio at high volume with headphones. Doing so can cause permanent hearing damage. Turn the radio volume down to a low volume before using headphones.
i Only use headphones with a 3.5 mm stereo jack plug.
Insert the headache jack into the headache socket on the side of the device. Sound Is then played exclusively via the headphones and the speaker is switched to mute.
If you would like to use the speakers again, unplug the headphones from the headphone jack on the device.
If you want to set the volume to maximum, the message [Warning! Loud Volume! OK?] appears shortly before the maximum volume is reached. Confirm the message by pressing the OK button. You can then adjust the volume to the maximum possible level. The setting is stored until the device is next switched off/on.
5.4 General device functions
5.4.1 Switching the device on
To ensure good DAB+FM (VHF) reception, please fully remove the aerial located on the reverse of the device. Please also note Section 5.3.3 when doing so.
First prepare the DIGITRADIC 1 for operation as described in Sections 5.3.1 and 5.3.2.
Press the On/Standby button on the top of the device to switch the DigITRADIO 1 on.
After switching the device on for the first time, you must set the [language]. To do so, use the or buttons to select one of the available languages and confirm the selection by pressing the OK button. The device then automatically runs a full scan in DAB mode. The display information shows the progress during the scan, plus the number of digital radio stations found. The first DAB+ station is played after the scan has finished.
5.4.2 Switching the device off
When using the malns:
Briefly press the On/Standby button to switch the device to standby mode.
The message [Standby] appears briefly in the display. The date and time are shown in the display. You can adjust the display brightness in standby mode as described in Section 9.2.
Holding down the On/Standby button puts the device into power saving
mode and the display is blank. The message [Power off] appears briefly in the display.
The battery continues to be charged during standby or power saving mode.
In battery mode:
In battery mode, the device is always switched off by pressing the On/Standby button. The message [Power off] appears briefly in the display. There is no time or date display in this case.
i Standby mode is not available in battery mode.
5.4.3 Switching between DAB+ and FM mode
5.4.4 Setting the volume
Use the DAB/FM button to switch between DAB+ (Digital Radio) and FM (VHF).
Set the volume using the Volume +/- buttons. The set volume is displayed via a bar diagram. Please also note Section 5.3.4 on operation with headphones attached.
5.4.5 Display
Depending on the function or option selected, the following information is shown in Display:
Station name.
frequency, menu name
Display, menu
options, volume

5.4.6 Accessing the display
Press the MENU button and use the or buttons to select the [Display] submenu. Then press the OK button. Use the and OK buttons to select a display option. You have the option of displaying the following information:
In DAB+ mode (selected function is marked with a *
[Scrolling text] (running text containing additional information that may be provided by the broadcaster). [Signal strength]. [Programme type], [Ensemble], [Frequency], [Signal quality], [Bit rate and codec], [Time] and [Date].
In FM/VHF mode (selected function is marked with a **):
[Radio text] (where broadcast), [Programme type] (PTY), [PS] (Programme service name, station name or frequency), [Audio information], [Time] and [Date].
Press the MENU button to exit the setting and return to the play view.
6 Menu operation
You can access all the functions and settings for the DIGITRADIO 1 via the menu. The MENU. and OK buttons are used for menu navigation.
The menu is split into submenus, each of which contains various menu items or functions that can be activated depending on the mode (DAB+ or FM). Simply press the MENU button briefly to open the menu. To switch to the submenus, first press the
or buttons to display a submenu and then press the OK button to access the submenu. An asterisk (*) marks the current selection.
Closing the menu: Press the MENU button several times (depending on which submenu you are in) until the current radio station is displayed again.
1 Settings are only saved if the OK button has been pressed. If the MENU button is pressed instead, the settings are not accepted and saved (the MENU button takes on the function of a "Back" button here).
1 Functions and the buttons to be pressed are shown in bold in the operating manual. Displays are in [square brackets].
Some text descriptions (e.g. menu items, broadcaster Information) may be too long to appear in the display. These will then be shown as scrolling text after a few moments.
7 The DAB+ (digital radio) function
7. What is DAB+?
DAB1 is a new digital format that delivers crystal-clear sound with no background noise. In contrast to traditional analogue radio stations, DAB+ can be used to broadcast multiple stations on one and the same frequency. These are called ensembles or multiplexes. An ensemble consists of the radio station and several service components or data services that are broadcast by the radio stations. You can find out more at www.digitalradio.de or www.digitalradio.ch, for example.
7.1.Data compression
Digital radio exploits aspects of human hearing for data compression. The human ear does not detect sounds that are below a certain minimum volume. Data below the absolute threshold of hearing can therefore be filtered out. This is possible because the digital data stream also saves the relative volume of each unit of information to other units. At a specific threshold, the quieter parts of a sound signal are blocked out by the louder parts. All the sound Information below the threshold of hearing
In a piece of music can be filtered out of the signal being broadcast. This leads to a reduction of data in the data stream to be transmitted, with no detectable sound difference for the listener (HE AAC v2 - process for enhancing the DAB+ encoding process).
7.1.2 Audio stream
With digital radio, audio streams are continuous data streams that contain MPEG-1 Audio Layer II frames and represent acoustic information. They are used to broadcast normal radio programmes, which you can listen to on the receiver. Digital radio not only provides radio with excellent sound quality, but additional information as well. The information may be about the current programme or something else (e.g. news, weather, traffic and tips).
7.2 DAB+ (digital radio) reception
Press the DAB+/FM button until [DAB] is shown in the display.
If DAB+ is being launched for the first time, a full station scan will take place. When the scan has finished, the first station in alphanumeric order will be played.
7.2.1 Carrying out a full scan
The automatic Full Scan scans all DABI Band III channels and thus finds every station being broadcast in the reception range.
When the scan has finished, the first station in alphanumeric order will be played.
To carry out a full scan, open the menu by pressing the MENU button and use the OK buttons to select [Full Scan].
[Scanning...] appears in the display.
During the scan, a progress bar and the number of stations found are displayed.
If no stations are found, check the telescopic aerial and change the location of the device if necessary (Sections 5.3.3 / 3.2.1).
7.2.2 Selecting a station
To select a DAB+ station, press the or buttons and confirm the station selection with OK.
7.2.3 Storing DAB+ stations in a storage location
The programme memory can store up to 20 stations in the DAB+ range.
First select the station you want (see Section 7.2.2).
To save this station to a storage location, hold the FAV button down while the station is playing. Then use the and buttons to select a station storage location (1 - 20). Press the OK button to save it.
Repeat the process to save more stations.
The station stored in FAV storage location 1 can also be accessed via the direct selection button.
7.2.4 Accessing DAB+ stations in a storage location
To access a station that you have already saved in the FAW memory, briefly press the FAV button and use the and buttons to select a station storage location (1 - 20). Press the OK button to play the station.
If no station has been saved to the selected storage location, [(none)] appears in the display.
7.2.5 Overwriting/deleting a stored station location
Simply save a new station to a favourites storage location as described.
If factory settings are apoliced, all storage locations will be deleted.
7.2.6 Signal strength
Briefly press the MENU button and use the or buttons to select the [Display] entry, then press OK.
Use the or buttons to select the [Signal Strength] entry, then press OK.
Exit the menu by pressing MENU several times.
The signal strength is shown in the display via a bar diagram.
1 Stations with a signal strength below the necessary minimum signal strength are not broadcasting a sufficiently strong signal. Align the telescopic aerial as described in Section 5.3.3 if necessary.
7.2.7 Manual settings
This menu item is used for checking the channels and can be used for aligning the serial.
Briefly press the MENU button and use the or buttons to select the [Manual Settings] entry, then press OK.
Use the or and OK buttons to select a channel (SA to 13F). Its signal strength will then be shown in the display. If a DAB+ station is received on a channel, the station's ensemble name is displayed. The aerial can then be aligned for maximum signal strength.
1 Stations with a signal strength below the necessary minimum signal strength are not broadcasting a sufficiently strong signal. Align the telescopic aerial as described in Section 5.3.3 if necessary.
7.2.8 Volume adjustment (DRC)
The volume adjustment menu item is used to set the compression rate, which equalises dynamic fluctuations and the associated volume variations.
Press the MENU button and use the or buttons to select the [Volume Adjustment] menu.
Press the OK button.
Use or to select the compression rate:
DRC high - High compression
DRC low - Low compression
DRC off - Compression deactivated.
Confirm by pressing the OK button.
7.2.9 Deleting inactive stations
This menu item is used for removing old stations that can no longer be received from the list of stations.
Press the MENU button and use the or buttons to select the [Delete Inactive Station] submenu.
Press the OK button.
The [Clear] query checks whether the inactive station should be deleted.
Use or to select [Yes] and confirm by pressing the OK button.
8 FM (VHF) operation
8.1 Switching to FM radio mode
Press the DAB/FM button to switch to FM mode.
[FM] appears in the display.
1 When first switched on, the frequency is set to 87.5 MHz.
If you have already set or saved a station, the radio plays the last station set.
1 The station name appears with ROS stations.
Align the aerial to improve reception (Section 5.3.3).
8.2 FM (VHF) reception with RDS information
RDS is a process for transmitting additional information via FM stations. Broadcasters with RDS send their station name or programme type, for example. This appears in the display. The device can display RT (radio text), PS (programme service or station name) and PTY (programme type). RDS information.
8.3 Automatic station scan
Hold down the or buttons for some time (2 to 3 sec.), to automatically scan for the next station with a sufficiently strong signal.
Alternatively you can also press the OK button.
If a FM station with a sufficiently strong signal is found, the scan stops and the station is played. If an RDS station is being received, the station name and radio text (where available) appear.
Please use the manual station scan to search for stations with weaker signals.
8.4 Manual station scan
Press the or buttons multiple times to set the station or frequency you want.
1 The display shows the frequency in increments of 0.05 MHz.
8.5 Scan settings
The sensitivity of the scan can be set in this menu item.
Press the MENU button and use the or buttons to select the [Scan Settings] entry, then press OK.
Select whether the scan should only stop at stations with a strong signal [Strong Stations Only] or at all stations (including ones with weak signals) [All Stations].
1 With the All Stations setting, the automatic scan stops every time an available station is found. This can lead to weak stations with background noise being played. During commissioning and when applying the factory settings, the [All Stations] menu item is set by default.
8.6 Audio settings
Press the MENU button and use the or buttons to select the [Audio Settings] submenu.
Press the OK button.
In the event of weak FM reception, use or to select the [Stereo Possible] or [Mono Only] entry to play in stereo (only available via headphones) or in mono only.
Confirm by pressing the OK button.
8.7 Storing FM stations in a storage location
The programme memory can store up to 20 stations in the FM/VHF range.
First set the station frequency you want (Sections 8.3, 8.4).
To save this station to a storage location, hold the FAV button down while the station is playing. Then use the and buttons to select a station storage location (1-20). Press the OK button to save it.
Repeat the process to save more stations.
The station stored in FAV storage location 1 can also be accessed via the direct selection button.
8.8 Accessing FM stations in a storage location
To access a station that you have already saved in the FAV memory, briefly press the FAV button and use the and buttons to select a station storage location (1 - 20). Press the OK button to play the station.
If no station has been saved to the selected storage location, (none) appears in the display.
8.9 Overwriting/deleting a stored station location
Simply save a new station to the relevant storage location as described.
If factory settings are applied, all storage locations will be deleted.
9 System settings
All the settings described in this section apply equally to DAB+ and FM mode.
9.1 Setting the time and date
9.1.1 Setting the time/date manually
Depending on the time update setting (Section 9.1.2), you will need to set the time and date manually.
Press the MENU button and use the or buttons to select the [Time] submenu.
Press the OK button.
Use the or buttons to select the [Set Time/Date] entry and press OK.
The first numbers for the time flash (hours); these can be changed using the or buttons.
The button increases the value, and the button reduces the value.
Press the OK button to accept the setting.The next numbers for the time then flash (minutes); these can also be changed as described above.
After each setting, press the OK button to move on to the next setting.
Proceed with setting the date as described above.
Once all the settings have been carried out and the OK button has been pressed for the last time, [Time Saved] appears in the display.
9.1.2 Updating the time
In this submenu you can specify whether the time should update automatically via DAB1 or FM (VHF) or you want to enter it manually (Section 9.1.1).
Press the MENU button and use the or buttons to select the [Time] submenu.
Press the OK button.
Use the or buttons to select the [Time Updates] entry, then press OK.
Use the or and OK buttons to select the following options:
[All Sources] (updates via DAB+ and FM)
[Update via DAB] (updates via DAB only)
[Update via FM] (updates via FM only)
[No Updates] (Date/time must be entered manually, see Section 9.1.1.)
9.1.3 Setting the time format
In the Set 12/24 Hrs submenu, you can enable the 12 or 24 hour format.
Press the MENU button and use the or buttons to select the [Time] entry.
Press the OK button.
Use the or buttons to select the [Set 12/24 Hrs] entry and press OK.
Use the or buttons to select one of the following options:
[Set 24 Hrs]
[Set 12 Hrs]
Press the OK button to accept the setting.
9.1.4 Setting the date format
In the Set Date Format,. submenu, you can specify the date display formaL.
Press the MENU button and use the or buttons to select the [Time]菜单.
Press the OK button.
Use the or buttons to select the [Set Date Format] entry, then press OK.
Use the or buttons to select one of the following options:
[DD-MM-YYYY] (day, month, year)
[MM-DD-YYYY] (month, day, year)
ess the OK button to accept the setting.
9.2 Display brightness
You can set the display brightness for both operation and standby (only available if the radio is connected to the mains).
To do so, press the MENU button and use the or buttons to select the [Brightness] entry.
Press the OK button.
Use the or buttons and then press the OK button to select one of the following functions:
[Operation] controls the brightness in normal operating mode. Here you can select from among the [High], [Medium] and [Low] brightness levels. Use the or buttons to select a brightness level and press the OK button to save this. The setting applies to both mains and battery operation.
[Standby] controls the brightness in standby mode (only applicable when the radio is connected to the mains). Here you can select from among the [High]. [Medium] and [Low] brightness levels. Use the or buttons to select a brightness level and press the OK button to save this.
[Auto Dim]: if the [On] option has been selected, this automatically dims the display to the Low brightness level. If the radio has not been used for 10 seconds, if the [Off] option has been selected, the display is permanently illuminated at the brightness level selected under the [Operation] function. Press the OK button to save the setting.
For battery operation, only the Operation and Auto Dim settings are applicable. Standby mode (date and time appear in the display when switched off) is only available in the device is connected to the mains.
9.3 Language
Press the MENU button and use the or buttons to select the [Language] submenu.
Press the OK button.
Use the or buttons to select one of the available languages and confirm the selection by pressing the OK button.
9.4 Factory settings
When you change the location of the device, e.g. if you move house, it is possible that the stored stations can no longer be received. By resetting to the factory settings, you can delete all the stored stations in this way and then run a new station scan.
Press the MENU button and use the or buttons to select the [Factory Settings] entry. Press the OK button.
To apply the factory settings, use the or buttons to select the [Yes] entry, then press the OK buttons.
All previously stored stations and settings will be deleted. The device will now be in the status it was in when supplied.
[Restarting...] now appears in the display and the device will start with the language selection ([Language]). Use the or buttons to select one of the available languages and confirm the selection by pressing the OK button. The device then automatically runs a full scan in DAB mode. The display information shows the progress during the scan, plus the number of digital radio stations found. The first DAB+ station is played after the scan has finished.
9.5 Software version
You can review the currently Installed software version under Software Version.
Press the MENU button and use the or buttons to select the [Software Version] entry.
Press the OK button. The current software version is displayed.
10 Cleaning
A To prevent the risk of electric shock, you should not clean the device with a wet cloth or under running water. Disconnect from the mains and switch the device off before cleaning!
Abrasive sponges, abrasive powders and solvents such as alcohol or petrol may not be used.
None of the following substances may be used: salt water, insecticides, solvents containing chlorine or acid (ammonium chloride).
Clean the housing with a soft cloth dampened with water. Do not use spirits, thunders etc.; you could damage the surface of the device.
1 Only clean the display with a soft cotton cloth. If necessary, use a cotton cloth with a small amount of non-alkaline, thinned soap solution, based on water or alcohol.
Rub the cotton cloth gently over the surface.
11 Eliminating malfunctions
If the device is not functioning as intended, run a check using the following table.
| Symptom Possible cause/remedy | |
| Device cannot be switched on. | The device is not receiving power. Connect the mains adaptor properly to the socket and the device. Charge the battery. |
| There is no sound Increase the volume. | |
| The display cannot be switched on. | Disconnect the device from the mains/remove the battery and resuspend the device with power. |
| Poor reception via DAB+FM | Extend the aerial fully. Change the position of the aerial or of the Digital Radio. |
| Device cannot be operated. | Disconnect the device from the mains/remove the battery and resuspend the device with power. |
If the malfunction cannot be eliminated even after carrying the checks described, please contact the Technical Hotline.
12 Technical data / Manufacturer's notes
Subject to technical changes and errors.
| Reception modes DAB/DAB+ FM |
| Power supply AC input: 100-240V, 50/6012 / DC output: 5V, 1A |
| Battery: 3.7V/1050mAh Li-ion, charging current max. 500mA Battery lifetime up to 10 hours (speaker at medium volume). |
| Frequencies: FM: 87.5-108MHz DAB/DAB+: 174-240MHz |
| Display OLED |
| Power consumption: when operating max. 6W (with mains adapter and battery charging) when operating typically: 1W (50% volume, no battery charging) Standby: < 0.4W Power off: < 0.3W Battery-operated power off: < 0.3mW |
| Audio output performance: 1W PMS |
| Weight 2.72g |
| Dimensions (W x H x 0): 15cm x 9.2cm x 3.34cm |
Notes
Mode d'emploi
DIGITRADIO 1
Radio DAB+/FM portable
TechniSat
62
1 Illustration
3.2.3 Mentions legales
[MM-JJ-AAAA] (mois, jour, annec)
9.5 Software version
9 Systeminnstillinger 286
[Scanning...] ("Skanner ...") vises i displayet.
8.6 Lydinnstillinger
Tryk pə MENU (MENY) knappen oŋ bruk -ø ng knapoe til a velge undermenyen [Audio Settings] («Lyddinstillingterg').
Trykk pa OK-knappen.
Hvs FM-mattakot or svakt, bruk ell til a velge [Stereo Possible] (“Stereo muliga") - ell [Mono Only] ("Bare mono")-alternativet for & splice i stereo (kun tilgengeling med hodetelefoner) ellere bil mono.
Bekreft ved a trykke pa OK-knappen
9.1.2 Opating at tid
Iienne undermenu kan du angive, hvorvidt tiden stal opdateres automatisk via DAB+ ellf FM ellor om du anskar at opdatero den manuelt. (Afsfn 9.1.1).
Trys pa MENKnappen og brug eiffer knappen tll at vaeige [Tid] undermenuen.
Tryk derefter pa OK knappen.
- View from the front and side
- View from the back
- Contents
- Foreword
- Target group of this operating manual
- Intended use
- Important instructions
- Safety
- Using batteries
- Disposal
- Disposal Instructions:
- Legal notices
- Servicing notes
- Setting Up the Device
- Caution!
- Description of the DIGITRADIO 1
- Scope of delivery
- Special features of the DIGITRADIO 1
- Preparing the DIGITRADIO 1 for use
- Inserting the battery
- Connecting to the mains
- Aligning the telescopic aerial
- Using headphones
- Damage to hearing!
- General device functions
- Switching the device on
- Switching the device off
- When using the malns:
- In battery mode:
- Switching between DAB+ and FM mode
- Setting the volume
- Display
- Accessing the display
- Menu operation
- The DAB+ (digital radio) function
- What is DAB+?
- 7.1.Data compression
- Audio stream
- DAB+ (digital radio) reception
- Carrying out a full scan
- Selecting a station
- Storing DAB+ stations in a storage location
- Accessing DAB+ stations in a storage location
- Overwriting/deleting a stored station location
- Signal strength
- Manual settings
- Volume adjustment (DRC)
- Deleting inactive stations
- FM (VHF) operation
- Switching to FM radio mode
- FM (VHF) reception with RDS information
- Automatic station scan
- Manual station scan
- Scan settings
- Audio settings
- Storing FM stations in a storage location
- Accessing FM stations in a storage location
- Overwriting/deleting a stored station location
- System settings
- Setting the time and date
- Setting the time/date manually
- Updating the time
- Setting the time format
- Setting the date format
- Display brightness
- Language
- Factory settings
- Software version
- Cleaning
- Eliminating malfunctions
- Technical data / Manufacturer's notes
- Mode d'emploi
- DIGITRADIO 1
- Mentions legales
- Lydinnstillinger
- Opating at tid
Brand : TECHNISAT
Model : DigitRadio 1 A
Category : Radio