USER MANUAL City Urban Pro CECOTEC
natural_image
Two light blue and black bicycles with front livery, displayed against a dark background (no text or symbols visible)
Safety instructions 11
-
Parts and components
-
Before use B2
-
Assembly 83
-
Operation 85
-
Cleaning and maintenance
-
Error codes 90
-
Technical specifications 91
-
Disposal of old electrical
and electronic appliances 92
-
Technical support and warranty 92
-
Copyright 92
-
Declaration of conformity 93
INDICE
Read these instructions thoroughly before using the device. Keep this instruction manual for future reference or new users.
- It is important to note that when using an electric pedal-assisted bicycle (EPAC) on public roads, specific legal requirements may apply according to national regulations. These requirements may include, among others, the obligation to have an adequate lighting system and reflectors to increase the visibility and safety of the cyclist.
- Before using your electric bicycle in public environments, we strongly recommend that you consult and comply with the regulations and standards in force in your country. Ensure that your electric bike is equipped with the required lighting devices and reflectors and that they are in good working order.
- Compliance with the relevant legal requirements not only ensures your own safety, but also contributes to road safety in general. Remember that it is the rider's responsibility to know and follow the applicable rules and regulations in order to use their electric bicycle safely and legally on public
roads.
- Always remove the battery during maintenance.
- Do not modify or tamper with the electrical management system of the electric bicycle.
- Warning: After prolonged use, use caution when touching hot surfaces such as disc brakes.
- The electric city bike has been specifically designed for use in urban environments and on flat surfaces. It is designed to provide electric assistance in this type of terrain and enhance the driving experience in urban environments. However, it is important to note that incorrect use of the E-bike can present potential risks and hazards. The following dangers of incorrect use are warned against:
- Risk of loss of control: In urban environments, conditions such as heavy traffic, pedestrians and unforeseen obstacles may exist. It is crucial to handle the electric bike with caution, respect traffic rules and use proper riding skills to avoid loss of control and possible accidents.
- Risk of overheating: in urban conditions, the continuous and prolonged use of the electric assistance system can generate heat. It is important to monitor engine and battery temperature to avoid overheating. If a significant temperature rise is detected, it is recommended to stop and allow the system to cool down before continuing.
- Risk of premature wear and tear: the frequent use in urban environments can subject the electric bicycle to increased wear and tear. Regular inspections of the E-bike and its components are recommended, paying attention to signs of wear and tear, damage, or weaknesses. Replace any worn or damaged components immediately to maintain the safety and optimum performance of the urban E-bike.
- Remember the importance of using your electric city bike
responsibly and appropriately to ensure a safe and enjoyable riding experience in urban environments. Always comply with traffic regulations and adopt a cautious approach when driving on busy streets and roads.
- Always wear a suitable bicycle helmet and ensure that it is correctly fitted. The use of helmets is of vital importance to safeguard the integrity of the head in case of falls or accidents.
- Periodically check the brakes to ensure that they are functioning properly. Check brake pads for wear and tear and adjust if necessary. Brakes in good condition are indispensable to ensure efficient braking ability.
- Check tyre pressure regularly. Ensure that the tyres are inflated to the recommended pressure. Underinflated tyres can affect the stability and performance of the bike, as well as increase the risk of punctures.
- Inspect the steering of the bicycle and ensure that it is properly adjusted. Check that there is no play and make sure that it rotates smoothly without hindrance. Loose or defective steering can compromise control of the bicycle.
- Regularly check tyres for damage or deformation. Ensure that they are in good condition, with no cracks, dents or other problems that could compromise their structural integrity.
- Use caution with braking distances in wet conditions. Remember that brakes may be less effective on wet surfaces, so increase braking distance and reduce speed in wet or slippery conditions.
- It is vital to use original spare parts for safety critical components. These parts are specifically designed for your electric bike; they meet the appropriate standards and guarantee optimum performance and safety. The use of non-original parts may compromise the safety and function
of the bicycle. Prioritise your safety and use only original spare parts supplied by the manufacturer or authorised dealer.
- It is important to watch out for wheel rims and to be aware of any dangerous wear. The wheel rims may suffer from wear due to various factors, such as knocks, friction or prolonged use. It is essential to regularly inspect wheel rims for signs of excessive wear, cracks, or damage. If any problems are observed, they should be addressed immediately to avoid potential risks while driving.
- WARNING: As with all mechanical components, the E-bike is subject to wear and tear and high stresses. Different materials and components can react to wear or fatigue in different ways. If the service life of a component has been exceeded, it could suddenly fail, possibly causing injury to the rider. Any form of cracking, scratching or discolouration change in highly stressed areas indicates that the component's lifespan has been reached and it should be replaced.
- WARNING: In composite components, impact damage may be invisible to the user. The manufacturer must explain the consequences of impact damage and that, in the event of an impact, the composite components must be returned to the manufacturer for inspection or destroyed and replaced.
- It is important to note that composite components can be affected by high temperatures, especially in confined environments. It is recommended to avoid exposing the electric bicycle to intense heat sources such as radiators, vehicle exhausts or storage in enclosed spaces without adequate ventilation. Excessive heat can cause deformation, weakening of materials or even structural failure.
- When installing a child seat on the electric bike, it is essential
to ensure that any springs under the saddle are adequately covered. This is to avoid the risk of the child's fingers or any objects getting caught in the spring, which can cause injury.
- It is important to note that bicycle handlebars can have a significant impact on the rider's turning and braking response. Incorrectly adjusted handlebars can cause stability problems when turning, which can result in loss of control of the bicycle. In addition, a loose handlebar can affect the ability to respond to the braking force, as the force applied in the brake levers will not be transmitted efficiently to the brakes. This may result in a slower response time or a reduction in braking power.
- Users are strongly advised not to perform pinion exchanges or any other modifications to the electric bicycle drivetrain using non-original parts. The use of original spare parts guarantees the compatibility, quality and expected performance of the electric bike.
- Any tampering with the electric bicycle may void the warranty provided by the manufacturer. This may include the exchange of parts with non-original components, unauthorised modifications or any other action that alters the original design and operation of the bicycle.
- The user is responsible for using the electric bicycle in accordance with the instructions and recommendations provided in the manual. Any improper handling is the responsibility of the user and may result in personal injury, damage to the bicycle or damage to third parties.
- The use of bicycle trailers or towing bicycles is not permitted with this E-bike. The use of bicycle trailers or towed bicycles may compromise the safety and performance of the E-bike and will void the product warranty.
-
The mechanism shall mark the ends of the fork when closed in the locked position.
-
The installation and use of accessories, such as trailers or towing bicycles, is not recommended as this would exceed the maximum weight supported by the electric bicycle; and it would significantly affect the electronic components and could considerably reduce their lifespan or even lead to their failure.
- For safety reasons and to preserve the optimum performance of this electric bicycle, do not use bicycle trailers and child seats on this model. The installation of bicycle trailers or child seats could affect the balance, stability, and safe operation of the electric bicycle.
- Be sure to charge the battery of the electric bike only indoors, in a dry and protected place. Avoid exposing the charger and battery to adverse weather conditions, such as rain or moisture, to prevent damage and ensure safe charging.
- Avoid overcharging the battery: disconnect the charger once the battery is fully charged. Avoid leaving the battery connected to the charger for a prolonged period of time, as overcharging may affect its lifespan and efficiency.
- Do not disassemble or modify the battery: The battery of the electric bicycle is a sensitive and complex component. Do not attempt to disassemble, repair, or modify it, as this may cause damage or safety hazards.
- Charge the battery regularly: If you do not use the electric bike for an extended period of time, be sure to charge the battery at least once every few weeks to maintain optimum performance and avoid complete discharge.
- WARNING: To recharge the battery, use only the removable power supply unit supplied with the device, reference number GPLC084V42Y.
-
The appliance is supplied with a battery, do not burn it, or expose it to high temperatures, as it may explode.
-
Leaks from the battery or cells can occur under extreme conditions. Do not touch any liquid that leaks from the battery. If the liquid gets into contact with skin, wash immediately with soap and water. If the liquid gets into the eyes, wash them immediately with clean water for a minimum of 10 minutes and seek medical attention. Wear gloves to handle the battery and dispose of it immediately in accordance with local regulations.
- You must remove the battery from the device before disposing of it.
- The device must be disconnected from the power supply when the battery is removed.
- The battery must be removed for safe disposal.
- Non-rechargeable batteries must not be recharged.
- Rechargeable batteries must be removed from the device before charging.
- Different types of batteries or new and used batteries must not be mixed.
- Batteries must be inserted according to the correct polarity.
- If the device is to be stored unused for a long period of time, the battery should be removed.
- The supply terminals must not be short-circuited.
INSTRUCTIONS DE SÉCURITÉ
- Aluminium alloy frame
- Rim: spoked rims
- Wheels
- Brakes: disc brake
- Removable 36 V 12.8 Ah battery
- Motor
- Shimano 7-speed derailleur
- LED headlight
- Rear rack
- Mudguard
NOTE:
The graphics in this manual are schematic representations and may not exactly match the device.
2. BEFORE USE
- This electric bike features packaging designed to protect it during transport. Remove the electric bicycle from its box and remove all packing material. You can keep the original box and other packaging elements in a safe place. This will help you prevent damage to the device when transporting it in the future. In case the original packaging is disposed of, make sure all packaging materials are recycled accordingly.
- Make sure all parts and components are included and in good conditions. If there is any piece missing or not in good condition, immediately contact the official Cecotec Technical Support Service.
Box content
- E-Bike
- Charger
- Tools
- Instruction manual
3. ASSEMBLY
Step 1
Place the appliance upright. You can identify the vertical position of the box by checking the "this side up" sign on the side of the box with directional arrows. Open the box carefully with the help of a box cutter or scissors.
Step 2
The e-bike is packaged to prevent scratches and damage. Once the box has been opened, carefully remove the parts of the electric bike. To do this, hold the electric bike by the stem and top tube and lift it vertically. Place it carefully on the floor, away from the packaging and in an upright position
Step 3
Apart from the main body of the electric bike, the box contains smaller boxes containing other components such as the charger, pedals, and tool kit. Remove them with care.
Step 4
The front wheel comes packaged with the electric bike and is attached to the frame with the help of a zip tie. The packaging protects the mechanical brake and the tyres from damage. To remove the front wheel from the frame, carefully cut off the zip tie and store it. Next, be sure to remove the protective packaging from the wheel before you start installing it on the electric bike.
Step 5
Look for any zip ties that may still be left on the wheel. Cut them carefully without damaging the electric bicycle.
Step 6
Keep the electric bike in an upright position and remove all packaging. Then you can start assembling the product.
Assembling the handlebar. Fig. 2
The electric bike is delivered with the stem bracket facing away from you. Before mounting the handlebars, make sure that the stem bracket faces outwards.
- First stand at the front of the bike and then loosen the two screws at the handlebar bracket joint with the 5 mm Allen key
- Then carefully turn the stem cover outwards. You must turn the stem cover 180^ counterclockwise and align it correctly.
- Remove the four screws of the upper bracket with the 4 mm Allen key and remove the stem cover.
- Carefully place the handlebars in the now open stem cover. Ensure that all cables are
ENGLISHENGLISH
untangled and exit from the front of the front fork so as not to obstruct movement once the front wheel is mounted.
- Align the handlebar slots in the stem. Then, replace the stem cover and tighten the screws clockwise. Make sure that the screws fit into the slot when tightened and that they are not lost to prevent damage to the thread.
- Insert the front light and horn wires into the hole at the top of the diagonal tube. Bring the accelerator cable and the two side brake sensor cables together and join them with the help of two cable ties.
Assembling the reflectors
- Slide the reflector holder into the slot provided on the back of the saddle post.
- Then slide the reflector bracket over the seat saddle post.
- Tighten the screw of the reflector bracket once it is in the correct position using the Phillips screwdriver.
- Follow the same steps to mount the front reflector. Place it on the handlebars and tighten the screw with the screwdriver.
Assembling the saddle post. Fig. 3
Lift the saddle tube lever and insert the saddle post. Finally, close the lock lever by pressing it towards the frame.
Note: adjust the saddle height with the lever under the saddle.
Assembling the saddle
- For the saddle height pre-adjustment, the saddle should be at the same height as your hip. Please note that the correct position should be one in which your hip is not tilted to one side when the pedal is in its bottom position and your foot is fully engaged in the pedal. Once the pre-adjustment has been made, finally adjust the saddle height, bearing in mind that when the saddle is raised, the knee should be neither fully stretched nor very bent when the pedal is at the bottom.
- Adjust the saddle properly to ensure maximum efficiency and comfort during exercise. The saddle is in the correct position if the user has a slightly bent knee when one of the pedals is at a 90-degree angle relative to the ground.
- To indicate the maximum height that the saddle can be adjusted, you will see vertical line markings following the word MIN.
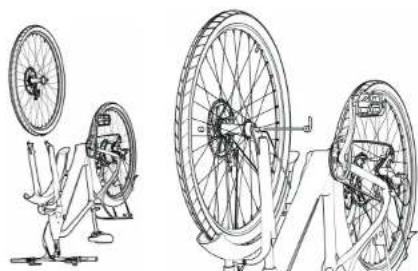
Front wheel mounting. Fig. 4
- Place the electric bicycle frame upside down on a stable surface. This ensures that no parts of the electric bike are damaged during assembly. Remove any packaging or zip ties that may remain on the front wheel.
- Stand in front of the front hub of the electric bike with the disc brake on the left. When mounting the front wheel, make sure that the tyre fits.
Note: If the front wheel does not fit, the inside of the front brake calliper must be loosened.
- Carefully stand the wheel upright and insert the fork brackets onto the fork bracket. Then insert the front axle together with the lock-on quick release and nut on the other side of the wheel. Once inserted, first tighten the nut, and then turn the lock-on quick release handle until it hardens slightly. Finally, operate the handle to close it securely.
- Make sure that the wheel is correctly centred in the frame, otherwise the balance of the electric bike may be disturbed. Make sure that the disc brake is on the left side of the bicycle.
Assembling the pedals. Fig. 5
- Check the marking indicating the left pedal and the right pedal. You will find stickers indicating this.
- To mount the pedals, the right pedal must be screwed clockwise, and the left pedal must be screwed counterclockwise with the 15 mm spanner.
Assembling the battery. Fig. 6
- The electric bike comes with a removable battery. Remove it from the box carefully. Place it in the space provided for it in the diagonally positioned central tube. Slide it in after making sure that the battery is correctly aligned.
- Once in place, insert the spanner into the hole on the right side of the battery. Turn the spanner clockwise to fix the battery in its place.
- Press the button on the front end of the battery to ensure that the power supply is connected and functioning properly.
Charging the battery
Only use the original charger supplied. To start charging, insert the charger into the socket on the side of the battery and plug it into a power source. The battery will fully charge in 4-6 hours.
4. OPERATION
Content shown on the display (everything is shown 1 second after it is switched on).
Control panel. Fig. 7
- Light
- Battery level
- Multifunctional display area
a. Total mileage
b. Current trip mileage
c. Current battery voltage
d. Amperage
e. Error codes
©
ENGLISHENGLISH
changing gears. Lubricate the chain every 100-200 km or when the chain is dry or dirty. Use a specific lubricant for bicycle chains, preferably one with a wax or Teflon base. Apply the lubricant to the inside of the chain while turning the pedals backwards. Remember to clean the chain before applying the lubricant for best results.
- When greasing the chain, make sure that the brake discs are not soiled, and that the sprocket is not engaged. Spray where the chain slides smoothly and wipe off excess lubricant with a cloth. Only use specific chain lubricant.
- The proper bicycle chain tension is the tension at which you can move the chain slightly vertically between approximately 1 cm and 3 cm without it being too slack or too tight.
To adjust the gears on a bicycle, follow these steps:
- Make sure that the bicycle is horizontal and stable.
- Shift to the lowest gear on both the front and rear derailleur.
- Turn the rear derailleur tension adjuster so that the chain moves smoothly over the sprockets without jumping.
- Adjust the limits of the rear derailleur so that the chain does not run outside or inside the sprockets.
- Shift to the highest gear and repeat steps 3 and 4 for the front derailleur.
To adjust the brakes on a bicycle, follow these steps:
First, locate each of the brakes that are attached to the handlebars of the bicycle, where the front brake is located on the left handlebar lever and the rear brake is located on the right handlebar lever.
- Ensure that the brake pads are correctly aligned with the braking surface of the rim.
- Adjust the brake cable tension using the adjusting screw on the brake or on the brake lever.
- Check that the brakes apply correctly and that the pads make even contact with the rim when the levers are actuated.
- Regarding the replacement of friction components, such as brake pads, it is recommended to replace them when they are worn and no longer provide good braking performance. Regularly inspect your brake pads and replace them if they are worn beyond the indicator or if they are no longer thick enough.
If you are unsure or unfamiliar with how to adjust the gears, it is recommended that you take your electric bike to a specialist repair shop.
We recommend that you have your vehicle serviced and maintained once every 6 months by a repair shop.
| TIGHTENING TORQUE TABLE |
| Front wheel nuts 30 - 35 Nm | |
| Rear wheel nuts 30 - 35 Nm | |
| Brake retaining nut B - 10 Nm | |
| Handlebar nut 10 Nm | |
| Steering nut | M4: 5 - 7 Nm |
| M5: 7 - 10 Nm |
| M6/M7: 12 - 15 Nm |
| Front fork nut 35 - 35 Nm | |
Maintenance control
| MONTHLY |
| Regular cleaning | Main frame Use | a low-pressure water jet or a damp cloth to clean it and then wipe it dry. Do not get the electrical components wet when cleaning the electric bike. |
| Transmission Use | a bicycle transmission degreaser on the chain, flywheel, and gears to clean them thoroughly. It is essential to remove dirt and dust that accumulate in the transmission. Always clean the transmission before lubricating the chain. |
| Bike chain Use | a low-pressure water jet or a damp cloth to clean it and then wipe it dry. Do not get the electrical components wet when cleaning the electric bike. |
| Wheels Check for loose spokes. |
| Wheels Check for the tyre pressure every week and maintain it within the limits specified on the tyre. |
| Bolts If there is play in the bolts and screws, tighten them immediately. |
ENGLISHENGLISH
| EVERY 6 MONTHS (AT AUTHORISED REPAIR SHOP) |
| Thorough cleaning | Brakes | Clean the brakes and brake pads to prevent squealing.If they are worn, replace them with new ones.Replace brake cables or brake fluid every 6 months for proper operation. |
| Wheels | Check the wheels for worn tread. Replace wheels if necessary. |
| Bike chain | Check the chain wear with the chain wear indicator. |
| Handlebar grips | Replace the grips if they are worn. |
| Gear shifting | Replace the gear shift cables every 6 months for best performance. |
| Front hub | Clean and regrease the bearing inside the hub. |
| EVERY YEAR (AT AUTHORISED REPAIR SHOP) |
| Full revision | Every component | Completely disassemble the electric bicycle. Clean and re-grease all threaded components after assembly.Inspect frame, suspension and all components, repair or replace parts as necessary.Degrease the transmission and replace the chain. |
- ERROR CODES
| Code | Description |
| E00 | Normal |
| E05 | Low battery |
| E07 | Motor failure |
| E08 | Display failure |
| E09 | Controller failure |
| E10 | Data reception failure |
| E11 | Data transmission failure |
7. TECHNICAL SPECIFICATIONS
Product reference: 07215 / 07216
Product: City Urban / City Urban Pro E-bike
| Product reference: | 07215 / 07216 |
| Product City Urban / City Urban Pro E bike |
| Features Measuring units Specifications | |
| Dimensions Dimensions LxWxDH 1850 X 640 X 1200 (mm) | |
| Weight Weight 23.1 kg | |
|
|
| Technical specifications | Range (1) 50 Km | |
| Max. speed of assistance 25 km/h | |
| Operating temperature | 0-45 °C |
| Storage temperature | 0-40 °C |
| IP protection rating | IPX4 |
| Battery | Type-model | EM-36V 12.8Ah-MF |
| Charging time | 4-6 hrs |
| Capacity | 12.8 Ah |
| Rated voltage | 36 V |
| Max. charge voltage | 42 V |
| Wheels | Wheel | 28" |
| Air pressure | 2.5 - 3.5 bar |
| Charger Model | GPLC054V42Y |
| Inlet | 100-240 V 50/60 Hz 2A |
| Outlet | 42 V DC, 2 A |
ENGLISHENGLISH
Range measured with a weight of 80 kg, fully charged battery at a constant speed of 15 km/h, on a flat surface, without wind, and with an ambient temperature of approx. 25 °C.
The A-weighted emission sound pressure level at the driver's ear is less than 70 dB(A).
Technical specifications may change without prior notification to improve product quality. Made in India | Designed in Spain
8. DISPOSAL OF OLD ELECTRICAL AND ELECTRONIC APPLIANCES

This symbol indicates that, according to the applicable regulations, the product and/or batteries must be disposed of separately from household waste. When this product reaches the end of its shelf life, you should dispose of the cells/batteries/accumulators and take them to a collection point designated by the local authorities.

Consumers must contact their local authorities or retailer for information concerning the correct disposal of old appliances and/or their batteries.
Compliance with the above guidelines will help protecting the environment.
9. TECHNICAL SUPPORT AND WARRANTY
Cecotec shall be liable to the end user or consumer for any lack of conformity that exists at the time of delivery of the product under the terms, conditions, and deadlines established by the applicable regulations.
It is recommended that repairs be carried out by qualified personnel.
If at any moment you detect any problem with your product or have any doubt, do not hesitate to contact the official Cecotec Technical Support Service at +34 96 321 07 28.
10. COPYRIGHT
The intellectual property rights over the texts in this manual belong to CECOTEC INNOVACIONES, S.L. All rights reserved. The contents of this publication may not, in whole or in part, be reproduced, stored in a retrieval system, transmitted, or distributed by any means (electronic, mechanical, photocopying, recording or similar) without the prior authorization of CECOTEC INNOVACIONES, S.L.
MANUFACTURER: CECOTEC INNOVACIONES S.L
ADDRESS: Av. Reyes Católicos, N°60, 46910, Alfatar, Valencia (Spain).
DESCRIPTION: Pedal-assisted electric bike
PRODUCT IDENTIFICATION: City Urban / City Urban Pro
FUNCTION: Pedal-assisted electric bike
MODEL: 07215 / 07216
It certifies the product described has been designed, manufactured, and tested and complies with all applicable provisions.
EU DIRECTIVES IMPLEMENTED:
- Directive 2006/42/CE on machinery.
- Directive 2011/65/EU and delegated directive (EU) 2015/863 on the restriction of the use of certain hazardous substances in electrical and electronic equipment.
- Directive 2014/30/EU on the harmonisation of the laws of the Member States relating to electromagnetic compatibility.
APPLICABLE HARMONISED NORMS:
- EN ISO 12100:2010
- EN 15194:2017
- EN ISO 4210 2:2023
- EN IEC 61000-6-1:2019
- EN IEC 61000-6-3:2021
- EN IEC 61000-3-2:2019+A1:2021
- EN IEC 61000 3 3:2013 + A1:2019 + A2:2021
FRANÇAISFRANÇAIS
1. PIÈCES ET COMPOSANTS
Img.1
- EN IEC 61000-6-3:2021
- EN IEC 61000 3 2:2019+A1:2021
- EN IEC 61000-3-3:2013 + A1:2019 + A2:2021
ITALIANOITALIANO
1. PARTI E COMPONENTI
Fig. 1
b. Storing in gashendel
c. Storing in de remmen
d. Storing in regelaar
e. Storing in de motor
f. Storing in communicatie
STOSOWANE DYREKTYWY UE:
Fig./Img./Abb./Afb./Rys./Obr.1

natural_image
Illustration of bicycle hand positioning and steering positions (no text or symbols)
Fig./Img./Abb./Afb./Rys./Obr.2

natural_image
Diagram showing bicycle seat mounting mechanism with a lever and chain (no text or symbols)
Fig./Img./Abb./Afb./Rys./Obr.3
natural_image
Technical line drawings of bicycle wheel assembly and mounting mechanism (no text or symbols)
Fig./Img./Abb./Afb./Rys./Obr.4

natural_image
Technical line drawing of mechanical components including a shaft, housing, and gear assembly (no text or symbols)
Fig./Img./Abb./Afb./Rys./Obr.5

natural_image
Line drawing of a bicycle with front wheel, rear wheel, and side panel (no text or symbols)
Fig./Img./Abb./Afb./Rys./Obr. 6

Fig./Img./Abb./Afb./Rys./Obr.7

Fig./Img./Abb./Afb./Rys./Obr.8
www.cecotec.es