
AXP26U559HW - Air Conditioning AEG - Free user manual and instructions
Find the device manual for free AXP26U559HW AEG in PDF.
| Product type | Portable monoblock air conditioner |
| Brand | AEG |
| Model | AXP26U559HW |
| Refrigerant | R290 (flammable) |
| Power supply | 220-240 V ~ 50 Hz, 10 A |
| Cooling power | ≈ 2.6 kW (estimate) |
| Heating power | ≈ 2.6 kW (estimate) |
| Dimensions (Length x Width x Height) | ≈ 450 x 350 x 750 mm (estimate) |
| Weight | ≈ 25 kg (estimate) |
| Noise level | ≈ 60-65 dB (estimate) |
| Operating modes | Cooling, Heating (depending on model), Dehumidification, Fan, Auto |
| Control | Touch panel, WiFi app (remote control not included) |
| Special functions | 24h timer, Sleep, Louver oscillation, Child lock, Filter reset, Built-in WiFi, Bluetooth for pairing |
| Connectivity | WiFi 2.4 GHz (IEEE 802.11 b/g/n), Bluetooth |
| Water tank capacity | Continuous drain possible (hose not included) |
| Maintenance | Clean air filter every 2 weeks |
| Safety | Automatic shut-off if tank full (code P1), use of flammable refrigerant R290 |
| Included accessories | Window kit (AWKIT5), kit extension (EWKEXT1), adapters and exhaust hose |
| Error codes | AS (ambient sensor), ES (evaporator sensor), L3 (fan motor), P1 (water tank full), E4 (communication) |
| Warranty | 2 years (standard) |
Frequently Asked Questions - AXP26U559HW AEG
User questions about AXP26U559HW AEG
0 question about this device. Answer the ones you know or ask your own.
Ask a new question about this device
Download the instructions for your Air Conditioning in PDF format for free! Find your manual AXP26U559HW - AEG and take your electronic device back in hand. On this page are published all the documents necessary for the use of your device. AXP26U559HW by AEG.
USER MANUAL AXP26U559HW AEG
Thank you for choosing this AEG air conditioner. We have designed this product to provide exceptional performance for many years, with innovative technologies that help make life simpler – features you might not find on ordinary appliances. Please spend a few minutes reading this manual to ensure you get the best out of your air conditioner.
Visit our website for:

Get usage advice, brochures, trouble-shooting, service information: www.aeg.com

Register your product for better service: www.registeraeg.com

Buy Accessories, Consumables and Original spare parts for your appliance: www.aeg.com/shop
CUSTOMER CARE AND SERVICE
Always use original spare parts.
When contacting our Authorised Service Centre, ensure that you have the following data available: Model, PNC, Serial Number.
The information can be found on the rating plate.

Warning / Caution - Safety information.
General information and tips.
Environmental information.
Subject to change without notice.
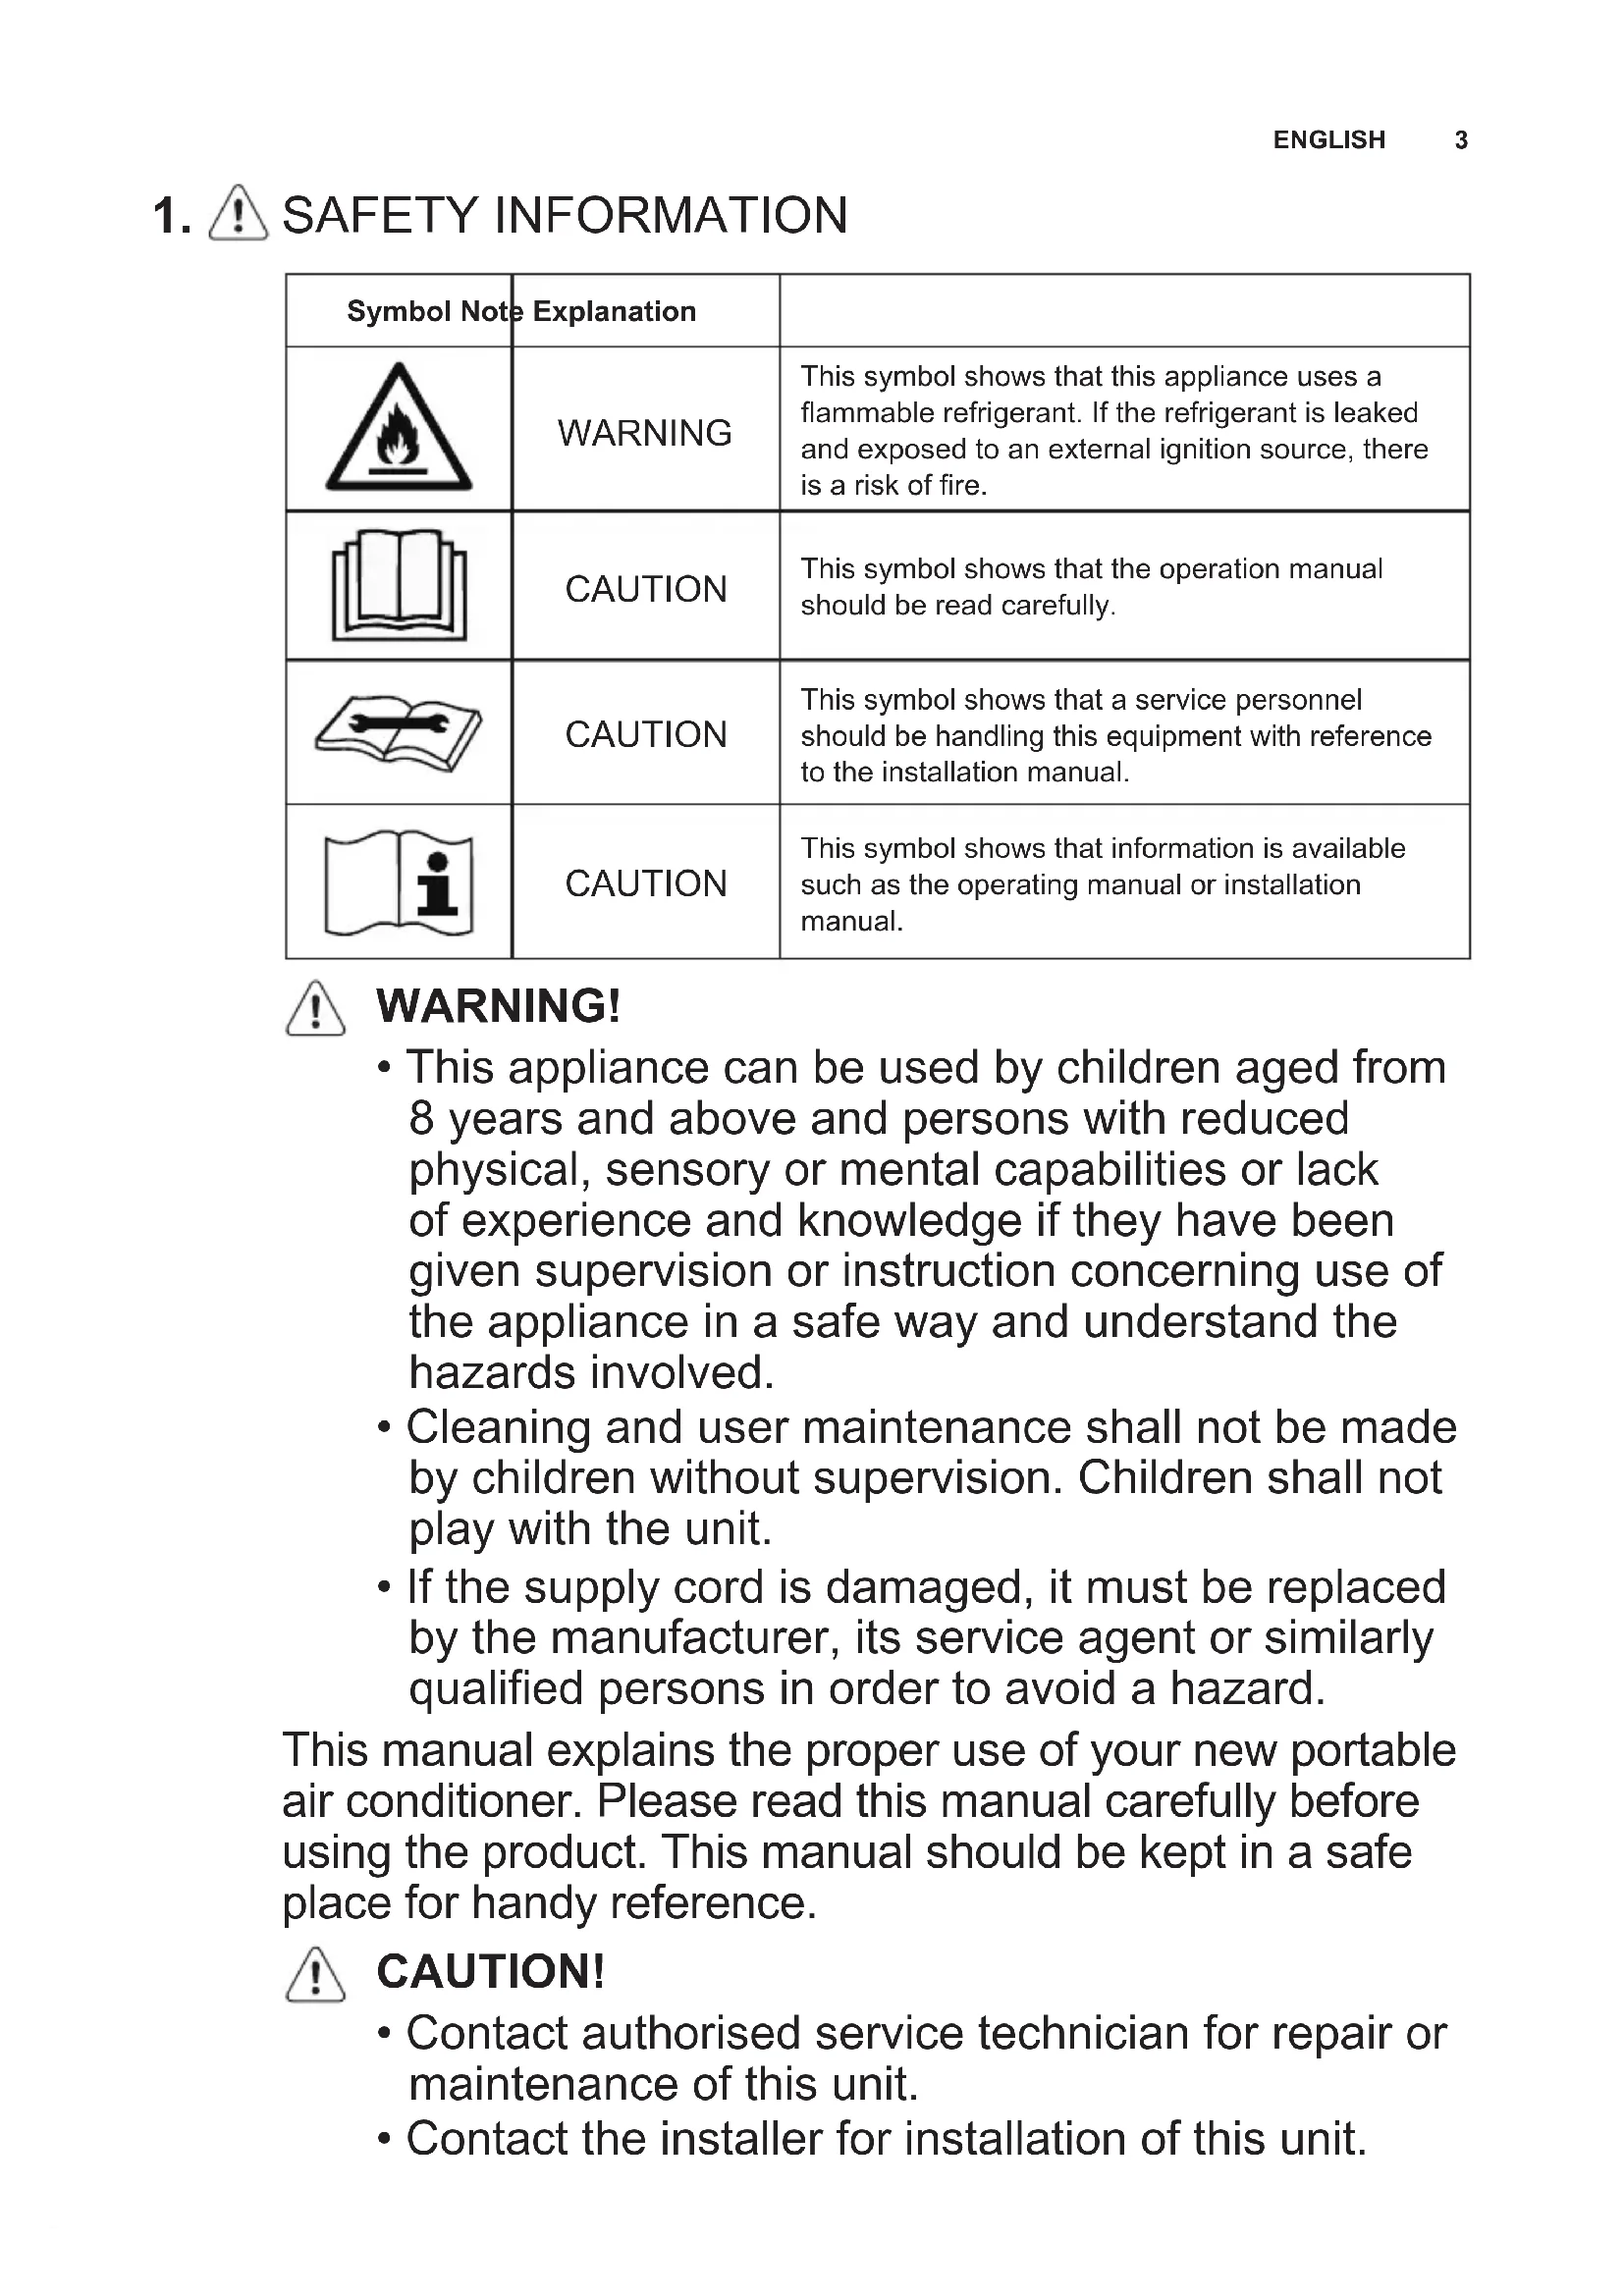
1. SAFETY INFORMATION
| Symbol Note | Explanation | |
| WARNING | This symbol shows that this appliance uses a flammable refrigerant. If the refrigerant is leaked and exposed to an external ignition source, there is a risk of fire. | |
| CAUTION | This symbol shows that the operation manual should be read carefully. | |
| CAUTION | This symbol shows that a service personnel should be handling this equipment with reference to the installation manual. | |
| CAUTION | This symbol shows that information is available such as the operating manual or installation manual. |

WARNING!
- This appliance can be used by children aged from 8 years and above and persons with reduced physical, sensory or mental capabilities or lack of experience and knowledge if they have been given supervision or instruction concerning use of the appliance in a safe way and understand the hazards involved.
- Cleaning and user maintenance shall not be made by children without supervision. Children shall not play with the unit.
- If the supply cord is damaged, it must be replaced by the manufacturer, its service agent or similarly qualified persons in order to avoid a hazard.
This manual explains the proper use of your new portable air conditioner. Please read this manual carefully before using the product. This manual should be kept in a safe place for handy reference.

CAUTION!
- Contact authorised service technician for repair or maintenance of this unit.
-
Contact the installer for installation of this unit.
-
The portable air conditioner is not intended for use by young children of infirm persons without supervision.
- Young children should be supervised to ensure that they do not play with the portable air conditioner.
- There are local council rules regarding maximum allowable noise levels emitted by air conditioners.
- If the power cord is to be replaced, replacement work shall be performed by authorised personnel only.
- Installation work must be performed in accordance with the national wiring regulations by authorised personnel only (if applicable). Incorrect connection can cause overheating and fire.
- Take care not to catch fingers in the fan when adjusting horizontal louvres swing.
- The fuse is 250V 3.15A, ceramic type.
- Cleaning and user maintenance shall not be made by children without supervision. Be aware that refrigerants may not contain an odour.
1.1 Important notes
- Do not operate unit without the air filter.
- Do not operate unit near any heat source or open fire.
- Do not expose the unit outside to direct sunlight and rain.
- Always store or move the unit in an upright position.
- Do not cover the appliance when in operation or immediately after use.
- Always drain condensation before storing unit.
1.2 Point to Keep in Mind When Using Your Portable Air Conditioner
CAUTION!
Warnings for use
- Do not modify any part of this product.
- Do not insert anything into any part of the unit.
-
Ensure the power supply used has an appropriate voltage rating. Only use a 220 - 240V, 50Hz, 10A mains electricity supply. Use of a power supply with an improper voltage rating can result in damage to the unit and possibly fire.
-
Always use an anti-explosive circuit breaker or fuse with the proper amp rating. Do not, under any circumstances, use wire, pins or other objects in place of a proper fuse.
- In the event of any abnormality with the portable air conditioner (eg. a burning smell), do not pull out the plug directly, open the window for ventilation firstly, then turn the unit off and disconnect the power supply.
CAUTION!
Warning for power supply cord
- This power plug must only be plugged into an appropriate wall socket. Do not use in conjunction with any extension cords.
- Push the power plug securely into the socket and make sure it is not loose.
- Do not pull, deform or modify the power supply cord, or immerse it in water. Pulling or misuse of the power supply cord can result in damage to the unit and cause electrical shock.
- If the supply cord is damaged, it must be replaced by the manufacturer or its service agent or a similarly qualified person in order to avoid a hazard. Use only the manufacturer specified power cord for replacement.
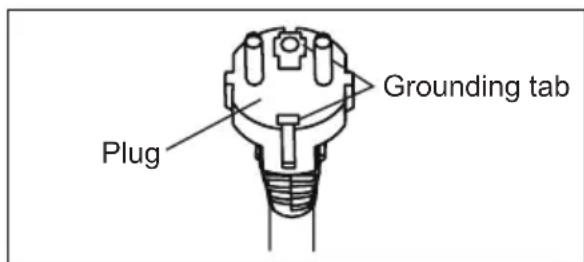
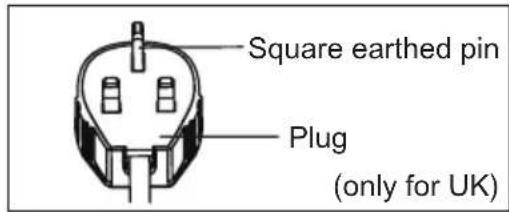
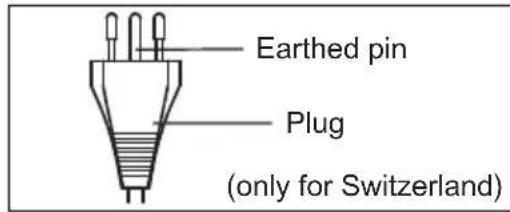
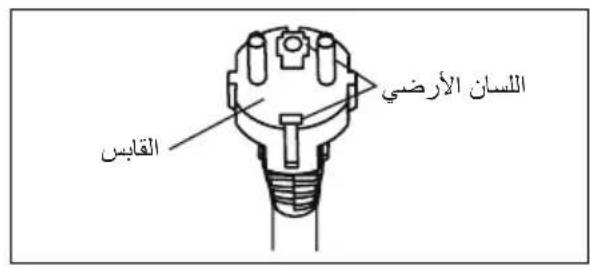
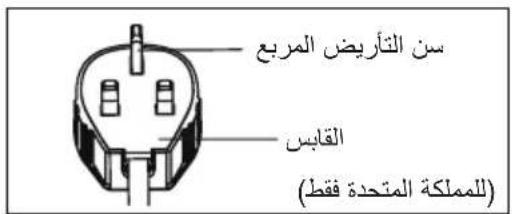
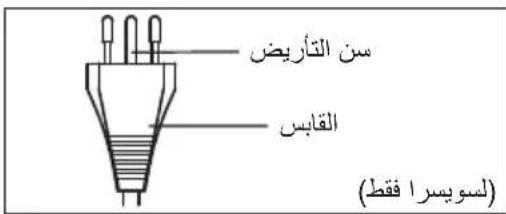
- This appliance must be earthed. This appliance is equipped with a cord having an earth wire. The plug must be plugged into an outlet that is properly installed and earthed. Do not under any circumstances cut or remove the square earthed pin (only for UK) from this plug.
1.3 Usage cautions
-
Be sure to turn the unit off and disconnect the power supply cord before performing any maintenance or cleaning.
-
Do not put unit near any heat source or open fire when replacing the filters.
-
Do not splash or pour water directly onto the unit. Water can cause electrical shock or equipment damage.
-
Drainage should be performed whenever moving the air conditioner. If any water remains in the tank, it may spill out while being moved.
-
To ensure proper drainage, the drainage hose must have no kinks and must not be elevated during dry mode or heat mode. If the hose is kinked or elevated, the drained water may spill out into the room.
-
The temperature around the drainage hose must not be below freezing point when used. Drained water may freeze inside the hose, causing water inside the unit to overflow into the room.
-
Do not block the exhaust air outlet with obstacles. Cooling performance may be reduced or stop completely.
-
Provide an anti-explosive residual current device (RCD) in order to protect against electric shock in accordance with British Standard and Wiring Rules.
-
Exposure to direct airflow for an extended period of time could be hazardous to your health. Do not expose occupants, pets, or plants to direct airflow for extended periods of time.
-
Do not use this portable air conditioner for non-specified special purposes (e.g. preserving precision devices, food, pets, plants, and art objects). Usage in such a manner could harm such property.
-
Do not use means to accelerate the defrosting process or to clean, other than those recommended by the manufacturer.
-
The appliance shall be stored in a room without continuously operating ignition sources (for example: open flames, an operating gas appliance or an operating electric heater).
- Do not pierce or burn.
- Compliance with national gas regulations shall be observed.
- Keep ventilation openings clear of obstruction.
PLEASE NOTE: CHECK THE PLATE FOR THE TYPE OF REFRIGERANT GAS USED IN YOUR APPLIANCE.

WARNING!
Specific information regarding appliances with R290 refrigerant gas.
- Thoroughly read all of the warnings.
- When defrosting and cleaning the appliance, do not use any tools other than those recommended by the manufacturing company.
- The appliance shall be stored in a room without continuously operating ignition sources (for example: open flames, an operating gas appliance or an operating electric heater).
- Do not pierce or burn.
- Refrigerant gases can be odourless.
- This appliance contains a certain number of grams (see rating label back of unit) of R290 refrigerant gas.
- R290 is a refrigerant gas that complies with the European directives on the environment. Do not puncture any part of the refrigerant circuit.
-
If the appliance is installed, operated or stored in a non-ventilated area, the room must be designed to prevent the accumulation of refrigerant leaks resulting in a risk of fire or explosion due to ignition of the refrigerant caused by electric heaters, stoves, or other sources of ignition.
-
The appliance must be stored in such a way as to prevent mechanical failure.
- Individuals who operate or work on the refrigerant circuit must have the appropriate certification issued by an accredited organisation that ensures competence in handling refrigerants according to a specific evaluation recognized by associations in the industry.
- Repairs must be performed based on the recommendations from the manufacturing company. Maintenance and repairs that require the assistance of other qualified personnel must be performed under the supervision of an individual specified in the use of flammable refrigerants.
1.4 Additional information
Transport of equipment containing flammable refrigerants
See transport regulations.
Marking of equipment using signs
See local regulations.
Disposal of equipment using flammable refrigerants
See national regulations.
Storage of equipment/appliances
The storage of equipment should be in accordance with the manufacturer's instructions.
Storage of packed (unsold) equipment
Storage package protection should be constructed such that mechanical damage to the equipment inside the package will not cause a leak of the refrigerant charge. The maximum number of pieces of equipment permitted to be stored together will be determined by local regulations.
2. SAFETY INSTRUCTION
2.1 Notes on Operation
- Allow 4 minutes for the compressor to restart cooling. If you turn the air conditioner off and immediately restart it, allow 4 minutes for the compressor to restart cooling. There is an electronic device in the unit that keeps the compressor turned off for 4 minutes for safety.
- In the event of a power failure during use, allow 4 minutes before restarting the unit. After power is reinstated, restart the portable air conditioner. If the power was off for less than four minutes, be sure to wait at least four minutes before restarting the unit. If you restart the air conditioner within four minutes, a protective device in the unit may cause the compressor to shut off. This protective device will prevent cooling for about 5 minutes. Any previous setting will be cancelled and the unit will return to its initial setting.
- When you turn the unit off in cooling mode, the compressor will shut off immediately and the upper/under fan motor will stop running after 5 seconds. If changing from cooling to fan mode, the compressor will shut off immediately and the under fan motor will stop running after 5 seconds. If changing from cooling to heating mode, the compressor will shut off immediately and the under fan motor will stop running after 30 seconds.
- Low temperature operation: Is your unit freezing up? Freezing may occur when the unit is set close to 18^ in low ambient temperature conditions, especially at night. In these conditions, a further temperature drop may cause the unit to freeze. Setting the unit to a higher temperature will prevent it from freezing.
- Dry mode decreases room temperature. Warm air will be blown out from the exhaust air outlet, but this is normal and does not indicate a problem with the unit.
-
This portable air conditioner blows the warm air generated by the unit outside the room via the exhaust hose while in cool mode. In the mean time, the same amount of air will enter the room from outside through any openings of the room.
-
Any person who is involved with working on or breaking into a refrigerant circuit should hold a current valid certificate from an industry-accredited assessment authority, which authorises their competence to handle refrigerants safely in accordance with an industry recognised assessment specification.
Servicing shall only be performed as recommended by the equipment manufacturer. Maintenance and repair requiring the assistance of other skilled personnel shall be carried out under the supervision of the person competent in the use of flammable refrigerants. - The working temperature range of the portable air conditioner is 16 - 35^ (60 - 95^) under cooling mode; 5 - 27^ (41 - 80^) under heating mode.
WiFi Working frequency and maximum output power: 2412-2472 MHz, 15.72dBm
To prevent injury to the user or other people and property damage, the following instructions must be followed. Incorrect operation due to ignoring instructions may cause harm or damage. The seriousness is classified by the following indications:

WARNING!
This symbol indicates the possibility of death or serious injury.

CAUTION!
This symbol indicates the possibility of injury or damage to property.
Meanings of symbols used in this manual are shown below:

This symbol indicates never to do this.

This symbol indicates always do this.
2.2 Warning during usage

WARNING!
| Warning Meaning | |
| Plug in power plug properly Otherwise, it may cause electric shock, fire and explosion due to excess heat generation | |
| Do not operate or stop the unit by inserting or pulling out Die power plug | It may cause electric shock, fire and explosion due to heat generation |
| Do not damage or use an unspecified power cord | It may cause electric shock, fire and explosion. If the power cord is damaged, it must be replaced by the manufacturer or an authorised service centre or a similarly qualified person in order to avoid a hazard |
| Do not modify power cord length or share the outlet with other appliances | It may cause electric shock, fire and explosion due to heat generation |
| Do not operate with wet hands or in damp environment | It may cause electric shock |
| Do not direct airflow at room occupants | This could harm your health |
| Always ensure effective earthing | Incorrect earthing may cause electric shock |
| Do not allow water to run into electric parts | It may cause failure of unit or electric shock |
| Always install circuit breaker and a dedicated power circuit | Incorrect installation may cause electric shock, fire and explosion |
| Unplug the unit if strange sounds, smell, or smoke comes from it | It may cause electric shock, fire and explosion |
| Do not use the socket if it is loose or damaged | It may cause electric shock, fire and explosion |
| Do not open the unit during operation | It may cause electric shock, fire and explosion |
| Keep firearms away | It may cause fire and explosion |
| Do not use the power cord close to heating appliances | It may cause electric shock, fire and explosion |
| Do not use the power cord near flammable gas or combustibles, such as gasoline, benzene, thinner, etc. | It may cause electric shock, fire and explosion |
| Ventilate room before operating air conditioner if there is a gas leakage from another appliance | It may cause explosion, fire, explosion and burns |
| Do not disassemble or modify unit It may cause failure and electric shock | |

CAUTION!
| Caution Meaning | |
| When the air filter is to be removed, do not touch the metal parts of the unit | It may cause an injury |
| Do not clean the air conditioner with water | Water may enter the unit and degrade the insulation. It may cause an electric shock |
| Ventilate the room well when used together with a stove, etc. | An oxygen shortage may occur |
| When the unit is to be cleaned, switch off, and turn off the circuit breaker | Do not clean unit when power is on as it may cause fire, explosion and electric shock, it may cause an injury |
| Do not place a pet or house plant where it will be exposed to direct air flow | This could injure the pet or plant |
| Do not use for special purposes Do not use this portable air conditioner to preserve precision devices, food, pets, plants, and art objects. It may cause deterioration of quality, etc. | |
| Stop operation and close the window during storms or hurricanes | Operation with windows opened may cause wetting of indoor and soaking of household furniture |
| Hold the plug by the head of the power plug when taking it out | It may cause electric shock and damage |
| Turn off the main power switch when not using the unit for a long time | It may cause failure of product or fire and explosion |
| Do not place obstacles around air-inlets or inside of air-outlet | It may cause failure of appliance or accident |
| Always insert the filters securely. Clean filter once every two weeks | Operation without filters may cause failure |
| Do not use strong detergent such as wax or thinner - use a soft cloth | Appearance may be deteriorated due to change of product colour or scratching of its surface |
| Do not place heavy object on the power cord and ensure that the cord is not compressed | There is danger of fire, explosion or electric shock |
| Do not drink water drained from air conditioner | It contains contaminants and could make you sick |
| Use caution when unpacking and installing Sharp edges could cause injury | |
| If water enters the unit, turn the unit off at the power outlet and switch off the circuit breaker. Isolate supply by taking the power-plug out and contact a qualified service technician | It could cause electric shock and damage |
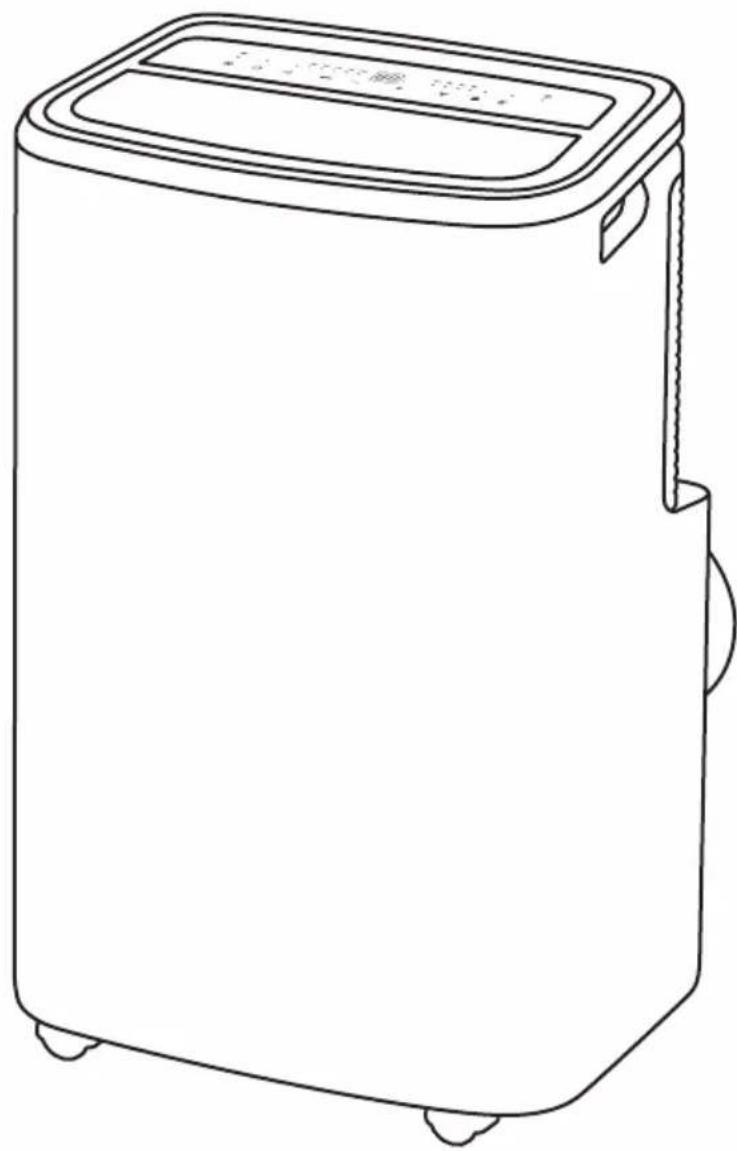
3. UNIT DESCRIPTION
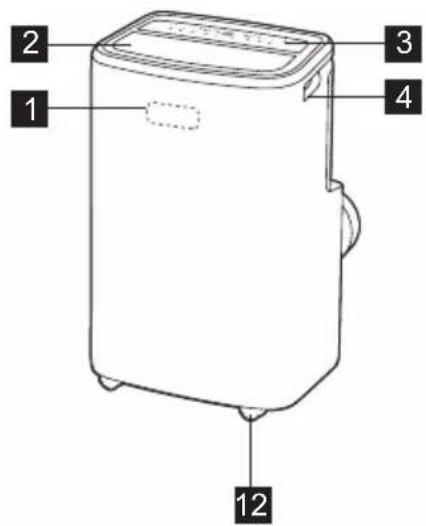
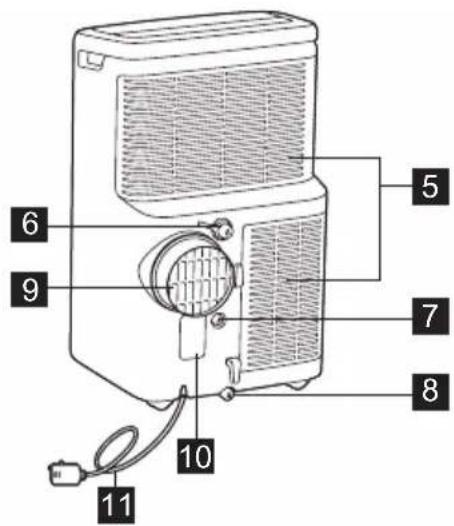
1 Signal receiver
2 Room air outlet
3 Control panel
4 Carrying handle (both sides)
5 Air intake
6 Continuous drain outlet (Dry mode)
7 Continuous drain outlet (Heat pump mode)
8 Bottom drain outlet
9 Air exhaust
10 Power plug socket
11 Power cord
12 Wheels
4. ACCESSORIES INCLUDED
| PARTS PARTS NAME QUANTITY | |
| 1 | Adaptor A, Exhaust duct, Adaptor B (flat mouth), 1 set |
| 2 | Drain hose 1 pc |
- Check all the accessories are included in the package and please refer to the installation instructions for their usage.
OPTIONAL ACCESSORIES

www.aeg.com
| PARTS PARTS NAME | |
| 1 | Window Kit (Ref. AWKIT5) |
| 2 | Window kit extension (Ref. EWKEXT1) |
5. INSTALLATION INSTRUCTIONS
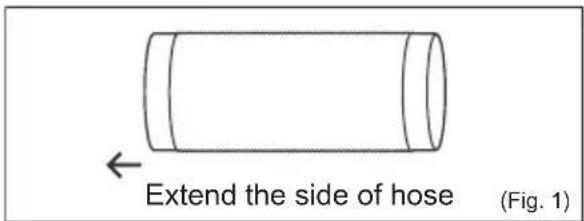
5.1 Exhausting hot air
In the Cool Mode, the unit must be placed close to a window or opening so that the warm exhaust air can be ducted outside. First position unit on a flat floor and make sure there's a minimum of 50cm clearance around the unit, and that it is close to a power socket.
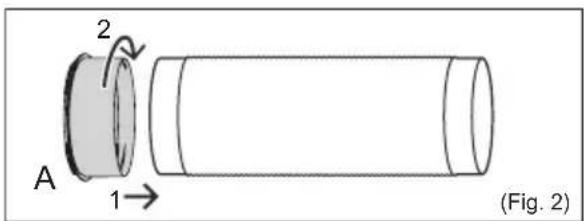
- Extend either side of the hose (Fig. 1) and screw the hose to adaptor A (Fig. 2).
- Extend the other side of the hose and screw it to adaptor B (Fig. 3).
- Open the window and place Adapter B through the gap. (Fig. 5)
Note: If need to install the window kit, please refer to the Window Kit Instruction Manual.
The hose can be extended from its original length of 38cm up to 150cm but it is best to keep the length to a minimum for efficiency. Also make sure that the hose does not have any sharp bends or sags. (Fig. 6)
- Lock the adaptor A into the unit. (Fig. 4)
6. PORTABLE AIR CONDITIONER FEATURES
6.1 CONTROL PANEL
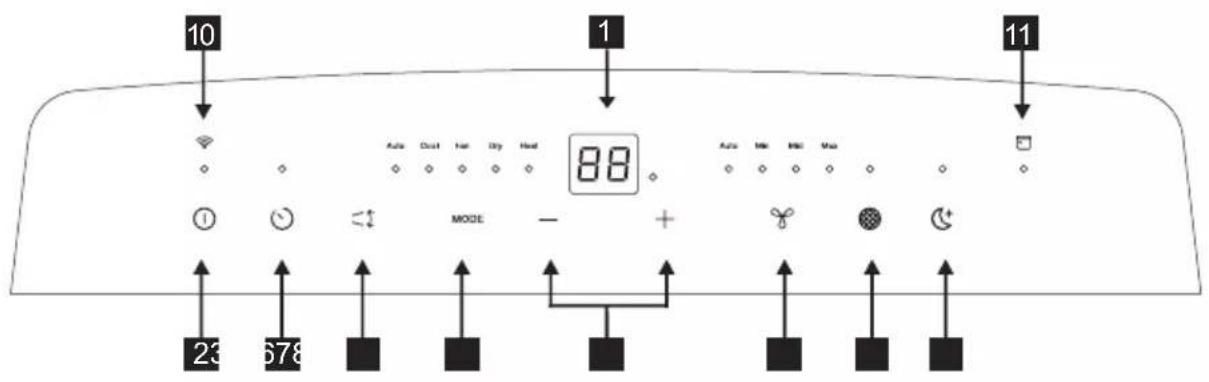
1 Displays temperature/time
2 Power ON/OFF
3 Timer
4 Louver swing
5 Mode Selection
6 Adjust Temperature or Timer
7 Fan Speed (Not available in Auto or Dry Mode)
8 Filter Reset
9 Sleep (Only available in Auto, Cool or Heat mode)
10WiFiIndicator
11 Scheduler Indicator
7. OPERATING INSTRUCTIONS

Some of the following instructions can only be used by using the Control Panel.
7.1 Usage of the Control Panel
Power ON/OFF
Power on the unit by gently touching the ON/OFF icon "①" on the control panel of the unit.
Heating Mode (on some models)
In this mode, the exhaust adaptor hose MUST be used.
- Press the "MODE" button until the "Heat indicator is lit.
- Press the "fan speed" button to choose the fan speed from the following fan speeds:
"Auto" "Min" "Mid" "Max" "Auto".
- Press the " " or "+" button to choose the temperature you want.
- Connected drain hose. See 7.3 Drainage section.
Cooling Mode
In this mode, the exhaust adaptor hose MUST be used.
- Press the "MODE" button until the Cool mode indicator is lit.
- Press the "fan speed" button to choose the fan speed from the following fan speeds:
"Auto" "Min" "Mid" "Max" "Auto".
- Press the " " or "+" button to choose the temperature you want.

It is not necessary to use the drainage hose in the "cool" mode.
Dry Mode
Press the "MODE" button until the Dry mode indicator is lit. The screen displays the room temperature.
At the same time, the "Min" fan indicator illuminates.
Note: In this mode, fan speed cannot be selected.
Fan Mode
In this mode, there is no need to use the exhaust hose or drainage hose.
- Press the "MODE" button until the Fan mode indicator is lit.
- Press the "Fan speed" button to choose the desired fan speed.
- The fan will run at the selected speed and the display will show the room temperature.
Note: Fan speed can not be changed in Auto mode or Dry mode.
Auto Mode
Always have the exhaust hose attached in this mode.
When you set the air conditioner in Auto mode, it will automatically select cooling, heating (inapplicable for cooling only models), or fan only operation depending on what temperature you have selected and the room temperature. The air conditioner will control room temperature automatically to achieve the desired temperature. In Auto mode, you cannot select the fan speed.
- Press the "MODE" button until the "Auto mode" indicator illuminates.
After "Auto mode" is selected, the unit will run automatically according to the actual room air temperature.
Timer Mode
The timer can be used to schedule the start and end of operation.
How to delay startup
Plug in the unit, so the unit turns to standby. Press the "Timer" button, then the timer indicator will be on and the number of hours on the screen will show "0.0". Tap or hold the PLUS "+" or MINUS "- to change the delay start timer at 0.5 hour increments up to 10 hours, then at 1 hour increments up to 24 hours. Press the "Timer" button again within 5 seconds, you will quit the timer setting directly.
After 5 seconds, the timer function is enabled and the timer indicator will be lit. The control will count down the time remaining until startup. The unit will start up in the mode as previously set.
To cancel the setting, press the "Timer" button again, and the display will show the remaining time. Press the "Timer" button again to cancel, the timer indicator will be off. You can also cancel the setting by pressing the "on/off" button.
How to delay shutdown
You can delay shutdown when the unit is on.
Press the "Timer" button, then the timer indicator will be on and the number of hours on the screen will show "0.0". Tap or hold the PLUS "+" or MINUS "-" to change the delay stop timer at 0.5 hour increments up to 10 hours, then at 1 hour increments up to 24 hours. Press the "Timer" button again within 5 seconds, you will quit the timer setting directly.
After 5 seconds, the timer function is enabled, the display will show the temperature back again and the timer indicator will be lit. The control will count down the time remaining until the shutdown. To cancel the setting, press the "Timer" button again, and the display will show the remaining time. Press the "Timer" button again to cancel, the timer indicator will be off. You can also cancel the setting by pressing the "on/off" button.
Sleep Mode
Activating this feature will give you a comfortable temperature and help save energy.
Only when the unit is in Cool, Heat or Auto mode, you can press the "sleep" button to make the unit run in Sleep mode.
Louver Swing Function
Press the "Louver swing" button to enable louver swing function, the louver on the top panel will swing up and down.
Press this button again to disable the louver swing function.
Filter Reset
This indicator is a reminder to clean the Air Filter (See Care and Cleaning) for more efficient operation.
The filter indicator will illuminate after 250 hours of operation. To reset after cleaning the filter, press the "filter reset" button, then the "filter" indicator will go off.
Child Lock
Turn on child lock by pressing the "MODE" button for 5 seconds, until the display shows "LC." To turn off child lock, press the "MODE" button again for 5 seconds.
WiFi
The unit is equipped with a WiFi module. When the unit is connected to the home WiFi, this icon " 念 will light up. If the icon is blinking, it indicates a temporary loss of WiFi connectivity - please refer to the AEG App for more details.
To manually initiate the onboarding process. Press " ① " for 5 seconds.
Note: Download our Electrolux App and follow the step-by-step onboarding instructions to connect the air conditioner to the App.
Bluetooth
The unit uses Bluetooth when onboarding.
Ensure you have your mobile phone's Bluetooth turned on to connect the air conditioner to the App.
Scheduler
Shows a scheduled event from the app is running.
7.2 Fault code
If the display reads "AS", the ambient temperature sensor has failed. Contact your Authorized AEG Service Center.

If the display reads "ES", the evaporator temperature sensor has failed. Contact your Authorized AEG Service Center.

If the display reads "L3", the condenser DC fan motor has failed. Contact your Authorized AEG Service Center.

If the display reads "P1", bottom tray is full. Turn off and unplug the unit, then carefully move the unit to a drain location. Remove the bottom drain plug and let the water drain away. Restart the unit until the "P1" symbol disappears. If error repeats, call for service.

If the display reads "E4", the communication between display PCB and main control PCB is faulty. Contact your Authorized AEG Service Center.

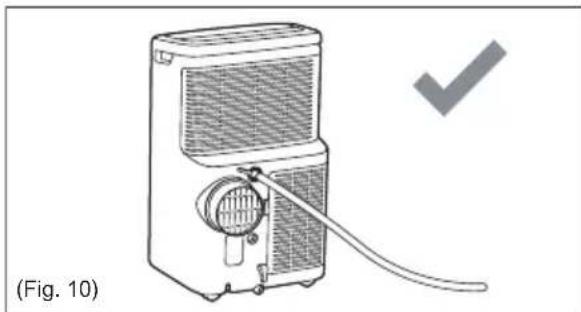
7.3 Drainage instruction
Continuous Drainage
During the Dry mode or Heat pump mode, you will need a garden hose (sold separately) or drain hose to drain the condensate from the unit.
Follow the steps below:
- Unscrew the drain cap of continuous drain outlet (Fig. 8).
- Connect one end of the garden hose (sold separately) or drain hose to the drain outlet then lead the other end into a drain that is lower than the unit (Fig. 9).
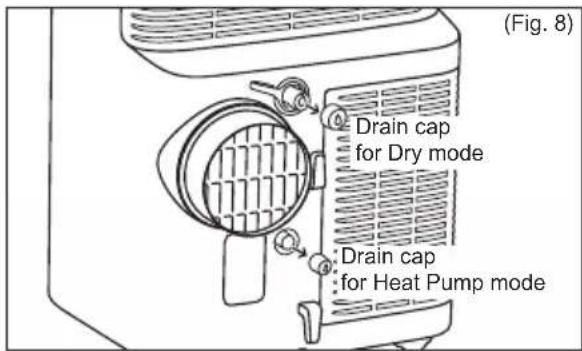
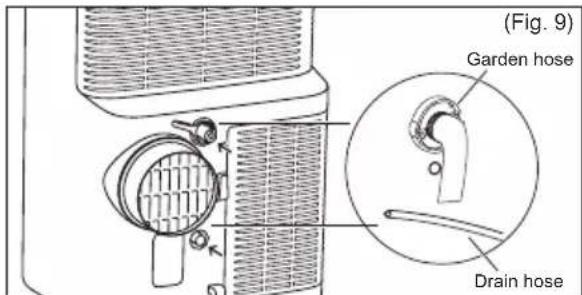
Note:
- Condensate may flow out after removing the drain cap, if the unit is running in Cool or Auto mode. When you want to remove the garden hose, prepare a drip tray (not supplied) to collect the condensate from the drain outlet.
- Please be sure that the height of the drain and section of the drain hose should not be higher than that of the drain outlet, or the continuous drainage may not work properly.
- During Cool or Auto mode, it is recommended to disable continuous drainage by replacing the drain cap to the drain outlet, to reach the maximum performance.
Emptying the condensate residue inside the unit during winter storage.
Put a drip tray (not supplied) under bottom drain outlet, then pull out the drain cap to allow the condensate to flow into the drip tray.
Replace the drain cap to the continuous drain outlet when no condensate flows out. Put the drip tray under the bottom drain outlet, then remove the rubber stopper from the drain outlet, to allow the condensate to flow into the drip tray. If your drip tray can't hold all the condensate, you may need to empty occasionally.
Replace the drain cap to the bottom drain outlet when no condensate flows out.
Note: To ensure all condensate residue has been removed, tilt the unit by lifting it slightly upwards from the front until no more condensate comes out from the drain outlet.
8. CARE & CLEANING
Clean your portable air conditioner occasionally to keep it looking new. Be sure to unplug the unit before cleaning to prevent shock or fire hazards.
8.1 Cleaning the unit
The cabinet and front may be dusted with an oil-free cloth or washed with a cloth dampened in a solution of warm water and mild liquid dishwashing detergent.
Never use harsh cleaners, wax or polish on the cabinet front.
Be sure to wring excess water from the cloth before wiping around the controls.
Excess water in or around the controls may cause damage to the portable air-conditioner.
8.2 Cleaning the filters
To keep your portable air conditioner working efficiently, you should clean the air filters every two weeks of operation with a vacuum cleaner.
- Removed the air filter as shown the below figure. Take out the upper air filter and the lower air filter.
- If the air filters are severely dirty, you can also wash the air filters using warm water under 40^ and liquid dishwashing detergent. Rinse filter and washing up liquid thoroughly.
Gently shake excess water from the filter. Be sure that the filter is thoroughly dry before replacing.
- Press the filter reset button " 念 " after having cleaned the filters.

Be sure that the filter is thoroughly dry before replacing.
8.3 Winter Storage
If the portable air conditioner will not be used for an extended period of time:
-
Drain the water collection tank completely and leave the bottom drain cap and rubber plug for long enough to allow any residual water to drain out. Once the tank is completely drained and no more water flows out, reinstall the rubber plug and cap.
-
Remove and clean the filter, allow it to dry completely, then reinstall it.
- Store the portable air conditioner in a cool, dry location, away from direct sunlight, extreme temperature, excessive dust, and well ventilated.
Before using the portable air conditioner again:
- Make sure the air filter and drain cap are in place.
- Check the cord to make sure it is in good condition, without cracks or damage.
- Install the portable air conditioner as described in the operating instructions.
9. TROUBLE SHOOTING
This list includes common issues that are not the result of defective workmanship or materials in this appliance.
Portable air conditioner will not operate.
- Wall plug disconnected. Push plug firmly into wall outlet.
- House fuse blown or circuit breaker tripped. Replace fuse with time delay type or reset circuit breaker.
- The unit is OFF. Turn the unit ON and set to desired setting.
- Fault code P1 appears in the display window. Drain water as described in 7.3 Drainage Section.
- Room Temperature lower than the set temperature (Cool Mode) or Room Temperature higher than the set temperature (Heat Mode). Reset the temperature.
Air from unit does not feel cold enough.
-
Room temperature below 16^ . Cooling may not occur until room temperature rises above 16^ .
-
Reset to a lower temperature.
- Compressor shut-off by changing modes. Wait approximately 4 minutes and listen for compressor to restart when set in the COOL mode.
Portable air conditioner cooling, but room is too warm.
- If ice forms on the cooling coil located behind decorative front, the outdoor temperature is likely to be below 16^ .
Air filter may be dirty. Clean filter. Refer to section 8 "Care and Cleaning". - If ice forms on cooling coil behind decorative front. Temperature is set too low for night time cooling. To defrost the coil, set to Fan mode. Then, set temperature to a higher setting.
- Exhaust duct not connected or blocked. See 5.1 Exhausting Hot Air Section.
Portable air conditioner cooling, but room is too warm - ice forming on cooling coil behind decorative front.
- Dirty air filter - air restricted. Clean air filter. Refer to 8. Care and Cleaning section.
- Temperature is set too high. Set temperature to a lower setting.
Air directional louvers positioned improperly. Position louvers for better air distribution. - Front of unit is blocked by drapes, blinds, furniture, etc. - restricts air distribution. Clear blockage in front of unit.
- Doors, windows, air vent, etc. open - cool air escapes. Close doors, windows, etc.
- Unit recently turned on in hot room. Allow additional time to remove "stored heat" from walls, ceiling, floor and furniture.
Portable air conditioner turns on and off rapidly.
- Dirty air filter - air restricted. Clean air filter.
- Outside temperature extremely hot. Set FAN speed to a faster setting to bring air through cooling coils more frequently.
Room too cold.
- Set temperature too low. Increase set temperature.
Room temperature may not reach the set target value on the display
- When using this portable air conditioner, the warm air is evacuated through the hose to the outside through the window kit. This creates an under pressure in the room, which results in air from neighboring rooms / leakages from outside to enter the room. For this reason, it is normal that you may not always fully reach the set target temperature on the product display.
Unable to connect to the WiFi
- Check that the Wi-Fi router is connected and is turned ON and working properly by checking that other appliances or you mobile phone can connect with the router.
- Need to reboot the router. Unplug the router, then plug it back in, try rebooting the router. Wait a few minutes and check again.
- The WiFi chip in the unit operates only at 2.4Ghz. So please ensure your home WiFi is operating at this bandwidth.
10. ENVIRONMENTAL CONCERNS
Recycle the materials with the symbol.
Put the packaging in applicable containers to recycle it. Help protect the environment and human health and to recycle waste of electrical and electronic
appliances. Do not dispose appliances marked with the symbol with the household waste. Return the product to your local recycling facility or contact your municipal office.
The software in the unit is partly based on free and open source software. To see the full copyright information and applicable license terms, please visit: https://emtech.dalta.electrolux.com/licenses
For more information visit
www.electrolux.com
CbДьРЖAHNE
- INHΦOPMAUJIY 3A BE3ONACHOCT 21
- INHCTPYKUN 3A BE3OJNACHOCT 28
- OINCAHNE HA YPEDA 31
- BKJIIOUeHIn AKCECOAPN 31
- INHCTPYKUN 3A MOHTIPAHE 32
6.XAPAKTEPNCIKHA IPEHOCIMKJINMATIK 33 - INHCTPYKUN 3A PABOTA 33
- TPNKANIOUHCTBAHE 36
- OTCTPAHRAHE HA IPOBJEMN 37
10.ΓPINA 3A OKOIHATA CPEIa 39
Pexm 3aToPJIaHe (npn HyaKoMoeJN)
BTo3npeKIMTPRA5BAda ce n3noJ3BaMapkybTHa n3nyckaTeHnIaAnTop.
- HatncheTe 6yToH "MODE"doKaTo HndnkaTopbT 3a peXIM "Heat"CBetHe.
- HatncheTe 6yToH "CkopoCT Ha BeHTnIaTopa", 3a Da n36epete CKopoCTTa Ha nepKaTa OT CbOTBeTHNTE CKopoCTn:
"ABTOMATnHa" "MnHmMaJHa" "CpeJHa" "MacmJaHa" "ABTOMATnHa".
- HatncheTe 6yToHa "—" nIn "+", 3a da n36epete TemnepaTypaTa, KOrTo NCKaTe.
4.CbbpkeTe MapkybT 3a n3TOUbaHe. Bux 7.3 Pa3deI n3TOUbaHe.
OxnaKdau pekIM
BTo3npeKIMTPRA5BAda ce n3noJ3BaMapkybTHa n3nyckaTeHNHrT aanTop.
- HatncheTe 6yToH "MODE"doKaTo HndnKaTopbT 3a peXIM "Cool" cBeThe.
- HATNCHETe 6yToH "CKOpocHa BEHTnIaTopa", 3a Da n36epete CKOpocTTa Ha nepKaTa OT CbOTBeTHHrTe CKOpocTn:
"ABTomatnHa" "MmHmamHa" "CpeHa" "MaKcImaJHa" "ABTomatnHa".
- HatncheTe 6yToHa "—" nnn "+", 3a da n36epete Temnepaypata, KOrTo NCKate.

He hynho da n3no3BaTe MapkybT 3a n3TOUBAHe B peKIM "cool".
Pexm n3CywaBaHe
HaTnchTe 6yToH "MODE"doKaTo HndnKaTopbT 3a peXIM "Dry" cBeThe.
EkpaHbT noka3Ba TemnepaTypaTa B cTaTa. B cbIoTO BpeMe HndkaTopbT "Min" 3a ckopoCTTa Ha BEHTnIaTopa CBETba.
Bélejka: B To3n pexm He MoKe Da 6bde n3bupaHa ckopocT Ha BEHTnlaTopa.
PexkIM BeHTnJaTop
BTo3npeKIMHЯMaHyXdaJaN3NoJ3BaTe Mapkya 3a N3BeXdaHe NJI3a N3TOUbaHe.
- HaTnchTe 6yToH "MODE" DokaTo HnDnKaTopbT 3a peXm "Fan" CBetHe.
- HATnchete 6yToH "Fan speed", 3a da n36peTe XeJHaHata ckOpocT Ha BEHTnlaTopa.
- BeHTnIaTOpbT 7e pa6OTn Ha n36paHaTaCKOPOCT n CTaTb B TempePaTypTa 7e 6bDe Ioka3aHa Ha dncnJe.
BeneKka: CkopocTtHa BHTnIaTopa He MoXe Da 6bJe IpomeHeBaABTomAtuHepxIM NnpexIM Ha N3CyUbaAhe.
ABTomatnueH peKIM
IpnTo3npeKIM BUNHArN Tp86Ba Da nMaTe npKpenen N3BexkdaaMapkyu. Korato HactponTe KImMaTnKa Ha ABTomatnueh peKIM, Toa ABTomatNoHO ige n3bepe pa6oTa B peKIM OXJaXdaHe, 3aTOJnHaHe (HenpINOxKMO 3a MoJeNtE, KOHTO NMAT cAmO OXJaXdaHe), nn BEHTnlaTop, B 3aBNCIMOCT OT TOBa KaKBa TEMnepaTypa Cte N3bpaJIi N KaKBa e TEMnpaTypa B cTajTa. KImMaTnKbT ige KOHTPOJInpa TEMnpaTypa BA cTajTa aBTOMaTHUHO, 3a Da ce NoCTurHE JeJaHaTa TEMnpaTypa.
Ipn ABTOMATUHEH pekim He mokeTe da n3bnpate ckopocTTa Ha BeHTnlaTopa. 1.Hatnche6ytoh“MODE”doKaTo INndkaTopbT 3a pekim "Auto mode" CBetHe. Cne KaTO 6bJe n36paH "Auto mode", ypeBt aBTOMaTHNO 3apabOTn B cBOTBcTCTBnE C peaHaTa TEMNEpaTpya B cTaTa.
Pekm TaMep
TaimepbT MoKe Da ce n3nOJ3Ba 3a HacIpoBbAe Ha HaJaNo I KpaH a pa6oTaTa.
- KaK Da 3a6aBm CTapTnpaHeto BKnUoyTe ypeA, Taka Ye da ocTaHe Ha pexkM CTeHd6aI.
HaTnchTe 6yToH "Timer" KOrato
HnDnKaTOpbT 3a TaMep Ce BkIIOuN
6poT yacObe Ha ekpaHa e NOKa3An KaTO
0.0".HaTnchTe nJn 3aApbXte PIIOC +
nN MInHC -", 3a Da npomEnTe TaImepa
3a 3abAbeNo CTapTpHa cBc CTbKn OT 0,5
Yaca Do 10 Yaca, CneT ToBa Ha CTbKn OT 1
Yac Do 24 Yaca.HatncHe OTHOBO 6yToHa
"Timer" 3a 5 cekyni N DnpeKTHo Ue
PpeKpatITE NaCTpOBaHeto Ha TaIMepa.
CneI 5 cekyni PhyHKUraTa Ha TaIMepa e
BkIIOyeHa n INDnKaTOpbT My Ue CBETHe.
KoHTpOJIHHa TnaHJI Ue OTbpon o6paTHO
OCTaBAUOT DO BKNIOUBAHETO BpeMe.
YpeBbT Iue ce BkIIOUH bpeXIMbT, KOITo e 6nI HAcTpoEHNpeDn TOBa.
3a da OTMeHInTe HAcTpoKkata, HaTnCHeTe OTHOBo 6byToHa "Timer" nДиCnJIeR T ue NOKaKe OCTBaAooTO BpeMe. HatnCHete OTHOBo 6byToHbT "Timer", 3a da OTMeHInTe, a INDnKaTOPbT ige ce n3KnIOuN. MoKeTe da OTMeHInTe HAcTpoKkata KaTO HaTnCHeTe 6byToHa "on/off".
- KaK Da 3a6abMn N3KnIOUcBAHeTO MoXeTe Da 3a6abNTe N3KnIOUcBAHeTO KOrato ypeDbT e BkIIOueH. HatncheTe 6yToH "Timer" Korato INdNKATOpbT 3a TaMep Ce BkIIOuH IN 6poT YacOBe Ha ekpaHa e NOKa3An KaTO "0.0". HatncheTe IIN 3aDpBxTe PIIOC "+" IIN MHNYC "-", 3a da npomeHnte TaIMepa 3a 3a6abEHO cnpaHne CbC CTbIKN oT 0,5 Yaca Do 10 Yaca, CneD TOBa HcCTbIKN oT 1 Yac Do 24 Yaca. HatncheTe OTHOBO 6yToHa "Timer" 3a 5ceKyni N dIpeKTHO ue NpeKpaTNe HAcTPOBaHETo Ha TaIMepa. CJeD 5ceKyni PhyHKzraTa 3a TaIMep Ue ce BkIIOUH n DcCnIe JIe NOKaKe OTHOBO TempePaTypaTa, a INdNKATOpbT Ha TaIMepa Ue CBETHe. KOHTPONHnT NaHel Ue OTbpon O6paTHo OCTaBaIoTO Do IN3KnIOUcBAHeTO BpeMe. 3a Da OTMeHInTe HAcTPOKaTa, HatncheTe OTHOBO 6yToHa "Timer" N dNcPJIeT Ue NOKaKe OCTaBaIoTO BpeMe. HatncheTe OTHOBO 6yToHbT "Timer", 3a Da OTMeHInTe, a INdNKATOpbT Ue Ce N3KnIOUc. MoXeTe Da OTMeHInTe HAcTPOKaTa KATO HAtncheTe 6yToHa "on/off".
PekmCbH
AknBpaHTo Ha Ta3n XapaKTePcTnKa ige Bn IpeOCTaBn ydo6Ha TemNepaTypa N ige BN NOMORHe Da CnecTne eHeprna.
Camo KOrato ypeDbTe Ha OxnaXdaHe,
3aToPiJaHe nn ABTomatUueh pexim,
MOxTe Da HATncHete 6yToH "sleep", 3a da
ce yBepnte, ye ypeDbT pa60tn B pekim CbH.
ФункцялюлеHe Ha xaIy3nTe
HaTnchTe 6yToH "Louver swing", 3a da BKNIOUHTe cyHKUra Ta IIOJeeHe Ha XaIy3NTE, KaTO XaIy3NTE B rOpHNrT nAHeI Ue ce 3aJIIOJeT HArOpe-HaDoIy. HaTnchTe To3N 6yToH OTHOB0, 3a Da N3KnIOHTe cyHKUra Ta IIOJeeHe Ha XaIy3NTE.
PpeNaCTpoBbHe Ha qntbpa
To3n Hndnkatop e HanomHRe Ha
NouchTe Bb3dyuHnA FInTbp (Bnx
FpNka n NouchTbaHe) 3a NO-eΦeKTHBHO
fYHKUOHNpaHe.
HndnkatOpbT Ha FInTbpa ue CBetHe CJIed
250 yaca pa6ota. 3a Da npehactponTe
CleD nouchTbaHe Ha FInTbpa,HaTNCHeTe
6yToH "filter reset", cneI KOeTo HndkaTOpbT "filter" ue n3rache.
3aKJIIOUBaHe 3a Deua
3a da BKNIOUHTe 3aKNOUBAHTo 3a Deua, HATNCHETe 6yToH "MODE" 3a 5 cekyHn DOKATO DNcNJIeT NOKKe "LC". 3a da N3KNIOHTe 3aKIOUBAHTo 3a Deua OTHOBO HATNCHETe 6yToH "MODE" 3a 5 cekyHn.
WiFi
YpeIbTe o60pydBaH c WiFi mOdyI.
Korato ypeT e CbBp3aH KbM domaWeH WiFi, nKOHaTa " 7e CBETHe. Ako nKOHaTa Mnra TOBa noka3Ba BpemHha 3ary6a Ha WiFi Bpb3ka - MoJy BxkTe npINOKeHneTo AEG 3a NOBeue INΦopMaun. 3a pBuHO CTapTnpaHe Ha Ipoceca Ha BKIOUcBAHe.
HaTnCHeTe " ① " 3a5ceKyHdN.
BeIexka: N3TerJneTe HaWeTo npUIOXeHHe Electrolux n CneBaIte HnCTpyKuInTe CTbNka NO CTbNka 3a CBbp3BaHe Ha KINMaTka KbM npUIOXeHNeTO.
Bluetooth
Pn npoeca Ha BkIouBaHe ypeBt n3non3Ba Bluetooth.
YBepTe ce, Ye Bluetooth Ha MobuHnT Bn
TelefoH e BKIoUeH, 3a Da CBbPKeTe
KINMaTka KbM npNuOKeHneTo.
Прогама дисецер
Ioka3Ba, Ye ce n3nblnHbBa nlaHnpaHo C6bntne OT npINOxKeHneTo.
7.2 KoI 3a noBpeDa
Ako dincnpeT noka3Ba "AS",
TemnepaTyphnTceH3OpceeNOBpeDnCbpxkTe ce cbc CBOrT OToPn3npaH AEG cepBn3eH ueHTbp.

Ako DnCnneT Noka3Ba "ES",
I3napraBaunr TemnepaTpeH cEH3Op ce e IOBpeAn. CbpxTe ce cbc CBOAT OtopnupaH AEG cepBn3eH ueHTbp.

Ako nncnneT noka3Ba "L3",
KOHDeH3aTOPHnT npabOTOKOB MOTOp Ha nepkata ce e nobpeu. Cbpxe te ce cbc CBOrT OToPi3npaH AEG cepBn3eH ueHTbp.

Ako dincnpeT noka3Ba "P1",doHaTa TaBnUka e nIbIHa. N3KIOUcTe ypeDa n Iro 3BaJeTe OT KOHTaKa, Cnei TOBa BHIMATEHNO IpemeCTeTe ypeDa Ha MRCTO 3a n3TOuBaHe. OTCpaHete DoJIHata npo6ka 3a n3TOUBAHe n OCTaBeTe BODaTa Da n3Teue.PecTApTnpaIte MaunHata DOKATO cMBOJbT "P1" n3Ye3He. Ako rpeIrkata ce NOBn OTHOBO, o6aTe Ce 3a o6CnykBaHe.

Ako dincnpeT noka3Ba "E4", KOMyHnkaunTa MeKdy PCB Ha dincnpeN TO3Ha OCHOBN KoHTpoJeH naHeI He pa60Tu. CbByKeTe ce cbc CBOrT OToPn3npaH AEG cepBn3eH ueHTbp.

7.3 INHCTpyKcnn 3a n3TOUbaHe
HenpekbcHaTo n3ToUbaHe
Pnppekm IV3CUYABAHE npn Pekm c HarpBaaua nomna ue Bne HyrgrpanHcN Mapky (npoabaT ce OTdEnHnn Mapky 3a n3TOUbaHe, 3a da n3TOuKoHdeH3a ot ypeDa.
CneIbainTe cTbnKIne no-dony:
OTBnTe KaNaKkTa 3a N3TOUBaHe Ha n3XoJa 3a npOdbJnxIteJHo N3TOUBaHe (ФИг.8).
Cbpxte eHnT KpaHa rpaHckn Mapky (npoabat ce otdeHNO) nIIM Mapkya 3a N3TOUbaHe KbM N3XOda 3a N3TOUbaHe, CJIeD KOETO NOCTABeTe DpyrNt Kpa Ha Mapkya Ha MRCTo, KOETO e No-HnCKO OT ypeDa (Fnr.9).
Benekkka:
CleI KaTo OTCTpaHInTe KaNaUkaTa 3a N3TOUbaHe KOHDeH3bT MoKe Da NoTeue aKO ypeDbTe pa6OtnHa pexm OxnaXdaHe nIN ABTomatuHc. Korato NCKaTe Da OTCTpaHInTe rpaDnHcKnT Mapkyu, NOIROTBete TaBnUka, B KOrTO da Kane (He e BkNIOUeHa), 3a Da Cb6nPaTe B HeA KOHDeH3a OT N3XODa 3a N3TOUbaHe.
MOnIM Da ce yBepnte, Ye BnCOUnHaTa Ha N3TOUbaHe mMCTOTO, Ha KOeTo e MapkybT 3a N3TOUbaHe He e IIO-BNCOKO OT N3XoDa 3a N3TOUbaHe HnH enpeKbCHAto T O N3TOUbaHe MoKe Da He cpa6OT npabUNHO.
Ipnpekm Oxlaqdahe nAn ABTomatnueh ce npenopbya da n3KIOUHTe HnpekbcHaTOTO n3TOUBAHe KaTO BpHTe KanaQKaTa 3a n3TOUBAHe Ha n3XOJa 3a n3TOUBAHe, 3a Da ce NOCTHRe MaKcImaJIHa pa6ota.

I3npa3HeTe OCTaTbUITE OT KOHdEHN3a Bypeda npn CbXpaHEnne ppe3 3mMaTa.
IocTaBeTe TaBnUka 3a n3KanBaHe (He e BkIIOueHa B KOMNKeTA) NOd DOJHnA N3XoD 3a n3TOuBaHe, CneT TOBa n3DbpNaIte KaNAcKaTa 3a n3TOUbaHe, 3a Da n03BOJNTe Ha KOHNeH3bT da IOTeYe B Tabata 3a n3KaIbBaHe.
IocTaBeTe o6paTHo kanaUkata 3a
n3TOUbaHe KbM n3XOda 3a npOdbJnxTeHNO
n3TOUbaHe KOrato Beue He n3TNUa KOHDeH3.
IocTaBeTe TabuYka 3a n3KanBaHe NOd
DOHNy n3XoD 3a n3TOUbaHe, CneD TOBa
MAXHEr TymEnrT CTOpE, 3a Da
IO3BOInTE Ha KOHDeH3bT Da NOTeYe B
TabaTa 3a n3KanBaHe. AKO TabuYkaTa 3a
n3KanBaHe He MoKe Da c6bepe ueJIyrt
KOHDeH3 MoKe Da ce HANOKn Da
n3Pp3BaTe nepNoDnuHo.
IocTaBeTe o6paTHo kanaUkata 3a n3TOUbaHe KbM n3XOda 3a n3TOUbaHe KOraTO BeYe He n3TnHa KOHDeH3.
Benekka: 3a da cte cnryphn, ye BCnquKn OCTaTbUcN OT KOHdeH3a ca OTCTpaHeHn, HAKIOHete ypeDa, KATO TIOBUNHETe JIeKO HArOpE OTnpEd, DOKaTO KOHdEH3bT He N3JIe3e OT OTBopa 3a N3TOUbaHe.
8. Глижам поочиства themselves
PeIOBHO NOUcTBaIe TpeHocmMnT Cn KINMaTnK, 3a Da rO NODbPkaIte KaTO HOB. YBepeTe Ce, ye cTe n3KnUChnIypeDa oT 3axpaHbAHeTo Ppei NouCTBaHe, 3a Da npEoTbPaTnTe TOKOB ydap nn OnaCHOCT OT NOxap.
Bb3aXa ot OTbopa He e OoctaTbHocTydeH.
- Пи саину Temnepatypa ot 16°C можда Няма oxлaxдане п徳саинота Temnepatypa да ce noBиш на 16°C.
- HactpoIte Ha no-HnCKa TemnepaTypa.
KOMnpecopbTceN3KnHouBa npn CmHa Ha pexkma. N3yakaTe npu6IIN3nteJHo 4 MNHyTu n cnywaTe 3a pectapTupaHe Ha KOMnpecopa, cJeD KoTo HacTpOInTe Ha pekIM OXIAKDAHE.
PpeHocmMnT KImMaTHK OxnaXda, Ho CTaTa e TBbPde TOnla.
Ako ce obpa3yBa JeD Bbpxy oxlaNTeHaTa cepneHTnHa, pa3noXkeHa 3aI DeKopaTnBHaTa npedHa Yact, BbHnHaTa TemnepaTypa BepoTHo e noD 16^
Bb3dyHnTfHnTbpMoKe da e 3aMbpceH. POnucTeFhntbpa.BnxTe Pa3dE8 "PpKa nNoocCTBaHe".
Ako ce obpa3yBa Jep Bbpyx oxlaaDaaata CepneHTnHa 3ad DeKopatNBHata IpeHa Yact. Tempepatypata e HactpoeHa Ha TBbpde Hncka 3a HoUHO oxlaXdaHe. 3a da pa3mpa3nte 6oBnHa, HactpoTe Ha peKIM BeHTnAtop. CneT TOBa HActpoTe Tempepatypata Ha No-BnCoka.
- I3nyckaTeJHnT KaHaJI He e Cbbp3aH nn e 6IokupaH. Bux Pa3dien 5.1 I3nyckaHe Ha ropeu Bb3dyx.
IpeHocmNt KJIIMMaTnK OxJaXda, HO B cTaYa e TBbPde ropeo - oOpMnpa ce nei no oxJaXdaUaTa 6ObHa 3aD DeKopatNBHaTa IpeHa YacT.
-Поунсте Вьздушниг ФиNTьр -Вьздухьт e HeДОCTaTbчeH. Поунсте Вьздушниг ФиNTьр. Викт Pea3дeн "8. Гпжа И поунстван".
- TemnepaTypaTa e HacTroeHa Ha TBbpDe Bucoka. HacTroPe TEmnpaTypaHa No-HnCKa.
- Xaany3nTe 3a HacooyBaHe Ha Bb3dyxa ca HenpabNlHo N03nCnoHnpaHi. P03nCIOHOHPaTe Xaany3nTe 3a No-dO6po pa3nPpeJeHne Ha Bb3dyxa.
- Ппеднату acт ha урда e 6лokupa ha ot nepde, zuopn, ob3abexkahe n np. -огразнчeho e pa3npedelenneHneTo ha вьзdyxa. Pa3uNCTe 6лokupaunTe npedmetn nped ypeda.
BpaTn, npo3Opu, BeHTnlaquHOHeH OTBOp, n dpyuN OTBOpN - CtydEnHrT Bb3dyx n3Jn3a. 3aTbOpTe BpaNTe, npo3OpuTE u dp. - Ckopo e BkIIOueH B ropeuca cTae. DaIte DOINbHNITeJIHO Bpeme 3a da ce npemaxhe "HaTPynahata ropeunha"OT CTeHNTe, TabaHa, nOda n O63aBeKdAnHeTo.
IpeHocmMnT KImMaTnK Pra3Ko Ce BKNIOyBa N N3KJIIOUyBa.
-Почисте ВьздушнигТ Фнлтbp -Вьздухьт e HeДОCTaMbчeH.Почисте ВьздушнигТ Фнлтbp.
Temnepaypata HABbH e n3KJIIOUHTeJIHO Bucoka. HAcTpoIte cKOpocTTa Ha BEHTNIATOPA Ha no-6bp3a, 3a da ce npOBexda Bb3dyxa npe3 OXnaJdaunTe 6o6HHn no-yeCTO.
CTaTa e TBbPde cTydeHa.
- Hactpoehata TemnepaTypa e TBbpde Hncka. YBeJIuYeTe Hactpoehata TemnepaTypa.
CTaHaTATEmNepaTypaMoKe Da He DOCTURHe 3aJaDeHaTa UeJeBa CToHOC T Ha DnCnpe
Korato n3noJI3BaTe To3n npenocm KJIMaTnK, TOnJIyRb3dUx N3JIu3a npe3 Mapkya HABbH npe3 KOMIIeKTA 3a npo3opeu. ToBa c3daBa NOd-HaIraHe B CtaTa, Koeto BOi Do HabJIu3aHe Ha Bb3dYx OT cbceHN CTaN/IN3TuHa He OTbH OT cTaTa. Iopadn Ta3n npuHa e HopMaJIHo He BInHaN Da DOCTIratc HAnbJIHO 3aJaDeHata uebea TEMpepaTypa Ha DnCpIeR Ha npOdykTa.
He moxé da ce cbbpxe cWiFi
- Поберетал Ni Wi-Fi pytepbte cBbP3aH n daH e BKJIIOUcEH n pa6oTn npabuHNO, kato npobepTe daH npyru ypeHn Hn Baunr Mo6uIne TeneOH Morat da ce cBbpxatc pytepa.
Heo6xoJMo e da pectaptnpaTe pyTepa. N3KIOUeTe pyTepa, cIeI TOBa ro BKNIOUeTe OTHOBO, ONITaIte da pectaptnape pyTepa. N3UaKaIte HAKONKO MNHyTN InpOBepTe OTHOBO. - WiFi чиль в устюговто paBOTN camo на 2.4 Ghz. Тaka ч, моля, уBERPEte ce, ч BAшпт домашен WiFi paBOTN на тa3и cheToTHa leNTa.
10.ГРИЖАЗOKОЛHATA CPEДA
PeuKnnpaTe MaepnaIte cbc CbOTBETHNcMBOJI.
Noctabete OnaKOBkata B cBOTBEHTHe KOHTeHepn 3a peuNKnpaHe. NOMORHeTe 3a 3aunTaHa OKONHaTa CpeDa u YOBeWKOTO 3dpabe n peuNKnpaTe
OTnAdbuNTe OT eNEKtpueeCKn I
eNEkTPOHn ypei. He n3xBbpIaTe ypei
MapkpauHc bC cIMBOLA 3aeDHO C
6ntOBn OtnaDbK. BbpHeTe npOdykTa B
MeCTHnnyHKT 3a peunKnipaHe nnn ce
CBpXeTe C o6UHckata cnYk6a.
CoTyeptHa ypeDa e qactuHOb 6a3npan Ha 6e3nPaTeH n OTBopeH copc coQTyep. 3a da Bnnte cyaNaTa INΦopMaζra 3a aBTOPCKIte npBa n pnpIOXmIte JnueH3Hn ycNoBn, MoJn NocTe: https://emtech.dela.electrolux.com/licenses
3a noBuey HOpMaunnoCteTe www.electrolux.com
INHALT
4. ACCESSORIES INCLUDES
4. ACCESSORIES INCLUS
ACCESSIONS EN OPTION

www.aeg.com
9. PROBLEEMOPLOSSING
aay aaii 1y gaiy i ygaaal 1gall
.1g jilie aki jia 0 gai -
aewbuaia.aaagaaa aaijlaal jall
jai jia jia jia jia jia jia jia jia jia jia jia jia jia jia jia jia jia jia jia jia jia jia jia jia jia jia jia jia jia jia jia
Jx Jx Jx Jx Jx Jx Jx Jx Jx
yLao aJg jell gIbuaa glly Ia. sIil
jll jiljli jilj
Jus 1 gall jll
aiee eae aee ae aee
iiall
WiFi
WFiWi-Fi j
i j 1
juaaiy1 yisai jgsaal aia jsrj
4
jiesa 4gill jgsjzoe!
g: jaii i. aiee eale! Jgag aeg g 1
与 AD = 1
2.4 2.4 WiFi
Jaaai jaiiWiFi aSuaa Jn nn Slll lla
1
a j 12
jiaai 1iie jiaai
Jaa 2 Jaaal 1gall
aia aaii gaii ai iai
aBb
aall a jll a jll a jll
a 1000
.ajll a jydu buiu 1.(aiaill g) adall jal
a 1g
16 1
a
Aa 16
aiaiaia oj jao jao jao baiall sale!
y j 1.
4
S OBC = S COD + S_ BOC
12a 1
gall gall 11
a jlljll jll a jn jnl jll jll jll
16
jgl jiljiljai jia jia jial - wia jial jil
a. 1234567890123456789012345678901234567890123456789012345678901234567890123456789012345678901234567890123456789
a 1 a
jol 120, jle oJrall
a
log 151, jilunly o2gmo o2gll aolal
plai jia gai jj .al gai jz jz lao - al j
8.3
jai jia jial jaoall gall So piaiuiipie all
1 1
1
1
1
1
a1 piaolai 45 jil g aibii jilal all jla .2
Lagil So 1al all alb, gall jia jao sI .1
2
gao gao los jaoall gai 15 jy p3 .3
aalalalalalalalalalalalalalalalalalalalalal
J 1111111111111111111111111111111111111111111111
7.3
aill cllb all j 1234567890
laill ll gllgall glllglll lll
laill aalldy b y ddddall
ydlll gj ncaill (aa y)
pssg y gail gaii gaii gaii gaii gaii gaii gaii gaii gaii gaii gaii gaii gaii gaii gaii gaii gaii gaii gaii gaii gaii gaii gaii gaii gaii gaii gaii gaii gaii gaii gaii gaii gaii gaii
aalil 1aiikaiy. ai gai jia gaii
"Jai will ai! / Jai" jiele biailly:12c?
Jusuill
e 8
jibin 1 jie 1iie 1
a biai j 0.0" aill lgl clll i
jyujil " - 2jball aoXo j " + " 4jall aoXo oJ yaiu
10 acl 0.5
aLw 24 aolal aLw y
5 5 5 5 5 5 5 5 5 5 5 5 5 5 5 5 5 5 5 5 5 5 5 5 5 5 5 5 5 5
.
5
y 1
aaiy gaii aaii i jilll sall niaic
山
gag g jya "iajall jjglbaiia 12e 11cly jya "iajall jjglbaiia .aiial iaiil
clll laii jaiy. iaiy
"Ji jil 1j
a 1
aill
aiaai i 2i jai gai gai li aie lae b
Jn Jnssll jie bainl sikay, gil
aaggll cia 1
j 1
g 12 gall ay gill cia 1 jut gsw ay gill cia
Jaiy g jie y jgall
1 2
2.4.8.11
jlll bua 3la
aill jil) 1 gll jil cai jil jssj wll
jss jss 1000
Jgall gll 6
6.1

()
jiallbuai 8
1
2
3
()
4
(WiFi) 10
5
11
6
J.7
.3
a
"JJJ"

i 1
a
“jiaia"ia jai jia 1i jai jai
aasall aee 1
aegall
2jgs jgs 1
aagall jiaegai gai “gai”jglbai 1
a y j 125 "a g aill a y" jg baii.2
Jusnns nnnn nn nnnn nnnn nnnn nnnn nnnn nnnn nnnn nnnn nnnn nnnn nnnn nnnn nnnn nnnn nnnn nnnn nnnn nnnn nnnn nnnn nnnn nnnn nnnn nnnn nnnn nnnn nnnn nnnn nnnn nnnn nnnn nnnn nnnn nnnn nn
2p 1000
·Jilwll . (a) JaiyI (a)
.
.
.
1

aaiy 2.
.
( xt^2 + x) ( xt^2 - x) = 0 ( xt^2 + x) ( xt^2 - x) = 0
i 1
JbI 15 baii. jia i jia jia jia jia jia jia jia jia jia jia jia jia jia jia jia jia jia jia jia jia jia jia jia jia jia jia jia jia jia jia jia jia jia jia jia jia jia jia jia jia jia
·
J 12
eell lal 5n no gai jgall
1
blll luiuui 1. (y11 bbi) bao aiao abgo
.
A
J111 1
·Jn
·
.
J
. 1
1.1
1
J 2
Jb0yIgOjRzBllssuill 2JxJgDgl J3
.4
.5
.6
Jgall gll 5al jaiu lic liic ylaiaabai1.2
14
!
1
.
.
240-220 1
- 50
B
.
a
a
1
Jg 1
y
| الترجمة الحرفية | ||
| الترجمة الحرفية محيى بعساني محيى بعساني محيى بعساني محيى بعساني محيى بعساني محيى بعساني محيى بعساني محيى بعساني محيى بعساني محيى بعساني محيى بعساني محيى بعساني محيى بعساني محيى بعساني محيى بعساني مajuى محيى مajuى مajuى مajuى مajuى مajuى مajuى مajuى مajuى مajuى مajuى مajuى مajuى مajuى مajuى مajuى مajuى مajuى مajuى مajuى مajuى مajuى مajuى مajuى مajuى مajuى مajuى مajuى مajuى مajuى مajuى مajuى مajuى مajuى مajuode مajuode مajuode مajuode مajuode مajuode مajuode مajuode مajuode مajuode مajuode مajuode مajuode مajuode مajuode مajuode مajuode مajuode مajuode مajuode مajuode مajuode مajuode مajuode مajuode مajuode مajuode مajuode مajuode مajuode مajuode مajuode مajuode مajuode majuode مajuode مajuode مajuode مajuode مajuode مajuode مajuode مajuode مajuode مajuode مajuode مajuode مajuode مajuode مajuode مajuode مajuode مajuode مajuode مajuode مajuode مajuode مajuode مajuode مajuode مajuode مajuode مajuode مajuode مajuode مajuode مajuode مajiبمboo مajuode مajuode مajuode مajuode مajuode مajuode مajuode مajuode مajuode مajuode مajuode مajuode مajuode مajuode مajuode مajuode مajuode مajuode مajuode مajuode مajuode مajuode مajuode مajuode مajuode مajuode مajuode مajuode مajuode مajuode مajuode مajuode مajuode мajuode مajuode مajuode مajuode مajuode مajuode مajuode مajuode مajuode مajuode مajuode مajuode مajuode مajuode مajuode مajuode مajuode مajuode مajuode مajuode مajuode مajuode مajuode مajuode مajuode مajuode مajuode مajuode مajuode مajuode مajuode مajuode مajuode مuluالإستعمال | الترجمة | |
| الترجمة الحرفية | ||
| الترجمة الحرفية محيى بعساني محيى بعساني محيى بعساني محيى بعساني محيى بعساني محيى بعساني محيى بعساني مajuode مajuode مajuode مajuode مajuode مajuode مajuode مajuode مajuode مajuode مajuode مajuode مajuode مajuode مajuode مajuode مajuode مajuode مajuode مajuode مajuode مajuode مajuode مajuode مajuode مajuode مajuode مajuode مajuode مajuode مajuode مajuode مajuode-majuode مajuode مajuode مajuode مajuode مajuode مajuode مajuode مajuode مajuode مajuode مajuode مajuode مajuode مajuode مajuode مajuode مajuode مajuode مajuode مajuode مajuode مajuode مajuode مajuode مajuode مajuode مajuode مajuode مajuode مajuode مajuode مajuode مaluالإستعمال | الترجمة | |
| الترجمة الحرفية | ||
| الTRLÉTÉTÉTÉTÉTÉTÉTÉTÉTÉTÉTÉTÉTÉTÉTÉTÉTÉTÉTÉTÉTÉTÉTÉTÉTÉTÉTÉTÉTÉTÉTÉTÉTÉTÉTÉTÉTÉTÉTÉTÉTÉTÉTÉTÉTÉTÉTÉTÉTÉTÉ TÉTÉTÉTÉTÉTÉTÉTÉTÉTÉTÉTÉTÉTÉTÉTÉTÉTÉTÉTÉTÉTÉTÉTÉTÉTÉTÉTÉTÉTÉTÉTÉTÉTÉTÉTÉTÉTÉTÉTÉTÉTÉTÉTÉTÉTÉTÉTÉTÉTÉ | الTRLÉTÉTÉTÉTÉTÉTÉTÉTÉTÉTÉTÉTÉTÉTÉTÉTÉTÉTÉTÉTÉTÉTÉTÉTÉTÉTÉTÉTÉTÉTÉTÉTÉTÉTÉTÉTÉTÉTÉTÉTÉTÉTÉTÉTÉTÉTÉTÉT ÉTÉTÉTÉTÉTÉTÉTÉTÉTÉTÉTÉTÉTÉTÉTÉTÉTÉTÉTÉTÉTÉTÉTÉTÉTÉTÉTÉTÉTÉTÉTÉTÉTÉTÉTÉTÉTÉTÉTÉTÉTÉTÉTÉTÉTÉTÉTÉTÉTÉTé |
1

j 8)
aiaaii aiaaa g aaasllg aiaaa
a
1e 5gbi jblal
Jb
J 1
Jg 100000000000000000000000000000000000000000000
aJl 11
14

.
.
J 1
.
Jgaoall
Jg
- 1
- 2
12 3
12 4
13
14
14 7
17 8 - 19 10
iil
a 1 a 1 1 1 1 1 1 1 1 1 1 1 1 1 1 1 1 1 1 1 1 1 1 1 1 1 1 1 1 1 1
:Lg
aal 100000000000000000000000000000000000000000
www.aeg.com

Jiaaii iiaie 1e aagaaal alaiaa
www.registeraeg.com

j 1 j 1
www.aeg.com/shop

a
alglilgeululjull
PNC jorjolb:cllll oig jao no sli liydoall aodll js yjw Juaaiyie
aaii i aie 10
aLl lglg 1
iLo


J 1
pia wall
AEG

- Visit our website for:
- CUSTOMER CARE AND SERVICE
- SAFETY INFORMATION
- WARNING!
- CAUTION!
- Important notes
- Point to Keep in Mind When Using Your Portable Air Conditioner
- Usage cautions
- PLEASE NOTE: CHECK THE PLATE FOR THE TYPE OF REFRIGERANT GAS USED IN YOUR APPLIANCE.
- Additional information
- Transport of equipment containing flammable refrigerants
- Marking of equipment using signs
- Disposal of equipment using flammable refrigerants
- Storage of equipment/appliances
- Storage of packed (unsold) equipment
- SAFETY INSTRUCTION
- Notes on Operation
- Warning during usage
- UNIT DESCRIPTION
- ACCESSORIES INCLUDED
- OPTIONAL ACCESSORIES
- INSTALLATION INSTRUCTIONS
- Exhausting hot air
- PORTABLE AIR CONDITIONER FEATURES
- CONTROL PANEL
- OPERATING INSTRUCTIONS
- Usage of the Control Panel
- Power ON/OFF
- Heating Mode (on some models)
- Cooling Mode
- Dry Mode
- Fan Mode
- Auto Mode
- Timer Mode
- Sleep Mode
- Louver Swing Function
- Filter Reset
- Child Lock
- WiFi
- Bluetooth
- Scheduler
- Fault code
- Drainage instruction
- Continuous Drainage
- Note:
- CARE & CLEANING
- Cleaning the unit
- Cleaning the filters
- Winter Storage
- TROUBLE SHOOTING
- Portable air conditioner will not operate.
- Air from unit does not feel cold enough.
- Portable air conditioner cooling, but room is too warm.
- Portable air conditioner cooling, but room is too warm - ice forming on cooling coil behind decorative front.
- Portable air conditioner turns on and off rapidly.
- Room too cold.
- Room temperature may not reach the set target value on the display
- Unable to connect to the WiFi
- ENVIRONMENTAL CONCERNS
- CbДьРЖAHNE
- Pexm 3aToPJIaHe (npn HyaKoMoeJN)
- OxnaKdau pekIM
- Pexm n3CywaBaHe
- PexkIM BeHTnJaTop
- ABTomatnueH peKIM
- Pekm TaMep
- PekmCbH
- ФункцялюлеHe Ha xaIy3nTe
- PpeNaCTpoBbHe Ha qntbpa
- 3aKJIIOUBaHe 3a Deua
- Прогама дисецер
- KoI 3a noBpeDa
- INHCTpyKcnn 3a n3TOUbaHe
- HenpekbcHaTo n3ToUbaHe
- Benekkka:
- Глижам поочиства themselves
- Bb3aXa ot OTbopa He e OoctaTbHocTydeH.
- PpeHocmMnT KImMaTHK OxnaXda, Ho CTaTa e TBbPde TOnla.
- IpeHocmNt KJIIMMaTnK OxJaXda, HO B cTaYa e TBbPde ropeo - oOpMnpa ce nei no oxJaXdaUaTa 6ObHa 3aD DeKopatNBHaTa IpeHa YacT.
- IpeHocmMnT KImMaTnK Pra3Ko Ce BKNIOyBa N N3KJIIOUyBa.
- CTaTa e TBbPde cTydeHa.
- CTaHaTATEmNepaTypaMoKe Da He DOCTURHe 3aJaDeHaTa UeJeBa CToHOC T Ha DnCnpe
- He moxé da ce cbbpxe cWiFi
- 10.ГРИЖАЗOKОЛHATA CPEДA
- INHALT
- ACCESSORIES INCLUDES
- ACCESSORIES INCLUS
- ACCESSIONS EN OPTION
- PROBLEEMOPLOSSING
- 8.3
- 7.3
- 1
- 14
- Jg
- iil
- a
Brand : AEG
Model : AXP26U559HW
Category : Air Conditioning