
PCBS 3037 - Vacuum Cleaner ProfiCare - Free user manual and instructions
Find the device manual for free PCBS 3037 ProfiCare in PDF.
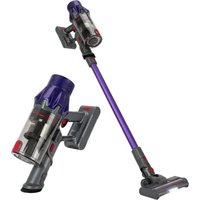
| Product Type | Cordless Rechargeable Vacuum Cleaner |
| Brand | ProfiCare |
| Model | PCBS 3037 / PC-BS 3037 A |
| Net Weight | 2.4 kg (with hose and nozzle) |
| Power Supply (Battery) | Li-ion 29.6 V, 2200 mAh |
| Power Supply (Charger) | Input: AC 100-240 V, 50/60 Hz, 0.8 A max; Output: DC 35 V, 500 mA |
| Charging Time | Approx. 4.5 hours |
| Maximum Runtime | 30 minutes |
| Dust Collector Capacity | 3 liters (indicated in the text) |
| Filtration System | Particulate filter + coarse filter + exhaust filter (non-removable) |
| Included Accessories | Wall mount, power adapter, floor nozzle with turbo brush, 3-in-1 combination nozzle (crevice/brush/upholstery), extendable special brush, articulated suction hose |
| Power Modes | Low and high (via MAX button) |
| LED Indicators | 3 charge indicators (25%, 50%, 100%); indicators on floor nozzle |
| Usage | Floor and table; dry dirt only |
| Maintenance | Clean filters with running water (let dry completely); empty collector; clean floor nozzle brush |
| Safety | Do not vacuum liquids or combustible substances; always use with filter; do not expose battery above 40°C; discharge before cleaning |
| Storage | Wall mount (charging possible); storage temperature 0-40°C; recharge every 4-6 weeks if unused |
Frequently Asked Questions - PCBS 3037 ProfiCare
User questions about PCBS 3037 ProfiCare
0 question about this device. Answer the ones you know or ask your own.
Ask a new question about this device
Download the instructions for your Vacuum Cleaner in PDF format for free! Find your manual PCBS 3037 - ProfiCare and take your electronic device back in hand. On this page are published all the documents necessary for the use of your device. PCBS 3037 by ProfiCare.
USER MANUAL PCBS 3037 ProfiCare
PykoBODCTBO no 3KcNpyataun
Batteries au lithium-ion rechargeables (Li-ion) 22
Batteries au lithium-ion rechargeables (Li-ion)
Thank you for selecting our product. We hope that you will enjoy use of the appliance.
Symbols in these Instruction Manual
Important information for your safety is specially marked. It is essential to comply with these instructions in order to avoid accidents and prevent damage to the appliance:

WARNING:
This warns you of dangers to your health and indicates possible injury risks.

CAUTION:
This refers to possible hazards to the appliance or other objects.

NOTE: This highlights tips and information.
Contents
Overview of the Components. 3
General Notes 45
Special Safety Instructions for this Appliance. 45
Rechargeable Lithium-Ion Batteries (Li-Ion) 46
Safe Handling of Rechargeable Lithium-Ion Batteries..46
Extending the Life of the Rechargeable Li-Ion Battery..46
Unpacking the Appliance 47
Overview of the Components/ Scope of Delivery. 47
Notes for Use 47
Switching the Appliance On / Off. 47
Start-Up 47
Suction Pipe 47
Floor Nozzle with Turbo Brush. 47
Combined Gap / Brush / Upholstery Nozzle (3 in 1)....48
Extendable Special Brush. 48
Assembly the Wall Holder. 48
Inserting the Plug of the Power Adapter 48
Fastening the Wall Holder. 48
Charging the Rechargeable Battery 48
Using the Appliance 49
End of Operation 49
Maintenance 49
The Filter System 49
Emptying the Dust Collector 49
Cleaning the Filters 49
Assembly of the Filter Unit 50
Cleaning 50
Floor Nozzle 50
Dust Container with Filter Unit 50
Storage 50
Troubleshooting 51
Technical Data. 51
Disposal 51
Accumulator/Battery Disposal. 51
Meaning of the "Dustbin" Symbol 52
General Notes
Read the operating instructions carefully before putting the appliance into operation and keep the instructions including the warranty, the receipt and, if possible, the box with the internal packing. If you give this appliance to other people, please also pass on the operating instructions.
- The appliance is designed exclusively for private use and for the envisaged purpose. This appliance is not fit for commercial use.
- The power adapter is only suitable for use in dry rooms.
- Check if the output current, voltage and the polarity of the power adapter match the information on the connected appliance!
- Do not touch the connected power adapter with wet hands!
- If necessary, disconnect the appliance from the power adapter.
- Ensure that the cable of the power adapter does not become kinked, jammed, driven over or come into contact with heat sources.
- Do not use a damaged power adapter.
- Do not repair the appliance yourself, but visit an authorized specialist.
- The appliance and the mains lead have to be checked regularly for signs of damage. If damage is found the appliance must not be used.
- Use only original spare parts.
- In order to ensure your children's safety, please keep all packaging (plastic bags, boxes, polystyrene etc.) out of their reach.

WARNING:
Do not allow small children to play with the foil. There is a danger of suffocation!
Special Safety Instructions for this Appliance
- This appliance can be used by children aged from 8 years and above and persons with reduced physical, sensory or mental capabilities or lack of experience and knowledge if they have been
given supervision or instruction concerning use of the appliance in a safe way and understand the hazards involved.
Children shall not play with the appliance.
- Cleaning and user maintenance shall not be made by children without supervision.
- The appliance is intended for use with safety extra-low voltage. Connect only to a power supply according to the specifications on the rating label.
- If the connection cable of this appliance has been damaged, it must be replaced with a special connection cable available from the manufacturer or its customer service.
- Use only the power adapter included in the scope of deliveries.
- Do not suck in combustible substances or liquids!
- Do not use this appliance to remove toner particles from a laser printer or copier to prevent fire or explosion.
- Do not suck up hot ashes or pointed or sharp objects!
- Never vacuum without the filter installed.
Rechargeable Lithium-Ion Batteries (Li-Ion)
The appliance is equipped with rechargeable Li-ion batteries. This results in numerous advantages compared to other batteries and accumulators:
A high cell voltage (more volts)
No memory effect
A low self-discharge
Safe Handling of Rechargeable Lithium-Ion Batteries
In general, Li-ion batteries are considered safe. Nevertheless, hazards may result from mechanical damage, electrical faults and thermal effects.
Mechanical damage may result in the leakage of gaseous or liquid substances that can be highly irritating, flammable or even toxic.
An electrical fault, such as a short circuit, may lead to overheating and cause a fire.
Even the heating of the outer shell of a Li-ion battery, e.g. due to sunlight or a heating element, may lead to fire or an explosion.
However, Li-ion batteries are safe when handled properly. Only if used or stored improperly they may become dangerous. Therefore:
- Avoid temperatures above 40^ and below 0^ .
- Do not drop the appliance or the rechargeable battery.
- In case the Li-Ion battery has been dropped and is now damaged, stop using it.
- When storing or disposing of the appliance, mask the terminals to prevent short circuits.
- Dispose of old accumulators properly in collecting containers at the trader or at municipal collection points.
Extending the Life of the Rechargeable Li-Ion Battery
For Li-ion batteries, even more than with other accumulators, their life can be extended by treating them properly. The following simple rules for charging and storing help you keeping the capacity of the battery:
- Temperature: The ideal temperature for these batteries ranges from 10 - 25^ . Temperatures above may lead to premature aging.
- Charging and discharging: During charging cycles, both full charge and deep discharge should be avoided.
When the charging process of the battery is completed, you should disconnect the charger immediately. A charge up to 90% is considered best.
Conversely, it is also preserving the battery more when it is not discharged to 0% . If the possibility arises, you should already recharge the battery when it is reaching a charge state of 30% .
Storage: Always store batteries in a dry place and at moderate temperatures between 10^ and 20^ . Also consider the effect of self-discharge! When the accumulator is already empty, this effect may lead to a deep discharge resulting in damaging the battery. If you intend to store the battery for an extended period of time, you can counteract this effect. We then recommend charging the battery to approx. 40% before storage. You should check the state of charge after not more than a month.
Unpacking the Appliance
- Remove the appliance from its packaging.
- Check the delivery scope for completeness.
- Check the appliance for any transport damage, in order to prevent hazards.

NOTE:
In case of any transport damage, contact your dealer immediately. Do not use a damaged appliance!
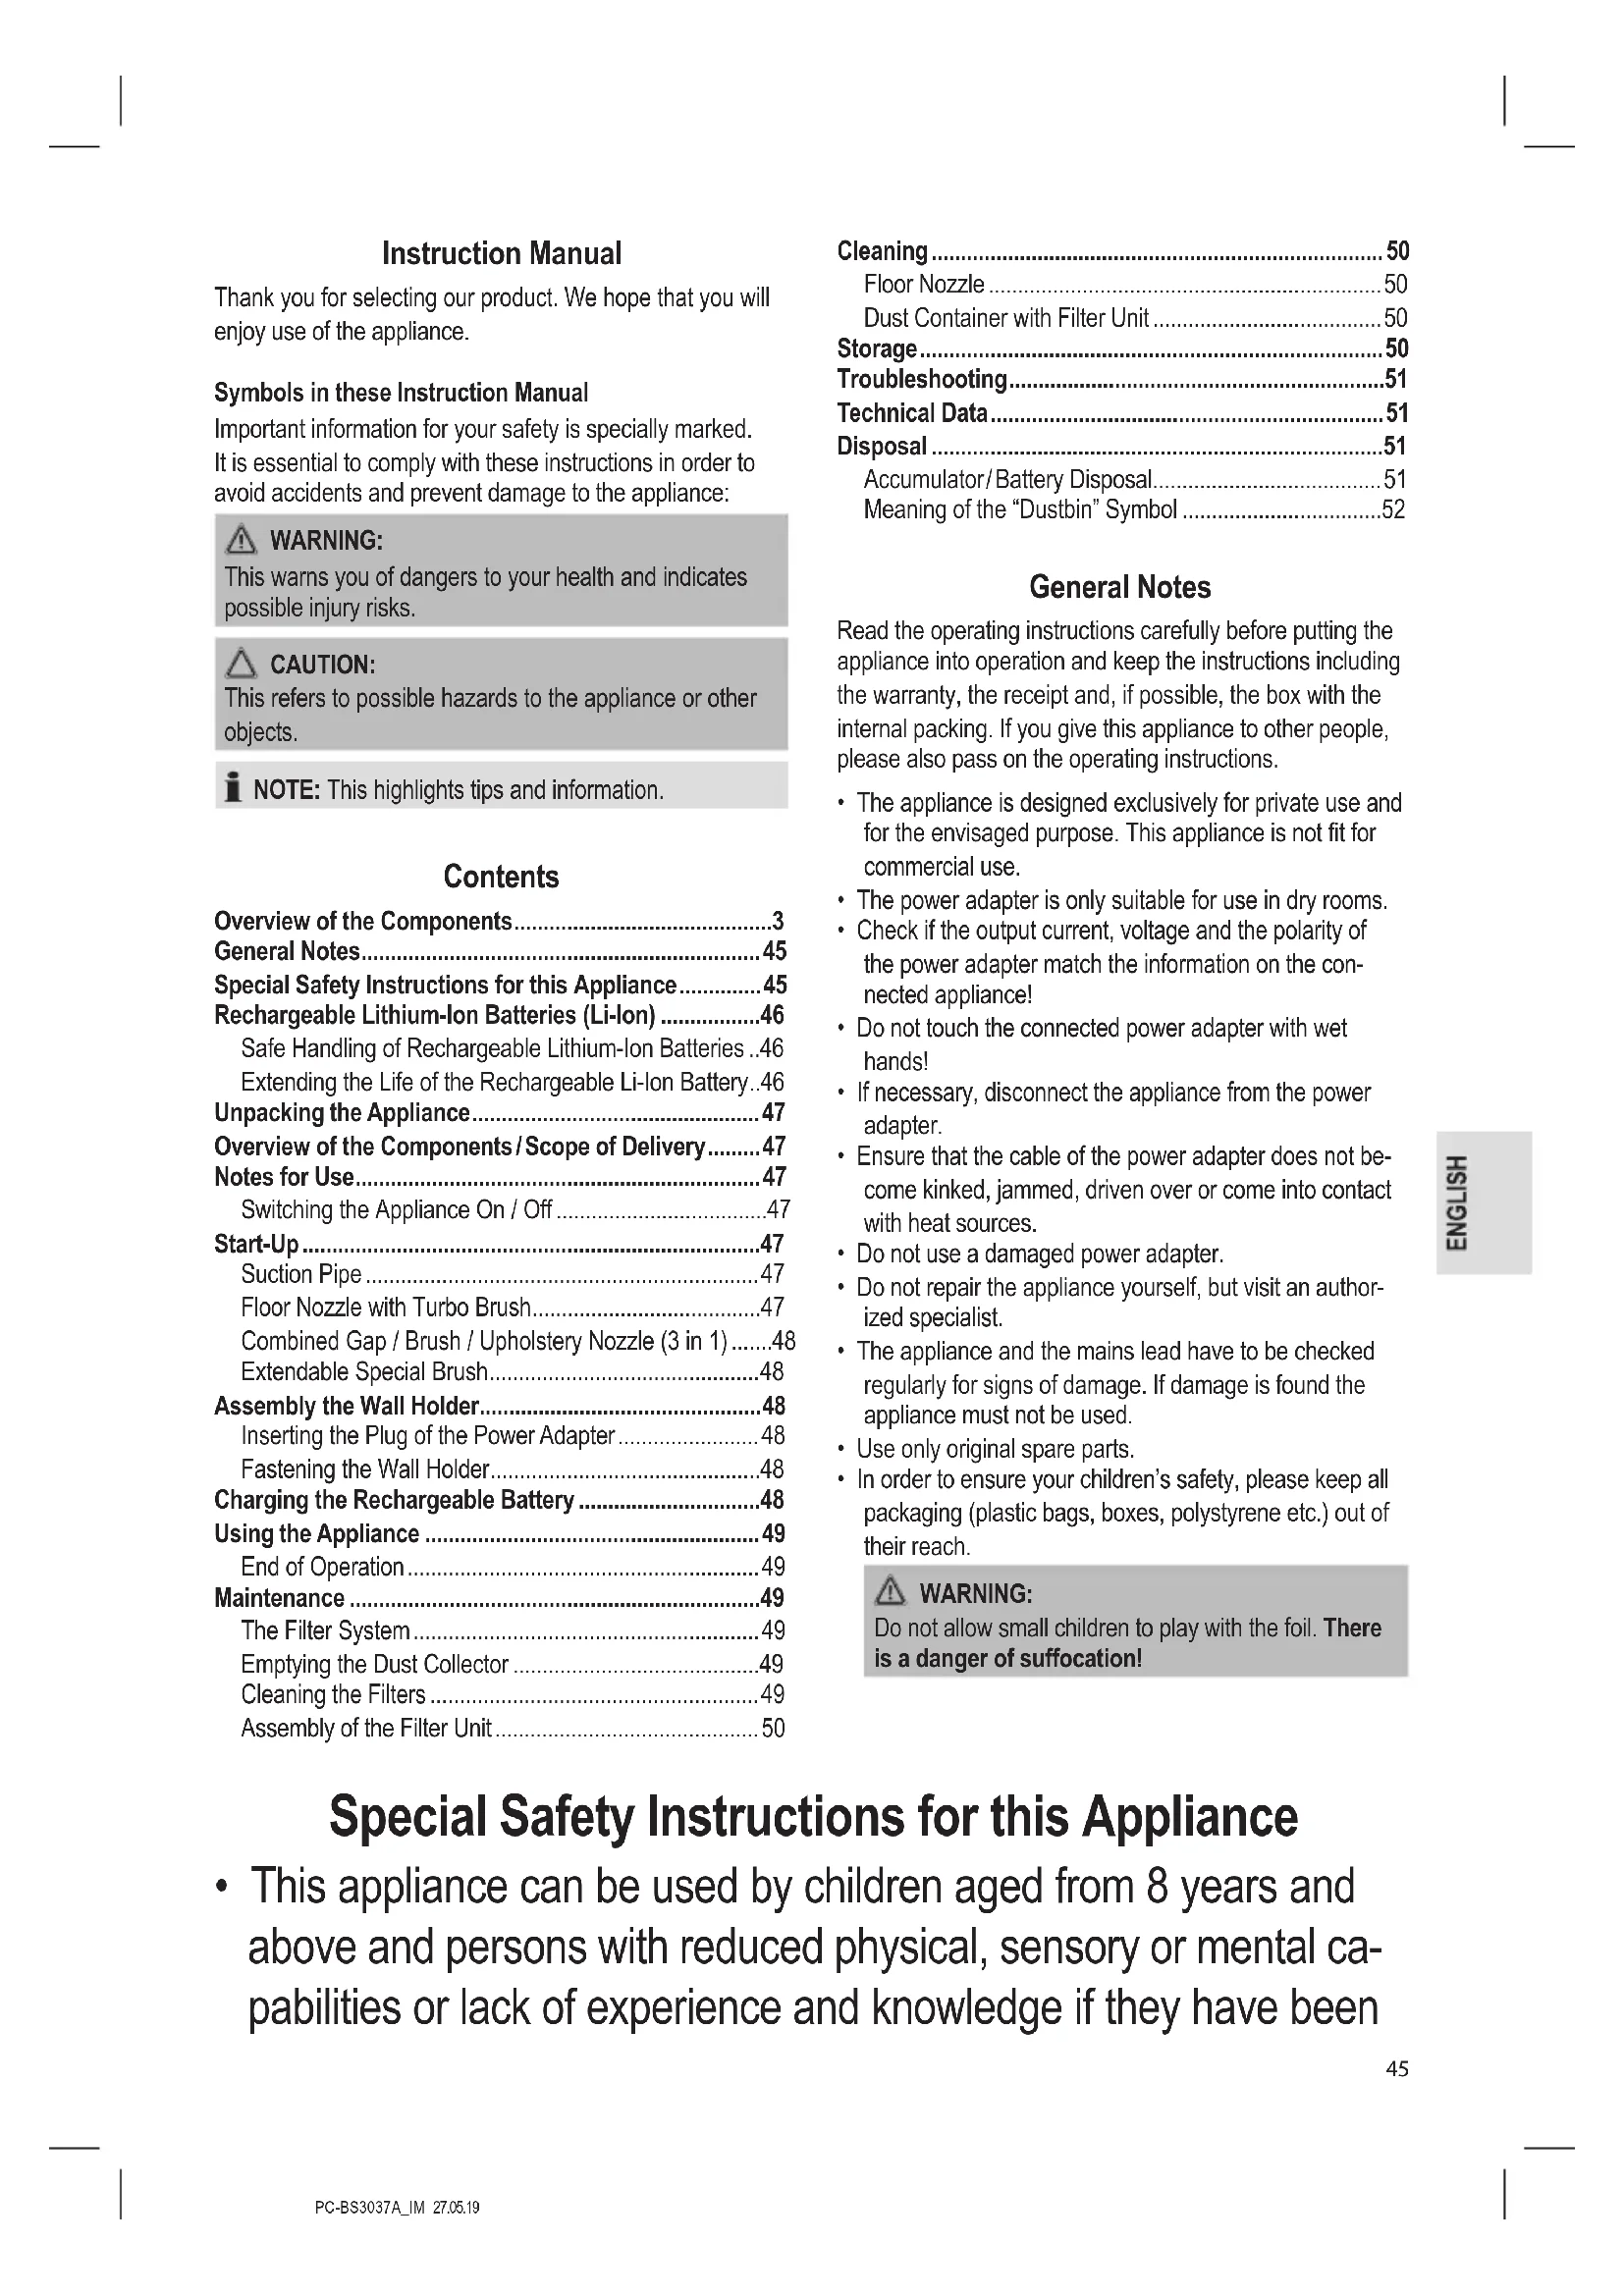
Overview of the Components / Scope of Delivery
Figure A
1 Dust container
2 Motor housing
3 MAX button
4 On/off button
5 Rechargeable battery pack
6 Rechargeable battery pack release
7 Dust container latch
Figure B
1 Dust container
2 Motor housing
8 Indicator lights
9 Carrying handle
10 Power supply connection socket
11 Hand set (Figure A)
12 Suction pipe release
13 Nozzle holder
14 Release for suction pipe joint
15 Floor nozzle with turbo brush
16 Floor nozzle release
17 Suction pipe
18 Combined nozzle release
19 Combined gap / brush / upholstery nozzle
20 Extendable special brush
Figures A and D
Wall holder
Not shown
1×Poweradapter
2× Wallplug
2 × Screw
Notes for Use
- The appliance is especially suitable for quickly vacuuming small amounts of dry dirt or dust.
- The appliance is operated via charged battery. Charging is done via the supplied power adapter.
- Direct power supply via power adapter is not possible.
- Hang the appliance onto the supplied wall mount when not in use. It also serves as a charging station.

CAUTION:
The appliance can not stand upright on its own. If you are not using the wall mount, gently place the vacuum cleaner on the floor.
- This rechargeable battery vacuum cleaner is no adequate replacement for a conventional floor vacuum cleaner. Especially on shag-pile carpet, the cleaning performance is not sufficient owing to its design.
- Contaminated filters reduce the suction power of the vacuum cleaner. Therefore, we recommend regular cleaning of the existing dirt filters.
- Ideally, clean the filters whenever they have been subject to a prolonged use.
- Please regularly check and clean the electric floor nozzle.
- If necessary, clean heavily soiled floors multiple times and / or use a conventional 230V floor vacuum cleaner.
Switching the Appliance On/Off
- The button (4) turns the appliance on and off.
- Press the MAX button on the back of the handset to toggle between low and high power levels.
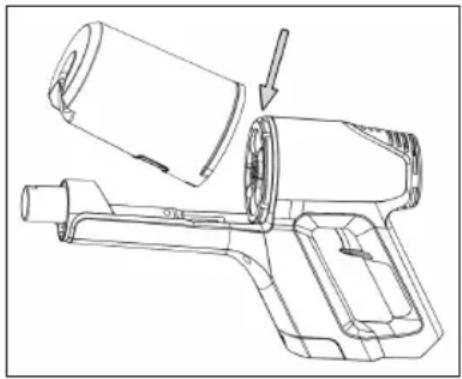
Start-Up
Suction Pipe
- The suction pipe is equipped with a joint. When tilted, it makes it easier for you to vacuum in places that are hard to reach. For a rigid suction pipe, let the hinge joint audibly snap into place.
- Insert the suction pipe with the two contact pins into the connection on the hand unit. It must audibly engage.
- To disconnect the suction pipe, press the release (12) and pull out the pipe at the same time.
Floor Nozzle with Turbo Brush
-
The floor nozzle is suitable for all floor coverings except for shag-pile carpets.
-
During operation, the LEDs on the floor nozzle light up for better visibility in dark areas.
CAUTION: You cannot replace the LEDs.
- Stick the lower end of the suction pipe onto the connector on the floor nozzle. Note the contact pins on the floor nozzle. The suction pipe must audibly snap into place.
- To disconnect the suction pipe, press the release (16) and pull out the pipe at the same time.
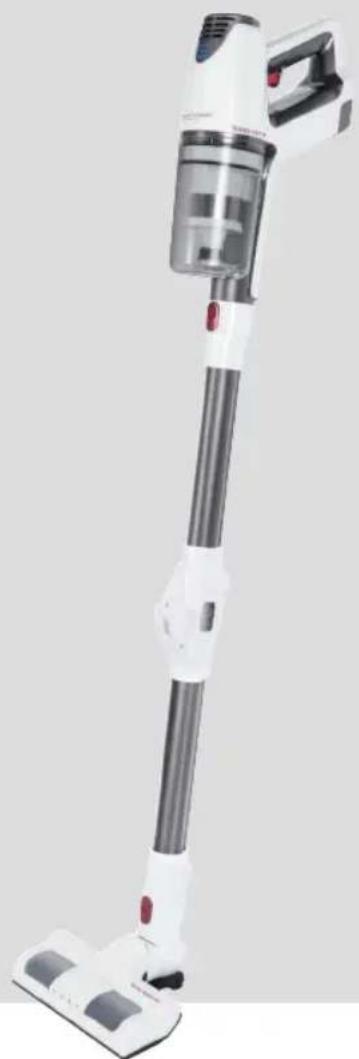
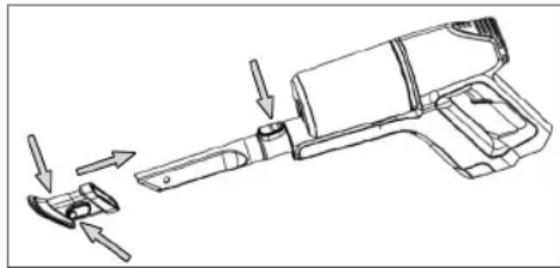
Combined Gap / Brush / Upholstery Nozzle (3 in 1)
- These accessories are always readily available when you keep them attached to the suction pipe above the hinge joint, using the bracket.
- While using this nozzle as a gap nozzle, you will be able to suck dirt out of corners, grooves and small gaps.
- To prevent scratching of the surface to be cleaned, use the gap nozzle along with the locked brush / upholstery nozzle. This enables you to gently remove dirt from slits in upholstery and mattresses. Also suitable for removing dust from sensitive surfaces such as furniture or curtains
- To attach the brush / upholstery nozzle to the gap nozzle, first press the buttons on the side and then slide the nozzle onto it, letting it audibly snap into place. (as shown in the following picture)
- To release the lock, simply press both buttons again.
- There are two different ways for connecting this combined nozzle attachment to the appliance:
Connection at the Hand Unit
- Insert the gap nozzle with the unlocking facing up into the connection on the handset. It must audibly snap into place.
- To release the nozzle, press the release button and pull it out at the same time.
Connection to the Suction Pipe
At the lower end of the suction pipe, you will find the same plug connection as on the handset. Mount / dismount the nozzle as described above.
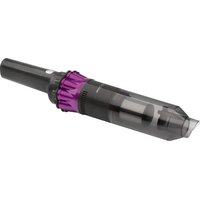
Extendable Special Brush
- This nozzle is particularly well suited for gentle cleaning of larger sensitive surfaces.
-
You may enlarge the dirt receiving surface by pulling the brush component all the way out.
-
You may attach this brush both directly onto the connection on the handset as well as onto the connection of the already mounted suction pipe.
To release the nozzle, simply pull it off.
Assembly the Wall Holder
Please take a look at Figures C and D on page 3.
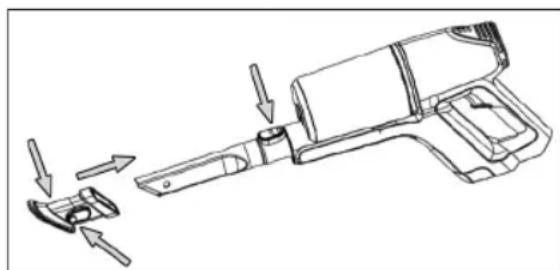
Inserting the Plug of the Power Adapter
If you want to use the wall holder also as the charging station, attach the plug of the power adapter first (Fig. C)
- Connect the power supply plug to the slot on the back of the charging unit.
- Firmly push the plug into the terminals. It must audiably snap into place.
- Secure the cable in the right or left cable guide.
Fastening the Wall Holder
WARNING:
Make sure beforehand whether there are cables in the wall which could be damaged!
CAUTION:
Place the wall holder so that the appliance is not exposed to direct sunlight or other heat sources.
NOTE:
If you would like to simultaneously use the wall mount as a charging station, there must be a power outlet nearby.
- Measure the height for the wall holder. Hold the vacuum cleaner against the wall with the suction pipe and the floor nozzle installed.
- Hold the wall holder against the wall as shown on page 3 (Fig. D). Mark 2 drill holes.
- Drill the holes and insert the wall plugs into the wall.
- Insert the screws through the holes of the wall holder.
- Tighten the screws with a screwdriver hand-tight.
Charging the Rechargeable Battery
CAUTION:
Do not charge the rechargeable battery unsupervised.
- Turn off the appliance.
- Connect the power adapter with the connection socket (10). If you have prepared the wall holder as a charging station, suspend the appliance from the wall holder.
- Connect the power adapter to a certified wall socket. Charge the appliance for approx. 5 hours before first-time use.

NOTE:
The indicator lights show the state of charge of the rechargeable battery. (25%, 50%, 100%)
- The appliance has electronic charge control, which prevents overcharging.
- Charging is completed when all 3 indicator lights are lit.
- In case the appliance is removed from the charging station or disconnected from the power adapter, the indicator lights go out.
It is normal for the appliance to heat up during charging.
- Disconnect the power adapter from the outlet once the rechargeable battery has been charged completely.
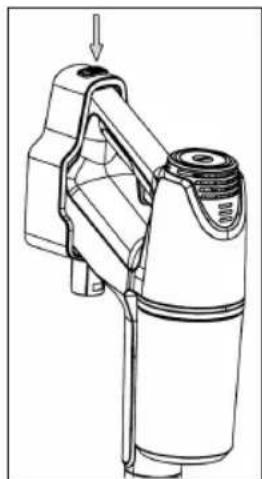
- To remove the appliance from the charging station, press the release latch on top of the wall mount.
NOTE:
Even when switched off, the rechargeable battery discharges continuously. If the appliance is out of use for a longer period of time, charge the rechargeable battery at least once every 4 to 6 weeks.
Using the Appliance
You can use the appliance as a floor vacuum cleaner or as a handheld and upright vacuum cleaner (basic unit).
- Disconnect the appliance from the power adapter.
- Turn on the appliance.
- If you would like to tilt the suction pipe at the joint, press the release (14).
NOTE:
- We recommend the higher power level for using the appliance with the floor nozzle. Press the MAX button.
- During operation, depending on the charging capacity of the rechargeable battery, 1 to 3 indicator are lit.
- We recommend recharging the battery once the indicator lights show a remaining capacity of only 25% .
- Once the capacity of the rechargeable battery is almost reaching its end, the last indicator light will flash. To avoid a deep discharge of the rechargeable battery, the motor will shut off the appliance accordingly. Recharge the battery.
End of Operation
-
Turn off the appliance.
-
If you have already installed the wall holder, hang up the vacuum cleaner.
Maintenance
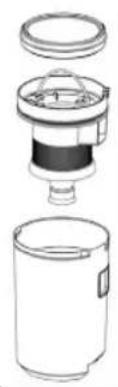
The Filter System
Your appliance features 3 filters. The common dust bag system has been replaced by a transparent dust collector. The higher flow speed of the collector allows for heavy dirt and smallest floating particles to be separated from the "sucked-in air".
It is thus not necessary to buy dust bags.
The filters must be cleaned periodically.

CAUTION:
- Never wash the filter in the washing machine.
- Do not use a hairdryer for drying.
- Only put the appliance back into operation when all filters are completely dry and correctly assembled.
The Filter Unit
The filter unit is composed of:
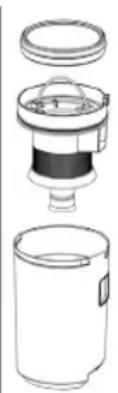
- Fine material filter
- Coarse filter
Proceed as follows to clean the filter unit:
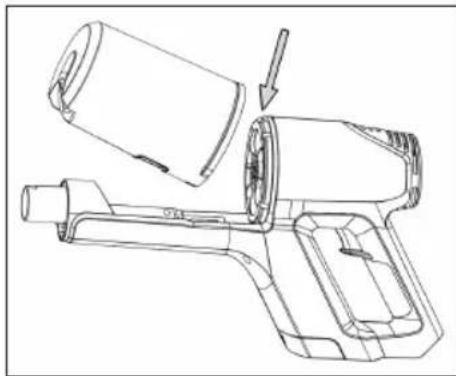
Emptying the Dust Collector
- Disconnect the appliance from the power adapter.
- If necessary, remove the suction tube or the nozzle attachment from the appliance.
- Please take a look at Figure A on page 3. Press the button on the dust container to release it from the handset.
- Pull out the fine material filter on the coloured piece of fabric.
- Pull out the coarse filter on its handle to remove it from the dust container.
- Empty the contents of the dust collector.
Cleaning the Filters
- Hold both filters over a garbage can and tap out the dust. You may also brush out the fine material filter. In case of heavy staining, clean the filters under running water.
- Let the filters air-dry completely before refitting them!
- Wipe the dust collector with a damp cloth and then wipe it dry.
Assembly of the Filter Unit
- Place the coarse filter in the dust container. Please note the recess on the edge of the dust container. Now push the coarse filter down so that it is placed in the center of the dust container.
- Put the fine material filter (with the coloured fabric part facing up) onto the coarse filter. Firmly press on the fine material filter.
- Then reattach the dust container to the handset. First, place the dust container on top of the motor housing. Now push the dust container down. The latch on the dust container must audibly snap into place.
Outlet Filter
The appliance is also equipped with an exhaust filter. It is located at the top of the motor housing.

CAUTION: You cannot remove this filter.
Cleaning

WARNING:
- Always disconnect the appliance from the power adapter before cleaning!
- Under no circumstances should you immerse the motor housing in water in order to clean it. Otherwise this might result in an electric shock or fire.

CAUTION:
- Do not use a wire brush or any abrasive items.
- Do not use any acidic or abrasive detergents.
-
The single components are not dishwasher-safe.
-
Wipe the casing with a damp cloth.
- You can wipe the power adapter unit with a dry cloth.
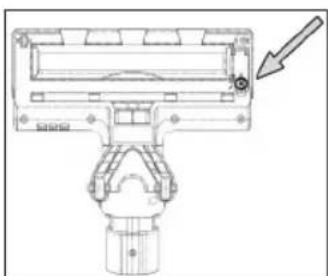
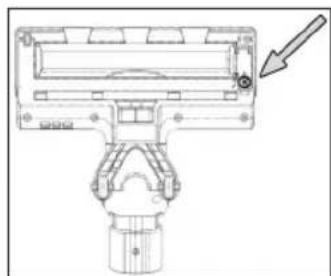
Floor Nozzle
- Disconnect the floor nozzle from the suction pipe.
- Turn the floor nozzle around, so that you see the lower side. Use a small coin or any other tool to open the latch. Direction of rotation: Counterclockwise. Flip the cover open.
- Pull out the brush roller.
- Remove threads and hair wound to the brush. Use scissors, if required.
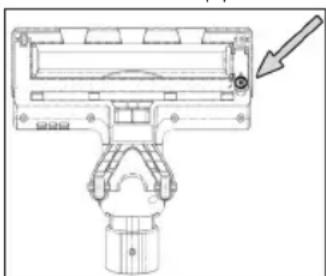
5. Assembly:
5.1 Put the brush roller, with the star-shaped recess first, back into the compartment.
5.2 Insert the other end of the brush roller with the square bearing into the recess underneath the cover.
- Close the lock of the brush roller.
Dust Container with Filter Unit
Please read the chapter "Maintenance" for cleaning of these components.
Storage
- Clean the appliance as described and allow it to dry.
- For storage, use the previously mounted wall bracket or carefully place the appliance on the floor.
We recommend that you keep the appliance in the original packaging if it will not be used for long periods.
NOTE concerning the life of the rechargeable battery:
Even when switched off, the rechargeable battery discharges continuously. When the appliance is out of use for a longer period of time, charge the rechargeable battery at least once every 4 to 6 weeks.
- Always store the appliance out of the reach of children in a dry, well ventilated place.
- The storage temperature should be between 0 and 40^ .
Troubleshooting
| Problem Possible cause | Remedy | |
| The appliance does not function. | The power adapter is connected. Disconnect the appliance from the power adapter. | |
| The rechargeable battery is defect. Contact our service or your dealer. | ||
| When the appliance is switched on, all indicator lights start flashing. | The rechargeable battery is empty. Charge the rechargeable battery. | |
| Weak suction power. The rechargeable battery is nearly discharged. | Charge the rechargeable battery. | |
| The dust container is full. Empty the dust container. | ||
| The filters are dirty. | Clean the filters as described under "Maintenance". | |
| CAUTION: Restart operation only with dry filters. | ||
| Noise during operation. A foreign body has been sucked into the floor nozzle. | Remove the foreign body. If required, disconnect the floor nozzle from the suction pipe. | |
| The floor nozzle with turbo brush is not operating. | The brush roller is blocked by dirt. | Clean the floor nozzle as described under "Cleaning". |
| Incorrect assembly of suction pipe and / or floor nozzle. | Check the assembling of the parts. | |
| The rechargeable battery does not keep the charge. | The rechargeable battery has reached the end of its life. | Contact our service or your dealer. |
Technical Data
Model: PC-BS 3037 A
Net weight
(Handset with suction pipe and floor nozzle):.. approx. 2.4 kg
Power Adapter
Protection class: II
Input: AC 100-240V, 50/60Hz, 0.8AMAX
Output: DC 35V, 500mA
Polarity:
Rechargeable battery: 29.6V, 2200 mAh Li-ion
Operating time: 30 minutes maximum
Charging time: approx. 4.5 hours
The right to make technical and design modifications in the course of continuous product development remains reserved.
This appliance has been tested according to all relevant current CE guidelines, such as electromagnetic compatibility and low voltage directives, and has been constructed in accordance with the latest regulations.
Disposal
Accumulator/Battery Disposal
The unit contains a rechargeable battery. Used batteries / accumulators (rechargeable batteries) do not belong in household waste.
The battery must be removed before the product is recycled. Press the release latch (6) and
remove the rechargeable battery pack from the handset.
Information, where batteries / accumulators are to be disposed of can be obtained from your local or municipal authorities.
Meaning of the "Dustbin" Symbol
Protect our environment: do not dispose of electrical equipment in the domestic waste. Please return any electrical equipment that you will no longer use to the collection points provided for their disposal.
This helps avoid the potential effects of incorrect disposal on the environment and human health.
This will contribute to the recycling and other forms of reutilisation of electrical and electronic equipment.
Information concerning where the equipment can be disposed of can be obtained from your local authority.
Instrukcje obslugi
Yka3bIbaeT Ha BO3MOxHnyO nAcHOCTb IIN3dEInna INpynx OKpyKaHOxN INpeDMETOB.

IPIMMEUHNA:JaetcoBETiHnHdopmaunIO.
CoepkaHne
O63op detae np6opa. 3
O67a HΦopMaun 70
CneuaJIbHbIe yka3aHnno
6e3oNaChocTn dIg 3Toro np6opa.71
HnHO-NTHeBBIe aKKyMnTOpHbE 6atapen (Li-Ion)..72
Be3oNaChoe o6paueHne c NOnHO-JIHTNeBbIMn
aKMyJyTophBMn 6aTapeMn 72
IpoDJIeHHe cPoKa cLyXbI MoHHO-JIITNeBOI aKKyMylTOpHoi 6aTapei. 72
PacnaKOBka yctpoiCTBa. 72
O63op detae np6opa / KomnJeKT nocTaBKn 72
PpmeuHnno nncnoB3OBaHnna 73
BkIIOueHHe/BbIKIOueHHe np6opa. 73
Hauano pa60tbI 73
Tpy6ka BcacbBaHHa 73
MoHTax HAcTeHHoro DepeKaTeJIa 74
BCTaBka BnIKn B 6JIOK nTaHn. 74
MOnTaX NaCTeHHOro DepeKaTeJI. 74
3apd akkymyTOpOB. 74
3Kcnnyataa np6opa 75
3aKoHHTb nOlb3OBaHne np6opom 75
06cnykBaHne 75
CnCTemaΦnJIbTPOB. 75
OnyctoWeHne nbIeScbOpnka. 75
OuHCTKaΦnIbTPOB. 75
C6opka 6noka qntbTPOB 76
Ynctka. 76
HacdaKa dIra nola. 76
TbJIeSc6OpHnK C 6Iokom qIITbTPOB .76
Xpanenne 77
Ponck yucpaHHe HencnpaBHOcte 77
TexHHueckne daHbIe 77
ytnn3a.. 78
Yttnn3aun6batae/AkkymnyTophix 6batapeek.....78
3HaueHne CmB0la «KOp3nHa» 78
06aHnΦopMaun
Ipeed Hauanom 3KcNpyataunn npnbopa BHNMaTeIbHO npouHTaTe npuaaraemyu INCTpyKUHNO no 3KcNpyataumn COxpaHNTe ee B HadeXHom MeCTe, BMeCTe C rapaHTnHBIM TaHOOM, KaccOBbIM YekOM n, NO BO3MOXHOCTn, KAPTOHHO KOp6KO C yNAKOBOUYBM MaTePnAON. Ecn daeTe KOMy-1NoBIO pONlb3OBAtbc npnbopom, O83aTeNbHO daJTe B PnDauy DaHHyo INCTpyKUHNO no 3KcNpyataunn.
ПользуITECBпиборOMToIbKOчАТьIMОБра3OMиnoHa3HaueHHIO.Pi6OBHeпрДнa3HaueHДЯКOMМерчECKOrOИСПЛьЗOBAHIN.
- CeteB0n aadTep npiroeH dIg IcNoIb3OBAHnra TOnbKO B CyNXN NOMeUeHNX.
- Поверпсоглacobанocь Быхогнор.Toka, Hanржени И поярночсп се tebero aanTepa CnHopma-cuieн Ha nodklnoyamom npin6ope!
He npikacaiTecb K ceTeBOMy aanTepy BnaXhIMny pukam!
KoIgIa Heo6xoDIma YnCTka, OTKHOnHTe npi6op ot ceTeBOrO aanTepa.
- Y6eIntecb, YTO Ka6eJIb CeTeBOrO aIaIaTepa He N30rHyT, He NpeKeaT, He HaTyrHyt N He KacaetcN UCTOuHnKOB Ternna.
- He npimHeHTe NOBpeKdEHHbI cTeBoO aJaantep.
He nItaTeCb camOCTeJIbHo pEmOHtIpOBaTb npI6Op o6paTntEcK yNtHOMoHcHHomy Ha 3TO cneuaJIncty.
-Прибори Кабелсeteво рптань Heo6xOДМО perуларнообследовать наншчпспдов поржден. При образужени nobpexdенnoIb3OBaTcR npriборomЗапецаetс.
IcnoJb3yIteToJIbKOOpnHaJIbHbIe3aIuaCTN.
- 13 coobpaqehn 6e3oNaChOCTn DnIaTeH He octabTnIte JexKaTb ynaKOBky (IInactNKOBblc MeuKN, KapTOH, NeHONlact n T.d.) 6e3 npncmOTpa.

IPEyIPEXKDEHNE:
He no3B0JnTe DeTm nIpaTb c noIIN3TNNEHOBOI nIeKo. Onacnoctb ydysb!
CneuNbHbIe yka3aHnNo 6e3oNaChOCTn IJy 3TOrO npnbopa
- ΘТИМ пибором могут полььзоватбаяdetистарше 8 leт и лица
C орразионьим Физческим, осятаеловими и псинческимспособноctям Или He Имени Oпытаблл 3нан,
Е слп OНи нахODЯТСЯ ПОД надзором Или поинстураювны
В оTHОшен 6e3ОпаСHorO поьзованя пибором И 3найт о
СВЯЗАHHbIX C ATIM ONaСHOCTЯX.
He n03B0JrTe dEtram irpaTb c np6opom.
-ЧИстka и ухов за прибором не дожны проворпся DeТьМи 6e3 надзopa. - UcTpoIcTBo IpeDHa3NaUeH O nIpa6Otbl OT 6e30nacHOro Hn3-Koro HapRjaKeHn. PoIKnIOuAaTe K NCTOChNkY PNTaHnycorlaCHO IHOpMaaHn Ha IHOpMaaOnHOH T6JIuYe.
- Ecπi coeHInTeIbHbI Ka6eIb yCTpoIcTba NOBpeJdeH, eTo Heo6xOIMO 3aMeHnTb Ha CneuaJIbHbI COeINHTeJIbHbI Ka6eIb, NoCTaBIAReMbI N3rTOBInTeIeM I cLyX60J KJIHeNTcKoI PoIdEprKKn.
- Icnoj3yTe TOnbKO NCTOCHNK NITaHnI N3 KOMNJIeKTA NOCTaBKn.
He BCacbBaIte roPioue BeseCTBa I XndkocT!
He nCnoJb3yIe daHbI np6Op dIydaJIeHnY cactu Tohepa I3 Ja3epHO npHTepa IIN KOINPOBaIbHO rCTPOcTBA, NOCKOJbKy 3TO MOKeT Bbl3BaTb BO3rOpAHne IIN B3PbIB.
He BCacbBaIte ropnyn pepeI nnOCTpOKoHeHbIe nnOCTpbIe npedMeTb! - Hn B Koem cnyae He 3KcPnyatnpyIte nbIeCoc 6e3 pfNbTpa.
HONHO-JNTHeBbIe aKKymyIaTOpHbIe 6aTapeN (Li-Ion)
YcTpoiCtBO 6ObOpyDObaHO MOHHO-NTHeBBIMn AKKMyJITOPHbIMN 6bTapeRMn. OHI 6bIaJaOT MHOKeCTBOMPneMysEcTB B cpaBHeHN C dpyrMMn TINAMN 6bTapeNnAkkymjTOpOB:
BbICOKoe HaprrxKeHne 3nEMeHTOB (60JIbe BOJIbT)
OTcYCTBnE 3ΦΦeKa TnamrTn
- Hn3kn camopazd
Бezonachoe obpaueHne c noHNO-NTnEBbIMN aKkMyIaTOpHbIMn 6aTapeMn
B cIeHOM IOHHO-JINTHeBIE 6aTapeu CHTaOTc8be3OanacHBIM.Tem He MeHee, MexaHueckne NOBpeKdEHH, NOBpeXdEHnB B3JIeKTPnuecko CEHN TENIOBbE 30pFKeTbMOyT CTaTB NCTOCHNKOM ONACHOtN.
MexAHueckoe NOBpeKdHHe MOKet npNBecT K yTeKe ra3o06pa3hIx ININ XNkIX BeIcE TB, KOtOpbIe MOyT Bbl-3BaTb CNJbHOe pa3dpaXeHne, MOyT 6bITb TropOUMIM ININ daKe TOKCHHbIM.
IpoDneHn cpoKa cnJyKbIOHHO-JNTHeBOAkkymyTOpHoi 6aTapei
IpaBnIbHoe o6paueHne c HoHHO-JNTHeBbIMN 6aTapeMn MoKcET npOdINITb cPOK INx CnyXbbl DaKe B 6oJIbWei CTe- Hn, Yem npn iCNoIb3OBAHm Dpyrnx AkkymyIaTOpOB. CoXpaHtB EMKOCT b6aTapei NOMOT CJeDyUOuNe IpocTbe npaBnla 3apAdkn I xpaHeHn:
TeMepaTypa: IdeaJIbHaT eMnpaTypa IIN 3TNX 6Batae BapbpyET B Dnana3OHe 10-25 ^ C .Boonee BbICOKne TeMnpaTypb MOrY TpNBecT N K npexDeBpeMeHHoN NOtepe CBOICTB.
3apnKa npa3pKa:BoBpeMaZIKNOB 3apJKn Heo6XOIMo N36eRaTb KaK NoIHorO 3apJa, TaK n rIy6okoi pa3pKn.
По Okончанни поцеса зардкбатарен Heobxodmo cpa3у ще отcoeindHTb зардhoe yctpoiCTBO.CuHTa-етс,чTOлучse BCero заржatho 90%.
BToXe Bpem6 6aTape npocnyknt doJbwe,ecnH He daBaTb eP a3paKaTcA Do 0% .PiNIOABHeHIN BO3MOxHOCHTB CERda nepe3apKaiTe 6aTapeHO,KoRdaypOBeHb 3apKn DoCTnraet 30 %
XpaHHeNc: Bcerda xpaHnTe 6aTapeB C cyxom MeCe npi cpeHnx TempePAtypax B dIana3oHe ot 10^ do 20^
TaKKe yuHTbIaIe 3ΦΦeKT camOpa3pIa! EcNn aKKyMyIaTOp yKe pa3pJKeH, 3OT eΦΦeKT MoKET npNBecTN K rIy60kO pa3pIaKHe, Bbl3bIbAIOUeN NOBpeXeHne6BaTapeN. EcNn Bbl HamepeHb XpaHtB 6batapeo npOOnKInTeMbHO BPEM, 3OT 3ΦΦeKT MOxHO HeITpAn3OBA Tb. B 3TOM cnyae Mbl peKOMeHdyem nepeXpaHEnEM 3apdntb 6batapeo npImepHo do 40 %. Heo6xOIMO npOBepHb yPOBeHb 3apdKn He no3DHee Yem UpeE3 MeCz.
PacnaKOBka yctpoNCTBa
Pnp6op He moKeT cam cToaTB BeptnKaIbHo. Ecnn He nCNoIb3yeTcHacTeHHbI KpeNEx, NoIOXInTe nbJNEcoC Ha noI.
3TOTIpeepaJkaembIakKMyJIaTOPbIINbIeCoc He YBIIeTcIIOJIHOUeHHo3aMeHOITpaIuOHHbIM BaKyyMHbIM bIIEcOCAM.Oc6eHHOHaIINHHOBOPcBOBIX KObpaxeroMOUHOCTHNBCacbIBAHn6yTeHeIOCTaTOHNO3-3aOC6eHHOCTe KOHCTpykun.
3aONHeHbIe qnIbTpbl ChNkaOT MoUHocT bCaCbIbAHnIpbJIecOca. IooTOMyMbI peKOMeHdyem perYIpaHOcHTNbJIeBbIe qnIbTpbl.
B Ieane YnCTnte FInIbTpbl nocne IIO6o IINTeHBOIcNOJIb3OBAHn.
- PtoxanyuCTa, peryIpyHO npOBepRte N uNCTnTe HaCaIky dny nona.
- Пи Heo6xOIMOCn, YIcHTe CINbHOrO 3aIpy3HeHHbIe
-плbl HeckoIbKO pa3 И/ИЛN ИСПОь3уЛte obIyHbI
- nbIeCoc c 3neKtpOnITaHmE mT cTe N 230 B~.
BkJIIOUeHHe / BbIKHOUeHHe np60pa
KhoNka (4) cnYkNT nIy BkJIooyeHn N BbIKIOOeHn npu6opa.
- HaKMITE KHOKNKY MAX ha 3aHHei CTOpOHe pyHOrO KOMnIeKTA dIy IpeKeKnHoyEnHa MeKdy yPoBhAmN BbICOKoN Hn3KO MouHocTn.
HauaJopabotbI
Tpy6ka BcacbBaHn
Tpy6ka BCacbBaHnI IMeET CoUHeHne. IpiC rIb6aHnB 6ydet npOSe YnCTntb PbIIEcOCOM B TpydHOIOCTynHbIX MeCTax.ДЯЗКрЕнEунТу6Kn BCacbBAHnI ShapHnP-Hoe CoeINHeHne (coUHeHne)doJxHO 3aCenITcA CO CblIMbIM UeJIYKOM.
BCTaBBTe BCacBaHIOU Tpy6y C DByMRA KOHTaKTHbIMN 1TbIPrMaB CoeINHeHne Ha pyuHOM 6nOke. OHa DoJxHa BOITN B 3aueJIeHne CO 3ByKOM.
-ДяOTcoeINHnBcSbIaIOUeTpy6bIHaKmTeHa KhoNkyOCBO6OKeHn(12),ODHOBpeMeHHO BbITrINBa Tpy6y.
CbeToOnoDbI 3aMeHe He nOndexKaT.
-ПикpenITE HIXHm KOHeI BCacbIBaHoueI Tpy6Kn K coeHNHTeIIO HacaIKn Ira nona.ObpaTte BHHMaHne Ha coeINHTeJIbHbIe KOHTaKTbI HacaIKn Ira nona.BcaCbIBaHouaI Tpy6Ka DOJXHa 3aueNITbcr Co CblIMMbIM UeJIYKOM.
-ДяOTcoeINHeHn BcscBbAIOUeI Tpy6by HaxMnte Ha KhoNky OcBO6OxKeHn (16),OJHOBpeMeHHo BblTirnBa Tpy6y.
KombuHropoBaHHa HacaKa dJa y3Knx MeCT / 1eTka / Me6JIbHOn O6NBKN (3-B-1)
3TN pINHAnJNEXKHOCTN BCErda rOTOBbl K pa6Ote,ecnIN xpaHHTb INPpIKpeIeHHbIMNKpoHHTeHy Ha Tpy6Ke BCacBIBAHNBAIIe WapHnPHORo CoeINHeHN.
- EcIN INCIOJIb3OBA Tb HacayB V NOIOXeHn DnY y3Knx MeCT, TO MOKHO UcTntb Nblb B yIax, UeJx N dpynx y3Knx MeCTax.
ДпяпгдьрашениcaрMH Ha OCHuaemoi NOBepxHOCTN NcONb3yIte HacaKg YnЯ y3kX MeC T C 3aKpeNJIeHHo HacaKoJ-TeKoI nIIc HacaKoJ dIЯ Me6eJIbHOr O6bKN.3To No3BOJNT AkKypaTHO ydaJIInb Nblb N3 CKIaDOK Me6eJIbHOr O6bKN I MaTPacOB. HacaKa TaKKe NpIXOJNT DnIy ydaJIeHry NBIN c DeNIKAThbIX NOBepxHOCTe, HapPIMep C Me6eIN nIIu TOp.
ДяпсоeHHeHЯ Hacdkn-KeTkn HAcdknДЯ Me6eIbHoI ObIKN K Hacdkne IЯ y3Knx Mect ChaHa nHaXMMTe KhoIKN c6Oky, 3aTeM BdBnHbTe Tyda Hacdky
do 3aueJIeHnco CbIIMMbIM UeJyKOM (CM. CneIyo- mnn pncyHok).
Дяocbo6xdeHn3aueJIeHnIpoCTOCHOBaHaXMITEKHONKIN.
CyueCTbYIOIT DaBa pa3HbIX cNoO6a KpeIeHnKOM6HnHpoBaHHo HacAdKn K np6Opy:
IodcoedueHHeue KpyHOMy bNOky
BCTaBBTe HacaIky dIy y3kNx MeC t pa3bIOKIpOBaHHoI INCeBOI CTOpOH BBePxB CoeINHeHne pyHoro KOMnNEKTA. DOnKeH 6bITb CJIbIWeH 3ByK 3aueIeHnI.
-Дяocbo6oxJdeHnHaCaJKn HaxMNTe KhoNkyOCbo6OxJdeHn,ODHOBpeMeHH BbITrIINBaHacaJky.
IodcoedHHeue KcsacbBaioueu mpye
Ha HxHHeM KOHcE BCAcbIbAHOSe Tpy6Kn HaxOHTc TaKo JKe CoeINHInTeJIb DnA BCTaBKn, YTO Ha pyHOM KOMnIkeTe. YctAHOBInTe / CHIMNTE HacAdKy, KaK yKa3aHO BblJe.
yDnHryoaa CneuaJbHaN 电
- 3Ta HacaKa OocbeHNO XopoWo NIOxOuNT DnAaKKpyatHOH YNCTKN 60JbWnx DeNkKaTHbIX NOBepXHOCTeN.
- MoXHo yDnHnHb NOBepxHOCTb c6opa nbIIN 3a cuet pa60Tb IeTKN.
Takyu 1eKy MoKHO npKpEnNtB npM0 K coEHNHTeHpyHOro KOMJIeKTA, JI6O K coEHNHTeH, yKe yCTaHOBJEHOMy Ha Tpy6ke BCacbIBaHn. - To6bI Ch8Tb Hacaiky, npocTo BbItaunTe ee.
MOHTAX HACTeHHoro DepeKaTeJIa
TpoKanyuNcTa,cm.pucyHKn C n D Ha cTp.3.
BcTabka BnIKN B6JOK NITaHn
EcnBbXOTHeNCNOb3OBaBhAcTeHHbIepXaTeB TaKKe B KaueCTBe 6a3bl DnA 3apRKn, ChaJa NOpKnIOuHTe Bnky K 6nOky NiTaHn (Pnc.C).
1.ПодключITE BUNky 3NeKtpOnnTaHmЯ кpoЗтke Ha 3aДнe CTopoH e 3apdHoi CTaHcHn.
2.AkkypaTHOBCTabBe BNJKY B KJIeMMbl.ДОЛKEH 6bITb CJIbIueH 3ByK 3aJIeIIeHnI.
3. 3akpenite ka6eB B npaBoI nII neBOH HnpaBIAIOUeJ dna Ka6eIa
MOnTaX HacTeHHoro DepeKaTeTn
I PDEyIPKJEHNE:
IpeBapnteHbO y6eHITcB OTCyTCTBnB CTeHe Ka6eJIe (npoBOdkn), KOTOpbHE MOrY T 6bITb NOBpexKeHb!
BHIMAHNE:
Pa3meaTe HacteHHb DepKaTeB TaKIM oBa3OM, yTo6bl np6Op He noDBepraNCa DeHCTBnO npMaBix COJIHeuHbIX lyuei nnDpyrNx nCTOUnHKOB TeNa.
IIPIMEUYAHNA:
EcnHyxHO OndHOBpeMeHHO NcNoJIb3ObaTb HacteHHoe KpeIeHneB KaueCTBe 3apJHoi CTaHUn, prdOM DoJnxHa 6bITb HacteHHa 3NeKtpnuecka po3etka.
1.ИЗмербTe BBICOTу ДЯ моТаха HabTeHHOrO DeржATEЯ.ПиЖМITEпьIECOCКCTeHcYCTaHOBNeHHOBCaCbIbAIOUSeTpy6oNHaCakOДЯнona.
2.ПиКМЛТЕнСTeHнБДЕрKaTeNьКCTeHe,ΚΑΚΝΚa-3aHoHa CtpaHnIe 3 (pnc.D).OTmTeTbTe 2 MecTaДпЯ BbICBepJIuBaHnIOrTBepCTnI.
3.ПорсверлenteOTВерстгиИВCTаБТБСЕНДHIO6EJI.N
4. BCTaBbTe BnHTbI uepe3 OTBepcTna B HacTeHHOM DepeXaTeJIe. BBePHTbe BnHTbIC HaCteHHbIM DepeXaTeJIem B DIO6eJIi.
5. 3aTnHTe BnHTbI BpyHyIO Do yNopac NOMOuHO OTBepTKI.
3apdakkymyrtoPOB
BHUMAHNE:
He 3apjkaaTe akkymyIaTOpHyIO 6aTaPeIO 6e3 npicMoTpa.
- BbIKIIOHTe yCTpoIcTBO.
- Пдкночiteблok пптаня K coeINHITelbHOMy pa3bemy (10).
Ecnn Bbl NIOIROBnH NaCTeHHb IepXaTeNb B KaYeCTBe 6a3bl nla 3apAkn, NOBecbTe Ha HEm np6Op.
3.ПоdkночиTe cTeBoi aadantep K cepTnФИцрОванHо JIeKtpnueckoP03eTke.3apJkaTe yCTpoIcTBO npIM.
5 yacob neped nepBbim nCnObn3oBaHneM.
I INPIMEUYAHNA:
- INДИКАТОРНБЕ ЛAMПОЧКIN ПOKАЗБIBAJOТ COCTОВНЕЗAPДКIN ПЕРЗAPЯЕМОн АKKUMЛЯТОРΗО 6aTApen. (25%, 50%, 100%)
-Пиббр сабжен 3лЕкгоньустpoиCTВOM KOHTPOJЯЗAPДК,пpeodTbaPauOuIMnepe3apKky.
3apka 3aBepseHa, KOrda roprT Bce 3 HnDkaTOpHbI JAmNoUKN. - Ecni npnbop cHrT c 3apdHoi cTaHcNn nINOTKJIIOUeHOT 3JIeKTPoNTaHnI, INHdkaTOpHbIeJAMnOChn NorachyT.
HarpB yCTpoIcTBA npn 3apJKe JbIeTcHOpMaJIbHbIM.
4.После поног зардкny akумлгорнбатарoenOTcoeINHnTe 6nOK nHTaHnry OTpo3ETKn.
5. YTo6bI ChrTb npn6op c 3aPdHoi CTaHcN, HaxMnte 3aUeKy OcBo6oxDeHnB BBepy HaCTehHOro Kpe- PJIeHnA.

ПРИМЕЧАНО:
JaKe npBvIKNoeHHom np6ope aKcyMnyTOpHna 6aTaPe noCToRnHO pa3paXaETc. Ecn np6op He nCNoIb3yETcB TeueHne dInTeNbHorO nepnoDa BpeMeHn, 3apKaJte akMyJrToPHy0 6bTaapeIO He pexe, Yem pa3 B 4-6 HeJeB.

3Kcnnyataun npn6opa
Moxho nCnoB3OBaT np6op B kaueCTbe nbinecoca dna nOHa nn B vnde nepeHOCHOro nbinecoca dna BePTnKaJIb-HOH ONUCTKN (6a3OBbI 6nok).
- OTKHIOUHTe npM6op OT 6noka nITaHnIa.
- BkIIOHTe np6op.
- TTo6bI CoHrTyB BCaCbIbAIOUyIO Tpy6Ky B COUJIeHeHH, HaxMnTe KHOJky OCBO6OxKeHHN (14).

ПРИМЕЧАНО:
-Пи Испльзовани пьбopa с надкоДя поа pekomeHdyetca cambl BbICOKИ ypoBeHb MOUHOCTN. Haxmnte KhoNky MAX.
BoBpeMa pa60bI, B 3aBnCIMoCTn OT ypOBH 3apRKn nepe3apJxAeMOrO aKkMyJrTopa rOpNT O1 Do 3 INDnKaTOpOB.
- Mbl pekomehnyem 3apkaTb akkymnyTOp, korga INHdkatopHBie lamnoQn NOKaYr OCTabuINc ypoBeHb 3apAKn TOnbKO 25%
Korda ypoBeHb 3apn kn nepe3apkaemoro aKKymyIaTOpa noTH 3aOKHTc, nocneHra uHnKaTOpHa IaMnoUka HauHET MIRa. TTo6bl He dOnyCTntb rny60ky pa3pndky nepe3apkaemoro aKKymyIaTOpa, npn 3tOM BbIKIOHTc MOtOP np60pa. 3apdnte aKKymyIaTOp.
3aKOHHTb NOJIb3OBAHHe np6opom
- BbIKIOHHTe yCTPOIcTBO.
- NocJe MOHTaxa HacteHHoro DePkaTeNa NOBecbTe Ha HERO PbIeCoc.
06cnyxnbHne
CnCTemaΦnIbTpOB
B yctpoiCTBe npedymOTpeHo 3 pntbtpa.ObHna ci-CTema C MeWKOM DnA c6opa nbIbN 6bla 3ameHeHa Ha npO3paHbI nbIeC6opHnk. BoJee Bbcokar ckopocTB c6opa nbIN N03BOJnEePa3dJIeTb TKeeny IbIb N MaJeWne YactNUBI B 3acacbIAeMOM BO3dyxa.
TakIM o6pa3OM, OTCyTCTByET Heo6xOJNMOCTb NOKyIaTB MeUKN.
Фильтбтгтpe6уT nepnoDyuuecko ouNCTK.

BHIMAHINE:
- 3aipeluaetcmaBtbpBCTpMaHHe
- 3anpeuataeTc nioJIb3OBaTb feh dIra cyuKn.
Bo3BpaaTb yctpOcTBo B pa6Oy MoXHO B TOM cnUyae,ecnBce pIbTpbl a6coJIIOTHO cyxne npabInbHo co6paHbl.
Enok punbmpoe
BIOK qinbtpOB BkniuohaeT B c6e cnedyouee:
ΦNlBtMepJIKxHacTnU
ΦnIbTp rpy6oOuNCTK
IЯ OuNCTK6nokaФINbTpOB BbINONHITcNeDyUouee:
OnycToWeHne nbIeScbOpHnka
- OTKHIOHTe np6op ot 6Ioka nHTaHnA.
2.Пи Heo6xOdMIOCTn ydaJInte C yCTpoIcTBA BCaCbIbAIO- 田yTO Tpy6y nIN HacdKy. - PoxaIyIcTa, CM. pcyHOK A Ha cTp. 3. HaxMnte KHOKky HA KOHTeHpe NbIIN dIra erO OTdJIeHnO TpyHOrO KOMPJIeKTA.
- BbITAUNTE pINbTp MEJIKNX YACTNU N3 KycOyKOB UBeTHOH TKAHN.
- 3a pyky BbIaInte fynIbTp rpy6oOn OYnCTKn dIra erO n3BNECHN I3 KOHTeHepa nbIIN.
- Onopoxhnte nbinec6bOpHnK.
OuHCTKaΦJIbTpOB
- Depeka o6a fNbtpa HAD MycOpHbIM BeDpOM, CTpX-Hnte nblb. TaKke MOxHO OCHNTb UeTKoI fNtBTP MeIKnx qactnB. B cnyae CnIbHoro 3arpa3HeHn I pOMOHTe fNbTpbI NOI pOToHOB BOOn.
2.ДаиTeФиЛьТрБI NOJIHOCТьО BBICOXHyTb NepeД yCTaHOB-KoнHaMeCTO!
3.ПрOTРNTeNBJIeNc6OpHNK BJIaXHOn TkaHbIO,3aTeM BBITPNTe HAcYxo.
C6opka 6noka qnbtpob
-
YctaHOBInTe fNtBtp rpy6oO uOcTKn B KOHTeHep nbINn. O6paNTe BHIMAHHe Ha BbIeMKn Ha KpaX KOHTeHepa nbINn. TepeB BdBnHbTe fNtBtp rpy6oO uOcTKn BHN3, yTO6bl OH BCTan No CEHTpy KOHTeHepa nbINn.
-
NocTaBbTe FmNbTp MeKnx YactNc (YTO6bI Yactb C UBeTHoN TKAHbIO CMOTpeNa BBePx) B FmNbTp rpy60n OuchTkn. AKKypaTHO HaDaBNTe Ha FmNbTp MeKnx YactNc.
-
CHOBA NOCDOEHNHTE KOHTEHep nbIN KpyHOMY KOMnIeKTy.Chaqana NocTAbTe KOHTEHep nbIN Ha Bepx Kopnyca MOTopa. 3aTEM BDbHbTE KOHTEHep nbIN BnI3. DOnJKeH 6bITb CbIWeH 3ByK 3auePHeHn 3aueJIKN Ha KOHTeHep nbIN.
BbinyckHou qunbmp
BbI He MoKTe ydaTb 30f Tp.
UncTka

PPEdUnPEXDEHNE:
- Пераюстков Всета оTKлочаite пибор OT SFOKa nHTaHnY!
- HN B KOEM Cnyae He OKyHaIte KOpnyc DBrIaTeJIЯ ДЯ MbITbY B BODy. 3TO MOxET 6bITb PruHOn 3JeKtpnueCKOrO ydapa nJIN noXapa.

BHIMAHINE:
He nnoj3yte npboonoyhble 9ETKNn npyrne npapaiaoune npedmetbl.
He nCnoJIb3yIte CnIbHbIe NIIu capanaIOUne YnCTA UNE CpeDCTBA.
OTdEJIbHbIe KOMIOHEHTbI He npEHa3aueHebI dIpy NOCYDOMOeHou MaunHbI.
Kopnyc MoxHIO npOtpaTb CnErkA BnaJXHO TPOIKoI.
- MoXHo BbITnpaTb 6NOK 3JIeKTPoNTaHnCyXO TkaHbIO.
Hacaika nnona
- OToeHNHe HacaKy dJa NoJa OT BCacbIbauoJe Tpy6bl.
2.Повернiteн Habakky ДЯ NOVA TAK, YTO6b YBnTeB ee HIXHIOC CTOPHY.ИСПONБ 3YnTE He6ObluYO MOHETKY INIpyRO INCHPTMENT DIA OTKDbTIN 3aUeKN.
HanpaBHeHne BpaueHn: npOTNB YacBOB CTpeJIKN. OTKNbTe Ha OTBePCTNI KpbIuKn.
- BbITaHInTe pOJIHKOBYU ⅢETKy.
4.YdaJInteIeTkoHHTKNBOIOcbl.NcnoJIb3yIteHOKHNu,piHHeo6XODIMOCTN.
5.C60pka:
5.1 Chaana BCTaBte o6paTHo POJIK UeTKN B 3Be3-DOO6pa3HyIO BbEMKY OTceKa.
5.2 BcTaBbTe DpyroK KOHeu pOnIka UeTKn C KBaDpaTHO ONOPO B BByEMKV NOI KpbluKoN.
- 3aKpOte 3aMOK pOJIJKOBOJ UETKJ.
TbIe6OpHc C 6JOKOM qJIbTpOB
IЯ OYCTK 3Tnx KOMNHOENTOB npoHTaTe, noxanyiCTa, rnaBy «O6cnykBaHne».
XpaHeHne
-Почистуе устюг STO KAK ONICaHOBpykoBoDCTBe,ДаHTe EMY NOJIHOCTbIO BbICOXHyTb.
ДяхраениинспьзуITE pahee yctaHOBJIeHHbI KPOHHTeIH HAcTeHHOro MOtTaKa,ПБОаKKypaTHO nIOJKeTe np6Op Ha non.
- PekomehnyeTcXpaHnTb yctpoiCTBO B erO opuHaHb-Ho ynaKOBKe,ecnOHO He nCNoB3yeTcI dNITbHoe Bpem.
I I PIMECHNE no cpoky cnyx6b1 aKKymyTTopHoi 6aTapen:
Pnp6op codepKtAkkymyTOpHyo 6atapeky. IcnoIb3ObaHhIe 6atapeKn/AkkymyIaTOpbl (nepe3apXaemble 6atapeKn) He OTHOCTCA K 6bitOBbIM OTXoam.
BaTapeKa DOnJxHa 6bItb N3BNeeHa nepei
ytnn3auein npnbopa.Haxmte 3auejky ocbooxdeHH (6) n3BneKeTnepe3apxkaembI aKKMyJrTOpHbIKOMnNEKT n3 pyHOrO KOMnEKA.
HOpMaUO MeCTax yTIN3aUN 6aTapeek / aKKyMnyrTOPOB MOXHO NONYHTB MEcTHbIX INI MyHUNaJIbHbIX OprAHAX Bnactn.
3haueHne CNMBOJa KOp3Ha
3aunTa OkpykaUoJe CpeBb: He OOnyckaetc TaYnIN3aUN 3NeKtpnpn6OpOB BMeCTe C 6bITOBbIMN OTXOdaM.
Yttnn3aun yctapeBwei TexHnKn HncnpabHBbIX 3neKtpoPi6OpOB npOn3BODITcB ropOdcNX npEeMHbIX NyHKtax.
He donyckaIte HnnpaBnIbHoYtynn3aunOxdoB.3To HAHOCT BpeOKpyKaIOUe CpeE N OKa3bBaET HeRaTHB HOE BO3DeIcTBne Ha 3DopOBBe IHOe.
Oka3bBaIte CoedCTBne nporpamme yTnIIN3aunn npyrrm foopmam nepepa60TKn 3NeKtpoHHoN 3NeKtpuueckoTeXHKn.
HhopmauO npHTax yTNn3aun 6bITOBoTExnKMOXHO NOJUHTB MecTHbIX OpraHAX Bnactn.
aegll 10g jka Jabll Uglnoe
40g 0 jj jj j j j j
Cdu
1.
m = 311
100xu!g a#
| الإستعمال | الإستعمال | الإستعمال |
| .الإستعمال الحرفية ممن الحرفية الحرفية | .ال,enGLISH | .ال,enGLISH |
| .ال,enGLISH | .ال,enGLISH | .ال,enGLISH |
| .ال,enGLISH | .ال,enGLISH | .ال,enGLISH |
| .ال,enGLISH | .ال,enGLISH | .ال,enGLISH |
| .ال,enGLISH | .ال,enGLISH | .ال,enGLISH |
| .ال,enGLISH | .ال,enGLISH | .ال,enGLISH |
| .ال,enGLISH | .ال,enGLISH | .ال,enGLISH |
| .### | .### | .### |
| .### | .### | .### |
| .### | .### | .### |
| .### | .### | .### |
| .### | .### | .### |
| .### | .### | .### |
| .### | .### | .### |
| .### | .### | .### |
| .### | .### | .### |

jul 1000
aBb0g0o0g0jglal
jaoaogai gao gai baoai ygi jai jai 13g .2
3a 3
aegaoo ooyjol jolalog 0g 0g 0
.111 111 111 111 111 111 111 111 111 1
.1jell aeg jn aillj ynnably 3gogb1 aiinll 1gbl gao 5
.
#
jai Lai 1 jaiy aol aie gaae b15 eloal .1
jlll jbi jbi jbi jbi jbi jbi jbi jbi jbi jbi jbi jbi jbi jbi jbi jbi jbi jbi jbi jbi jbi jbi jbi jbi jbi jbi jbi jbi jbi jbi jbi jbi jbi jbi jbi jbi jbi jbi jbi jbi jbi jbi jbi jbi jbi jbi jbi jbi jbi jbi jblg
.
1gssj 0scl LsLsU gaaa (y) aegy caleybj 2
aalgol aalln wlaa dabu uul yell 2003.3
jull 00g
goggl aaggl albaLo gjy jalll alg 1
iJaiil 1jgl jgbl ggsjll Jl. Jl. oeg aI
J. J. J. J. J. J. J. J. J. J. J. J. J. J. J. J. J. J. J. J. J. J. J. J. J. J. J. J. J. J. J. J. J. J. J. J. J. J. J. J. J. J. J. J. J. J. J. J. J. J. J.
a2b3 89g 80) aiiuull 1g61 gaiy u de aasll 1g61 gaiy 2
4ab = y_0
.aa jydaagg zo jla
.(gai)JUJI)MAXjJL
·j 1000000000000000000000000000000000000000000
hazil gili jogill
- jaojoo
.0j 1gJ p1a2wUy U3 aL5 5 8u6
abx 100,50,25) aJbIaJnJnJnJnJnJnJnJnJnJnJnJnJnJnJnJnJnJnJnJnJnJnJnJnJnJnJnJnJnJnJnJnJnJnJnJnJnJnJnJnJnJnJnJnJnJnJnJnJnJnJ
la jao 100000000000000000000000000000000000000000000000000000000000000000000000
4ab = 5a
j 1 j 1 1 1 1 1 1 1 1 1 1 1 1 1 1 1 1 1 1 1 1 1 1 1 1 1 1 1 1 1 1 1 1 1 1 1 1 1 1 1
3
jglslplw
aLys ausos gI cLsOJU aLys ausos jglal plucil uSg. (aasjll oog) daaagog agaoo. aBbI OJoo oog Jo Jgol JdI.
山
Laaa aalaaagall oia .g y aawll s.
. alol, olj all jgs
. Jauu
. l! uis g uall asgo
. Caii I bai i aog
. igw sg wle
yailolJolalg
3aDgC 15
aIbIgjo ooo
09jooogol S,aaabaoai bilal Jolpulaiuoi j! (CJ)Ugi aill
- 00
.
J 100! go jaaa oj y. aal bao61 pkiy wai gdo .2
. degawoo oji 90
.
jiljoljoe
:
1
4
g 3011 2011 2011 2011 2011 2011 2011 2011 2011 2011 2011 2011 2011 2011 2011 2011 2011 2011 2011 2011 2011 8
A
y jn 0sly ayll ayl lal y sll aasb1 oia y .
jbi cbll o1 nsk jn blaaall aasol alldi
. glll 0gaaai
gogil .aylgssll aaisb1 bao oggo no aaswbl cnaebl lai .
. abio kdo gdo gdo ayjll cdo go adhcy
. algo yal plauowll iie cdoa bai jllt bdo .
. pblsl agdo gdo gdo jy .
pduol gl aepall iie ,cgo do dya ayawbl cdo .
. 230 aydaal all doy y slal
jgljllj
.
#
bui
$$ \left. \right.\left. \right.\left. \right.\left. \right.\left.\left.\left.\left.\left.\left.\left.\left.\left.\left.\left.\left.\left.\left.\left.\left.\left.\left.\left.\left.\left.\left.\left.\left.\left.\left.\left.\left.\left.\left.\right.\right.\right.\right.\right.\right.\right.\right.\right.\right.\right.\right.\right.\right.\right.\right.\right.\right.\right.\right.\right.\right.\right.\right.\right.\right.\right.\right.\right.\right. $$
$$ . \left{ \begin{array}{l} \text {a l a n d} \text {a l l} \ \text {a l a n d} \text {a l l} \end{array} \right. $$
$$ ! d i s c u b l g o d s l a l g b l g j n d l l d l y $$
$$ \cdot \overbrace {2} ^ {\prime \prime} \overbrace {1} ^ {\prime \prime} \overbrace {2} ^ {\prime \prime} \overbrace {2} ^ {\prime \prime} \overbrace {2} ^ {\prime \prime} \overbrace {2} ^ {\prime \prime} \overbrace {2} ^ {\prime \prime} \overbrace {2} ^ {\prime \prime} \overbrace {2} ^ {\prime \prime} \overbrace {2} ^ {\prime \prime} \overbrace {2} ^ {\mathrm {i n}} $$
Jooaol oaley alal n jg aay aay aay
Jolal 116.5311 p5161 g.92g.1000 UJIb; aE allb!
aall aill alll alll alll lal
:aylll ldd 1d llaal jn jn jn
jauu aoulo gao juaa uai oug yuul yuul yuul yuul
:501gUjIbJzJiaJiaJiaJiaJia
·yjyjyjdyjgljgjjj:
$$ \cdot (y d t \neq 0) y x d t = U $$
$$ \therefore \exists s, t \mid u, d \Rightarrow \exists t \mid u $$
$$ \bullet \dot {q} \dot {q} \dot {q} \dot {q} \dot {q} \dot {q} \dot {q} \dot {q} \dot {q} $$
J 25-10
a. jujiu jue xue
Jolal jaii aaiy
1
- jzai 1e jolal Jaa yjll bll jaoa Jua Stai
J3y90 J L
0000000000000000000000000000000000000
jaii dla uog iic aia jlln jw gaiy
.30
0120 0000000000000000000000000000000000000
20g 10d
JSe,aleepeo 100 100 100
c0s13. aiaaai 25
aag jll lla jj jSgJgbl aiao jai Jblln jos
gaa 100.40
10g j 10j
laie jblaoaui 15jgagao aai lgl gai gaii iu jau
a1y 1y1g a1y1g yllbgl a1y1g
gll a jgl gdlal slgl 1 y
J 1
aJg aJgEJI JI. Juaaall aJraill JIO. JyjyJyJy
a
g
Jaaaiy g y aal 1 s0g j
1000 100000000000000000000000000000000000000000000
:adg .wulio gao de la jjfo jolouuui uic y Jcbzjj
40 40
y .aalldy alll
.ogolovskiiJsc
la aia yalil g jlgll jjoo w . jglw gab
.
-ue ggeol Uglg
aaii la jg g iil gaaill bll
jgljllcugoo gaa
.1
alai jao 5w paluiil albi jao 2
aIgJgJgJgJgJgJgJgJgJgJgJgJgJgJgJgJgJgJgJgJgJgJgJgJgJgJgJgJgJgJgJgJgJgJgJgJgJgJgJgJgJgJgJgJgJgJgJgJgJgJg
jblzg 5g0g0
0j,0j,0j,0j
aliljg jyj gabpduy
daiy jil yilil dle yj lal yjglal
ggsy plzily aagjdl xloggl dIg jqll q
pIaaiJie aagaiy aai 5i aiaiS1 iae .aiai Cioae aai jia
.aaalalalalalalalalalalalalalalalalalalal
JgLg jLg (Lg g jyglg, gialg
A
y
山
jglpluulwuyzusui j Jolui. uua 1d
pulwyylllwlaljgoj
Llalw lblaw laa aolglb ois de cldg
gaii gaojolge gog jiaol laloll oijl jy
jglg jgl
:
jblao g jyag daiw do jblie ayloy jao jolia joi
aIwU wewd aliaea
:
1
S : S_1 = 12
:
cloggglgailglgagalljllg
Ugaxb1
3
85. 130-0000000000000000000000000000000000000000000000
85.
84 84
84
84
84 84
8300.12 1
83102000000000000000000000000000000000000
83
83
83
83
83. (1 3) aaaaabla/aa/ai
82.
82
82. 证: = , = , =
82.
82
82
81.
jI 1i joo
n nn nnnnnnnnnnnnnnnnnnnnnnnnnnnnnnnnnnnnnnnnnnnnnnnnnnnnnnnnnnnnnnnnnnnnnnnnnnnnnnnnnnnnnnnnnnnnnnnnnnnnnnnnnnnnnnnnnnnnnnnnnnnnnnnnnnnn nn
3
. jIaJI JlaI
GARANTIEKARTE
warranty card · garantiekaart · carte de garantie · scheda di garanzia · tarjeta de garantia · cartao de garantia · garantikort · karta gwarancyjna · zaru.cnli list · kartica jamstva · carte de garantie · fapaunnoHa Kapta · zaru.cnly list · garancijski list · garanciajegy · rapaHTiHmΦOpMynap · fapaHTnHbTanoH
PC-BS 3037 A
24 Monate Garantie gemäß Garantieerklarung - 24 months warranty according to warranty declaration - 24 maanden garantie volgens garantieverklaring - 24 mois de garantie selon la déclaration de garantie - 24 messi de garanzia seconde la dichiarazione di garanzia - 24 meses de garantia de acuerdo con la déclaration de garantia - 24 meneds garanti
1 henhold til garantibetingelsene - 24 misise gwarancjna podastwie owiadczenia
gwarancjnego - záruka 24 mésicó podle prohlasenf o zárue - 24 mjesecno jamstvo
u sklado s jamstvenom déclaraci-jom - 24 luni garantie conform déclaratie de garanjee - 24 meça rapanjna a cbotertcbrne c rapaunnohara deknapaern - 24-mesačná
záruka podla vhylasenia o záruke - 24-mesecnha garancjna, skladno z garancjsko izjavo - 24 hönap garancia a garanciaféltetelekben leirtak szerint - rapahtra na 24 mični
bidenobidno 390 npo rapahtio - rapahtny 24 meça cornaccho zabneneHHBM
rapahtnhmnpa#nam - annjy
Kaufdatum, Handlsterpmel, Unterschied - date of purchase, dealer stamp, signature - aankoepdatum, dealtempel, handbekening - date d'achat, tampon du concessionaire, signature - data di acquisto, timbre di rienditone, firma - fecha de compra, sellio del distribuiador, firma - data de compra, carimbo do distribuiador, assinatura - kippsdato, forhandlstempel, signature - data zakpu, pieczec spradewie, podisp - datum zakupeni, radlo prodede, podisp - datum koupivne, zig trovocne, podisp - data o achite /ièzie, stamplia furnizatori, semnata - Dara na nojikyana, neuva na Ppodapava, Ppokn - datum nakuki, pecliatka obchodnica/ predajcu, podisp - datum napka, zig trovocne, podisp - vislaris datuma, kereskedé belyegreje, alárikas - Data npodbanha, nevata npodapau, npopnc - Data npopobetemni, ilamnnpojanu, pnojnc -
PROFI CARE.
www.proficare-germany.de
PROFI CARE.
Internet: www.proficare-germany.de
Made in P.R.C.

- Batteries au lithium-ion rechargeables (Li-ion)
- Symbols in these Instruction Manual
- WARNING:
- CAUTION:
- Contents
- General Notes
- Special Safety Instructions for this Appliance
- Rechargeable Lithium-Ion Batteries (Li-Ion)
- Safe Handling of Rechargeable Lithium-Ion Batteries
- Extending the Life of the Rechargeable Li-Ion Battery
- Unpacking the Appliance
- NOTE:
- Overview of the Components / Scope of Delivery
- Figure A
- Figure B
- Figures A and D
- Not shown
- Notes for Use
- Switching the Appliance On/Off
- Start-Up
- Suction Pipe
- Floor Nozzle with Turbo Brush
- Combined Gap / Brush / Upholstery Nozzle (3 in 1)
- Connection to the Suction Pipe
- Extendable Special Brush
- Assembly the Wall Holder
- Inserting the Plug of the Power Adapter
- Fastening the Wall Holder
- Charging the Rechargeable Battery
- Using the Appliance
- End of Operation
- Maintenance
- The Filter System
- The Filter Unit
- Emptying the Dust Collector
- Cleaning the Filters
- Assembly of the Filter Unit
- Outlet Filter
- Cleaning
- Floor Nozzle
- Assembly:
- Dust Container with Filter Unit
- Storage
- NOTE concerning the life of the rechargeable battery:
- Technical Data
- Power Adapter
- Disposal
- Accumulator/Battery Disposal
- Meaning of the "Dustbin" Symbol
- Instrukcje obslugi
- CoepkaHne
- 06aHnΦopMaun
- IPEyIPEXKDEHNE:
- CneuNbHbIe yka3aHnNo 6e3oNaChOCTn IJy 3TOrO npnbopa
- HONHO-JNTHeBbIe aKKymyIaTOpHbIe 6aTapeN (Li-Ion)
- Бezonachoe obpaueHne c noHNO-NTnEBbIMN aKkMyIaTOpHbIMn 6aTapeMn
- IpoDneHn cpoKa cnJyKbIOHHO-JNTHeBOAkkymyTOpHoi 6aTapei
- PacnaKOBka yctpoNCTBa
- BkJIIOUeHHe / BbIKHOUeHHe np60pa
- HauaJopabotbI
- Tpy6ka BcacbBaHn
- KombuHropoBaHHa HacaKa dJa y3Knx MeCT / 1eTka / Me6JIbHOn O6NBKN (3-B-1)
- IodcoedueHHeue KpyHOMy bNOky
- IodcoedHHeue KcsacbBaioueu mpye
- yDnHryoaa CneuaJbHaN 电
- MOHTAX HACTeHHoro DepeKaTeJIa
- BcTabka BnIKN B6JOK NITaHn
- MOnTaX HacTeHHoro DepeKaTeTn
- I PDEyIPKJEHNE:
- BHIMAHNE:
- IIPIMEUYAHNA:
- 3apdakkymyrtoPOB
- BHUMAHNE:
- I INPIMEUYAHNA:
- ПРИМЕЧАНО:
- 3Kcnnyataun npn6opa
- 3aKOHHTb NOJIb3OBAHHe np6opom
- 06cnyxnbHne
- CnCTemaΦnIbTpOB
- BHIMAHINE:
- Enok punbmpoe
- OnycToWeHne nbIeScbOpHnka
- OuHCTKaΦJIbTpOB
- C6opka 6noka qnbtpob
- UncTka
- PPEdUnPEXDEHNE:
- Hacaika nnona
- TbIe6OpHc C 6JOKOM qJIbTpOB
- XpaHeHne
- I I PIMECHNE no cpoky cnyx6b1 aKKymyTTopHoi 6aTapen:
- 3haueHne CNMBOJa KOp3Ha
- Cdu
- jul 1000
- #
- jull 00g
- 4ab = y_0
- 4ab = 5a
- jglslplw
- yailolJolalg
- jgljllj
- 山
- Ugaxb1
- jI 1i joo
- GARANTIEKARTE
- PC-BS 3037 A
Brand : ProfiCare
Model : PCBS 3037
Category : Vacuum Cleaner