
XS03 - Smoke detector X-Sense - Free user manual and instructions
Find the device manual for free XS03 X-Sense in PDF.
| Product Type | Smoke Detector |
| Brand | X-Sense |
| Model | XS03 |
| Power Source | Integrated lithium battery (10 years, non-replaceable) |
| Sensor Type | Photoelectric |
| Safety Standard | EN 14604:2005+AC:2008 |
| Detection Range | 20 to 40 m² |
| Audible Alarm | ≥85 dB at 3 m, pulsating, 3.2 ± 0.3 kHz |
| Visual Alarm | Synchronized flashing red LED |
| Silence Mode Duration | Approximately 9 minutes |
| Optimal Temperature Range | 4.4 to 37.8°C |
| Permissible Humidity | ≤85% (non-condensing) |
| Package Contents | 1 detector, 1 mounting base, 2 screws, 2 plugs |
| Maintenance | Clean every 3 months with a vacuum cleaner (soft brush) |
| Recommended Test | Once a week |
| Low Battery / Malfunction | 1 beep every 60s (low battery) / 2 beeps every 40s (malfunction) |
| Manufacturer | X-Sense Innovations Co., Ltd., Shenzhen, China |
| Support | support@x-sense.com |
Frequently Asked Questions - XS03 X-Sense
User questions about XS03 X-Sense
0 question about this device. Answer the ones you know or ask your own.
Ask a new question about this device
Download the instructions for your Smoke detector in PDF format for free! Find your manual XS03 - X-Sense and take your electronic device back in hand. On this page are published all the documents necessary for the use of your device. XS03 by X-Sense.
USER MANUAL XS03 X-Sense
Photoelectric Somke Alarm
User Manual


X-Sense Innovations Co., Ltd.
Email: support@x-sense.com
Conforms to EN 14604-2005 IAC:2008

Model:XS03
F.1.05.XS0301
Contents
English 01-12
Deutsch 13-25
Francais 26-38
Espanol 39-51
Italiano 52-64
Nederlands 65-77
English
This user manual contains important information regarding the operation of your X-Sense smoke alarm. Ensure you read this user manual fully before installing and operating the alarm. If you are installing this smoke alarm for use by others, you must leave this manual (or a copy of it) with the end user.
Introduction
Thank you for purchasing our smoke alarm. This smoke alarm conforms with the European Standard EN 14604:2005+AC:2008 and is designed to detect smoke. Our products are constantly being improved and expanded.
Visual and Audible Alerts
During an emergency, the unit will alarm at 85 dB within a distance of 3 meters, and a red LED indicator will flash in sync with the alarm tone.
Battery Operated
A long-life lithium battery sealed inside the alarm ensures a 10-year lifetime in standby condition.
Silence Mode
Silence your smoke alarm by momentarily pressing the test/silence button when non-emergency smoke (e.g. steam) causes nuisance alarms. The red indicator fl ashes every 5 seconds to remind you that the smoke alarm has been silenced Press the test/silence button to exit the silence mode or wait 9 minutes for the alarm to automatically exit the silence mode.
Low Battery & Malfunction Warning
This alarm provides a full audible-visual warning when the battery is low or if there is any malfunction.
The alarm beeps once and the red LED indicator flashes every 60 seconds when the battery is low.
The alarm beeps twice and the red LED indicator fl ashes every 40 seconds when the alarm is in malfunction.
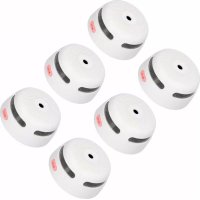
Package Contents
1×AlarmUnit
1×Mounting Bracket

2×Screws

2×Anchor Plugs

1 × User Manual
Safety Information
IMPORTANT
- DANGERS, WARNINGS, AND CAUTIONS ALERT YOU TO IMPORTANT OPERATING INSTRUCTIONS OR TO POTENTIALLY HAZARDOUS SITUATIONS. PAY SPECIAL ATTENTION TO THESE SITUATIONS.
- THIS ALARM IS NOT INTENDED TO ALERT HEARING IMPAIRED INDIVIDUALS. THE USE OF ALCOHOL OR DRUGS MAY ALSO IMPAIR ONE'S ABILITY TO HEAR THE SMOKE ALARM.
- FIRES IN CHIMNEYS, WALLS, ROOFS, DIFFERENT LEVELS OR BEHIND CLOSED DOORS MIGHT NOT BE DETECTED.
- THIS DEVICE DOES NOT DETECT FLAMES, HEAT, CARBON MONOXIDE OR OTHER HAZARDOUS GASES.
WARNING
- NEVER IgNORE ANY ALARM. FAILURE TO RESPOND CAN RESULT IN SERIOUS INJURY OR DEATH.
- THE SILENCE FEATURE IS ONLY FOR YOUR CONVENIENCE AND WILL NOT CORRECT A PROBLEM. ALWAYS CHECK YOUR HOME FOR A POTENTIAL PROBLEM AFTER ANY ALARM. FAILURE TO DO SO CAN RESULT IN INJURY OR DEATH.
- TEST THIS SMOKE ALARM ONCE A WEEK. IF THE ALARM EVER FAILS TO TEST CORRECTLY, REPLACEITIMMEDIATELY!IFTHEALARMCANNOTWORKPROPERLY, IT WILL NOT ALERT YOU TO A PROBLEM.
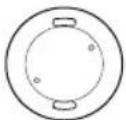
Installation Positioning

Smoke Alarms

Smoke & Carbon Monoxide Alarms

Carbon Monoxide Alarms

Fire Extinguishers
NOTE: If a smoke alarm is installed in a kitchen, ensure it has an accessible silence button, and install it as far away from the stove and sink as possible to avoid false alarms.
- Prioritize the installation of a smoke alarm in the bedroom and walkways, and make sure you can hear the alarm from all sleeping areas. In a home with several bedrooms, install an alarm in every bedroom. If you install only one smoke alarm in your home, install the alarm near to all bedrooms where possible, and not in a basement or furnace room.
- Install an alarm above the stairway and on every floor of the house.
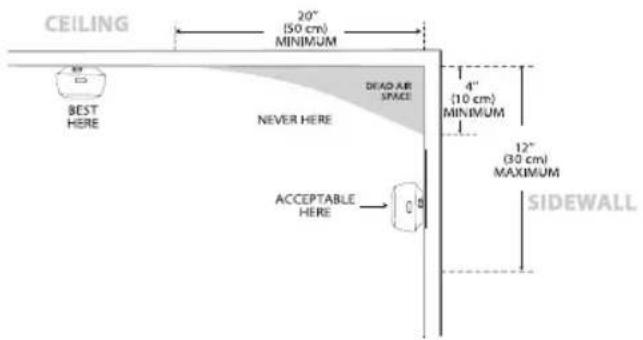
- Smoke, heat and anything burning will spread horizontally after rising to the ceiling, so install the alarm in the middle of the ceiling where possible. Ensure that the alarm is installed at the minimum distance away from corner.
- If an alarm cannot be installed in the middle of a ceiling, install it at a distance of 20 inches (50 cm) away from the corners of the room.
- If an alarm is installed onto a wall, a distance of 4-12 inches (10-30 cm) should be kept below the ceiling.
- If the length of a room or hall is beyond 30 feet (900 cm), several alarms should be installed in the same room.
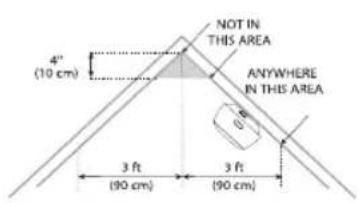
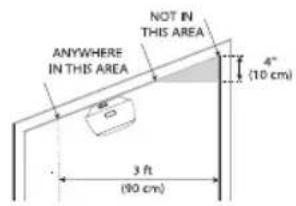
- When the wall or ceiling is angled, the alarm needs to be installed within 3 feet (90 cm) of the highest wall or ceiling point (measured horizontally) in the room.
WARNING
- THIS ALARM SHOULD BE INSTALLED BY A COMPETENT PERSON.
- ALARMS SHOULD NOT BE USED AS A SUBSTITUTE FOR PROPER INSTALLATION, USE AND MAINTENANCE OF FUEL BURNING APPLIANCES INCLUDING APPROPRIATE VENTILATION AND EXHAUST SYSTEMS.
- TO PREVENT INJURY, THIS DEVICE SHOULD BE SECURELY ATTACHED TO THE CEILING OR WALL IN ACCORDANCE WITH THE INSTALLATION INSTRUCTIONS.
- BATTERIES SHOULD NOT BE EXPOSED TO EXCESSIVE HEAT SUCH AS DIRECT SUNLIGHT, FIRE, ETC.
InstallationMethod
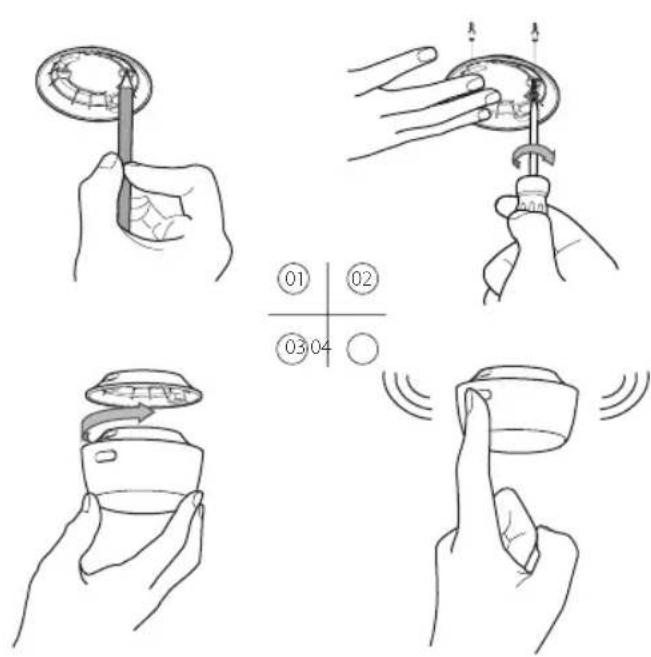
- Use the mounting bracket to mark the screw holes on the ceiling or the wall.
- Drill holes at the 2 marks using an appropriately-sized drill bit. Insert the anchor plugs and screw the mounting bracket using the screws provided.
- Attach the alarm to the mounting bracket and turn clockwise to lock the alarm.
- Test the smoke alarm according to the steps in the section below.
0809
Alarm Test
The alarm must be properly attached to the mounting bracket before it can be tested.
- Press the test button.
- The unit beeps 3 times.
- The red LED will flash once every second during the audible signal.
- After testing, the alarm will automatically enter standby mode.
NOTE: The test function accurately tests the alarm's smoke sensing circuit without the need to test with smoke. If your smoke alarm fails to emit an audible test signal, refer to the troubleshooting guide at the end of this manual immediately. Never use an open flame to test this device.
LED Indicator and Audible Alarm
| Status | LED indicator | Audible alarm |
| Standby Mode Red LED | flashes once every 60 seconds. | None |
| Test Mode Red LED | flashes once every second. | 3 short quick beeps |
| Alarm Mode Red LED | flashes once every second. | Short quick beeps |
| Silence Mode Red LED | flashes once every 5 seconds. | None |
| Low Battery Red LED | flashes once every 60 seconds. | 1 beep every 60 seconds |
| Malfunction Red LED flashes twice every 40 seconds. | 2 beeps every 40 seconds |
Technical Specifications
| Power Supply 10-year sealed lithium battery (non-replaceable) | |
| Sensor Type Photoelectric | |
| Safety Standard EN 14604:2005+AC:2008 | |
| Coverage Area 215-430 sq. ft (20-40 m²) | |
| Operating Temperature 40-100°F (4.4-37.8°C) | |
| Operating Relative Humidity ≤ 85% (non-condensing) | |
| Alarm Loudness ≥ 85 dB at 10 ft (3 m) @ 3.2 ± 0.3 kHz pulsing alarm | |
| Silence Duration About 9 minutes | |
NOTES
- Battery life is calculated on the current ratings in the standby mode with weekly testings. If its operation mode changes to an alarming condition, the battery life will be decreased accordingly.
- The smoke alarm functions between 40 and 100^ (4.4 and 37.8^ ). Prolonged exposure to temperatures outside of this range can reduce battery life and affect accuracy. We do not recommend operating the device outside of this range.
Maintenance
To keep your smoke alarm in good working order, follow these simple steps:
- Verify the unit's alarm sound and indicator are working properly by testing the unit once a week.
- As a minimum your smoke alarm should be cleaned once every 3 months: Remove the unit from the ceiling and clean the alarm cover and vents with your vacuum cleaner fitted with the soft brush attachment to remove dust and dirt.
- Never use detergents or other solvents to clean the unit.
- Avoid spraying air fresheners, hair spray or other aerosols near the alarm.
- Do not paint the unit. Paint will seal the vents and interfere with the sensor's ability to detect fire.
- Never attempt to disassemble the unit or clean inside. Doing so will void your warranty.
- When removed, place the smoke alarm back in its proper location as soon as possible, to assure continuous protection from fire.
- When household cleaning supplies or similar contaminants are used, the area should be ventilated.
Troubleshooting
| PROBLEM | SOLUTION |
| Your smoke alarm does not sound during testing. | • Please check whether the alarm is properly attached to the mounting bracket. • Make sure you push the test button firmly. |
| False alarms triggered intermittently or when residents are cooking, taking showers, etc. | ·Check the location of your smoke alarm (see "Installation Positioning"). ·Clean the smoke alarm (see "Maintenance"). |
| Red LED flashes and the alarm sounds 1 beep every 60 seconds. | The battery is low. Replace the device immediately, as the battery is sealed inside the device and can't be replaced. |
| Red LED flashes and the alarm sounds 2 beep every 40 seconds. | The alarm is malfunctioning. Please clean your smoke alarm and see if it is working normally. If not, replace the device immediately. |
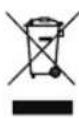
Environmental Protection
Waste electrical products should not be disposed of with household waste. Please recycle where facilities exist. Check with Local Authority or retailer for recycling advice.
Manufacturer and Service Information
X-Sense Innovations Co., Ltd.
Address: B4-503, Kexing Science Park, 15 Keyuan Road, Shenzhen, 518057, CHINA
Email: support@x-sense.com
Deutsch
Adresse: B4-503, Kexing Science Park, Keyuan Straße 15, Shenzhen, 518057 CHINA
E-Mail: support@x-sense.com
Français


- Contents
- English
- Introduction
- Visual and Audible Alerts
- Battery Operated
- Silence Mode
- Low Battery & Malfunction Warning
- Package Contents
- Safety Information
- IMPORTANT
- WARNING
- Installation Positioning
- InstallationMethod
- Alarm Test
- NOTES
- Maintenance
- Environmental Protection
- Manufacturer and Service Information
- Deutsch
- Français
Brand : X-Sense
Model : XS03
Category : Smoke detector