Nomad Power PRO 24 XL - Power bank GYS - Free user manual and instructions
Find the device manual for free Nomad Power PRO 24 XL GYS in PDF.
User questions about Nomad Power PRO 24 XL GYS
0 question about this device. Answer the ones you know or ask your own.
Ask a new question about this device
Download the instructions for your Power bank in PDF format for free! Find your manual Nomad Power PRO 24 XL - GYS and take your electronic device back in hand. On this page are published all the documents necessary for the use of your device. Nomad Power PRO 24 XL by GYS.
USER MANUAL Nomad Power PRO 24 XL GYS
FR 2/3-8/45-48
EN 2/9-14/45-48
DE 2/15-20/45-48
ES 2/21-26/45-48
RU 2/27-32/45-48
NL 2/33-38/45-48
IT 2/39-44/45-48
NOMAD POWER
PRO 12XL
PRO 24XL
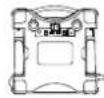
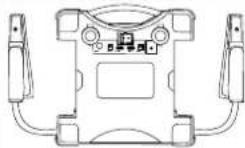
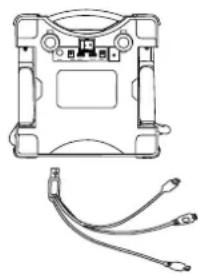
INTERFACE PRODUIT / PRODUCT INTERFACE / BEDIENFELD / INTERFAZ DEL PRODUCTO / HHTEPΦΕΝΑΠAPATA / BEDIENING VAN HET APPARAAT / INTERFACCIA PRODOTTO
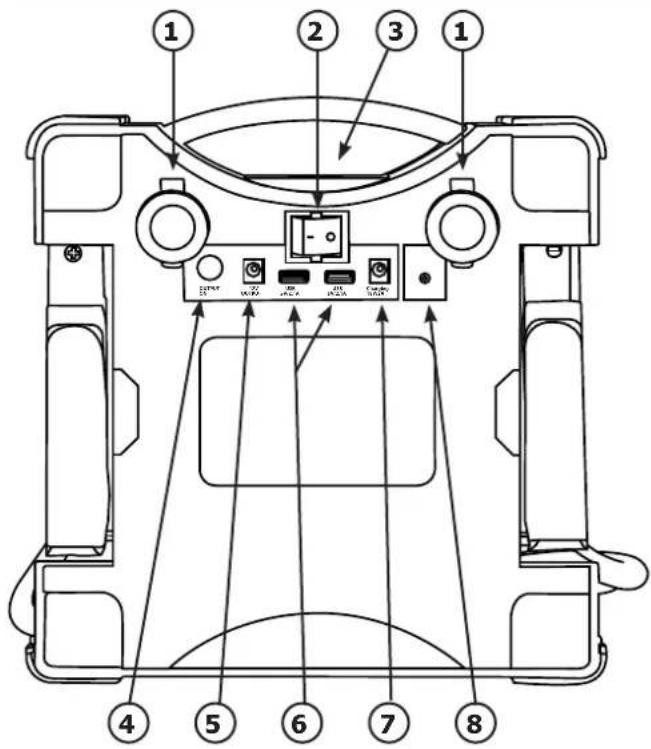
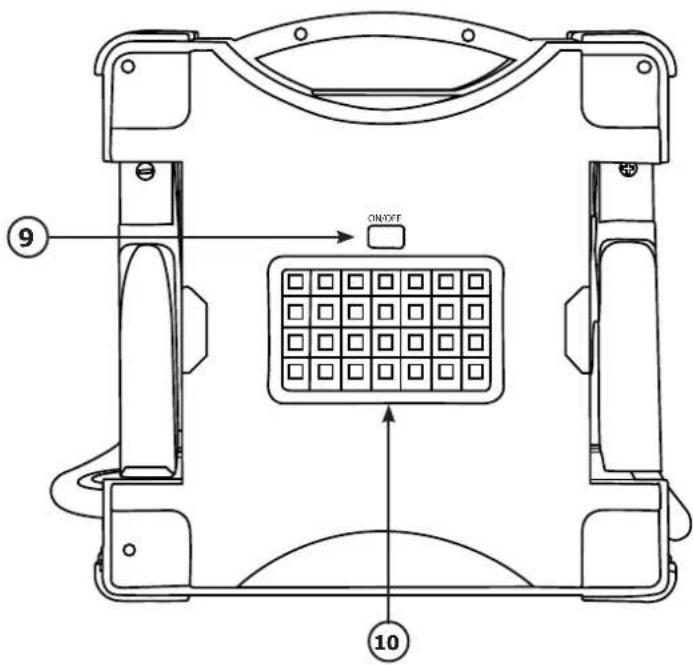


| 1 | Port allume-cigare 12 V / 12 V cigarette lighter port / Zigarettenanzünderanschluss 12 V / Puerto encendedor 12 V / Flopt prékypnbategia 12 B / Aansluiting voor sigarettenaansteker 12 V / Porta accendi-sigari 12 V |
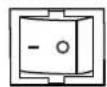
| 2 | Interrupteur principal / Main switch / Hauptschalter / Interruptor principal / Γλabný nepeklnoucatelb / Hoofdschakelaar / Interrut-tore principale |
| 3 | Affichage LED / LED display / LED-Anzeige / Indicador LED / CbetoindnoHydniocnly / LED display / Schermo LED |
| 4 | Bouton de sortie ON / Output ON button / Taste ON / Botón de salute ON / Knop kBa Ka BbXoJa ON / Knop uittgang ON / Pulsante di uscita ON |
| 5 | Port de sortie 12 V - 5 A / 12 V - 5 A output port / Ausgang 12 V - 5 A / Puerto de salute 12 V - 5 A / BbXoHNo noprT 12 B - 5 A / Uitgang 12 V - 5 A / Porta di uscita 12 V - 5 A |
| 6 | Ports USB - 5 V - 2.1 A / USB port - 5 V - 2.1 A / USB-Ports - 5 V - 2.1 A / Puerto USB 5 V 2.1 A / Piort USB - 5 B - 2.1 A / USB uitt-gangen 5 V - 2.1 A / Porto USB - 5 V - 2.1 A |
| 7 | Port de charge 18 V - 2 A / 18 V - 2 A Load port / Lade-Eingang 18 V - 2 A / Puerto de carga 18 V - 2 A / Piort d'Paraedkn 18 B - 2 A / Aansluiting laden 18 V - 2 A / Porta di carica 18 V - 2 A |
| 8 | LED d'erreur / error LED / Fehler-LED / LED de error / Μινικαtor oùmibkn / LED die error aangeeft / LED di erreore |
| 9 | Bouton lampe de travail / Work lamp button / Schalter für LED-Feld / Botón de lamypara de trabajo / Knopka pa6ooyen λambl / Knop werklamp / Pulsante lampada di lavoro |
| 10 | Lampe de travail LED / LED work lamp / LED-Feld / Lamypara de trabajo LED / LED λamna pa6oTy / LED werklamp / Lampada di lavoro LED |
| 11 | Chargeur 18 V DC (câble allume-cigare) / 18 V DC charger (cigarette lighter cable) / Adapter 18 V DC (an Zigarettenanzünder) / Cargador 18 V DC (cable encendedor) / 3apyndnóe yctpoyctbo 18 B noctoynHoro Toka (kâbě lyt prinkyrpmbaTejra) / Lader 18 V DC (kabel sigarettenaansteker) / Caricabatterie 18 V DC (cavo accendi-sigari) |
| 12 | Chargeur mural 18 V 100-240 VAC / 18 V 100-240 VAC wall mounted charger / Ladegerät zum Anschluss an Steckdose 18 V 100- 240 VAC / Cargador 18 V 100-240 VAC / HacteynHoe zapeynHoe yctpoyctbo 18 B, 100-240 B nepeMeHHoro Toka / Netaansluiting 18 V 100-240 VAC / Caricabatterie a muro 18 V 100-240 VAC |
| 13 | Câble USB 3 en 1 / 3-in-1 USB cable / 3-fach USB-Kabel / Cable USB 3 en 1 / Kâbě ly USB 3 b 1 / USB-kabel 3 in 1 / Cavo USB 3 in 1 |
| 14 | Sangle / Strip / Tragegurt / Cinta / CṭaJxHàa Iønta / Riem / Cinturino |
INSTRUCTIONS DE SECURITE

FIXATION AVEC LA SANGLE
CONDITIONS DE GARANTIE
This manual includes guidelines on the operation of your device and the precautions to follow for your own safety. Ensure it is read carefully before first use and keep it handy for future reference.
This device should only be used for start-up or power supply within the limits indicated on the device and in the manual. The safety instructions must be followed. In case of improper or unsafe use, the manufacturer cannot be held responsible
Device suitable for indoor use only. Do not expose to rain or excessive moisture.
This device may be used by children from age 8 and by persons with reduced physical, sensory or mental capabilities or lack of experience and knowledge, provided that they are under supervision or have been told how to use the device safely and are aware of the potential risks. Children must not use the device as a plaything. Cleaning and servicing tasks may not be carried out by children unless they are supervised.
Do not use for charging non-rechargeable batteries
Do not use any charger other than the one supplied with the machine to charge the batteries.
Do not use the device if the charging cable appears to be damaged or assembled incorrectly in order to avoid any risk of short circuiting the battery (NOMAD POWER charger).
Never charge a frozen or damaged battery.
Do not cover the device
Do not place the device near a fire or subject it to heat or to longterm temperatures exceeding 50^
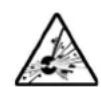
Risk of explosion or acid projection if the clamps are short-circuited or if the 12V booster is connected to a 24V vehicle or vice versa.
The automatic mode of operation and usage restrictions are explained below in these operating instructions.
Risk of explosion and fire!
A battery being charged can emit explosive gas.
- Avoid flames and sparks. Do not smoke.
- Protect the electrical contacts of the battery against short-circuiting.


Acid projection hazard!
- Wear safety goggles and protective gloves

- If your eyes or skin come into contact with battery acid, rinse the affected part of the body with plenty of water and seek immediate medical assistance.
Connection / disconnection:
- Disconnect the power supply before connecting/disconnecting the device to/from the battery.

Class II device (NOMAD POWER charger)

Class III device (NOMAD POWER).

Maintenance:
- The power supply cable cannot be replaced. If the cable is damaged, the device should not be used (NOMAD POWER charger).
Service should be performed by a qualified person - Warning! Always remove the power plug from the wall socket before carrying out any work on the device.
- Under no circumstances should solvents or other aggressive cleaning agents be used.
- Clean the device's surfaces with a soft, dry cloth.

C E
Regulations
The device complies with European Directive.
The certificate of compliance is available on our website.
EAC
EAC conformity mark (Eurasian Economic Commission)
UK CA
- Equipment in compliance with British requirements. The British Declaration of Conformity is available on our website (see home page).
- Equipment in conformity with Moroccan standards.
The declaration C_ (CMIM) of conformity is available on our website (see cover page).


Disposal:
- This product should be disposed of at an appropriate recycling facility. Do not dispose of in domestic waste.
- The battery must be removed from the device before the latter is discarded.
- The device must absolutely be disconnected from the power supply network before removing the battery.
PRODUCT DESCRIPTION
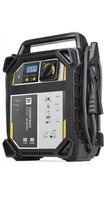
Thanks to their high-performance lithium-ion battery (PRO 12 XL: 118.4 Wh - PRO 24 XL: 236.8 Wh), the NOMAD POWER PRO 12XL / PRO provides 3 functions:
- Instant starts of vehicles:
- PRO 12 XL: equipped with a 12V battery (6 cells of 2V), such as cars, commercial vehicles, camper vans, boats, agricultural vehicles etc.
- PRO 24 XL : equipped with a 24 V (12 cells of 2 V ),such as buses,trucks,plants,etc.
- 12V power supply of all electronic devices via their USB ports and/or cigarette lighter ports. Most of mobile phones, smartphones, portable gaming devices, electric cool box, etc. can be charged with the included accessories.
Service lighting


Extreme outside temperatures or mechanical problems on the vehicle (poor starter, no fuel or engine problems) can limit the booster's capacity.
LCD SCREEN DESCRIPTION
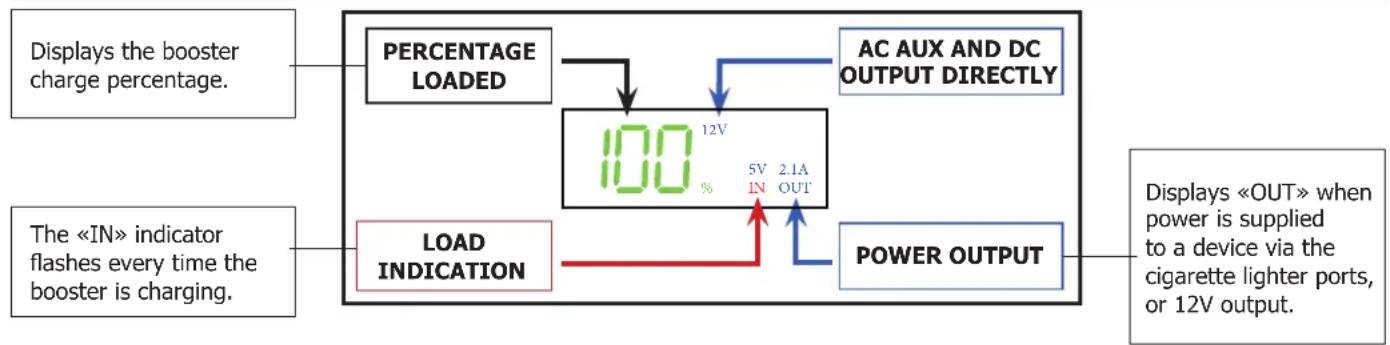
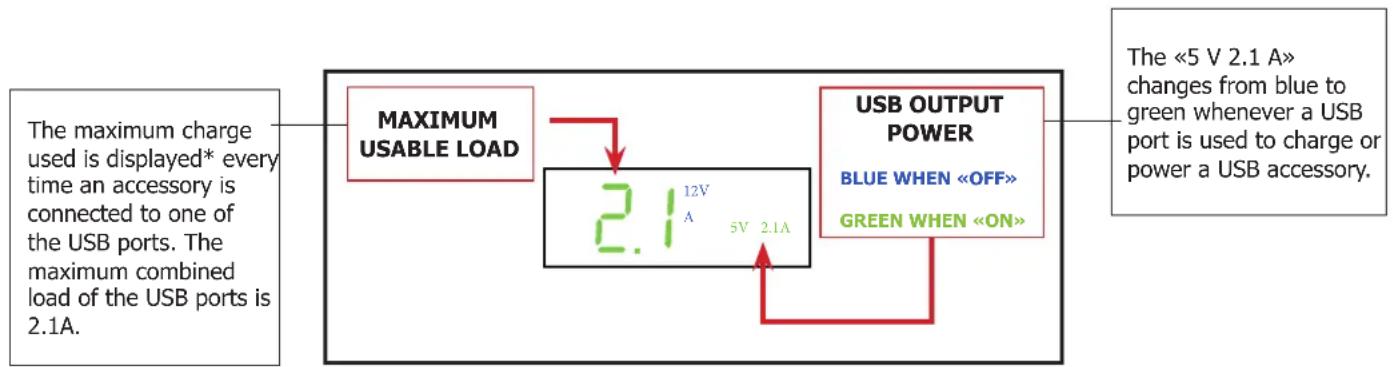
* The USB amps will only be displayed for 2 seconds before the LEDs return to the percentage charge display.
INTERNAL BATTERY CHARGING
| It is best to charge the Nomad Power at a temperature > 10°C. If the temperature is below 0°C, do not charge the Nomad Power. Place the Nomad Power in a temperate room for 1 hour before charging. | |
| ! | Before storing a NOMAD POWER for an indefinite period of time : - Do not charge it to 100%, but rather between 60 and 80%. - Every 6 months, perform a 100% charge to keep its performance intact. |
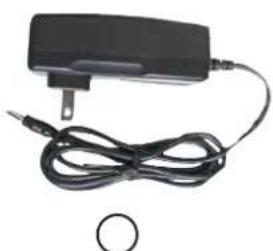
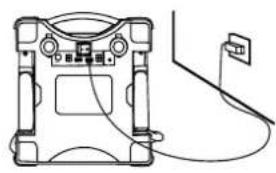
For an optimal charging comfort in all circumstances (at home, at work or on the road), the NOMAD POWER is equipped with a wall mounted charger and a cigarette lighter cable.
OR
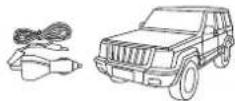
1 - Plug the wall mounted charger (12) into a mains socket.
2- Connect the end of the cable to the 18 V/2 A charging port (7) of the NOMAD POWER
1 - Plug the car adaptor (11) to the vehicle's cigarette lighter socket.
2 - Connect the other end of the adapter to the 18 V/2 A charging port (7) of the NOMAD POWER to start charging.
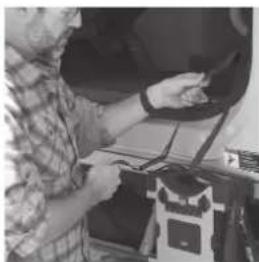
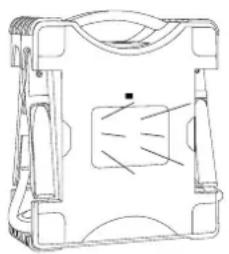
STRAP FASTENING
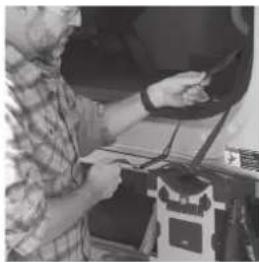
Put the NOMAD POWER on a flat surface. Secure it by inserting the safety strap into the handle and attaching it securely to the vehicle using the carabine hook provided.
USE AS A BOOSTER

RECHARGE THE NOMAD POWER before first use and after each use.

Before use, make sure that the NOMAD POWER is charged to at least 50% of its load capacity. A charged booster guarantees vehicle starting and allows the 118.4 Wh (PRO 12 XL) / 236.8 Wh (PRO 24 XL) to be used to charge a wide range of accessories.
1
Switch on the booster by pressing the main switch (2), it becomes illuminated and the display lights up.
2
Disconnect the red and black clamps from the booster. A flashing red and green 8 appears on the display. It indicates that the charger is looking for a battery.

3
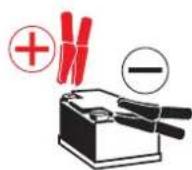
1- Connect the red clamp to the (+) of the battery.
2- Connect the black clamp as far as possible from a fuel hose or fitting and as close as possible to the starter ground.

The LED indicator shows a green «8» to indicate that the battery is detected and properly connected.

If the LED (8) lights up and a red «8» appears on the display, it means that there is an error that needs to be corrected. Refer to the fault codes (PRO 12 XL) or the table «Troubleshooting» (PRO 24 XL) of this manual.
5 Turn the ignition key to the on position and start the engine.

6
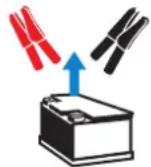
After starting, disconnect the battery clamps from the battery and replace the clamps on the booster.

Leave the vehicle running.
7 Turn the unitoff.
USE OF THE BOOSTER'S INTERNAL BATTERY
When the vehicle battery is too discharged, the booster battery can be used as a power source for starting. Proceed as follows:
- Disconnect the engine block terminals from the vehicle battery.
- Connect the terminals of the engine block to the clamps of the nomad power. The booster does not detect a battery, a flashing red and green 8 appears on the display.
- Press the on button (4) for 3 seconds. The led indicator displays a green «8» to indicate that the nomad power's lithium battery is becoming the vehicle's primary power source.
- Performing a start. The engine uses the power from the nomad power pro xl's lithium battery for starting.
- Reconnect the terminals of the engine block to the vehicle battery.

Once the vehicle is started, the engine block must always be powered by a battery. The connection of the engine block terminals to the vehicle battery must be made before disconnecting the NOMAD POWER clamps from the terminals.
CHARGING MOBILE PHONES
The NOMAD POWER is equipped with two USB ports (6) and a 3-in-1 (USB-C, Micro USB connections) (13) offering flexibility for most phones or tablets. Additional standard USB accessories can also be used (not included).

1 - Turn the main switch (2) to the «ON» position.
2 - Connect the supplied 3-in-1 USB cable.
3 - Connect it to the electronic device to be recharged: tablet, mobile phone...
POWER SUPPLY
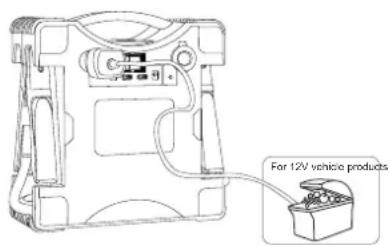
1- Connect the supplied 12 V cigarette lighter cable to one of the two 12 V cigarette lighter ports (1).
2 - Link the power supply cable to the power socket of your 12 V electrical device.
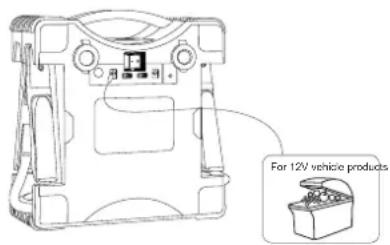
1 - Connect a 12 V power supply cable (not supplied) to the 12 V / 3.5 A output port (5).
2 - Link the power supply cable to the power socket of your 12 V electrical device.
FLASHLIGHT FUNCTION
Press the ON/OFF button on the LED (9) to activate the lighting.
Each new press changes the lighting mode (3 available modes: normal, strobe light, SOS) until the light goes out.
FAULT CODES (PRO 12 XL)
| E1 | Reverse polarity Time | Low | High temperature Low temperature | E4 | |
| E5 | High current Low current | Short circuit | E7 | E8 | Unit is not activating |
| Low voltage Over Voltage | E9* | |
| - The voltage of one of the battery cells is between 1.1 V and 2.4 V. - The battery voltage is below 13.5 V. Connect the charger and press the ON/OFF switch until E0 disappears from the display. After this operation, the charging of the product should be monitored. | Due to an imbalance in one of the battery cells, the voltage of one of the cells is higher than 4.35 V. Stop charging and contact your dealer. | |
- Products with S/N greater than "S2206...".
PROBLEM SOLVING (PRO 24 XL)
| Troubleshooting Causes Solutions | ||
| The screen is black and shows nothing. Sleep mode is on. | Press the ON/OFF button or toggle the main switch to the OFF then ON position. The screen lights up again. | |
| Each connection causes a flashing red and green "8" to appear on the display. | The booster doesn't detect a battery. | Turn on the lights or the radio so that the NOMAD POWER detects a current load and activates. |
| A fixed red "8" appears on the LCD screen when the clamps are connected and an alarm sounds. | The device detects a polarity reversal. | Check the battery polarity. Red clamp to the positive battery terminal (+) and the black clamp to the negative (-). |
| Thermal protection of the booster. | The charger is overheated because the ambient temperature is high. Wait a few minutes for the booster to cool down before trying to start again. | |
| Short circuit. Damaged battery. Change | the battery. | |
| A fixed red "8" appears on the LCD screen as soon as the booster switches on.** | The battery is heavily discharged (<4V). | Replace the vehicle battery. |
** Products with S/N less than "S2206..."
WARRANTY
The warranty covers faulty workmanship for 1 year from the date of purchase (parts and labour).
The warranty does not cover:
- Transit damage.
Normal wear of parts (eg.: cables, clamps, etc.). - Damages due to misuse (power supply error, dropping of equipment, disassembling).
- Environment related failures (pollution, rust, dust).
In case of failure, return the unit to your distributor together with: - The proof of purchase (receipt etc ...)
- A description of the fault reported
He nokpbBaIte annapaT.
He yctaHaBnBaTb aannapat pAOM C nCTOCHNkOM TeIJa H He NOdBepraTb BblCOKM TeMnepaTypam (Bblwe 50^ ) B TeueHn DJIHTeJbHOro nepNoDa.
OnacHocTb B3pbBa NnBb6paCbBAHnKNCLOTb B CnyaekopOTko 3aMbKaHn 3axmOB Nn NOkIooHn ycnInTe12B Ha TpaHcnpTHOM cpeDCTBe c HnprJxHnem 24 B nll Haobopot.
ABTOMaTnueckn peXm, a TAKKe OrpaHnueHn npn erO NCNoJIb3OBaHnN, ONNCaHbI DaJee B 3TOJ INHCTpyKcHn.

Pnck noxapa n B3pbBa!
Pn3aPae 6aTape MoKeT BbInyCTNTb B3pbBBOONaChbI Ra3.

- I36eAaTe PnAmEn n NcKp. He Kypntb.

3aunntte nobepxnoctn 6atapen ot 3neKtpnueckoro KOHTaKaTb BO n36eXahne KOPOTKOro 3aMbikaHna.

PnCK KNCIOTHbIX 6pbI3r!

Hocnte 3aunTHbIe ouKn n nepuATkn.

Bcnyaee KOHTaKaTc rIa3amn nn Koxe, npomOte 6bHOBODON pOKOHcyIbTpUyTe Bpaua 6e3 npomeDJIeHn.

- OTKJIIOUHTe NOdauy NITaHnI nepeI Tem KaK IOdKJIIOUaTb IJI NtOTKJIIOUaTb CoeINHeHnI K 6aTaapee.
Annapat Klacca II (3apdHoe yctpoCTBO NOMAD POWER)
Annapat Klacca III (NOMAD POWER).
yxo4:
-Шнур питаня He может 6ыт bзамеон.Еси ka6ьл NOВпжден,аПпарТ He полескT yтUILIN3aци (Зарадноустю NOMAD POWER).
- TexHnueckoe obcIyXnBaHne doJxHO npOn3BOdntbCra T0JIbKO KBaJIuΦnUncpOBaHHbIM CneLnaJIInCTOM.
BHHMaHHe! OTKIIOUHTe annapaT oT po3eTKn Do hauana peMOHTbIX pa6oT.
- HN B KOem Cnyuae He NcnoJb3OBAbTb pactBOpNTeIN IIN dpyrne Koppo3nHbIe MOIOUne cpeCTBa.
OuHCTHTb NOBepxHOCTb annapaT c NOMOcIbO cyXo TpIKN.

Hopmbi npaBnla:
- Annapat COOTBETCTByet ДиpeKTINBaM EBpocoi03a
-Декларачи COOTBETCTBЯ ectb Ha Hauwem caHTe.
3HaK COOTBeTCTBnE EAC (EBpa3nCKoe COOTBeTCTBne KauecTba) - UcpoCTBO COOTBETCTBYET DnpeKtNBam EbpocO103a. 3aBLeHne O COOTBETCTBnI DnIe BeNko6pntAHn NocTyHNO Ha Hauem Be6-caTe (CM. rnaBHyIO cTpaHnU).
- Tobap COOTBETCTBYET HopMaM MapOKko.
-Декларачиа C. (CMIM)doCTyнha Дя сkaчиBaHЯ HaHaWeMa caIte (cM Ha TtTyIbHoI CTpaHnIe).


Yttnn3aun:
- 3TOT annapaT noIeKNT nepepa6oTke. He Bbl6paCbIBaTb B O6uyn Mycopoc6OpHnK.
Heo6xOIMo n3BLeueb aKKymyIaTOp n3 annapaTa npexJe yemero OTnpaBnTB B yTNIN3aCNUO. - OTcoeHnHTe annapaT OT 3JIeKtpOnNTaHnI nepeTd Tem KaK BbIHytb aKKyMylrTop.
ONICAHNE YCTPOICTBA
OMSCHRIJVING VAN HET APPARAAT
For 12V vehicle products
For 12V vehicle products