Juice Fountain Compact 8451 - Juicer Solis - Free user manual and instructions
Find the device manual for free Juice Fountain Compact 8451 Solis in PDF.
User questions about Juice Fountain Compact 8451 Solis
0 question about this device. Answer the ones you know or ask your own.
Ask a new question about this device
Download the instructions for your Juicer in PDF format for free! Find your manual Juice Fountain Compact 8451 - Solis and take your electronic device back in hand. On this page are published all the documents necessary for the use of your device. Juice Fountain Compact 8451 by Solis.
USER MANUAL Juice Fountain Compact 8451 Solis
MONTAGE DES ENTSAFTERS
SCHRITT 1:
Rotation SOFT FRUIT: 10'000 rpm
SOFT VEG: 12'000 rpm
HARD FRUIT: 14'000 rpm
HARD VEG: 16'000 rpm
Dimensions env. 35,5× 22,0× 41,0cm
Please read through this user manual thoroughly before using your juicer Solis Juice Fountain Compact, so that you become familiar with your appliance and can use it safely. We thoroughly recommend that you keep these instructions and, if you pass the appliance on, that you also hand these instructions to the new owner.
For your own safety, please observe the following safety measures when using electrical appliances:
- To prevent electric shock, neither the motor unit nor the power cord and the power plug must come into contact with water or other liquids. Water might get into the chassis and damage the appliance. Risk of electric shock! Should the motor unit resp. the power cord or the power plug come into contact with liquid, use dry rubber gloves to immediately pull the power plug from the socket. Do not start using it again before having it checked for functionality and safety by Solis or a service centre authorized by Solis.
- Do not operate the appliance resp. pull or connect the plug with wet or moist hands or feet.
- Before using the appliance, check that the voltage stated on the type plate of your appliance matches your mains voltage. We do not recommend operating the appliance with a multiway plug adapter.
- Only use the appliance as described in this manual to juice fruits and vegetables. Do not use the appliance outdoors and protect it from moisture and wetness.
GB
- Do not leave the power cable hanging over table edges to prevent the appliance from being pulled down. Make sure that neither the appliance nor the power cord or plug comes into contact with hot surfaces, such as hotplates or a radiator.
- Put the power cord so that nobody can trip over it. Keep clear of pointed objects.
- Always fully unwind the power cord before connecting the power plug to the power socket.
- Never carry the appliance by the power cord and do not place anything on the power cord. Never pull on the power cord to disconnect the appliance from the power mains. Only pull on the plug.
- We recommend that you do not use an extension cable with this appliance. Do not place the appliance directly underneath a power socket.
- Keep the appliance away from hot gas, hot ovens and other heat-emitting appliances or heat sources. Never use the appliance on a hot or wet surface. Never place the appliance near moisture, heat and naked flames. Keep the appliance away from moving parts or appliances and pets.
- During use, the appliance has to be placed on an even, clean, stable, moisture- and heat-resistant as well as dry surface, e.g. a table or a work surface. Your appliance might shift and vibrate during use. Therefore, never place the juicer near the edge of a table.
GB
- Keep a minimum safety distance of 20~cm between the appliance and walls, curtains or other materials and objects and make sure that the air around the appliance can circulate freely.
- Never cover the appliance with cloths or the like while it is in use. The air inlet and outlet openings must never be obstructed. Do not place anything on the juicer.
- Never place the appliance in such a way that it might fall into water or come into contact with water or another liquid (e.g. in or next to a sink).
- The appliance is not designed for outdoor use. The appliance must not come into contact with rain. Do not use in vehicles or on boats.
- Always disconnect the appliance from the supply if it is left unattended and before assembling, disassembling or cleaning. We recommend the use of a residual current device (RCD safety switch) to ensure additional protection during the use of electrical appliances. It is advisable to use a safety switch with a rated residual operating current of 30mA maximum. For professional advice consult an electrician.
- Before disconnecting the appliances power plug from the power socket, please always make sure that the appliance is switched off (rotary control has to be set to OFF position).
- Do not make any adjustments to the appliance, the power cord, the plug or the accessories.
-
Incorrect use may cause injury!
-
Never reach for an appliance that has fallen into water or other liquids. Always use dry rubber gloves to pull the plug before taking it out. Do not start using it again before having it checked for functionality and safety by Solis or a service centre authorized by Solis.
- Never submerge the motor unit, the power cord or the power plug in water or any other liquid and do not bring any of these parts into contact with water.
- Place the appliance so that it is never exposed to direct sunlight.
- Never insert any objects or tool into appliance openings. The appliance may become damaged – danger of electric shock!
- Before attaching or removing parts, always switch the appliance off and pull the plug.
- Never use the appliance without fruits or vegetables.
- Always make sure that the appliance is correctly assembled before connecting it to a power socket and starting to use it.
- Never reach into the funnel! You might be seriously injured! During use, only use the tamper to push down on the vegetables / the fruits. Never insert any other object into the funnel!
- Do not shake or move the appliance while it is in use. Never move the appliance if it is filled with foods and in operation. Before moving the appliance, you should switch it off, pull the plug and empty the pomace container as well as the juice jug.
GB
- Only use the appliance as described in this manual. Only use with the provided accessories or accessories recommended by Solis, incorrect accessories or misuse can lead to damage of the appliance, fire, electric shock or personal damage.
- Never use the appliance with an external timer switch or remote control.
- The appliance is only suited for household use and not for commercial use.
- Remove and discard all packaging materials and potential stickers or labels (except for the type plate) before using the appliance for the first time.
- Check your juicer before every use to make sure that the appliance itself, the power cord and the power plug are without damage and no parts have come loose.
- To prevent electric shock, do not use the appliance if cord or power plug are damaged or if the appliance has other faults, has fallen down resp. is damaged in any other way or if parts have come loose. Never attempt repairs yourself but take the appliance to Solis or a service centre authorized by Solis in order to get it inspected, repaired or mechanically and electrically maintained, in order to avoid a hazard.
-
Appliances can be used by persons with reduced physical, sensory or mental capabilities or lack of experience and knowledge if they have been given supervision or instruction concerning use of the appliance in a safe way and if they understand the hazards involved.
-
This appliance shall not be used by children. Keep the appliance and its cord out of reach of children.
- Children shall not play with the appliance.
- Always switch the appliance off before pulling the plug, otherwise the appliance might be damaged.
- Do not place anything on the appliance while it is in use or in storage.
- Pull the plug after every use. Only then, the appliance is fully switched off.
- The appliance has to be cleaned after every use. Please refer to the notes given in the section "Cleaning and maintenance" of this manual.
- Only clean the appliance chassis with a dry or slightly moist cloth. Never use aggressive, abrasive or acidic detergents for cleaning.
- When lifting or moving the appliance, always hold the juicer by the base. Always switch the appliance off first, pull the plug and empty out the pomace and the juice. Always move the appliance very carefully and do not shake or throw it, it might be damaged.
- Should you notice a strange smell or sound, switch the appliance off and pull the plug. Do not start using it again before having its functionality and safety checked by Solis or a service centre authorised by Solis.
- Never touch the grating blades in the sieve, they are extremely sharp and might injure you!
GB
- Before removing the cover, please switch the appliance off with the rotary control (OFF position), wait for the sieve to come to a complete standstill and then pull the power plug.
- If you have used the appliance for 2 minutes, you should always take a break of 30 seconds to prevent the motor from overheating.
- Caution: When cleaning or removing resp. installing parts, the appliance has to be at a complete standstill and be switched off as well as disconnected from the power. Otherwise, there is the risk of injury.
- If the supply cord is damaged, it must be replaced by the manufacturer, its service agent or similarly qualified persons in order to avoid a hazard.
- Care shall be taken when handling the sharp cutting blades, emptying the bowl and during cleaning.
- Do not use the appliance if the rotating sieve or the protecting cover is damaged or has visible cracks.
-
Switch off the appliance and disconnect from supply before changing accessories or approaching parts that move in use.
-
This appliance is intended to be used in household and similar applications such as:
-
staff kitchen areas in shops, offices and other working environments,
-farm houses, - by clients in hotels, motels and other residential type environments,
- bed and breakfast type environments.


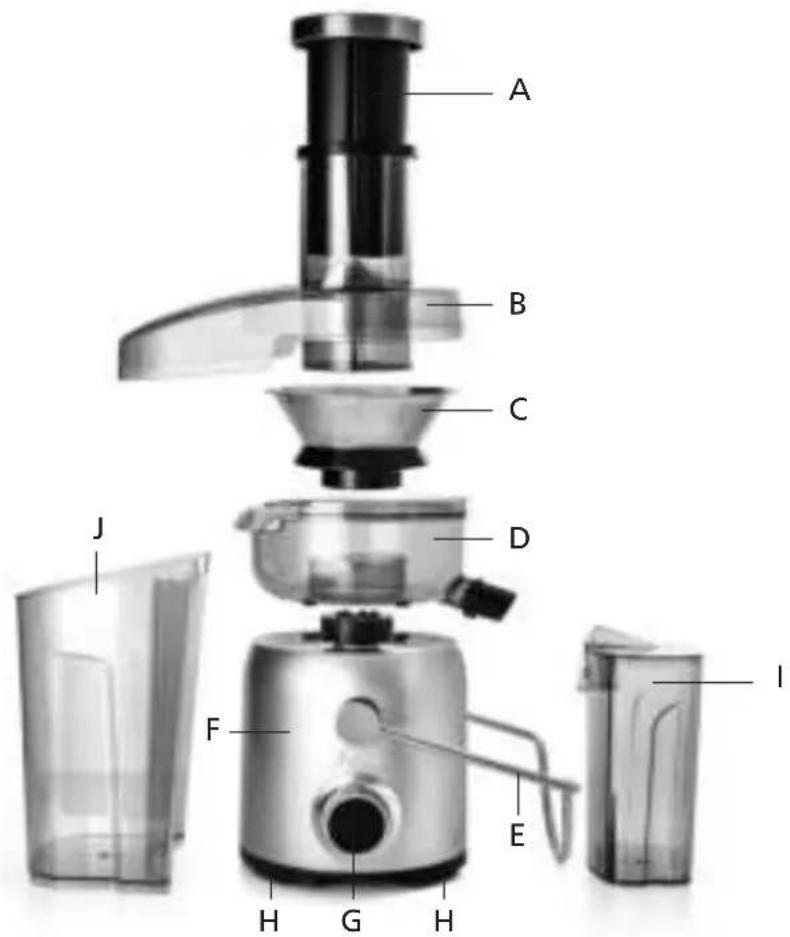
APPLIANCE DESCRIPTION

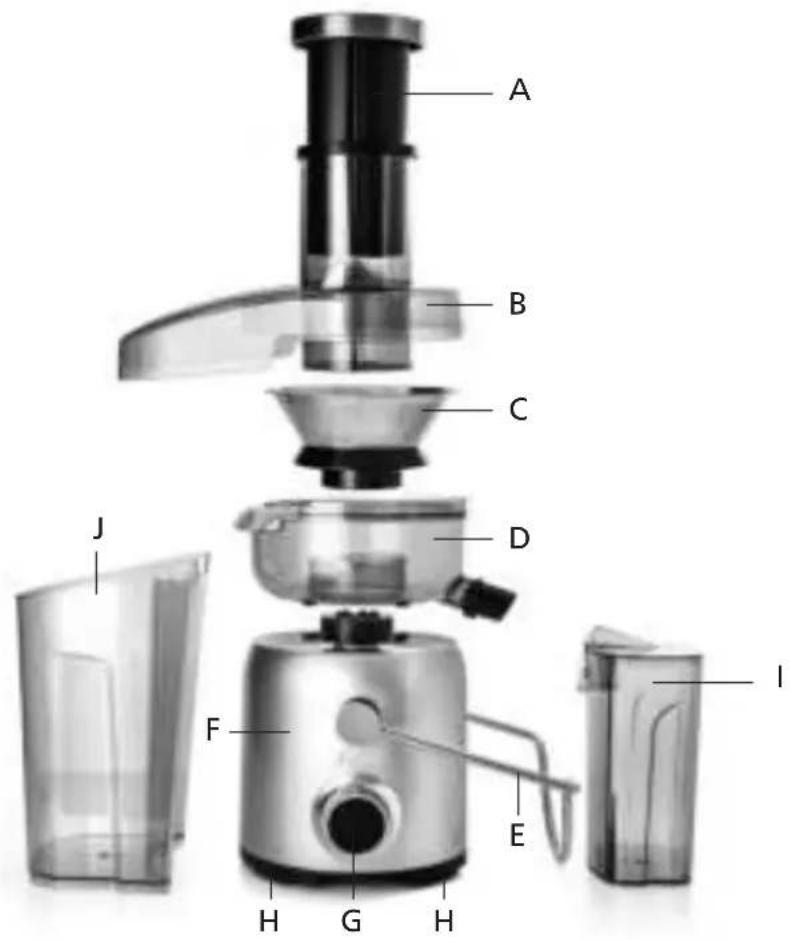
A Tamper
B Cover with funnel
C Sieve with grating blades
D Juicer bowl with lockable spout
E Clasp
F Motor unit
G Rotary function control with display
H Anti-vibration rubber feet; slip safe
Accessories:
1 Juice jug with foam separator and lid (removable)
J Pomace container

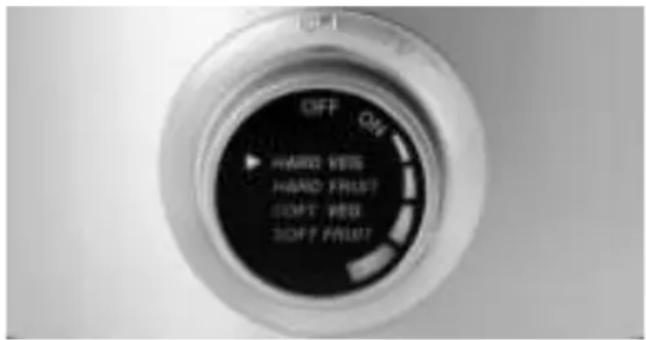
THE ROTARY CONTROL FUNCTIONS AND THE DISPLAY
GB
With the rotary control, you can switch the appliance on and off and select one of the four juicing speeds. A display lights up in the rotary control once you set the control to the ON position.
OFF POSITION
- If the rotary control is set to the OFF position, the appliance is switched off.
- The appliance should always be set to OFF after you have finished juicing and before connecting or disconnecting the power cord.
ON POSITION
Once you set the rotary control to the ON position, the appliance is switched on. The display in the rotary control lights up, displaying the four different possible settings. If you turn the control in a clockwise direction, the appliance switches between the four possible speeds, one after the other.
SPEEDS
You can choose between 4 different settings for the juicing power / speed:
HARD VEG for hard vegetables
HARD FRUIT for hard fruits
SOFT VEG for soft vegetables
SOFT FRUIT for soft fruits
Turn the rotary control in a clockwise direction to the right, the arrow next to the descriptions as well as the ring segments indicate the current appliance setting. "Hard Veg" has the highest speed, "Soft Fruit" has the lowest speed.
GB
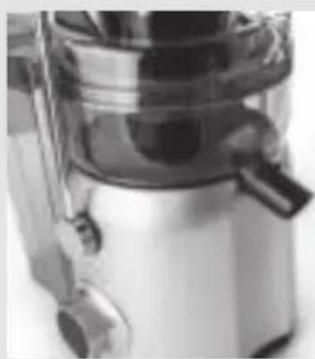
You can lock the spout to prevent dripping out after pouring out the juice.
Locking the spout:
Turn it in a clockwise direction all the way shut.
Opening the spout: Turn it in a counter clockwise direction all the way shut.
ASSEMBLING THE JUICER
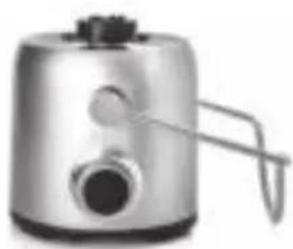
STEP1:
- Place the motor unit on a dry, stable, moisture resistant and level work surface with a power socket nearby. The clasp should be placed on the side with the spout recess.
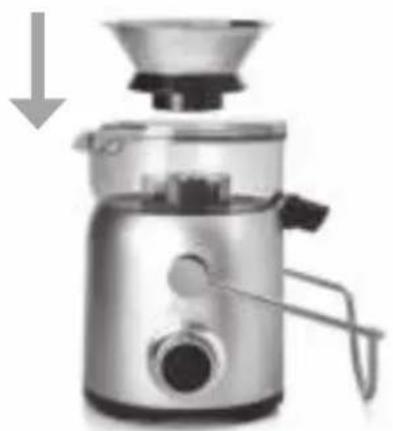
STEP2:
- Place the juicer bowl on the motor unit. The spout of the juicer bowl must be placed in the corresponding recess in the motor unit, the four knobs on the juicer bowl automatically slide into place in the rubber coated recesses.

STEP 3:
- Place the sieve in the juicer bowl. Firmly press down on the edge of the sieve to make it audibly lock into place in the juicer bowl. Caution: Never touch the grinding blades in the sieve, only touch the sieve by the raised edge! The grinding blades are sharp, risk of injury!

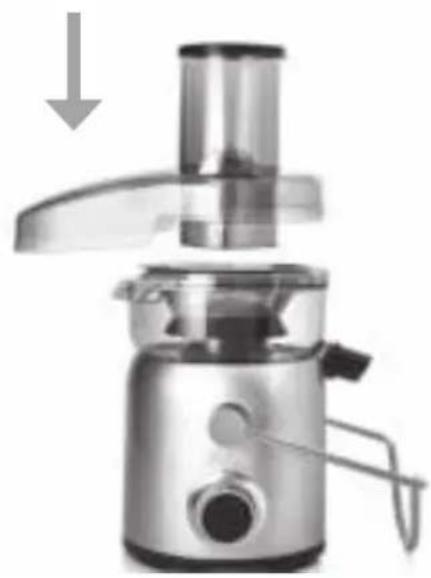
STEP4:
- Place the cover with the funnel on the juicer bowl. The cover for the pomace container should be directed in the direction opposite from the spout. The cover should completely glide into the juicer bowl, the pomace container cover is placed exactly above the bulge of the bowl. The two nibs to the left and right of the bulge on the juicer bowl are placed within the cover.


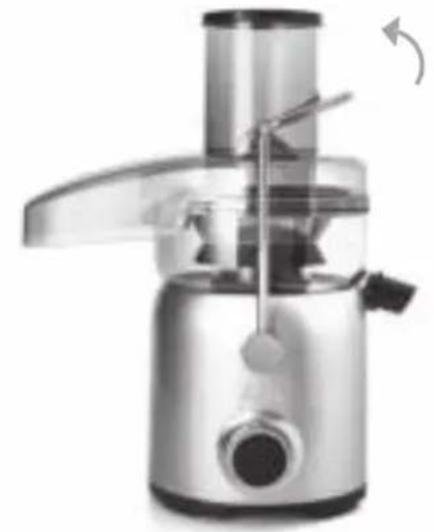
STEP 5:
- Push the clasp up and over the cover so that it audibly locks into place.
GB
STEP6:
- Place the pomace container under the designated cover, so that it touches the motor unit and the pomace container is fully covered by the cover.
- Tip: To simplify the cleaning of the pomace container, you can line it with a thin plastic bag.

STEP7:
- Open the spout. It has to be turned all the way in a counter clockwise direction.


spout locked spout open
STEP8:
- Place the juice jug with the foam separator right next to the appliance so that it fully connects with the motor unit.


STEP 9:
- When you start using the appliance and fi ll the vegetables / the fruits into the funnel on the top, use the tamper to slowly push the vegetables resp. the fruits downwards. Take care to push the tamper down slowly and gently. Too much force does nothing to speed up the juicing process and might even damage the appliance. Only use the tamper to push down on the vegetables / the fruits. Never insert any other objects or your hand into the funnel!
Note: The 3 guide rails in the tamper have to be positioned above the nibs in the funnel so that the tamper can easily slide down. The widest guide rail should be positioned in front, above the rotary control, as the nib in the front is the largest. If the widest guide rail is not positioned above the rotary control, you might experience problems when pushing the tamper down or lifting it up.
DISASSEMBLING THE JUICER
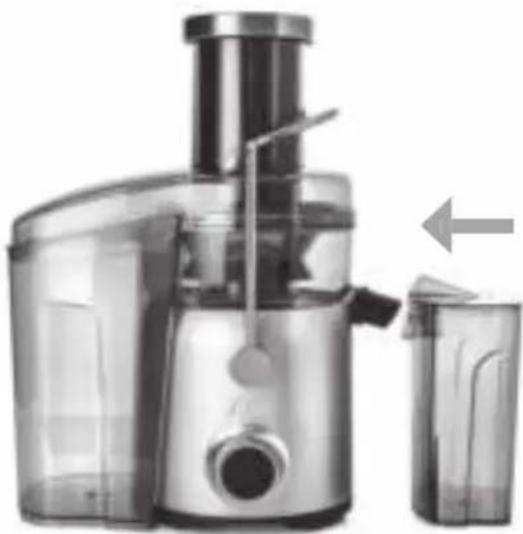
STEP1:
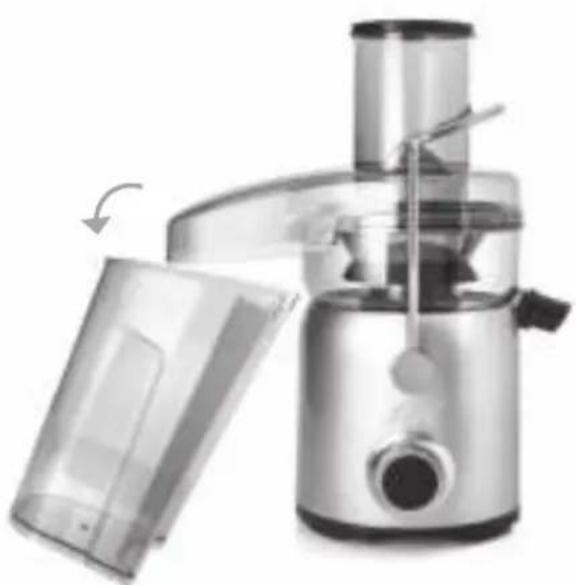
Pull the pomace container out of the appliance. Remove the juice jug.
STEP 2:
- Open the clasp by folding it over the re尼ency and down to the right.
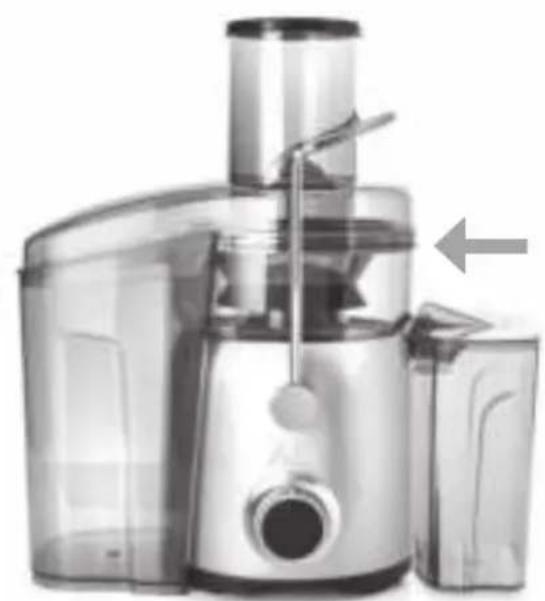
STEP3:
- Lift the juicer cover with the tamper off the juicer bowl.
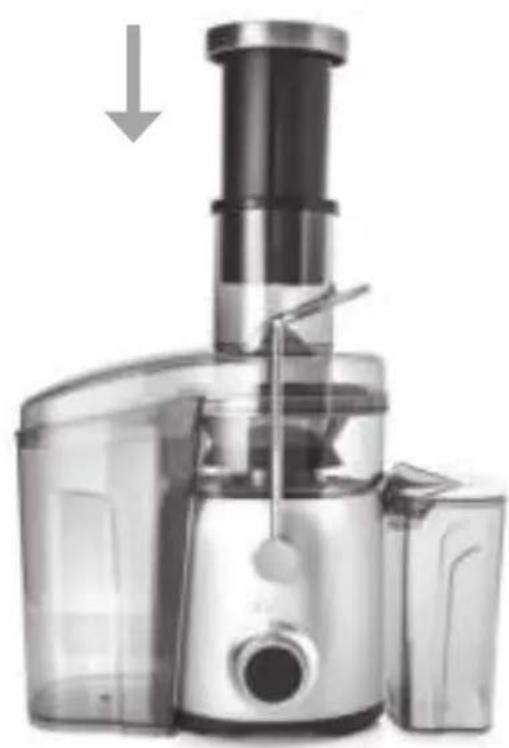
STEP4:
- Lift the juicer bowl together with the inlying sieve off the motor unit. When lifting both parts off together, you avoid injuring yourself with the sharp sieve. To do that, firmly yank the juicer bowl up to separate it from the motor unit. After that, you can turn the juicer bowl upside down so that the sieve falls out. Make sure that the sieve does not fall from high up, as this will damage the sieve as well as the surface beneath. Alternatively, you can first remove the sieve from the juicer bowl by firmly pulling it up and out. When doing this, you must only hold the sieve by the upper edge, as the grinding blades in the sieve are extremely sharp and must never be touched! Then, the juicer bowl can be easily lifted off the motor unit.
BEFORE FIRST USE
Before using your juicer for the first time, remove all potential advertisement stickers and labels (except for the type plate).
Take the appliance apart as described in the section "Disassembling the juicer" (see above).
- Rinse all juicer parts except the motor unit with warm (not above 50^ ) water and some detergent. Please be very careful not to injure yourself with the sharp grinding blades in the sieve. For the sieve, best use the supplied cleaning brush. Dry all parts carefully.
Wipe the motor unit clean with a soft, slightly moist towel.
- When all parts are completely clean, assemble the juicer as described in the section "Assembling the juicer" (see page 82 - 86).
USING THE JUICER
Notes for juicing:
carrots: max. 5 kg; KB 2 minutes
sugar cane: don't peel, but remove the knot. KB: 2 minutes, juicing as much as possible and fi lling the funnel full; push force: 10N / 1kg
GB
- Place the cleaned and dry appliance, fully assembled, on a dry, stable, level and moisture resistant work surface.
- Place the pomace container under the designated cover, so that it touches the motor unit and the cover fully covers the pomace container.
- Place the lid with the attached foam separator on the juice jug. Make sure that the foam separator slides into the two guide rails in the juice jug. Please pull the lid straight up when removing it. This prevents the attached foam separator from breaking off. Make sure that the spout is opened (turn the spout in a counter clockwise direction all the way to the stop). Place the juice jug directly next to the appliance so that the juicer spout reaches into the spout of the juice jug.
- Wash the vegetables or the fruits and peel the fruits or the vegetables with inedible or very thick skins (e.g. oranges). Remove large pips and stones from the stone fruit (e.g. peaches, nectarines, mangos, apricots, cherries, plums etc.), otherwise, the appliance might be damaged. You can leave the pips in fruits with small pips, like water melons, grapes or apples.
-
Cut the fruits or the vegetables into suitably small pieces, so that they fit into the funnel.
-
Plug the power plug into a suitable power socket and turn the rotary control to ON. The display lights up, displaying all four available speeds.
-
Use the rotary control to select the desired speed:
-
HARD VEG for hard vegetables like e.g. fennel, carrots etc.
- HARD FRUIT for hard fruits like e.g. apples, pears etc.
- SOFT VEG for soft vegetables like e.g. cucumbers, tomatoes etc.
- SOFT FRUIT for soft fruits like e.g. peaches, grapes etc.
Each clockwise turn changes the speed setting. An arrow lights up next to the selected speed, each ring segment additionally indicates the selected speed:
SOFT FRUIT with the lowest speed
SOFT VEG with a medium speed
HARD FRUIT with the second highest speed
HARD VEG with the highest speed
- Tip: You should choose a lower speed for vegetables and fruits with high water content (SOFT FRUIT resp. SOFT VEG).
- The appliance immediately starts at the selected speed.
- Fill the funnel with the fruits / the vegetables and slowly push them down the funnel with the tamper. To extract as much juice as possible, it is important to push the tamper down very slowly.
- Caution: Only use the tamper to move foods down the funnel. Never reach into the funnel with any other objects or your hands. Risk of appliance damage and injuries! Never remove potential blockades with your hand or other kitchen tools! To remove blockades, always switch the appliance off first, pull the power plug and wait for the appliance to come to a complete standstill.
- The juice now runs into the juice jug, the pulp is expelled into the pomace container.
- Once the juice jug or the pomace container are full, switch the appliance off with the rotary control (OFF position) and wait for the appliance to come to a standstill. Then, take off the juice jug resp. the pomace container and empty both. You can lock the spout to prevent it from dripping (turn it in a clockwise direction all the way to the stop).
- If you do not require the appliance any longer, first switch it off with the rotary control (OFF position) and wait for the appliance to come to a complete standstill.
- After using it, disassemble the appliance and clean it as described in the section "Cleaning and Maintenance" (see page 91).
Caution: Never use the appliance while empty, meaning without foods in the funnel.
Should you have used the appliance for 2 minutes, you should always take a break of 30 seconds to prevent the motor from overheating.
Important notes:
GB
Always remove hard skins as well as stones and large pips before juicing.
- Fruits and vegetables can be put into the funnel with some small leaves attached. However, larger leaves and stalks have to be removed beforehand.
- Very soft fruits like bananas or figs can not be put into the juicer. The pulp would jam up the appliance and cause motor damage.
Do not process any frozen vegetables or fruits - this could damage the appliance.
- Never let the appliance run idly!
CLEANING AND MAINTENANCE
The appliance should be cleaned after every use.
Before cleaning, switch the appliance off with the rotary control (OFF position) and wait for the appliance to come to a standstill.
- Remove the juice jug and the pomace container from the appliance.
Disassemble the appliance as described. We recommend pulling the sieve out of the appliance together with the juicer bowl and then turning the juicer bowl upside down to remove the sieve. Like this, you avoid coming into contact with the grating blades.
Should you pull the sieve out separately, you must only touch the sieve by the upper edge, so that you do not touch the grating blades. Caution: The grating blades are very sharp!
- All removable parts can be cleaned in water. The motor unit on the other hand must never be submerged in water! After that, dry all parts carefully.
- You can clean the removable parts in warm (not above 50^ ) dish water with a sponge resp. clean the sieve with the supplied brush.
Clean the motor unit with a slightly moist towel and some mild detergent.
Make sure that all parts are completely dry before reassembling the appliance.
In general, do not use any aggressive or scouring detergents or metal sponges, as these might damage the surface.
STORAGE
- Check, if the appliance is disconnected from the power and clean and dry.
- Best store the appliance fully assembled and in an upright position in a dry, dark space, best in the original packaging. Do not place anything on the appliance.
Always keep the appliance and the power cord out of the reach of children.
GB

To save space, you can place the juice jug in the pomace container.
TECHNICAL SPECIFICATIONS
Model no. Type 8451
Product description High speed juicer
Voltage/Frequency 220-240 V~/50/60 Hz
Output 1200 Watts
KB 2 minutes
Rotation SOFT FRUIT: 10'000 rpm
SOFT VEG: 12'000 rpm
HARD FRUIT: 14'000 rpm
HARD VEG: 16'000 rpm
Dimensions approx. 35.5 × 22.0 × 41.0 cm
(W (incl. pomace container and juice jug) × D × H)
Weight
approx. 4.52kg
Technical changes reserved.
DISPOSAL

EU 2012/19/EU
Information for correct disposal of the product in accordance with the European Directive EU 2012/19/EU.
At the end of its working life this equipment must not be disposed of as an household waste. It must be taken to special local community waste collection centres or to a dealer providing this service. Disposing of electrical and electronic equipment separately avoids possible negative effects on the environment and human health deriving from an inappropriate disposal and enables its components to be recovered and recycled to obtain significant savings in energy and resources. In order to underline the duty to dispose of this equipment separately, the product is marked with a crossed-out dustbin.
Solis of Switzerland Ltd reserves the right to carry out technical and visual changes and modifications to improve the product at any time.
SOLIS HELPLINE
This item stands out due to its long-life cycle and reliability. Despite this though, if a malfunction ever occurs, simply give us a call. Often a breakdown can be easily and quickly remedied with the right tip or technique without having to straight away send off the device for repair. We will give you all the advice and practical support you require. The contact addresses can be found at the end of this manual.
Keep the original packaging in a safe place so that you may use it in the event that transportation or shipping of the product becomes necessary.
APPARAATBESCHRIJVING

Solis customer service
Please contact us in advance of sending in products for return or repair. We will gladly give you the respective address. Alternatively, you can simply visit www.solis.com.
Solis Klantendienst Helpline
Solis Produzione SA
Centro Solis
Via Penate 4
CH-6850 Mendrisio
Switzerland
Address for return shipment of
goods differs - please refer to
www.solis.com
+41-91-802 90 10 support.ch@solis.co www.solis.com


wOo'S!os'MMM
do ae aee eae ee eae
Te sn 1sian aseald
OISIOIN
Uns sns snn-zaep
nne nne nee