
ELPLX01S - Video projector EPSON - Free user manual and instructions
Find the device manual for free ELPLX01S EPSON in PDF.

| Product type | Interchangeable lens for projector |
| Brand | Epson |
| Model | ELPLX01S |
| Focal length | 5.8 mm |
| Aperture (F) | 1.9 |
| Weight | Approximately 3500 g |
| Operating temperature | 0 to +45 °C |
| Storage temperature | -10 to +60 °C |
| Lens type | Fixed focal length (zoom not supported) |
| Compatibility | Specific Epson projectors (check projector model) |
| Included accessories | Lens unit with caps (2 types), User's Guide |
| Safety | Disconnect projector before installation/removal; do not use flammable gas for cleaning |
| Maintenance | Clean with a dry cloth; do not use alcohol, benzene, or thinner |
| Settings | Calibration required after replacement (select [Yes] at startup) |
| Lens shift | Yes (allows keystone correction) |
| Attachment | By locking lever; ensure the lens is securely locked |
| Removal | Turn the lever counterclockwise, pull the lens toward you |
| Precautions | Do not touch the lens; replace lens cap before projection; wait 30 min after power off |
| Transport | Remove lens unit before transport |
| Environment | Do not expose to moisture, exhaust fumes, or cigarette smoke |
Frequently Asked Questions - ELPLX01S EPSON
User questions about ELPLX01S EPSON
0 question about this device. Answer the ones you know or ask your own.
Ask a new question about this device
Download the instructions for your Video projector in PDF format for free! Find your manual ELPLX01S - EPSON and take your electronic device back in hand. On this page are published all the documents necessary for the use of your device. ELPLX01S by EPSON.
USER MANUAL ELPLX01S EPSON
User's Guide ...... 3
Check the following list to confirm that you have all of the supplied items. If by any chance there is anything missing or damaged, please contact your dealer.
☐ Lens unit (With lens covers (2 types))
□User's Guide (this guide)
Safety Instructions
Read this document and the User's Guide supplied with the projector carefully to use this unit safely and correctly. To allow you to solve any unknown points quickly, keep this information close to hand.
So that you can use the product safely and correctly, symbols are applied in this Guide and on the product to indicate possible harm to the user or to others and the risk of damage to property. The indications and their meaning are as follows. Make sure you understand them properly before reading the guide.
 Warning Warning | This symbol indicates information that, if ignored, could possibly result in death or personal injury due to incorrect handling. |
 Caution Caution | This symbol indicates information that, if ignored, could possibly result in personal injury or physical damage due to incorrect handling. |

Warning
- Disconnect the power cable from the projector before attaching or removing this product. Attaching or removing while the power cable is connected could cause an electric shock.
- When attaching the product to the projector, make sure that it is securely installed and that it is locked in place. If this product is not attached correctly it may fall, resulting in personal injury or an accident.
- When removing dirt and dust from the projector, do not use a spray that contains flammable gas. The high heat generated inside the projector may cause a fire.

Caution
- When projecting, remove the lens cover from the front of the lens unit.
- Before attaching the lens unit, check the projector's model number. If this lens unit is attached to a projector other than the specified projector, the lens unit or the projector could be damaged.
- When the projector is installed on the ceiling, uninstall the projector, and then attach or remove the lens unit in a safe location.
- Be careful not to trap your finger when attaching this product to the projector. This may cause an injury.
- Do not disassemble or remodel.
- Do not use or store the projector in places where it might be subjected to high and low extremes of temperature.
- Do not use or store the projector in places where smoke from oil or cigarettes may be present, as it can adversely affect the quality of the projected images.
- Do not get it wet.
- Do not drop it or subject it to impacts. When putting this product down, make sure you place it on a flat, stable surface.
- When moving the projector, do not hold the lens unit. The lens unit may come off and the projector may fall causing an injury.
- Remove the lens unit when transporting the projector. If the projector is transported with the lens unit attached, the lens unit or the projector could be damaged.
- Turn off the projector and then wait for a while (approximately 30 minutes) before removing the lens unit. If you touch the lens unit during projection or immediately after turning off the projector, it could cause a burn.
- If the lens shift has been done, move the lens position to the home position before replacing the lens unit.
- Do not touch or pull the connector part or the cable as this could cause a malfunction.
- When cleaning this product, do not use a wet cloth or solvents such as alcohol, benzene, or thinner as this could cause an electric shock or a malfunction.
Removing and Attaching the Lens Unit
Depending on the projector being used, procedures and illustrations may differ from the explanations. Make sure you read the User's Guide supplied with the projector.
Attaching
Caution
- When attaching the lens unit, remove the power plug from the electrical outlet first.
- Do not attach the lens unit when the projector's lens insertion section is facing up. Dust or dirt could enter the projector.
● Try not to touch the lens section with your hand or fingers. If fingerprints or oils are left on the surface of the lens, projection quality deteriorates.
Procedure
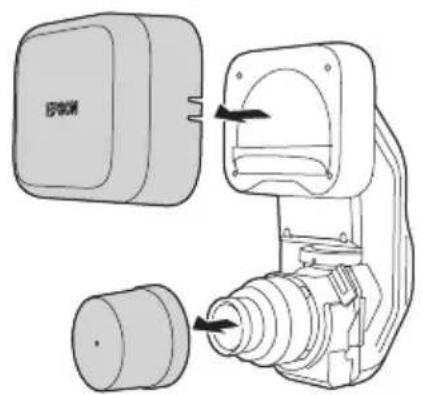
natural_image
Technical line drawing of a mechanical device with two components and directional arrows indicating movement (no text or symbols)1 Remove the lens covers (2 types) from the lens unit. Use the covers when storing or transporting the lens unit on its own. Keep the lens covers in a safe place.
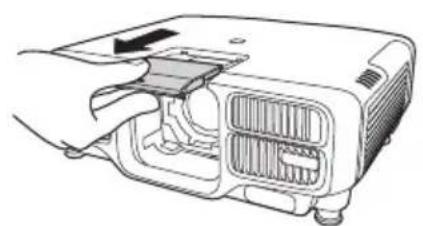
natural_image
Line drawing of a projector module with ventilation slots and a handle (no text or symbols)② Pull the lens replacement cover straight out. Keep the lens replacement cover in a safe place.
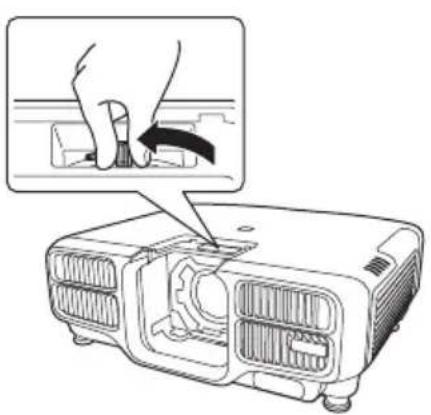
natural_image
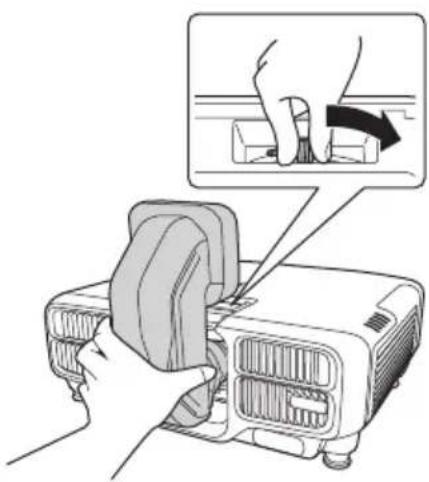
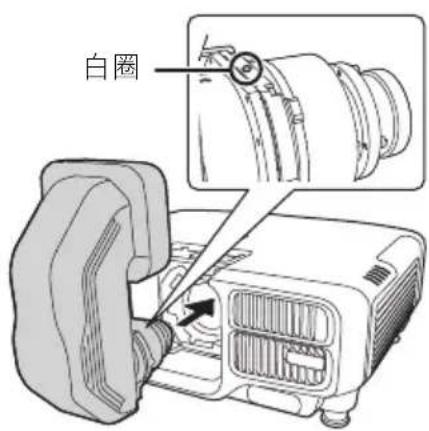
Diagram of a projector with a hand inserting a cable into the case, showing internal components and casing (no text or symbols)③ Hold the lock lever and turn it counterclockwise.
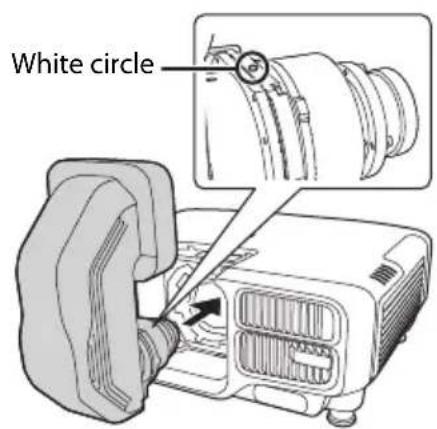
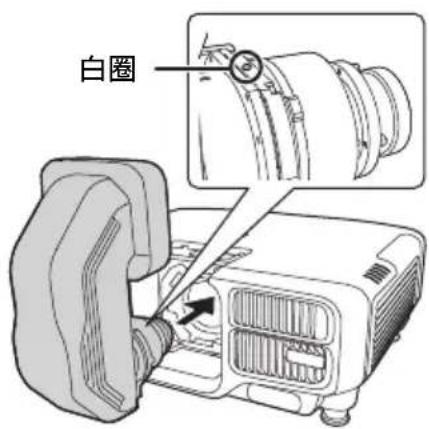
④ Insert the lens unit straight into the lens insertion section with the white circle on the lens on top.
natural_image
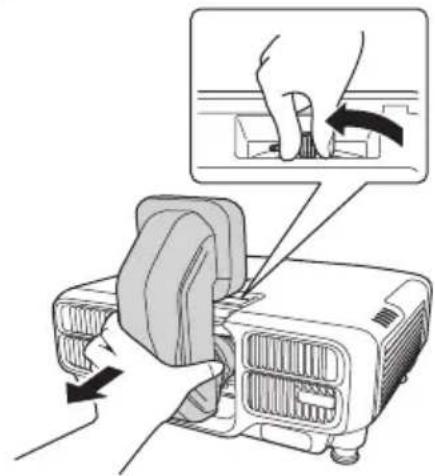
Illustration of hands using a projector to adjust the blade (no text or symbols present)⑤ While holding the lens unit firmly, hold the lock lever and turn it clockwise to lock the lens unit. Check that the lens cannot be detached.
Lens Calibration
After replacing the lens unit, calibrate the lens so that the projector can correctly acquire the lens position and adjustment range. After attaching a lens unit, a message is displayed when the projector is turned on. Select [Yes] to calibrate the lens.
Caution
When replacing the lens unit, remove the power plug from the electrical outlet first. If the lens shift has been done, move the lens position to the home position before replacing the lens unit.
Procedure
natural_image
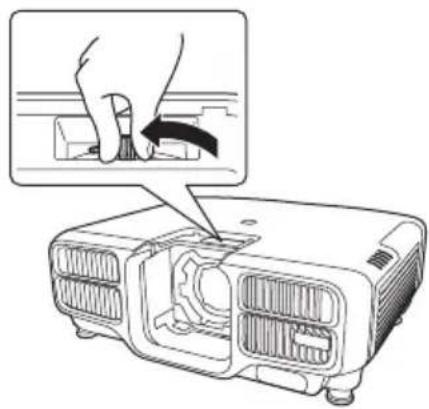
Diagram showing a hand pressing down on a projector module with an inset close-up of the component (no text or symbols present)While holding the lens unit firmly, hold the lock lever and turn it counterclockwise to unlock the lens unit.
Pull the lens unit straight out as it is released.
Adjusting the Image
For more information on the following, see the User's Guide supplied with the projector.
- Screen sizes and projection distances
- Focus adjustment
- Distortion adjustment
When you perform distortion adjustment, the size of the screen changes. - Lens shift
- Keystone correction
* This product is a fixed focus lens. The zoom function is not supported.
The User's Guide is available from the following Web site. epson.sn
Visit the following Web site to find the projection distance calculator. http://www.epson.com/
Specifications
Product name: ELPLX01S/ELPLX01WS
Focusing Length: 5.8 mm
F Number: 1.9
Operating temperature : 0 to +45°C (No condensation) Storage temperature : -10 to +60°C (No condensation)
Mass: Approx. 3500 g
Contact your local dealer or the nearest address provided in the documentation supplied with the projector.
natural_image
Line drawing of a projector with internal components and ventilation slots (no text or symbols)natural_image
Diagram of a projector with a hand inserting a cable into the case, showing internal components and casing (no text or symbols)natural_image
Illustration of hands cleaning a projector with a magnified inset showing the blade being cut (no text or symbols)natural_image
Diagram of a projector with hand operating a slide, showing blade and handle mechanism (no text or symbols)natural_image
Technical line drawing of a mechanical device with no visible text or symbolsnatural_image
Line drawing of a projector internal structure with ventilation slots and a handle (no text or symbols)natural_image
Diagram of a projector with a hand inserting a slot into the case, showing internal components and a close-up view (no text or symbols)natural_image
Illustration of a hand using a power tool to lift a projector (no text or symbols present)natural_image
Diagram of a projector with hand operating a slide, showing blade and blade alignment (no text or symbols)natural_image
Technical line drawing of a mechanical device with no visible text or symbolsnatural_image
Line drawing of a projector internal structure with ventilation slots and a handle (no text or symbols)natural_image
Diagram of a projector with a hand inserting a cable into the housing (no text or symbols present)natural_image
Illustration of a hand operating a projector with a close-up view showing the blade being cut (no text or symbols present)natural_image
Diagram of a projector with hand operating a slide, showing internal components and directional arrows (no text or symbols)natural_image
Line drawing of a projector module with internal components and a handle (no text or symbols)natural_image
Diagram of a projector with a hand inserting a button into the internal gear (no text or symbols present)natural_image
Illustration of hands cleaning a projector with a magnified view showing the process (no text or symbols)natural_image
Diagram of a projector with hand operating a slide, showing internal components and directional arrows (no text or symbols)natural_image
Technical line drawing of a mechanical device with two components and directional arrows indicating movement (no text or symbols)natural_image
Line drawing of a projector internal structure with ventilation slots and a handle (no text or symbols)natural_image
Diagram of a projector with a hand operating the blade (no text or symbols present)③ 抓住锁杆,逆时针转动。
natural_image
Illustration of a hand using a device to lift a component, with an inset showing hand positioning and a black arrow indicating the motion (no text or symbols present)natural_image
Diagram of a projector with hands operating the blade, showing mechanical components and a close-up view of the blade (no text or symbols present)natural_image
Technical line drawing of a mechanical device with two components and directional arrows indicating movement (no text or symbols)① 移除鏡頭組件的鏡頭蓋 (2種)。
natural_image
Line drawing of a projector with internal cooling fins and ventilation slots (no text or symbols)② 平直拉出鏡頭更換蓋。
將替換鏡頭蓋存放在安全的地方。
natural_image
Diagram of a projector with a hand inserting a cable into the case, showing internal components and a magnified view (no text or symbols)③ 抓住鎖桿並以逆時針方向旋轉。
natural_image
Illustration of a hand using a device to adjust or install a component, with an inset showing hand positioning and a downward arrow (no text or symbols)natural_image
Diagram of a projector with hand operating a slide, showing internal components and motion arrows (no text or symbols)natural_image
Line drawing of a projector internal structure with ventilation slots and fan (no text or symbols)natural_image
Diagram of a projector with a hand inserting a button into the case, showing internal components and a magnified view (no text or symbols)natural_image
Illustration of hands using a device to adjust or install a component, with an inset showing hand positioning (no text or symbols present)natural_image
Illustration of a projector with hands operating it, showing internal components and a close-up of the blade (no text or symbols)http://www.epson.jp/products/bizprojector/simulator/
仕様一覧
natural_image
Symbol of a trash bin crossed with a diagonal line, no text or numbers presentEnglish
The crossed out wheeled bin label that can be found on your product indicates that this product and incorporated batteries should not be disposed of via the normal household waste stream. To prevent possible harm to the environment or human health please separate this product and its batteries from other waste streams to ensure that it can be recycled in an environmentally sound manner. For more details on available collection facilities please contact your local government office or the retailer where you purchased this product. Use of the chemical symbols Pb, Cd or Hg indicates if these metals are used in the battery.
Deutsch
This information only applies to customers in the European Union, according to Directive 2002/96/EC OF THE EUROPEAN PARLIAMENT AND OF THE COUNCIL OF 27 January 2003 on waste electrical and electronic equipment (WEEE) and DIRECTIVE 2006/66/EC OF THE EUROPEAN PARLIAMENT AND OF THE COUNCIL OF 6 September 2006 on batteries and accumulators and waste batteries and accumulators and repealing Directive 91/157/EEC and legislation transposing and implementing it into the various national legal systems.
For other countries, please contact your local government to investigate the possibility of recycling your product.
natural_image
Simple line drawing of a trash bin with two crossed lines indicating no waste or prohibition (no text or symbols)For users outside the Province of Buenos Aires, Argentina:
This information only applies to customers in the Province of Buenos Aires, Argentina, according to Law No. 14321 in the Province of Buenos Aires (excluding the City of Buenos Aires) on waste electrical and electronic equipment (WEEE).
For other countries and other locations, please contact your local government to investigate the possibility of recycling your product.
Indication of the manufacturer and the importer in accordance with requirements of directive 2011/65/EU (RoHS)
Manufacturer : SEIKO EPSON CORPORATION
Address : 3-5, Owa 3-chome, Suwa-shi, Nagano-ken 392-8502 Japan
Telephone : 81-266-52-3131
http://www.epson.com/
Importer : EPSON EUROPE B.V.
Addres : Atlas Arena, Asia Building, Hoogoorddreef 5, 1101 BA Amsterdam Zuidoost The Netherlands
Telephone : 31-20-314-5000
http://www.epson.eu/
Üretici : SEIKO EPSON CORPORATION
Adres : 3-5, Owa 3-chome, Suwa-shi, Nagano-ken 392-8502 Japan
Tel :81-266-52-3131
Web : http://www.epson.com/
External Dimensions
[Unit: mm]
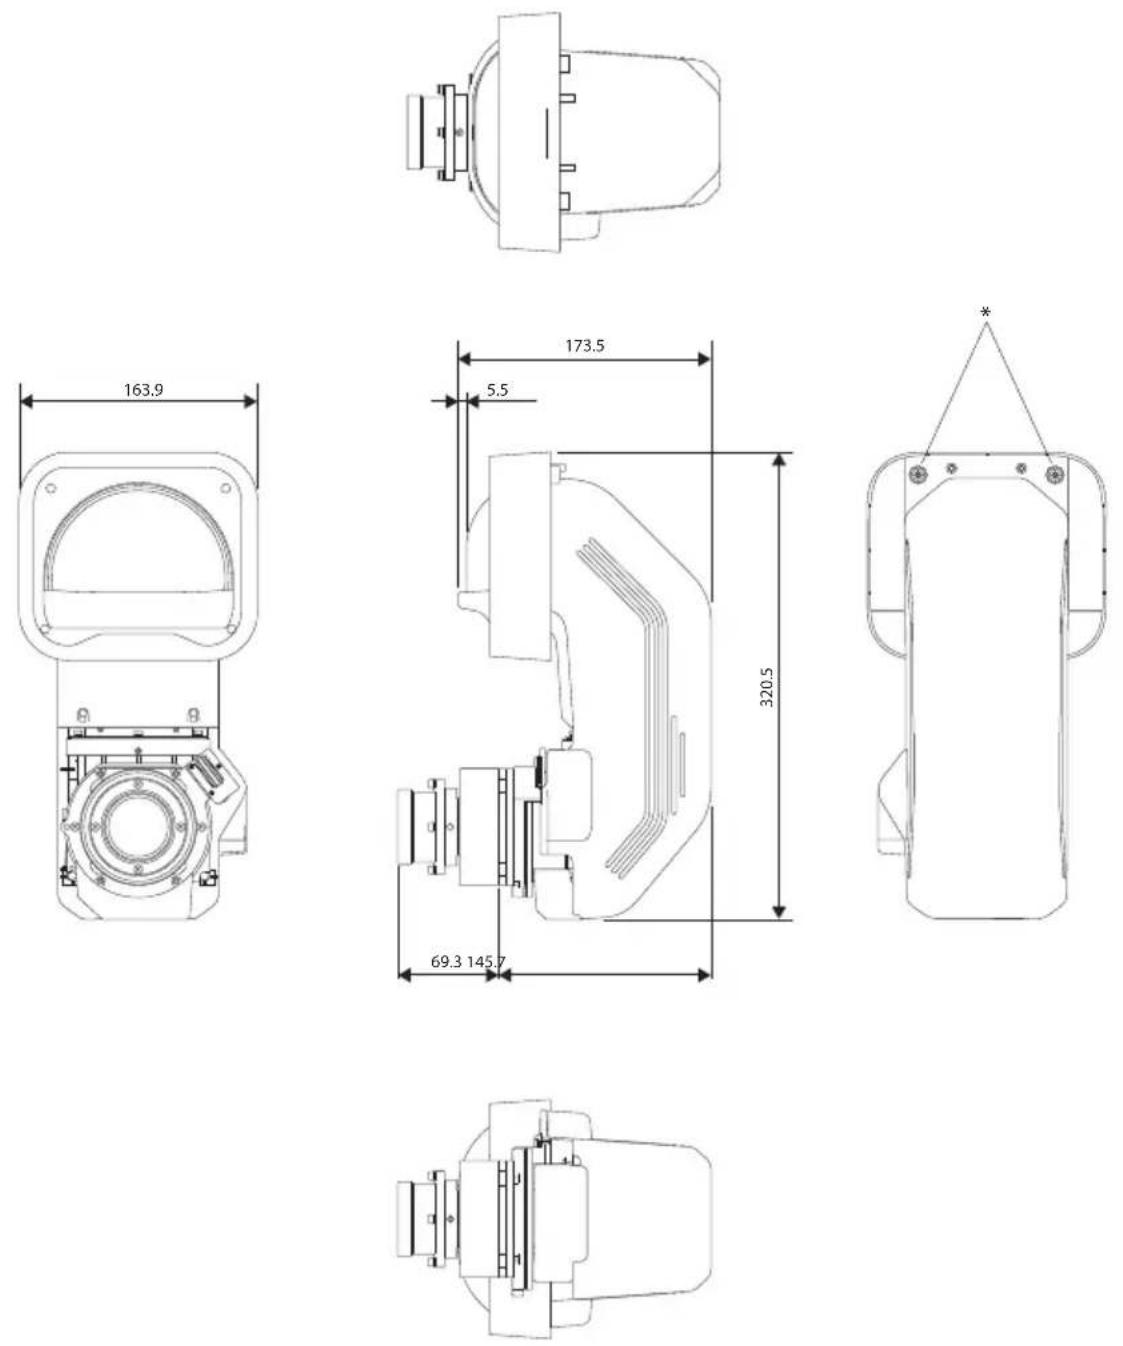
* Screw holes for the optional external camera ELPEC01
* Trous de vis pour la caméra externe optionnelle ELPEC01
* Schraubenlöcher für optionale externe Kamera ELPEC01
* Fori per le viti per la telecamera esterna opzionale ELPEC01
* Orificios para tornillos para la cámara externa opcional ELPEC01
* 可选外置摄像头 ELPEC01 的螺丝孔
* 選購外接相機 ELPEC01 的螺絲孔
* 外付けカメラ ELPEC01(オプション品)取り付け用ネジ穴
EPSON®
EXCEED YOUR VISION