
PowerLite Pro G6770WUNL - Video projector EPSON - Free user manual and instructions
Find the device manual for free PowerLite Pro G6770WUNL EPSON in PDF.


| Type | Video projector |
| Brand | Epson |
| Model | PowerLite Pro G6770WUNL |
| Display Technology | 3LCD |
| Native Resolution | WUXGA (1920 x 1200) |
| Brightness | 6000 lumens |
| Contrast Ratio | 5000:1 |
| Lamp Life | 3000 hours (Normal), 4000 hours (Eco) |
| Lens Shift | Vertical and horizontal |
| Keystone Correction | Vertical & horizontal |
| Inputs | HDMI, VGA, DVI-D, Composite, S-Video, USB |
| Dimensions (W x D x H) | Approx. 19.6 x 15.4 x 7.9 in (500 x 390 x 200 mm) |
| Weight | Approx. 22 lb (10 kg) |
| Power Consumption | 400W (Normal), 0.5W (Standby) |
| Noise Level | 35 dB (Normal), 28 dB (Eco) |
| Warranty | 2 years limited |
| Maintenance | Clean air filter every 500 hours; replace lamp when indicator shows |
| Security | Kensington lock slot, password protection |
| Replaceable Parts | Lamp (ELPLP87), Air filter |
Frequently Asked Questions - PowerLite Pro G6770WUNL EPSON
User questions about PowerLite Pro G6770WUNL EPSON
0 question about this device. Answer the ones you know or ask your own.
Ask a new question about this device
Download the instructions for your Video projector in PDF format for free! Find your manual PowerLite Pro G6770WUNL - EPSON and take your electronic device back in hand. On this page are published all the documents necessary for the use of your device. PowerLite Pro G6770WUNL by EPSON.
USER MANUAL PowerLite Pro G6770WUNL EPSON
Additional Components 15
Optional Equipment and Replacement Parts 15
Warranty and Registration Information 17
Notations Used in the Documentation.... 18
Where to Go for Additional Information 18
Projector Part Locations.... 18
Projector Parts - Front/Top 19
Projector Parts - Rear 20
Projector Parts - Interface Ports 21
Projector Parts - Base 22
Projector Parts - Control Panel 23
Projector Parts - Remote Control 25
Setting Up the Projector 28
Projector Placement.... 28
Projector Setup and Installation Options 28
Projection Distance.... 31
Projector Connections 35
Connecting to Computer Sources.... 36
Connecting to a Computer for VGA Video 36
ConnectingtoaComputerforHDMIVideoandAudio....37
ConnectingtoaComputerforDisplayPortVideoandAudio....37
Connecting to a Computer for 5 BNC Video.... 38
Connecting to a Computer for Sound 39
Connecting to Video Sources 39
Connecting to an HDMI Video Source 40
ConnectingtoaComponent-to-BNCVideoSource....40
ConnectingtoaComponent-to-VGAVideoSource....41
Connecting to an S-Video Video Source 42
Connecting to a Composite Video Source 42
Connecting to an SDI Video Source 43
Connecting to a Video Source for Sound 43
Connecting to an HDBaseT Transmitter 44
Connecting to an External Computer Monitor 45
Connecting to External Speakers 46
Attaching and Removing a Lens.... 47
Attaching the Lens Unit 47
Removing the Lens Unit 49
Attaching and Removing the Cable Cover 51
Attaching and Removing the Cable Clips 52
Installing Batteries in the Remote Control 53
Using the Projector on a Network 56
Wired Network Projection.... 56
Connecting to a Wired Network 57
Selecting Wired Network Settings 57
Wireless Network Projection 60
Installing the Wireless LAN Module 61
Using Quick Wireless Connection (Windows Only) 63
Selecting Wireless Network Settings Manually.... 65
Wireless LAN Menu Settings 68
Selecting Wireless Network Settings in Windows.... 69
Selecting Wireless Network Settings in OS X 70
Enabling WPA or EAP Security 70
Wireless Security Menu Settings 72
Registering a Digital Certificate on the Projector 74
Secure HTTP 74
Registering Digital Certificates from a Web Browser 75
DigitalCertificateTypesforRegistrationviaWebControl....76
Setting Up Projector Network E-Mail Alerts 77
Network Projector E-mail Alert Messages 79
Setting Up Monitoring Using SNMP 80
Selecting Other Network Settings.... 81
Controlling a Networked Projector Using a Web Browser 83
Crestron RoomView Support 85
Setting Up Crestron RoomView Support 85
ControllingaNetworkedProjectorUsingCrestronRoomView....87
Using Basic Projector Features 89
Turning On the Projector 89
Turning Off the Projector 91
Selecting the Language for the Projector Menus.... 92
Resizing the Image with the Zoom Ring 92
Focusing the Image Using the Focus Ring.... 93
FocusingtheImagewiththeOptionalShortThrowLens....94
Setting the Lens Type 96
Setting the Screen Type 97
Adjusting the Image Position Using Screen Position 98
Adjusting the Image Position Using Lens Shift 99
Displaying a Test Pattern 102
Available Test Pattern Image Adjustments.... 103
Adjusting the Image Height 104
Image Shape 105
Correcting Image Shape with H/V Keystone 106
Correcting Image Shape with Quick Corner 109
Correcting Image Shape with Arc Correction.... 110
Correcting Image Shape with Curved Surface 113
Correcting Image Shape with Point Correction.... 117
Correcting Image Shape with Corner Wall 119
Remote Control Operation 125
Selecting an Image Source 126
Projection Modes 127
ChangingtheProjectionModeUsingtheRemoteControl....128
Changing the Projection Mode Using the Menus.... 128
Image Aspect Ratio 129
Changing the Image Aspect Ratio 130
Available Image Aspect Ratios 130
Color Mode.... 131
Changing the Color Mode.... 132
Available Color Modes.... 132
Turning On Auto Iris.... 133
Controlling the Volume with the Volume Buttons.... 134
Setting the Date and Time....134
Adjusting Projector Features 136
Shutting Off the Picture and Sound Temporarily 136
Stopping Video Action Temporarily 137
Zooming Into and Out of Images 137
Projector Security Features.... 138
Password Security Types.... 138
Setting a Password 139
Selecting Password Security Types.... 140
Entering a Password to Use the Projector.... 141
Saving a User's Logo Image to Display 142
Locking the Projector's Buttons 144
Unlocking the Projector's Buttons 145
Installing a Security Cable 145
Projecting Two Images Simultaneously.... 146
Using Multiple Projectors.... 148
ProjectorIdentificationSystemforMultipleProjectorControl....149
Setting the Projector ID 149
Setting the Remote Control ID 150
AdjustingthePositionoftheProjectedImageFromMultipleProjectors....151
Scaling an Image 152
Adjusting the Lamp's Brightness 154
Blending the Image Edges 154
Adjusting the Black Level 157
Matching the Image Colors.... 161
Viewing 3D Images 162
Saving Settings to Memory and Using Saved Settings 162
Saving a Scheduled Event 163
Viewing Scheduled Events 164
Editing a Scheduled Event.... 165
Copying Menu Settings Between Projectors 166
Saving Settings to a USB Flash Drive.... 167
Transferring Settings From a USB Flash Drive 168
Saving Settings To a Computer 170
Transferring Settings From a Computer 171
Adjusting the Menu Settings 174
Using the Projector's Menus.... 174
Image Quality Settings - Image Menu 176
Input Signal Settings - Signal Menu.... 178
Projector Feature Settings - Settings Menu 182
Projector Setup Settings - Extended Menu.... 185
Projector Network Settings - Network Menu.... 191
Projector Information Display - Info Menu 193
Event ID Code List.... 195
Projector Reset Options - Reset Menu 196
Maintaining and Transporting the Projector 198
Projector Maintenance 198
Cleaning the Lens.... 198
Cleaning the Projector Case.... 199
Air Filter and Vent Maintenance 199
Cleaning the Air Filter 200
Replacing the Air Filter 203
Projector Lamp Maintenance.... 205
Replacing the Lamp 205
Resetting the Lamp Timer 209
Replacing the Remote Control Batteries 210
Transporting the Projector 212
Solving Problems 213
Projection Problem Tips 213
Projector Light Status 214
Using the Projector Help Displays 217
Solving Image or Sound Problems 218
Solutions When No Image Appears 218
Solutions When "No Signal" Message Appears 219
Displaying From a PC Laptop 219
Displaying From a Mac Laptop 220
Solutions When "Not Supported" Message Appears 220
Solutions When Only a Partial Image Appears 220
Solutions When the Image is Not Rectangular 221
Solutions When the Image Contains Noise or Static 222
Solutions When the Image is Fuzzy or Blurry 222
SolutionsWhentheImageBrightnessorColorsareIncorrect....223
Solutions to Sound Problems 224
Solving Projector or Remote Control Operation Problems 225
Solutions to Projector Power or Shut-Off Problems 225
Solutions to Problems with the Remote Control 226
Solutions to Password Problems 227
Solving Network Problems 227
SolutionsWhenYouCannotAccesstheProjectorThroughtheWeb....227
SolutionsWhenNetworkAlertE-MailsareNotReceived....228
SolutionsWhenYouCannotAccesstheProjectorUsingiProjection....228
Where to Get Help 228
Technical Specifications 230
General Projector Specifications 230
Projector Lamp Specifications 234
Remote Control Specifications 234
Projector Dimension Specifications 235
Projector Electrical Specifications 235
Projector Environmental Specifications.... 237
Projector Safety and Approvals Specifications 238
Supported Video Display Formats.... 238
Notices 242
Recycling.... 242
Important Safety Information 242
Important Safety Instructions.... 243
Restriction of Use 246
FCC Compliance Statement.... 246
Trademarks 247
Open Source Software License 247
Copyright Notice....294
ANoteConcerningResponsibleUseofCopyrightedMaterials....294
Copyright Attribution 294
PowerLitePro
G6070W/G6170/G6270W/G6470WU/G6570WU/G6770WU/G6870/G6970WUUser'sGuide
WelcometothePowerLitePro
G6070W/G6170/G6270W/G6470WU/G6570WU/G6770WU/G6870/G6970WUUser'sGuide.
IntroductiontoYourProjector
Refertothesesectionstolearnmoreaboutyourprojectorandthismanual.
ProjectorFeatures
NotationsUsedintheDocumentation
WheretoGoforAdditionalInformation
ProjectorPartLocations
ProjectorFeatures
ThePowerLiteProG6070W,G6170,G6270W,G6470WU,G6570WU,G6770WU,G6870,and G6970WU projectors includethesespecialfeatures:
Bright, high-resolution projectionsystem
•PowerLiteProG6070W:Upto5500lumensofbrightness(whitelightoutputandcolorlightoutput)
PowerLiteProG6170/G6270W:Upto6500lumensofbrightness(whitelightoutputandcolorlight output)
PowerLiteProG6470WU:Upto4500lumensofbrightness(whitelightoutputandcolorlightoutput)
PowerLiteProG6570WU:Upto5200lumensofbrightness(whitelightoutputandcolorlightoutput)
PowerLiteProG6770WU/G6970WU:Upto6000lumensofbrightness(whitelightoutputandcolor lightoutput)
PowerLiteProG6870:Upto7000lumensofbrightness(whitelightoutputandcolorlightoutput)
Note: Color brightness (color light output) and white brightness (white light output) will vary depending on usage conditions. Colorlight output measured in accordance with IDMS15.4; whitelight output measured in accordance with ISO21118.
•PowerLiteProG6070W/G6270W:Nativeresolutionof1280×800pixels(WXGA)
PowerLiteProG6170/G6870:Nativeresolutionof1024×768pixels(XGA)
PowerLiteProG6470WU/G6570WU/G6770WU/G6970WU:Nativeresolutionof1920×1200pixels (WUXGA)
Flexibleconnectivity
•Wiredandwirelessnetworksupportforprojection,monitoring,andcontrolviaremotenetwork computer(PowerLiteProG6070W/G6170/G6270W/G6470WU/G6570WU/G6770WU)
- Wirednetworksupportformonitoringandcontrolviaremotenetworkcomputer(PowerLitePro G6870/G6970WU)
- VarietyofconnectionmethodstoacomputerorvideovideviceincludingHDMI,BNC,DisplayPort,HDBaseT,andSDI(PowerLiteProG6970WU)
- Portsforconnectinganexternalmonitorandexternalspeakers
Easy-to-usesetupandoperationfeatures
• Interchangeable bayonetlensoptions available
- Projectimagessidebysidefromtwoseparateinputsources
- CreateonelargeseamlessdisplaywhenprojectingfrommultipleprojectorsusingEdgeBlending
- Epson'sInstantOffandDirectPowerOnfeaturesforquicksetupandshutdown
•SupportforCrestronRoomViewnetworkmonitoringsystems
- Networkmessagebroadcastsystemtoprojecttimelymessagestoallnetworkedprojectors(Windows only)
Note: The PowerLite Pro G6970WU projector with the standard lens is shown in most illustrations in this manual, unless noted otherwise.
ProductBoxContents
AdditionalComponents
OptionalEquipmentandReplacementParts
Warranty and Registration Information
Parenttopic: Introduction to Your Projector
Relatedconcepts
ProjectorPartLocations
ProductBoxContents
Saveallthepackagingincaseyouneedtoshiptheprojector.Alwaysusetheoriginalpackaging(or equivalent)whenshipping.
Makesureyourprojectorboxincludedalloftheseparts:
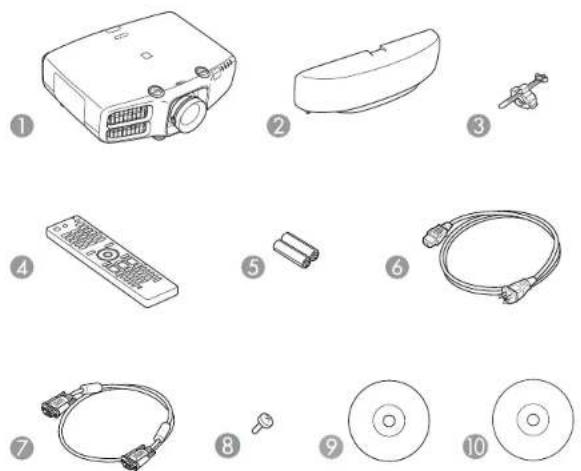
1Projectorwithstandardzoomlens
2Cablecover
3Cableclip 2
4Remotecontrol
5Remotecontrolbatteries(twoAAalkaline)
6Powercord
7VGAcomputercable
8Lensunitscrew
9ProjectordocumentationCD
10ProjectorsoftwareCD(PowerLitePro
G6070W/G6170/G6270W/G6470WU/G6570WU/G6770WU)
^1 LensandlensunitscrewnotincludedwiththePowerLitePro
G6070WNL/G6170NL/G6270WNL/G6470WUNL/G6570WUNL/G6770WUNL/G6870NL/G6970WUNL
^2 2clipsincludedwiththePowerLiteProG6870/G6970WU
Parenttopic:ProjectorFeatures
AdditionalComponents
Dependingonhowyouplantousetheprojector,youmayneedtoobtainthefollowingadditional components:
• Toconnectacomputerthroughits VGA port to the projector's BNCports, you need a VGA-to-5-BNC cable or adapter. You can purchase one from Epson or an authorized Epson reseller.
- Toreceiveacompositevideosignal,youneedanRCA-stylevideoorA/Vcable.Seeyourlocal computerorelectronicsdealerforpurchaseinformation.
- ToreceiveanS-Videosignal,youneedanS-Videocablecompatiblewithyourdevice.Seeyourlocal computerorelectronicsdealerforpurchaseinformation.
• Toreceive a component video signal, you need a component-to-BNCoraD-sub, 15-pin, component-to-VGA videocable or adapter. You can purchase one from Epson or an authorized Epson reseller.
- ToreceiveanHDMIsignal,youneedacompatibleHDMIcable.YoucanpurchaseonefromEpsonoranauthorizedEpsonreseller.
Note:OlderMaccomputers(2009andearlier)maynotsupportaudiothroughtheHDMIport.
• ToreceiveaDisplayPortsignal, youneedacompatibleDisplayPortable.
•ToreceiveanHDBaseTsignal,youneedacompatible100Base-TXLANcable.
•ToreceiveanSDIsignal(PowerLiteProG6970WU),youneedacompatibleBNCvideocable.
- Toprojectwithaudiofromcertainports,youmayneedacommerciallyavailableaudiocable compatiblewithyourdevice.Seeyourlocalcomputerorelectronicsdealerforpurchaseinformation.
• ToconnectaMacthatincludesonlyaMiniDisplayPort, Thunderboltport, or Mini-DVIportforvideo output, youneedtoobtainanadapter.ContactAppleforcompatibleadapteroptions.
Parenttopic:ProjectorFeatures
OptionalEquipmentandReplacementParts
Youcanpurchasescreens,otheroptionalaccessories,andreplacementpartsfromanEpsonauthorizedreseller.Tofindthenarestreseller,call800-GO-EPSON(800-463-7766).Oryoucanpurchaseonlineatepsonstore.com(U.S.sales)orepson.ca(Canadiansales).
Epsonoffersthefollowingoptionalaccessoriesandreplacementpartsforyourprojector:
| OptionorpartPartnumber | |
| GenuineEpsonreplacementlamp(ELPLP76)V13H010L76 | |
| Airfilter(ELPAF43)V13H134A43 | |
| QuickWirelessConnectionUSBkey(ELPAP09;PowerLiteProV12H005M09G6070W/G6170/G6270W/G6470WU/G6570WU/G6770WU) | |
| WirelessLANmodule(ELPAP07;PowerLiteProV12H418P12G6070W/G6170/G6270W/G6470WU/G6570WU/G6770WU) | |
| HDBaseTTransmitter(ELPHD01)V12H547020 | |
| Replacementremotecontrol158279900 | |
| Remotecontrolcableset(ELPKC28)V12H005C28 | |
| EpsonDC-11documentcamera(ELPDC11)V12H377020 | |
| EpsonDC-20documentcamera(ELPDC20)V12H500020 | |
| WirelessIRmousereceiverforremotecontrol(ELPST16)V12H007T16 | |
| PolarizerKitfor3DStackingELPPL01 | |
| Passive3Dglasses(adult)ELPGS02A | |
| Passive3Dglasses(children)ELPGS02B | |
| AdvancedprojectorceilingmountwithprecisiongearELPMBPRG | |
| AdjustablesuspendedceilingchannelkitELPMBP01 | |
| Falseceilingplatekit | ELPMBP02 |
| Structuralroundceilingplate | ELPMBP03 |
| Adjustableextensioncolumn(pipe)8"to11"(20to28cm) | ELPMBC01 |
| Component-to-VGAvideocable(ELPKC19) | V12H005C19 |
| VGAvideocable6feet(1.8m)length | F3H982-06 |
| VGAvideocable10feet(3.0m)length | F3H982-10 |
| VGAvideocable25feet(7.6m)length | F3H982-25 |
| HDMlaudiovideocable3feet(0.9m)length | AV22300-03 |
| HDMlaudiovideocable6feet(1.8m)lengthAV22300-06 | |
| HDMlaudiovideocable12feet(3.6m)lengthAV22300-12 | |
| Shortthrowzoomlens(ELPLU01)V12H004U01 | |
| Rearprojectionwidelens(ELPLR03)V12H004R03 | |
| Standardzoomlens(ELPLS07)V12H004S07 | |
| Middlethrowzoomlens#1(ELPLM04)V12H004M04 | |
| Middlethrowzoomlens#2(ELPLM05)V12H004M05 | |
| Longthrowzoomlens(ELPLL06)V12H004L06 | |
| Activespeakers(ELPSP02)V12H467020 | |
| PixiePluscontrolsystemforEpsonprojectorsELPSP10 | |
| DuetultraportableprojectorscreenELPSC80 | |
| 50"portablerollscreen(4:3)ELPSC06 | |
| 60"portablepop-upscreen(4:3)ELPSC07 | |
| 80"portablepop-upscreen(4:3)ELPSC08 | |
| 1-YearExtendedExchangeServicePlanEPPEXPB1 | |
| 2-YearExtendedExchangeServicePlanEPPEXPB2 |
Parenttopic:ProjectorFeatures
Warranty and Registration Information
Yourprojectorcomeswithabasicwarrantythatletsyouprojectwithconfidence.Fordetails,seethe warrantythatcamewithyourprojector.
Inaddition, EpsonoffersfreeExtraCareRoadService. Intheunlikelyeventofanequipmentfailure, you won't havetowaitforyourunittoberepaired. Instead, Epsonwillshipyouareplacementunitanywhere intheUnitedStates, Canada, or Puerto Rico. SeetheExtraCareRoadServicebrochurefordetails.
RegistryourproductonlineusingtheprojectorCDoratthissite:epson.com/webreg.
Registeringalsoletsyoureceivespecialupdatesonnewaccessories,products,andservices.
Parenttopic:ProjectorFeatures
NotationsUsedintheDocumentation
Followtheguidelinesinthesenotationsasyoureadyourdocumentation:
- Warningsmustbefollowedcarefullytoavoidbodilyinjury .
- Cautionsmustbeobservedtoavoiddamagetoyourequirement.
- Notes contain important information about your projector.
- Tipscontainadditionalprojectioninformation.
Parenttopic: Introduction to Your Projector
WheretoGoforAdditionallInformation
Needquickhelponusingyourprojector?Here'swheretolookforhelp:
•Built-inhelpsystem
PresstheHelpbuttonontheremotecontroltogetquicksolutionstocommonproblems.
•epson.com/support(U.S)orepson.ca/support(Canada)
ViewFAQs(frequentlyaskedquestions)ande-mailyourquestionstoEpsontechnicalsupport24 hoursaday.
- Fordetailedinstructionsonusingyourprojectorinanetworkenvironment(PowerLitePro G6070W/G6170/G6270W/G6470WU/G6570WU/G6770WU),seethe EasyMPNetworkProjection OperationGuide.
- Fordetailedinstructionsonmonitoringyourprojectorinanetworkenvironment(Windowsonly),see the EasyMPMonitorOperationGuide.
• Fordetailedinstructionsonusingyourprojectortoholdinteractivemeetingsinanetworkenvironment (PowerLiteProG6070W/G6170/G6270W/G6470WU/G6570WU/G6770WU),seetheEasyMPMultiPCProjectionOperationGuide.
• If you still need help after checking this manual and the sources listed above, you can use the Epson PrivateLineSupportservicetogethelpfast. Fordetails, see "Where to Get Help".
Parenttopic: Introduction to Your Projector
Relatedreferences
WheretoGetHelp
ProjectorPartLocations
Checktheprojectorpartillustrationstolearnaboutthepartsonyourprojector.
Note: The PowerLite G6970WU projector is shown in most illustrations in this manual, unless noted otherwise.
ProjectorParts-Front/Top
ProjectorParts-Rear
ProjectorParts-InterfacePorts
ProjectorParts-Base
ProjectorParts-ControlPanel
ProjectorParts-RemoteControl
Parenttopic: Introduction to Your Projector
ProjectorParts-Front/Top
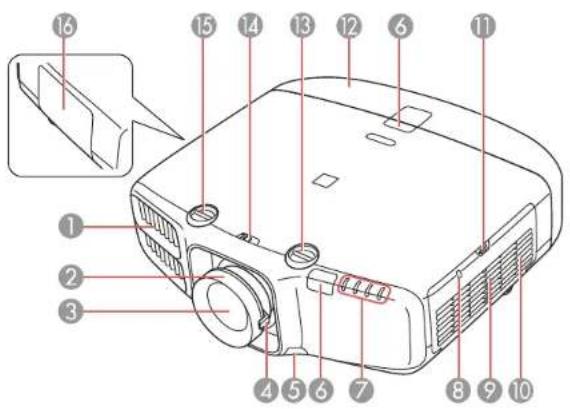
1 Exhaustvent
2Focusing
3Projectorlens
4Zoomring
5Lensunitreleasebutton
6Remotereceiver
7Projectorstatuslights
8WirelessLANindicatorlight(PowerLitePro G6070W/G6170/G6270W/G6470WU/G6570WU/G6770WU)
9Airfilter/intakevent
10Speaker(PowerLiteProG6070W/G6170/G6270W/G6470WU/G6570WU/G6770WU)
11 Airfiltercoverlatch
12Cablecover
13Vertical lens shiftdial
14Lensshiftdiallock
15Horizontallensshiftdial
16Lampcover
Parenttopic:ProjectorPartLocations
ProjectorParts-Rear
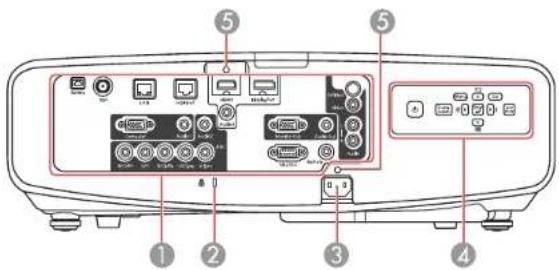
1 Interfaceports
2Kensingtonsecurityslot
3ACinputport
4Controlpanel
5Cableclipslot
Parenttopic:ProjectorPartLocations
ProjectorParts-InterfacePorts
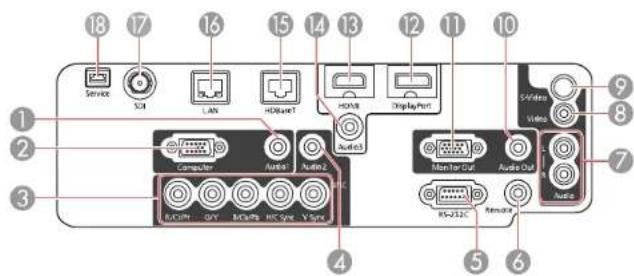
1Audio1port
2Computerport
3BNCports
4Audio2port
5RS-232Cport
6Remoteport
7AudioL-Rports
8Videoport
9S-Videoport
10AudioOutport
11MonitorOutport
12DisplayPortconnector
13HDMIport
14Audio3port
15HDBaseTport
16NetworkLANport
17SDIport(PowerLiteProG6970WU)
18Serviceport
Parenttopic:ProjectorPartLocations
ProjectorParts-Base
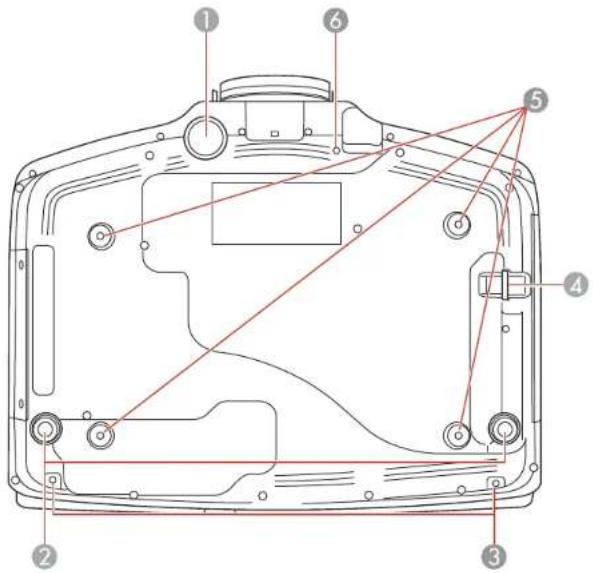
1Frontadjustablefoot
2Rearfeet
3Screwholesforcablecover
4Securitycableattachmentpoint
5Mountingbracketholes
6Screwholeforlensunitreleasebutton
Parenttopic:ProjectorPartLocations
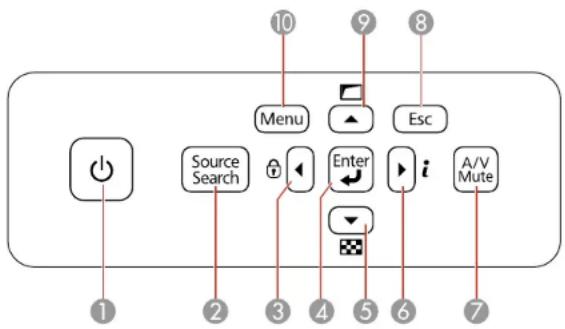
ProjectorParts-ControlPanel
flowchart
graph TD
    A["1"] --> B["+"]
    C["2"] --> D["Source Search"]
    E["3"] --> F["←"]
    G["4"] --> H["Enter"]
    I["5"] --> J["↓"]
    K["6"] --> L["i"]
    M["7"] --> N["A/V Mute"]
    O["8"] --> P["Esc"]
    Q["9"] --> R["Menu"]
    S["10"] --> T["Menu"]
1Powerbutton
2SourceSearchbutton(searchesforconnectedsources)
3LeftarowbuttonanddisplaytheControlPanelLockscreen
4Enterbutton(selectsoptionsandoptimizescreenimagewhenprojectinganRGBsignalfrom theComputerorBNCports)
5Downarrowbuttonanddisplaysatestpattern
6Rightarowbuttonanddisplaysthelnfomenu
7A/VMutebutton(turnsthevideoandaudioonoroff)
8Escbutton(cancels/exitsfunctions)
9Uparrowbuttonanddisplaysscreenadjustmentoptions
10Menubutton(accessesprojectormenusystem)
Parenttopic:ProjectorPartLocations
Relatedreferences
ProjectorLightStatus
ProjectorParts-RemoteControl
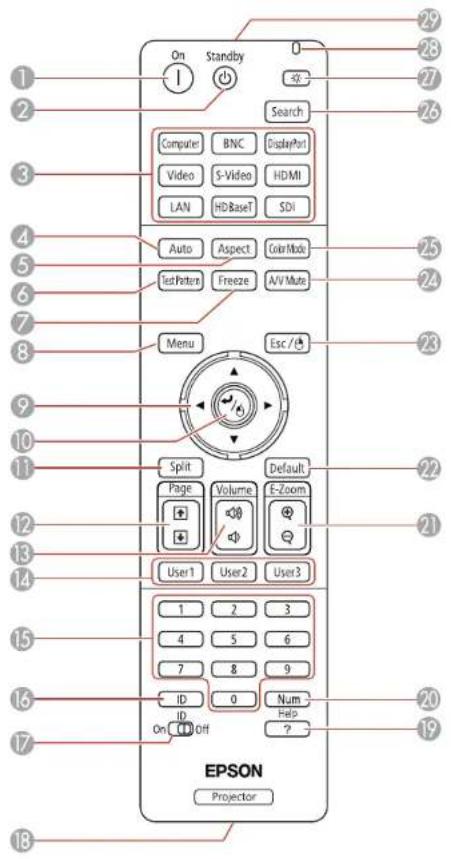
1Onbutton(turnspoweron)
2Standbybutton(turnspoweroff)
3Sourcebuttons(changesinputsource;somebuttonsmaynotfunctiondependingonthemodel)
4 Auto button (automatically adjusts position, tracking, and sync settings when projecting analog RGBsignalsfromtheComputerorBNCports)
5Aspectbutton(selectstheimageaspectratio)
6TestPatternbutton(displaysatestpattern)
7Freezebutton(stopsvideoaction)
8Menubutton(accessesprojectormenusystem)
9Arrowbuttons(movethroughon-screenoptionsandcontrolwirelessmousefunctions)
10Enterbutton(selectsoptionsandcontrolswirelessmousefunctions)
11Splitbutton(splitsthescreen)
12 Page up/down buttons (scroll through image files when projecting from a computer over a network connection)
13Volumeup/downbuttons(adjustprojectorspeakerorexternalspeakervolume)
14 User1, User2, and User3 buttons (customizable for different functions)
15Numericbuttons(enternumbers)
16IDbutton(holddowntousenumericbuttonstoselectaprojector)
17IDswitch(enablesordisablesIDsettings)
18Remoteport(connectstoaremotecontrolcable)
19Helpbutton(accessesprojectorhelpinformation)
20Numbutton(whenhelddown,switchesnumericbuttonstonumberfunction)
21E-Zoom+/-buttons(zoomintoandoutoftheimage)
22Defaultbutton(resetssettingstotheirdefaultvaluesintheprojectormenusystem)
23Escbutton(cancels/exitsfunctionsandcontrolswirelessmousefunctions)
24A/VMutebutton(turnsthevideoandaudioonoroff)
25ColorModebutton(selectsdisplaymodes)
26Searchbutton(searchesforconnectedsources)
27Lightbutton(lightsupthebuttonstemporarily)
28Indicatorlight(lightsupwhentheremotecontrolisinuse)
29Remotecontrolsignalemitter(emitsremotecontrolsignals)
Parenttopic:ProjectorPartLocations
SettingUptheProjector
Followtheinstructionsinthesesectionstosetupyourprojectorforuse.
ProjectorPlacement
ProjectorConnections
AttachingandRemovingaLens
AttachingandRemovingtheCableCover
AttachingandRemovingtheCableClips
Installing Batteries in the Remote Control
ProjectorPlacement
Youcanplacetheprojectoronalmostanyflatsurfacetoprojectanimation.
Youcanalsoinstalltheprojectorinaceilingmountifyouwanttouseitinafixedlocation.
Keeptheseconsiderationsinmindasyouselectaprojectorlocation:
- Placetheprojectoronasturdy, levelsurfaceorinstallitusingacompatiblemount.
- Leaveplentyofspacearoundandundertheprojectorforventilation, anddonotplaceitontopofor nexttoanythingthatcouldblockthevents.
- Position the projector within reach of foregrounded electrical outlet to extension cord.
ProjectorSetupandInstallationOptions
ProjectionDistance
Parenttopic:SettingUptheProjector
ProjectorSetupandInstallationOptions
Youcansetuporinstallyourprojectorinthefollowingways:
Front
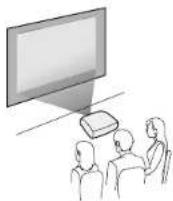
Rear
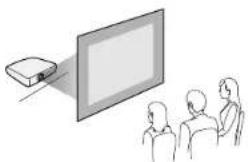
natural_image
Illustration of a projector projecting onto a screen to three people (no text or symbols)Frontceiling
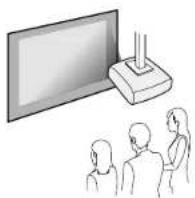
Rearceiling
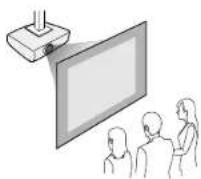
Note: Be sure to leave at least 20 inches (50 cm) of space in front of the air exhaust and intake vents and, when setting up multiple projectors, 20 inches (50 cm) of space between the projectors.
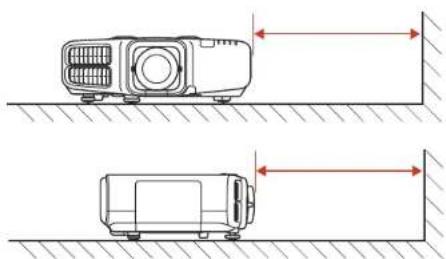
natural_image
Technical line drawing of two mechanical devices with height arrows indicating measurement or alignment (no text or symbols present)If you mount the project to the ceiling, install it within the following angles:
•Vertically:Anyangleinacomplete360degreecircle.
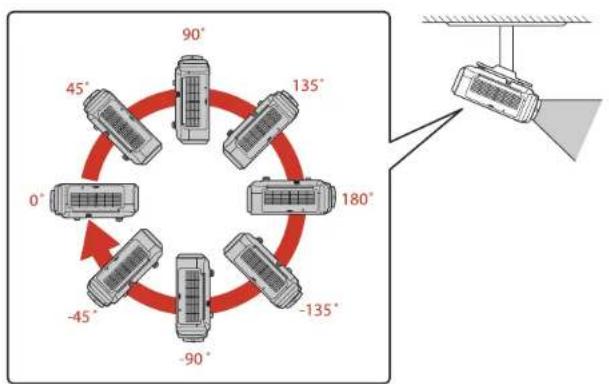
flowchart
graph TD
    A["0°"] --> B["45°"]
    B --> C["90°"]
    C --> D["135°"]
    D --> E["180°"]
    E --> F["-135°"]
    F --> G["-90°"]
    G --> H["-45°"]
    H --> A
    style A fill:#f9f,stroke:#333
    style B fill:#ccf,stroke:#333
    style C fill:#cfc,stroke:#333
    style D fill:#fcc,stroke:#333
    style E fill:#cff,stroke:#333
    style F fill:#ffc,stroke:#333
    style G fill:#cfc,stroke:#333
    style H fill:#fcc,stroke:#333
• Horizontally: Withintheadjustmentrangeoftherearadjustablefeet.
If you project from the ceiling or from the rear, select the correct Projection setting and, if necessary, turn on the Inv Direction Button setting. If you installed the projector at an angle, select the Direction setting.
Note: Selecting an incorrect Direction setting may shorten the lamp life.
Parenttopic:ProjectorPlacement
Relatedreferences
ProjectorSetupSettings-ExtendedMenu
ProjectionDistance
The distance at which you place the projector from the screen, but can vary depending on the zoom factor, aspect ratio, and other settings.
Usethetablesheretodetermineapproximatelyhowfartoplacetheprojectorfromthescreenbasedon thesizeoftheprojectedimage.(Conversionfiguresmayhavebeenroundedupordown.)Youcanalso use the projector Throw Distance Calculator at epson.com/support (U.S.) or epson.ca/support (Canada).
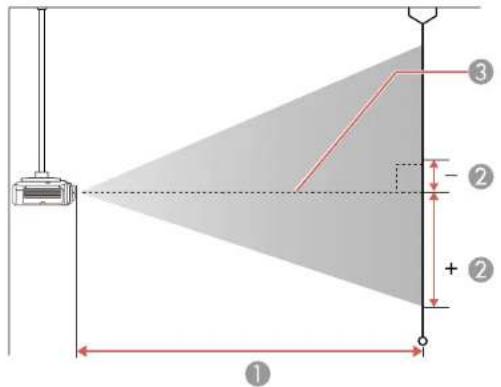
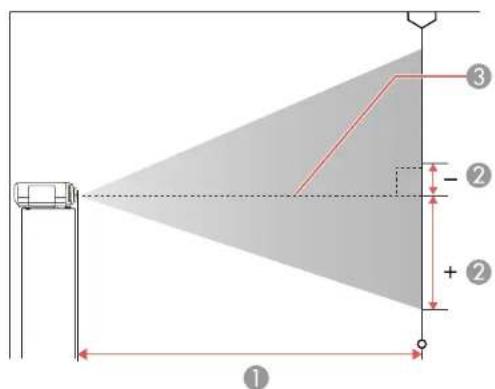
1 Projectiondistance
2Distancefromthecenterofthelenstothebaseoftheimage(variesdependingonverticallens shift)
3Centeroflens
PowerLiteProG6170/G6870
| 4:3AspectRatiolmageorScreenwithStandardZoomLens | |||
| ScreenorimagesizeProjectiondistance | ce(1)Verticallensshift(2) WidetoTele(MinimumtoToptoBottom Maximum) | ||
| 30inches24×18.1 | inches30to56inches- (61×46cm)(76to141cm)(-3to49cm) | 1.4to19.4inches | |
| 40inches31.9×24 | .0inches41to75inches (81×61cm)(103to189cm)(-5to66cm) | -1.8to25.8inches | |
| 50inches40.2×29 | .9inches51to94inches (102×76cm)(130to238cm)(-6to82cm) | -2.3to32.3inches | |
| 60inches48.0×35 | .8inches62to113inches (122×91cm)(157to286cm)(-7to98cm) | -2.7to38.7inches | |
| 80inches64.2×48 | .0inches83to151inches (163×122cm)(211to383cm)(-9to131cm) | -3.6to51.6inches | |
| 100inches79.9×5 | 9.8inches104to189inches (203×152cm)(265to479cm)(-12to164cm) | -4.6to64.6inches | |
| 150inches120.1× | 90.2inches157to284inches (305×229cm)(400to721cm)(-17to246cm) | -6.8to96.8inches | |
| 200inches159.8× | 120.1210to379 inches (406×305cm) | -9.1to129.1inches (534to963cm)(-23to328cm) | |
| 250inches200.0× | 150.0263to474inches inches (508×381cm) | -11.4to161.4inches (669to1205cm)(-29to410cm) | |
| 300inches241.2× | 179.9316to570inches inches (610×457cm) | -13.7to193.7inches (804to1447cm)(-35to492cm) | |
PowerLiteProG6070W/G6270W/G6470WU/G6570WU/G6770WU/G6970WU
| 16:10AspectRatioImageorScreenwithStandardZoomLens | |||
| ScreenorimagesizeProjectiondistance | ce(1)Verticallensshift(2) WidetoTele(MinimumtoToptoBottom Maximum) | ||
| 50inches42.5×26 | .4inches53to97inches (108×67cm)(135to24-7cm)(−12to79cm) | −4.7to31.2inches | |
| 60inches51.2×3 | .9inches64to117inches (130×81cm)(163to29-7cm)(−14to95cm) | −5.6to37.4inches | |
| 80inches67.7×42 | .5inches86to156inches (172×108cm) | −7.5to49.9inches (219to397cm)(−19to127cm) | |
| 100inches | 84.6×53.2inches108to (215×135cm) | 196inches−9.4to62.4inches (275to498cm)(−24to158cm) | |
| 150 inches | 127.2 × 79.5 inches (323×202cm) | 164 to 295 inches (415to749cm)(−36to238cm) | −14 to 93.5 inches |
| 200 inches | 169.7 × 105.9 inches (431 ×269cm) | 219 to 394 inches (555to 1000cm) | −18.7 to 124.7 inches (−48 to317cm) |
| 250inches211.8× | 132.7274to492inches(inches(538×337cm) | -23.4to155.9inches(695to1251cm)(-59to396cm) | |
| 300inches254.3× | 159.1329to591inches(inches(646×404cm) | -28.1to187.1inches(835to1501cm)(-71to475cm) | |
Parenttopic:ProjectorPlacement
ProjectorConnections
Youcanconnecttheprojectortovarietyofcomputer,video,andaudiosourcestodisplay presentations,movies,orotherimages,withorwithoutsound.
- Connectanytypeofcomputerthathasastandardvideooutput(monitor)port,DisplayPort,orHDMI port.
•Forvideoprojection,connectdevicessuchasDVDplayers,gamingconsoles,digitalcameras,tablets,andsmartphoneswithcompatiblevideooutputports. - If your presentation or video inclusion, you can connect audio input cables, if necessary.
Caution: If you will use the projector at altitudes above 4921 feet (1500 m), turn on High Altitude Mode to ensure the projector's internal temperature is regulated properly.
ConnectingtoComputerSources
ConnectingtoVideoSources
ConnectingtoanHDBaseTTransmitter
ConnectingtoanExternalComputerMonitor
ConnectingtoExternalSpeakers
Parenttopic:SettingUptheProjector
Relatedreferences
ProjectorSetupSettings-ExtendedMenu
ProductBoxContents
ConnectingtoComputerSources
Followtheinstructionsinthesesectionstoconnectacomputertotheprojector.
ConnectingtoaComputerforVGAVideo
ConnectingtoaComputerforHDMIVideoandAudio
ConnectingtoaComputerforDisplayPortVideoandAudio
ConnectingtoaComputerfor5BNCVideo
ConnectingtoaComputerforSound
Parenttopic:ProjectorConnections
ConnectingtoaComputerforVGAVideo
YoucanconnecttheprojectortoyourcomputerusingaVGAcomputercable.
Note: To connect a Mac that includes only a Thunderbolt port or Mini-DVI port for video output, you need to obtain an adapter that allows you to connect the projector's VGA video port. Contact Apple for compatible adapter options.
- If necessary, disconnect your computer's monitorable.
- Connectthe VGAcomputercabletoyourcomputer'smonitorport.
- ConnecttheotherendtoaComputerportontheprojector.

flowchart
graph TD
    A["Port 1"] --> B["USB Interface"]
    B --> C["Audio Interface"]
    C --> D["USB Interface"]
    D --> E["Audio Interface"]
    E --> F["USB Interface"]
    F --> G["USB Interface"]
    G --> H["Laptop"]
- TightenthescrewsontheVGAconnector.
Parenttopic: ConnectingtoComputerSources
Relatedtasks
ConnectingtoaComputerforSound
ConnectingtoaComputerforHDMIVideoandAudio
If your computer has an HDMI port, you can connect it to the projector using an optional HDMI cable.
Note: To connect a Mac that includes only a Thunderbolt port or Mini-DVI port for video output, you need to obtain an adapter that allows you to connect to the projector's HDMI port. Contact Apple for compatibleadapteroptions.OlderMaccomputers(2009andearlier)maynotsupportaudiothroughthe HDMIport.
- ConnecttheHDMIcabletoyourcomputer'sHDMIoutputport.
- Connecttheotherendtotheprojector'sHDMIport.

flowchart
graph TD
    A["Device Module"] --> B["Switch 1"]
    A --> C["Switch 2"]
    A --> D["Switch 3"]
    A --> E["Switch 4"]
    A --> F["Switch 5"]
    A --> G["Switch 6"]
    A --> H["Switch 7"]
    A --> I["Switch 8"]
    A --> J["Switch 9"]
    A --> K["Switch 10"]
    A --> L["Switch 11"]
    A --> M["Switch 12"]
    A --> N["Switch 13"]
    A --> O["Switch 14"]
    A --> P["Switch 15"]
    A --> Q["Switch 16"]
    A --> R["Switch 17"]
    A --> S["Switch 18"]
    A --> T["Switch 19"]
    A --> U["Switch 20"]
    A --> V["Switch 21"]
    A --> W["Switch 22"]
    A --> X["Switch 23"]
    A --> Y["Switch 24"]
    A --> Z["Switch 25"]
Note: The projector converts the digital audio signal sent from your computer into a mono analog signal fortheinternalspeakerorastereoanalogsignalifyouareconnectingtoexternalspeakers.
Note: If you have problems hearing audio through the HDMI connection, you can use the Audio3 port instead top playsound. Connectoneendofanoptional3.5mmstereomini-jackaudiocabletothe projector's Audio3 port and the other end to your computer's audio out port. Then select Audio3 for the HDMIAudioOutputsettingintheExtendedmenu.
Parenttopic: ConnectingtoComputerSources
Relatedreferences
ProjectorSetupSettings-ExtendedMenu
Relatedtasks
AttachingandRemovingtheCableClips
ConnectingtoaComputerforDisplayPortVideoandAudio
If your computer has a Display Portor Mini Display Port connector, you can connect it to the projector using an optional Display Portable.
-
ConnecttheDisplayPortcabletoyourcomputer'sDisplayPortorMiniDisplayPortconnector.
-
Connecttheotherendtotheprojector'sDisplayPortconnector.

flowchart
graph LR
    A["Port 1"] --> B["Switch"]
    C["Port 2"] --> D["Switch"]
    E["Port 3"] --> F["Switch"]
    G["Port 4"] --> H["Switch"]
    I["Port 5"] --> J["Switch"]
    K["Port 6"] --> L["Switch"]
    M["Port 7"] --> N["Switch"]
    O["Port 8"] --> P["Switch"]
    Q["Port 9"] --> R["Switch"]
    S["Port 10"] --> T["Switch"]
    U["Port 11"] --> V["Switch"]
    W["Port 12"] --> X["Switch"]
    Y["Port 13"] --> Z["Switch"]
    AA["Port 14"] --> AB["Switch"]
    AC["Port 15"] --> AD["Switch"]
    AE["Port 16"] --> AF["Switch"]
    AG["Port 17"] --> AH["Switch"]
    AI["Port 18"] --> AJ["Switch"]
    AK["Port 19"] --> AL["Switch"]
    AM["Port 20"] --> AN["Switch"]
    AO["Port 21"] --> AP["Switch"]
    AQ["Port 22"] --> AR["Switch"]
    AS["Port 23"] --> AT["Switch"]
    AU["Port 24"] --> AV["Switch"]
    AW["Port 25"] --> AX["Switch"]
    AY["USB"] --> AZ["USB Cable"]
    BA["USB Cable"] --> BB["USB Cable"]
    BC["USB Cable"] --> BD["USB Cable"]
    BE["USB Cable"] --> BF["USB Cable"]
    BG["USB Cable"] --> BH["USB Cable"]
    BI["USB Cable"] --> BJ["USB Cable"]
    BK["USB Cable"] --> BL["USB Cable"]
    BM["USB Cable"] --> BN["USB Cable"]
    BO["USB Cable"] --> BP["USB Cable"]
    BZ["USB Cable"] --> CA["USB Cable"]
    CB["USB Cable"] --> CD["USB Cable"]
    CE["USB Cable"] --> CF["USB Cable"]
    CG["USB Cable"] --> DH["USB Cable"]
    DI["USB Cable"] --> DJ["USB Cable"]
    DK["USB Cable"] --> DL["USB Cable"]
Note: If you have problems hearing audio through the DisplayPort connection, you can use the Audio3 portinsteadtoplaysound.Connectoneendofanoptional3.5mmstereomini-jackaudiocabletothe projector's Audio3 port and the other end to your computer's audio out port. Then select Audio3 for the DisplayPortAudioOutputsettingintheExtendedmenu.
Parenttopic: ConnectingtoComputerSources
Relatedreferences
ProjectorSetupSettings-ExtendedMenu
ConnectingtoaComputerfor5BNCVideo
YoucanconnecttheprojectortoyourcomputerusinganoptionalVGA-to-5-BNCcable.
-
ConnecttheVGAconnectortoyourcomputer'smonitorport.
-
Connectthe5BNCconnectorstotheprojector'sBNCports.

flowchart
graph LR
    A["User Interface"] --> B["Port 1"]
    A --> C["Port 2"]
    A --> D["Port 3"]
    A --> E["Port 4"]
    A --> F["Port 5"]
    A --> G["Port 6"]
    A --> H["Port 7"]
    A --> I["Port 8"]
    A --> J["Port 9"]
    A --> K["Port 10"]
    A --> L["Port 11"]
    A --> M["Port 12"]
    A --> N["Port 13"]
    A --> O["Port 14"]
    A --> P["Port 15"]
    A --> Q["Port 16"]
    A --> R["Port 17"]
    A --> S["Port 18"]
    A --> T["Port 19"]
    A --> U["Port 20"]
    A --> V["Port 21"]
    A --> W["Port 22"]
    A --> X["Port 23"]
    A --> Y["Port 24"]
    A --> Z["Port 25"]
Parenttopic: ConnectingtoComputerSources
Relatedtasks
ConnectingtoaComputerforSound
ConnectingtoaComputerforSound
If your computer presentation includes sound and you did not connect it to the projector's DisplayPort or HDMI port, you can still play sound through the projector's speakers system (PowerLite Pro G6070W/G6170/G6270W/G6470WU/G6570WU/G6770WU). Just connect an optional 3.5mm stereo mini-jack audiocable as described here.
Note: If your projector does not have an internal speaker system (PowerLite Pro G6870/G6970WU), you can playsoundbyconnectingexternalspeakerstotheprojector.
- Connect the audiocable toy our laptop's headphone or audio-out jack, or your desktop's speaker or audio-out port.
- Connect the other end to the Audio port that corresponds to the Computer or BNC ports you are using.
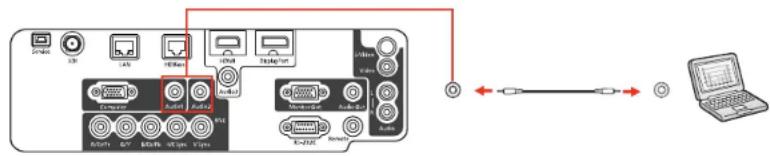
flowchart
graph LR
    A["USB Port 1"] --> B["USB Port 2"]
    B --> C["USB Port 3"]
    C --> D["USB Port 4"]
    D --> E["USB Port 5"]
    E --> F["USB Port 6"]
    F --> G["USB Port 7"]
    G --> H["USB Port 8"]
    H --> I["USB Port 9"]
    I --> J["USB Port 10"]
    J --> K["USB Port 11"]
    K --> L["USB Port 12"]
    L --> M["USB Port 13"]
    M --> N["USB Port 14"]
    N --> O["USB Port 15"]
    O --> P["USB Port 16"]
    P --> Q["USB Port 17"]
    Q --> R["USB Port 18"]
    R --> S["USB Port 19"]
    S --> T["USB Port 20"]
    T --> U["USB Port 21"]
    U --> V["USB Port 22"]
    V --> W["USB Port 23"]
    W --> X["USB Port 24"]
    X --> Y["USB Port 25"]
Parenttopic: ConnectingtoComputerSources
Relatedtasks
ConnectingtoExternalSpeakers
ConnectingtoVideoSources
Followtheinstructionsinthesesectionstoconnectvideovicestotheprojector.
ConnectingtoanHDMIVideoSource
ConnectingtoaComponent-to-BNCVideoSource
ConnectingtoaComponent-to-VGAVideoSource
ConnectingtoanS-VideoVideoSource
ConnectingtoaCompositeVideoSource
ConnectingtoanSDIVideoSource
ConnectingtoaVideoSourceforSound
Parenttopic:ProjectorConnections
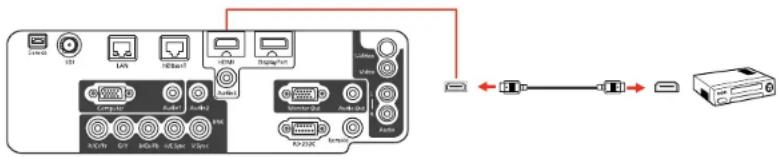
ConnectingtoanHDMIVideoSource
If your videosourcehasan HDMI port, you can connect it to the projector using an optional HDMI cable. The HDMI connection provides the best image equality.
- ConnecttheHDMIcabletoyourvideosource'sHDMIoutputport.
- Connecttheotherendtotheprojector'sHDMIport.
flowchart
graph LR
    A["Device 1"] --> B["USB"]
    B --> C["USB port"]
    C --> D["Display port"]
    D --> E["Server"]
    F["Computer"] --> G["USB port"]
    H["USB port"] --> I["USB port"]
    J["USB port"] --> K["USB port"]
    L["USB port"] --> M["USB port"]
    N["USB port"] --> O["USB port"]
    P["USB port"] --> Q["USB port"]
    R["USB port"] --> S["USB port"]
    T["USB port"] --> U["USB port"]
    V["USB port"] --> W["USB port"]
    X["USB port"] --> Y["USB port"]
    Z["USB port"] --> AA["USB port"]
    AB["USB port"] --> AC["USB port"]
    AD["USB port"] --> AE["USB port"]
    AF["USB port"] --> AG["USB port"]
    AH["USB port"] --> AI["USB port"]
    AJ["USB port"] --> AK["USB port"]
    AL["USB port"] --> AM["USB port"]
    AN["USB port"] --> AO["USB port"]
    AP["USB port"] --> AQ["USB port"]
    AR["USB port"] --> AS["USB port"]
    AT["USB port"] --> AU["USB port"]
    AV["USB port"] --> AW["USB port"]
    AX["USB port"] --> AY["USB port"]
Note: The projector converts the digital audio signal sent from your video source into a mono analog signal for the internal speakers or stereoanalogsignify you are connecting to external speakers.
Note: If you have problems hearing audio through the HDMI connection, you can use the Audio3 port instead top playsound. Connect one end of an optional 3.5 mm stereomini-jack audiocable to the projector's Audio3 port and the other end to your computer's audio out port. Then select Audio3 for the HDMI AudioOutput setting in the Extended menu.
Parenttopic: ConnectingtoVideoSources
Relatedreferences
ProjectorSetupSettings-ExtendedMenu
Relatedtasks
AttachingandRemovingtheCableClips
ConnectingtoaComponent-to-BNCVideoSource
If your videosourcehas component videoports, you can connect it to the projector using an optional component-to-BNC videocable. Depending on your component ports, you may need to use an adapter cable along with a component videocable.
-
Connect the component connector to your video source's color-coded component video output ports, usually labeled Y, Pb, Pr or Y, Cb, Cr. If you are using an adapter, connect these connectors to your component videocable.
-
Connect the BNC connectors to the projector's R/Cr/Pr, G/Y, B/Cb/Pb ports.

flowchart
graph TD
    A["Device Port 1"] --> B["Data Bus"]
    B --> C["Server Unit"]
    C --> D["Ethernet Connection"]
    D --> E["Server Unit"]
    style A fill:#f9f,stroke:#333
    style E fill:#ccf,stroke:#333
Parenttopic: ConnectingtoVideoSources
Relatedtasks
ConnectingtoaVideoSourceforSound
ConnectingtoaComponent-to-VGAVideoSource
If your videosourcehas component videoports, you can connect it to the projector using an optional component-to-VGA videocable. Depending on your component ports, you may need to use an adapter cable along with a component videocable.
-
Connect the component connector to your video source's color-coded component video output ports, usually labeled Y, Pb, Pr or Y, Cb, Cr. If you are using an adapter, connect these connectors to your component videocable.
-
ConnecttheVGAconnectortoaComputerportontheprojector.

flowchart
graph LR
    A["Port 1"] --> B["Switch"]
    C["Port 2"] --> D["Switch"]
    E["Port 3"] --> F["Switch"]
    G["Port 4"] --> H["Switch"]
    I["Port 5"] --> J["Switch"]
    K["Port 6"] --> L["Switch"]
    M["Port 7"] --> N["Switch"]
    O["Port 8"] --> P["Switch"]
    Q["Port 9"] --> R["Switch"]
    S["Port 10"] --> T["Switch"]
    U["Port 11"] --> V["Switch"]
    W["Port 12"] --> X["Switch"]
    Y["Port 13"] --> Z["Switch"]
    AA["Port 14"] --> AB["Switch"]
    AC["Port 15"] --> AD["Switch"]
    AE["Port 16"] --> AF["Switch"]
    AG["Port 17"] --> AH["Switch"]
    AI["Port 18"] --> AJ["Switch"]
    AK["Port 19"] --> AL["Switch"]
    AM["Port 20"] --> AN["Switch"]
    AO["Port 21"] --> AP["Switch"]
    AQ["Port 22"] --> AR["Switch"]
    AS["Port 23"] --> AT["Switch"]
    AU["Port 24"] --> AV["Switch"]
    AW["Port 25"] --> AX["Switch"]
    AY["Port 26"] --> AZ["Switch"]
    BA["Port 27"] --> BB["Switch"]
    BC["Port 28"] --> BD["Switch"]
    BE["Port 29"] --> BF["Switch"]
    BG["Port 30"] --> BH["Switch"]
    BI["Port 31"] --> BJ["Switch"]
    BK["Port 32"] --> BL["Switch"]
    BM["Port 33"] --> BN["Switch"]
    BO["Port 34"] --> BP["Switch"]
    BZ["Port 35"] --> CA["Switch"]
    CB["Port 36"] --> CC["Switch"]
    CD["Port 37"] --> CE["Switch"]
    CF["Port 38"] --> CG["Switch"]
    CH["Port 39"] --> CI["Switch"]
    CJ["Port 40"] --> CK["Switch"]
    CL["Port 41"] --> CM["Switch"]
    CN["Port 42"] --> CO["Switch"]
    CP["Port 43"] --> CPB["Switch"]
    CS["Port 44"] --> CSB["Switch"]
    CT["Port 45"] --> CU["Switch"]
    CV["Port 46"] --> CVB["Switch"]
    CW["Port 47"] --> CX["Switch"]
    CY["Port 48"] --> CYB["Switch"]
    CZ["Port 49"] --> CZC["Switch"]
    DA["Port 50"] --> DAB["Switch"]
- TightenthescrewsontheVGAconnector.
If your image colors appear incorrect, you may need to change the Input Signal setting in the projector's Signalmenu.
Parenttopic: ConnectingtoVideoSources
Relatedreferences
InputSignalSettings-SignalMenu
Relatedtasks
ConnectingtoaVideoSourceforSound
ConnectingtoanS-VideoVideoSource
If your videosourcehasanS-Videoport, you can connect it to the projector using an optional S-Video cable.
- ConnecttheS-Videocabletoyourvideosource'sS-Videooutputport.
- Connecttheotherendtotheprojector'sS-Videoport.

flowchart
graph LR
    A["Port 1"] --> B["Switch"]
    C["Port 2"] --> D["Switch"]
    E["Port 3"] --> F["Switch"]
    G["Port 4"] --> H["Switch"]
    I["Port 5"] --> J["Switch"]
    K["Port 6"] --> L["Switch"]
    M["Port 7"] --> N["Switch"]
    O["Port 8"] --> P["Switch"]
    Q["Port 9"] --> R["Switch"]
    S["Port 10"] --> T["Switch"]
    U["Port 11"] --> V["Switch"]
    W["Port 12"] --> X["Switch"]
    Y["Port 13"] --> Z["Switch"]
    AA["Port 14"] --> AB["Switch"]
    AC["Port 15"] --> AD["Switch"]
    AE["Port 16"] --> AF["Switch"]
    AG["Port 17"] --> AH["Switch"]
    AI["Port 18"] --> AJ["Switch"]
    AK["Port 19"] --> AL["Switch"]
    AM["Port 20"] --> AN["Switch"]
Parenttopic: ConnectingtoVideoSources
Relatedtasks
ConnectingtoaVideoSourceforSound
ConnectingtoaCompositeVideoSource
If your videosource has a composite video port, you can connect it to the projector using an optional RCA-style video or A/V cable.
- Connect the cable with they yellow connector to your videosource's yellow video output port.
- Connecttheotherendtotheprojector'sVideoport.

Parenttopic: ConnectingtoVideoSources
Relatedtasks
ConnectingtoaVideoSourceforSound
ConnectingtoanSDIVideoSource
If your videosourcehasan SDlport.youcanconnectittotheprojectorusing an optional BNCvideo cable(PowerLiteProG6970WU).
- ConnecttheBNCvideocabletoyourvideosource'sSDIoutputport.
- Connecttheotherendtotheprojector's SDIport.

flowchart
graph LR
    A["Central Device"] --> B["Port 1"]
    A --> C["Port 2"]
    A --> D["Port 3"]
    A --> E["Port 4"]
    A --> F["Port 5"]
    A --> G["Port 6"]
    A --> H["Port 7"]
    A --> I["Port 8"]
    A --> J["Port 9"]
    A --> K["Port 10"]
    A --> L["Port 11"]
    A --> M["Port 12"]
    A --> N["Port 13"]
    A --> O["Port 14"]
    A --> P["Port 15"]
    A --> Q["Port 16"]
    A --> R["Port 17"]
    A --> S["Port 18"]
    A --> T["Port 19"]
    A --> U["Port 20"]
    A --> V["Port 21"]
    A --> W["Port 22"]
    A --> X["Port 23"]
    A --> Y["Port 24"]
    A --> Z["Port 25"]
Parenttopic: ConnectingtoVideoSources
ConnectingtoaVideoSourceforSound
Youcanplaysoundthroughtheprojector'sspeakersystemifyourvideosourcehasaudiooutputports (PowerLiteProG6070W/G6170/G6270W/G6470WU/G6570WU/G6770WU).
Note: If your projector does not have an internal speaker system (PowerLite Pro G6870/G6970WU), you can playsoundbyconnectingexternalspeakerstotheprojector.
If you are projecting video using the Computer or BNC ports, connect the projector to the video source using an optional stereo3.5mmmini-jackaudiocable.
If you are projecting video using the Video or S-Video port, connect the projector to the video source using an RCA audiotable.
Note: If you connected your video source to the projector using an HDMI cable, the audio signal is transferred with the videosignal; you donotneed an additional cable for sound. If you connected to the projector's SDI port (PowerLite ProG6900WU), audio output is not supported.
- Connect the audiocable to your video source's audio-exports.
2.Dooneofthefollowing:
- Connecttheotherendofthecabletotheprojector's Audioportthatcorrespondstothe ComputerorBNCportyouareusingforvideo.
- Connect the red and white plugs on the other end of the cable to the projector's Audio L-R ports.

flowchart
graph LR
    A["Device 1"] --> B["USB Port"]
    C["Device 2"] --> D["Audio Port"]
    E["Device 3"] --> F["USB Port"]
    G["Device 4"] --> H["Audio Port"]
    I["Device 5"] --> J["USB Port"]
    K["Device 6"] --> L["Audio Port"]
    M["Device 7"] --> N["USB Port"]
    O["Device 8"] --> P["Audio Port"]
    Q["Device 9"] --> R["USB Port"]
    S["Device 10"] --> T["Audio Port"]
    U["Device 11"] --> V["USB Port"]
    W["Device 12"] --> X["Audio Port"]
    Y["Device 13"] --> Z["USB Port"]
    AA["Device 14"] --> AB["Audio Port"]
    AC["Device 15"] --> AD["USB Port"]
    AE["Device 16"] --> AF["Audio Port"]
    AG["Device 17"] --> AH["USB Port"]
    AI["Device 18"] --> AJ["Audio Port"]
    AK["Device 19"] --> AL["USB Port"]
    AM["Device 20"] --> AN["Audio Port"]
Parenttopic: ConnectingtoVideoSources
Relatedtasks
ConnectingtoExternalSpeakers
ConnectingtoanHDBaseTTransmitter
TosendanHDMlorRS-232Csignaloveralongdistance,youcanconnecttheprojectortoanoptonal HDBaseTtransmitterusinga100Base-TXnetworkcable.Thisisusefulwhenyouwanttosendasignal toorcontroltheprojectorfromaremotelocation,suchasinahalloreventsite,sinceyoucanusea networkcableupto328feet(100m)inlength.Toensureproperdatatransmission,useaCategory5e STPcableorbetter.
- Turnoff the projector and HDBase T transmitter.
Note: Makesure the projector and HDBase T transmitter are turned off when connecting or disconnecting an network cable between the two devices.
- ConnectoneendofthenetworkcabletotheHDBaseTportonthetransmitter.
- Connecttheotherendtotheprojector'sHDBaseTport.

SeethedocumentationthatcamewiththeHDBaseTtransmitterforinstructionsonconnectingitto yourvideodeviceorcomputer.
- Turnon the projector and HDBase Ttransmitter.
Note: To enable communication from the Ethernet and serial ports on the transmitter, select On as the Control Communications setting in the projector's Extended menu. Turning on this setting disables the projector's LAN, RS-232C, and Remote ports. If you connected an Extron XTP transmitter or switcher to the projector's HDBaseT port, select On as the Extron XTP setting in the projector's Extended menu.
Parenttopic:ProjectorConnections
Relatedreferences
ProjectorSetupSettings-ExtendedMenu
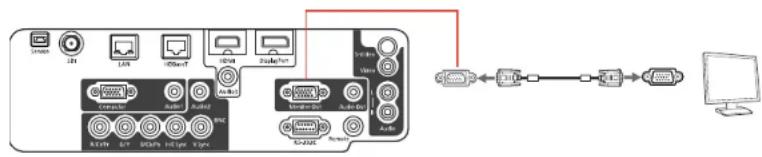
ConnectingtoanExternalComputerMonitor
If you connected a computer to the projector's Computer or BNC port, you can also connect an external monitor to the projector. This lets you see your presentation on the external monitor even when the projected image is not visible.
If you want to output image to an external monitor when the projector is turned off, you need to select Communication On as the Standby Mode setting and Always On as the A/V Output setting in the projector's Extended menu.
Note: Monitors that use a refresh rate less than 60 Hz may not be able to display images correctly.
- Make sure your computer is connected to the projector's Computer or BNC port.
- Connecttheexternalmonitor'scabletoyourprojector'sMonitorOutport.
flowchart
graph LR
    A["Port 1"] --> B["Switch"]
    C["Port 2"] --> D["Switch"]
    E["Port 3"] --> F["Switch"]
    G["Port 4"] --> H["Switch"]
    I["Port 5"] --> J["Switch"]
    K["Port 6"] --> L["Switch"]
    M["Port 7"] --> N["Switch"]
    O["Port 8"] --> P["Switch"]
    Q["Port 9"] --> R["Switch"]
    S["Port 10"] --> T["Switch"]
    U["Port 11"] --> V["Switch"]
    W["Port 12"] --> X["Switch"]
    Y["Port 13"] --> Z["Switch"]
    AA["Port 14"] --> AB["Switch"]
    AC["Port 15"] --> AD["Switch"]
    AE["Port 16"] --> AF["Switch"]
    AG["Port 17"] --> AH["Switch"]
    AI["Port 18"] --> AJ["Switch"]
    AK["Port 19"] --> AL["Switch"]
    AM["Port 20"] --> AN["Switch"]
    AO["Port 21"] --> AP["Switch"]
    AQ["Port 22"] --> AR["Switch"]
    AS["Port 23"] --> AT["Switch"]
    AU["Port 24"] --> AV["Switch"]
    AW["Port 25"] --> AX["Switch"]
    AY["Computer"] --> AZ["Data Link"]
    style A fill:#f9f,stroke:#333
    style B fill:#ccf,stroke:#333
    style C fill:#ccf,stroke:#333
    style D fill:#ccf,stroke:#333
    style E fill:#ccf,stroke:#333
    style F fill:#ccf,stroke:#333
    style G fill:#ccf,stroke:#333
    style H fill:#ccf,stroke:#333
    style I fill:#ccf,stroke:#333
    style J fill:#ccf,stroke:#333
    style K fill:#ccf,stroke:#333
    style L fill:#ccf,stroke:#333
    style M fill:#ccf,stroke:#333
    style N fill:#ccf,stroke:#333
    style O fill:#ccf,stroke:#333
    style P fill:#ccf,stroke:#333
    style Q fill:#ccf,stroke:#333
    style R fill:#ccf,stroke:#333
    style S fill:#ccf,stroke:#333
    style T fill:#ccf,stroke:#333
    style U fill:#ccf,stroke:#333
    style V fill:#ccf,stroke:#333
    style W fill:#ccf,stroke:#333
    style X fill:#ccf,stroke:#333
    style Y fill:#ccf,stroke:#333
    style Z fill:#ccf,stroke:#333
    style AA fill:#ccf,stroke:#333
    style AB fill:#ccf,stroke:#333
    style AC fill:#ccf,stroke:#333
    style AD fill:#ccf,stroke:#333
    style AE fill:#ccf,stroke:#333
Note: If you do not see an image on the external monitor, you may need to change the Monitor Out setting in the Extended menu. Only analog RGB signals from the Computer or BNC port can be outputtoanexternalmonitor.
Parenttopic:ProjectorConnections
Relatedreferences
ProjectorSetupSettings-ExtendedMenu
ConnectingtoExternalSpeakers
Toenhancethesoundfromyourpresentation,youcanconnecttheprojectortoexternalself-powered speakers.Youcancontrolthevolumeusingtheprojector'sremotecontrol.
Youcanalsoconnecttheprojectortoanamplifierwithspeakers.
If you want to output audio from the externals speakers when the projector is turned off, you need to select Communication On for the Standby Mode setting and Always On for the A/V Output setting in the projector's Extended menu.
Note: The projector's built-inspeakersystem (PowerLitePro
G6070W/G6170/G6270W/G6470WU/G6570WU/G6770WU)isdisabledwhenyouconnectexternal speakers.
- Makesureyourcomputerorvideosourceisconnectedtotheprojectorwithbothaudioandvideo cablesasnecessary.
- Locatetheappropriatecabletoconnectyoureternalspeakers, suchasastereomini-jack-to-pin-jackcable, oranothertypeofcableoradapter.
- Connectoneendofthecabletoyoureternalspeakersasnecessary.
- Connectthestereomini-jackendofthecabletoyourprojector'sAudioOutport.

Parenttopic:ProjectorConnections
Relatedreferences
ProjectorSetupSettings-ExtendedMenu
AttachingandRemovingaLens
Followtheinstructionsinthesesectionstoattachorremoveacompatiblelens.
AttachingtheLensUnit
RemovingtheLensUnit
Parenttopic:SettingUptheProjector
AttachingtheLensUnit
Youcanattachacompatiblelenstotheprojector.
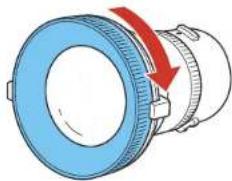
Caution: Place the projector so it faces to the side or down to attach a lens to help prevent dirt or dust from entering the projector and lowering the projection quality. Besuretoattachonly incompatible lens. Avoid touching the lens with your bare hand stop prevent fingerprint onordamage to the lens surface.
- Turnthefocusringasshownuntilstops.
natural_image
Diagram of a blue mechanical component with a red arrow indicating rotation or force direction (no text or symbols)Note: If you installed the projector facing up at an angle of 35 to 150° or down at an angle of -35 to -150°,tightenthelenstorquering,butnottootightly.Over-tighteningthetorqueringcancauseitto malfunction.
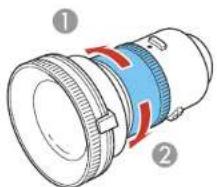
1 Tighten 2 Loosen
- Holdthelensunitwiththewhitedotfacingup.Insertthelensunitstraightintotheprojector'slens socketandturnitclockwiseuntilyouhearitclickintoplace.
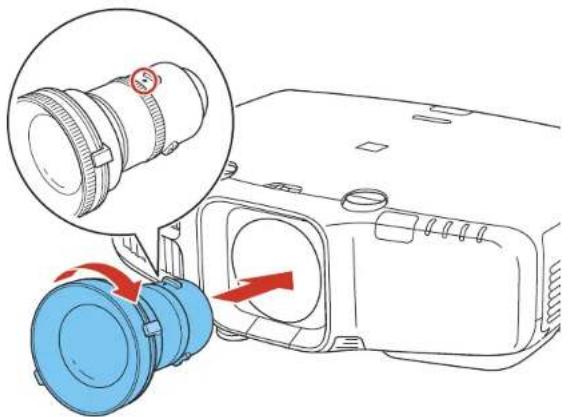
natural_image
Diagram of a projector module with a blue pump and a magnified inset showing the lens (no text or symbols)- Insert the screw that came with the projector orthelens unit, and tighten it. This secure the helens unit release button and prevent the helens from accidentally being removed.
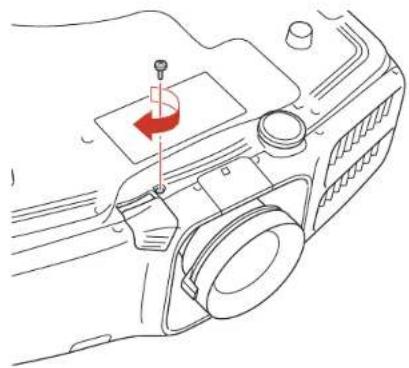
natural_image
Technical line drawing of a mechanical component with a red arrow indicating direction (no text or symbols)- SettheLensTypesettingtothecorrectoptionintheprojector'sExtendedmenu.
Parenttopic: Attaching and RemovingaLens
Relatedtasks
SettingtheLensType
RemovingtheLensUnit
Youcanremovethelensunittoreplaceitwithadifferentlens.
Caution: Remove the lens unit only when necessary to prevent dirt or dust from entering the projector and lowering the projection quality. Avoid touching the lens with your bare hand stop preventing fingerprints onordamagetothelens surface.
-
Centerthelensusingthelensshiftdials.
-
Removethescrewsecuringthelensunitreleasebutton.
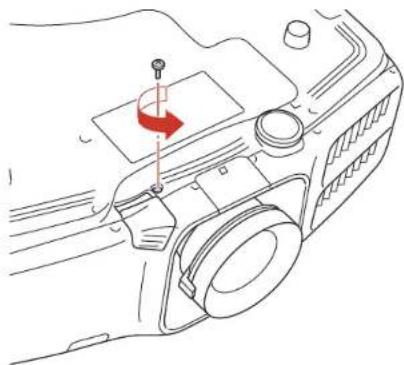
natural_image
Technical line drawing of a car interior showing a valve mechanism and adjustment knob (no text or symbols)- Pressandholdthelensunitreleasebuttonasyouturnthelensunitcounterclockwiseuntilyouhear itclick.
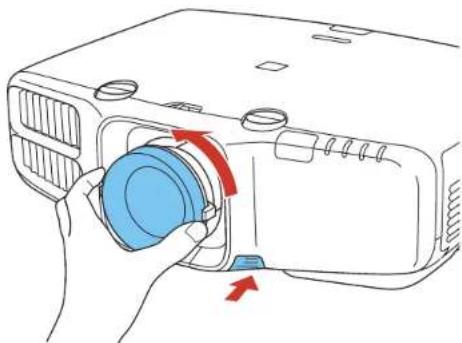
natural_image
Line drawing of a projector with blue and red buttons indicating action (no text or symbols)- Gentlypullthelensunitstraightoutoftheprojector.
Parenttopic: Attaching and RemovingaLens
AttachingandRemovingtheCableCover
Youcanattachthecablecoverthatcamewithyourprojectortohidetheattachedcablesfromview.
- Bundlethecablestogetherusingabandorotherfastener(notprovided).
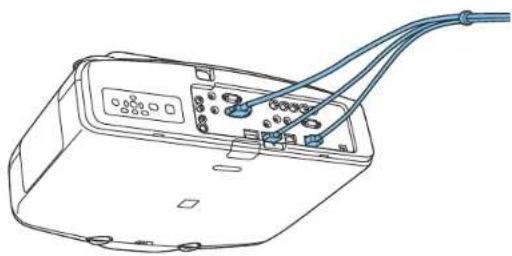
natural_image
Line drawing of a device casing with attached cables and ports (no text or symbols)- Placethecablecoverontheprojectorasshown, guiding the cablesthrough then notch on the base of the cablecover.
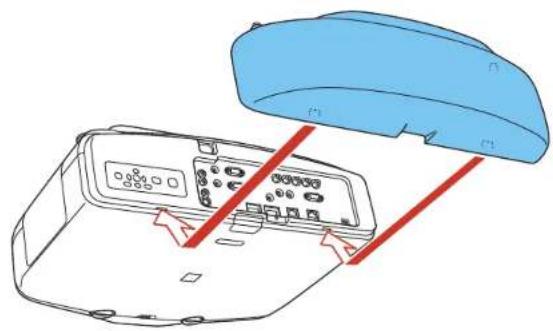
- Tightenbothcablecoverscrews.
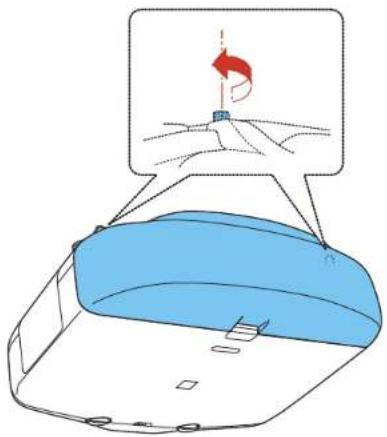
natural_image
Diagram of a blue car interior with a red directional arrow and a small object above it, no text or symbols present.Toremovethecover, loosenbothscrewsandpullthecoveroffoftheprojector.
Parenttopic:SettingUptheProjector
AttachingandRemovingtheCableClips
Youcaninstallthecableclipsthatcamewithyourprojectortoprovideadditionalsupporttothepower andHDMlcables.
Note: The Power Lite Pro G6070W/G6170/G6270W/G6470WU/G6570WU/G6770WU comewithone cableclip.
-
Connect the power and HDMI cable to the projector.
-
Insert the end of the cable clip anchors into the cable clip slots near the power inlet and HDMI port.
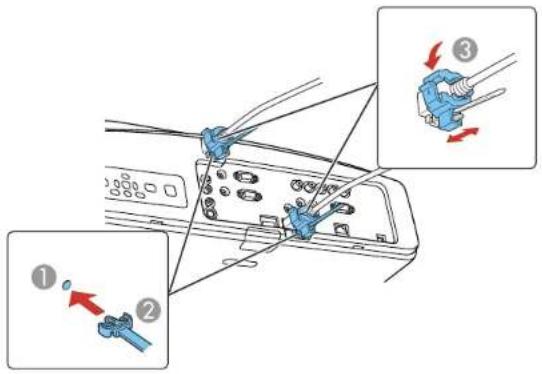
1 Cableclipslot
2Cableclipanchor
3Cableclip
- PlacetheopencableclipsaroundthepowerandHDMlcables, but don'tlockthemintoplace.
4.SlideeachcableclipontotheanchorsandlocktheclipsontothepowerandHDMIconnectorsas shown.
Toremovethecableclips, opentheclips and disconnect the cables. Then pinch the sides of each cable clip anchor and carefully pull them out of the cable clips slots.
Parenttopic:SettingUptheProjector
Relatedtasks
ConnectingtoaComputerforHDMIVideoandAudio
ConnectingtoanHDMIVideoSource
Installing Batteries in the Remote Control
TheremotecontrolusesthettwoAAbatteriesthatcamewiththeprojector.
Caution: Use only the type of batteries specified in this manual. Do not install batteries of different types, ormixnewandoldbatteries.
- Removethebatterycover.
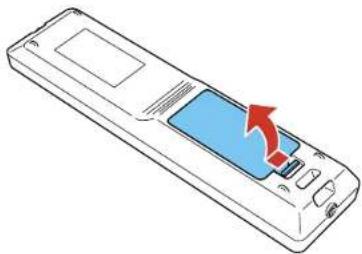
natural_image
Line drawing of a remote control device with a blue screen and red arrow indicating action (no text or symbols)- Insert the batteries with the + and - ends facing as shown.
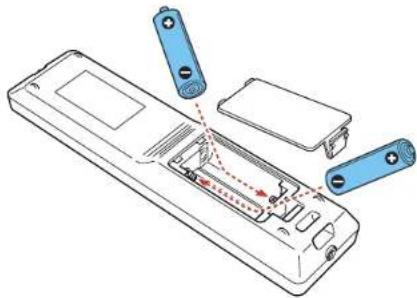
natural_image
Line drawing of a remote control unit with battery and indicator lights (no text or symbols)- Replace the battery cover and press it down until it clicks into place.
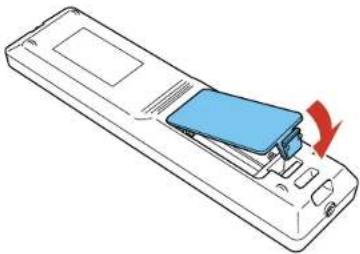
natural_image
Line drawing of a remote control device with a blue internal component and a red arrow indicating rotation (no text or symbols)Warning: Dispose of used batteries according to local regulations. Do not expose batteries to heat or flame. Keep batteries out of thereachofchildren; they are choking hazards and are every dangerous if swallowed.
Parenttopic:SettingUptheProjector
UsingtheProjectoronaNetwork
Followtheinstructionsinthesesectionstosetupyourprojectorforuseonanetwork.
WiredNetworkProjection
WirelessNetworkProjection
RegisteringaDigitalCertificateontheProjector
SettingUpProjectorNetworkE-MailAlerts
SettingUpMonitoringUsingSNMP
SelectingOtherNetworkSettings
ControllingaNetworkedProjectorUsingaWebBrowser
CrestronRoomViewSupport
WiredNetworkProjection
Youcansendimagestoyourprojectorthroughawirednetwork(PowerLitePro
G6070W/G6170/G6270W/G6470WU/G6570WU/G6770WU). Todothis, you connect the projectorto
yournetwork, and then setup your projector and computer for network projection.
Afterconnectingandsettinguptheprojectorasdescribedhere,installthenetworksoftwarefromthe
Epson Projector Software CD or download the software as necessary. Use the following software and documentation to setup, control, and monitor network projection:
- EasyMPNetworkProjectionsoftwaresetsupyourcomputerfornetworkprojection(PowerLitePro G6070W/G6170/G6270W/G6470WU/G6570WU/G6770WU).SeetheEasyMPNetworkProjectionOperationGuideforinstructions.
- EasyMPMonitorsoftware(Windowsonly)letsyoumonitorandcontrolyourprojectthroughthe network.YoucandownloadthelatestsoftwareanddocumentationfromtheEpsonwebsite.Gotoepson.com/support (U.S.) or epson.ca/support (Canada) and select your projector.
- EasyMPNetworkUpdatersoftware(Windowsonly)allowsyoutoupdatefirmwareforaprojectoroverawiredLAN.SeetheEasyMPNetworkUpdaterOperationGuideforinstructions.Youcandownloadthe latest software and documentation from the Epson web site. Go to epson.com/support (U.S.) orepson.ca/support(Canada)andselectyourprojector.
•ProjectionfromiOSorAndroiddevicesusingthefreeEpsoniProjectionapp(ifyourprojectoris connectedviaaLANcabletoanetworkthatincludesawirelessaccesspoint)[PowerLitePro G6070W/G6170/G6270W/G6470WU/G6570WU/G6770WU];visitepson.com/projectorapp(U.S.)orepson.ca/projectorapp(Canada)formoreinformation.
Note: If your projector is connected via a LAN cable to a network that includes a wireless access point, youcanconnecttotheprojectorwirelesslythroughtheaccesspointusingtheEasyMPNetwork Projectionsoftware(PowerLiteProG6070W/G6170/G6270W/G6470WU/G6570WU/G6770WU).
ConnectingtoaWiredNetwork
SelectingWiredNetworkSettings
Parenttopic: Using the Projectorona Network
ConnectingtoaWiredNetwork
Toconnecttheprojectortoawiredlocalareanetwork(LAN), usea100Base-TXor10Base-Tnetwork cable. Toensureproperdatatransmission, useaCategory5eshieldedcableorbetter.
- Connectoneendofthenetworkcabletoyournetworkhub, switch, orrouter.
- Connecttheotherendofthecabletotheprojector'sLANport.

Parenttopic: WiredNetworkProjection
SelectingWiredNetworkSettings
Before you can project from computerson your network, you must select thenetworksettings for the projector using its menusystem.
Note: Make sure you already connected the projector to your wired network using the LAN port.
-
Turnon the projector.
2.PresstheMenubutton. -
SelecttheNetworkmenuandpressEnter.
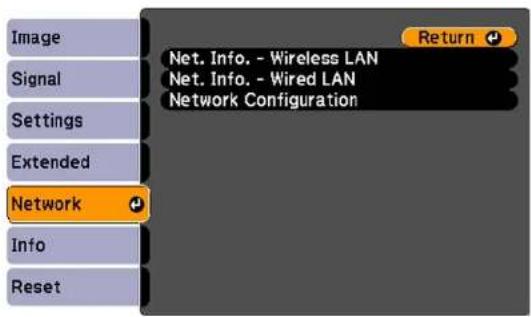
- SelectNetworkConfigurationandpressEnter.
- SelecttheBasicmenuandpressEnter.
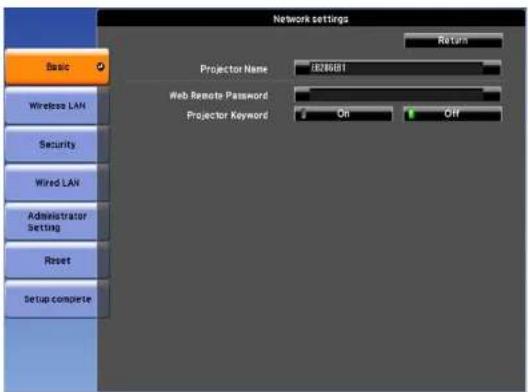
- Select the following basic options as necessary:
-ProjectorNameletsyouenteranameupto16alphanumericcharacterslongtoidentifytheprojectoroverthenetwork.
- WebRemotePassword(PowerLitePro G6070W/G6170/G6270W/G6470WU/G6570WU/G6770WU)orWebControlPassword (PowerLiteProG6870/G6970WU)letsyouenterapasswordupto8alphanumericcharacters longforaccessingtheprojectorovertheweb.(DefaultusernameisEPSONWEB;default passworddisadmin.)
-ProjectorKeyword(PowerLiteProG6070W/G6170/G6270W/G6470WU/G6570WU/G6770WU) letsyouturnonasecuritypasswordtopreventaccesstotheprojectorbyanyonenotintheroom withit.Youmustenteradisplayed,randomizedkeywordfromacomputerusingtheEasyMP NetworkProjectionsoftwaretoaccesstheprojector.
Note: Usethedisplayedkeyboardtoenterthename, passwordsandkeyword. Pressthearrow buttonsontheremotecontroltohighlightcharactersandpressEntertoselectthem.
- SelecttheWiredLANmenuandpressEnter.
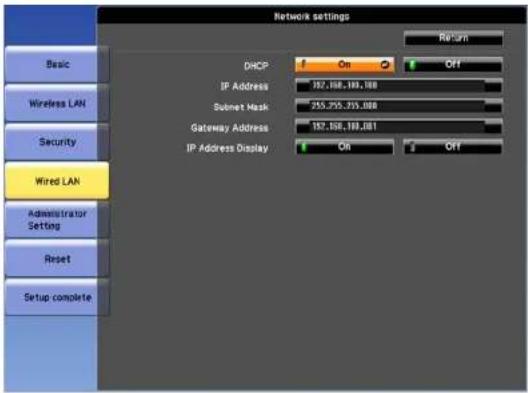
- Select your IP Settings as necessary:
- If your network assigns addresses automatically, turn on the DHCP setting.
- If you must set addresses manually, turn off DHCP and enter the projector's IP Address, Subnet Mask, and GatewayAddressasneeded.
Note: To highlight then numbers you want from the displayed keyboard, press the arrow button on theremote control. Toselect a highlighted number, press Enter.
- TopreventdisplayoftheIPaddressonthestandbyscreen,turnoffIPAddressDisplay.
- When you finish selecting settings, select Setup complete and follow the on-screen instructions to saveyoursettingsandexithemenus.
Parenttopic: WiredNetworkProjection
WirelessNetworkProjection
Youcansendimagestoyourprojectorthroughawirelessnetwork(PowerLitePro G6070W/G6170/G6270W/G6470WU/G6570WU/G6770WU).Todothis,youmustinstalltheoptional Epson802.11b/g/nwirelessLANmodule,andthensetupyourprojectorandcomputerforwireless projection.
Note: If your projector is connected via a LAN cable to a network that includes a wireless access point, you can connect the projector wirelessly through the access point using the EasyMPNetwork Projection software without the need for the optional wireless module.
After installing the module and setting up the projector, install the network software from the Epson ProjectorSoftwareCDordownloadthesoftware, asnecessary. Use the following software and documentation to setup, control, and monitor wireless projection:
- EasyMPNetworkProjectionsoftwaresetsupyourcomputerforwirelessnetworkprojection.Seethe EasyMPNetworkProjectionOperationGuideforinstructions.
- EasyMPMonitorsoftware(Windowsonly)letsyoumonitorandcontrolyourprojectthroughthe network.YoucandownloadthelatestsoftwareanddocumentationfromtheEpsonwebsite.Gotoepson.com/support (U.S.) or epson.ca/support (Canada) and select your projector.
- EasyMPMultiPCProjectionsoftwareallowsyoutoholdinteractivemeetingsbyprojectingthe computer screens of users over a network. See the EasyMP Multi PC Projection Operation Guide for instructions.
•ProjectionfromiOSorAndroiddeviceswiththewirelessLANmoduleandfreeEpsoniProjectionapp; visit epson.com/projectorapp (U.S.) or epson.ca/projectorapp (Canada) for more information
InstallingtheWirelessLANModule
UsingQuickWirelessConnection(WindowsOnly)
SelectingWirelessNetworkSettingsManually
SelectingWirelessNetworkSettingsinWindows
SelectingWirelessNetworkSettingsinOSX
EnablingWPAorEAPSecurity
Parenttopic: Using the Projectorona Network
InstallingtheWirelessLANModule
Tousetheprojectoroverawirelessnetwork, installtheEpson802.11b/g/nwirelessLANmodule.Donot installanyothertypeofwirelessLANmodule.
Caution: Never remove the module while its indicator light is green or flashing, or while you are projectingwirelessly. You may damage themoduleorlosedata.
- Turnoff the projector and unplug the power cord.
2.Slidetheairfiltercoverlatchandopentheairfiltercover.
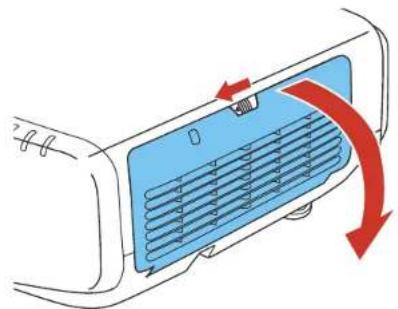
natural_image
Diagram of a car air conditioner panel with airflow direction indicated by red arrows (no text or symbols)- RemovethescrewsecuringthewirelessLANmodulestopper, thenremovethestopper.
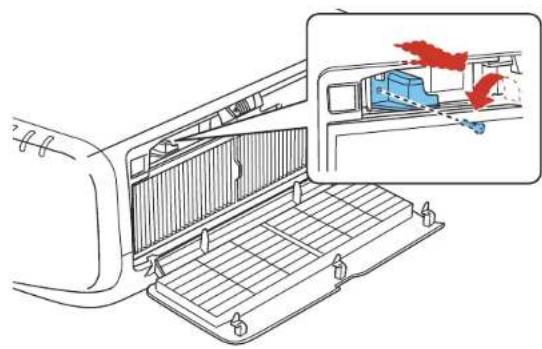
natural_image
Diagram of a car air conditioner unit with a close-up view showing airflow direction (no text or symbols)- Insert the wireless LAN module into the port.
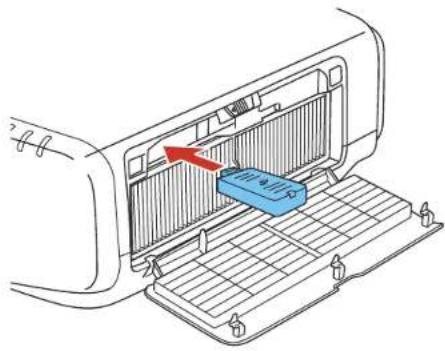
natural_image
Diagram of a car air conditioner unit with a blue internal component and red arrow indicating airflow direction (no text or symbols)- Replacethewireless LAN module stopper and secure it using the screw you removed.
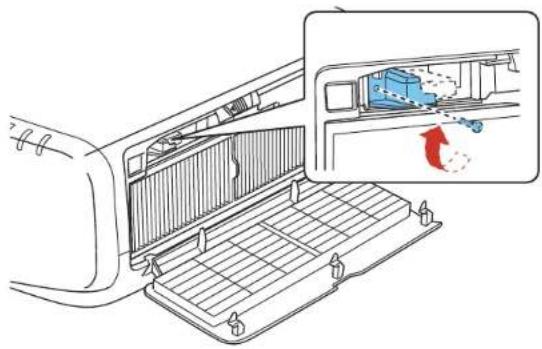
natural_image
Diagram of an air conditioner unit with a side view showing airflow direction (no text or symbols)6.Closetheairfiltercover.
- Pluginandturnontheprojector.
Parenttopic: Wireless Network Projection
Relatedreferences
OptionalEquipmentandReplacementParts
UsingQuickWirelessConnection(WindowsOnly)
YoucanusetheQuickWirelessConnectionUSBkeytoquicklyconnectyourcomputertotheprojector wirelessly(PowerLiteProG6070W/G6170/G6270W/G6470WU/G6570WU/G6770WU).Thenyoucan projectyourpresentationandremovethekeywhenyouaredone.
Note: The Quick Wireless Connection USB key is not included with your projector and is optional.
Note: Make sure the wireless LAN module is installed. The wireless LAN module is not included with your projector and disoptional.
-
Turnon the projector.
-
PresstheLANbuttonontheremotecontrol.
Youseeascreenlikethis:
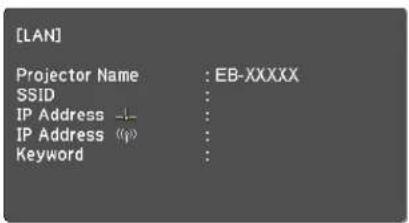
- Verify that an SSIDandIPaddressare displayed, then removethewireless LAN module from the projector.
- Insert the Quick Wireless Connection USB key into the same port used for the wireless LAN module.
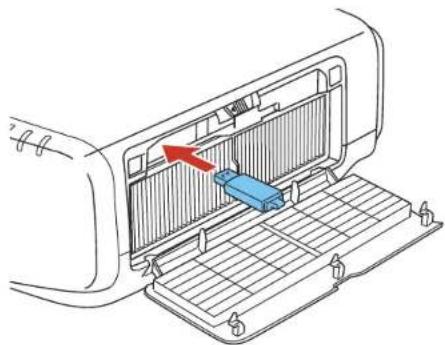
natural_image
Diagram of a car air conditioner unit with a blue plastic component inserted, showing airflow direction (no text or symbols)Youseeaprojectedmessagethatthenetworkinformationupdateiscomplete.
5.RemovetheUSBkey.
6. Reinsertthewireless LAN module into the projector.
- ConnecttheUSBkeytoaUSBportonyourcomputerorlaptop.
Note: In Windows Vista, if you see the AutoPlay window, select Run LaunchQWRD.exe, then selectAllowonthenextscreen.
- Followtheon-screen instruction to install the Quick Wireless Connection driver.
Note: If you see a Windows Firewall message, click Yes to disable the firewall for this application.
Afterafewminutes, yourcomputerimage is displayed by the projector. If it does not appear, press the LAN button on your remote control or restart your computer.
-
Run your presentation as necessary.
-
When you finish projecting wirelessly, select the Safely Remove Hardware option in the Windows taskbar, then removethe USB key from your computer.
Note: You may need to start your computer to activate your wireless LAN connection.
Parenttopic: Wireless Network Projection
Relatedreferences
OptionalEquipmentandReplacementParts
SelectingWirelessNetworkSettingsManually
Before you can project from your wireless network, you must select then network settings for the projector using its menusystem.
- Turnon the projector.
2.PresstheMenubutton.
- SelecttheNetworkmenuandpressEnter.
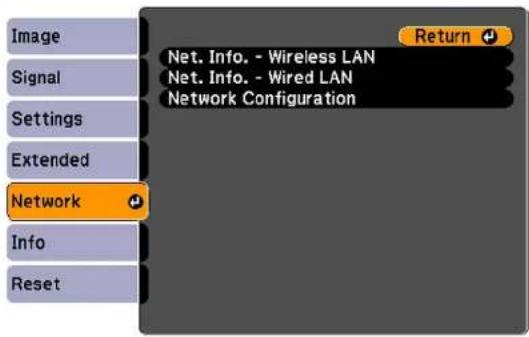
- SelectNetworkConfigurationandpressEnter.
- SelecttheBasicmenuandpressEnter.
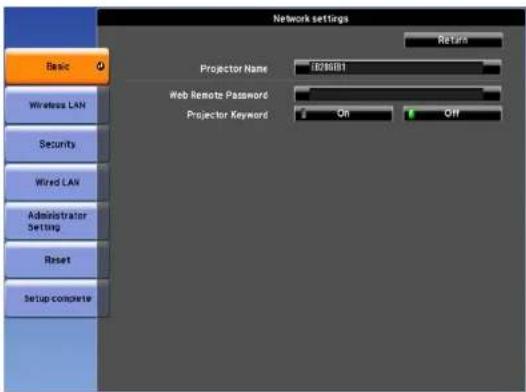
- Select the following basic options as necessary:
-ProjectorNameletsyouenteranameupto16alphanumericcharacterslongtoidentifytheprojectoverthenetwork.
- WebRemotePasswordletsouenterapasswordupto8alphanumericcharacterslongfor accessingtheprojectorovertheweb. (DefaultusernameisEPSONWEB;defaultpasswordis admin.)
-ProjectorKeywordletsyouturnonasecuritypasswordtopreventaccesstotheprojectorbyanyonenotintheroomwithit.TheprojectordisplaysarandomkeywordthatyoumustenterfromacomputerusingtheEasyMPNetworkProjectionsoftwareoraniOSorAndroiddeviceusingiProjection.
Note: Usethedisplayedkeyboardtoenterthename, passwordsandkeyword.Pressthearrow buttonsontheremotecontroltohighlightcharactersandpressEntertoselectthem.
- Select the Wireless LAN menu and press Enter.
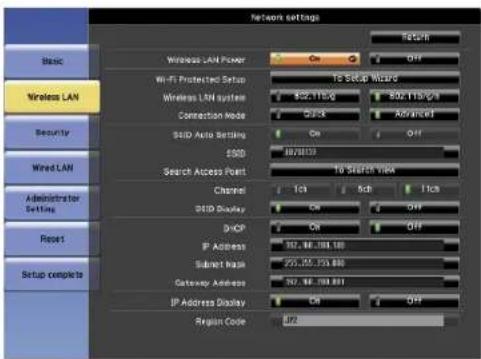
-
Select these settings on the Wireless LAN menu as necessary for your network.
-
When you finish selecting settings, select Setup complete and follow the on-screen instructions to saveyoursettingsandexithemenus.
Afteryoucompletethewirelesssettingsforyourprojector,youneedtoselectthewirelessnetworkon yourcomputer,oriOSorAndroiddevice.
WirelessLANMenuSettings
Parenttopic: Wireless Network Projection
WirelessLANMenuSettings
| SettingOptionsDescription | ||
| WirelessLANPowerOnTurnswirelessLANsupportonOff | andoff | |
| Wi-FiProtectedSetupToSetupWizardSelectToSetupWizardtostart | theWPSSConnectionSetuputility | |
| WirelessLANSystem802.11b/gSetsthetypeofwirelessLAN802.11b/g/n | systemtheprojectorisconnectingto | |
| ConnectionModeQuickSelectsthetypeofwirelessAdvanced | connection:Quick:letsyouquicklyconnecttoonecomputerorusetheoptionalQuickWirelessConnectionUSBkeytoconnectIfyousettheSSIDAutoSettingsettingtoOn,theprojectorbecomesaneasyaccesspoint;ifyousetittoOff,thenetworkiscreatedinAdhocmode.Advanced:letsyouconnecttomultiplecomputersviaawirelessnetworkaccesspoint(infrastructuremode) | |
| SSIDAutoSettingOnTurnsonautomaticSSIDOff | searchinginQuickconnectionmode;settoOffwhenconnectingtomultipleprojectorsatthesametime;settoOnwhenconnectinginQuickconnectionmodewithanAndroiddeviceusingiProjection | |
| SSIDUp32alphanumericcharacters | SetstheSSID(networkname)of | thewirelessLANsystemtheprojectorisconnectingto |
| SearchAccessPointToSearchView | wSearchforavailablewireless | networkaccesspointsinAdvancedconnectionmode |
| Channel1chInQuickconnectionmode | de,6ch11ch | selectsthefrequencyband(channel)usedbythewirelessLAN |
| SSIDDisplayOnSelectswhethertod | displaytheOff | SSIDonthenetworkstandbyscreen |
| DHCPOnTurnsonDHCPifyournetwork | Off | assignsaddressesautomatically;settoOfftomanuallyenterthenetwork'sIPAddress,SubnetMask,andGatewayAddress |
| IPAddress—Vieworchangetheprojector'sIP | address | |
| SubnetMask—Vieworchangetheprojector's | SubnetMask | |
| GatewayAddress—VieworchangetheIPaddress | fortheprojector'sgateway | |
| IPAddressDisplayOnSelectswhethertodisplaytheIPOff | addressonthenetworkstandbyscreen | |
Parenttopic: Selecting Wireless Network Settings Manually
SelectingWirelessNetworkSettingsinWindows
Beforeconnectingtotheprojector, selectthecorrectwirelessnetworkonyourcomputer.
- To access your wireless utility software, access the Desktop and double-click the network icon on the Windowstaskbar.
2.Dooneofthefollowing:
- If your projector is set upon an existing network (Advanced mode), select thenetworkname (SSID).
- IfyourprojectorisconfiguredforQuickmode,selecttheprojector'sSSID.
3.ClickConnect.
Parenttopic: Wireless Network Projection
SelectingWirelessNetworkSettingsinOSX
Beforeconnectingtotheprojector, select the correct wireless network in OSX.
- ClicktheAirPorticononthemenubaratthetopofthescreen.
- MakesureAirPortisturnedon, thendooneofthefollowing:
- If your projector is set upon an existing network (Advanced mode), select thenetworkname (SSID).
- IfyourprojectorisconfiguredforQuickmode,selecttheprojector'sSSID.
Parenttopic: Wireless Network Projection
EnablingWPAorEAPSecurity
SetuptheWPAorEAPsecuritysettingstomatchyournetwork'ssettings.Checkwithyournetwork administratorforguidanceonenteringthecorrectinformation.
-
Turnon the projector.
2.PresstheMenubutton. -
SelecttheNetworkmenuandpressEnter.
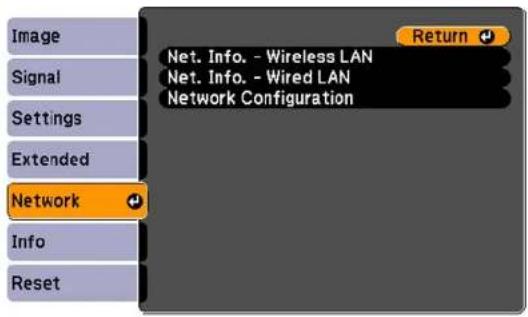
- SelectNetworkConfigurationandpressEnter.
- SelecttheSecuritymenuandpressEnter.
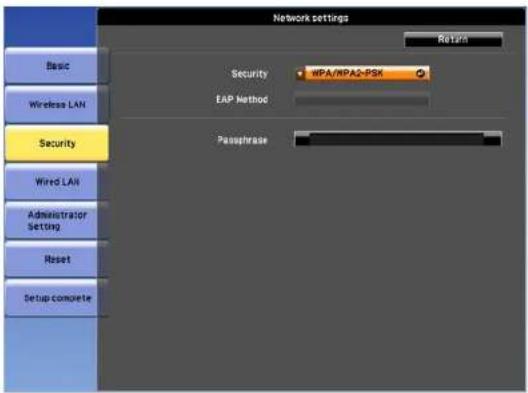
-
SelectaWPAorEAPsettingfromthedrop-downmenu.
-
Select the settings on these security menu as necessary for your network.
- When you finish selecting settings, select Setup complete and follow the on-screen instructions to saveyoursettingsandexithemenus.
WirelessSecurityMenuSettings
Parenttopic: Wireless Network Projection
WirelessSecurityMenuSettings
SettingstheSecuritymenuletyouselectthetypeofsecurityandsecuritysettingsthatmatchthe networkyouareconnectingtheprojectorto.
| SettingOptionsDescription | ||
| SecurityOpenSelectsthetypeofsec | urityusedWPA2-PSK(AES)WPA/WPA2-PSKWPA/WPA2-EAP | onthewirelessnetwork |
| PassphraseVariouspassphrasesf | from8toForWPA2-PSKand63charactersWPA/WPA2-PSKsec | urity,selectsthepre-sharedpassphraseusedonthenetwork(Youcanenterupto32charactersintheprojectormenu.Toinputmorethan32characters,useyourWebbrowser.)InQuickmode,theinitialpassphraseishidden.ChangethepassphrasetoconnectusingEpsoniProjection. |
| EAPMethodPEAPForWPA/WPA2 | -EAPsecurity,PEAP-TLSEAP-TLSEAP-FastLEAP | selectstheprotocolforauthentication |
| UsernameVarioususernamesupto | 64ForWPA/WPA2-EAPsecurity, charactersselectstheusername; | automaticallydetectedwhen usingthePEAP-TLSorEAP-TLSEAPmethods(Youcanenterupto32 charactersintheprojectormenu. Toinputmorethan32 characters,useyourWeb browser.) |
| PasswordVariouspasswordsupto | 64ForWPA/WPA2-EAPsecurity, charactersselectsthepasswordforE | EAP authentication(Youcanenterupto32 charactersintheprojectormenu. Toinputmorethan32 characters,useyourWeb browser.) |
| ClientCertificate—ForWPA/WPA | 2-EAPsecurity, | displaysthecertificate'sIssued to,Issuedby,andValidity periodifaclientcertificatehas beenset |
| VerifyServerCertificateOnForWPA | WPA2-EAPsecurity, Off | selectswhethertoverifythe servercertificatewhenaCA certificatehasbeenset |
| CAcertificate—ForWPA/WPA2-E | APsecurity, | displaysthecertificate'sIssued to,Issuedby,andValidity periodifaCAcertificatehas beenset |
| SettingRADIUSServerNameOnF | forWPA/WPA2-EAPsecurity,Off | selectswhethertoverifythe authenticationservername duringcertificateverification |
| RADIUSServerNameVariousserver | ernamesupto32ForWPA/WPA2-EAPsecurity,characterselectstheservernametoverify | |
| VerifyExp.dateofServerCert.OnF | forWPA/WPA2-EAPsecurity,Off | selectswhethertoverifythe servercertificate'svalidityperiod duringcertificateverification |
Parenttopic: EnablingWPAorEAPSecurity
RegisteringaDigitalCertificateontheProjector
Followtheinstructionshereifyouneedtoinstalladigitalcertificateontheprojectortoprovidesecurityforyourpresentationfiles(PowerLiteProG6070W/G6170/G6270W/G6470WU/G6570WU/G6770WU).
Note: You can register a digital certificate over a network. However, be sure to register just once or the certificatemaynotinstallcorrectly.
SecureHTTP
RegisteringDigitalCertificatesfromaWebBrowser
Parenttopic: UsingtheProjectoronaNetwork
SecureHTTP
YoucanusetheHTTPSprotocoltoincreasesecuritybetweentheprojectorandawebbrowser communicatingwithit. Todothis,youcreateaservercertificate,installitontheprojector,andturnon theSecureHTTPsettingintheprojectormenustoverifythereliabilityofthewebbrowser.
Evenifyoudonotinstallaservercertificate, theprojectorautomaticallycreatesaself-signedcertificate andallowscommunication. However, becausetheself-signedcertificatecannotverifyreliabilityfroma webbrowser,youseeawarningabouttheserver'sreliabilitywhenyouaccesstheprojectorfromaweb browser.Thiswarningdoesnotpreventcommunication.
Parenttopic: RegisteringaDigitalCertificateontheProjector
RegisteringDigitalCertificatesfromaWebBrowser
YoucanregisterthedigitalcertificatesontheprojectorforwirelessLANauthentication.
-
Makesure your digital certificate file is compatible with projector registration.
-
Makesuretheprojectoristurnedon.
3.Startyourwebbrowseronacomputerconnectedtothenetwork.
- Type the projector's IP address into the browser's address box and press the computer's Enter key.
YouseetheWebControlscreenandaprompttoenterauserIDandpassword.
5.Enterthefollowinginformationinuppercaseorlowercaseletters,exactlyasshown:
- FortheuserID, enterEPSONWEB. (YoucannotchangetheuserID.)
- For the password, enter the default password admin. (You can change the Web Control password using the projector's Network menu.)
- Under Network, select the Administrator Settings option and select Manage Certificates.
Youseeascreenlikethis:
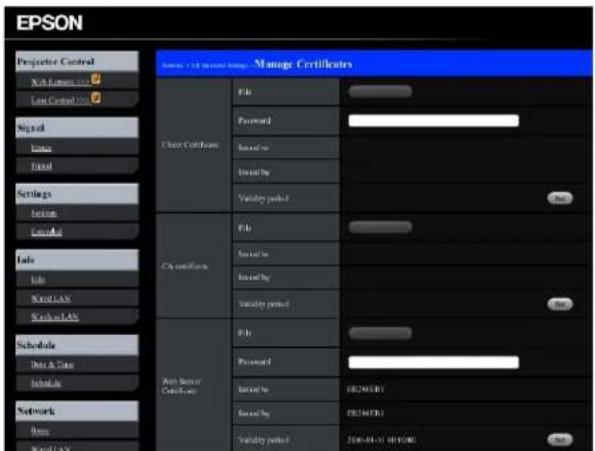
- Click the Browse button, select the certificate file, and click Open.
8.EnterapasswordinthePasswordbox.
9.ClickSettoadjustthecertificatevalidityperiod. - When you finish registering the certificate, click Apply to finalize your changes and complete the registration.
DigitalCertificateTypesforRegistrationviaWebControl
Parenttopic: RegisteringaDigitalCertificateontheProjector
DigitalCertificateTypesforRegistrationviaWebControl
Youcanregisterthesetypesofdigitalcertificatesusingtheprojector'sWebControlfeature.
ClientCertificate(PEAP-TLS/EAP-TLS)
| SpecificationDescription | |
| FormatPKCS#12 | |
| ExtensionPFX/P12 | |
| EncryptionRSA | |
| HashesMD5/SHA-1/SHA-256/SHA-384/SHA-512 | |
| Keylength512/1024/2048/4096bit | |
| PasswordUpto32alphanumericcharacters;required | |
ServerCertificate(PEAP/PEAP-TLS/EAP-TLS/EAP-Fast)
| SpecificationDescription | |
| FormatX509v3 | |
| ExtensionDER/CER/PEM | |
| EncryptionRSA | |
| HashesMD5/SHA-1/SHA-256/SHA-384/SHA-512 | |
| Keylength512/1024/2048/4096bit | |
| EncodingBASE64/Binary |
WebServerCertificate(SecureHTTP)
| SpecificationDescription | |
| FormatPKCS#12 | |
| ExtensionPFX/P12 | |
| EncryptionRSA | |
| HashesMD5/SHA-1/SHA-256/SHA-384/SHA-512 | |
| Keylength512/1024/2048/4096bit | |
| CommonnameNetworkhostname | |
| OrganizationOptional | |
| PasswordUpto32alphanumericcharacters;required | |
Parenttopic: Registering Digital Certificates from a Web Browser
SettingUpProjectorNetworkE-MailAlerts
Youcansetuptheprojectortosendyouane-mailalertoverthenetworkifthereisaproblemwiththe projector.
- PresstheMenubutton.
- SelecttheNetworkmenuandpressEnter.
- SelectNetworkConfigurationandpressEnter.
- Dooneofthefollowing:
- Select the Mail menu and press Enter. Turn on Mail Notification.
PowerLiteProG6870/G6970WU
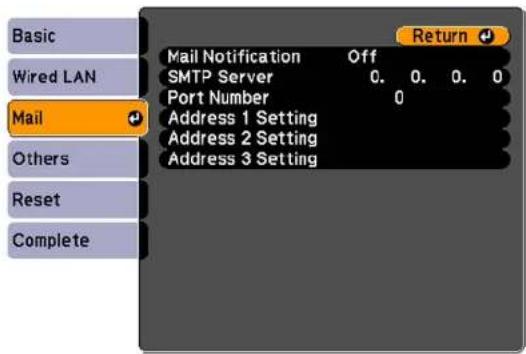
- Select the Administrator Settings menu and press Enter, then select Mail Notification and pressEnter.TurnonMailNotification.
PowerLiteProG6070W/G6170/G6270W/G6470WU/G6570WU/G6770WU
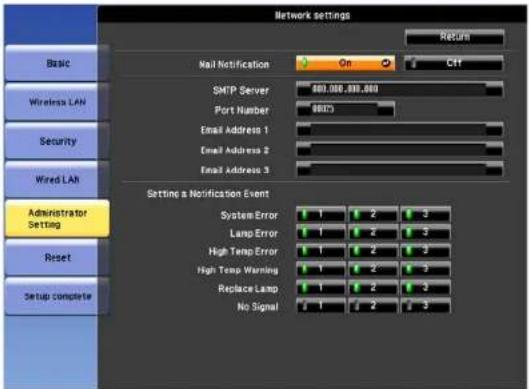
5.EnterthelPaddressfortheSMTPServeroption.
Note: ToentertheIPaddressusingthenumerickeysontheremotecontrol,pressandholdthe Numbutton.Donotusetheseaddresses:127.x.x.xor224.0.0.0through255.255.255.255(wherex isanumberfrom0to255).
-
SelectanumberfortheSMTPserverPortNumber, from 1 to 65535 (defaultis25).
-
Choose an Address or Email Address field, enter the e-mail address, and select the alerts you wanttoreceivethere.Repeatforuptothreeaddresses.
Note: Youre-mailaddresscanbeupto32alphanumericcharacterslong.
- When you finish selecting settings, select Complete or Setup complete and follow the on-screen instructionstosaveyoursettingsandexithemenus.
Note: If a critical problem causes a projector to shut down, you may not receive an e-mail alert.
NetworkProjectorE-mailAlertMessages
Parenttopic: Using the Projectorona Network
NetworkProjectorE-mailAlertMessages
When a problem occurs with an networked projector, and you selected to receive email alerts, you receive an email containing the following information:
•EpsonProjectoronthesubjectline
- Thenameoftheprojectorexperiencingaproblem
•TheIPaddressoftheaffectedprojector
•Detailedinformationabouttheproblem
Note: If a critical problem causes a projector to shut down, you may not receive an e-mail alert.
Parenttopic: SettingUpProjectorNetworkE-MailAlerts
SettingUpMonitoringUsingSNMP
NetworkadministratorscaninstallSNMP(SimpleNetworkManagementProtocol)softwareonnetworkcomputerssotheycanmonitorprojectors.Ifyournetworkusesthissoftware,youcansetuptheprojectorforSNMPmonitoring.
- PresstheMenubutton.
- SelecttheNetworkmenuandpressEnter.
- SelectNetworkConfigurationandpressEnter.
4.Dooneofthefollowing:
- SelecttheOthersmenuandpressEnter. PowerLiteProG6870/G6970WU
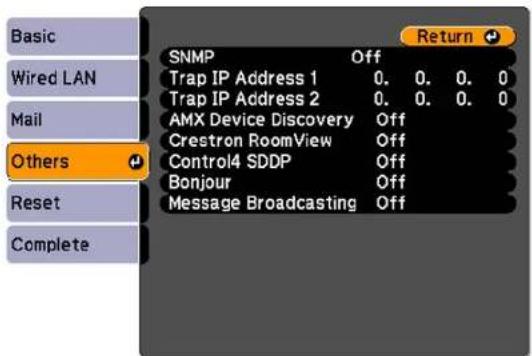
- Select the Administrator Setting menu and press Enter, then select the SNMP menu and press Enter.
PowerLiteProG6070W/G6170/G6270W/G6470WU/G6570WU/G6770WU
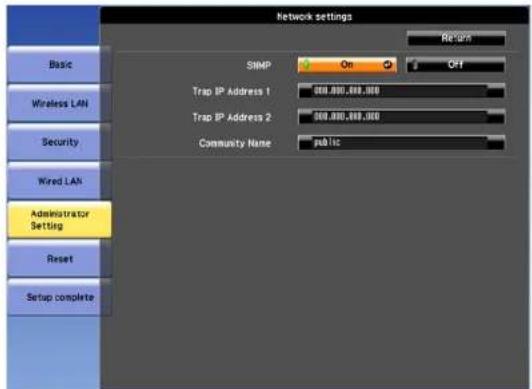
5.EnteruptotwoIPaddressestoreceiveSNMPnotifications,using0to255foreachaddressfield.
Note: ToentertheIPaddressusingthenumerickeysontheremotecontrol,pressandholdthe Numbutton.Donotusetheseaddresses:127.x.x.xor224.0.0.0through255.255.255.255(wherex isanumberfrom0to255).
6.Enteracommunityname(PowerLiteG6070W/G6170/G6270W/G6470WU/G6570WU/G6770WU). Youcanenterupto32single-bytealphanumericcharacters.
7. When you finish selecting settings, select Complete or Setup complete and follow the on-screen instructionstosaveyoursettingsandexithemenus.
Parenttopic: Using the Projectorona Network
SelectingOtherNetworkSettings
Youcanselectothernetworksettingoptions.
- Pressthe Menubutton.
- SelecttheNetworkmenuandpressEnter.
- SelectNetworkConfigurationandpressEnter.
4.Dooneofthefollowing:
- SelecttheOthersmenuandpressEnter.
PowerLiteProG6870/G6970WU
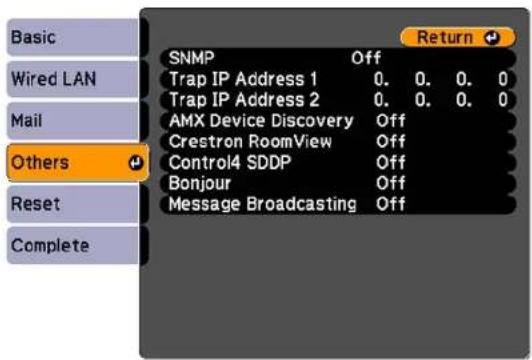
- SelecttheAdministratorSettingmenuandpressEnter.
PowerLiteProG6070W/G6170/G6270W/G6470WU/G6570WU/G6770WU
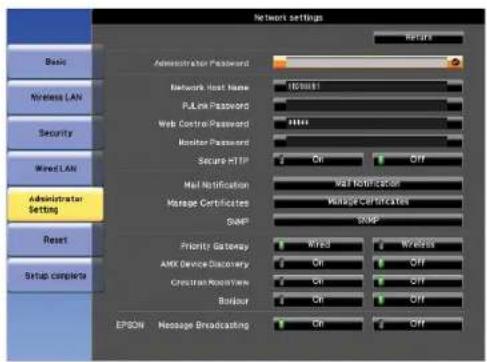
-
If available, select the Priority Gateway setting for your network.
-
If your network environment uses an AMX controller, turn on the AMX Device Discovery setting to allow the projectorted by detected.
-
If your network environment uses a Crestron RoomView controller, turn on the Crestron RoomView setting to allow the project to be detected.
Note: Enabling Crestron Room View disable the Epson Message Broadcast feature in the Easy MP Monitor software.
-
If your network environment uses a Control4 or Control4 SDDP controller, turn on the Control4 SDDP setting to allow the project to be detected.
-
If you want this projector to receive broadcasted messages over the network, turn on the Message Broadcasting setting. Administrators can broadcast messages over thenetwork using the Message Broadcasting plug-infor EasyMPMonitor(Windowsonly).
-
When you finish selecting settings, select Complete or Setup complete and follow the on-screen instructionstosaveyoursettingsandexithemenus.
Parenttopic: Using the Projectorona Network
ControllingaNetworkedProjectorUsingaWebBrowser
Once you have connected your project to your own network, you can select projector settings and control projection using a compatible web browser. This lets you access the projector remotely.
Note: The web setup and control features support Microsoft Internet Explorer 8.0 or later, and Safari on networksthatdonotuseaproxyserverforconnection.Youcannotselectalloftheprojectormenu settingsorcontrolallprojectorfunctionsusingawebbrowser.
Note: If you set Standby Mode to Communication On, you can use a web browser to select settings and control projection even if the projector is instand by mode.
- Makesuretheprojectoristurnedon.
2.Startyourwebbrowseronacomputerordeviceconnectedtothenetwork.
- Type the projector's IP address into the browser's address box and press the computer's Enter key.
Note: You may need to login before you use the Web Control screen. If you see a login window, enter your username and password. (The default username is EPSONWEB and the default password admin.)
YouseetheWebControlscreen.
Note: If you connect from a web browser on a smartphone or tablet, as screen with two options is displayed. Select remote to display the Web Remote page, or select config to display the Web Control page.
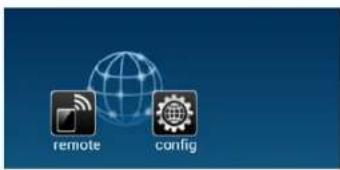
- Toselectprojectormenusettings, selectthenameofthemenuandfollowtheon-screen instructions.
- To control projection remotely, select the Web Remote option.
Youseeascreenlikethis:
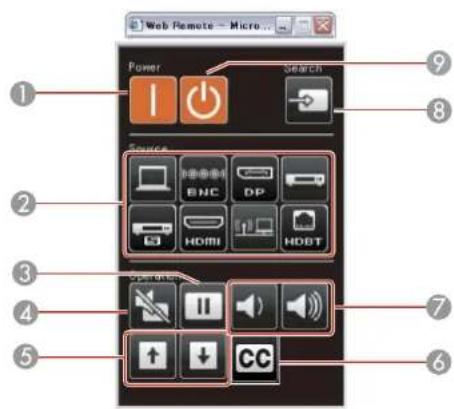
1 Poweronbuttoncontrol
2Inputsourceselectioncontrols(somebuttonsmaynotbeavailabledependingonyour availableprojectorports)
3Freezebuttoncontrol
4A/VMutebuttoncontrol
5PageUpandPageDownbuttoncontrols
6Closedcaptioncontrol
7Volumebuttoncontrols
8Sourcesearchcontrol
9Standbybuttoncontrol
- Select the icon corresponding to the projector function you want to control.
Parenttopic: Using the Projectorona Network
Relatedreferences
ProjectorSetupSettings-ExtendedMenu
CrestronRoomViewSupport
If you are using the CrestronRoom Viewnetwork monitoring and control system, you can setup your projector for use on the system. CrestronRoom Viewlets you control and monitor your projector using a web browser.
Note: You cannot use the Epson Web Control feature or the Message Broadcasting plug-in for EasyMP MonitorwhenyouuseCrestronRoomView.
ForadditionalinformationonCrestronRoomView,contactCrestron.
SettingUpCrestronRoomViewSupport
ControllingaNetworkedProjectorUsingCrestronRoomView
Parenttopic: Using the Projectorona Network
SettingUpCrestronRoomViewSupport
TosetupyourprojectorfonitoringandcontrolusingaCrestronRoomViewsystem,makesureyour computerandprojectorareconnectedtothenetwork.
Note: If you want to use the Crestron RoomView system when the projector is turned off, you need to adjusttheStandbyModesettingsintheExtendedmenu.
- PresstheMenubutton.
- SelecttheNetworkmenuandpressEnter.
- SelectNetworkConfigurationandpressEnter.
- Select the Others menu (PowerLite Pro G6870/G6970WU) or the Administrator Setting menu (PowerLiteProG6070W/G6170/G6270W/G6470WU/G6570WU/G6770WU) and press Enter.
PowerLiteProG6870/G6970WU
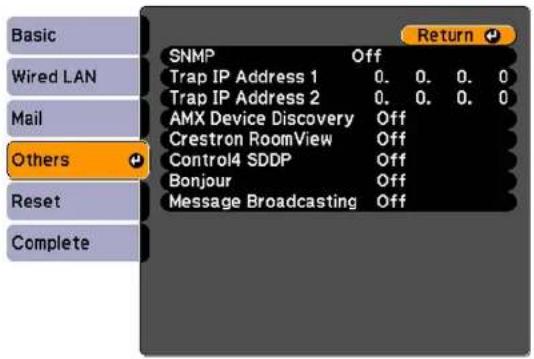
PowerLiteProG6070W/G6170/G6270W/G6470WU/G6570WU/G6770WU
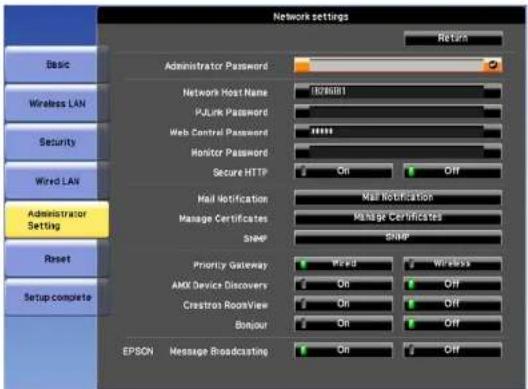
- Set the Crestron RoomView setting to On to allow the projector to be detected.
Note: Enabling Crestron Room View disable the Epson Message Broadcasting feature in the EasyMP Monitor software.
- When you finish selecting settings, select Complete and follow the on-screen instructions to save yoursettingsandexithemenus.
- Turnoff the projector, thenturnitonagain to enable these setting.
Parenttopic: CrestronRoomViewSupport
ControllingaNetworkedProjectorUsingCrestronRoomView
OnceyouhavesetupyourprojectortouseCrestronRoomView,youcancontrolandmonitorprojection usingacompatiblewebbrowser.
1.Startyourwebbrowseronacomputerconnectedtothenetwork.
2. Type the projector's IP address into the browser's address box and press the computer's Enter key.
Youseethisscreen:
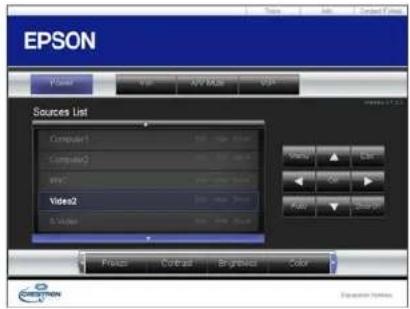
- Select the input source that you want to control in the Sources Listbox. You can scroll through available sources using the up and down arrows in the box.
- To control projection remotely, click the on-screen button that corresponds to the projector's remote control buttons. You can scroll through button options at the bottom of the screen.
Note: These on-screen buttons do not directly correspond to the projector's remote control buttons:
- OKactsastheEnterbutton
-
Menudisplaystheprojector'smenu
-
Toviewinformationabouttheprojector, clicktheInfotab.
- To change projector, Crestron, and password settings, click the Tools tab, select settings on the displayedscreen, and clickSend.
- When you finish selecting settings, click Exit to exit the program.
Parenttopic: CrestronRoomViewSupport
UsingBasicProjectorFeatures
Followtheinstructionsinthesesectionstouseyourprojector'sbasicfeatures.
TurningOntheProjector
TurningOfftheProjector
SelectingtheLanguagefortheProjectorMenus
ResizingthelmagewiththeZoomRing
FocusingtheImageUsingtheFocusRing
SettingtheLensType
SettingtheScreenType
AdjustingtheImagePositionUsingScreenPosition
AdjustingtheImagePositionUsingLensShift
DisplayingaTestPattern
AdjustingtheImageHeight
ImageShape
RemoteControlOperation
SelectinganImageSource
ProjectionModes
ImageAspectRatio
ColorMode
ControllingtheVolumewiththeVolumeButtons
SettingtheDateandTime
TurningOntheProjector
Turnonthecomputerorvideoequipmentyouwanttousebeforeyouturnontheprojectorsoitcan displaytheimagesource.
Note: If the Startup Source Search setting in the Extended menu is enabled, the projector automaticallydetectstheinputsignalwhenyouturniton.
- Connect the power cord to the projector's power inlet.
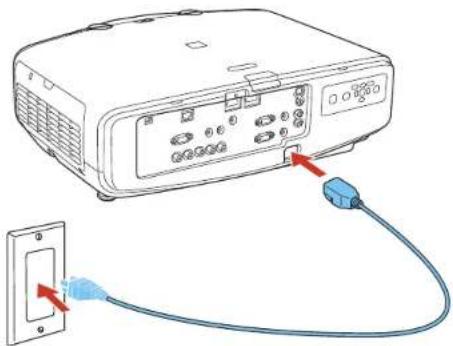
natural_image
Line drawing of a projector connected to a wall-mounted socket via cable (no text or symbols)2.Plugthepowercordintoanelectricaloutlet.
Theprojector'spowerlightturnsorange. This indicates that the projector is receiving power, but is not yet turned on (itisinstandbymode).
Note: WithDirectPowerOnturnedon, theprojectorturnsonassoonasyouplugitin.
- Press the power button on the projector or the On button on the remote control to turn on the projector.
The projectorbeeps and the powerlightflashes green as the projector warms up. After about 30 seconds, the powerlight stops flashing and turnsgreen.
Warning: Never look into the projector lens when the lamp is on. This can damage your eyes and is especially dangerous for children and pets.
If you donot see a projected imagerightaway, try the following:
• Turnontheconnectedcomputerorvideodevice.
- InsertaDVDorothervideomedia, and presstheplaybutton (if necessary).
- Press the Source Search button on the projector or the Search button on the remote control to detect the videosource.
Parenttopic: UsingBasicProjectorFeatures
Relatedtasks
TurningOntheProjector
TurningOfftheProjector
Before turning off the projector, shutdown any computer connected to it so you can see the computer display during shutdown.
Note: Turn off this product when not in use to prolong the life of the projector. Lamp life will vary depending upon modes selected, environmental conditions, and usage. Brightness decreases over time.
-
PressthepowerbuttonontheprojectortheStandbybuttonontheremotecontrol.
-
If you see a shutdown confirmation screen, press the power button on the projector or the Standby buttonontheremotecontrolagain.(Toleavetheprojectoron,pressanyotherbutton.)
Power Off?
Yes: Press ⏻ button
No : Press any other button
Theprojectorbeepstwice, thelampturnsoff, and thepowerlightturnsorange.
Note: With Epson's Instant Off technology, there is no cool-down period so you can pack up the projector for transport right away (if necessary).
- Totransportorstoretheprojector, makesurethepowerlightisorange(butnotflashing), then unplugthepowercord.
Caution: To avoid damaging the projector or lamp, never unplug the power cord when the power light is green or flashing orange.
Parenttopic: UsingBasicProjectorFeatures
SelectingtheLanguagefortheProjectorMenus
If you want to view the projector's menus and messages in another language, you can change the Languagesetting.
- Turnontheprojector.
2.PresstheMenubutton. - SelecttheExtendedmenuandpressEnter.
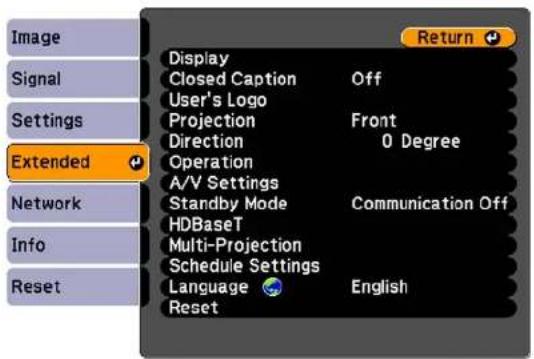
- Select the Languagesetting and press Enter.
- SelectthelanguageyouwanttouseandpressEnter.
- PressMenuorEsctoexitthemenus.
Parenttopic: UsingBasicProjectorFeatures
ResizingthelmagewiththeZoomRing
- Turnontheprojectoranddisplayanimation. Wait30minutesafterturningontheprojectorbefore settingthefocus, zoom, and lensshiftformaximumaccuracy.
Note: You can display a pattern to aid in adjusting the projected image using the Settings menu.
Note: You can also display a pattern to aid in adjusting the projected image using the Test Pattern buttonontheremotecontrol.
- Toenlargeorreducetheimagesize, rotatetheprojector'szoomring.
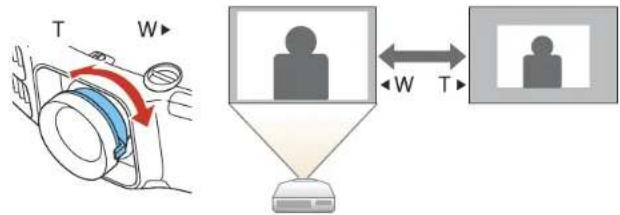
Parenttopic: UsingBasicProjectorFeatures
Relatedreferences
ProjectorSetupSettings-ExtendedMenu
Relatedtasks
DisplayingaTestPattern
FocusingtheImageUsingtheFocusRing
- Turnontheprojectoranddisplayanimation. Wait30minutesafterturningontheprojectorbefore settingthefocus, zoom, and lensshiftformaximumaccuracy.
Note: You can display a pattern to aid in adjusting the projected image using the Settings menu.
Note: You can also display a pattern to aid in adjusting the projected image using the Test Pattern buttonontheremotecontrol.
- Tosharpentheimagefocus, rotatetheprojector's focus ring.
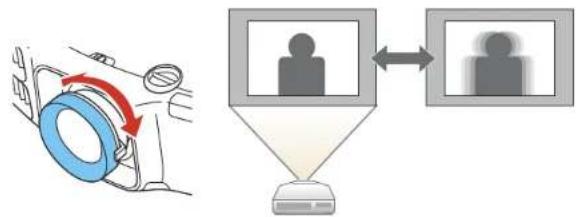
flowchart
graph TD
    A["Car Tire"] --> B["User Icon"]
    B --> C["User Icon"]
    C --> D["User Icon"]
    D --> E["User Icon"]
    style A fill:#f9f,stroke:#333
    style B fill:#ccf,stroke:#333
    style C fill:#cfc,stroke:#333
    style D fill:#fcc,stroke:#333
FocusingtheImagewiththeOptionalShortThrowLens
Parenttopic: UsingBasicProjectorFeatures
Relatedreferences
ProjectorSetupSettings-ExtendedMenu
Relatedtasks
DisplayingaTestPattern
FocusingthelmagewiththeOptionalShortThrowLens
If you installed the optional short throw lens (ELPLU01) and used the lens shift option to shift the lens, you can focus the image using the distortion and focus rings.
- Turnon the projector and display an image.
Note: You can display a pattern to aid in adjusting the projected image using the Settings menu.
Note: You can also display a pattern to aid in adjusting the projected image using the Test Pattern buttonontheremotecontrol.
- Carefully rotatethedistortionringallthewaycounter-clockwise.
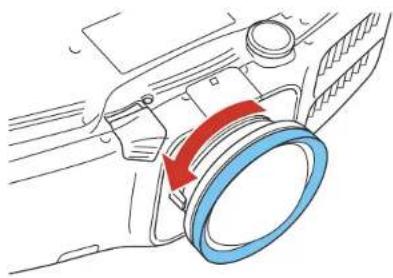
natural_image
Diagram of a car interior showing a blue ring and red directional arrow (no text or symbols)Note: Be careful not to shift the short throw lens when adjusting it to prevent the projected image fromshifting.
- Support the front of the lens with one hand and set the other to carefully rotate the focus using until the center of the image is focused.
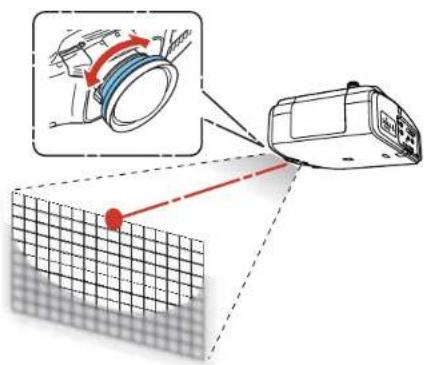
- Rotatethedistortionringuntiltheedgesoftheimagearealsofocused.
natural_image
Diagram showing a red laser beam interacting with a grid-patterned object, no text or symbols present-
Rotatethefocusingagaintofocustheentirescreenimage.
-
If the center of the image out of focus, rot at the distortion ring again to bring the area into focus.
Parenttopic: Focusing theImageUsingtheFocusRing
Relatedreferences
ProjectorSetupSettings-ExtendedMenu
Relatedtasks
DisplayingaTestPattern
SettingtheLensType
Youcanselectthemodelnumberfortheattachedlens.
- Turnon the projector and display an image.
2.PresstheMenubutton.
-
SelecttheExtendedmenuandpressEnter.
-
SelectOperationandpressEnter.
-
SelectLensTypeandpressEnter.
Youseethisscreen:
![[Lens Type] ELPLS07 ELPLU01 ELPLR03 ELPLM04 ELPLM05 ELPLL06 Return](/content/2026/05/1054021/images/0eb2cb1f2d2f5c75b311b7f20f37f9ea41a646e9d4bd904a43e774e86aae0df9.jpg)
- Select your model number and press Enter.
- PresstheMenubuttontoacceptthechanges.
Parenttopic: UsingBasicProjectorFeatures
SettingtheScreenType
YoucanusetheScreenTypesettingtomatchtheaspectratioofthedisplayedimagetothescreenyou areusing.
- Turnon the projector and display an image.
2.PresstheMenubutton. - SelecttheExtendedmenuandpressEnter.
- Select Display > Screen > Screen Type.
Youseethisscreen:
![[Screen Type] 14:3 16:9 16:10 Return 🔒](/content/2026/05/1054021/images/52ea0c1f0e05ce8656c8c223fcf290f3398f2c806b979fb77fb717fc2d0a35a2.jpg)
- Select your screen's spectratio and press Enter.
-
PresstheMenubuttontoacceptthechanges.
-
Adjust the aspect ratio for the projected image, if necessary.
Parenttopic: UsingBasicProjectorFeatures
Relatedconcepts
ImageAspectRatio
AdjustingtheImagePositionUsingScreenPosition
You can adjust the image position if there are margins between the edge of the image and the projected screenframe.
Note: You cannot adjust the screen position if the Screen Type is set to 16:10 for a WXGA/WUXGA projectormodelor4:3foraXGAprojectormodel.
- Turnon the projector and display an image.
- PresstheMenubutton.
- SelecttheExtendedmenuandpressEnter.
- Select Display > Screen > Screen Position.
- Usethearrowbuttonsontheremotecontrolorprojectortoadjustthepositionoftheimage.
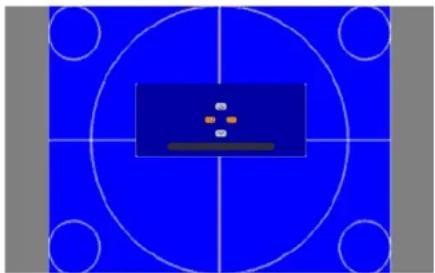
natural_image
Blue basketball court with a central circular target and corner markers (no text or symbols)- When you are finished, press the Menubutton.
Parenttopic: UsingBasicProjectorFeatures
Relatedtasks
SettingtheScreenType
SettingtheScreenType
AdjustingthelmagePositionUsingLensShift
If you cannot install the projectordirectly in front of the screen, you can adjust the position of the projected image using the lens shift feature.
Followtheseguidelineswhenusinglensshifttoadjustyourimages:
- Whenadjustingtheimageheight,positiontheimagelowerthanwhereyouwantittobeandthenmoveitupusingtheverticalallensshiftdial. Thishelpspreventtheimagefrommovingdownafter adjustment.
- Keeptheverticalandhorizontallensshiftdialsintheircenterpositionsfortheclearestpicture.
Note: Wait 30 minutes after turning on the projector before setting the focus, zoom, and lens shift for maximum accuracy.
- Turnon the projector and display an image.
2.Slidethelensshiftdiallockasshowntoreleasethelock.
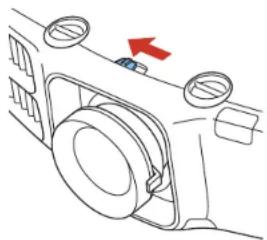
natural_image
Diagram of a car's side profile showing vent, door, and seat components with a red arrow indicating direction (no text or symbols)- Turnthe vertical and horizontal shift dialson the project to adjust the position of the projected image as necessary.
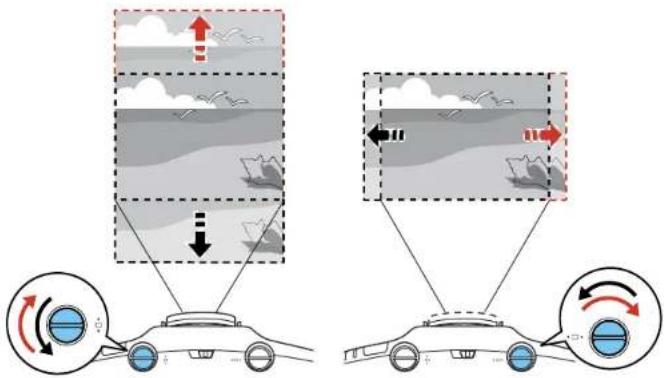
Note: You can mov the imagewith in therangesshown below. You cannot mov the imagetoboth the horizontal and vertical maximum values.
PowerLiteProG6070W/G6270W/G6470WU/G6570WU/G6770WU/G6970WU
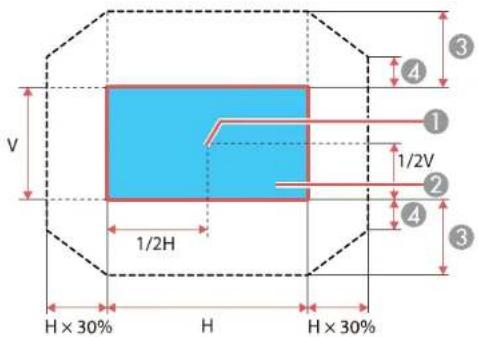
PowerLiteProG6170/G6870
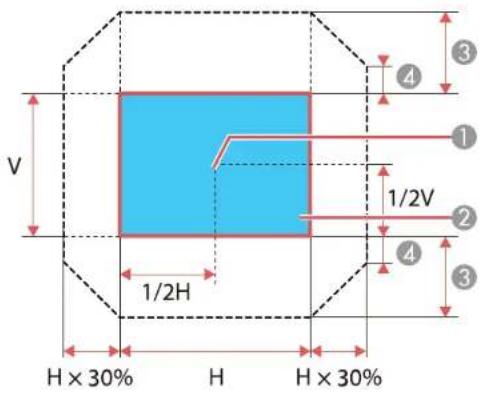
1 Centeroflens
2Projectedimagewhenlensshiftissetinthecenter
3Maximumverticaladjustmentrange:
V×67%(PowerLiteProG6070W/G6270W/G6470WU/G6570WU/G6770WU/G6970WU)
V×57%(PowerLiteProG6170/G6870)
4Maximumverticaladjustmentrangewithmaximumhorizontaladjustment:
V×27%(PowerLiteProG6070W/G6270W/G6470WU/G6570WU/G6770WU/G6970WU)
V×19%(PowerLiteProG6170/G6870)
- When you are finished, slidethelens shift diallock as show to lock the dials.
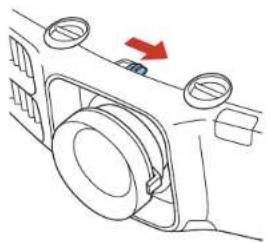
natural_image
Diagram of a car interior showing dashboard and ventricles with a red arrow indicating direction (no text or symbols)Parenttopic: UsingBasicProjectorFeatures
DisplayingaTestPattern
Youcandisplayatestpatterntoadjusttheprojectedimagewithoutconnectingacomputerorvideo device.
Note: The test pattern's shape is determined by the Screen Type setting. Be sure to set the correct screentypebeforeadjustingwiththetestpattern.
-
Turnon the projector.
-
Press the Test Pattern button on the remote control or the down arrow button on the control panel.
-
Press the left or right arrow buttons on the remote control or press Enter on the control panel to cyclethroughtheavailabletestpatterns.
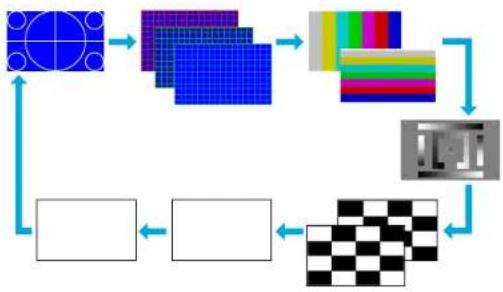
flowchart
graph TD
    A["Grid Grid"] --> B["Color Grid"]
    B --> C["Color Filter"]
    C --> D["Pixelated Image"]
    D --> E["Pixelated Mask"]
    E --> F["Pixelated Output"]
    F --> G["Pixelated Image"]
    G --> H["Pixelated Mask"]
    H --> I["Pixelated Output"]
    I --> J["Pixelated Image"]
    J --> K["Pixelated Mask"]
    K --> L["Pixelated Output"]
    L --> M["Pixelated Image"]
    M --> N["Pixelated Mask"]
    N --> O["Pixelated Output"]
    O --> P["Pixelated Image"]
    P --> Q["Pixelated Mask"]
    Q --> R["Pixelated Output"]
    R --> S["Pixelated Image"]
    S --> T["Pixelated Mask"]
    T --> U["Pixelated Output"]
    U --> V["Pixelated Image"]
    V --> W["Pixelated Mask"]
    W --> X["Pixelated Output"]
    X --> Y["Pixelated Image"]
    Y --> Z["Pixelated Mask"]
    Z --> A
-
Adjust the image as necessary.
-
PresstheEsctoexitthetestpattern.
AvailableTestPatternImageAdjustments
Parenttopic: UsingBasicProjectorFeatures
AvailableTestPatternImageAdjustments
Youcanmakethefollowingimageadjustmentswhilethetestpatternisdisplayed.
| MenuSettings | |
| ImageColorMode | |
| Abs.ColorTemp. | |
| Advanced•Gamma1•RGB•RGBCMY | |
| SignalAutoSetup | |
| SettingsGeometricCorrection | |
| ExtendedMulti-Projection | •BrightnessLevel•EdgeBlending ^2 •Multi-screen |
^1 ExceptforcustomGammasettings
^2 ExceptfortheBlackLevelsetting(PowerLiteProG6870/G6970WU)
Parenttopic: DisplayingaTestPattern
AdjustingthelmageHeight
If you are projecting from a table or other flats surface, and the image is too high or low, you can adjust the image height using the projector's adjustable feet.
- Turnon the projector and display an image.
- To adjust the image height, rotate the front foot to extend or retract it.
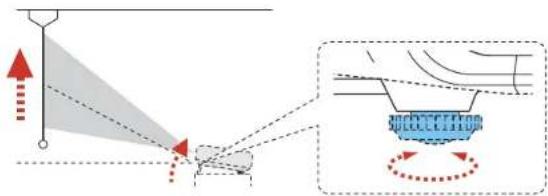
- If the image is tilted, rotate there are feet to adjust their height.
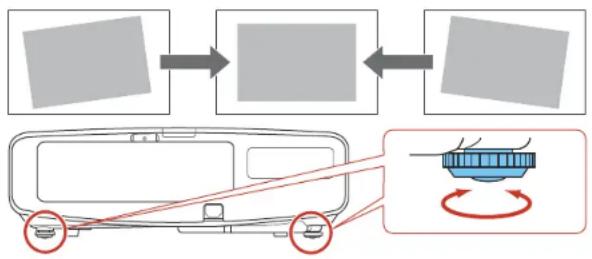
flowchart
graph TD
    A["Input Signal"] --> B{Signal Transmission}
    B --> C["Motor Control"]
    C --> D["Output Signal"]
    style A fill:#f9f,stroke:#333
    style D fill:#bbf,stroke:#333
If the projected image is unevenly rectangular, you need to adjust the imageshape.
Parenttopic: UsingBasicProjectorFeatures
Relatedconcepts
ImageShape
ImageShape
Youcanprojectanevenlyrectangularimagebyplacingtheprojectordirectlyinfrontofthecenterofthe screenandkeepingitlevel. Ifyouplacetheprojectoratanangletothescreen,ortiltedupordown,oroff totheside,youmayneedtocorrecttheimageshapeforthebestdisplayquality.
Note: You cannot combine multiple image adjustment methods, except adjusting the Point Correction setting after adjusting the Curved Surface or Corner Wall (PowerLite Pro G6870/G6970WU) settings.
CorrectingImageShapewithH/VKeystone
CorrectingImageShapewithQuickCorner
CorrectingImageShapewithArcCorrection
CorrectingImageShapewithCurvedSurface
CorrectingImageShapewithPointCorrection
CorrectingImageShapewithCornerWall
Parenttopic: UsingBasicProjectorFeatures
CorrectingImageShapewithH/VKeystone
Youcanusetheprojector'sH/VKeystonesettingtocorrecttheshapeofanimagethatisunevenly rectangularonthesides.
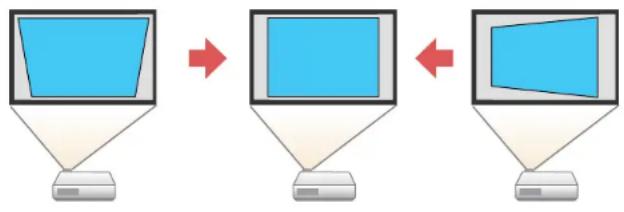
flowchart
graph LR
    A["Original Image"] --> B["Intermediate Display"]
    B --> C["Final Desktop"]
Note: For the best results, make sure the Lens Type setting in the projector's Extended menu is set correctlybeforemakinganykeystoneadjustments.
- Turnontheprojectoranddisplayanimation.
Note: You can display a pattern to aid in adjusting the projected image using the Settings menu.
Note: You can also display a pattern to aid in adjusting the projected image using the Test Pattern buttonontheremotecontrol.
-
PresstheMenubutton.
-
SelecttheSettingsmenuandpressEnter.
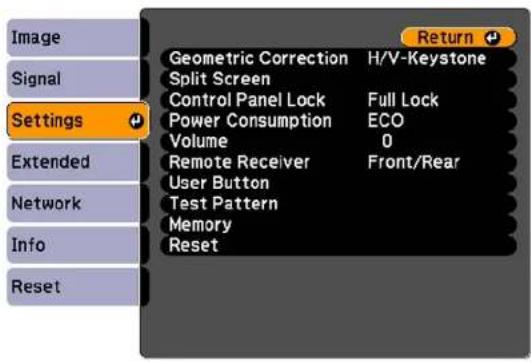
- Select the Geometric Correction setting and press Enter.
- Select the H/V-Keystone setting and press Enter. Then press Enter again.
YouseetheH/V-Keystoneadjustmentscreen:
![[H/V-Keystone] V-Keystone 0 H-Keystone 0 Return](/content/2026/05/1054021/images/b09b80cd1f9f0ba1bdd1c7ef17025247482e221c329f5faf34da8456c7fee703.jpg)
- Usethearrowbuttonsontheprojectorotheremotecontroltoselectbetweenverticaland horizontalkeystonecorrectionandtoadjusttheimageshapeasnecessary.
V-Keystone
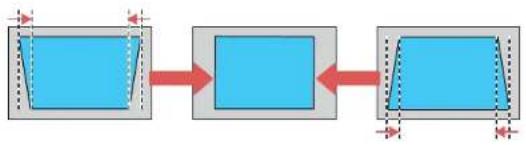
flowchart
graph LR
    A["Rectangular Box"] --> B["Blue Rectangle"]
    B --> C["Blue Rectangle with Dashed Lines and Red Arrow"]
H-Keystone
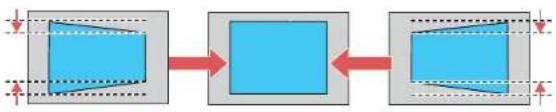
flowchart
graph LR
    A["Step 1"] --> B["Step 2"]
    B --> C["Step 3"]
- When you are finished, press Esc.
Aftercorrection, your image is slightly smaller.
Parenttopic:ImageShape
Relatedreferences
ProjectorFeatureSettings-SettingsMenu
ProjectorSetupSettings-ExtendedMenu
Relatedtasks
DisplayingaTestPattern
CorrectingImageShapewithQuickCorner
Youcanusetheprojector'sQuickCornersettingtocorrecttheshapeandsizeofanimagethatis unevenlyrectangularonallsides.
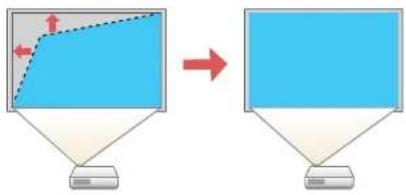
flowchart
graph TD
    A["Blue Arrow Graph"] --> B["Blue Rectangle"]
    style A fill:#f9f,stroke:#333
    style B fill:#bbf,stroke:#333
- Turnon the projector and display an image.
Note: You can display a pattern to aid in adjusting the projected image using the Settings menu.
Note: You can also display a pattern to aid in adjusting the projected image using the Test Pattern buttonontheremotecontrol.
2.PresstheMenubutton.
3. SelecttheSettingsmenuandpressEnter.
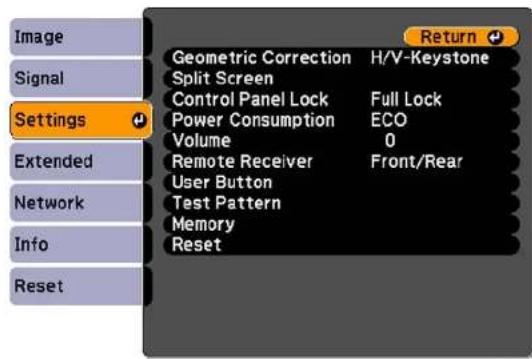
-
Select the Geometric Correction setting and press Enter.
-
Select the Quick Corner setting and press Enter. Then press Enter again. YouseetheQuickCorneradjustmentscreen:
![[Quick Corner] Select the area.](/content/2026/05/1054021/images/593f70499393bc9a119aeec7286d9c85b6a74287ccf2f26840afa8336f035422.jpg)
Note: To reset your adjustments, press the Esc button for at least 2 seconds to display a reset screen, and select Yes.
- Usethearowbuttonsontheprojectorotheremotecontroltoselectthecorneroftheimageyou wanttoadjust.ThenpressEnter.
- Pressthearrowbuttonstoadjusttheimageshapeasnecessary.
- When you are finished, press Esc.
Parenttopic:ImageShape
Relatedreferences
ProjectorSetupSettings-ExtendedMenu
Relatedtasks
DisplayingaTestPattern
CorrectingImageShapewithArcCorrection
Youcanusetheprojector'sArcCorrectionsettingtoadjustthecurveorarcofthesidesofyourimage (PowerLiteProG6070W/G6170/G6270W/G6470WU/G6570WU/G6770WU).
- Turnon the projector and display an image.
Note: You can display a pattern to aid in adjusting the projected image using the Settings menu.
Note: You can also display a pattern to aid in adjusting the projected image using the Test Pattern buttonontheremotecontrol.
2.PresstheMenubutton.
3. SelecttheSettingsmenuandpressEnter.
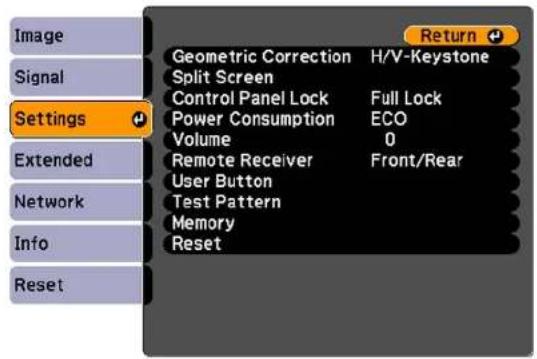
- Select the Geometric Correction setting and press Enter.
- Select the Arc Correction setting and press Enter. Then press Enter again.
YouseetheArcCorrectionadjustmentscreen.
![[Arc Correction] Select the area.](/content/2026/05/1054021/images/294a2b4fbe786b14c88d28cb63accf01e4957a1460e05706d66563266857dea2.jpg)
Note: To reset your adjustments, press the Esc button for at least 2 seconds to display a reset screen, and select Yes.
- Use the arrow button on the projector or theremote control to select the corner or side of the image you want to adjust. Then press Enter.
- Pressthearrowbuttonstoadjusttheimageshapeasnecessary.
- When you are finished, press Esc.
Parenttopic:ImageShape
Relatedreferences
ProjectorSetupSettings-ExtendedMenu
Relatedtasks
DisplayingaTestPattern
CorrectingImageShapewithCurvedSurface
Youcanusetheprojector'sCurvedSurfacesettingtoadjusttheshapeofanimageprojectedona curvesurface(PowerLiteProG6870/G6970WU).
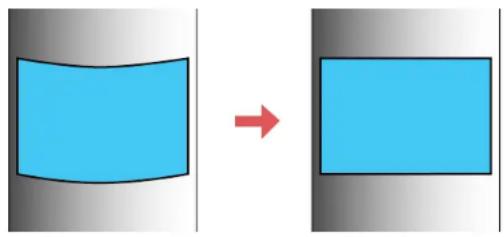
natural_image
Two blue rectangular shapes with a curved top-left corner, separated by a red arrow (no text or symbols)Note: For the best results, project from the front of the screen onto a surface with a uniform arc radius and withthelenscenteredhorizontallyusinglensshift. Theimagemaynotbeevenlyfocused throughoutvenafterperformingthestepshere.
- Turnon the projector and display an image.
Note: You can display a pattern to aid in adjusting the projected image using the Settings menu.
Note: You can also display a pattern to aid in adjusting the projected image using the Test Pattern buttonontheremotecontrol.
-
Pressthe Menubutton.
-
SelecttheSettingsmenuandpressEnter.
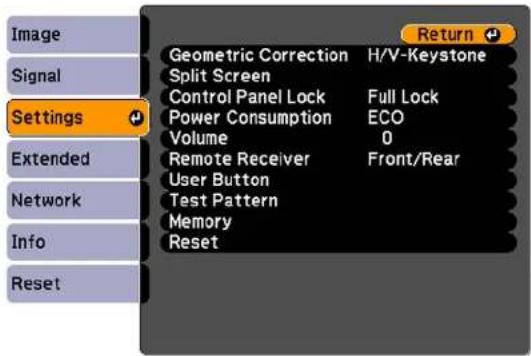
- Select the Geometric Correction setting and press Enter.
- SelecttheCurvedSurfacesettingandpressEnter.
Note: If you see a confirmation message, press Enter.
Youseethisscreen:
![[Curved Surface] Correct Shape Horizontal Linearity Vertical Linearity](/content/2026/05/1054021/images/119d5000c287f6587e2cbc27710f8815362f5d0639121aa21867ae0c7f84a460.jpg)
-
SelecttheCorrectShapesettingandpressEnter.
-
Usethearrowbuttonsontheprojectorotheremotecontroltoselecttheareayouwanttoadjust. ThenpressEnter.
![[Correct Shape] Select the area.](/content/2026/05/1054021/images/947915f88beefb45aa4c23f8c9bfcfe683b8546d4ae5084cb328366e01a5596c.jpg)
Note: To reset your adjustments, press the Esc button for at least 2 seconds to display a reset screen, and select Yes.
- Usethearrowbuttonsontheprojectortoadjusttheimageshape.
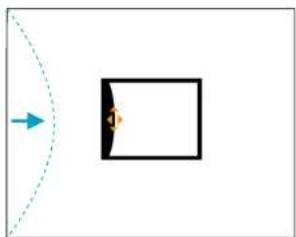
natural_image
Simple diagram showing a curved arrow pointing to a rectangular shape with an arrowhead, no text or symbols present.Note: If the adjustment triangle turns gray, you cannot adjust the shape any further in that direction.
9.PresstheEscbuttontoreturntotheCurvedSurfacemenuscreen.
10. Repeat the previous three steps as necessary to adjust other image areas.
If the image expands or contracts, continue with then next step to adjust the linearity.
- SelectoneofthefollowingfromtheCurvedSurfacemenuscreen:
•HorizontalLinearity:Adjustshorizontalexpansionorcontraction.
•VerticalLinearity:Adjustsverticalexpansionorcontraction.
- SelectadisplayedlinetouseasabaselineandpressEnter.
Theselectedbaselineflashesredandwhite.
- Adjustthelinearity by doing one of the following:
- Presstheleftarrowbuttontocontractthedistancebetweenthelinesclosesttothebaseline.
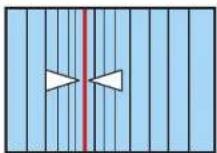
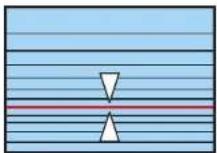
- Presstherightarrowbuttontoexpandthedistancebetweenthelinesclosesttothebaseline.
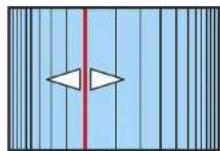
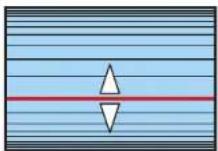
- When you are finished, pressMenu.
Note: If necessary, you can fine-tune the results of your Curved Surface adjustments using Point Correction.
Parenttopic:ImageShape
Relatedreferences
ProjectorSetupSettings-ExtendedMenu
Relatedtasks
DisplayingaTestPattern
CorrectingImageShapewithPointCorrection
CorrectingImageShapewithPointCorrection
Youcanusetheprojector'sPointCorrectionfeaturetofine-tunetheimageshapeusingpointsonagrid. Thisisusefulforadjustingoverlappingareasinmultipleprojectedimagesthatdonotlineupcorrectly.

natural_image
Two-panel diagram showing a grid transformation: one with cloud shapes and arrows, the other with aircraft in flight (no text or symbols)- Turnon the projector and display an image.
Note: You can display a pattern to aid in adjusting the projected image using the Settings menu.
Note: You can also display a pattern to aid in adjusting the projected image using the Test Pattern buttonontheremotecontrol.
2.PresstheMenubutton.
3. SelecttheSettingsmenuandpressEnter.
4. Select the Geometric Correction setting and press Enter.
5. SelectthePointCorrectionsettingandpressEnter.
Note: If you see a confirmation message, press Enter.
Youseethisscreen:
![[Point Correction] Return Point Correction 3x3 Pattern Color White Reset](/content/2026/05/1054021/images/4bacd6d4b848c6e2d874a322f0ccc0b1262d2cbd654246b9bdec4d41b6d4b16a.jpg)
- SelectthePointCorrectionsettingandpressEnter.
- SelectthenumberofgridlinestodisplayandpressEnter.
Note: If you need to change the color of the grid lines, select the Pattern Color setting and select a suitable color.
- Use the arrow button on the projector or remote control to the point on the grid that you want to adjust. Then press Enter.
Theboxchangesfromasinglinetoadouble-linedsquare.
![[Point Correction] H-Pos: 4 V-Pos: 4 [1●]: Select [Esc]: Return [Q]: Enter](/content/2026/05/1054021/images/16eeeddd6443ac4390a2f1fcbadfdce1723dcdc12c2edc79ecc9a86b07e83a38.jpg)
- Usethearrowbuttonstocorrecttheimageshapeinallnecessarydirections.
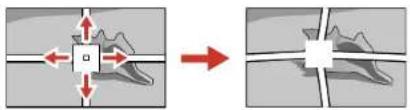
natural_image
Diagram showing a mechanical or structural change before and after, with no visible text or symbols.Note: You can press Enter to show or hide the image and grid to check the results.
- Press Esc to return to the previous screen and select another point to correct, if necessary.
- When you are finished, pressMenu.
Parenttopic:ImageShape
Relatedreferences
ProjectorSetupSettings-ExtendedMenu
Relatedtasks
DisplayingaTestPattern
CorrectingImageShapewithCornerWall
Youcanusetheprojector'sCornerWallsettingtoadjusttheshapeofanimageprojectedonasurface withrightangles,suchasarectangularpillarothecornerofaroom(PowerLiteProG6870/G6970WU).
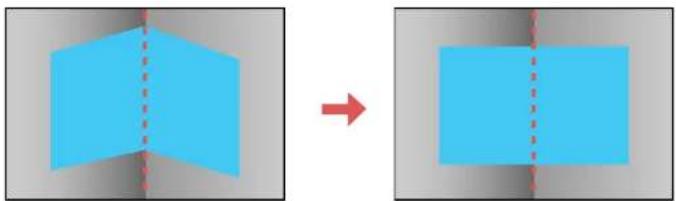
natural_image
Two blue geometric shapes with dashed vertical lines, one solid and one dashed, both on a gray background (no text or symbols)Note: For the best results, project from the front of the screen onto a right-angled surface with the lens centeredhorizontallyusinglensshift.Theimagemaynotbeevenlyfocusedthroughoutevenafter performingthestepshere.Ifyouareusingtheoptionalshortthrowlens(ELPLU01),youmaynotbeable toadjusttheCornerWallsetting.
- Turnon the projector and display an image.
Note: You can display a pattern to aid in adjusting the projected image using the Settings menu.
Note: You can also display a pattern to aid in adjusting the projected image using the Test Pattern buttonontheremotecontrol.
2.PresstheMenubutton.
3. SelecttheSettingsmenuandpressEnter.
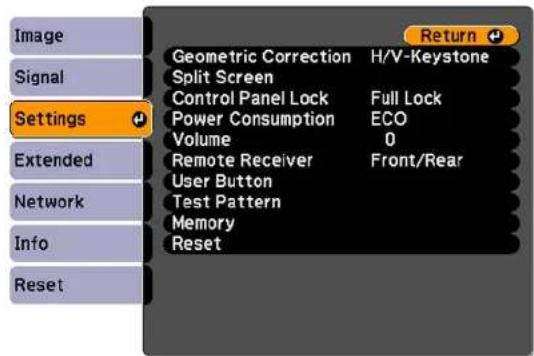
- Select the Geometric Correction setting and press Enter.
- SelecttheCornerWallsettingandpressEnter.
Note: If you see a confirmation message, press Enter.
Youseethisscreen:
![[Corner Wall] Return Corner Type Horizontal Corner Correct Shape Linearity](/content/2026/05/1054021/images/9f6258906a5a27ed8a662cd0e31fce445c69ff6e18e9a36eaec925e23769e687.jpg)
- SelecttheCornerTypesettingandpressEnter.
- Selectoneofthefollowing:
•HorizontalCornerwhenthesurfaceslineuphorizontally
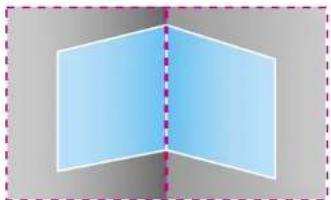
natural_image
Abstract geometric shape with two light blue rectangles and a vertical dashed line, no text or symbols present.•VerticalCornerwhenthesurfaceslineupvertically
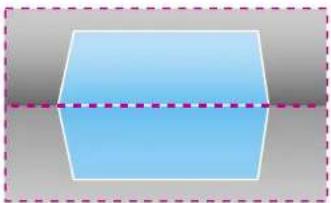
natural_image
Simple geometric shape with a blue hexagon and a dashed line crossing it (no text or symbols)8.PresstheEscbuttontoreturntotheCornerWallmenuscreen.
9. SelecttheCorrectShapesettingandpressEnter.
- Adjust the projector's position and use the lens shift option to center the image over the point where the two surfaces meet. (Therest of these steps show Horizontal Corner as the selected Corner Type but the steps are these same for Vertical Corner.)
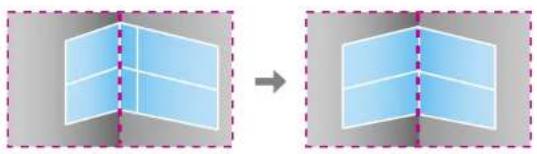
natural_image
Two 3D geometric shapes with blue panels and dashed vertical lines, no text or symbols presentNote: You can press Enter to show or hide the image and grid to check the results.
- Usethearrowbuttonsontheprojectorotheremotecontroltoselecttheareayouwanttoadjust. ThenpressEnter.
![[Correct Shape] Select the area.](/content/2026/05/1054021/images/1d90d6a66f387304f34aa5dad6915036f6eabe24b4716a8b253fa33127951be5.jpg)
- For horizontal corners, adjust the top area using the lowest point (indicated by the blue arrow) as your reference. Adjust the lower area using the highest point (indicated by the pink arrow) as your reference.
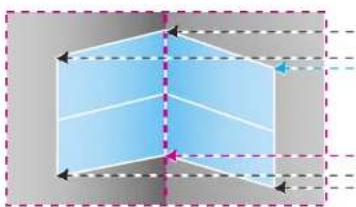
natural_image
Pure 3D geometric diagram showing a cube with dashed and solid lines indicating hidden edges (no text or symbols)- For vertical corners, adjust the left and right areas using the points nearest the center of the image as your reference points.
Note: To reset your adjustments, press the Esc button for at least 2 seconds to display a reset screen, and select Yes.
- Pressandholdthearrowbuttonsontheprojectororremotecontroltoadjusttheimageshape.
- Repeat the previous wosteps as necessary to adjust other image areas.
If the image expands or contracts, continue with then next step to adjust the linearity.
14.PresstheEscbuttontoreturntotheCornerWallscreen.
15. SelecttheLinearitysettingandpressEnter.
16. Adjustthelinearity by doing the following as necessary:
- Pressandholdtheleftarrowbuttontocontractthedistancebetweenhelinesclosesttotheletfor topoftheimage.
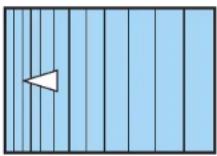
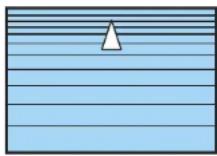
- Pressandholdtherightarrowbuttontocontractthedistancebetweenhelinesclosesttotheright orbottomoftheimage.
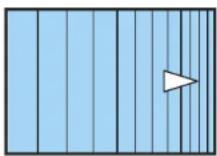
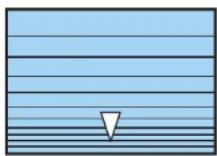
- When you are finished, pressMenu.
Note: If necessary, you can fine-tune the results of your Corner Wall adjustments using Point Correction.
Parenttopic:ImageShape
Relatedreferences
ProjectorSetupSettings-ExtendedMenu
Relatedtasks
DisplayingaTestPattern
CorrectingImageShapewithPointCorrection
RemoteControlOperation
Theremotecontrolletsyoucontroltheprojectorfromalmostanywhereintheroom,upto49feet(15m) away.Youcanpointitatthefrontorrearoftheprojector.
Makesurethatyouaimtheremotecontrolattheprojector'sreceiverswithintheangleslistedhere.
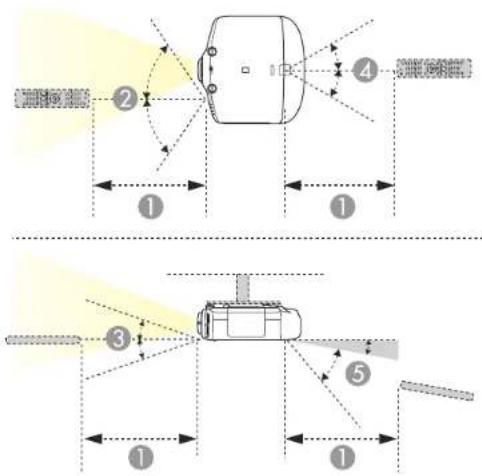
149feet(15m)
2±60°
3 ± 20^
4 ± 30^
5+10^ to +50^
Note: Avoid using the remote control in conditions with bright fluorescent lights or in direct sunlight, or theprojectormaynotrespondtocommands. If you will not use theremote control for alongtime, removethebatteries.
Parenttopic: UsingBasicProjectorFeatures
Relatedtasks
ReplacingtheRemoteControlBatteries
SelectinganImageSource
If you connected multiple images our cesto the projector, such as a computer and DVD player, you may want to switch from one images our ceto the other.
- Makesuretheconnectedimagesourceyouwanttouseisturnedon.
- For videoimagesources, insert a DVD or other videomedia and press its play button, if necessary.
3.Dooneofthefollowing:
- Press the Source Search button on the projector or the Search button on the remote control until youseetheimagefromthesourceyouwant.
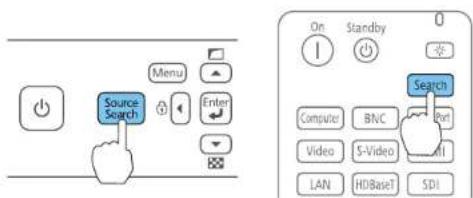
- Pressthebuttonforthesourceyouwantontheremotecontrol.
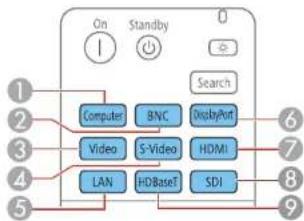
1 Computerportsource
2BNCportsource
3Videoportsource(compositevideo)
4S-Videoportsource
5Networksource
6DisplayPortsource
7HDMIportsource
8SDlportsource(PowerLiteProG6970WU)
9HDBaseTportsource
Parenttopic: UsingBasicProjectorFeatures
ProjectionModes
Dependingonhowyoupositionedtheprojector,youmayneedtochangetheprojectionmodesoyour imagesprojectcorrectly.
- Front(defaultsetting)letsyouprojectfromatableinfrontofthescreen.
- Front/Ceiling flips the image over top-to-bottom to project upside-down from a ceiling or wall mount.
•Rearflipstheimagehorizontallytoprojectfrombehindatransluentscreen.
- Rear/Ceiling flips the image over top-to-bottom and horizontally to project from the ceiling and behind atranslucentscreen.
ChangingtheProjectionModeUsingtheRemoteControl
ChangingtheProjectionModeUsingtheMenus
Parenttopic: UsingBasicProjectorFeatures
ChangingtheProjectionModeUsingtheRemoteControl
Youcanchangetheprojectionmodetofliptheimageovertop-to-bottom.
- Turnon the projector and display an image.
2.HolddowntheA/VMutebuttonontheremotecontrolforfiveseconds.
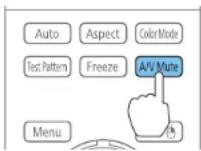
Theimagedisappearsbrieflyandreappearsflippedtop-to-bottom.
- To change projection back to the original mode, hold down the A/V Mute button for five seconds again.
Parenttopic: ProjectionModes
ChangingtheProjectionModeUsingtheMenus
You can change the projection model to flip the image over top-to-bottom and/or left-to-right using the projectormenus.
-
Turnon the projector and display an image.
2.PresstheMenubutton. -
SelecttheExtendedmenuandpressEnter.
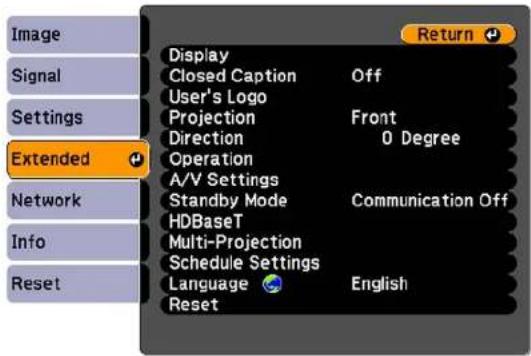
- SelecttheProjectionsettingandpressEnter.
- SelectaprojectionmodeandpressEnter.
- PressMenuorEsctoexitthemenus.
Parenttopic: ProjectionModes
ImageAspectRatio
Theprojectorcandisplayimagesindifferentwidth-to-heighttratioscalledaspectratios.Normallythe inputsignalfromyourvideosourcedeterminestheimage'saspectratio.However,forcertainimages youcanchangetheaspectratiotofityourscreenbypassingabuttonontheremotecontrol.
If you always want to use a particular aspect ratio for certain video inputs, you can select it using the projector's menus.
ChangingtheImageAspectRatio
AvailableImageAspectRatio
Parenttopic: UsingBasicProjectorFeatures
Relatedreferences
ImageQualitySettings-ImageMenu
ChangingthelmageAspectRatio
Youcanchangetheaspectratioofthedisplayedimagetoresizeit.
Note: Set the Screen Type setting in the projector's Extended menu before changing the aspect ratio.
- Turnon the projector and switch to the images source you want to use.
- PresstheAspectbuttonontheremotecontrol.
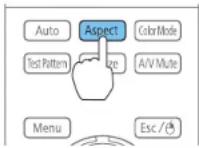
Theshapeandsizeofthedisplayedimagechanges,andthenameoftheaspectratioappears brieflyonthescreen.
- Tocyclethroughtheavailableaspectratiosforyourinputsignal, press the Aspectbutton repeatedly.
Parenttopic:ImageAspectRatio
Relatedtasks
SettingtheScreenType
AvailableImageAspectRatio
You can select the following image as spectratios, depending on these selected Screen Types setting and the inputs signal from your images source.
Note: Black bands and cropped or stretched images may project in certain aspect ratios, depending on theaspectratioandresolutionofyourinputsignal.
| ScreenTypesettingAvailableaspectratios | |
| 4:3AutoorNormal,4:3,6:9,Native* | |
| 16:9AutoorNormal,Full,Zoom,Native | |
| 16:10AutoorNormal,16:9,Full,Zoom,Native | |
*Available only when projecting computer images, or from sources connected to the HDMI or HDBaseT port
| AspectratiosettingDescription | |
| AutoAutomaticallysetstheaspectratio | accordingtotheinputsignal. |
| NormalDisplaysimagesinthesame | aspectratiooftheinputsignal. |
| 4:3Displaysimagesata4:3aspectratio. | |
| 16:9Displaysimagesata16:9aspectratio. | |
| FullDisplaysimagesusingthefullsize | oftheprojectionarea,butdoes notmaintaintheaspectratio. |
| ZoomDisplaysimagesusingthefullwidth | oftheprojectionareaand maintainstheaspectratiooftheimage.Areasthatexceedthe edgesoftheprojectedscreenarenotprojected. |
| NativeDisplaysimagesasis(aspectratioandresolutionaremaintained).Areasthatexceedtheedgesoftheprojectedscreenarenot projected. | |
Parenttopic:ImageAspectRatio
Relatedtasks
SettingtheScreenType
ColorMode
TheprojectoroffersdifferentColorModestoprovideoptimumbrightness,contrast,andcolorfora varietyofviewingenvironmentsandimagetypes.Youcanselectamodedesignedtomatchyourimage andenvironment,orexperimentwiththeavailablemodes.
If you always want to use a particular color mode for certain video inputs, you can select it using the projectormenus.
ChangingtheColorMode
AvailableColorModes
TurningOnAutolris
Parenttopic: UsingBasicProjectorFeatures
Relatedreferences
ImageQualitySettings-ImageMenu
ChangingtheColorMode
Youcanchangetheprojector'sColorModeusingtheremotecontroltooptimizetheimageforyourviewingenvironment.
- Turnon the projector and switch to the images source you want to use.
- If you are projecting from a DVD player or other videos source, insert ad disc or other video media and press the play button, if necessary.
- PresstheColorModebuttonontheremotecontroltochangetheColorMode.
The image appearance changes and then a name of the Color Mode appears briefly on the screen.
- To cycle through all the available Color Modes for your input signal, press the Color Mode button repeatedly.
Parenttopic:ColorMode
AvailableColorModes
YoucansettheprojectortousetheseColorModes,dependingontheinputsourceyouareusing:
| ColorModeDescription | |
| DynamicBestforprojectinginabrightroom | |
| PresentationBestforcolorpresentationsinabrightroom | |
| TheatreBestformoviesprojectedinadarkroom | |
| sRGBBestforstandardsRGBcomputerdisplays | |
| DICOMSIM ^1 | BestforprojectingX-rayphotographsandothermedicalimages |
| Multi-ProjectionBestforprojectingfrommultipleprojectors(reducesthecolortonedifferencebetweenimages) | |
^1 Available only when inputting RGB signals
Note: The DICOM SIM Color Mode is for reference purposes only and should not be used to make medical diagnoses.
Parenttopic:ColorMode
TurningOnAutolris
In certain colormodes, you can turn on the AutoIrissetting to automatically optimize the image based on the brightness of the content you project.
Note: Auto Iris is disabled if Edge Blending is set to On.
- Turnon the projector and switch to the images source you want to use.
2.PresstheMenubutton. - SelectthelmagemenuandpressEnter.
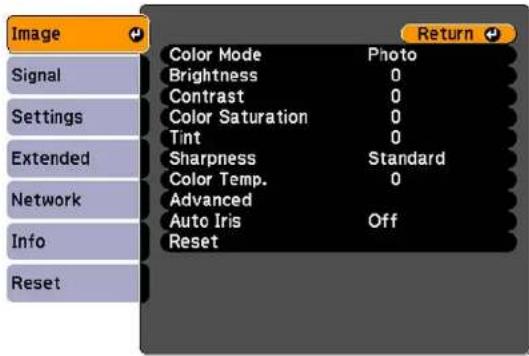
- SelecttheAutolrissettigandselectHighSpeed.
Note: Select Normal for quieter performance. You can turn Auto Iris on or off for each Color Mode that supports the feature. You cannot change the Auto Iris setting when you are using a Closed Captionsetting.
- PressMenuorEsctoexitthemenus.
Parenttopic:ColorMode
ControllingtheVolumewiththeVolumeButtons
YoucanusetheVolumebuttonsontheremotecontroltoadjustthevolumeasyouprojecta presentationwithaudio.Thevolumebuttonscontroltheprojectorsinternalspeakersystem(PowerLite ProG6070W/G6170/G6270W/G6470WU/G6570WU/G6770WU)oranyexternalspeakersyou connectedtotheprojector.
Youmustadjustthevolumeseparatelyforeachconnectedinputsource.
-
Turnon the projector and start apresentation that includes audio.
-
Tolowerorraisethevolume, presstheVolumebuttonsontheremotecontrol.
Avolumegaugeappearsonthescreen.
- Tosetthevolumetoaspecificlevelforaninputsource, usetheprojectormenus.
Parenttopic: UsingBasicProjectorFeatures
Relatedreferences
ProjectorFeatureSettings-SettingsMenu
SettingtheDateandTime
Youcansetthedateandtimefortheprojector.
- PresstheMenubutton.
- SelecttheExtendedmenuandpressEnter.
- SelecttheOperationsettingandpressEnter.
- SelecttheDate&TimesettingandpressEnter.
Youseeascreenlikethis:
![[Date & Time] Return Date & Time Daylight Saving Time Daylight Saving Time Off DST Start DST End DST Adjustment (min) 0 Internet Time](/content/2026/05/1054021/images/82bd0b79c9816bf1a224b845474046394c98181cfce25907c1ec1407a5e4cf29.jpg)
- SelecttheDate&TimesettingandpressEnter.
- Usethedisplayedkeyboardtoenterthedateandtime.
- When you are finished, pressMenu.
Parenttopic: UsingBasicProjectorFeatures
AdjustingProjectorFeatures
Followtheinstructionsinthesesectionstouseyourprojector'sfeatureadjustments.
ShuttingOffthePictureandSoundTemporarily
StoppingVideoActionTemporarily
ZoomingIntoandOutofImages
ProjectorSecurityFeatures
ProjectingTwoImagesSimultaneously
UsingMultipleProjectors
Viewing3DImages
SavingSettingstoMemoryandUsingSavedSettings
SavingaScheduledEvent
CopyingMenuSettingsBetweenProjectors
ShuttingOffthePictureandSoundTemporarily
Youcantemporarilyturnofftheprojectedpictureandsoundifyouwanttoredirectyouraudience's attentionduringapresentation.Anysoundorvideoactioncontinuestorun,however,soyoucannot resumeprojectionatthepointthatyoustoppededit.
If you want to display an images such as a company logo or picture when the presentation is stopped, you can setup this feature using the projector's menus.
Note: The lamp is still lit while using A/V Mute and the lamp hours will continue to accumulate.
- Press the A/V Mute button on the remote control to temporarily stop projection and mute any sound.
- Toturnthepictureandsoundbackon, press A/VMuteagain.
Parenttopic: AdjustingProjectorFeatures
Relatedreferences
ProjectorSetupSettings-ExtendedMenu
StoppingVideoActionTemporarily
Youcantemporarilystoptheactioninavideoorcomputerpresentationandkeepthecurrentimageon thescreen.Anysoundorvideoactioncontinuestorun,however,soyoucannotresumeprojectionatthe pointthatyoustoppededit.
- PresstheFreezebuttonontheremotecontroltostopthevideoaction.
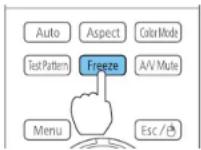
- Torestartthevideoactioninprogress, pressFreezeagain.
Parenttopic: Adjusting Projector Features
ZoomingIntoandOutofImages
Youcandrawattentiontopartsofapresentationbyzoomingintoapportionoftheimageandenlargingit onthescreen.
- PresstheE-Zoom+buttonontheremotecontrol.
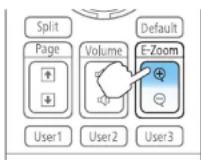
Youseeacrosshaironthescreenindicatingthecenterofthezoomarea.
-
Usethefollowingbuttonsontheremotecontroltoadjustthezoomedimage:
-
Usethearowbuttonstopositionthecrosshairintheimageareayouwanttozoominto.
- PresstheE-Zoom+buttonrepeatedlytozoomintotheimagearea,enlargingitasnecessary. PressandholdtheE-Zoom+buttontozoominmorequickly.
- Toparoundthezoomedimagearea, usethearrowbuttons.
- Tozoomoutoftheimage, presstheE-Zoom-buttonasnecessary.
•Toreturntotheoriginalimagesize,pressEsc.
Parenttopic: Adjusting Projector Features
ProjectorSecurityFeatures
You can secure your project to do better theft or prevent unintended use by setting up the following security features:
- Passwordsecuritytopreventtheprojectorfrombeingturnedon,andpreventchangestothestartup screenandothersettings.
- Buttonlocksecuritytoblockoperationoftheprojectorusingthebuttonsonthecontrolpanelorremote control.
• Securitycablingtophysicallycabletheprojectorinplace.
PasswordSecurityTypes
LockingtheProjector'sButtons
InstallingaSecurityCable
Parenttopic: AdjustingProjectorFeatures
PasswordSecurityTypes
Youcansetupthesetypesofpasswordsecurityusingonesharedpassword:
- Power On Protection password prevents anyone from using the projector without first entering a password.
- User's Logo Protection password prevents anyone from changing the custom screen the projector candisplaywhenitturnsonorwhenyouusetheA/VMutefeature.Thepresenceofthecustom screendiscouragestheftbyidentifyingtheprojector'sowner.
- Network Protection password prevents anyone from changing the network settings in the projector menus.
- Time/ScheduleProtectionpasswordpreventsanyonefromchangingtheprojector'stimeor schedulesettings.
SettingaPassword
SelectingPasswordSecurityTypes
EnteringaPasswordtoUsetheProjector
SavingaUser'sLogoImagetoDisplay
Parenttopic:ProjectorSecurityFeatures
SettingaPassword
Tousepasswordsecurity,youmustsetapassword.
- Hold down the Freeze button on the remote control for about five seconds or until you see this menu.
![[Password Protection] Power On Protection Off User's Logo Protection Off Network Protection Off Time/Schedule Protection Off Password](/content/2026/05/1054021/images/186a5f1a152a7e3c2b7f72724bf70ace9b0f643a0c5fcb237499df1a5ca5957a.jpg)
-
PressthedownarrowtoselectPasswordandpressEnter. Youseetheprompt"Changethepassword?".
-
SelectYesandpressEnter.
-
Press and hold down the Num button on the remote control and use the numeric buttons to set a four-digit password.
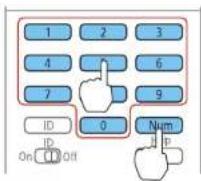
Thepassworddisplaysas****asyouenterit.Thenyouseetheconfirmationprompt.
5.Enterthepasswordagain.
Youseethemessage"Passwordaccepted."
- PressEsctoreturntothemenu.
7.Makeanoteofthepasswordandkeepitinasafeplaceincaseyouforgetit.
Parenttopic:PasswordSecurityTypes
SelectingPasswordSecurityTypes
Aftersettingapassword,youseethismenu,allowingyoutoselectthepasswordsecuritytypesyouwanttouse.
![[Password Protection] Power On Protection Off User's Logo Protection Off Network Protection Off Time/Schedule Protection Off Password](/content/2026/05/1054021/images/9c4b66dec812205b5c9e18a275f38f440c7ce181aa3712ba066789d3e9210890.jpg)
If you do not see this menu, hold down the Freeze button on the remote control for about five seconds or untilthemenuappears.
- To prevent unauthorized use of the projector, select Power On Protection, press Enter, select On, pressEnteragain,andpressEsc.
- To prevent changes to the User's Logo screen or related display settings, select User's Logo Protection, press Enter, select On, press Enter again, and press Esc.
- To prevent changes to network settings, select Network Protection, press Enter, select On, press Enteragain, and press Esc.
- To prevent changes to the projector's time or schedule settings, select Time/Schedule Protection, press Enter, select On, press Enter again, and press Esc.
Note: Be sure to keep the remote control in a safe place; if you lose it, you will not be able to enter the passwordrequiredtousetheprojector.
Parenttopic:PasswordSecurityTypes
EnteringaPasswordtoUsetheProjector
If a password is set up and a Power On Protection password is enabled, you see a prompt to enter a passwordwheneveryouturnontheprojector.
![[Password] Enter the password. See your documentation for more information.](/content/2026/05/1054021/images/695ae6e2c9a2fde987a581a40d5b0a1e051544fc937ad8622bb8bdb7838f1655.jpg)
Youmustenterthecorrectpasswordtousetheprojector.
- Press and hold down the Num button on the remote control while you enter the password using the numericbuttons.
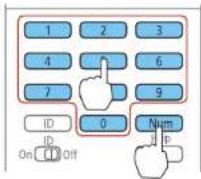
Note: Thedefaultpasswordis0000.
Thepasswordscreencloses.
-
If the password is incorrect, the following may happen:
-
Youseea"wrongpassword"messageandaprompttotryagain.Enterthecorrectpasswordto proceed.
- If you enter an incorrect password several times in succession, the projector displays are request code and messages get a contact Epson Support. Donot attempt to enter the password again. When you contact Epson Support, provide the displayed request code and proof of ownership for assistance in unlocking the projector.
Parenttopic:PasswordSecurityTypes
SavingaUser'sLogolmagetoDisplay
Youcantransferanimagetotheprojectorandthendisplayitwhenevertheprojectorturnson. Youcan alsodisplaytheimagewhentheprojectorisnotreceivinganinputsignalorwhenyoutemporarilystop projection(usingtheA/VMutefeature). ThistransferredimageiscalledtheUser'sLogoscreen.
TheimageyouselectastheUser'sLogocanbeaphoto,graphic,orcompanylogo,whichisusefulin identifyingtheprojector'sownertohelpdetertheft.YoucanpreventchangestotheUser'sLogoby settinguppasswordprotectionforit.
-
DisplaytheimageyouwanttoprojectastheUser'sLogo.
-
Press the Menu button, select the Extended menu, and press Enter.
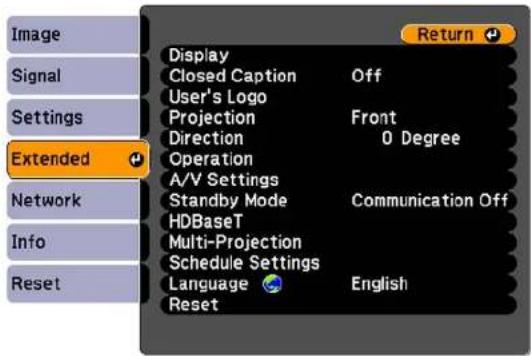
- Select the User's Logosetting and press Enter.
Youseeapromptaskingifyouwanttousethedisplayedimageasauser'slogo.
- SelectYesandpressEnter.
Youseeaselectionboxoverlayingyourimage.
- Usethearrowbuttonsontheremotecontroltosurroundtheimageareayouwanttouseasthe User'sLogoandpressEnter.
Youseeapromptaskingifyouwanttoselectthisimagearea.
- Select Yes and press Enter. (If you want to change the selected area, select No, press Enter, and repeatthelaststep.)
YouseetheUser'sLogozoomfactormenu.
![[User's Logo] Set the zoom factor. Zoom factor: 100% 200% 300%](/content/2026/05/1054021/images/079609ae571d22aaf7553f24291d2160ea544d560e34417338c91d7cc4942e65.jpg)
- SelectazoompercentageandpressEnter.
YouseeapromptaskingifyuwanttosavetheimageastheUser'sLogo.
- Select Yes and press Enter.
Youseeacompletionmessage.
- PressEsctoexitthemessagescreen.
- SelecttheExtendedmenuandpressEnter.
- SelectDisplayandpressEnter.
-
SelectwhenyouwanttodisplaytheUser'sLogoscreen:
-
To display it whenever there is no input signal, select Display Background and set it to Logo.
• To display it whenever you turn the projector on, select Startup Screen and set it to On.
• To display it whenever you press the A/V Mute button, select A/V Mute and set it to Logo.
TopreventanyonefromchangingtheUser'sLogosettingswithoutfirstenteringapassword,seta passwordandenableUser'sLogosecurity.
Parenttopic:PasswordSecurityTypes
LockingtheProjector'sButtons
Youcanlockthebuttonsontheprojector'scontrolpaneltopreventanyonefromusingtheprojector.You canlockallthebuttonsonallthebuttonsexceptthepowerbutton.
-
PresstheMenubutton.
-
SelecttheSettingsmenuandpressEnter.
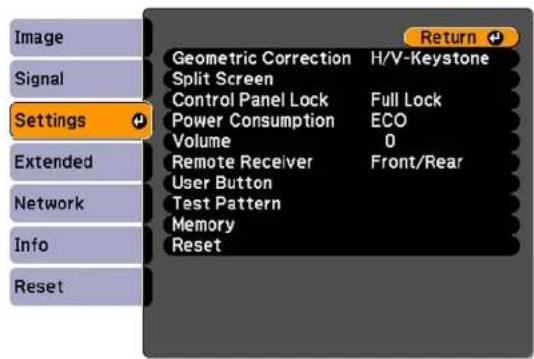
- SelecttheControlPanelLocksettingandpressEnter.
- SelectoneoftheselocktypesandpressEnter:
•Tolockalloftheprojector'sbuttons,selectFullLock.
- Tolockallbuttonsexceptthepowerbutton,selectPartialLock.
Youseeaconfirmationprompt.
- SelectYesandpressEnter.
UnlockingtheProjector'sButtons
Parenttopic:ProjectorSecurityFeatures
UnlockingtheProjector'sButtons
If the projector's buttons have been locked, hold the Enter button on the projector's control panel for sevensecondstounlockthem.
Parenttopic:LockingtheProjector'sButtons
InstallingaSecurityCable
Youcaninstalltwotypesofsecuritycablesontheprojectortodetertheft.
- Use the security slot on the project to attach a Kensington lock. See your local computer or electronics dealer for purchase information.
- Use the security cable attachment point on the project to attach a wire cable and secure it to a room fixture or heavy furniture.
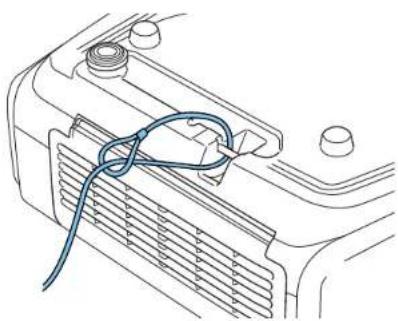
natural_image
Line drawing of a car hood with a blue cable tied to a component (no text or symbols)Note: Do not pass drop-prevention cables through the security cable attachment point when mounting the projectoronawallorceiling.
Parenttopic: ProjectorSecurityFeatures
Relatedreferences
ProjectorParts-Rear
ProjectingTwolmagesSimultaneously
Youcanusethesplitscreenfeaturetosimultaneouslyprojecttwoimagesfromdifferentimagesourcesnexttoeachother.Youcancontrolthesplitscreenfeatureusingtheremotecontrolortheprojectormenus.
Note: While you use the split screen feature, other projector features may not be available and some settingsmaybeautomaticallyappliedtobothimages.
Note: You cannot project from the same input source onto both sides (left and right) of the screen. You also cannot uses splitscreen with certain inputs source combinations.
- PresstheSplitbuttonontheremotecontrol.
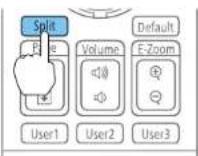
The currently selected inputs our current source of the left side of the screen.
2.PresstheMenubutton.
Youseethisscreen:
![[Split Screen Setup] Screen Size ●Equal Source Swap Screens Audio Source Auto Exit Split Screen](/content/2026/05/1054021/images/50bef6e14c0025fd43bf6af589873a180d40ea2843d73ddb0e18699f4030d5dc.jpg)
- To select an input source for the other image, select the Source setting, press Enter, select the input source, select Execute, and press Enter. (You can also change image sources, if necessary.)
- To switch the images, select the Swap Screens setting and press Enter.
- To change the image sizes, select the Screen Size setting, press Enter, select a sizing option, pressEnter, and pressMenutoexit.
Note: Depending on the video input signals, the images may not appear at the same size even if you choose the Equal setting.
- To choose the audio you want to hear, select the Audio Source setting, press Enter, select an audiooption, press Enter, and press Menutoexit.
Note: Select Auto to hear audio from the largest screen or the left screen.
- Toexitthesplitscreenfeature, presstheSplitorEscbutton.
Parenttopic:AdjustingProjectorFeatures
UsingMultipleProjectors
Youcancombinetheprojectedimagesfromtwoormoreprojectorstocreateonelargeimage. The followingtwooptionsareavailable:
- Projectdifferentimagesfromeachprojectorandcreateoneseamlessimage
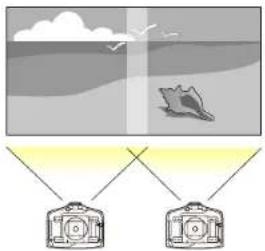
- ProjectthesameimagefromeachprojectorandusetheScalefeaturetocreateoneseamlessimage
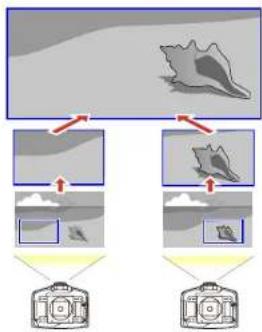
flowchart
graph TD
    A["Input Image"] --> B["Image Collection"]
    B --> C{Decision}
    C -->|Yes| D["Output Camera"]
    C -->|No| E["Image Output"]
    D --> F["Final Camera"]
    E --> F
Followtheinstructionsinthesesectionstosetupandprojectfrommultipleprojectors.
ProjectorIdentificationSystemforMultipleProjectorControl
Adjusting the Position of the Projected Image From Multiple Projectors
ScalinganImage
Adjusting the Lamp's Brightness
BlendingtheImageEdges
AdjustingtheBlackLevel
MatchingtheImageColors
Parenttopic: AdjustingProjectorFeatures
ProjectorIdentificationSystemforMultipleProjectorControl
Youcanoperatemultipleprojectorsusingoneremotecontrolformoreelaboratepresentations. Todo this, youassignanidentificationnumbertoeachprojectorandtotheremotecontrol. Thenyoucan operatealltheprojectorsatonceorindividually.
Youcanalsomatchthecolorsdisplayedbyanyprojectorsyouplantouseneareachother.
Caution: Leave at least 20 inches (50 cm) of space between the projector to prevent them from overheating.
SettingtheProjectorID
SettingtheRemoteControlID
Parenttopic: Using Multiple Projectors
SettingtheProjectorID
If you want to control multiple projectors from a remote control, give each projector a unique ID.
-
PresstheMenubutton.
-
SelecttheExtendedmenuandpressEnter.
-
SelecttheMulti-ProjectionmenuandpressEnter.
-
SelectProjectorIDandpressEnter.
![[Projector ID] Off 1 2 3 4 5 6 7 8 9](/content/2026/05/1054021/images/dadb41ca30916b6871452d0c53cb6fa3367bf4cdfba8e158d0a482e956b2708a.jpg)
- Use the arrow button on theremote control to select the identification number you want to use for the projector. Then press Enter.
Repeat these steps for all the other projectors you want to operate from one remote control.
Parenttopic: ProjectorIdentificationSystemforMultipleProjectorControl
SettingtheRemoteControlID
The remote control's ID is set to 0 by default so it can operate any compatible projector. If you want to set theremotecontroltooperateonlyaparticularprojector,youneedtosettheremotecontrol'sIDtomatch theprojector'sID.
- Turnon theprojectoryouwanttheremotecontroltooperatewithexclusively.
- SettheremotecontrolIDswitchtoOn.
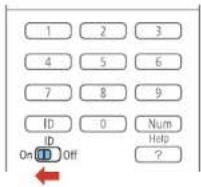
- Hold down the ID button on the remote control while you press the numeric button that matches the projector'sID.Thenreleasethebuttons.
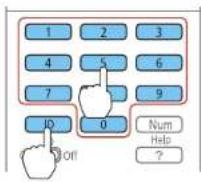
Note: If you don't know the projector's ID, hold down the ID button and press the Help button to temporarily display the projector's Donthescreen. If the batteries are left out of theremote control for an extended period, theremote control is return to its default setting.
Parenttopic:ProjectorIdentificationSystemforMultipleProjectorControl
AdjustingthePositionoftheProjectedImageFromMultipleProjectors
If you need to adjust the position of a projected image from multiple projectors, perform the adjustments in the order listed here.
Note: You can display a pattern to aid in adjusting the projected image using the Settings menu.
Note: You can also display a pattern to aid in adjusting the projected image using the Test Pattern buttonontheremotecontrol.
- Adjust the projector's physical position and angle to the screen.
- Usetheprojector'slensshiftandzoomfeatures.
Note: Wait30minutesafterturningontheprojectorbeforesettingthelensshiftandzoomfor maximumaccuracy.
- Adjust the imageshape using these Geometric Correction settings:
-QuickCorner
-PointCorrection
Parenttopic: Using Multiple Projectors
Relatedconcepts
ProjectorPlacement
Relatedtasks
DisplayingaTestPattern
AdjustingtheImagePositionUsingLensShift
ResizingtheImagewiththeZoomRing
CorrectingImageShapewithQuickCorner
CorrectingImageShapewithPointCorrection
ScalinganImage
YoucanprojectthesameimagefrommultipleprojectorsandusetheScalefeaturetocropandcombine themintoonelargeimage.
-
PresstheMenubutton.
-
SelecttheSignalmenuandpressEnter.
-
SelecttheScalesettingandpressEnter.
Youseethisscreen:
![[Scale] Scale Off Scale Mode Zoom Display Scale Vertically x 0.00 Scale Horizontally x 0.00 Image Display Range](/content/2026/05/1054021/images/760de17dadcf83d833a327ee059c7851cc156d3afc4ce45212727464bfba1ffa.jpg)
-
SelecttheScalesettingandselectOn.
-
SelecttheScaleModesettingandselectoneofthefollowingoptions:
- ZoomDisplay: Maintain the image aspect ratio as your scale the image
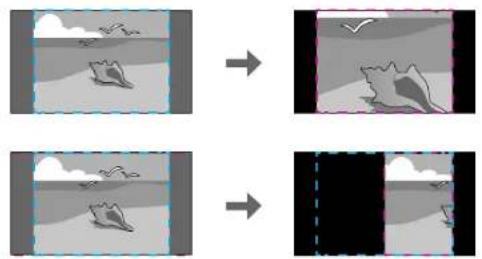
natural_image
Four-panel diagram showing a transition from a landscape with mountains to a landscape with birds and clouds, ending in a black rectangle (no text or symbols)•FullDisplay:Adjuststheimagetotheprojector'sscreensizeasyouscaletheimage
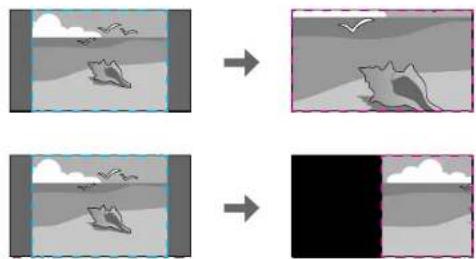
natural_image
Four-panel diagram showing a beach scene with birds and waves, before and after transformation (no text or symbols)-
Selectoneormoreofthefollowingscalingoptionsandadjustitasnecessary:
-
or +: Scales the image horizontally and vertically at the same time
•ScaleVertically:Scalestheimageverticallyonly
•ScaleHorizontally:Scalestheimagehorizontallyonly -
Select the Image Display Range setting and use the arrow buttons to adjust the coordinates and sizeofeachimageasyouviewthescreen.
-
When you are finished, press the Menubutton.
Parenttopic: Using Multiple Projectors
AdjustingtheLamp'sBrightness
When projecting with multiple projectors, you must adjust the brightness settings so that all projectors are as bright asthedarkest lamp.
Note: Even after adjusting the brightness levels, the brightness of each lamp may not match exactly.
- Turnonalltheprojectorsanddisplaythesameimage.
- SelectNormalforthePowerConsumptionsetting.
- Select Multi-Projection or 3D Multi-Projection (for 3D images) for the color mode.
4.PresstheMenubutton. - SelecttheExtendedmenuandpressEnter.
- SelecttheMulti-ProjectionsettingandpressEnter.
- Select the Brightness Level setting and press Enter (not available for the PowerLite Pro G6470WU).
- Selectabrightnesslevel.
- PressEsctoreturntotheprevioussscreen.
Parenttopic: Using Multiple Projectors
Relatedconcepts
ColorMode
Relatedreferences
ProjectorFeatureSettings-SettingsMenu
BlendingtheImageEdges
Youcanusetheprojector'sEdgeBlendingfeaturetocreateaseamlessimagefrommultipleprojectors.
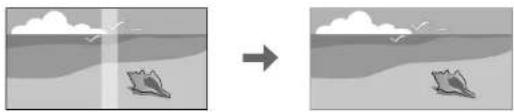
natural_image
Two grayscale images showing a beach scene with birds flying above and a small boat on the water, connected by an arrow (no text or symbols)- PresstheMenubutton.
- SelecttheExtendedmenuandpressEnter.
- SelecttheMulti-ProjectionsettingandpressEnter.
- SelecttheEdgeBlendingsettingandpressEnter.
Youseethisscreen:
![[Edge Blending] Return Edge Blending Off Top Edge Off Bottom Edge Off Left Edge Off Right Edge Off Blend Curve 0 Black Level Guide Display Off Pattern Guide Off Guide Colors Pattern 1](/content/2026/05/1054021/images/9c3d69013f26089e5931816685abd44cd478bd4b37b1646bb55b68224b8cb2df.jpg)
- Turn on the Edge Blending, Guide Display, and Pattern Guide settings.
Note: If the projected guide is unclear, try changing the Guide Colors setting.
- SelecttheedgeyouwanttoblendandpressEnter.
Youseeascreenlikethis:
![[Top Edge] Blending Off Blend Range 0 Return](/content/2026/05/1054021/images/4705b4523b820bf8808d5c218cd16ff4b7c7d146b7a7e62b26d12b619e7848d2.jpg)
-
SelecttheBlendingsettingandselectOn.
-
SelecttheBlendRangesettingandselectthewidthoftheblendedarea.
Settherangesothatthedisplayedguidesareattheedgesoftheoverlappingareabetweenthettwo images.
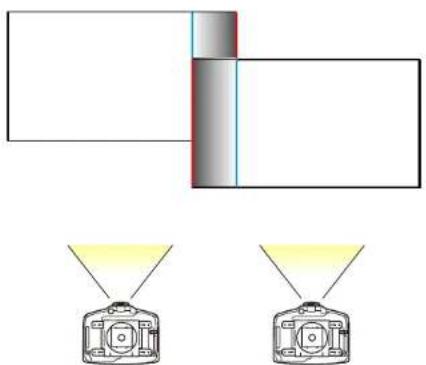
natural_image
Diagram showing two identical camera setups with yellow light beams, no text or symbols present- Press Esctogobacktothepreviousscreen.
- SelecttheBlendCurvesetting(PowerLitePro G6070W/G6170/G6270W/G6470WU/G6570WU/G6770WU) and selectagradientfortheshaded area.
- When the edges are blended, turn off the Guide Display and Pattern Guide settings to check the finalsettings.
- When you are finished, press the Menubutton.
Parenttopic: Using Multiple Projectors
AdjustingtheBlackLevel
Whentwoimagesoverlap.theoverlappingareacanbedifferentinbrightnessandtonefromtheareas thatdonotoverlap.Youcanusetheprojector'sBlackLevelsettingtoreducethisdifferenceandmakeit lessnoticeable(PowerLiteProG6870/G6970WU).
natural_image
Simple diagram showing a red arrow pointing downward from a vertical dashed line between two gray rectangular blocks (no text or symbols)Note:
-
You cannot adjust the black level when a test pattern is displayed.
•Thebrightnessandtoneoftheoverlappingareasmaydifferfromtherestoftheimageevenafter adjustingtheblacklevel. -
PresstheMenubutton.
- SelecttheExtendedmenuandpressEnter.
- SelecttheMulti-ProjectionsettingandpressEnter.
- SelecttheEdgeBlendingsettingandpressEnter.
Youseethisscreen:
![[Edge Blending] Return Edge Blending Off Top Edge Off Bottom Edge Off Left Edge Off Right Edge Off Blend Curve 0 Black Level Guide Display Off Pattern Guide Off Guide Colors Pattern 1](/content/2026/05/1054021/images/c01d2554510d4ad04b432f8692c9837af0fd11c8ad4373ec39ae400c6c0afb72.jpg)
- SelecttheBlackLevelsettingandpressEnter.
Youseethisscreen:
![[Black Level] Return Signal Settings Area Correction Color Adjustment Reset Extended Network Info Reset](/content/2026/05/1054021/images/bf9e180489ad35dc8441c8bbd4175b726bc26abada3803d6faf53db22bf1f65d.jpg)
- SelecttheAreaCorrectionsettingandpressEnter.
Thepointsyoucanusetosettherangeforblackleveladjustmentsaredisplayed.
Note: The points displayed differ depending on the edge settings (Top Edge, Bottom Edge, Right Edge, Left Edge) and the selected Geometric Correction setting. For example, if Left Edge is set and 5 × 5 is selected for the Point Correction setting, you see a screen like this:
natural_image
Pure diagram of a mechanical or optical component with no text, numbers, or symbols- UsethearrowbuttonstoselectanadjustmentpointandpresstheEnterbutton.
Theselectedpointturnsorange.
- Usethearowbuttonstomovethepointtotheedgeoftheblendingarea.
-
Tomoveanotherpoint, presstheEscbuttonandrepeattheprevioustwosteps.
-
When you are finished, press the Esc button twice and select Yes when you see the confirmation messagetoreturntotheBlackLevelmenuscreen.
Note: Changing any of the Top Edge, Bottom Edge, Right Edge, or Left Edge settings resets the BlackLevelsettingtoitsdefaultvalue.
- Select the Color Adjustment setting and press Enter.
Youseethisscreen:
![[Color Adjustment] Brightness Correct. 0 Color Correct. (G/R) 0 G Color Correct. (B/Y) 0 B Return R Y](/content/2026/05/1054021/images/4dba92461fee02554bf6a49fe071c4ca0d651fc38d415c323b1497f69c07b1ae.jpg)
- Adjust the brightness and tone of the area that don to overlaptomatch the area that overlap using the displayed adjustments sliders.

natural_image
Simple diagram showing a curved arrow on the left and a vertical dashed line on the right, both without any text or symbols.- When you are finished, press the Menubuttonto exit.
Parenttopic: Using Multiple Projectors
MatchingthelmageColors
You can match the display quality of multiple projector that will project next to each other.
Note: Make sure you select Multi-Projection or 3D Multi-Projection (for 3D images) for the color mode. Brightnessandcolorsmaynotmatchexactlyevenafterperformingthestepsbelow.
- PresstheMenubutton.
- SelecttheExtendedmenuandpressEnter.
- SelecttheMulti-ProjectionsettingandpressEnter.
- SelecttheMulti-screensettingandpressEnter.
Youseethisscreen:
![[Multi-screen] Adjustment Level Lv. 0 Return Brightness Correct. 0 Color Correct. (G/R) 0 G R Color Correct. (B/Y) 0 B Y](/content/2026/05/1054021/images/14dfded9a4613f88209f3bc1f8d7f302a4984ec0ff87f3bd876d93a302d52884.jpg)
Note: Press Enter to toggle between the projected image and the adjustment screen.
- Set the Adjustment Level setting to 1 and press Enter.
- SettheremotecontrolIDtomatchthesecondprojector.
- Access the Extended menu Multi-screen setting on the second projector and set the Adjustment Levelsettingto1.
- Adjust the Brightness Correct. setting on the projector with the darkest display so it matches the lighter display, and press Enter. (You may need to switch the remote control ID back and forth to makeadjustmentstoeachprojectorinallofthesesteps.)
- Change the Adjustment Level setting to 5 on each projector, but this time match the lighter display tothedarkerone.
-
Adjust the Brightness Correct. setting on Adjustment Level 2, 3, and 4 in the same way.
-
Adjust the Color Correct. settings for green-to-red (G/R) and blue-to-yellow (B/Y) balance for all the levelsonbothprojectorsinthesameway.
- If you need to match more projectors, repeat these steps matching projector 3 to projector 2, 4 to 3, and soon.
Parenttopic: Using Multiple Projectors
Relatedconcepts
ColorMode
Viewing3DImages
Using an optional polarizer and 3D glasses, you can usetwoprojector stop project and view passive 3D images. Seethe instruction supplied with the optionalequipment for setup and use.
For optimal viewing, select the 3D Images setting from the Signal menu and select one of the 3D color modes.
Parenttopic: AdjustingProjectorFeatures
Relatedconcepts
ColorMode
SavingSettingstoMemoryandUsingSavedSettings
Youcansavecustomizedsettingsforeachofyourvideoinputsandthenselectthesavedsettings wheneveryouwanttousethem.
- Turnon the projector and display an image.
- PresstheMenubutton.
- SelecttheSettingsmenuandpressEnter.
- Select the Memory setting and press Enter.
Youseethisscreen:
![[Memory] Return Load Memory Save Memory Erase Memory Rename Memory Settings Extended Network Info Reset](/content/2026/05/1054021/images/e7f400690c41ee2f645dc3e3e24cf99b378c3f9f89a53f4c497bc25dad39518a.jpg)
-
Selectone of the following options:
-
LoadMemory: Overwrites your current settings with saved settings
- SaveMemory: Savesyourcurrentsettingstomemory(10memorieswithdifferentnamesare available)
Note: Amemorynamethathasalreadybeenusedisindicatedbyagreenmark. Savingovera previously saved memory over writes the settings with your current settings.
-
EraseMemory: Erasestheselectedmemorysettings
•RenameMemory: Renamesasavedmemory -
PressEsctoexit.
Parenttopic:AdjustingProjectorFeatures
SavingaScheduledEvent
Youcanselectprojectorcommandsyouwanttoperformandschedulethemasanevent.
- PresstheMenubutton.
-
SelecttheExtendedmenuandpressEnter.
-
SelecttheScheduleSettingssettingandpressEnter.
TheScheduleSettingsscreenappears.
-
SelecttheSchedulemenuandpressEnter.
-
SelectAddNewandpressEnter
-
In the Event Settings section, select the events you want to have occur. (Select No Change for eventsthatyoudonotwanttooccur.)
-
IntheDate/TimeSettingssection, setthedate and timeforthescheduledeventstooccur.
-
When you are finished, select Save and press Enter.
-
Toschedulemoreevents, repeat the previous 4 steps.
-
SelectSetupcompleteandselectYestosaveyourchanges.
ViewingScheduledEvents
EditingaScheduledEvent
Parenttopic:AdjustingProjectorFeatures
ViewingScheduledEvents
Youcanviewanycurrentlyscheduledevents.
-
PresstheMenubutton.
-
SelecttheExtendedmenuandpressEnter.
-
SelecttheScheduleSettingssettingandpressEnter.
Youseeascreenlikethis:
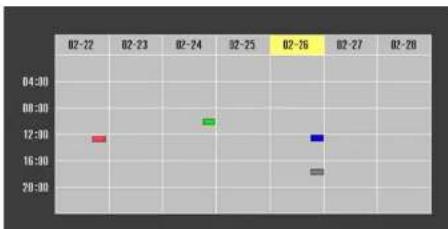
line
| Date | Value | |---|---| | 02-22 | 12:00 | | 02-23 | 14:00 | | 02-24 | 16:00 | | 02-25 | 18:00 | | 02-26 | 20:00 | | 02-27 | 16:00 | | 02-28 | 14:00 |The colored boxes in the calendar indicate the following about the scheduled events:
One-timeevent
Reoccurringevent
Communicationison/off
Eventisinvalid
Parenttopic: SavingaScheduledEvent
EditingaScheduledEvent
Youcaneditanycurrentlyscheduledevent.
- PresstheMenubutton.
- SelecttheExtendedmenuandpressEnter.
- SelecttheScheduleSettingssettingandpressEnter.
Youseeascreenlikethis:
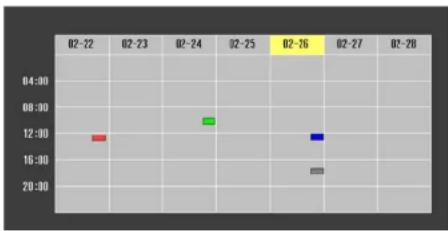
bar
| Time | Value | |---|---| | 02-22 | 12:00 | | 02-23 | 12:00 | | 02-24 | 15:00 | | 02-25 | 15:00 | | 02-26 | 15:00 | | 02-27 | 15:00 | | 02-28 | 15:00 |4.Presstheleftorightarrowbuttonstohighlighthedateonthecalendarcontainingthescheduled eventyouwanttoedit.
5.Presstheupordownarrowbuttonstohighlightheeventyouwanttoedit,andpressEsc.
6. Selectoneofthefollowing:
- On/Off: Enableordisabletheselectedevent.
- Edit:Editthesettingsfortheselectedevent.
- Clear: Deletetheselectedevent.
-
AddNew:Addanewscheduledevent.
-
When you are finished, select Return and press Enter.
- SelectSetupcompleteandselectYestosaveyourchanges.
Note: To delete all scheduled events, select Schedule Reset and select Yes.
Parenttopic: SavingaScheduledEvent
CopyingMenuSettingsBetweenProjectors
After you select menu settings for your projector, you can transfer them to another projector of the same model.
Note: Copy the projector's settings before you adjust the projected image using the projector's GeometricCorrectionsettings.AnysavedUser'sLogosettingontheprojectorwilltransfertotheother projector.
Caution: If the copy process fails due to a power failure, communication error, or for any other reason, Epsonwillnotberesponsibleforanyrepaircostsincurred.
The following settings will not transfer between projectors:
- Infomenuitems
•NetworkmenusettingsotherthanthoseintheMailandOthersmenus
Note: In addition to the methods covered this section, you can also copy and transfer settings to multiple projectoroveranetworkusingtheEasyMPNetworkUpdatersoftware.SeetheEasyMPNetwork Updater Operation Guide for instructions. You can download the latest software and documentation from the Epson web site. Go to epson.com/support (U.S.) or epson.ca/support (Canada) and select your projector.
SavingSettingstoaUSBFlashDrive
TransferringSettingsFromaUSBFlashDrive
SavingSettingsToaComputer
TransferringSettingsFromaComputer
Parenttopic: AdjustingProjectorFeatures
SavingSettingstoaUSBFlashDrive
YoucansavetheprojectorsettingsyouwanttotransfertoaUSBflashdrive(PowerLitePro G6070W/G6170/G6270W/G6470WU/G6570WU/G6770WU).
Note: Use an empty flash drive. If the drive contains other files, the transfer may not complete correctly.
- Turnoff the projector and unplug the power cord from the projector's power inlet.
- Insert the flash drive into the wireless LAN module port.
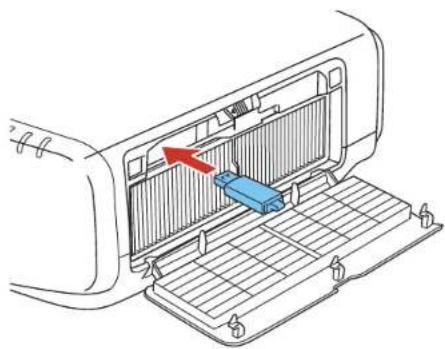
natural_image
Diagram of a car air conditioner unit with a blue internal component and red arrow indicating airflow direction (no text or symbols)Note: Connect the flash driven directly to the projector. Donotuseahub.
- Press and hold the Esc button on the control panel or remote control as you connect the power cord to the projector's power inlet.
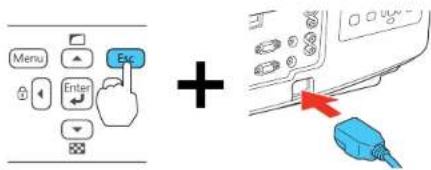
- Whenthepower, Lamp, and Templightsturnorange, releasethe Escbutton.
Thelightsflashtoindicate that settings are transferring to the flash drive. Whenthelightsstop flashing, the power light turns orange and the projectorenters standby mode.
Caution: Do not unplug the power cord or remove the flash drive while the lights are flashing. This could damage the projector.
- Oncetheprojectorentersstandbymode, removetheflashdrive.
Parenttopic: CopyingMenuSettingsBetweenProjectors
Relatedreferences
ProjectorLightStatus
TransferringSettingsFromaUSBFlashDrive
AftersavingprojectorsettingstoaUSBflashdrive,youcantransferthemtoanotherprojectorofthe samemodel(PowerLiteProG6070W/G6170/G6270W/G6470WU/G6570WU/G6770WU).
Note: Make sure the USB flash drive contains only a single settings transfer from another projector of the same model. The settings are contained in a file called pjconfdata.bin. If the drive contains other files, the transfer may not complete correctly.
Donotadjustimagesettingsonaprojectoruntilafteryoutransfersettingstoit. Otherwise, you may have to repeate your adjustments.
-
Turnoff the projector and unplug the power cord from the projector's power inlet.
-
Insert the flash drive into the wireless LAN module port.
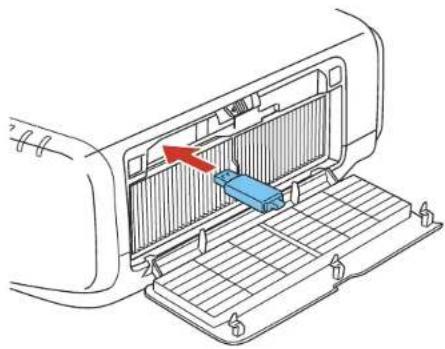
natural_image
Diagram of a car air conditioner unit with a blue plastic component inserted into the back panel (no text or symbols)Note: Connect the flash driven directly to the projector. Donotuseahub.
- Press and hold the Menu button on the control panel or remote control as you connect the power cordtotheprojector'spowerinlet.
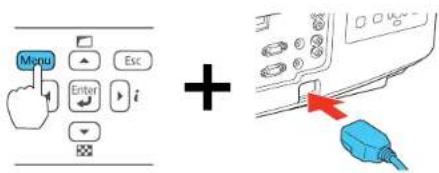
- Whenthepower, Lamp, and Templightsturnorange, releasethe Menubutton.
Thelightsflashtoindicatethatsettingsaretransferringtotheprojector.Whenthelightsstop flashing,thepowerlightturnsorangeandtheprojectorentersstandbymode.
Caution: Do not unplug the power cord or remove the flash drive while the lights are flashing. This could damage the projector.
- Oncetheprojectorentersstandbymode, removetheflashdrive.
Parenttopic: CopyingMenuSettingsBetweenProjectors
Relatedreferences
ProjectorLightStatus
SavingSettingsToaComputer
Youcansavetheprojectorsettingsyouwanttotransfertoacomputer(PowerLitePro G6870/G6970WU).
Yourcomputermustberunningoneofthefollowingoperatingsystems:
- WindowsVista
- Windows7
- Windows8.x
-OSX10.5.8
-OSX10.6.x
-OSX10.7.x
-OSX10.8.x
-OSX10.9.x
-OSX10.10.x
-
Turnoff the projector and unplug the power cord from the projector's power inlet.
-
ConnectaUSBcabletoyourproject'sServiceport.
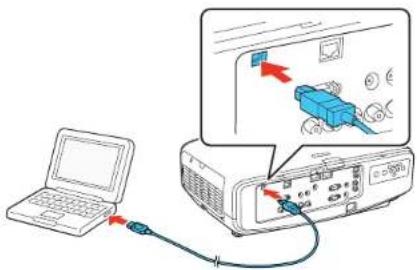
natural_image
Diagram showing a laptop connected to an electronic device via cable, with a monitor displaying a blue object and red arrows indicating action (no text or symbols present)-
Connect the other end to any available USB port on your computer.
-
Press and hold the Esc button on the control panel or remote control as you connect the power cord totheprojector'spowerinlet.
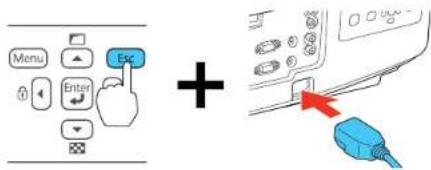
- Whenthepower, Lamp, and Templightsturnorange, releasethe Escbutton.
Theprojectorshowsupasaremovablediskonyourcomputer.
-
Opentheremovablediskandcopythepjconfdata.binfiletoyourcomputer.
-
Oncethefilehascopied,dooneofthefollowing:
- Windows: Open the My Computer, Computer, or Windows Explorer utility. Right-click the nameofyourprojector(listedasaremovabledisk)andselectEject.
- OSX:Dragtheremovablediskiconforyourprojectorfromthedesktopintothetrash.
Theprojectorentersstandbymode.
Parenttopic: CopyingMenuSettingsBetweenProjectors
Relatedreferences
ProjectorLightStatus
TransferringSettingsFromaComputer
Aftersavingprojectorsettingstoacomputer,youcantransferthemtoanotherprojectorofthesame model(PowerLiteProG6870/G6970WU).
Yourcomputermustberunningoneofthefollowingoperatingsystems:
- WindowsVista
- Windows7
- Windows8.x
-OSX10.5.8
-OSX10.6.x
-OSX10.7.x
-OSX10.8.x
-OSX10.9.x
-OSX10.10.x
Donotadjustimagesettingsonaprojectoruntilafteryoutransfersettingstoit. Otherwise, you may have to repeat your adjustments.
-
Turnoff the projector and unplug the power cord from the projector's power inlet.
-
ConnectaUSBcabletoyourprojector'sServiceport.
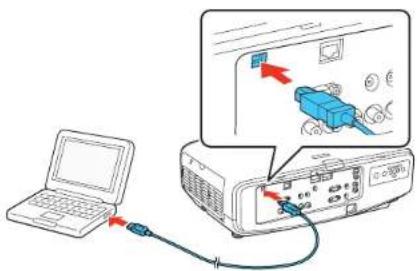
-
Connect the other end to any available USB port on your computer.
-
Press and hold the Menu button on the control panel or remote control as you connect the power cordtotheprojector'spowerinlet.
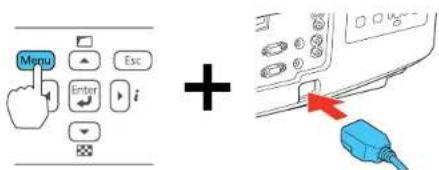
- Whenthepower, Lamp, and Templightsturnorange, releasethe Menubutton.
Theprojectorshowsupasaremovablediskonyourcomputer.
- Copythepjconfdata.binfilefromyourcomputertotheremovabledisk.
Note: Donotcopyanyotherfilestotheremovabledisk.
- Oncethefilehascopied,dooneofthefollowing:
- Windows: Open the My Computer, Computer, or Windows Explorer utility. Right-click the nameofyourprojector(listedasaremovabledisk)andselectEject.
- OSX:Dragtheremovablediskiconforyourprojectorfromthedesktopintothetrash.
Thepower, Status, Lamp, and Templights start flashing to indicate that the projector's settings are being updated. Whenthelights stop flashing, the power light turns orange and the projectorenters standby mode.
Caution: Donotunplugthepowercordwhilethelightsareflashing. This could damage the projector.
Parenttopic: CopyingMenuSettingsBetweenProjectors
Relatedreferences
ProjectorLightStatus
AdjustingtheMenuSettings
Followtheinstructionsinthesesectionstoaccesstheprojectormenusystemandchangeprojector settings.
UsingtheProjector'sMenus
ImageQualitySettings-ImageMenu
InputSignalSettings-SignalMenu
ProjectorFeatureSettings-SettingsMenu
ProjectorSetupSettings-ExtendedMenu
ProjectorNetworkSettings-NetworkMenu
ProjectorInformationDisplay-InfoMenu
ProjectorResetOptions-ResetMenu
UsingtheProjector'sMenus
Youcanusetheprojector'smenustoadjustthesettingsthatcontrolhowyourprojectorworks. The projectordisplaysthemenusonthescreen.
- Pressthe Menubutton on the control panel or remote control.
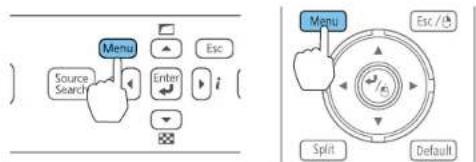
Youseethemenuscreendisplayingthelmagemenusettings.
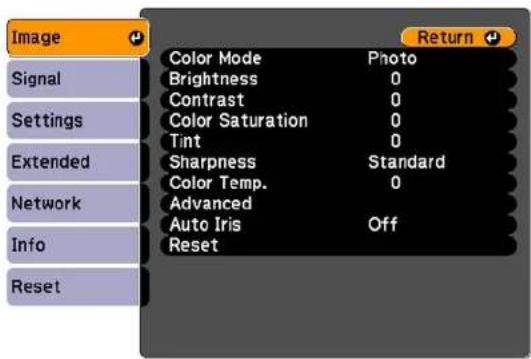
2.Presstheupordownarrowbuttontomovethroughthemenuslistedontheleft. Thesettingsfor eachmenuaredisplayedontheright.
Note: The available settings depend on the current input source.
- Tochangesettingsinthedisplayedmenu, pressEnter.
- Presstheupordownarrowbuttontomovethroughthesettings.
- Changethesettings using the buttons listed on the bottom of themenuscreens.
- Toreturnallthemenusettingstotheirdefaultvalues, selectReset.
- When you finish changing settings on an amino, press Esc.
- PressMenuorEsctoexitthemenus.
Parenttopic:AdjustingtheMenuSettings
ImageQualitySettings-ImageMenu
SettingsonthImagemenuletyouadjustthequalityofyourimagefortheinputsourceyouarecurrently using. Theavailablesettingsdependonthecurrentlyselectedinputsource.
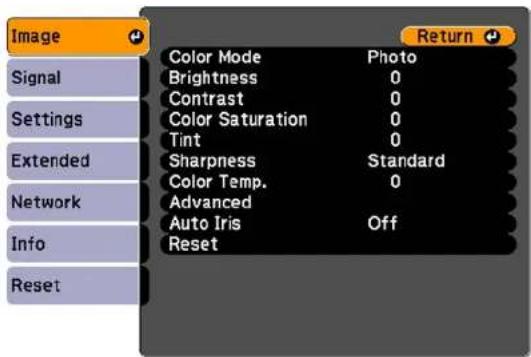
Tochangesettingsforaninputsource,makesurethesourceisconnectedandselectthatsource.
| SettingOptionsDescription | ||
| ColorModeSeethelistofavailableColorAdjuststhevividnessofimage Modescolorsforvariousimagetypes andenvironments | ||
| BrightnessVaryinglevelsavailableLightensordarkenstheoverall image | ||
| ContrastVaryinglevelsavailableAdjuststhedifferencebetween lightanddarkareasoftheimage | ||
| ColorSaturationVaryinglevelsavailableAdjuststhebalanceofgreento colors | ||
| TintVaryinglevelsavailableAdjuststhebalanceofgreento magentatonesintheimage | ||
| SharpnessVaryinglevelsavailable | Adjuststhesharpnessor | softnessofimagedetails |
| ColorTemp.(absolutecolorVaryingtemperature)colortemperature | levelsavailableSetsthecolortonebasedon | sedon |
| AdvancedVariousoptionsavailable | Adjuststhegammalevelsand | intensityofindividualhuesintheimage |
| AutolrisOffAdjuststheprojectedluminanceNormalHighSpeed | basedontheimagebrightnesswhencertainColorModesareselected | |
Note: The Brightness setting does not affect lamp brightness. To change the lamp brightness mode, usethePowerConsumptionsetting.
Parenttopic:AdjustingtheMenuSettings
Relatedreferences
AvailableColorModes
InputSignalSettings-SignalMenu
Normally the projector detects and optimizes the input signal settings automatically. If you need to customize these settings, you can use the Signal menu. The available settings depend on the currently selected inputs source.
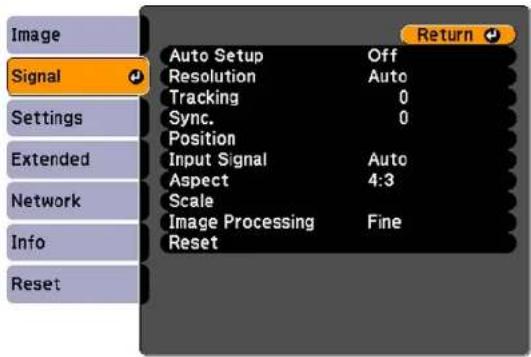
Note: You can restore the default settings of the Position, Tracking, and Sync settings by pressing the Autobuttonontheremotecontrol.
Tochangesettingsforaninputsource,makesurethesourceisconnectedandselectthatsource.
| SettingOptionsDescription | ||
| AutoSetupOnAutomaticallyoptim | zesimageOff | qualityfromananalogRGBcomputerconnection(whenOn) |
| ResolutionAutoSetstheinputsignalresolutionNormalWideManual | fromananalogRGBcomputerconnectionAuto:detectstheresolutionautomaticallyNormal:for4:3or5:4screensWide:forwidescreenManual:allowsyoutospecifyaresolution | |
| TrackingVaryinglevelsavailableAdjustssignaltoeliminate | verticalstripesinimagesfromananalogRGBcomputerconnection | |
| Sync.VaryinglevelsavailableAdjustssignaltoeliminate | fuzzinessorflickeringinimagesfromananalogRGBcomputerconnection | |
| PositionUp,down,left,rightAdjuststheimagelocationonthe | screen | |
| 3DSetup3DImagesEnablespassive3Dimages | whenprojectingfrom2projectors | |
| ProgressiveOffSetswhethertoconvertVideoFilm/Auto | interlaced-to-progressivesignalsforcertainvideoimagetypesOff:forfast-movingvideoimagesVideo:formostvideoimagesFilm/Auto:formovies,computergraphics,andanimation | |
| FramelInterpolationOffSmoothsfastmovingvideoby(PowerLiteProG6470WU/LowG6570WU/G6770WU/G6970WU) | NormalHigh | comparingconsecutiveframes andinsertinganintermediate framebetweenthem |
| NoiseReductionOffReducesflickeringinanalog | NR1NR2 | imagesintwolevels;cannotbe setifImageProcessingissettoFast |
| MosquitoNROnReducesthenoiseor artifacts | Off | seenaroundtheedgesofobjects thatiscausedbythe decompressionofMPEGvideo; cannotbesetifImage ProcessingissettoFast |
| VideoRangeAutoSetsthevideorangetomatch | NormalExpanded | thesettingofthedevice connectedtotheDisplayPort, HDMI,HDBaseTandSDI (PowerLiteProG6970WU)input ports |
| InputSignalAutoSpecifiesthesignaltypefrom | RGBComponent | inputsourcesconnectedto computerportsAuto:detectssignals automaticallyRGB:correctscolorfor computer/RGBvideoinputsComponent:correctscolorfor componentvideoinputs |
| VideoSignalAutoSpecifiesthesignaltypefromtheVariousvideostandards | inputsourcesconnectedtothevideoportsAuto:detectssignalautomatically | |
| AspectSeethelistofavailableaspectSetstheaspectratio(width-to-ratiosheightratio)fortheselectedinput | source | |
| ScaleVariousscaleoptionsWhenusingmultipleprojectorsto | projectoneimage,adjustthescaleoftheimagedisplayedbyeachprojector | |
| OverscanAutoChangestheprojectedimageOff4%8% | ratiotomaketheedgesvisiblebyaselectablepercentageorautomatically | |
| ImageProcessingFastAdjustshowimagesareFine | processedFast:displaysimagesquickerFine:displaysimagesinhigherquality | |
| DisplayPortEQSetting1Adjuststheinputsignallevelfor2 | thedeviceconnectedtotheDisplayPortconnector;changetoreduceinterferenceorcorrectotherimageproblems | |
Parenttopic:AdjustingtheMenuSettings
Relatedreferences
AvailableImageAspectRatio
ProjectorFeatureSettings-SettingsMenu
OptionsontheSettingsmenuletyoucustomizevariousprojectorfeatures.
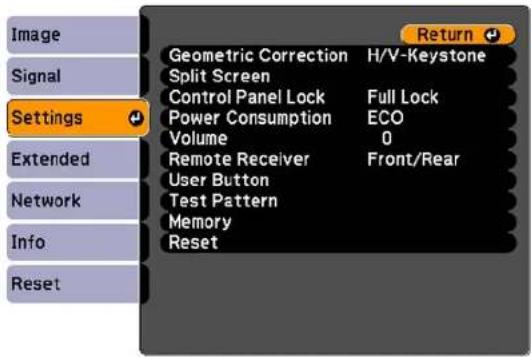
| SettingOptionsDescription | ||
| GeometricCorrectionH/V-Keystone | AdjuststheprojectedimageQuickCornerArcCorrection(PowerLiteProG6070W/G6170/G6270W/G6470WU/G6570WU/G6770WU/)PointCorrectionCurvedSurface(PowerLiteProG6870/G6970WU)CornerWall(PowerLiteProG6870/G6970WU) | shapeH/VKeystone:letsoumanuallycorrecttheanglesofthehorizontalandverticalsidesQuickCorner:selecttoadjust thepositionofthefourcornersArcCorrection:selecttoadjust thecurveorarcofthehorizontal andverticalsidesPointCorrection:selectto displayagridandfinelyadjust theimagepositionCurvedSurface:selecttoadjust theimagewhenprojectingona curvesurfaceCornerWall:selecttoadjustthe imagewhenprojectingona surfacewitharightangle |
| SplitScreen—Dividestheviewingarea | horizontallyanddisplaytwo imagesside-by-side;whilein SplitScreenmode,pressMenu todisplaytheSplitScreen optionsorEsctocancelsplit screendisplay | |
| ControlPanelLockFullLockControlsprojectorbuttonlockingPartialLockOff | tosecuretheprojectorFullLock:locksallbuttonsPartialLock:locksallbuttons exceptthepowerbuttonOff:nobuttonslocked | |
| PowerConsumptionNormalSelectsthebrightnessmodeof | TempInterlockECO | theprojectorlampNormal:setsmaximumlamp brightnessTemplInterlock:automatically dimsthelampifthesurrounding temperatureistoohighfor normaloperationECO:reduceslampbrightness andfannoise,andsavespower andlamplife |
| VolumeVaryinglevelsavailableAdjuststhevolumeofthe | Adjuststhevolumeofthe | projector'sspeakersystem |
| RemoteReceiverFront/RearLimit | sreceptionofremotecontrolFrontRearOff | signalsbytheselectedreceiver;Offturnsoffallreceivers |
| UserButtonUserButton1Assigns | amenuoptiontotheUserButton2UserButton3 | User1,User2,andUser3buttonsontheremotecontrolfor one-touchaccess |
| TestPattern—Displaysatestpatterntoassistin | Intoassistin | adjustingtheimage;pressthe leftortrightarrowbuttonsonthe remotecontrolorEnteronthe controlpaneltocyclethroughthe availabletestpatterns,orEsctocancelpatterndisplay |
| MemoryLoadMemorySavecustomizedsetsofsettingsSaveMemoryEraseMemoryRenameMemory | tomemory | |
Parenttopic:AdjustingtheMenuSettings
ProjectorSetupSettings-ExtendedMenu
SettingstheExtendedmenuletyoucustomizevariousprojectorsetupfeaturesthatcontrolits operation.
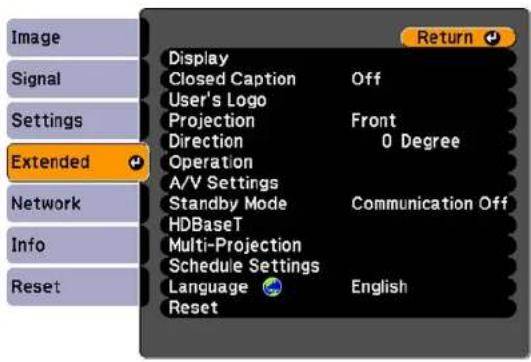
| SettingOptionsDescription | ||
| Display—Seethenexttableinthistopic | ||
| ClosedCaptionOffControlsuseof | closedcaptions | andselectstheclosedcaption type(closedcaptionsareonly visibleforNTSCsignals connectedthroughtheS-Video orVideoports) |
| CC1 | ||
| CC2 | ||
| User'sLogo—Createsascreenthat | the | projectordisplaystoidentifyitself andenhancesecurity |
| ProjectionFrontSelectsthewaytheprojectorFront/CeilingRearRearCeiling | facesthescreensotheimageis orientedcorrectly | |
| DirectionVaryinglevelsavailableSelectstheinstallationanglefor | theprojector;theprojector'sfan maygetlouderdependingonthe directionangleselected | |
| Operation—Seethelasttableintheopic | ||
| A/VSettingsA/VOutputSelectsvariousaudioandvideoMonitorOutAudioSettings | outputsettingsA/VOutput:selecttooutput audioandvideotoanexternal devicewhentheprojectorisin standbymode(StandbyMode mustbeturnedontousethis setting)MonitorOut:Selecttheimage sourcetooutputtoanexternal devicewhentheprojectorisin standbymode;whensettoAuto, selectsoutputfromtheComputerorBNCport dependingonwhichwasused whentheprojectorwentinto standbymodeAudioSettings:Selectsaudio sourcetooutput | |
| StandbyModeCommunicationOn | Enablethissettingtoallowthe CommunicationOff | followingoperationstooccur whentheprojectorisinstandby mode:Monitorandcontrolthe projectoroveranetworkOutputaudioandvideotoan externaldevice(A/VOutput mustbesettoAlwaysOn)Communicationfromthe HDBaseTport(Control Communicationsmustbeset toOn) |
| HDBaseTControlCommunications | Selectsthecommunication ExtronXTP | settingsforconnectionstoan HDBaseTtransmitterorswitcherControlCommunications: enablesordisables communicationfromtheEthernet andserialportsonthe transmitter;turningonthissetting disablestheprojector'sLAN,RS-232C,andRemoteports(Extron XTPmustbeturnedofftouse thissetting)ExtronXTP:settoOnwhenyou connectanExtronXTP transmitterorswitchertothe HDBaseTports |
| Multi-ProjectionBrightnessLevel | ISelectvariousoptionswhen (notavailableforPowerLitePro G6470WU)EdgeBlendingMulti-screenProjectorID | projectingfrommultiple projectorsBrightnessLevel:adjuststhe brightnessofthelamp;Power ConsumptionintheSettings menumustbesettoNormalto usethissettingEdgeBlending:blendsthe borderbetweenmultipleimages tocreateaseamlessscreenMulti-screen:adjuststhetintand brightnessofeachprojected imageProjectorID:setstheprojector toaparticularIDnumberwhich allowsyoutousearemote controltoindividuallycontrol projectors |
| ScheduleSettings—Schedulespecificoperationsto | occuratapre-scheduledtime | |
| LanguageVariouslanguagesavailable | Selectsthelanguagefor | projectormenuandmessage displays(notchangedbyReset option) |
Displaysettings
| SettingDescription | |
| MenuPositionSelectsthepositionoftheprojectormenudisplayedonthescreen | |
| MessagesControlswhethermessagesaredisplayedonthescreen | |
| DisplayBackgroundSelectsthescreencolororlogot | displaywhenno signalisreceived |
| StartupScreenControlswhetheraspecialscreenappearswhen theprojectorstartsup | |
| A/VMuteSelectsthescreencolororlogotodisplaywhen | A/VMuteisturnedon |
| StandbyConfirmationDisplaysaconfirmationmessageafterpressing theStandbybuttonontheremotecontrol | |
| AirFilterNoticeDisplaysamessagewhenaclogintheairfilteris detected | |
| ScreenSetstheaspectratioandpositionoftheprojected | imageaccordingtothetypeofscreenbeingused |
| PanelAlignmentCorrectscolormisalignmentintheprojectedimage | |
| ColorUniformityAdjuststhecolortonebalance | |
Operationsettings
| SettingOptionsDescription | ||
| DirectPowerOn—Turnsontheprojectorwhenyou | plugitin | |
| SleepMode—Automaticallyplaces the | projectorinstandbymodeafteranintervalofinactivity | |
| SleepModeTimer1to30minutes | Setsthetimebefo | etheprojectorautomaticallyturnsoff(SleepModemustbeturnedon) |
| HighAltitudeMode | —Regulatestheprojector's | operatingtemperatureataltitudesabove4921feet(1500m) |
| BNCSyncTermination—Setstheteminationforthesignal | fromtheBNCport(normally shouldbeoffunlessanalog terminationsuchasforswitchers isnecessary) | |
| RemoteControlTypeNormalSelectNormaltousetheremoteSimple | controlthatcamewiththe projectororSimpletousea differentEpsonprojectorremote controlanddisabletheremote controlthatcamewiththe projector | |
| InvDirectionButton—Enablethissettingifyouinstalled | theprojectoronaceilingand wanttoinvertthearrowbuttons onthecontrolpanel | |
| StartupSourceSearch—Automaticallydetectstheimage | signalwhenyouturnonthe projector | |
| A/VMuteReleaseA/VMuteSelectA/VMuteifyouwanttoAll | useonlytheA/VMutebuttononto turnoffA/Vmute,orselectAllto useanybuttontoturnitoff | |
| Beep—Turnsonoroffthebeepthat | soundswhenyouturnthe projectoronoroff | |
| LensTypeVariouslensmodelnumbersSelectthemodelnumberforthe | attachedlens | |
| InstantOffEnabledSelectEnabledtoplacetheDisabled | projectorintostandbystatusafter powerofforDisabledtosend theprojectorintostandbystatus approximately3minutesafter poweroff | |
| Date&Time—Adjuststheprojectorssystem | timeanddatesettings | |
Parenttopic:AdjustingtheMenuSettings
ProjectorNetworkSettings-NetworkMenu
SettingstheNetworkmenuletyouviewnetworkinformationandsetuptheprojectorformonitoring andcontroloveranetwork.
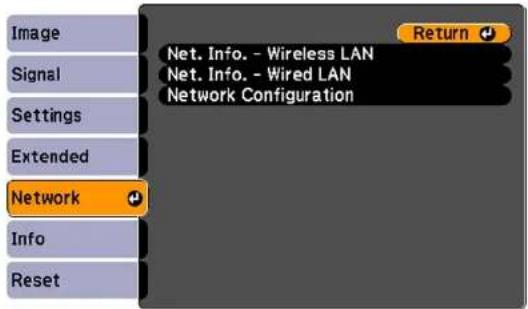
| SettingOptionsDescription | ||
| Net.Info-WirelessLANConnection(PowerLiteProAntennalevelG6070W/G6170/G6270W/G6470WU/G6570WU/G6770WU) | nmodeDisplayswirelessnetworkstatusProjectorNameSSIDDHCPIPAddressSubnetMaskGatewayAddressMACAddressRegionCode | anddetails |
| Net.Info-WiredLANProjectorName | eDisplayswirednetworkstatusDHCPIPAddressSubnetMaskGatewayAddressMACAddress | anddetails |
| NetworkConfigurationAccesses | additionalnetworkConfiguresyournetworksettingsmenus |
Parenttopic:AdjustingtheMenuSettings
Relatedconcepts
WiredNetworkProjection
WirelessNetworkProjection
ProjectorInformationDisplay-InfoMenu
YoucandisplayinformationabouttheprojectorandinputsourcesbyviewingtheInfomenu.However, youcannotchangeanysettingsinthemenu.
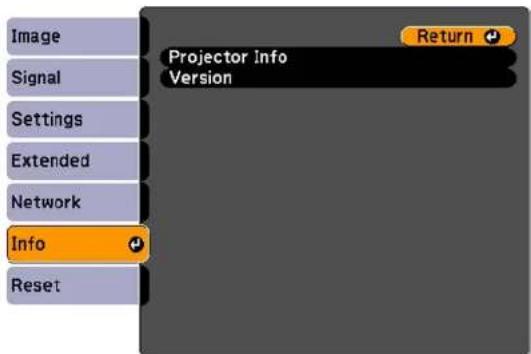
Note: The lamp usage timer does not register any hours until you have used the lamp for at least 10 hours. Available settings depend on the current input source.
| SettingOptionsDescription | ||
| ProjectorInfoLampHoursDisplay | sthenumberofhours(H) | thelamphasbeenusedinNormalandECOPowerConsumptionmodes;iftheinformationisdisplayedinyellow,obtainagenuineEpsonreplacementlampsoon |
| SourceDisplaysthenameoftheportto | whichthecurrentinputsourcesconnected | |
| InputSignalDisplaystheinputsignal | lsettingofthecurrentinputsource | |
| ResolutionDisplaystheresolutionofthe | currentinputsource | |
| VideoSignalDisplaysthevideosign | alformatofthecurrentinputsource | |
| RefreshRateDisplaystherefreshrateofthe | currentinputsource | |
| SyncInfoDisplaysinformationthat | maybeneededbyaservicetechnician | |
| StatusDisplaysinformationabout | projectorproblemsthatmaybeneededbyaservicetechnician | |
| SerialNumberDisplaystheprojector'sserialnumber | ||
| HDBaseTSignalQualityDisplaystheimagesignalinformationfromtheHDBaseTport | ||
| VersionMainDisplaystheprojector'sfirmwareMain2Video | information | |
EventIDCodeList
Parenttopic:AdjustingtheMenuSettings
Relatedreferences
OptionalEquipmentandReplacementParts
ProjectorLampSpecifications
EventIDCodeList
If the Event ID option on the Info menu displays a code number, check this list of Event ID codes for the solution to the projector problem associated with the code.
| EventIDcodeCause | seandsolution |
| 0432TheEasyMP | NetworkProjectionprogramdidnotstart.Turntheprojectoroffand thenonagain. |
| 0435 | |
| 0434Unstablenetw | workcommunication.Checkthenetworkcommunicationstatus,waita fewmoments,andtryconnectingtothenetworkagain. |
| 0481 | |
| 0482 | |
| 0485 | |
| 0433Cannotdisplay | ythetransferredimages.RestarttheEasyMPNetworkProjection program. |
| 0484Communicat | onwithcomputerwasdisconnected.RestarttheEasyMPNetwork Projectionprogram. |
| 04FETheEasyMP | NetworkProjectionprogramquitunexpectedly.Checkthenetwork communicationstatus,thenturntheprojectoroffandthenonagain. |
| 04FFAprojectorsy | stemerrorhasoccurred.Turntheprojectoroffandthenonagain. |
| 0891Cannotfindan | accesspointwiththesameSSID.Setyourcomputer,accesspoint, andprojectortothesameSSID. |
| 0892TheWPA/WP | A2authenticationtypedoesnotmatch.Makesurethewireless networksecuritysettingsarecorrect. |
| 0893TheWEP/TK | P/AESencryptiontypedoesnotmatch.Makesurethewireless networksecuritysettingsarecorrect. |
| 0894Communicat | onwithunauthorizedaccesspointwasdisconnected.Contactyour networkadministrator. |
| 0898Failedtoacquire | ireDHCP.MakesuretheDHCPserverisoperatingcorrectly.Ifyou arenotusingDHCP,turnofftheDHCPsettingintheNetworkmenus. |
| 0899Communicat | onerror.RestarttheEasyMPNetworkProjectionprogram. |
| 089ATheprojector | 'sEAPauthenticationtypedoesnotmatchthenetwork.Checkthe wirelessLANsecuritysettingsandmakesurethatthesecuritycertificateisinstalled correctly. |
| 089BEAPserver | authenticationfailed.CheckthewirelessLANsecuritysettingsand makesurethatthesecuritycertificateisinstalledcorrectly. |
| 089CEAPclientau | authenticationfailed.CheckthewirelessLANsecuritysettingsandmake surethatthesecuritycertificateisinstalledcorrectly. |
| 089DKeyexchang | failed. |
Parenttopic:ProjectorInformationDisplay-InfoMenu
ProjectorResetOptions-ResetMenu
You can reset most of the projector settings to their default values using the Reset All option on the Resetmenu.
You can also reset the projector's lamp usage timer to zero when you replace the lamp using the Reset Lamp Hours option, or reset the saved names and settings in the Save Memory list using the Reset Memoryoption.
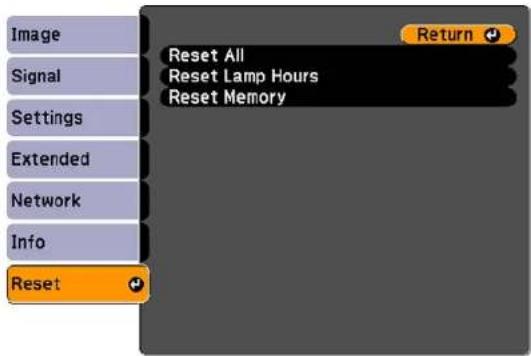
You cannot reset the following settings using the ResetAlloption:
- InputSignal
-User'sLogo
•Language
•Networkmenuitems
•LampHours
- Password
•Multi-screen
- Date&Time
-PanelAlignment
•ColorUniformity
Parenttopic:AdjustingtheMenuSettings
MaintainingandTransportingtheProjector
Followtheinstructionsinthesesectionstomaintainyourprojectorandtransportitfromplacetoplace.
ProjectorMaintenance
TransportingtheProjector
ProjectorMaintenance
Yourprojectorneedslittlemaintenancetokeepworkingatitsbest.
Youmayneedtocleanthelensperiodically, andcleantheairfilterandairventstoppreventtheprojector fromoverheatingduetoblockedventilation.
Theonlypartsyoushouldreplacearethelamp,airfilter,andremotecontrolbatteries.Ifanyotherpart needsreplacing,contactEpsonoranauthorizedEpsonservicer.
Warning: Before cleaning any part of the projector, turn it off and unplug the power cord. Never open any cover on the projector, except a specifically explained in this manual. Dangerous electrical voltages in the projector can injure you severely.
Warning: Do not try to service this product yourself, except as specifically explained in this manual. Referallotherservicingtoqualifiedservicers.
CleaningtheLens
CleaningtheProjectorCase
AirFilterandVentMaintenance
ProjectorLampMaintenance
ReplacingtheRemoteControlBatteries
Parenttopic: Maintaining and Transporting the Projector
CleaningtheLens
Cleantheprojector'slensperiodically,orwheneveryounoticedustorsmudgesonthesurface.
• Toremovedustorsmudges, gentlywipethelenswithlens-cleaningpaper.
- Toremovestubbornsmudges, moistenasoft, lint-freeclothwithlenscleanerandgentlywipethelens. Donotsprayanyliquiddirectlyonthelens.
Warning: Donotusealenscleaner that contains flammable gas. The high heat generated by the projector lamp may cause a fire.
Caution: Do not use glass cleaner or any harsh materials to clean the lens and do not subject the lens toanyimpacts;youmaydamageit.Donotusecannedair,orthegasesmaybearesidue.Avoid touchingthelenswithyourbarehandstopreventfingerprintsonordamagetothelenssurface.
Parenttopic: Projector Maintenance
CleaningtheProjectorCase
Beforecleaningtheprojectorcase,turnofftheprojectorandunplugthepowercord.
• Toremovedustordirt, useasoft, dry, lint-freecloth.
- Toremovestubborndirt, useasoftclothmoistenedwithwaterandmildsoap. Donotsprayliquid directlyontheprojector.
Caution: Do not use wax, alcohol, benzine, paint thinner, or other chemicals to clean the projector case. These can damage the case. Donot use can be aair, or the gases may leave a residue.
Parenttopic: Projector Maintenance
AirFilterandVentMaintenance
Regularfiltermaintenanceisimportanttomaintainingyourprojector.YourEpsonprojectorisdesigned withaneasilyaccessible,user-replaceablefiltertoprotectyourprojectorandmakeregularmaintenance simple.Filtermaintenanceintervalswilldependontheenvironment.
Ifregularmaintenanceisnotperformed,yourEpsonprojectorwillnotifyyouwhenthetemperature insidetheprojectorhasreachedahighlevel.Donotwaituntilthiswarningappearstomaintainyour projectorfilterasprolongedexposuretohightemperaturesmayreducethelifeofyourprojectorlamp.
DamageduetothefailuretoproperlymaintaintheprojectororitsfiltermaynotbecoveredbytheprojectorlampLimitedWarranties.
CleaningtheAirFilter
ReplacingtheAirFilter
Parenttopic: Projector Maintenance
CleaningtheAirFilter
Youneedtocleantheprojector'sairfilterinthefollowingsituations:
•Thefilterorventsgetdusty.
• Youseeamessagetellingyoutocleanit.
• The projector's filter light flashes green.
- Turnoff the projector and unplug the power cord.
2.Slidetheairfiltercoverlatchandopentheairfiltercover.
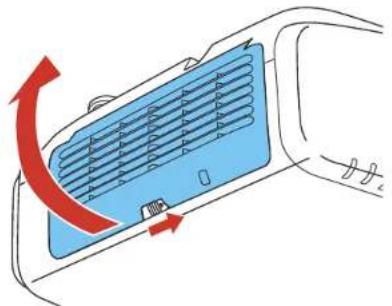
- Pulltheairfilteroutoftheprojector.
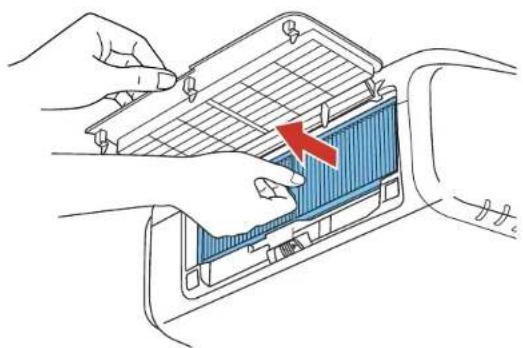
natural_image
Illustration of hands installing a component on an air conditioner cover (no text or symbols)- Tapeachsideoftheairfilter4to5timestoshakeoffanyexcessdust.
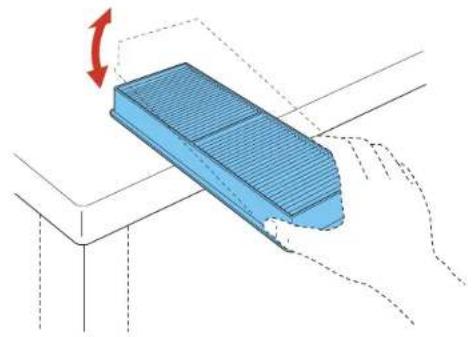
natural_image
Diagram of a blue rectangular object being cut with a red rotation arrow, no text or symbols presentCaution: Donotuse excessive force when tapping the air filter, or it may crack and become unusable. Donotrinset the air filter in water, or use any detergent or solvent to clean it. Donotuse canned air; the gases may leave a residue, or push dust and debris into the projector's optics or others sensitive areas.
- Vacuum the front of the air filter (thesidewith the abs) to remove any remaining dust.
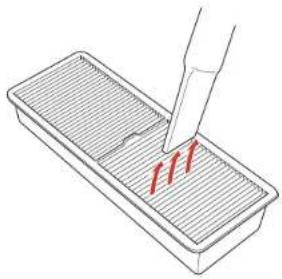
natural_image
Illustration of a pipette dispensing red liquid into a rectangular container (no text or symbols)Note: If dust is difficult to remove the air filter is damaged, replace the air filter.
- Placetheairfilterbackintheprojectorasshownandpushgentlyuntilclicksintoplace.
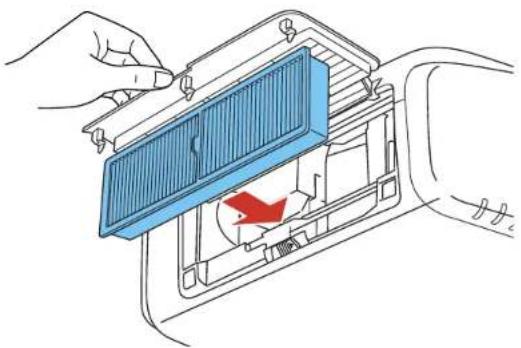
natural_image
Diagram of a car interior showing a blue air vent mounted on a door, with a hand adjusting the component (no text or symbols present)- Closetheairfiltercover.
Parenttopic: AirFilterandVentMaintenance
Relatedreferences
ProjectorLightStatus
ReplacingtheAirFilter
Youneedtoreplacetheairfilterinthefollowingsituations:
• Aftercleaningtheairfilter, youseeamessagetellingyoutocleanorreplaceit
•Theairfilteristornordamaged
Youcanreplacetheairfilterwhiletheprojectorismountedtotheceilingorplacedonatable.
- Turnoff the projector and unplug the power cord.
2.Slidetheairfiltercoverlatchandopentheairfiltercover.
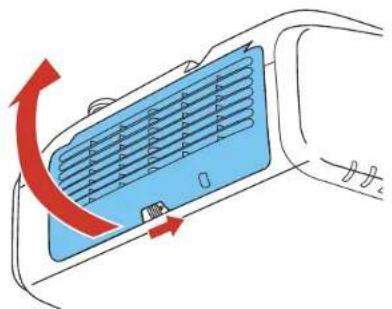
- Pulltheairfilteroutoftheprojector.
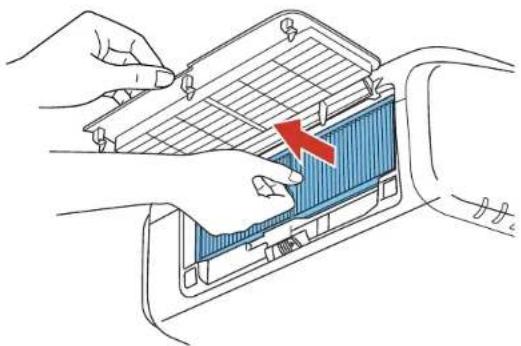
natural_image
Illustration of hands installing or adjusting a blue panel inside a car air conditioner unit (no text or symbols visible)Note: Air filters contain polypropylene. Dispose of used air filters according to local regulations.
- Placethenewairfilterintheprojectorasshownandpushgentlyuntilitclicksintoplace.
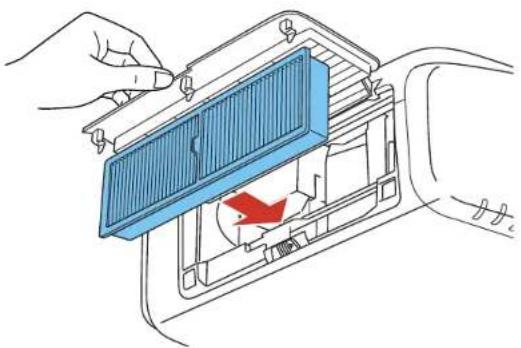
natural_image
Diagram showing hands installing a blue panel inside an air vent, with a red arrow indicating airflow direction (no text or symbols)- Closetheairfiltercover.
Parenttopic: AirFilterandVentMaintenance
Relatedreferences
ProjectorLightStatus
OptionalEquipmentandReplacementParts
ProjectorLampMaintenance
The projector keep a stack of the number of hours the lamp is used and displayed this information in the projector's menusystem.
Replacethelampassoonaspossiblewhenthefollowingoccurs:
• The projected image gets darker or start stodeteriorate
- Amessageappearswhenyouturnontheprojectortellingyoutoreplacethelamp
• The projector's lamplightis flashing orange
ReplacingtheLamp
ResettingtheLampTimer
Parenttopic: Projector Maintenance
Relatedreferences
ProjectorLightStatus
OptionalEquipmentandReplacementParts
ReplacingtheLamp
Beforeyoureplacethelamp,lettheprojectorcooldownforatleastonehoursothelampwillnotbehot.
Warning: Letthelampfullycoolbeforereplacingittoavoidinjury.
Youcanreplacethelampwhiletheprojectorismountedtotheceiling,ifnecessary.
-
Turnoff the projector and unplug the power cord.
-
Allow the projector lamptocooldown for at least one hour.
-
Usethescrewdriverincludedwiththereplacementlamptoloosenthescrewssecuringthelamp cover, and thenremovethelampcover.
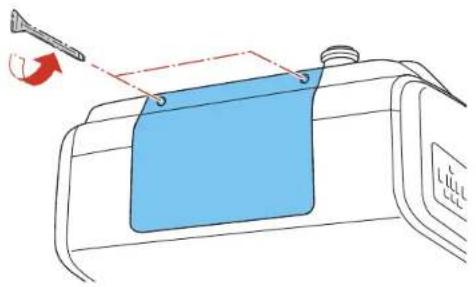
natural_image
Diagram of a medical device with a blue bandage and a needle inserted, showing no text or symbols.Warning: If the lamp is broken, glass fragments may be loose inside the lamp chamber. Be careful removing any brokenglassto avoid injury.
- Loosenthescrewssecuringthelamptotheprojector. Thescrewsdonotcomeallthewayout.
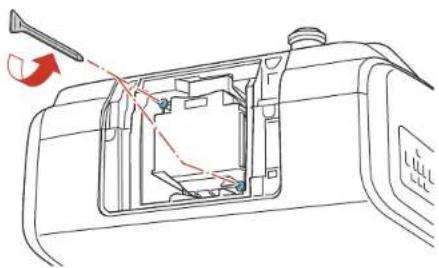
natural_image
Technical line drawing of a device interior with a handle and internal components (no text or symbols)- Holdthelampbyitshandleandgentlypullitoutoftheprojector.
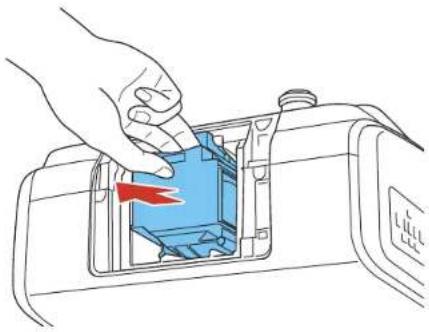
natural_image
Illustration of hands installing a blue component into a device housing (no text or symbols visible)Note: The lamp(s) in this product contain mercury. Please consult your state and local regulations regarding disposal or recycling. Donotputin the trash.
- Gently insert the new lamp into the projector. If it does not fit easily, makes sure it is facing the right way.
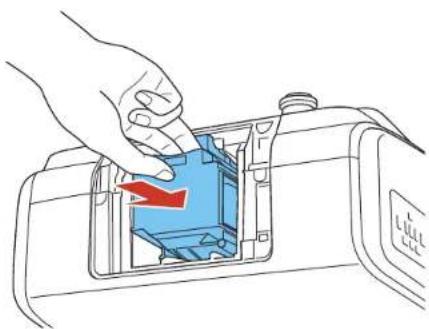
natural_image
Illustration of a hand inserting a blue plastic component into a device casing (no text or symbols)Caution: Donottouchanyglassonthelampassemblytoavoidprematurelampfailure.
- Pushinthelampfirmly and tightenthescrewstosecureit.
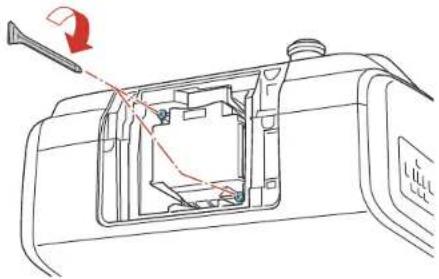
natural_image
Diagram of a device interior showing internal components and a tool (no text or symbols)- Replacethelampcoverandtightenthescrewstosecureit.
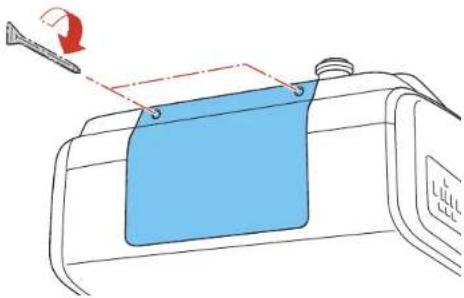
natural_image
Diagram of a device with a blue cover and a tool, showing a red arrow pointing to the component (no text or symbols present)Note: Besurethelampcoverissecurely installedorthelampwillnotcomeon.
Resetthelamptimertozerotokeeptrackofthenewlamp'susage.
Parenttopic: Projector Lamp Maintenance
Relatedreferences
OptionalEquipmentandReplacementParts
Relatedtasks
ResettingtheLampTimer
ResettingtheLampTimer
Youmustresetthelamptimerafterreplacingtheprojector'slamptoclearthelampreplacement messageandtokeeptrackoflampusagecorrectly.
Note: Do not reset the lamp timer if you have not replaced the lamp to avoid inaccurate lamp usage information.
- Turnon the projector.
2.PresstheMenubutton. - SelecttheResetmenuandpressEnter.
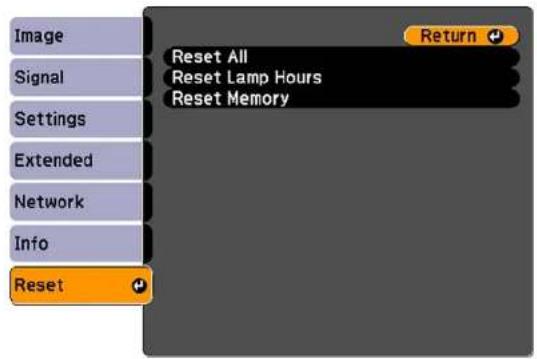
- SelectResetLampHoursandpressEnter.
Youseeapromptaskingifyuwanttoresetthelamphours.
- SelectYesandpressEnter.
- PressMenuorEsctoexitthemenus.
Parenttopic: Projector Lamp Maintenance
Relatedtasks
ReplacingtheLamp
ReplacingtheRemoteControlBatteries
TheremotecontrolusestwoAAmanganeseoralkalinebatteries. Replacethebatteriesassoonasthey runout.
Caution: Use only the type of batteries specified in this manual. Do not install batteries of different types, ormixnewandoldbatteries.
- Openthebatterycoverasshown.
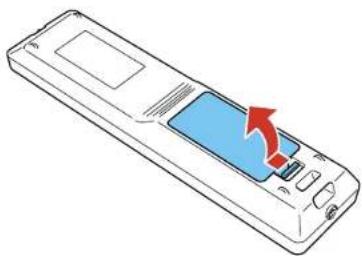
natural_image
Line drawing of a remote control device with a blue screen and red arrow indicating action (no text or symbols)- Removetheoldbatteries.
Warning: If the battery fluid has leaked, wipe it away with a soft cloth and avoid getting the fluid on yourhands. If it gets on your hands, wash them immediately to avoid injury.
- Insert the batteries with the + and - ends facing as shown.
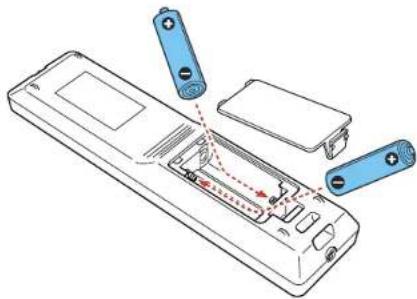
natural_image
Diagram of a remote control panel with batteries and internal components (no text or symbols)- Closethebatterycoverandpressitdownuntilclicksintoplace.
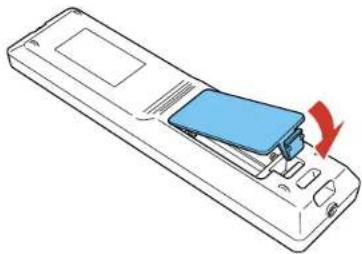
natural_image
Line drawing of a remote control device with a blue internal component and a red arrow indicating rotation (no text or symbols)Warning: Dispose of used batteries according to local regulations. Do not expose batteries to heat or flame. Keep batteries out of thereachofchildren; they are choking hazards and are very dangerous if swallowed.
Parenttopic:ProjectorMaintenance
Relatedreferences
RemoteControlOperation
TransportingtheProjector
The projector contains precision parts, some of which are glass. Follow these guidelines to transport, ship, or store the projectors safely:
- Removeanyequipmentconnectedtotheprojector.
- Usetwooremorepeopletounpackorlifttheprojector.
-
Dooneofthefollowing:
-
If you are using the standard zoom lens, keep it installed on the projector.
- If you are using an option allens, remove it from the projector.
- If the projectordidnotcomewithalens, attach the cover that was included with the projectortothe lensmount.
• Centerthelensusinglensshift.
- Attachtheprotectivelenspadthatwasincludedwiththeprojector.
- Whentransportingtheprojectoralongdistanceorascheckedluggage,packitinafirmboxwith cushioningarounditandmarkthebox"Fragile."
- Whenshippingtheprojectorforrepairs, placeitinitsoriginalpackingmaterials, ifpossible, oruse equivalent materials with cushioning around the projector. Markthebox "Fragile."
Note: Epson shall not believe for any damages incurred during transportation.
Parenttopic: Maintaining and Transporting the Projector
Relatedtasks
AdjustingtheImagePositionUsingLensShift
Relatedtopics
AttachingandRemovingaLens
SolvingProblems
Checkthesolutionsinthesesectionsifyouhaveanyproblemsusingtheprojector.
ProjectionProblemTips
ProjectorLightStatus
UsingtheProjectorHelpDisplays
SolvingImageorSoundProblems
SolvingProjectororRemoteControlOperationProblems
SolvingNetworkProblems
WheretoGetHelp
ProjectionProblemTips
If the projector is not working properly, try turning it off and unplugging it. Then plug it back in and turn it on.
If this does not solv the problem, check the following:
•Thelightsontheprojectormayindicatewhattheproblemis.
- Theprojector's Helpsystemcandisplayinformationaboutcommonproblems,iftheprojectoris operating.
- Thesolutionsinthismanualcanhelpyousolvemanyproblems.
If noneofthesesolutionshelp, you can contact Epsonfortechnical support.
Parenttopic: Solving Problems
ProjectorLightStatus
Thelightsontheprojector'scontrolpanelindicatetheprojectorstatusandletyouknowwhenaproblem occurs. Checkthestatusandcolorofthelightsandlookforasolutioninthetablehere.
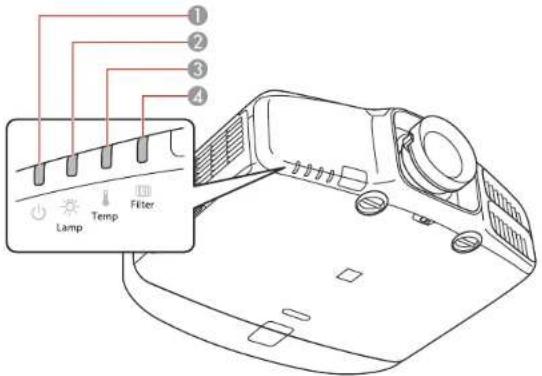
1Powerlight
2Lamplight
3Temp(temperature)light
4Filterlight
| PowerlightLamp | TemplightLight | FilterlightStatus | andsolution | |
| GreenOffOffOffN | Normaloperation. | |||
| FlashinggreenOff | OffOffWarmingup.Waitforan | imagetoappear. | ||
| OrangeOffOffOff | Standbyorsleepmode. | |||
| FlashingorangeOff | OffOffOffPreparingnetworkmonitoringorshuttingdown.(Waitforthelighttoremainorangebeforeunpluggingtheprojector.) | |||
| PowerlightLamp | TemplightLight | FilterlightStatus | sandsolution | |
| FlashingredOffFl | FlashingOffProjector | projectoristoohot. orange | •Makesurethattheventsandairfilterare notcloggedwithdustorobstructedby nearbyobjects.•Cleanorreplacetheairfilter.•Makesuretheenvironmentaltemperature isnottoohot. | |
| RedOffRedOffProjector | Projectorhasoverheatedandturnedoff. | Leaveitturnedofftocooldownforfive minutes.•Makesurethattheventsandairfilterare notcloggedwithdustorobstructedby nearbyobjects.•Cleanorreplacetheairfilter.•Ifoperatingtheprojectorathighaltitude, turnonHighAltitudeMode.•Iftheproblempersists,unplugthe projectorandcontactEpsonforhelp. | ||
| RedFlashingOff | OffLamphasapred | problem. | •Checktoseeifthelampisburnedout, broken,orinstalledincorrectly.Reseator replacethelampasnecessary.•Makesurethattheventsandairfilterare notcloggedwithdustorobstructedby nearbyobjects.•Ifoperatingtheprojectorathighaltitude, turnonHighAltitudeMode.•Iftheproblempersists,unplugthe projectorandcontactEpsonforhelp. | |
| OnOffOffFlashing | Itistimetocleantheairfilter. | green | ||
| PowerlightLamp | Templightlight | FilterlightStatus | andsolution | |
| OnOffOffFlashing | Lowairflowthroughtheprojector. | •Makesurethattheventsandairfilterare notcloggedwithdustorobstructedby nearbyobjects.•Cleanorreplacetheairfilter.•Iftheproblempersists,unplugthe projectorandcontactEpsonforhelp. | ||
| RedOffOffRedLowairflowthroughtheairfilter. | •Makesurethattheventsandairfilterare notcloggedwithdustorobstructedby nearbyobjects.•Cleanorreplacetheairfilter.•Iftheproblempersists,unplugthe projectorandcontactEpsonforhelp. | |||
| OnFlashingOffOffThelampisporangeneed | astitsreplacementstobereplacedtoavoiddamage. | Do notcontinueusingtheprojector. | ||
| RedOffFlashingredOffAfanorsensorhasaproblem.Turnthe | projectoroff,unplugit,andcontactEpson forhelp. | |||
| RedorflashingFlashedred | fishingFlashingredOffInternalerror.Turnthe | rorairexhaustventprojectoroff,unplugit,and contactEpsonforhelp. | ||
| Light status varies | Flashing orange rapidly | Flashing orange rapidly | Off | When transferring settings between projectors, the settings file may be corrupt or theUSBflashdriveorUSBcablemaynot beproperlyconnected.Removetheflash driveorcable,unplugthepowercord,and tryagain. |
| Flashingorangerapidlyorangeora | FlashingFlashingangerapidlyprorapidlyprojec | ingOffWhentrProjectors,writingactorerrormayhaveoccurred. | sferringsettingsbetweenmayhavefailedandaTurntheprojectoroff,unplugit,andcontactEpsonforhelp. | |
Note: If the lights display a pattern not listed in the table above, turn the projector off, unplug it, and contactEpsonforhelp.
Parenttopic: Solving Problems
Relatedreferences
ProjectorSetupSettings-ExtendedMenu
WheretoGetHelp
Relatedtasks
CleaningtheAirFilter
ReplacingtheAirFilter
ReplacingtheLamp
UsingtheProjectorHelpDisplays
Youcandisplayinformationtohelpyousolvecommonproblemsusingtheprojector'sHelpsystem.
-
Turnon the projector.
-
PresstheHelpbuttonontheremotecontrol.
YouseetheHelpmenu.
-
Usetheupanddownarrowbuttonstohighlighttheproblemyouwanttosolve.
-
PressEntertoviewthesolutions.
-
When you are finished, do one of the following:
•Toselectanotherproblemtosolve,pressEsc.
• Toexitthehelpsystem, pressHelp
Parenttopic: Solving Problems
SolvingImageorSoundProblems
Checkthesolutionsinthesesectionsifyouhaveanyproblemswithprojectedimagesorsound.
SolutionsWhenNoImageAppears
SolutionsWhen"NoSignal"MessageAppears
SolutionsWhen"NotSupported"MessageAppears
SolutionsWhenOnlyaPartialImageAppears
SolutionsWhentheImageisNotRectangular
SolutionsWhentheImageContainsNoiseorStatic
SolutionsWhenthelmageisFuzzyorBlurry
SolutionsWhentheImageBrightnessorColorsareIncorrect
SolutionstoSoundProblems
Parenttopic: Solving Problems
SolutionsWhenNoImageAppears
Ifnoimageappears, try the following solutions:
- Press the A/V Mute button on the remote control to see if the image was temporarily turned off.
- Makesureallnecessarycablesaresecurelyconnectedandthepowerisonfortheprojectorand connectedvideosources.
- Presstheprojector'spowerbuttontowakeitfromstandbyorsleepmode. Alsosee if your connected computer is insleepmode or displaying ablankscreensaver.
- Press the Menu button. If the projector menu is able to display, there may be a problem with the connectedvideosource,cableconnection,orport.
- CheckthesettingsontheSignalmenutomakesuretheyarecorrectforthecurrentvideosource.
- Adjust the Brightness setting or select the Normal Power Consumption setting.
- Check the Display setting to make sure Messages is set to On.
- If the projectordoesnotrespondwhenyoupressthecontrolpanelbuttons,thebuttonsmaybe locked.Unlockthebuttons.
- If the projectordoesnotrespond when you press buttons on theremote control, makes sure theremote receivers are returned on.
- ForimagesprojectedwithWindowsMediaCenter,reducethescreensizefromfullscreenmode.
- ForimagesprojectedfromapplicationsusingWindowsDirectX,turnoffDirectXfunctions.
- For sources connected to the DisplayPort, change the DisplayPort EQ Setting in the Signal menu.
Parenttopic: SolvingImageorSoundProblems
Relatedconcepts
ProjectorConnections
Relatedreferences
ImageQualitySettings-ImageMenu
InputSignalSettings-SignalMenu
ProjectorFeatureSettings-SettingsMenu
Relatedtasks
UnlockingtheProjector'sButtons
SolutionsWhen"NoSignal"MessageAppears
If the "NoSignal" message appears, try the following solutions:
- Press the Source Search or Search button and wait a few seconds for an image to appear.
- Turnontheconnectedcomputerorvideosource,andpressitsplaybuttontobeginyourpresentation, ifnecessary.
- Checktheconnectionfromtheprojectortoyourvideosources.
- If you are projecting from alaptop computer, makes sure it setup to display on an external monitor.
- Ifnecessary,turntheprojectorandtheconnectedcomputerorvideosourceoffandthenonagain.
DisplayingFromaPCLaptop
DisplayingFromaMacLaptop
Parenttopic: Solving Imageor Sound Problems
Relatedconcepts
ProjectorConnections
DisplayingFromaPCLaptop
If you see the "No Signal" message when you display from a PC laptop, you need to setup the laptop to display on an external monitor.
- Hold down the laptop's Fn key and press the key labelled with a monitor icon or CRT/LCD. (See yourlaptopmanualfordetails.) Waitafewsecondsforanimagetoappear.
-
Todisplayonboththelaptop'smonitorandtheprojector, trypressingthesamekeysagain.
-
If the same image is not displayed by the laptop and projector, check the Windows Display utility to make sure the external monitor portisenabled and extended desktop mode is disabled. (Seeyour computer or Windows manual for instructions.)
- If necessary, check your video card settings and set the multiple display option to Mirror or Duplicate.
Parenttopic: SolutionsWhen"NoSignal"MessageAppears
DisplayingFromaMacLaptop
If you se the "No Signal" message when you display from a Mac laptop, you need to setup the laptop form mirrored display. (Se your laptop manual for details.)
- OpentheSystemPreferencesutilityandselectDisplays.
- ClicktheArrangementtab.
- Select the Mirror Displays checkbox.
Parenttopic: SolutionsWhen"NoSignal"MessageAppears
SolutionsWhen"NotSupported"MessageAppears
If the "Not Supported" message appears, try the following solutions:
- MakesurethecorrectinputsignalisselectedontheSignalmenu.
- Makesurethecomputer'sdisplayresolutiondoesnotexceedtheprojector'sresolutionandfrequency limit.Ifnecessary,selectadifferentdisplayresolutionforyourcomputer.(Seeyourcomputermanual fordetails.)
- Asatest, try setting the computer's display resolution to the lowest possible setting, and then gradually increase it as necessary.
Parenttopic: SolvingImageorSoundProblems
Relatedreferences
InputSignalSettings-SignalMenu
SupportedVideoDisplayFormats
SolutionsWhenOnlyaPartialImageAppears
Ifonlyapartialcomputerimageappears,trythefollowingsolutions:
- PresstheAutobuttonontheremotecontroltooptimizetheimagesignal.
- MakesureyouselectedthecorrectScreenTypesettingforthescreenbeingused.
-
MakesuretheScalesettingintheExtendedmenuisturnedoff.
-
TryadjustingtheimagepositionusingtheScreenPositionmenusetting.
-
PresstheAspectbuttonontheremotecontroltoselectadifferentimageaspectratio.
-
If you zoomed into or out of the image using the E-Zoom buttons, press the Esc button until the projectorreturnstoafulldisplay.
- Checkthecablesconnectingthecomputerorvideosourcetotheprojector.Tryconnectingdifferent cables.
- Checkyourcomputerdisplaysettingstodisabledualdisplayandsettheresolutionwithinthe projector'slimits.(Seeyourcomputermanualfordetails.)
- Checktheresolutionassignedtoyourpresentationfilestoseeiftheyarecreatedforadifferentresolutionthanyouareprojectingin.(Seeyoursoftwarehelpfordetails.)
Parenttopic: Solving Imageor Sound Problems
Relatedreferences
InputSignalSettings-SignalMenu
ProjectorSetupSettings-ExtendedMenu
SupportedVideoDisplayFormats
Relatedtasks
SettingtheScreenType
SolutionsWhenthelmageisNotRectangular
If the projected image is not evenly rectangular, try the following solutions:
- Placetheprojectordirectlyinfrontofthecenterofthescreen, facingitsquarely, if possible.
- AdjusttheimageshapeusingtheGeometricCorrectionmenusettings.
Parenttopic: Solving Imageor Sound Problems
Relatedconcepts
ImageShape
Relatedreferences
ProjectorFeatureSettings-SettingsMenu
SolutionsWhentheImageContainsNoiseorStatic
If the projected images seem to contain electronic interference (noise) or static, try the following solutions:
- Checkthecablesconnectingyourcomputerorvideosourcetotheprojector. Theyshouldbe:
• Separated from the powercord to prevent interference
- Securelyconnectedatbothends
• Notconnectedtoanextensioncable
• Nolongerthan10feet(3m)forVGA/computercablesor24feet(7.3m)forHDMIcables
- Checkthesettingsontheprojector'sSignalmenutomakesuretheymatchthevideosource.If available for your video source, adjust the Progressive and Noise Reduction settings.
- Selectacomputervideoresolutionandrefreshratethatarecompatiblewiththeprojector.
- If you are projecting from a computer, press the Auto button on the remote control to automatically adjust the tracking and sync. If the problem remains, display uniformly patterned image on the screen and manually adjust the Tracking and Sync settings.
- If you connected an extension powerable, try projecting without it to see if it caused interference in the signal.
- For sources connected to the DisplayPort, change the DisplayPort EQ Setting in the Signal menu.
Parenttopic: SolvingImageorSoundProblems
Relatedreferences
InputSignalSettings-SignalMenu
SupportedVideoDisplayFormats
Relatedtasks
DisplayingFromaPCLaptop
DisplayingFromaMacLaptop
SolutionsWhenthelmageisFuzzyorBlurry
If the projected image is fuzzy or blurry, try the following solutions:
- Adjusttheimagefocus.
- Cleantheprojectorlens.
Note: To avoid condensation on the lens after bringing the projector in from a cold environment, let the projectorwarmuptoroomtemperaturebeforeusingit.
- Position the projector close enough to the screen.
- Position the projector so the keystone adjustment angle is not sowidethatit distortsthe image.
- AdjusttheSharpnesssettingtoimproveimagequality.
- If you are projecting from a computer, press the Auto button on the remote control to automatically adjust the tracking and sync. If any bands or overall blurriness remain, display a uniformly patterned image on the screen and manually adjust the Tracking and Sync settings.
- If you are projecting from a computer, use a lower resolution or try to match the projector's native resolution.
Parenttopic: SolvingImageorSoundProblems
Relatedreferences
InputSignalSettings-SignalMenu
ImageQualitySettings-ImageMenu
ProjectionDistance
SupportedVideoDisplayFormats
Relatedtasks
FocusingtheImageUsingtheFocusRing
CleaningtheLens
SolutionsWhenthelImageBrightnessorColorsareIncorrect
If the projected image is stood dark or light, or the colors are incorrect, try the following solutions:
- Press the Color Mode button on the remote control to try different color modes for the image and environment.
- Checkyourvideosourcesettings.
- Adjust the available settings on the Image menu for the current input source, such as Brightness, Contrast, Tint, Color Adjustment, and/or Color Saturation.
- Make sure you selected the correct Input Signal or Video Signal setting on the Signal menu, if available for your imagesource.
- Makesureallthecablesaresecurelyconnectedtotheprojectorandyourvideodevice.Ifyou connectedlongcables,tryconnectingshortercables.
- If you are using the ECO Power Consumption setting, try selecting Normal or Temp Interlock in the projector's menus.
- Position the projector close enough to the screen.
- If the image has been progressively darkening, you may need to replace the projector lamp soon.
Parenttopic: SolvingImageorSoundProblems
Relatedconcepts
ProjectorLampMaintenance
Relatedreferences
InputSignalSettings-SignalMenu
ImageQualitySettings-ImageMenu
ProjectorFeatureSettings-SettingsMenu
SolutionstoSoundProblems
If there is nosound when you expect it the volume of a low or high, try the following solutions:
- Adjust the projector's volumesettings.
- Press the A/V Mute button on the remote control to resume video and audio if they were temporarily stopped.
- Press the Source Search or Search button to switch to the correct input source, if necessary.
- Checkyourcomputerorvideosourcetomakesurethevolumeisturnedupandtheaudiooutputisset forthecorrectsource.
- Checktheaudiocableconnectionsbetween the projector and your videosource.
- If you dono the earsound from an HDMI source, set the connected device to PCM output.
- Makesureanyconnectedaudiocablesarelabeled"NoResistance".
• If you are using a Mac and you don't have sound from an HDMI source, makes sure your Mac supports audio through the HDMI port. If not, you need to connect an audioable.
- If you want to use a connected audio source when the projector is off, set the Standby Mode option to Communication On and make sure the A/V Settings options are set correctly.
- Youmustconnectexternalspeakerstotheprojectortohearsound(PowerLiteProG6870/G6970WU).
- MakesuretheAudioSettingsoptionissettothecorrectaudioportforyourvideodevice.
- Ifyouturntheprojectoronimmediatelyafterturningitoff,thecoolingfansmayrunathighspeed momentarilyandcauseanunexpectednoise.Thisisnormal.
Parenttopic: SolvingImageorSoundProblems
Relatedreferences
ProjectorSetupSettings-ExtendedMenu
Relatedtasks
ConnectingtoaComputerforSound
ConnectingtoaVideoSourceforSound
ConnectingtoExternalSpeakers
SolvingProjectororRemoteControlOperationProblems
Checkthesolutionsinthesesectionsifyouhaveproblemsoperatingtheprojectororremotecontrol.
SolutionstoProjectorPowerorShut-OffProblems
SolutionstoProblemswiththeRemoteControl
SolutionstoPasswordProblems
Parenttopic: Solving Problems
SolutionstoProjectorPowerorShut-OffProblems
If the project orders not come on when you press the power button or it should you expectedly, try the followingsolutions:
- Makesurethepowercordissecurelyconnectedtotheprojectorandtoaworkingelectricaloutlet.
- Theprojector'sbuttonsmaybelockedforsecurity.Unlockthebuttonssorusetheremotecontrolto turnontheprojector.
- If the projector 'slampshutsoffunexpectedly, it may have entered standby mode after a period of inactivity. Pressthe power button to wake the projector and adjust the Sleep Mode Timersetting to changethesleep interval.
- If the projector's lampshut soff and the power and templights arered, the projector has overheated and shutoff. Check the solutions for this light status.
- If the power button on theremote control does not turn on the projector, check its batteries and make sure the Remote Receiver setting is turned on the projector's menu, if available.
• The powercord may be defective. Disconnect the cord and contact Epson.
Parenttopic: SolvingProjector or RemoteControlOperationProblems
Relatedreferences
ProjectorFeatureSettings-SettingsMenu
ProjectorLightStatus
Relatedtasks
UnlockingtheProjector'sButtons
SolutionstoProblemswiththeRemoteControl
If the projectordoesnotrespondtoremotecontrolcommands, try the following solutions:
- Check that theremote control batteries are installed correctly and have power. If necessary, replace the batteries.
- Makesureyouareoperatingtheremotecontrolwithinthereceptionangleandrangeoftheprojector.
- Makesuretheprojectorisnotwarminguporshuttingdown.
- Checktoseeifabuttonontheremotecontrolisstuckdown,causingittoentersleepmode.Release thebuttontowaketheremotecontrolup.
• Strongfluorescentlighting, directsunlight, orinfrareddevicesignals maybeinterfering with the projector'sremotereceivers. Dimthelightsormovetheprojectorawayfromthesunorinterfering equipment.
- Make sure the optional remote control cable set is not attached to the projector's Remote port. If you leavethecableconnectedtotheport,theremotecontrolcannotcontroltheprojector.
•Ifavailable,turnoffoneoftheremotereceiversintheprojector'smenusystem,orcheckifallthe remotereceiverswereturnedoff.
• If you assigned an ID number to other remote control to operate multiple projectors, you may need to check or change the ID setting (feature not available with all projectors).
- Make sure the Remote Control Type setting in the Extended menu is set to Normal if you are using theremotecontrolthatcamewiththeprojector.
- If you los etheremote control, you can order another one from Epson.
Parenttopic: SolvingProjector or RemoteControlOperationProblems
Relatedreferences
ProjectorFeatureSettings-SettingsMenu
OptionalEquipmentandReplacementParts
RemoteControlOperation
SolutionstoPasswordProblems
If you cannot enter or remember a password, try the following solutions:
- You may have turned on password protection without first setting a password. Try entering 0000 using theremotecontrol.
- If you have entered an incorrect password to many times and see a message displayed are request code, writed down the code and contact Epson. Donot attempt to enter the password again. Provide therequest code and proof of ownership for assistance in unlocking the projector.
- IfyousetaWebControlpasswordandforgottheuserIDorpassword,tryenteringthefollowing:
- UserID:EPSONWEB
- Defaultpassword:admin
- Ifyoulosetheremotecontrolyoucannotenterapassword.OrderanewonefromEpson.
Parenttopic: Solving Projector or Remote Control Operation Problems
SolvingNetworkProblems
Checkthesolutionsinthesesectionsifyouhaveproblemsusingtheprojectoronanetwork.
SolutionsWhenYouCannotAccesstheProjectorThroughtheWeb
SolutionsWhenNetworkAlertE-MailsareNotReceived
SolutionsWhenYouCannotAccesstheProjectorUsingiProjection
Parenttopic: Solving Problems
SolutionsWhenYouCannotAccesstheProjectorThroughtheWeb
If you are unable to access the project through haweb browser, makes sure you are using the correct ID and password, which are cases sensitive.
- FortheuserID,enterEPSONWEB.(YoucannotchangetheuserID.)
- Forthepassword, enter the password set in the projector's Network menu. The default password is admin.
- Makesureyouhaveaccesstothenetworktheprojectorison.
Note: The userIDandpasswordarecasesensitive.
Parenttopic: Solving Network Problems
SolutionsWhenNetworkAlertE-MailsareNotReceived
If you donot receive an e-mail alerting y out o problems with a projector over then network, try the followingsolutions:
- Makesuretheprojectoristurnedonandconnectedtothenetworkcorrectly.(Ifanerrorshutdownthe projector, itcannotsendane-mail.)
- Makesureyousetuptheprojectore-mailalertsettingscorrectlyontheprojector'snetworkMailmenu orinthenetworksoftware.
- Set the Standby Mode setting to Communication On so the network software can monitor the projectorinstandbymode.
Parenttopic: Solving Network Problems
Relatedreferences
ProjectorSetupSettings-ExtendedMenu
Relatedtasks
SettingUpProjectorNetworkE-MailAlerts
SolutionsWhenYouCannotAccesstheProjectorUsingiProjection
If you are using Quick connection mode and are unable to access the projector through an Android device using iProjection, make sure the SSID Auto Setting is set to On.
Parenttopic: Solving Network Problems
Relatedreferences
WirelessLANMenuSettings
WheretoGetHelp
If you need to contact Epson for technical supports, use the following support options.
InternetSupport
Visit Epson's support website at epson.com/support (U.S.) or epson.ca/support (Canada) for solutions to commonproblemswithyourprojector.Youcandownloadutilitiesanddocumentation,getFAQsand troubleshootingadvice,ore-mailEpsonwithyourquestions.
SpeaktoaSupportRepresentative
TousetheEpsonPrivateLineSupportservice, call(800)637-7661. This service is available for the duration of your warranty period. You may also speak with projectorsupport specialist by dialing(562) 276-4394(U.S.) or (905)709-3839(Canada).
Supporthoursare6AMto8PM, PacificTime, MondaythroughFridayand7AMto4PM, PacificTime, Saturday.
Daysandhoursofsupportaresubjecttochangewithoutnotice. Tollerlongdistancechargesmay apply.
Beforeyoucall,havethefollowinginformationready:
•Productname
•Productserialnumber(locatedonthebottomorrearoftheprojector,orinthemenusystem)
•Proofofpurchase(suchasastorereceipt)anddateofpurchase
•Computerorvideoconfiguration
•Descriptionoftheproblem
PurchaseSuppliesandAccessories
Youcanpurchasescreens,otheroptionalaccessories,andreplacementpartsfromanEpsonauthorizedreseller.Tofindthenarestreseller,call800-GO-EPSON(800-463-7766).Oryoucanpurchaseonlineatepsonstore.com(U.S.sales)orepson.ca(Canadiansales).
Topurchase are placement remote control, call(562)276-4394(U.S.) or (905)709-3839(for dealer referral in Canada).
Parenttopic: Solving Problems
TechnicalSpecifications
Thesesectionslistthetechnicalspecificationsofyourprojector.
GeneralProjectorSpecifications
ProjectorLampSpecifications
RemoteControlSpecifications
ProjectorDimensionSpecifications
ProjectorElectricalSpecifications
ProjectorEnvironmentalSpecifications
ProjectorSafetyandApprovalsSpecifications
SupportedVideoDisplayFormats
GeneralProjectorSpecifications
TypeofdisplayPoly-siliconTFTactivematrix
ResolutionPowerLiteProG6070W/G6270W:
1280×800pixels(WXGA)
PowerLiteProG6170/G6870:
1024×768pixels(XGA)
PowerLiteProG6470WU/G6570WU/G6770WU/G6970WU:
1920×1200pixels(WUXGA)
LensF=1.65to2.55
Focallength:21.34to37.99mm
ColorreproductionFullcolor, upto 1 billioncolors
BrightnessPowerLiteProG6070W:
NormalorTempInterlockPowerConsumptionmode:
Whitelightoutput5500lumens(ISO21118standard)
Colorlightoutput5500lumens
ECOPowerConsumptionmode:
Whitelightoutput4455lumens(ISO21118standard)
PowerLiteProG6170:
NormalorTempInterlockPowerConsumptionmode:
Whitelightoutput6500lumens(ISO21118standard)
Colorlightoutput6500lumens
ECOPowerConsumptionmode:
Whitelightoutput4940lumens(ISO21118standard)
PowerLiteProG6270W:
NormalorTempInterlockPowerConsumptionmode:
Whitelightoutput6500lumens(ISO21118standard)
Colorlightoutput6500lumens
ECOPowerConsumptionmode:
Whitelightoutput4550lumens(ISO21118standard)
PowerLiteProG6470WU:
NormalorTempInterlockPowerConsumptionmode:
Whitelightoutput4500lumens(ISO21118standard)
Colorlightoutput4500lumens
ECOPowerConsumptionmode:
Whitelightoutput3915lumens(ISO21118standard)
PowerLiteProG6570WU:
NormalorTempInterlockPowerConsumptionmode:
Whitelightoutput5200lumens(ISO21118standard)
Colorlightoutput5200lumens
ECOPowerConsumptionmode:
Whitelightoutput3952lumens(ISO21118standard)
PowerLiteProG6770WU/G6970WU:
NormalorTempInterlockPowerConsumptionmode:
Whitelightoutput6000lumens(ISO21118standard)
Colorlightoutput6000lumens
ECOPowerConsumptionmode:
Whitelightoutput4200lumens(ISO21118standard)
PowerLiteProG6870:
NormalorTempInterlockPowerConsumptionmode:
Whitelightoutput7000lumens(ISO21118standard)
Colorlightoutput7000lumens
ECOPowerConsumptionmode:
Whitelightoutput4900lumens(ISO21118standard)
Note: Colorbrightness(colorlightoutput) and white brightness (whitelightoutput) will vary depending on usage conditions. Color light output measured in accordance with IDMS 15.4; whitelight output measured in accordance with ISO 21118.
Contrastratio5000:1withAutoIrisonandNormalPowerConsumptionmode
Imagesize50inches(1.27m)to300inches(7.62m)
ProjectiondistancePowerLiteProG6170/G6870:
51 inches(1.30m) to 570 inches(14.47m)
PowerLitePro
G6070W/G6270W/G6470WU/G6570WU/G6770WU/G6970WU:
53inches(1.35m)to591inches(15.01m)
ProjectionmethodsFront, rear, ceiling-mounted
OpticalaspectratioPowerLiteProG6170/G6870:
(width-to-height)4:3
PowerLitePro
G6070W/G6270W/G6470WU/G6570WU/G6770WU/G6970WU:
16:10
FocusadjustmentManual
ZoomadjustmentManual
Zoomratio1:1.8
(Tele-to-Wide)
InternalsoundsystemPowerLitePro
G6070W/G6170/G6270W/G6470WU/G6570WU/G6770WU:
10Wmonaural
PowerLiteProG6870/G6970WU:
N/A
NoiselevelPowerLiteProG6070W/G6170/G6570WU:
37dB(NormalPowerConsumptionmode)
31dB(ECOPowerConsumptionmode)
PowerLiteProG6470WU:
34dB(NormalPowerConsumptionmode)
31dB(ECOPowerConsumptionmode)
PowerLiteProG6270W/G6770WU/G6870/G6970WU:
39dB(NormalPowerConsumptionmode)
31dB(ECOPowerConsumptionmode)
KeystonecorrectionangleVertical:±30°(withstandardlens)
Horizontal:±30°(withstandardlens)
LensshiftrangePowerLiteProG6170/G6870:
(approximate)Vertical:±57%(Manual)
Horizontal:±30%(Manual)
PowerLitePro
G6070W/G6270W/G6470WU/G6570WU/G6770WU/G6970WU:
Vertical:±67%(Manual)
Horizontal:±30%(Manual)
Parenttopic: Technical Specifications
ProjectorLampSpecifications
TypeUHE(UltraHighEfficiency)
Powerconsumption380W
LamplifePowerLiteProG6070W/G6470WU:
NormalPowerConsumptionmode:
Uptoabout3000hours
ECOPowerConsumptionmode:
Uptoabout4000hours
PowerLiteProG6170/G6570WU:
NormalPowerConsumptionmode:
Uptoabout2500hours
ECOPowerConsumptionmode:
Uptoabout4000hours
PowerLiteProG6270W/G6770WU/G6870/G6970WU:
NormalPowerConsumptionmode:
Uptoabout2000hours
ECOPowerConsumptionmode:
Uptoabout4000hours
Note: Turn off this product when not in use to prolong the life of the projector. Lamp life will vary depending upon modes selected, environmental conditions, and usage. Brightness decreases over time.
Parenttopic: Technical Specifications
RemoteControlSpecifications
Receptionrange49feet(15m)
Batteries TwoalkalineormanganeseAA
Parenttopic: Technical Specifications
ProjectorDimensionSpecifications
Height(excludingfeet)5.7inches(144mm)
Width19.9inches(505mm)
Depth15.0inches(382mm)
WeightPowerLitePro
(withstandardlensandwithout cablecover)21.8lb(9.9kg)
G6070W/G6170/G6270W/G6470WU/G6570WU/G6770WU:
PowerLiteProG6870/G6970WU:
21.4lb(9.7kg)
(Thestandardlensweighsapproximately1.61lbs[0.73kg].)
Parenttopic: Technical Specifications
ProjectorElectricalSpecifications
Ratedfrequency50/60Hz
Powersupply100to240VAC±10%
PowerLiteProG6070W:
5.0to2.2A
PowerLiteProG6170/G6570WU:
5.3to2.3A
PowerLiteProG6470WU:
4.7to2.1A
PowerLiteProG6270W/G6770WU/G6870/G6970WU:
5.7to2.5A
PowerconsumptionOperating:
(100to120V)PowerLiteProG6070W:
NormalPowerConsumptionmode:498W
ECOPowerConsumptionmode:421W
PowerLiteProG6170/G6570WU:
NormalPowerConsumptionmode:528W
ECOPowerConsumptionmode:421W
PowerLiteProG6470WU:
NormalPowerConsumptionmode:468W
ECOPowerConsumptionmode:421W
PowerLiteProG6270W/G6770WU/G6870/G6970WU:
NormalPowerConsumptionmode:568W
ECOPowerConsumptionmode:421W
Standby:
0.31W(CommunicationOff),2.8W(CommunicationOn)
PowerconsumptionOperating:
(220to240V)PowerLiteProG6070W:
NormalPowerConsumptionmode:477W
ECOPowerConsumptionmode:405W
PowerLiteProG6170/G6570WU:
NormalPowerConsumptionmode:504W
ECOPowerConsumptionmode:405W
PowerLiteProG6470WU:
NormalPowerConsumptionmode:449W
ECOPowerConsumptionmode:405W
PowerLiteProG6270W/G6770WU/G6870/G6970WU:
NormalPowerConsumptionmode:542W
ECOPowerConsumptionmode:405W
Standby:
0.41W(CommunicationOff),3.3W(CommunicationOn)
Parenttopic: Technical Specifications
ProjectorEnvironmentalSpecifications
TemperatureOperating:32to113°F(0to45°C)
Storage:14to140°F(-10to60°C)
Humidity(relative,non-Operating:20to80%
condensing)
Storage:10to90%
OperatingaltitudeUpto4921feet(1500m)
Upto10000feet(3048m)withHighAltitudeModeenabled
Parenttopic: Technical Specifications
ProjectorSafetyandApprovalsSpecifications
UnitedStatesFCCPart15ClassB(DoC)
UL60950-12ndedition(cTUVusMark)
CanadalCES-003ClassB
CSAC22.2No.60950-1
Parenttopic: Technical Specifications
SupportedVideoDisplayFormats
Forbestresults,yourcomputer'smonitorportorvideocardresolutionsshouldbesettodisplayinthe projector'snativeresolution.However,yourprojectorincludesEpson'sSizeWisechipthatsupportsother computerdisplayresolutions,soyourimagewillberesizedtofitautomatically.
Yourcomputer'smonitorportorvideocardrefreshrate(verticalfrequency)mustbecompatiblewiththe projector.(Seeyourcomputerorvideocardmanualfordetails.)
Thetablehereliststhecompatiblerefreshrateandresolutionforeachcompatiblevideodisplayformat.
| DisplayformatRefreshrate(inHz) | Resolution(inpixels) | |
| Computersignals(analogRGB) | ||
| VGA60/72/75/85640×480 | ||
| SVGA56/60/72/75/85800×600 | ||
| XGA60/70/75/851024×768 | ||
| WXGA601280×768 | ||
| 601366×768 | ||
| 60/75/851280×800 | ||
| WXGA+60/75/851440×900 | ||
| WXGA++601600×900 | ||
| SXGA70/75/851152×864 | ||
| 60/75/851280×960 | ||
| 60/75/851280×1024 | ||
| SXGA+60/751400×1050 | ||
| WSXGA ^+ | 601680×1050 | |
| UXGA601600×1200 | ||
| WUXGA ^2,3 | 601920×1200 | |
| MAC13"67640×480 | ||
| MAC16"75832×624 | ||
| MAC19"751024×768 | ||
| 591024×768 | ||
| MAC21"751152×870 | ||
| Compositevideo | ||
| TV(NTSC)60720×480 | ||
| TV(PAL)50/60720×576 | ||
| TV(SECAM)50720×576 | ||
| Componentvideo | ||
| SDTV(480i)60720×480 | ||
| SDTV(576i)50720×576 | ||
| SDTV(480p)60720×480 | ||
| SDTV(576p)50720×576 | ||
| HDTV(720p)50/601280×720 | ||
| HDTV(1080i)50/601920×1080 | ||
| HDTV(1080p) ^4 | 50/601920×1080 | |
| HDMI,DisplayPort,andHDBaseTinputsignals | ||
| VGA60640×480 | ||
| SVGA | 60800×600 | |
| XGA601024×768 | ||
| WXGA601280×768 | 5 | |
| 601280×800 | ||
| 601366×768 | ||
| WXGA+601440×900 | ||
| WXGA++601600×900 | ||
| WSXGA+ ^6 | 601680×1050 | |
| SXGA601280×960 | ||
| 601280×1024 | ||
| SXGA+601400×1050 | ||
| UXGA601600×1200 | ||
| WUXGA ^3,7 | 601920×1200 | |
| SDTV(480i ^8 /480p)60720×480 | ||
| SDTV(576i ^8 /576p)50720×576 | ||
| HDTV(720p)50/601280×720 | ||
| HDTV(1080i)50/601920×1080 | ||
| HDTV(1080p)24 | ^8/30^8/50/601920×1080 | |
| SDIInputsignals(PowerLiteProG6970WU) | ||
| SDTV(480i) | 60720×480 | |
| SDTV(576i) | 50720×576 | |
| HDTV(720p)50/601280×720 | ||
| HDTV(1080i)50/601920×1080 | ||
| HDTV(1080p)24/25/30 | 1920×1080 | |
^1 Only compatible when Wide is selected as the Resolution setting (PowerLite Pro G6070W/G6270W/G6470WU/G6570WU/G6770WU/G6970WUonly)
^2 PowerLiteProG6470WU/G6570WU/G6770WU/G6970WUonly
^3 CompatibleonlywithVESACVT-RB(ReducedBlanking)inputsignal
^4 InputsignalsonlyfromtheComputerport(PowerLiteProG6070W/G6170/G6270W/G6870)
^5 DisplayPortinputonly
^6 PowerLiteProG6070W/G6270W/G6470WU/G6570WU/G6770WU/G6970WUonly
^7 InputsignalsonlyfromtheHDMIport(PowerLiteProG6070W/G6170/G6270W/G6870)
^8 HDMIinputonly
Parenttopic: Technical Specifications
Notices
Checkthesesectionsforimportantnoticesaboutyourprojector.
Recycling
ImportantSafetyInformation
ImportantSafetyInstructions
FCCComplianceStatement
Trademarks
OpenSourceSoftwareLicense
CopyrightNotice
Recycling
Epson offers a recycling program for end of life products. Please go to this site for information on how to return your products for proper disposal.
Parenttopic:Notices
ImportantSafetyInformation
Caution: Never look into the projector lens when the lamp is turned on; the bright light can damage your eyes. Neverletchildrenlookintothelenswhenitison. Neveropenanycoverontheprojector, except thelampandfiltercovers. Dangerousselectricalvoltagesinsidetheprojectorcanseverelyinjureyou. Except as specifically explained in this User's Guide, do not attempt to service this product yourself. Referallservicingtoqualifiedservicepersonnel.
Warning: The projector and its accessories come packaged in plastic bags. Keep plastic bags away from small childrento avoid any risk of suffocation.
Caution: When you replace the lamp, never touch the new lamp with your bare hands; the invisible residue left by the oil on your handsmay short enthe lamplife. Use cloth glovet to handle thenew lamp.
Parenttopic:Notices
ImportantSafetyInstructions
Followthesesafetyinstructionswhensettingupandusingtheprojector:
- Donotlookintothelenswhentheprojectorison.Thebrightlightcandamageyoureyes.Avoid standinginfrontoftheprojectorsothebrightlightdoesnotshineintoyoureyes.
- Donotplacetheprojectoronanunstablecart,stand,ortable.
- Donotoperatetheprojectoronitsside,orwhiletiltedtooneside.
• If the projector is mounted on aceiling or wall, it should be installed by qualified technicians using mounting hardware designed for use with this projector.
- Wheninstallingoradjustingaceilingorwallmount,donotuseadhesivestopreventthescrewsfrom looseninganddonotuseoilsorlubricants.Thismaycausetheprojectorcasetocrackandthe projectortofallfromitsceilingmount.Thiscouldcauseseriousinjurytoanyoneunderthemountand coulddamagetheprojector.
- Donotusetheprojectornearwater, sourcesofheat, high-voltageelectricalwires, or sourcesof magneticfields.
- Usethetypeofpowersourceindicatedontheprojector. Useofadifferentpowersourcemayresultin fireorelectricshock. If you are not sure of the power available, consult your dealer or power company.
- Placetheprojectornearawalloutletwheretheplugcanbeeasilyunplugged.
•Takethefollowingprecautionswhenhandlingtheplug:Donotholdtheplugwithwethands.Donot inserttheplugintoadustyoutlet.Inserttheplugfirmlyintotheoutlet.Donotpullthepowercordwhen disconnectingtheplug;alwaysbesuretoholdtheplugwhendisconnectingit.Donotoverloadwall outlets,extensioncords,orpowerstrips.Failuretocomplywiththeseprecautionscouldresultinfireor electricshock.
- Donotplacetheprojectorwherethecordcanbewalkedon. This may result in infrayingordamageto the plug.
- Unplugtheprojectorfromthewalloutletbeforecleaning. Useadrycloth(or,forstubborndirtor stains,amoistcloththathasbeenwrungdry)forcleaning.Donotuseliquidoraerosolcleaners,any sprayscontainingflammablegas,orsolventssuchasalcohol,paintthinner,orbenzine.
- Donotblocktheslotsandopeningsintheprojectorcase. Theyprovideventilationandpreventthe projectorfromoverheating. Donotoperatetheprojectoronasofa,rug,orthersoftsurface,orsetit ontopofloosepapers. Donotcovertheprojectorwithabblanket,curtain,ortablecloth.Ifyouare settinguptheprojectornearawall,leaveatleast7.9inches(20cm)ofspacebetweenthewalland theairexhaustvent.
- Donotoperatetheprojectorinaclosed-incabinetunlessproperventilationisprovided.
- Neverallowobjectsofanykindtoenteranyopeningsintheprojector.Donotleaveobjects,especially flammableobjects,neartheprojector.Neverspilliquidofanykindintotheprojector.
- If you are using two or more projector side-by-side, leave at least 20 inches (50cm) of space between the projector to allow for proper ventilation.
- Youmayneedtocleantheairfilterandvent.Acloggedairfilterorventcanblockventilationneeded tocooltheprojector.Donotusecannedair,orthegasesmaybeare residue.
- Donotstoretheprojectoroutdoorsforanextendedlengthoftime.
- Exceptasspecificallyexplainedinthismanual,donotattempttoservicethisproductyourself.Refer allservicingtoqualifiedpersonnel.Openingorremovingcoversmayexposeyoutodangerous voltagesandotherhazards.
- Neveropenany covers on the projectore except a specifically explained in this manual. Never attempt to disassemble or modify the projector. Refer all repair to qualified service personnel.
- Unplugtheprojectorfromthewalloutletandreferservicingtoqualifiedservicepersonnelunderthe followingconditions:ifitdoesnotoperatenormallywhenyoufollowtheoperatinginstructions,or exhibitsadistinctchangeinperformance;ifsmoke,strangeodors,orstrangenoisescomefromthe projector;ifthepowercordorplugisdamagedorfrayed;ifliquidorforeignobjectsgetinsidethe projector,orifithasbeenexposedtorainorwater;ifithasbeendroppedorthehousinghasbeen damaged.
- Donottouchtheplugduringanelectricalstorm. Otherwise, you may receive an electric shock.
- Unplugtheprojectorwhenitwillnotbeusedforextendedperiods.
- Donotusetheprojectorwhereitmaybeexposedtorain,water,orexcessivehumidity.
- Donotuseorstoretheprojectorwhereitmaybeexposedtosmoke,steam,corrosivegases, excessivedust,vibration,orshock.
- Donotusetheprojectorwhereflammableorexplosivegasesmaybepresent.
- Donotuseorstoretheprojectororremotecontrolinahotlocation,suchasnearaheater,indirect sunlight,orinaclosedvehicle.
- If you set the projector in a country other than where you purchased it, use the correct power cord for that country.
- Donotstandontheprojectorplaceheavyobjectsonit.
-
Donotusetheprojectoroutsideoftherequiredtemperaturerangeof32to113°F(0to45°C).Doing somaycauseanunstabledisplayandcouldleadtoprojectordamage.Donotuseorstorethe projectorwhereitmaybeexposedtosuddenchangesintemperature.
-
Donotstoretheprojectoroutsideoftherequiredtemperaturerangeof14to140°F(-10to60°C)orindirectsunlightforlongperiodsoftime.Doingsomaycausedamagetothecase.
- Donotplaceanythingthatcanbecomewarpedordamagedbyheatneartheexhaustvents.Donot bringyourhandsorfaceclosetotheventswhileprojectionisinprogress.Donotbringyourfaceclose totheprojectorwhileitisinuse.
• Before you mov the projector, makes sure its power is turned off, the plug is disconnected from the outlet, and all cables are disconnected. - Nevertrytoremovethelampimmediatelyafterusebecauseitwillbeextremelyhot.Beforeeremoving thelamp,turnoffthepowerandwaitatleastanhourtoallowthelamptocoolcompletely.
- Donotdisassemblethelamporsubjectittoimpacts.
- Donotplacethesourceofanopenflame, such as alitcandle, onorneartheprojector.
- Donotblockthelensduringprojectionusingabookoranyotherobject. Thiscoulddamagethe projectororcauseafire.
- Donotmodifythepowercord. Donotplaceheavyobjectsontopofthepowercordorbend, twist, or pullitexcessively. Keepthepowercordawayfromhotelectricalappliances.
• Ifthelampbreaks, ventilatetheroomtopreventgasescontainedinthelampfrombeinginhaledor comingincontactwithyoueyesormouth. If youdoinhalegasesorgasescomeincontactwithyour eyesormouth, seekmedicaladviceimmediately. - If the projector is mounted overhead and the lamp breaks, be careful to prevent pieces of glass from falling into you are a mouth when you open the lamp cover. If pieces of glass do get into you are an mouth, seek medical advice immediately.
•Alwayslowerthevolumebeforeturningofftheprojector.Turningontheprojectorwiththevolumetoo highcandamageyourears.
•Alwaysattachthelenscovertothelenswhennotusingtheprojectortopreventthelensfrom becomingdirtyordamaged.
Note: Hg The lamp(s) in this product contain mercury. Please consult your state and local regulations regarding disposolorrecycling.Donotputinthetrash.
WARNING: The cords included with this product contain chemicals, including lead, known to the State of California to cause birth defects or other reproductive harm. Wash hands after handling. (This notice is provided in accordance with Proposition 65 in Cal. Health & Safety Code § 25249.5 and following.)
RestrictionofUse
Parenttopic:Notices
RestrictionofUse
Whenthisproductisusedforapplicationsrequiringhighreliability/safetysuchastransportationdevices relatedtoaviation,rail,marine,automotive;disasterpreventiondevices;varioussafetydevices;or functional/precisiondevices,youshouldusethisproductonlyaftergivingconsiderationoincludingfail-safesandredundanciesintoyourdesigntomaintainsafetyandtotalsystemreliability.
Because this product was not intended for use in applications requiring extremely high reliability/safety such as aerospace equipment, main communication equipment, nuclear power control equipment, or medicale equipment related to direct medical care, please make your own judgment on this product's suitability after a fullevaluation.
Parenttopic: Important Safety Instructions
FCCComplianceStatement
ForUnitedStatesUsers
This equipment has been tested and found to comply with the limits for a Class B digital device, pursuant to Part 15 of the FCC Rules. These limits are designed to provide reasonable protection against harmful interference in a residential installation. This equipment generates, uses, and can radiater radio frequency energy and if not installed and used in accordance with the instructions, may cause harmful interference or radiocommunication. However, there is no guarantee that interference will not occur in particular installation. If this equipment does cause interference or radio and television reception, which can be determined by turning the equipment off and, the user is encouraged to try to correct the interference by one or more of the following measures:
• Reorientorrelocatethereceivingantenna.
- Increase these separation between the equipment and receiver.
- Connecttheequipmentintoanoutletonacircuitdifferentfromthattowhichthereceiverisconnected.
- Consultthedealeroranexperiencedradio/TVtechnicianforhelp.
WARNING
The connection of an on-shielded equipment interface cable to this equipment will invalidate the FCC Certification or Declaration of this device and may cause interference levels which exceed the limits established by the FCC forthise equipment. It is the responsibility of the user to obtain and use a shielded equipment interface cable with this device. If this equipment has more than one interface connector, do not leave cables connected to unused interfaces. Changes or modifications not expressly approved by the manufacturer could void the user's authority to operate the equipment.
ForCanadianUsers
ThisClassBdigitalapparatuscomplieswithCanadianICES-003.
CetappareilnumériquedelaclasseBestconformeàlanormeNMB-003duCanada.
Parenttopic:Notices
Trademarks
EPSON ^® , EasyMP ^® , InstantOff ^® , PowerLite ^® , and QuickCorner ^® are registered trademarks, and EPSON Exceed Your Vision is a registered logomark of Seiko Epson Corporation.
PrivateLine^® isaregisteredtrademark;Duet ^TM andSizeWise ^TM aretrademarks;andEpsonStore ^SM and ExtraCare ^SM areservicemarksofEpsonAmerica,Inc.
MacandOSXaretrademarksofAppleInc., registeredintheU.S.andothercountries.
HDMIandHigh-DefinitionMultimediaInterfacearethetrademarksorregisteredtrademarksofHDMI
LicensingLLC. HDMI
HDBaseT™ andtheHDBaseTAlliancelogoaretrademarksoftheHDBaseTAlliance.
GeneralNotice: Other product names used herein are for identification purposes only and maybe trademark of their respective owners. Epson disclaims any and all rights in those marks.
EPSON®
EXCEED YOUR VISION
Parenttopic:Notices
OpenSourceSoftwareLicense
GNUGPL
This projector product include the open source software programs which apply the GNU General Public License Version 2 or laterversion ("GPL Programs").
WeprovidethesourcecodeoftheGPLProgramsuntilfive(5)yearsafterthediscontinuationofsame modelofthisprojectorproduct.
If you desire to receive the source code of the GPL Programs, contact Epson as described in the User's Guide.
TheseGPLProgramsareWITHOUTANYWARRANTY;withouteventheimpliedwarrantyof MERCHANTABILITYANDFITNESSFORAPARTICULARPURPOSE.SeetheGNUGeneralPublic Licenseformoredetails.
ThelistofGPLProgramsisasfollowsandthenamesofauthoraredescribedinthesourcecodeofthe GPLPrograms
ThelistofGPLPrograms
busybox-1.13.4
iptables-1.4.4
libgcc1(gcc-4.3.3)
libstdc++-6.0.10
linux-2.6.27
patches
udhcp0.9.8
uvcrev.219
wireless tools29
EPSONoriginaldrivers
The GNUGeneralPublicLicenseVersion2isasfollows. YoualsocanseetheGNUGeneralPublicLicenseVersion2athttp://www.gnu.org/licenses/.
GNUGENERALPUBLICLICENSE
Version2, June 1991
Copyright©)1989,1991 Free Software Foundation, Inc., 51 Franklin Street, Fifth Floor, Boston, MA 02110-1301 USA Everyone is permitted to copy and distribute overbatim copies of this licensed document, but changing it is not allowed.
Preamble
The licenses form most software are designed to take away your freedom to share and change it. By contrast, the GNU General Public License is intended to guarantee your freedom to share and change free software --tomakesure the software is free for all its users. This General Public License applies to most of the Free Software Foundation's software and to any other program whose authors commit to using it. (Some other Free Software Foundation software is covered by the GNU Lesser General Public License instead.) You can apply it to your programs, too.
Whenwespeakoffreesoftware, wearereferringtofreedom, notprice. OurGeneralPublicLicensesare designedtomakesurethatyouhavethefreedomtodistributecopiesoffreesoftware(andchargefor
thisserviceifyouwish),thatyoureceivesourcecodeorcangetitifyouwantit,thatyoucanchangethe softwareorusepiecesofitinnewfreeprograms;andthatyouknowyoucandothesethings.
Toprotectyourrights,weneedtomakerestrictionsthatforbidanyonetodenyyoutheserightsortoaskyoutsurrendertherights.Theserestrictionstranslatetocertainresponsibilitiesforyouifyoudistributecopiesofthesoftware,orifyoumodifyit.
Forexample, if youdistributecopiesofsuchaprogram, whethergratisorforafee, youmustgivethe recipientsalltherightsthatyouhave. Youmustmakesurethatthey, too, receiveorcangetthesource code. Andyoumustshowthemthesetermssotheyknowtheirrights.
Weprotectyourrightswithtwosteps:(1)copyrightthesoftware,and(2)offeryouthislicensewhich givesyoulegalpermissiontocopy,distributeand/ormodifythesoftware.
Also,foreachauthor'sprotectionandours,wewanttomakecertainthateveryoneunderstandsthatthereisnowarrantyforthisfreesoftware.Ifthesoftwareismodifiedbysomeoneelseandpassedon,wewantitsrecipientstoknowthatwhattheyhaveisnottheoriginal,sothatanyproblemsintroducedbyotherswillnotreflectonthoriginalauthors'reputations.
Finally, anyfreeprogramisthreatenedconstantlybysoftwarepatents. Wewishtoavoidthedangerthat redistributorsofafreeprogramwillindividuallyobtainpatentlicenses,ineffectmakingtheprogram proprietary. Topreventthis, we havemadeitclearthatanypatentmustbelicensedforeveryone'sfree useornotlicensedatall.
Theprecisetermsandconditionsforcopying,distributionandmodificationfollow.
GNUGENERALPUBLICLICENSETERMSANDCONDITIONSFORCOPYING,DISTRIBUTIONAND MODIFICATION
- This License applies to any program or other work which contains an notice placed by the copyright holders saying it may be distributed under the term so this General Public License. The "Program", below, refer to any such program or work, and a "work based on the Program" means either the Program or any derivative work under copyright law that is also, a work containing the Program or portion of it, either by a majority with modifications and/or translated into another language. (Hereinafter, translation is included without limitation in the term "modification".) Each licensee is addressed as "you".
Activitiesotherthancopying,distributionandmodificationarenotcoveredbythisLicense;theyare outsideitsscope.TheactofrunningtheProgramisnotrestricted,andtheoutputfromtheProgramis coveredonlyifitscontentsconstituteaworkbasedontheProgram(independentofhavingbeenmade byrunningtheProgram).WhetherthatistruedependsonwhattheProgramdoes.
- You may copy and distribute overbatim copies of the Program's source code easy to receive it, in any medium, provided that you conspicuously and appropriately publish one each copy an appropriate copyright notice and disclaimer of warranty; keep intact all then notice that refer to this License and to the absence of any warranty; and give any other recipients of the Program's copy of this License along with the Program.
You may charge a fee for the physical act of transferring acopy, and you may at your option offer warranty protection in exchange for a fee.
- You may modify your copy or copies of the Program or any portion of it, thus forming a work based on the Program, and copy and distributes such modifications or work under the terms of Section 1 above, provided that you also meet all of these conditions:
a) Youmustcausethemodifiedfilestocarryprominentnoticesstatingthatouchangedthefilesandthe dateofanychange.
b) Youmustcauseanyworkthatyoudistributeorpublish, thatinwholeorinpartcontainsorisderived fromtheProgramoranypartthereof,tobelicensedasawholeatnochargetoallthirdpartiesunderthe termsofthisLicense.
c) If themodifiedprogramnormallyreadscommandsinteractivelywhenrun,youmustcauseit,when startedrunningforsuchinteractiveuseinthemostordinaryway,toprintordisplayanannouncement includinganappropriatecopyrightnoticeandanoticethatthereisnowarranty(orelse,sayingthatyou provideawarranty)andthatusersmayredistributetheprogramundertheseconditions,andtellingthe userhowtoviewacopyofthisLicense. (Exception:iftheProgramitselfisinteractivebutdoesnot normallyprintsuchanannouncement,yourworkbasedontheProgramisnotrequiredtoprintan announcement.)
Theserequirementsapplytothemodifiedworkasawhole. Ifidentifiablesectionsofthatworkarenot derivedfromtheProgram, andcanbereasonablyconsideredindependentandseparateworksin themselves, thenthisLicense, anditsterms, donotapplytothosesectionswhenyoudistributethemas separateworks. Butwhenyoudistributethesamesectionsaspartofawholewhichisaworkbasedon theProgram, thedistributionofthewholemustbeonthetermsofthisLicense, whosepermissionsfor otherlicenseesextendtotheentirewhole, andthustoeachandeverypartregardlessofwhowroteit.
Thus, it is not the intent of this section to claim rights or contest your right to work written entirely by you; rather, the intent to exercise the right to control the distribution of derivative or collectiveworks based on the Program.
Inaddition, mere aggregation of another work not based on the Program with the Program (or with a work based on the Program) on a volume of a storage or distribution medium does not bring the other work under the scope of this License.
- You may copy and distribute the Program (or a work based on it, under Section 2) in object code or executable form under the terms of Sections 1 and 2 above provided that you also do one of the following:
a) Accompanyitwiththecompletecorrespondingmachine-readablesourcecode, which must be distributed under the terms of Sections 1 and 2 above on a medium customarily used for software interchange; or,
b) Accompanyitwithawrittenoffer, validforatleastthreeyears, togiveanythirdparty, forachargeno morethanyourcostofphysicallyperformingsourcedistribution, acompletemachine-readablecopy of thecorrespondingsourcecode, tobedistributedunderthetermsofSections1 and2 aboveona mediumcustomarilyusedforsoftwareinterchange; or,
c) Accompanyitwiththeinformationyoureceivedastotheoffertodistributecorrespondingsource code. (Thisalternativeisallowedonlyfornoncommercialdistributionandonlyifyoureceivedthe programinobjectcodeoreexecutableformwithsuchanoffer,inaccordwithSubsectionabove.)
Thesourcecodeforaworkmeansthepreferredformoftheworkformakingmodificationstoit. Foran executablework, completesourcecodemeansallthesourcecodeforallmodulesitcontains, plusany associatedinterfacedefinitionfiles, plusthescriptsusedtocontrolcompilationandinstallationofthe executable. However, asaspecialexception, thesourcecodedistributedneednotincludeanythingthat isnormallydistributed(ineithersourceorbinaryform)withthemajorcomponents(compiler, kernel, and soon)oftheoperatingsystemonwhichtheexecutableruns, unless thatcomponentitselfaccompanies theexecutable.
If distribution of executable or object code is made by offering access to copy from a designated place, then offering equivalent access to copy the source code from the same place counts as distribution of the source code, even though third parties are not compelled to copy the source along with the object code.
-
You may not copy, modify, sublicense, ordistributethe Program except as expressly provided under this License. Any attempt other wisetocopy, modify, sublicense or distributethe Program is void, and will automatically terminate your rights under this License. However, parties who have received copies, or rights, from you under this License will not have their license terminated so long as such parties remain in full compliance.
-
You are not required to accept this License, since you haven't signed it. However, nothing else grants your permission to modify the Program or its derivatives. These actions are prohibited by law if you don't accept this License. Therefore, by modifying the distribution the Program (or any work based on the Program), you indicate your acceptance of this License setodo, and all its terms and conditions for copying, distributing or modifying the Program or works based on it.
-
Each time you are distributed the Program (or any work based on the Program), there is a automatically receives a license from the original licensor to copy, distribute or modify the Program subject to these terms and conditions. You may not impose any further restrictions on their recipients' exercise of their rights granted herein. You are not responsible for enforcing compliance by third parties this License.
-
If, asaconsequence of acourt judgment or allegation of patent infringement for any other reason (not limited to patent tissues), conditions are imposed on you (whether by court order, agreement or otherwise) that contradict the condition of this License, they don't excuse you from the conditions of this License. If you cannot distribute so fastly simultaneously your obligations under this License and any other pertinent obligations, then as a consequence you may not distribute the Program at all.
Forexample, if apatentlicense would not permit royalty - freeredistribution of the Program by all those who receive copies directly or indirectly through you, then the only way you could satisfy both it and this License would before refrain entirely from distribution of the Program.
If any portion of this section is held invalid or unenforceable under any particular circumstance, the balance of these section is intended to apply and these section as a whole is intended to apply in other circumstances.
Itisnotthepurposeofthissectiontoinduceyoutoinfringeanypatentsorotherpropertyrightclaimsortocontestvalidityofanysuchclaims;thissectionhasthesolepurposeofprotectingtheintegrityofthefreesoftwaredistributionsystem,whichisimplementedbypubliclicensepractices.Manypeoplehavemadegenerouscontributionstothewiderangeofsoftwaredistributedthroughthatsysteminrelianceonconsistentapplicationofthatsystem;itisuptotheauthor/donortodecideifheorsheiswillingtodistributesoftwarethroughanyothersystemandalicenseecannotimposethatchoice.
This section is intended to make through clearly clear what is believed to be a consequence of the rest of this License.
-
If the distribution and/or use of the Program is restricted in certain countries either by patents or by copyrighted interfaces, the original copyright holder who places the Program under this License may add an explicit geographical distribution limitation excluding those countries, so that distribution is permitted only in among countries not thus excluded. In such case, this License incorporates the limitation as if written in the body of this License.
-
The Free Software Foundation may publish revised and/or new version of the General Public License from timetotime. Such new versions will be similar to spirit to the present version, but may differ in detail to address new problems or concerns.
Eachversionisgivenadistinguishingversionnumber.IftheProgramspecifiesaversionnumberofthisLicensewhichappliestoitand"anylaterversion",youhavetheoptionoffollowingthetermsandconditionseitherofthatversionorofanylaterversionpublishedbytheFreeSoftwareFoundation.IftheProgramdoesnotspecifyaversionnumberofthisLicense,youmaychooseanyversioneverpublishedbytheFreeSoftwareFoundation.
- If you wish to incorporate part of the Program into other free programs, whose distribution conditions are different, writeto the author to ask for permission. For software which is copyrighted by the Free Software Foundation, writeto the Free Software Foundation; was sometimes make exceptions forth this. Our decision will be guided by the two goals of preserving the freestatus of all derivatives of four free software and of promoting the sharing and reuse of software generally.
NOWARRANTY
11.BECAUSETHEPROGRAMISLICENSEDFREEOFCHARGE, THEREISNOWARRANTYFOR THEPROGRAM,TOTHEEXTENTPERMITTEDBYAPPLICABLELAW.EXCEPTWHEN OTHERWISESTATEDINWRITINGTHECOPYRIGHTHOLDERSAND/OROTHERPARTIES PROVIDETHEPROGRAM"ASIS"WITHOUTWARRANTYOFANYKIND,EITHEREXPRESSEDOR
IMPLIED, INCLUDING, BUT NOT LIMITED TO, THE IMPLIED WARRANTY OF MERCHANTABILITY AND FITNESS FOR APARTICULAR PURPOSE. THE ENTIRERISKASTOTHEQUALITY AND PERFORMANCE OF THE PROGRAM IS WITH YOU SHOULD THE PROGRAM PROVE DEFECTIVE, YOU ASSUMETHECOSTOFALL NECESSARY SERVICING, REPAIRORCORRECTION.
- INNOEVENTUNLESSREQUIRED BYAPPLICABLELAWORAGREEDTOINWRITINGWILL ANYCOPYRIGHTHOLDER, ORANYOTHERPARTYWHOMAYMODIFYAND/ORREDISTRIBUTE THEPROGRAMASPERMITTEDABOVE, BELIABLETOYOUFORDAMAGES, INCLUDINGANY GENERAL, SPECIAL, INCIDENTALORCONSEQUENTIALDAMAGESARISINGOUTOFTHEUSE ORINABILITYTOUSETHEPROGRAM (INCLUDINGBUTNOTLIMITEDTOLOSSOFDATAOR DATABASEINGRENDEREDINACCURATEORLOSSESSUSTAINEDBYYOUORTHIRDPARTIES ORAFAILUREOFTHEPROGRAMTOOPERATEWITHANYOTHERPROGRAMS), EVENIFSUCH HOLDEROROTHERPARTYHASBEENADVISEDOFTHEPOSSIBILITY OFSUCHDAMAGES.
ENDOFTERMSANDCONDITIONS
HowtoApplyTheseTermstoYourNewPrograms
If you develop an new program, and you want to be of the greatest possible us to the public, the best way to achieve this is a make it free software which everyone can redistribute and change under these terms.
Todos, attach the following notice to the program. It is a fest to attach them to the start of each source file to most effectively convey the exclusion of warranty; and each file should have at least the "copyright" line and a point to where the full notice is found.
Copyright(c)
Thisprogramisfreesoftware;youcanredistributeitand/ormodifyitunderthetermsoftheGNU GeneralPublicLicenseaspublishedbytheFreeSoftwareFoundation;eitherversion2oftheLicense,or (atyouroption)anylaterversion.
Thisprogramisdistributedinthehopethatitwillbeuseful,butWITHOUTANYWARRANTY;without eventheimpliedwarrantyofMERCHANTABILITYorFITNESSFORAPARTICULARPURPOSE.See theGNUGeneralPublicLicenseformoredetails.
YoushouldhavereceivedacopyoftheGNUGeneralPublicLicensealongwiththisprogram;ifnot, writetotheFreeSoftwareFoundation, Inc., 51 Franklin Street, Fifth Floor, Boston, MA02110-1301 USA.
Alsoaddinformationonhowtocontactyoubyelectronicandpapermail.
If the program is interactive, make it output a short notice like this when it starts in an interactiv mode:
Gnomovisionversion69, Copyright(c)yearnameofauthorGnomovisioncomeswithABSOLUTELYNO WARRANTY;fordetailstype'showw'.Thisisfreesoftware, andyouarewelcometoredistributeitunder certainconditions;type'showc'fordetails.
Thehypotheticalcommands'showw'and'showc'shouldshowtheappropriatepartsoftheGeneralPublicLicense.Ofcourse,thecommandsyouusemaybecalledsomethingotherthan'showw'and'showc';theycouldevenbemouse-clicksormenuitems--whateversuitsyourprogram.
Youshouldalsogetyouremployer(ifyouworkasaprogrammer)oryourschool,ifany,tosigna "copyrightdisclaimer"fortheprogram,ifnecessary.Hereisasample;alterthenames:
Yoyodyne, Inc., hereby disclaims all copyright interest in the program 'Gnomovision' (which makes passes at compilers) written by James Hacker.
TyCoon, PresidentofVice
ThisGeneralPublicLicenseddoesnotpermitincorporatingyourprogramintoproprietaryprograms.If yourprogramisasubroutinelibrary,youmayconsideritmoreusefultopermitlinkingproprietary applicationswiththelibrary.Ifthisiswhatyouwanttodo,usetheGNULesserGeneralPublicLicense insteadofthisLicense.
GNULGPL
This projector product includes the open source software programs which apply the GNU Lesser General Public License Version 2 or later version ("LGPL Programs").
WeprovidethesourcecodeoftheLGPLProgramsuntilfive(5)yearsafterthediscontinuationofsame modelofthisprojectorproduct.
If you desiretoreceivethesourcecodeoftheLGPLPrograms, please seethe "EPSONProjector ContactList" in the User's Guide, and contact the customers support of your region.
TheseLGPLProgramsareWITHOUTANYWARRANTY;withouteventheimpliedwarrantyof MERCHANTABILITYANDFITNESSFORAPARTICULARPURPOSE.SeetheGNUGeneralPublic Licenseformoredetails.
ThelistofLGPLProgramsisasfollowsandthenamesofauthoraredescribedinthesourcecodeoftheLGPLPrograms.
LGPLPrograms
glibc-2.8
SDL-1.2.13
SDL-Image
The GNULesserGeneralPublicLicenseVersion2isasfollows.YoualsocanseetheGNULesser GeneralPublicLicenseVersion2athttp://www.gnu.org/licenses/.
GNULESSERGENERALPUBLICLICENSE
Version2.1, February 1999
Copyright©)1991,1999FreeSoftwareFoundation,Inc.51FranklinStreet,FifthFloor,Boston,MA 02110-1301USAEveryoneispermittedtocopyanddistributeverbatimcopiesofthislicensedocument, butchangingitisnotallowed.
[ThisisthefirstreleasedversionoftheLesserGPL.ItalsocountsasthesuccessoroftheGNULibraryPublicLicense,version2,hencetheversionnumber2.1.]
Preamble
The licensesformostsoftwarearedesignedtotakeawayyourfreedomtoshareandchangeit. By contrast, the GNUGeneralPublicLicensesareintendedtoguaranteeyourfreedomtoshareand changefreesoftware--tomakesurethesoftwareisfreeforallitsusers.
Thislicense,the LesserGeneralPublicLicense,appliestosomespeciallydesignatedsoftware packages--typicallylibraries--oftheFreeSoftwareFoundationandotherauthorswhodecidetouseit.Youcanuseittoo,butwesuggestyoufirstthinkcarefullyaboutwhetherthislicenseortheordinaryGeneralPublicLicenseisthebetterstrategytouseinanyparticularcase,basedontheexplanations below.
Whenwespeakoffreesoftware, wearereferringtofreedomofuse, notprice. Our General Public Licenses are designed to make sure that you have the freedom to distribute copies offreesoftware (and charge forth this service if you wish); that you receive source code or can get it if you want it; that you can chan the software and use pieces of it in new free programs; and that you are informed that you can do these things.
Toprotectyourrights,weneedtomakerestrictionsthatforbiddistributorstodenyyoutheserightsorto askyoutsurrendertheserights.Theserestrictionstranslatetocertainresponsibilitiesforyouifyou distributecopiesofthelibraryorifyoumodifyit.
Forexample, if youdistributecopiesofthelibrary, whethergratisorforafee, youmustgivethe recipientsalltherightsthatwegaveyou. Youmustmakesurethatthey, too, receiveorcangetthe sourcecode. If youlinkothercodewiththelibrary, youmustprovidecompleteobjectfilestothe recipients, sothattheycanrelinkthemwiththelibraryaftermakingchangestothelibraryand recompilingit. And you must show them the setermssotheyknowtheirrights.
Weprotectyourrightswithatwo-stepmethod:(1)wecopyrightthelibrary, and(2)weofferyouthis license, which gives you legal permission to copy, distribute and or modify the library.
Toprotecteachdistributor,wewanttomakeitveryclearthatthereisnowarrantyforthefreelibrary. Also,ifthelibraryismodifiedbysomeoneelseandpassedon,therecipientsshouldknowthatwhatthey
haveisnottheoriginalversion,sothattheoriginalauthor'sreputationwillnotbeaffectedbyproblems thatmightbeintroducedbyothers.
Finally, softwarepatentsposeaconstantthreattotheexistenceofanyfreeprogram. Wewishtomake surethatacompanycannoteffectivelyrestricttheusersofafreeprogrambyobtainingarestrictive licensefromapatentholder. Therefore, weinsistthatanypatentlicenseobtainedforaversionofthe librarymustbeconsistentwiththefullfreedomofusesspecifiedinthislicense.
MostGNUsoftware,includingsomelibraries,iscoveredbytheordinaryGNUGeneralPublicLicense. Thislicense,theGNULesserGeneralPublicLicense,appliestocertaindesignatedlibraries,andisquite differentfromtheordinaryGeneralPublicLicense.Weusethislicenseforcertainlibrariesinorderto permitlinkingthoselibrariesintonon-freeprograms.
Whenaprogramislinkedwithalibrary,whetherstaticallyorusingasharedlibrary,thecombinationof thetwoislegallyspeakingacombinedwork,aderivativeoftheoriginallibrary. TheordinaryGeneral PublicLicensethereforepermitssuchlinkingonlyiftheentirecombinationfitsitscriteriaoffreedom. The LesserGeneralPublicLicensepermitsmorelaxcriteriaforlinkingothercodewithelibrary.
Wecallthislicensethe"Lesser"GeneralPublicLicensebecauseitdoesLesstoprotecttheuser's freedomthantheordinaryGeneralPublicLicense.ItalsoprovidesotherfreesoftwaredevelopersLess ofanadvantageovercompetingnon-freeprograms.Thesedisadvantagesarethereasonweusethe ordinaryGeneralPublicLicenseformanylibraries.However,theLesserlicenseprovidesadvantagesin certainspecialcircumstances.
Forexample,onrareoccasions,theremaybeaspecialneedtoencouragethewidestpossibleuseofacertainlibrary,sothatitbecomesade-factostandard.Toachievethis,non-freeprogramsmustbeallowedtousethelibrary.Amorefrequentcaseisthatafreelibrarydoesthesamejobaswidelyusednon-freelibraries.Inthiscase,thereislittletogainbylimitingthefreelibrarytofreesoftwareonly,soweusetheLesserGeneralPublicLicense.
Inothercases, permissionouseaparticularlibraryinnon-freeprogramsenablesagreaternumberof peopletousealargebodyoffreesoftware. Forexample, permissionousetheGNUCLibraryinnon-freeprogramsenablesmanymorepeopletousethewholeGNUoperatingsystem, aswellasitsvariant, theGNU/Linuxoperatingsystem.
Although the Lesser General Public License is less protective of the users' freedom, it does ensure that the user of a program that is linked with the Library has the freedom and the where with altorun that program using a modified version of the Library.
Theprecisetermsandconditionsforcopying,distributionandmodificationfollow.Paycloseattentionto thedifferencebetweena"workbasedonthelibrary"anda"workthatusesthelibrary". Theformer containscodederivedfromthelibrary,whereasthelattermustbecombinedwiththelibraryinorderto run.
GNULESSERGENERALPUBLICLICENSETERMSANDCONDITIONSFORCOPYING, DISTRIBUTIONANDMODIFICATION
- This License Agreement applies to any software library or other program which contains an notice placed by the copyright holder or other authorized part(s) saying it may be distributed under the terms of this Lesser General Public License (also called "this License"). Each licensee is addressed as "you".
A"library"meansacollectionofsoftwarefunctionsand/ordatapreparedsoastobeconvenientlylinked withapplicationprograms(whichusesomeofthosefunctionsanddata)toformexecutables.
The "Library", below, refer to any such software library or work which has been distributed under these terms. A "work based on the Library" mean either the Library or any derivative work under copyright law: that is to say, a work containing the Library or portion of it, either verbatim or with modifications and/or translated straightforwardly into another language. (Hereinafter, translation is included without limitation in the term "modification".)
"Sourcecode"foraworkmeansthepreferredformoftheworkformakingmodificationstoit. Fora library, completesourcecodemeansallthesourcecodeforallmodulesitcontains, plusanyassociated interfacedefinitionfiles, plusthescriptsusedtocontrolcompilationandinstallationofthelibrary.
Activitiesotherthancopying,distributionandmodificationarenotcoveredbythisLicense;theyare outsideitsscope.TheactofrunningaprogramusingtheLibraryisnotrestricted,andoutputfromsucha programiscoveredonlyifitscontentsconstituteaworkbasedontheLibrary(independentoftheuseof theLibraryinatoolforwritingit).WhetherthatistruedependsonwhattheLibrarydoesandwhatthe programthatusesestheLibrarydoes.
- You may copy and distribute overbatim copies of the Library's completes source code as you receive it, in an medium, provided that you conspicuously and appropriately publish one each copy an appropriate copyright notice and disclaimer of warranty; keep intact all then notices that refer to this License and to the absence of any warranty; and distribute a copy of this License along with the Library.
You may charge a fee for the physical act of transferring acopy, and you may at your option offer warranty protection in exchange for a fee.
- You may modify your copy or copies of the Library or any portion of fit, thus forming a work based on the Library, and copy and distributes such modifications or work under the terms of Section 1 above, provided that you also meet all of these conditions:
a) Themodifiedworkmustitselfbeasoftwarelibrary.
b) You must cause the files modified to carry prominent notices stating that you changed the files and the date of any change.
c) You must cause the whole of the work to be licensed at no charge to all third parties under the terms of this License.
d) If a facility in them modified Library refer to a function or a table of data to be supplied by an application program that uses the facility, other than as an argument passed when the facility is invoked, then you must make a good faith effort to ensure that, in the event an application does not supply such function or table, the facility still operates, and performs whatever part of its purpose remains meaningful.
(Forexample, afunctioninalibrarytocomputesquarerootshasapurposethatisentirelywell-defined independentoftheapplication. Therefore, Subsection2drequiresthatanyapplication-suppliedfunction ortableusedbythisfunctionmustbeoptional:iftheapplicationdoesnotsupplyit,thesquareroot functionmuststillcomputesquareroots.)
Theserequirementsapplytothemodifiedworkasawhole.Ifidentifiablesectionsofthatworkarenot derivedfromtheLibrary,andcanbereasonablyconsideredindependentandseparateworksin themselves,thenthisLicense,anditsterms,donotapplytothosesectionswhenyoudistributethemas separateworks.Butwhenyoudistributethesamesectionsaspartofawholewhichisaworkbasedon theLibrary,thedistributionofthewholemustbeonthetermsofthisLicense,whosepermissionsfor otherlicenseesextendtotheentirewhole,andthustoeachandeverypartregardlessofwhowroteit.
Thus, it is not the intent of this section to claim rights or contest your right to work written entirely by you; rather, the intent to exercise the right to control the distribution of derivative or collectiveworks based on the Library.
In addition, mere aggregation of another work not based on the Library with the Library (or with a work based on the Library) on a volume of fast storage or distribution medium does not bring the other work under the scope of this License.
- You may opt to apply the terms of the ordinary GNU General Public License instead of this License to agivency of the Library. Todo this, you must alter all thenoticest that referto this License, so that they referto the ordinary GNU General Public License, version 2, instead of this License. (If an ewer version than version 2 of the ordinary GNU General Public License has appeared, then you can specify that version instead if you wish.) Donot make any other change in these notices.
Oncethischangeismadeinagivency,itisirreversibleforthatcopy,sotheordinaryGNUGeneral PublicLicenseappliestoallsubsequentcopiesandderivativeworksmadefromthatcopy.
ThisoptionisusefulwhenyouwishtocopypartofthecodeoftheLibraryintoaprogramthatisnota library.
- You may copy and distribute the Library (or portion order derivative of fit, under Section 2) in object code to execute a form under the terms of Sections 1 and 2 above provided that you accompany it with the complete corresponding machine-readable source code, which must be distributed under the terms of Sections 1 and 2 above on a medium customarily used for software interchange.
If distribution of object code is made by offering access to copy from designated place, then offering equivalent access to copy the source code from the same places satisfies the requirement to distribute the source code, even though third parties are not compelled to copy the source along with the object code.
- A program that contains n oderivative of any portion of the Library, but is designed to work with the Library by being compiled or linked with it, is called a "work that uses the Library". Such a work, in isolation, is not a derivative of the Library, and therefore falls outside the scope of this License.
However, linkinga"workthatusestheLibrary"withtheLibrarycreatesanexecutablethatisaderivative oftheLibrary(becauseitcontainsportionsoftheLibrary), ratherthana"workthatusesthelibrary". The executableisthereforecoveredbythisLicense.Section6statestermsforddistributionofsuch executables.
Whena"workthatusestheLibrary"usesmaterialfromaheaderfilethatispartoftheLibrary,theobject codefortheworkmaybeaderivativeworkoftheLibraryeventhoughthesourcecodeisnot.Whether thisistrueisespeciallysignificantiftheworkcanbelinkedwithouttheLibrary,oriftheworkisitselfa library.Thethresholdforthistobetrueisnotpreciselydefinedbylaw.
If such an object file uses only numerical parameters, data structure layouts and accessors, and small macros and small inline functions (ten lines or less in length), then the use of the object file is unrestricted, regardless of whether it is legally a derivative work. (Executables containing this object code plus portion of the Library will still fall under Section 6.)
Otherwise, iftheworkisaderivativeoftheLibrary, youmaydistributetheobjectcodefortheworkunder thetermsofSection6. AnyexecutablescontainingthatworkalsofallunderSection6, whetherornot theyarelinkeddirectlywiththeLibraryitself.
- As an exception to the Sections above, you may also combine or link a "work that uses the Library" with the Library to produce a work containing portion of the Library, and distribute that work under terms of your choice, provided that the terms permit modification of the work for the customer's own use and reverse engineering for debugging such modifications.
YoumustgiveprominentnoticewitheachcopyoftheworkthattheLibraryisusedinitandthatthe LibraryanditsusearecoveredbythisLicense. YoumustsupplyacopyofthisLicense. Ifthework duringexecutiondisplayscopyrightnotices, youmustincludethecopyrightnoticefortheLibraryamong them, aswellasareferencedirectingtheusertothecopyofthisLicense. Also, youmustdooneof thesethings:
a)Accompanytheworkwiththecompletecorrespondingmachine-readablesourcecodefortheLibrary includingwhateverchangeswereusedinthework(whichmustbedistributedunderSections1and2 above);and,iftheworkisanexecutablelinkedwiththeLibrary,withthecompletemachine-readable "workthatusestheLibrary",asobjectcodeand/orsourcecode,sothattheusercanmodifytheLibrary and thenrelinktoproduceamodifiedexecutablecontainingthemodifiedLibrary.(Itisunderstoodthat theuserwhochangesthecontentsofdefinitionsfilesintheLibrarywillnotnecessarilybeableto recompiletheapplicationousethemodifieddefinitions.)
b) UseasuitablesharedlibrarymechanismforlinkingwiththeLibrary.Asuitablemechanismisonethat (1) usesatruntimeacopyofthelibraryalreadypresentontheuser'scomputersystem,ratherthan copyinglibraryfunctionsintotheexecutable,and(2) willoperateproperlywithamodifiedversionofthe library,iftheuserinstallsone,aslongasthemodifiedversionisinterface-compatiblewiththeversion thattheworkwasmadewith.
c) Accompanytheworkwithawrittenoffer, validforatleastthreeyears, togivethesameuserthe materialsspecifiedinSubsection6a, above, forchargenomorethanthecostofperformingthis distribution.
d) If distribution of the work is made by offering access to copy from a designated place, offer equivalent access to copy the above specified materials from the same place.
e) Verify that the user has already received a copy of these materials that you have already sent this user's copy.
Foranexecutable, therequiredformofthe"workthatusestheLibrary"mustincludeanydataandutilityprogramsneededforreproducingtheexecutablefromit. However,asaspecialexception,thematerials tobedistributedneednotincludeanythingthatisnormallydistributed(ineithersourceorbinaryform) withthemajorcomponents(compiler,kernel,andsoon)oftheoperatingsystemonwhichthe executableruns,unlessthatcomponentitselfaccompaniestheexecutable.
It may happen that this requirement contradict the licensor restrictions of other proprietary libraries that do not normally accompany the operating system. Such a contradiction means you cannot use both them and the Library together in an executable that you distribute.
- You may placelibraryfaciliesthatareaworkbasedontheLibraryside-by-sideinasinglelibrary together with other library facilities not covered by this License, and distributes such a combined library, provided that these separated distribution of the work based on the Library and of the other library facilities is otherwise permitted, and provided that you do the set two things:
a) Accompany the combined library with a copy of the same work based on the Library, uncombined with another library facilities. This must be distributed under the terms of the Sections above.
b) Give prominent notice with the combined library of the fact that part of it is a work based on the Library, and explaining what to find the accompanying uncombined form of the homework. - You may not copy, modify, sublicense, link with, ordistribut the Library except as expressly provided under this License. Any attempt other wisetocopy, modify, sublicense, link with, ordistribut the Library is void, and will automatically terminate your rights under this License. However, parties who have received copies, or rights, from you under this License will nothavetheir licensesterminated solongas such parties remain infull compliance.
- You are not required to accept this License, since you haven not signed. However, nothing else grants your permission to modify the library or its derivative works. These actions are prohibited by law if you don't accept this License. Therefore, by modifying the distributing the Library (or any work based on the Library), you indicate your acceptance of this License to do so, and all its terms and conditions for copying, distributing or modifying the Library or works based on it.
- Each time you're distributed the Library (or any work based on the Library), there is a automatically receiving a license from the original licensor to copy, distribute, link with or modify the Library subject to the terms and conditions. You may not impose any further restrictions on the recipients' exercise of
therightsgrantedherein.Youarenotresponsibleforenforcingcompliancebythirdpartieswiththis License.
- If, as a consequence of court judgment or allegation of patent infringement for any other reason (not limited to patent issues), conditions are imposed by you (whether by court order, agreement or otherwise) that contradict the condition of this License, they don't excuse you from the condition of this License. If you cannot distribute soastosatisfysimultaneously your obligations under this License and any other pertinent obligations, then as a consequence you may not distribute the Library at all. For example, if a patent license would not permit royalty-free distribution of the Library by all those who receive copies directly or indirectly through you, then the only way you could satisfy both it and this License would before refrain entirely from distribution of the Library.
If any portion of this section is held invalid or unenforceable under any particular circumstance, the balance of these section is intended to apply, and these section as a whole is intended to apply in other circumstances.
Itisnotthepurposeofthissectiontoinduceyoutoinfringeanypatentsorotherpropertyrightclaimsortocontestvalidityofanysuchclaims;thissectionhasthesolepurposeofprotectingtheintegrityofthefreesoftwaredistributionsystemwhichisimplementedbypubliclicensepractices. Manypeoplehavemadegenerouscontributionstothewiderangeofsoftwaredistributedthroughthatsysteminrelianceonconsistentapplicationofthatsystem;itisuptotheauthor/donortodecideifheorsheiswillingtodistributesoftwarethroughanyothersystemandalicenseecannotimposethatchoice.
This section is intended to make thoroughly clear what is believed to be a consequence of the rest of this License.
-
If the distribution and/or use of the Library is restricted in certain countries either by patents or by copyrighted interfaces, the original copyright holder who places the Library under this License may add an explicit geographical distribution limitation excluding those countries, so that distribution is permitted only in our country's not thus excluded. In such case, this License incorporates the limitation as if written in the body of this License.
-
TheFreeSoftwareFoundationmaypublishrevisedand/ornewversionsoftheLesserGeneralPublicLicensefromtimetotime.Suchnewversionswillbesimilarinspirittothepresentversion,but maydifferindetailtoaddressnewproblemsorconcerns.
Eachversionisgivenadistinguishingversionnumber. If the Library specifies a version number of this License which appliestoit and "anylaterversion", you have the option off following the terms and condition either of that version or of any laterversion published by the Free Software Foundation. If the Library does not specify a license version number, you may choose any version ever published by the Free Software Foundation.
- If you wish to incorporate part of the Library into other free programs, whose distribution conditions are incompatible with these, writeto the author to ask for permission. For software which is copyrighted by the Free Software Foundation, writeto the Free Software Foundation; wesometimes make
exceptionsforthis. Our decision will be guided by the two goals of preserving the freestatus of all derivatives of four freesoftware and of promoting the sharing and reuse of software generally.
NOWARRANTY
15.BECAUSETHELIBRARYISLICENSEDFREEOFCHARGE, THEREISNOWARRANTYFOR THELIBRARY, TOTHEEXTENTPERMITTEDBYAPPLICABLELAW.EXCEPTWHENOTHERWISE STATEDINWRITINGTHECOPYRIGHTHOLDERSAND/OROTHERPARTIESPROVIDETHE LIBRARY"ASIS"WITHOUTWARRANTYOFANYKIND,EITHEREXPRESSEDORIMPLIED, INCLUDING,BUTNOTLIMITEDTO,THEIMPLIEDWARRANTIESOFMERCHANTABILITYAND FITNESSFORAPARTICULARPURPOSE.THEENTIRERISKASTOTHEQUALITYAND PERFORMANCEOFTHELIBRARYISWITHYOU.SHOULDTHELIBRARYPROVEDEFECTIVE, YOUASSUMETHECOSTOFALLNECESSARYSERVICING,REPAIRORCORRECTION.
16. INNOEVENTUNLESSREQUIRED BYAPPLICABLELAWORAGREEDTOINWRITINGWILL ANYCOPYRIGHTHOLDER, ORANYOTHERPARTYWHOMAYMODIFYAND/ORREDISTRIBUTE THELIBRARYASPERMITTEDABOVE, BELIABLETOYOUFORDAMAGES, INCLUDING ANY GENERAL, SPECIAL, INCIDENTALORCONSEQUENTIALDAMAGESARISINGOUTOFTHEUSE ORINABILITYTOUSETHELIBRARY (INCLUDINGBUTNOTLIMITEDTOLOSSOFDATAORDATA BEINGRENDEREDINACCURATEORLOSSESSUSTAINEDBYYOUORTHIRDPARTIESORA FAILUREOFTHELIBRARYTOOPERATEWITHANYOTHERSOFTWARE), EVENIFSUCH HOLDEROROTHERPARTYHASBEENADVISEDOFTHEPOSSIBILITYOFSUCHDAMAGES.
ENDOFTERMSANDCONDITIONS
HowtoApplyTheseTermstoYourNewLibraries
If you develop anewlibrary, and you want it to be of the greatest possible us to the public, we recommend making it free software that everyone can redistribute and change. You can do so by permitting redistribution under these terms (or, alternatively, under the term so for the ordinary General Public License).
Toapplytheseterms, attach the following notice to the library. It's a fest to attach them to the start of each source file to most effectively convey the exclusion of warranty; and each file should have at least the "copyright" line and a point to where the full notice is found.
Copyright(c)
Thislibraryisfreesoftware;youcanredistributeitand/ormodifyitunderthetermsoftheGNULesser GeneralPublicLicenseaspublishedbytheFreeSoftwareFoundation;eitherversion2.1oftheLicense, or(atyouroption)anylaterversion.
Thislibraryisdistributedinthehopethatitwillbeuseful, but WITHOUTANYWARRANTY; without even theimpliedwarrantyofMERCHANTABILITYorFITNESSFORAPARTICULARPURPOSE.Seethe GNULesserGeneralPublicLicenseformoredetails.
YoushouldhavereceivedacopyoftheGNULesserGeneralPublicLicensealongwiththislibrary;if not,writetotheFreeSoftwareFoundation,Inc.,51FranklinStreet,FifthFloor,Boston,MA02110-1301 USA
Alsoaddinformationonhowtocontactyoubyelectronicandpapermail.
Youshouldalsogetyouremployer(ifyouworkasaprogrammer)oryourschool,ifany,tosigna "copyrightdisclaimer"forthelibrary,ifnecessary.Hereisasample;alterthenames:
Yoyodyne, Inc., hereby disclaims all copyright interest in the library 'Frob' (alibrary fort weakening knobs) written by James Random Hacker.
TyCoon, PresidentofVice
This projector product includes the open source software program "University of California, Berkeley License (Berkeley Software Distribution License)" which applies the terms and conditions provided by owner of the copyright to the BSDLicense.
The "BSDLicense" are WITHOUT ANY WARRANTY; without event the implied warranty of MERCHANTABILITY AND FITNESS FOR APARTICULAR PURPOSE.
ListofBSDLicenseprograms
busybox-1.13.4
Licensetermsofconditionsofeachprogramwhichareprovidedbyownerofthecopyrighttothe"BSD License"areasfollows.
Copyright(c)TheRegentsoftheUniversityofCalifornia.Allrightsreserved.
ThiscodeisderivedfromsoftwarecontributedtoBerkeleybyKennethAlmquist.
Redistributionanduseinsourceandbinaryforms,withorwithoutmodification,arepermittedprovided thatthefollowingconditionsaremet:
-
Redistributionsofsourcecodemustretaintheabovecopyrightnotice, thislistofconditionsandthe followingdisclaimer.
-
Redistributionsinbinaryformmustreproducetheabovecopyrightnotice,thislistofconditionsandthe followingdisclaimerinthedocumentationand/orothermaterialsprovidedwiththedistribution.
-
Neither then a name of the University nor then names of its contributors maybe used to endorse or promote products derived from this software without specific prior written permission.
THISSOFTWAREISPROVIDEDBYTHEREGENTSANDCONTRIBUTORS"ASIS"ANDANY EXPRESSORIMPLIEDWARRANTIES,INCLUDING,BUTNOTLIMITEDTO,THEIMPLIED WARRANTIESOFMERCHANTABILITYANDFITNESSFORAPARTICULARPURPOSEARE DISCLAIMED.INNOEVENTSHALLTHEREGENTSORCONTRIBUTORSBELIABLEFORANY DIRECT,INDIRECT,INCIDENTAL,SPECIAL(EXEMPLARY,ORCONSEQUENTIALDAMAGES (INCLUDING,BUTNOTLIMITEDTO,PROCUREMENTOFSUBSTITUTEGOODSORSERVICES; LOSSOFUSE,DATA,ORPROFITS;ORBUSINESSINTERRUPTION)HOWEVERCAUSEDANDON ANYTHEORYOFLIABILITY,WHETHERINCONTRACT,STRICTLIABILITY,ORTORT(INCLUDING NEGLIGENCEOROTHERWISE)ARISINGINANYWAYOUTOFTHEUSEOFTHISSOFTWARE, EVENIFADVISEDOFTHEPOSSIBILITYOFSUCHDAMAGE.
libjpeg
This projector product includes the open source software program "libjpeg" which applies the terms and conditions provided by owner of the copyright to the "libjpeg".
The "libjpeg" are WITHOUT ANY WARRANTY; without event the implied warranty of MERCHANTABILITY AND FITNESS FOR APARTICULAR PURPOSE.
Listoflibjpegprograms
libjpeg-6b
Licensetermsofconditionsofeachprogramwhichareprovidedbyownerofthecopyrighttothe"libjpeg"areasfollows.
Copyright(c)1994-1997, Thomas G. Lane. This file is part of the Independent JPEG Group's software. For condition so distribution and use, seethe accompanying README file.
This distribution contains the sixth public release of the Independent JPEG Group's free JPEG software. You are welcomed to distribute this software and to use it for any purpose, subject to the conditions under LEGAL ISSUES, below.
LEGALISSUES
InplainEnglish:
- Wedon't promisethat this software works. (Butifyou find any bugs, please let us know!)
- Youcanusethissoftwareforwhateverouwant. Youdon'thavetopayus.
- You may not pretend that you wrote this software. If you use it in a program, you must acknowledge somewhere in your documentation that you've used the JGcode.
Inlegalese:
TheauthorsmakeNOWARRANTYorrepresentation,eitherexpressorimplied,withrespecttothis software,itsquality,accuracy,merchantability,orfitnessforaparticularpurpose.Thissoftwareis provided"ASIS",andyou,itsuser,assumetheentireriskastoitsqualityandaccuracy.
Thissoftwareiscopyright(c)1991-1998,ThomasG.Lane.AllRightsReservedexceptasspecified below.
Permissionisherebygrantedtouse,copy,modify,anddistributethissoftware(orportionsthereof)for anypurpose,withoutfee,subjecttotheseconditions:
(1) If any part of the source code for this software is distributed, then this README file must be included, with this copyright and no-warrant notice unaltered; and any additions, deletions, or changes to the original files must be clearly indicated in accompanying documentation.
(2) If only executable code is distributed, then the accompanying documentation must state that "this software is based in part on the work of the Independent JPEG Group".
(3) Permission for use of this software is granted only if the user accepts full responsibility for any undesirable consequences; the authors accept NOLIABILITY for damages of any kind.
TheseconditionsapplytoanysoftwarederivedfromorbasedonthelJGcode,notjusttotheunmodified library.Ifyouuseourwork,yououghttoacknowledgeus.
PermissionisNOTgrantedfortheuseofanylJGauthor'snameorcompanynameinadvertisingor publicityrelatingtothissoftwareorproductsderivedfromit. Thissoftwaremaybereferredtoonlyas "theIndependentJPEGGroup'ssoftware".
Wespecificallypermitandencouragetheuseofthissoftwareasthebasisofcommercialproducts, providedthatallwarrantyorliabilityclaimsareassumedbytheproductvendor.
ansi2knr.cisincludedinthisdistributionbypermissionofL.PeterDeutsch,soleproprietorofits copyrightholder,AladdinEnterprisesofMenloPark,CA.ansi2knr.cisNOTcoveredbytheabove copyrightandconditions,butinsteadbytheusualdistributiontermsoftheFreeSoftwareFoundation; principally,thatyoumustincludesourcecodeifyouredistributeit.(Seethefileansi2knr.cforfulldetails.) However,sinceansi2knr.cisnotneededaspartofanyprogramgeneratedfromthelJGcode,thisdoes notlimityoumorethantheforegoingparagraphsdo.
TheUnixconfigurationscript"configure"wasproducedwithGNUAutoconf.ItiscopyrightbytheFree SoftwareFoundationbutisfreelydistributable.Thesameholdsforitssupportingscripts(config.guess, config.sub.ltconfig,ltmain.sh).Anothersupportscript,install-sh,iscopyrightbyM.I.T.butisalsofreely distributable.
ItappearsthatthearithmeticcodingoptionoftheJPEGspeciscoveredbypatentsownedbyIBM, AT&T,andMitsubishi.Hencearithmeticodingcannotlegallybeusedwithoutobtainingoneormore licenses.Forthisreason,supportforarithmeticcodinghasbeenremovedfromthefreeJPEGsoftware. (SincearithmeticodingprovidesonlyamarginalgainovertheunpatentedHuffmanmode,itisunlikely
thatverymanyimplementationswillsupportit.)Sofarasweareaware,therearenopatentrestrictions ontheremainingcode.
The IJGdistributionformerlyincludedcodetoreadandwriteGIFfiles.ToavoidentanglementwiththeUnisysLZWpatent,GIFreadingsupporthasbeenremovedaltogether,andtheGIFwriterhasbeen simplifiedtoproduce"uncompressedGIFs".ThistechniquedoesnotusetheLZWalgorithm;the resultingGIFfilesarelargerthanusual,butarereadablebyallstandardGIFdecoders.
Wearerequiredtostatethat
"TheGraphicsInterchangeFormat(c)istheCopyrightpropertyofCompuServeIncorporated.GIF(sm)isaServiceMarkpropertyofCompuServeIncorporated."
libpng
This projector product includes the open source software program "libpng" which applies the terms and conditions provided by owner of the copyright to the "libpng".
The "libpng" are WITHOUT ANY WARRANTY; without event the implied warranty of MERCHANTABILITY AND FITNESS FOR APARTICULAR PURPOSE.
Listoflibpngprograms
libpng-1.2.49
Licensetermsofconditionsofeachprogramwhichareprovidedbyownerofthecopyrighttothe"libpng" areasfollows.
Forconditionsofdistributionanduse,seecopyrightnoticeinpng.hCopyright(c)1998-2012Glenn Randers-Pehrson(Version0.96Copyright(c)1996,1997AndreasDilger)(Version0.88Copyright©) 1995,1996GuyEricSchalnat,Group42,Inc.)
Thiscopyofthelibpngnoticesisprovidedforyourconvenience.Incaseofanydiscrepancybetween thiscopyandthenoticesinthefilepng.hthatisincludedinthelibpngdistribution,thelattershallprevail.
COPYRIGHTNOTICE, DISCLAIMER, and LICENSE:
If you modify libpngyou may insert additional notices immediately following this sentence.
Thiscodeisreleasedunderthelibpnglicense.
libpngversion1.2.6, August 15, 2004, through 1.2.49, March 29, 2012, are Copyright (c) 2004, 2006-2009 Glenn Randers-Pehrson, and a redistribution according to the same disclaimer and license as libpng-1.2.5 with the following individual added to the list of Contributing Authors
CosminTruta
libpngversions1.0.7, July 1, 2000, through 1.2.5-October 3, 2002, are Copyright (c) 2000-2002 Glenn Randers-Pehrson, and a red distributed according to the same disclaimer and license as libpng-1.0.6 with the following individuals added to the list of Contributing Authors
Simon-PierreCadieux
EricS.Raymond
GillesVollant
andwiththefollowingadditionstothedisclaimer:
Thereisnowarrantyagainstinterferencewithyourenjoymentofthelibraryoragainstinfringement. Thereisnowarrantythatoureffortsorthelibrarywillfulfillanyofyourparticularpurposesorneeds. This libraryisprovidedwithallfaults,andtheentireriskofsatisfactoryquality,performance,accuracy,and effortiswiththeuser.
libpngversions0.97, January 1998, through 1.0.6, March 20, 2000, are Copyright ©) 1998, 1999 Glenn Randers-Pehrson, and a redistribution according to the same disclaimer and license as libpng-0.96, with the following individuals added to the list of Contributing Authors:
TomLane
GlennRanders-Pehrson
WillemvanSchaik
libpngversions0.89,June1996,through0.96,May1997,areCopyright(c)1996,1997AndreasDilger Distributedaccordingtothesamedisclaimerandlicenseaslibpng-0.88,withthefollowingindividuals addedtothelistofContributingAuthors:
JohnBowler
KevinBracey
SamBushell
MagnusHolmgren
GregRoelofs
TomTanner
libpngversions0.5, May 1995, through 0.88, January 1996, are Copyright (c) 1995, 1996 Guy Eric Schalnat, Group 42, Inc.
For the purposes of this copyright and license, "Contributing Authors" is defined as the following set of individuals:
AndreasDilger
DaveMartindale
GuyEricSchalnat
PaulSchmidt
TimWegner
ThePNGReferenceLibraryissupplied"ASIS".TheContributingAuthorsandGroup42,Inc.disclaimall warranties,expressedorimplied,including,withoutlimitation,thewarrantiesofmerchantabilityandof fitnessforanypurpose.TheContributingAuthorsandGroup42,Inc.assumenoliabilityfordirect, indirect,incidental,special,exemplary,orconsequentialdamages,whichmayresultfromtheuseofthe PNGReferenceLibrary,evenifadvisedofthepossibilityofsuchdamage.
Permissionisherebygrantedtouse,copy,modify,anddistributethissourcecode,orportionshereof,for anypurpose,withoutfee,subjecttothefollowingrestrictions:
- The origin of this source codemust not bemis represented.
- Altered versions must be plainly marked as such and must not be represented as being the original source.
- This Copyrightnoticemaynotberemovedoralteredfromanysourceoralteredsourcedistribution.
The Contributing Authors and Group 42, Inc. specifically permit, without fee, and encourage the use of this source code as a component to supporting the PNG file format in commercial products. If you use this source code in a product, acknowledgment is not required but would be appreciated.
A"png_get_copyright"functionisavailable,forconvenientusein"about"boxesandthelike:
printf("%s", png_get_copyright(NULL));
Also, the PNGlogo(inPNGformat, ofcourse) is supplied in the files "pngbar.png" and "pngbar.jpg" (88x31) and "pngnow.png" (98x31).
LibpngisOSICertifiedOpenSourceSoftware.OSICertifiedOpenSourceisacertificationmarkofthe OpenSourceInitiative.
GlennRanders-Pehrson
glennrp@users.sourceforge.net
March29,2012
zlib
Thisprojectorproductincludestheopensourcesoftwareprogram"zlib"whichappliesthetermsand conditionsprovidedbyownerofthecopyrighttothe"zlib".
The"zlib"areWITHOUTANYWARRANTY;withouteventheimpliedwarrantyofMERCHANTABILITY ANDFITNESSFORAPARTICULARPURPOSE.
Listofzlibprograms
zlib-1.1.4
zlib-1.2.3(PowerLiteProG6070W/G6170/G6270W/G6470WU/G6570WU/G6770WU)
minzip1.01e(PowerLiteProG6070W/G6170/G6270W/G6470WU/G6570WU/G6770WU)
Licensetermsofconditionsofeachprogramwhichareprovidedbyownerofthecopyrighttothe"zlib" areasfollows.
Copyrightnotice:
(c)1995-1998Jean-IoupGaillyandMarkAdler
Thissoftwareisprovided'as-is',withoutanyexpressorimpliedwarranty.Innoeventwilltheauthorsbe heldliableforanydamagesarisingfromtheuseofthissoftware.
Permissionisgrantedtoanyonetousethissoftwareforanypurpose,includingcommercialapplications,andtoalteritandredistributeitfreely,subjecttothefollowingrestrictions:
- The origin of this software must not be represented; you must not claim that you would the original software. If you use this software in a product, an acknowledgment in the product documentation would be appreciated but is not required.
- Altered source versions must be plainly marked as such, and must not be represented as being the original software.
- This noticemay not beremoved or altered from any sourced distribution.
Jean-loupGailly
jloup@gzip.orgMarkAdler
madler@alumni.caltech.edu
Ifyouusethezlibrinaryinaproduct,wewouldappreciate*not*receivinglengthylegaldocumentsto sign. Thesourcesareprovidedforfreebutwithoutwarrantyofanykind. Thelibraryhasbeenentirely writtenbyJean-loupGaillyandMarkAdler;itdoesnotincludethird-partycode.
If you are distributed from modified sources, we would appreciate that you include in the file Change Log history information documenting your changes.
Apache-2.0
This projector product includes the open source software program which applies the terms and conditions provided by owner of the copyright to the "Apache-2.0".
The "apache-2.0" are WITHOUT ANY WARRANTY; without even the implied warranty of MERCHANTABILITY AND FITNESS FOR APARTICULAR PURPOSE.
ListofApache-2.0programs:
mDNSResponder-107.6(onlymDNSResponderPosixisused)
DroidSansFallback.ttf
Licenseterms"ApacheLicenseVersion2.0,January2004"areasfollows.
ApacheLicense
Version2.0, January 2004
http://www.apache.org/licenses/
TERMSANDCONDITIONSFORUSE, REPRODUCTION, AND DISTRIBUTION
- Definitions.
"License" shall mean the terms and conditions for use, reproduction, and distribution as defined by Sections 1 through 9 of this document.
"Licensor" shall mean the copyright owner entity authorized by the copyright owner that is granting the License.
"LegalEntity" shall mean the union of the acting entity and all other entities that control, are controlled by, or are under common control with that entity. For the purposes of this definition, "control" means (1) the power, director indirect, to cause the direction or management of such entity, whether by contractor otherwise, or (ii) ownership of fifty percent (50%) or more of the outstanding shares, or (iii) beneficial ownership of such entity.
"You" (or "Your") shall mean an individual or Legal Entity exercising permissions granted by this License.
"Source"formshallmeanthepreferredformformakingmodifications,includingbutnotlimitedto softwaresourcecode,documentationsource,andconfigurationfiles.
"Object"formshallmeananyformresultingfrommechanicaltransformationortranslationofaSource form,includingbutnotlimitedtocompiledobjectcode,generateddocumentation,andconversionsto othermediatypes.
"Work" shall mean the work of authorship, whether in Source Object form, made available under the License, as indicated by copyright notice that is included in or attached to the work (an example is provided in the Appendix below).
"DerivativeWorks" shall mean any work, whether in SourceObject form, that is based on (ordered from) the Work and for which the editorial revisions, annotations, elaborations, or other modifications represent, as a whole, an original work authorship. For the purposes of this License, Derivative Works shall not include work that remain separable from, or merely link (or bind by name) to the interfaces of, the Work and Derivative Work thereof.
"Contribution" shall mean any work of authorship, including the original version of the Work and any modifications or addition to that Work or Derivative Work thereof, that is intentionally submitted to Licensor for inclusion in the Work by the copyright owner or by an individual or legal entity authorized to submit on behalf of the copyright owner. For the purposes of this definition, "submitted" means any form of electronic, verbal, or written communications sent to the Licensor or its representatives, including but not limited to communication one electronic mailing lists, source code control systems, and issue tracking system that are managed by, or on behalf of the Licensor for the purpose of discussing and improving
theWork, but excluding communication that is conspicuously marked or otherwise designated in writing by the copyright to owneras "NotaContribution."
"Contributor" shall mean Licensor and any individual legal entity on behalf of whom a contribution has been received by Licensor and subsequently incorporated within the Work.
- GrantofCopyrightLicense. SubjecttothetermsandconditionsofthisLicense, eachContributor herebygrantstoYouaperpetual, worldwide, non-exclusive, no-charge, royalty-free, irrevocable copyrightlicensetoreproduce, prepareDerivativeWorksof, publiclydisplay, publiclyperform, sublicense, anddistributetheWorkandsuchDerivativeWorksinSourceorObjectform.
- GrantofPatentLicense. SubjecttothetermsandconditionsofthisLicense, eachContributorhereby grantstoYouaperpetual,worldwide,non-exclusive,no-charge,royalty-free,irrevocable(exceptas statedinthissection)patentlicensetomake,havemade,use,offertosell,sell,import,andotherwise transfertheWork,wheresuchlicenseappliesonlytothosepatentclaimslicensablebysuchContributor thatarenecessarilyinfringedbytheirContribution(s)aloneorbycombinationoftheirContribution(s)with theWorktowhichsuchContribution(s)wassubmitted.IfYouinstitutepatentlitigationagainstanyentity (includingacross-claimorcounterclaiminalawsuit)allegingthattheWorkoraContribution incorporatedwithintheWorkconstitutesdirectorcontributorypatentinfringement,thenanypatent licensesgrantedtoYouunderthisLicenseforthatWorkshallterminateasofthedatesuchlitigationis filed.
- Redistribution. You may reproduce and distribute copies of the Work or Derivative Work thereof in anymedium, with or without modifications, and in Source or Object form, provided that You meet the following conditions:
(a) You must give any other recipients of the Work or Derivative Works as copy of this License; and
(b) You must cause an unmodified file to store a copy of the file that you change the files; and
c) Youmustretain, in the Source form of any Derivative Work that You distribute all copyright, patent, trademark, and attribution notices from the Source form of the Work, excluding those notices that donot pertainto an yap part of the Derivative Works; and
(d) If the Work includes a NOTICE text file as part of its distribution, then any Derivative Work that You distribute must include readable copy of the attribution notices contained with insuch NOTICE file, excluding those notices that donot pertainto any part of the Derivative Works, in at least one of the following places: with a NOTICE text file distributed as part of the Derivative Works; within the Source form documentation, if provided along with the Derivative Works; or, within a display generated by the Derivative Works, if and where versa such third-part notices normally appear. The content of the NOTICE file are for informational purposes only and donot modify the License. You may add Your own attribution notices within Derivative Work that You distribute, alongside or as an addendum to the NOTICE text from the Work, provided that such additional attribution notices cannot be construed as modifying the License.
YoumayaddYourowncopyrightstatementtoYourmodificationsandmayprovideadditionalordifferentlicensetermsandconditionsforuse,reproduction,ordistributionofYourmodifications,orforanysuchDerivativeWorksasawhole,providedYouruse,reproduction,anddistributionoftheWorkotherwisecomplieswiththeconditionsstatedinthisLicense.
- Submission of Contributions. Unless You explicitly state otherwise, any Contribution intentionally submitted for inclusion in the Work by Youtube the Licensor shall be under the terms and conditions of this License, without any additional terms or conditions.
Notwithstandingtheabove,nothinghereinshallsupersedeormodifythetermsofanyseparatelicense agreementyoumayhaveexecutedwithLicensorregardingsuchContributions.
-
Trademarks. This Licensed does not grant permission to set the tradenames, trademarks, service marks, or product names of the Licensor, except as required for reasonable and customary use in describing the origin of the Work and reproducing the content of the NOTICE file.
-
DisclaimerofWarranty.Unlessrequiredbyapplicablelaworagreedtoinwriting,Licensorprovides theWork(andeachContributorprovidesitsContributions)onan"ASIS"BASIS,WITHOUT WARRANTIESORCONDITIONSOFANYKIND,eitherexpressorimplied,including,withoutlimitation, anywarrantiesorconditionsofTITLE,NON-INFRINGEMENT,MERCHANTABILITY,orFITNESSFOR APARTICULARPURPOSE.Youaresolelyresponsiblefordeterminingtheappropriatenessofusingor redistributingtheWorkandassumeanyrisksassociatedwithYoureexerciseofpermissionsunderthis License.
-
Limitation of Liability. Innoevent and underno legal theory, whether intort (including negligence), contract, or otherwise, unless required by applicable law (such as deliberate and grossly negligent acts) or agreed to in writing, shall any Contributor be liable to You for damages, including any direct, indirect, special, incidental, or consequential damages of any character arising as a result of this License or out of the use or inability to set the Work (including but not limited todamages for loss of goodwill, work stoppage, computer failure or malfunction, or any and all other commercial damages or losses), even if such Contributor has been advised of the possibility of such damages.
-
Accepting Warranty or Additional Liability. Whiler distributing the Work or Derivative Work thereof, You may choose to offer, and charge a fee for, acceptance of support, warranty, indemnity, or other liability obligations and/or rights consistent with this License. However, in accepting such obligations, You may act only on your own behalf and your sole responsibility, not on behalf of any other Contributor, and only if you agree to indemnify, defend, and hold each Contributor harmless for any liability incurred by, or claims asserted against, such Contributor by reason of your accepting any such warranty or additional liability.
ENDOFTERMSANDCONDITIONS
APPENDIX: How to apply the Apache License to your work.
ToapplytheApacheLicensetoyourwork,attachthefollowingboilerplatenotice,withthefields enclosedbybrackets”]]"replacedwithyourownidentifyinginformation.(Don'tincludethebrackets!)
Thetextshouldbeenclosedintheappropriatecommentsyntaxforthefileformat.Wealsorecommend thatafileorclassnameanddescriptionofpurposebeincludedonthesame"printedpage"asthe copyrightnoticeforeasieridentificationwithinthird-partyarchives.
Copyright[yyyy][nameofcopyrightowner]
LicensedundertheApacheLicense, Version2.0(the"License");
youmaynotusethisfileexceptincompliancewiththeLicense.
YoumayobtainacopyoftheLicenseat
http://www.apache.org/licenses/LICENSE-2.0
Unlessrequiredbyapplicablelaworagreedtoinwriting,softwaredistributedundertheLicenseis distributedonan"ASIS"BASIS,WITHOUTWARRANTIESORCONDITIONSOFANYKIND,either expressorimplied.
SeetheLicenseforthespecificlanguagegoverningpermissionsandlimitationsundertheLicense.newlib
This projector product includes the open source software program "newlib" which applies the terms and conditions provided by owner of the copyright to the "newlib".
The "newlib" are WITHOUT ANY WARRANTY; without event the implied warranty of MERCHANTABILITY AND FITNESS FOR APARTICULAR PURPOSE.
Listofnewlibprograms
newlib1.17.0
Licensetermsofconditionsofeachprogramwhichareprovidedbyownerofthecopyrighttothe"newlib"areasfollows.
Thenewlibsubdirectoryisacollectionofsoftwarefromseveralsources.
Eachfilemayhaveitsowncopyright/licensethatisembeddedinthesourcefile.Unlessotherwisenoted inthebodyofthesourcefile(s),thefollowingcopyrightnoticeswillapplytothecontentsofthenewlib subdirectory:
(1) RedHat Incorporated
Copyright(c)1994-2007RedHat, Inc. Allrightsreserved.
Thiscopyrightedmaterialismadeavailabletoanyonewishingtouse,modify,copy,orredistributeitsubjectothetermsandconditionsoftheBSDLicense. Thisprogramisdistributedinthehopethatitwillbeuseful,butWITHOUTANYWARRANTYexpressedorimplied,includingtheimpliedwarrantiesofMERCHANTABILITYorFITNESSFORAPARTICULARPURPOSE.Acopyofthislicenseisavailableathttp://www.opensource.org/licenses.AnyRedHattrademarksthataireincorporatedinthesource
codeordocumentationarenotsubjecttotheBSDLicenseandmayonlybeusedorreplicatedwiththe expresspermissionofRedHat,Inc.
(2)UniversityofCalifornia,Berkeley
Copyright(c)1981-2000TheRegentsoftheUniversityofCalifornia.
Allrightsreserved.
Redistributionanduseinsourceandbinaryforms,withorwithoutmodification,arepermittedprovided thatthefollowingconditionsaremet:
*Redistributionsofsourcecodemustretaintheabovecopyrightnotice,thislistofconditionsandthe followingdisclaimer.
*Redistributionsinbinaryformmustreproducetheabovecopyrightnotice,thislistofconditionsandthe followingdisclaimerinthedocumentationand/orothermaterialsprovidedwiththedistribution.
*NeitherthenameoftheUniversitynorthenamesofitscontributorsmaybeusedtoendorseor promoteproductsderivedfromthissoftwarewithoutspecificpriorwrittenpermission.
THISSOFTWAREISPROVIDEDBYTHECOPYRIGHTHOLDERSANDCONTRIBUTORS"ASIS" ANDANYEXPRESSORIMPLIEDWARRANTIES,INCLUDING,BUTNOTLIMITEDTO,THEIMPLIED WARRANTIESOFMERCHANTABILITYANDFITNESSFORAPARTICULARPURPOSEARE DISCLAIMED.INNOEVENTSHALLTHECOPYRIGHTOWNERORCONTRIBUTORSBELIABLE FORANYDIRECT,INDIRECT,INCIDENTAL,SPECIAL(EXEMPLARY,ORCONSEQUENTIAL DAMAGES(INCLUDING,BUTNOTLIMITEDTO,PROCUREMENTOFSUBSTITUTEGOODSOR SERVICES;LOSSOFUSE,DATA,ORPROFITS;ORBUSINESSINTERRUPTION)HOWEVER CAUSEDANDONANYTHEORYOFLIABILITY,WHETHERINCONTRACT,STRICTLIABILITY,ORTORT(INCLUDINGNEGLIGENCEOROTHERWISE)ARISINGINANYWAYOUTOFTHEUSEOF THISSOFTWARE,EVENIFADVISEDOFTHEPOSSIBILITYOFSUCHDAMAGE.
(3) David M. Gay (AT&T 1991, Lucent 1998)
TheauthorofthissoftwareisDavidM.Gay.
Copyright©)1991byAT&T.
Permissionouse, copy, modify, and distributethissoftware for any purpose without fee is hereby granted, provided that this notice is included in all copies of any software which is includes a copy or modification of this software and all copies of the supporting documentation for such software.
THISSOFTWAREISBEINGPROVIDED"ASIS", WITHOUTANYEXPRESSORIMPLIED WARRANTY.INPARTICULAR,NEITHERTHEAUTHORNORAT&TMAKESANY REPRESENTATIONORWARRANTYOFANYKINDCONCERNINGTHEMERCHANTABILITY OF THISSOFTWAREORITSFITNESSFORANYPARTICULARPURPOSE.
TheauthorofthissoftwareisDavidM.Gay.
Copyright(c)1998-2001byLucentTechnologies
AllRightsReserved
Permissiontouse, copy, modify, and distributethissoftwareanditsdocumentationforanypurpose and withoutfeeisherebygranted, providedthattheabovecopyrightnoticeappearinallcopiesandthatboth thatthecopyrightnoticeandthispermissionnoticeandwarrantydisclaimerappearinsupporting documentation, and thathnameofLucentoranyofitsentitiesnotbeusedinadvertisingorpublicity pertainingtodistributionofthesoftwarewithoutspecific,writtenpriorpermission.
LUCENTDISCLAIMSALLWARRANTIESWITHREGARDTOTHISSOFTWARE,INCLUDINGALL IMPLIEDWARRANTIESOFMERCHANTABILITYANDFITNESS.INNOEVENTSHALLLUCENTOR ANYOFITSENTITIESBELIABLEFORANYSPECIAL,INDIRECTORCONSEQUENTIALDAMAGES ORANYDAMAGESWHATSOEVERRESULTINGFROMLOSSOFUSE,DATAORPROFITS, WHETHERINANACTIONOFCONTRACT,NEGLIGENCEOROTHERTORTIOUSACTION, ARISINGOUTOFORINCONNECTIONWITHTHEUSEORPERFORMANCEOFTHISSOFTWARE.
(4)AdvancedMicroDevices
Copyright1989,1990AdvancedMicroDevices,Inc.
ThissoftwareisthepropertyofAdvancedMicroDevices,Inc(AMD)whichspecificallygrantstheusertherighttomodify,useanddistributethissoftwareprovidedthisnoticeisnotremovedoraltered.AllotherrightsarereservedbyAMD.
AMDMAKESNOWARRANTYOFANYKIND, EXPRESSORIMPLIED, WITHREGARDTOTHIS SOFTWARE.INNOEVENTSHALLAMDBELIABLEFORINCIDENTALORCONSEQUENTIAL DAMAGESINCONNECTIONWITHORARISINGFROMTHEFURNISHING, PERFORMANCE, OR USEOFTHISSOFTWARE.
Sothatallmaybenefitfromyourexperience, pleasereportanyproblemsorsuggestionsaboutthis softwaretothe29KTechanicalSupportCenterat800-29-29-AMD(800-292-9263)intheUSA,or0800-89-1131intheUK,or0031-11-1129inJapan,tollfree. Thedirectdialnumberis512-462-4118.
AdvancedMicroDevices, Inc.
29KSupportProducts
MailStop573
5900E.BenWhiteBlvd.
Austin,TX78741
800-292-9263
(5)C.W.Sandmann
Copyright(C)1993C.W.Sandmann
Thisfilemaybefreelydistributedaslongastheauthor'snameremains.
(6) EricBackus
(C)Copyright1992EricBackus
Thissoftwaremaybeusedfreelysolongasthiscopyrightnoticeislefttintact.Thereisnowarranteeon thissoftware.
(7) Sun Microsystems
Copyright(C)1993bySunMicrosystems,Inc.Allrightsreserved.
DevelopedatSunPro,aSun Microsystems,Inc.business.Permissionouse,copy,modify,and distributethissoftwareisfreelygranted,providedthatthisnoticeispreserved.
(8)HewlettPackard
(c)Copyright1986HEWLETT-PACKARDCOMPANY
Toanyonewhoacknowledgesthatthisfileisprovided"ASIS"withoutanyexpressorimpliedwarranty: permissiontouse, copy, modify, anddistributethisfileforanypurposeisherebygrantedwithoutfee, providedthattheabovecopyrightnoticeandthisnoticeappearsinallcopies, andthatthenameof Hewlett-PackardCompanynotbeusedinadvertisingorpublicitypertainingtodistributionofthe softwarewithoutspecific,writtenpriorpermission.Hewlett-PackardCompanymakesnorepresentations aboutthesuitabilityofthissoftwareforanypurpose.
(9) Hans-PeterNilsson
Copyright(C)2001 Hans-PeterNilsson
Permissiontouse, copy, modify, and distributethissoftware is freely granted, provided that the above copyright notice, this notice and the following disclaimer are preserved with no changes.
THISSOFTWAREISPROVIDED"ASIS"ANDWITHOUTANYEXPRESSORIMPLIED WARRANTIES,INCLUDING,WITHOUTLIMITATION,THEIMPLIEDWARRANTIESOF MERCHANTABILITYANDFITNESSFORAPARTICULARPURPOSE.
(11)ChristopherG.Demetriou
Copyright(c)2001ChristopherG.Demetriou
Allrightsreserved.
Redistributionanduseinsourceandbinaryforms,withorwithoutmodification,arepermittedprovided thatthefollowingconditionsaremet:
-
Redistributionsofsourcecodemustretaintheabovecopyrightnotice, thislistofconditionsandthe followingdisclaimer.
-
Redistributions in binary form must reproduce the above copyright notice, this list of conditions and the following disclaimer in the documentation and/or other materials provided with the distribution.
- Thenameoftheauthormaynotbeusedtoendorseorpromoteproductsderivedfromthissoftware withoutspecificpriorwrittenpermission.
THISSOFTWAREISPROVIDEDBYTHEAUTHOR"ASIS"ANDANYEXPRESSORIMPLIED WARRANTIES,INCLUDING,BUTNOTLIMITEDTO,THEIMPLIEDWARRANTIESOF MERCHANTABILITYANDFITNESSFORAPARTICULARPURPOSEAREDISCLAIMED.INNO EVENTSHALLTHEAUTHORBELIABLEFORANYDIRECT,INDIRECT,INCIDENTAL,SPECIAL,EXEMPLARY,ORCONSEQUENTIALDAMAGES(INCLUDING,BUTNOTLIMITEDTO,PROCUREMENTOFSUBSTITUTEGOODSORSERVICES;LOSSOFUSE,DATA,ORPROFITS;ORBUSINESSINTERRUPTION)HOWEVERCAUSEDANDONANYTHEORYOFLIABILITY,WHETHERINCONTRACT,STRICTLIABILITY,ORTORT(INCLUDINGNEGLIGENCEOROTHERWISE)ARISINGINANYWAYOUTOFTHEUSEOFTHISSOFTWARE,EVENIFADVISED OFTHEPOSSIBILITYOFSUCHDAMAGE.
(12)SuperH,Inc.
Copyright2002SuperH, Inc. Allrightsreserved
ThissoftwareisthepropertyofSuperH,Inc(SuperH)whichspecificallygrantstheusertherightto modify,useanddistributethissoftwareprovidedthisnoticeisnotremovedoraltered.Allotherrightsare reservedbySuperH.
SUPERHMAKESNOWARRANTYOFANYKIND, EXPRESSORIMPLIED, WITHREGARDTOTHIS SOFTWARE.INNOEVENTSHALLSUPERHBELIABLEFORINDIRECT,SPECIAL,INCIDENTALOR CONSEQUENTIALDAMAGESINCONNECTIONWITHORARISINGFROMTHEFURNISHING, PERFORMANCE,ORUSEOFTHISSOFTWARE.
Sothatallmaybenefitfromyourexperience,pleasereportanyproblems
orsuggestionsaboutthissoftwaretotheSuperHSupportCentervia
e-mailatsoftwaresupport@superh.com.
SuperH, Inc.
405RiverOaksParkway
SanJose
CA95134
USA
(13)RoyalInstituteofTechnology
Copyright(c)1999KungligaTekniskaHökolan(RoyalInstituteofTechnology, Stockholm, Sweden).
Allrightsreserved.
Redistributionanduseinsourceandbinaryforms,withorwithoutmodification,arepermittedprovided thatthefollowingconditionsaremet:
- Redistributionsofsourcecodemustretaintheabovecopyrightnotice, thislistofconditionsandthe followingdisclaimer.
- Redistributions in binary form must reproduce the above copyright notice, this list of conditions and the following disclaimer in the documentation and or other materials provided with the distribution.
- Neither the name of KTHnorthenamesofitscontributors maybe used to endorse or promote products derived from this software without specific prion written permission.
THISSOFTWAREISPROVIDEDBYKTHANDITSCONTRIBUTORS"ASIS"ANDANYEXPRESS ORIMPLIEDWARRANTIES,INCLUDING,BUTNOTLIMITEDTO,THEIMPLIEDWARRANTIESOF MERCHANTABILITYANDFITNESSFORAPARTICULARPURPOSEAREDISCLAIMED.INNO EVENTSHALLKTHORITSCONTRIBUTORSBELIABLEFORANYDIRECT,INDIRECT, INCIDENTAL,SPECIAL,EXEMPLARY,ORCONSEQUENTIALDAMAGES(INCLUDING,BUTNOT LIMITEDTO,PROCUREMENTOFSUBSTITUTEGOODSORSERVICES;LOSSOFUSE,DATA,OR PROFITS;ORBUSINESSINTERRUPTION)HOWEVERCAUSEDANDONANYTHEORYOF LIABILITY,WHETHERINCONTRACT,STRICTLIABILITY,ORTORT(INCLUDINGNEGLIGENCEOR OTHERWISE)ARISINGINANYWAYOUTOFTHEUSEOFTHISSOFTWARE,EVENIFADVISED OFTHEPOSSIBILITYOFSUCHDAMAGE.
(14) AlexeyZelkin
Copyright(c)2000,2001AlexeyZelkinphantom@FreeBSD.org
Allrightsreserved.
Redistributionanduseinsourceandbinaryforms,withorwithoutmodification,arepermittedprovided thatthefollowingconditionsaremet:
- Redistribution of source codemust retain the above copyright notice, this list of conditions and the following disclaimer.
- Redistributions in binary form must reproduce the above copyright notice, this list of conditions and the following disclaimer in the documentation and or other materials provided with the distribution.
THISSOFTWAREISPROVIDEDBYTHEAUTHORANDCONTRIBUTORS"ASIS"ANDANY EXPRESSORIMPLIEDWARRANTIES,INCLUDING,BUTNOTLIMITEDTO,THEIMPLIED WARRANTIESOFMERCHANTABILITYANDFITNESSFORAPARTICULARPURPOSEARE DISCLAIMED.INNOEVENTSHALLTHEAUTHORORCONTRIBUTORSBELIABLEFORANY DIRECT,INDIRECT,INCIDENTAL,SPECIAL(EXEMPLARY,ORCONSEQUENTIALDAMAGES (INCLUDING,BUTNOTLIMITEDTO,PROCUREMENTOFSUBSTITUTEGOODSORSERVICES; LOSSOFUSE,DATA,ORPROFITS;ORBUSINESSINTERRUPTION)HOWEVERCAUSEDANDON
ANYTHEORYOFLIABILITY, WHETHERINCONTRACT, STRICTLIABILITY, ORTORT (INCLUDING NEGLIGENCE OR OTHERWISE) ARISINGINANYWAYOUTOF THE USE OF THIS SOFTWARE, EVENIFADVISED OF THE POSSIBILITY OF SUCH DAMAGE.
(15)AndreyA.Chernov
Copyright(C)1997byAndreyA.Chernov,Moscow,Russia.
Allrightsreserved.
Redistributionanduseinsourceandbinaryforms,withorwithoutmodification,arepermittedprovided thatthefollowingconditionsaremet:
- Redistributionsofsourcecodemustretaintheabovecopyrightnotice, thislistofconditionsandthe followingdisclaimer.
- Redistributions in binary form must reproduce the above copyright notice, this list of conditions and the following disclaimer in the documentation and or other materials provided with the distribution.
THISSOFTWAREISPROVIDEDBYTHEAUTHOR"ASIS"ANDANYEXPRESSORIMPLIED WARRANTIES,INCLUDING,BUTNOTLIMITEDTO,THEIMPLIEDWARRANTIESOF MERCHANTABILITYANDFITNESSFORAPARTICULARPURPOSEAREDISCLAIMED.INNO EVENTSHALLTHEREGENTSORCONTRIBUTORSBELIABLEFORANYDIRECT,INDIRECT, INCIDENTAL,SPECIAL,EXEMPLARY,ORCONSEQUENTIALDAMAGES(INCLUDING,BUTNOT LIMITEDTO,PROCUREMENTOFSUBSTITUTEGOODSORSERVICES;LOSSOFUSE,DATA,OR PROFITS;ORBUSINESSINTERRUPTION)HOWEVERCAUSEDANDONANYTHEORYOF LIABILITY,WHETHERINCONTRACT,STRICTLIABILITY,ORTORT(INCLUDINGNEGLIGENCEOR OTHERWISE)ARISINGINANYWAYOUTOFTHEUSEOFTHISSOFTWARE,EVENIFADVISED OFTHEPOSSIBILITYOFSUCHDAMAGE.
(16)FreeBSD
Copyright(c)1997-2002FreeBSDProject.
Allrightsreserved.
Redistributionanduseinsourceandbinaryforms,withorwithoutmodification,arepermittedprovided thatthefollowingconditionsaremet:
- Redistributionsofsourcecodemustretaintheabovecopyrightnotice,thislistofconditionsandthe followingdisclaimer.
- Redistributions in binary form must reproduce the above copyright notice, this list of conditions and the following disclaimer in the documentation and or other materials provided with the distribution.
THISSOFTWAREISPROVIDEDBYTHEAUTHORANDCONTRIBUTORS"ASIS"ANDANY EXPRESSORIMPLIEDWARRANTIES,INCLUDING,BUTNOTLIMITEDTO,THEIMPLIED WARRANTIESOFMERCHANTABILITYANDFITNESSFORAPARTICULARPURPOSEARE
DISCLAIMED.INNOEVENTSHALLTHEAUTHORORCONTRIBUTORSBELIABLEFORANY DIRECT,INDIRECT,INCIDENTAL,SPECIAL,EXEMPLARY,ORCONSEQUENTIALDAMAGES (INCLUDING,BUTNOTLIMITEDTO,PROCUREMENTOFSUBSTITUTEGOODSORSERVICES; LOSSOFUSE,DATA,ORPROFITS;ORBUSINESSINTERRUPTION)HOWEVERCAUSEDANDON ANYTHEORYOFLIABILITY,WHETHERINCONTRACT,STRICTLIABILITY,ORTORT(INCLUDING NEGLIGENCEOROTHERWISE)ARISINGINANYWAYOUTOFTHEUSEOFTHISSOFTWARE, EVENIFADVISEDOFTHEPOSSIBILITYOFSUCHDAMAGE.
(17)S.L.Moshier
Author:S.L.Moshier.
Copyright(c)1984,2000S.L.Moshier
Permissionouse, copy, modify, and distributethissoftware for any purpose without fee is hereby granted, provided that this are notice is included in all copies of any software which is includes a copy or modification of this software and all copies of the supporting documentation for such software.
THISSOFTWAREISBEINGPROVIDED"ASIS", WITHOUTANYEXPRESSORIMPLIED WARRANTY.INPARTICULAR, THEAUTHORMAKESNOREPRESENTATIONORWARRANTYOF ANYKINDCONCERNINGTHEMERCHANTABILITYOFTHISSOFTWAREORITSFITNESSFOR ANYPARTICULARPURPOSE.
(18)CitrusProject
Copyright(c)1999CitrusProject,
Allrightsreserved.
Redistributionanduseinsourceandbinaryforms,withorwithoutmodification,arepermittedprovided thatthefollowingconditionsaremet:
- Redistributionsofsourcecodemustretaintheabovecopyrightnotice,thislistofconditionsandthe followingdisclaimer.
- Redistributions in binary form must reproduce the above copyright notice, this list of conditions and the following disclaimer in the documentation and or other materials provided with the distribution.
THISSOFTWAREISPROVIDEDBYTHEAUTHORANDCONTRIBUTORS"ASIS"ANDANY EXPRESSORIMPLIEDWARRANTIES,INCLUDING,BUTNOTLIMITEDTO,THEIMPLIED WARRANTIESOFMERCHANTABILITYANDFITNESSFORAPARTICULARPURPOSEARE DISCLAIMED.INNOEVENTSHALLTHEAUTHORORCONTRIBUTORSBELIABLEFORANY DIRECT,INDIRECT,INCIDENTAL,SPECIAL,EXEMPLARY,ORCONSEQUENTIALDAMAGES (INCLUDING,BUTNOTLIMITEDTO,PROCUREMENTOFSUBSTITUTEGOODSORSERVICES; LOSSOFUSE,DATA,ORPROFITS;ORBUSINESSINTERRUPTION)HOWEVERCAUSEDANDON ANYTHEORYOFLIABILITY,WHETHERINCONTRACT,STRICTLIABILITY,ORTORT(INCLUDING
NEGLIGENCEOROTHERWISE)ARISINGINANYWAYOUTOFTHEUSEOFTHISSOFTWARE, EVENIFADVISEDOFTHEPOSSIBILITYOFSUCHDAMAGE.
(19) Todd C. Miller
Copyright(c)1998ToddC.MillerTodd.Miller@courtesan.com
Allrightsreserved.
Redistributionanduseinsourceandbinaryforms,withorwithoutmodification,arepermittedprovided thatthefollowingconditionsaremet:
- Redistributionsofsourcecodemustretaintheabovecopyrightnotice, thislistofconditionsandthe followingdisclaimer.
- Redistributions in binary form must reproduce the above copyright notice, this list of conditions and the following disclaimer in the documentation and or other materials provided with the distribution.
- Thenameoftheauthormaynotbeusedtoendorseorpromoteproductsderivedfromthissoftware withoutspecificpriorwrittenpermission.
THISSOFTWAREISPROVIDED"ASIS"ANDANYEXPRESSORIMPLIEDWARRANTIES, INCLUDING,BUTNOTLIMITEDTO,THEIMPLIEDWARRANTIESOFMERCHANTABILITYAND FITNESSFORAPARTICULARPURPOSEAREDISCLAIMED.INNOEVENTSHALLTHEAUTHOR BELIABLEFORANYDIRECT,INDIRECT,INCIDENTAL,SPECIAL,EXEMPLARY,OR CONSEQUENTIALDAMAGES(INCLUDING,BUTNOTLIMITEDTO,PROCUREMENT OF SUBSTITUTEGOODSORSERVICES;LOSSOFUSE,DATA,ORPROFITS;ORBUSINESS INTERRUPTION)HOWEVERCAUSEDANDONANYTHEORYOFLIABILITY,WHETHERIN CONTRACT,STRICTLIABILITY,ORTORT(INCLUDINGNEGLIGENCEOROTHERWISE)ARISING INANYWAYOUTOFTHEUSEOFTHISSOFTWARE,EVENIFADVISEDOFTHEPOSSIBILITYOF SUCHDAMAGE.
(20)DJDelorie(i386)
Copyright(C)1991 DJDelorie
Allrightsreserved.
Redistributionanduseinsourceandbinaryformsispermittedprovidedthattheabovecopyrightnotice andfollowingparagraphareduplicatedinallsuchforms.
ThisfileisdistributedWITHOUTANYWARRANTY;withouteventheimpliedwarrantyof MERCHANTABILITYorFITNESSFORAPARTICULARPURPOSE.
(23)Intel(i960)
Copyright(c)1993IntelCorporation
Intelherebygrantsyoupermissiontocopy,modify,anddistributethissoftwareanditsdocumentation. Intelgrantsthispermissionprovidedthattheabovecopyrightnoticeappearsinallcopiesandthatboth thecopyrightnoticeandthispermissionnoticeappearinsupportingdocumentation. Inaddition,Intel grantsthispermissionprovidedthatyouprominentlymarkas"notpartoftheoriginal"anymodifications madetothissoftwareordocumentation,andthatthenameofIntelCorporationnotbeusedin advertisingorpublicitypertainingtodistributionofthesoftwareorthedocumentationwithoutspecific, writtenpriorpermission.
IntelCorporationprovidesthisASIS, WITHOUTANYWARRANTY, EXPRESSORIMPLIED, INCLUDING, WITHOUTLIMITATION, ANYWARRANTYOFMERCHANTABILITYORFITNESSFORA PARTICULARPURPOSE. Intelmakesnoguaranteeorrepresentationsregardingtheuseof, orthe resultsoftheuseof, thesoftwareanddocumentationintermsofcorrectness, accuracy, reliability, currentness, orotherwise; andyourelyonthesoftware, documentationandresultssolelyatyourown risk.
INNOEVENTSHALLINTELBELIABLEFORANYLOSSOFUSE,LOSSOFBUSINESS,LOSSOF PROFITS,INDIRECT,INCIDENTAL,SPECIALORCONSEQUENTIALDAMAGESOFANYKIND.IN NOEVENTSHALLINTEL'STOTALLIABILITYEXCEEDTHESUMPAIDTOINTELFORTHE PRODUCTLICENSEDHEREUNDER.
(26)MikeBarcroft
Copyright(c)2001MikeBarcroftmike@FreeBSD.org
Allrightsreserved.
Redistributionanduseinsourceandbinaryforms,withorwithoutmodification,arepermittedprovided thatthefollowingconditionsaremet:
- Redistributionsofsourcecodemustretaintheabovecopyrightnotice, thislistofconditionsandthe followingdisclaimer.
- Redistributions in binary form must reproduce the above copyright notice, this list of conditions and the following disclaimer in the documentation and or other materials provided with the distribution.
THISSOFTWAREISPROVIDEDBYTHEAUTHORANDCONTRIBUTORS"ASIS"ANDANY EXPRESSORIMPLIEDWARRANTIES,INCLUDING,BUTNOTLIMITEDTO,THEIMPLIED WARRANTIESOFMERCHANTABILITYANDFITNESSFORAPARTICULARPURPOSEARE DISCLAIMED.INNOEVENTSHALLTHEAUTHORORCONTRIBUTORSBELIABLEFORANY DIRECT,INDIRECT,INCIDENTAL,SPECIAL,EXEMPLARY,ORCONSEQUENTIALDAMAGES (INCLUDING,BUTNOTLIMITEDTO,PROCUREMENTOSUBSTITUTEGOODSORSERVICES; LOSSOFUSE,DATA,ORPROFITS;ORBUSINESSINTERRUPTION)HOWEVERCAUSEDANDON ANYTHEORYOFLIABILITY,WHETHERINCONTRACT,STRICTLIABILITY,ORTORT(INCLUDING NEGLIGENCEOROTHERWISE)ARISINGINANYWAYOUTOFTHEUSEOFTHISSOFTWARE, EVENIFADVISEDOFTHEPOSSIBILITYOFSUCHDAMAGE.
(27)KonstantinChuguev(--enable-newlib-iconv)
Copyright(c)1999,2000
KonstantinChuguev.Allrightsreserved.
Redistributionanduseinsourceandbinaryforms,withorwithoutmodification,arepermittedprovided thatthefollowingconditionsaremet:
- Redistributionsofsourcecodemustretaintheabovecopyrightnotice,thislistofconditionsandthe followingdisclaimer.
- Redistributions in binary form must reproduce the above copyright notice, this list of conditions and the following disclaimer in the documentation and or other materials provided with the distribution.
THISSOFTWAREISPROVIDEDBYTHEAUTHORANDCONTRIBUTORS"ASIS"ANDANY EXPRESSORIMPLIEDWARRANTIES,INCLUDING,BUTNOTLIMITEDTO,THEIMPLIED WARRANTIESOFMERCHANTABILITYANDFITNESSFORAPARTICULARPURPOSEARE DISCLAIMED.INNOEVENTSHALLTHEAUTHORORCONTRIBUTORSBELIABLEFORANY DIRECT,INDIRECT,INCIDENTAL,SPECIAL(EXEMPLARY,ORCONSEQUENTIALDAMAGES (INCLUDING,BUTNOTLIMITEDTO,PROCUREMENTOFSUBSTITUTEGOODSORSERVICES; LOSSOFUSE,DATA,ORPROFITS;ORBUSINESSINTERRUPTION)HOWEVERCAUSEDANDON ANYTHEORYOFLIABILITY,WHETHERINCONTRACT,STRICTLIABILITY,ORTORT(INCLUDING NEGLIGENCEOROTHERWISE)ARISINGINANYWAYOUTOFTHEUSEOFTHISSOFTWARE, EVENIFADVISEDOFTHEPOSSIBILITYOFSUCHDAMAGE.
iconv(CharsetConversionLibrary)v2.0
(28) ArtemBityuckiy(--enable-newlib-iconv)
Copyright(c)2003, ArtemB. Bityuckiy, SoftMineCorporation. RightstransferredtoFranklinElectronic Publishers.
Redistributionanduseinsourceandbinaryforms,withorwithoutmodification,arepermittedprovided thatthefollowingconditionsaremet:
-
Redistribution of source codemust retain the above copyright notice, this list of conditions and the following disclaimer.
-
Redistributions in binary form must reproduce the above copyright notice, this list of conditions and the following disclaimer in the documentation and or other materials provided with the distribution.
THISSOFTWAREISPROVIDEDBYTHEAUTHORANDCONTRIBUTORS"ASIS"ANDANY EXPRESSORIMPLIEDWARRANTIES,INCLUDING,BUTNOTLIMITEDTO,THEIMPLIED WARRANTIESOFMERCHANTABILITYANDFITNESSFORAPARTICULARPURPOSEARE DISCLAIMED.INNOEVENTSHALLTHEAUTHORORCONTRIBUTORSBELIABLEFORANY DIRECT,INDIRECT,INCIDENTAL,SPECIAL,EXEMPLARY.ORCONSEQUENTIALDAMAGES (INCLUDING,BUTNOTLIMITEDTO,PROCUREMENTOFSUBSTITUTEGOODSORSERVICES;
LOSSOFUSE, DATA, ORPROFITS; ORBUSINESSINTERRUPTION) HOWEVER CAUSEDANDON ANYTHEORYOFLABILITY, WHETHERINCONTRACT, STRICTLIABILITY, ORTORT (INCLUDING NEGLIGENCEOROTHERWISE) ARISINGINANYWAYOUTOFTHEUSEOFTHISSOFTWARE, EVENIFADVISEDOFTHEPOSSIBILITY OFSUCHDAMAGE.
(30)-Alex Tatmanjants(targetsusinglibc/posix)
Copyright(c)1995AlexTatmanjantsalex@elvisti.kiev.ua
atElectronniVistiIA,Kiev,Ukraine.
Allrightsreserved.
Redistributionanduseinsourceandbinaryforms,withorwithoutmodification,arepermittedprovided thatthefollowingconditionsaremet:
-
Redistribution of source codemust retain the above copyright notice, this list of conditions and the following disclaimer.
-
Redistributions in binary form must reproduce the above copyright notice, this list of conditions and the following disclaimer in the documentation and or other materials provided with the distribution.
THISSOFTWAREISPROVIDEDBYTHEAUTHOR"ASIS"ANDANYEXPRESSORIMPLIED WARRANTIES,INCLUDING,BUTNOTLIMITEDTO,THEIMPLIEDWARRANTIESOF MERCHANTABILITYANDFITNESSFORAPARTICULARPURPOSEAREDISCLAIMED.INNO EVENTSHALLTHEAUTHORBELIABLEFORANYDIRECT,INDIRECT,INCIDENTAL,SPECIAL, EXEMPLARY,ORCONSEQUENTIALDAMAGES(INCLUDING,BUTNOTLIMITEDTO,PROCUREMENTOFSUBSTITUTEGOODSORSERVICES;LOSSOFUSE,DATA,ORPROFITS; ORBUSINESSINTERRUPTION)HOWEVERCAUSEDANDONANYTHEORYOFLIABILITY, WHETHERINCONTRACT,STRICTLIABILITY,ORTORT(INCLUDINGNEGLIGENCEOR OTHERWISE)ARISINGINANYWAYOUTOFTHEUSEOFTHISSOFTWARE,EVENIFADVISED OFTHEPOSSIBILITYOFSUCHDAMAGE.
(31)-M.WarnerLosh(targetsusinglibc/posix)
Copyright(c)1998,M.WarnerLoshimp@freebsd.org
Allrightsreserved.
Redistributionanduseinsourceandbinaryforms,withorwithoutmodification,arepermittedprovided thatthefollowingconditionsaremet:
-
Redistributionsofsourcecodemustretaintheabovecopyrightnotice, thislistofconditionsandthe followingdisclaimer.
-
Redistributions in binary form must reproduce the above copyright notice, this list of conditions and the following disclaimer in the documentation and or other materials provided with the distribution.
THISSOFTWAREISPROVIDEDBYTHEAUTHORANDCONTRIBUTORS"ASIS"ANDANY EXPRESSORIMPLIEDWARRANTIES,INCLUDING,BUTNOTLIMITEDTO,THEIMPLIED WARRANTIESOFMERCHANTABILITYANDFITNESSFORAPARTICULARPURPOSEARE DISCLAIMED.INNOEVENTSHALLTHEAUTHORORCONTRIBUTORSBELIABLEFORANY DIRECT,INDIRECT,INCIDENTAL,SPECIAL(EXEMPLARY,ORCONSEQUENTIALDAMAGES (INCLUDING,BUTNOTLIMITEDTO,PROCUREMENTOFSUBSTITUTEGOODSORSERVICES; LOSSOFUSE,DATA,ORPROFITS;ORBUSINESSINTERRUPTION)HOWEVERCAUSEDANDON ANYTHEORYOFLIABILITY,WHETHERINCONTRACT,STRICTLIABILITY,ORTORT(INCLUDING NEGLIGENCEOROTHERWISE)ARISINGINANYWAYOUTOFTHEUSEOFTHISSOFTWARE, EVENIFADVISEDOFTHEPOSSIBILITYOFSUCHDAMAGE.
(32)-AndreyA.Chernov(targetsusinglibc/posix)
Copyright(C)1996byAndreyA.Chernov,Moscow,Russia.
Allrightsreserved.
Redistributionanduseinsourceandbinaryforms,withorwithoutmodification,arepermittedprovided thatthefollowingconditionsaremet:
- Redistributionsofsourcecodemustretaintheabovecopyrightnotice,thislistofconditionsandthe followingdisclaimer.
- Redistributions in binary form must reproduce the above copyright notice, this list of conditions and the following disclaimer in the documentation and or other materials provided with the distribution.
THISSOFTWAREISPROVIDEDBYTHEAUTHOR"ASIS"ANDANYEXPRESSORIMPLIED WARRANTIES,INCLUDING,BUTNOTLIMITEDTO,THEIMPLIEDWARRANTIESOF MERCHANTABILITYANDFITNESSFORAPARTICULARPURPOSEAREDISCLAIMED.INNO EVENTSHALLTHEREGENTSORCONTRIBUTORSBELIABLEFORANYDIRECT,INDIRECT, INCIDENTAL,SPECIAL(EXEMPLARY,ORCONSEQUENTIALDAMAGES)(INCLUDING,BUTNOT LIMITEDTO,PROCUREMENTOFSUBSTITUTEGOODSORSERVICES;LOSSOFUSE,DATA,OR PROFITS;ORBUSINESSINTERRUPTION)HOWEVERCAUSEDANDONANYTHEORYOF LIABILITY,WHETHERINCONTRACT,STRICTLIABILITY,ORTORT(INCLUDINGNEGLIGENCEOR OTHERWISE)ARISINGINANYWAYOUTOFTHEUSEOFTHISSOFTWARE,EVENIFADVISED OFTHEPOSSIBILITYOFSUCHDAMAGE.
(33)-DanielEischen(targetsusinglibc/posix)
Copyright(c)2001DanielEischendeischen@FreeBSD.org.
Allrightsreserved.
Redistributionanduseinsourceandbinaryforms,withorwithoutmodification,arepermittedprovided thatthefollowingconditionsaremet:
- Redistributionsofsourcecodemustretaintheabovecopyrightnotice, thislistofconditionsandthe followingdisclaimer.
- Redistributions in binary form must reproduce the above copyright notice, this list of conditions and the following disclaimer in the documentation and or other materials provided with the distribution.
THISSOFTWAREISPROVIDEDBYTHEAUTHORANDCONTRIBUTORS"ASIS"ANDANY EXPRESSORIMPLIEDWARRANTIES,INCLUDING,BUTNOTLIMITEDTO,THEIMPLIED WARRANTIESOFMERCHANTABILITYANDFITNESSFORAPARTICULARPURPOSEARE DISCLAIMED.INNOEVENTSHALLTHEREGENTSORCONTRIBUTORSBELIABLEFORANY DIRECT,INDIRECT,INCIDENTAL,SPECIAL(EXEMPLARY,ORCONSEQUENTIALDAMAGES (INCLUDING,BUTNOTLIMITEDTO,PROCUREMENTOSUBSTITUTEGOODSORSERVICES; LOSSOFUSE,DATA,ORPROFITS;ORBUSINESSINTERRUPTION)HOWEVERCAUSEDANDON ANYTHEORYOFLIABILITY,WHETHERINCONTRACT,STRICTLIABILITY,ORTORT(INCLUDING NEGLIGENCEOROTHERWISE)ARISINGINANYWAYOUTOFTHEUSEOFTHISSOFTWARE, EVENIFADVISEDOFTHEPOSSIBILITYOFSUCHDAMAGE.
(35)-ARMLtd(armandthumbvarianttargetsonly)
Copyright(c)2009ARMLtd
Allrightsreserved.
Redistributionanduseinsourceandbinaryforms,withorwithoutmodification,arepermittedprovided thatthefollowingconditionsaremet:
- Redistributionsofsourcecodemustretaintheabovecopyrightnotice, thislistofconditionsandthe followingdisclaimer.
- Redistributions in binary form must reproduce the above copyright notice, this list of conditions and the following disclaimer in the documentation and/or other materials provided with the distribution.
- Thenameofthecompanymaynotbeusedtoendorseorpromoteproductsderivedfromthissoftware withoutspecificpriorwrittenpermission.
THISSOFTWAREISPROVIDEDBYARMLTD"ASIS"ANDANYEXPRESSORIMPLIED WARRANTIES,INCLUDING,BUTNOTLIMITEDTO,THEIMPLIEDWARRANTIESOF MERCHANTABILITYANDFITNESSFORAPARTICULARPURPOSEAREDISCLAIMED.INNO EVENTSHALLARMLTDBELIABLEFORANYDIRECT,INDIRECT,INCIDENTAL,SPECIAL,EXEMPLARY,ORCONSEQUENTIALDAMAGES(INCLUDING,BUTNOTLIMITEDTO,PROCUREMENTOFSUBSTITUTEGOODSORSERVICES;LOSSOFUSE,DATA,ORPROFITS;ORBUSINESSINTERRUPTION)HOWEVERCAUSEDANDONANYTHEORYOFLIABILITY,WHETHERINCONTRACT,STRICTLIABILITY,ORTORT(INCLUDINGNEGLIGENCEOR OTHERWISE)ARISINGINANYWAYOUTOFTHEUSEOFTHISSOFTWARE,EVENIFADVISED OFTHEPOSSIBILITYOFSUCHDAMAGE.
(36)-CodeSourcery, Inc.
Copyright(c)2009CodeSourcery, Inc.
Allrightsreserved.
Redistributionanduseinsourceandbinaryforms,withorwithoutmodification,arepermittedprovided thatthefollowingconditionsaremet:
*Redistributionsofsourcecodemustretaintheabovecopyrightnotice,thislistofconditionsandthe followingdisclaimer.
*Redistributionsinbinaryformmustreproducetheabovecopyrightnotice,thislistofconditionsandthefollowingdisclaimerinthedocumentationand/orothermaterialsprovidedwiththedistribution.
*NeitherthenameofCodeSourcerynorthenamesofitscontributorsmaybeusedtoendorseor promoteproductsderivedfromthissoftwarewithoutspecificpriorwrittenpermission.
THISSOFTWAREISPROVIDEDBYCODESOURCERY,INC."ASIS"ANDANYEXPRESSOR IMPLIEDWARRANTIES,INCLUDING,BUTNOTLIMITEDTO,THEIMPLIEDWARRANTIESOF MERCHANTABILITYANDFITNESSFORAPARTICULARPURPOSEAREDISCLAIMED.INNO EVENTSHALLCODESOURCERYBELIABLEFORANYDIRECT,INDIRECT,INCIDENTAL, SPECIAL,EXEMPLARY,ORCONSEQUENTIALDAMAGES(INCLUDING,BUTNOTLIMITEDTO,PROCUREMENTOFSUBSTITUTEGOODSORSERVICES;LOSSOFUSE,DATA,ORPROFITS; ORBUSINESSINTERRUPTION)HOWEVERCAUSEDANDONANYTHEORYOFLIABILITY, WHETHERINCONTRACT,STRICTLIABILITY,ORTORT(INCLUDINGNEGLIGENCEOR OTHERWISE)ARISINGINANYWAYOUTOFTHEUSEOFTHISSOFTWARE,EVENIFADVISED OFTHEPOSSIBILITYOFSUCHDAMAGE.
(37)MIPSTechnologies, Inc
/*
*Copyright(c)2009MIPSTechnologies,Inc.
*
*Allrightsreserved.
*
*Redistributionanduseinsourceandbinaryforms,withorwithoutmodification,arepermittedprovided thatthefollowingconditionsaremet:
*
**Redistributionsofsourcecodemustretaintheabovecopyrightnotice,thislistofconditionsandthe followingdisclaimer.
**Redistributionsinbinaryformmustreproducetheabovecopyrightnotice,thislistofconditionsandthefollowingdisclaimerinthedocumentationand/orothermaterialsprovidedwiththedistribution.
**NeitherthenameofMIPSTechnologiesInc.northenamesofitscontributorsmaybeusedto endorseorpromoteproductsderivedfromthissoftwarewithoutspecificpriorwrittenpermission.
*THISSOFTWAREISPROVIDEDBYTHECOPYRIGHTHOLDERSANDCONTRIBUTORS"ASIS" ANDANYEXPRESSORIMPLIEDWARRANTIES,INCLUDING,BUTNOTLIMITEDTO,THEIMPLIED WARRANTIESOFMERCHANTABILITYANDFITNESSFORAPARTICULARPURPOSEARE DISCLAIMED.INNOEVENTSHALLTHECOPYRIGHTOWNERORCONTRIBUTORSBELIABLE FORANYDIRECT,INDIRECT,INCIDENTAL,SPECIAL(EXEMPLARY,ORCONSEQUENTIAL DAMAGES(INCLUDING,BUTNOTLIMITEDTO,PROCUREMENTOFSUBSTITUTEGOODSOR SERVICES;LOSSOFUSE,DATA,ORPROFITS;ORBUSINESSINTERRUPTION)HOWEVER CAUSEDANDONANYTHEORYOFLIABILITY,WHETHERINCONTRACT,STRICTLIABILITY,ORTORT(INCLUDINGNEGLIGENCEOROTHERWISE)ARISINGINANYWAYOUTOFTHEUSEOF THISSOFTWARE,EVENIFADVISEDOFTHEPOSSIBILITYOFSUCHDAMAGE.
/*
WPASupplicant(PowerLiteProG6070W/G6170/G6270W/G6470WU/G6570WU/G6770WU)
The copyright owner of the WPASupplicant opensourcesoftware providesterms and conditions (hereinafter referred to as "WPASupplicant License"). The projector use this product in compliance with the BSDLicense, as part of the WPASupplicant License.
The "WPASupplicantLicense" is WITHOUT ANY WARRANTY; without event the implied warranty of MERCHANTABILITY AND FITNESS FOR APARTICULAR PURPOSE.
ListofWPASupplicantLicenseprograms
WPASupplicant-0.7.3
Licensetermsofconditionsofeachprogramwhichareprovidedbyownerofthecopyrighttothe"WPA SupplicantLicense"areasfollows.
Copyright(c)2003-2011, JouniMalinenj@w1.fiandcontributorsAllRightsReserved.
Redistributionanduseinsourceandbinaryforms,withorwithoutmodification,arepermittedprovided thatthefollowingconditionsaremet:
-
Redistributionsofsourcecodemustretaintheabovecopyrightnotice, thislistofconditionsandthe followingdisclaimer.
-
Redistributions in binary form must reproduce the above copyright notice, this list of conditions and the following disclaimer in the documentation and or other materials provided with the distribution.
-
Neitherthename(s)oftheabove-listedcopyrighttholder(s)northenamesofitscontributorsmaybeusedtoendorseorpromoteproductsderivedfromthissoftwarewithoutspecificpriorwrittenpermission.
THISSOFTWAREISPROVIDEDBYTHECOPYRIGHTHOLDERSANDCONTRIBUTORS"ASIS" ANDANYEXPRESSORIMPLIEDWARRANTIES,INCLUDING,BUTNOTLIMITEDTO,THEIMPLIED
WARRANTIESOFMERCHANTABILITYANDFITNESSFORAPARTICULARPURPOSEARE DISCLAIMED.INNOEVENTSHALLTHECOPYRIGHTOWNERORCONTRIBUTORSBELIABLE FORANYDIRECT,INDIRECT,INCIDENTAL,SPECIAL,EXEMPLARY,ORCONSEQUENTIAL DAMAGES(INCLUDING,BUTNOTLIMITEDTO,PROCUREMENTOFSUBSTITUTEGOODSOR SERVICES;LOSSOFUSE,DATA,ORPROFITS;ORBUSINESSINTERRUPTION)HOWEVER CAUSEDANDONANYTHEORYOFLIABILITY,WHETHERINCONTRACT,STRICTLIABILITY,ORTORT(INCLUDINGNEGLIGENCEOROTHERWISE)ARISINGINANYWAYOUTOFTHEUSEOF THISSOFTWARE,EVENIFADVISEDOFTHEPOSSIBILITYOFSUCHDAMAGE.
ForMPEG-4ASP:
WithrespecttoaLicenseeofferingMPEG-4VideoDecodersand/orEncodersthefollowingnoticeshall begiven:THISPRODUCTISLICENSEDUNDERTHEMPEG-4VISUALPATENTPORTFOLIO LICENSEFORTHEPERSONALANDNON-COMMERCIALUSEOFACONSUMERFOR(i) ENCODINGVIDEOINCOMPLIANCEWITHTHEMPEG-4VISUALSTANDARD("MPEG-4VIDEO") AND/OR(ii)DECODINGMPEG-4VIDEOTHATWASENCODEDBYACONSUMERENGAGEDINA PERSONALANDNON-COMMERCIALACTIVITYAND/ORWASOBTAINEDFROMAVIDEO PROVIDERLICENSEDBYMPEGLATOPROVIDEMPEG-4VIDEO.NOLICENSEISGRANTEDOR SHALLBEIMPLIEDFORANYOTHERUSE.ADDITIONALINFORMATIONINCLUDINGTHAT RELATINGTOPROMOTIONAL,INTERNALANDCOMMERCIALUSESANDLICENSINGMAYBE OBTAINEDFROMMPEGLA,LLC.SEEHTTP://WWW.MPEGLA.COM.
ForMPEG-4AVC:
THISPRODUCTISLICENSEDUNDERTHEAVCPATENTPORTFOLIOLICENSESFORTHE PERSONALANDNON-COMMERCIALUSEOFACONSUMERTO(i)ENCODEVIDEOIN COMPLIANCEWITHTHEAVCSTANDARD("AVCVIDEO")AND/OR(ii)DECODEAVCVIDEOTHAT WASENCODEDBYACONSUMERENGAGEDINAPERSONALANDNON-COMMERCIALACTIVITY AND/ORWASOBTAINEDFROMAVIDEOPROVIDERLICENSEDTOPROVIDEAVCVIDEO.NO LICENSEISGRANTEDORSHALLBEIMPLIEDFORANYOTHERUSE.ADDITIONAL INFORMATIONMAYBEOBTAINEDFROMMPEGLA,L.L.C.SEEHTTP://WWW.MPEGLA.COM
ForWMV/WMA(Microsoft):
ThisproductisprotectedbycertainintellectualpropertyrightsofMicrosoft.
Useordistributionofsuchtechnologyoutsideofthisproductisprohibitedwithoutalicensefrom Microsoft.
ForVC-1
THISPRODUCTISLICENSEDUNDERTHEVC-1PATENTPORTFOLIOLICENSEFORTHE PERSONALANDNON-COMMERCIALUSEOFACONSUMERTO(i)ENCODEVIDEOIN COMPLIANCEWITHTHEVC-1STANDARD("VC-1VIDEO")AND/OR(ii)DECODEVC-1VIDEOTHAT WASENCODEDBYACONSUMERENGAGEDINAPERSONALANDNON-COMMERCIALACTIVITY AND/ORWASOBTAINEDFROMAVIDEOPROVIDERLICENSEDTOPROVIDEVC-1VIDEO.NO
LICENSEISGRANTEDORSHALLBEIMPLIEDFORANYOTHERUSE.ADDITIONAL INFORMATIONMAYBEOBTAINEDFROMMPEGLA,L.L.C.SEEHTTP://WWW.MPEGLA.COM
MITLicense
This projector product includes the open source software program which applies the terms and conditions provided by owner of the copyright to the MIT License. The MIT License are WITHOUT ANY WARRANTY; without event the implied warranty of MERCHANTABILITY AND FITNESS FOR A PARTICULAR PURPOSE.
ListofMITLicenseprograms
jquery-1.7.2.min.js
jquery-ui-1.8.20.custom.zip
jquery.ui.touch-punch.js
jquery.upload-1.0.2.min.js
Licensetermsofconditionsofeachprogramwhichareprovidedbyownerofthecopyrighttothe"MIT License"areasfollows.
Copyright(c)2012jQueryFoundationandothercontributors,http://jquery.com/
Permissionisherebygranted,freeofcharge,toanypersonobtainingacopyofthissoftwareand associateddocumentationfiles(the"Software"),todealintheSoftwarewithoutrestriction,including withoutlimitationtherightstouse,copy,modify,merge,publish,distribute,sublicense,and/orsellcopies oftheSoftware,andtopermitpersonstowhomtheSoftwareisfurnishedtodoso,subjecttothe followingconditions:
Theabovecopyrightnoticeandthispermissionnoticeshallbeincludedinallcopiesorsubstantial portionsoftheSoftware.
THESOFTWAREISPROVIDED"ASIS", WITHOUTWARRANTYOFANYKIND, EXPRESSOR IMPLIED, INCLUDING BUT NOT LIMITED TOTHEWARRANTIESOF MERCHANTABILITY, FITNESS FOR APARTICULAR PURPOSE AND NONINFRINGEMENT. INNOEVENT SHALL THE AUTHORS OR COPYRIGHT HOLDERS BELIABLE FOR ANY CLAIM, DAMAGESOROTHER LIABILITY, WHETHER IN AN ACTION OF CONTRACT, TORTOR OTHERWISE, ARISING FROM OUTFORIN CONNECTION WITH THESOFTWARE OR THE USE OR OTHER DEALINGS IN THESOFTWARE.
TOPPERS/JSP
This projector product includes the open source software program "TOPPERS/JSP" which applies the terms and conditions provided by owner of the copyright to the "TOPPERS/JSP". The "TOPPERS/JSP" are WITHOUT ANY WARRANTY; without event the implied warranty of MERCHANTABILITY AND FITNESS FOR APARTICULAR PURPOSE.
ListofTOPPERS/JSPprograms
jsp-1.4.3
Licensetermsofconditionsofeachprogramwhichareprovidedbyownerofthecopyrighttothe "TOPPERS/JSP"areasfollows.
TOPPERS/JSPKernel
ToyohashiOpenPlatformforEmbeddedReal-TimeSystems/
JustStandardProfileKernel
Copyright(C)2000-2003byEmbeddedandReal-TimeSystemsLaboratoryToyohashiUniv.of Technology,JAPAN
Copyright(C)2004byEmbeddedandReal-TimeSystemsLaboratory
GraduateSchoolofInformationScience, Nagoya Univ., JAPAN.
Theabovecopyrightholder,limitedtocasesinwhichonesatisfiesconditions(1)\~(4)below,orthe conditionsdescribedinVersion2oftheGNUPublicLicenseofficiallyannouncedbytheFreeSoftware Foundation,consentstotheuse,reproduction,alteration,andredistribution(hereaftercalledutilization) ofthissoftware(thissoftwareincludesalterations,likewisebelow)withoutcompensation.
(1) Whenthissoftwareisutilizedintheformofsourcecode, theabovecopyrightdeclaration, these conditionsofutilization, andthefollowingstipulationofnoguaranteeshallbeincludedinunchanged forminsidethesourcecode.
(2) Whenthissoftwareisredistributedinaforminwhichitcanbeusedinthedevelopmentofother software,libraryform,etc.,theabovecopyrightdisplay,thesetermsofutilization,andthefollowing stipulationofnoguaranteeshallbeinsertedindocumentationaccompanyingredistribution(user's manual,etc.).
(3) Whenthissoftwareisredistributedinaforminwhichitcannotbeusedinthedevelopmentofother software,embeddedindevices,etc.,oneofthefollowingconditionsshallbesatisfied.
(a) The above copyright display, these terms of utilization, and the following stipulation of no guarantee shall be inserted in documentation accompanying redistribution (user's manual, etc.).
(b) The TOPPERS Project shall be notified to using to method in which the form of distribution is decided otherwise.
(4) The above copyright holder and the TOPPERS Project shall be exempt from responsibility for whatever damages occur either directly or indirectly through the utilization of this software.
Thissoftwareissomethingthatisprovidedwithnoguarantee. TheabovecopyrightholderandtheTOPPERSProjectmakenoguaranteewhatsoeverinregardtothissoftware,includingthepossibilityofitsapplication.Inaddition,theabovecopyrightholderandtheTOPPERSProjectshallalsonotbearresponsibilityforwhateverdamagesoccureitherdirectlyorindirectlythroughtheutilizationofthissoftware.
Note: The TOPPERSLicense has been revised several times; what is shown above the latest version that is to be applied to software made up public hereafter.
TINET
This projector product includes the open source software program "TINET" which applies the terms and conditions provided by owner of the copyright to the "TINET". The "TINET" are WITHOUT ANY WARRANTY; without even the implied warranty of MERCHANTABILITY AND FITNESS FORA PARTICULAR PURPOSE.
ListofTINETprograms
tinet-1.4.4
Licensetermsofconditionsofeachprogramwhichareprovidedbyownerofthecopyrighttothe "TINET"areasfollows.
(1)FreeBSD
Copyright(c)1980,1986,1993
TheRegentsoftheUniversityofCalifornia.Allrightsreserved.
Redistributionanduseinsourceandbinaryforms,withorwithoutmodification,arepermittedprovided thatthefollowingconditionsaremet:
-
Redistributionsofsourcecodemustretaintheabovecopyrightnotice, thislistofconditionsandthe followingdisclaimer.
-
Redistributions in binary form must reproduce the above copyright notice, this list of conditions and the following disclaimer in the documentation and or other materials provided with the distribution.
-
All advertising materials mentioning features or use of this software must display the following acknowledgement:
ThisproductincludessoftwaredevelopedbytheUniversityofCalifornia,Berkeleyanditscontributors.
- Neither thename of the University northen names of its contributors maybe used to endorse or promote products derived from this software without specific prior written permission.
THISSOFTWAREISPROVIDEDBYTHEREGENTSANDCONTRIBUTORS"ASIS"ANDANY EXPRESSORIMPLIEDWARRANTIES,INCLUDING,BUTNOTLIMITEDTO,THEIMPLIED WARRANTIESOFMERCHANTABILITYANDFITNESSFORAPARTICULARPURPOSEARE DISCLAIMED.INNOEVENTSHALLTHEREGENTSORCONTRIBUTORSBELIABLEFORANY DIRECT,INDIRECT,INCIDENTAL,SPECIAL(EXemplARY,ORCONSEQUENTIALDAMAGES (INCLUDING,BUTNOTLIMITEDTO,PROCUREMENTOSUBSTITUTEGOODSORSERVICES; LOSSOFUSE,DATA,ORPROFITS;ORBUSINESSINTERRUPTION)HOWEVERCAUSEDANDON ANYTHEORYOFLIABILITY,WHETHERINCONTRACT,STRICTLIABILITY,ORTORT(INCLUDING
NEGLIGENCEOROTHERWISE)ARISINGINANYWAYOUTOFTHEUSEOFTHISSOFTWARE, EVENIFADVISEDOFTHEPOSSIBILITYOFSUCHDAMAGE.
(6)TINETandTOPPERS
TINET(TCP/IPProtocolStack)
Copyright(C)2001-2006byDep.ofComputerScienceandEngineeringTomakomaiNationalCollegeof Technology,JAPAN
TINET(TCP/IPProtocolStack)
Copyright(C)2001-2006byDep.ofComputerScienceandEngineeringTomakomaiNationalCollegeof Technology,JAPAN
Theabovecopyrightholder,limitedtocasesinwhichonesatisfiesconditions(1)\~(4)below,orthe conditionsdescribedinVersion2oftheGNUPublicLicenseofficiallyannouncedbytheFreeSoftware Foundation,consentstotheuse,reproduction,alteration,andredistribution(hereaftercalledutilization) ofthissoftware(thissoftwareincludesalterations,likewisebelow)withoutcompensation.
(1) Whenthissoftwareisutilizedintheformofsourcecode, theabovecopyrightdeclaration, these conditionsofutilization, and the following stipulation of noguaranteeshallbeincludedinunchanged forminsidethesourcecode.
(2) Whenthissoftwareisredistributedinaforminwhichitcanbeusedinthedevelopmentofother software,libraryform,etc.,theabovecopyrightdisplay,thesetermsofutilization,andthefollowing stipulationofnoguaranteeshallbeinsertedindocumentationaccompanyingredistribution(user's manual,etc.).
(3) Whenthissoftwareisredistributedinaforminwhichitcannotbeusedinthedevelopmentofother software,embeddedindevices,etc.,followingconditionsshallbesatisfied.
(a) The abovecopyright display, these terms of utilization, and the following stipulation of no guarantee shall be inserted in documentation accompanying redistribution (user's manual, etc.).
(4) The above copyright holder and the TOPPERS Project shall be exempt from responsibility for whatever damages occur either directly or indirectly through the utilization of this software.
Thissoftwareissomethingthatisprovidedwithnoguarantee. TheabovecopyrightholderandtheTOPPERSProjectmakenoguaranteewhatsoeverinregardtothissoftware,includingthepossibilityofitsapplication.Inaddition,theabovecopyrightholderandtheTOPPERSProjectshallalsonotbearresponsibilityforwhateverdamagesoccureitherdirectlyorindirectlythroughtheutilizationofthissoftware.
Parenttopic:Notices
CopyrightNotice
Allrightsreserved.Nopartofthispublicationmaybereproduced,storedinaretrievalsystem,ortransmittedinanyformorbyanymeans,electronic,mechanical,photocopying,recording,orotherwise,withoutthepriorwrittenpermissionofSeikoEpsonCorporation.TheinformationcontainedhereinisdesignedonlyforusewiththisEpsonproduct.Epsonisnotresponsibleforanyuseofthisinformationasappliedtootherproducts.
Neither Seiko Epson Corporation nor its affiliates shall be liable to the purchaser of this product or third parties for damages, losses, costs, or expenses incurred by purchaser third parties as a result of: accident, misuse, or abuse of this product or unauthorized modifications, repairs, or alteration to this product, or (excluding the U.S.) failure to strictly comply with Seiko Epson Corporation's operating and maintenance instructions.
SeikoEpsonCorporationshallnotbelieableforanydamagesorproblemsarisingfromtheuseofany optionsoranyconsumableproductsotherthanthosedesignatedasOriginalEpsonProductsorEpson ApprovedProductsbySeikoEpsonCorporation.
Thisinformationissubjecttochangewithoutnotice.
ANoteConcerningResponsibleUseofCopyrightedMaterials
CopyrightAttribution
Parenttopic:Notices
ANoteConcerningResponsibleUseofCopyrightedMaterials
Epsonencourageseachusertoberesponsibleandrespectfulofthecopyrightlawswhenusingany Epsonproduct.Whilesomecountries'lawspermitlimitedcopyingorreuseofcopyrightedmaterialin certaincircumstances,thosecircumstancesmaynotbeasbroadassomepeopleassume.Contactyour legaladvisorforanyquestionsregardingcopyrightlaw.
Parenttopic: CopyrightNotice
CopyrightAttribution
©2015EpsonAmerica,Inc.
2/15
CPD-42346
Parenttopic: CopyrightNotice
- Using Basic Projector Features 89
- Solving Problems 213
- Technical Specifications 230
- PowerLitePro
- G6070W/G6170/G6270W/G6470WU/G6570WU/G6770WU/G6870/G6970WUUser'sGuide
- IntroductiontoYourProjector
- ProjectorFeatures
- Bright, high-resolution projectionsystem
- Flexibleconnectivity
- Easy-to-usesetupandoperationfeatures
- ProductBoxContents
- AdditionalComponents
- OptionalEquipmentandReplacementParts
- Warranty and Registration Information
- NotationsUsedintheDocumentation
- WheretoGoforAdditionallInformation
- ProjectorPartLocations
- ProjectorParts-Rear
- SettingUptheProjector
- ProjectorPlacement
- ProjectorSetupandInstallationOptions
- ProjectionDistance
- ProjectorConnections
- ConnectingtoComputerSources
- ConnectingtoaComputerforVGAVideo
- ConnectingtoaComputerforHDMIVideoandAudio
- ConnectingtoaComputerforDisplayPortVideoandAudio
- ConnectingtoaComputerfor5BNCVideo
- ConnectingtoaComputerforSound
- ConnectingtoVideoSources
- ConnectingtoanHDMIVideoSource
- ConnectingtoaComponent-to-BNCVideoSource
- Relatedtasks
- ConnectingtoaComponent-to-VGAVideoSource
- Relatedreferences
- ConnectingtoanS-VideoVideoSource
- ConnectingtoaCompositeVideoSource
- ConnectingtoanSDIVideoSource
- Parenttopic: ConnectingtoVideoSources
- ConnectingtoaVideoSourceforSound
- ConnectingtoanHDBaseTTransmitter
- ConnectingtoanExternalComputerMonitor
- ConnectingtoExternalSpeakers
- AttachingandRemovingaLens
- AttachingtheLensUnit
- RemovingtheLensUnit
- AttachingandRemovingtheCableCover
- AttachingandRemovingtheCableClips
- Installing Batteries in the Remote Control
- UsingtheProjectoronaNetwork
- WiredNetworkProjection
- ConnectingtoaWiredNetwork
- SelectingWiredNetworkSettings
- WirelessNetworkProjection
- InstallingtheWirelessLANModule
- UsingQuickWirelessConnection(WindowsOnly)
- SelectingWirelessNetworkSettingsManually
- SelectingWirelessNetworkSettingsinWindows
- SelectingWirelessNetworkSettingsinOSX
- EnablingWPAorEAPSecurity
- WirelessSecurityMenuSettings
- RegisteringaDigitalCertificateontheProjector
- SecureHTTP
- RegisteringDigitalCertificatesfromaWebBrowser
- DigitalCertificateTypesforRegistrationviaWebControl
- SettingUpProjectorNetworkE-MailAlerts
- NetworkProjectorE-mailAlertMessages
- SettingUpMonitoringUsingSNMP
- SelectingOtherNetworkSettings
- ControllingaNetworkedProjectorUsingaWebBrowser
- CrestronRoomViewSupport
- SettingUpCrestronRoomViewSupport
- ControllingaNetworkedProjectorUsingCrestronRoomView
- UsingBasicProjectorFeatures
- TurningOntheProjector
- TurningOfftheProjector
- SelectingtheLanguagefortheProjectorMenus
- ResizingthelmagewiththeZoomRing
- FocusingtheImageUsingtheFocusRing
- FocusingthelmagewiththeOptionalShortThrowLens
- SettingtheLensType
- SettingtheScreenType
- AdjustingtheImagePositionUsingScreenPosition
- AdjustingthelmagePositionUsingLensShift
- DisplayingaTestPattern
- AvailableTestPatternImageAdjustments
- AdjustingthelmageHeight
- ImageShape
- CorrectingImageShapewithH/VKeystone
- CorrectingImageShapewithQuickCorner
- CorrectingImageShapewithArcCorrection
- CorrectingImageShapewithCurvedSurface
- CorrectingImageShapewithPointCorrection
- CorrectingImageShapewithCornerWall
- RemoteControlOperation
- SelectinganImageSource
- ProjectionModes
- ChangingtheProjectionModeUsingtheRemoteControl
- ChangingtheProjectionModeUsingtheMenus
- ImageAspectRatio
- ChangingthelmageAspectRatio
- AvailableImageAspectRatio
- ColorMode
- ChangingtheColorMode
- AvailableColorModes
- TurningOnAutolris
- ControllingtheVolumewiththeVolumeButtons
- SettingtheDateandTime
- AdjustingProjectorFeatures
- ShuttingOffthePictureandSoundTemporarily
- StoppingVideoActionTemporarily
- ZoomingIntoandOutofImages
- ProjectorSecurityFeatures
- PasswordSecurityTypes
- SettingaPassword
- SelectingPasswordSecurityTypes
- EnteringaPasswordtoUsetheProjector
- SavingaUser'sLogolmagetoDisplay
- LockingtheProjector'sButtons
- UnlockingtheProjector'sButtons
- InstallingaSecurityCable
- ProjectingTwolmagesSimultaneously
- UsingMultipleProjectors
- ProjectorIdentificationSystemforMultipleProjectorControl
- SettingtheProjectorID
- SettingtheRemoteControlID
- AdjustingthePositionoftheProjectedImageFromMultipleProjectors
- ScalinganImage
- AdjustingtheLamp'sBrightness
- Relatedconcepts
- BlendingtheImageEdges
- AdjustingtheBlackLevel
- Note:
- MatchingthelmageColors
- Viewing3DImages
- SavingSettingstoMemoryandUsingSavedSettings
- SavingaScheduledEvent
- ViewingScheduledEvents
- EditingaScheduledEvent
- CopyingMenuSettingsBetweenProjectors
- SavingSettingstoaUSBFlashDrive
- TransferringSettingsFromaUSBFlashDrive
- SavingSettingsToaComputer
- TransferringSettingsFromaComputer
- AdjustingtheMenuSettings
- UsingtheProjector'sMenus
- ImageQualitySettings-ImageMenu
- InputSignalSettings-SignalMenu
- ProjectorFeatureSettings-SettingsMenu
- ProjectorSetupSettings-ExtendedMenu
- ProjectorNetworkSettings-NetworkMenu
- ProjectorInformationDisplay-InfoMenu
- EventIDCodeList
- ProjectorResetOptions-ResetMenu
- MaintainingandTransportingtheProjector
- ProjectorMaintenance
- CleaningtheLens
- CleaningtheProjectorCase
- AirFilterandVentMaintenance
- CleaningtheAirFilter
- ProjectorLightStatus
- ReplacingtheAirFilter
- ProjectorLampMaintenance
- ReplacingtheLamp
- ResettingtheLampTimer
- ReplacingtheRemoteControlBatteries
- TransportingtheProjector
- SolvingProblems
- ProjectionProblemTips
- UsingtheProjectorHelpDisplays
- SolvingImageorSoundProblems
- SolutionsWhenNoImageAppears
- SolutionsWhen"NoSignal"MessageAppears
- DisplayingFromaPCLaptop
- DisplayingFromaMacLaptop
- SolutionsWhen"NotSupported"MessageAppears
- SolutionsWhenOnlyaPartialImageAppears
- SolutionsWhenthelmageisNotRectangular
- SolutionsWhentheImageContainsNoiseorStatic
- SolutionsWhenthelmageisFuzzyorBlurry
- SolutionsWhenthelImageBrightnessorColorsareIncorrect
- SolutionstoSoundProblems
- SolvingProjectororRemoteControlOperationProblems
- SolutionstoProjectorPowerorShut-OffProblems
- SolutionstoProblemswiththeRemoteControl
- SolutionstoPasswordProblems
- SolvingNetworkProblems
- SolutionsWhenYouCannotAccesstheProjectorThroughtheWeb
- SolutionsWhenNetworkAlertE-MailsareNotReceived
- SolutionsWhenYouCannotAccesstheProjectorUsingiProjection
- WheretoGetHelp
- InternetSupport
- SpeaktoaSupportRepresentative
- PurchaseSuppliesandAccessories
- TechnicalSpecifications
- GeneralProjectorSpecifications
- PowerLiteProG6170:
- PowerLiteProG6270W:
- PowerLiteProG6470WU:
- PowerLiteProG6570WU:
- PowerLiteProG6770WU/G6970WU:
- PowerLiteProG6870:
- ProjectiondistancePowerLiteProG6170/G6870:
- OpticalaspectratioPowerLiteProG6170/G6870:
- ProjectorLampSpecifications
- RemoteControlSpecifications
- ProjectorDimensionSpecifications
- ProjectorElectricalSpecifications
- ProjectorEnvironmentalSpecifications
- ProjectorSafetyandApprovalsSpecifications
- SupportedVideoDisplayFormats
- Notices
- Recycling
- ImportantSafetyInformation
- ImportantSafetyInstructions
- RestrictionofUse
- FCCComplianceStatement
- ForUnitedStatesUsers
- WARNING
- ForCanadianUsers
- Trademarks
- OpenSourceSoftwareLicense
- GNUGENERALPUBLICLICENSETERMSANDCONDITIONSFORCOPYING,DISTRIBUTIONAND MODIFICATION
- NOWARRANTY
- ENDOFTERMSANDCONDITIONS
- GNULGPL
- Preamble
- InplainEnglish:
- TimWegner
- ForMPEG-4ASP:
- ForMPEG-4AVC:
- ForWMV/WMA(Microsoft):
- ForVC-1
- TINET
- CopyrightNotice
- ANoteConcerningResponsibleUseofCopyrightedMaterials
- CopyrightAttribution
Brand : EPSON
Model : PowerLite Pro G6770WUNL
Category : Video projector