
BrightLink Pro 1480Fi - Video projector EPSON - Free user manual and instructions
Find the device manual for free BrightLink Pro 1480Fi EPSON in PDF.


| Product Type | Interactive Ultra Short Throw Projector |
| Brand | Epson |
| Model | BrightLink Pro 1480Fi |
| Display Technology | 3LCD, 3-chip |
| Resolution | WUXGA (1920 x 1200) |
| Brightness | 4,400 lumens (color & white) |
| Contrast Ratio | 5,000,000:1 (dynamic) |
| Interactive Touch | Yes, up to 6 touch points |
| Dimensions (W x D x H) | 45.6 x 32.9 x 12.1 cm (without feet) |
| Weight | Approx. 9.5 kg |
| Power Supply | 100 - 240 V AC, 50/60 Hz |
| Power Consumption | Normal: 345 W, Standby: 0.5 W |
| Light Source | Laser phosphor, up to 20,000 hours |
| Throw Ratio | 0.27 - 0.37:1 (ultra short throw) |
| Inputs | 2x HDMI (HDCP 2.2), VGA, USB, LAN |
| Connectivity | Wi-Fi, Miracast, screen mirroring |
| Maintenance | Clean air filter every 5,000 hours; replace filter when needed |
| Safety | Laser class 1 (IEC 60825-1) |
| Spare Parts | Replacement filter (ELPAF60), optional lamp module (ELPLP99) |
| Repairability | Designed for service; replaceable filter and light source unit |
Frequently Asked Questions - BrightLink Pro 1480Fi EPSON
User questions about BrightLink Pro 1480Fi EPSON
0 question about this device. Answer the ones you know or ask your own.
Ask a new question about this device
Download the instructions for your Video projector in PDF format for free! Find your manual BrightLink Pro 1480Fi - EPSON and take your electronic device back in hand. On this page are published all the documents necessary for the use of your device. BrightLink Pro 1480Fi by EPSON.
USER MANUAL BrightLink Pro 1480Fi EPSON
Additional Components 17
Optional Equipment and Replacement Parts 18
Warranty and Registration Information 19
Notations Used in the Documentation 20
Where to Go for Additional Information 20
Additional Projector Software and Manuals 20
Projector Part Locations 22
Projector Parts - Front/Side 23
Projector Parts - Top/Side 24
Projector Parts - Interface 25
Projector Parts - Base 26
Projector Parts - Control Panel 27
Projector Parts - Remote Control 28
Projector Parts - Interactive Pens 30
Projector Parts - Pen Stand (BrightLink 1485Fi) 31
Projector Parts - Control Pad (BrightLink 1485Fi) 32
Projector Parts - Touch Unit 33
Setting Up the Projector 35
Projector Placement 35
Projector Setup and Installation Options 36
Projection Distance.... 38
Removing and Attaching the Cable Cover 39
Projector Connections.... 39
Connecting to Computer Sources.... 40
ConnectingtoaComputerforUSBVideoandAudio....40
Connecting to a Computer for VGA Video 42
ConnectingtoaComputerforHDMIVideoandAudio....42
ConnectingtoaComputerforPenandFingerUse....43
Connecting a Computer to the Control Pad.... 44
Connecting to a Computer for Sound.... 45
Connecting to Video Sources 46
Connecting to an HDMI Video Source 46
Connecting to a Composite Video Source 47
Connecting to a Video Source for Sound 48
Connecting External Output Devices 48
Connecting to an External Computer Monitor 49
Connecting to an External HDMI Monitor.... 50
Connecting to External Speakers.... 50
Connecting a Microphone....51
Connecting to External USB Devices 52
USB Device Projection.... 52
ConnectingaUSBDeviceorCameratotheProjector....53
Connecting a USB Device to the Control Pad 54
Selecting the Connected USB Source 55
DisconnectingaUSBDeviceFromtheControlPadorProjector....55
Connecting to a Document Camera 55
Connecting a Printer to the Control Pad 56
Connecting Multiple Projectors of the Same Model 57
Multiple Projector Connection Menu Settings 58
Installing Batteries in the Remote Control 60
Installing Batteries in the Pens 62
Using the Projector on a Network 64
Wired Network Projection.... 64
Connecting to a Wired Network 65
Selecting Wired Network Settings 65
Wireless Network Projection 68
Installing the Wireless LAN Module 69
Connecting Directly to a Smartphone or Tablet 71
Using Quick Wireless Connection (Windows).... 74
Selecting Wireless Network Settings Manually.... 75
Wireless LAN Menu Settings 80
Selecting Wireless Network Settings in Windows 83
Selecting Wireless Network Settings on Mac 83
Setting Up Wireless Network Security 83
WirelessNetworkProjectionfromaMobileDeviceorWindowsComputer(ScreenMirroring)......85
Screen Mirroring Restrictions 85
Selecting Screen Mirroring Settings 86
ConnectingforScreenMirroringwithaWindows8.x/Windows10Computer....88
Connecting for Screen Mirroring with Miracast 89
Setting Up Projector Network E-Mail Alerts 90
Network Projector E-mail Alert Messages 91
Setting Up Monitoring Using SNMP 91
Controlling a Networked Projector Using a Web Browser 92
Creating an Address Book 95
Using Crestron Connected 96
Setting Up Crestron Connected 97
ControllingaNetworkedProjectorUsingCrestronConnected....97
Registering a Digital Certificate on the Projector 100
ImportingaWebServerCertificateUsingtheProjectorMenus....100
Registering Digital Certificates from a Web Browser 101
Digital Certificate Types.... 102
Using Basic Projector Features 104
Turning On the Projector 104
Using the Home Screen.... 106
Turning Off the Projector 108
Selecting the Language for the Projector Menus.... 110
Setting the Date and Time 110
Image Shape 112
CorrectingImageShapewiththeKeystoneButtons....112
Correcting Image Shape with Quick Corner 115
Correcting Image Shape with Arc Correction.... 118
Correcting Image Shape with Point Correction 121
Correcting Image Shape with Corner Markers.... 123
Applying Saved Image Shape Settings 124
Resizing the Image with the Wide and Tele Buttons 125
Adjusting the Image Position.... 126
Focusing the Image.... 127
Remote Control Operation 130
Selecting an Image Source 131
Projection Modes 134
ChangingtheProjectionModeUsingtheRemoteControl....134
Changing the Projection Mode Using the Menus.... 135
Image Aspect Ratio 136
Changing the Image Aspect Ratio 136
Available Image Aspect Ratios 137
Color Mode.... 138
Changing the Color Mode 138
Available Color Modes.... 138
Adjusting the Hue, Saturation, and Brightness 139
Adjusting Gamma.... 141
Adjusting the Projector's Brightness Level 143
Constant Brightness Usage Hours 146
Turning On Automatic Luminance Adjustment 148
Controlling the Volume with the Volume Buttons.... 149
Inverting the Audio Channels 150
Selecting a Quick Startup Setting.... 151
Projecting a PC Free Presentation 152
Supported PC Free File Types 153
Starting a PC Free Slide Show 154
Starting a PC Free Movie Presentation 156
PC Free Display Options 157
Adjusting Projector Features 159
Shutting Off the Picture and Sound Temporarily 159
Stopping Video Action Temporarily 160
Zooming Into and Out of Images 161
Using Multiple Projectors (DuoLink).... 162
Projector Identification System for Multiple Projector Control 162
Setting the Projector ID 162
Setting the Remote Control ID 163
Adjusting Color Uniformity 164
Blending the Image Edges 168
Matching the Image Colors 170
Adjusting the Black Level 172
Adjusting RGBCMY 175
Scaling an Image 177
Projecting Multiple Images Simultaneously.... 179
Input Sources for Split Screen Projection 182
Projector Security Features.... 182
Password Security Types 183
Setting a Password 183
Selecting Password Security Types.... 184
Entering a Password to Use the Projector.... 185
Saving a User's Logo Image to Display 186
Locking the Projector's Buttons 188
Unlocking the Projector's Buttons 189
Installing a Security Cable 190
Creating a User Pattern to Display 190
Saving Settings to Memory and Using Saved Settings 192
Copying Menu Settings Between Projectors 193
Saving Settings to a USB Flash Drive.... 194
Transferring Settings from a USB Flash Drive 195
Saving Settings to a Computer 196
Transferring Settings from a Computer 197
Scheduling Projector Events 199
Saving a Scheduled Event.... 199
Viewing Scheduled Events 201
Editing a Scheduled Event.... 202
Using the Interactive Features 205
Interactive Modes.... 205
UsingtheProjectedScreenasaWhiteboard(Built-inWhiteboardMode)....206
DrawingonaProjectedImage(Built-inAnnotationMode)....207
ControllingComputerFeaturesfromaProjectedScreen(PCInteractiveMode)....208
PCInteractiveModeSystemRequirements....210
Using the Interactive Pens 210
Using the Pens 211
Pen Calibration 213
Calibrating Automatically 214
Calibrating Manually 216
Using Finger Touch Interactivity 219
Touch Unit Safety Instructions.... 219
Calibrating for Finger Touch Interactivity 220
Using Finger Touch Operations.... 224
Using BrightLink with a Computer 226
Adjusting the Pen Operation Area 227
Easy Interactive Tools 230
Windows Pen Input and Ink Tools 230
Enabling Windows Pen Input and Ink Tools.... 231
Using Windows Pen Input and Ink Tools 232
Whiteboard Mode 234
Using the Whiteboard Toolbar 234
The Whiteboard Toolbar 235
Selecting Background Templates 238
Inserting and Working With Images 238
Selecting Whiteboard Settings 239
Selecting Basic Whiteboard Settings 240
Selecting Whiteboard Print Settings.... 241
SelectingSettingsforSavingWhiteboardPages....243
SelectingSettingsforEmailingWhiteboardPages....245
Selecting Settings for a Directory Server 246
Selecting a Networked Device Source 249
Saving Pages in Whiteboard Mode 249
Printing Whiteboard Pages 251
Emailing Whiteboard Pages 252
Using BrightLink Without a Computer 254
Using the Built-in Annotation Mode 254
Built-in Tools for Use Without a Computer 255
Controlling an Epson Document Camera 258
Splitting the Projected Image with Whiteboard Mode 259
Sharing the Projected Screen 260
Starting a Shared Screen Session 260
Using Interactive Features with Two Projectors (DuoLink) 261
Adjusting the Menu Settings 262
Using the Projector's Menus.... 262
Image Quality Settings - Image Menu 264
Input Signal Settings - Signal I/O Menu 269
Installation Settings - Installation Menu 273
Display Settings - Display Menu 278
Feature Settings - Operation Menu 280
Administration Settings - Management Menu.... 284
Event ID Code List.... 290
Network Settings - Network Menu 293
Pen and Touch Setup Settings - Pen/Touch Menu 297
Interactive Settings - Interactive Menu 300
Multiple Projector Operation Settings - Multi-Projection Menu 303
Image Quality Memory Settings - Memory Menu 308
Setup Settings - ECO Menu 309
Initial Settings and Reset Options - Initial/All Settings Menu 311
Maintaining and Transporting the Projector 313
Projector Maintenance 313
Cleaning the Lens 313
Cleaning the Projector Case 314
Air Filter and Vent Maintenance 314
Cleaning the Air Filter and Vents 315
Replacing the Air Filter 319
Replacing the Remote Control Batteries 321
Replacing the Hard Pen Tips.... 323
Replacing the Soft Pen Tips 324
Transporting the Projector 327
Solving Problems 328
Projection Problem Tips 328
Projector Light Status 329
Using the Projector Menu Displays 332
Solving Image or Sound Problems 333
Solutions When No Image Appears 333
SolutionsWhenImageisIncorrectUsingtheUSBDisplayFunction....334
Solutions When "No Signal" Message Appears.... 335
Displaying From a PC Laptop 336
Displaying From a Mac Laptop 336
Solutions When "Not Supported" Message Appears 337
Solutions When Only a Partial Image Appears 337
Solutions When the Image is Not Rectangular 338
Solutions When the Image Contains Noise or Static 339
Solutions When the Image is Fuzzy or Blurry 340
SolutionsWhentheImageBrightnessorColorsareIncorrect....340
SolutionsWhenanAfterimageRemainsOntheProjectedImage....341
Solutions to Sound Problems 341
Solutions to Microphone Problems 342
Solving Projector or Remote Control Operation Problems 343
Solutions to Projector Power or Shut-Off Problems 343
Solutions to Remote Control Problems 344
Solutions to Password Problems 345
Solutions When a Battery Message Appears 345
Solving Network Problems 345
Solutions When Wireless Authentication Fails 346
SolutionsWhenYouCannotAccesstheProjectorThroughtheWeb....346
SolutionsWhenNetworkAlertE-MailsareNotReceived....347
SolutionsWhentheImageContainsStaticDuringNetworkProjection....347
SolutionsWhenYouCannotConnectUsingScreenMirroring....348
SolutionsWhentheImageorSoundContainsStaticWhenUsingScreenMirroring....348
SolutionsWhentheProjectedScreenisnotSharedCorrectly....348
Solving Interactive Problems.... 349
Solutions When the Interactive Pens Do Not Work 349
SolutionsWhentheInteractivePenPositionIsNotAccurate....351
SolutionsWhentheInteractivePensAreSloworDifficulttoUse....352
SolutionsWhentheInteractivePensCauseInterferenceorUnwantedEffects....352
SolutionsWhenFingerTouchInteractivityDoesNotWork....353
SolutionsWhenYouCannotOperateaComputerfromtheProjectedScreen....354
SolutionsforProblemsWithCapturing,Printing, Saving, or Scanning....354
Solutions for Problems with Whiteboard Mode 355
Where to Get Help 355
Technical Specifications 357
General Projector Specifications 357
Projector Light Source Specifications.... 359
Interactive Pen Specifications 359
Touch Unit Specifications 359
Remote Control Specifications 360
Projector Dimension Specifications 360
Projector Electrical Specifications 360
Projector Environmental Specifications.... 361
Projector Safety and Approvals Specifications 362
Safety and Approvals Specifications for Latin America 362
Supported Video Display Formats 363
USB Display System Requirements 366
Notices 367
Recycling.... 367
Important Safety Information 367
Laser Safety Information 368
Laser Light Source Warning 371
Important Safety Instructions.... 371
Restriction of Use 375
List of Safety Symbols (corresponding to IEC60950-1 A2).... 376
FCC Compliance Statement.... 380
Binding Arbitration and Class Waiver 381
Trademarks 384
Copyright Notice.... 385
ANoteConcerningResponsibleUseofCopyrightedMaterials....385
Copyright Attribution 386
BrightLink1480Fi/1485FiUser'sGuide
Welcome to the BrightLink 1480Fi/1485Fi User's Guide.
For a printable PDF copy of this guide, click here.
IntroductiontoYourProjector
Refertothesesectionstolearnmoreaboutyourprojectorandthismanual.
ProjectorFeatures
NotationsUsedintheDocumentation
WheretoGoforAdditionalInformation
AdditionalProjectorSoftwareandManuals
ProjectorPartLocations
ProjectorFeatures
TheBrightLink1480Fi/1485Fiprojectorincludesthesespecialfeatures:
Uniqueinteractivefunctions
•Annotationwithorwithoutacomputer
- Annotationwithtwopensatthesametime(dependingoninteractivemode,connectionmethod,and operatingsystem)
•EnhancedEasyInteractivetoolbarforWindowsandMac
- Touch-basedinteractivityforasmanyassixusers(TouchUnitrequired)
•Controlyourcomputerfromtheprojectedscreen
- Print, save, and send your presentations without a computer
- Scananddisplaycontentfromaconconnectedscanner
- ImportcontentfromaUSBdrive
- Shareyourprojectedcontentwithtablets,smartphones,andotherdevices
Bright, high-resolution projectionsystem
•Upto5000lumensofcolorbrightness(colorlightoutput)andwhitebrightness(whitelightoutput)
Note: Color brightness (color light output) and white brightness (white light output) will vary depending on usage conditions. Colorlight output measured in accordance with IDMS15.4; whitelight output measured in accordance with ISO21118.
•1080pnativeresolution
Flexibleconnectivity
•ThreeHDMIportsforcomputerorvideodeviceconnection
- Plug-and-playUSBprojectionandaudioforinstantsetup
•HDBaseTcontrolpadwithsingleconnectiontoprojectorforsimplifiedcablingandinstallation (BrightLink1485Fi)
•Wiredandwirelessnetworksupportforprojection
•ScreenmirroringtoconnectyourmobiledevicewirelesslyusingMiracasttechnology
- Projectormonitoringandcontrolviaremotenetworkcomputer
•PCFreephotoslideshowsviaconnectedUSBmemorydevicesorEpsondocumentcamera(onlyon modelsthatsupporttheslideshowfunction)
•OneHDMIportforconnectinganexternaldisplayorlinkinganothercompatibleprojector(BrightLink 1485Fi)
- UseEpsoniProjection(Windows/Mac)tosimultaneouslyprojectuptofourimagesfromnetworkcomputersormobiledevices
- ProjectionfromaniOSdevice,Androiddevice,orChromebookwiththefreeEpsoniProjectionapp; visit epson.com/iprojection (U.S.) or epson.ca/iprojection (Canada) for more information
Innovativedisplayandoperationfeatures
•Long-lifelaserlightsource
- Supportforside-by-sideprojectormountingwithcontinuousannotation(BrightLink1485Fi)
• Highdigitalzoomratioforlargerimagesinshorterprojectiondistances
•2,500,000:1contrastratioandDynamicContrastcontrolforsharp,detailedimages
•Built-inclosedcaptioningdecoder
•Powerful16Wspeakersystemwithaudiooutportforconnectingexternalspeakers
- Epson'sDirectPowerOnandAutoPowerOnfeaturesforquickandeasysetup
•SupportforCrestronRoomViewnetworkmonitoringsystems
•Networkmessagebroadcastsystemtoprojecttimelymessagestoallnetworkedprojectors
ProductBoxContents
AdditionalComponents
OptionalEquipmentandReplacementParts
Warranty and Registration Information
Parenttopic: Introduction to Your Projector
ProductBoxContents
Saveallthepackagingincaseyouneedtoshiptheprojector.Alwaysusetheoriginalpackaging(or equivalent)whenshipping.
Makesureyourprojectorboxincludedalloftheseparts:
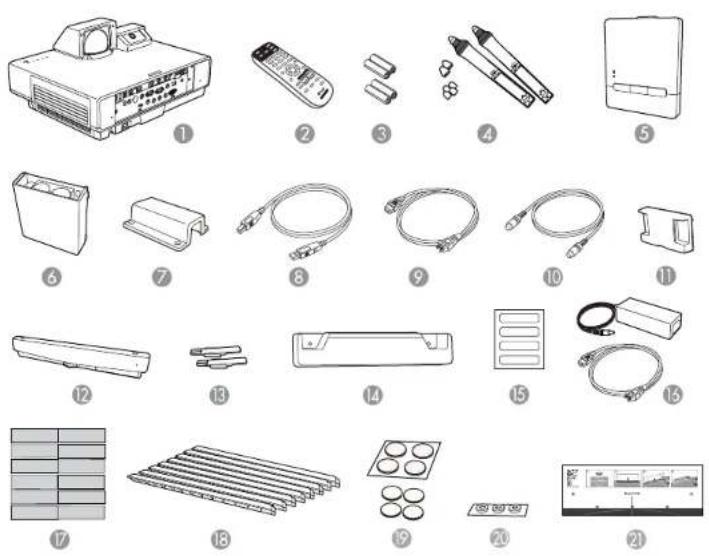
1Projector
2Remotecontrol
3Remotecontrolandpenbatteries(2AArechargeable and 2AAalkaline; included battery charger not shown)
4 Interactivepensandreplacementpentips(4softtips,2hardtips)
5Controlpad(BrightLink1485Fi)
6Penstand(BrightLink1485Fi)
7ControlpadACadapterholder(BrightLink1485Fi)
86ft(1.8m)USBcable
9Powercord
10TouchUnitconnectioncable(includedwithBrightLink1485Fi;optionalforBrightLink1480Fi)
11 Lenscap
12TouchUnit(includedwithBrightLink1485Fi;optionalforBrightLink1480Fi)
13MarkersforTouchUnitsetup(includedwithBrightLink1485Fi;optionalforBrightLink1480Fi)
14Cablecover
15Labels(4)
16ControlpadACadapterandpowercord
17Tapeforsecuringmarkers(includedwithBrightLink1485Fi;optionalforBrightLink1480Fi)
18Infrareddeflectors(12)(includedwithBrightLink1485Fi;optionalforBrightLink1480Fi)
19Autoimageadjustmentmarkersandmagnets
20Spacersforscrewholes
21TouchUnitmountingtemplate(includedwithBrightLink1485Fi;optionalforBrightLink1480Fi)
Parenttopic:ProjectorFeatures
AdditionalComponents
Dependingonhowyouplantousetheprojector,youmayneedtoobtainadditionalcomponents.
Note: To connect a Mac that does not include a compatible video output port, you need to obtain an adapter that allows you to connect to an input port on the projector. Contact Apple for compatible adapter options. To connect a smartphone ortable, you may need to obtain an adapter that allows you to connect the projector. This allows you to mirror your smartphone ortable screens, watch movies, and more. Contact your device manufacturer for compatible adapter options.
Unlesslisted as available from Epsonin thistable, see your local computerorelectronics dealer for purchase information.
| Signalorconnection type | Additionalcomponentnecessary |
| CompositevideoRCA-style | ideoorA/Vcable |
| HDMICompatibleHDMlcable | AvailableforpurchasefromEpsonoranauthorizedEpsonreseller.Note:OlderMaccomputers(2009andearlier)maynotsupportHDMI audio. |
| AudiofromcertainportsCom | merciallyavailableaudiocablecompatiblewithyourdevice |
| VGAToconnectacomputerth | roughitsVGAporttotheprojector'sVGAvideo port,youneedaVGAcomputercable. |
| MultipleBrightLink projectors | TosyncadditionalBrightLinkprojectorstogether,youneedastereomini cable(commerciallyavailable)ortheremotecontrolcableset(ELPKC28).AvailableforpurchasefromEpsonoranauthorizedEpsonreseller. |
Parenttopic:ProjectorFeatures
OptionalEquipmentandReplacementParts
Youcanpurchasescreens,otheroptionalaccessories,andreplacementpartsfromanEpsonauthorizedreseller.Tofindthenarestreseller,call800-GO-EPSON(800-463-7766)intheU.S.or800-807-7766inCanada. Or you can purchase online at epsonstore.com (U.S. sales) or epsonstore.ca (Canadian sales).
Epsonoffersthefollowingoptionalaccessoriesandreplacementpartsforyourprojector:
| OptionorpartPartnumber | |
| Replacementairfilter(ELPAF56)V13H134A56 | |
| Ultra-shortthrowwallmount(ELPMB62)V12HA06A05 | |
| FingerTouchUnit(ELPFT01)V12H007A23 | |
| WirelessLANmodule(ELPAP11)V12H005A02 | |
| EpsonDC-07documentcamera(ELPDC07)V12H759020 | |
| EpsonDC-11documentcamera(ELPDC11)V12H377020 | |
| EpsonDC-12documentcamera(ELPDC12)V12H594020 | |
| EpsonDC-13documentcamera(ELPDC13)V12H757020 | |
| EpsonDC-20documentcamera(ELPDC20)V12H500020 | |
| EpsonDC-21documentcamera(ELPDC21)V12H758020 | |
| PowerLitePilot3connectionandcontrolbox(ELPCB03)V12H927020 | |
| Activespeakers(ELPSP02)V12H467020 | |
| AdditionalinteractivepenA(ELPPN05A)(orange)V12H773010 | |
| AdditionalinteractivepenB(ELPPN05B)(blue)V12H774010 | |
| Replacementsetofhardpentips(ELPPS03)V12H775010 | |
| Replacementsetofsoftpentips(ELPPS04)V12H776010 | |
| Remotecontrolcableset(ELPKC28)V12H005C28 | |
| 100inch(254cm)16:9whiteboard(DaLite)V12H006A01 | |
| 100inch(254cm)16:9whiteboard(MooreCo)V12H006A02 | |
| TouchUnitmountingbracket(ELPMB63)V12HA05A09 | |
| USBextensioncable(ELPKC31)V12H525001 | |
| PixiePluscontrolsystemELPSP10 |
In addition to the accessories listed above, 1-year and 2-year extended service plans are available.
Parenttopic:ProjectorFeatures
Warranty and Registration Information
Yourprojectorcomeswithabasicwarrantythatletsyouprojectwithconfidence.Fordetails,seethe warrantythatcamewithyourprojector.
Inaddition, EpsonoffersfreeExtraCareRoadService. Intheunlikelyeventofanequipmentfailure, you won't havetowaitforyourunittoberepaired. Instead, Epsonwillshipyouareplacementunitanywhere intheUnitedStates, Canada, orPuertoRico. SeetheExtraCareRoadServicebrochurefordetails.
Note: Availabilityvariesbyregion.
Registryourproductonlineatthissite:epson.com/webreg.
Registeringalsoletsyoureceivespecialupdatesonnewaccessories,products,andservices.
Parenttopic:ProjectorFeatures
NotationsUsedintheDocumentation
Followtheguidelinesinthesenotationsasyoureadyourdocumentation:
- Warningsmustbefollowedcarefullytoavoidbodilyinjury .
- Cautionsmustbeobservedtoavoiddamagetoyourequirement.
- Notes contain important information about your projector.
- Tipscontainadditionalprojectioninformation.
Parenttopic: Introduction to Your Projector
WheretoGoforAdditionallInformation
Needquickhelponusingyourprojector?Here'swheretolookforhelp:
•GuidanceiconintheOtherToolsmenuoftheinteractivetoolbar
Selectthe Guidanceicontodisplaythehelpscreenfortoolbarfunctions.
• epson.com/support (U.S.), epson.ca/support (Canada), or epson.com.jm/support (Caribbean)
ViewFAQs(frequentlyaskedquestions)ande-mailyourquestionstoEpsontechnicalsupport24 hoursaday.
- If you still need help after checking this manual and any others sources listed here, you can use the Epson Private Line Support service to get help fast. Ford details, see "Where to Get Help."
Parenttopic: Introduction to Your Projector
Relatedreferences
WheretoGetHelp
AdditionalProjectorSoftwareandManuals
Afterconnectingandsettinguptheprojector,installtheprojectorsoftwareasnecessary.Youmayneed toinstallitfromasoftwareCD,ifincluded,ordownloadthesoftwareandmanualsasnecessary.
Youcaninstalltheprojectorsoftwareprogramslistedhereandviewtheirmanualsforinstructionson usingthem.
Note: If you still need help after checking this manual and the sources listed here, you can use the EpsonPrivateLineSupportservicetogethelpfast.Fordetails,see"WhereToGetHelp."
| ProjectorsoftwareManual | Description | |
| EpsonProjector Management(Windows only) | EpsonProjector ManagementOperation Guide | Letsyoumonitorandcontrolyourprojector throughthenetwork.Youcandownloadthelatestsoftwareand documentationfromtheEpsonwebsite.Gotoepson.com/support(U.S.)orepson.ca/support(Canada)andselectyourprojector. |
| EpsoniProjection (Windows/Mac) | EpsoniProjection OperationGuide (Windows/Mac) | Letsyouprojectthecomputerscreensof usersoveranetwork.Youcandownloadthelatestsoftwareand documentationfromtheEpsonwebsite.Gotoepson.com/support(U.S.)orepson.ca/support(Canada)andselectyourprojector. |
| EpsoniProjectionappInstructionsareincluded withtheapp | LetsyouprojectfromaniOSdevice,Android device,orChromebookifyourprojectoris connectedtoanetworkthatincludesa wirelessaccesspoint.Visitepson.com/iprojection(U.S.)orepson.ca/iprojection(Canada)formore information. | |
| EasyInteractiveTools (Windows/Mac) | EasyInteractiveTools OperationGuide | Letsyouuseyourcomputertointeractively drawonprojectedimages(Macusersalso needtoinstalltheEasyInteractiveDriver)Youcandownloadthelatestsoftwareand documentationfromtheEpsonwebsite.Gotoepson.com/support(U.S.)orepson.ca/support(Canada)andselectyourprojector. |
| —OpenSourceSoftware | License | Youcandownloadthisdocumentfromthe Epsonwebsite.Gotoepson.com/support(U.S.)orepson.ca/support(Canada)and selectyourprojector. |
Parenttopic: Introduction to Your Projector
ProjectorPartLocations
Check the projector part illustration to learn about the part's your projector.
Note: The BrightLink 1485Fi is shown in most illustrations in this manual, unless noted otherwise.
ProjectorParts-Front/Side
ProjectorParts-Top/Side
ProjectorParts-Interface
ProjectorParts-Base
ProjectorParts-ControlPanel
ProjectorParts-RemoteControl
ProjectorParts-InteractivePens
ProjectorParts-PenStand(BrightLink1485Fi)
ProjectorParts-ControlPad(BrightLink1485Fi)
ProjectorParts-TouchUnit
Parenttopic: Introduction to Your Projector
ProjectorParts-Front/Side
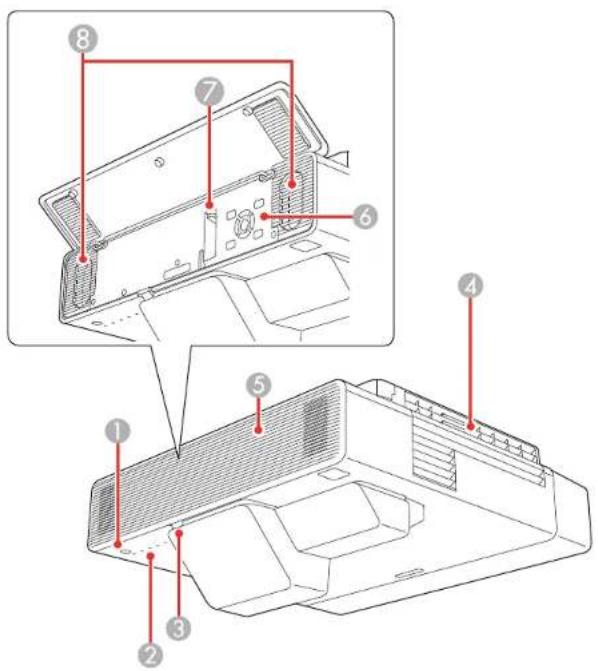
1Powerbutton
2Statuslights
3Remotecontrolreceiver
4Exhaustvent
5Frontcover
6Controlpanel
7Focuslever
8Speakers
Parenttopic:ProjectorPartLocations
Relatedreferences
ProjectorLightStatus
ProjectorParts-Top/Side
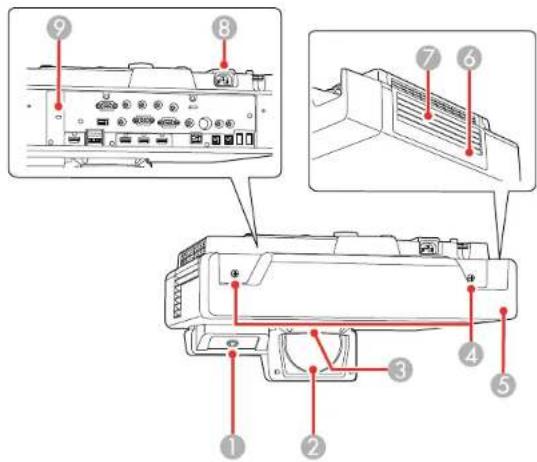
1 Interactivepenreceiver
2Projectionlens
3Remotereceiver
4Cablecoverscrews
5Cablecover
6Airfiltercover
7Airintakevent(airfilter)
8Powerinlet
9Securitycableinstallationslot
Parenttopic:ProjectorPartLocations
ProjectorParts-Interface
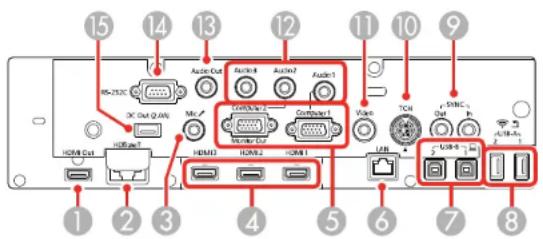
1HDMIOutport
2HDBaseTport(BrightLink1485Fi)
3Micport
4HDMI1/HDMI2/HDMI3ports
5Computer1/Computer2MonitorOutports
6LANport
7USB-B1/USB-B2ports
8USB-A1/USB-A2ports
9SYNCIn/Outports
10TCHportfortheTouchUnitconnectioncable
11Videoport
12Audio1/Audio2/Audio3ports
13AudioOutport
14RS-232Cport
15DCOut(2.0A)port
Parenttopic:ProjectorPartLocations
Relatedconcepts
ProjectorConnections
ProjectorParts-Base
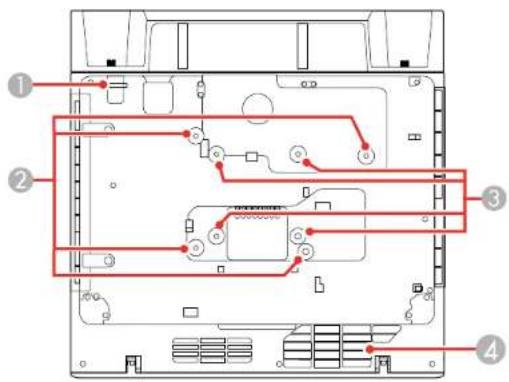
1 Securitycableattachmentpoint
2Wallmountingplateholes(4)
3VESA-compatiblemountfixingpoints(4)
4Airintakevent
Parenttopic:ProjectorPartLocations
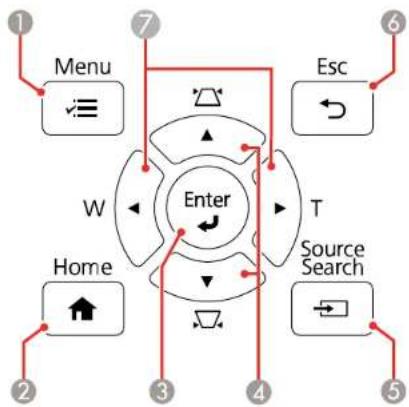
ProjectorParts-ControlPanel
flowchart
graph TD
    A["Home"] --> B["Menu"]
    B --> C["Enter"]
    C --> D["Esc"]
    D --> E["Source Search"]
    E --> F["Esc"]
    style A fill:#f9f,stroke:#333
    style B fill:#ccf,stroke:#333
    style C fill:#cfc,stroke:#333
    style D fill:#fcc,stroke:#333
    style E fill:#cff,stroke:#333
    style F fill:#ffc,stroke:#333
1MeniButton(accessesprojectormenusystem)
2 Homebutton(accessesprojectorHomescreen)
3Enterbutton(selectsoptions)
4Verticalkeystoneadjustmentbuttons(displaytheadjustmentscreenandadjustscreenshape) andarrowbuttons
5 SourceSearchbutton(searchesforconnectedvideosources)
6EscButton(cancels/exitsfunctions)
7 W/T (Wide/Tele) buttons (adjust projected image size) and arrow buttons
Parenttopic:ProjectorPartLocations
ProjectorParts-RemoteControl
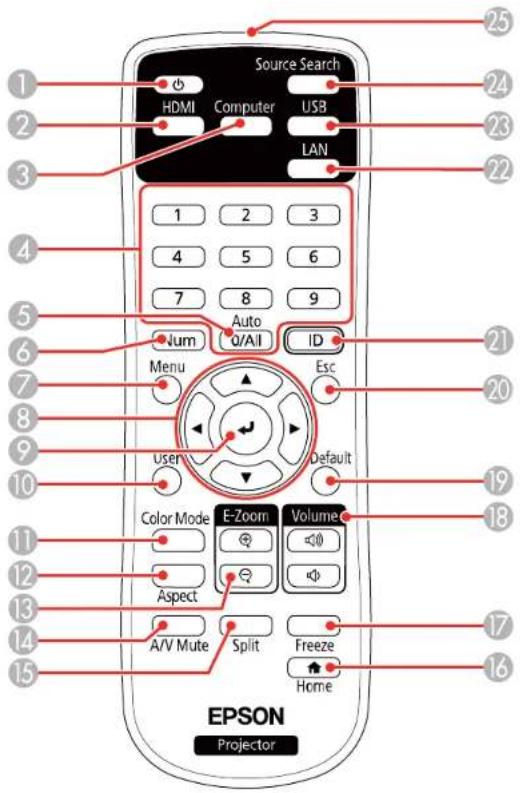
1Powerbutton
2HDMIbutton(cyclesthroughconnectedHDMIsources)
3Computerbutton
4Numericbuttons
5 Autobutton(automaticallyadjustsposition,tracking,andsyncsettings)
6Numbutton(whenhelddown, switchesnumericbuttonstonumberfunction)
7Menubutton(accessesprojectormenusystem)
8Arrowbuttons(movethroughon-screenoptions)
9Enterbutton(selectsoptions)
10Userbutton(customizablefordifferentfunctions)
11ColorModebutton(selectsdisplaymodes)
12Aspectbutton(selectstheimageaspectratio)
13E-Zoom+/-buttons(zoomintoandoutoftheimage)
14A/VMutebutton(turnsoffpictureandsound)
15Splitbutton(splitsthescreenbetweentwoimagesources)
16 Homebutton(accessesprojectorHomescreen)
17Freezebutton(stopsvideoaction)
18Volumeup/downbuttons(adjustspeakervolume)
19Defaultbutton(resetstheselectedsettingtoitsdefaultvalue)
20Escbutton(cancels/exitsfunctionsandcontrolswirelessmousefunctions)
21IDbutton(selectsaprojectortousewiththeremotecontrol)
22LANbutton(connectstoanetworksource)
23USBbutton(cyclesthroughconnectedUSBsources)
24SourceSearchbutton(searchesforconnectedsources)
25Remotecontrolemitter
Parenttopic:ProjectorPartLocations
ProjectorParts-InteractivePens
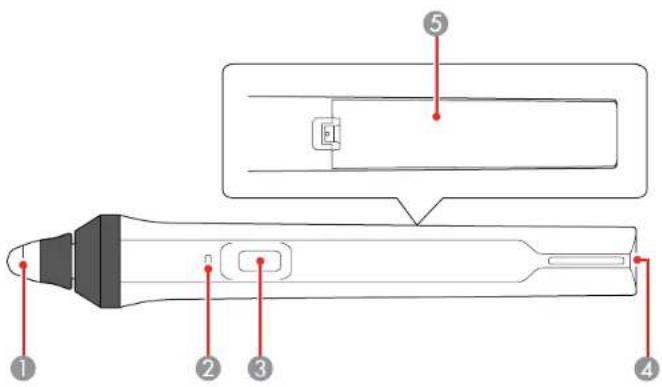
1 Pentip
2Batterylight
3Functionbutton
4Attachmentforoptionalstraporcord
5Batterycover
Parenttopic:ProjectorPartLocations
ProjectorParts-PenStand(BrightLink1485Fi)
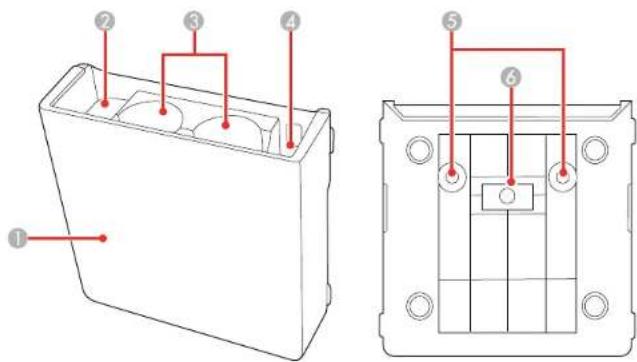
1Frontcover
2 Pentipstoragearea
3Penstoragearea
4Batterystoragearea
5Wallmountingholes
6Installationmagnet
Parenttopic:ProjectorPartLocations
ProjectorParts-ControlPad(BrightLink1485Fi)
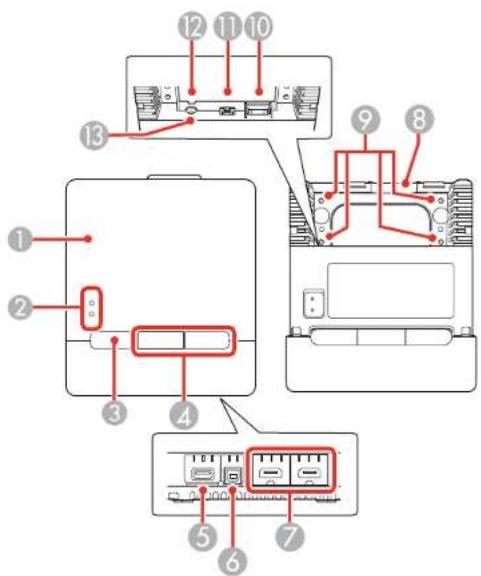
1Frontcover
2Indicatorlights
3Powerbutton
4HDMI1/HDMI2buttons
5USB-Aport
6USB-Bport
7HDMI1/HDMI2inputports
8Uppercablepath
9Mountingscrewholes
10HDBaseTport
11USB-Bport(toprojector)
12Powerinletcablepath
13Powerinlet
Parenttopic:ProjectorPartLocations
ProjectorParts-TouchUnit
The TouchUnitisincludedwiththeBrightLink1485FiandoptionalfortheBrightLink1480Fi.
Front/Top
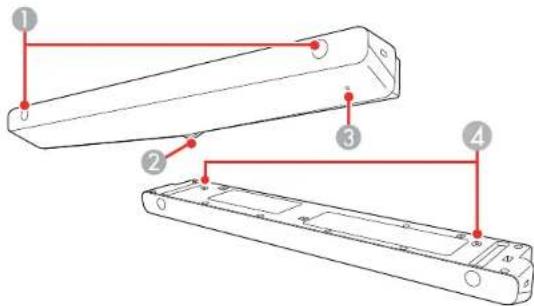
Back
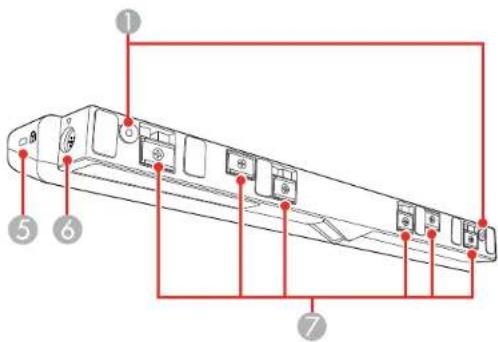
1 Installationscrewholes
2Laserdiffusionport
3Indicatorlight
4 Installationscrewholes
5Securitycableinstallationslot
6TCHport
7 Installationmagnets
Parenttopic:ProjectorPartLocations
SettingUptheProjector
Followtheinstructionsinthesesectionstosetupyourprojectorforuse.
ProjectorPlacement
RemovingandAttachingtheCableCover
ProjectorConnections
Installing Batteries in the Remote Control
Installing Batteries in the Pens
ProjectorPlacement
Yourultra-shortthrowprojectorisdesignedtobeinstalledonawall(withawallmount)orverticallyona table(withatablemount)tocreateaninteractiveetabletopworkspace.
Youcanalsoplacetheprojectoronaflatsurfacesuchasadeskortabletoprojectinaportablesetup.
Note: A Touch Unit is optional for the BrightLink 1480Fi and must be installed for finger touch operation. Fingertouchoperationisavailableonlyiftheprojectorisinstalledonawall(withawallmount)and projectingfromthefrontofthewall,orverticallyonatable(withatablemount)andprojectingfromthe topofthetable.
Keeptheseconsiderationsinmindasyouselectaprojectorlocation:
- FollowtheinstructionsintheonlineInstallationGuidetoinstalltheprojector.
- Leaveplentyofspacearoundandundertheprojectorforventilation, anddonotplaceitontopofor nexttoanythingthatcouldblockthevents.
- If you are using the projector at altitudes above (1500 m), set the High Altitude Mode setting to On in the projector's Installationmenutoensuretheprojector'sinternaltemperatureisregulatedproperly.
- Position the projector within reach of foreground electrical outlet to extension cord.
- Ifinstallingverticallyonatable,acommerciallyavailablemountcompatiblewiththeVESAMounting InterfaceStandard(100x100mm)isrequired.
- Ifinstallingonawall, thewallmount(V12HA06A05)isrequired.
- If the projector is not mounted, place it on asturdy, levelsurface.
- Forfingertouch, makesuretheprojectionsurfaceisflat, smooth, and unwarpedwithnomorethan 0.2inch(5mm)ofunevennessinanydirection.
- Placetheprojectorsoitsquarelyfacesthescreen, notatanangle. If you cannot install the projector squarely facing the screen, correct any resulting imaged distortion using the projector controls. - Trynottosetup the projector in location subject to high humidity and dust, or in location subject to smoke from firesortobaccosmoke.
ProjectorSetupandInstallationOptions
ProjectionDistance
Parenttopic:SettingUptheProjector
ProjectorSetupandInstallationOptions
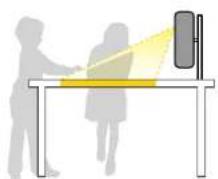
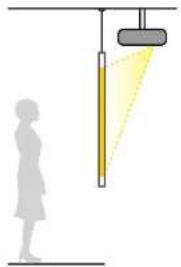
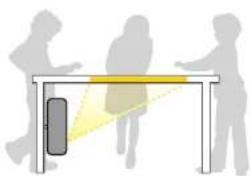
Youcansetuporinstallyourprojectorinthefollowingways:
Mountedonthewallorceiling
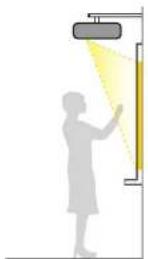
Mounted vertically on a tablet o create an interactive workspace
natural_image
Illustration of a person observing a yellow light source at a table, with silhouettes of another person in the background (no text or symbols)Mountedonthewallorceilingandprojectingfrombehindatransluentscreen(interactivefeaturesnot supported)
natural_image
Diagram showing a person standing beside a hanging object with a yellow light beam, no text or symbols present.Mounted vertically and projecting from underneath thatable (interactive features not supported)
natural_image
Silhouettes of people interacting with a yellow laser beam and screen (no text or symbols)Frontprojectionfromatableorportablecart(fingertouchnotsupported)
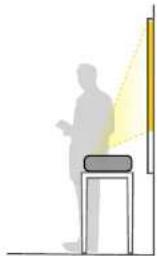
natural_image
Silhouette of a person standing next to a chair with a yellow light beam projecting upward (no text or symbols)Rearprojectionfromatableorportablecartbehindatransluentscreen(interactivefeaturesnot supported)
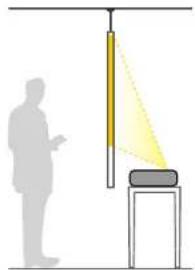
natural_image
Diagram showing a person standing next to a vertical yellow-orange lamp and a table with a gray base, no text or symbols present.Whereveryousetuptheprojector, makesuretopositionitsquarelyinfrontofthescreen, notatan angle.
If you place the projector vertically, turn on the Vertical Installation setting in the projector's Installation menu.
If you install the projector to a fixed location, turn on the Fixed Installation setting in the projector's Installationmenu.
If you project from a table or portable cart, be sure to select the correct Projection option in the projector's menusystem.
Note: You cannot use the interactive pens or finger touch when projecting from behind a screen or under atable.
Parenttopic:ProjectorPlacement
ProjectionDistance
The distance at which you place the projector from the screen to determine the approximate size of the image. The imagesize increase the farther the projector is from the screen, but can vary depending on the zoom factor, aspect ratio, and other settings.
Refer to the tables in the online Installation Guide to determine approximately how far to place the projectorfromthescreenbasedonthesizeoftheprojectedimage.(Conversionfiguresmayhavebeen rounded up or down.) You can also use the Projection Distance Calculator here (U.S.), here (Canada), orhere(Caribbean).
Parenttopic:ProjectorPlacement
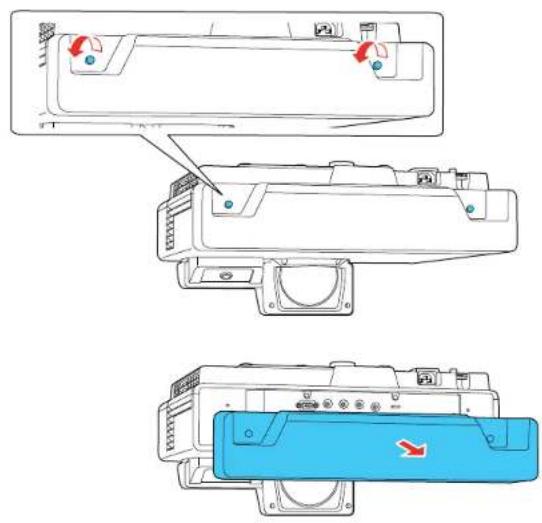
RemovingandAttachingtheCableCover
Beforeyoucanconnectequipmenttoyourprojector,youneedtoremovethecablecover.
- Loosenbothofthescrewssecuringthecablecoverandliftoffthecablecover.
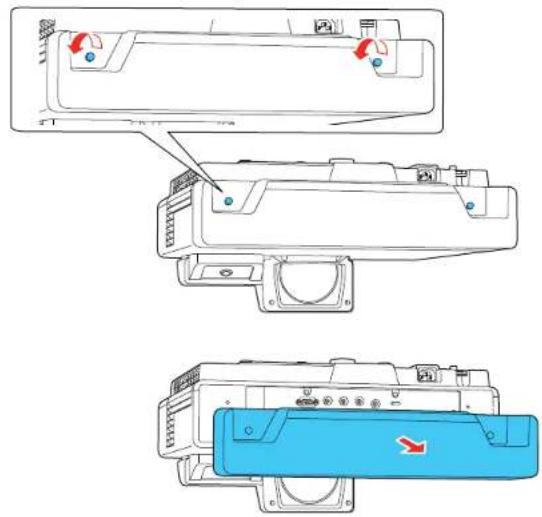
Toattachthecablecover, replacethecablecover and tighten the cable covers screws.
Parenttopic: SettingUptheProjector
ProjectorConnections
Seethesectionstoconnecttheprojectortoavarietyofprojectionsources.
Caution: If you will use the projector at altitudes above 4921 feet (1500 m), turn on High Altitude Mode to ensure the projector's internal temperature is regulated properly.
ConnectingtoComputerSources
ConnectingtoVideoSources
ConnectingExternalOutputDevices
ConnectingaMicrophone
ConnectingtoExternalUSBDevices
ConnectingtoaDocumentCamera
ConnectingaPrintertotheControlPad
ConnectingMultipleProjectorsoftheSameModel
Parenttopic:SettingUptheProjector
Relatedreferences
AdditionalComponents
InstallationSettings-InstallationMenu
ConnectingtoComputerSources
Followtheinstructionsinthesesectionstoconnectacomputertotheprojector.
ConnectingtoaComputerforUSBVideoandAudio
ConnectingtoaComputerforVGAVideo
ConnectingtoaComputerforHDMIVideoandAudio
ConnectingtoaComputerforPenandFingerUse
ConnectingaComputertotheControlPad
ConnectingtoaComputerforSound
Parenttopic:ProjectorConnections
ConnectingtoaComputerforUSBVideoandAudio
If your computer meets the system requirements, you can send video and audio output to the projector through the computer's USB port (preferably USB2.0). Connect the project to your computer using a USB cable.
Note: This also lets you use the interactive pens with your computer. You need to change the USB Display setting to On in the projector's Signal I/O menu before you can project through the USB port.
NotethatusingUSBDisplaywillslowinteractivepenfunction.Forthebestperformance,VGAorHDMI connectionsarerecommended.
Note: A USB connection may cause a delay for content requiring high bandwidth, such as movies. An HDMI connection is recommended for projecting movies, videogames, and other home entertainment content.
-
Turnonyourcomputer.
-
Connect the cable to your projector's USB-B1 port.
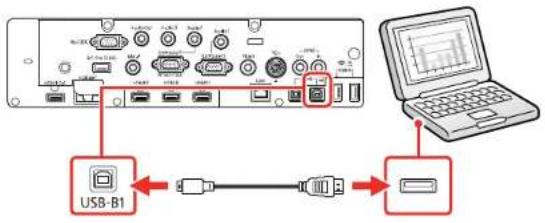
Note: If you use a USB hub, the connection may not operate properly. Connect the USB cable directly to the projector.
-
ConnecttheotherendtoanyavailableUSBportonyourcomputer.
-
TouseUSBDisplay, dooneofthefollowing:
-
Windows 10/Windows 8.x: Click EPSON_PJ_UD in the upper right-corner, then select Run EMP_UDSE.exeinthedialogboxthatappearstinstalltheEpsonUSBDisplaysoftware.
- Windows 7/Windows Vista: Select Run EMP_UDSE.exe in the dialog box that appears to install theEpsonUSBDisplaysoftware.
- Mac: The USB Display setup folder appears on your screen. Select USB Display Installer and followtheon-screeninstructionstoinstalltheEpsonUSBDisplaysoftware.
Followanyon-screeninstructions.Youneedtoinstallthissoftwareonlythefirsttimeyouconnect theprojectortothecomputer.
Theprojectordisplaystheimagefromyourcomputer'sdesktopandoutputssound,ifyourpresentation containsaudio.
Parenttopic: ConnectingtoComputerSources
Relatedreferences
InputSignalSettings-Signall/OMenu
ConnectingtoaComputerforVGAVideo
YoucanconnecttheprojectortoyourcomputerusingaVGAcomputercable.
Note: To connect a Mac that does not include a compatible video output port, you need to obtain an adapter that allows you to connect to an input port on the projector. Contact Apple for compatible adapter options. To connect a smartphone ortablet, you may need to obtain an adapter that allows you to connect the projector. This allows you to mirror your smartphone ortabletscreens, watch movies, and more. Contact your device manufacturer for compatible adapter options.
Note: To project an image source connected to the Computer2/Monitor Out port, set Monitor Out Port to Computer2 in the projector's Signall/Omenu.
- If necessary, disconnect your computer's monitorable.
- ConnecttheVGAcomputercabletoyourcomputer'smonitorport.
- ConnecttheotherendtoaComputerportontheprojector.
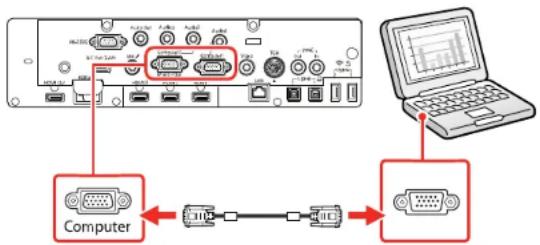
- TightenthescrewsontheVGAconnector.
Parenttopic: ConnectingtoComputerSources
ConnectingtoaComputerforHDMIVideoandAudio
If your computer has an HDMI port, you can connect to the projector using an optional HDMI cable.
Note: To connect a Mac that does not include a compatible video output port, you need to obtain an adapterthatallowsyoutoconnecttoaninputportontheprojector.ContactAppleforcompatible adapteroptions.Toconnectasmartphoneortablet,youmayneedtoobtainanadapterthatallowsyou
toconnecttotheprojector. This allows you to mirror your smartphone or tablet screens, watch movies, and more. Contact your device manufacturer for compatible adapter options.
- ConnecttheHDMIcabletoyourcomputer'sHDMIoutputport.
- Connecttheotherendtooneoftheprojector'sHDMIports.
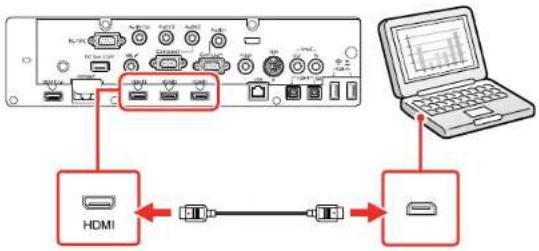
Note: If you have problems hearing audio through the HDMI connection, connect one end of an optional 3.5 mm stereo mini-jack audio cable to the projector's Audio port and the other end to your computer's audio out port. Then select the audio port you connected to as the HDMI Audio Output setting in the Signall/Omenu.
Parenttopic: ConnectingtoComputerSources
ConnectingtoaComputerforPenandFingerUse
If you connected your computer to a Computer or HDMI port on the projector, you also need to connect the USB cables you can us the tepens and your fingers with your computer.
Note: A Touch Unit is optional for the BrightLink 1480Fi and must be installed for finger touch operation.
Note: If your computer is connected to an HDMI input on the control pad (BrightLink 1485Fi), connect thecomputer'sUSBcabletothecontrolpad'sUSB-Bport.
- ConnecttheUSBcabletoyourprojector'sUSB-B1port.
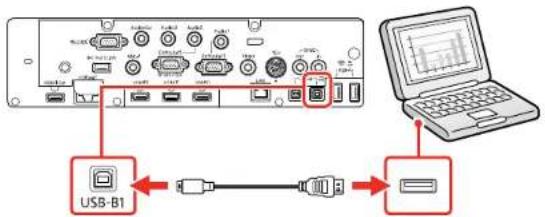
Note: If your computer is connected to the projector's HDMI3 port, connect the USB cable to the projector'sUSB-B2port.YoucanchangetheHDMIportassociatedwiththeUSB-B2portby changing the USB-B2 setting in the projector's Pen/Touch > PC Interactivity menu.
- ConnecttheotherendtoanyavailableUSBportonyourcomputer.
Parenttopic: ConnectingtoComputerSources
Relatedreferences
PenandTouchSetupSettings-Pen/TouchMenu
ConnectingaComputertotheControlPad
If your computer has an HDMI port, you can connect it to the projector's control pad (BrightLink1485Fi) using an HDMI cable.
Note: To connect a Mac that includes only a Mini DisplayPort, Thunderbolt port, or Mini-DVI port for videooutput,youneedtoobtainanadapterthatallowsyoutoconnecttotheprojector'sHDMIport. ContactAppleforcompatibleadapteroptions.OlderMaccomputers(2009andearlier)maynotsupport audiothroughtheHDMIport.
-
Turnonyourprojectorandcomputer,ifnecessary.
-
Connect an HDMI cable to the In1 or In2 port on the bottom of the control pad, then connect the other end of the cable to any available HDMI port on your computer.
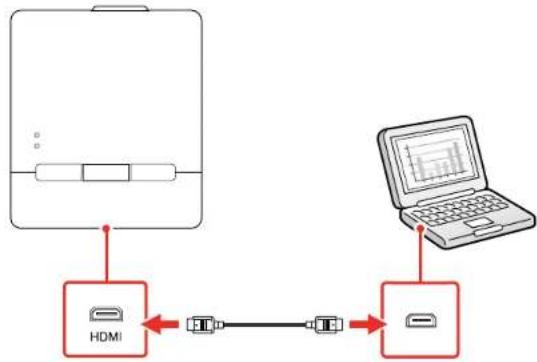
flowchart
graph LR
    A["Device 1"] -->|Data Bus| B["HDMI"]
    B --> C["Device 2"]
    C --> D["Laptop"]
- Press the 1 or 2 button on the control pad to select the port your computer is connected to.
The projector switches the input source to HDBaseT, displays the image from your computer's desktop, and output sound, if your presentation contains audio.
- If you want to operate your computer from the projected screen using the interactive Pennsylvania your fingers, connect the USB cable to the USB-B port on the bottom of the control pad and any available USB port on your computer.
Parenttopic: ConnectingtoComputerSources
ConnectingtoaComputerforSound
If your computer presentation includes sound and you did not connect to a projector port that receives audiosignals, you can still play sound through the projector's speakers system. Just connect an optional
3.5mmstereomini-jackaudiocableasdescribedhere.
Note: Makesuretheaudiocableyouuseislabeled "Noresistance."
-
Connect the audiocable toy our laptop's headphone or audio-out jack, or your desktop's speaker or audio-out port.
-
Connect the other end to the Audio port that corresponds to the Computer port you are using.
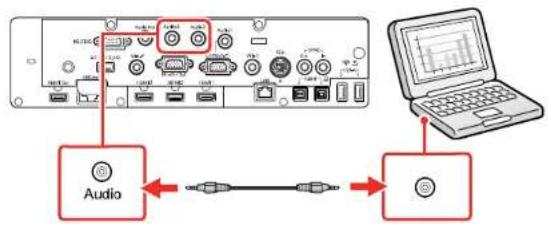
flowchart
graph LR
    A["USB Cable"] --> B["Audio"]
    B <--> C["USB Cable"]
    C <--> D["Laptop"]
Parenttopic: ConnectingtoComputerSources
ConnectingtoVideoSources
Followtheinstructionsinthesesectionstoconnectvideovicestotheprojector.
ConnectingtoanHDMIVideoSource
ConnectingtoaCompositeVideoSource
ConnectingtoaVideoSourceforSound
Parenttopic:ProjectorConnections
ConnectingtoanHDMIVideoSource
If your videosourcehasan HDMI port, you can connect it to the projector using an optional HDMI cable. The HDMI connection provides the best image equality. You can also connect your videosourced to an HDMI port on the control pad (Bright Link 1485Fi).
Caution: Do not turn on the video source before connecting it to the projector. Doing so could damage the projector.
-
ConnecttheHDMIcabletoyourvideosource'sHDMIoutputport.
-
Connecttheotherendtooneoftheprojector'sHDMIports.
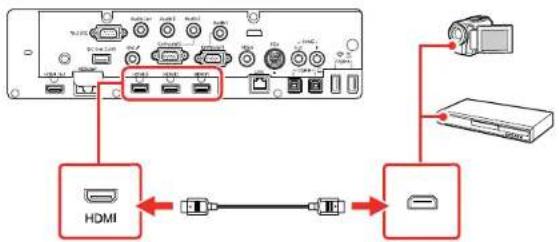
flowchart
graph TD
    A["Device 1"] --> B["USB Port 1"]
    A --> C["USB Port 2"]
    A --> D["USB Port 3"]
    A --> E["USB Port 4"]
    A --> F["USB Port 5"]
    A --> G["USB Port 6"]
    A --> H["USB Port 7"]
    A --> I["USB Port 8"]
    A --> J["USB Port 9"]
    A --> K["USB Port 10"]
    A --> L["USB Port 11"]
    A --> M["USB Port 12"]
    A --> N["USB Port 13"]
    A --> O["USB Port 14"]
    A --> P["USB Port 15"]
    A --> Q["USB Port 16"]
    A --> R["USB Port 17"]
    A --> S["USB Port 18"]
    A --> T["USB Port 19"]
    A --> U["USB Port 20"]
    A --> V["USB Port 21"]
    A --> W["USB Port 22"]
    A --> X["USB Port 23"]
    A --> Y["USB Port 24"]
    A --> Z["USB Port 25"]
Note: If you have problems hearing audio through the HDMI connection, you can use one of the projector's audiports instead to play sound. Connect one end of an optional 3.5 mm stereomini-jack audiocable to one of the projector's audiports and the other end to your computer's audio output. Then select the audio port you connected to as the HDMI Audio Output setting in the Signal I/O menu.
Parenttopic: ConnectingtoVideoSources
Relatedreferences
InputSignalSettings-Signall/OMenu
ConnectingtoaCompositeVideoSource
If your videosource has a composite video port, you can connect it to the projector using an optional RCA-style video or A/V cable.
- Connect the cable with the yellow connector to your video source's yellow video output port.
- Connecttheotherendtotheprojector'sVideoport.
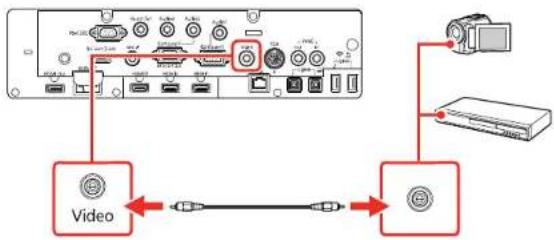
flowchart
graph TD
    A["Server"] --> B["Switch"]
    B --> C["Video"]
    C --> D["Switch"]
    D --> E["Server"]
    style A fill:#f9f,stroke:#333
    style E fill:#bbf,stroke:#333
Parenttopic: ConnectingtoVideoSources
ConnectingtoaVideoSourceforSound
Youcanplaysoundthroughtheprojector'sspeakersystemifyourvideosourcehasaudiooutputports.
If you are projecting video using the Video or a Computer port, connect the projector to the video source using an optional stereomini-jackaudiocable.
Note: If you connected your video source to the projector using an HDMI cable, the audio signal is transferred with the videosignal; you donotneed an additional cable for sound.
- Connect the audiocable to your video source's audio-exports.
- Connect the other end of the cable to the projector's Audio port that corresponds to the Computer or Videoportyouareusingforvideo.
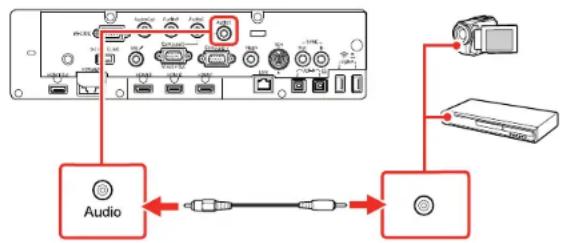
flowchart
graph TD
    A["Input"] --> B["Audio"]
    B --> C["USB Cable"]
    C --> D["Output"]
    style A fill:#f9f,stroke:#333
    style D fill:#bbf,stroke:#333
Parenttopic: ConnectingtoVideoSources
ConnectingExternalOutputDevices
Seethesectionstoconnecttheprojectortoexternaloutputdevices.
ConnectingtoanExternalComputerMonitor
ConnectingtoanExternalHDMIMonitor
ConnectingtoExternalSpeakers
Parenttopic:ProjectorConnections
ConnectingtoanExternalComputerMonitor
If you connected a computer to the projector's Computer1 port, you can also connect an external monitor to the projector. This lets you see your presentation on the external monitor even when the projected image is not visible.
To output images to an external VGA monitor, set the Monitor Out Port setting to Monitor Out in the projector's Signall/Omenu.
If you want to output image to an external monitor when the projector is turned off, you need to select Always On as the A/V Output setting in the projector's Signal I/O menu.
Note: Monitors that use a refresh rate less than 60 Hz may not be able to display images correctly.
- Make sure your computer is connected to the projector's Computer port. If there are two computer ports, makesureyouusetheComputer1port.
- Connect the external monitor's cable to your projector's Computer2/Monitor Out port.
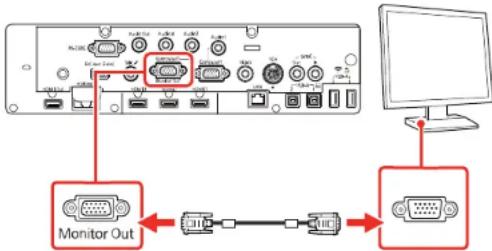
Note: Content you draw using the built-in interactive features is not displayed on an external monitor unless you draw using Easy Interactive Tools software.
Parenttopic: ConnectingExternalOutputDevices
Relatedreferences
InputSignalSettings-Signall/OMenu
ConnectingtoanExternalHDMIMonitor
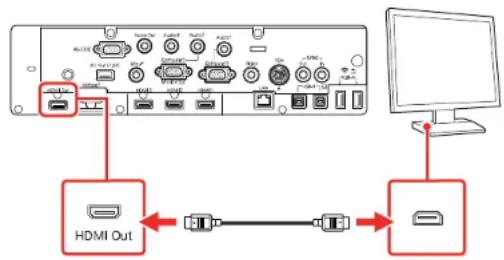
You can connect an external HDMI monitor to the projector's HDMI Out port and use it to display projectedcontentfromthecurrentlyselectedinputsource(exceptfortheHomescreenandimagesfromaScreenMirroringsource).
Note: You can display the entire whiteboard during split screen projection. The whiteboard display is delayedonanexternalmonitor.
- ConnectanHDMI cabletoyourmonitor'sHDMI inputport.
- Connecttheotherendtotheprojector'sHDMIOutport.
Parenttopic: Connecting ExternalOutput Devices
ConnectingtoExternalSpeakers
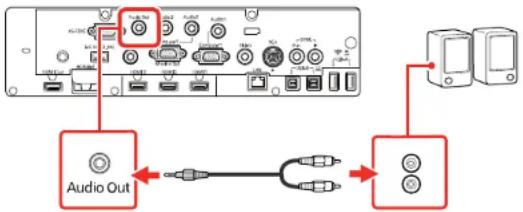
Toenhancethesoundfromyourpresentation,youcanconnecttheprojectortoexternalself-powered speakers.Youcancontrolthevolumeusingtheprojector'sremotecontrol.
Youcanalsoconnecttheprojectortoanamplifierwithspeakers.
Set the Audio Out Device setting to AV System in the projector's Signal I/O menu. When an audio/videosystemisnotconnectedtotheprojector,audioisoutputfromtheexternalspeakersevenifAudioOutDeviceissettoAVSystem.
If you want to output audio from the externals speakers when the projector is turned off, you need to select Always On as the A/V Output setting in the projector's Signal I/O menu.
Note: The projector's built-in speaker system is disabled when you connect external speakers.
- Makesure your computer or video source is connected to the projector with both audio and video cables as necessary.
- Locatetheappropriatecabletoconnectyoureternalspeakers, suchasastereomini-jack-to-pin-jackcable, oranothertypeofcableoradapter.
- Connectoneendofthecabletoyoureternalspeakersasnecessary.
- Connectthestereomini-jackendofthecabletoyourprojector'sAudioOutport.
Parenttopic: ConnectingExternalOutputDevices
Relatedreferences
InputSignalSettings-Signall/OMenu
ConnectingaMicrophone
You can connect a microphone to the projector's Mic port to provide audio support during presentations.
Note: The projector does not support plug-in-power microphones. If you want to output audio from the microphone when the projector is off, select Always On as the A/V Output setting in the Signal I/O menu.
- Connectthemicrophonecabletotheprojector'sMicport.
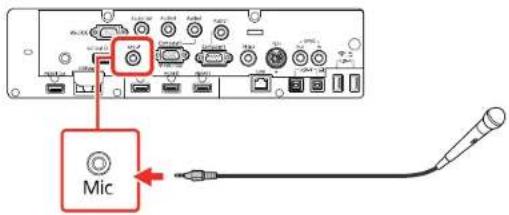
- Turnonthemic microphone, if necessary.
- If you hear a crackling noise or the volume is too high or low, adjust the Mic Input Level setting in theSignall/Omenu.
Parenttopic:ProjectorConnections
Relatedreferences
InputSignalSettings-Signall/OMenu
ConnectingtoExternalUSBDevices
FollowtheinstructionsinthesesectionstoconnectexternalUSBdevicestotheprojector.
USBDeviceProjection
ConnectingaUSBDeviceorCameratotheProjector
ConnectingaUSBDevicetotheControlPad
SelectingtheConnectedUSBSource
DisconnectingaUSBDeviceFromtheControlPadorProjector
Parenttopic:ProjectorConnections
Relatedtasks
StartingaPCFreeSlideShow
USBDeviceProjection
Youcanprojectimagesandothercontentwithoutusingacomputerorvideovdevicebyconnectinganyofthesedevicestoyourprojectorortothecontrolpad(BrightLink1485Fi):
- USBflashdrive
•Digitalcameraorsmartphone
•USBharddrive
Note: DigitalcamerasorsmartphonesmustbeUSB-mounteddevices, notTWAIN-compliantdevices, andmustbeUSBMassStorageClass-compliant.
Note: USBharddrivesmustmeettheserequirements:
- USBMassStorageClass-compliant(notallUSBMassStorageClassdevicesaresupported)
• FormattedinFATorFAT32 - Self-poweredbytheirownACpowersupplies(bus-poweredharddrivesarenotrecommended)
- Does nothavemultiplepartitions
YoucanprojectslideshowsfromimagefilesonaconnectedUSBdevice.
Parenttopic: ConnectingtoExternalUSBDevices
Relatedtasks
StartingaPCFreeSlideShow
ConnectingaUSBDeviceorCameratotheProjector
You can connect your USB device or camera to the projector's USB-A port and use it to project images and other content.
- If your USB device camewith a power adapter, plug the device into an electrical outlet.
- ConnecttheUSBcable(orUSBflashdrive)tooneoftheprojector'sUSB-Aports.
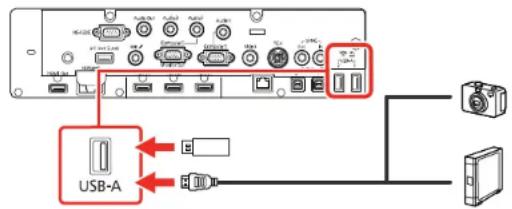
Note: Use the USB cable supplied with or specified for use with your device. Do not connect a USB huboraUSBcablelongerthan10feet(3m), orthedevicemaynotoperatecorrectly.
- Connect the other end of the cable (if applicable) to your device.
Parenttopic: ConnectingtoExternalUSBDevices
Relatedtasks
StartingaPCFreeSlideShow
ConnectingaUSBDevicetotheControlPad
You can connect your USB device to the USB-A port on the control pad (BrightLink 1485Fi) and use it to projectimagesandothercontent.
- If your USB device camewith a power adapter, plug the device into an electrical outlet.
- Connect a USB cable to either USB-A port on the projector and to the upper USB-B port on the controlpad.
- Connect the USB cable for the device (or a USB flash drive) to the USB-A port on the bottom of the controlpad.
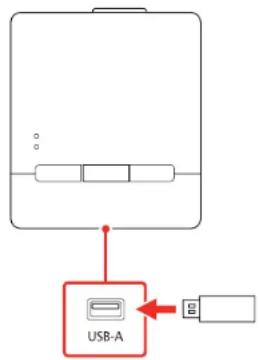
- Connecttheotherendofthecable(ifapplicable)toyourdevice.
Note: You can also connect a USB device directly to one of the projector's USB-A ports.
Parenttopic: ConnectingtoExternalUSBDevices
Relatedtasks
StartingaPCFreeSlideShow
SelectingtheConnectedUSBSource
You can switch the projector's display to the source you connected to one of the USB-A ports. To display the connected USB device, select the USB1 source.
Note: If you have connected a document camera using a USB cable, select the USB2 source.
-
MakesuretheconnectedUSBsourceisturnedon, if necessary.
-
Press the USB or Source Search button on the remote control and select the USB1 or USB2 source.
Parenttopic: ConnectingtoExternalUSBDevices
Relatedtasks
StartingaPCFreeSlideShow
DisconnectingaUSBDeviceFromtheControlPadorProjector
When you finish presenting with a connected USB device, you must prepare to disconnect the device from the control pad (Bright Link 1485 Fi) or projector.
- If the device has a power button, turn off and unplug the device.
2.DisconnecttheUSBdevice(orcable)fromthecontrolpad(BrightLink1485Fi)orprojector.
Parenttopic: ConnectingtoExternalUSBDevices
Relatedtasks
StartingaPCFreeSlideShow
ConnectingtoaDocumentCamera
Youcan connectadocument cameratoyourprojectortoprojectimagesviewedbythecamera.
Note: If you connect a document camera to one of the USB-A ports on the projector, select the USB2 source to display the image. You cannot simultaneously connect two document cameras to the USB-A ports.
Depending on your Epsondocument cameramodel, do one of the following to connect the document cameratoyour projector:
- FortheEpsonDC-07documentcamera,locatetheUSBcablethatcamewiththecameraandconnectittotheprojector'sportandtothedocumentcamera'sUSBTypeBport.
- For the Epson DC-11 document camera, connect it to the projector's Computer or Video port and to the corresponding portonthedocumentcamera.Seethedocumentcameramanualfordetails.
- For the Epson DC-12 document camera, connect it to the projector's HDMI, Computer, or Video port and to the corresponding portion the document camera. Seethedocument cameramanualfordetails.
- For the Epson DC-13 document camera, connect it to the projector's HDMI, Computer, or Video port and to the corresponding port on the document camera. Seethedocument cameramanualfordetails.
- For the Epson DC-20 document camera, connect it to the projector's HDMI, Computer, or Video port and to the corresponding port on the document camera. Seethedocument cameramanualfordetails.
- For the Epson DC-21 document camera, connect it to the projector's HDMI, Computer, or Video port and to the corresponding port on the document camera. Seethedocument cameramanualford details.
Note: For additional features supported by software, connect your document camera to your computer instead of the projector. Seethedocumentcameramanualfordetails.
Parenttopic:ProjectorConnections
ConnectingaPrintertotheControlPad
You can connect an Epson printer or all-in-one device to the USB-A port on the control pad (BrightLink 1485Fi) and use it to print your projected and annotated content. Makes sure the printer meet the control command requirements.
Note: You can connect a wireless printer by selecting Network Printer as the Print > Printer setting in the Interactive menu.
- Connect a USB cable to one of the USB-A ports on the projector and to the USB-B port at the top of the controlpad.
- Connect another USB cable to the USB-A port on the bottom of the control pad. Make sure the cable isnolongerthan16.4ft(5m).
- ConnecttheotherendofthecabletotheUSBTypeBportontheprinter.
Parenttopic:ProjectorConnections
Relatedreferences
InteractiveSettings-InteractiveMenu
ConnectingMultipleProjectorsoftheSameModel
Youcanconnectuptofourprojectorsofthesamemodelinthesameroomtoprojectasingleunified image(BrightLink1485Fi).
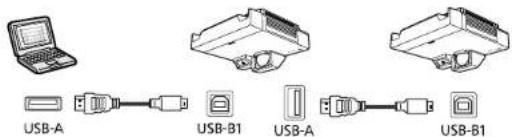
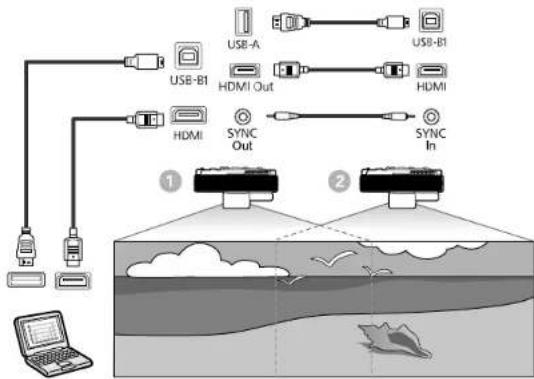
Note: The interactive features are available only when connecting two projectors (DuoLink). The two projectors must be connected using the optional remote control cableset(V12H005C28) and a USB-A to USB-B cable.
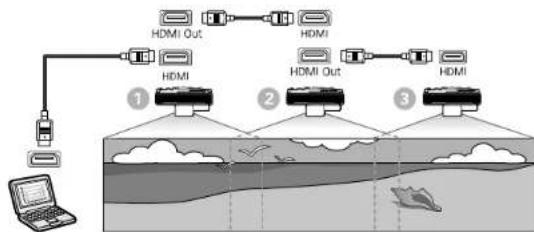
- Connect the computer and the projectors using HDMI cables as shown.
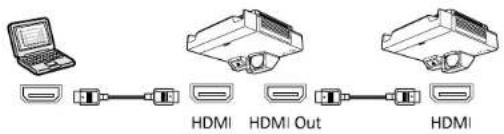
Note: If you are connecting three or more projectors, connect the projectors in a chain as shown.
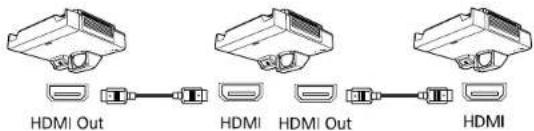
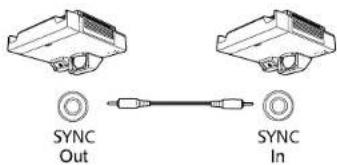
- If you are using interactive features, connect one end of the cable to the SYNC In port on one projector, and connect the other end to the SYNCOutport on the other projector.
- If you are using interactive features, connect the computer and the projectors using USB cables as shown.
- Aftermaking the appropriate connections, you need to adjust the necessary project or menu settings accordingly. Click the link below.
MultipleProjectorConnectionMenuSettings
Parenttopic:ProjectorConnections
Relatedconcepts
UsingMultipleProjectors(DuoLink)
Relatedreferences
MultipleProjectorConnectionMenuSettings
Relatedtasks
ConnectingMultipleProjectoroftheSameModel
MultipleProjectorConnectionMenuSettings
Afterconnectingmultipleprojectorstoprojectaunifiedimage,seethetablesbelowtoselectthecorrect projectormenusettings.MakesureyourcomputerisconnectedtoProjector1(theleft-mostprojectorin yoursetup).
InteractiveSetup(2Projectors)
flowchart
graph TD
    A["User"] --> B["USB-B1"]
    A --> C["USB-A"]
    A --> D["USB-B1"]
    B --> E["HDMI Out"]
    C --> F["HDMI"]
    D --> G["HDMI"]
    E --> H["HDMI"]
    F --> I["HDMI"]
    G --> J["HDMI"]
    H --> K["Sync Out"]
    I --> L["Sync In"]
    M["Laptop"] --> N["User Device"]
    style M fill:#f9f,stroke:#333
    style N fill:#ccf,stroke:#333
| SettingProjector1Projector2 | ||
| Signall/OMenu | ||
| EDID3240x1080/60Hz3 | 240x1080/60Hz | |
| Pen/TouchMenu | ||
| Installationof Projectors>Syncof Projectors | WiredWired | |
| Multi-ProjectionMenu | ||
| HDMIOutSettingProcess | OutProcessOut | |
| OrderSpecifytheposition | oftheprojectorsinnumberorderfromlefttoright | |
| ConnectComputerYes | No | |
| EdgeBlending>selectanyedge>BlendStartPosition | 0 | 0 |
| SettingProjector1Projector2 | ||
| EdgeBlending>selectanyedge>BlendRange | 300300 | |
Note: If you are using the projectors in the same room as another projector that does not support multi-projector connections, set the Installation of Projectors > Infrared Intensity setting to Strong.
Non-interactiveSetup(2-4Projectors)
flowchart
graph TD
    A["Laptop"] --> B["Server"]
    B --> C["HDMI Out"]
    C --> D["HDMI"]
    D --> E["HDMI Out"]
    E --> F["HDMI"]
    F --> G["HDMI Out"]
    G --> H["HDMI"]
    H --> I["HDMI Out"]
    I --> J["HDMI Out"]
    J --> K["HDMI Out"]
    K --> L["HDMI Out"]
    L --> M["HDMI Out"]
    M --> N["HDMI Out"]
    N --> O["HDMI Out"]
    O --> P["HDMI Out"]
    P --> Q["HDMI Out"]
    Q --> R["HDMI Out"]
    R --> S["HDMI Out"]
    S --> T["HDMI Out"]
    T --> U["HDMI Out"]
    U --> V["HDMI Out"]
    V --> W["HDMI Out"]
    W --> X["HDMI Out"]
    X --> Y["HDMI Out"]
    Y --> Z["HDMI Out"]
| SettingProjector1Projectors2-4 | |
| Multi-ProjectionMenu | |
| HDMIOutSettingProcess | sOutPassThrough |
| NumberofProjectors | specifythenumberofprojectorsconnectedinaseries |
| OrderSpecifytheposition | oftheprojectorsinnumberorderfromlefttoright |
Parenttopic: ConnectingMultipleProjectoroftheSameModel
Installing Batteries in the Remote Control
TheremotecontrolusesthetwoAAbatteriesthatcamewiththeprojector.
Caution: Use only the type of batteries specified in this manual. Do not install batteries of different types, ormixnewandoldbatteries.
- Removethebatterycover.
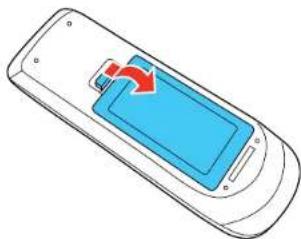
natural_image
Illustration of a mobile phone with a blue screen and red arrow indicating rotation (no text or symbols)- Insert the batteries with the + and - ends facing as shown.
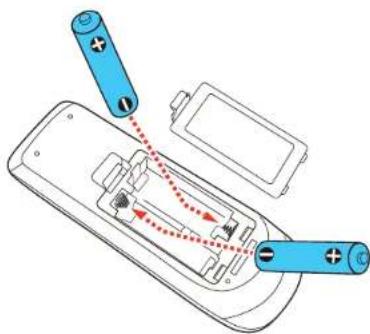
Warning: Make sure the batteries are inserted in the correct positions. If the batteries are not inserted correctly, they could explode or leak, causing a fire, injury, ordamageto the product.
- Replacethebatterycoverandpressitdownuntilclicksintoplace.
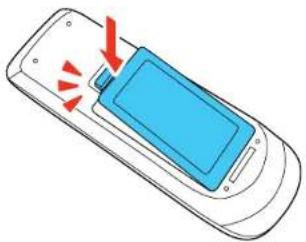
natural_image
Illustration of a mobile phone with a blue screen and red arrows indicating action or notification (no text or symbols)Warning: Dispose of used batteries according to local regulations. Do not expose batteries to heat or flame. Keep batteries out of thereachofchildren; they are choking hazards and are very dangerous if swallowed.
Parenttopic: SettingUptheProjector
InstallingBatteriesinthePens
EachpenusesoneAAbattery.
- Removethebatterycoverasshown.
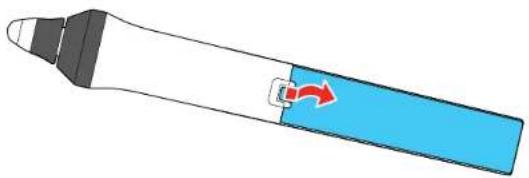
natural_image
Illustration of a pen-like object with a blue handle and a red arrow indicating rotation (no text or symbols)- Insert the battery with the + and - ends facing as shown.
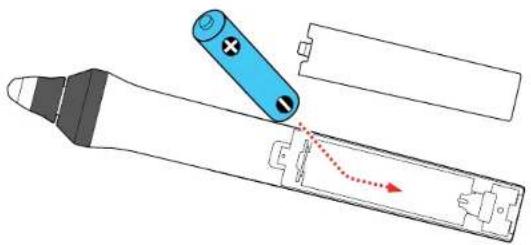
natural_image
Diagram of a battery with internal components and a red dotted arrow indicating a flow or movement (no text or symbols present)Warning: Make sure the batteries are inserted in the correct positions. If the batteries are not inserted correctly, they could explode or leak, causing a fire, injury, ordamageto the product.
- Replacethebatterycoverandpressitdownuntilitclicksintoplace.
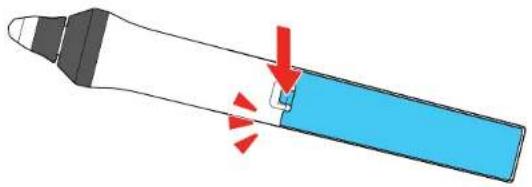
natural_image
Diagram of a tool tip with a blue handle and red arrows indicating motion or force (no text or symbols)Warning: Dispose of used batteries according to local regulations. Do not expose batteries to heat or flame. Keep batteries out of thereach of children; they are choking hazards and are very dangerous if swallowed.
Parenttopic: SettingUptheProjector
UsingtheProjectoronaNetwork
Followtheinstructionsinthesesectionstosetupyourprojectorforuseonanetwork.
Note: The interactive features may be slower over a network connection than over a USB connection.
WiredNetworkProjection
WirelessNetworkProjection
WirelessNetworkProjectionfromaMobileDeviceorWindowsComputer(ScreenMirroring)
SettingUpProjectorNetworkE-MailAlerts
SettingUpMonitoringUsingSNMP
ControllingaNetworkedProjectorUsingaWebBrowser
CreatinganAddressBook
UsingCrestronConnected
RegisteringaDigitalCertificateontheProjector
WiredNetworkProjection
Youcanprojectthroughawirednetwork.Todothis,youconnecttheprojectortoyournetworkwithan Ethernetcable,andthenetupyourprojectorandcomputerfornetworkprojection.
Afterconnectingandsettinguptheprojector,installtheprojectorsoftware.Youmayneedtoinstallit fromasoftwareCD,ifincluded,ordownloadthesoftwareandmanualsasnecessary.
Note: If your projector is connected via a LAN (Ethernet) cable to a network that includes a wireless accesspoint, you can connect to the projector wirelessly through the accesspoint using the Epson network software.
ConnectingtoaWiredNetwork
SelectingWiredNetworkSettings
Parenttopic: UsingtheProjectoronaNetwork
Relatedreferences
AdditionalProjectorSoftwareandManuals
ConnectingtoaWiredNetwork
Toconnecttheprojectortoawiredlocalareanetwork(LAN),usea100Base-TXor10Base-Tnetwork cable.Toensureproperdatatransmission,useaCategory5shieldedcableorbetter.
- Connectoneendofthenetworkcabletoyournetworkhub, switch, orrouter.
- Connecttheotherendofthecabletotheprojector'sLANport.
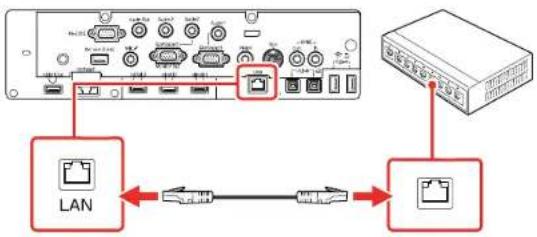
Parenttopic: WiredNetworkProjection
SelectingWiredNetworkSettings
Before you can project from computerson your network, you must select then network settings for the projector using its menusystem.
Note: Make sure you already connected the projector to your wired network using the LAN port.
- Turnontheprojector.
2.PresstheMenubutton.
3. SelecttheNetworkmenuandpressEnter
| Frequently Used Items | Network | |
| Image | Wireless LAN Info. | |
| Signal I/O | Wireless LAN Info. IPv6 | |
| Installation | Simple AP | |
| Display | Wired LAN Info. | |
| Operation | Wired LAN Info. IPv6 | |
| Management | Network Settings | |
| Reset Network Settings | ||
| Network | Pen/Touch | |
| Pen/Touch | Auto Calibration | |
| Interactive | Manual Calibration | |
| Multi-Projection | Touch Unit | |
| Memory | Installation of Projectors | |
| ECO | Pen Hovering | On |
| Initial/All Settings | PC Interactivity | |
| Reset Pen/Touch Settings | ||
| Interactive | ||
| Drawing Function | On | |
4. SelectNetworkSettingsandpressEnter
- SelectProjectorNameandenteranameupto16alphanumericcharacterslongtoidentifytheprojectoronetwork.
- SetthePriorityControlInterfacesettingtoWiredLAN.
- SelecttheWiredLANmenuandpressEnter
| [ Wired LAN ] | Return | |
| IP Settings | ||
| DNS Server 1 | 0.0.0.0 | |
| DNS Server 2 | 0.0.0.0 | |
| IPv6 | Off | √ |
| IP Address Display | On | |
- SelectIPSettingsandpressEnter
-
Select your IP settings as necessary:
-
If your network assigns addresses automatically, turn on the DHCP setting.
- If you must set addresses manually, turn off DHCP and enter the projector's IP Address, Subnet Mask, and GatewayAddress as needed.
Note: To highlight the numbers you want from the displayed keyboard, press the arrow button on the remote control. To select a highlighted number, press Enter. Alternatively, press and hold the Numbutton on theremote control while entering the desired numbers.
- To prevent display of the IP address on the standby screen, turn off IP Address Display in the WiredLANmenu.
- Select Return and press ↕ Enter to return to the Network Settings menu.
- SelectNetworkProjectionandpressEnter.
Youseeascreenlikethis:
| [ Network Projection ] | Return | |
| Epson iProjection | On | |
| SSID Display | On | |
| Display LAN Info. | Text & QR Code | |
| Moderator Password | ||
| Projector Keyword | Off | |
| Keyword Interrupt Display | Off | |
| Screen Mirroring | On | |
| Adjust Image Quality | 1(Clean) | |
| Capture | Disabled | |
| Screen Mirroring Info | On | |
| Message Broadcasting | Off | |
| Screen Sharing | On | |
| Connection Mode | Keyword On | |
- SettheEpsoniProjectionsettingtoOn.
-
Select the following options as necessary:
-
Display LAN Info lets you select how the projector displays network information. You can select anoptiontodisplayaQRcodethatletsyouquicklyconnectyouriOSorAndroiddevicesusingthe EpsoniProjectionapp.
- ModeratorPasswordletssyouenterapasswordupto4numberslongforaccessingtheprojector asamoderatorwiththeEpsoniProjection(Windows/Mac)softwareortheEpsoniProjectionapp. (Nodefaultpassword.)
-ProjectorKeywordletysyouturnonasecuritypasswordtopreventaccesstotheprojectorby anyonenotintheroomwithit.Youmustenteradisplayed,randomizedkeywordfromacomputer usingtheEpsoniProjection(Windows/Mac)softwaretoaccesstheprojector. - KeywordInterruptDisplayletysyouselectwhethertodisplayaprojectorkeywordontheprojectedimagewhenaccessingtheprojectorusingEpsoniProjection.
Note: Usethedisplayedkeyboardtoenterthepasswordandkeyword.PressthearrowbuttonsontheremotecontroltohighlightcharactersandpressEnterloselectthem.
- When you finish selecting settings, select Return and press ↕ Enter to return the Network Settingsmenu.
- SelectSet, and follow the on-screen instruction to save your settings and exit themenus.
Parenttopic: WiredNetworkProjection
WirelessNetworkProjection
Youcanprojectoverawirelessnetwork.Todothis,youmustsetupyourprojectorandcomputerfor wirelessprojection.
Toconnectwirelesslytoyourprojector,configuretheconnectionusingtheprojector'sNetworkmenus.
Afterconnectingandsettinguptheprojector,installtheprojectorsoftware.Youmayneedtoinstallit fromasoftwareCD,ifincluded,ordownloadthesoftwareandmanualsasnecessary.
Note: If your projector is connected via a LAN cable to a network that includes a wireless access point, youcanconnecttotheprojectorwirelesslythroughtheaccesspointusingtheEpsonnetworksoftware.
InstallingtheWirelessLANModule
ConnectingDirectlytoaSmartphoneorTablet
UsingQuickWirelessConnection(Windows)
SelectingWirelessNetworkSettingsManually
SelectingWirelessNetworkSettingsinWindows
SelectingWirelessNetworkSettingsMac
SettingUpWirelessNetworkSecurity
Parenttopic: UsingtheProjectoronaNetwork
Relatedreferences
AdditionalProjectorSoftwareandManuals
InstallingtheWirelessLANModule
Tousetheadditionalwirelessconnections, installtheoptionalEpson802.11b/g/nwirelessmoduleinthe projector.Donotinstallanyothertypeofwirelessmodule.
Caution: Never remove the module while its indicator light is blue or flashing, or while you are projecting wirelessly. You may damagethemodule or losedata.
Note: The wireless LAN module is not included with your projector.
-
Turnoff the projector and unplug the power cord.
-
Loosenthescrewssecuringthecablecoverandliftoffthecablecover, ifitisattached.
- Insert the wireless LAN module into a USB-A portion the projector.
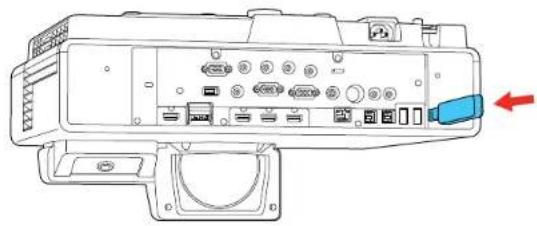
natural_image
Technical line drawing of a device rear panel with ports and connectors, no text or symbols present- Replacethecablecoverandtightenthecablecoverscrews.
5.Pluginandturnontheprojector.
Parenttopic: Wireless Network Projection
Relatedreferences
OptionalEquipmentandReplacementParts
ConnectingDirectlytoaSmartphoneorTablet
YoucandisplayaQRcodeonthescreenanduseittoconnectasinglesmartphoneortablettoyourprojectorwiththeEpsoniProjectionapp.
- Download the latest version of the Epsoni Projection app from the App Store or Google Play and install it on your smartphone or tablet.
- PresstheMenubuttonontheprojectorotheremotecontrol.
- SelecttheManagementmenuandpressEnter
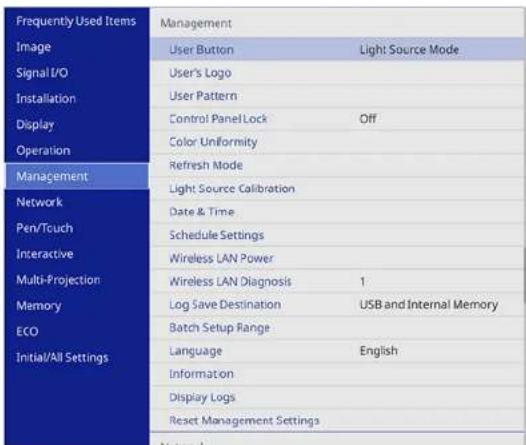
- SelectOnastheWirelessLANPowersetting.
5. SelecttheNetworkmenuandpressEnter
| Frequently Used Items | Network | |
| Image | Wireless LAN Info. | |
| Signal I/O | Wireless LAN Info. IPv6 | |
| Installation | Simple AP | |
| Display | Wired LAN Info. | |
| Operation | Wired LAN Info. IPv6 | |
| Management | Network Settings | |
| Reset Network Settings | ||
| Network | Pen/Touch | |
| Pen/Touch | Auto Calibration | |
| Interactive | Manual Calibration | |
| Multi-Projection | Touch Unit | |
| Memory | Installation of Projectors | |
| ECO | Pen Hovering | On |
| Initial/All Settings | PC Interactivity | |
| Reset Pen/Touch Settings | ||
| Interactive | ||
| Drawing Function | On | |
6.SelectNetworkSettingsandpressEnter
- MakesureSimpleAPissettoOn.
8. SelectNetworkProjectionandpressEnter
| [ Network Projection ] | Return | |
| Epson iProjection | On | |
| SSID Display | On | |
| Display LAN Info. | Text & QR Code | |
| Moderator Password | ||
| Projector Keyword | Off | |
| Keyword Interrupt Display | Off | |
| Screen Mirroring | On | |
| Adjust Image Quality | 1(Clean) | |
| Capture | Disabled | |
| Screen Mirroring Info | On | |
| Message Broadcasting | Off | |
| Screen Sharing | On | |
| Connection Mode | Keyword On | |
9. SelectOnastheEpsoniProjectionsetting.
-
Select Return and press ↕ Enter to return to the Network Settings menu.
-
Select the following settings as necessary:
- SSIDDisplayselectswhethertodisplaytheSSIDonthenetworkstandbyscreenandHome screen.
- Display LAN Info lets you select how the projector displays network information. You can select anoptiontodisplayaQRcodethatletsyouquicklyconnectyouriOSorAndroiddevicesusingthe EpsoniProjectionapp.
- ModeratorPasswordletyouenterapasswordupto4numberslongforaccessingtheprojector asamoderatorwiththeEpsoniProjection(Windows/Mac)softwareortheEpsoniProjectionapp. (Nodefaultpassword.)
-ProjectorKeywordletsyouturnonasecuritypasswordtopreventaccesstotheprojectorbyanyonenotintheroomwithit. Theprojectordisplaysarandomkeywordthatyoumustenterfrom
acomputerusingtheEpsoniProjection(Windows/Mac)softwareoraniOSorAndroiddevice usingtheEpsoniProjectionapp.
- KeywordInterruptDisplayletysyouselectwhetherdisplayaprojectorkeywordontheprojectedimagewhenaccessingtheprojectorusingEpsoniProjection.
-
When you finish selecting settings, select Return and press ← Enter to return to the Network Settingsmenu
-
SelectSet, and follow the on-screen instruction to save your settings and exit themenus.
-
PresstheLANbuttonontheremotecontrol.
YourprojectordisplaysaQRcodeontheprojectionsurface.YoucanpresstheEnterbuttonto hide and show the QR code on the screen. If you do not see the QR code, set the Display LAN Info settingtoText&QRCodeintheNetworkmenu.
-
OpentheEpsoniProjectionapponyoursmartphoneortablet.
-
Use the QRcodereaderfeature to read the QRcode and connect your device to the projector.
Note: The projector and the smartphone must be on the same wireless network in order to establish a connection.
Your smartphone or tablet is now connected to your projector. Visit epson.com/iprojection (U.S.) or epson.ca/iprojection (Canada) for information on controlling your projector with the Epson iProjection app.
Parenttopic: Wireless Network Projection
UsingQuickWirelessConnection(Windows)
YoucancreateaQuickWirelessConnectionUSBKeytoquicklyconnecttheprojectortoaWindows computerwirelessly. Thenyoucanprojectyourpresentationandremovethekeywhenyouaredone.
Note:AUSBflashdriveisnotincludedwithyourprojector.
- CreateaQuickWirelessConnectionUSBKeywithaUSBflashdriveandtheEpsoniProjection (Windows)software.
Note: See the online Epson iProjection Operation Guide for instructions.
-
MakesurethewirelessLANmoduleisinstalledinyourprojector.
-
Turnon the projector.
-
PresstheLANbuttonontheremotecontrol.
TheLANstandbyscreenisdisplayed.
-
VerifytheSSIDandIPaddress.
-
Insert the USB key into the projector's USB-A1 port.
Note: If the control pad is connected to the projector, you can connect the USB key to the USB-A portonthecontrolpadinstead.
Youseeaprojectedmessagethatthenetworkinformationupdateiscomplete.
7.RemovetheUSBkey.
-
Insert the USB key into a USB port on your computer.
-
Followtheon-screen instruction to install the Epsoni Projection software.
Note: If you see a Windows Firewall message, click Yes to disable the firewall. You need administratorauthoritytoinstallthesoftware.Ifitisnotinstalledautomatically,double-click MPPLaunch.exeintheUSBkey.
Afterafewminutes, yourcomputerimage is displayed by the projector. If it does not appear, press the LAN or Source Search button on your remote control or restart your computer.
-
Run your presentation as necessary.
-
When you finish projecting wirelessly, select the Safely Remove Hardware option in the Windows taskbar, then removetheUSBkey from your computer.
Note: You can share the USB key with other computers without disconnecting your computer. You may need to start your computer to activate your wireless LAN connection.
Parenttopic: Wireless Network Projection
Relatedreferences
AdditionalProjectorSoftwareandManuals
SelectingWirelessNetworkSettingsManually
Before you can project from your wireless network, you must select then network settings for the projector using its menusystem.
- Turnon the projector.
2.PresstheMenubutton.
3. SelecttheManagementmenuandpressEnter
| Frequently Used Items | Management | |
| Image | User Button | Light Source Mode |
| Signal I/O | User's Logo | |
| Installation | User Pattern | |
| Display | Control Panel Lock | Off |
| Operation | Color Uniformity | |
| Management | Refresh Mode | |
| Network | Light Source Calibration | |
| Pen/Touch | Date & Time | |
| Interactive | Schedule Settings | |
| Multi-Projection | Wireless LAN Power | |
| Memory | Wireless LAN Diagnosis | 1 |
| ECO | Log Save Destination | USB and Internal Memory |
| Initial/All Settings | Batch Setup Range | |
| Language | English | |
| Information | ||
| Display Logs | ||
| Reset Management Settings | ||
- SelectOnastheWirelessLANPowersetting.
5. SelecttheNetworkmenuandpressEnter
| Frequently Used Items | Network | |
| Image | Wireless LAN Info. | |
| Signal I/O | Wireless LAN Info. IPv6 | |
| Installation | Simple AP | |
| Display | Wired LAN Info. | |
| Operation | Wired LAN Info. IPv6 | |
| Management | Network Settings | |
| Reset Network Settings | ||
| Network | Pen/Touch | |
| Pen/Touch | Auto Calibration | |
| Interactive | Manual Calibration | |
| Multi-Projection | Touch Unit | |
| Memory | Installation of Projectors | |
| ECO | Pen Hovering | On |
| Initial/All Settings | PC Interactivity | |
| Reset Pen/Touch Settings | ||
| Interactive | ||
| Drawing Function | On | |
6.SelectNetworkSettingsandpressEnter
- SelectProjectorNameandenteranameupto16alphanumericcharacterslongtoidentifytheprojectoronthenetwork.
- SetthePriorityControllInterfacesettingtoWirelessLAN.
-
Select the connection method:
-
To connect directly to a wireless device (Simple AP mode), set the Simple AP setting to On and gotostep16.
- Toconnecttoadeviceviaawirelessnetworkrouter(infrrastructuremode),settheSimpleAP settingtoOffandgotothenextstep.
- If you installed the optional wireless LAN module and want to use both connection methods, set the Simple AP setting to On and goto then next step.
10. SelecttheWirelessLANmenuandpressEnter
| [ Wireless LAN ] | Return | |
| Search Access Point | ||
| SSID | ||
| Security | Open | |
| IP Settings | ||
| DNS Server 1 | 0.0.0.0 | |
| DNS Server 2 | 0.0.0.0 | |
| IPv6 | Off | √ |
| IP Address Display | On | |
11. SelectSearchAccessPointandpressEnter!
Theprojectorsearchesforwirelessnetworks.
- Selectthenetworkyouwanttoconnecttoandenterthepassword,ifnecessary.
Note: If you need to assign the SSID manually, select SSID to enter the SSID.
13. SelectIPSettingsandpressEnter.
-
Select your IP settings as necessary:
-
If your network assigns addresses automatically, turn on the DHCP setting.
- If you must set addresses manually, turn off DHCP and enter the projector's IP Address, Subnet Mask, and GatewayAddress as needed.
Note: Donotusetheseaddresses: 0.0.0.0, 127.x.x.x, 192.0.2.xor224.0.0.0 through
255.255.255.255(wherexisanumberfrom0to255)forIPAddress,255.255.255.255or0.0.0.0
through254.255.255.255forSubnetMask,and0.0.0.0,127.x.x.xor224.0.0.0through
255.255.255.255forGatewayAddress.ForDNSServeraddresses,donotusethefollowingIP
addresses:127.x.x.x(wherexisanumberfrom0to255).Whenthesettingsarenotset,DNS serverinformationisacquiredusingDHCP.
Note: To highlight then numbers you want from the displayed keyboard, press the arrow button on theremote control. Toselect a highlighted number, press Enter
- TopreventdisplayoftheIPaddressonthenetworkinformationscreen,turnoffIPAddress Display.
- Select Return and press ↕ Enter to return to the Network Settings menu.
17.andselecttheNetworkProjectionmenuthenpressEnter
| [ Network Projection ] | Return | |
| Epson iProjection | On | |
| SSID Display | On | |
| Display LAN Info. | Text & QR Code | |
| Moderator Password | ||
| Projector Keyword | Off | |
| Keyword Interrupt Display | Off | |
| Screen Mirroring | On | |
| Adjust Image Quality | 1(Clean) | |
| Capture | Disabled | |
| Screen Mirroring Info | On | |
| Message Broadcasting | Off | |
| Screen Sharing | On | |
| Connection Mode | Keyword On | |
- SettheEpsonIProjectionsettingtoOn.
- Select the following options as necessary:
- SSID Display lets you select whether to display the projector's SSID on the standby screen and Homescreen.
- Display LAN Info lets you select how the projector displays network information. You can select anoptiontodisplayaQRcodethatletssyouquicklyconnectyouriOSorAndroiddeviceswiththeEpsoniProjectionapp.
- ModeratorPasswordletyouenterapasswordupto4numberslongforaccessingtheprojector asamoderatorwiththeEpsoniProjection(Windows/Mac)softwareortheEpsoniProjectionapp.
-ProjectorKeywordletysyouturnonasecuritypasswordtopreventaccesstotheprojectorbyanyonenotintheroomwithit.TheprojectordisplaysarandomkeywordthatyoumustenterfromacomputerusingtheEpsoniProjection(Windows/Mac)softwareoraniOSorAndroiddeviceusingtheEpsoniProjectionapp. - KeywordInterruptDisplayletysouselectwhetherodisplayaprojectorkeywordontheprojectedimagewhenaccessingtheprojectorusingEpsoniProjection.
Note: Usethedisplayedkeyboardtoenterthepasswordandkeyword.PressthearbuttonsontheremotecontroltohighlightcharactersandpressEnterfoselectthem.
- When you finish selecting settings, select Return to return to the Network Settings menu.
- SelectSetandfollowtheon-screeninstructionstosaveyoursettingsandexithemenus.
Afteryoucompletethewirelesssettingsforyourprojector,youneedtoselectthewirelessnetworkon yourcomputer,oriOSorAndroiddevice.
Note: You can press the LAN button on the remote control to check your network security settings after completingthewirelesssettings.
WirelessLANMenuSettings
Parenttopic: Wireless Network Projection
Relatedreferences
OptionalEquipmentandReplacementParts
WirelessLANMenuSettings
| SettingOptionsDescription | ||
| SearchAccessPointToSearchView | wSearchforavailablewireless | networkaccesspointsinAdvancedconnectionmode |
| SSIDUp32alphanumericcharacters | ManuallysettheSSID(network | name)ofthewirelessLAN systemtheprojectoris connectingto |
| SecurityWPA2/WPA3-PSK | WPA2/WPA3-EAPWPA3-PSKWPA3-EAPOpen | Selectsthetypeofsecurityused onthewirelessnetworkWPA2/WPA3-PSK:usesWPA2/WPA3personalmode; encryptionisdependentonthe accesspointsettings;Passphrasemustbethesame astheaccesspointWPA2/WPA3-EAP:usesWPA2/WPA3enterprisemode; encryptionisdependentonthe accesspointsettingsWPA3-PSK:usesWPA3security withAESforencryption.UsethePassphrasevaluetoestablisha connectionfromacomputerWPA3-EAP:usesWPA3 enterprisemode;encryptionis dependentontheaccesspoint settings |
| PassphraseVariouspassphrases | from8to 32characters(fromaweb browser,themaximumis63 characters) | Selectsthepre-sharedkeyused onthenetwork;passphrasesare case-sensitive.lfthenetwork settingsareresetafterthe passphrasehasbeenchanged morethanonce,thefirst passphraseisrestored.This settingisonlydisplayedwhen SecurityissettoWPA3-PSKor WPA2/WPA3-PSK. |
| EAPMethodEAPType | UsernamePasswordClientCertificateVerifyServerCertificateCAcertificateRADIUSServerName | SetstheEAPsettingsforWPA3-EAPandWPA2/WPA3-EAP security |
| IPSettingsDHCP(OnorOff) | IPAddressSubnetMaskGatewayAddress | SelectsDHCPifyournetwork assignsIPaddresses automatically,orturnsoffDHCP soyoucanenterthenetwork'sIP address,subnetmask,and gatewayaddressasneeded |
| DNS Server 1/ DNS Server 2 | Various IP addresses | Sets the IP address for the DNS serverusing0to255foreach addressfield.TheDNSserver resolvesthehostname |
| IPv6On | Off | EnablesIPv6toallowmonitoring andcontroloftheprojectorover anetworkusingEpsonWeb ControlandPJLink |
| AutoConfigurationOn | Off | Selectswhethertoautomatically assignaddressesaccordingto theRouterAdvertisement |
| UseTemporaryAddressOn | Off | EnablesuseofatemporaryIPv6 address |
| IPAddressDisplayOn | Off | SelectswhethertodisplaytheIP addressonthenetworkstandby screenandHomescreen |
Parenttopic: Selecting Wireless Network Settings Manually
SelectingWirelessNetworkSettingsinWindows
Beforeconnectingtotheprojector, select the correct wireless network on your computer.
- To access your wireless utility software, access the Desktop and double-click then network icon on the Window stask bar.
2.Dooneofthefollowing:
- If your projector is set upon an existing network (Advanced mode), select thenetworkname (SSID).
- If your projector is configured for Quickmode, select the projector's SSID.
3.ClickConnect.
Parenttopic: Wireless Network Projection
SelectingWirelessNetworkSettingsMac
Beforeconnectingtotheprojector,selectthecorrectwirelessnetworkonyourMac.
- ClicktheAirPorticononthemenubaratthetopofthescreen.
- MakesureAirPortisturnedon, thendooneofthefollowing:
- If your projector is set upon an existing network (Advanced mode), select thenetworkname (SSID).
- If your projector is configured for Quickmode, select the projector's SSID.
Parenttopic: Wireless Network Projection
SettingUpWirelessNetworkSecurity
Youcansetupsecurityforyourprojectortouseonawirelessnetwork.Setuponeofthefollowing securityoptionstomatchthesettingsusedonyournetwork:
•WPA2-PSK(SimpleAPmodeonly)
•WPA3-PSK
•WPA2/WPA3-PSK
•WPA3-EAP
•WPA2/WPA3-EAP
Note: To set up WPA3-EAP or WAP2/WAP3-EAP security, register your digital certificate file and place itonaUSBstoragedeviceforconnectiontoyourprojector.
1.PresstheMenubutton.
2. SelecttheNetworkmenuandpressEnter
| Frequently Used Items | Network | |
| Image | Wireless LAN Info. | |
| Signal I/O | Wireless LAN Info. IPv6 | |
| Installation | Simple AP | |
| Display | Wired LAN Info. | |
| Operation | Wired LAN Info. IPv6 | |
| Management | Network Settings | |
| Reset Network Settings | ||
| Network | Pen/Touch | |
| Pen/Touch | Auto Calibration | |
| Interactive | Manual Calibration | |
| Multi-Projection | Touch Unit | |
| Memory | Installation of Projectors | |
| ECO | Pen Hovering | On |
| Initial/All Settings | PC Interactivity | |
| Reset Pen/Touch Settings | ||
| Interactive | ||
| Drawing Function | On | |
-
SelectNetworkSettingsandpressEnter
4.Dooneofthefollowing: -
To connect directly to a wireless device (Simple AP mode), select Passphrase, press Enter, and enterapassphrasefrom8to63characterslong.Whenyouaredone, returntotheNetwork Settings screen, select Set, and follow the on-screen instructions to save your settings and exit themenus.Skiptherestofthesesteps.
-
To connect to a device via a wireless network router (infrastructure mode), select the Wireless LANmenuandpressEnter.Continuewiththenextstep.
-
SelecttheSecuritysettingandpressEnter
- Select these security settings for your network.
- Dooneofthefollowingaccordingtothesecurityyouselected:
- WPA3-PSK or WPA2/WPA3-PSK: Select Passphrase, press Enter, and enter a passphrase from8to63characterslong. Thencontinuewithstep9.
- WPA3-EAP or WPA2/WPA3-EAP: Select EAP Type and press Enter.
- Select the protocol for authentication as the EAPTypesetting.
- When you are finished, select Return and press ↕ Enter to return to the Network Settings menu.
- SelectSet, and follow the on-screen instruction to save your settings and exit themenus.
Parenttopic: Wireless Network Projection
Relatedtopics
RegisteringaDigitalCertificateontheProjector
WirelessNetworkProjectionfromaMobileDeviceorWindowsComputer (ScreenMirroring)
Youcansendimagestoyourprojectorfrommobiledevicessuchaslaptops,smartphones,andtablets usingMiracasttechnologyorfromaWindowscomputer.IfyourdevicesupportsMiracast,youdonot needtoinstallanyadditionalsoftware.
ScreenMirroringRestrictions
SelectingScreenMirroringSettings
ConnectingforScreenMirroringwithaWindows8.x/Windows10Computer
ConnectingforScreenMirroringwithMiracast
Parenttopic: Using the Projectorona Network
ScreenMirroringRestrictions
NotethefollowingwhenusingScreenMirroringfeatures:
- You cannot project an interlaced image.
- You cannot play audiowith more than 3 channels.
- Youcannotprojectimageswitharesolutionabove1920×1080andaframerateabove30fps.
- Youcannotproject3Dvideo.
- YoucannotuseextendedMiracastfeaturesonWindows8.1.
- YoumaynotbeabletoviewcontentswithcopyrightprotectionusingaMiracastconnection.
- Donotchangetheprojector'sScreenMirroringsettingsduringScreenMirroringprojection.Doingso maycausetheprojectortodisconnectanddelayreconnection.
- DonotturnoffthetheelectricalsupplytotheprojectorduringScreenMirroringprojection.
Parenttopic: Wireless Network Projection from a Mobile Device or Windows Computer (Screen Mirroring)
SelectingScreenMirroringSettings
You can select Screen Mirroring settings for your projector and then project images from your mobile device.
1.PresstheMenubutton.
2. SelecttheManagementmenuandpressEnter
| Frequently Used Items | Management | |
| Image | User Button | Light Source Mode |
| Signal I/O | User's Logo | |
| Installation | User Pattern | |
| Display | Control Panel Lock | Off |
| Operation | Color Uniformity | |
| Management | Refresh Mode | |
| Network | Light Source Calibration | |
| Pen/Touch | Date & Time | |
| Interactive | Schedule Settings | |
| Multi-Projection | Wireless LAN Power | |
| Memory | Wireless LAN Diagnosis | 1 |
| ECO | Log Save Destination | USB and Internal Memory |
| Initial/All Settings | Batch Setup Range | |
| Language | English | |
| Information | ||
| Display Logs | ||
| Reset Management Settings | ||
- SettheWirelessLANPowersettingtoOn.
4. SelecttheNetworkmenuandpressEnter
| Frequently Used Items | Network | |
| Image | Wireless LAN Info. | |
| Signal I/O | Wireless LAN Info. IPv6 | |
| Installation | Simple AP | |
| Display | Wired LAN Info. | |
| Operation | Wired LAN Info. IPv6 | |
| Management | Network Settings | |
| Reset Network Settings | ||
| Network | Pen/Touch | |
| Pen/Touch | Auto Calibration | |
| Interactive | Manual Calibration | |
| Multi-Projection | Touch Unit | |
| Memory | Installation of Projectors | |
| ECO | Pen Hovering | On |
| Initial/All Settings | PC Interactivity | |
| Reset Pen/Touch Settings | ||
| Interactive | ||
| Drawing Function | On | |
5.SelectNetworkSettingsandpressEnter
6. SelectPriorityControlInterfaceandpressEnter
-
Choose one of the following options:
-
If you are casting images over a wired LAN, select Wired LAN
-
If you are casting images wirelessly directly or via a wireless network router, select Wireless LAN.
-
SettheSimpleAPsettingtoOn.
9. SelectNetworkProjectionandpressEnter
- SettheScreenMirroringsettingtoOn.
- Selectthesesettingsasnecessary:
- AdjustImageQualityletsyouadjustthescreenmirroringspeedandquality.Selectasmall numbertoimprovethequalityoralargenumbertoincreasethespeed.
•CaptureletsyoucapturetheprojectedImageandpasteitonapageinWhiteboardmode.
Note: If you enable the Capture setting, the project or disables HDCP.
- ScreenMirroringInfodisplaysconnectioninformationwhenprojectingfromaScreenMirroring source.
- When you finish selecting settings, select Return and press ↕ Enter to return to the Network Settingsscreen.
- SelectSet, and follow the on-screen instruction to save your settings and exit themenus.
Parenttopic: Wireless Network Projection from a Mobile Device or Windows Computer (Screen Mirroring)
ConnectingforScreenMirroringwithaWindows8.x/Windows10Computer
Youcan setup your computer to wirelessly project images and plays sound using Screen Mirroring.
Note: If you are using Windows 10, you can cast images over a local area network or from your device to theprojectordirectly. Whenyoucastimagesoveralocalareanetwork,theconnectionismorestable andsecure.ConnecttheprojectortothenetworkwithanEthernetcableorinstalltheoptionalwireless LANmoduleandsetthewirelessLANsettingstoconnecttoawirelessnetwork.
- Select the Screen Mirroring settings on your projector as necessary.
- PresstheLANbuttonontheremotecontroltoswitchtotheScreenMirroringsource.
YouseetheScreenMirroringstandbyscreen.
3.Dooneofthefollowing:
- Windows 10: Open Action Center and select Connect.
-
Windows 8.x: Select Devices > Project > Add a wireless display.
-
Select your projector's DisplayName from the list.
-
If you see the PIN entry screen on your computer, enter the PIN coded displayed on the Screen Mirroring stand by screen or at the bottom right of the projected image.
Theprojectordisplaystheimagefromyourcomputerormobiledevice.
Note: It may take some time to establish the connection. Do not disconnect the projector's power cordwhileitisconnectingtoyourdevice.Thismaycauseyourdevicetofreezeormalfunction.
Parenttopic: Wireless Network Projection from a Mobile Device or Windows Computer (Screen Mirroring)
Relatedreferences
OptionalEquipmentandReplacementParts
NetworkSettings-NetworkMenu
Relatedtasks
SelectingScreenMirroringSettings
ConnectingforScreenMirroringwithMiracast
If your mobile devices supports Miracast, you can connect the projector wirelessly and project images and sound.
- SelecttheScreenMirroringsettingsyourprojectorasnecessary.
- PresstheLANbuttonontheremotecontroltoswitchtotheScreenMirroringsource.
YouseetheScreenMirroringstandbyscreen.
- On your mobile device, use the Miracast function to search for the projector.
Note: See your mobile device's documentation for information on accessing the Miracast function.
Youseealistofavailabledevices.
- Select your projector from the list.
- If you see the PIN entry screen any your mobile device, enter the PIN coded displayed on the Screen Mirroring stand by a screen or at the bottom right of the projected image.
Theprojectordisplaystheimagefromyourmobiledevice.
Caution: It may take some time to establish the connection. Do not disconnect the projector's power cordwhileitisconnectingtoyourdevice.Doingsomaycauseyourdevicetofreezeormalfunction.
Note: Depending on them mobile device, you may need to delete a device when connecting. Follow the on-screen instructions on your device.
Parenttopic: Wireless Network Projection from a Mobile Device or Windows Computer (Screen Mirroring)
Relatedreferences
NetworkSettings-NetworkMenu
Relatedtasks
SelectingScreenMirroringSettings
SettingUpProjectorNetworkE-MailAlerts
Youcansetuptheprojectortosendyouane-mailalertoverthenetworkifthereisaproblemwiththe projector.
Note: If the Standby Mode setting is set to Communication On in the Operation menu, you can receive e-mail alerts even if the projector is in standby mode (the power is off). The Standby Mode setting is displayed only if the A/V Output setting in the Signal I/O menu is set to While Projecting.
- PresstheMenubutton.
- SelecttheNetworkmenuandpressEnter
- SelectNetworkSettingsandpressEnter
- SelecttheMailNotificationmenuandpressEnter
![[Mail Notification] Mail Notification Off Return](/content/2026/05/1053810/images/dea19e148ab05f6e7355effdc90d7b7669d5ed452ab18239ae7be5338429ac0d.jpg)
- TurnonMailNotification.
6.EnterthelPaddressfortheSMTPServersetting.
Note: Donotuse127.x.x.x (wherexisanumberfrom0to255).
- SelectanumberfortheSMTPserverPortNumbersetting, from 1 to 65535 (defaultis25).
- Selectatype of Authentication for the SMTP server.
- EnteraUserNamefortheSMTPserver.
- EnteraPasswordfortheSMTPserverauthentication.
11.Enterthesender'semailaddressastheFromsetting. -
Choose an Address field, enter the e-mail address, and select the alerts you want to receive there. Repeatforuptothreeaddresses.Youre-mailaddresscanbeupto64alphanumericcharacters long.
-
If you are using the PJLink protocol for projector control, turn on the PJLink setting in the Projector ControlmenuandenterthelPaddresswhereyouwanttoreceivePJLinknotificationsasthe NotifiedIPAddresssetting.
- When you finish selecting settings, select Return and press ↕ Enter to return to the Network Settingsmenu.
- SelectSet, and follow the on-screen instruction to save your settings and exit themenus.
Note: If a critical problem causes a projector to shut down, you may not receive an e-mail alert.
NetworkProjectorE-mailAlertMessages
Parenttopic: Using the Projectorona Network
NetworkProjectorE-mailAlertMessages
When a problem occurs with an networked projector, and you selected to receive email alerts, you receive an e-mail containing the following information:
•TheemailaddressenteredastheFromsetting
•EpsonProjectoronthesubjectline
- Thenameoftheprojectorexperiencingaproblem
•TheIPaddressoftheaffectedprojector
•Detailedinformationabouttheproblem
Note: If a critical problem causes a projector to shut down, you may not receive an e-mail alert.
Parenttopic: SettingUpProjectorNetworkE-MailAlerts
SettingUpMonitoringUsingSNMP
NetworkadministratorscaninstallSNMP(SimpleNetworkManagementProtocol)softwareonnetworkcomputerssotheycanmonitorprojectors.Ifyournetworkusesthissoftware,youcansetuptheprojectorforSNMPmonitoring.
-
PresstheMenubutton.
-
Select Network > Network Settings > Projector Control > SNMP > On.
-
Enter up to two IP addresses to receive SNMP notifications as the Trap IP Address setting, using 0 to255foreachaddressfield.
Note: ToentertheIPaddressusingthenumerickeysontheremotecontrol, pressandholdthe Numbutton. Donotusetheseaddresses: 224.0.0.0 through 255.255.255.255. This projector supports SNMPagentversion1(SNMPv1).
4.EntertheSNMPCommunityName(upto32alphanumericcharacters).
-
When you finish selecting settings, select Return and press ↕ Enter to return to the Network Settingsmenu.
-
SelectSet, and follow the on-screen instruction to save your settings and exit themenus.
Parenttopic: Using the Projectorona Network
ControllingaNetworkedProjectorUsingaWebBrowser
Once you have connected your project to your own network, you can select project settings and control projection using incompatible web browser. This lets you access the project remotely.
Note: The web setup and control features support Microsoft Internet Explorer 11.0 or later, Microsoft Edge, GoogleChrome, and Safarionnetworksthatdonotuseaproxyserverforconnection. You cannotselectalloftheprojectormenusettingsorcontrolallprojectorfunctionsusingawebbrowser.
Note: If you set Standby Mode to Communication On in the Operation menu, you can use a web browsertoselectsettingsandcontrolprojectioneveniftheprojectorisinstandbymode(thepoweris off). The Standby Mode setting is displayed only if the A/V Output setting in the Signal I/O menu is set toWhileProjecting.
- Makesuretheprojectoristurnedon.
2.Startyourwebbrowseronacomputerordeviceconnectedtothenetwork. - Type the projector's IP address into the browser's address box and press the computer's Enter key (if you are entering an IPv6 address, wraptheaddress with [and]).
Note: You can find the projector's IP address in the projector's Network menu or on the LAN input screen.
Note: If you attempt to connect to the Web Control screen via a proxy server, the screen will not be displayed. MakeadirectconnectiontotheWebControlscreen.
YouseetheWebControlscreen.
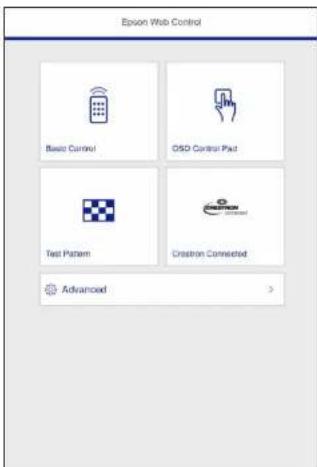
- To control projection remotely, select the Basic Control option from the Web Controlscreen.
Note: If you see login window, enter your username and password. (The default username is EPSONREMOTE and the default password disgust.)
Youseeascreenlikethis:
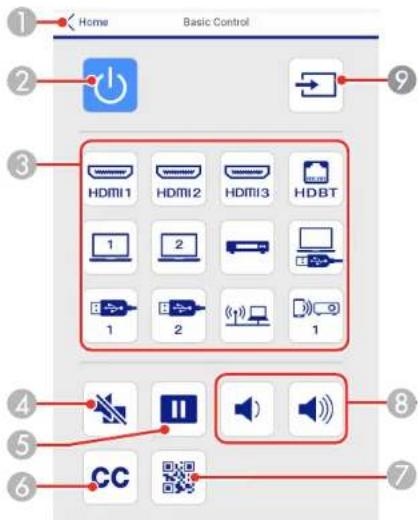
1ReturnstotheEpsonWebControlscreen
2Powerbuttoncontrol
3Selectstheinputsource
4A/VMutebuttoncontrol
5Freezebuttoncontrol
6Displaysclosedcaptions
7DisplaysaQRcodeforconnectingwithiOSorAndroiddevicesusingtheEpsoniProjection app
8Volumebuttoncontrols
9Searchesforconnectedsources
- Select the icon corresponding to the projector function you want to control.
- Toselectprojectormenusettings, selectAdvancedontheWebControlscreen.
Note: If you see a login window, enter your username and password. (The default username is EPSONWEB and the default password admin.)
- Selectthenameofthemenuandfollowtheon-screeninstructions.
Parenttopic: Using the Projectorona Network
CreatinganAddressBook
Whensendinge-mailsfromwhiteboardmode,youcanchoosee-mailaddressesfromanaddressbook.Youcancreatetheaddressbookbyloadingatextfileofupto999addressesthroughewebcontrolpage.
Note: Addressesaredisplayedintheordertheyappearinthetextfile.
-
Create the text file containing the list of addresses you want to add to the address book. The file must have the following characteristics:
-
Tab-delimited
•Eachlinecancontainupto256characters - Filenamewitha.txtextension
•CharactercodemustbeUnicode(UTF-16withBOM)
- Eachlinemustcontainapairofstringsseparatedbyatab:
Thetextfileshouldlooksomethinglikethis:
Joe Smith xxxxxxx@xxxxx.com Mary Jones-Smith xxxxxxx@xxxx.c John Q. Public xxxx@xxxxxx.com
-
Makesuretheprojectoristurnedon.
3.Startyourwebbrowseronacomputerconnectedtothenetwork. -
Type the projector's IP address into the browser's address box and press the computer's Enter key (if you are entering an IPv6 address, wraptheaddress with [and]).
Note: You can find the projector's IP address in the projector's Network menu or on the LAN input screen.
5.Entertheusernameandpasswordattheprompts.
6.SelectAdvanced.
Note: If you attempt to connect to the Web Control screen via a proxy server, the screen will not be displayed.MakeadirectconnectiontotheWebControlscreen.
YouseetheWebControlscreen.
-
Select Interactive > Mail > Address Book File and browse for the address book file.
-
SelecttheaddressbookfileandselectSend.
Theaddressbookfileisuploadedtotheprojector.
Note: If you need to delete the address book, select Interactive > Mail > Address Book Settings > DeleteAddressBookandselectExecute.
Parenttopic: UsingtheProjectoronaNetwork
UsingCrestronConnected
If you are using the Crestron Connected network monitoring and control system, you can setup your projector for use on the system. Crestron Connected lets you control and monitor your projector using a web browser.
Note: You cannot use the Message Broadcasting feature in the Epson Projector Management software when you use Crestron Connected.
ForadditionalinformationonCrestronConnected,contactCrestron.
SettingUpCrestronConnected
ControllingaNetworkedProjectorUsingCrestronConnected
Parenttopic: UsingtheProjectoronaNetwork
SettingUpCrestronConnected
TosetupyourprojectorfonitoringandcontrolusingaCrestronConnectedsystem,makesureyour computerandprojectorareconnectedtothenetwork.
Note: If you want to use the Crestron Connected system when the projector is turned off, you need to adjust the Standby Mode setting in the Operation menu. The Standby Mode setting is displayed only if the A/V Output setting in the Signal I/O menu is set to While Projecting.
- PresstheMenubutton.
- SelecttheNetworkmenuandpressEnter.
- SelectNetworkSettingsandpressEnter.
- Select the Projector Control menu and press Enter.
- Set the Crestron Connected setting to On to allow the projector to be detected.
Note: Enabling Crestron Connected disable the Epson Message Broadcasting feature in the Epson Projector Management software.
-
When you are finished selecting settings, select Return and press Enter to return to the Network Settingsmenu.
-
SelectSet, and follow the on-screen instruction to save your settings and exit themenus.
-
Turnoff the projector, thenturnitonagain to enable these setting.
Parenttopic: UsingCrestronConnected
Relatedreferences
InputSignalSettings-Signall/OMenu
NetworkSettings-NetworkMenu
FeatureSettings-OperationMenu
ControllingaNetworkedProjectorUsingCrestronConnected
OnceyouhavesetupyourprojectortouseCrestronConnected,youcancontrolandmonitorprojection usingacompatiblewebbrowser.
1.Startyourwebbrowseronacomputerconnectedtothenetwork.
- Type the projector's IP address into the browser's address box and press the computer's Enter key.
YouseetheEpsonWebControlscreen:
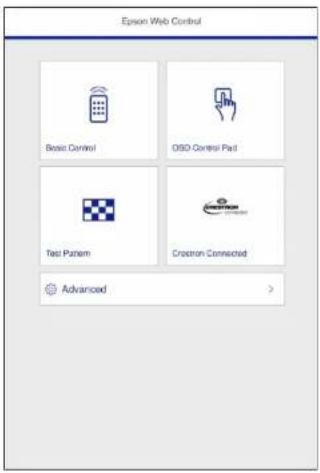
- SelectCrestronConnected.
Youseeascreenlikethis:
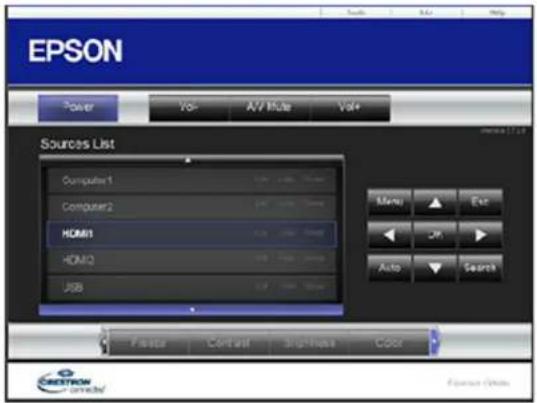
Note: Sources in the image above vary depending on ports available by your product.
- Select the input source that you want to control in the Sources List box. You can scroll through available sources using the up and down narrows in the box.
- To control projection remotely, click the on-screen button that corresponds to the projector's remote control buttons. You can scroll through button options at the bottom of the screen.
Note: These on-screen buttons do not directly correspond to the projector's remote control buttons:
-
OKactsastheEnterbutton
• Menudisplaystheprojector'smenu -
Toviewinformationabouttheprojector, clicktheInfotab.
- To change projector, Crestron, and password settings, click the Tools tab, select settings on the displayedscreen, and clickSend.
- When you finish selecting settings, click Exit to exit the program.
Parenttopic: UsingCrestronConnected
RegisteringaDigitalCertificateontheProjector
Followtheinstructionshereifyouneedtoinstalladigitalcertificateontheprojectortoprovidesecurityforyourpresentationfiles.
Note: You can register a digital certificate over a network. However, be sure to register just once or the certificatemaynotinstallcorrectly.
ImportingaWebServerCertificateUsingtheProjectorMenus
RegisteringDigitalCertificatesfromaWebBrowser
DigitalCertificateTypes
Parenttopic: UsingtheProjectoronaNetwork
ImportingaWebServerCertificateUsingtheProjectorMenus
You can create your web server certificate and import it using the projectormenus and USB flash drive.
Note: You can also register digital certificates from your web browser. Make sure to only register once, orthecertificatemaynotinstallcorrectly.
-
Makesureyourdigitalcertificatefileiscompatiblewithprojectorregistrationandsavedintheroot directoryoftheUSBflashdrive.
-
PresstheMenubuttonontheprojectororremotecontrol.
-
Select Network > Network Settings > Projector Control > Secure HTTP > On.
-
SelecttheWebServerCertificatesettingandpressEnter.
-
SelectSaveandpressEnter!
-
Follow the on-screen instructions to connect a USB flash drive to the USB-A port on the projector or controlpad(BrightLink1485Fi).
-
PressEntertodisplaythecertificatelist.
-
Select the certificate you want to import from the displayed list.
Amessageisdisplayedpromptingyoutoenterthepasswordforthecertificate.
9.EnterthepasswordandpressEnter
The certificate is imported and a completion message appears.
Parenttopic: RegisteringaDigitalCertificateontheProjector
RegisteringDigitalCertificatesfromaWebBrowser
YoucanregisterthedigitalcertificatesontheprojectorforwirelessLANauthentication.
Note: You can also register the digital certificates in the projector's Network menu. However, be sure to registerjustonceorthecertificatemaynotinstallcorrectly.
-
Makesureyourdigitalcertificatefileiscompatiblewithprojectorregistration.
-
Makesuretheprojectoristurnedon.
3.Startyourwebbrowseronacomputerormobiledeviceconnectedtothenetwork.
- Type the projector's IP address into the browser's address box and press the computer's Enter key.
YouseetheWebControlscreenandaprompttoenterauserIDandpassword.
- Select Advanced and enter the following information in uppercase or lowercase letters, exactly as shown:
- FortheuserID, enterEPSONWEB.(YoucannotchangetheuserID.)
- Forthepassword, enterthedefaultpasswordadmin. (YoucanchangetheWebControlpassword usingtheprojector'sNetworkSettingsmenu.)
6.UnderNetwork,selectCertificate.
Note: You may need to select the ☐ menu icon to find Network, depending on your device.
Youseeascreenlikethis:
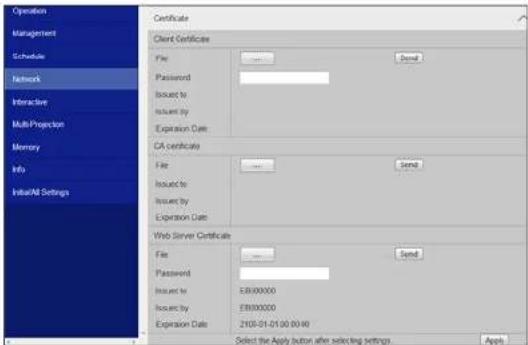
- Click the Choose File button, select the certificate file, and click Open.
Note: The buttonnamemayvarydependingonthebrowseryouareusing.
8.EnterapasswordinthePasswordboxandclickSend.
9. When you finish registering the certificate, click Apply to finalize your changes and complete the registration.
Parenttopic: RegisteringaDigitalCertificateontheProjector
DigitalCertificateTypes
Youcanregisterthesetypesofdigitalcertificates.
ClientCertificate(PEAP-TLS/EAP-TLS)
| SpecificationDescription | |
| FormatPKCS#12 | |
| ExtensionPFX,P12 | |
| EncryptionRSA | |
| HashesMD5/SHA-1/SHA-256/SHA-384/SHA | A-512 |
| Keylength512/1024/2048/4096bit | |
| PasswordUpto64alphanumericcharacters;required | |
CACertificate(PEAP/PEAP-TLS/EAP-TLS/EAP-FAST)
| SpecificationDescription | |
| FormatX509v3 | |
| ExtensionDER/CER/PEM | |
| EncryptionRSA | |
| HashesMD5/SHA-1/SHA-256/SHA-384/SHA-512 | |
| Keylength512/1024/2048/4096bit | |
| EncodingBASE64/Binary |
WebServerCertificate(SecureHTTP)
| SpecificationDescription | |
| FormatPKCS#12 | |
| ExtensionPFX,P12 | |
| EncryptionRSA | |
| HashesMD5/SHA-1/SHA-256/SHA-384/SHA-512 | |
| Keylength512/1024/2048/4096bit | |
| CommonnameNetworkhostname | |
| OrganizationOptional | |
| PasswordUpto64alphanumericcharacters;required | |
Parenttopic: RegisteringaDigitalCertificateontheProjector
UsingBasicProjectorFeatures
Followtheinstructionsinthesesectionstouseyourprojector'sbasicfeatures.
TurningOntheProjector
TurningOfftheProjector
SelectingtheLanguagefortheProjectorMenus
SettingtheDateandTime
ImageShape
ResizingtheImagewiththeWideandTeleButtons
AdjustingtheImagePosition
FocusingtheImage
RemoteControlOperation
SelectinganImageSource
ProjectionModes
ImageAspectRatio
ColorMode
AdjustingtheHue, Saturation, and Brightness
AdjustingGamma
AdjustingtheProjector'sBrightnessLevel
TurningOnAutomaticLuminanceAdjustment
ControllingtheVolumewiththeVolumeButtons
InvertingtheAudioChannels
SelectingaQuickStartupSetting
ProjectingaPCFreePresentation
TurningOntheProjector
Turnontheprojectorbeforeyouturnonthecomputerorvideoequipmentyouwanttouse.
- Connect the power cord to the projector's power inlet.
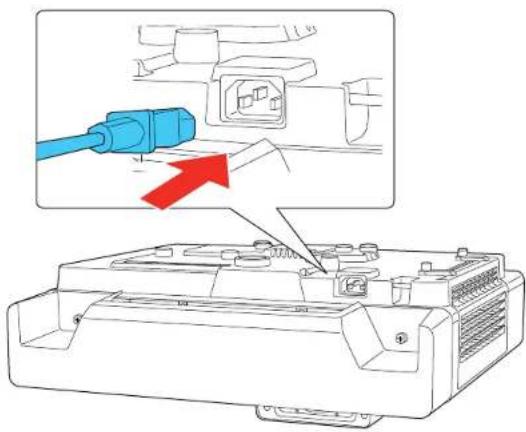
2.Plugthepowercordintoanelectricaloutlet.
Theprojector's On/Standbylightturnsblue. This indicates that the projector is receiving power.
Note: With Direct Power On turned on, the projector turns on as soon as you plug it in. If you enable the Auto Power On setting in the projector's Operation menu, the projector turns on when it detects assignorcableconnectionfromtheselectedport.
- Pressthepowerbuttonontheprojector, controlpad(BrightLink1485Fi), orremotecontroltoturnon theprojector.
TheprojectorbeepsandtheStatuslightflashesblueastheprojectorwarmsup.Afterabout30 seconds,theStatuslightstopsflashingandturnsblue.
Note: When Quick Startup is enabled in the projector's Operation menu, the projector becomes readyforuseinseveralsecondsthenexttimeyoupressthepowerbutton.
Warning: Never look into the projector lens when the laser is on. This can damage your eyes and is especially dangerous for children and pets. If you are using theremote control to turn the projector on, makes sure no one is looking into the sensor in front of the projector before returning it on.
Caution: Make sure no objects are blocking the light from the projector lens. Objects blocking the lensforanextendedtimecanmeltandlightthatisreflectedbackintothelenscancausethe projectortomalfunction.
If you donot see a projected imageright away, try the following:
- Turnontheconnectedcomputerorvideodevice.
- InsertaDVDorothervideomediaandpresstheplaybutton,ifnecessary.
- PresstheSourceSearchbuttonontheprojectororremotecontroltodetectthevideosource.
Note: If the Auto Source Search setting in the Operation menu is enabled, the projector automaticallydetectstheinputsignalwhenyouturniton.
- Changethescreenoutputfromthecomputerwhenusingalaptop.
- Pressthebuttonforthevideosourceontheremotecontrol.
- IftheHomescreenisdisplayed,selectthesourceyouwanttoproject.
UsingtheHomeScreen
Parenttopic: UsingBasicProjectorFeatures
Relatedreferences
FeatureSettings-OperationMenu
UsingtheHomeScreen
You can select inputs sources and other frequently used options from the Homescreen.
Note: A Touch Unit is optional for the BrightLink 1480Fi and must be installed to enable finger touch operation.
- TodisplaytheHomescreen,dooneofthefollowing:
- PresstheHomebuttononthecontrolpanelorremotecontrol.
- TurnontheprojectorwiththeHomeScreenAutoDispsettingenabled.
- Turnontheprojectorwhennosignalisreceivedfromtheselectedinputsource.
2.Pressthearrowbuttonsontheremotecontrolorcontrolpaneltonavigatethescreen,andpress
Enter to select an option. You can also select menu items using the interactive pen or your finger.
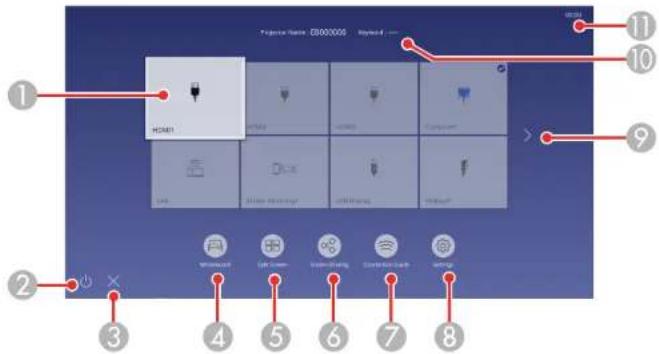
1Selectsthesourceyouwanttoproject
Acheckmarkappearsintheupperrightcornerofthecurrentinputsource.Formostsources, apreviewoftheinputimageappearsasathumnail.
2Turnsofftheprojector
3ClosestheHomescreen
4StartsWhiteboardmode
5Projectsimagesfromtwoorfourinputsourcessimultaneouslyinagridformat
6Sharesyourprojectedimagewithotherprojectorsconnectedtothesamenetwork
7DisplaystheConnectionGuide
You can view steps for different wireless connection methods depending on the devices you are using, such as smartphones or computers.
8Letsyouselectthefollowingcommonprojectorsettings(thesesettingsmayvarydepending onotherselectedsettings):
•ColorMode
•BrightnessLevel
•Volume
- Geometry Correction (H/V-Keystone and Quick Corner are available)
•AutoCalibration
- Aspect
9Movestothepreviousornextpageiftherearemoreavailableinputsources
10Displaystheprojectornameandtheprojectorkeyword
11 Displaysthecurrenttime
Note: The Homescreencloses after 10 minutes of inactivity.
- Presstheicontoclosethe Homescreen.
Parenttopic: TurningOntheProjector
TurningOfftheProjector
Before turning off the projector, shutdown any computer connected to it so you can see the computer display during shutdown.
Note: Turn off this product when not in use to prolong the life of the projector. Laser life will vary depending upon modeselected, environmental conditions, and usage. Brightness decreases over time.
- Pressthepowerbuttonontheprojector, controlpad, orremotecontrol.
Theprojectordisplaysashutdownconfirmationscreen.
Power Off?
Yes:Press 🔊 button
No : Press any other button
- Pressthepowerbuttonagain.(Toleaveiton, pressanyotherbutton.)
Theprojectorbeepstwice, the laserturnsoff, and the Statuslightturnson.
Note: If the Light Source Calibration setting is set to Run Periodically in the projector's Managementmenu, lightsourcecalibrationstartsautomaticallyifyouturnofftheprojectorandthe followingconditionsarepresent:
•100hourshavepassedsincethelastlightsourcecalibration.
- Youhaveusedtheprojectorcontinuouslyforatleast20minutes.
- Totransportorstoretheprojector, makesuretheOn/Standbylightisblue(notflashing)andthe Statuslightisoff, thenunplugthepowercord.
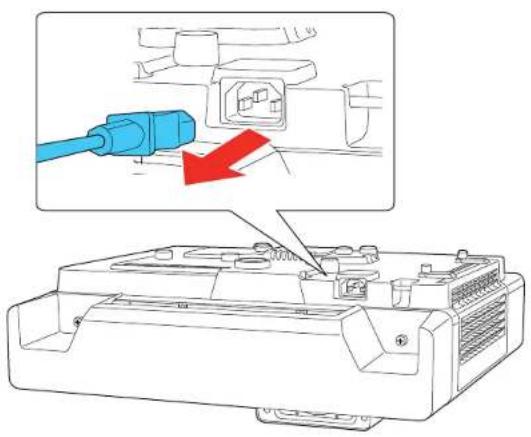
Caution: To avoid damaging the projector or laser, never unplug the power cord when the status light is on or flashing.
Parenttopic: UsingBasicProjectorFeatures
Relatedreferences
AdministrationSettings-ManagementMenu
SelectingtheLanguagefortheProjectorMenus
If you want to view the projector's menus and messages in another language, you can change the Languagesetting.
- Turnontheprojector.
2.PresstheMenubutton. - SelecttheManagementmenuandpressEnter.
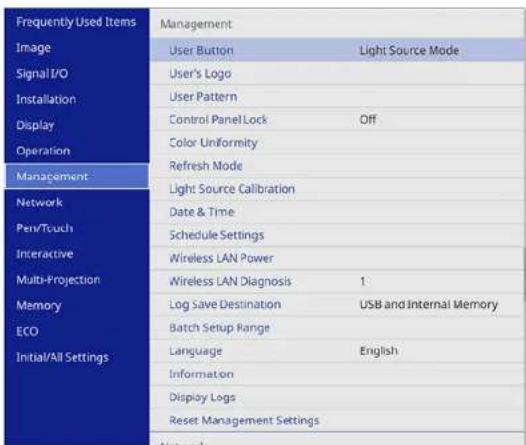
- SelecttheLanguagesettingandpressEnter.
- SelectthelanguageyouwanttouseandpressEnter.
- PressMenuorEsctoexitthemenus.
Parenttopic: UsingBasicProjectorFeatures
SettingtheDateandTime
Youcansetthedateandtimefortheprojector.
1.PresstheMenubutton.
- SelecttheManagementmenuandpressEnter
- SelecttheDate&TimesettingandpressEnter.
Youseeascreenlikethis:
![[ Date & Time ] Return Date & Time Daylight Saving Time Daylight Saving Time Off DST Start DST End DST Adjustment (min) 0 Internet Time](/content/2026/05/1053810/images/d25c654544615152571e9d3dbee748de6b3158bc958df3bff3a5c04f70766c65.jpg)
-
SelecttheDate&TimesettingandpressEnter.
-
Select Date, press ↕ Enter, and use the displayed keyboard to enter today's date.
- Select Time, press ↕ Enter, and use the displayed keyboard to enter the current time.
- Adjust the Time Difference (UTC) settings to set the time difference from the Coordinated Universal Time.
- When you are finished, select Set and press Enter.
- To activate daylight saving time, select the Daylight Saving Time setting and set it to On. Then selectsettings.
- When you are finished, select Set and press Enter
- To update the time automatically through an internet time server, select the Internet Time setting andsetittoOn.
- SelectInternetTimeServerandpressEnter
13.EnterthelPaddressfortheInternettimeserveryouwanttouseandselectOK. - SelectSetandpressEnter.
- PressMenuorEsctoexitthemenus.
Parenttopic: UsingBasicProjectorFeatures
ImageShape
Youcanprojectanevenlyrectangularimagebyplacingtheprojectordirectlyinfrontofthecenterofthe screenandkeepingitlevel.Ifyouplacetheprojectoratanangletothescreen,ortiltedupordown,oroff totheside,youmayneedtocorrecttheimageshapeforthebestdisplayquality.Aftercorrection,your imageislightlysmaller.
Forthebestqualityimages, trytoadjusttheprojector'spositiontoachievethecorrectimagesizeand shape. You cannot correct an imageshape using multiple correction methods at the same time.
Note: For interactive use, the image must be evenly rectangular, without distortion. Refer to the online Installation Guide for instructions on positioning the projector to achieve an evenly rectangular image.
CorrectingImageShapewiththeKeystoneButtons
CorrectingImageShapewithQuickCorner
CorrectingImageShapewithArcCorrection
CorrectingImageShapewithPointCorrection
CorrectingImageShapewithCornerMarkers
ApplyingSavedImageShapeSettings
Parenttopic: UsingBasicProjectorFeatures
CorrectingImageShapewiththeKeystoneButtons
Youcanusetheprojector'skeystonecorrectionbuttonstocorrecttheshapeofanimagethatis unevenlyrectangularonthesides.
Note: You can use the keystone buttons to correct the image up to ±3^ horizontally or vertically. If the projectorismountedonthewall, usetheadjustmentdialsonthewallmountocorrectthescreenimage before usinganyotherdigitalcorrectionmethods.
Note: If you change the Screen Type setting or adjust the image position, your image adjustments are reset.
- Turnon the projector and display an image.
- PressoneofthesekeystonebuttonsonthecontrolpaneltodisplaytheKeystoneadjustment screen.
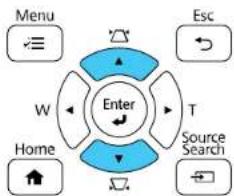
flowchart
graph TD
    A["Menu"] --> B["Enter"]
    C["Esc"] --> B
    D["W"] --> B
    E["Home"] --> B
    F["Source Search"] --> B
    B --> G["T"]
    B --> H["W"]
    B --> I["Esc"]
- Pressakeystonebuttonontheprojector'scontrolpaneltoadjusttheimageshape.
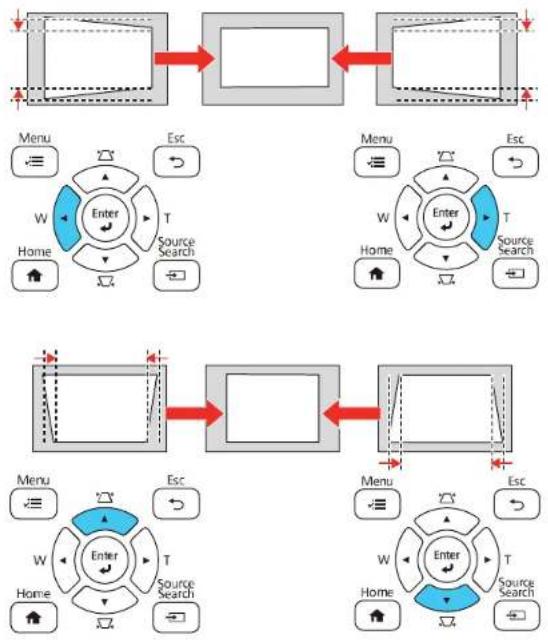
flowchart
graph TD
    A["Input Data"] --> B["Processing Module"]
    B --> C["Output Module"]
    subgraph Input
        D["Menu"] --> E["Esc"]
        F["W"] --> G["Enter"]
        H["Home"] --> I["T"]
        J["Source Search"] --> K["Esc"]
    end
    subgraph Processing
        L["Menu"] --> M["Esc"]
        N["W"] --> O["Enter"]
        P["Home"] --> Q["T"]
        R["Source Search"] --> S["Esc"]
    end
    subgraph Output
        T["Menu"] --> U["Esc"]
        V["W"] --> W["Enter"]
        X["Home"] --> Y["T"]
        Z["Source Search"] --> AA["Esc"]
    end
Note: The horizontal keystone adjustment buttons are labeled W and T.
Aftercorrection, your image is slightly smaller.
Note: To save the current image shape, select Save Memory. You can save up to three image shapes in the projector's memory.
Note: If the projector is installed out of reach, you can also correct the image shape with the remote controlling the H/V-Keystonesettings in the projectormenus.
Parenttopic:ImageShape
CorrectingImageShapewithQuickCorner
Youcanusetheprojector'sQuickCornersettingtocorrecttheshapeandsizeofanimagethatis unevenlyrectangularonallsides.
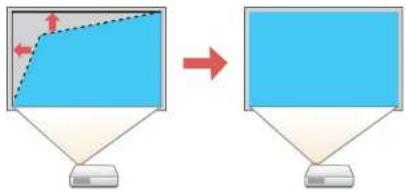
flowchart
graph TD
    A["Blue Shape with Dashed Line and Red Arrow"] --> B["Blue Rectangle with Control Button"]
Note: If you change the Screen Type setting or adjust the image position, your image adjustments are reset.
- Turnon the projector and display an image.
2.PresstheMenubutton.
3. SelecttheInstallationmenuandpressEnter.
| Frequently Used Items | Installation | |
| Image | Fixed Installation | Off |
| Signal I/O | Test Pattern | |
| Installation | Setting Plate Installation Guide | |
| Display | Vertical Installation | No |
| Operation | Projection | Front/Upside Down |
| Management | Auto Screen Adjustment | |
| Network | Geometry Correction | Point Correction |
| Pen/Touch | Digital Zoom | |
| Interactive | Connect ELPCB02 | Off |
| Multi-Projection | Touch Unit | |
| Memory | Remote Receiver | Off |
| ECO | Screen Type | 16:9 |
| Initial/All Settings | High Altitude Mode | Off |
| Reset Insalation Settings | ||
| Display | ||
| Pattern Display | ||
| Pattern Type | ||
- Select the Geometry Correction setting and press Enter.
- SelecttheQuickCornersettingandpressEnter.
Note: You may see a confirmation screen. Select Yes and press Enter again.
YouseetheQuickCorneradjustmentscreen:
[Quick Corner]


natural_image
Abstract geometric shape with blue and gray color blocks (no text or symbols)

[Esc] Press for 2 seconds to reset
Note: To reset your adjustments, press and hold the Esc button for at least 2 seconds to display a resetscreen. ThenselectYes.
-
Use the arrow button on the projector or remote control to select the corner of the image you want to adjust. Then press Enter.
-
Press the arrow buttons to adjust the image shape as necessary. Press Enter to return to the area selectionscreen.
Note: You can also use the numeric buttons on the remote control to adjust the image shape. If one of the directional arrows on the screen turns gray, you cannot adjust the shape any further in that direction.
- When you are finished, press Esc.
The Geometry Correction setting is now set to Quick Corner in the projector's Installation menu. If you pressthekeystoneadjustmentbuttonsonthecontrolpanel,theareaselectionscreenappears.
Note: To save the current image shape, select Save Memory. You can save up to three image shapes in the projector's memory.
Parenttopic:ImageShape
CorrectingImageShapewithArcCorrection
Youcanusetheprojector'sArcCorrectionsettingtoadjustthecurveorarcofthesidesofyourimage.
Note: If you change the Screen Type setting or adjust the image position, your image adjustments are reset.
- Turnon the projector and display an image.
2.PresstheMenubutton.
3. SelecttheInstallationmenuandpressEnter.
| Frequently Used Items | Installation | |
| Image | Fixed Installation | Off |
| Signal I/O | Test Pattern | |
| Installation | Setting Plate Installation Guide | |
| Display | Vertical Installation | No |
| Operation | Projection | Front/Upside Down |
| Management | Auto Screen Adjustment | |
| Network | Geometry Correction | Point Correction |
| Pen/Touch | Digital Zoom | |
| Interactive | Connect ELPCB02 | Off |
| Multi-Projection | Touch Unit | |
| Memory | Remote Receiver | Off |
| ECO | Screen Type | 16:9 |
| Initial/All Settings | High Altitude Mode | Off |
| Reset Insalation Settings | ||
| Display | ||
| Pattern Display | ||
| Pattern Type | ||
-
Select the Geometry Correction setting and press Enter.
-
Select the Arc Correction setting and press Enter. Then select Yes and press Enter again.
YouseetheArcCorrectionadjustmentscreen:
![[ Arc Correction ] H 0 V 0 Return (press for 2 seconds to reset)](/content/2026/05/1053810/images/fb9a14139850f0653866d7ed53269eceab63ba7e9b1045e3de5b5edbeb8b1552.jpg)
Note: To reset your adjustments, press the Esc button for at least 2 seconds to display a reset screen, and select Yes.
- Use the arrow button on the projector or theremote control to select the corner or side of the image you want to adjust. Then press Enter.
-
Pressthearrowbuttonstoadjusttheimageshapeasnecessary.
-
When you are finished, press Esc.
Note: To save your the current image shape, select Save Memory. You can save up to three image positions in the projector's memory.
Parenttopic:ImageShape
CorrectingImageShapewithPointCorrection
Youcanusetheprojector'sPointCorrectionfeaturetofine-tunetheimageshapeusingpointsonagrid. Thisisusefulforadjustingoverlappingareasinmultipleprojectedimagesthatdonotlineupcorrectly.
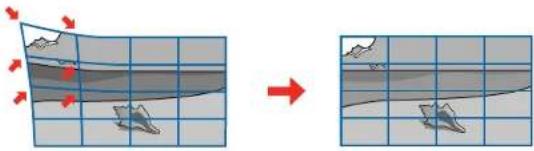
natural_image
Diagram showing a curved surface with directional arrows and grid lines, no text or symbols present- Turnon the projector and display an image.
2.PresstheMenubutton. - Select Installation > Geometry Correction > Point Correction.
Note: If you see a confirmation message, select Yes and press ← Enter.
- SelectthePointCorrectionsettingagainandpressEnter.
- SelectthenumberofgridlinestodisplayandpressEnter.
Youseeagridontheprojectedimage.
Note: If you need to change the color of the grid lines, select the Pattern Color setting and select a suitable color.
6.Pressthearrowbuttonsontheprojectororremotecontrolltomovetothepointonthegridthatyou wanttoadjust.ThenpressEnter.
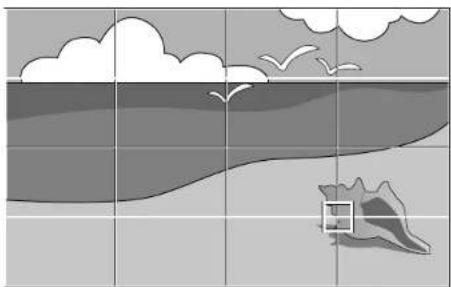
natural_image
Illustration of a beach scene with clouds, birds, and a small house (no text or symbols)- Pressthearrowbuttonsasnecessarytocorrecttheimageshape.
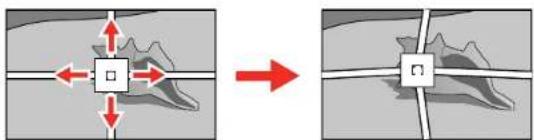
-
Press Esc to return to the previous screen and select another point to correct, if necessary.
-
When you are finished, press the Menubutton.
Note: If necessary, you can fine-tune your image adjustments using the Quick Corner setting.
Parenttopic:ImageShape
Relatedtasks
CorrectingImageShapewithQuickCorner
CorrectingImageShapewithCornerMarkers
If you have installed corner markers on the projection surface, you can use the projector's Auto Screen Adjustment setting to correct the imageshape automatically.
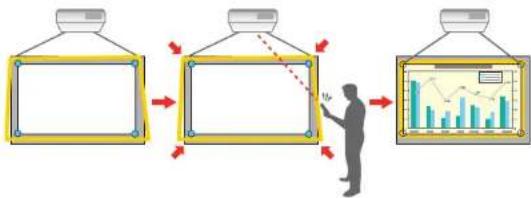
flowchart
graph LR
    A["Presentation"] --> B["Image Processing"]
    B --> C["Output"]
1.PresstheMenubutton
2. SelecttheInstallationmenuandpressEnter
| Frequently Used Items | Installation | |
| Image | Fixed Installation | Off |
| Signal I/O | Test Pattern | |
| Installation | Setting Plate installation Guide | |
| Display | Vertical Installation | No |
| Operation | Projection | Front/Upside Down |
| Management | Auto Screen Adjustment | |
| Network | Geometry Correction | Point Correction |
| Pen/Touch | Digital Zoom | √ |
| Interactive | Connect ELPCB02 | Off |
| Multi-Projection | Touch Unit | |
| Memory | Remote Receiver | Off |
| Screen Type | 16:9 √ | |
| ECO | High Altitude Mode | Off |
| Initial/All Settings | Reset Installation Settings | |
| Display | ||
| Pattern Display | ||
| Pattern Type | ||
- SelecttheAutoScreenAdjustmentsettingandpressEnter.
Youseeaguidescreen.
-
Followtheon-screen instruction to adjust the position of the projected images that the corner markers appear just inside the yellow area.
-
PressEnter.
Aguidepatternappearsandtheprojectorstartsadjustingtheimageshape.
Note: If necessary, you can fine-tune your image adjustments using the Quick Corner setting.
Parenttopic:ImageShape
Relatedtasks
CorrectingImageShapewithQuickCorner
ApplyingSavedImageShapeSettings
Youcanloadtheimageshapesettingsyouselectedandsavedtotheprojector'smemoryandapply themtothecurrentimage.
-
Turnon the projector and display an image.
-
HolddowntheNumbuttonontheremotecontrolandpressthenumberbutton(1,2,or3)that matchsthenumberofthesavedimageshapesetting.
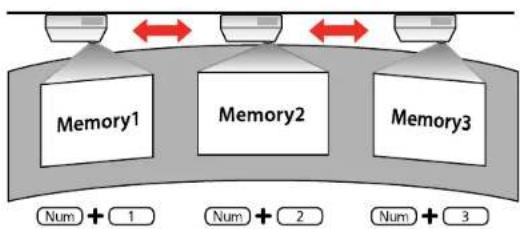
flowchart
graph TD
    A["Memory1"] --> B["Memory2"]
    B --> C["Memory3"]
    D["Num + 1"] --> E["Num + 2"] --> F["Num + 3"]
    style A fill:#f9f,stroke:#333
    style B fill:#f9f,stroke:#333
    style C fill:#f9f,stroke:#333
    style D fill:#ccf,stroke:#333
    style E fill:#ccf,stroke:#333
    style F fill:#ccf,stroke:#333
Thesavedimageshapesettingisappliedandyouarepromptedtocalibratethescreen.
- Followtheon-screen instructionstocalibratethescreen.
Parenttopic:ImageShape
ResizingthImagewiththeWideandTeleButtons
YoucanresizetheimageusingtheWideandTelebuttons.
- Turnontheprojectoranddisplayanimation.
- Toenlargetheimagesize, presstheW(Wide)buttonontheprojector'scontrolpanel.
- Toreducetheimagesize, presstheT(Tele)button.
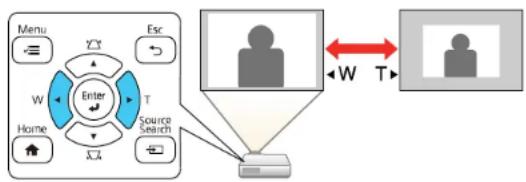
flowchart
graph TD
    A["Menu"] --> B["Enter"]
    B --> C["Esc"]
    C --> D["Home"]
    D --> E["Source Search"]
    E --> F["User icon"]
    F --> G["User icon"]
    G --> H["User icon"]
    H --> I["User icon"]
    I --> J["User icon"]
    J --> K["User icon"]
    K --> L["User icon"]
    L --> M["User icon"]
    M --> N["User icon"]
    N --> O["User icon"]
    O --> P["User icon"]
    P --> Q["User icon"]
    Q --> R["User icon"]
    R --> S["User icon"]
    S --> T["User icon"]
    T --> U["User icon"]
    U --> V["User icon"]
    V --> W["User icon"]
    W --> X["User icon"]
    X --> Y["User icon"]
    Y --> Z["User icon"]
    Z --> A
Afteryouadjusttheimagesize, theImageShiftscreenisdisplayautomaticallyforadjustingthe imageposition.
Note: If the projector is installed out of reach, you can also adjust the image size with the remote controlling the DigitalZoomsetting in the projectormenus.
Parenttopic: UsingBasicProjectorFeatures
Relatedreferences
InstallationSettings-InstallationMenu
AdjustingtheImagePosition
YoucanusethelmageShiftfeaturetoadjusttheimagepositionwithoutmovingtheprojector.Waitat least20minutesafteryoustartprojectingtoadjusttheimageposition.
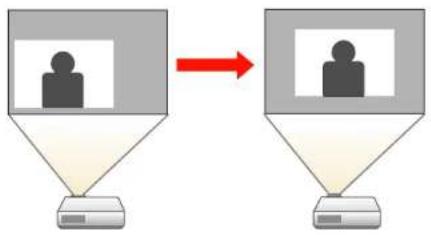
flowchart
graph TD
    A["User Platform"] -->|Red Arrow| B["User Single User Platform"]
Note: This feature is not available if the Zoom option is set to the widest setting.
- Turnon the projector and display an image.
- Adjust the imagesize using the W(Wide) and T(Tele) buttons.
Afteryouadjusttheimagesize, theImageShiftscreenisdisplayedautomatically.
![[Image Shift]](/content/2026/05/1053810/images/80f0a4c4cb1189a9a1212a18f97f3c0000e7bd90fcec9f8bc1caba500582b2ab.jpg)
- Usethearbuttonsontheprojectororremotecontroltoadjusttheimageposition.
Note: You can also use the Installation menu to adjust the Image Shift setting.
- Press Esc to close the Image Shift screen. The screen closes if no operation is performed for approximately 10 seconds.
Note: The Image Shift setting is retained even if the projector is turned off; however, you need to readjusttheimagepositionifyouchangetheprojector'slocationorangle.
Parenttopic: UsingBasicProjectorFeatures
Relatedreferences
InstallationSettings-InstallationMenu
Focusingthelmage
Waitatleast20minutesafteryoustartprojectingtoadjustthefocus.
- Turnon the projector and display an image.
2.PresstheMenubutton. - SelecttheInstallationmenuandpressEnter
| Frequently Used Items | Installation | |
| Image | Fixed Installation | Off |
| Signal I/O | Test Pattern | |
| Installation | Setting Plate installation Guide | |
| Display | Vertical Installation | No |
| Operation | Projection | Front/Upside Down |
| Management | Auto Screen Adjustment | |
| Network | Geometry Correction | Point Correction |
| Pen/Tcuch | Digital Zoom | |
| Interactive | Connect ELPCB02 | Off |
| Multi-Projection | Touch Unit | |
| Memory | Remote Receiver | Off |
| ECO | Screen Type | 16:9 |
| Initial/All Settings | High Altitude Mode | Off |
| Reset Installation Settings | ||
| Display | ||
| Pattern Display | ||
| Pattern Type | ||
- SelectTestPatternandpressEnter
- Openthefrontcover.
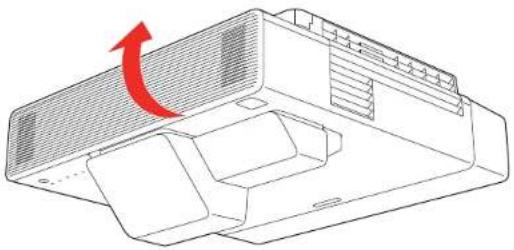
natural_image
Technical line drawing of a mechanical housing component with a red arrow indicating rotation (no text or symbols)6.Movethefocusleverandadjustthefocususingthecenterreferencepointoftheprojectedscreen.
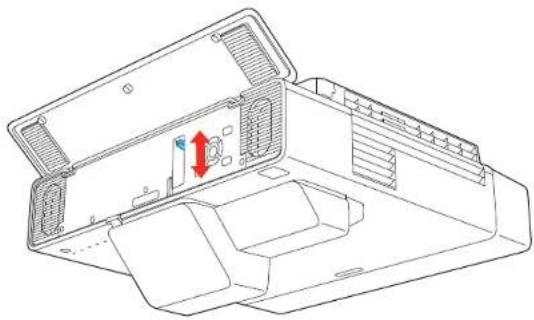
natural_image
Technical line drawing of a mechanical housing or enclosure with internal components and a red directional arrow indicating movement (no text or symbols present)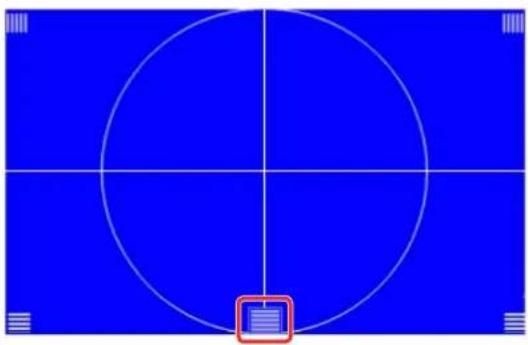
natural_image
Blue basketball court with white grid lines and a circular target on the left (no text or symbols)- Oncethecenterreferencepointisinfocus, check that the corner reference points are also infocus.
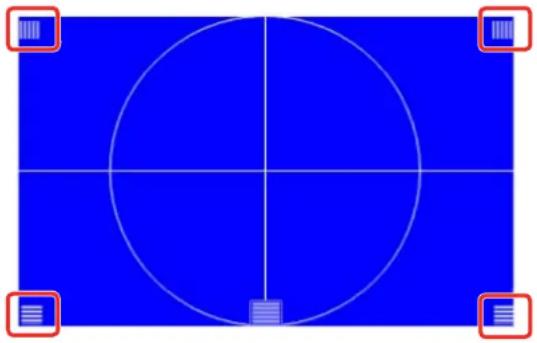
natural_image
Blue basketball court with white grid lines and corner markers (no text or symbols)Note: If any areas are out of focus, use the focus lever to adjust the focus until the corners appear thesame.
- Toremovethetestpattern, pressEsc.
Parenttopic: UsingBasicProjectorFeatures
RemoteControlOperation
Theremotecontrolledsyoucontroltheprojectorfromalmostanywhereintheroom,upto19.7feet(6m) away.Youcanpointitatthescreenorboard,orthefrontorbackoftheprojector.
Makesurethatyouaimtheremotecontrolattheprojector'sreceiverswithintheangleslistedhere.
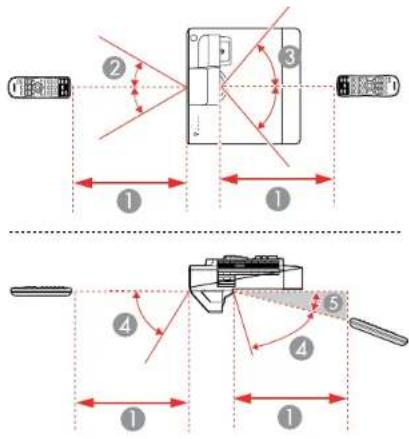
119.7 feet(6m)
2 ± 30^
3 ± 55^
460°
515°
Note: Avoid using the remote control in conditions with bright fluorescent lights or in direct sunlight, or theprojectormaynotrespondtocommands. If you will not use theremote control for alongtime, removethebatteries.
Parenttopic: UsingBasicProjectorFeatures
SelectinganImageSource
If you connected multiple images our cestotheprojector, such as a computer and DVD player, you may want to switch from one images our ceto the other.
Note: If you turned on the Auto Source Search setting in the Operation menu, the projector automatically switch the another detected imagesource if the signal to the current imagesource is lost.
- Makesuretheconnectedimagesourceyouwanttouseisturnedon.
- For videoimagesources, insert a DVD or other videomedia and press its play button, if necessary.
- Dooneofthefollowing:
- Press the Source Search button on the projector or remote control until you see the image from the source you want.
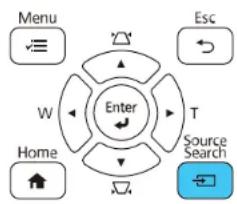
flowchart
graph TD
    A["Home"] --> B["Enter"]
    C["Menu"] --> B
    D["Esc"] --> B
    E["Source Search"] --> B
    B --> F["W"]
    B --> G["T"]
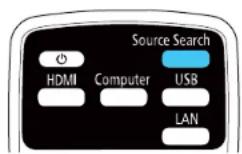
- Pressthebuttonforthesourceyouwantontheremotecontrol.Ifthereismorethanoneportfor thatsource,pressthebuttonagaintcyclethroughthesources.
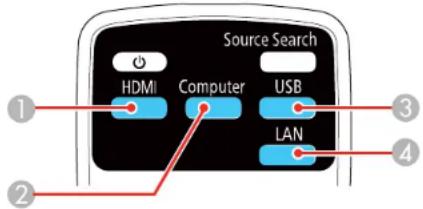
1HDMI, Video, and HDBaseT(BrightLink1485Fi) sources
2VGAportsources
3USBportsources(computerdisplayorexternaldevices)
4NetworkandScreenMirroringsources
- PressthebuttonfortheHDMIsourceyouwantonthecontrolpad(BrightLink1485Fi).
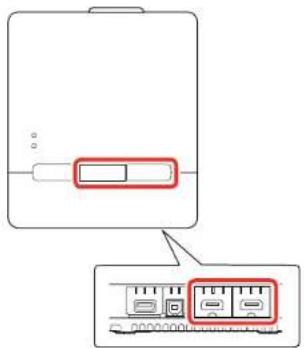
- PresstheHomebuttonontheremotecontrolorprojectorandselectyourimagesource.
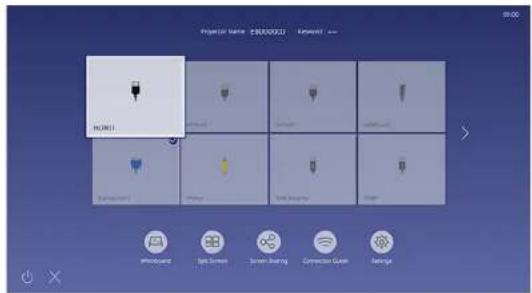
Note: Your Homescreen may look different from the illustrations shown here.
Parenttopic: UsingBasicProjectorFeatures
Relatedreferences
FeatureSettings-OperationMenu
Relatedtasks
UsingtheHomeScreen
ProjectionModes
Dependingonhowyoupositionedtheprojector,youmayneedtochangetheprojectionmodesoyour imagesprojectcorrectly.
- Frontletsyouprojectfromatableinfrontofthescreen.
- Front/Upside Down flips the image over top-to-bottom to project upside-down from a wall or ceiling mount.
- Rearflipstheimagehorizontallytoprojectfrombehindattranslucentscreen.
- Rear/Upside Down flips the image over top-to-bottom and horizontally to project from the wall or ceiling and behindatranslucent screen.
You can change the projection mode using the remote control or by changing the Projection setting in the Installationmenu.
ChangingtheProjectionModeUsingtheRemoteControl
ChangingtheProjectionModeUsingtheMenus
Parenttopic: UsingBasicProjectorFeatures
ChangingtheProjectionModeUsingtheRemoteControl
Youcanchangetheprojectionmodetofliptheimageovertop-to-bottom.
- Turnontheprojectoranddisplayanimation.
2.HolddowntheA/VMutebuttonontheremotecontrolfor5to10seconds.
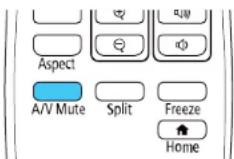
Theimagedisappearsbrieflyandreappearsflippedtop-to-bottom.
- To change projection back to the original mode, hold down the A/V Mute button for 5 to 10 seconds again.
Parenttopic:ProjectionModes
ChangingtheProjectionModeUsingtheMenus
You can change the projection model to flip the image over top-to-bottom and or left-to-right using the projectormenus.
- Turnontheprojectoranddisplayanimation.
2.PresstheMenubutton. - Select the Installation menu and press Enter.
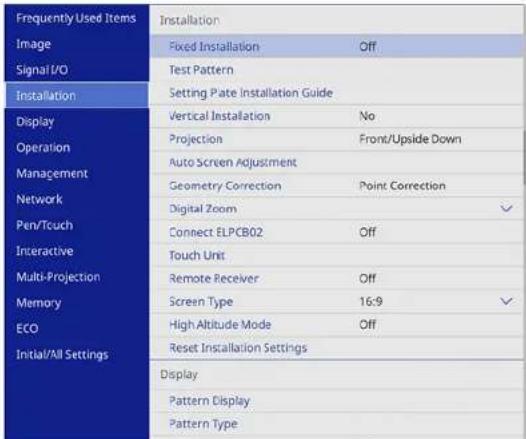
- SelecttheProjectionsettingandpressEnter.
- SelectaprojectionmodeandpressEnter.
- PressMenuorEsctoexitthemenus.
Parenttopic: ProjectionModes
ImageAspectRatio
Theprojectorcandisplayimagesindifferentwidth-to-heighttratioscalledaspectratios. Normally the inputsignalfromyourvideosourcedeterminestheimage'saspectratio. However, for certain images you can change the aspect ratio of your screen by pressing a button on theremote control.
If you always want to use a particular aspect ratio for certain video inputs, you can select using the projector's menus.
ChangingthelmageAspectRatio
AvailableImageAspectRatio
Parenttopic: UsingBasicProjectorFeatures
ChangingthelmageAspectRatio
Youcanchangetheaspectratioofthedisplayedimagetoresizeit.
Note: Set the Screen Type setting in the projector's Installation menu before changing the aspect ratio.
Note: This setting is available only when the Scale setting is turned off or the Scale Mode setting is set to FullDisplay(BrightLink1485Fi).
- Turnon the projector and switch to the images source you want to use.
2.PresstheAspectbuttonontheremotecontrol.
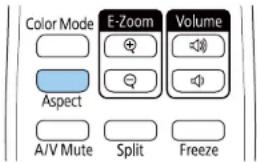
Theshapeandsizeofthedisplayedimagechanges,andthenameoftheaspectratioappears brieflyonthescreen.
- Tocyclethroughtheavailableaspectratiosforyourinputsignal, press the Aspectbutton repeatedly.
Note: To remove black bars when projecting from a computer, set the Resolution setting to Wide or NormalinthImagemenu, depending on your computer's resolution.
Parenttopic:ImageAspectRatio
Relatedreferences
ImageQualitySettings-ImageMenu
AvailableImageAspectRatio
You can select the following image aspect ratios, depending on the selected Screen Type setting and inputsignalfromyourimagesource.
Note: Black bands and cropped images may project in certain aspect ratios, depending on the aspect ratio and resolution of your input signal.
| AspectratiosettingDescription | |
| AutoAutomaticallysetstheaspectratio | ioaccordingtotheinputsignaland theResolutionsetting. |
| FullDisplaysimagesusingthefullwidth | thoftheprojectionarea,butdoes notmaintaintheaspectratio. |
| ZoomDisplaysimagesusingthefullwidth | thoftheprojectionareaand maintainstheaspectratiooftheimage. |
| NativeDisplaysimagesasis(aspect ratioandresolutionaremaintained). | |
Note: The appearance of the Native image aspect ratio setting varies depending on the input signal.
If there are margins between the images, you can adjust the position of the projected image using the Screen Position setting in the Installation menu.
Parenttopic:ImageAspectRatio
ColorMode
TheprojectoroffersdifferentColorModestoprovideoptimumbrightness,contrast,andcolorfora varietyofviewingenvirnmentsandimagetypes.Youcanselectamodedesignedtomatchyourimage andenvironment,orexperimentwiththeavailablemodes.
If you always want to use a particular color mode for certain video inputs, you can select it using the projectormenus.
ChangingtheColorMode
AvailableColorModes
Parenttopic: UsingBasicProjectorFeatures
ChangingtheColorMode
Youcanchangetheprojector'sColorModeusingtheremotecontroltooptimizetheimageforyourviewingenvironment.
- Turnon the projector and switch to the images source you want to use.
- If you are projecting from a DVD player or other videos source, insert ad disc or other video media and press the play button, if necessary.
3.PresstheColorModebuttonontheremotecontroltochangetheColorMode.
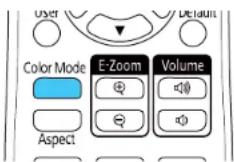
The image appearance changes and then a name of the Color Mode appears briefly on the screen.
- To cycle through all the available Color Modes for your input signal, press the Color Mode button repeatedly.
Parenttopic:ColorMode
AvailableColorModes
YoucansettheprojectortousetheseColorModes,dependingontheinputsourceyouareusing:
| ColorModeDescription | |
| PresentationBestforcolorpresentationsinabrightroom | |
| DynamicBestforvideogamesinabrightroom | |
| CinemaBestformoviesprojectedinadarkroomwithnaturaltoneimages | |
| sRGBBestforstandardsRGBcomputerdisplays | |
| BlackboardBestforprojectingimagesdirectlyonagreenchalkboard | |
| DICOMSIMBestforprojectingX-raysandothermedicalimages(showsclear shadows) | |
| Multi-Projection(BrightLink1485Fi) | Bestforprojectingfrommultipleprojectors(reducesthecolortone differencebetweenimages) |
Note: The DICOM SIM color mode is for reference purposes only and should not be used to make medical diagnoses.
Parenttopic:ColorMode
AdjustingtheHue, Saturation, and Brightness
You can adjust the hue, saturation, and brightness settings for individual image colors.
- Turnon the projector and switch to the images source you want to use.
2.PresstheMenubutton.
3. Select theImagemenuandpressEnter
| Frequently Used Items | Image | |
| Image | Color Mode | Presentation |
| Signal I/O | Brightness | 50 |
| Installation | Contrast: | 50 |
| Display | Color Saturation | 50 |
| Operation | Tint | 50 |
| Management | Sharpness | 50 |
| Network | White Balance | |
| Pen/Touch | Dynamic Contrast | Off |
| Noise Reduction | 0 | |
| Interactive | MPEG Noise Reduction | Off |
| Multi-Projection | Gamma | 0 |
| Memory | RGBCMY | |
| ECO | Deinterlacing | Off |
| Initial/All Settings | Super-resolution | |
| Detail Enhancement | ||
| Reset to Defaults | ||
| Source | Computer1 | |
| Resolution | Auto | |
4. SelectRGBCMYandpressEnter!
5. SelectthecolortoadjustandpressEnter
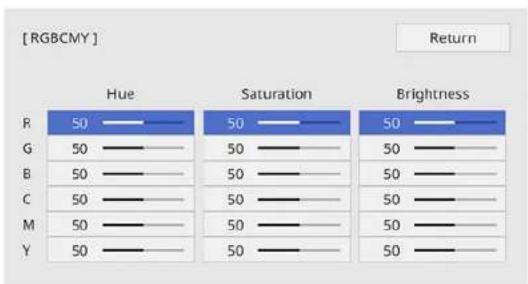
bar
[RGBCMY] Return | Category | Hue | Saturation | Brightness | |---|---|---|---| | R | 50 | 50 | 50 | | G | 50 | 50 | 50 | | B | 50 | 50 | 50 | | C | 50 | 50 | 50 | | M | 50 | 50 | 50 | | Y | 50 | 50 | 50 |6.Dothefollowingasnecessaryforeachsetting:
- Toadjusttheoverallhueofthecolor(bluish,greenish,reddish),adjusttheHuesetting.
- Toadjusttheoverallvividnessofthecolor,adjusttheSaturationsetting.
- Toadjusttheoverallbrightnessofthecolor,adjusttheBrightnesssetting.
![[R] Return Hue 50 M ← —— Y Saturation 50 —— Brightness 50 ——](/content/2026/05/1053810/images/60f45e97108805e0c58d0de9bd3707e789a6a85dbf2f33bd29b824318b5ee4ef.jpg)
- PresstheMenuorEsctoexitthemenus.
Parenttopic: UsingBasicProjectorFeatures
AdjustingGamma
You can adjust the gammato improved differences in half-tone brightness that vary depending on the connected device.
Note: Project a still image to adjust the gamma; you cannot adjust it properly when projecting a movie or othermovingvideo.Medicalimagesmanynotreproducecorrectlydependingonyouroperating environmentandscreen.
- Turnon the projector and switch to the images source you want to use.
2.PresstheMenubutton. - Select the ImagemenuandpressEnter
- SelecttheGammasettingandpressEnter
- Selectandadjustthecorrectionvalue.
Youseeascreenlikethis:
![[Gamma] 2 1 ✓ 0 -1 -2 Custom Reset Return](/content/2026/05/1053810/images/c3716700c8fed7da158d68111cc714fbb120c7dfcaebe3564cf85cae53e6cb85.jpg)
When you select small value, you can reduce the overall brightness of the image to make the images sharper. When you select large value, the dark areas of images become brighter, but the colors aturation for lighter areas may become weaker.
Note: If you set the Color Mode setting to DICOM SIM in the projector's Image menu, select the adjustment value according to the projection size. If the projection size is 80 inches (203cm) or less, select a small value. If the projection size is 80 inches or more, select a large value.
- If you want to make finer adjustments, select Custom and press ↕ Enter.
7.Presstheleftorrightarrowbuttontoselectthetoneyouwanttochange,thenpresstheupordown arrowbuttontoadjustthetoneandpressEnter!
Youseeascreenlikethis:
[Gamma]
Blinking area is the adjustment target.
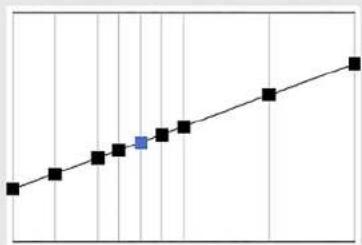
- PressMenuorEsctoexitthemenus.
Parenttopic: UsingBasicProjectorFeatures
AdjustingtheProjector'sBrightnessLevel
Youcanadjustthebrightnessofyourprojector'slightsource.
- Turnon the projector and switch to the images source you want to use.
2.PresstheMenubutton.
3. SelecttheOperationmenuandpressEnter
| Frequently Used Items | Operation | |
| Image | Auto Source Search | On |
| Signal I/O | Light Source Brightness Cont... | |
| Installation | Direct Power On | Off |
| Display | Auto Power On | Off |
| Operation | Sleep Mode | On |
| Management | Sleep Mode Timer | 10 min. |
| Network | A/V Mute Timer | On |
| Pen/Touch | Standby Mode | Communication On |
| Interactive | Port | Wired LAN |
| Multi-Projection | Quick Startup | Off |
| Memory | Indicators | On |
| ECO | Inv Direction Button | Off |
| Initial/All Settings | Reset Operation Settings | |
| Management | ||
| User Button | Light Source Mode | |
| User's Logo | ||
| User Pattern | ||
4. SelectLightSourceBrightnessControlandpressEnter
![[Light Source Brightness Control] Return Maintain Brightness Off Light Source Mode Normal](/content/2026/05/1053810/images/e3d1b45a82547d0b415597ab626d1bc27a8adbef9bccfac01b691c38f5187d33.jpg)
- If you want to maintain the brightness at a specific level, select the Maintain Brightness setting and selectOn.
- If you turn on Maintain Brightness, select the Maintain Brightness Level setting and check the EstimatedRemainsinformation.
- If you turn off Maintain Brightness, select the Light Source Mode setting:
- Normal: Setsbrightnessstothemaximumlevel(idealforconferencerooms, auditoriums, and lecturehalls)
- Quiet: Sets brightness to 70% and reduces fan noise (ideal for libraries, theaters, museums, and artgalleries)
- Extended: Sets brightness to 70% and extends the life expectancy of the light source (ideal for darkerenvironmentswithambientlight,suchasmuseumsandartgalleries,whereareduced maintenancecycleisdesired)
-
Custom: Allowsyoutoselectacustombrightnesslevelbetween70to100%
-
If you set the Light Source Mode setting to Custom, select Brightness Level and use the left and rightarrowbuttonstoselectthebrightness.
-
PressMenuorEsctoexitthemenus.
Note: For the best results in maintaining the brightness level, set the Light Source Calibration settingtoRunPeriodicallyintheprojector'sManagementmenu.
ConstantBrightnessUsageHours
Parenttopic: UsingBasicProjectorFeatures
Relatedreferences
AdministrationSettings-ManagementMenu
Relatedtasks
SavingaScheduledEvent
ConstantBrightnessUsageHours
If you turn on the Maintain Brightness setting, the number of hours the projector can maintain constant brightnessisdisplayedastheEstimatedRemainssetting.
![[ Light Source Brightness Control ] Return Maintain Brightness On Maintain Brightness Level 100 % Estimated Remains 0H](/content/2026/05/1053810/images/ff0b452391d9b19da23aeab267e2f2f77f737737a97a8e14693c0ed87a1811e8.jpg)
| DisplaylevelEstimatedremaining | hours |
| 10000ormorehours | |
| 8000to9999hours | |
| 6000to7999hours | |
| 4000to5999hours | |
| 2000to3999hours | |
| 0to1999hours |
Lightsourcelifespan
The estimated life span of the light source varies depending on the Brightness Level setting and whether the MaintainBrightnesssettingisonoroff.
MaintainBrightnessoff
| BrightnessLevelsettingHours | |
| 100%20000hours | |
| 90%21000hours | |
| 80%24000hours | |
| 70%30000hours |
MaintainBrightnesson
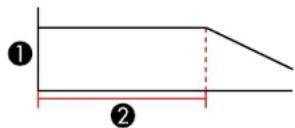
1Brightnesslevel
2Timetheprojectorcanmaintainconstantbrightness(approximate)
| BrightnessLevelsettingHours | |
| 85%6000hours | |
| 80%10000hours | |
| 70%19000hours |
Note: The lightsourceusage hours vary depending upon environmental conditions and usage. The hours listed here are an approximate and are not guaranteed. After 2000 hours of use, you may need to replace parts in the projector. If Maintain Brightness is turned on, and you have exceeded the usage hours listed here, you may not be able to select a high Maintain Brightness Level setting.
Parenttopic: Adjusting the Projector's Brightness Level
TurningOnAutomaticLuminanceAdjustment
You can turn on the Dynamic Contrast setting to automatically optimize the image luminance. This improves the image contrast based on the brightness of the content you project.
- Turnon the projector and switch to the images source you want to use.
2.PresstheMenubutton.
3. Select theImagemenuandpressEnter.
| Frequently Used Items | Image | |
| Image | Color Mode | Presentation |
| Signal I/O | Brightness | 50 |
| Installation | Contrast: | 50 |
| Display | Color Saturation | 50 |
| Operation | Tint | 50 |
| Management | Sharpness | 50 |
| Network | White Balance | |
| Pen/Touch | Dynamic Contrast | Off |
| Noise Reduction | 0 | |
| Interactive | MPEG Noise Reduction | Off |
| Multi-Projection | Gamma | 0 |
| Memory | RG8CMY | |
| ECO | Deinterlacing | Off |
| Initial/All Settings | Super-resolution | |
| Detail Enhancement | ||
| Reset to Defaults | ||
| Source | Computer1 | |
| Resolution | Auto | |
- Select the Dynamic Contrast setting, choose one of the following options, and press Enter:
•Normaltoadjustbrightnessatthestandardspeed.
•HighSpeedtoadjustbrightnessassoonasthescenechanges.
- PressMenuorEsctoexitthemenus.
Parenttopic: UsingBasicProjectorFeatures
ControllingtheVolumewiththeVolumeButtons
You can use the Volume buttons on the remote control to adjust the volume of your projected content. The volume buttons control the projector's internal speakers system or any external speakers you connected to the projector.
Youmustadjustthevolumeseparatelyforeachconnectedinputsource.
-
Turnon the projector and start apresentation that includes audio.
-
Tolowerorraisethevolume, press the Volume button son theremote control.
Avolumegaugeappearsonthescreen.
- Tosetthevolumetoaspecificlevelforaninputsource, usetheprojectormenus.
Parenttopic: UsingBasicProjectorFeatures
InvertingtheAudioChannels
Youcaninverttheaudio'sleftandrightchannelstomatchtheprojectorinstallationposition.
- Turnon the projector and start apresentation.
2.PresstheMenubutton.
3. SelecttheSignall/OmenuandpressEnter
| Frequently Used Items | Signal I/O | |
| Image | Volume | |
| Signal I/O | Source | Computer1 |
| Installation | Signal Format | |
| Display | Mic Input Level | 50 |
| Operation | Overscan | Auto |
| Management | EDID | 3240x1080/60Hz |
| Network | Reset to Defaults | |
| Pen/Touch | A/V Output | While Projecting |
| Interactive | Inverse Audio | Off |
| Multi-Projection | Audio Output | Auto |
| Memory | HDMI Audio Output | |
| ECO | Monitor Out Port | Monitor Out |
| Initial/All Settings | USB Display | 9 |
| HDMI Link | ||
| Reset Signal I/O Settings | ||
| Installation | ||
| Fixed Installation | Off | |
- SettheInverseAudiosettingtoOn.
- PressMenuorEsctoexitthemenus.
Parenttopic: UsingBasicProjectorFeatures
SelectingaQuickStartupSetting
If you want to quickly restart the projector within five seconds after turning it off, you can change the Quick Startup setting. You can select 20, 60, or 90 minutes of Quick Startup time.
Note: The projectormaytakelongerthanfivesecondstostartupinthefollowingconditions:
- When projecting from the projector's USB-B1 or HDMIOutport
- WhenprojectingwithScreenMirroring
- Ifwhiteboardsharingwasterminatedintheprevioussession
-
If you want to restore the white board contents from the previous session
-
Turnontheprojector.
2.PresstheMenubutton. - SelecttheOperationmenuandpressEnter.
| Frequently Used Items | Operation | |
| Image | Auto Source Search | On |
| Signal I/O | Light Source Brightness Cont... | |
| Installation | Direct Power On | Off |
| Display | Auto Power On | Off |
| Operation | Sleep Mode | On |
| Management | Sleep Mode Timer | 10 min. |
| Network | A/V Mute Timer | On |
| Pen/Touch | Standby Mode | Communication On |
| Port | Wired LAN | |
| Interactive | Quick Startup | Off |
| Multi-Projection | Indicators | On |
| Memory | Inv Direction Button | Off |
| ECO | Reset Operation Settings | |
| Initial/All Settings | Management | |
| User Button | Light Source Mode | |
| User's Logo | ||
| User Pattern | ||
- SelecttheQuickStartupsettingandpressEnter.
- Select how long you want to enable Quick Startup mode for and press Enter.
- PressMenuorEsctoexitthemenus.
Pressthepowerbuttontoquicklyrestarttheprojectorinthismode.
Parenttopic: UsingBasicProjectorFeatures
ProjectingaPCFreePresentation
Youcanuseyourprojector'sPCFreefeaturewheneveryouconnectaUSBdevicethatcontains compatiblefiles. Thisletysyouquicklyandeasilydisplaythecontentsofthefilesandcontroltheirdisplay usingtheprojector'sremotecontrol.
SupportedPCFreeFileTypes
StartingaPCFreeSlideShow
StartingaPCFreeMoviePresentation
PCFreeDisplayOptions
Parenttopic: UsingBasicProjectorFeatures
SupportedPCFreeFileTypes
Youcanprojectthesetypesoffilesusingtheprojector'sPCFreefeature.
Note: For best results, place your files on media that is formatted in FAT16/32. If you have trouble projectingfrommediaformattedfornon-Windowsfilesystems,tryformattingthemediaforWindows instead.YoumaynotbeabletousethesecurityfeaturesoncertainUSBstoragedeviceswithPCFree features.WhenconnectingaUSB-compatibleharddrive,connecttheACadaptersuppliedwiththe drive.PCFreemaynotworkwithUSBdevicesecurityfeatures.
Note: While projecting a PC Free presentation, you cannot correct the image shape using keystone correction. Correct the imageshape before starting your presentation.
| Filetypeand extension | Details |
| Image(.jpg)Makes | urethefileisnot:•CMYKformat•Progressiveformat•Highlycompressed•Above8192×8192resolution |
| Image(.bmp)Makes | surethefileresolutionisnotabove1280×800 |
| Image(.gif)Makes | urethefileisnot:•Above1280×800resolution•Animated•Interlaced |
| Image(.png)Makes | surethefileresolutionisnot:•Above1920×1080•Interlaced |
| MotionJPEG movie(.avi) | SupportsonlyAVI1.0Makesurethefileisnot:•SavedwithanaudiocodeotherthanPCMorADPCM•Above1280×720resolution•Largerthan2GB |
Parenttopic: ProjectingaPCFreePresentation
StartingaPCFreeSlideShow
AfterconnectingaUSBdeviceordigitalcameratotheprojector,youcanswitchtotheUSBinputsource andstartyourslideshow.
Note: You can change the PC Free operation options or add special effects by highlighting Option at the bottomofthescreenandpressingEnter.
Note: You can also set the interactive penory your fingertoo operatetheslideshow.
- PresstheUSBbuttonontheprojectorremotecontroluntilthePCFreefilelistappears.
ThePCFreescreenappears.
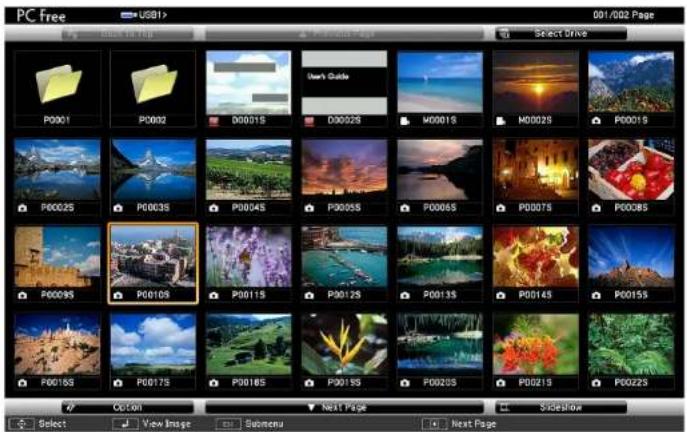
2.Dothefollowingasnecessarytolocateyourfiles:
- If you need to display files inside as subfolder your device, press the arrow button to highlight the folder and press the Enter button.
• To move back up a folder level on your device, highlight Back to Top and press Enter. - To view additional files in a folder, highlight Next page or Previous page and press Enter.
- To display images from a different USB drive, select Select Drive at the top of the PC Free screen andpressEnter.
3.Dooneofthefollowing:
- To display an individual image, press the arrow buttons to highlight the image and press Enter. (PresstheEscbuttontoreturntothefilelistscreen.)
- Todisplayaslideshowofalltheimagesinafolder,pressthearrowbuttonstohighlghtthe SlideshowoptionatthebottomofthescreenandpressEnter.
Note: If any file names are longer than the display area or include unsupported symbols, the file names may be shortened or changed only in the screendisplay.
-
While projecting, use the following command to control the display as necessary:
-
Torotateadisplayedimage, presstheupordownarrowbutton. Youcanalsorotatetheimageby flickingitwiththeinteractivepenoryourfinger.
-
Tomovetothenextorpreviousimage, presstheleftorrightarrowbutton. Youcanalsomove betweenimagesbyflickingtheimagewiththeinteractivepenoryourfinger.
-
Tostophthedisplay, followtheon-screeninstructionsorpresstheEscbutton.
- TurnofftheUSBdevice, if necessary, and thendisconnect the device from the projector.
Parenttopic: ProjectingaPCFreePresentation
StartingaPCFreeMoviePresentation
AfterconnectingaUSBdeviceordigitalcameratotheprojector,youcanswitchtotheUSBinputsource andstartyourmovie.
Note: You can change the PC Free operation options by highlighting Option at the bottom of the screen and pressing Enter.
- PresstheUSBbuttonontheprojectorremotecontroluntilthePCFreescreenappears.
ThePCFreescreenappears.
-
Dothefollowingasnecessarytolocateyourfiles:
-
If you need to display files inside as subfolder your device, press the arrow button to highlight the folder and press the Enter button.
- To move back up a folder level on your device, highlight Back to Top and press Enter.
- To view additional files in a folder, highlight Next page or Previous page and press Enter.
-
To display movie files from a different USB drive, select Select Drive at the top of the PC Free screenandpressEnter.
-
Toplaybackamovie, pressthearbuttonstohighlighthefileandpressEnter.
Note: If any file names are longer than the display area or include unsupported symbols, the file namesmaybeshortenedorchangedonlyinthescreendisplay.Ifyouwanttoplaybackallthe moviesinafolderinsequence,selecttheSlideshowoptionatthebottomofthescreen.
- To stop movie playback, press the Esc button, highlight Exit, and press Enter.
- TurnofftheUSBdevice, if necessary, and then disconnect the device from the projector.
Parenttopic: ProjectingaPCFreePresentation
PCFreeDisplayOptions
Youcanselectthesedisplayoptionswhenusingtheprojector'sPCFreefeature.
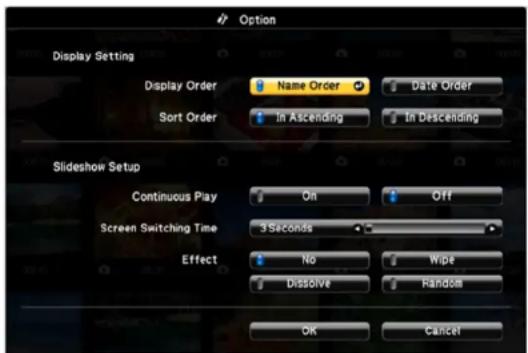
| SettingOptionsDescription | ||
| DisplayOrderNameOrder | erDisplaysfilesinnameorder | |
| DateOrderDisplaysfilesindateorder | ||
| SortOrderInAscending | Sortsfilesinfirst-to-lastorder | |
| InDescendingSortsfilesinlast-to-firstorder | ||
| ContinuousPlayOnDisplaysaslideshowcontinuously | ||
| OffDisplaysaslideshowonetime through | ||
| ScreenSwitching Time | NoDoesnotdisplaythenextfileautomatically | |
| 1Secondto60SecondsDisplays filesfortheselectedtimeand switchchestothenextfileautomatically;high resolutionimagesmayswitchataslightly slowerrate | ||
| EffectNoNoeffect | ||
| WipeTransitionsbetweenimageswithawipeeffect | ||
| Dissolve | Transitionsbetweenimageswithadissolve effect | |
| Random | Transitionsbetweenimagesusingarandom varietyofeffects | |
Parenttopic: ProjectingaPCFreePresentation
AdjustingProjectorFeatures
Followtheinstructionsinthesesectionstouseyourprojector'sfeatureadjustments.
ShuttingOffthePictureandSoundTemporarily
StoppingVideoActionTemporarily
ZoomingIntoandOutofImages
UsingMultipleProjectors(DuoLink)
ProjectingMultipleImagesSimultaneously
ProjectorSecurityFeatures
CreatingaUserPatterntoDisplay
SavingSettingstoMemoryandUsingSavedSettings
CopyingMenuSettingsBetweenProjectors
SchedulingProjectorEvents
ShuttingOffthePictureandSoundTemporarily
Youcantemporarilyturnofftheprojectedpictureandsoundifyouwanttoredirectyouraudience's attentionduringapresentation.Anysoundorvideoactioncontinuestorun,however,soyoucannot resumeprojectionatthepointthatyoustoppedit.
If you want to display an images such as a company logo or picture when the presentation is stopped, you can setup this feature using the projector's menus.
- Press the A/V Mute button on the remote control to temporarily stop projection and mute any sound.
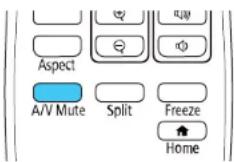
- Toturnthepictureandsoundbackon, pressA/VMuteagain.
Note: The projector's power automatically turns off thirty minutes after A/V Mute is enabled. You can disable this feature in the projector's Operationmenu.
Note: You can also stop projection by selecting the A/V Mute icon in the interactive toolbar.
Parenttopic: AdjustingProjectorFeatures
Relatedtasks
SavingaUser'sLogolmagetoDisplay
StoppingVideoActionTemporarily
Youcantemporarilystoptheactioninavideoorcomputerpresentationandkeepthecurrentimageon thescreen.Anysoundorvideoactioncontinuestorun,however,soyoucannotresumeprojectionatthe pointthatyoustoppededit.
Note: You can also stop video action using the interactive pens.
- PresstheFreezebuttonontheremotecontroltostopthevideoaction.
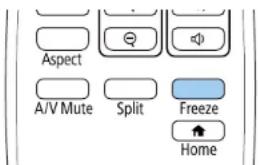
- Torestartthevideoactioninprogress, pressFreezeagain.
Parenttopic: AdjustingProjectorFeatures
ZoomingIntoandOutofImages
Youcandrawattentiontopartsofapresentationbyzoomingintoaportionoftheimageandenlargingit onthescreen.
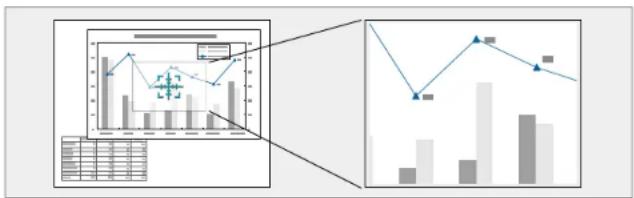
bar_line
| Category | Bar Value | Line Value | |---|---|---| | Category 1 | 35 | 40 | | Category 2 | 28 | 35 | | Category 3 | 32 | 30 | | Category 4 | 40 | 25 | | Category 5 | 38 | 20 | | Category 6 | 30 | 15 | | Category 7 | 36 | 10 | | Category 8 | 42 | 5 | | Category 9 | 34 | 8 | | Category 10 | 37 | 12 |Note: This feature is unavailable if the Scale setting in the Image menu is enabled (BrightLink 1485Fi).
- PresstheE-Zoom+buttonontheremotecontrol.
Youseeacrosshaironthescreenindicatingthecenterofthezoomarea.
-
Usethefollowingbuttonsontheremotecontroltoadjustthezoomedimage:
-
Usethearrowbuttonstopositionthecrosshairintheimageareayouwanttozoominto.
- PresstheE-Zoom+buttonrepeatedlytozoomintotheimagearea,enlargingitasnecessary. PressandholdtheE-Zoom+buttontozoominmorequickly.
- Toparoundthezoomedimagearea, usethearrowbuttons.
- Tozoomoutoftheimage, presstheE-Zoom-buttonasnecessary.
• Toreturntotheoriginalimagesize, pressEsc.
Parenttopic: AdjustingProjectorFeatures
UsingMultipleProjectors(DuoLink)
Youcancombinetheprojectedimagesfromtwoormoreprojectorstocreateonelargeimage (BrightLink1485Fi). Followtheinstructionsinthesesectionstosetupandprojectfrommultiple projectors.
Note: The interactive features are not available when connecting more than two projectors. See the onlineDuoLinkSetupGuideforadditionalinformation.
ProjectorIdentificationSystemforMultipleProjectorControl
AdjustingColorUniformity
BlendingthelmageEdges
MatchingtheImageColors
AdjustingtheBlackLevel
AdjustingRGBCMY
ScalinganImage
Parenttopic: AdjustingProjectorFeatures
ProjectorIdentificationSystemforMultipleProjectorControl
Youcanoperatemultipleprojectorsusingoneremotecontrolformoreelaboratepresentations. Todo this, youassignanidentificationnumbertoeachprojectorandtotheremotecontrol. Thenyoucan operatealltheprojectorsatonceorindividually.
SettingtheProjectorID
SettingtheRemoteControlID
Parenttopic: Using Multiple Projectors(DuoLink)
SettingtheProjectorID
If you want to control multiple projectors from a remote control, give each projector a unique ID.
1.PresstheMenubutton.
- SelecttheMulti-ProjectionmenuandpressEnter.
3. SelectProjectorIDandpressEnter.
![[ Projector ID ] ✓ Off 1 2 3 4 5 6 7 8 9 Return](/content/2026/05/1053810/images/56899c9f052e924ebf657373769a0b51bd0ef1ee57925662486517500e5084de.jpg)
4.Pressthearrowbuttonsontheremotecontroltoselecttheidentificationnumberyouwanttousefor theprojector.ThenpressEnter.
Repeat the seven steps for all the other projectors you want to operate from one remote control.
Note: If you don't know the projector's ID, aim the remote control at the projector and press the ID button to temporarily display the projector's Donthescreen.
Parenttopic:ProjectorIdentificationSystemforMultipleProjectorControl
SettingtheRemoteControlID
Theremotecontrol'sIDissettozerobydefaultsoitcanoperateanycompatibleproject.Ifyouwanto settheremotecontroltooperateonlyaparticularproject,youneedtosettheremotecontrol'sIDto matchtheprojector'sID.
- Turnontheprojectoryouwanttheremotecontroltooperatewithexclusively.
-
Make sure you know the projector's ID number as set in the Multi-Projection menu Projector ID setting.
3.Aimtheremotecontrolatthatprojector. -
Hold down the ID button on the remote control while you press the numeric button that matches the projector'sID.Thenreleasethebuttons.
Theremotecontrol'sIDisset.
Note: If the batteries are left out of the remote control for an extended period, the remote control ID returnstoitsdefaultsetting.
Parenttopic: ProjectorIdentificationSystemforMultipleProjectorControl
AdjustingColorUniformity
Ifthecolortoneisunevenoneachscreen,adjustthecolortonebalanceintheMulti-Projectionmenuof eachprojector.(Thecolortonemaynotbeuniformevenafterperformingcoloruniformity.)
Note: Set the Color Mode setting in each projector's Image menu to Multi-Projection before you start projecting(BrightLink1485Fi).
- Press the Menu button on the remote or control panel, select the Multi-Projection menu, and press Enter.
| Frequently Used Items | Multi-Projection | |
| Image | Projector ID | Off |
| Signal I/O | HDMI Out Setting | Off |
| Installation | Geometry Correction | Point Correction |
| Display | Edge Blending | |
| Operation | Scale | |
| Management | Color Uniformity | |
| Network | Light Source Mode | Normal |
| Pen/Touch | Color Matching | |
| Interactive | RGBCMY | |
| Reset Multi-Projection Settings | ||
| Multi-Projection | Memory | |
| Memory | Save Memory | |
| ECO | Load Memory | |
| Initial/All Settings | Rename Memory | |
| Erase Memory | ||
| Reset Memory | ||
| ECO | ||
- SelecttheColorUniformitysettingandpressEnter.
![[Color Uniformity ] Return Color Uniformity Off Reset](/content/2026/05/1053810/images/cb087b28b22d162e95be804908632dff05a9475b93743638b901ef5b203c6b45.jpg)
- Select On as the Color Uniformity setting and press Enter, then press Esc.
- SelectAdjustmentLevelandpressEnter.
- SelectanadjustmentlevelandpressEsc.
- SelectStartAdjustmentsandpressEnter.
7. Select the area you want to adjust and press Enter.
![[Color Uniformity] Top Left Top Top Right Right Bottom Right Bottom Bottom Left Left All Return](/content/2026/05/1053810/images/6ac7c7333f9bcb9a6e57fe07f853798cb6d8ea1676a50eb7ed8d02d9f30a3a54.jpg)
- Select Red, Green, or Blue and press the left arrow button to weaken the color tone or the right arrowbuttontostrengthenthecolortone.
Note: The adjustments screen changeseach time you press Enter.
![[ Color Uniformity ] Top Left Adjustment Level 8/8 Red Green Blue Return](/content/2026/05/1053810/images/fec6cc356771e61b78e689ef42054153c20dacfc0f4c7f7845de83f1f06bff29.jpg)
- PressEsctoreturntotheareaselectionscreen.
10.Repeatsteps7through9foreacharea,thenselectAlltoadjusttheentirescreen.
- PressEsctoexitthemenus.
Parenttopic: Using Multiple Projectors(DuoLink)
Relatedreferences
ImageQualitySettings-ImageMenu
BlendingtheImageEdges
Youcanusetheprojector'sEdgeBlendingfeaturetocreateaseamlessimagefrommultipleprojectors (BrightLink1485Fi).

natural_image
Two gray rectangular shapes with a red arrow pointing to a dashed rectangle, no text or symbols present.1.PresstheMenubutton.
2. SelecttheMulti-ProjectionmenuandpressEnter.
| Frequently Used Items | Multi-Projection | |
| Image | Projector ID | Off |
| Signal I/O | HDMI Out Setting | Off |
| Installation | Geometry Correction | Point Correction |
| Display | Edge Blending | |
| Operation | Scale | |
| Management | Color Uniformity | |
| Network | Light Source Mode | Normal |
| Pen/Touch | Color Matching | |
| Interactive | RGBCMY | |
| Reset Multi-Projection Settings | ||
| Multi-Projection | Memory | |
| Memory | Save Memory | |
| ECO | Load Memory | |
| Initial/All Settings | Rename Memory | |
| Erase Memory | ||
| Reset Memory | ||
| ECO | ||
-
SelecttheEdgeBlendingsettingandpressEnter.
-
Turn on the Edge Blending, Line Guide, and Pattern Guide settings.
Note: If the projected guide is unclear, try changing the Guide Color setting.
- SelecttheedgeyouwanttoblendoneachprojectandpressEnter.
Youseeascreenlikethis:
![[Top Edge] Return Blending Off Blend Start Position 0___________________ Blend Range 0___________________ Blend Curve 0](/content/2026/05/1053810/images/ab7a5f9a40ea8aaaf13136133ceaf12d1862b56b84e87edf3f4db90fca83c13d.jpg)
- SelecttheBlendingsettingandselectOn.
- PressEsctoreturntothepreviousscreen.
- SelecttheBlendStartPositionsettingandadjustthepointwhereedgeblendingbegins.
Note: If you created a unified image area using the Edge Blending feature, set the Blend Start Position setting to 0.
- Select the Blend Range setting and use the arrow buttons to select the width of the blended area so that the displayed guides are at the edges of the overlapping area between the two images.
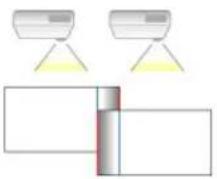
Note: If you created a unified image area using the Edge Blending feature, set the Blend Range setting to 300.
- SelecttheBlendCurvesettingandselectagradientfortheshadedareaontheprojectors.
- PressEsctogobacktothepreviousscreen.
- When the edges are blended, turn off the Line Guide and Pattern Guide settings on each projector to check the final settings.
- When you are finished, press the Menubutton.
Parenttopic: UsingMultipleProjectors(DuoLink)
MatchingthelmageColors
Youcanmatchthedisplaycolorofmultipleprojectorsthatwillprojectnexttooneanother(BrightLink 1485Fi).Turnonalltheprojectorssoyoucanproperlyadjustthecolorofthecombinedscreen.
1.PresstheMenubutton.
- Select the Multi-Projection menu (BrightLink 1485Fi) or Management menu (BrightLink 1480Fi) andpressEnter.
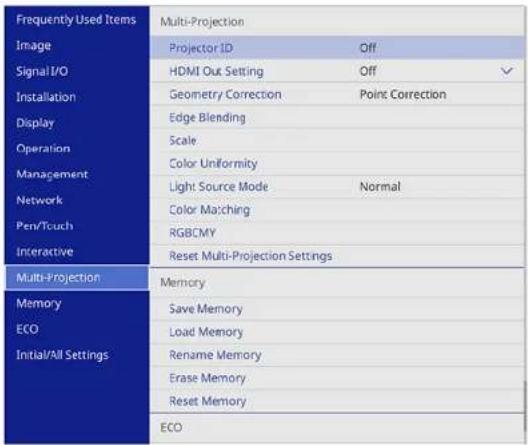
- SelecttheColorMatchingsettingandpressEnter
Youseethisscreen:
![[ Color Matching ] Adjustment Level 1 Red 0 Green 0 Blue 0 Brightness Return - +](/content/2026/05/1053810/images/b1c8c373e1faa4f8d2b223b71fc6596ec2e302fa9979e589d6edcc03f6ad1776.jpg)
4.PresstheleftorrightarrowbuttontoselectAdjustmentLevel8.
Note: There are several adjustment levels and you can adjust each level individually.
5.PresstheleftorrightarrowbuttonstoadjusttheBrightnesssetting.
6. Press the left or right arrow buttons to adjust the color tone for the Red, Green, and Blue settings if necessary.
7. PressEsctoreturntotheMulti-Projectionmenu.
8. SelecttheOperationmenuandpressEnter
9. SelectLightSourceBrightnessControlandpressEnter
10. Set the Light Source Mode setting to Custom and adjust the Brightness Level setting as necessary.
11. Press Esc and repeat steps 2-6 for Adjustment Level 7 through 2.
12. When you are finished, press the Menubutton.
Parenttopic: UsingMultipleProjectors(DuoLink)
AdjustingtheBlackLevel
Whentwoimagesoverlap, theoverlappingareacanappeardifferentlyfromtheareasthatdonot overlap. Youcanusetheprojector'sBlackLevelsettingtomakethedifferencelessnoticeable (BrightLink1485Fi).
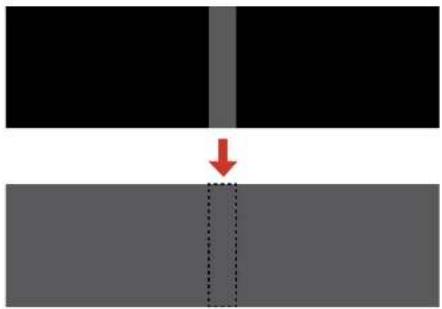
natural_image
Diagram showing a red arrow pointing to a vertical gray line between two black rectangular regions, with no text or symbols present.Note: You cannot adjust the black levels while projecting a test pattern, and you may not be able to adjust the black levels correctly if the Geometry Correction settings are set too high. The brightness and tone of the overlapping areas may differ from the rest of the image even after adjusting the black level.
1.PresstheMenubutton.
2. SelecttheMulti-ProjectionmenuandpressEnter
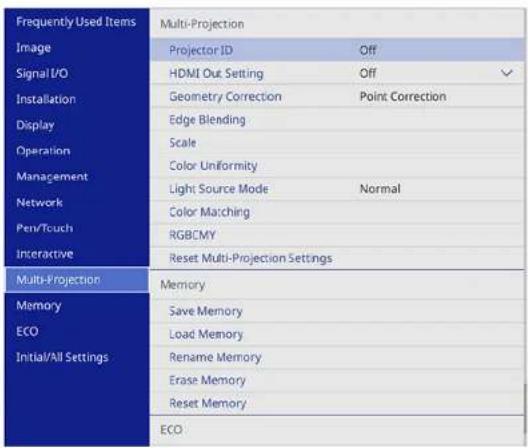
3. SelecttheBlackLevelsettingandpressEnter.
Note: The Black Level setting is displayed only if Edge Blending is enabled and at least one (top, bottom, left, right) edgeissettoOn.
4. Select the Color Adjustment setting and press Enter
You see a screen based on the Top Edge, Bottom Edge, Right Edge, and Left Edge settings you selected for the Edge Blending setting.
5. SelecttheareayouwanttoadjustandpressEnter.
Note: The areayou selected disdisplayed in orange. Adjustoverlapping areas starting with the brightest areas first. Forexample, adjustarea2tomatcharea1, then adjustarea3tomatcharea2.
- Adjustthebrightnessandtoneoftheareasthatdonotoverlaptomatchtheareasthatoverlapusing thedisplayedadjustmentsliders.ThenpresstheEscbutton.
![[ Color Adjustment ] Red 0 Return Green 0 Blue 0 Brightness - +](/content/2026/05/1053810/images/335d70f5a8f72eb9745e36e343cd07d0039219b72f536035b4db4f102c3905a6.jpg)
- Repeat the previous wostepsas needed until all areas match.
- If the tone of some areas do not match, you can adjust them using the Area Correction setting. Continue with then next step. Otherwise, press the Menubutton to exit.
- PresstheEscbuttontoreturntotheBlackLevelscreen.
- SelecttheAreaCorrectionsettingandpressEnter#
- SelecttheStartAdjustmentssettingandpressEnter
Youseeascreenwithboundarylinesindicatingareasthatareoverlapping.Theboundarylinesare based on the Top Edge, Bottom Edge, Right Edge, and Left Edge settings you selected for the EdgeBlendingsetting.
- Use the arrow buttons to select a boundary line of the area you want to adjust and press Enter. Theselectedlineisdisplayedinorange.

natural_image
Abstract geometric shape with a black triangle on a dark gray background, no text or symbols present.-
UsethearrowbuttonstoadjusttheboundarylinepositionandpresstheEnterbutton.
-
UsethearrowbuttonstoselectanadjustmentpointandpresstheEnterbutton.
Note: You can change the number of adjustment points displayed by changing the Points setting in theAreaCorrectionmenu.
Theselectedpointturnsorange.
- Usethearrowbuttonstomovethepoint.
- Tomoveanotherpoint, presstheEscbuttonandrepeattheprevioustwosteps.
- To move another boundary line, press the Esc button repeatedly until you can select a boundary line.
- When you are finished, press the Esc button until you see a confirmation message. Select Yes and pressEnter.
- When you are finished, press the Menubutton.
Note: Changing the Top Edge, Bottom Edge, Right Edge, or Left Edge settings resets the Black Levelsettingtoitsdefaultvalue.
Parenttopic: Using Multiple Projectors(DuoLink)
AdjustingRGBCMY
You can adjust the Hue, Saturation, and Brightness settings for R (red), G (green), B (blue), C (cyan), M(magenta), and Y(yellow) colorcomponents.
Turn on all the projectors and select the RGBCMY setting in each projector's Image menu so that the colortoneonthecombinedscreenbecomesentirelyeven.
- PresstheMenubutton.
2. SelectthelmagemenuandpressEnter
| Frequently Used Items | Image | |
| Image | Color Mode | Presentation |
| Signal I/O | Brightness | 50 |
| Installation | Contrast: | 50 |
| Display | Color Saturation | 50 |
| Operation | Tint | 50 |
| Management | Sharpness | 50 |
| Network | White Balance | |
| Pen/Touch | Dynamic Contrast | Off |
| Noise Reduction | 0 | |
| Interactive | MPEG Noise Reduction | Off |
| Multi-Projection | Gamma | 0 |
| Memory | RG8CMY | |
| ECO | Deinterlacing | Off |
| Initial/All Settings | Super-resolution | |
| Detail Enhancement | ||
| Reset to Defaults | ||
| Source | Computer1 | |
| Resolution | Auto | |
3. SelecttheRGBCMYsettingandpressEnter
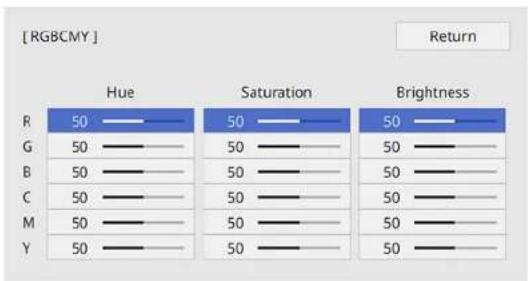
bar
[RGBCMY] Return | Category | Hue | Saturation | Brightness | |---|---|---|---| | R | 50 | 50 | 50 | | G | 50 | 50 | 50 | | B | 50 | 50 | 50 | | C | 50 | 50 | 50 | | M | 50 | 50 | 50 | | Y | 50 | 50 | 50 |4. SelectthecoloryouwanttoadjustandpressEnter.
Youseethisscreen:
![[R] Return Hue 50 M ← —— Y Saturation 50 —— Brightness 50 ——](/content/2026/05/1053810/images/4c9667e30ddfd81f2c6d565fc89b2e1be2cec9baa7b31b7ded13f9d0cc1498ea.jpg)
- Toadjusttheoverallhueofthecolor,adjusttheHuesetting.
- Toadjusttheoverallvividnessofthecolor,adjusttheSaturationsetting.
-
Toadjusttheoverallbrightnessofthecolor,adjusttheBrightnesssetting.
-
Press the left or right arrow buttons to adjust the Hue, Saturation, and Brightness settings.
6.Repeattheprevioustwostepsasnecessarytoadjusteachcolor.
- PressMenuorEsctoexitthemenus.
Parenttopic: Using Multiple Projectors(DuoLink)
ScalinganImage
YoucanprojectthesameimagefrommultipleprojectorsandusetheScalefeaturetocropandcombine themintoonelargeimage(BrightLink1485Fi).
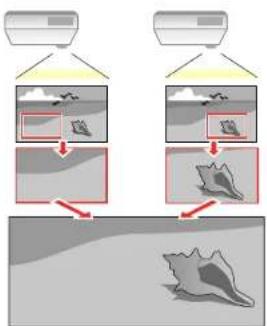
flowchart
graph TD
    A["Top Panel"] --> B["Surface Detection"]
    C["Top Panel"] --> D["Object Tracking"]
    B --> E["Surface Display"]
    D --> F["Object Tracking"]
    style A fill:#f9f,stroke:#333
    style C fill:#f9f,stroke:#333
    style B fill:#ccf,stroke:#333
    style D fill:#ccf,stroke:#333
    style E fill:#dfd,stroke:#333
    style F fill:#dfd,stroke:#333
1.PresstheMenubutton.
2. SelecttheMulti-ProjectionmenuandpressEnter
3. SelecttheScalesettingandpressEnter
Youseethisscreen:
![[Scale] Scale Off Clip Range Return](/content/2026/05/1053810/images/a60365883f18a21e64e0bfd9c27d6993055322e872712d9c1a2cb1307e959ba7.jpg)
-
SelectoneofthefollowingastheScalesetting:
-
Auto to automatically adjust the clipped areas according to the HDMI Output Setting and Edge Blendingsettingsyouselected
•Manualtoadjusttheclippedareasmanually -
Select the Scale Modesetting and select one of these options:
- ZoomDisplaytomaintaintheimageaspectratioasyouscaletheimage
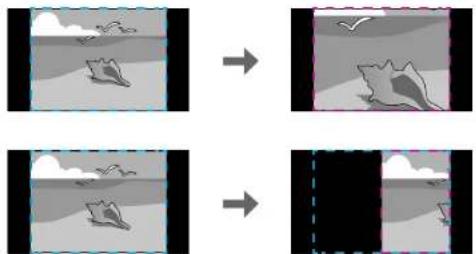
natural_image
Four-panel diagram showing a beach scene with birds and fish, each before and after transformation (no text or symbols)•FullDisplaytoadjusttheimagetotheprojector'sscreensizeasyouscaletheimage
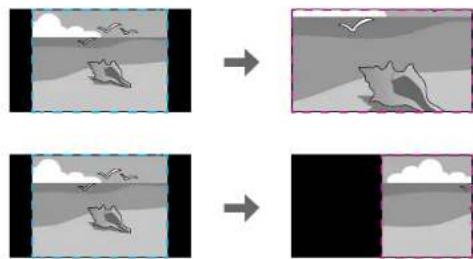
natural_image
Four-panel diagram showing a bird flying over water with a bird flying away, each panel containing a grayscale image of a bird (no text or symbols)-
If you selected Auto as the Scale setting, you can skip the remaining steps. If you selected Manual, adjust each of the following options as necessary:
-
Select – or + to scale the image horizontally and vertically at the same time
- SelectScaleVerticallytoscaletheimageverticallyonly
-
SelectScaleHorizontallytoscaletheimagehorizontallyonly
-
Select the Clip Adjustment setting and use the arrow buttons to adjust the coordinates and size of each imageasyouviewthescreen.
- SelecttheClipRangesettingtopreviewtheareayoujustselected.
9.PresstheMenubuttontoexit.
Parenttopic: UsingMultipleProjectors(DuoLink)
ProjectingMultipleImagesSimultaneously
Youcanusethesplitscreenfeatureosimultaneouslyprojectfromtwoorfourimagesfromdifferent imagesourcesnexttoeachother.Youcancontrolthesplitscreenfeatureusingtheremotecontrol,the projectormenus,ortheinteractivefunction.
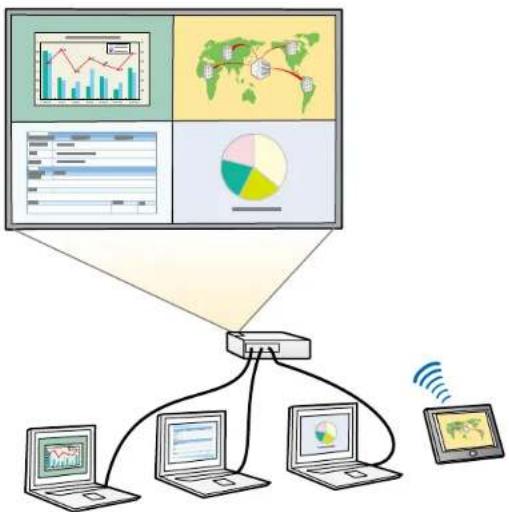
flowchart
graph TD
    A["User Server"] --> B["Server"]
    C["Desktop Computer"] --> B
    D["Mobile Device"] --> B
    E["Global Map Display"] --> B
    F["Data Dashboard"] --> B
    G["User Interface"] --> B
    H["User Interface"] --> B
    I["User Interface"] --> B
    J["User Interface"] --> B
    K["User Interface"] --> B
    L["User Interface"] --> B
    M["User Interface"] --> B
    N["User Interface"] --> B
    O["User Interface"] --> B
    P["User Interface"] --> B
    Q["User Interface"] --> B
    R["User Interface"] --> B
    S["User Interface"] --> B
    T["User Interface"] --> B
    U["User Interface"] --> B
    V["User Interface"] --> B
    W["User Interface"] --> B
    X["User Interface"] --> B
    Y["User Interface"] --> B
    Z["User Interface"] --> B
    AA["User Interface"] --> B
    AB["User Interface"] --> B
    AC["User Interface"] --> B
    AD["User Interface"] --> B
    AE["User Interface"] --> B
    AF["User Interface"] --> B
    AG["User Interface"] --> B
    AH["User Interface"] --> B
    AI["User Interface"] --> B
    AJ["User Interface"] --> B
    AK["User Interface"] --> B
    AL["User Interface"] --> B
    AM["User Interface"] --> B
    AN["User Interface"] --> B
    AO["User Interface"] --> B
    AP["User Interface"] --> B
    AQ["User Interface"] --> B
    AR["User Interface"] --> B
    AS["User Interface"] --> B
    AT["User Interface"] --> B
    AU["User Interface"] --> B
    AV["User Interface"] --> B
    AW["User Interface"] --> B
    AX["User Interface"] --> B
    AY["User Interface"] --> B
Note: While you use the split screen feature, other projector features may not be available and some settingsmaybeautomaticallyappliedtoallimages.
Note: You cannot use split screen with certain input source combinations. You cannot perform split screen projection when the Connect ELPCB02 setting is set to On in the Installation menu.
Note: If you are projecting content from one source, you can split the projected image with a whiteboard screen.Clickthelinkbelowformoreinformation.
- PresstheSplitbuttonontheremotecontrol.
Note: You can also select SplitScreen from the Homescreen.
You are prompted forthenumberofscreens.
- Select 2 Screens or 4 Screens, depending on the number of input sources you want to project.
If you selected 2 Screens, the currently selected input source moves to the left side of the screen. If youselected4Screensandusedthesplitscreenfeaturetoprojectfourimagesbefore,the projectedimagesarearrangedinthesameorderastheywerepreviously.
3.PresstheMenubutton.
Youseeascreenlikethis:
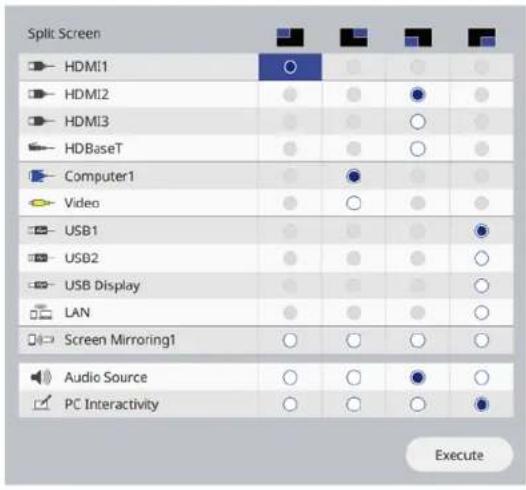
4.PressthearrowandEnterbuttonstoselectanimagesourceforeachsectionofthescreen.
5. To choose the audio you want to hear, select an input source as the Audio Sources setting.
6. Toselecttheinputsourcetobecontrolledbyfingerorpeninteractivity,selectaninputsourceasthePCInteractivitysetting.
Note: A Touch Unit is optional for the BrightLink 1480Fi and must be installed to enable finger touch operation.
-
If you selected 2 Screens and want to change the size of the images, select a sizing option as the ScreenSizesetting.
-
SelectExecuteandpressEnter
-
Toexitthesplitscreenfeature, presstheSplitorEscbutton.
InputSourcesforSplitScreenProjection
Parenttopic: AdjustingProjectorFeatures
Relatedtasks
SplittingtheProjectedImagewithWhiteboardMode
InputSourcesforSplitScreenProjection
You can choose most inputs source combinations for splits screen projection, but the following combinations are not supported:
•HDMI2,HDMI3,HDBaseT
•Computer1, Computer2, Video
• USB1, USB2, USB Display, LAN
Note: The HDBaseT source is available only for the Bright Link 1485Fi.
Parenttopic: Projecting Multiple Images Simultaneously
ProjectorSecurityFeatures
You can secure your project to do better the for prevent unintended use by setting up the following security features:
- Passwordsecuritytopreventtheprojectorfrombeingturnedon,andpreventchangestothestartup screenandothersettings.
- Buttonlocksecuritytoblockoperationoftheprojectorusingthebuttonsonthecontrolpanel.
•Securitycablingtophysicallycabletheprojectorinplace.
PasswordSecurityTypes
LockingtheProjector'sButtons
InstallingaSecurityCable
Parenttopic: AdjustingProjectorFeatures
PasswordSecurityTypes
Youcansetupthesetypesofpasswordsecurityusingonesharedpassword:
- Power On Protection password prevents anyone from using the projector without first entering a password.
- User's Logo password prevents anyone from changing the custom screen the projector can display when it turn on. The presence of the custom screen is to identify the projector's owner.
• Networkpasswordpreventsanyonefromchangingthenetworksettingsintheprojectormenus.
- Schedule password prevents anyone from changing the projector's time or schedule settings.
- Interactivepasswordpreventsanyonefromchangingtheprojector'sinteractivesettings.
SettingaPassword
SelectingPasswordSecurityTypes
EnteringaPasswordtoUsetheProjector
SavingaUser'sLogolmagetoDisplay
Parenttopic:ProjectorSecurityFeatures
SettingaPassword
Tousepasswordsecurity,youmustsetapassword.
Note: Thedefaultpasswordissetto0000.
- Hold down the Freeze button on the remote control for about five seconds or until you see this menu.
![[ Password Protection ] Power On Protection Off Menu Protection Password](/content/2026/05/1053810/images/85ab374088f0ab8638a721ce4d4d7fac8c38112063b67aae132f4e818e921274.jpg)
- PressthedownarrowtoselectPasswordandpressEnter.
Youseetheprompt"Changethepassword?".
-
SelectYesandpressEnter.
-
Press and hold down the Num button on the remote control and use the numeric buttons to set a four-digit password.
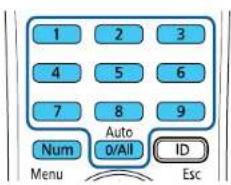
Thepassworddisplaysas****asyouenterit. Thenyouseetheconfirmationprompt.
5.Enterthepasswordagain.
Youseethemessage"Passwordaccepted."
- PressEsctoreturntothemenu.
7.Makeanoteofthepasswordandkeepitinasafeplaceincaseyouforgetit.
Parenttopic:PasswordSecurityTypes
SelectingPasswordSecurityTypes
Aftersettingapassword,youseethismenu,allowingyoutoselectthepasswordsecuritytypesyouwanttouse.
| [ Password Protection ] | |
| Power On Protection | Off |
| Menu Protection | |
| Password | |
If you do not see this menu, hold down the Freeze button on the remote control for about five seconds or untilthemenuappears.
- To prevent unauthorized use of the projector, select Power On Protection, press Enter, select On, press Enter again, and press Esc.
- To prevent changes to certain projector settings, select Menu Protection, press Enter, and do the followingasnecessary:
- To prevent changes to the User's Logo screen or related display settings, select User's Logo, press Enter, select On, press Enter again, and press Esc.
- To prevent changes to the projector's time or schedule settings, select Schedule, press Enter, selectOn, pressEnteragain, andpressEsc.
- To prevent changes to network settings, select Network, press ↕ Enter, select On, press ↕ Enter again, and press Esc.
- To prevent changes to the projector's interactive settings, select Interactive, press Enter, select On, press Enter again, and press Esc.
YoucanattachthePasswordProtectstickertotheprojectorasanadditionaltheftdeterrent.
Note: Be sure to keep the remote control in a safe place; if you lose it, you will not be able to enter the passwordrequiredtousetheprojector.
Parenttopic: PasswordSecurityTypes
EnteringaPasswordtoUsetheProjector
If a password is set up and a Power On Protection password is enabled, you see a prompt to enter a passwordwheneveryouturnontheprojector.
[Password]
Enter the password.
See your documentation for more information.
Youmustenterthecorrectpasswordtousetheprojector.
- Press and hold down the Num button on the remote control while you enter the password using the numericbuttons.
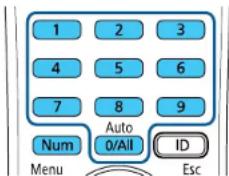
Note: The default password is 0000.
Thepasswordscreencloses.
-
If the password is incorrect, the following may happen:
-
Youseea"wrongpassword"messageandaprompttotryagain.Enterthecorrectpasswordto proceed.
- If you have forgotten the password, make note of the RequestCode: xxxx number that appears on the screen and contact Epson Support.
- If you enter an incorrect password three times in succession, you see a message getting you that the projector is locked. After the message is displayed for 5 minutes, the projectorenters standby mode. Unplug the projector, plugin the power cord, and turn the projector. You see a prompt to enter the password.
- If you continueto enter an incorrect password many times in succession, the projector displays a request code and messages a contact Epson Support. Donot attempt to enter the password again. When you contact Epson Support, provided displayed request code and proof of ownership for assistance in unlocking the projector.
Parenttopic:PasswordSecurityTypes
Relatedreferences
WheretoGetHelp
SavingaUser'sLogolmagetoDisplay
Youcantransferanimagetotheprojectorandthendisplayitwhenevertheprojectorturnson. Youcan alsodisplaytheimagewhentheprojectorisnotreceivinganinputsignalorwhenyoutemporarilystop projection. ThistransferredimageiscalledtheUser'sLogoscreen.
TheimageyouselectastheUser'sLogocanbeaphoto,graphic,orcompanylogo,whichisusefulin identifyingtheprojector'sownertohelpdetertheft.YoucanpreventchangestotheUser'sLogoby settinguppasswordprotectionforit.
Note: You cannot save an image that is protected by HDCPasaUser's Logo.
Note: When you copy the menu settings from one projector to another using the batch setup feature, the userlogoisalsocopied.Donotincludeanyinformationintheuserlogothatyoudonotwanttoshare betweenmultipleprojectors.
-
Display the image you want to project the User's logo.
-
Press the Menu button, select the Management menu, and press ↕ Enter.
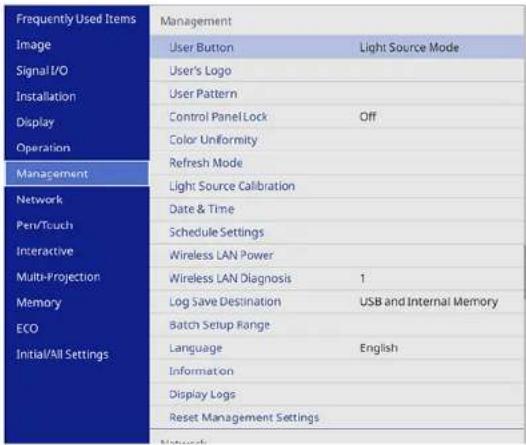
-
SelecttheUser'sLogosettingandpressEnter
-
SelectStartSettingandpressEnter
Youseeapromptaskingifyouwanttousethedisplayedimageasauser'slogo.
Note: When you select User's Logo, adjustments such as Geometry Correction, E-Zoom, Aspect, Scale (BrightLink 1485Fi), and Screen Type are temporarily canceled.
- SelectYesandpressEnter!
Note: Depending on the imagesignal, the screensize may change to match the resolution of the imagesignal.
-
Make sure the image appears as you want it, then select Yes again and press Enter. Youseeacompletionmessage.
-
PressEsctoexitthemessagescreen.
-
SelecttheDisplaymenuandpressEnter
-
SelectwhenyouwanttodisplaytheUser'sLogoscreen:
-
To display it whenever there is no input signal, select No-Signal Screen and set it to Logo.
- To display it whenever you turn the projector on, select Startup Screen and set it to On.
TopreventanyonefromchangingtheUser'sLogosettingswithoutfirstenteringapassword,seta passwordandenableUser'sLogosecurity.
Parenttopic: PasswordSecurityTypes
Relatedtasks
SelectingPasswordSecurityTypes
SettingaPassword
LockingtheProjector'sButtons
Youcanlockthebuttonsontheprojector'scontrolpaneltopreventanyonefromusingtheprojector.You canlockallthebuttonsonallthebuttonsexceptthepowerbutton.
- PresstheMenubutton.
2. SelecttheManagementmenuandpressEnter.
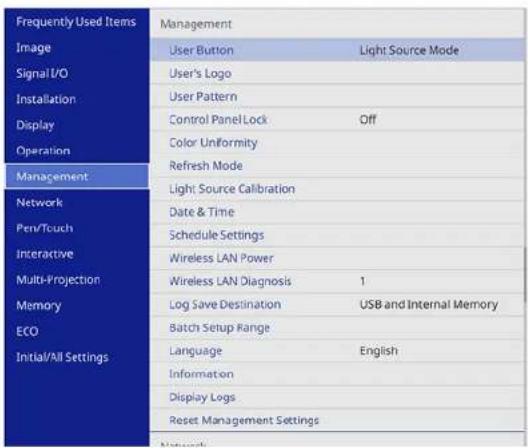
- SelecttheControlPanelLocksettingandpressEnter.
-
SelectoneoftheselocktypesandpressEnter:
-
Tolockalloftheprojector'sbuttons,selectFullLock.
- Tolockallbuttonsexceptthepowerbutton,selectExceptforPower.
Youseeaconfirmationprompt.
- SelectYesandpressEnter.
UnlockingtheProjector'sButtons
Parenttopic:ProjectorSecurityFeatures
UnlockingtheProjector'sButtons
If the projector's buttons have been locked, hold the Enter button on the projector's control panel for seven seconds to unlock them. You can also set the Control Panel Lock setting to Off in the Managementmenu.
Parenttopic:LockingtheProjector'sButtons
Relatedreferences
AdministrationSettings-ManagementMenu
InstallingaSecurityCable
Youcaninstalltwotypesofsecuritycablesontheprojectortodetertheft.
- Use the security slot on the project to attack a Kensington lock. See your local computer or electronics dealer for purchase information.
- Use the security cable attachment point on the project to attach a wire cable and secure it to a room fixture or heavy furniture.
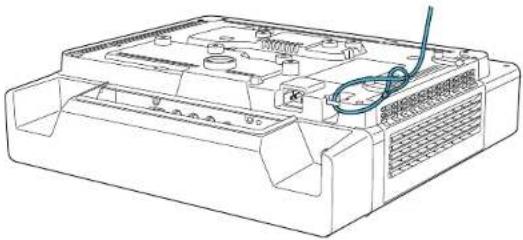
natural_image
Line drawing of a rectangular electronic device casing with internal components and a cable inserted (no text or symbols)Note: Do not pass drop-prevention cables through the security cable attachment point when mounting the projectoronawallorceiling.
Parenttopic: ProjectorSecurityFeatures
CreatingaUserPatterntoDisplay
Youcantransferanimagetotheprojectorandthendisplayitasapatterntoaidinpresentationswhen youusethePatternDisplayfeature. ThistransferredimageiscalledtheUserPattern.
Note: Once you save a user pattern, you cannot restore the default pattern.
-
Display the image you want to project the User Pattern from a connected computer or video source.
-
Press the Menu button, select the Management menu, and press Enter.
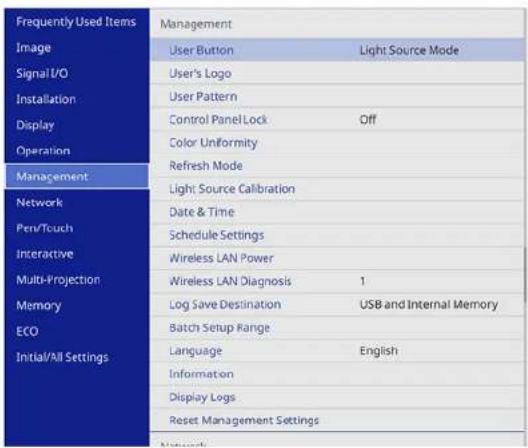
- Select the UserPatternsetting and press Enter.
YouseeapromptaskingifyouwanttousethedisplayedimageasaUserPattern.
Note: When you select User Pattern, adjustments such as Keystone, E-Zoom, Aspect, Adjust Zoom, orImageShiftaretemporarily canceled.
- SelectYesandpressEnter.
Note: It takes a few moments for the projector to save the image; do not use the projector, its remote control, oranyconnectedequipmentuntilitisfinished.
Youseeacompletionmessage.
- PressEsctoexitthemessagescreen.
To view your user pattern, press the Menu button, select the Display menu, and press Enter. Set the Pattern Type setting to User Pattern, then return to the Display menu and select Pattern Display.
Parenttopic:AdjustingProjectorFeatures
SavingSettingstoMemoryandUsingSavedSettings
Youcansavecustomizedsettingsforeachofyourvideoinputsandthenselectthesavedsettings wheneveryouwanttousethem.
- Turnontheprojectoranddisplayanimation.
2.PresstheMenubutton. - SelecttheMemorymenuandpressEnter.
Youseethisscreen:
| Frequently Used Items | Scale | |
| Image | Color Uniformity | |
| Signal I/O | Light Source Mode | Normal |
| Installation | Color Matching | |
| Display | RGBCMY | |
| Operation | Reset Multi-Projection Settings | |
| Management | Memory | |
| Network | Save Memory | |
| Pen/Touch | Load Memory | |
| Interactive | Rename Memory | |
| Multi-Projection | Erase Memory | |
| Reset Memory | ||
| Memory | ECO | |
| ECO | Light Source Mode | Normal |
| Initial/All Settings | Sleep Mode | On |
| Standby Mode | Communication On | |
| Initial/All Settings | ||
| Reset All | ||
-
Selectoneofthefollowingoptions:
-
LoadMemory:Overwritesyourcurrentsettingswithsavedsettings
- SaveMemory: Savesyourcurrentsettingstomemory(10memorieswithdifferentnamesare available)
Note: Amemorynamethathasalreadybeenusedisindicatedbyabluemark. Savingovera previously saved memory over writesthesettings with your current settings.
- EraseMemory: Erasestheselectedmemorysettings
•RenameMemory: Renamesasavedmemory -
ResetMemorySettings: Deleteallsavedmemory
-
PressEsctoexit.
Parenttopic: AdjustingProjectorFeatures
CopyingMenuSettingsBetweenProjectors
Afteryouselectmenusettingsforyourprojector,youcantransferthemtoanotherprojectorofthesame model.
Note: Copy the projector's settings before you adjust the projected image using the projector's Geometry Correctionsettings.AnysavedUser'sLogosettingontheprojectorwilltransfertotheotherprojector.
Caution: If the copy process fails due to a power failure, communication error, or for any other reason, Epsonwillnotberesponsibleforanyrepaircostsincurred.
The following settings will not transfer between projectors:
•LightSourceHours
- Status
The following settings will not transfer between projectors if you set the Batch Setup Range setting to Limited:
- PasswordProtectionsettings
•EDIDintheSignall/Omenu
•Networkmenusettings
Note: In addition to the methods covered in this section, you can also copy and transfer settings to multipleprojectorsoveranetworkusingtheEpsonProjectorManagementsoftware.Seetheonline Epson Projector Management Operation Guide for instructions. You can download the latest software anddocumentationfromtheEpsonwebsite.
SavingSettingstoaUSBBFlashDrive
TransferringSettingsfromaUSBFlashDrive
SavingSettingstoaComputer
TransferringSettingsfromaComputer
Parenttopic: AdjustingProjectorFeatures
SavingSettingstoaUSBFlashDrive
YoucansavetheprojectorsettingsyouwanttotransfertoaUSBflashdrive.
Note: Use an empty flash drive. If the drive contains other files, the transfer may not complete correctly. TheflashdrivemustusetheFATformatandcannothaveanysecurityfeatures.
- Turnoff the projector and unplug the power cord from the projector's power inlet.
- Insert the flash drive into the USB-A1 or USB-A2 port.
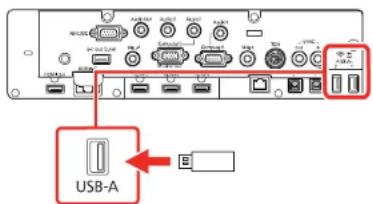
Note: Connect the flash drive directly to the projector. Do not use a hub or your settings may not be saved correctly.
-
Press and hold the Esc button on the control panel or remote control as you connect the power cord totheprojector'spowerinlet.
-
When the On/Standby and Status lights are blue, and the Laser and Templights are orange, release the Esc button.
Thelightsflashtoindicate that settings are transferring to the flash drive. Whenthelightsstop flashing, the On/Standby light turns blue and the projectorentersstandbymode.
Caution: Do not unplug the power cord or remove the flash drive while the lights are flashing. This could damage the projector.
- Oncetheprojectorentersstandbymode, removetheflashdrive.
Note: If the projector does not enter standby mode and the lights continue flashing, see the link belowforasolution.
Parenttopic: CopyingMenuSettingsBetweenProjectors
TransferringSettingsfromaUSBFlashDrive
AftersavingprojectorsettingstoaUSBflashdrive,youcantransferthemtoanotherprojectorofthe samemodel.
Note: Make sure the USB flash drive contains only a single settings transfer from another projector of the same model. The settings are contained in a file called pjconfdata.bin. If the drive contains other files, the transfer may not complete correctly.
Donotadjustimagesettingsonaprojectoruntilafteryoutransfersettingstoit. Otherwise, you may have to repeat your adjustments.
- Turnoff the projector and unplug the power cord from the projector's power inlet.
- Insert the flash drive into one of the USB-Aports.
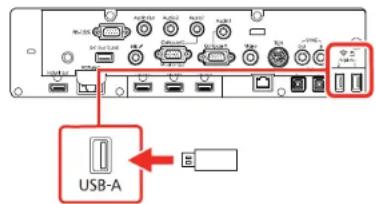
Note: Connect the flash drive directly to the projector. Do not use a hub or your settings may not be saved correctly.
- Press and hold the Menu button on the control panel or remote control as you connect the power cordtotheprojector'spowerinlet.
- When the On/Standby and Status lights are blue, and the Laser and Templights are orange, release the Menubutton.
Thelightsflashtoindicatethatsettingsaretransferringtotheprojector.Whenthelightsstop flashing,theOn/Standbylightturnsblueandtheprojectorentersstandbymode.
Caution: Do not unplug the power cord or remove the flash drive while the lights are flashing. This could damage the projector.
- Oncetheprojectorentersstandbymode, removetheflashdrive.
Note: If the projector does not enter standby mode and the lights continue flashing, see the link belowforasolution.
Parenttopic: CopyingMenuSettingsBetweenProjectors
SavingSettingstoaComputer
Youcansavetheprojectorsettingsyouwanttotransfertoacomputer.
Yourcomputermustberunningoneofthefollowingoperatingsystems:
- Windows7
- Windows8.x
- Windows10
-OSX10.11.x
•macOS10.12.x
•macOS10.13.x
•macOS10.14.x
-
Turnoff the projector and unplug the power cord from the projector's power inlet.
-
ConnectaUSBcabletoyourprojector'sUSB-B1port.
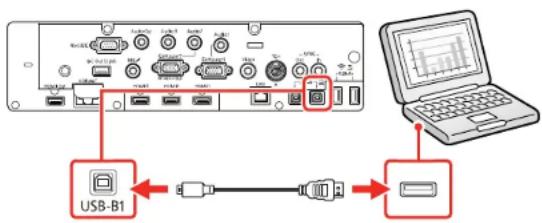
-
ConnecttheotherendtoanyavailableUSBportonyourcomputer.
-
Press and hold the Esc button on the control panel or remote control as you connect the power cord totheprojector'spowerinlet.
-
When the On/Standby and Status lights are blue, and the Laser and Templights are orange, release the Esc button.
Theprojectorshowsupasaremovablediskonyourcomputer.
-
Opentheremovablediskandcopythepjconfdata.binfiletoyourcomputer.
-
Oncethefilehascopied, dooneofthefollowing:
- Windows: Open the My Computer, Computer, Windows Explorer, or File Explorer utility. Right-clickthenameofyourprojector(listedasaremovabledisk)andselectEject.
•Mac:Dragtheremovablediskiconforyourprojectorfromthedesktopintothetrash.
TheprojectorturnsoffwhenyoudisconnecttheUSBcable.
Note: If the projector does not turn off and the lights continue flashing, see the link below for a solution.
Parenttopic: CopyingMenuSettingsBetweenProjectors
TransferringSettingsfromaComputer
Aftersavingprojectorsettingstoacomputer,youcantransferthemtoanotherprojectorofthesame model.
Yourcomputermustberunningoneofthefollowingoperatingsystems:
- Windows7
- Windows8.x
- Windows10
-OSX10.11.x
•macOS10.12.x
•macOS10.13.x
•macOS10.14.x
Donotadjustimagesettingsonaprojectoruntilafteryoutransfersettingstoit. Otherwise, you may have to repeat your adjustments.
- Turnoff the projector and unplug the power cord from the projector's power inlet.
- ConnectaUSBcabletoyourprojector'sUSB-B1port.
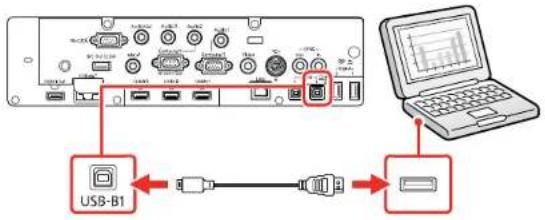
- ConnecttheotherendtoanyavailableUSBportonyourcomputer.
- Press and hold the Menu button on the control panel or remote control as you connect the power cordtotheprojector'spowerinlet.
- When the On/Stand-by and Status lights are blue, and the Laser and Templights are orange, release the Menubutton.
Theprojectorshowsupasaremovablediskonyourcomputer.
- Copy the pjconf data.bin file from your computer to other removable disk.
Note: Donotcopyanyotherfilestotheremovabledisk.
-
Oncethefilehascopied,dooneofthefollowing:
-
Windows: Open the My Computer, Computer, Windows Explorer, or File Explorer utility. Right-clickthenameofyourprojector(listedasaremovabledisk)andselectEject.
•Mac:Dragtheremovablediskiconforyourprojectorfromthedesktopintothetrash.
Various projector lights start flashing to indicate that the projector's settings are being updated. Whentelights stop flashing, remove the USB cable from the projector. The projectorenters standby mode.
Caution: Donotunplugthepowercordwhilethelightsareflashing. This could damage the projector.
Note: If the projector does not turn off and the lights continue flashing, see the link below for a solution.
Parenttopic: CopyingMenuSettingsBetweenProjectors
SchedulingProjectorEvents
Youcansaveaprojectorcommand, suchasturningtheprojectoronorofforswitchinginputsources, as an"event."Youcanschedulewhenyouwanttheprojectortoautomaticallyexecutethecommand.
Caution: Do not place flammable objects in front of the lens. If you schedule the projector to turn on automatically, flammable objects in front of the lens could catch on fire.
Note: The Schedule setting in the Menu Protection menu must be turned off to schedule an event.
SavingaScheduledEvent
ViewingScheduledEvents
EditingaScheduledEvent
Parenttopic: AdjustingProjectorFeatures
Relatedtasks
SelectingPasswordSecurityTypes
SettingaPassword
SavingaScheduledEvent
Youcanselectprojectorcommandsyouwanttoperformandschedulethemasanevent.
Note: Light Source Calibration events do not start if the projector is not used continuously for at least 20 minutes, or if the projector is regularly turned off by shutting off the power outlet. Set Light Source Calibration event to occur only after 100 hours of usage.
Note: The Schedule setting in the Menu Protection menu must be turned off to schedule an event.
- SetthedateandtimeintheManagementmenu.
2.PresstheMenubutton. - SelecttheManagementmenuandpressEnter.
-
SelecttheScheduleSettingssettingandpressEnter.
-
SelecttheSchedulemenuandpressEnter.
- SelectAddNewandpressEnter.
Youseeascreenlikethis:
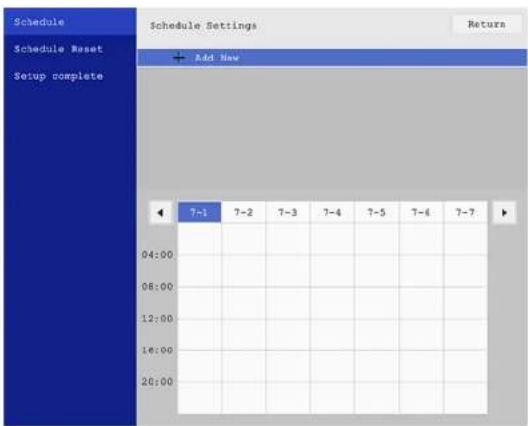
- In the Event Settings section, select the events you want to have occur. (Select No Change for eventsthatyoudonotwanttooccur.)
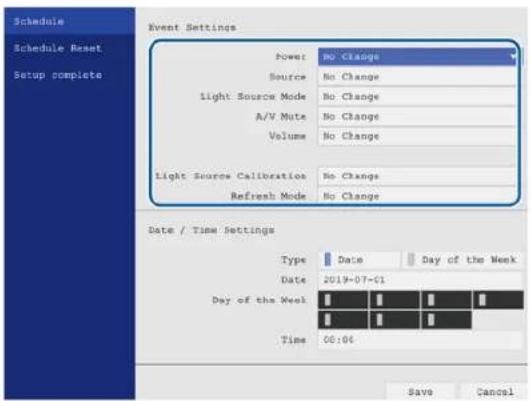
- In the Date/Time Settings section, set the date and time for the scheduled event to occur.
- When you are finished, select Save and press Enter.
- Toschedulemoreevents, repeat the previous steps as necessary.
- SelectSetupcompleteandpressEntertosaveyourchanges.
Parenttopic: SchedulingProjectorEvents
ViewingScheduledEvents
YoucanviewyourscheduledeventsonthecalendardisplayedontheScheduleSettingsscreen.
- PresstheMenubutton.
- SelecttheManagementmenuandpressEnter.
- SelectScheduleSettingsandpressEnter.
- SelectScheduleandpressEnter.
Youseeascreenlikethis:
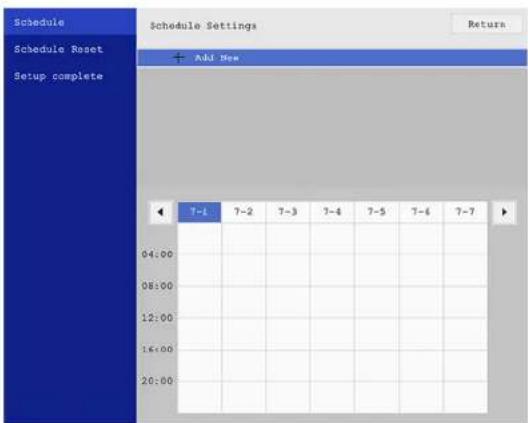
Coloredboxesonthecalendarindicatethefollowing:
One-timeevent
Repeatingevent
Eventisinvalid
Communicationisonoroff
- Toviewanevent, presstheleftandrightarrowbuttonsontheremotetoselectaday.
Thescreendisplaysthedetailsoftheeventsscheduledforthatday.Ablueiconindicatesan enabledevent,agrayiconindicatesadisabledevent,andtheiconindicatesarepeatingevent.
Parenttopic: SchedulingProjectorEvents
EditingaScheduledEvent
Youcaneditanycurrentlyscheduledevent.
-
PresstheMenubutton.
-
SelecttheManagementmenuandpressEnter.
- SelecttheScheduleSettingssettingandpressEnter.
Youseeascreenlikethis:
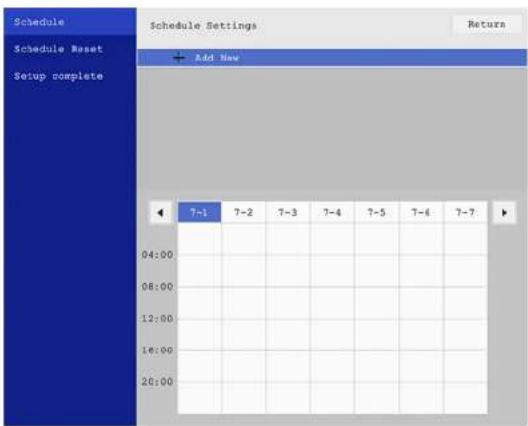
4.Presstheleftorightarrowbuttonstohighlightthedateonthecalendarcontainingthescheduled eventyouwanttoedit.
5.Presstheupordownarrowbuttonstohighlighttheeventyouwanttoedit,andpressEnter.
6. Selectoneofthefollowing:
- Enabled/Disabledtoenableordisabletheselectedevent.
•Edittoeditthesettingsfortheselectedevent.
•Cleartodeletetheselectedevent. -
AddNewtoaddanewscheduledevent.
-
When you are finished, select Return and press Enter.
-
SelectSetupcompleteandpressEntertosaveyourchanges.
Note: To delete all scheduled events, select Schedule Reset and select Yes.
Parenttopic: SchedulingProjectorEvents
UsingtheInteractiveFeatures
Followtheinstructionsinthesesectionstouseyourprojector'sinteractivefeatures.
InteractiveModes
UsingtheInteractivePens
UsingFingerTouchInteractivity
UsingBrightLinkwithaComputer
WindowsPenInputandInkTools
WhiteboardMode
UsingBrightLinkWithoutaComputer
SplittingtheProjectedImagewithWhiteboardMode
SharingtheProjectedScreen
Using Interactive Features with Two Projectors (DuoLink)
InteractiveModes
TheBrightLinkinteractivefeaturesturnanyflatwallintoaninteractivewhiteboard,eitherwithorwithoutacomputer. Theseinteractivemodesareavailable:
• In Whiteboard mode, you can use one or both interactive pens and up to 6 finger stowrite on the projected "whiteboard". You can split these screen and interact with the whiteboard and another projected source. You can insert images from a USB drive or scanner and save, print, oremaily your whiteboard pages without connecting a computer.
• Inbuilt-inAnnotationmode(PCFreeAnnotation), youcanannotateovercontentprojectedfroma computer, tablet, documentcamera, or othersource. Youcancaptureyourannotatedpages, and saveorprintthem. Youcanevensplitthescreenandannotateonuptofourimagesatthesametime, usingoneorbothpensoryourfinger.
•InPCInteractivemode, youcanusetheinteractivepenoryourfingerasamousetonavigate, select, andscrollthroughcontentfromyourcomputer.Youcansplitthescreenintofourandinteractwiththe computerononescreenandannotateanimationontheotherthreescreens.
Note: A Touch Unit is optional for the BrightLink 1480Fi and must be installed for finger touch operation.
Note: You can also use the Easy Interactive Tools software to provide additional interactive features, such as saving your annotations and printing them. See the online Easy Interactive Tools Operation Guidefordetailedinstructions.
Using the Projected Screenasa Whiteboard (Built-in Whiteboard Mode)
DrawingonaProjectedImage(Built-inAnnotationMode)
ControllingComputerFeaturesfromaProjectedScreen(PCInteractiveMode)
Parenttopic: Using the Interactive Features
Using the Projected Screenasa Whiteboard (Built-in Whiteboard Mode)
Youcanusetheinteractivepensoryourfingertowriteordrawontheprojectionsurfacejustasyou wouldonachalkboardordryeraseboard.Youcanuseonepen,bothpensatthesametime,ora combinationofpensandfingertouch.
Note: A Touch Unit is optional for the BrightLink 1480Fi and must be installed for finger touch operation.
1.PresstheHomebuttonontheremotecontrolandselectWhiteboard.
Youseethewhiteboardscreen, withthetoolbaronthebottomofthescreen:
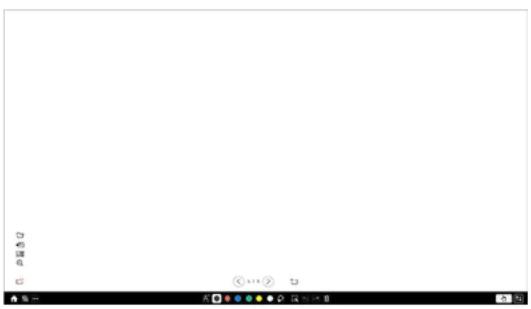
natural_image
Blank white canvas with no visible text, symbols, or graphics-
Tomovethetoolbartotheright, left, top, or bottom of the screen, use the penory our fingertodragit to the desired location.
-
Toshoworhidethetoolbar, selecttheicon.
Note: You can also show or hide the projector control toolbar by setting the Interactive > Display Toolbars setting to Always Show or Hide for Set Time.
Parenttopic: InteractiveModes
Relatedreferences
InteractiveSettings-InteractiveMenu
DrawingonaProjectedImage(Built-inAnnotationMode)
Youcanprojectfromacomputer, tablet, videodevice, or othersource and annotate over your projected content using the interactive sensory your finger. You can use one pen, both pens at the same time, or a combination of pens and fingert touch.
Note: A Touch Unit is optional for the BrightLink 1480Fi and must be installed for finger touch operation.
- Projectanimagefromaconconnecteddevice.
Youseethetoolbaronthebottomoftheprojectedimage.
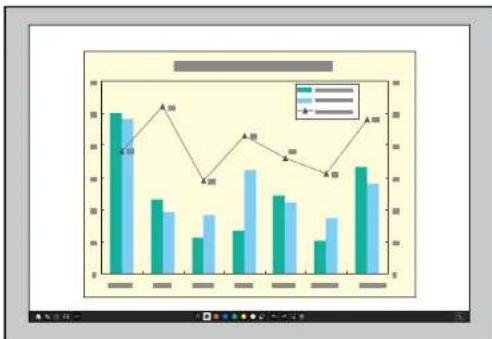
bar_line
| Category | Series 1 | Series 2 | |---|---|---| | 1 | 85 | 75 | | 2 | 60 | 55 | | 3 | 40 | 45 | | 4 | 50 | 65 | | 5 | 60 | 50 | | 6 | 40 | 55 | | 7 | 70 | 60 | | 8 | 80 | 70 |-
Tomovethetoolbartotheright, left, top, orbottomofthescreen, usethepenoryourfingertodragit tothedesiredlocation.
-
Toswitchtooneoftheotherinteractivemodes,dooneofthefollowing:
- Tosplitthescreenwithwhiteboardmode,selecttheWhiteBoardicononthetoolbar.
- ToswitchtoPCInteractivemode, switchtotheinputsourcefortheconnectedcomputerorselect the PC Interactivity icon on the toolbar and make sure it is set to On if the computerisalreadyconnected.
- Toshoworhidethetoolbar, selecttheicon.

Note: You can also show or hide the projector control toolbar by setting the Interactive > Display Toolbars setting to Always Show or Hide for Set Time.
Parenttopic: InteractiveModes
Relatedreferences
InteractiveSettings-InteractiveMenu
ControllingComputerFeaturesfromaProjectedScreen(PCInteractiveMode)
Youcannavigate, select, and interact with your computer programs from the projected screen using the interactive pensory our finger just as you would damouse.
Note: A Touch Unit is optional for the BrightLink 1480Fi and must be installed for finger touch operation. MacusersneedtoinstalltheEasyInteractiveDriverbeforeusingPCIinteractiveemode.Gotoepson.com/support (U.S.) or epson.ca/support (Canada) and select your projector.
-
Connect your computerto any available video input port on the projector other than a USB port.
-
Connect your computer to the projector's USB-B1 port.
Note: When using the control pad (BrightLink1485Fi), you need to connect your computer to the control pad with an HDMI cable and a USB cable plugged in to the control pad's USB-B port. If you are connecting over an network, you donot need a USB cable.
-
Turnonyourprojectorandcomputertoprojectyourcomputerscreen.
-
Press the Menu button on the remote control, select the Pen/Touch menu, and press the Enter button.
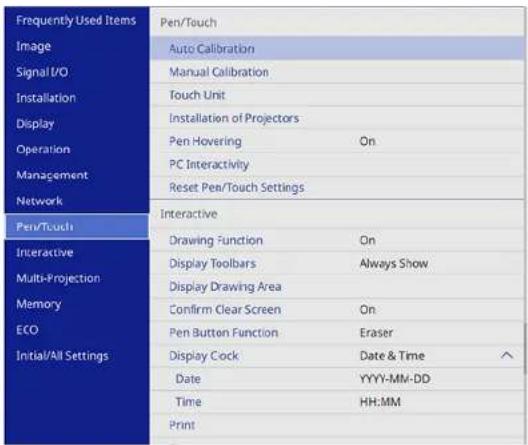
- SelectthePCInteractivitysettingandpresstheEnterbutton.
- Selectone of the following as the Pen Tracking Mode depending on the operating system your computer is using:
•PenMode:WindowsorMac
- MouseMode:Ubuntu
-
Press the ↕ Enter button and press the Menu button to exit the projector's menus.
-
Hovernearortapontheboardortheprojectedimagewiththeinteractivepenoryourfinger.
- MakesurethatPCInteractivityisenabledonthetoolbar.
Note: YoucanusePCInteractivemodewhenconnectedoveranetworkorwithaUSBcable (connectingviaUSBisrecommended).WhenconnectedviaUSB, enabletheUSBDisplaysetting in the projector's Signal I/O menu and connect the computer to the projector's USB-B1 port or the USB-Bportonthecontrolpad(BrightLink1485Fi).WhenprojectingusingUSBDisplay, response timemaybeslower.
Youcannowoperatethecomputerusingtheinteractivepensoryourfinger.
PCInteractiveModeSystemRequirements
Parenttopic: InteractiveModes
PCInteractiveModeSystemRequirements
YourcomputersystemmustmeetthesystemrequirementsheretousePCInteractiveemodeandEasy InteractiveTools.
Note: Easy Interactive Driver must be installed and running to use Easy Interactive Tools on a Mac.
| RequirementWindows | Mac | |
| OperatingsystemWindows | 7SP1Ultimate,Enterprise,Professional,andHomePremium(32-and64-bit) | OSX10.11.x;macOS10.12.x,macOS10.13.x,macOS10.14.x(64-bit) |
| Windows8.1,ProandEnterprise(32-and64-bit) | ||
| Windows10HomeandPro(32-and64bit) | ||
| CPUIntelCore2Duo1.2 | GHzorfaster(IntelCorei3orfasterrecommended) | IntelCore2Duo1.2GHzorfaster(IntelCorei5orfasterrecommended) |
| Memory1GBormore(2GBormore recommended) | 2GBormore(4GBormore recommended) | |
| Harddiskspace100MBormore | ||
| DisplayResolutionbetween1024×768and1920×1200,16-bitcolororgreater | ||
Parenttopic: Controlling Computer Features from a Projected Screen (PC Interactive Mode)
UsingtheInteractivePens
Followtheinstructionsinthesesectionstousetheinteractivepens.
UsingthePens
PenCalibration
Parenttopic: Using the Interactive Features
UsingthePens
Yourprojectorcamewithabluepenandanorangepen,identifiedbythecolorstripattheendofthe pen.Youcanuseeitherpen,orbothpensatthesametime(oneofeachcolor)inbuilt-inwhiteboardor annotationmode.
Makesurethepenbatteriesareinstalled.
Note: The pen turns off automatically after 15 seconds of inactivity. Hold the pen to turn the pen back on.
Note: If you are using two pens at the same time, make sure to use them at least 4 inches (10.16 cm) apart to avoid interference.
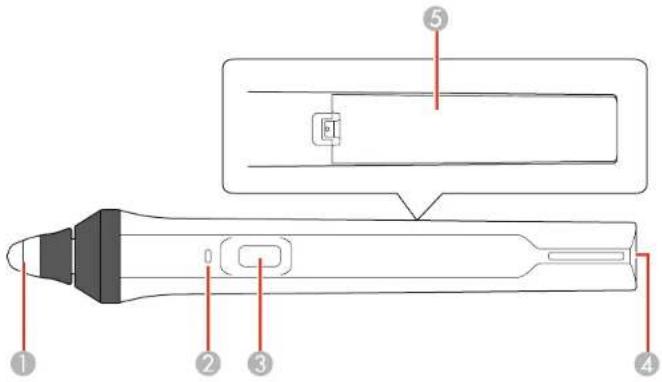
1 Pentip
2Batterylight
3Functionbutton
4Attachmentforoptionalstraporcord
5Batterycover
Note: To check the battery, press and hold the function button. If the battery is low, the light flashes. If the light does not turn on or flash, replace the battery.
- Forbestperformance, holdthepenperpendicular to the board, as shown below. Donot cover the black section near the tip of the pen.
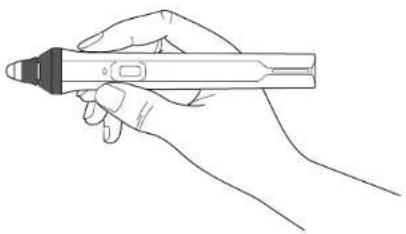
natural_image
Line drawing of a hand holding a pen (no text or symbols)- Towriteordrawontheprojectionsurfaceinbuilt-inAnnotationmodeorbuilt-inWhiteboardmode,do thefollowing:
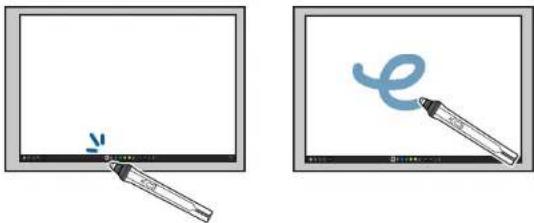
• Toselectaprojecteditem, suchasanicon, taptheprojectionsurface with the pentip.
• Todrawon the projected screen, tap the projections surface with the pen and drag it as necessary.
- Tomovethepointer, hoveroverthesurfacewithouttouchingit.
- Toswitchthepenfromdrawingtooltoeraseroradifferentfunction, pressthebuttonontheside.
Note: You can change the function of the button by changing the Pen Button Function setting in the Interactive menu.
•TousethepenasamouseinPCInteractivemode,dothefollowing:
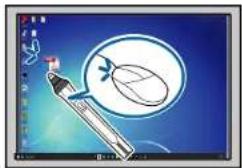
natural_image
Illustration of a pen and magnifying glass over a blue background with a circular emblem (no text or symbols)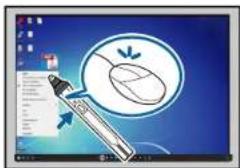
•Toleft-click,taptheboardwiththepentip.
• Todouble-click, taptwise.
- Toright-click, press the button on the side or press and hold the pen on the screen.
Note: Tomakealongpressofthepenactasaright-clickonaMacorPC, setthePenTracking Mode setting to Mouse Mode and set the Press and Hold setting to Right Click.
• Toclickanddrag, tapanddragwiththepen.
- Tomovethecursor, hoverovertheboardwithouttouchingit.
Note: You can turn off the hovering feature using the Pen Hovering setting in the projector's Pen/Touchmenu.
Parenttopic: Using the Interactive Pens
Relatedreferences
PenandTouchSetupSettings-Pen/TouchMenu
InteractiveSettings-InteractiveMenu
PenCalibration
Calibrationcoordinatesthepositionofthepenwiththelocationofyourcursor.Youonlyneedtocalibrate thefirsttimeyouuseyourproject'sinteractivefeatures.Calibrationresultsremainuntilyoucalibrate again.
Besuretocalibratethepenbeforeperformingfingertouchcalibration.
If you notice positioning discrepancies after doing any of the following, calibrate again:
•PerformingGeometryCorrection
- Adjustingtheimagesize
•UsingthelmageShiftfeature
- Movingtheprojector
Note: When two projectors are connected and projecting interactive content (BrightLink 1485Fi), draw a lineacrossthetwoscreensafterpencalibrationandmakesurethescreensarealignedcorrectly.Ifthe linepositiondoesnotmatch,realignthescreensandperformcalibrationagain.
Note: Moveanypenyouarenotusingawayfromtheprojectionscreenwhilecalibrating.
CalibratingAutomatically
CalibratingManually
Parenttopic: Using the Interactive Pens
CalibratingAutomatically
YoudonotneedthepensoracomputerforAutoCalibration.
Note: You can start Auto Calibration by pressing the User button on the remote control or by pressing the Menubuttonontheremotecontrolasdescribedhere.
- Press the Menu button, select the Pen/Touch menu, and press ↕ Enter.
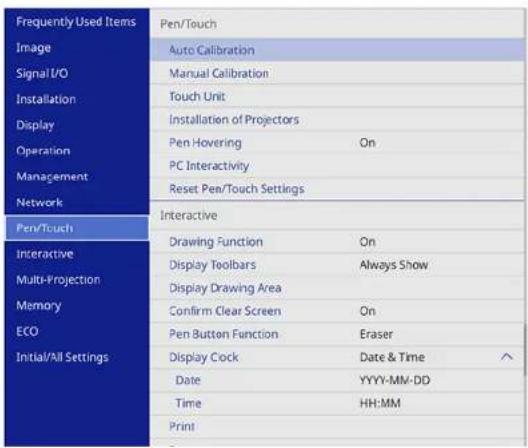
- SelectAutoCalibrationandpressEnter
Thisscreenappears:
![[ Auto Calibration. ] Setup the projector so that the patterned image fits within the frame of the screen. Calibration starts when preparations are complete. Do you want to continue? Yes No](/content/2026/05/1053810/images/83159bd3fc3e1c86b379b287089cf560b99aa9f56991e9b27ad5271a4cc672ca.jpg)
-
Adjust the image focus, if necessary.
-
Check that the image pattern fits into the projected display, then press ↕ Enter to select Yes.
Apatternappearsthendisappears, and the system is calibrated. If you see a message that calibration failed, you need to calibrate manually.
Thecursorlocationandpenpositions should match after calibration. If not, you may need to calibrate manually.
Parenttopic: Pen Calibration
Relatedtasks
CalibratingManually
CalibratingManually
If the cursor location and pen position on hot match after autocalibration, you can calibrate manually.
- Press the Menu button, select the Pen/Touch menu, and press ↕ Enter.
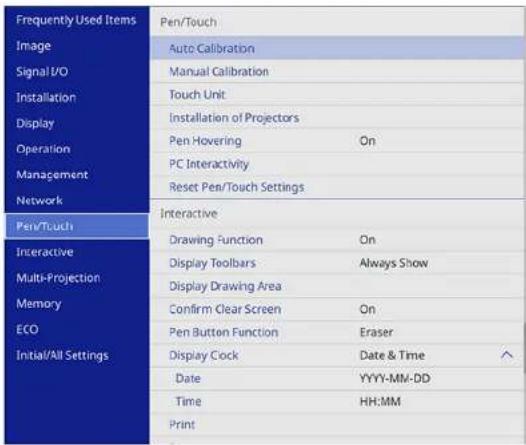
- SelectManualCalibrationandpressEnter
Thisscreenappears:
![[ Manual Calibration ] Touch each mark shown on the screen with the pen. Continue until you have touched all marks up to the final mark shown on the lower right. Calibration starts when preparations are complete. Do you want to continue? Yes No](/content/2026/05/1053810/images/21c34b251b266458881d77152c8ae47f31198b8cf3f5f35e02c2a45b9f30699b.jpg)
- Adjust the image focus, if necessary.
- PressEntertoselectYes.
Agreencircleappearsintheupperleftcornerofyourprojectedimage.
- Touch the center of the circle with the tip of the pen.
The circled disappears, and you see another circle below the first stone.
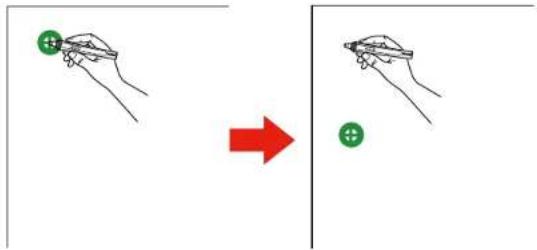
Note: For themostaccuratecalibration, makesureyoutouchthecenterofthecircle.
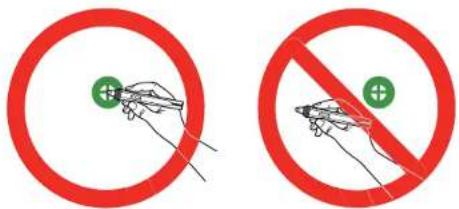
Note: Make sure you are not blocking the signal between the pen and the interactive receiver (next totheprojectorlens).
- Touch the center of then next circle, then repeat. When you get to the bottom of the column, then next circle appears at the top of a new column.
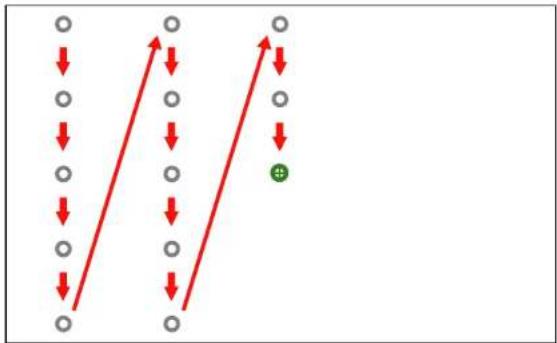
flowchart
graph TD
    A["Top Circle"] --> B["Down Arrow"]
    B --> C["Left Arrow"]
    C --> D["Right Arrow"]
    D --> E["Bottom Circle"]
    E --> F["Down Arrow"]
    F --> G["Left Arrow"]
    G --> H["Right Arrow"]
    H --> I["Green Plus"]
Note: If you make a mistake, press the Esc button on the remote control or control panel to go back to the previous circle. To cancel the calibration process, press and hold the Esc button for 2 seconds.
- Continue until all of the circles disappear.
Parenttopic: Pen Calibration
UsingFingerTouchInteractivity
Youcanuseyourfingertoperformthesamefunctionsastheinteractivepenswhenyouinstallthe TouchUnit.
Note: See the online Installation Guide for detailed instructions on installing the Touch Unit (BrightLink 1485Fi). If your product did not comewith a TouchUnit, you can use incompatible TouchUnit that you already have or you can purchase one as an optional accessory (BrightLink 1480Fi).
TouchUnitSafetyInstructions
CalibratingforFingerTouchInteractivity
UsingFingerTouchOperations
Parenttopic: Using the Interactive Features
TouchUnitSafetyInstructions
The TouchUnitenablesfingertouchinteractivitywithyourprojector.Donotconnectittoanyother projectorsordevices.
Abuilt-in, high-powerlaserisemitted from the laser diffusion portion the bottom of the Touch Unit.
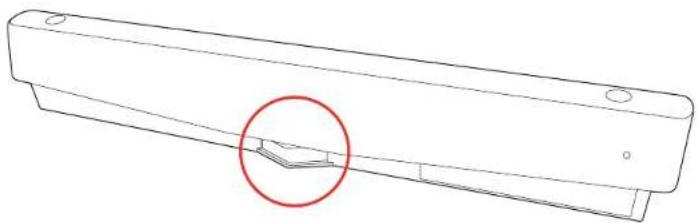
natural_image
Technical line drawing of a mechanical bracket with a red circle highlighting a small feature (no text or symbols)Followthese precautions when using the Touch Unit and fingertouchinteractivity:
- Childrenusingfingertouchinteractivityshouldalwaysbeaccompaniedbyanadult.
- NeverdisassembleormodifytheTouchUnit.NeveropenancasesontheprojectororTouchUnit. Electricalvoltagesinsidetheprojectorcancausesevereinjury.
- DonotlookintothelaserdiffusionportsonthebackoftheTouchUnit. Thelasercandamageyour eyes. Extracareshouldbetakenwhenchildrenarepresent.
- DonotallowthelaserlightfromtheTouchUnittopassthroughorbereflectedbyanyopticaldevices, suchasamagnifyingglassormirror. Thiscouldcausepersonalinjuryorfire.
- DonotviewthelaserlightfromtheTouchUnitusinganopticaldevicesuchasaneyeloupe, magnifyingglass,ormicroscope,especiallywithin2.75inches(70mm)ofthelaserdiffusionports. Thiscoulddamageyoureyes.
- Unplugtheprojectorfromtheelectricaloutletandreferallrepairstoqualifiedservicepersonnelifany problemsoccurwiththeTouchUnit.ContinueduseoftheTouchUnitmayresultinfireoraccidents, andcanalsodamageyoureyes.
The TouchUnitisaClass1laserproductthatcomplieswithIEC/EN60825-1:2007. The labels indicating the Class3BlaserproductandwarningsarelocatedinthefollowingareaontheTouchUnit:

Parenttopic: Using FingerTouchInteractivity
CalibratingforFingerTouchInteractivity
Fingertouchcalibrationcoordinatesthepositioningofyourfingerwiththelocationofthecursor.
Note: Make sure you have calibrated the pens, installed the Touch Unit, performed angle adjustment, and turned the Touch Unit on before calibrating for finger touch interactivity. See the online Installation GuideforTouchUnitinstallationandangleadjustmentinformation.
- Press the Menu button, select the Installation menu, and press Enter.
| Frequently Used Items | Installation | |
| Image | Fixed Installation | Off |
| Signal I/O | Test Pattern | |
| Installation | Setting Plate Installation Guide | |
| Display | Vertical Installation | No |
| Operation | Projection | Front/Upside Down |
| Management | Auto Screen Adjustment | |
| Network | Geometry Correction | Point Correction |
| Pen/Touch | Digital Zoom | |
| Interactive | Connect ELPCB02 | Off |
| Multi-Projection | Touch Unit | |
| Memory | Remote Receiver | Off |
| ECO | Screen Type | 16:9 |
| Initial/All Settings | High Altitude Mode | Off |
| Reset Installation Settings | ||
| Display | ||
| Pattern Display | ||
| Pattern Type | ||
2.SelectTouchUnitandpressEnter
| [ Touch Unit ] | Return | |
| Installation Pattern | ||
| Power | On | |
| Touch Unit Setup | ||
| Touch Calibration | ||
| Calibration Range | Wide | |
3.SelectTouchCalibrationandpressEnter
Thefollowingscreenappears:
[Touch Calibration]
Attention: Do not place hands or other obstacles on the screen during adjustment.
- Touch each mark shown on the screen with your finger.
- Keep touching the marks until they move.
- Continue until you have touched all of the marks up to the
final mark at the bottom-right.
Calibration starts when preparations are complete. Do you want to continue?

Note: If Touch Calibration is disabled, make sure Power is set to On.
- Adjust the image focus, if necessary.
- PressEntertoselectYes.
Agreencircleappearsintheupperleftcornerofyourprojectedimage.
- Touchandholdthecenterofthecirclewithyourfingeruntilthecircledisappearsandanothercircle appears,thenreleaseit.
The circled disappears, and you see another circle below the first stone.
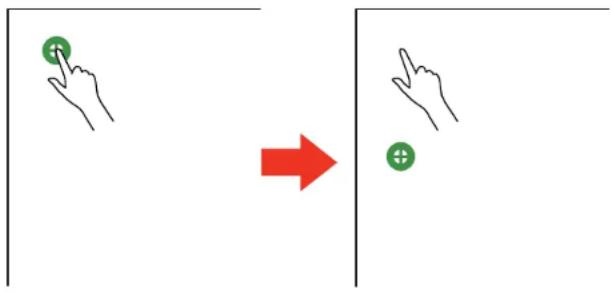
Note: For the most accurate calibration, make sure you touch the center of the circle with the tip of yourfinger.

Note: Make sure you are not blocking the signal between your finger and the interactive receiver (nexttotheprojectorlens).
- Touch the center of then next circle with your finger and continue until all of the circles disappear.
Whenyougettothebottomofacolumn,thenextcircleappearsatthetopofanewcolumn.
Note: If you make a mistake, press the Esc button on the remote control or control panel to go back to the previous circle. It may take several seconds after all of the dot shaved disappeared for touch calibration to be completed. To cancel the calibration process, press and hold the Esc button for 2 seconds.
- If the cursor location and your finger position on hot match, repeat these step to calibrate again.
Parenttopic: Using FingerTouchInteractivity
Relatedconcepts
PenCalibration
Relatedreferences
PenandTouchSetupSettings-Pen/TouchMenu
InstallationSettings-InstallationMenu
UsingFingerTouchOperations
You can use your fingertoint interact with the projected screen, just as you would use an interactive pen.
Youcanuseeitherapenoryourfinger,orusebothatthesametime.
When performing touch operations with your finger, you can use up to six fingers (depending on the interactive mode, operating system, and connection type).
Note: A Touch Unit is optional for the BrightLink 1480Fi and must be installed for finger touch operation.
- Install the Touch Unit as described in the online Installation Guide.
Note: If you are using an older TouchUnit, referto the installation guide for that model.
- Turnonyourprojector. This automatically turns on the TouchUnitalso.
ThebluelightontheTouchUnitturnson.
natural_image
Simple line drawing of a handheld device with a blue dot on its tip, no text or symbols present.Note: If the blue light does not turn on, press the Menu button on the remote control and make sure the Installation>TouchUnit>PowersettingissettoOn.
-
Calibratethepens.
-
Adjust the angle of the Touch Unit as described in the online Installation Guide.
Note: If you are using an older Touch Unit, refer to the angle adjustment steps in the installation guideforthatmodel.
-
Calibrate for fingertouchinteractivity.
-
Towriteordrawontheprojectionsurface, dothefollowing:
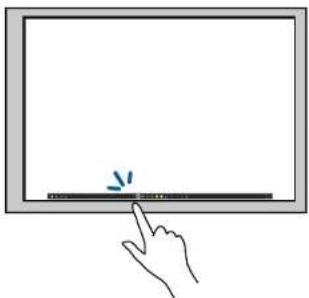
natural_image
Hand pointing at a blank screen with a small mark, no text or symbols present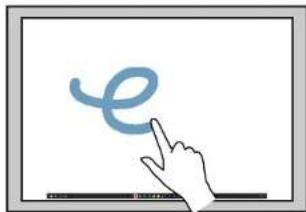
natural_image
Illustration of a hand pointing at a stylized blue 'e' symbol on a white background (no text or symbols present)• Toselectaprojecteditem, suchasanicon, taptheprojectionsurface with your finger.
• Todrawontheprojectedscreen, taptheprojectionsurfacewithyourfingeranddragitas necessary.
- TouseyourfingerasamouseinPCInteractivemode, dothefollowing:
•Toleft-click,taptheboardwithyourfinger.
• Todouble-click, taptwicewithyourfinger.
- Toright-click, presstheboard with your finger for about 3 seconds (Windows).
• Toclickanddrag, pressonanddraganitemwithyourfinger.
•Toscroll,dragyourfingeronthescreen.
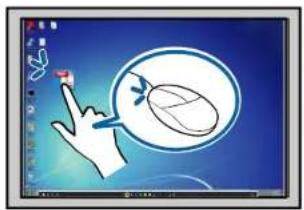
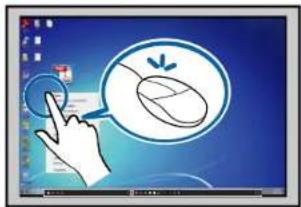
-
If your operating systems support these functions, you can also do the following:
-
Tozoominorout, touchanitemusingtwofingersandeithermoveyourfingersawayfromeach other(zoomin)ortowardeachother(zoomout).
- Torotateanimage, touchtheimagewithyourfingersandrotateyourhand.
• Todragupordownonapage,ormovebackwardorforwardinabrowserwindow,useswiping gesturesorflicks.
Note: Finger touch operations may not work correctly with long or artificial nails, or fingers wearing bandages. If your fingers are to close together, or your sleeve or free hand touches the screen, fingertouch may not be recognized. Some operating systems may not support gestures such as flicks.
Parenttopic: Using FingerTouchInteractivity
Relatedreferences
PenandTouchSetupSettings-Pen/TouchMenu
InstallationSettings-InstallationMenu
UsingBrightLinkwithaComputer
YoucanconnectacomputertotheprojectorandinstalltheEasyInteractiveToolssoftwarefromthe website. Make sure your computer is connected to the USB-B port on the projector or the control pad (BrightLink1485Fi)withaUSBcable.Youcanthendothefollowing:
•Usethepensoryourfingerasamousetocontrolyourcomputer
- Use the Easy Interactive Tools software to annotate with both tensor combination of pen and finger touch at the same time
Note: ATouchUnitisoptionalfortheBrightLink1480Fiandmustbeinstalledforfingertouch operation.
Note: See the online Easy Interactive Tools Operation Guide for detailed information.
- Saveandprintyourannotations
- UsetheTabletPCinputpanelinWindows10,Windows8.x,orWindows7
- UseInkToolsforannotationinMicrosoftOffice(2007orlater)applications
- Connecttoaremotecomputerandcontrolitwiththeinteractivepensoryourfinger
• Annotateacrosstwoprojectors(BrightLink1485Fi)
Adjusting the Pen Operation Area
EasyInteractiveTools
Parenttopic: Using the Interactive Features
Adjusting the Pen Operation Area
If you connect different computer or adjust the computer's resolution, the pen operation area is adjusted automatically to match your mouse pointer position. If you notice that the pen position is incorrect when using PC Interactive mode, you can adjust the pen are manually.
Note: ManualadjustmentisnotavailablewhenprojectingfromaLANsource.
Note: To perform manual pen area adjustment, the computer must be connected to the USB-B1 port on the projectorortheUSB-Bportontheprojectorcontrolpad(BrightLink1485Fi).
-
Project your computer's desktop.
-
Press the Menu button, select the Pen/Touch menu, and press Enter.
| Frequently Used Items | Pen/Touch | |
| Image | Auto Calibration | |
| Signal I/O | Manual Calibration | |
| Installation | Touch Unit | |
| Display | Installation of Projectors | |
| Operation | Pen Hovering | On |
| Management | PC Interactivity | |
| Network | Reset Pen/Touch Settings | |
| Pen/Touch | Interactive | |
| Interactive | Drawing Function | On |
| Multi-Projection | Display Toolbars | Always Show |
| Memory | Display Drawing Area | |
| ECO | Confirm Clear Screen | On |
| Initial/All Settings | Pen Button Function | Eraser |
| Display Clock | Date & Time | |
| Date | YYYY-MM-DD | |
| Time | HH:MM | |
- SelectthePCInteractivitysettingandpressEnter
Youseeascreenlikethis:
![[ PC Interactivity ] Return Pen Tracking Mode Pen Mode USB-B2 Off Auto Adjust Pen Area On](/content/2026/05/1053810/images/38737aaa12df65b6aeb8de06cab3e953876af012b2410a7c878173e2f047d751.jpg)
- Make sure Auto Adjust Pen Area is set to Off, then select Manual Adj. Pen Area and press Enter.
Youseethisscreen:
![[Manual Adj. Per Area] Adjust the pen area to match the position of the pen to the mouse pointer. Yes No](/content/2026/05/1053810/images/deb5c430aecbbd6f2629384a19061df3fc3d191deb7b276cb01d736ab909e649.jpg)
- PressEntertoselectYes.
Themousepointermovestowardthetopleftcorner.
- Whenthemousepointerstops, touch the tip of the pointer with the interactive pen.
Themousepointmovestowardthebottomrightcorner. - Whenthemousepointerstops, touchthetipofthepointerwiththeinteractivepen.
Parenttopic: UsingBrightLinkwithaComputer
EasyInteractiveTools
YoucandownloadtheEasyInteractiveToolssoftwareforusewithacomputer.EasyInteractiveTools letsyouuseyourinteractivepenorfingertodraw,save,andinteractwithprojectedcontentfromyour computer.
Note: A Touch Unit is optional for the BrightLink 1480Fi must be installed for finger touch operation.
Thesetwomodesareavailable:
- Annotation(PCinteractive)modedisplaysthetoolbarontheprojectedImageandletysyouusethepenorfingerasamousetoopenapplications,accesslinks,andoperatescrollbars,forexample.Youcan alsoannotateoverwhateverisdisplayedfromyourcomputer(usingbothpensanduptosixfingersatthesametime).
- Whiteboardmodeletsyouprojectononeof6backgroundpatternsin3coloroptions,andusethe toolbartowriteordrawonthebackground.Youcanalsoimportimagesfromyourcomputerora documentcamera.Infullscreenwhiteboardmode,twopeoplecanusethepensatthesametime. Fingertouchisalsoavailableinwhiteboardmode.
Note: For detailed instructions on using the Easy Interactive Tools software, see the online Easy Interactive ToolsOperationGuideortheonlinehelp.
Parenttopic: UsingBrightLinkwithaComputer
Relatedreferences
AdditionalProjectorSoftwareandManuals
WindowsPenInputandInkTools
If you are using Windows 10, Windows 8.x, or Windows 7, you can set the pen input and lnktool to add input and annotation to your work. You can also set these features over an network when you set the interactive features to be available on your network. See the online Epson iProjection Operation Guide (Windows/Mac) for instructions on setting up your computer for network projection.
EnablingWindowsPenInputandInkTools
UsingWindowsPenInputandInkTools
Parenttopic: Using the Interactive Features
EnablingWindowsPenInputandInkTools
TousethepeninputandInktoolsinWindows10, Windows8.x, or Windows7, youneedtoadjustthe penoperationmodeinyourprojectorsmenus.
- Press the Menu button, select the Pen/Touch menu, and press ↕ Enter.
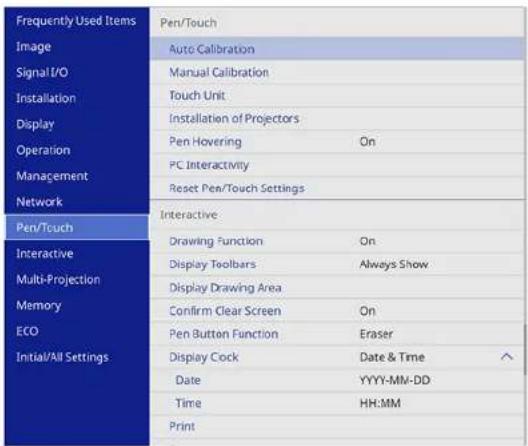
- SelectthePCInteractivitysettingandpressEnter
Youseeascreenlikethis:
![[ PC Interactivity ] Return Pen Tracking Mode Pen Mode USB-B2 Off Auto Adjust Pen Area On](/content/2026/05/1053810/images/3f8eb77ce7473bb64265ef9614c44b59617f26a4aa2ac6d079c9102cd61790d1.jpg)
- SelectPenTrackingModeandpressEnter
- SelectPenModeandpressEnter
Parenttopic: Windows Pen Input and Ink Tools
UsingWindowsPenInputandInkTools
If you are using Windows 10, Windows 8.x, or Windows 7, you can add handwritten input to your work and convert text.
If you have Microsoft Office 2007 or later, you can also set the Ink function to add handwritten notes on Word document, Excel spreadsheet, or PowerPoint presentation.
Note: OptionnamesfortheannotationfunctionsmayvarydependingonyourversionofMicrosoft Office.
- ToopentheTouchKeyboardinWindows10, right-clickortap-and-holdontheTaskbar, and select Showtouchkeyboardbutton. Selectthekeyboardicononthescreen.
• ToopentheTouchKeyboardinWindows8.x, right-clickortap-and-holdontheTaskbar, and select Toolbars > TouchKeyboard. Select the keyboard dicon on the screen and select the pen icon.
- To open the Tablet PC input panel in Windows 7, select > All Programs > Accessories > Tablet PC>TabletPCInputPanel.
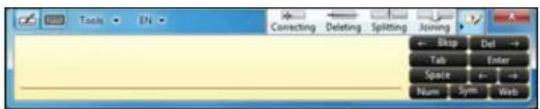
Youcanwriteintheboxusingtheinteractivepenoryourfinger,andselectfromavarietyofoptionsto editandconvertthetext.
Note:ATouchUnitisoptionalfortheBrightLink1480Fiandmustbeinstalledforfingertouch operation.
- To add Ink annotations in Microsoft Office applications, select the Draw tab. If the Draw tab does not appear in your Microsoft Office application, change the Pen Tracking Mode setting in the projector's menus.
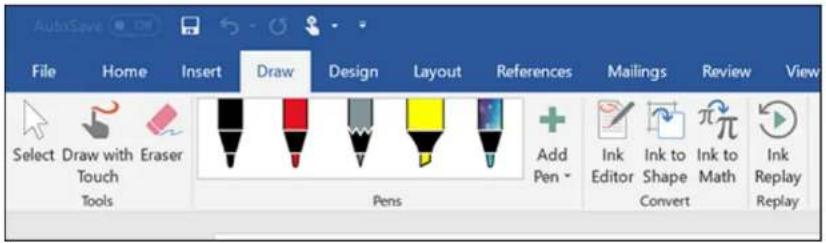
• To annotate your PowerPoint slides in Slideshow mode, press the button on the side of the interactive pen or press the projection surface with your finger for about 3 seconds, and select Pointer Options > Pen from the pop-up menu.
Formoreinformationaboutthesefeatures,seeWindowsHelp.
Parenttopic:WindowsPenInputandInkTools
WhiteboardMode
Youcanusethepensandyourfingerstowriteordrawontheprojectionsurfacejustasyouwouldona chalkboardordryeraseboard.Amaximumoftwopensandsixfingerscanbeusedatthesametime.Seethesesectionsforinstructions.
Note: A Touch Unit is optional for the BrightLink 1480Fi and must be installed to enable finger touch operation.
UsingtheWhiteboardToolbar TheWhiteboardToolbar SelectingBackgroundTemplates InsertingandWorkingWithImages SelectingWhiteboardSettings SelectingaNetworkedDeviceSource SavingPagesinWhiteboardMode PrintingWhiteboardPages EmailingWhiteboardPages Parenttopic:UsingtheInteractiveFeatures
UsingtheWhiteboardToolbar
Youcanusebothpensandyourfingerstointeractwiththescreenandwhiteboardtoolbar.
- PresstheHomebuttonontheremotecontrolandselectWhiteboard.
Youseethewhiteboardscreen, with the whiteboard toolbar at the bottom:
natural_image
Blank white canvas with no visible text, symbols, or graphics- Tomovethetoolbartotheright, left, top, orbottomofthescreen, dragittothedesiredlocation.
- To addanewpage, select the New page icon above the toolbar.
- Toshoworhidetheprojectorcontroltoolbar, selecttheicon.
Note: You can also show or hide the toolbar by setting the Interactive > Display Toolbars setting to AlwaysShoworHideforSetTime.
Parenttopic: WhiteboardMode
TheWhiteboardToolbar
The whiteboardtoolbarletsyoudraw, write, and insert images and shapes.
Note: A mini toolbar also appears when you press the button on the interactive pen anywhere in the drawingarea.Youcanusetheminitoolbartoswitchthetypeofpenoreraser.Youcanchangethe functionofthebuttonbychangingthePenButtonFunctionsettinginthelnteractivemenu.
| DisplaystheHomescreen. | |
| Togglesthevideoandaudiooffandon. | |
| Displaysadditionaltools.Mail: Shares the projected screen with an email recipient (set up theMailsettings in theInteractivemenufirst).Save: Saves the projected screen (set up theSavesettings in theInteractivemenu first).Print: Printstheprojectedscreenfromaprinteronthesamenetwork(setupthePrintsettingsintheInteractivemenufirst).Timer: Countsthetimeupordown.Volume: Adjuststheprojector'svolume.ShareProjection: SharesthecurrentscreenwithdevicesconnectedusingEpsoniProjection.ParticipantList: Displaystheuserselectionscreensoyoucanprojectfromdevicesconnectedtotheprojectoroveranetwork.Guidance: Displays the help screen for the toolbar functions. SelectCloseto close thehelpscreen.Clearalldrawingcontents:Clearsallicurrentdrawingsandimagesandreturnsthewhiteboardmodetoitsdefaultstatus. | |
| Displaystheavailablepentype, thickness, orshape.(Yellow/Green/Aqua/Pink/Red/Blueforhighlighter): Selectthecolorforthetypeofpen/shapefromtheoptions. | |
| Switchestotheerasertooltoerasecontentfromthewhiteboard.Selectthesizeoftheeraser. | |
| Selectsalobjectsandimagesinarectangulararea.Specifytheareabydrawingonthe projectionsurface.Youcanalsotapanobjectorimagetoselectit.·Tocancelthecurrentselection,tapanemptyareaontheboard.·Dragtheedgeoftheareatoenlargeorreducetheobjectorimage.·Dragtheiconatthetopoftheareatorotatetheslectedobjectorimage.·Toperformthefollowingoperations,selecttheiconatthebottomrightoftheselected objectorimage:·Duplicate·Copy·Paste(taphelocationwhereyouwanttopaste)·Delete | |
| Undoesthepreviousaction. | |
| Restoresacancelledaction. | |
| Clearsalldrawingsfromthedisplayedpage. | |
| Disablestouchinputtemporarilytopreventunintendedoperation.Tapagaintoenabletouch operation. | |
| Hidesthetoolbar.Tapagaintoshowthetoolbar. |
AdditionalFunctionsinWhiteboardMode
| Opensafileintoanewwhiteboardpage. | |
| Importsanimagetothecurrentwhiteboardpage. | |
| Selectsfrom6pre-installedbackgroundtemplatesin3differentcolors. | |
| Enlargesorreducestheprojectedimage(notavailablewhenthewhiteboardscreenissplit withtheannotationscreen). | |
| Deletesthecurrentwhiteboardpage. | |
| Displaysthepreviouswhiteboardpage. | |
| > | Displaysthenextwhiteboardpage. |
| → | Addsanewwhiteboardpageafterthecurrentpage.Youcanhaveupto20whiteboard pages. |
Followtheseguidelineswhenusingthewhiteboardtoolbar:
- Youcandisplayimagesofupto2filesperpageat1920×1080pixelsonthewhiteboardscreen (includingimagesstoredontheclipboard).
- Topasteanimage, youneedtousethesamepenthatyouusedtocutorcopytheimage.
- Drawnobjectsaredisplayedatthefrontoftheprojectedpage.
- Ifobjectsorimagesaremovedoutoftheprojectedscreen,youmaynotbeabletoselectthem.
Parenttopic: WhiteboardMode
SelectingBackgroundTemplates
Inwhiteboardmode,youcaninserthorizontalorverticallines,agraph-papergrid,oranother backgroundtemplateandplaceitonyourwhiteboardpages.Youcanselectfrom6pre-installed templatesin3differentcolors.
- In Whiteboard mode, select the icon to the left of the toolbar.
Youseetheavailabletemplates.
- Selectoneofthetemplatepatternsorselecttoimportanimage.
Note: To import a template image, connect to a USB flash drive or a shared directory containing a JPGorPNGfile.
Parenttopic: WhiteboardMode
InsertingandWorkingWithImages
InWhiteboardmode,youcanusethInsertImagetooltoinsertanimagefromaUSBflashdriveora networkfolder. Imagescanbein.pngor.jpgformat,withamaximumsizeof2048×2048pixels. You canalsoscanadocumentorimageintoanewpageusingasupportedEpsonall-in-oneprinter connectedtothesamenetworkortheprojectorcontrolpad(BrightLink1485Fi).Oncetheimageis projected,youcanmove,resize,orrotateit.
Note: You can also use the ☐ tool to the left of the toolbar to import files (including .pdf files) in whiteboardmode.
Note: You cannot scan with standalone scanners or printers that have run out of ink or cannot print. When importing from ascan, you cannot usethescan button, the partial documentorimagescanning function, or the Automatic Document Feeder (ADF), even if these are available on your product.
-
SelecttheInsertImagetool.
2.Dooneofthefollowing: -
Select USB or Network, then locate and select the image you want to add.
-
Load your original in the scanner, select Scan, and choose the settings for the scanned image as necessary.
-
SelectOpenorScan.
Afteramoment, the image appears on the whiteboard page.
-
SelecttheSelecttoolanddoanyofthefollowingasnecessary:
-
Tomovetheimage,touchinsideitanddragtheimage.
- Toresizetheimage,touchanycorneranddraginwardtoshrinkoroutwardtoenlarge.
-
Torotatetheimage,touchtheiconatthetopoftheimageanddragleftorright.
-
Usethemenuinthebottomrightcorneroftheimagetoselectanyofthefollowingasnecessary:
-
Duplicatecreatesacopyoftheimageonthecurrentwhiteboardpage.
- Copy copies the image on the whiteboard. Touch a location on the screen to paste a copy of the image.
- Pastecreatesanewcopyoftheimage.Dragtheimagetothedesiredlocation.
- Deleteremovestheimagefromthewhiteboard.
When you are finished, select any other tool from the white board tool to exit image editing mode.
Parenttopic: WhiteboardMode
SelectingWhiteboardSettings
Followtheinstructionsinthesesectionstoselectsettingsforcapturing,scanning,saving,printing,and emailinginWhiteboardmode.
Note: If the Menu Protection password setting is set to On for the Interactive option, you cannot changesettingsintheInteractivemenu.
SelectingBasicWhiteboardSettings
SelectingWhiteboardPrintSettings
SelectingSettingsforSavingWhiteboardPages
SelectingSettingsforEmailingWhiteboardPages
SelectingSettingsforaDirectoryServer
Parenttopic: WhiteboardMode
Relatedtasks
SelectingPasswordSecurityTypes
SettingaPassword
SelectingBasicWhiteboardSettings
Youcanselectthewhiteboardfeaturesyouwanttouseandcontrolthewaywhiteboardpagesaresaved intheprojector.
- PresstheMenubuttonontheremotecontrol.
- SelecttheInteractivemenuandpressEnter
| Frequently Used Items | Interactive | |
| Image | Drawing Function | On |
| Signal I/O | Display Toolbars | Always Show |
| Installation | Display Drawing Area | |
| Display | Confirm Clear Screen | On |
| Operation | Pen Button Function | Eraser |
| Management | Display Clock | Date & Time |
| Network | Date | YYYY-MM-DD |
| Pen/Touch | Time | HH:MM |
| Interactive | ||
| Save | ||
| Multi-Projection | ||
| Memory | Directory | |
| ECO | Reset Interactive Settings | |
| Initial/All Settings | Multi-Projection | |
| Projector ID | Off | |
| HDMI Out Setting | Off | |
| Geometry Correction | Point Correction | |
- Select the following options as necessary:
- DrawingFunctiondisplaytheinteractivetoolbar
•DisplayToolbarssetswhentodisplaytheinteractivetoolbar
- DisplayDrawingAreadisplaystheavailabledrawingarea
- ConfirmClearScreendisplaysaconfirmationscreenbeforeclearingallthedrawingsfromthe projectedscreen
- Pen Button Function selects the operation performed by the button on the side of the interactive pen
- Display Clock sets the date and time display format on the whiteboard toolbar (set the date and timeintheManagementmenu)
•PrintshowsthePrintmenusettings
•SaveshowstheSavemenusettings
- MailshowstheMailmenusettings
- DirectoryshowstheDirectorymenusettings
- Reset Interactive Settings resets all adjustment values on the Interactive menu to their default settings
- When you finish selecting settings, press the Menubutton to exit themenus.
Parenttopic: Selecting Whiteboard Settings
SelectingWhiteboardPrintSettings
You can select the default settings for printing whiteboard pages from the projector.
- PresstheMenubutton.
2. SelecttheInteractivemenuandpressEnter
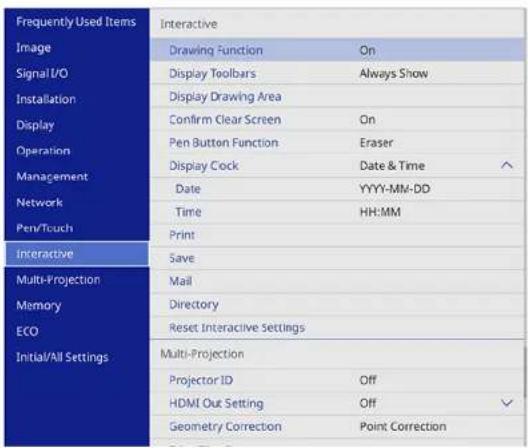
3. SelectPrintandpressEnter!
- Select the following printing options as necessary:
- Printer lets you select either USB Printer or Network Printer as the printer connection.
Note: Selecting USB Printer will also enable scanning from Epson all-in-one printers.
- Printer Address lets you enter an IP address for a printer connected to the same network as the projector.
Note: You cannot set the following IP addresses: 127.x.x.x, 192.0.x.x, or 224.0.0.0 through 255.255.255.255 (wherexisanumberfrom0to255). ToreturnthelPaddresstoitsdefaultvalue, enter0.0.0.0.
- Printer Type lets you manually select the printer type or let the projector automatically determine the printertype(inmostcases,youshouldleavethissettingasAutoDetect).
•PCLTypeletsyouselectthePCLtypetomatchtheprintertypeandsettingsoftheconnected networkprinter.
Note: If printing fails when using a PCL6 printer in Normal mode, try printing in Mode 1 or Mode 2.
- TestPrintletsyousendatestpagetotheconnectedprinter.
- Default Paper Size lets you select either Letter or A4 as the default paper size.
Note: Use the displayed keyboard to enter the IP address if necessary. Press the arrow buttons on theremotecontroltohighlightnumbersandpressEnteroselectthem.
- When you finish selecting settings, press the Menubutton to exit themenus.
Parenttopic: SelectingWhiteboardSettings
SelectingSettingsforSavingWhiteboardPages
You can select the default settings for saving white board pages from the projector.
1.PresstheMenubutton.
2. SelecttheInteractivemenuandpressEnter
| Frequently Used Items | Interactive | |
| Image | Drawing Function | On |
| Signal I/O | Display Toolbars | Always Show |
| Installation | Display Drawing Area | |
| Display | Confirm Clear Screen | On |
| Operation | Pen Button Function | Eraser |
| Management | Display Cock | Date & Time |
| Network | Date | YYYY-MM-DD |
| Pen/Touch | Time | HH:MM |
| Interactive | ||
| Multi-Projection | Save | |
| Memory | ||
| ECO | Directory | |
| Initial/All Settings | Reset Interactive Settings | |
| Multi-Projection | ||
| Projector ID | Off | |
| HDMI Out Setting | Off | |
| Geometry Correction | Point Correction | |
3. SelecttheSavemenuandpressEnter
-
Select the following options as necessary:
-
USBStorageletsyousavewhiteboardpagefilestoaUSBthumbdrive.
- PC via USB Cable lets you save whiteboard page files to a device connected to the projector with aUSBcable.
•NetworkFolderletsyousavewhiteboardpagefilestoanetworkfolder. - CIFS Server lets you set the CIFS server's IP address or fully qualified domain name (FQDN). Youcanenterupto64alphanumericcharacters.
Note: You cannot use the following characters: " ' + , : ; <= > ? [ \ ] ` | or spaces. If you need to entermorecharacters, enterthemusingtheWebConfigutility. TouseaFQDN, you must configureaDNSserver. You cannot usethefollowingIPaddresses: 127.x.x.x, 192.9.2.x, or 224.0.0.0to255.255.255.255.
- SharedFolderPathletsyouenterthenetworkfoldernameinthisformat: share_name\folder_nameorsharename.Youcanenterupto64alphanumericcharacters.You cannotusethefollowingcharacters:"*/:<>?or].
- User name lets you enter a user name with read/write privileges on the network folder. You can enterupto64alphanumericcharacters.Youcanenteradomainnamebyaddingitbeforethe usernameandseparatingthemwithabackslashinthisformat:domain\username.Donotusea colon(:")orspaces.
- Passwordletyouenterapasswordfortheusernameyouentered. Youcanenterupto64 alphanumericcharacters. AfteryouenterthepasswordandselectOK, thepasswordishidden. Donotuseacolon(":")orspaces.
- CheckConnectionletsyoutestthenetworkconnection.
- Alwaysapplypasswordletsyourequirethatwhiteboardfilesmustbesavedaspassword-protectedPDFForEWF2files.
Note: Usethedisplayedkeyboardtoentertheaddress, username, and password if necessary. PressthearrowbuttonsontheremotecontroltohighlightnumbersandpressEntertoelect them.
- When you finish selecting settings, press the Menubutton to exit themenus.
Parenttopic: SelectingWhiteboardSettings
SelectingSettingsforEmailingWhiteboardPages
You can select these settings for emailing whiteboard pages from the projector.
- PresstheMenubuttonontheremotecontrol.
- SelecttheInteractivemenuandpressEnter
| Frequently Used Items | Interactive | |
| Image | Drawing Function | On |
| Signal I/O | Display Toolbars | Always Show |
| Installation | Display Drawing Area | |
| Display | Confirm Clear Screen | On |
| Operation | Pen Button Function | Eraser |
| Management | Display Cock | Date & Time |
| Network | Date | YYYY-MM-DD |
| Pen/Touch | Time | HH:MM |
| Interactive | ||
| Save | ||
| Multi-Projection | ||
| Memory | Directory | |
| ECO | Reset Interactive Settings | |
| Initial/All Settings | Multi-Projection | |
| Projector ID | Off | |
| HDMI Out Setting | Off | |
| Geometry Correction | Point Correction | |
- SelecttheMailmenuandpressEnter
- Select the following options foremailing as necessary:
- MailFunctionletsyousharecapturedwhiteboardpagesviaemail.
- SMTPServerletysyouenterthelPaddressorfullyqualifieddomainname(FQDN)forthemail server.Youcanenterupto64alphanumericcharacters.IfyouspecifyanFQDN,youmust configureaDNSserver.Donotusespacesorthefollowingsymbols:"*+;;;<=>?[']
Note: You cannot set the following IP addresses: 127.x.x.x, 192.0.2.x, or 224.0.0.0 to 255.255.255.255 (where exisanumber from 0 to 255).
- Port Number lets you enter a port number for the SMTP server. The default port is 25 when set to Open,465forSSL,and587forTLS.
- Authenticationletsyousetthetypeofauthenticationexpectedbythemailserver.
- Usernameletsyouenterausernameforthemailserver.Youcanenterupto64alphanumeric characters.Donotuseacolon(":")orspaces.
- Passwordletsyouenterapasswordforthemailserver.Youcanenterupto64alphanumeric characters.Donotuseacolon(":")orspaces.
- Fromletysyouentertheemailaddresstobedisplayedtothesender.Youcanenterupto64 alphanumericcharacters.Donotusespacesorthefollowingsymbols:"(),;,[>
- Defaulte-mailaddressletsyouenteranoptionaladdressfortesting.Youcanenterupto64 alphanumericcharacters.Donotusespacesorthefollowingsymbols:"(),;<>[.]
- Send a test e-mail lets you connect to the SMTP server and send a test email to the address you setasthedefault.
- DisallowAddressInputcontrolswhetheryoucanenteremailaddressesmanually.When enabled,youcanonlychooseemailaddressesfromanaddressbookordirectoryservice.
Note: Usethedisplayedkeyboardtoentertheaddresses.Pressthearowbuttonsontheremote controltohighlightnumbersorcharactersandpressEnteroselectthem.
- When you finish selecting settings, press the Menubutton to exit themenus.
Parenttopic: SelectingWhiteboardSettings
SelectingSettingsforaDirectoryServer
Youcanselectthesettingsforspecifyingaemaildirectoryserverforyourprojector.
- Pressthe Menubuttonontheremotecontrol.
2. SelecttheInteractivemenuandpressEnter
| Frequently Used Items | Interactive | |
| Image | Drawing Function | On |
| Signal I/O | Display Toolbars | Always Show |
| Installation | Display Drawing Area | |
| Display | Confirm Clear Screen | On |
| Operation | Pen Button Function | Eraser |
| Management | Display Cock | Date & Time |
| Network | Date | YYYY-MM-DD |
| Pen/Touch | Time | HH:MM |
| Interactive | ||
| Multi-Projection | Save | |
| Memory | ||
| ECO | Directory | |
| Initial/All Settings | Reset Interactive Settings | |
| Multi-Projection | ||
| Projector ID | Off | |
| HDMI Out Setting | Off | |
| Geometry Correction | Point Correction | |
3. SelectDirectoryandpressEnter
-
Select the following options as necessary:
-
Directory Access Function specifies whether to search an active directory server for user names and email addresses.
- LDAPServerletyouentertheIPaddressorfullyqualifieddomainname(FQDN)fortheLDAP server.Youcanenterupto64alphanumericcharacters.Donotusespacesorthefollowing symbols:"*+;";<=>?[]'.IfyouspecifyanFQDN,youmustconfigureaDNSserver.
Note: You cannot us the following IP addresses: 127.x.x.x, 192.0.2.x, or 224.0.0.0 to 255.255.255.255 (wherexisanumber from 0 to 255).
- Port Number lets you enter a port number for the LDAP server. The default port is 389. Specify "3268" to search the global catalog.
-
Authentication lets you set the type of authentication expected by the LDAP server. If you are using Digest-MD5 or Simple authentication and the LDAP Server setting is set to an IP address, you must enable reverse DNS lookup on the DNS server.
-
UserNameletsyouenterausernameforthemailserver.Youcanenterupto64alphanumeric characters.Useoneofthefollowingmethodswhenenteringtheusernamewiththedomain name:domainname\usernameorusername@domainname.Donotuseacolon(":")orspaces.
- PasswordletsyouenterapasswordfortheLDAPserver.Youcanenterupto64alphanumeric characters.Donotuseacolon(":")orspaces.
- CheckConnectionteststhenetworkconnection.
- SearchBaseDNletsyouentertheDN(DistinguishedName)wherethesearchforusernames andemailaddressesshouldstart.Youcanenterupto64alphanumericcharacters.Donotusea colon(:):"orspaces.Thisfieldiscase-sensitive.
Note: MakesureyouspecifytheOU(OrganizationalUnit)andDC(DomainComponent)as necessary, withOUfirstinthisformat:OU=accounts, DC=example, DC=com. TheDNmustbeat orbelowtheDClevelinthedatabasestructure.
- User Attributes lets you enter a user name, for example, "cn." You can enter up to 64 alphanumeric characters. Donotuseacolon(":")orspaces. Thisfieldisease-sensitive.
- MailAttributesletyouentertheattributeforthemailaddress.Youcanenterupto64 alphanumericcharacters.Donotuseacolon(:")orspaces.Thisfieldisease-sensitive.
- GroupAttributesletsyouentertheattributefortheusergroupname.Youcanenterupto64 alphanumericcharacters.Donotuseacolon(":")orspaces.Thisfieldiscase-sensitive.
- Search target attributes lets you enter the search attributes for user name, email address, and usergroupname.Youcanenterupto64alphanumericcharacters.Donotuseacolon(:")or spaces.Thisfieldiscase-sensitive.
Note: The default value is "cn." You can specify up to three keys separated by commas. Do not use three more commas, commas right at the start for the end, or continuous commas. The search is performed using forward matching and returns all results that start with these search keys.
- Additional filter lets you enter an additional filter to Search target attributes. You can enter up to64alphanumericcharacters.Donotuseacolon(:")orspaces.Thisfield disease-sensitive.
Note: Usethedisplayedkeyboardtoentertheaddresses.Pressthearowbuttonsontheremote controltohighlightnumbersorcharactersandpressEnterloselectthem.
- When you finish selecting settings, press the Menubutton to exit themenus.
Parenttopic: SelectingWhiteboardSettings
SelectingaNetworkedDeviceSource
Youcanprojectanimagefromdevicesconnectedtotheprojectorviaanetwork.Youcanselectthe imagesourcefromcomputersrunningEpsoniProjection(Windows/Mac)andsmartphonesortablets runningtheEpsoniProjectionapp.
- SelecttheOtherToolsiconontheprojectortoolbar.
- SelectParticipantList.
Youseealistofavailabledevices. Theiconnexttoausernameindicatesthecurrentlyselected source.
- Select the username for the device from which you want to project.
Note: You can select Thumbnail to switch the display from user names to thumbnail images of each device's screen. SelectRefreshtoupdatetheuserlist.
- SelectClose.
Youseethescreenimagefromtheselecteddevice.
While the user selections screen is displayed, you cannot do the following:
• Useotherinteractivefeatures
•Control the projector from the bottom toolbar
- Connecttomultipleprojectors
•Hearsoundfromtheprojector
- ProjectanimageusingEpsoniProjection(Windows/Mac)
Note: You cannot access the Participant List screen when connecting to multiple projectors by using EpsoniProjection(Windows/Mac)andprojectingthesameimage(mirroring).
Parenttopic: WhiteboardMode
SavingPagesinWhiteboardMode
YoucansaveyourwhiteboardpagesasJPG, PDF, PNG, or EWF2filesandselectthelocationwhere youwanttostoreyourfiles.
Note: You must first set up the Save settings in the projector's Interactive menu. For best results, connectdirectlytotheprojectororcontrolpad(BrightLink1485Fi)tosavewhiteboardpages.Youmay notbeabletouseUSBflashdrivesthatincorporatesecurityfunctions.
-
SelecttheOtherToolsiconontheprojectortoolbar.
-
SelecttheSavicon.
Youseeascreenlikethefollowing:
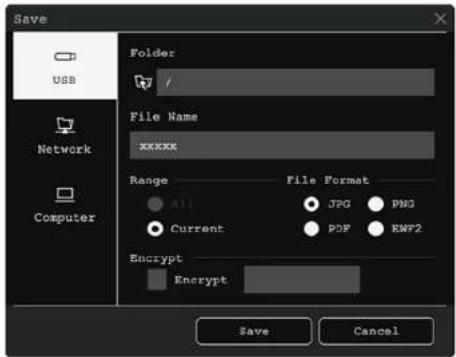
- Selectoneofthefollowingasthedestinationwhereyouwanttosaveyourfile:
- USB or Network to save to a connected USB storage device or network folder
- Computer to temporarily save the file on the projector and make it available for copying from a computer. After you copy the file, it is erased
Note: You cannot save the file to a computer when the input source is USB Display or the HDBaseT control pad (BrightLink1485Fi), or when you have split the screen into halves or quarters.
-
Select the folder where you want to save your file.
-
To enter a file name, select the File Name text box, use the on-screen keyboard to enter a file name.
-
SelectoneofthefollowingastheRangesetting:
-
Alltosaveallthepagesinthecurrentwhiteboardsession(PDForEWF2)
-
Currenttosaveonlythecurrentwhiteboardpage
-
Select the file format. If you choose PDF or EWF2 (Epson Whiteboard Format), you can encrypt the file and add a password. If you choose EWF2, you can reopen the file later and continue editing.
Note: JPGandPNGfilesaresavedas1920×1080pixels.
- When you are ready to save the whiteboard pages, select Save or Next.
Parenttopic: WhiteboardMode
PrintingWhiteboardPages
You can print your white board pages directly to a printer and select various print settings forth them.
The projectorsupportsthe following printer control commands:
•Networkconnection:ESC/P-RandPCL6
•USBconnection:ESC/P-R
Note: You must first set up the Print settings in the projector's Interactive menu.
- SelecttheOtherToolsiconontheprojectortoolbar.
- SelectthePriIcon.
Youseeascreenlikethefollowing:
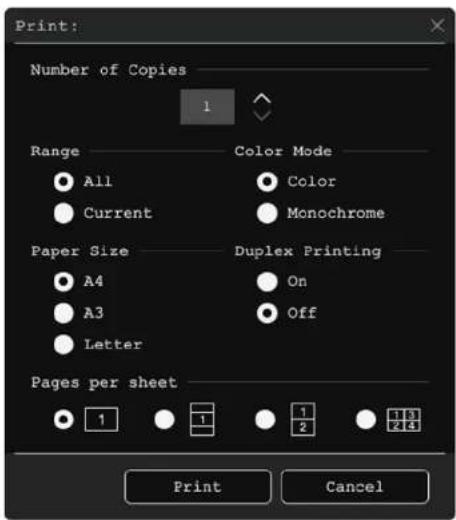
- Selectanyoftheprintsettingsasnecessary.
- When you are ready, select Print.
Parenttopic: WhiteboardMode
EmailingWhiteboardPages
If your projector is set upon an network and configured to use an email server, you can email your white board pages as an email attachment directly from the projector.
Note: You must first set up the Mail settings in the projector's Interactive menu.
- SelecttheOthToolsiconontheprojector'stoolbar.
- SelecttheMacon.
Youseeascreenlikethefollowing:
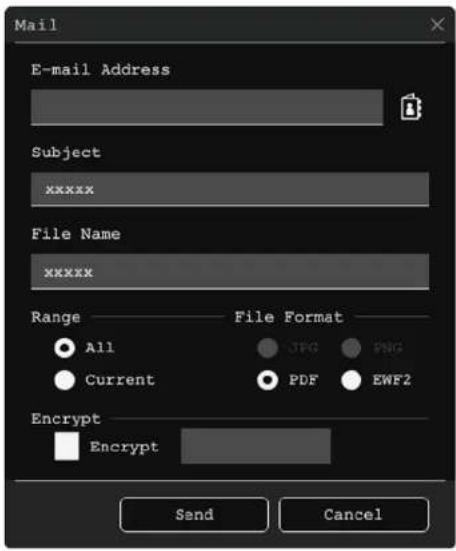
-
Tap the E-mail Address text box, select Add to enter the recipient's email address using the on-screenkeyboard, and select OK.
Note: If you imported an address book or set up a directory service, you can select up to 50 email addressesbyselectingtheaddressbookicon. -
Tap the Subject text box and enter the email subject using the on-screen keyboard, and select OK.
-
TaptheFileNametextboxandenterthenameoftheemailattachmentusingtheon-screen keyboard, andselectOK.
-
Select the file format for the email attachment. If you choose PDF or EWF2 (Epson Whiteboard Format), you can encrypt the file and add up a password.
-
SelectoneofthefollowingunderRange:
- Alltoattachallthepagesinthecurrentwhiteboardsession(PDForEWF2format)
- Currenttoattachonlythecurrentwhiteboardpage
- When you are ready to email the whiteboard pages, select Send.
Parenttopic: WhiteboardMode
UsingBrightLinkWithoutaComputer
Youcanusethepensandyourfingerstowriteordrawontheprojectionsurfacesimultaneouslywithout connectingacomputer(PCFreeannotation).Thisletsyouannotateimagesfromadocumentcamera, iPad,DVDplayer,orothersource.
Note: A Touch Unit is optional for the BrightLink 1480Fi and must be installed for finger touch operation.
Thesetwomodesareavailable:
•Built-inannotationmodedisplaysthebuilt-intoolbaronwhateverimageisbeingprojectedfroma documentcamera,iPad,orothersource.
•Built-inWhiteboardmodeletsyouprojectawhitescreenoroneof6backgroundpatternsin3colors, andusethetoolbartowriteordrawasyouwouldonachalkboardordryeraseboard.
UsingtheBuilt-inAnnotationMode
Built-inToolsforUseWithoutaComputer
ControllinganEpsonDocumentCamera
Parenttopic: Using the Interactive Features
UsingtheBuilt-inAnnotationMode
Youcanuseeitherpenwiththebuilt-intoolbar,bothpensatthesametime,yourfinger,oracombination ofbothpenandfingertouch.
Note: Make sure the Drawing Function setting is set to On in the projector's Interactive menu.
- Makesureyourdeviceisconnectedandselecttheinputsourceyouwanttodisplay.
Youseethetoolbaratthebottomoftheprojectedimage.
-
Tomovethetoolbartotheright, left, top, or bottom of the screen, use the penory our fingertodragit to the desired location.
-
Select the drawing tool you want to use from the toolbar and cannot be projected screen using the interactive sensory or fingers.
- Tominimizethetoolbar, selecttheMininzeiconontherightsideofthetoolbar.
Parenttopic: UsingBrightLinkWithoutaComputer
Built-inToolsforUseWithoutaComputer
The built-in annotation toolbar is embedded in the projector and allows you to draw and write on the projected screen. Make sure the PC Interactivity setting on the toolbar is disabled, if it appears.
Note: A mini toolbar also appears when you press the button on the interactive pen anywhere in the drawing area. Youcanusetheminitoolbartoswitchthetypeofpenoreraser.Youcanchangethe functionofthebuttonbychangingthePenButtonFunctionsettinginthelnteractivemenu.

| DisplaystheHomescreen. | |
| Togglesthevideoandaudiooffandon. | |
| Enlargesorreducestheprojectedimage(notavailablewhenthescreenissplitintohalvesorquarters). | |
| Capturesthecurrentscreenandcopiesittothewhiteboard.FullScreencapturestheentirescreen.SelectArealetsyouselectaportionoftheimagetocapture.Note:If you want to capture the Screen Mirroring image, set Capture to Enabled in the projector's Network > Network Settings > Network Projection menu. | |
| Splitsthescreenanddisplaysthewhiteboardsourcewiththecurrentsource(notavailable whenthescreenissplitintohalvesorquartersorwhentheScalesettingison.). | |
| Specifiesthesplitscreensettings(availableonlywhenyouhavesplitthescreenintohalves orquarters). | |
| Specifiesthehorizontalpositionoftheimageinsidetheultra-widedisplay(availableonly whenScreenTypeissetto16:6[BrightLink1485Fi]).Displaysadditionaltools.→ Mail: Shares the projected screen with an email recipient (set up the Mail settings in the Interactiveemenufirst).→ Save: Saves the projected screen (set up the Save settings in the Interactive menu first).→ Print:Printstheprojectedscreenfromaprinteronthesamenetwork(setupthePrint settingsinthelInteractivemenufirst).→ Timer:Countsthetimeupordown.→ Volume:Adjuststheprojector'svolume.→ ShareProjection:SharesthecurrentscreenwithdevicesconnectedusingEpson iProjection.→ ParticipantList:Displaystheuserselectionscreensoyoucanprojectfromdevices connectedtotheprojectoroveranetwork.→ Guidance: Displays the help screen for the toolbar functions. Select Close to close the helpscreen.Clearalldrawingcontents:Clearsallicurrentdrawingsandimagesandreturnsthe annotationmodetoitsdefaultstatus. | |
| A | Displaystheavailablepentype,thickness,orshape.→ (Yellow/Green/Aqua/Pink/Red/Blueforhighlighter):Selectthecolorforthe typeofpen/shapefromtheoptions. |
| Switchestotheerasertooltoerasecontentfromthewhiteboard.Selectthesizeofthe eraser. | |
| Selectsalobjectsandimagesinarectangulararea.Specifytheareabydrawingonthe projectionsurface.Youcanalsotapanobjectorimagetoselectit.Tocancelthecurrentselection,tapanemptyareaontheboard.Dragtheedgeoftheareatoenlargeorreducetheobjectorimage.Dragtheiconatthetopoftheareatorotatetheslectedobjectorimage.Toperformthefollowingoperations,selecttheiconatthebottomrightoftheselected objectorimage:DuplicateCopyPaste(tapthelocationwhereyouwanttopaste)Delete | |
| Undoesthepreviousaction. | |
| Restorestheactionthatwaspreviouslyundone. | |
| Clearsalldrawingsfromthedisplayedpage. | |
| Disablestouchinputtemporarilytopreventunintendedoperation.Tapagaintoenabletouch operation. | |
| Stopsscreensharing(availableonlywhenprojectingasharedimage). | |
| TogglesthePCInteractivitysettingoffandon.SetthePCInteractivitysettingtoOnto controlthecomputerusingtheinteractivepensand/oryourfingers(notavailablewhen projectingasharedimage). | |
| Hidesthetoolbar.Tapagaintoshowthetoolbar. |
Followtheseguidelineswhenusingtheannotationtoolbar:
- Topasteanimage, youneedtousethesamepenthatyouusedtocutorcopytheimage.
- Drawnobjectsaredisplayedatthefrontoftheprojectedpage.
- Ifobjectorimagesaremovedoutoftheprojectedscreen,youmaynotbeabletoselectthem.
Parenttopic: UsingBrightLinkWithoutaComputer
ControllinganEpsonDocumentCamera
You can control certain document camera features from the projected toolbar when incompatible Epson document camera is connected.
Note: Adocument cameratoolbaris displayed only when an Epson DC-07, DC-13, or DC-21 document cameras is connected.
- Connectan Epsondocument camerato the projector.
Note: If you are connecting the document camera via HDMI cable, make sure HDMI Link is set to On in the Signal I/O menu and disable PC Interactivity on the interactive toolbar.
Youseeatoolbarlikethisatthebottomoftheprojectedimage.Youcanselectthefollowingoptions asavailable.
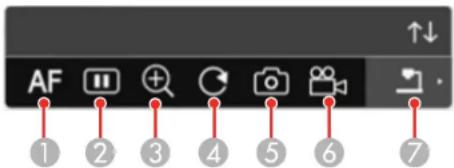
1 Automatically focus the image
2Pausestheimage
3Enlargestheimage
4Rotatestheimage180°
5Capturestheimageanddrawings
6Recordstheimage
7SwitchessourcestotheSDCardViewer
- Tomovethetoolbar, usethepenoryourfingertodragittothedesiredlocation.
Note: A Touch Unit is optional for the Bright Link 1480 Fi and must be installed for fingert or touch operation.
- Tominimizeorexpandthetoolbar, selecttheicon.
Parenttopic: UsingBrightLinkWithoutaComputer
Relatedtasks
ConnectingtoaDocumentCamera
SplittingtheProjectedImagewithWhiteboardMode
When projecting from an input source in Annotation mode, you can split the screen and open a whiteboard pagetoint interact with simultaneously.
Note: This feature is not available when the screen is split into halves or quarters or the Scale setting (BrightLink1485Fi) is enabled.
- Turnon the projector and project an image, if necessary.
- SelecttheWhiteboardiconontheleftsideofthetoolbar.
Youseethewhiteboarddisplayonthescreen.
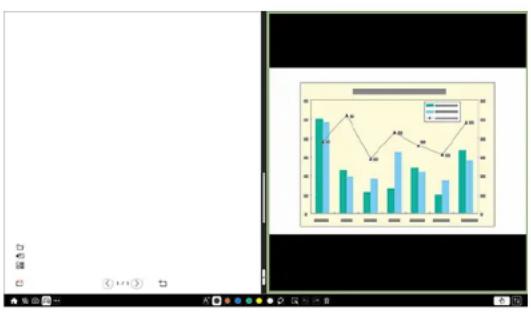
bar_line
| Category | Series 1 (%) | Series 2 (%) | |---|---|---| | 1 | 85 | 60 | | 2 | 70 | 45 | | 3 | 65 | 35 | | 4 | 75 | 50 | | 5 | 60 | 40 | | 6 | 70 | 55 | | 7 | 65 | 45 | | 8 | 80 | 65 |- To increase either the whiteboard or the projected image, drag the white part of the center divided to the appropriateside.
Note: To enlarge either side to fit the entire screen, drag the white part of the center divider fully to the desired edge of the screen.
- Toswaptheprojectedimageandwhiteboardfromlefttoright,selecttheatthebottomofthe centerdivider.
You cannot perform the following operations during splitscreen projection:
•E-Zoom
- Switchingaspectmode
Parenttopic: Using the Interactive Features
SharingtheProjectedScreen
FollowtheinstructionsinthesesectionstosharetheprojectedscreenwithothercompatibleBrightLink projectors.
Thescreensharingfunctionislimitedbythefollowing:
- YoucannotshareimagesorcontentthatareprotectedbyHDCP.
- Youcannotchangetheprojector'sNetworksettingswhilescreensharing.
- The Screen Type setting in the Installation menu must be set to 16:9, 16:10, or 4:3.
StartingaSharedScreenSession
Parenttopic: Using the Interactive Features
StartingaSharedScreenSession
Youcansharetheprojector'sscreenwithupto4compatibleprojectorsonthesamenetwork.Userscan interactwiththesharedscreenfromtheconnectedprojectors.
TousetheScreenSharingfeature, the distributing and receiving projectors must be connected to the same network and have the Screen Sharing setting enabled in the projector's Network menu. Other requirements include the following:
- Onthedistributingprojector:ifyouwanttoskipauthenticationofkeywordsforotherprojectorsto speed up connection, set the Connection Mode setting to Keyword Off in the projector's Network menu.
- Onthereceivingprojectors: makesurethatnocomputerisconnectingtotheprojectorusingEpson iProjection software, and that the Screen Type setting in the projector's Installation menu matches thatofthedistributingprojector.
-
Turnon the projector, if necessary.
-
Press the ⬆ Home button on the remote control and select Screen Sharing on the Home screen.
3.EnterthelPaddressoftheprojectoryouwanttoshareyourscreenwithandselectConnect.
The projectors start connecting.
4.EntertheProjectorKeywordifnecessary.
When the connection is established, a connection status bar appears at the top of the distributing projector's screen. Each receiving project displays a message indicating that it cannot share the image on the screen until the distributing projector selects an input source.
-
Repeatsteps3-4 to connect any remaining projectors.
-
Select the input source you want to display.
The projected screen is shared with the receiving projector on their LAN input source.
- To end screen sharing from the distributing projector, select the Stop Sharing icon in the status bar atthetopofthescreen.
Note: To end screen sharing from the receiving projectors, select the Stop Sharing icon on the toolbar.
You can also restrict drawing from receiving projectors. Press the ⬆ Home button on the remote control and select Screen Sharing. In the list of connected projectors, tap the projector you wish to restrict drawingfromanddisablethedrawingsetting.
Parenttopic: SharingtheProjectedScreen
Using Interactive Features with Two Projectors (DuoLink)
Youcanuseyourprojector'sinteractivefeatureswhileprojectingwithtwoprojectorsinstalledsideby side(BrightLink1485Fi).Ifyou'reusingaMac,downloadandinstallthesoftwarefromthewebsitetoget started.
SeetheonlineDuoLinkSetupGuideforadditionalinformation.
Parenttopic: Using the Interactive Features
AdjustingtheMenuSettings
Followtheinstructionsinthesesectionstoaccesstheprojectormenusystemandchangeprojector settings.
UsingtheProjector'sMenus
ImageQualitySettings-ImageMenu
InputSignalSettings-Signall/OMenu
InstallationSettings-InstallationMenu
DisplaySettings-DisplayMenu
FeatureSettings-OperationMenu
AdministrationSettings-ManagementMenu
NetworkSettings-NetworkMenu
PenandTouchSetupSettings-Pen/TouchMenu
InteractiveSettings-InteractiveMenu
MultipleProjectorOperationSettings-Multi-ProjectionMenu
ImageQualityMemorySettings-MemoryMenu
SetupSettings-ECOMenu
InitialSettingsandResetOptions-Initial/AllSettingsMenu
UsingtheProjector'sMenus
Youcanusetheprojector'smenustoadjustthesettingsthatcontrolhowyourprojectorworks.The projectordisplaysthemenusonthescreen.
- Pressthe Menubutton on the control panel or remote control.
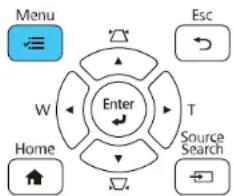
flowchart
graph TD
    A["Menu"] --> B["Enter"]
    B --> C["Esc"]
    B --> D["Target"]
    B --> E["Home"]
    B --> F["Source Search"]
    B --> G["W"]
    B --> H["T"]
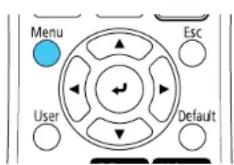
Youseethemenuscreen.
| Frequently Used Items | Image | |
| Image | Color Mode | Presentation |
| Signal I/O | Brightness | 50 |
| Installation | Contrast: | 50 |
| Display | Color Saturation | 50 |
| Operation | Tint | 50 |
| Management | Sharpness | 50 |
| Network | White Balance | |
| Pen/Touch | Dynamic Contrast | Off |
| Noise Reduction | 0 | |
| Interactive | MPEG Noise Reduction | Off |
| Multi-Projection | Gamma | 0 |
| Memory | RG8CMY | |
| ECO | Deinterlacing | Off |
| Initial/All Settings | Super-resolution | |
| Detail Enhancement | ||
| Reset to Defaults | ||
| Source | Computer1 | |
| Resolution | Auto | |
- Presstheupordownarrowbuttontomovethroughthemenuslistedontheleft. Thesettingsfor eachmenuaredisplayedontheright.
Note: The available settings depend on the current input source, resolution, or other menu settings.
- Tochangesettingsinthedisplayedmenu, pressEnter.
4.Presstheupordownarrowbuttontomovethroughthesettings. - Changethesettingsusingthebuttonslistedonthebottomofthemenuscreens.
- Toreturnallthemenusettingstotheirdefaultvalues, selectInitial/AllSettings.
- When you finish changing settings on an amino acid, press Esc.
- PressMenuorEsctoexitthemenus.
Note: The icon indicates that a setting contains sub-settings.
Note: You can also set the interactive property your fingertoselect menus and settings.
Parenttopic:AdjustingtheMenuSettings
ImageQualitySettings-ImageMenu
Settingsthelmagemenuletyouadjustthequalityofyourimagefortheinputsourceyouarecurrently using. Theavailablesettingsdependonthecurrentlyselectedcolormodeandinputsource.
| Frequently Used Items | Image | |
| Image | Color Mode | Presentation |
| Signal I/O | Brightness | 50 |
| Installation | Contrast | 50 |
| Display | Color Saturation | 50 |
| Operation | Tint | 50 |
| Management | Sharpness | 50 |
| Network | White Balance | |
| Pen/Touch | Dynamic Contrast | Off |
| Noise Reduction | 0 | |
| Interactive | MPEG Noise Reduction | Off |
| Multi-Projection | Gamma | 0 |
| Memory | RGBCMY | |
| ECO | Deinterlacing | Off |
| Initial/All Settings | Super-resolution | |
| Detail Enhancement | ||
| Reset to Defaults | ||
| Source | Computer1 | |
| Resolution | Auto | |
ColorModeSettings
| SettingOptionsDescription | ||
| ColorModeSeethelistofavailableColorModes | Color Modes | Adjuststhevividnessofimage colorsforvariousimagetypes andenvironments |
| BrightnessVaryinglevelsavailableLightensordarkenstheoverall | Lightensordarkenstheoverall | image |
| ContrastVaryinglevelsavailableAdjuststhedifferencebetween | Adjuststhedifferencebetween | lightanddarkareasoftheimage |
| ColorSaturationVaryinglevelsav | ilableAdjuststheintensityoftheimage | colors |
| TintVaryinglevelsavailableAdjustst | thebalanceofgreento | magentatonesintheimage |
| SharpnessVaryinglevelsavailable | Adjuststhesharpnessor | softnessofimagedetails |
| WhiteBalanceColorTemp. | G-MCorrectionCustom | Setstheoverallcolortoneofthe imageColorTemp.:setsthecolor temperatureaccordingtothe selectedcolormode;lower valuestinttheimagered,and highervaluestinttheimageblueG-MCorrection:makesfine adjustmentstothecolortone; highervaluestinttheimage greenandlowervaluestintthe imageredCustom:adjuststheindividual RGBcomponentsoftheoffset andgain |
| DynamicContrastOff | NormalHighSpeed | Adjuststheprojectedluminance basedontheimagebrightness |
| NoiseReductionVaryinglevelsav | ilableReducesflickeringinanalog | images |
| MPEGNoiseReductionHigh | NormalLowOff | Reducesthenoiseorstaticin MPEGvideo |
| Gamma-2to2 | Custom | Adjuststhecolorsbyselecting oneofthegammacorrection valuesorreferringtoagamma graph |
| RGBCMYVaryinglevelsavailable | adjuststhehue,saturation,and | brightnessforeachcolor |
| DeinterlacingOff | VideoFilm/Auto | Setswhethertoconvert interlaced-to-progressivesignals forcertainvideoimagetypesOff:forfast-movingvideoimagesVideo:formostvideoimagesFilm/Auto:formovies,computer graphics,andanimation |
| Super-resolutionFineLineAdjust | SoftFocusDetail | Sharpensblurredimageswhen projectinglow-resolutionimagesFineLineAdjust:enhancesthe contrastandoutlinesof complicatedimagesSoftFocusDetail:enhancesthe contrastandoutlinesofsmooth backgrounds |
| DetailEnhancementStrength | Range | Enhancesdetailstocreateclear outlinesStrength:highersettingscreate astrongereffectRange:highersettingsincrease theaffectedareaaroundthe outline |
| ResettoDefaults—Resetsallsettings | gsfortheColor | Modecurrentlyselected |
Note: The Brightness setting does not affect laser brightness. To change the laser brightness mode, usetheLightSourceBrightnessControlsettingintheOperationmenu.
InputSourceSettings
Tochangesettingsforaninputsource, makesurethesourceisconnectedandselectthatsource.
Note: You can restore the default settings of the Tracking, Sync, and Position settings by pressing the Autobuttonontheremotecontrol.
| SettingOptionsDescription | ||
| Source—Displaysthecurrentinputsource | selected | |
| ResolutionAuto | NormalWide | Setstheinputsignalresolutionif notdetectedautomaticallyusing theAutooption |
| AspectSeethelistofavailableaspect ratios | Setstheaspectratio(width-to-heightratio)TurnofftheScalesettingorset theScaleModesettingtoFull Displaybeforeselectingthis setting(BrightLink1485Fi). | |
| Scale (BrightLink1485Fi) | VaryinglevelsavailableWhenusing | multipleprojectors, adjuststhescaleoftheimage displayedbyeachprojector |
| AnalogSignalAdjustmentAutoSetup | TrackingSync.Position | AdjuststhesignalwhenComputeristhecurrently selectedinputsourceAutoSetup:settoOnto automaticallyoptimizetheimage qualityTracking:adjuststhesignalto eliminateverticalstripesin imagesSync:adjustssignaltoeliminate fuzzinessorflickeringinimagesPosition:adjuststheimage locationonthescreen |
| ResettoDefaults—Resetsallsettingsforthe | currentlyselectedinputsource | |
Note: Select Reset Image Settings to reset all settings on the Image menu to their default values.
Parenttopic: Adjusting theMenu Settings
Relatedconcepts
ImageAspectRatio
Relatedreferences
FeatureSettings-OperationMenu
Relatedtasks
ChangingtheColorMode
TurningOnAutomaticLuminanceAdjustment
InputSignalSettings-Signall/OMenu
Normally the projector detects and optimizes the input signal settings automatically. If you need to customize these settings, you can use the Signall/Omenu. The available settings depend on the currently selected inputs source.
| Frequently Used Items | Signal I/O | |
| Image | Volume | |
| Signal I/O | Source | Computer1 |
| Installation | Signal Format | |
| Display | Mic Input Level | 50 |
| Operation | Overscan | Auto |
| Management | EDID | 3240x1080/60Hz |
| Network | Reset to Defaults | |
| Pen/Touch | A/V Output | While Projecting |
| Interactive | Inverse Audio | Off |
| Multi-Projection | Audio Output | Auto |
| Memory | HDMI Audio Output | |
| ECO | Monitor Out Port | Monitor Out |
| Initial/All Settings | USB Display | 0 |
| HDMI Link | ||
| Reset Signal I/O Settings | ||
| Installation | ||
| Fixed Installation | Off | |
Tochangesettingsforaninputsource,makesurethesourceisconnectedandselectthatsource.
| SettingOptionsDescription | ||
| VolumeVaryinglevelsavailable | Adjuststhevolumeoftheprojector'sspeakersystemorexternalspeakers | |
| SourceSignalFormat | MicInputLevelOverscanEDIDResettoDefaults | Displayssettingsselectedforthecurrent inputsourceSignalFormat:setsthesignaltypeand videorangeforcertaininputsources•VideoSignal:specifiesthesignaltype frominputsourcesconnectedtovideo ports;ifinterferenceappearsorno imageappearswhensettoAuto, selecttheappropriatesignaltype•VideoRange:setsthevideorangeto matchthesettingofaninputsource connectedtotheHDMIportsor HDBaseTport(BrightLink1485Fi)MicInputLevel:adjuststhevolumefrom amicrophonewhenaudioisnotoutputto anaudio/visualsystem;whentheMic InputLevelsettingisturnedup,the volumeoftheotherconnecteddeviceis turneddown,andwhentheMicInput Levelisturneddown,thevolumeofthe otherconnecteddeviceisturnedupOverscan:changestheprojectedimage ratiotomaketheadgesvisiblebya selectablepercentageorautomatically whenprojectingacomponentsignalEDID:describesthedisplaycapabilities ofyourprojectorwhentheselectedinput sourceisHDMlorHDBaseT(BrightLink 1485Fi);changethissettingas necessaryaccordingtotheresolutionof thecurrentinputsourceResettoDefaults:resetsallsettingsfor thecurrentinputsource |
| A/VOutputWhileProjecting | AlwaysOn | Determineswhentheprojectoroutputs audioandimagestoexternaldevices;set toAlwaysOntooutputaudioand imageswhentheprojectorisinstandby mode |
| InverseAudioOn | Off | SettoOntoinverttheaudio'sleftand rightchannelstomatchtheprojector's installationposition |
| AudioOutputAuto | Audio1Audio2Audio3 | Setstheaudioinputportwhenprojecting frominputsourcesotherthanHDMI, HDBaseT(BrightLink1485Fi),LAN,and ScreenMirroring;selectAudio3when inputtingaudiofromtheAudloport |
| HDMIAudioOutputHDMI1 | HDMI2HDMI3 | Setstheaudioinputportwhenprojecting fromoneoftheHDMIports |
| MonitorOutPortMonitorOut | Computer2 | Selectsthefunctionofthe Computer2/MonitorOutportMonitorOut:selectthisoptionwhen outputtinganimagesignaltoanexternal monitorComputer2:selectthisoptionwhen inputtinganimagesignalfroma computer |
| USBDisplayOn | Off | SettoOntoenabletheUSBDisplay featureforacomputerconnectedtothe USB-B1port |
| HDMILinkDeviceConnections | HDMILinkAudioOutDevicePowerOnLinkPowerOffLink | AdjuststheHDMILinkoptionsthatallow theprojectororremotetocontrolHDMI-connecteddevicesthatsupporttheCEC standardDeviceConnections:liststhedevices connectedtotheHDMI1,HDMI2,and HDMI3portsHDMILink:enablesordisablesthe HDMILinkfeatureAudioOutDevice:selectswhetherto outputaudiofromtheinternalspeakers oraconnectedaudio/visualsystemPowerOnLink:controlswhathappens whenyouturnontheprojectororalinked deviceBidirectional:automaticallyturnson theconnecteddevicewhenyouturnon theprojector,andviceversaDevice->PJ:automaticallyturnson theprojectorwhenyouturnonthe connecteddevicePJ->Device:automaticallyturnson theconnecteddevicewhenyouturnon theprojectorPowerOffLink:controlswhetherlinked devicesareturnedoffwhentheprojector isturnedoff |
| ResetSignall/OSettingsRese | sallsettingsontheSignall/O | menutotheirdefaultvalues |
Parenttopic: Adjusting theMenu Settings
InstallationSettings-InstallationMenu
SettingsonthInstallationmenuletyousetupyourprojectoryourinstallationenvironment. The availablesettingsdependonthecurrentlyselectedinputsourceandothersettings.
| Frequently Used Items | Installation | |
| Image | Fixed Installation | Off |
| Signal I/O | Test Pattern | |
| Installation | Setting Plate Installation Guide | |
| Display | Vertical Installation | No |
| Operation | Projection | Front/Upside Down |
| Management | Auto Screen Adjustment | |
| Network | Geometry Correction | Point Correction |
| Pen/Touch | Digital Zoom | |
| Connect ELPCB02 | Off | |
| Interactive | Touch Unit | |
| Multi-Projection | Remote Receiver | Off |
| Memory | Screen Type | 16:9 |
| ECO | High Altitude Mode | Off |
| Initial/All Settings | Reset Installation Settings | |
| Display | ||
| Pattern Display | ||
| Pattern Type | ||
| SettingOptionsDescription | ||
| FixedInstallationOn | Off | SettoOnifyouinstalledthe projectorinafixedlocation |
| TestPattern—Displaysatestpatterntoassistin | focusingandzoomingtheimage andcorrectingimageshape | |
| SettingPlateInstallationGuide— | Displaysanon-screenguideto | assistwithinstallingthe projectionscreenwhenyouhave installedtheprojectoronawall |
| VerticalInstallationYes | No | SettoYesifyouinstalledthe projectorinaverticalposition |
| ProjectionFront | Front/UpsideDownRearRear/UpsideDown | Selectsthewaytheprojector facesthescreensotheimageis orientedcorrectly |
| AutoScreenAdjustment—Automaticallyadjuststheimage | shapewhencornermarkersare placedontheprojectionsurface | |
| GeometryCorrectionH/V-Keystone | QuickCornerArcCorrectionPointCorrectionMemory | Adjustsimageshapeto rectangular(horizontally and vertically)H/VKeystone:letyoumanually correcthorizontalandvertical sidesQuickCorner:selecttocorrect imageshapeandalignment usinganon-screendisplayArcCorrection:selecttoadjust thecurveorarcofthehorizontal andverticalsidesPointCorrection:selectto dividetheprojectedimageintoa gridandcorrectdistortionby movingaselectedpointMemory:controlsmemory functionsforcurrentimageshape settingsSaveMemory:savesthe currentimageshapeasa memorysettingLoadMemory:loadsasaved imageshapememoryRenameMemory:renamesa savedimageshapememoryEraseMemory:deletesa savedimageshapememoryResetMemory:resetsallthe imageshapememorysettings |
| DigitalZoomVaryinglevelsavailable | eAdjuststhesizeoftheprojected | image |
| ImageShiftVaryingpositionsavailable | bleAdjuststhepositionofthe | projectedimage |
| ConnectELPCB02On | Off | SettoOntoswitchtheinput sourcebetweentheHDMI2port andHDMI3porteachtimeyou presstheHDMI2buttononthe optionalinterfacebox |
| TouchUnitInstallationPattern | PowerTouchUnitSetupTouchCalibrationCalibrationRange | InstallationPattern:displaysa patterntohelpyouadjustthe positionoftheTouchUnitPower:turnsontheTouchUnit powerTouchUnitSetup:performs angleadjustmentforlaser diffusionTouchCalibration:performs calibrationforfingertouch operationsCalibrationRange:iffinger touchoperationsarerecognized asdragoperations,selectWidetowidenthecalibrationrange |
| RemoteReceiverFront/Rear | FrontRearOff | Limitsreceptionofremotecontrol signalsbytheselectedreceiver; Offturnsoffallreceivers |
| ProjectorID(BrightLink1480Fi) | Off1through9 | AssignsanIDfortheprojector whenyouusemultipleprojectors |
| ScreenType4:3 | 16:6(BrightLink1485Fi)16:916:1021:9 | Setstheaspectratiotofitthe imageontheprojectionsurface |
| ScreenPositionVaryingpositions | availableShiftstheimagepositiononthe | screen |
| HighAltitudeModeOn | Off | Regulatestheprojector's operatingtemperatureat altitudesabove4921feet(1500 m) |
| ResetInstallationSettings—Resetsallsettingsonthe | Installationmenutotheirdefault valuesexceptforthefollowing:•DigitalZoom•ImageShift | |
Parenttopic: Adjusting theMenu Settings
Relatedtasks
CorrectingImageShapewithArcCorrection
CorrectingImageShapewiththeKeystoneButtons
CorrectingImageShapewithQuickCorner
AdjustingtheImagePosition
LockingtheProjector'sButtons
UnlockingtheProjector'sButtons
Relatedtopics
SettingUptheProjector
DisplaySettings-DisplayMenu
SettingstheDisplaymenuletyoucustomizevariousprojectordisplayfeatures. Theavailablesettings dependonthecurrentlyselectedinputsourceandothersettings.
| Frequently Used Items | Display | |
| Image | Pattern Display | |
| Signal I/O | Pattern Type | |
| Installation | No-signal Screen | Blue |
| Display | Startup Screen | On |
| Operation | Home Screen Auto Disp. | On |
| Management | Messages | On |
| Network | Menu Rotation | Off |
| Pen/Touch | Split Screen Setting | |
| Interactive | Reset Display Settings | |
| Multi-Projection | Operation | |
| Memory | Auto Source Search | On |
| ECO | Light Source Brightness Cont... | |
| Direct Power On | Off | |
| Initial/All Settings | Auto Power On | Off |
| Sleep Mode | On | |
| Sleep Mode Timer | 10 min. | |
| A/V Mute Timer | On | |
| SettingOptionsDescription | ||
| PatternDisplay—Displaystheselectedpattern | typetoassistinadjustingthe image | |
| PatternTypePattern1 | Pattern2Pattern3Pattern4UserPattern | Selectsthetypeofgridpattern,linepattern,orcustompatternto display |
| No-signalScreenBlack | BlueLogo | Selectthescreencolororlogoto displaywhennoinputsignalis detected |
| StartupScreenOn | Off | Controlswhetheralogois displayedwhentheprojector startsup |
| HomeScreenAutoDisp.On | Off | ControlswhethertheHome screenisdisplayedautomatically whennoinputsignalisdetected whentheprojectorturnson |
| MessagesOn | Off | Controlswhetherprojectorstatus anderormessagesare displayedontheprojectedimage |
| MenuRotationRight90Degree | Left90DegreeOff | Rotatesthemenudisplay 90^ |
| SplitScreenSettingDisplayAudio | OutputSourceAlign | AdjuststheSplitScreenfeature DisplayAudioOutputSource: controlswhetheraniconis displayedwiththesource providingaudiooutputduring SplitScreenprojectionAlign:ifsplittingthescreen betweentwoimages,determines whethertheimagesarealigned atthetoporinthemiddleofthe screen |
| ResetDisplaySettings—Resetsa | lsettingsontheDisplay | menutotheirdefaultvalues |
Note: You must disable User's Logo password protection to adjust the No-signal Screen and Startup Screensettings.
Parenttopic:AdjustingtheMenuSettings
Relatedtasks
CreatingaUserPatterntoDisplay
FeatureSettings-OperationMenu
Settings the Operation menu let you customize various projector features that controls operation. The available settings depend on the currently selected inputs source and other settings.
| Frequently Used Items | Operation | |
| Image | Auto Source Search | On |
| Signal I/O | Light Source Brightness Cont... | |
| Installation | Direct Power On | Off |
| Display | Auto Power On | Off |
| Operation | Sleep Mode | On |
| Management | Sleep Mode Timer | 10 min. |
| Network | A/V Mute Timer | On |
| Pen/Touch | Standby Mode | Communication On |
| Interactive | Port | Wired LAN |
| Multi-Projection | Quick Startup | Off |
| Memory | Indicators | On |
| ECO | Inv Direction Button | Off |
| Initial/All Settings | Reset Operation Settings | |
| Management | ||
| User Button | Light Source Mode | |
| User's Logo | ||
| User Pattern | ||
| SettingOptionsDescription | ||
| AutoSourceSearchOn | Off | Enablestheprojectorto automaticallyselectaninput source |
| LightSourceBrightness Control | MaintainBrightnessMaintainBrightnessLevelEstimatedRemainsLightSourceModeBrightnessLevel | Controlstheconstantbrightness of theprojector'slightsourceMaintainBrightness:maintains aconstantbrightnessMaintainBrightnessLevel: selectsthebrightnesslevel to maintainwhentheMaintainBrightnesssettingisenabled EstimatedRemains:ifthe MaintainBrightnesssettingis enabled,displaytheremaining numberofhourstheprojector canmaintainconstantbrightnessLightSourceMode:selectsthe brightnessmodeoftheprojector whentheMaintainBrightness settingisdisabledNormal:maximumbrightnessQuiet:70%brightnesswith reducedfannoiseExtended:70%brightness andextendsthelife expectancyofthelightsourceCustom:selectacustom brightnesslevelandenable useofthenextsettingBrightnessLevel:selectthe Custombrightnesslevelyou want |
| DirectPowerOnOn | Off | Controlswhethertheprojector automaticallyturnsonwhenyou pluginin |
| AutoPowerOnHDMI1 | Computer1USBDisplayOff | Selectswhethertoautomatically turnontheprojectorwhenyou connectaninputsignaltoa specificinputsource |
| SleepModeOn | Off | Automaticallyturnsoffthe projectorafteranintervalof inactivity |
| SleepModeTimer1to30minutesSetsthetimebeforetheprojector | automaticallyturnsoff(Sleep Modemustbeturnedon) | |
| A/VMuteTimerOn | Off | Automaticallyturnsoffthe projectorafter30minutesof inactivity |
| StandbyModeCommunicationOn | CommunicationOff | Enablethissettingtoallowthe followingoperationstooccur whentheprojectorisinstandby mode:Monitorandcontrolthe projectoroveranetworkOutputaudioandvideotoan externaldevice(A/VOutput mustbesettoAlwaysOn) |
| PortWiredLAN | WirelessLAN | Selectstheporttousewhilethe StandbyModesettingissetto CommunicationOn |
| QuickStartupOff | 20min.60min.90min. | Setsthetimeperiodforwhich youwanttobeabletorestartthe projectorwithinfivesecondsof turningitoff(QuickStartmode). |
| ClosedCaptionCC1 | CC2Off | Enablesandselectsthetypeofclosedcaptionstodisplay |
| IndicatorsOn | Off | Enablesordisablesthestatusindicatorlightsontheprojector |
| InvDirectionButtonOn | Off | Enablethissettingifyouwanttoinvertthedirectionofthearrowbuttonsonthecontrolpaneltomatchtheprojector'sinstallationposition |
| ResetOperationSettings—Reset | allsettingsthe | Operationmenutotheirdefaultvalues |
Parenttopic: Adjusting theMenu Settings
Relatedtasks
TurningOntheProjector
TurningOfftheProjector
SelectingaQuickStartupSetting
AdministrationSettings-ManagementMenu
SettingstheManagementmenuletyoucustomizevariousprojectoradministrativefeatures.
| Frequently Used Items | Management | |
| Image | User Button | Light Source Mode |
| Signal I/O | User's Logo | |
| Installation | User Pattern | |
| Display | Control Panel Lock | Off |
| Operation | Color Uniformity | |
| Management | Refresh Mode | |
| Network | Light Source Calibration | |
| Pen/Touch | Date & Time | |
| Interactive | Schedule Settings | |
| Multi-Projection | Wireless LAN Power | |
| Memory | Wireless LAN Diagnosis | 1 |
| ECO | Log Save Destination | USB and Internal Memory |
| Initial/All Settings | Batch Setup Range | |
| Language | English | |
| Information | ||
| Display Logs | ||
| Reset Management Settings | ||
Note: You must disable Schedule password protection to adjust the Schedule Settings settings.
| SettingOptionsDescription | ||
| UserButtonLightSourceMode | InformationDeinterlacingClosedCaptionResolutionMicInputLevelPatternDisplayAutoCalibrationDisplayLANInfo.SettingPlateInstallationGuide | AssignsamenuoptiontotheUserbuttonontheremotecontrolforone-touchaccess(AutoCalibrationisthedefaultoption) |
| User'sLogoStartSetting | Reset | Createsthescreenthattheprojectordisplaystoidentifyitselfandenhancesecurity |
| UserPattern—Capturesaprojected | screenand | savesitasapatternfordisplay;selectPatternDisplayintheDisplaymenutodisplaythesavedpattern |
| ControlPanelLockFullLock | ExceptforPowerOff | ControlsprojectorbuttonlockingtosecuretheprojectorFullLock:locksallbuttonsExceptforPower:locksallbuttonsexceptthepowerbuttonOff:nobuttonslocked |
| ColorUniformityColorUniformity | AdjustmentLevelStartAdjustmentsReset | AdjuststhecolortonebalanceColorUniformity:settoOntoadjustthecolortonebalanceforthewholescreenAdjustmentLevel:setstheadjustmentlevelStartAdjustments:adjuststhered,green,andbluecolortonesindividuallyfortheselectedareaReset:resetsallColorUniformityadjustmentvaluestotheirdefaults |
| ColorMatching(BrightLink1480Fi) | AdjustmentLevelRedGreenBlueBrightness | Correctsthetintandbrightnessdifferencesbetweenimages |
| RefreshModeTimer | MessagesStart | SelectStarttoclearanafterimagethatremainsintheprojectedImageandturnoffheprojectorafterthetimespecifiedintheTimerscreen.PressanybuttontocancelRefreshMode.EnabletheMessagessettingifyouwanttodisplayamessagewhenRefreshModeisinprogress. |
| LightSourceCalibrationRunNow | RunPeriodicallyLastRun | Selectsoptionstoperformlight sourcecalibrationtomaintainthe colorbalanceoftheprojected imageRunNow:SelectOntostartlight sourcecalibrationnow.Make suretheprojectorhasbeen turnedonforatleast20minutes formaximumaccuracy.Youmay notbeabletostartcalibrationif theprojector'senvironmental temperatureisoutofrange.RunPeriodically:SelectOnto performcalibrationevery100 hoursofusageLastRun:Displaysthedateand timelightsourcecalibrationwas lastperformed |
| Date&TimeDate&Time | DaylightSavingTimeInternetTime | Adjuststheprojector'sdateand timesettings•Date&Time:setsthedate andtimeontheprojector•DaylightSavingTime: enablesdaylightsavingtime•InternetTime:updatesthe timeautomaticallyviaan onlinetimeserver |
| ScheduleSettings—Schedulesprojectoreventsto | occurautomaticallyatselected datesandtimes | |
| WirelessLANPowerOn | Off | Enablesordisableswireless communication |
| WirelessLANDiagnosisPing | IPAddressPinguntilstoppedStart | Displaysthestatusofthe wirelessLANcommunication |
| LogSaveDestinationInternalMemory | USBandInternalMemory | Selectswhereyouwanttosave projectorerrorandoperationlog files |
| BatchSetupRangeAll | Limited | Selectswhichprojectormenu settingstocopyusingthebatch setupfeature;selectAlltocopy allthesettings,orselectLimited tocopyallsettingsexceptforthe following:•PasswordProtectionsettings•EDIDsettingintheSignall/O menu•Networkmenusettings |
| LanguageVariouslanguagesavailable | Selectsthelanguagefor | projectormenuandmessage displays |
| InformationOperationHours | LightSourceHoursEstimatedRemainsSourceInputSignalResolutionRefreshRateSyncInfoVideoSignalHDBaseTSignalLevel(BrightLink1485Fi)StatusSerialNumberEventIDVersion | Displaysinformationaboutthe projectorandcurrentinputsignal; thedisplayeditemsvary dependingonthecurrentinput sourceTheVersionoptiondisplays versionnumbersfortheprojector andothercomponents |
| DisplayLogsTempWarningInfo | PowerOn/OffHistory | Displayslogdatasavedtothe locationsspecifiedintheLog SaveDestinationsetting |
| ResetManagementSettings—Resetsallsettingsonthe | Managementmenutotheir defaultvaluesexceptforthe following:ScheduleSettingsLanguage | |
EventIDCodeList
Parenttopic: Adjusting theMenu Settings
Relatedtasks
SettingtheDateandTime
SelectingtheLanguagefortheProjectorMenus
SavingaScheduledEvent
ViewingScheduledEvents
EditingaScheduledEvent
EventIDCodeList
IftheEventIDoptionontheInformationscreenintheManagementmenudisplaysacodenumber, checkthislistofEventIDcodesforthesolutiontotheprojectorproblemassociatedwiththecode.
| EventIDcodeCause | seandsolution |
| 0026Ascreenmirroringcommunicationerrorhasoccurred.Turntheprojectoroffandon again,orrestartthenetworksoftware. | |
| 0032 | |
| 0036 | |
| 0037 | |
| 0027Unstablescreenmirroringcommunication.Checkthenetworkcommunication status,waitafewmoments,andtryconnectingtothenetworkagain. | |
| 0028 | |
| 0029 | |
| 0030 | |
| 0031 | |
| 0035 | |
| 0023Connectionfailed.IfyouseethePINnentryscreenonyourcomputer,enterthePIN codedisplayedonthenetworkinformationscreenoratthebottomrightofthe projectedimage.Ifthisdoesnotsolvetheproblem,restarttheprojectorandthe connecteddevices,andthenchecktheconnectionsettings. | |
| 0024 | |
| 0025 | |
| 0043Thevideoformatisnotsupported.Changetheresolutionofthemobiledeviceand reconnect.Alternatively,changetheAdjustImageQualitysettingfortheprojector andreconnect. | |
| 0432Thenetworksoftwaredidnotstart.Turntheprojectoroffandthenonagain. | |
| 0435 | |
| 0433Cannotdisplayythetransferredimages.Restartthenetworksoftware. | |
| 0434Unstablenetworkcommunication.Checkthenetworkcommunicationstatus,waitafewmoments,andtryconnectingtothenetworkagain. | |
| 0481 | |
| 0482 | |
| 0485 | |
| 0483Thenetworksoftwarequitunexpectedly.Checkthenetworkcommunicationstatus,thenturntheprojectoroffandthenonagain. | |
| 04FE | |
| 0484Communicatonwithcomputerwasdisconnected.Restartthenetworksoftware. | |
| 0479Aprojectorsystemerrorhasoccurred.Turntheprojectoroffandthenonagain. | |
| 04FF | |
| 0891CannotfindtheSSID(networkname).Makesureyourcomputerandprojectorareconnectedtoyouraccesspoint'scurrentSSID. | |
| 0892TheWPA/WPA2/WPA3authenticationtypedoesnotmatch.Makesurethewirelessnetworksecuritysettingsarecorrect. | |
| 0893TheWEP/TKP/AESencryptiontypedoesnotmatch.Makesurethewirelessnetworksecuritysettingsarecorrect. | |
| 0894Communicatonwithunauthorizedaccesspointwasdisconnected.Contactyournetworkadministrator. | |
| 0895Communicatonwithaconconnecteddevicewasdisconnected.Checkyourdevice'sconnectionstatus. | |
| 0898FailedtoacquireDHCPaddress.MakesuretheDHCPserverisoperatingcorrectly.IfyouarenotusingDHCP,turnofftheDHCPsettingintheNetworkmenus. | |
| 0899Acommunicationerrorhasoccurred.Tryrestartingthenetworksoftwareandrestartingyourprojector.Ifthatdoesnotsolvetheproblem,contactEpsonforhelp. | |
| 089ATheEAPauthenticationtypedoesnotmatchthenetwork.CheckthewirelessLANsecuritysettingsandmakesurethatthesecuritycertificateisinstalledcorrectly. | |
| 089BEAPserverauthenticationfailed.CheckthewirelessLANsecuritysettingsandmakesurethatthesecuritycertificateisinstalledcorrectly. | |
| 089CEAPclientauthenticationfailed.CheckthewirelessLANsecuritysettingsandmakesurethatthesecuritycertificateisinstalledcorrectly. | |
| 089DKeyexchange | failed.CheckthewirelessLANsecuritysettingsandmakesurethat thesecuritycertificateisinstalledcorrectly. |
| 0920Theinternalb | batterythatsavestheprojector'sdateandtimesettingsisrunninglow.ContactEpsonforhelp. |
| 0B01Theinternals | storagecouldnotbedetectedcorrectly.Turnofftheprojectorand disconnectthepowercord,thenreconnectthepowercordandturntheprojector backon.Whentheprojectoristurnedon,thesecuritycertificateandaddressbook aredeleted.Ifthatdoesnotsveletheproblem,contactEpsonforhelp. |
| 0BFFAnerrorhas | ccurredinthewhiteboardfunction.Restarttheprojector. |
Parenttopic: AdministrationSettings-ManagementMenu
Relatedreferences
NetworkSettings-NetworkMenu
Relatedtasks
SettingUpWirelessNetworkSecurity
NetworkSettings-NetworkMenu
SettingstheNetworkmenuletyouviewnetworkinformationandsetuptheprojectorforcontroloveranetwork.
| Frequently Used Items | Network | |
| Image | Wireless LAN Info. | |
| Signal I/O | Wireless LAN Info. IPv6 | |
| Installation | Simple AP | |
| Display | Wired LAN Info. | |
| Operation | Wired LAN Info. IPv6 | |
| Management | Network Settings | |
| Reset Network Settings | ||
| Network | Pen/Touch | |
| Pen/Touch | Auto Calibration | |
| Interactive | Manual Calibration | |
| Multi-Projection | Touch Unit | |
| Memory | Installation of Projectors | |
| ECO | Pen Hovering | On |
| Initial/All Settings | PC Interactivity | |
| Reset Pen/Touch Settings | ||
| Interactive | ||
| Drawing Function | On | |
Note: You must disable Network password protection to adjust then network settings.
| SettingOptionsDescription | ||
| WirelessLANInfo.Projector | NameWirelessLAN | Displayswirelessnetworkstatusand detailswhenthewirelessLANmodule isinstalledorwhentheSimpleAP settingisdisabledTheWirelessLANoptiondisplaysthe following:AntennalevelSSIDChannelDHCPIPAddressSubnetMaskGatewayAddressDNSServer1DNSServer2MACAddressRegionCode |
| WirelessLANInfo.IPv6IPv6A | address(Manual)IPv6Address(Auto) | DisplaysIPv6informationwhenthe wirelessLANmoduleisinstalledor whentheSimpleAP settingisdisabled |
| SimpleAPProjectorName | SimpleAP | Displayswirelessnetworkstatusand detailswhentheSimpleAPsettingis enabled.TheSimpleAPoptiondisplaysthe following:•AntennaLevel•SSID•Channel•IPAddress•MACAddress•RegionCode |
| WiredLANInfo.ProjectorName | DHCPIPAddressSubnetMaskGatewayAddressMACAddress | Displayswirednetworkstatusand details |
| WiredLANInfo.IPv6IPv6Address(Manual)IPv6Address(Auto) | DisplaysIPv6information.TheIPv6Address(Manual)option displaysthefollowing:IPv6AddressPrefixLengthGatewayAddressTheIPv6Address(Auto)option displaysthefollowing:TemporaryAddressLink-localAddressStatelessAddressStatefulAddress | |
| NetworkSettings—Configuresyournetworksettings | ||
| ResetNetworkSettings—ResetsallsettingsontheNetwork | menutotheirdefaultvalues | |
Parenttopic: Adjusting theMenu Settings
Relatedconcepts
WirelessNetworkProjection
WiredNetworkProjection
Relatedreferences
WirelessLANMenuSettings
PenandTouchSetupSettings-Pen/TouchMenu
Settings the Pen/Touch menu let you setup the interactive pens and fingertouch operations.
| Frequently Used Items | Pen/Touch | |
| Image | Auto Calibration | |
| Signal I/O | Manual Calibration | |
| Installation | Touch Unit | |
| Display | Installation of Projectors | |
| Operation | Pen Hovering | On |
| Management | PC Interactivity | |
| Network | Reset Pen/Touch Settings | |
| Pen/Touch | Interactive | |
| Interactive | Drawing Function | On |
| Multi-Projection | Display Toolbars | Always Show |
| Memory | Display Drawing Area | |
| ECO | Confirm Clear Screen | On |
| Initial/All Settings | Pen Button Function | Eraser |
| Display Clock | Date & Time | |
| Date | YYYY-MM-DD | |
| Time | HH:MM | |
| SettingOptionsDescription | ||
| AutoCalibrationManualCalibration | —Startcalibrationforthe | interactivepens |
| TouchUnitPower | TouchUnitSetupTouchUnitAdjustmentGuideTouchCalibrationCalibrationRange | SelectsettingsfortheTouchUnitPower:turnsontheTouchUnitpowerTouchUnitSetup:performs angleadjustmentforlaser diffusionTouchUnitAdjustmentGuide: whenusingmultipleprojectors sidebyside,displaysaguidefor adjustingtheadjacentprojector's settingsforusewiththetouch unit(HDMIOutputSettingmust besettoProcessOut)TouchCalibration:performs calibrationforfingertouch operationsCalibrationRange:iffinger touchoperationsarerecognized asdragoperations,selectWidetowidenthecalibrationrange |
| InstallationofProjectorsInfrared | IntensitySyncofProjectors | Selectsettingsforinteractivepen andfingertouchoperationswith multipleprojectorsInfraredIntensity:ifthe interactivepensareunstabledue toinfraredinterference,selectStrongSyncofProjectors:ifthe projectorsareconnectedusing theoptionalremotecontrolcable set,selectWired |
| PenHoveringOn | Off | Turnsthepenhoveringfeature onandoff;whensettoOn,the pointerfollowsthepentipasyou hoveritoverthescreenand moveitaround |
| PCInteractivityPenTrackingMode | PressandHoldPenTipBehaviorUSB-B2AutoAdjustPenAreaManualAdj.PenArea | Selectpenoperationand adjustmentoptionsPenTrackingMode:setsthe correctoperatingsystemforthe interactivepenfeatures.For WindowsorMac,selectPen Mode.ForUbuntu,selectMouse Mode.PressandHold:whensetto RightClick,letsyouusealong penpressorfingerpressasa right-clickoperationPenTipBehavior:assigns eitherRightClickorLeftClick tothepentipUSB-B2:setstheHDMIport usedforthecomputerconnected totheUSB-B2whenusing interactivefeatureswiththe computerAutoAdjustPenArea: automaticallyadjuststhepen areaastheresolutionforthe connectedcomputerimage changesManualAdj.PenArea:letsyou adjustthepenareamanually |
| ResetPen/TouchSettings—Resetsallsettingsonthe | Pen/Touchmenutotheirdefault values | |
Parenttopic:AdjustingtheMenuSettings
Relatedconcepts
PenCalibration
Relatedtasks
CalibratingforFingerTouchInteractivity
Relatedtopics
UsingtheInteractiveFeatures
InteractiveSettings-InteractiveMenu
SettingsontheInteractivemenuletyoucustomizevariousprojectorinteractivefeatures.
| Frequently Used Items | Interactive | |
| Image | Drawing Function | On |
| Signal I/O | Display Toolbars | Always Show |
| Installation | Display Drawing Area | |
| Display | Confirm Clear Screen | On |
| Operation | Pen Button Function | Eraser |
| Management | Display Clock | Date & Time |
| Network | Date | YYYY-MM-DD |
| Pen/Touch | Time | HH:MM |
| Interactive | ||
| Save | ||
| Multi-Projection | ||
| Memory | Directory | |
| ECO | Reset Interactive Settings | |
| Initial/All Settings | Multi-Projection | |
| Projector ID | Off | |
| HDMI Out Setting | Off | |
| Geometry Correction | Point Correction | |
Note: You must disable Interactive password protection to adjust the interactive settings.
| SettingOptionsDescription | ||
| DrawingFunctionOn | Off | Enablesordisablesfeaturesfor drawingontheprojectedimage |
| DisplayToolbarsAlwaysShow | HideforSetTime | Controlswhentheinteractive toolbarisdisplayed |
| DisplayDrawingAreaOn | Off | Displaysorhidesthedrawing area |
| ConfirmClearScreenOn | Off | Displaysaconfirmationscreen beforeclearingallcontentdrawn ontheprojectedimage |
| PenButtonFunctionDrawingTool | IbarEraserClearScreenOff | Setsthefunctionofthebuttonon thesideoftheinteractivepens |
| DisplayClockDate&Time | DateTimeOff | Setsthedateandtimedisplayon thewhiteboardtoolbar;adjustthe Date&Timesettinginthe Managementmenu |
| DateYYYY-MM-DD | YYYY/MM/DDMM/DD/YYYYDD/MM/YYYY | Setstheformatofthedate |
| Print—Adjustssettingsthatcontrol | whiteboardprinting | |
| Save—Adjustssettingsthatcontrolfile | savingofwhiteboardcontent | |
| Mail—Adjustssettingsthatcontrol | emailtransmissionofwhiteboard content | |
| Directory—Adjustssettingsthatcontrol | directoryservicestosearchfor emailaddresses | |
| ResetInteractiveSettings—Resetsallsettingsonthe | Interactivemenutotheirdefault values | |
Parenttopic:AdjustingtheMenuSettings
Relatedtasks
SavingPagesinWhiteboardMode
PrintingWhiteboardPages
EmailingWhiteboardPages
UsingthePens
CreatinganAddressBook
Relatedtopics
UsingtheInteractiveFeatures
MultipleProjectorOperationSettings-Multi-ProjectionMenu
Settings the Multi-Projection menu let you setup multiple project or project as single unified image (BrightLink1485Fi).
| Frequently Used Items | Multi-Projection | |
| Image | Projector ID | Off |
| Signal I/O | HDMI Out Setting | Off |
| Installation | Geometry Correction | Point Correction |
| Display | Edge Blencing | |
| Operation | Scale | |
| Management | Color Uniformity | |
| Network | Light Source Mode | Normal |
| Pen/Touch | Color Matching | |
| Interactive | RGBCMY | |
| Reset Multi-Projection Settings | ||
| Multi-Projection | Memory | |
| Memory | Save Memory | |
| ECO | Load Memory | |
| Initial/All Settings | Rename Memory | |
| Erase Memory | ||
| Reset Memory | ||
| ECO | ||
| SettingOptionsDescription | ||
| ProjectorIDOff | 1through9 | AssignsanIDfortheprojector whenyouusemultipleprojectors |
| HDMIOutSettingPassThrough | ProcessOutOff | SettoPassThroughtoenable uptofourprojectorsconnected viaHDMIcablestoprojecta unifiedimage.SettoProcessOuttoenable useofinteractivepensorfinger touchoperationsforuptotwo projectors. |
| NumberofProjectors2to4Setsthen | numberofprojectors | usedtocreateaunifiedimage; thissettingisdisplayedonlyifHDMIOutSettingissettoPass Through |
| Order1to4(whenHDMIOutSetting | issettoPassThrough)1or2(whenHDMIOutSettingissettoProcessOut) | Setstheprojector'spositionin numberedorderfromlefttoright |
| ConnectComputerYes | No | SettoYesifyouconnecteda computertotheprojector;this settingisdisplayedonlyifHDMI OutSettingissettoProcess Out |
| GeometryCorrectionH/V-Keystone | QuickCornerArcCorrectionPointCorrectionMemory | Adjustsimageshapeto rectangular(horizontally and vertically)H/VKeystone:letyoumanually correcthorizontalandvertical sidesQuickCorner:selecttocorrect imageshapeandalignment usinganon-screendisplayArcCorrection:selecttoadjust thecurveorarcofthehorizontal andverticalsidesPointCorrection:selectto dividetheprojectedimageintoa gridandcorrectdistortionby movingaselectedpointMemory:controlsmemory functionsforcurrentimageshape settingsSaveMemory:savesthe currentimageshapeasa memorysettingLoadMemory:loadsasaved imageshapememoryRenameMemory:renamesa savedimageshapememoryEraseMemory:deletesa savedimageshapememoryResetMemory:resetsallthe imageshapememorysettings |
| EdgeBlendingEdgeBlending | TopEdgeBottomEdgeLeftEdgeRightEdgeLineGuidePatternGuideGuideColor | Blendstheborderbetween multipleimagestocreatea seamlessscreen |
| BlackLevelColorAdjustment | AreaCorrectionReset | Adjuststhebrightnessandtone differencesinoverlapping images |
| ScaleVaryinglevelsavailableWhen | usingmultipleprojectors, | adjuststhescaleoftheimage displayedbyeachprojector |
| ColorUniformityColorUniformity | AdjustmentLevelStartAdjustmentsReset | AdjuststhecolortonebalanceColorUniformity:settoOnto adjustthecolortonebalancefor thewholescreenAdjustmentLevel:setstheadjustmentlevelStartAdjustments:adjuststhered,green,andbluecolortones individuallyfortheselectedareaReset:resetsallColorUniformity adjustmentvaluestotheir defaults |
| LightSourceModeNormal | QuietExtendedCustom | Selectsthebrightnessmodeof theprojectorwhentheMaintain BrightnesssettingisdisabledNormal:maximumbrightnessQuiet:70%brightnesswith reducedfannoiseExtended:70%brightnessand extendsthelifeexpectancyofthe lightsourceCustom:selectacustom brightnesslevelandenableuse ofthenextsetting |
| ColorMatchingAdjustmentLevel | RedGreenBlueBrightness | Correctsthetintandbrightness differencesbetweenimages |
| RGBCMYVaryinglevelsavailableA | djuststhehue,saturation,and | brightnessforeachcolor |
| ResetMulti-ProjectionSettings— | ResetsallsettingsontheMulti- | Projectionmenutotheirdefault values |
Parenttopic: Adjusting theMenu Settings
Relatedconcepts
UsingMultipleProjectors(DuoLink)
Relatedreferences
MultipleProjectorConnectionMenuSettings
Relatedtasks
BlendingthelmageEdges
AdjustingColorUniformity
MatchingtheImageColors
AdjustingtheBlackLevel
AdjustingRGBCMY
ScalinganImage
ImageQualityMemorySettings-MemoryMenu
Settings the Memory menu let you save and load image quality settings in the projector's memory.
| Frequently Used Items | Scale | |
| Image | Color Uniformity | |
| Signal I/O | Light Source Mode | Normal |
| Installation | Color Matching | |
| Display | RGBCMY | |
| Operation | Reset Multi-Projection Settings | |
| Management | Memory | |
| Network | Save Memory | |
| Pen/Touch | Load Memory | |
| Interactive | Rename Memory | |
| Multi-Projection | Erase Memory | |
| Reset Memory | ||
| Memory | ECO | |
| ECO | Light Source Mode | Normal |
| Initial/All Settings | Sleep Mode | On |
| Standby Mode | Communication On | |
| Initial/All Settings | ||
| Reset All | ||
| SettingOptionsDescription | ||
| SaveMemoryMemory1to10Letsyou | usavethecurrentimage | qualitysettingstomemory |
| LoadMemoryMemory1to10Loads | asavedimagequality | settingmemory |
| RenameMemoryMemory1to10R | namesasavedimagequality | settingmemory |
| EraseMemoryMemory1to10Delete | esasavedimagequality | settingmemory |
| ResetMemory—Resetsalltheimagequality | settingmemorysettings | |
Parenttopic:AdjustingtheMenuSettings
Relatedtasks
SavingSettingstoMemoryandUsingSavedSettings
SetupSettings-ECOMenu
SettingstheECOmenuletyoucustomizeprojectorfunctionstosavepower.
| Frequently Used Items | Scale | |
| Image | Color Uniformity | |
| Signal I/O | Light Source Mode | Normal |
| Installation | Color Matching | |
| Display | RGBCMY | |
| Operation | Reset Multi-Projection Settings | |
| Management | Memory | |
| Network | Save Memory | |
| Pen/Touch | Load Memory | |
| Interactive | Rename Memory | |
| Multi-Projection | Erase Memory | |
| Memory | Reset Memory | |
| ECO | ECO | |
| Initial/All Settings | Light Source Mode | Normal |
| Sleep Mode | On | |
| Standby Mode | Communication On | |
| Initial/All Settings | ||
| Reset All | ||
| SettingOptionsDescription | ||
| LightSourceModeNormal | QuietExtendedCustom | Selectsthebrightnessmodeof theprojectorwhentheMaintain BrightnesssettingisdisabledNormal:maximumbrightnessQuiet:70%brightnesswith reducedfannoiseExtended:70%brightnessand extendsthelifeepectancyofthe lightsourceCustom:selectacustom brightnesslevelandenableuse ofthenextsetting |
| SleepModeOn | Off | Automaticallyturnsoffthe projectorafteranintervalof inactivity |
| StandbyModeCommunicationOn | CommunicationOff | Enablethissettingtoallowthe followingoperationstooccur whentheprojectorisinstandby mode:Monitorandcontrolthe projectoroveranetworkOutputaudioandvideotoan externaldevice(A/VOutput mustbesettoAlwaysOn) |
Parenttopic: Adjusting theMenu Settings
Relatedreferences
ProjectorLightSourceSpecifications
InitialSettingsandResetOptions-Initial/AllSettingsMenu
You can reset most of the projector settings to their default values using the Reset All option on the Initial/AllSettingsmenu.
| Frequently Used Items | Scale | |
| Image | Color Uniformity | |
| Signal I/O | Light Source Mode | Normal |
| Installation | Color Matching | |
| Display | RGBCMY | |
| Operation | Reset Multi-Projection Settings | |
| Management | Memory | |
| Network | Save Memory | |
| Pen/Touch | Load Memory | |
| Interactive | Rename Memory | |
| Multi-Projection | Erase Memory | |
| Memory | Reset Memory | |
| ECO | ECO | |
| Initial/All Settings | Light Source Mode | Normal |
| Sleep Mode | On | |
| Standby Mode | Communication On | |
| Initial/All Settings | ||
| Reset All | ||
WhenyouselecttheResetAlloption,youseethisscreen:
![[Reset All] ✓ Reset Image Settings ✓ Reset Signal S/O Settings ✓ Reset Installation Settings ✓ Reset Display Settings ✓ Reset Operation Settings ✓ Reset Management Settings ✓ Reset Network Settings ✓ Reset Pen/Reuse Settings ✓ Reset Interactive Settings ✓ Reset Multi-Projection Settings ✓ Reset Memory Return Execute](/content/2026/05/1053810/images/ade1573693d5cb8e7e28e40ad311e0cbec2c9cf0ed3f1f9ca293ab290b015644.jpg)
Checkmarksappearnexttothemenusettingsthatareselectedtobereset.Ifyoudonotwanttoreset settings in some menus, deselect them. When you are ready, select Execute and press Enter.
You cannot reset the following settings using the ResetAlloption:
•DigitalZoom
•ImageShift
- ScheduleSettings
•Language
Parenttopic:AdjustingtheMenuSettings
MaintainingandTransportingtheProjector
Followtheinstructionsinthesesectionstomaintainyourprojectorandtransportitfromplacetoplace.
ProjectorMaintenance
AirFilterandVentMaintenance
ReplacingtheRemoteControlBatteries
ReplacingtheHardPenTips
ReplacingtheSoftPenTips
TransportingtheProjector
ProjectorMaintenance
Yourprojectorneedslittlemaintenancetokeepworkingatitsbest.
Youmayneedtocleanthelensperiodically, andcleantheairfilterandairventstopreventtheprojector fromoverheatingduetoblockedventilation.
Theonlypartsyoushouldreplacearetheairfilter,penbatteriesandtips,andremotecontrolbatteries.If anyotherpartneedsreplacing,contactEpsonoranauthorizedEpsonservicer.
Thisprojectorusesasealedlaserlightsourcewhichdoesnotneedservicingandcannotbereplaced.
Warning: Before cleaning any part of the projector, turn it off and unplug the power cord. Never open any cover on the projector, except a specifically explained in this manual. Dangerous electrical voltages in the projector can injure you severely.
Warning: Do not try to service this product yourself, except as specifically explained in this manual. Referallotherservicingtoqualifiedservicers.
CleaningtheLens
CleaningtheProjectorCase
Parenttopic: Maintaining and Transporting the Projector
CleaningtheLens
Cleantheprojector'slensperiodically,orwheneveryounoticedustorsmudgesonthesurface.Make sureyouunplugtheprojectorbeforecleaningthelens.
- Toremovedustorsmudges, gentlywipethelenswithlens-cleaningpaper.
- Toremovestubbornsmudges, moistenasoft, lint-freeclothwithlenscleanerandgentlywipethelens. Donotsprayanyliquiddirectlyonthelens.
Warning: Donotusealenscleanerthatcontainsflammablegas. The high heat generated by the projectormaycauseafire.
Caution: Do not use glass cleaner or any harsh materials to clean the lens and do not subject the lens toanyimpacts; you may damage it. Donot use canned air, orthegases may leave a residue. Avoid touching the lens with your bare hand stop prevent fingerprint onordamage to the lens surface.
Parenttopic: Projector Maintenance
Relatedtasks
TurningOfftheProjector
CleaningtheProjectorCase
Beforecleaningtheprojectorcase,turnofftheprojectorandunplugthepowercord.
• Toremovedustordirt, useasoft, dry, lint-freecloth.
- Toremovestubborndirt, useasoftclothmoistenedwithwaterandmildsoap.Donotsprayliquid directlyontheprojector.
Caution: Do not use wax, alcohol, benzine, paint thinner, or other chemicals to clean the projector case. Thesecandamagethecase.Donotusecannedair,orthegasesmayleaveaflammable residue.
Parenttopic: Projector Maintenance
Relatedtasks
TurningOfftheProjector
AirFilterandVentMaintenance
Regularfiltermaintenanceisimportanttomaintainingyourprojector.YourEpsonprojectorisdesigned withaneasilyaccessible,user-replaceablefiltertoprotectyourprojectorandmakeregularmaintenance simple.Filtermaintenanceintervalswilldependontheenvironment.
Ifregularmaintenanceisnotperformed,yourEpsonprojectorwillnotifyyouwhenthetemperature insidetheprojectorhasreachedahighlevel.Donotwaituntilthiswarningappearstomaintainyour projectorfilterasprolongedexposuretohightemperaturesmayreducethelifeofyourprojectororlaser.
Damageduetothefailuretoproperlymaintaintheprojectororitsfiltermaynotbecoveredbytheprojector'sLimitedWarranty.
CleaningtheAirFilterandVents
ReplacingtheAirFilter
Parenttopic: Maintaining and Transporting the Projector
Relatedreferences
ProjectorLightSourceSpecifications
CleaningtheAirFilterandVents
Cleantheprojector'sairfilterorventsiftheygetdusty,orifyouseeamessagetellingyoutocleanthem.
Caution: Do not use water or any detergent to clean the air filter. Do not use canned air, or the gases may leave a flammableresidue.
- Turnoff the projector and unplug the power cord.
- Loosenthescrewssecuringtheairfiltercover.
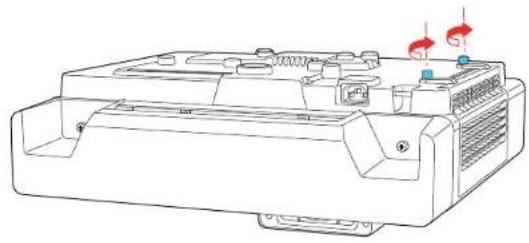
natural_image
Technical line drawing of a mechanical device casing with internal components and mounting holes (no text or symbols)- Opentheairfiltercover.
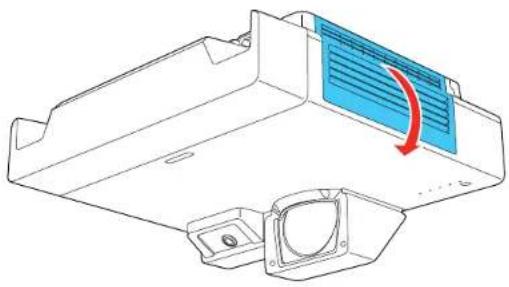
natural_image
Technical line drawing of a mechanical component with a blue airflow arrow indicating direction (no text or symbols)- Pulltheairfilteroutoftheprojector.
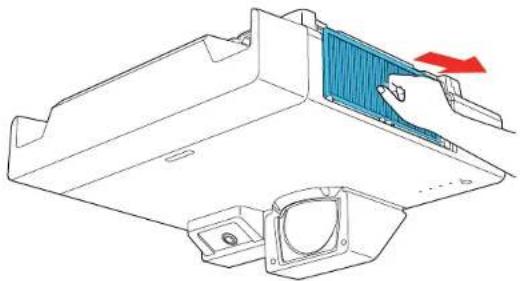
natural_image
Technical line drawing of a mechanical component with a blue panel and red arrow indicating direction (no text or symbols)- Tapeachsideofthefilter4to5timestoshakeoffanyexcessdust.Dothisoutsidetheroomor awayfromtheprojector.
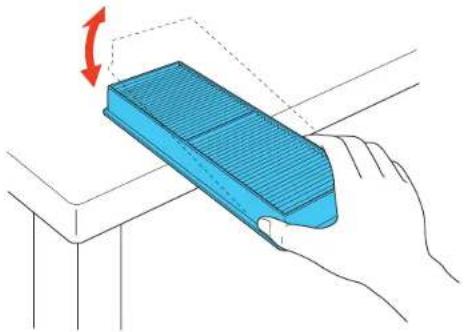
natural_image
Illustration of a blue corrugated metal object being handled by a hand, with no visible text or symbols.Caution: Donotuse excessive force when tapping the air filter, or it may crack and become unusable. Donotrin the air filter in water, or use any detergent or solvent to clean it. Donotuse canned air; the gases may leave a flammable residue, or push dust and debris into the projector's optics or others sensitive areas.
- Vacuum the front of the air filter (thesidewith the tabs) to remove any remaining dust.
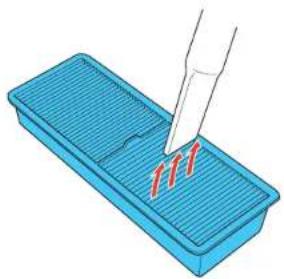
natural_image
Illustration of a pipette dispensing red liquid into a blue rectangular container (no text or symbols)Note: If dust is difficult to remove the air filter is damaged, replace the air filter.
- Placetheairfilterbackintheprojectorasshown.
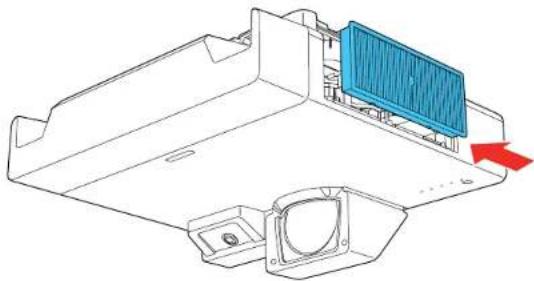
natural_image
Technical line drawing of a mechanical component with a blue panel and red arrow indicating direction (no text or symbols)- Closetheairfiltercoverandtightenthescrews.
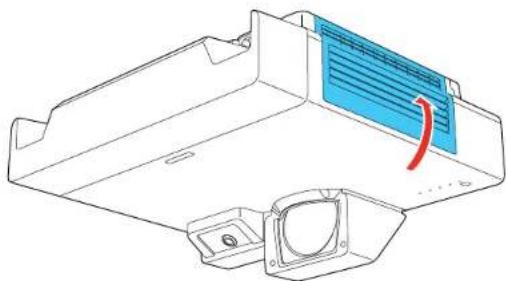
natural_image
Technical line drawing of a mechanical housing component with a blue panel and circular base (no text or symbols)Parenttopic: AirFilterandVentMaintenance
Relatedtasks
TurningOfftheProjector
ReplacingtheAirFilter
Youneedtoreplacetheairfilterinthefollowingsituations:
•Aftercleaningtheairfilter,youseeamessagetellingyoutocleanorreplaceit
•Theairfilteristornordamaged
Youcanreplacetheairfilterwhiletheprojectorismountedonthewallorceiling.
- Turnoff the projector and unplug the power cord.
- Loosenthescrewssecuringtheairfiltercover.
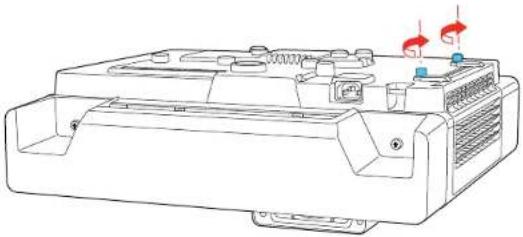
natural_image
Technical line drawing of a mechanical device casing with heat exchangers and cooling fins (no text or symbols)- Opentheairfiltercover.
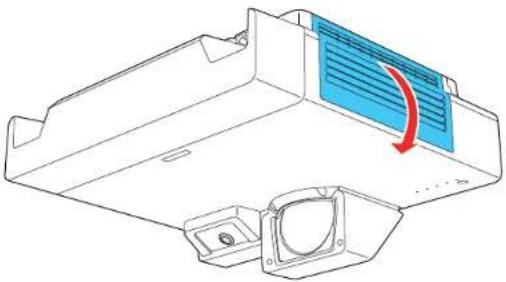
natural_image
Technical line drawing of a mechanical component with a blue airflow arrow indicating direction (no text or symbols)- Pulltheairfilteroutoftheprojector.
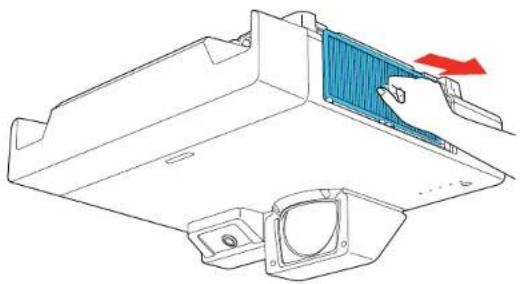
natural_image
Technical line drawing of a mechanical component with a blue panel and red arrow indicating direction (no text or symbols)Note: Air filters contain polypropylene. Dispose of used air filters according to local regulations.
- Placethenewairfilterintheprojectorasshown.
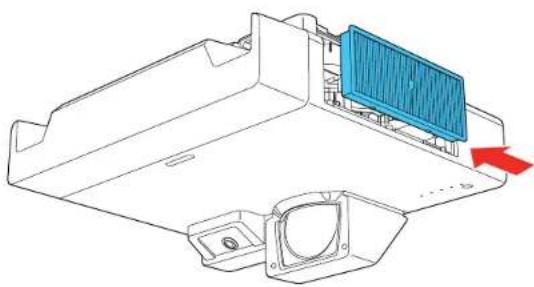
natural_image
Technical line drawing of a mechanical component with a blue panel and red directional arrow (no text or symbols)- Closetheairfiltercoverandtightenthescrews.
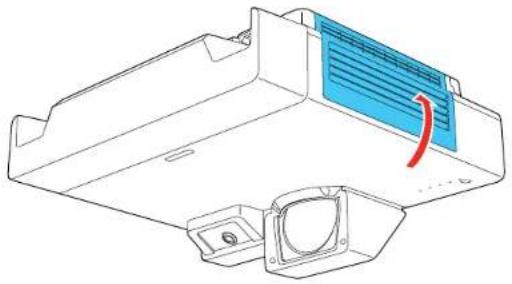
natural_image
Technical line drawing of a mechanical component with a blue cover and red curved arrow indicating rotation (no text or symbols)Parenttopic: AirFilterandVentMaintenance
Relatedtasks
TurningOfftheProjector
ReplacingtheRemoteControlBatteries
TheremotecontrolusestwoAAmanganeseoralkalinebatteries. Replacethebatteriesassoonasthey runout.
Caution: Use only the type of batteries specified in this manual. Do not install batteries of different types, ormixnewandoldbatteries.
- Removethebatterycoverasshown.
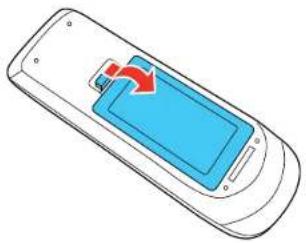
natural_image
Illustration of a mobile phone with a blue screen and red arrow indicating a download or update action (no text or symbols present)- Removetheoldbatteries.
Warning: If the battery fluid has leaked, wipe it away with a soft cloth and avoid getting the fluid on yourhands. If it gets on your hands, wash them immediately to avoid injury.
- Insert the batteries with the + and - ends facing as shown.
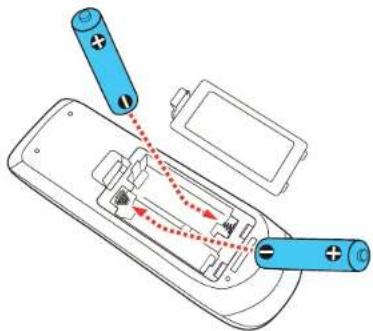
Warning: Make sure the batteries are inserted in the correct positions. If the batteries are not inserted correctly, they could explode or leak, causing a fire, injury, ordamageto the product.
- Replacethebatterycoverandpressitdownuntilclicksintoplace.
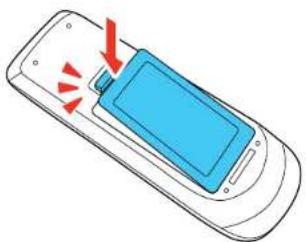
natural_image
Illustration of a mobile phone with a blue screen and red arrows indicating action or notification (no text or symbols)Warning: Dispose of used batteries according to local regulations. Do not expose batteries to heat or flame. Keep batteries out of thereachofchildren; they are choking hazards and are very dangerous if swallowed.
Parenttopic: Maintaining and Transporting the Projector
ReplacingtheHardPenTips
Ifthepentipsbecomedamagedornolongerworkcorrectly,youcanreplacethem.
Note: If you are using an ultra-wide display screen with an aspect ratio of 16:6, use only the hard pen tip (BrightLink1485Fi).
- Twistoffthetipofthepentoremoveit.
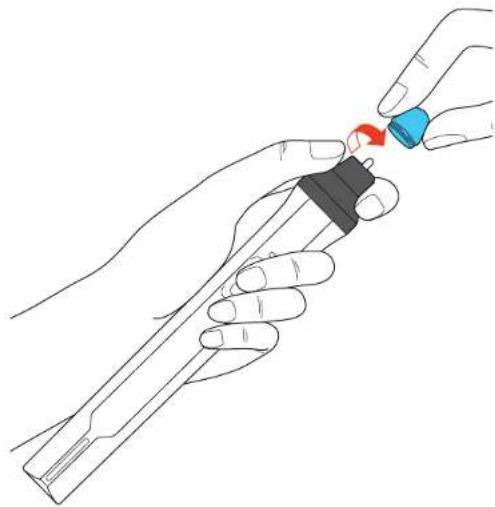
natural_image
Line drawing of hands holding a pen with a blue tool, no text or symbols present2.Twistonthenewtip.
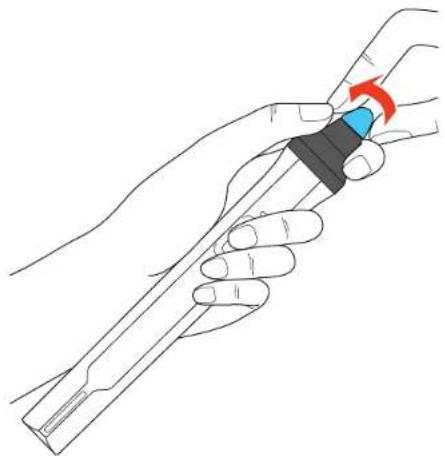
natural_image
Illustration of a hand holding a pen or tool with a blue and red arrow indicating rotation (no text or symbols)Parenttopic: Maintaining and Transporting the Projector
ReplacingtheSoftPenTips
Ifthepentipsbecomedamagedornolongerworkcorrectly,youcanreplacethem.Ifthesofttipis difficulttouseonatexturedsurface,replaceitwiththehardpentip.
Note: If you are using an ultra-wide display screen with an aspect ratio of 16:6, use only the hard pen tip (BrightLink1485Fi).
- Twistoffthetipofthepentoremoveit.
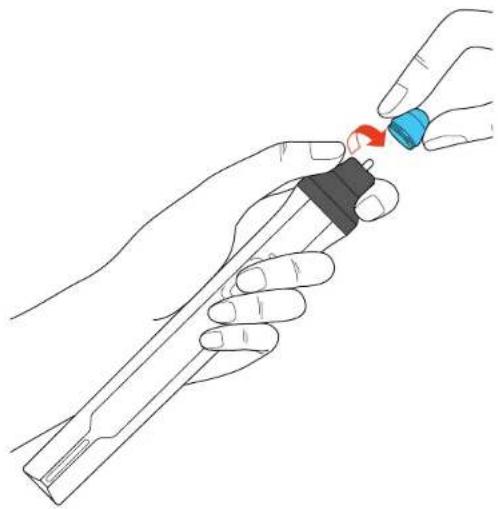
natural_image
Line drawing of a hand holding a pen with a blue cap and red arrow indicating motion (no text or symbols)2.Removethesofttip.

natural_image
Simple diagram of a blue object with a red arrow pointing downward, no text or symbols present- Insertthenewtip.

natural_image
Illustration of a stylized hat with blue and white coloring and a red upward arrow (no text or symbols)- Twistonthepentip.
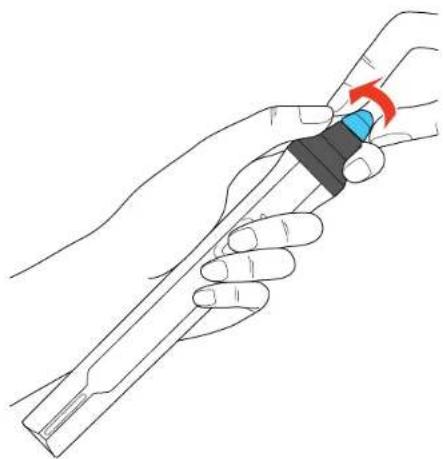
natural_image
Line drawing of a hand holding a tool with a blue handle and red arrow indicating rotation (no text or symbols)Parenttopic: Maintaining and Transporting the Projector
TransportingtheProjector
The projector contains precision parts, some of which are glass. Follow the guidelines heretotransport, ship, or store the projectors safely.
- Remove any equipment connected to the projector.
- Turnoff the projector.
-
Makesure the power light is blue (but not flashing) and the status light is off, then unplug the power cord.
-
Attachthelenscap.
5.Dooneofthefollowing:
- Whentransportingtheprojectoralongdistanceorascheckedluggage,packitinafirmboxwith cushioningarounditandmarkthebox"Fragile."
- Whenshippingtheprojectorforrepairs, placeitinitsoriginalpackingmaterials, if possible, or use equivalent materials with cushioning around the projector. Markthebox "Fragile."
Note: Epson shall not believe for any damages incurred during transportation.
Parenttopic: Maintaining and Transporting the Projector
SolvingProblems
Checkthesolutionsinthesesectionsifyouhaveanyproblemsusingtheprojector.
ProjectionProblemTips
ProjectorLightStatus
UsingtheProjectorMenuDisplays
SolvingImageorSoundProblems
SolvingProjectororRemoteControlOperationProblems
SolvingNetworkProblems
SolvingInteractiveProblems
WheretoGetHelp
ProjectionProblemTips
If the projector is not working properly, try turning it off and unplugging it. Then plug it back in and turn it on.
If this does not solve the problem, check the following:
•Thelightsontheprojectormayindicatewhattheproblemis.
- Thesolutionsinthismanualcanhelpyousolvemanyproblems.
If noneofthesesolutionshelp, you can contact Epsonfortechnicalsupport.
Parenttopic: Solving Problems
Relatedreferences
WheretoGetHelp
ProjectorLightStatus
Relatedtasks
CleaningtheLens
TurningOntheProjector
TurningOfftheProjector
CleaningtheAirFilterandVents
ReplacingtheAirFilter
ProjectorLightStatus
Thelightsontheprojectorindicate the projectorstatusandletyouknowwhenaproblemoccurs. Check the statusandcolorofthelightsandlookforasolutioninthetablehere.
Note: If the Indicators setting in the Operation menu is Off, all lights are off under normal projection conditions.
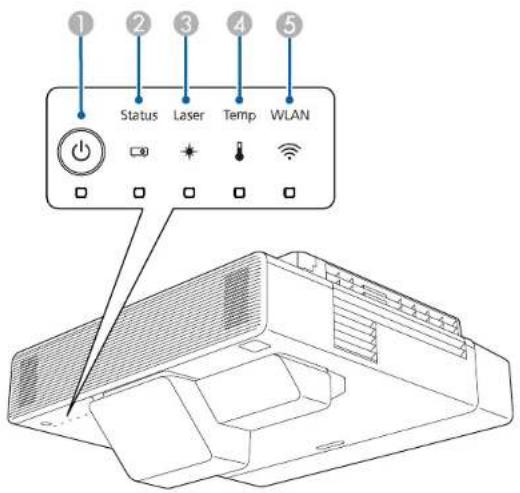
1On/Standbylight
2Statuslight
3Laserlight
4Temp(temperature)light
5WirelessLANlight
| On/Standby light | StatuslightLaser | lightTemplight | Statusandsolution |
| BlueBlueOffOffNormaloperation. | |||
| BlueFlashingblue | OffOffWarmingup. | Waitforanimageto | appear. |
| Shuttingdown.(WhentheStatuslight stopsflashing,youcanunplugthe projector.) | |||
| BlueOffOffOffStandby,sleepmode, | ormonitoring. | ||
| FlashingblueOffOff | OffPreparingfor | monitoringorquick | startupmode;allfeaturesare disabled. |
| FlashingblueVaries | VariesFlashing | orange | |
| OffFlashingblue | OffOrangeProjector | hasoverheatedandturned | off.Leaveitturnedofftocooldown. Afteraboutfiveminutes,dothe following:•Makesurethattheventsandair filterarenotcloggedwithdustor obstructedbynearbyobjects.•Makesuretheenvironmental temperatureisnottoohot.•Cleanorreplacetheairfilter.•Ifoperatingtheprojectorathigh altitude,turnonHighAltitude Mode.•Iftheproblempersists,unplugthe projectorandcontactEpsonfor help. |
| FlashingblueVaries | Flashing | orange | VariesLaserwaming.Turntheprojectoroff, unplugit,andcontactEpsonforhelp. |
| OffFlashingblue | OrangeOffLaserhas | saproblem.Turnthe | projectoroff,unplugit,andcontact Epsonforhelp. |
| OffFlashingblue | OffFlashing | orangeAfanorsensorhasaproblem.Turn theprojectoroff,unplugit,and contactEpsonforhelp. | |
| OffFlashingblue | Flashing | orange | OffInternalprojectorerror.Turnthe projectoroff,unplugit,andcontact Epsonforhelp. |
| Varies | Flashing | orange | VariesRefreshModeisinprogress. |
| On/Standby light | StatuslightLaser | lightTemplight | Statusandsolution | |
| VariesVariesFast | flashing orange | Fastflashing orange | Thebatchsetupfileiscorruptorthe USBflashdriveisconnected incorrectly.DisconnecttheUSBflash driveandturnofftheprojector. Unplugtheprojector,plugitinagain, andtryagain. | |
| Fastflashing blue | Fastflashing blue | Fast flashing orange | Fastflashing orange | Writingthemenusettingshasfailed andanerrorintheprojector's firmwarehasoccurred.Turnthe projectoroff,unplugit,andcontact Epsonforhelp. |
WirelessLANLightStatus
The Wireless LAN status light indicates the following:
- Blue: WirelessLANisavailableandoperatingnormally
- Flashingblue(quickly):Connectingtoadevice
- Flashingblue(slowly):Aerrorhasoccurred.Turnofftheprojectorandrestartit
- Off: Wireless LAN is not available. Make sure the Wireless LAN Power setting is set to On in the projector's Managementmenu
Note: If the lights display a pattern not listed in the tables above, turn the projector off, unplug it, and contactEpsonforhelp.
Parenttopic: Solving Problems
Relatedreferences
WheretoGetHelp
FeatureSettings-OperationMenu
AdministrationSettings-ManagementMenu
Using the ProjectorMenu Displays
Theprojectordisplaysdescriptionsinthemenusystemtohelpyounavigatetheprojector'ssettings. The descriptionsappearontherightsideofthescreenasyouscrollthemenusettings.
Parenttopic: Solving Problems
SolvingImageorSoundProblems
Checkthesolutionsinthesesectionsifyouhaveanyproblemswithprojectedimagesorsound.
SolutionsWhenNoImageAppears
SolutionsWhenImageisIncorrectUsingtheUSBDisplayFunction
SolutionsWhen"NoSignal"MessageAppears
SolutionsWhen"NotSupported"MessageAppears
SolutionsWhenOnlyaPartialImageAppears
SolutionsWhentheImageisNotRectangular
SolutionsWhentheImageContainsNoiseorStatic
SolutionsWhentheImageisFuzzyorBlurry
SolutionsWhentheImageBrightnessorColorsareIncorrect
SolutionsWhenanAfterimageRemainsOntheProjectedImage
SolutionstoSoundProblems
SolutionstoMicrophoneProblems
Parenttopic: Solving Problems
SolutionsWhenNoImageAppears
Ifnoimageappears, try the following solutions:
•Makesurethelenscapisoff.
- Press the A/V Mute button on the remote control to see if the image was temporarily turned off.
- Makesureallnecessarycablesaresecurelyconnectedandthepowerisonfortheprojectorand connectedvideosources.
- If you connected your videos our to the Computer2/MonitorOutport, makes sure you set the MonitorOutPort setting to Computer2.
- Makesuretheimagebeingprojectedisnotcompletelyblack(onlywhenprojectingcomputerimages).
- Presstheprojector'spowerbuttontowakeitfromstandbyorsleepmode. Alsoseeifyourconnected computerisinsleepmodeordisplayingablankscreensaver.
- Press the Menu button. If the projector menu displays, there may be a problem with the connected videosource,cableconnection,orport.
- AdjusttheBrightnesssettingonthelmagemenu.
- Adjustthebrightnessofyourprojector'slightsource.
- Check the Display menu to make sure the Messages setting is set to On.
• If the projectordoesnotrespond when you press the control panel buttons, the buttons may be locked. Unlock the buttons.
- If the projectordoesnotrespond when you press buttons on theremote control, makes sure theremote receivers are returned on.
- ForimagesprojectedwithWindowsMediaCenter,reducethescreensizefromfullscreenmode.
- ForimagesprojectedfromapplicationsusingWindowsDirectX,turnoffDirectXfunctions.
• Theprojectormaynotbeabletoprojectcopyrightedvideosthatyouplaybackonacomputer. For details, seethemanualsuppliedwithyourcomputer.
- If the others solutions donotsolvethe problem, reset all of the projector settings using the option on the Reset menu.
Parenttopic: SolvingImageorSoundProblems
Relatedreferences
DisplaySettings-DisplayMenu
SetupSettings-ECOMenu
InputSignalSettings-Signall/OMenu
ImageQualitySettings-ImageMenu
Relatedtasks
SelectinganImageSource
UnlockingtheProjector'sButtons
ShuttingOffthePictureandSoundTemporarily
SolutionsWhenImageisIncorrectUsingtheUSBDisplayFunction
IfnoimageappearsoriftheimageappearsincorrectlyusingtheUSBDisplayfunction,trythefollowing solutions:
- PresstheUSBbuttonontheremotecontrol.
- Press the Source Search button on the remote control or control panel, and select USB Display.
•MakesuretheUSBDisplaysoftwarehasinstalledcorrectly.Installitmanuallyifnecessary.
- MakesureyourcomputerisconnectedtotheUSB-B1portontheprojector.
- Make sure the USB Display setting is set to On in the projector's Signal I/O menu.
- On a Mac, select the USB Display icon in the Dock or from the Applications folder. If you select Exit fromtheUSBDisplayiconmenuintheDock,USBDisplaydoesnotstartautomaticallywhenyou connecttheUSBcable.
- ForimagesprojectedwithWindowsMediaCenter, reduce the screensize from fullscreen mode.
- ForimagesprojectedfromapplicationsusingWindowsDirectX,turnoffDirectXfunctions.
- If the mouse cursor flickers, select Make the movement of the mouse pointer smooth in the Epson USBDisplaySettingsprogramonyourWindowscomputer.
- Turn off the Transfer layered window setting in the Epson USB Display Settings program on your Windowscomputer.
- If you can get the computer resolution during projection, the video quality and performance may decline.
- MakesureyouareusingthemostrecentversionoftheUSBDisplaysoftware.Youcandownloadthe latest version from the Epson web site. Go to epson.com/support (U.S.) or epson.ca/support (Canada) andselectyourprojector.
Parenttopic: SolvingImageorSoundProblems
Relatedreferences
InputSignalSettings-Signall/OMenu
Relatedtasks
SelectinganImageSource
ConnectingtoaComputerforUSBVideoandAudio
SolutionsWhen"NoSignal"MessageAppears
If the "NoSignal" message appears, try the following solutions:
- PresstheSourceSearchbuttonandwaitafewsecondsforanimagetoappear.
- Turnontheconnectedcomputerorvideosource,andpressitsplaybuttontobeginyourpresentation, ifnecessary.
- Checktheconnectionfromtheprojectortoyourvideosources.
- If you are projecting from alaptop computer, makes sure it is setup to display on an external monitor.
- If necessary, turn the projector and the connected computer or video source off and then on again.
- If you are projecting from an HDMI source, replace the HDMI cable with a shorter one.
- Connectthevideosourcedirectlytotheprojector.
• Tryadifferentvideocable.
- If the othersolutions donotsolvethe problem, reset all of the projector settings using the option on the Reset menu.
DisplayingFromaPCLaptop
DisplayingFromaMacLaptop
Parenttopic: SolvingImageorSoundProblems
Relatedtasks
SelectinganImageSource
ConnectingtoanExternalComputerMonitor
Relatedtopics
ConnectingtoComputerSources
ConnectingtoVideoSources
DisplayingFromaPCLaptop
If you see the "No Signal" message when you display from a PC laptop, you need to setup the laptop to display on an external monitor.
- Hold down the laptop's Fn key and press the key labeled with a monitor icon or CRT/LCD. (See your laptopmanualfordetails.) Waitafewsecondsforanimagetoappear. Todisplayonboththe laptop'smonitorandtheprojector, trypressingthesamekeysagain.
Note: On Windows 7 or later, hold down the Windows key and press P at the same time, then click Duplicate.
-
If the same image is not displayed by the laptop and projector, check the Windows Display utility to make sure the external monitor portisenabled and extended desktop mode is disabled. (Seeyour computer or Windows manual for instructions.)
-
If necessary, check your video card settings and set the multiple display option to Clone, Mirror, or Duplicate.
Parenttopic: SolutionsWhen"NoSignal"MessageAppears
DisplayingFromaMacLaptop
If you se the "No Signal" message when you display from a Mac laptop, you need to setup the laptop form or reddisplay. (Se your laptop manual for details.)
-
Open the System Preferences utility and select Displays, Display, or Color LCD.
-
ClicktheArrangeorArrangementtab.
-
Select the Mirror Displays checkbox.
Parenttopic: SolutionsWhen"NoSignal"MessageAppears
SolutionsWhen"NotSupported"MessageAppears
If the "Not Supported" message appears, try the following solutions:
- MakesurethecorrectinputsignalisselectedontheSignall/Omenu.
- Makesurethecomputer'sdisplayresolutiondoesnotexceedtheprojector'sresolutionandfrequency limit.Ifnecessary,selectadifferentdisplayresolutionforyourcomputer.(Seeyourcomputermanual fordetails.)
Parenttopic: SolvingImageorSoundProblems
Relatedreferences
InputSignalSettings-Signall/OMenu
SolutionsWhenOnlyaPartialImageAppears
Ifonlyapartialcomputerimageappears, trythefollowingsolutions:
- For VGA connections, press the Auto button on the remote control to optimize the image signal.
- Make sure you selected the correct Screen Type setting in the projector's Installation menu for the screenyouareusing.Iftherearemarginsbetweentheedgeoftheimageandtheprojectedscreen frame,adjustthepositionoftheimage.
- MakesuretheScalesettingintheImagemenuisturnedoff(BrightLink1485Fi).
- MakesuretheResolutionsettingintheImagemenuissetcorrectlyfortheinputsignal.
- TryadjustingtheimagepositionusingthePositionsettinginthelmagemenu.
- PresstheAspectbuttonontheremotecontroltoselectadifferentimageaspectratio.
- If you zoomed into or out of the image using the E-Zoom buttons, press the Esc button until the projectorreturnstoafulldisplay.
- Checkyourcomputerdisplaysettingstodisabledualdisplayandsettheresolutionwithinthe projector'slimits.(Seeyourcomputermanualfordetails.)
- Checktheresolutionassignedtoyourpresentationfilestoreeiftheyarecreatedforadifferentresolutionthanyouareprojectingin.(Seeyoursoftwarehelpfordetails.)
- MakesureyouselectedthecorrectProjectionsettingintheInstallationmenu.
- TryadjustingtheimagepositionusingtheImageShiftsetting.
Parenttopic: SolvingImageorSoundProblems
Relatedreferences
InputSignalSettings-Signall/OMenu
InstallationSettings-InstallationMenu
ImageQualitySettings-ImageMenu
Relatedtasks
ChangingtheImageAspectRatio
ZoomingIntoandOutofImages
SolutionsWhenthelmageisNotRectangular
If the projected image is not evenly rectangular, try the following solutions:
- If the projector is not mounted on the wall or ceiling, place it directly in front of the center of the screen, facing its squarely, if possible.
- Use the Image Shift setting to adjust the image position, rather than moving the projector.
- Pressthekeystonebuttonsontheprojectortoadjusttheimageshape.
- Adjust the image shape using the individual Geometry Correction settings in the Installation menu.
Note: Adjusting Quick Corner, H/V-Keystone, and Arc Correction settings may affect focus and pencalibration.
Note: If the projector is mounted on the wall, always use the adjustment dials on the mount to center the image.
Parenttopic: SolvingImageorSoundProblems
Relatedreferences
InstallationSettings-InstallationMenu
ImageQualitySettings-ImageMenu
Relatedtasks
CorrectingImageShapewithArcCorrection
CorrectingImageShapewiththeKeystoneButtons
CorrectingImageShapewithQuickCorner
SolutionsWhentheImageContainsNoiseorStatic
If the projected images seem to contain electronic interference (noise) or static, try the following solutions:
- Checkthecablesconnectingyourcomputerorvideosourcetotheprojector. Theyshouldbe:
• Separated from the power cord to prevent interference
•Securelyconnectedatbothends
- Notconnectedtoanextensioncable
- Make sure you selected the correct Signal Format or EDID settings in the projector's Signal I/O menu, if available for your images source.
- Adjust the Noise Reduction, MPEG Noise Reduction, and Deinterlacing settings in the projector's Imagemenu.
- If available for your video source, select Auto as the Resolution setting in the Image menu.
- Selectacomputervideoresolutionandrefreshratethatarecompatiblewiththeprojector.
- If you are projecting from a computer using a VGA cable, press the Auto button on the remote control to automatically adjust the tracking and sync. If the problem remains, display a uniformly patterned image on the screen and manually adjust the Tracking and Sync settings.
- If you adjusted the image shape using the projector controls, try decreasing the Sharpness setting to improve image equality.
- If you connected an extension powerable, try projecting without it to see if it caused interference in the signal.
- If you are using the USB Display function, turn off the Transfer layered window setting in the Epson USBDisplaySettingsprogramonyourWindowscomputer.
Parenttopic: SolvingImageorSoundProblems
Relatedreferences
InputSignalSettings-Signall/OMenu
SupportedVideoDisplayFormats
ImageQualitySettings-ImageMenu
Relatedtopics
ConnectingtoVideoSources
ConnectingtoComputerSources
SolutionsWhenthelmageisFuzzyorBlurry
If the projected image is fuzzy or blurry, try the following solutions:
- Adjusttheimagefocus.
- Cleantheprojectorlens.
- Position the projector close enough to the screen, and directly in front of it.
- Verify that the throw distance from the project to your projections surface meet these specifications in your projector's online Installation Guide.
- Position the projector so the keystone adjustment angle is not sowidethat it distortsthe image.
- AdjusttheSharpnesssettingtoimproveimagequality.
- If you are projecting from a computer using a VGA cable, press the Auto button on the remote control to automatically adjust the tracking and sync. If any bands or overall blurriness remain, display a uniformly patterned image on the screen and manually adjust the Tracking and Sync settings.
- If you are projecting from a computer, use a lower resolution or adjust the computer's resolution to match the projector's nativeresolution, if possible.
Parenttopic: SolvingImageorSoundProblems
Relatedreferences
ImageQualitySettings-ImageMenu
Relatedtasks
FocusingtheImage
CleaningtheLens
SolutionsWhenthelImageBrightnessorColorsareIncorrect
If the projected image is stood dark or light, or the colors are incorrect, try the following solutions:
- Press the Color Mode button on the remote control to try different color modes for the image and environment.
- Checkyourvideosourcesettings.
- Adjust the available settings on the Image menu for the current input source, such as Brightness, Contrast, Tint, White Balance, Color Saturation and RGBCMY.
- Make sure you selected the correct Signal Format or EDID setting in the Signal I/O menu, if available for your videosource.
- Makesureallthecablesaresecurelyconnectedtotheprojectorandyourvideodevice.Ifyou connectedlongcables,tryconnectingshortercables.
- Position the projector close enough to the screen.
- MakesureyouhaveruntheLightSourceCalibrationintheManagementmenurecently. Ifusing multipleprojectors, performthecalibrationonallprojectorstoensureaconsistentimagequality.
Parenttopic: SolvingImageorSoundProblems
Relatedreferences
InputSignalSettings-Signall/OMenu
AdministrationSettings-ManagementMenu
ImageQualitySettings-ImageMenu
SolutionsWhenanAfterimageRemainsOntheProjectedImage
If you see an afterimage in the projected image, select Refresh Mode > Start in the Management menu.
Parenttopic: SolvingImageorSoundProblems
Relatedreferences
AdministrationSettings-ManagementMenu
SolutionstoSoundProblems
If there is nosound when you expect it the volume is too low or high, try the following solutions:
- Adjust the projector's volumesettings.
- Press the A/V Mute button on the remote control to resume video and audio if they were temporarily stopped.
- Checkyourcomputerorvideosourcetomakesurethevolumeisturnedupandtheaudiooutputisset forthecorrectsource.
- Trydisconnectingandreconnectingtheaudiocable.
- Checktheaudiocableconnectionsbetween the projector and your videosource.
- If you dono the earsound from an HDMI source, set the connected device to PCM output.
- Makesureanyconnectedaudiocablesarelabeled"NoResistance."
- If you are using the USB Display function, turn on the Output audio from the projector setting in the EpsonUSBDisplaySettingsprogramonyourcomputer.
- If you are using a Mac and you don to the earsound from an HDMI source, makes sure your Mac supports audio through the HDMI port. If not, you need to connect a audiocable.
- If you want to use a connected audio source when the projector is off, set the Quick Startup option in the Operation menu to Off and make sure the A/V Output setting in the Signal I/O menu is set to AlwaysOn.
- If the volume for the computer is set to the minimum while the projector's volume is set to maximum, the sound level may be mixed. Turnup the computer's volume and decrease the projector's volume (when using Epsoni Projection[Windows/Mac] or USB Display).
- Make sure the Audio Output Device option is set to the correct audio port for your video device.
- If you turn the projector immediately after turning it off, the cooling fans may run at high speed momentarily and cause an unexpected noise. This is normal.
Parenttopic: SolvingImageorSoundProblems
Relatedreferences
InputSignalSettings-Signall/OMenu
Relatedtasks
ConnectingtoaComputerforSound
ConnectingtoaVideoSourceforSound
ConnectingtoExternalSpeakers
ControllingtheVolumewiththeVolumeButtons
SolutionstoMicrophoneProblems
If there is nosound when you use a microphone connected to the projector, try the following solutions:
- Makesurethemicrophoneissecurelyconnectedtotheprojector.
- Adjust the Mic Input Level setting in the Signal I/O menu. If the setting is too high, the sound of the otherconnecteddeviceswillbetoolow.
Parenttopic: SolvingImageorSoundProblems
Relatedreferences
InputSignalSettings-Signall/OMenu
Relatedtasks
ConnectingaMicrophone
SolvingProjectororRemoteControlOperationProblems
Checkthesolutionsinthesesectionsifyouhaveproblemsoperatingtheprojectororremotecontrol.
SolutionstoProjectorPowerorShut-OffProblems
SolutionstoRemoteControlProblems
SolutionstoPasswordProblems
SolutionsWhenaBatteryMessageAppears
Parenttopic: Solving Problems
SolutionstoProjectorPowerorShut-OffProblems
If the project orders not come on when you press the power button or it should you expectedly, try the followingsolutions:
- Makesurethepowercordissecurelyconnectedtotheprojectorandtoaworkingelectricaloutlet.
- Theprojector'sbuttonsmaybelockedforsecurity.Unlockthebutton sorusetheremote controlto turnontheprojector.
- If the projector's lasers hut so off unexpectedly, it may have entered standby mode after a period of inactivity. Press the power button to wake the projector and adjust the Sleep Mode setting to change the sleep interval. The A/V Mute Timer may be set. Set the A/V Mute Timer to Off in the Operation menu.
- If the projector's lasershutsoff, the Statuslightisflashing, and the Templightison, the projector has overheated and shutoff. Check the solutions for this light status.
• If the power button on theremote control does not turn on the projector, checks batteries and make sure the Remote Receiversetting is turned on the projector's menu, if available.
- Thepowercordmaybedefective. Tryanotherpowercord. If that doesn't work, disconnect thecord and contact Epson.
- The cooling fans may run in an inst and by status depending on the projector settings. Also, when the projector wakes from a stand by status, the fans may cause an unexpected noise. This is not a malfunction.
Parenttopic: SolvingProjectorRemoteControlOperationProblems
Relatedreferences
WheretoGetHelp
ProjectorLightStatus
FeatureSettings-OperationMenu
Relatedtasks
UnlockingtheProjector'sButtons
SolutionstoRemoteControlProblems
If the projectordoesnotrespondtoremotecontrolcommands, try the following solutions:
- Check that theremote control batteries are installed correctly and have power. If necessary, replace the batteries.
- Makesureyouareoperatingtheremotecontrolwithinthereceptionangleandrangeoftheprojector.
- Makesuretheprojectorisnotwarminguporshuttingdown.
- Checktoseeifabuttonontheremotecontrolisstuckdown, causingittoentersleepmode. Release thebuttontowaketheremotecontrolup.
• Strongfluorescentlighting, directsunlight, orinfrareddevicesignals maybeinterfering with the projector'sremotereceivers. Dimthelightsormovetheprojectorawayfromthesunorinterfering equipment.
•Ifavailable,turnononeoftheremotereceiversintheprojector'smenusystem,orcheckifallthe remotereceiverswereturnedoff.
- If the remote receiver setting is off, press and hold the Menu button on the remote for at least 15 secondstorestorethedefaultsetting.
- If you assigned an ID number to other remote control to operate at multiple projectors, you may need to check or change the ID setting (feature not available with all projectors).
- To set the remote control so it will operate any projector, hold down the ID button and press the 0/All button.
- If you los etheremote control, you can purchase another from an authorized Epsonreseller.
Parenttopic: SolvingProjectorRemoteControlOperationProblems
Relatedreferences
RemoteControlOperation
Relatedtasks
Installing Batteries in the Remote Control
ReplacingtheRemoteControlBatteries
SolutionstoPasswordProblems
If you cannot enter or remember a password, try the following solutions:
- You may have turned on password protection without first setting a password. Try entering 0000 using theremotecontrol.
- If you have entered an incorrect password to many times and see a message displayed are request code, writed down the code and contact Epson. Donot attempt to enter the password again. Provide therequest code and proof of ownership for assistance in unlocking the projector.
- IfyousetaEpsonWebControlpasswordandforgottheuserIDorpassword,tryenteringthe following:
-UserID:EPSONWEB
- Defaultpassword:admin
- IfyousetaRemotepassword(inEpsonWebControl)andforgottheuserIDorpassword,tryentering thefollowing:
- UserID:EPSONREMOTE
- Defaultpassword:guest
- If you los etheremote control, you cannot enter a password. Order anewone from Epson.
Parenttopic: SolvingProjectororRemoteControlOperationProblems
Relatedconcepts
ProjectorSecurityFeatures
SolutionsWhenaBatteryMessageAppears
Ifyouseeamessagetellingyouthatthebatterythatsavesyourclocksettingsisrunninglow,contact Epsonforhelp.
Parenttopic: SolvingProjectororRemoteControlOperationProblems
Relatedreferences
WheretoGetHelp
SolvingNetworkProblems
Checkthesolutionsinthesesectionsifyouhaveproblemsusingtheprojectoronanetwork.
SolutionsWhenWirelessAuthenticationFails
SolutionsWhenYouCannotAccesstheProjectorThroughtheWeb
SolutionsWhenNetworkAlertE-MailsareNotReceived
SolutionsWhentheImageContainsStaticDuringNetworkProjection
SolutionsWhenYouCannotConnectUsingScreenMirroring
SolutionsWhentheImageorSoundContainsStaticWhenUsingScreenMirroring
SolutionsWhentheProjectedScreenisnotSharedCorrectly
Parenttopic: Solving Problems
SolutionsWhenWirelessAuthenticationFails
If you cannot authenticate wireless connection, try the following solutions:
- If the wireless settings are correct, but authentication fails, you may need to update the Date & Time settings in the Management menu, if available.
- ChecktheSecuritysettingsandpassphraseintheNetworkmenu.
- Makesuretheconnecteddeviceisonandoperatingproperly.
- If the accesspoint security is WPA3-EAP, changethe accesspoint setting to WPA2/WPA3-EAP.
Parenttopic: Solving Network Problems
Relatedreferences
EventIDCodeList
NetworkSettings-NetworkMenu
AdministrationSettings-ManagementMenu
Relatedtasks
SettingtheDateandTime
SolutionsWhenYouCannotAccesstheProjectorThroughtheWeb
If you are unable to access the project through a web browser, makes sure you are using the correct ID and password, which are cases sensitive.
Note: You cannot change the user ID.
- YoumayneedtologintoaccesssomeoptionsontheWebControlscreen.Ifyouseealoginwindow, enter EPSONWEB as the user ID and enter the password set in the projector's Network menu as the password.Thedefaultpasswordisadmin.
- Avoidconnectingviaaproxyserver.
- Makesureyouhaveaccesstothenetworktheprojectorison.
- ChecktheIPaddressontheprojector,thenreentertheIPaddressinthebrowsersearchbar.
Note: The userIDandpasswordarecasesensitive.
Parenttopic: SolvingNetworkProblems
SolutionsWhenNetworkAlertE-MailsareNotReceived
If you donot receive an e-mail alerting you to problem with a projector over then network, try the followingsolutions:
- Makesuretheprojectoristurnedonandconnectedtothenetworkcorrectly.(Ifanerrorshutdownthe projector, itcannotsendane-mail.)
- Makesureyousetuptheprojectore-mailalertsettingscorrectlyontheprojector'snetworkMail Notificationmenuorinthenetworksoftware.
- Set the Standby Mode setting to Communication On so the network software can monitor the projectorinstandbymode.ChangethePortsettingaccordingtoyournetworkenvironment.
Parenttopic: SolvingNetworkProblems
Relatedreferences
NetworkProjectorE-mailAlertMessages
Relatedtasks
SettingUpProjectorNetworkE-MailAlerts
SolutionsWhenthelImageContainsStaticDuringNetworkProjection
If the projected image contains static during network projection, try the following solutions:
- Checkforanyobstaclesbetweentheaccesspoint, thecomputer, themobiledevice, and theprojector. If necessary, changetheirpositionstoimprovecommunication. Alsomakesurethattheyarenottoo farapart; movethemclosertogetherandtrytoconnectagain.
- If the wireless connection is slow your projected image contains noise, check for interference from other equipment, such as Bluetooth device or microwave. Movethe interfering device farther away or expand your wireless bandwidth.
- If the connections speed declines, reduce the number of connected devices.
Parenttopic: SolvingNetworkProblems
SolutionsWhenYouCannotConnectUsingScreenMirroring
If you are unable to connect the projector using Screen Mirroring, try the following solutions:
- Select On as the Screen Mirroring setting in the projector's Network menu.
- Select On as the Simple AP setting in the projector's Network menu.
- Make sure the Display Name setting does not contain a dash ("-") or it may not be displayed correctly onthemobiledevice.
- Select Off as the Screen Mirroring setting, then select On again.
- Makesurethemobiledevicesettingsarecorrectandrestartthedevice.
- You may not be able to connect immediately after disconnecting from the projector. Wait awhile and try connecting again.
- If you have previously connected to the projector using Screen Mirroring, the device may have saved the previous connection information. Delet the saved information and connect to the projector from the list of available devices.
Parenttopic: Solving Network Problems
SolutionsWhenthelmageorSoundContainsStaticWhenUsingScreenMirroring
If the projected image or sound contains static when connecting using Screen Mirroring, try the following solutions:
- AvoidcoveringtheWi-Fiantennaofthemobiledevice.
- If you use a Screen Mirroring connection and an internet connection at the same time, the image may freeze or contain noise. Disconnect from the internet to improve the connections speed of the mobile device.
- MakesuretheprojectioncontentsmeettheScreenMirroringrequirements.
- Dependingonthesettingsofthemobiledevice, theconnectionmaybelostwhenthedeviceenters powersavingmode. Checkthepowersavingsettingsonthemobiledevice.
- Makesureyourmobiledevicehasthelatestversionofitswirelessdriverandfirmwareinstalled.
Parenttopic: SolvingNetworkProblems
SolutionsWhentheProjectedScreenisnotSharedCorrectly
If the Screen Sharing feature does not deliver the screento are receiving projector properly, try the followingsolutions:
- Connecttheprojectortothesamenetworkastheprojectorthatissharingitsscreen.
- MakesurethereceivingprojectorsupportstheScreenSharingfunction.
- Make sure the Screen Sharing setting in the Network menu is set to On for all projectors.
- CloseanyrunningEpsoniProjection(Windows/Mac)software.
- Makesuretheimagebeingprojectedisnotprotectedbycopyright.
- Make sure Sharing is displayed on the status bar that appears in the upper center part of the screen. Ifitisnotdisplayed,tryreconnecting.
Parenttopic: Solving Network Problems
Relatedreferences
NetworkSettings-NetworkMenu
Relatedtasks
StartingaSharedScreenSession
SolvingInteractiveProblems
Checkthesolutionsinthesesectionsifyouhaveproblemsusingtheinteractivesystem.
Note: If the "Error occurred in the Easy Interactive Function" message appears, contact Epson for help.
SolutionsWhentheInteractivePensDoNotWork
SolutionsWhentheInteractivePenPositionIsNotAccurate
SolutionsWhentheInteractivePensAreSloworDifficulttoUse
SolutionsWhentheInteractivePensCauseInterferenceorUnwantedEffects
SolutionsWhenFingerTouchInteractivityDoesNotWork
SolutionsWhenYouCannotOperateaComputerfromtheProjectedScreen
SolutionsforProblemsWithCapturing,Printing, Saving, or Scanning
SolutionsforProblemswithWhiteboardMode
Parenttopic: Solving Problems
SolutionsWhentheInteractivePensDoNotWork
If the interactive pensdonotwork, try the following solutions:
• Thepensturnoffautomaticallywhennotinuse.Pickupthepentoturnitbackon.
- Make sure PC Interactivity is set to On on the projector's interactive toolbar.
- Makesureyouarenotcoveringtheblacksectionnearthetipofthepen.
•Makesurethepentipissecurelyattachedtothepen.
•Tryreplacingthesoftpentipwiththehardpentip.
- Makesurenothingisblockingthesignalbetweenthepenandtheinteractivepenreceiveronthe projector.
• Tryholding the penatadifferentangles that your hand is not blocking the signal.
- Makesurethecablecoverisinplacetokeepcablesfromblockingthesignal.
- Makesurethepenbatteryhasenoughpower.Pressthebuttononthesideofthepentocheck remainingbatterypower.Tryreplacingthebattery.
- If you are projecting from a computer, makes sure the USB cable is connected to the computer and projector.
- Dimtheroomlightsandturnoffanyfluorescentlights. Makesuretheprojectionsurfaceandpen receiverarenotindirectsunlightorothersourcesofbrightlighting.
- Removeanydecorativelightsfromaroundtheprojectororprojectionsurface.
• If the pentipis worn outordamaged, you may need to replace it.
- Makesuretheinteractivepenreceiverontheprojectoriscleanandfreefromdust.
•Makesurethereisnointerferencefrominfraredremotecontrols,mice,orinfraredmicrophones.
- Makesureyouhavecalibratedthesystem.Tryrecalibrating.
- If you are using a Mac with your projector, makes sure that you installed the Easy Interactive Tools software, and that you have downloaded and installed the latest Easy Interactive Driver from the Epson supports site.
- If you are using multiple interactive projectors in the sameroom, makes sure you are using async cable between the projectors and that the Installation of Projectors > Sync of Projectors setting in the Pen/Touch menuissetto Wired.
- If you are using Epson iProjection (Windows/Mac) software, select Set Options and make sure Use Interactive Pen is enabled. Also, select the Adjust performance tab and select Transfer layered window.
- If you are using a Quick Wireless Connection USB Key, start the Epson Quick Wireless Connections Settings program on your computer, select the General settings tab and make sure Use Interactive Pen is enabled. Also, select the Adjust performance tab and select Transfer layered window.
Parenttopic: Solving Interactive Problems
Relatedconcepts
PenCalibration
Relatedtasks
ReplacingtheHardPenTips
ReplacingtheSoftPenTips
UsingthePens
SolutionsWhentheInteractivePenPositionIsNotAccurate
Ifthepenpositionisnotthesameasthemousepointer, trythefollowingsolutions:
- Makesureyouhavecalibratedthesystem.Trymanualcalibration.
- Reset the keystone, Quick Corner, and Arc Correction settings to their factory defaults.
- If you mounted the projector using a wall mount and used keystone or other digital correction settings to adjust the image, return these settings to their factory defaults. Instead, use headjustment dialson the wall mount to adjust the imageshape; donot use any digital correction. Then focus the image and recalibrate.
- If you use the E-Zoom + button on the remote control to enlarge the image, the pen position is not accurate. When you return the image to the original size, the positions should be correct.
- Select Reset All from the Initial/All Settings menu to restore the projector settings to their default values.
- Settheoutputresolutionofyourcomputertomatchthenativeresolutionoftheprojector. If you connectedyourprojectorthroughavideoscaler, makesurethevideoscaleroutputresolutionsetting matchesyourprojector'snativeresolution.
• Focustheimagetosharpenit.
- Makesurethecablecoverisinplacetokeepcablesfromblockingthesignal.
•Tryadjustingthepenoperationarea.
- In PC Interactivity (in the Pen/Touch menu), turn off the Auto Adjust Pen Area setting and select the ManualAdj.PenAresetting.
Parenttopic: Solving Interactive Problems
Relatedconcepts
PenCalibration
Relatedreferences
PenandTouchSetupSettings-Pen/TouchMenu
GeneralProjectorSpecifications
InstallationSettings-InstallationMenu
Relatedtasks
Adjusting the Pen Operation Area
RemovingandAttachingtheCableCover
ZoomingIntoandOutofImages
SolutionsWhentheInteractivePensAreSloworDifficulttoUse
If the pens are difficult to use correspond to slowly, try the following solutions:
- Foreasieroperation, holdthepenperpendicular to the projections surface.
- Forthebestperformance,connectyourcomputertotheprojectorusingaVGAorHDMIcablefordisplayandtheUSBcableforinteractivity.
- If you are using USB Display in Windows, you may need to disable Windows Aero in the Epson USB Display Settings program on your computer.
- If you are having difficulty double-clicking on a Mac, go to the System Preferences menu, select Mouse, Trackpad, or Mouse & Trackpad, and reduce the Double-click speed.
- Set the Pen/Touch > Pen Hovering setting to Off.
Parenttopic: Solving Interactive Problems
Relatedreferences
PenandTouchSetupSettings-Pen/TouchMenu
Relatedtasks
UsingthePens
SolutionsWhentheInteractivePensCauseInterferenceorUnwantedEffects
If the pens are causing interference or unwanted effects, try the following solutions:
- Whenyouusetwopensatthesametime, makesuretousethematleast4inches(10.16cm) apart.
- Donotrestthepensontheimageareaofaninteractivevetabletoavoidinterferencewithyour computer'smouse.
- Makesurethatnothingisblockingthedirectlinetotheinteractivepenreceiverontheprojector.
Parenttopic: Solving Interactive Problems
SolutionsWhenFingerTouchInteractivityDoesNotWork
Iffingertouchinteractivitydoesnotwork,trythefollowingsolutions:
- MakesureaTouchUnitisinstalledcorrectlyandthecableisproperlyconnected.Seeyourprojector's onlineInstallationGuidefordetails.
- If the light on the Touch Unit is not on, check the Touch Unit settings in the Pen/Touch menu and makesurethePowersettingissettoOn.
- If you are using a Mac with your projector, makes sure that you installed the Easy Interactive Tools software, and that you have downloaded and installed the latest Easy Interactive Driver from the Epson support site.
- Adjust the angle on the Touch Unit. See your projector's online Installation Guide for details.
- Makesuretherearenoobstacles(suchascables)betweentheTouchUnit'slaserdiffusionportsand theprojectionsurface. Ifthereareanyobstaclesthataredifficulttomove, attachtheinfrared deflectors to the projection surface. See your projector's online Installation Guide for details.
- Removeanydecorativelightsfromaroundtheprojectororprojectionsurface.
- If you are having difficulty double-clicking on a Mac, go to the System Preferences menu, select Mouse, Trackpad, or Mouse & Trackpad, and reduce the Double-click speed.
• Makesurethereis nointerference from infrared remote controls, mice, or infrared microphones.
- Makesureyouhaveperformedpencalibrationandfingertouchcalibration.Tryrecalibrating.
- Keep your clothing or part so of your body more than 0.4 inches (1 cm) away from the projection surface.
- If there are people within 4 inches (10cm) in front of or around the projections screen or there are any obstacles causing interference, touch operations may not work properly.
- If touch operation does not work correctly even after calibration, check the Calibration Range setting in the Pen/Touch menu. Select Wide if you drag items when touching the screen or Narrow if mouse operationsdonotworksmoothly.
Parenttopic: Solving Interactive Problems
Relatedconcepts
PenCalibration
Relatedreferences
PenandTouchSetupSettings-Pen/TouchMenu
Relatedtasks
CalibratingforFingerTouchInteractivity
SolutionsWhenYouCannotOperateaComputerfromtheProjectedScreen
If you are unable to access a computer from the projected screen, try the following solutions:
- Make sure the USB Display setting in the Signal I/O menu is set to On.
- Makesureyouperformpencalibrationwhenusingtheinteractivepenforthefirsttimesothattheprojectorrecognizesthepositionofthepencorrectly.
- MakesurePCInteractivityisturnedonintheprojector'sinteractivetoolbar.
- MakesuretheUSBcableissecurelyconnected.DisconnecttheUSBcable,andthenreconnectit.
- When you are connecting your computer to the projector's USB-B2 port, make sure the USB-B2 settinginthePen/TouchmenumatchestheHDMIinputyourcomputerisconnectedto.
- Whenconnectingyourcomputertoeitherofthecontrolpad's(BrightLink1485Fi)HDMIports,make sure to connect your computer to the USB-B port on the control pad and not directly to the projector.
Parenttopic: Solving Interactive Problems
SolutionsforProblemsWithCapturing,Printing, Saving, or Scanning
If you are having trouble capturing and pasting, or printing, saving, or scanning, try the following solutions:
- If you are having trouble pasting a captured image, makes sure the image is not HDCP protected.
- Ifablackframeappearsaroundapastedimage, it maybe because the image was shifted or resized.
- Connectonlyoneprinterormultifunctiondeviceatatime, andmakesurethedeviceissupportedby theprojector.
- If you are having trouble printing or scanning, makes sure the printer is not out of a link, jammed, or any other error state.
- For USB printing or scanning, make sure the printer is connected to the USB-A port on the projector or controlpad(BrightLink1485Fi).Ifyouareusingthecontrolpad,makesureaUSBcableisconnected between the projector's USB-A port and the upper USB-B port on the control pad.
- ForUSBprintingorscanning, tryconnectingadifferentUSBcable, and makesurethecablesareless than16feet(4.9m)long.
- CheckthesettingsontheInteractivemenu.
Parenttopic: Solving Interactive Problems
Relatedreferences
InteractiveSettings-InteractiveMenu
Relatedtasks
ConnectingaPrintertotheControlPad
ConnectingaUSBDevicetotheControlPad
ConnectingaUSBDeviceorCameratotheProjector
SolutionsforProblemswithWhiteboardMode
If you are having problems with the whiteboard, try the following solutions:
- EnabletheDrawingFunctionsettingintheInteractivemenu.
- WhentheEasyInteractiveToolssoftwareisinuse,whiteboardmodedoesnotstart.
If the time is incorrect on the internal storage settings for white board mode, you may need to update the
Date&Timesettingsintheprojector'sManagementmenu.
Parenttopic: Solving Interactive Problems
Relatedreferences
InteractiveSettings-InteractiveMenu
AdministrationSettings-ManagementMenu
Relatedtasks
SettingtheDateandTime
WheretoGetHelp
If you need to contact Epson for technical supports, use the following support options.
InternetSupport
Visit Epson's support website at epson.com/support (U.S.), epson.ca/support (Canada), or epson.com.jm/support (Caribbean) and select your product for solutions to common problems with your projector. Youcandownloadutilitiesanddocumentation,getFAQsandtroubleshootingadvice,ore-mail Epsonwithyourquestions.
SpeaktoaSupportRepresentative
TousetheEpsonPrivateLineSupportservice, call(800)637-7661. This service is available for the duration of your warranty period. You may also speak with projectorsupport specialist by dialing(562) 276-4394(U.S.) or (905)709-3839(Canada).
Supporthoursare6AMto8PM, PacificTime, MondaythroughFridayand7AMto4PM, PacificTime, Saturday.
Daysandhoursofsupportaresubjecttochangewithoutnotice. Tollerlongdistancechargesmay apply.
Beforeyoucall,havethefollowinginformationready:
•Productname
•Productserialnumber(locatedonthebottomorrearoftheprojector,orinthemenusystem)
•Proofofpurchase(suchasastorereceipt)anddateofpurchase
•Computerorvideoconfiguration
•Descriptionoftheproblem
PurchaseSuppliesandAccessories
Youcanpurchasescreens,otheroptionalaccessories,andreplacementpartsfromanEpsonauthorizedreseller.Tofindthenarestreseller,call800-GO-EPSON(800-463-7766)intheU.S.or800-807-7766inCanada. Or you can purchase online at epsonstore.com (U.S. sales) or epsonstore.ca (Canadian sales).
Topurchase are replacement remote control, call(562)276-4394(U.S.) or (905)709-3839(for dealer referralin Canada).
Parenttopic: Solving Problems
Relatedreferences
ProjectorLightStatus
TechnicalSpecifications
Thesesectionslistthetechnicalspecificationsofyourprojector.
GeneralProjectorSpecifications
ProjectorLightSourceSpecifications
InteractivePenSpecifications
TouchUnitSpecifications
RemoteControlSpecifications
ProjectorDimensionSpecifications
ProjectorElectricalSpecifications
ProjectorEnvironmentalSpecifications
ProjectorSafetyandApprovalsSpecifications
SafetyandApprovalsSpecificationsforLatinAmerica
SupportedVideoDisplayFormats
USBDisplaySystemRequirements
GeneralProjectorSpecifications
TypeofdisplayPoly-siliconTFTactivematrix
Nativeresolution1080p(1366×768×2)
LensF=1.5
Focallength:3.9mm
ColorreproductionFullcolor, upto 1.7 billion colors
BrightnessNormalLightSourcemode:
Whitelightoutput5000lumens(ISO21118standard)
Colorlightoutput5000lumens
QuietorExtendedLightSourcemode:
Whitelightoutput3500lumens(ISO21118standard)
Custommode:
Whitelightoutput3500to5000lumens(ISO21118standard)
Note: Colorbrightness(colorlightoutput)andwhitebrightness (whitelightoutput)will vary depending on usage conditions. Color light output measured in accordance with IDMS 15.4; whitelight output measured in accordance with ISO 21118.
ContrastratioOver2,500,000:1withDynamicColorMode,NormalLightSource Mode,andWideZoomon
Imagesize 65inches(1.65m)to100inches(2.54m)
(innativeaspectratio)
Projectiondistance 15.4inches(0.39m)to24.1inches(0.61m)
(innativeaspectratio)
ProjectionmethodsFront, rear, wall-mounted, table-mounted, ceiling-mounted
Opticalaspectratio 16:9
(width-to-height)
FocusadjustmentManual
ZoomadjustmentDigital
Zoomratio 1.0to1.35
(Tele-to-Wide)
Internalsoundsystem8W×8Wstereo
Noiselevel36dB(NormalorExtendedLightSourceMode)
27dB(QuietLightSourceMode)
Keystonecorrectionangle±3°
USBTypeBportcompatibilityTwoUSB2.0compliantportsforUSBdisplay, wirelessLANmodule connection, interactivity, firmwareupdate, or copying menusettings
USBTypeAportcompatibility TwoUSB2.0 compliant ports for USB memory device, printer, Epsondocument camera, wireless LAN module connection, firmware update, or copying menu settings
Parenttopic: Technical Specifications
ProjectorLightSourceSpecifications
TypeLaserdiode
LightsourceoutputpowerUpto104.5W
Wavelength449to461nm
Lightsourcelife NormalorQuietLightSourceMode:
(approximate)
Uptoabout20000hours
ExtendedLightSourceMode:
Uptoabout30000hours
Note: Turn off this product when not in use to prolong the life of the projector. Laser life will vary depending upon modes selected, environmental conditions, and usage. Brightness decreases over time.
Parenttopic: Technical Specifications
InteractivePenSpecifications
BatteriesOneAAalkalineormanganese
Size6.3inches(161mm)long;diameter0.94inches(24mm)
Weight(withoutbattery)1.06oz(30g)
Parenttopic: Technical Specifications
TouchUnitSpecifications
TechnologyInfraredLaser(Class1)
DimensionsHeight:1.58inches(40mm)
Width:16.6inches(422mm)
Depth:2.56inches(65mm)
Weight21.2oz(600g)
Parenttopic: Technical Specifications
RemoteControlSpecifications
Receptionrange19.7feet(6m)
Batteries TwoalkalineormanganeseAA
Parenttopic: Technical Specifications
ProjectorDimensionSpecifications
Height(excludingfeet)8.25inches(209.5mm)
Width18inches(458mm)
Depth(excludingcablecover)14.8inches(375mm)
Weight(excludingcablecover)20.5lb(9.3kg)
Parenttopic: Technical Specifications
ProjectorElectricalSpecifications
Ratedfrequency50/60Hz
Powersupply100to240VAC±10%
3.8to1.7A
| Powerconsumption(100to120V) | Operating: |
| NormalorCustomPowerConsumptionmode:381W | |
| ExtendedorQuietPowerConsumptionmode:270W | |
| Standby: | |
| 0.5W(CommunicationOff),2.0W(CommunicationOn) | |
| Powerconsumption(220to240V) | Operating: |
| NormalorCustomPowerConsumptionmode:366W | |
| ExtendedorQuietPowerConsumptionmode:262W | |
| Standby: | |
| 0.5W(CommunicationOff),2.0W(CommunicationOn) |
Parenttopic: Technical Specifications
ProjectorEnvironmentalSpecifications
TemperatureOperating-Singleprojector:
32to104°F(0to40°C)
Operating-Multiple projectors:
32to95°F(0to35°C)
Storage:
14to140°F(-10to60°C)
Humidity(relative, non-condensing)
Operating:20to80%
Storage:10to90%
OperatingaltitudeUpto4921feet(1500m)
Upto10000feet(3048m)withHighAltitudeModeenabled
Parenttopic: Technical Specifications
ProjectorSafetyandApprovalsSpecifications
UnitedStatesFCCPart15ClassB(DoC)
UL60950-12ndedition(cTUVusMark)
CanadalCES-003ClassB
CSAC22.2No.60950-1
Parenttopic: Technical Specifications
SafetyandApprovalsSpecificationsforLatinAmerica
NoticeforArgentina
WLANModule:WLU5630B-D101(RoHS)
Brand:EPSON

CNCID:C-23113
NoticeforMexico
Operationissubjectttothefollowingtwoconditions:(1)thisdevicemaynotcauseharmfulinterference, and(2)thisdevicemustacceptanyinterferencereceived,includinginterferencethatmaycause undesiredoperationofthedevice.
ProductModel:H919/H921(BrightLink1480Fi+/1485Fi+)
WLANModuleModel:WLU5630B-D101
Brand:EPSON
IFTCertificationNumber:RCPEPWL19-0590
NoticeforParaguay
Importedby:
Fastrax, S.A.
Address:3-3-5OwaSuwa-shi,Nagano-Ken392-8502,Japan
Parenttopic: Technical Specifications
SupportedVideoDisplayFormats
Forbestresults, your computer's monitor port or video card resolutions should be set to display in the projector's nativer resolution. However, your projector includes Epson's Size Wise chip that supports other computer display resolutions, so your image will be resized to automatically.
Yourcomputer'smonitorportorvideocardrefreshrate(verticalfrequency)mustbecompatiblewiththe projector.(Seeyourcomputerorvideocardmanualfordetails.)
Thetablehereliststhecompatiblerefreshrateandresolutionforeachcompatiblevideodisplayformat.
| DisplayformatRefreshrate(InHz) | Resolution(inpixels) | |
| Computersignals(analogRGB) | ||
| VGA60/72/75/85640×480 | ||
| SVGA60/72/75/85800×600 | ||
| XGA60/70/75/851024×768 | ||
| WXGA601280×768 | ||
| 601366×768 | ||
| 60/75/851280×800 | ||
| WXGA+60/75/851440×900 | ||
| WXGA++601600×900 | ||
| DisplayformatRefreshrate(inHz) | Resolution(inpixels) | |
| SXGA70/75/851152×864 | ||
| 60/75/851280×960 | ||
| 60/75/851280×1024 | ||
| SXGA+60/751400×1050 | ||
| WSXGA+*601680×1050 | ||
| UXGA601600×1200 | ||
| 50/601920×1080 | ||
| WUXGA(ReducedBlanking)601920×1200 | ||
| Compositevideo | ||
| TV(NTSC,NTSC4.43)60720×480 | ||
| TV(SECAM)50720×576 | ||
| TV(PAL,N-PAL)50720×576 | ||
| TV(PAL,M-PAL)60720×576 | ||
| Componentvideo | ||
| SDTV(480p)59.94720×480 | ||
| SDTV(576p)50720×576 | ||
| HDTV(720p) | 50/59.94/60 | 1280×720 |
| HDTV(1080p) | 50/59.94/60 | 1920×1080 |
| HDMI/HDBaseTControlinputsignals | ||
| VGA | 60640×480 | |
| SVGA60800×600 | ||
| XGA | 601024×768 | |
| WXGA | 601280×800 | |
| 601366×768 | ||
| WXGA+ | 601440×900 | |
| WXGA++ | 601600×900 | |
| WSXGA+601680×1050 | ||
| SXGA601280×960 | ||
| 601280×1024 | ||
| SXGA+601400×1050 | ||
| UXGA601600×1200 | ||
| 1920×108050/601920×1080 | ||
| WUXGA(ReducedBlanking)601920×1200 | ||
| QXGA602048×1536 | ||
| WQHD602560×1440 | ||
| WQXGA(ReducedBlanking)602560×1600 | ||
| SDTV(480i/480p)59.94720×480 | ||
| SDTV(576i/576p)50720×576 | ||
| HDTV(720p)50/59.94/60 | 1280×720 | |
| HDTV(1080i) | 50/59.94/60 | 1920×1080 |
| HDTV(1080p) | 23.98/24/29.97/30/50/59.94/60 | 1920×1080 |
| 4K | 23.98/24/25/29.97/30/50/59.94/60 | 3840×2160 |
| 4K(SMPTE) | 23.98/24/50/59.94/60 | 4096×2160 |
| UniqueAspect(2projectorsconnectedbyadaisychain) | ||
| UniqueAspect(16:6) | 601920×720 | |
| UniqueAspect(21:9) | 601920×810 | |
| 3240×1080603240×1080 | ||
*Wideresolutiononly
Parenttopic: Technical Specifications
USBDisplaySystemRequirements
Yourcomputersystemmustmeetthesystemrequirementssheretousetheprojector'sUSBDisplay software.
| RequirementWindows | Mac | |
| OperatingsystemWindows | 7Ultimate,Enterprise,Professional,andHomePremium(32-and64-bit);HomeBasicandStarter(32-bit) | OSX10.11.x(64-bit),macOS10.12.x(64-bit),macOS10.13.x(64-bit),and10.14.x(64bit) |
| Windows8.x,Pro,andEnterprise(32-and64-bit) | ||
| Windows10Home,Pro,andEnterprise(32-and64-bit) | ||
| CPUIntelCore2Duorfaster | (IntelCorei3orfasterrecommended) | IntelCore2Duorfaster(IntelCore i5orfasterrecommended) |
| Memory2GBormore(4GBormorerecommended) | ||
| Harddiskspace20MBormore | ||
| DisplayResolutionbetween640×480and1920×1200,16-bitcolororgreater | ||
Parenttopic: Technical Specifications
Relatedreferences
InputSignalSettings-Signall/OMenu
Notices
Checkthesesectionsforimportantnoticesaboutyourprojector.
Recycling
ImportantSafetyInformation
LaserSafetyInformation
LaserLightSourceWarning
ImportantSafetyInstructions
ListofSafetySymbols(correspondingtoIEC60950-1A2)
FCCComplianceStatement
BindingArbitrationandClassWaiver
Trademarks
CopyrightNotice
Recycling
Epson offers a recycling program for end of life products. Please go to this site for information on how to return your products for proper disposal.
Parenttopic:Notices
ImportantSafetyInformation
Caution: Never look into the projector lens when the laser is turned on; the bright light can damage your eyes. Neverletchildrenlookintothelenswhenitison. Neveropenanycoverontheprojector, except thefiltercovers. Dangerousselectricalvoltagesinsidetheprojectorcanseverelyinjureyou. Exceptas specifically explained in this User's Guide, do not attempt to service this product yourself. Refer all servicingtoqualifiedservicepersonnel.
Warning: The projector and its accessories come packaged in plastic bags. Keep plastic bags away from small childrento avoid any risk of suffocation.
Parenttopic:Notices
LaserSafetyInformation
ThisprojectorisaClass2laserproductthatcomplieswiththeIEC/EN60825-1:2007international standardforlasers.Followthesesafetyinstructionswhenusingtheprojector.
Warning: Possibly hazardous optical radiation emitted from this product. Do not look at operating light source. Eyeinjurymayresult.
- IfanerroroccursintheprojectororTouchUnit,turnoffthepowerandunplugtheprojectorandTouchUnitimmediately.ContinuingtousetheprojectororTouchUnitcouldresultinanelectricshock,fire,orvisualimpairment.ContactEpsonsupport.
- DonotattempttodisassembleormodifytheprojectororTouchUnit. Theprojectorcontainsahigh-powerlasercomponent.Seriousinjurycouldresult.
- Donotlookintothelensduringprojection.Also,donotlookintothelensusingopticaldevices,such asamagnifyingglassortelescope.Thiscouldcausevisualimpairment.
- Donotplaceflammableobjectsinfrontofthelens.Objectscouldcatchfire.
- Whenturningontheprojectoratadistanceusingtheremotecontrol,makesurenooneislookingintothelens.
- Donotallowsmallchildrentooperatetheprojector.Childrenmustbeaccompaniedbyanadult.
- Donotapplyopticaldevices, such as amagnifying glassor reflector, to the projected image. Using the projectormay result in physical harm, fire, oran accident.
- Donotblockthelightfromthelensduringprojection. The hightemperaturein this areacouldcause burns, fire, or other damage. Thelensmay overheat duet othereflected light and could cause the projectortomalfunction.
- Beforeusing the projector, makes sure there is nothing in the area that could reflect the projected image.
- When disposing of the projector, donot disassemble it. Dispose of the projector in accordance with your local or national laws and regulations.
Labels are attached to the project to indicate it is a Class2 laser product and complies with FDA performance standards for laser product except for deviations pursuant to Laser Notice No. 50, dated June 24, 2007:
•Inside
WARNING
CAUTION: CLASS 3B INVISIBLE LASER RADIATION WHEN OPEN AVOID EXPOSURE TO THE BEAM
ATTENTION : RAYONNEMENT LASER INVISIBLE DE CLASSE 3B - EN CAS D'OUVERTURE
EXPOSITION AU FAISCEAU DANGEREUSE
RefertothetableherefortheExposureHazardValues(EHV)inaccordancewiththeIEC62471-2:2009 standard.TheEHVindicatesthehazardlevelforobjectsinfrontofthelightsourcefor0.25secondsata distanceof7.9inches(20cm).Thehigherthevalue,thegreaterthehazardlevel.
| ExposureHazardValue0.68 |
Parenttopic:Notices
ImportantSafetyInstructions
Followthesesafetyinstructionswhensettingupandusingtheprojector:
- Donotlookintothelenswhentheprojectorison. Thebrightlightcandamageyoureyes. Avoid standinginfrontoftheprojectorsothebrightlightdoesnotshineintoyoureyes.
- Donotplaceanyflammableobjectsinfrontoftheprojectorlens,otherwise,afiremayoccur.
• Donottouchthelenswithbarehands.
- Donotplacetheprojectoronanunstablecart,stand,ortableoronasurfacetathatisunabletosupport itsweight. Otherwise,itcouldfallortopplecausinganaccidentandinjury.
- If the projector is mounted on aceiling or wall, it should be installed by qualified technicians using mounting hardware designed for use with this projector. When installing the projector in a high position, take measures to prevent it from falling by using wirestoensures safety in an emergency, such as an earthquake, and to prevent accidents. If the projector is not installed correctly, the projector could fall. This may result in injury or accidents. Contact your dealer to carry out the installation work.
- Wheninstallingoradjustingaceilingorwallmount,donotuseadhesivestopreventthescrewsfrom looseninganddonotuseoilsorlubricants.Thismaycausetheprojectorcasetocrackandthe projectortofallfromitsceilingmount.Thiscouldcauseseriousinjurytoanyoneunderthemountand coulddamagetheprojector.
- Donotusetheprojectornearwater, sourcesofheat, high-voltageelectricalwires, or sourcesof magneticfields.
- Use the type of powersource indicated on the projector. Use of different powers our current fire electric shock. If you are not sure of the power available, consult your dealer or power company.
- Placetheprojectornearawalloutletwheretheplugcanbeeasilyunplugged.
• Takethefollowing precautions when handling the plug: Donothold the plug with wet hands. Donot insert the plug into adusty outlet. Insert the plug firmly into the outlet. Donot pull the power cord when disconnecting the plug; always besure to hold the plug when disconnecting it. Donot overload wall outlets, extension cords, or power strips. Failure to comply with these precautions could result in fire or electric shock.
- Donotplacetheprojectorwherethecordcanbewalkedon. This may result in refraying ordamageto the plug.
- Unplugtheprojectorfromthewalloutletandallowtocoolbeforecleaning. Useadrycloth(or, for stubborndirtorstains, amoistcloththathasbeenwrungdry)forcleaning. Donotuseliquidoraerosol cleaners, anysprayscontainingflammablegas, orsolventssuchasalcohol, paintthinner, orbenzine.
- Donotblocktheslotsandopeningsintheprojectorcase. Theyprovideventilationandpreventthe projectorfromoverheating. Iftheventsarecovered, theinternaltemperaturecouldriseandcausea fire. Donotplacetheprojectorinlocationssubjecttohightemperatures, suchasnearheating equipment. Donotoperatetheprojectoronasofa, rug, orothersoftsurface, orsetitontopofloose papers. Donotcovertheprojectorwithablanket, curtain, ortablecloth. Ifyouaresettingupthe projectornearawall, leaveatleast19.7inches(50cm)ofspacebetweenthewallandtheprojector.
- Donotoperatetheprojectorinaclosed-incabinetunlessproperventilationisprovided.
- Neverallowobjectsofanykindtoenteranyopeningsintheprojector.Donotleaveobjects,especially flammableobjects,neartheprojector.Donotplaceanycontainersofliquidontopoftheunit.Never spillliquidofanykindintotheprojector.
- Donotinsertordropmetal, flammable, orforeignobjectsintotheprojector'sventsoropeningsnor leavethemnearby. Doingsomayresultinfire, electricshock, orburns.
- If you are using two more projector side-by-side (BrightLink1485Fi), leave enough space between the projector to allow for proper ventilation.
- Youmayneedtocleantheairfilterandvent.Acloggedairfilterorventcanblockventilationneeded tocooltheprojector.Donotusecannedair,orthegasesmaybearesidue.
- Followthemaintenancescheduleforthisprojector. If the interior of the projector has not been cleaned for alongtime, dust may buildup, which could cause fire electric shock. Replace your air filter periodically and contact your deal alert to clean the interior of the projector, as needed.
- Donotstoretheprojectoroutdoorsforanextendedlengthoftime.
- Exceptasspecificallyexplainedinthismanual,donotattempttoservicethisproductyourself.Refer allservicingtoqualifiedpersonnel.Openingorremovingcoversmayexposeyoutodangerous voltagesandotherhazards.
- Neveropenany covers the projectorexceptasspecificallyexplained in this manual. Never attempt to disassemble or modify the projector (including consumables). Refer all repair to qualified service personnel. Electrical voltages insidethe projector can cause serious injury.
- Unplugtheprojectorfromthewalloutletandreferservicingtoqualifiedservicepersonnelunderthe followingconditions:ifitdoesnotoperatenormallywhenyoufollowtheoperatinginstructions,or exhibitsadistinctchangeinperformance;ifsmoke,strangeodors,orstrangenoisescomefromthe projector;ifthepowercordorplugisdamagedorfrayed;ifliquidorforeignobjectsgetinsidethe projector,orifithasbeenexposedtorainorwater;ifithasbeendroppedorthehousinghasbeen damaged.Continuingtousetheprojectorundertheseconditionsmayresultinfireorelectricshock.
- Donottouchtheplugduringanelectricalstorm. Otherwise, you may receive an electric shock.
- Unplugtheprojectorwhenitwillnotbeusedforextendedperiods. Theinsulationmaydeteriorate, whichmayresultinfire.
- Donotusetheprojectorwhereitmaybeexposedtorain,water,orexcessivehumidity.
- Donotuseorstoretheprojectorwhereitmaybeexposedtosmoke,steam,corrosivegases, excessivedust,vibration,orshock.Doingsomayresultinmalfunction,electricshock,andfire.
- Donotuseorstoretheprojectorinplaceswheresmokefromoilorcigarettesmaybepresent,asit canadverselyaffectthequalityoftheprojectedimages.
- Donotusetheprojectorwhereflammableorexplosivegasesmaybepresent.Theinsideofthe projectorcangetveryhotduringuseandthegasesmayignite,resultinginafire.
- Donotuseorstoretheprojectororremotecontrolinahotlocation,suchasnearaeater,indirect sunlight,orinaclosedvehicle. Thermaldeformationortechnicalmalfunctionmayoccur,whichmay resultinafire.
- Checkthespecificationsforthepowercable. Using an inappropriate powercable could result in fire or electric shock. The powercables supplied with the projector is intended to comply with powersupply requirements for the country of purchase. If you use the projector in the country where it was purchased, only uses the powercable that came with the projector.
- If you use the projector in a country other than where you purchase it, use the correct power cord for that country.
- Donotstandontheprojectororplaceheavyobjectsonit. Youmayfallover, resulting in injury and damage to the projector.
- Donotusetheprojectoroutsideoftherequiredtemperaturerangebelow:
32to104°F(0to40°C)atanaltitudeof7500feet(2286m)orless,or32to95°F(0to35°C)atan altitudeof7500to10000feet(2286to3048m)
When using multiple projectors at the same time (Bright Link 1485Fi):
32to95°F(0to35°C)atanaltitudeof7500feet(2286m)orless,or32to86°F(0to30°C)atanaltitudeof7500to10000feet(2286mto3048m)
Doingsomaycauseanunstabledisplayandcouldleadtoprojectordamage.Donotuseorstorethe projectorwhereitmaybeexposedtosuddenchangesintemperature.
- Donotuseorstoretheprojectorinplaceswhereitmightbesubjectedtohighandlowextremesof temperature.
- Donotstoretheprojectoroutsideoftherequiredtemperaturerangeof14to140°F(-10to60°C)or indirectsunlightforlongperiodsoftime.Doingsomaycausedamagetothecase.
- Donotplaceanythingthatcanbecomewarpedordamagedbyheatneartheexhaustvents.Donot bringyourhandsorfaceclosetotheventswhileprojectionisinprogress.Donotbringyourfaceclose totheprojectorwhileitisinuse.
• Before you mov the projector, makes sure its power is turned off, the plug is disconnected from the outlet, and all cables are disconnected. Fire electric shock may result.
- Donotplacethesourceofanopenflame, suchasalitcandle, onorneartheprojector.
- During projection, donotblockthelight from the projector with abookor other objects. If the light from the projector is blocked, the area on which the light shines becomes shot which could cause it to melt,
burn, orstartafire. Also, the lens may get hot due to the reflected light which could cause the projectortomalfunction. Tostopprojection, use the A/VMutefunction, or turn off the projector.
- Donotmodifythepowercord. Donotplaceheavyobjectsontopofthepowercordorbend,twist,or pullitexcessively.Keepthepowercordawayfromhotelectricalappliances. Donotusethepower cordifitisdamaged. Fireorelectricshockmayresult. Contactyourdealerifthecablebecomes damaged.
•Alwayslowerthevolumebeforeturningofftheprojector. Turningontheprojectorwiththevolumetoo highcandamageyourears. - Whenastillimageisdisplayedforalongtime,imageretentionmayoccuronthescreen.Donot displayimagesintheexactsamepositionforlongperiods.
•Alwaysattachthelenscovertothelenswhennotusingtheprojectortopreventthelensfrom becomingdirtyordamaged. - Donotstoretheinteractivepensorthebatteriesinahotlocation,suchasnearaheater,indirect sunlight,orinaclosedvehicle. Thermaldeformationortechnicalmalfunctionmayoccur,whichmay resultinafire.
- Removethebatteriesfromtheinteractivepensifyouwillnotbeusingthepensforalongtime.
- Incorrectbatteryusagemaycauseleakageofbatteryfluidandbatteryrupture,whichcouldresultin fire,injury,orcorrosion.Whenreplacingbatteries,takethefollowingprecautions:insertbatteriesso thatthepolaritiesarecorrect;donotusebatteriesofdifferenttypesormixoldandnewbatteries;do notuseanybatteriesotherthanthosespecified;ifbatteriesleak,wipeawaybatteryfluidwithasoft cloth;ifbatteryfluidgetsonyourhands,washthemimmediately;replacethebatteriesassoonasthey runout;removethebatterisifyouwillnotbeusingtheprojectorforalongperiodoftime;donot exposebatteriestoheatorflameanddonotputtheminwater;disposeofusedbatteriesaccordingto localregulations;keepbatteriesoutofthereachofchildren.Batteriesarechokinghazardsandare verydangerousifswallowed.
RestrictionofUse
Parenttopic:Notices
RestrictionofUse
Whenthisproductisusedforapplicationsrequiringhighreliability/safetysuchastransportationdevices relatedtoaviation,rail,marine,automotive;disasterpreventiondevices;varioussafetydevices;or functional/precisiondevices,youshouldusethisproductonlyaftergivingconsiderationoincludingfail-safesandredundanciesintoyourdesigntomaintainsafetyandtotalsystemreliability.
Because this product was not intended for use in applications requiring extremely high reliability/safety such as aerospace equipment, main communication equipment, nuclear power control equipment, or
medicalequipmentrelatedtodirectmedicalcare, pleasemakeyourownjudgmentonthisproduct's suitabilityafterafullevaluation.
Parenttopic: Important Safety Instructions
ListofSafetySymbols(correspondingtoIEC60950-1A2)
The following table lists the meaning of the safety symbols labeled on the equipment.
| No. | Symbol | ApprovedStandards | Description | |
| 1IEC604 | 17 | [......] | No.5007 | "ON"(power)Toindicateconnectiontothemains. |
| 2IEC604 | 17 | No.5008 | "OFF"(power)Toindicatedisconnectionfromthe mains. | |
| 3IEC604 | 17 | No.5009 | Stand-byToidentifytheswitchorswitchpositionbymeansofwhichpartoftheequipmentisswitchedoninordertobringitintothestand-bycondition. | |
| 4ISO700 | 0 | No.0434B,IEC3864-B3.1 | CautionToidentifygeneralcautionwhenusing theproduct. | |
| 5IEC604 | 17 | No.5041 | Caution,hotsurfaceToindicatethathemarkeditemcanbe hotandshouldnotbetouchedwithout takingcare. | |
| 6IEC604 | 17 | No.6042ISO3864-B3.6 | Caution,riskofelectricshockToidentifyequipmentthathasriskof electricshock. | |
| 7IEC604 | 17 | No.5957 | ForindooruseonlyToidentifyelectricalequipmentdesignedprimarilyforindooruse. | |
| 8IEC604 | 17 | No.5926 | PolarityofDCpowerconnectorToidentifythepositiveandnegativeconnections(thepolarity)onapieceofequipmenttowhichaDCpowersupplymaybeconnected. | |
9-PolarityofDCpowerconnector | Toidentifythepositiveandnegativeconnections(thepolarity)onapieceofequipmenttowhichaDC.powersupplymaybeconnected. | |||
| 10IEC60 | 117 | No.5001B | Battery,generalOnbatterypoweredequipment.Toidentifyadeviceforinstanceacoverforthebatterycompartment,ortheconnectorterminals. | |
| 11IEC60 | 117 | No.5002 | PositioningofcellToidentifythebatteryholderitselfandtoidentifythepositioningofthecell(s)insidethebatteryholder. | |
12-Positioningofcell | Toidentifythebatteryholderitselfandtoidentifythepositioningofthecell(s)insidethebatteryholder. | |||
| No. | SymbolApprovedStandards | Description | ||
| 13IEC60 | 417 | No.5019 | ProtectiveearthToidentifyanyterminalwhichisintended forconnectiontoanexternalconductor forprotectionagainstelectricshockin caseofafault,ortheterminalofa protectiveearthelectrode. | |
| 14IEC60 | 417 | No.5017 | EarthToidentifyanearth(ground)terminalin caseswhereneitherthesymbolNo.13is explicitlyrequired. | |
| 15IEC60 | 417 | No.5032 | AlternatingcurrentToindicateontheratingplatethatthe equipmentissuitableforalternating currentonly;toidentifyrelevant terminals. | |
| 16IEC60 |  | No.5031 | DirectcurrentToindicateontheratingplatethatthe equipmentissuitablefordirectcurrent only;toidentifyrelevantterminals. | |
| 17IEC60 | 417 | No.5172 | ClassIIequipmentToidentifyequipmentmeetingthesafety requirementsspecifiedforClassII equipmentaccordingtoIEC61140. | |
| 18ISO38 | 64Generalprohibition | Toidentifyactionsoroperationsthatare prohibited. | ||
| 19ISO38 | 64Contactprohibition | Toindicateinjurythatcouldoccurdueto touchingaspecificpartoftheequipment. | ||
| No. | symbolApprovedStandards | Description | ||
20—Neverlookintotheopticallenswhilethe | projectorison. | |||
21—Toindicatethethemarkeditem | don't | placeanythingonprojector. | ||
22ISO3864 | IEC60825-1 | Caution,laserradiationToindicatetheequipmenthasalaser radiationpart. | ||
23ISO3864Disassemblyprohibition | Toindicateariskofinjury,suchas electricshock,iftheequipmentis disassembled. | |||
24IEC60417 | No.5266 | Standby,partialstandbyToindicatethatpartoftheequipmentis inthereadystatus. | ||
25ISO3864 | IEC60417No.5057 | Caution,movablepartsToindicatethyoumustkeepaway frommovablepartsaccordingto protectionstandards. | ||
27IEC60417-6056Caution(movableflanblades) | Toindicatethyoumustkeepaway fromthebladesofthemovablefan accordingtoprotectionstandards. | |||
28IEC60417-6043Caution(sharpcorners) | Toindicatethyoumustnottouchthe sharpcornersoftheproductaccordingto protectionstandards. | |||
| No.Symbol | ApprovedStandards | Description | ||
| 29—Neverlook into the projection lengthwhile | theprojectorison. | |||
| 30ISO70 | 10 | No.W027 | Warning, lightemission(UV, visiblelight, IRandsoon)Toindicate that you must be careful not to injure you reyes or skin when near light emitting sections. | |
| 31IEC60 | 417 | No.5109 | Nottobe used in residential areasTo indicate that the electrical equipment/device is not suitable for use in residential area. | |
Parenttopic:Notices
FCCComplianceStatement
ForUnitedStatesUsers
This equipment has been tested and found to comply with the limits for a Class B digital device, pursuant to Part 15 of the FCC Rules. These limits are designed to provide reasonable protection against harmful interference in a residential installation. This equipment generates, uses, and can radiater radio frequency energy and, if not installed and used in accordance with the instructions, may cause harmful interference or radiocommunications. However, there is no guarantee that interference will not occur in particular installation. If this equipment does cause interference or radio and television reception, which can be determined by turning the equipment off and, the user is encouraged to try to correct the interference by one or more of the following measures:
•Reorientorrelocatethereceivingantenna.
- Increase these separation between the equipment and receiver.
- Connecttheequipmentintoanoutletonacircuitdifferentfromthattowhichthereceiverisconnected.
- Consultthedealeroranexperiencedradio/TVtechnicianforhelp.
This device complies with part 15 of the FCC Rules. Operation is subject to the following two conditions: (1) This device may not cause harmful interference, and (2) this device must accept any interference received, including interference that may cause undesired operation.
WARNING
The connection of an-shielded equipment interface cable to this equipment will invalidate the FCC Certification or Declaration of this device and may cause interference levels which exceed the limits established by the FCC forthisequipment. It is therefore responsible for the user to obtain and use a shielded equipment interface cable with this device. If this equipment has more than one interface connector, do not leave cables connected to unused interfaces. Changes or modifications not expressly approved by the manufacturer could void the user's authority to operate the equipment.
ForCanadianUsers
CANICES-3(B)/NMB-3(B)
Parenttopic:Notices
BindingArbitrationandClassWaiver
1. DISPUTES, BINDING INDIVIDUAL ARBITRATION, AND WAIVEROF CLASSACTIONS AND CLASSARBITRATIONS
1.1 Disputes. The terms of this Section 1 shall apply to all Disputes between you and Epson. The term "Dispute" is meant to have the broadest meaning permissible underlaw and includes any dispute, claim, controversy or action between you and Epson arising out for relating this Agreement, Epson branded products (hardware and including any related software), other transaction involving you and Epson, whether in contract, warranty, misrepresentation, fraud, tort, intentionaltort, statute, regulation, ordinance, or any other legal or equitable basis. "DISPUTE" DOES NOT INCLUDE IP CLAIMS, or more specifically, a claimor cause of action for (a) trademark infringement or dilution, (b) patent infringement, (c) copyright infringement or misuse, or (d) trades secret misappropriation (an "IP Claim"). You and Epson also agree, notwithstanding Section 1.6, that court, not an arbitrator, may decide if a claimor cause of action is for an IP claim.
1.2 Binding Arbitration. You and Epson agree that all Disputes shall be resolved by binding arbitration according to this Agreement. ARBITRATION MEANSTHAT YOU WAIVE YOUR RIGHT TO AJUDGE OR JURY IN ACOURTPROCEEDING AND YOUR GROUNDS FOR APPEAL ARE LIMITED.
PursuanttothisAgreement, bindingarbitrationshallbeadministered by JAMS, anationally recognized arbitration authority, pursuant to its code of procedure, then ineffect for consumer related disputes, but excluding any rule that permit joinder or class actions in arbitration (formoredetail on procedure, see Section 1.6 below). You and Epson understand and agree that (a) the Federal Arbitration Act (9U.S.C. §1, et seq.) govern the interpretation and enforcement of this Section 1, (b) this Agreement memorializes at transaction in interstate commerce, and (c) this Section 1 shall survivetermination of this Agreement.
1.3 Pre-Arbitration Steps and Notice. Before submitting a claim for arbitration, you and Epson agree to try, for sixty (60) days, to resolve any Dispute informally. If Epson and you donot reach an agreement to
resolvetheDisputewithinthesixty(60)days),youorEpsonmaycommenceanarbitration.Noticeto Epsonmustbeaddressedto:EpsonAmerica,Inc.,ATTN:LegalDepartment,3840KilroyAirportWay, LongBeach,CA90806(the"EpsonAddress").TheDisputeNoticetoyouwillbesenttothemostrecent addressEpsonhasinitsrecordsforyou.Forthisreason,itisimportanttonotifyusifyouraddress changesbyemailingusatEAILegal@ea.epson.comorwritingusattheEpsonAddressabove.Noticeof theDisputeshallincludethesender'sname,addressandcontactinformation,thefactsgivingrisetothe Dispute,andthereliefrequested(the"DisputeNotice").FollowingreceiptoftheDisputeNotice,Epson andyouagreetoactinggoodfaithtoresolvetheDisputebeforecommencingarbitration.
1.4 Small Claims Court. Notwithstanding the foregoing, you may bring an individual action in the small claimscourtofyourstateormunicipalityiftheactioniswithinthatcourt'sjurisdictionandspendingonlyinthatcourt.
1.5WAIVEROFCLASSACTIONSANDCLASSARBITRATIONS.YOUANDEPSONAGREETHAT EACHPARTYMAYBRINGDISPUTESAGAINSTTHEOTHERPARTYONLYINANINDIVIDUAL CAPACITY,ANDNOTASAPLANTIFFORCLASSMEMBERINANYCLASSOR REPRESENTATIVEPROCEEDING,INCLUDINGWITHOUTLIMITATIONFEDERALORSTATE CLASSACTIONS,ORCLASSARBITRATIONS.CLASSACTIONLAWSUITS,CLASS-WIDE ARBITRATIONS,PRIVATEATTORNEY-GENERALACTIONS,ANDANYOTHERPROCEEDING WHERESOMEONEACTSINAREPRESENTATIVECAPACITYARENOTALLOWED. ACCORDINGLY,UNDERTHEARBITRATIONPROCEDUREOUTLINEDINTHISSECTION,AN ARBITRATORSHALLNOTCOMBINEORCONSOLIDATEMORETHANONEPARTY'SCLAIMS WITHOUTTHEWRITTENCONSENTOFALLAFFECTEDPARTIESTOANARBITRATION PROCEEDING.
1.6 Arbitration Procedure. If you or Epson commences arbitration, the arbitration shall be governed by therulesofJAMSthatareineffectwhenthearbitrationisfiled,excludinganyrulesthatpermitarbitration on a class or representative basis (the "JAMS Rules"), available at http://www.jamsadr.com or by calling 1-800-352-5267,andundertherulessetforthinthisAgreement.AllDisputesshallberesolvedbya singleneutralarbitrator,andbothpartiesshallhaveareasonableopportunitytoparticipateinthe selectionofthearbitrator.ThearbitratorisboundbythetermsofthisAgreement.Thearbitrator,andnot anyfederal,stateorlocalcourtoragency,shallhaveexclusiveauthoritytoresolvealldisputesarising outoforrelatingtotheinterpretation,applicability,enforceabilityformationofthisAgreement, includinganyclaimthatalloranypartofthisAgreementisvoidorvoidable.Notwithstandingthisbroad delegationofauthoritytothearbitrator,acourtmaydeterminethelimitedquestionofwhetheraclaimor causeofactionisforanlPClaim,whichisexcludedfromthedefinitionof"Disputes"inSection1.1 above.Thearbitratorshallbeempoweredtograntwhateverreliefwouldbeavailableinacourtunder laworinequity.Thearbitratormayawardyouthesamedagesasacourtcould,andmayaward declaratoryorinjunctivereliefonlyinfavoroftheindividualpartyseekingreliefandonlytotheextent necessarytoprovidereliefwarrantedbythatparty'sindividualclaim.Insomeinstances,thecostsof arbitrationcanexceedthecostsoflitigationandtherighttodiscoverymaybemorelimitedinarbitration
thanincourt. Thearbitrator'sawardisbindingandmaybeenteredasajudgmentinanycourtof competentjurisdiction.
You may choose to engage in arbitration hearings by telephone. Arbitration hearings not conducted by telephones shall take place in allocation reasonably accessible from your primary residence, or in Orange County, California, at your option.
a) Initiation of Arbitration Proceeding. If either you or Epson decidest to arbitrate a dispute, both parties agree to the following procedure:
(i) WriteaDemandforArbitration. The demand must include a description of the dispute and the amount of damage sought to be recovered. You can find a copy of a Demand for Arbitration at http://www.jamsadr.com ("DemandforArbitration").
(ii) Send three copies of the Demand for Arbitration, plus the appropriate filing fee, to: JAMS, 500 North State College Blvd., Suite 600 Orange, CA92868, U.S.A.
(iii) Sendonecopy of the Demand for Arbitration to the other party (same address as the Dispute Notice), or otherwise agreed by the parties.
b) HearingFormat. During the arbitration, the amount of any settlement to offer mades shall not be disclosed to the arbitrator until after the arbitrator determines the amount, if any, to which you or Epson is entitled. The discoveryorexchange of non-privileged information relevant to the Disputem maybe allowed during the arbitration.
c) Arbitration Fees. Epson shall pay, or (if applicable) reimburse you for all JAMS filings and arbitrator fees for any arbitration commenced (by you or Epson) pursuant to provision of this Agreement.
d) Awardin Your Favor. For Disputes in which you or Epson seeks \75,000 or less sind damages exclusive of attorney's fees and costs, if the arbitrator's decision results in an award to you in an amount greater than Epson's last written offer, if any, to settle the Dispute, Epson will: (i) pay you \1,000 or the amount of the award, whichever is greater; (ii) pay outwicethe amount of your reasonable attorney's fees, if any; and (iii) reimburse you for any expenses (including expert witness fees and costs) that your attorney reasonably accrues for investigating, preparing, and pursuing the Dispute in arbitration. Except as agreed upon by you and Epson in writing, the arbitrator shall determin the amount of fees, costs, and expensestobepaid by Epson pursuant to this Section 1.6d).
e) Attorney's Fees. Epson will not seek its attorney's fees and expenses for any arbitration commenced involving a Dispute under this Agreement. Your right to attorney's fees and expenses under Section 1.6d) aboved does not limit your right to attorney's fees and expenses under applicable law; notwithstanding the foregoing, the arbitrator may not award duplicative awards of attorney's fees and expenses.
1.7 Opt-out. You may elect to opt-out (exclude yourself) from the final, binding, individual arbitration procedure and waiver of class and representative proceeding specified in this Agreement by sending a written letter to the Epson Address within thirty (30) day so for your assent
tothisAgreement(includingwithoutlimitationthepurchase,download,installationofthe SoftwareorotherapplicableuseofEpsonHardware,productsandservices)thatspecifies(i)yourname,(ii)yourmailingaddress,and(iii)yourrequesttobeexcludedfromthefinal,binding individualarbitrationprocedureandwaiverofclassandrepresentativeproceedingspecifiedin thisSection1.Intheeventthatyouopt-outconsistentwiththeproceduresetforthabove,all othertermsshallcontinuetoapply,includingtherequirementtoprovidenoticepriortolitigation.
1.8 Amendments to Section 1. Notwithstanding any provision in this Agreement to the contrary, you and Epsonagreethatif Epsonmakesanyfutureamendmentstothedisputeresolutionprocedureand classactionwaiverprovisions(otherthanachangetoEpson'saddress)inthisAgreement,Epsonwill obtainyouraffirmativeassenttotheapplicableamendment.Ifyoudonotaffirmativelyassenttothe applicableamendment,youareagreeingthatyouwillarbitrateanyDisputebetweenthepartiesin accordancewiththelanguageofthisSection1(orresolvedisputesasprovidedforinSection1.7,ifyou timelyelectedtoopt-outwhenyoufirstassentedtothisAgreement).
1.9 Severability. If any provision in this Section 1 is found to be unenforceable, that provision shall be severed with the remainder of this Agreement remaining in full force and effect. The foregoing shall not applytothep prohibitionagainstclassorrepresentativeactionsasprovidedinSection1.5.This meansthatifSection1.5isfoundtobeunenforceable,theentireSection1(butonlySection1) shallbenullandvoid.
Parenttopic:Notices
Trademarks
EPSON® andQuickCorner ® areregisteredtrademarks, EpsoniProjectionisattrademark, and EPSON ExceedYourVisionisaregisteredlogomarkofSeikoEpsonCorporation.
PrivateLine^® isaregisteredtrademarks;SizeWise ^TM isatrademark;andExtraCare ^SM isaservicemarkof EpsonAmerica,Inc.
WindowsisaregisteredtrademarkofMicrosoftCorporationintheUnitedStatesand/orothercountries.
Mac,macOS,andOSXaretrademarksofAppleInc.,registeredintheU.S.andothercountries.
Google ^® isaregisteredtrademarkandAndroid ^TM ,GoogleChrome ^TM ,andGooglePlay ^TM aretrademarks of GoogleLLC.
HDBaseT™ andtheHDBaseTAlliancelogoaretrademarksoftheHDBaseTAlliance.
Miracast®isaregisteredtrademarkofWi-FiAlliance ©.
GeneralNotice: Other product names used herein are for identification purposes only and maybe trademark of their respective owners. Epson disclaims any and all rights in those marks.
EPSON®
EXCEED YOUR VISION
Parenttopic:Notices
CopyrightNotice
Allrightsreserved. Nopartofthispublicationmaybereproduced, storedinaretrievalsystem, or transmittedinanyformorbyanymeans, electronic, mechanical, photocopying, recording, or otherwise, without the prior written permission of SeikoEpsonCorporation. The information contained herein is designed only for use with this Epsonproduct. Epsonis not responsible for any use of this information as applied to other products.
Neither Seiko Epson Corporation nor its affiliates shall be liable to the purchaser of this product or third parties for damages, losses, costs, or expenses incurred by purchaser third parties as a result of: accident, misuse, or abuse of this product or unauthorized modifications, repairs, or alteration to this product, or (excluding the U.S.) failure to strictly comply with Seiko Epson Corporation's operating and maintenance instructions.
SeikoEpsonCorporationshallNotbeliableforanydamagesorproblemsarisingfromtheuseofany optionsoranyconsumableproductsotherthanthosedesignatedasOriginalEpsonProductsorEpson ApprovedProductsbySeikoEpsonCorporation.
Thisinformationissubjecttochangewithoutnotice.
ANoteConcerningResponsibleUseofCopyrightedMaterials
CopyrightAttribution
Parenttopic:Notices
ANoteConcerningResponsibleUseofCopyrightedMaterials
Epsonencourageseachusertoberesponsibleandrespectfulofthecopyrightlawswhenusingany Epsonproduct.Whilesomecountries'lawspermitlimitedcopyingorreuseofcopyrightedmaterialin certaincircumstances,thosecircumstancesmaynotbeasbroadassomepeopleassume.Contactyour legaladvisorforanyquestionsregardingcopyrightlaw.
Parenttopic: CopyrightNotice
CopyrightAttribution
©2019EpsonAmerica,Inc.
10/19
CPD-57752
Parenttopic: CopyrightNotice
- Using the Interactive Features 205
- Solving Problems 328
- BrightLink1480Fi/1485FiUser'sGuide
- IntroductiontoYourProjector
- ProjectorFeatures
- Uniqueinteractivefunctions
- Bright, high-resolution projectionsystem
- Flexibleconnectivity
- Innovativedisplayandoperationfeatures
- ProductBoxContents
- AdditionalComponents
- OptionalEquipmentandReplacementParts
- Warranty and Registration Information
- NotationsUsedintheDocumentation
- WheretoGoforAdditionallInformation
- AdditionalProjectorSoftwareandManuals
- ProjectorPartLocations
- ProjectorParts-Top/Side
- ProjectorParts-TouchUnit
- SettingUptheProjector
- ProjectorPlacement
- ProjectorSetupandInstallationOptions
- ProjectionDistance
- RemovingandAttachingtheCableCover
- ProjectorConnections
- ConnectingtoComputerSources
- ConnectingtoaComputerforUSBVideoandAudio
- Relatedreferences
- ConnectingtoaComputerforVGAVideo
- ConnectingtoaComputerforHDMIVideoandAudio
- Parenttopic: ConnectingtoComputerSources
- ConnectingtoaComputerforPenandFingerUse
- ConnectingaComputertotheControlPad
- ConnectingtoaComputerforSound
- ConnectingtoVideoSources
- ConnectingtoanHDMIVideoSource
- ConnectingtoaCompositeVideoSource
- ConnectingtoaVideoSourceforSound
- ConnectingExternalOutputDevices
- ConnectingtoanExternalComputerMonitor
- ConnectingtoanExternalHDMIMonitor
- ConnectingtoExternalSpeakers
- ConnectingaMicrophone
- ConnectingtoExternalUSBDevices
- USBDeviceProjection
- Relatedtasks
- ConnectingaUSBDeviceorCameratotheProjector
- ConnectingaUSBDevicetotheControlPad
- SelectingtheConnectedUSBSource
- DisconnectingaUSBDeviceFromtheControlPadorProjector
- ConnectingtoaDocumentCamera
- ConnectingaPrintertotheControlPad
- ConnectingMultipleProjectorsoftheSameModel
- MultipleProjectorConnectionMenuSettings
- Installing Batteries in the Remote Control
- InstallingBatteriesinthePens
- UsingtheProjectoronaNetwork
- WiredNetworkProjection
- ConnectingtoaWiredNetwork
- SelectingWiredNetworkSettings
- SelecttheNetworkmenuandpressEnter
- SelectNetworkSettingsandpressEnter
- WirelessNetworkProjection
- InstallingtheWirelessLANModule
- ConnectingDirectlytoaSmartphoneorTablet
- SelecttheNetworkmenuandpressEnter
- 6.SelectNetworkSettingsandpressEnter
- SelectNetworkProjectionandpressEnter
- SelectOnastheEpsoniProjectionsetting.
- UsingQuickWirelessConnection(Windows)
- SelectingWirelessNetworkSettingsManually
- SelecttheWirelessLANmenuandpressEnter
- SelectSearchAccessPointandpressEnter!
- SelectIPSettingsandpressEnter.
- SelectingWirelessNetworkSettingsinWindows
- SelectingWirelessNetworkSettingsMac
- SettingUpWirelessNetworkSecurity
- Relatedtopics
- WirelessNetworkProjectionfromaMobileDeviceorWindowsComputer (ScreenMirroring)
- ScreenMirroringRestrictions
- SelectingScreenMirroringSettings
- SelecttheNetworkmenuandpressEnter
- 5.SelectNetworkSettingsandpressEnter
- SelectPriorityControlInterfaceandpressEnter
- SelectNetworkProjectionandpressEnter
- ConnectingforScreenMirroringwithaWindows8.x/Windows10Computer
- ConnectingforScreenMirroringwithMiracast
- SettingUpProjectorNetworkE-MailAlerts
- NetworkProjectorE-mailAlertMessages
- SettingUpMonitoringUsingSNMP
- ControllingaNetworkedProjectorUsingaWebBrowser
- CreatinganAddressBook
- UsingCrestronConnected
- SettingUpCrestronConnected
- ControllingaNetworkedProjectorUsingCrestronConnected
- RegisteringaDigitalCertificateontheProjector
- ImportingaWebServerCertificateUsingtheProjectorMenus
- RegisteringDigitalCertificatesfromaWebBrowser
- DigitalCertificateTypes
- UsingBasicProjectorFeatures
- TurningOntheProjector
- UsingtheHomeScreen
- TurningOfftheProjector
- SelectingtheLanguagefortheProjectorMenus
- SettingtheDateandTime
- ImageShape
- CorrectingImageShapewiththeKeystoneButtons
- CorrectingImageShapewithQuickCorner
- SelecttheInstallationmenuandpressEnter.
- CorrectingImageShapewithArcCorrection
- CorrectingImageShapewithPointCorrection
- CorrectingImageShapewithCornerMarkers
- ApplyingSavedImageShapeSettings
- ResizingthImagewiththeWideandTeleButtons
- AdjustingtheImagePosition
- Focusingthelmage
- RemoteControlOperation
- SelectinganImageSource
- ProjectionModes
- ChangingtheProjectionModeUsingtheRemoteControl
- ChangingtheProjectionModeUsingtheMenus
- ImageAspectRatio
- ChangingthelmageAspectRatio
- AvailableImageAspectRatio
- ColorMode
- ChangingtheColorMode
- AvailableColorModes
- AdjustingtheHue, Saturation, and Brightness
- Select theImagemenuandpressEnter
- SelectRGBCMYandpressEnter!
- SelectthecolortoadjustandpressEnter
- AdjustingGamma
- AdjustingtheProjector'sBrightnessLevel
- SelecttheOperationmenuandpressEnter
- SelectLightSourceBrightnessControlandpressEnter
- ConstantBrightnessUsageHours
- Lightsourcelifespan
- TurningOnAutomaticLuminanceAdjustment
- Select theImagemenuandpressEnter.
- ControllingtheVolumewiththeVolumeButtons
- InvertingtheAudioChannels
- SelecttheSignall/OmenuandpressEnter
- SelectingaQuickStartupSetting
- ProjectingaPCFreePresentation
- SupportedPCFreeFileTypes
- StartingaPCFreeSlideShow
- StartingaPCFreeMoviePresentation
- PCFreeDisplayOptions
- AdjustingProjectorFeatures
- ShuttingOffthePictureandSoundTemporarily
- StoppingVideoActionTemporarily
- ZoomingIntoandOutofImages
- UsingMultipleProjectors(DuoLink)
- ProjectorIdentificationSystemforMultipleProjectorControl
- SettingtheProjectorID
- SelectProjectorIDandpressEnter.
- SettingtheRemoteControlID
- AdjustingColorUniformity
- Select the area you want to adjust and press Enter.
- Note: The adjustments screen changeseach time you press Enter.
- BlendingtheImageEdges
- MatchingthelmageColors
- AdjustingtheBlackLevel
- SelecttheMulti-ProjectionmenuandpressEnter
- SelecttheBlackLevelsettingandpressEnter.
- Select the Color Adjustment setting and press Enter
- SelecttheareayouwanttoadjustandpressEnter.
- AdjustingRGBCMY
- SelectthelmagemenuandpressEnter
- SelecttheRGBCMYsettingandpressEnter
- SelectthecoloryouwanttoadjustandpressEnter.
- ScalinganImage
- ProjectingMultipleImagesSimultaneously
- 3.PresstheMenubutton.
- InputSourcesforSplitScreenProjection
- ProjectorSecurityFeatures
- PasswordSecurityTypes
- SettingaPassword
- SelectingPasswordSecurityTypes
- EnteringaPasswordtoUsetheProjector
- SavingaUser'sLogolmagetoDisplay
- LockingtheProjector'sButtons
- SelecttheManagementmenuandpressEnter.
- UnlockingtheProjector'sButtons
- InstallingaSecurityCable
- CreatingaUserPatterntoDisplay
- SavingSettingstoMemoryandUsingSavedSettings
- CopyingMenuSettingsBetweenProjectors
- SavingSettingstoaUSBFlashDrive
- TransferringSettingsfromaUSBFlashDrive
- SavingSettingstoaComputer
- TransferringSettingsfromaComputer
- SchedulingProjectorEvents
- SavingaScheduledEvent
- ViewingScheduledEvents
- EditingaScheduledEvent
- UsingtheInteractiveFeatures
- InteractiveModes
- Using the Projected Screenasa Whiteboard (Built-in Whiteboard Mode)
- DrawingonaProjectedImage(Built-inAnnotationMode)
- ControllingComputerFeaturesfromaProjectedScreen(PCInteractiveMode)
- PCInteractiveModeSystemRequirements
- UsingtheInteractivePens
- UsingthePens
- PenCalibration
- CalibratingAutomatically
- CalibratingManually
- Thisscreenappears:
- UsingFingerTouchInteractivity
- TouchUnitSafetyInstructions
- CalibratingforFingerTouchInteractivity
- Thefollowingscreenappears:
- UsingFingerTouchOperations
- UsingBrightLinkwithaComputer
- Adjusting the Pen Operation Area
- EasyInteractiveTools
- WindowsPenInputandInkTools
- EnablingWindowsPenInputandInkTools
- UsingWindowsPenInputandInkTools
- WhiteboardMode
- UsingtheWhiteboardToolbar
- TheWhiteboardToolbar
- SelectingBackgroundTemplates
- InsertingandWorkingWithImages
- SelectingWhiteboardSettings
- SelectingBasicWhiteboardSettings
- SelectingWhiteboardPrintSettings
- SelecttheInteractivemenuandpressEnter
- SelectPrintandpressEnter!
- SelectingSettingsforSavingWhiteboardPages
- SelecttheSavemenuandpressEnter
- SelectingSettingsforEmailingWhiteboardPages
- SelectingSettingsforaDirectoryServer
- SelectDirectoryandpressEnter
- SelectingaNetworkedDeviceSource
- SavingPagesinWhiteboardMode
- PrintingWhiteboardPages
- EmailingWhiteboardPages
- UsingBrightLinkWithoutaComputer
- UsingtheBuilt-inAnnotationMode
- Built-inToolsforUseWithoutaComputer
- ControllinganEpsonDocumentCamera
- SplittingtheProjectedImagewithWhiteboardMode
- SharingtheProjectedScreen
- StartingaSharedScreenSession
- Using Interactive Features with Two Projectors (DuoLink)
- AdjustingtheMenuSettings
- UsingtheProjector'sMenus
- ImageQualitySettings-ImageMenu
- InputSourceSettings
- InputSignalSettings-Signall/OMenu
- InstallationSettings-InstallationMenu
- DisplaySettings-DisplayMenu
- FeatureSettings-OperationMenu
- AdministrationSettings-ManagementMenu
- EventIDCodeList
- NetworkSettings-NetworkMenu
- PenandTouchSetupSettings-Pen/TouchMenu
- InteractiveSettings-InteractiveMenu
- MultipleProjectorOperationSettings-Multi-ProjectionMenu
- ImageQualityMemorySettings-MemoryMenu
- SetupSettings-ECOMenu
- InitialSettingsandResetOptions-Initial/AllSettingsMenu
- MaintainingandTransportingtheProjector
- ProjectorMaintenance
- CleaningtheLens
- CleaningtheProjectorCase
- AirFilterandVentMaintenance
- CleaningtheAirFilterandVents
- ReplacingtheAirFilter
- ReplacingtheRemoteControlBatteries
- ReplacingtheHardPenTips
- ReplacingtheSoftPenTips
- TransportingtheProjector
- SolvingProblems
- ProjectionProblemTips
- ProjectorLightStatus
- WirelessLANLightStatus
- Using the ProjectorMenu Displays
- SolvingImageorSoundProblems
- SolutionsWhenNoImageAppears
- SolutionsWhenImageisIncorrectUsingtheUSBDisplayFunction
- SolutionsWhen"NoSignal"MessageAppears
- DisplayingFromaPCLaptop
- DisplayingFromaMacLaptop
- SolutionsWhen"NotSupported"MessageAppears
- SolutionsWhenOnlyaPartialImageAppears
- SolutionsWhenthelmageisNotRectangular
- SolutionsWhentheImageContainsNoiseorStatic
- SolutionsWhenthelmageisFuzzyorBlurry
- SolutionsWhenthelImageBrightnessorColorsareIncorrect
- SolutionsWhenanAfterimageRemainsOntheProjectedImage
- SolutionstoSoundProblems
- SolutionstoMicrophoneProblems
- SolvingProjectororRemoteControlOperationProblems
- SolutionstoProjectorPowerorShut-OffProblems
- SolutionstoRemoteControlProblems
- SolutionstoPasswordProblems
- SolutionsWhenaBatteryMessageAppears
- SolvingNetworkProblems
- SolutionsWhenWirelessAuthenticationFails
- SolutionsWhenYouCannotAccesstheProjectorThroughtheWeb
- SolutionsWhenNetworkAlertE-MailsareNotReceived
- SolutionsWhenthelImageContainsStaticDuringNetworkProjection
- SolutionsWhenYouCannotConnectUsingScreenMirroring
- SolutionsWhenthelmageorSoundContainsStaticWhenUsingScreenMirroring
- SolutionsWhentheProjectedScreenisnotSharedCorrectly
- SolvingInteractiveProblems
- SolutionsWhentheInteractivePensDoNotWork
- SolutionsWhentheInteractivePenPositionIsNotAccurate
- Relatedconcepts
- SolutionsWhentheInteractivePensAreSloworDifficulttoUse
- SolutionsWhentheInteractivePensCauseInterferenceorUnwantedEffects
- SolutionsWhenFingerTouchInteractivityDoesNotWork
- SolutionsWhenYouCannotOperateaComputerfromtheProjectedScreen
- SolutionsforProblemsWithCapturing,Printing, Saving, or Scanning
- SolutionsforProblemswithWhiteboardMode
- WheretoGetHelp
- InternetSupport
- SpeaktoaSupportRepresentative
- PurchaseSuppliesandAccessories
- TechnicalSpecifications
- GeneralProjectorSpecifications
- ProjectorLightSourceSpecifications
- InteractivePenSpecifications
- TouchUnitSpecifications
- RemoteControlSpecifications
- ProjectorDimensionSpecifications
- ProjectorElectricalSpecifications
- ProjectorEnvironmentalSpecifications
- ProjectorSafetyandApprovalsSpecifications
- SafetyandApprovalsSpecificationsforLatinAmerica
- NoticeforMexico
- NoticeforParaguay
- SupportedVideoDisplayFormats
- USBDisplaySystemRequirements
- Notices
- Recycling
- ImportantSafetyInformation
- LaserSafetyInformation
- WARNING
- ImportantSafetyInstructions
- RestrictionofUse
- ListofSafetySymbols(correspondingtoIEC60950-1A2)
- FCCComplianceStatement
- ForUnitedStatesUsers
- ForCanadianUsers
- BindingArbitrationandClassWaiver
- DISPUTES, BINDING INDIVIDUAL ARBITRATION, AND WAIVEROF CLASSACTIONS AND CLASSARBITRATIONS
- Trademarks
- EPSON®
- CopyrightNotice
- ANoteConcerningResponsibleUseofCopyrightedMaterials
- CopyrightAttribution
Brand : EPSON
Model : BrightLink Pro 1480Fi
Category : Video projector