
Avanza M10 - Scooter smartGyro - Free user manual and instructions
Find the device manual for free Avanza M10 smartGyro in PDF.
| Product Type | Electric mobility scooter |
| Brand | smartGyro |
| Model | Avanza M10 |
| Power Supply | 24 V battery (2 × 12 V, deep cycle, sealed maintenance-free) |
| Charger | External, for indoor use only |
| Brakes | Regenerative brake + electromechanical disc parking brake |
| Speed Adjustment | Gradual dial (slow to fast) |
| Front Basket Capacity | 6.8 kg maximum |
| Maximum Recommended Slope | Refer to the manual (figure 1) |
| Automatic Shut-off Function | Timer after 20 minutes of inactivity |
| EMI Immunity | 20 V/m (tested) |
| Electrical Protection | Main circuit breaker and console fuse |
| Ergonomic Adjustments | Seat height, handlebar angle, armrest width |
| Handlebar Folding | Yes, for transport |
| Panel Material | Painted ABS plastic |
| Routine Maintenance | Clean with a damp cloth and non-abrasive cleaner; check connections |
| Warranty | 2 years (under conditions) |
| Recycling | Batteries and electronic components: separate collection according to local regulations |
Frequently Asked Questions - Avanza M10 smartGyro
User questions about Avanza M10 smartGyro
0 question about this device. Answer the ones you know or ask your own.
Ask a new question about this device
Download the instructions for your Scooter in PDF format for free! Find your manual Avanza M10 - smartGyro and take your electronic device back in hand. On this page are published all the documents necessary for the use of your device. Avanza M10 by smartGyro.
USER MANUAL Avanza M10 smartGyro
Dear users, thank you for using our smartGyro Avanza scooter, we hope that it will live up to your expectations. To use the product correctly, keep it in good condition and prolong its useful life, carefully read the instructions before using the product.
WARNING: The symbols below are used in this owner's manual and on the scooter to identify warnings and important information. It is very important for you to read and understand them completely.
Failure to follow designated procedures may result in personal injury, component damage or malfunction.
I. INTRODUCTION
SECURITY
Thanks for trusting smart gyro. The product you have purchased combines high quality components with safety and comfort in mind. We are confident that the design features will provide the comforts you expect during your daily activities. Understand how this product works and take care of it, it is very important to use it without any problem.
Read and follow all instructions, warnings and notes in this manual before starting your trip for the first time. In addition, your safety depends on you, as well as your provider, caregiver or health professional.
If there is any information in this manual that you do not understand or if you need additional assistance to understand the operation, contact smart gyro.
BUYER AGREEMENT
By accepting the delivery of this product, you agree that it will not change, modify this product or eliminate or render inoperable or unsafe any protection, shield or other security features of this product.
SHIPPING AND DELIVERY
Before using your scooter, make sure your delivery is complete, as some components may be packaged individually. If you do not receive a complete delivery, contact your authorized provider immediately.
PRODUCT SECURITY
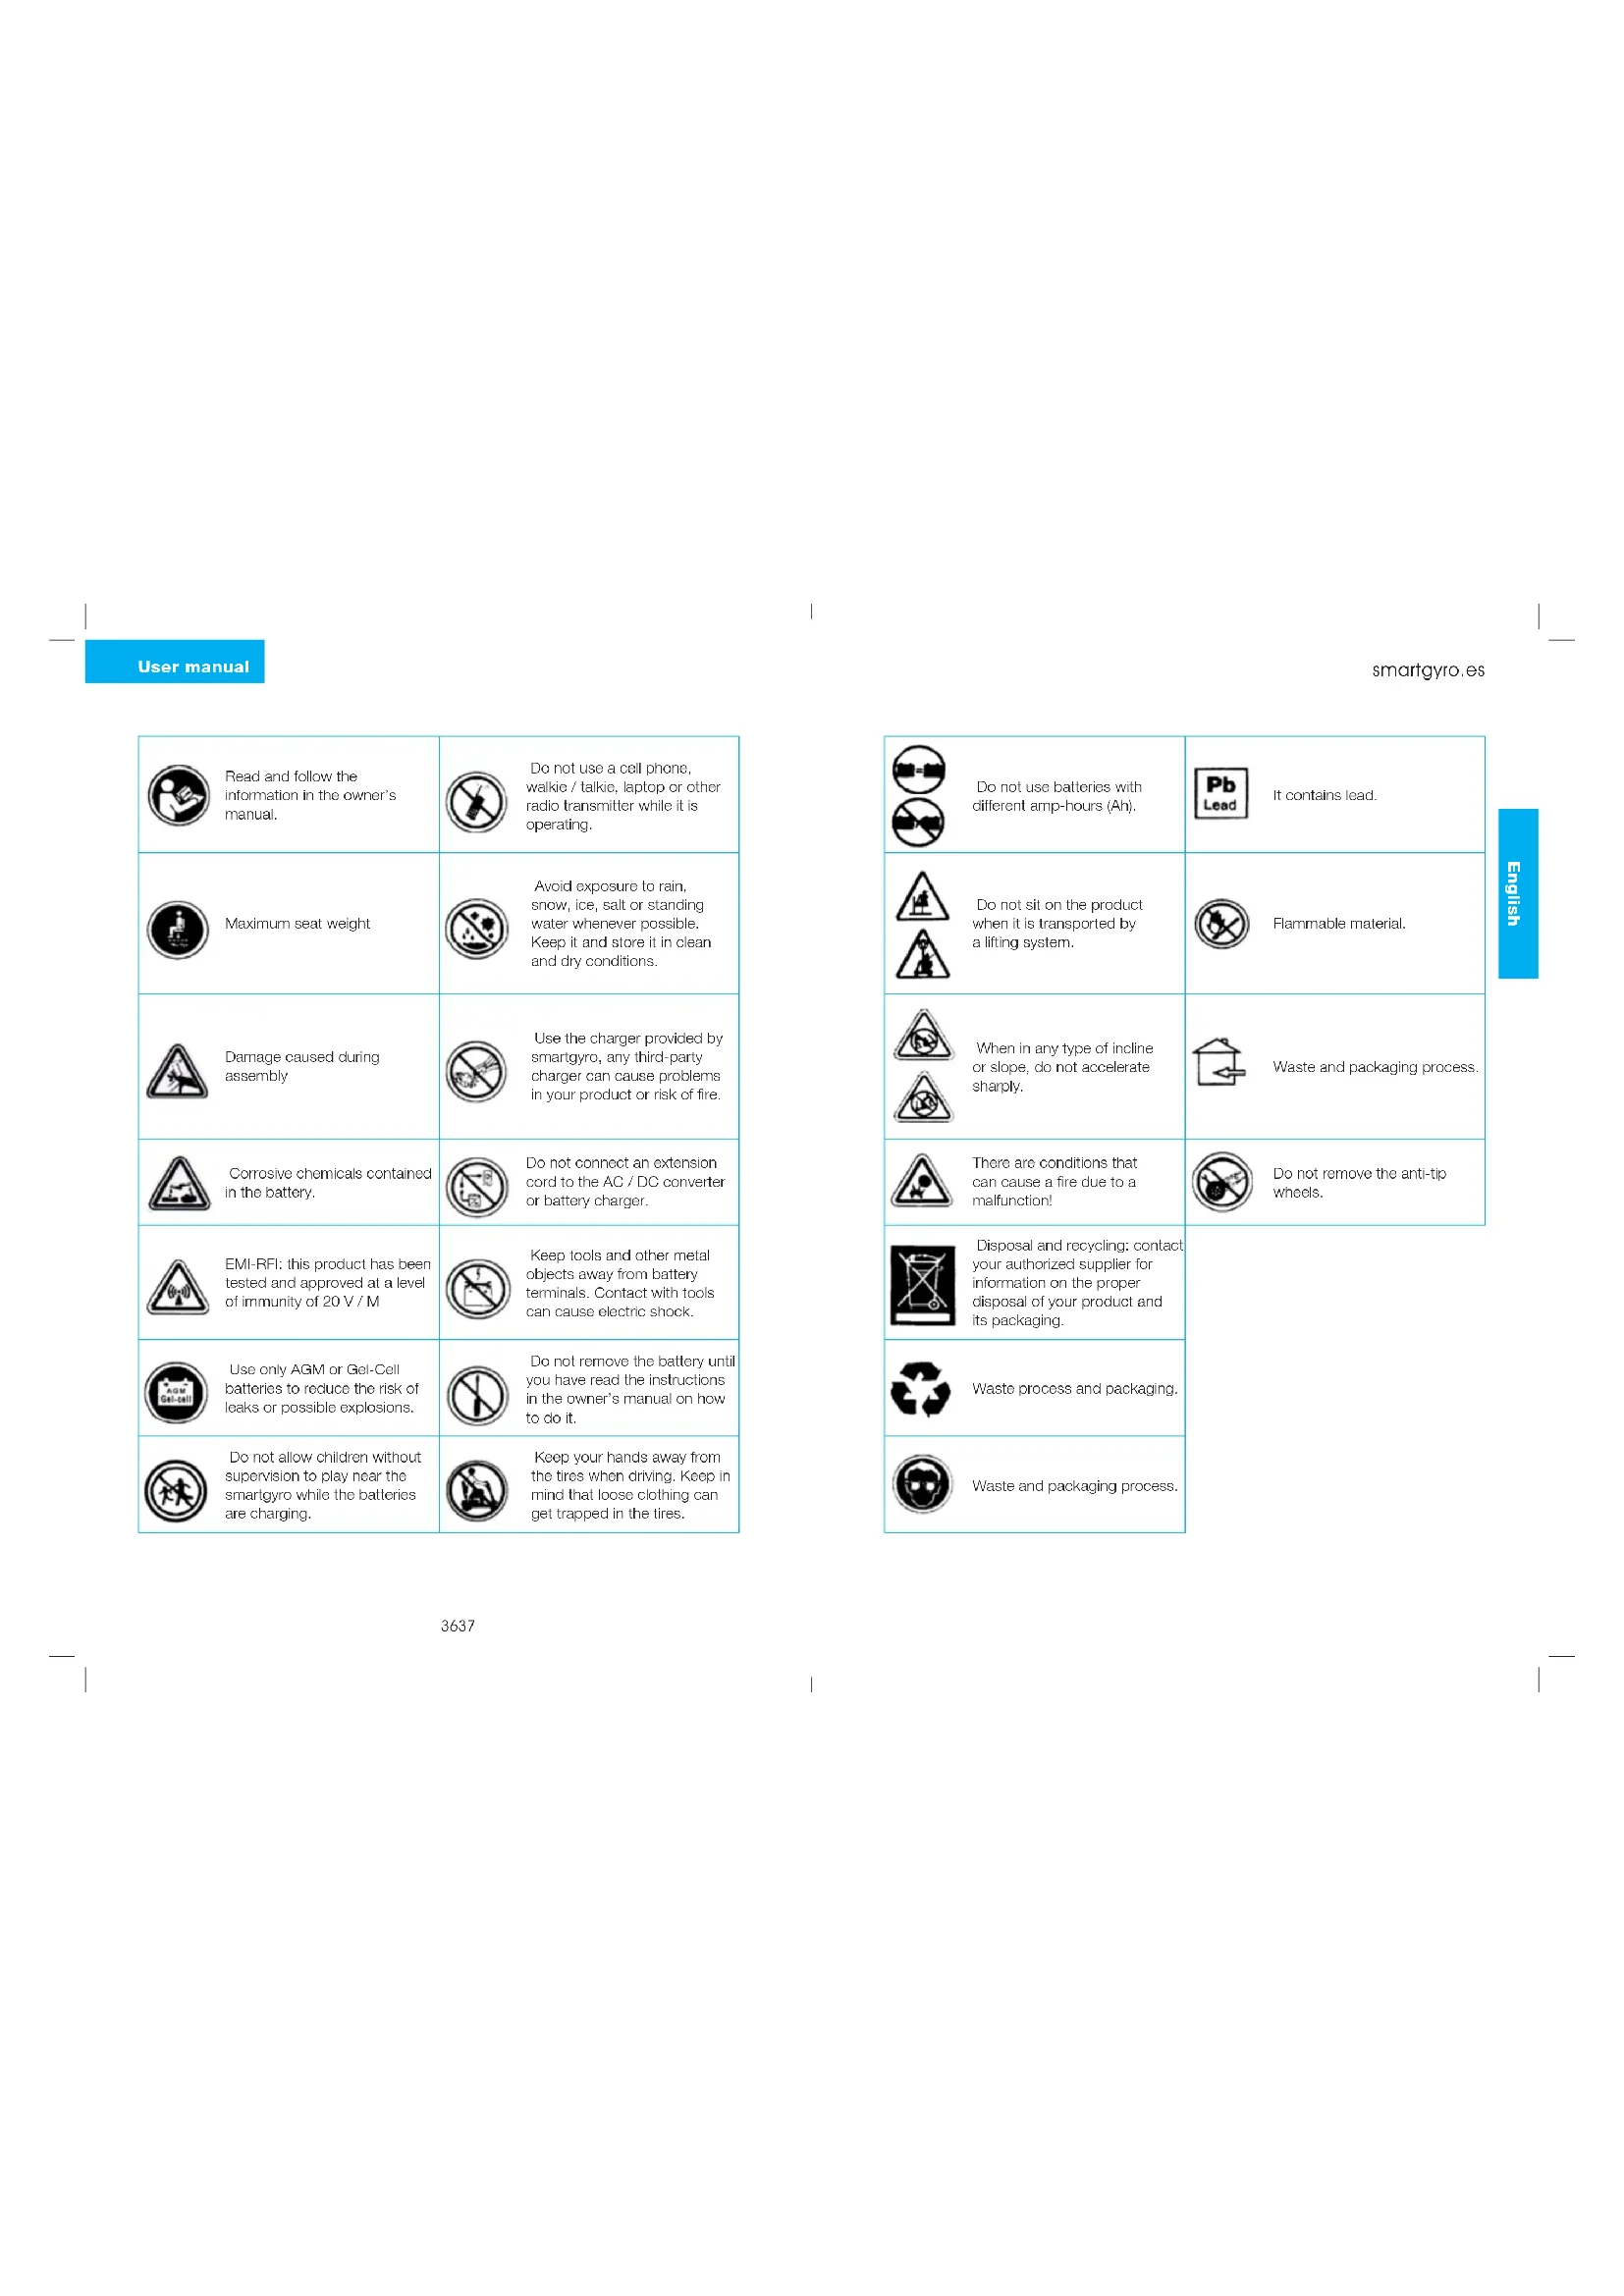
The following symbols are used on the Avanza scooter to identify warnings, mandatory actions and prohibitions. It is very important that you read them and understand them completely.
User manual
smartgyro.es
| Read and follow the information in the owner's manual. | Do not use a cell phone, walkie / talkie, laptop or other radio transmitter while it is operating. |
| Maximum seat weight | Avoid exposure to rain, snow, ice, salt or standing water whenever possible. Keep it and store it in clean and dry conditions. |
| Damage caused during assembly | Use the charger provided by smartygro, any third-party charger can cause problems in your product or risk of fire. |
| Corrosive chemicals contained in the battery. | Do not connect an extension cord to the AC / DC converter or battery charger. |
| EMI-RFI: this product has been tested and approved at a level of immunity of 20 V / M | Keep tools and other metal objects away from battery terminals. Contact with tools can cause electric shock. |
| Use only AGM or Gel-Cell batteries to reduce the risk of leaks or possible explosions. | Do not remove the battery until you have read the instructions in the owner's manual on how to do it. |
| Do not allow children without supervision to play near the smartygro while the batteries are charging. | Keep your hands away from the tires when driving. Keep in mind that loose clothing can get trapped in the tires. |
| Do not use batteries with different amp-hours (Ah). | Pb Lead | It contains lead. |
| Do not sit on the product when it is transported by a lifting system. | Plammable material. | |
| When in any type of incline or slope, do not accelerate sharply. | Waste and packaging process. | |
| There are conditions that can cause a fire due to a malfunction! | Do not remove the anti-tip wheels. | |
| Disposal and recycling: contact your authorized supplier for information on the proper disposal of your product and its packaging. | ||
| Waste process and packaging. | ||
| Waste and packaging process. |
User manual
smartgyro.es
GENERAL
Do not drive your new Scooter for the first time without having read and fully understood this user manual.
Smartgyro Avanza is a vehicle designed to improve your comfort. We offer a wide variety of products to better adapt to the individual needs of the user. The content of this manual is based on the expectation of a team of experts in mobility devices who have adjusted the smartGyro Avanza properly and have helped the prescribing health professional and/or the authorized provider in the process of instructions for use of the product.
There are certain situations, including some medical conditions, in which the smartGyro Avanza user will have to practice their management in the presence of a trained assistant. A trained assistant can be defined as a family member or health professional specially trained to help a user in various activities of daily life.
When you start using your SmartGyro Avanza during your daily activities, you will probably encounter situations where you will need some practice. Just take your time and soon you will have full and confident control as you maneuver through doors, elevations and descents of elevators, ascent ramps and on terrains with uneven surfaces.
Here are some precautions, tips, and other safety considerations that will help you get used to driving with the SmartGyro Avanza safely.
MODIFICATIONS
Our scooter has been designed to provide you maximum mobility and usefulness. However, under no circumstances should you modify, add, delete or disable any part of your SmartGyro Avanza.

Do not modify your SmartGyro Avanza in any way. Do not use third-party parts.

Do not attempt to lift or move your SmartGyro Avanza by any of its removable parts, such as the arreststs or the seat.
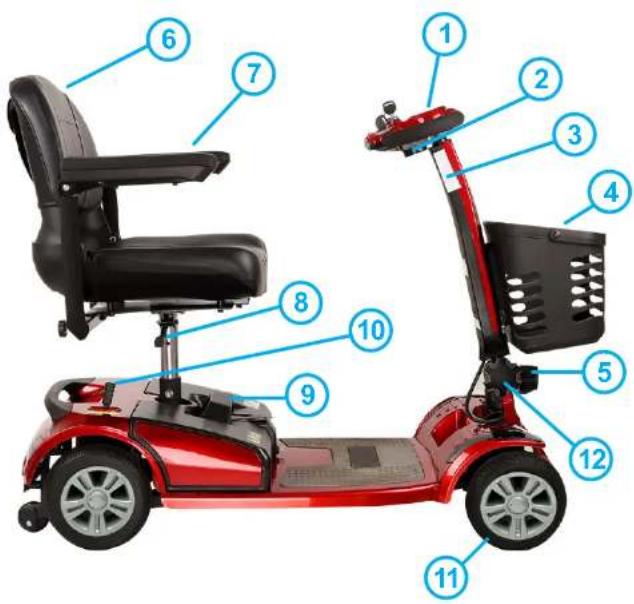
PARTS OF SMARTGYRO AVANZA
- Handiobar and console
- Accelerator / brake / m. Atras
- Handle bar 9. Battery compartment
- Basket 10. Parking brake
- Focus 11.Wheels
-
Seat 12.Folding handlebar
-
Amrost
- Height adjustment and turn
User manual
smartgyro.es
II. BEFORE STARTING YOUR TRIP
Know the capabilities of your smartGyro Avanza. We recommend that you perform a safety
check before each use to ensure that your SmartGyro Avanza runs smoothly and safely.
Perform the following inspections before using your scooter:
-
Check all electrical connections. Make sure the cables are tight and not corroded.
-
Check the brakes.
Check the battery charge.
If you discover a problem, contact your authorized provider for help.
LIMITATIONS OF WEIGHT
Your scooter is rated for a maximum weight capacity. See the Table of specifications at the beginning of the chapter for information.

REQUEREDI Stay within the specified weight capacity for your scooter. Overcoming the capacity of weight cancels your guarantee in case of any problem. We are not responsible for misuse of the Avanza Smartgyro for a weight that exceeds the maximum allowed.

Do not carry passengers on your scooter. Carrying passengers on your scooter can affect the center of gravity and increase the risk of collisions and rollovers.
RAISE HIGH GROUNDS
More and more buildings have ramps with degrees of inclination designed for easy and safe access. Some ramps can have 180 degree turns that require you to know your scooter.
- Proceed with extreme caution when approaching the access ramp or other slope.
- Make large turns with your scooter around the corners. If it does, the rear wheels of the scooter will follow a wide arc, will not cut the corner and may have a clean trajectory.
- When going down a ramp, keep a low speed to ensure a controlled descent safely.
Avoid sudden stops and starts. When climbing on a slope, try to keep your SmartGyro Avanza moving. If you must stop, restart slowly and then accelerate with caution. To do this, place the accelerator in the slowest position. If your SmartGyro Avanza begins to lower the tilt faster than you want, let it stop completely by releasing the throttle control lever. Then push the throttle control lever slightly forward to ensure a controlled descent safely.

In any type of incline or slope, never accelerate your SmartGyro Move sharply while sitting on it.
When climbing an incline, do not zigzag or drive at an angle. Drive your SmartGyro Go straight to the slope. This greatly reduces the possibility of a fall. Be very careful when climbing a steep slope.

Do not drive your SmartCyro Advances parallel or diagonally on a slope; Do not stop if possible, while ascending or descending a slope.
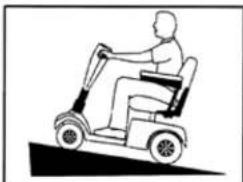
WARNING! Do not move up or down a potentially dangerous slope (areas covered with snow, ice, cut grass, or leaves with moisture). Although your SmartGyro Avanza is capable of scaling slopes greater than those illustrated in Image 1, under no circumstances should you exceed the till guidelines or any other specification presented in this manual. Doing so could cause instability in your SmartGyro Avanza.
The public access ramps for the disabled are not subject to government regulation in all countries and therefore do not necessarily share the same standard percentage of slope. Other inclinations can be natural or not designed specifically for these electric vehicles. Image 1 illustrates the stability of your SmartGyro Avenza and its ability to scale degrees under various weight loads and under controlled test conditions.
These tests were performed with the SmartCyro Avanza seat in the highest position and were adjusted backwards in the base of the seat to its furthest position. Use this information as a guide. The ability of your SmartCyro Avanza to climb slopes is affected by its weight, speed and its angle of approach to the inclination.
User manual
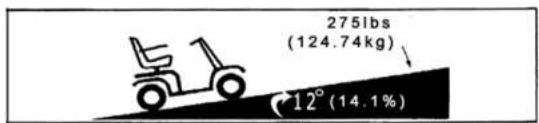
1. Recommended maximum inclination

Any attempt to raise or lower a steeper slope than what is shown in the Image may place your SmartGyro Avanza in an unstable position and cause it to tilt.
Never carry an oxygen tank that weighs more than 6.8 kg. Never fill the front or back basket with a content that exceeds 6.8 kg. When approaching a slope, it is best to lean forward. See Images 2 and 2A. This moves the center of gravity towards the front of the SmartGyro Avanza to improve its stability.
NOTE: While on a climb, if the throttle control lever is released while moving forward, the SmartGyro Avanzan can "rewind" approximately 1 foot (30.5 cm) before the brake is applied automatically. If the throttle control lever is released while moving in reverse, the SmartGyro Avanzan can "roll back" Approximately 3 feet (one meter) before the brake is activated.
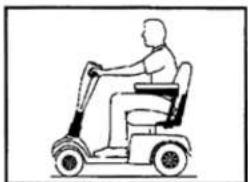
2A. Normal driving position 2B. Greater stability driving position
ROTATE WITH YOUR SMARTGYRO
Excessively high speeds can create the possibility of tipping over. Factors that affect rollover include, but are not limited to, speed in curves, steering angle (the speed with which uneven surfaces are traversed, inclined road surfaces, driving from a low area), traction to an area of high traction (such as going from a grassy area to a paved area (especially at high speed
smartgyro.es
while tuming), and changes of direction, high speeds are not recommended when cornering. for a corner, reduce the speed and the steering angle (decrease the speed of the turn) to prevent your SmartGyro Avanza from losing balance.

When you take a sharp curve, reduce your speed and keep the contour of gravity.
BRAKING INFORMATION
Your SmartGyro Avanza is equipped with powerful brake systems:
Regenerative: uses electricity to reduce vehicle speed quickly when the throttle control lever returns to the center / stop position.
Disc parking brake: mechanically activated after regenerative braking slows the vehicle to a standstill or when the system is switched off for any reason.
It also has an advanced braiding assistance on slopes, if you stop accelerating with the smart gyro advances on a slope, it will stop automatically.
DRIVING SURFACES
Your SmartGyro Avanza is designed to provide optimum stability under normal driving conditions with smooth surfaces.
There will be times when you will encounter other types of surface. For this reason, your SmartGyro Avanza is designed to work on compact soils, with grass or gravel. Feel free to use your SmartGyro Advances safely on the lawn and in park areas.
Slow down your SmartGyro Advance when driving on uneven terrain and / or soft surfaces.
- Avoid tall grass that may get entangled in the undercarriage.
- Avoid gravel and loose sand.
If you are not sure about a driving surface, avoid that surface.
USE OF YOUR SMARTGYRO AVANZA ON ROADS AND ROADS
You should not use your SmartGyro Avanza on roads and public roads. Obey all local traffic laws intended for this type of vehicle.
User manual
smartgyro.es
OBSCTACLES

Do not drive near elevated surfaces, unprotected protrusions, and/or descents (curbs, stairs, etc.)
Do not try to make your SmartGyro Avanza release or lower an excessively high obstacle.
Do not try to move your SmartGyro Advances backward by a step, curb or other obstacle. This can cause the SmartGyro Avanza to tilt and lose balance. Make sure that your SmartGyro Avanza does not move perpendicular to any obstacle that must ascend or descend; see images 3 and 4 for a reference.
WARNING! Do not try to climb a curb that is more than 5 cm high.
3.Climbing a curb correctly
4. Climbing a curb incorrectly
CLIMATIC PRECAUTIONS
The exposure of your SmartGyro Avanza to adverse weather conditions should be avoided whenever possible. If you are suddenly caught in rain, snow, intense cold or heat while driving your SmartGyro Avanza, proceed to take refuge. Dry completely your SmartGyro Avanza before saving it, loading it or reusing it.

Operation in rain, snow, fog / spray conditions and on slippery icy surfaces can have an adverse effect on the electrical system. Keep and store your SmartGyro Avanza in clean and dry conditions.
WARNING! Prolonged exposure to hot or cold conditions can affect the temperature of the upholstery.
Be careful when using your SmartGyro Avanza in very hot or cold conditions or when exposing your scooter to sunlight for long periods.
STAIRS
SmartGyro Avanza is not designed to go up or down stairs or escalators. Use an elevator.

Do not use your SmartCyro Avanza to go up or down stairs.
DOORS
Determine if the door opens Inwards or outwards.
Use your hand to turn the knob or push the handle.
- Drive your SmartGyro Move forward gently and slowly forward to push the door open.
ELEVATORS
Modern elevators have a security mechanism on the edge of the door as a sensor that when it detects a presence, open the doors.
If you are at the door of an elevator when the doors begin to close, move away so that the sensor does not come into contact with SmartGyro Avanza.
Take care that parts or accessories of SmartGyro Avanza are not caught in the doors of the elevators.
NOTE: Be careful when trying to turn your smartGyro Advances in small spaces and avoid areas that may pose a problem.
ELEVATION
To move your SmartGyro Avanza, a Lifting accessory may be necessary to assist in transportation. It is recommended that you carefully review the instructions, specifications and safety information established by the manufacturer of the lifting product before transporting it.
Never sit on your SmartGyro Avanza when used in connection with any type of lifting / lifting product. We are not responsible for misuse of a third-party product:
User manual
smartgyro.es
BATTERY
In addition to considering the warnings shown below, be sure you understand all battery usage information.


REQUIRED Battery posts, terminals and related accessories contain lead and lead compounds. Wear glasses and wash your hands after touching it.
The scooter batteries are heavy. If you can not lift that much weight, be sure to get help. Use proper lifting techniques and avoid lifting beyond your capacity.
Always protect the batteries against freezing and never charge a battery if it is too cold or too hot.
WARNING! Connect the battery cables properly. The RED (+) cable must be connected to the positive (+) terminal of the battery. The BLACK (-) cable must be connected to the negative terminal (-) of the battery. Replace the cables immediately if they are damaged. Protective caps should be installed on all terminals of the battery.
NOTE: If you find that the battery is damaged or cracked, replace it immediately. To dispose of it, place it in a plastic bag and contact your local waste disposal agency or an authorized supplier for instructions on how to dispose of and recycle the battery.
TRANSPORTING YOUR SMARTGYRO AVANZA
We recommend that you do not remain seated in your SmartGyro Avanza while being carried by a motor vehicle. The SmartGyro Avanza should be stored in the trunk of a car or in the back of a truck or van with the batteries removed and properly secured, in addition, all removable parts, including the armrests, seat and cover, must be removed and placed correctly.

WARNING! Do not sit in your SmartGyro Move while in a moving vehicle.
Always make sure that your SmartCyro Avanza and its batteries are properly secured when transported. The batteries should be secured in the vertical position and the protective caps should be installed in the terminals of the battery.
Batteries should not be transported with flammable or combustible elements.
TURN OFF THE SMARTGYRO AVANZA
Getting on and off the scooter requires a good sense of balance.
Observe the following safety tips to get on and off your SmartGyro Avanzat
Remove the switch key.
-Make sure the seat is secure.
Avoid putting all your weight on the SmartGyro Avanza armrests and do not use the armrests to support weight, as this can cause the SmartGyro Avanza to tip over causing a fall and / or personal injury.
WARNING! Avoid putting all your weight on the side of your scooter. Such use can cause the SmartGyro Avanza to lose its balance.
ERGONOMICS IN YOUR SMARTGYRO AVANZA
Avoid stretching or bending while driving your SmartGyro Avanza. Leaning forward creates the risk of accidental contact with the throttle lever.
Learning to one side while sitting creates the risk of losing balance. It is important to maintain a stable center of gravity and prevent the SmartGyro Avanza from tilting. We recommend that the user determine their personal limitations of balance when using it.
WARNING! Do not bend, tilt or touch objects if you have to pick them up from the SmartGyro Avanza platform or from either side of SmartGyro Avanza. Movements like these can change your center of gravity and the weight distribution of the SmartGyro Advances and make your SmartGyro Avanza tilt.

Keep your hands away from the tires when driving. Keep in mind that loose clothing can get caught between the wheels.
PRESCRIPTION MEDICATIONS / PHYSICAL LIMITATIONS TO DRIVE YOUR SMARTGYRO
As a SmartCyro Avanza user, you must take care and common sense when operating your scooter. This includes knowledge of safety issues when taking prescription or over-the-counter medications when the user has specific physical limitations.
User manual
smartgyro.es
INTERFERENCIA ELECTROMAGNÉTICA Y DE RADIOFRECUENCE (EMI/RFI)
Laboratory tests have shown that electromagnetic and radio frequency waves can have an adverse effect on the performance of electric mobility vehicles.
Electromagnetic and radio frequency interference can come from sources such as mobile phones, two-way radios (such as walkie-talkies), radio stations, TV stations, TV stations, radio amateurs (HAM) transmitters, wireless computer links, signals from microwave, warnings, transmitters and mid-range mobile transceivers used by emergency vehicles. In some cases, these waves can cause involuntary movements or damage to the control system. The mobility vehicle has an immunity (or resistance) to EMI. The higher the level of immunity, the greater the protection against EMI. This product has been tested and has passed a level of immunity of 20 V / M.

iWARNING! Keep in mind that cell phones, two-way radios, laptops, and other types of radio transmitters can cause an involuntary movement of your electric mobility vehicle due to EMI. Be careful when using any of these items while operating your mobility vehicle and avoid approaching the radio and television stations.
WARNING! The addition of accessories or electrical components to the mobility vehicle can increase the susceptibility of the vehicle. Do not modify your SmartGyro Avanza in any way, not authorized by us.
III. YOUR SMARTGYRO AVANZA
CENTER CONSOLE
The center console contains all the controls needed to drive your SmartCyro Avanza, including the key switch, front light bulb, horn button, speed lever and battery life meter.
The basic controls such as the brake, accelerator and horn, are adapted for use by both left-handed and right-handed people.

Do not expose the console and handlebar to moisture. In case the console is exposed to moisture, do not attempt to operate your SmartGyro Avanza until it has completely dried.
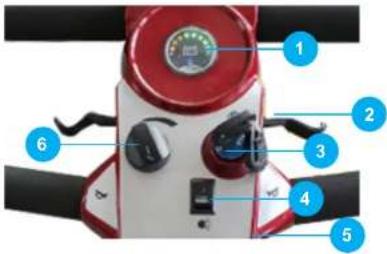
- BATTERY INDICATOR
- ACCELERATOR, BRAKE AND GO BACK
- IGNITION UNDER KEY
4.FRONTLIGHT
INTERRUPTOR
5.HORN - SPEED ADJUSTMENT
BATTERY INDICATOR
When the key is fully inserted into the key switch, this meter indicates the approximate power of the battery. For more information about the battery status meter, see point IV. "Batteries and charge".
ACCELERATOR / BRAKE AND REVERSE
This lever allows you to control the speed of your SmartGyro Avanza.
Place your right hand on the right handle and your left hand on the left handle.
- Use the throttle lever backwards to uncouple the brackets of your SmartHygro Avanza and move forward.
- Use the throttle lever forward to uncouple the brackets of your SmartGyro Avanza and brake.
- Use the throttle lever forward for a few seconds to uncouple the brackets of your SmartGyro back.
- Release the lever and let your SmartGyro Avanza come to a complete stop.
- When the throttle lever is fully released, it will automatically return to the "stop" position and activate the brakes of your SmartGyro Avanza.
SWITCH UNDER KEY
Insert the key into the switch and turn it clockwise to turn on your SmartCyro Avanza.
- Turn the key to the left to turn off your SmartGyro Avanza. Although the key can be left in the switch when the SmartGyro Avanza is off, we recommend that you remove it to avoid possible theft.
User manual
smartgyro.es
NOTE: if the key is moved to the "OFF" position while your SmartGyro Avanza is in motion, the electronic brakes will activate and stop.
HORN
This button activates a warning sound. Your SmartGyro Avanza must be on for the horn to be operational. Do not hesitate to use the warning horn, as it can prevent injuries.
SPEED ADJUSTMENT
This dial allows you to preset and limit the maximum speed of your SmartGyro Avanza.
- Turning to the left the maximum speed setting will be slower.
- Turning to the right the maximum speed setting will be faster.
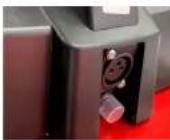
REMOVING THE BATTERY
A handle on the top of the battery compartment makes it easier to lift the battery compartment. The compartment contains the battery, the power cord connection of the charger, the main circuit breaker (reset button) and the battery fuse.
See image 7.
RESET BUTTON
When the battery voltage of your SmartGyro Avanza is exhausted or is very tight due to excessive loads or steep slopes, the main circuit breaker can be tripped to protect the motor and electronic components from damage.
7. Battery compartment
Considerations:
The main reset button of the circuit breaker jumps when the breaker trips.
- When the switch is triggered, the entire electrical system of your SmartCyro Avanza shuts down.
Wait a minute or two for the electronic components of your SmartGyro Avanza to "rest".
Press the reset button to reset the main switch.
If the main switch trips frequently, you may have to charge the batteries more frequently. You may also need your authorized provider to perform a charge test on the batteries of your SmartGyro Avanza.
If the main switch trips repeatedly, consult your authorized dealer.
FUSE OF THE CENTRAL CONSOLE
The fuse located under the battery protects the electronic components of the console. See Image 8.
In the event that any component of the console does not respond, check this fuse, see VIII.
"Basic troubleshooting" and follow the fuse replacement instructions.

8. Fuse compartment.
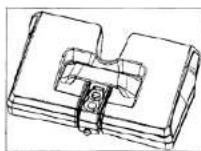
PROTECTION PANELS
TO REMOVE THE PARTS OF THE PROTECTION PANEL:
- Use your finger to locate the push hole behind each protection piece.
- Push through the hole to separate the piece.
See images 10, 11.
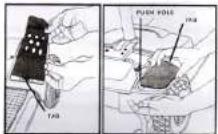
10. Front lender panel
11. Rear fender panel
User manual
smartgyro.es
REINSTALL THE PROTECTION PARTS
Place each piece in its proper location and press with light pressure to ensure closure.
NOTE: When installing the front and rear fender panels, make sure that the tab at the bottom of each panel is inserted into the opening of the flange before securing the panel. See Image 10
IV. BATTERY AND CHARGER
Your SmartGyro Avenza requires two deep-cycle, 12-volt, long-life, sealed and maintenance-free batteries in one package. They are recharged with the external charging system supplied. Charge the batteries of your SmartGyro Progress for 8 to 14 hours before using them for the first time. Keep the batteries fully charged for your SmartGyro to function without problems.
BATTERY CONNECTOR
The charging connector is located on the front of the battery, it consists of 3 pins. It can be charged connected or removed from the Scooter (pull the handle upwards). If it is charged inside the Scooter, it is very important that it is turned off.
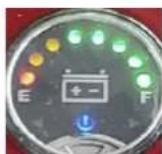
BATTERY INDICATOR
The battery status meter on the console indicates the approximate power of your batteries. red indicates that an Immediate recharge is necessary. See the Picture. To ensure maximum accuracy, the battery condition gauge should be checked while operating your SmartGyro on a dry, level surface.
5253
LOADING BATTERIES
NOTE: The battery can be charged inside or outside SmartGyro Avanza. Next, read carefully the precautions in the use of the battery:

Do not use an extension cord to plug the battery charge directly into a properly wired standard electrical outlet.

Do not allow unsupervised children to play near the SmartGyro Advances while the batteries are charging.

Read the Instructions for charging the battery in this manual and if you have any questions contact us, we will be happy to help.

Explosive gases can be generated while the batteries are being charged. Keep the SmartGyro Avanza and the battery charger away from sources of ignition, such as sparks, and provide adequate ventilation when charging the batteries.
You must recharge your SmartGyro Avanza with the external charger supplied. Do not use an automotive type battery charger.

Inspect the battery charger, wiring and connectors for damage before each use. Contact your authorized dealer if you find damage.
WARNING Do not attempt to open the battery charger compartment. If the battery charger does not seem to work properly, contact your authorized dealer.

If the battery charger is equipped with cooling slots, do not attempt to insert objects through these slots.

If your battery charger has not been tested and approved for outdoor use, do not expose it to adverse weather conditions.
User manual
smartgyro.es
FOLLOW THESE SIMPLE STEPS TO CHARGE YOUR BATTERIES SAFELY:
- Place your SmartGyro Avanza or the battery pack near a standard electrical outlet. See Image 13.
- Remove the switch key from the center console.
- Plug the charger's power cord into the power connector on your SmartGyro Avanza, then into the electrical outlet. We recommend that you charge the batteries for 8 to 14 hours.
- When the batteries are fully charged, unplug the charger's power cord from the electrical outlet and then from the charger's power cord connector.
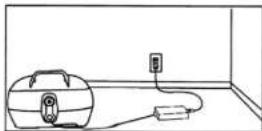
13. Charging the batteries (battery compartment removed)
FREQUENTLY ASKED QUESTIONS ABOUT THE BATTERY AND CHARGER
HOW DOES THE CHARGER WORK?
When the battery voltage of your SmartGyro Avanza is low, the charger works harder, sending more electric current to the batteries to increase its charge. When the batteries come close to a full charge, the charger sends less electrical current. When the batteries are fully charged, the current sent from the charger is almost zero amperage. Therefore, when the charger is plugged in, it keeps charging the batteries of your SmartGyro Avanza, but does not overcharge them. We do not recommend charging the batteries of your SmartGyro Avanza for more than 24 consecutive hours.
WHAT HAPPENS IF THE BATTERIES IN MY SMARTGYRO AVANZA DO NOT CHARGE?
Make sure that the battery pack's fuse is working properly.
Make sure that both ends of the charger power cord are correctly inserted.
CAN I USE A DIFFERENT CHARGER?
The charger is adapted to the type, size and chemical formulation of the battery. We recommend that you use the charger supplied in the original equipment, any other charging method is completely forbidden and may invalidate your warranty in case of error or malfunction.
HOW OFTEN SHOULD I CHARGE THE BATTERIES?
Depends on its use:
Daily use throughout the day.
-Infrequent or sporadic use.
With these considerations, you can determine how often and for how long you should charge the batteries of your SmartGyro Avanza. The battery charger was designed so that you do not overcharge the batteries, however, you may encounter some problems if you do not charge your batteries often enough and if you do not charge them regularly. Following the guidelines below, it will provide safe operation and charging to the battery.
If you use your SmartGyro Avanza daily, charge your batteries as soon as you finish using it for the day. We recommend that you charge the batteries of your SmartGyro Avanza for 8 to 14 hours after daily use.
- If you use your SmartGyro Avanza once a week or less, charge your batteries at least once a week for 12 to 14 hours in a row.
- Keep the batteries of your SmartGyro Avanza fully charged.
- Avoid deeply discharging the batteries of your SmartGyro Avanza.
HOW CAN I ENSURE MAXIMUM BATTERY LIFE?
Fully charged batteries provide reliable performance and long life. Keep the batteries of your SmartGyro Avanza fully charged whenever possible. Protect your SmartGyro Avanza and batteries from extreme heat or cold. Batteries that discharge regularly and deeply, which are infrequently charged in extreme temperatures or stored without a full charge, can be permanently damaged, which can cause unreliable performance and limited life.
HOW CAN I GET THE MAXIMUM RANGE OR DISTANCE PER CHARGE?
Rarely will you have the ideal driving conditions: driving surfaces, flat and smooth, without winds or curves. Often, it will face cracks in the pavement, curves of irregular surfaces and wind, all of which affect the distance of the operating time per battery charge. Below are some suggestions for obtaining the maximum range per battery charge.
Always fully charge the batteries of your SmartGyro Avanza before daily use.
User manual
smartgyro.es
- Limit the weight of your luggage to essential items.
Try to maintain a uniform speed without sudden changes.
WHAT TYPE AND SIZE OF BATTERY SHOULD I USE?
The battery of your smart gyro is sealed and should not be exchanged by another third-party battery even if the type of connection matches. If it is necessary to change your battery due to lack of autonomy or because it does not work, consult our technical team to obtain a new battery.
NOTE: Sealed batteries can not be repaired or disassembled.


WATCH OUT The battery terminals, terminals and related accessories contain lead compounds.
WARNING Contact your provider if you have any questions about the batteries in your SmartGyro Avanza. The batteries of your SmartGyro Avanza should only be repaired or replaced by an authorized dealer or a qualified technician.
NOTE: If you find a damaged or cracked battery, Immediately store it in a plastic bag and contact your local waste disposal agency or an authorized dealer for instructions on how to dispose of and recycle the battery.
WHY DO MY NEW BATTERIES SEEM WEAK?
Deep-cycle batteries use a chemical technology different from that used in car batteries, nickel-cadmium batteries (Nicads) and other types of communication batteries. Deep-cycle batteries are specifically designed to provide power, deplete their charge and then accept a relatively fast recharge (8 to 14 hours).
V. OPERATION
BEFORE ENTERING YOUR SMARTGYRO AVANZA
Have you fully charged the batteries? See IV. "Batteries and charge"
- Make sure that the lock nut on the handlebar is in the unlocked position. See VII, "Disassembly and assembly".
USE YOUR SMARTGYRO AVANZA
- Be sure to remove the key from the switch.

WARNING! Never attempt to raise or lower your SmartGyro Advances without first removing the switch key. This will prevent the SmartGyro Avanza from moving if it makes accidental contact with the throttle control lever.
- Stand next to your SmartGyro Avanza.
- Unhook the seat rotation lever and turn the seat until it faces you.
- Make sure the seat is locked in position.
- Position yourself comfortably and safely on the seat.
- Unhook the seat rotation lever and turn the seat until you are facing forward.
- Make sure the seat is locked in place.
- Make sure your feet are safe on the floor board.
OPERATING WITH YOUR SMARTGYRO AVANZA

The following may adversely affect steering and stability while driving your SmartGyro Avanza
- Hold or lie a leash to walk your pet.
Passenger transportation (including pets).
Hang any item behind the wheel
Being towed or pushed by another motorized vehicle. Such practices could cause loss of control and / or rollovers, which could result in personal injury.
Keep both hands on the handlebar and feet at the base of the floor at all times while operating your SmartGyro Avanzas. This driving position gives you the most control over your vehicle.
- Adjust the desired speed.
- Press your thumb against the appropriate side of the throttle control lever.
User manual
smartgyro.es
The parking brake of the electromechanical disc is automatically deactivated and the SmartGyro Avanza accelerates smoothly to be preselected with the speed adjustment disc.
Pull the left handle to steer your SmartGyro Advances to the left.
Pull the right handle to steer your SmartGyro Advances to the right.
Move the handlebar to the center position to move in a straight line.
- To stop, slowly release the throttle lever. Electronic brakes will activate automatically when your SmartGyro Avanza stops.
SHUTTING OFF YOUR SMARTGYRO AVANZA
- Make your SmartGyro Avanza stop completely.
- Remove the key from the switch.
- Unhock the seat rotation lever and turn the seat until you are facing the side of your SmartGyro Avanza.
- Make sure the seat is locked in position.
- Exit the seat and the support on the side of your SmartGyro Avenida with care and safety.
- You can leave the seat facing to the side to make it easier to board your SmartGyro Advance next time.
OFF TIMER FUNCTION
Your SmartGyro Avanza is equipped with an energy-saving automatic shutdown timer function designed to preserve the battery life of your SmartGyro Avanza. If by mistake, leave the key in the key switch and in the "on" position but do not use your SmartGyro Progress for approximately 20 minutes, the SmartGyro Avanza controller automatically shuts down. If the sleep timer function has been activated, perform the following steps to resume normal operation.
- Remove the key from the key switch.
- Be insert the key and turn on your SmartGyro Avanza.
VI. ADJUSTMENTS OF THE HANDLEBAR
ANGLE ADJUSTMENT OF THE HANDLEBAR
Remove the key from the key switch before adjusting the handlebar or seat. Never try to adjust the handlebar or seat with the smartgyro on. See image 15 for adjusting the handlebar.
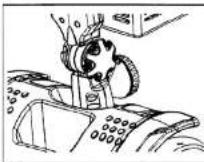
15. Handlebar adjustment knob.
ADJUSTING THE SEAT ROTATION
The seat rotation lever, located on the side of the seat base, secures the seat in various positions.
- Lift the seal rotation lever to disengage the seal.
- Turn the seat to the desired position
- Release the lever to secure the seat in place.
ADJUSTING THE ARMREST
The width of the amrest can be adjusted inwards or outwards.
- Loosen the armrest adjustment nuts.
- Remove retaining pins
- Slide the amrests in or out to the desired width
- Alien the adjustment holes in the seat frame and armrest, then reinsert the retaining pins.
- Tighten the armrest adjustment nuts.
NOTE: Rotate the armrests upwards to help getting on and off your SmartGyro Avanza.
HEIGHT ADJUSTMENT
The seat can be positioned at different heights. See Image16.
16. Adjusting the seat height
User manual
smartgyro.es
- Remove the retaining pin from the seat post.
- Ralse or lower the top seat post to the desired seat height,
- While holding the top seat post at that height, align the adjustment holes.
- Insert the retaining pin completely
VII. DISASSEMBLY AND ASSEMBLY OF SMARTGYRO AVANZA
DISASSEMBLY
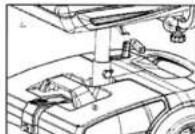
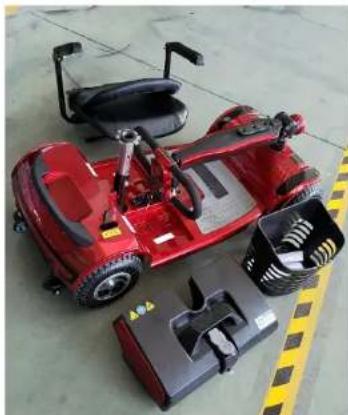
You can disassemble the SmartGyro Avanza in four parts: seat, frame, basket and battery. See Image 18.
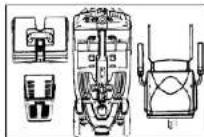
Imagen 18. Avanza disassembled
No tools are required to disassemble or assemble your SmartGyro Avanza. Always disassemble or mount your SmartGyro Avanza on a level and dry surface, with enough space for you to work and move.
Remember that some components of SmartGyro Avanza are heavy and you may need help to lift them.

WARNING! Do not lift weight beyond your physical capacity. Ask for help when it is necessary al desmostar o montar su SmartGyro Avanza.
STEP5 TO DISMOUNT YOUR SMARTGYRO AVANZA
- Remove the basket by lifting it up.
- Remove the battery compartment, pull up from its handle located on the top.
- Pull the seat lever to slap it.
- Fold the handlebar to its base, it has a thread that loosens the handlebar adjustment.
VIII. BASIC PROBLEM SOLVING
Any electromechanical device occasionally requires some type of problem solving. Many of these problems occur because the batteries are not fully charged or because the batteries are worn out and can no longer hold a charge.
DIAGNOSTIC SOUNDS
The diagnostic sound codes for your SmartGyro Avanza are designed to help you perform basic troubleshooting quickly and easily. A diagnostic beep will sound in case one of the conditions listed below develops.
NOTE: Your SmartGyro Avanza will not work unless the condition of the sound code is resolved and the scooter has been restarted.
What happens if all the systems in my SmartGyro Avanza seem "disconnected"?
Make sure the key is in the "on" position.
- Check that the batteries are fully charged.
Press the reset button of the main switch. See Ill. "Your SmartCyro Advances."
Check the fuse on the rudder scooter console located under the battery.
User manual
smartgyro.es
PROBLEM SOLVING
| • • (2) The battery voltage is too low to operate | Charge fully until the charger and gauges indicate they have been completed. |
| • • • (3) The battery voltage is too high to operate the SmartGyro Avanza | Contact your authorized provider for help. |
| • • • • • (6) Throttle problem. It is possible that the throttle control lever was pressed when the key was inserted. | Release the throttle control lever completely. Then reinsert the key. |
| • • • • • • (7) It is possible that the throttle control lever was pressed when the key was inserted. | Contact your authorized provider for help. |
| • • • • • • (8) The SmartGyro Avanza engine is disconnected. | Contact your authorized provider for help. |
| • • • • • • • (9) The ignition controller has been disconnected. You may be trying to install the battery while the ignition key is inserted and the motor controller may be in overheat protection mode | Turn off your SmartGyro Advances for a minimum of 10 minutes to allow the controller to cool or attempt to re-insert the key. |
TO CHECK A FUSE:
- Remove the fuse by pulling it out of its slot.
- Examine the fuse to make sure it is blown. See Images 10 and 20.
- Insert a new fuse of the proper rating
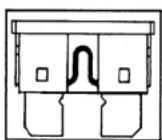
19. Working fuse
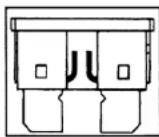
20. Fused fuse

The replacement fuse must exactly match the rating of the previous fuse. If fuses with the proper rating are not used, the electrical system may be damaged.
WHAT HAPPENS IF THE SMARTGYRO AVANZA BATTERIES DO NOT CHARGE?
- Check the fuse located on the battery. Replace it if necessary.
During the charging process check if the charger LED is on. - Check the fuse located in the battery pack, Replace it if necessary.
Make sure that both ends of the charger power cable are fully inserted.
If the battery fuse burns continuously, contact your authorized dealer for technical service.
WHAT HAPPENS IF THE MAIN SWITCH TRIPS REPEATEDLY?
If the main switch is triggered repeatedly, consult the authorized supplier.
Charge the SmartGyro Avanza batteries more frequently. See IV, "Batteries and charge".
If the problem continues, have the batteries of your smartGyro Avanza tested by your authorized supplier
If the battery status gauge is in the low load position and the engine moves with difficulty when I press the throttle control lever:
- Fully charge the batteries of your smartGyro Avanza. See IV. "Batteries and charge".
Have your authorized supplier test the charge of each battery.
User manual
smartgyro.es
IX. CARE AND MAINTENANCE
Your SmartGyro Avanza requires a minimum amount of care and maintenance.
EXTERIOR SURFACES
Bumpers, tires and molding can benefit from the occasional application of a rubber or vinyl conditioner.

Do not use a rubber or vinyl conditioner on the seat or the tread of SmartCyro Avanza.
CLEANING AND DISINFECTION
Use a damp cloth and a mild non-abrasive cleaner to clean the plastic and metal parts of your SmartGyro Avanza. Avoid using products that may scratch the surface of your SmartGyro Avanza.
II necessary, clean your product with an approved disinfectant. Make sure the disinfectant is safe before application.
WARNING! Follow all safety instructions for the proper use of the disinfectant and / or cleaning agent before applying it to your product. Failure to follow the instructions may cause skin irritation or premature deterioration of the upholstery and/or SmartGyro Avanza finishes.
CONNECTIONS OF THE BATTERY TERMINALS
Make sure terminal connections remain tight and not corroded.
CABLING
Check all wiring connections regularly.
Regularly inspect all wiring insulation, including the charger power cord, for wear or damage.
Have your authorized service provider repair or replace any damaged connector, connection or insulation you find before using your SmartGyro Avanza again.

Although the SmartGyro Avanza has passed the necessary test requirements for liquid spills, it must keep electrical connections away from sources of moisture, including direct exposure to water or liquids. Check electrical components frequently for signs of corrosion and replace as necessary.
ABS PLASTIC COVERS
The protective parts are made of durable ASS plastic and are coated with an advanced formula urethane paint.
AXLES BEARINGS AND THE MOTOR ASSEMBLY
All these elements are pre-lubricated, sealed and do not require subsequent lubricants.
CONSOLE, CHARGER AND ELECTRONICS
Keep these areas free of moisture.
Allow these areas to dry completely if they have been exposed to moisture before operating your SmartGyro Avanza again.
STORING YOUR SMARTGYRO AVANZA
If you plan not to use your smartGyro Avanza for an extended period of time, it is better:
- Fully charge your batteries before storing them.
- Remove the smartGyro Avanza battery.
- Store your SmartGyro Avanza in a warm and dry environment.
- Avoid storing your smartGyro Advance to extreme temperatures.
Batteries that discharge regularly and deep, that are infrequently charged at extreme temperatures or stored without a full charge can be permanently damaged, which can cause unreliable performance and limited life. It is recommended that you charge the batteries SmartGyro Avanza periodically during periods of prolonged storage to ensure adequate performance.
WARNING! Protect the batteries from cold temperatures and never charge a frozen battery. For extended storage, you can place several boards under the frame of your SmartGyro Avanza to lift it off the ground. This removes the weight of the tires and reduces the possibility of flat spots developing in the areas of the tires that come into contact with the ground.
TERMS OF THE WARRANTY
If you have any problems with this product, we recommend that you first read this manual in detail or go to our website smartgyro. es where you can access "Frequently asked questions about the product", "Troubleshooting", "Manusls", etc...
If still the problem persists, and before any procedure that you deem necessary, contact the distributor where you purchased the product, always presenting the original purchase invoice.
User manual
smartgyro.es
WARRANTY TERMS
- Two years of guarantee for our products, provided that each and every one of the steps indicated in the procedure for processing the SAT SMARTGYRO is carried out correctly at www.smartgyro.es
- The guarantee will be considered void in the event of breakage or tampering with the guarantee seals, if the material is physically damaged (mistreatment, knocks, falls), without proper packaging and / or transport damage, in case of obvious samples of a improper handling, misuse, dirt, etc.
- This warranty does not cover damage caused to other equipment that has been used with the unit.
- Terms subject to change without prior notice.
IF YOU NEED MORE DETAILED INFORMATION ABOUT OUR GUARANTEE CONDITIONS BETWEEN: www.smartgyro.es
RECYCLING
Electrical or electronic products, batteries, accumulators and other accessories must necessarily be collected separately. When you have finished the useful life of your electrical or electronic device remove the batteries and deposit it, separately, in the correct container for proper management. Keep in mind that batteries can not be deposited indiscriminately together with household waste. Consider recycling according to the manufacturer's guidelines. With this gesture, it will help reduce the risks to your health and preserve the environment. If you have any questions, check with your municipality or distributor to request the essential details regarding recycling of your old device. No. REI-RPA 1201-RD.106 / 2008.
PRECAUTIONS CLIMATIQUES
7. Compartment a piles
Considerations:
CONDITIONS DE LA GARANTIE
CONDITIONS DE GARANTIE
CUSCINETTI ASSALI E ASSEMBLAGGIO MOTORE

8. Compartmento do fusivel.
PAINÉIS DE PROTEÇAO
PARA REMOVER AS PARTES DO PAINEL DE PROTEÇÃO:
Veja as imagens 10, 11.
10. Paine do para-choque dianteiro
11. Painei trasoiro do para-choque
Manual de usuario
smartgyro.es

