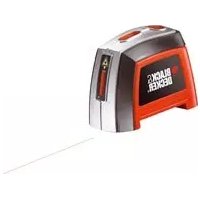
BDL300S - Laser pointer BLACK & DECKER - Free user manual and instructions
Find the device manual for free BDL300S BLACK & DECKER in PDF.
| Product type | Automatic 360° laser level |
| Brand | Black & Decker |
| Model | BDL300S |
| Laser class | IIIa |
| Operating modes | Single 120° laser and 360° laser |
| Self-leveling range | ±5° |
| Power supply | 9V alkaline battery |
| Tripod height (min) | 686 mm |
| Tripod height (max) | 1524 mm |
| Additional fine adjustment | Up to 178 mm |
| Suspension | By included strap |
| Outdoor use | Not recommended |
| Cleaning | Damp cloth and mild soap |
| Warranty | 2 years residential use |
| Customer service | 1 800 544-6986 |
| Included accessories | Integrated tripod, suspension strap, protective case |
| Maintenance | Repairs by authorized service center only |
| Spare parts | Available at authorized service centers |
| Safety precautions | Do not look into the beam, do not disassemble, keep out of reach of children |
Frequently Asked Questions - BDL300S BLACK & DECKER
User questions about BDL300S BLACK & DECKER
0 question about this device. Answer the ones you know or ask your own.
Ask a new question about this device
Download the instructions for your Laser pointer in PDF format for free! Find your manual BDL300S - BLACK & DECKER and take your electronic device back in hand. On this page are published all the documents necessary for the use of your device. BDL300S by BLACK & DECKER.
USER MANUAL BDL300S BLACK & DECKER
text_image
Catalog No. BDL300SBEFORE RETURNING THIS PRODUCT
FOR ANY REASON PLEASE CALL
1-800-544-6986
IF YOU SHOULD HAVE A QUESTION OR EXPERIENCE A PROBLEM WITH YOUR BLACK & DECKER PRODUCT, CALL 1-800-544-6986
BEFORE YOU CALL. HAVE THE FOLLOWING INFORMATION AVAILABLE, CATALOG No., TYPE No., AND
DATE CODE (e.g. 20000130M). IN MOST CASES, A BLACK & DECKER REPRESENTATIVE CAN
RESOLVE YOUR PROBLEM OVER THE PHONE. IF YOU HAVE A SUGGESTION OR COMMENT, GIVE
US A CALL. YOUR FEEDBACK IS VITAL TO BLACK & DECKER.
SAVE THIS MANUAL FOR FUTURE REFERENCE.
VEA EL ESPAÑOL EN LA CONTRAPORTADA.
⚠ WARNING: Read and understand all instructions. Failure to follow all instructions listed below may result in electric shock, fire and/or serious personal injury.
SAVE THESE INSTRUCTIONS
Safety Instructions
- Do not operate the laser in explosive atmospheres, such as in the presence of flammable liquids, gases, or dust.
- Use the laser only with the specifically designated batteries. Use of any other batteries may create a risk of fire.
- Store idle laser out of reach of children and other untrained persons. Lasers are dangerous in the hands of untrained users.
- Use only accessories that are recommended by the manufacturer for your model. Accessories that may be suitable for one laser, may create a risk of injury when used on another laser.
- Do not use optical tools such as a telescope or transit to view the laser beam. Serious eye injury could result.
- Do not place the laser in a position which may cause anyone to intentionally or unintentionally stare into the laser beam. Serious eye injury could result
- Turn the laser off when it is not in use. Leaving the laser on increases the risk of staring into the laser beam.
• Repairs and servicing MUST be performed by a qualified repair facility. Repairs performed by unqualified personnel could result in serious injury.
- WARNING: DO NOT DISASSEMBLE THE LASER. There are no user serviceable parts inside. Disassembling the Laser will void all warranties on the product. Do not modify the product in any way. Modifying the tool may result in Hazardous Laser Radiation Exposure.
- Do not operate the laser around children or allow children to operate the laser. Serious eye injury may result.
- Do not remove or deface warning labels. Removing labels increases the risk of exposure to radiation.
- Position the laser securely. Damage to the laser or serious injury could result if the laser falls.
- CAUTION: Use caution when drilling, nailing or cutting into walls, floors and ceilings which may contain electrical wiring or pipes. Always turn off the power when working near electrical wires.
⚠️ CAUTION: Use of controls or adjustments or performance of procedures other than those specified in this manual may result in hazardous laser radiation exposure.
The label on your tool may include the following symbols.
V....volts
mW milliwatts
nm......wavelength in
nanometers
IIIa....Class IIIa Laser
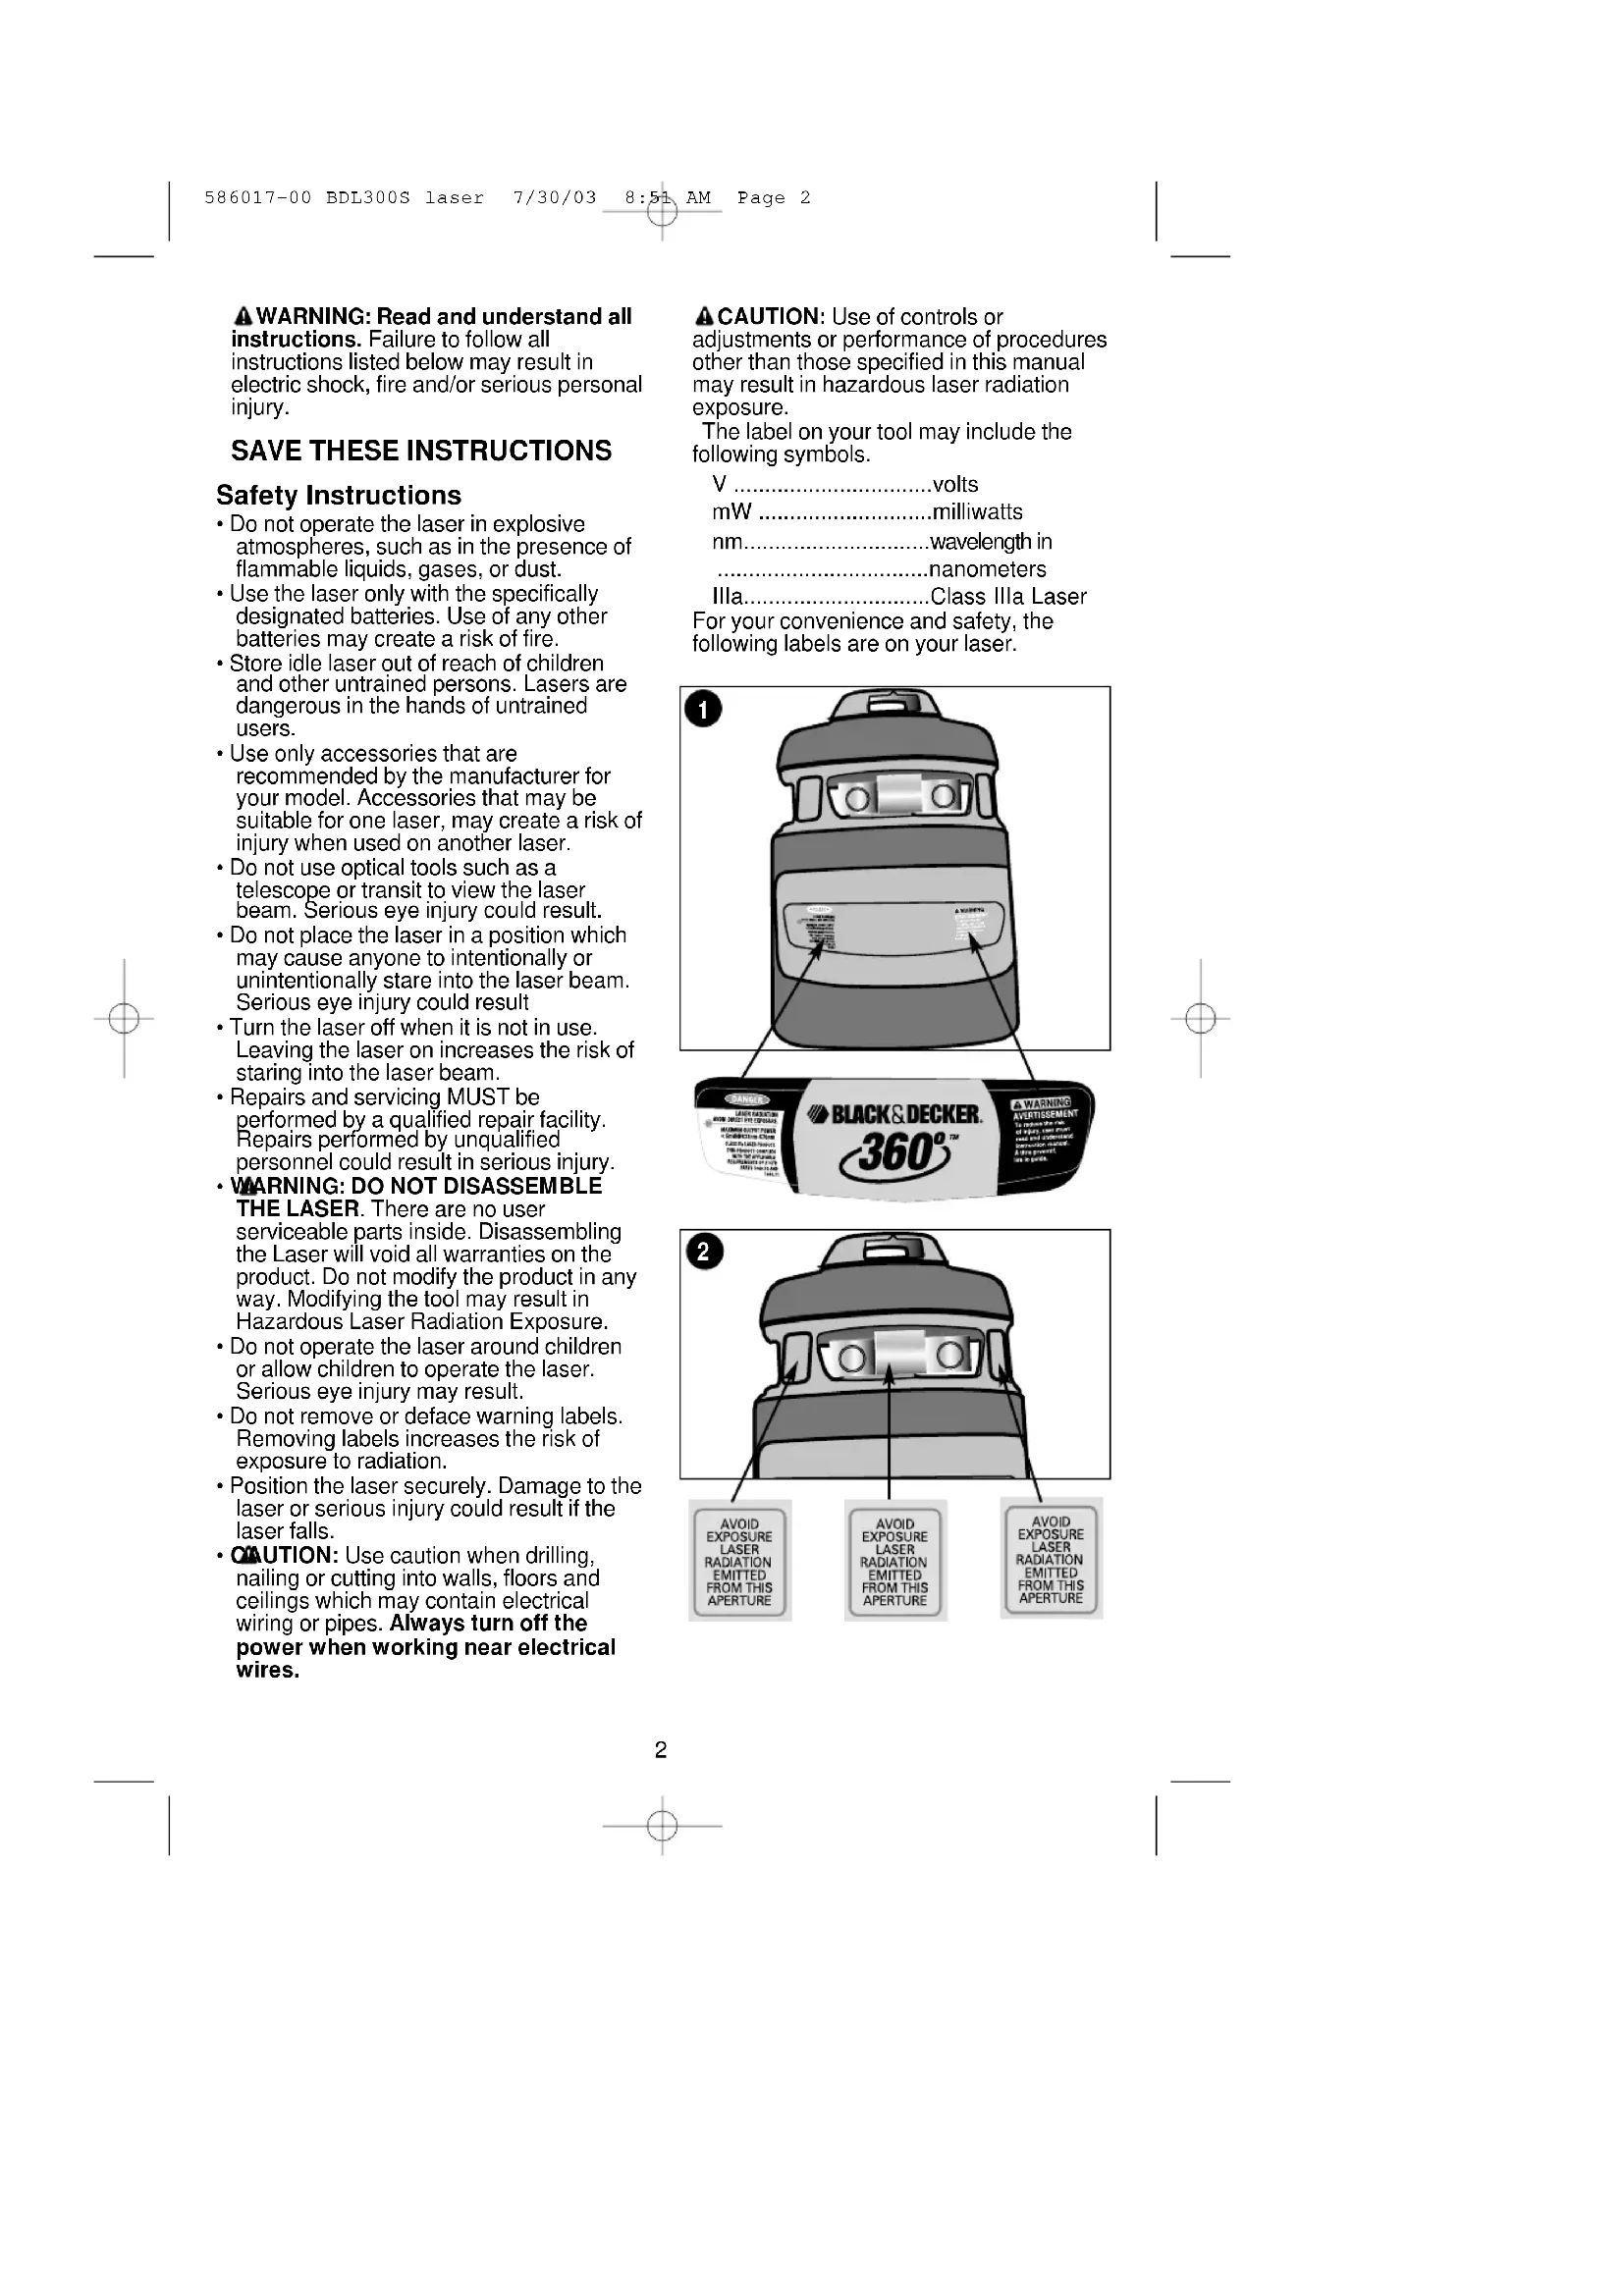
For your convenience and safety, the following labels are on your laser.
text_image
1 A WARNING BLACK & DECKER. 360°™ A WARNING AVERTIGEMENT To ensure the up of Black & Decker, then and continue to a higher level of in the product to be quick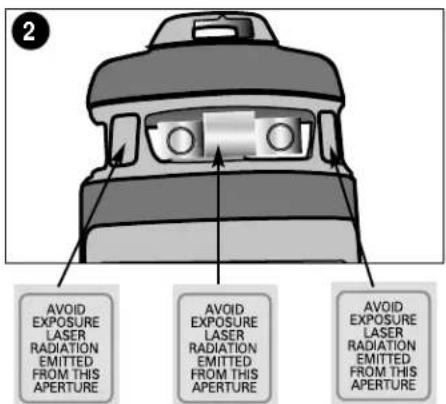
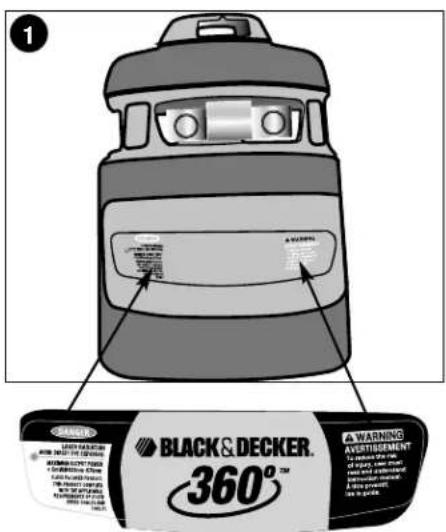
text_image
AVOID EXPOSURE LASER RADIATION EMITTED FROM THIS APERTURE AVOID EXPOSURE LASER RADIATION EMITTED FROM THIS APERTURE AVOID EXPOSURE LASER RADIATION EMITTED FROM THIS APERTUREINSTALLING THE BATTERY
Ensure laser on/off switch is in the left "OFF" position. Remove the battery compartment cover by pressing the tab of the cover in towards the center of the laser and out as shown in figure 3. Connect a fresh 9 volt alkaline battery making sure to match (+) and (-) terminals correctly. Replace the battery compartment cover.
ASSEMBLY / SET-UP
UNFOLDING THE LASER LEGS
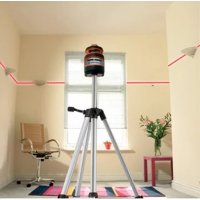
To open the 360° Laser:
1.) Choose a relatively smooth and level surface away from other work site activity to position the tripod.
2.) Unfasten the strap that is around the outside portion of the laser and unfold the three sections of the laser housing which become the legs of the tripod.
3.) Lock the legs in place, by pushing in on the top portion of the hinge until it snaps into place as shown in figure 4.
⚠ CAUTION: Make sure tripod is secure and sitting on a flat and stable surface.
natural_image
Illustration of hands holding a mechanical component (no text or symbols visible)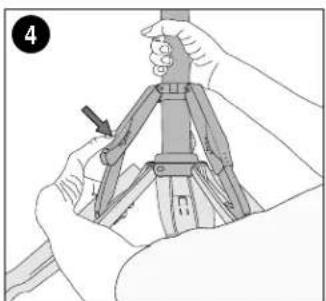
natural_image
Illustration of hands operating a mechanical device with a tool, no text or symbols visibleADJUSTING THE TRIPOD
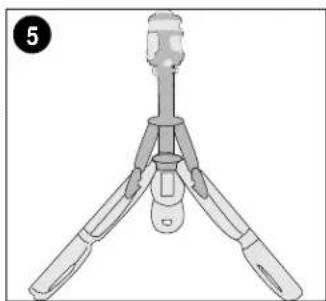
The tripod is adjustable from its lowest position of approximately 27 inches (686mm) shown in figure 5 to a maximum height of 5 feet (1524mm) shown in figure 6.
natural_image
Illustration of a tripod-mounted device with adjustable legs and a central handle (no text or symbols)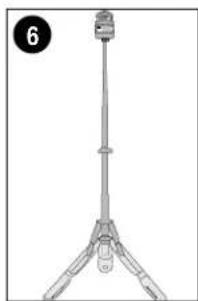
natural_image
Mechanical tripod device with a vertical rod and connector (no text or symbols visible)Extend any or all of the 5 sections of the tripod to reach the approximate desired height. Extend each section by gently sliding each tube out until it stops and then pull slightly harder on each section to lock.
text_image
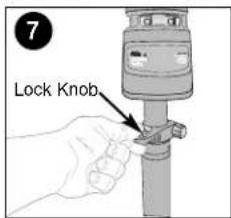
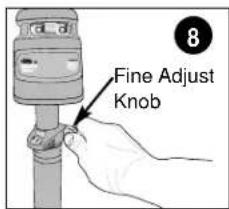
7 Lock KnobWhen the approximate desired height is obtained, use the fine adjust knob shown in figure 8 to raise the laser to the final desired height. The fine adjustment knob will raise the laser up to an additional 7 inches (178mm) high.
First, loosen the lock knob as shown in figure 7.
Turn the fine adjust knob (figure 8) until the desired height is reached. Tighten the lock knob (fig. 7) to secure the tripod at the adjusted height.
text_image
Fine Adjust Knob 8REMOVING LASER FROM TRIPOD
The laser can be removed from the tripod for use on any horizontal surface such as a floor or a tabletop.
⚠CAUTION: Make sure laser is secure and on a stable surface.
Remove the laser by pressing in on the two spring loaded tabs shown in figure 9 and lifting the laser off the tripod.
To reattach laser to tripod, grasp the tripod top plate to support, align notches in laser with tabs (buttons) on plate. Press laser down until the tabs to lock into place.
Make sure laser is securely fastened.

text_image
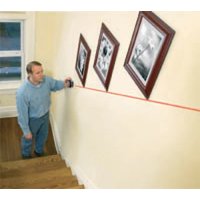
9HANGING THE LASER
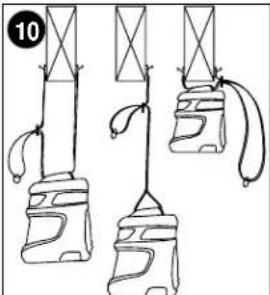
The laser can also be hung from a joist or other secure structure using the hanging strap included.
⚠️ CAUTION: Make sure laser is securely suspended by the strap.
To hang, thread the strap through the slot in the top of the laser and fasten the hook as shown in figures 10 and 11. Adjust the laser so that it hangs relatively straight. The
natural_image
Line drawing of three mechanical components with ropes and connectors (no text or symbols)
natural_image
Person installing ceiling fixtures in a room, no visible text or symbolsself-leveling function will then compensate for any minor error.
LASER OPERATION
- Before attempting to use the laser, make sure the tool is positioned on a relatively smooth, flat and stable surface.
- To increase working distance and accuracy, set up the laser in the middle of your working area. Brightness of area may effect line visibility.
- When attaching to the tripod or using the hanging strap, mount the laser securely.
- Be aware that extreme temperature changes can cause movement or shifting of building structures, tripods, equipment, etc. which can effect accuracy. Verify your set-up before each use as the laser may have moved.
• This product is not recommended for outdoor use.
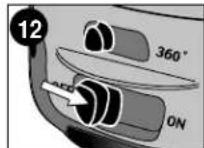
TURNING THE LASER ON
To turn the laser on, slide the lower on/off switch shown in figure 12 to the right.
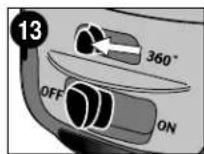
OPERATING IN SINGLE 120° LASER MODE
To operate the laser using a single laser beam, slide the upper switch to the left as shown in figure 13.
OPERATING IN 360° LASER MODE
To operate the laser using all 3 laser beams, slide the upper switch to the right as shown in figure 14.

TROEBESOOUNG
| Problem | Possible Cause | Solution |
| • Laser does not project on wall. | • The self leveling range for the level line is +/- 5°. | • Position tripod ona relatively smooth and level surface. |
| • Line only visible on one wall. | • Switch in 120° mode. | • Move switch t 360° mode. |
| • Laser beam dim. | • Weak battery. | • Replace battery |
STORAGE
To store the unit, reattach the laser to the top of the tripod making sure that it snaps into place securely. Loosen the locking knob, turn the fine adjust knob to its lowest setting and return the tripod to its lowest position. Unhinge the legs and fold them into the center. Reattach the strap around housing. Always store the laser indoors and in its closed state with the switch in the "OFF" position.
MAINTENANCE
Use only mild soap and damp cloth to clean the tool. Never let any liquid get inside the tool; never immerse any part of the tool into a liquid.
IMPORTANT: To assure product SAFETY and RELIABILITY, repairs, maintenance and adjustment (other than those listed in this manual) should be performed by authorized service centers or other qualified service personnel, always using identical replacement parts.
ACCESSORIES
Recommended accessories for use with your tool are available from your local dealer or authorized service center. If you need assistance regarding accessories, please call: 1-800-54-HOW-TO (544-6986).
▲WARNING: The use of any accessory not recommended for use with this tool could be hazardous.
SERVICE INFORMATION
All Black & Decker Service Centers are staffed with trained personnel to provide customers with efficient and reliable power tool service. Whether you need technical advice, repair, or genuine factory replacement parts, contact the Black & Decker location nearest you. To find your local service location, refer to the yellow page directory under "Tools—Electric" or call: 1-800-544-6986 or visit www.blackanddecker.com
FULL TWO-YEAR HOME USE WARRANTY
Black & Decker (U.S.) Inc. warrants this product for two years against any defects in material or workmanship. The defective product will be replaced or repaired at no charge in either of two ways.
The first, which will result in exchanges only, is to return the product to the retailer from whom it was purchased (provided that the store is a participating retailer). Returns should be made within the time period of the retailer's policy for exchanges (usually 30 to 90 days after the sale). Proof of purchase may be required. Please check with the retailer for their specific return policy regarding returns that are beyond the time set for exchanges.
The second option is to take or send the product (prepaid) to a Black & Decker owned or authorized Service Center for repair or replacement at our option. Proof of purchase may be required. Black & Decker owned and authorized Service Centers are listed under "Tools-Electric" in the yellow pages of the phone directory and on our website www.blackanddecker.com.
This warranty does not apply to accessories. This warranty gives you specific legal rights and you may have other rights which vary from state to state. Should you have any questions, contact the manager of your nearest Black & Decker Service Center. This product is not intended for commercial use.
FREE WARNING LABEL REPLACEMENT: If your warning labels become illegible or are missing, call 1-800-544-6986 for a free replacement.
Imported by
Black & Decker (U.S.) Inc.,
701 E. Joppa Rd.
Towson, MD 21286 U.S.A.

See 'Tools-Electric'
- Yellow Pages -
for Service & Sales

text_image
BLACK & DECKER. 360° WARNING AVERTISSEMENT To reduce the risk of the injury, we will hold and maintain the control system. It is a security. for help.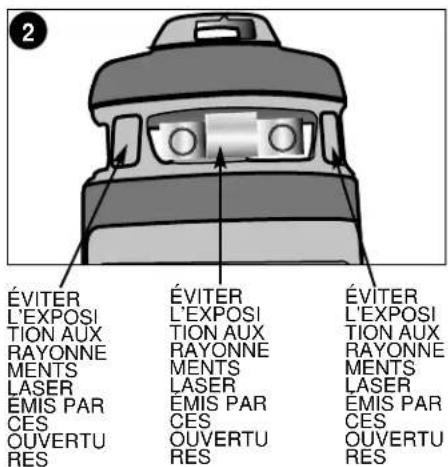
text_image
ÉVITER L'EXPOSI TION AUX RAYONNE MENTS LASER ÉMIS PAR CES OUVERTU RES ÉVITER L'EXPOSI TION AUX RAYONNE MENTS LASER ÉMIS PAR CES OUVERTU RES ÉVITER L'EXPOSI TION AUX RAYONNE MENTS LASER ÉMIS PAR CES OUVERTU RESINSTALLATION DE LA PILE
natural_image
Illustration of hands holding a handheld device with buttons and ports (no text or symbols visible)ASSEMBLAGE ET INSTALLATION
DÉPLOIEMENT DES PATTES DU LASER
natural_image
Illustration of hands using a mechanical device to adjust or install a component (no text or symbols visible)natural_image
Illustration of a tripod-mounted device with three legs and a central handle (no text or symbols)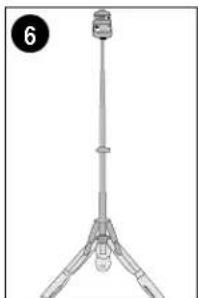
natural_image
Line drawing of a tripod-mounted scientific instrument with a central vertical shaft and top mount (no text or symbols)natural_image
Illustration of a hand holding a device with arrows indicating movement or change (no text or symbols present)SUSPENSION DU LASER
natural_image
Line drawing of three mechanical components with ropes and handles, no text or symbols present
natural_image
Close-up of a hand installing ceiling fixtures on a wall, no visible text or symbolsFONCTIONNEMENT DU LASER
Black & Decker Canada Inc.
100 Central Ave.
text_image
BLACK & DECKER. 360°™ WARNING A BRTREBMENT 1. This is a warning of the company's business environment. 2. The company's business environment is not allowed to use any liability or expense. 3. The company's business environment is not allowed to use any liability or expense. 4. The company's business environment is not allowed to use any liability or expense. 5. The company's business environment is not allowed to use any liability or expense. 6. The company's business environment is not allowed to use any liability or expense. 7. The company's business environment is not allowed to use any liability or expense. 8. The company's business environment is not allowed to use any liability or expense. 9. The company's business environment is not allowed to use any liability or expense. 10. The company's business environment is not allowed to use any liability or expense. 11. The company's business environment is not allowed to use any liability or expense. 12. The company's business environment is not allowed to use any liability or expense. 13. The company's business environment is not allowed to use any liability or expense. 14. The company's business environment is not allowed to use any liability or expense. 15. The company's business environment is not allowed to use any liability or expense. 16. The company's business environment is not allowed to use any liability or expense. 17. The company's business environment is not allowed to use any liability or expense. 18. The company's business environment is not allowed to use any liability or expense. 19. The company's business environment is not allowed to use any liability or expense. 20. The company's business environment is not allowed to use any liability or expense. 21. The company's business environment is not allowed to use any liability or expense. 22. The company's business environment is not allowed to use any liability or expense. 23. The company's business environment is not allowed to use any liability or expense. 24. The company's business environment is not allowed to use any liability or expense. 25. The company's business environment is not allowed to use any liability or expense. 26. The company's business environment is not allowed to use any liability or expense. 27. The company's business environment is not allowed to use any liability or expense. 28. The company's business environment is not allowed to use any liability or expense. 29. The company's business environment is not allowed to use any liability or expense. 30. The company's business environment is not allowed to use any liability or expense. 31. The company's business environment is not allowed to use any liability or expense. 32. The company's business environment is not allowed to use any liability or expense. 33. The company's business environment is not allowed to use any liability or expense. 34. The company's business environment is not allowed to use any liability or expense. 35. The company's business environment is not allowed to use any liability or expense. 36. The company's business environment is not allowed to use any liability or expense. 37. The company's business environment is not allowed to use any liability or expense. 38. The company's business environment is not allowed to use any liability or expense. 39. The company's business environment is not allowed to use any liability or expense. 40. The company's business environment is not allowed to use any liability or expense. 41. The company's business environment is not allowed to use any liability or expense. 42. The company's business environment is not allowed to use any liability or expense. 43. The company's business environment is not allowed to use any liability or expense. 44. The company's business environment is not allowed to use any liability or expense. 45. The company's business environment is not allowed to use any liability or expense. 46. The company's business environment is not allowed to use any liability or expense. 47. The company's business environment is not allowed to use any liability or expense. 48. The company's business environment is not allowed to use any liability or expense. 49. The company's business environment is not allowed to use any liability or expense. 50. The company's business environment is not allowed to use any liability or expense. 51. The company's business environment is not allowed to use any liability or expense. 52. The company's business environment is not allowed to use any liability or expense. 53. The company's business environment is not allowed to use any liability or expense. 54. The company's business environment is not allowed to use any liability or expense. 55. The company's business environment is not allowed to use any liability or expense. 56. The company's business environment is not allowed to use any liability or expense. 57. The company's business environment is not allowed to use any liability or expense. 58. The company's business environment is not allowed to use any liability or expense. 59. The company's business environment is not allowed to use any liability or expense. 60. The company's business environment is not allowed to use any liability or expense. 61. The company's business environment is not allowed to use any liability or expense. 62. The company's business environment is not allowed to use any liability or expense. 63. The company's business environment is not allowed to use any liability or expense. 64. The company's business environment is not allowed to use any liability or expense. 65. The company's business environment is not allowed to use any liability or expense. 66. The company's business environment is not allowed to use any liability or expense. 67. The company's business environment is not allowed to use any liability or expense. 68. The company's business environment is not allowed to use any liability or expense. 69. The company's business environment is not allowed to use any liability or expense. 70. The company's business environment is not allowed to use any liability or expense. 71. The company's business environment is not allowed to use any liability or expense. 72. The company's business environment is not allowed to use any liability or expense. 73. The company's business environment is not allowed to use any liability or expense. 74. The company's business environment is not allowed to use any liability or expense. 75. The company's business environment is not allowed to use any liability or expense. 76. The company's business environment is not allowed to use any liability or expense. 77. The company's business environment is not allowed to use any liability or expense. 78. The company's business environment is not allowed to use any liability or expense. 79. The company's business environment is not allowed to use any liability or expense. 80. The company's business environment is not allowed to use any liability or expense. 81. The company's business environment is not allowed to use any liability or expense. 82. The company's business environment is not allowed to use any liability or expense. 83. The company's business environment is not allowed to use any liability or expense. 84. The company's business environment is not allowed to use any liability or expense. 85. The company's business environment is not allowed to use any liability or expense. 86. The company's business environment is not allowed to use any liability or expense. 87. The company's business environment is not allowed to use any liability or expense. 88. The company's business environment is not allowed to use any liability or expense. 89. The company's business environment is not allowed to use any liability or expense. 90. The company's business environment is not allowed to use any liability or expense. 91. The company's business environment is not allowed to use any liability or expense. 92. The company's business environment is not allowed to use any liability or expense. 93. The company's business environment is not allowed to use any liability or expense. 94. The company's business environment is not allowed to use any liability or expense. 95. The company's business environment is not allowed to use any liability or expense. 96. The company's business environment is not allowed to use any liability or expense. 97. The company's business environment is not allowed to use any liability or expense. 98. The company's business environment is not allowed to use any liability or expense. 99. The company's business environment is not allowed to use any liability or expense. 100. The company's business environment is not allowed to use any liability or expense.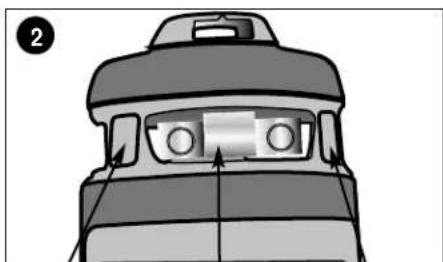
natural_image
Diagram of a vehicle's top-down view showing airflow or motion direction (no text or symbols)EVITE LA EXPOSICIÓN
natural_image
Illustration of hands holding a small mechanical component (no text or symbols visible)ENSAMBLAJE / MONTAJE
CÓMO EXTENDER LAS PATAS DEL LÁSER
natural_image
Illustration of hands using a compass tool to adjust or install a mechanical component (no text or symbols visible)natural_image
Technical line drawing of a tripod-mounted device with two views (5 and 6), no text or symbols present.natural_image
Illustration of a hand holding a small electronic device with arrows indicating action or movement (no text or symbols)CÓMO COLGAR EL LÁSER
natural_image
Three diagrams of mechanical devices with ropes and connectors, no text or symbols present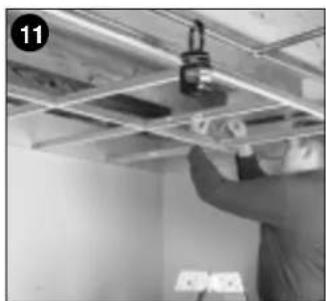
natural_image
Person installing ceiling fixtures in a room, no visible text or symbolsCat No. BDL300S Form # 586017-00 AUG-03 Copyright © 2003 Black & Decker Printed in China