
HWMS6511 - Soundbar SAMSUNG - Free user manual and instructions
Find the device manual for free HWMS6511 SAMSUNG in PDF.
| Product Type | Soundbar |
| Brand | Samsung |
| Model | HW-MS6511 |
| Dimensions (W x H x D) | 1160 x 80 x 168 mm |
| Weight | 6.5 kg |
| Power Supply | AC (see product label) |
| Standby Power Consumption (all network ports active) | 4.0 W |
| Connectivity | HDMI (ARC), Optical, AUX, Bluetooth, Wi-Fi (2.4/5 GHz) |
| Supported Audio Formats | LPCM 2ch, Dolby Digital, DTS |
| Speakers | 6 woofers + 3 tweeters (4 ohms) |
| Audio Modes | Standard, Music, Clear Voice, Sports, Cinema, Smart Mode, Surround |
| Wireless Functions | Bluetooth (A2DP), Wi-Fi, Spotify Connect, Amazon Alexa |
| Wall Mounting | Yes (kit included) |
| TV Compatibility | Samsung Smart TV 2014 and later, ARC |
| Software Update | Automatic via Internet |
| Included Accessories | Remote control, AA batteries x2, power cable, wall mounts, fixing guide |
| Maintenance | Wipe with a soft, dry cloth |
| Safety | Do not expose to moisture, do not open, risk of electric shock |
| Repairability | Contact Samsung customer service |
Frequently Asked Questions - HWMS6511 SAMSUNG
User questions about HWMS6511 SAMSUNG
0 question about this device. Answer the ones you know or ask your own.
Ask a new question about this device
Download the instructions for your Soundbar in PDF format for free! Find your manual HWMS6511 - SAMSUNG and take your electronic device back in hand. On this page are published all the documents necessary for the use of your device. HWMS6511 by SAMSUNG.
USER MANUAL HWMS6511 SAMSUNG
HW-MS6500 / HW-MS6501
Imagine the possibilities
Thank you for purchasing this Samsung product.
To receive more complete service, please register
your product at www.samsung.com/register
SAFETY INFORMATION
SAFETY WARNINGS
TO REDUCE THE RISK OF ELECTRIC SHOCK, DO NOT REMOVE THE COVER (OR BACK). NO USER-SERVICEABLE PARTS ARE INSIDE. REFER SERVICING TO QUALIFIED SERVICE PERSONNEL.
 | CAUTIONRISK OF ELECTRIC SHOCK.DO NOT OPEN. |  |
 | This symbol indicates that high voltage is present inside. It is dangerous to make any kind of contact with any internal part of this product. | |
 | This symbol indicates that this product has included important literature concerning operation and maintenance. | |
 | Class II product: This symbol indicates that it does not require a safety connection to electrical earth (ground). | |
 | AC voltage: This symbol indicates that the rated voltage marked with the symbol is AC voltage. | |
 | DC voltage: This symbol indicates that the rated voltage marked with the symbol is DC voltage. | |
 | Caution, Consult instructions for use: This symbol instructs the user to consult the user manual for further safety related information. | |
WARNING
- To reduce the risk of fire or electric shock, do not expose this appliance to rain or moisture.
CAUTION
- TO PREVENT ELECTRIC SHOCK, MATCH WIDE BLADE OF PLUG TO WIDE SLOT, FULLY INSERT.
- This apparatus shall always be connected to a AC outlet with a protective grounding connection.
- To disconnect the apparatus from the mains, the plug must be pulled out from the mains socket, therefore the mains plug shall be readily operable.
- Do not expose this apparatus to dripping or splashing. Do not put objects filled with liquids, such as vases on the apparatus.
- To turn this apparatus off completely, you must pull the power plug out of the wall socket. Consequently, the power plug must be easily and readily accessible at all times.
PRECAUTIONS
- Ensure that the AC power supply in your house complies with the power requirements listed on the identification sticker located on the back of your product. Install your product horizontally, on a suitable base (furniture), with enough space around it for ventilation (7\~10 cm). Make sure the ventilation slots are not covered. Do not place the unit on amplifiers or other equipment which may become hot. This unit is designed for continuous use. To fully turn off the unit, disconnect the AC plug from the wall outlet. Unplug the unit if you intend to leave it unused for a long period of time.
- During thunderstorms, disconnect the AC plug from the wall outlet. Voltage peaks due to lightning could damage the unit.
- Do not expose the unit to direct sunlight or other heat sources. This could lead to overheating and cause the unit to malfunction.
-
Protect the product from moisture (i.e. vases), and excess heat (e.g. a fireplace) or equipment creating strong magnetic or electric fields. Unplug the power cable from the AC wall socket if the unit malfunctions. Your product is not intended for industrial use. It is for personal use only. Condensation may occur if your product has been stored in cold temperatures. If transporting the unit during the winter, wait approximately 2 hours until the unit has reached room temperature before using.
-
The battery used with this product contains chemicals that are harmful to the environment. Do not dispose of the battery in the general household trash. Do not expose the battery to excess heat, direct sunlight, or fire. Do not short circuit, disassemble, or overheat the battery. Danger of explosion if the battery is replaced incorrectly. Replace only with the same or equivalent type.
ABOUT THIS MANUAL
The user manual has two parts: this simple paper USER MANUAL and a detailed FULL MANUAL you can download.

natural_image
Illustration of a person sitting on a sofa using a laptop (no text or symbols visible)USER MANUAL
See this manual for safety instructions, product installation, components, connections, and product specifications.

natural_image
Illustration of a person sitting on a couch next to a computer (no text or symbols visible)
FULL MANUAL
You can access the Full Manual on Samsung's on-line customer support centre by scanning the QR code. To see the manual on your PC or mobile device, download the manual in document format from the website. (http://www.samsung.com/support)
Design, specifications and App screen are subject to change without prior notice.
CONTENTS
01 Checking the Components 2
Inserting Batteries before using the Remote Control (AA batteries X 2) ____ 2
02 Product Overview 3
Front Panel / Right Side Panel of the Soundbar 3
Bottom Panel of the Soundbar 4
03 Connecting the Soundbar 5
Connecting Electrical Power ____ 5
04 Connecting to your TV 7
Method 1. Connecting with a Cable ____ 7
- Connecting using an Optical Cable ____ 7
- Connecting a TV using an HDMI Cable 8
Method 2. Connecting Wirelessly ____ 9
- Connecting a TV via Bluetooth ____ 9
- Connecting via Wi-Fi 11
05 Connecting an External Device 13
Connecting using an Optical or Analogue Audio (AUX) Cable 13
Connecting using an HDMI Cable 14
06 Connecting a Mobile Device 15
Method 1. Connecting via Bluetooth ____ 15
Method 2. Connecting via Wi-Fi (Wireless Network) 18
07 Connecting an Amazon product 20
08 Controlling your Soundbar with an Amazon device 23
09 Using the Remote Control 24
How to Use the Remote Control ____ 24
Adjusting the Soundbar volume with a TV remote control 27
Using the Hidden Buttons ____ 28
Output specifications for the different sound effect modes ____ 28
10 Installing the Wall Mount 29
Installation Precautions 29
Wallmount Components 29
Assembling the Holder-Cable 31
Installing the Holder Foot 32
11 Software Update 32
12 Troubleshooting 33
13 Licence 34
14 Open Source Licence Notice 34
15 Important Notes About Service 35
16 Specifications and Guide 35
Specifications 35
01 CHECKING THE COMPONENTS

(for Holder-Foot : 2 EA)
(for Holder-Cable : 1 EA)
- For Soundbar wall mounting components, see page 29.
• See page 31 for instructions on how to use the Holder-Cable. - To purchase additional components or optional cables, contact a Samsung Service Centre or Samsung Customer Care.
- The appearance of the accessories may differ slightly from the illustrations above.
Inserting Batteries before using the Remote Control (AA batteries X 2)
Slide the battery cover in the direction of the arrow until it is completely removed. Insert 2 AA batteries (1.5V) oriented so that their polarity is correct. Slide the battery cover back into position.

text_image
Diagram illustrating the step-by-step disassembly of a remote control panel into battery casing, showing charge states and polarity.02 PRODUCT OVERVIEW
Front Panel / Right Side Panel of the Soundbar

text_image
Position the product so that the SAMSUNG logo is located on the top. SAMSUNG 1 2 3 4 Right Side of the Soundbar| 1 | DisplayDisplays the product's status and current mode. | |
| 2 | -/+ (Volume) ButtonAdjusts the volume.When adjusted, the volume level appears on the Soundbar's front display. | |
| 3 |  (Source) ButtonSelects the source input mode. (Source) ButtonSelects the source input mode. | |
| Input mode Display | ||
| Optical Digital input D.IN | ||
| ARC (HDMI OUT) input | D.IN → TV ARC (Auto conversion) | |
| AUX input AUX | ||
| HDMI input HDMI | ||
| Wi-Fi mode WIFI | ||
| BLUETOOTH mode BT | ||
| • To turn on "BT PAIRING" mode, change the source to "BT" mode, and then press and hold the (Source) button for more than 5 seconds. | ||
| 4 |  (Power) ButtonTurns the power on and off. (Power) ButtonTurns the power on and off. | |
- When you plug in the AC cord, the power button will begin working in 4 to 6 seconds.
- When you turn on this unit, there will be a 4 to 5 second delay before it produces sound.
- If you want to enjoy sound only from the Soundbar, you must turn off the TV's speakers in the Audio Setup menu of your TV. Refer to the owner's manual supplied with your TV.
Bottom Panel of the Soundbar

text_image
POWER OUT (For TV) POWER IN DIGITAL AUDIO IN (OPTICAL) WIRELESS AUX IN HDMI IN HDMI OUT (TV-ARC) Wi-Fi SETUP SPK ADD| 1 | POWER OUT (For TV)Connect the power cord of a Samsung TV connected to the Soundbar and mounted on the wall using a Wall Mount Kit (WMN300SB - not supplied). |
| 2 | POWER INConnect the Soundbar's AC power cable. |
| 3 | DIGITAL AUDIO IN (OPTICAL)Connect to the digital (optical) output of an external device. |
| 4 | WIRELESSAttach the wireless dongle that connects the Soundbar to surround speakers and a subwoofer wirelessly.(The surround speaker, subwoofer, and wireless dongle are sold separately.)The WIRELESS jack is not USB-compatible.The availability of subwoofers differs by area. Check the availability athttp://www.samsung.com/support. |
| 5 | AUX INConnect to the Analogue output of an external device. |
| 6 | HDMI INInputs digital video and audio signals simultaneously using an HDMI cable.Connect to the HDMI output of an external device. |
| 7 | HDMI OUT (TV-ARC)Connect to the HDMI (ARC) jack on a TV. |
| 8 | Wi-Fi SETUP / SPK ADDConnect to a wireless network (Wi-Fi) via theSamsung Multiroomapp. |
- When disconnecting the power cable from a wall outlet, pull the plug. Do not pull the cable.
- Do not connect this unit or other components to an AC outlet until all connections between components are complete.
03 CONNECTING THE SOUNDBAR
Connecting Electrical Power
- For more information about the required electrical power and power consumption, refer to the label attached to the product. (Label : Bottom of the Soundbar Main Unit)

text_image
Power Cord Connecting Electrical Power POWER IN Bottom of the Soundbar Main Unit- Connect the supplied power cable to the POWER IN jack.

text_image
POWER OUT (For TV)Bottom of the Soundbar Main Unit
- The POWER OUT jack is used to provide power to a Samsung TV mounted on the wall using a Wall Mount Kit (WMN300SB - not supplied).
- The POWER OUT jack can connect only to Samsung TVs that use a 2-pin power cord and consume 400 W or less. (Connecting the jack to a device that consumes more than 400 W may damage the Soundbar or cause a malfunction.)


For a list of Samsung TVs that are compatible with the WMN300SB Wall Mount Kit and the
POWER OUT jack, see the WMN300SB Wall Mount Kit user manual.
You can view the manual on line at http://www.samsung.com/support.
04 CONNECTING TO YOUR TV
Hear TV sound from your Soundbar through wired or wireless connections.
- When the Soundbar is connected to a selected Samsung TVs, the Soundbar can be controlled using the TV's remote control.
- When using optical cable, this feature can be supported by 2017 Samsung Smart TVs that support Bluetooth.
- This function also allows you to use the TV menu to adjust the sound field and various settings as well as the volume and mute.
Method 1. Connecting with a Cable
When broadcasting signals are Dolby Digital and the setting for "Digital Output Audio Format" is PCM on your TV, it is recommended to change the setting to Dolby Digital. When the setting is changed, you can experience better sound quality. (The menu may differ depending on the TV manufacturer.)
Connecting using an Optical Cable

flowchart
graph LR
    TV["TV"] --> OpticalOut["OPTICAL OUT"]
    OpticalOut --> OpticalCable["Optical Cable"]
    OpticalCable --> DigitalAudioIn["DIGITAL AUDIO IN (OPTICAL)"]
    DigitalAudioIn --> Wireless["Wireless"]
    OpticalCable --> RightSide["Right Side of the Soundbar"]
    D.IN["D.IN"] --> RightSide
- Connect the DIGITAL AUDIO IN (OPTICAL) jack on the Soundbar to the OPTICAL OUT jack of the TV with a digital optical cable.
- Press the → (Source) button on the right side panel or remote control, and then select the "D.IN" mode.
Auto Power Link
Auto Power Link automatically turns on the Soundbar when the TV is turned on.
- Connect the Soundbar and a TV with a digital optical cable.
-
Press the → (Source) button on the right side panel or on the remote control, and then select "D.IN".
-
Press the Left button on the remote control for 5 seconds to turn Auto Power Link on or off.

natural_image
Circular play button icon with a double arrow symbol at center (no text or numbers)• Auto Power Link is set to ON by default.
(To turn off this function, turn off Auto Power using the Soundbar.)
- Depending on the connected device, Auto Power Link may not function.
- This function is only available in the "D.IN" mode.
Connecting a TV using an HDMI Cable

flowchart
graph TD
    A["TV"] --> B["Connect to the HDMI IN (ARC) port of your TV."]
    B --> C["HDMI IN (ARC)"]
    C --> D["1 HDMI Cable (not supplied)"]
    D --> E["Bottom of the Soundbar"]
    E --> F["HDMI OUT (TV-ARC)"]
    F --> G["Connect to the HDMI OUT (TV-ARC) port of the Soundbar main unit."]
    G --> H["2 TV ARC"]
    H --> I["Right Side of the Soundbar"]
- With the Soundbar and TV turned on, connect the HDMI cable (not supplied) as shown in the figure.
-
"TV ARC" appears in the display window of the Soundbar main unit and the Soundbar plays TV sound.
-
If TV sound is inaudible, press the → (Source) button on the remote control or on the right side of the Soundbar to switch to "D.IN" mode. The screen displays "D.IN" and "TV ARC" in sequence, and TV sound is played.
- If "TV ARC" does not appear in the display window of the Soundbar main unit, confirm that the cable is connected to the correct port.
- Use the volume buttons on the TV's remote control to change the volume of the Soundbar.
NOTES
- HDMI is an interface that enables the digital transmission of video and audio data with just a single connector.
- If the TV provides an ARC port, connect the HDMI cable to the HDMI IN (ARC) port.
- We recommend you use a coreless HDMI cable if possible. If you use a cored HDMI cable, use one whose diameter is less than 14 mm.
- Anynet+ must be turned on.
- This function is not available if the HDMI cable does not support ARC.
Method 2. Connecting Wirelessly
Connecting a TV via Bluetooth
When a TV is connected using Bluetooth, you can hear stereo sound without the hassle of cabling.
- Only one TV can be connected at a time.

flowchart
graph LR
    A["TV"] --> B["Bluetooth"]
    B --> C["Remote Device"]
    C --> D["Monitor Icon"]
The initial connection
- Press the → (Source) button on the right side panel or on the remote control, and then select "BT".
- Change "BT" to "BT PAIRING".
- If "BT READY" appears, press and hold the ➞ (Source) button on the right side panel of the Soundbar or on the remote control for more than 5 seconds to display "BT PAIRING".
- Select Bluetooth mode on the TV. (For more information, see the TV's manual.)
- Select "[AV] Samsung Soundbar MSxxxx" from the list on TV's screen.
An available Soundbar is indicated with "Need Pairing" or "Paired" on the TV Bluetooth device list. To connect to the Soundbar, select the message and establish a connection.
- When the TV is connected, [TV Name] "BT" appears on the Soundbar's front display.
- You can now hear TV sound from the Soundbar.
If the device fails to connect
- If the previously connected Soundbar listing (e.g. "[AV] Samsung Soundbar MSxxxx") appears in the list, delete it.
- In "BT" mode, press and hold the → (Source) button for more than 5 seconds on the right side panel of the Soundbar or on the remote control to switch to "BT PAIRING" mode.
Then, select "[AV] Samsung Soundbar MSxxxx" from the TV's search list.
What are the BT READY and BT PAIRING statuses?
- BT READY : In this mode, you can search for previously connected TVs or connect to the Soundbar from a previously connected mobile device.
- BT PAIRING : In this mode, you can connect to a new device. (While in "BT" mode, press and hold the → (Source) button for more than 5 seconds on the right side of the Soundbar or on the remote control.)
NOTES
- If asked for a PIN code when connecting a Bluetooth device, enter <0000>.
- In Bluetooth connection mode, the Bluetooth connection will be lost if the distance between the Soundbar and the Bluetooth device exceeds 10 meters.
- The Soundbar automatically turns off after 5 minutes in the Ready state.
-
The Soundbar may not perform Bluetooth search or connection correctly under the following circumstances:
-
If there is a strong electrical field around the Soundbar.
- If several Bluetooth devices are simultaneously paired with the Soundbar.
- If the Bluetooth device is turned off, not in place, or malfunctions.
- Electronic devices may cause radio interference. Devices that generate electromagnetic waves must be kept away from the Soundbar main unit - e.g., microwaves, wireless LAN devices, etc.
Disconnecting the Soundbar from the TV
Press the → (Source) button on the right side panel or on the remote control and switch to any mode but "BT".
- Disconnecting takes time because the TV must receive a response from the Soundbar. (The time required may differ, depending on the TV model.)
- To cancel automatic Bluetooth connection between the Soundbar and TV, press the ▶II (Play/Pause) button on the remote control for 5 seconds in "BT READY" status. (Toggle On → Off)
Pre-connection Checklist
- Confirm that your Samsung smart TV was released after 2014. This function is compatible only with Samsung smart TVs released after 2014.
- Make sure your Wireless router (Wi-Fi) is ready and working.
- Make sure that the TV is connected to the Wireless router (your Wi-Fi network).

text_image
TVStep 1: Connecting the Soundbar to Wi-Fi
- Press the → (Source) button on the right side of the Soundbar or on the remote control to select "WIFI" mode.
- When using selected Samsung TV (2016 or 2017 Samsung smart TVs that support Bluetooth.)
- If you select "WIFI" mode when the TV is turned on, the TV screen displays a pop-up window providing instructions on how to automatically connect the Soundbar to a wireless router (Wi-Fi). Refer to instructions in the pop-up window of TV.

text_image
WIFI- Connect your mobile device (smartphone, tablet etc.) to the Wi-Fi network the TV is connected to.
- Install and launch the Samsung Multiroom app on your mobile device (smartphone, tablet etc.).

flowchart
graph LR
    A["Mobile Device"] --> B["Get IT ON Google Play"]
    B --> C["Android"]
    D["App Store Download on the App Store"] --> E["iOS"]
    F["Smartphone Icon"] --> G["Hand Clicking Pie Chart"]
- Follow the instructions in the app screen on the mobile device to connect the Soundbar to your Wi-Fi network.
Step 2 : Configuring Settings on the TV
- If the TV disconnects from your wireless network after you change the input source to the Soundbar, use the TV menu to connect the TV to the network again.
For TVs released in 2017
- Home menu → Settings (💡) → Sound → Sound Output → Select [AV] Soundbar MSxxxx (Wi-Fi)
- The Soundbar outputs TV sound.
For TVs released in 2016
- Home menu → Settings (💡) → Sound → Sound Output → Select [AV] Samsung Soundbar MSxxxx (Wi-Fi)
- The Soundbar outputs TV sound.
For TVs released in 2015
- Home menu → Sound → Speaker List → Select [AV] Samsung Soundbar MSxxxx (Wi-Fi)
- The Soundbar outputs TV sound.
For TVs released in 2014
- Home menu → Sound → Speaker Settings → Select Multiroom Link - Settings → Soundbar+Surround.
- From the Soundbar menu item, select "[AV] Samsung Soundbar MSxxxx" and then select "OK".
- Home menu → Sound → Speaker Settings → Select TV Sound Output → Multiroom Link

text_image
Speaker Settings TV Sound Output Multiroom Link TV Speaker • TV Installation Type Stand TV SoundConnect • Samsung Audio Device List • Add New Device On Multiroom Link • Settings Soundbar+Surround Bluetooth Headphone • Bluetooth Headphone List OK
text_image
Multiroom Link Soundbar+Surround Soundbar [AV] Samsung Soundbar M ✓ [AV] Samsung Soundbar MSxxxx Don't Use OK Volume Level Speaker Test Edit Na- The Soundbar outputs TV sound.
NOTES
- The TV and Soundbar must be connected to the same wireless network (Wi-Fi).
- If your wireless router (Wi-Fi) uses a DFS channel, you will not be able to establish a Wi-Fi connection between the TV and Soundbar. Contact your Internet service provider for details.
- If the 5GHz Wi-Fi connection is not smooth, use the 2.4GHz bandwidth.
05 CONNECTING AN EXTERNAL DEVICE
Connect to an external device via a wired or wireless network to play the external device's sound through the Soundbar.
Connecting using an Optical or Analogue Audio (AUX) Cable

flowchart
graph TD
    A["Game console"] --> B["BD / DVD player / Set-top box /"]
    B --> C["Right Side of the Soundbar"]
    D["Optical OUT"] --> E["Optical Cable"]
    E --> F["Digital Audio IN (OPTICAL)"]
    F --> G["WIRELESS"]
    G --> H["AUX IN"]
    I["Audio (AUX) Cable (not supplied)"] --> J["Bottom of the Soundbar"]
    K["R - AUDIO - L"] --> I
Optical Cable
1 Connect DIGITAL AUDIO IN (OPTICAL) on the main unit to the OPTICAL OUT jack of the Source Device using a digital optical cable.
② Select "D.IN" mode by pressing the →(Source) button on the right side panel or on the remote control.
OR
Audio (AUX) Cable
1 Connect AUX IN (Audio) on the main unit to the AUDIO OUT jack of the Source Device using an audio cable.
② Select "AUX" mode by pressing → (Source) button on the right side panel or on the remote control.
Connecting using an HDMI Cable

flowchart
graph TD
    A["External Device"] --> B["HDMI OUT"]
    B --> C["1"]
    C --> D["HDMI Cable (not supplied)"]
    E["TV"] --> F["HDMI IN (ARC)"]
    F --> G["2"]
    G --> H["HDMI Cable (not supplied)"]
    I["Bottom of the Soundbar"] --> J["HDMI IN"]
    I --> K["HDMI OUT (TV-ARC)"]
    L["Right Side of the Soundbar"] --> M["HDMI"]
- Connect an HDMI cable (not supplied) from the HDMI IN jack on the back of the product to the HDMI OUT jack on your digital device.
- Connect an HDMI cable (not supplied) from the HDMI OUT (TV-ARC) jack on the back of the product to the HDMI IN jack on your TV.
- Press the → (Source) button on the right side panel or on the remote control, and then select "HDMI".
- "HDMI" mode is displayed on the Soundbar display panel and sound plays.
06 CONNECTING A MOBILE DEVICE
Method 1. Connecting via Bluetooth
When a mobile device is connected using Bluetooth, you can hear stereo sound without the hassle of cabling.
- You cannot connect more than one Bluetooth device at a time.

text_image
Bluetooth deviceThe initial connection
- Press the → (Source) button on the right side panel or on the remote control, and then select "BT".
- Change "BT" to "BT PAIRING".
- If "BT READY" appears, press and hold the → (Source) button on the right side panel of the Soundbar or on the remote control for more than 5 seconds to display "BT PAIRING".
- Select "[AV] Samsung Soundbar MSxxxx" from the list.
- When a Soundbar is connected to the Bluetooth device, [Bluetooth Device Name] "BT" appears in the front display.
- Play music files from the device, connected via Bluetooth, through the Soundbar.
If the device fails to connect
- If the previously connected Soundbar listing (e.g. "[AV] Samsung Soundbar MSxxxx") appears in the list, delete it
- In "BT" mode, press and hold the → (Source) button for more than 5 seconds on the right side panel of the Soundbar or on the remote control to switch to "BT PAIRING" mode.
Then, select "[AV] Samsung Soundbar MSxxxx" from the Bluetooth device search list.
What are the BT READY and BT PAIRING statuses?
- BT READY : In this mode, you can search for previously connected TVs or connect to the Soundbar from a previously connected mobile device.
- BT PAIRING : In this mode, you can connect to a new device. (While in "BT" mode, press and hold the

(Source) button for more than 5 seconds on the right side of the Soundbar or on the remote petrol.)
NOTES
- If asked for a PIN code when connecting a Bluetooth device, enter <0000>.
- In Bluetooth connection mode, the Bluetooth connection will be lost if the distance between the Soundbar and the Bluetooth device exceeds 10 meters.
- The Soundbar automatically turns off after 5 minutes in the Ready state.
-
The Soundbar may not perform Bluetooth search or connection correctly under the following circumstances:
-
If there is a strong electrical field around the Soundbar.
- If several Bluetooth devices are simultaneously paired with the Soundbar.
-
If the Bluetooth device is turned off, not in place, or malfunctions.
-
Electronic devices may cause radio interference. Devices that generate electromagnetic waves must be kept away from the Soundbar main unit - e.g., microwaves, wireless LAN devices, etc.
• The Soundbar supports SBC data (44.1kHz, 48kHz). - Connect only to a Bluetooth device that supports the A2DP (AV) function.
- You cannot connect the Soundbar to a Bluetooth device that supports only the HF (Hands Free) function.
- Once you have paired the Soundbar to a Bluetooth device, selecting “[AV] Samsung Soundbar MSxxxx” from the device’s scanned devices list will automatically change the Soundbar to “BT” mode.
- Available only if the Soundbar is listed among the Bluetooth device's paired devices.
(The Bluetooth device and the Soundbar must have been previously paired at least once.)
- The Soundbar will appear in the Bluetooth device's searched devices list only when the Soundbar is displaying "BT READY".
- Soundbar cannot be paired to another Bluetooth device, while using the Bluetooth function.
Disconnecting the Bluetooth device from a Soundbar
You can disconnect a Bluetooth device from the Soundbar. For instructions, see the Bluetooth device's user manual.
• The Soundbar will be disconnected.
- When the Soundbar is disconnected from the Bluetooth device, the Soundbar will display "BT DISCONNECTED" on the front display.
Disconnecting the Soundbar from the Bluetooth device
Press the → (Source) button on the right side panel or on the remote control, and then change to any mode except "BT".
- Disconnecting takes time because the Bluetooth device must receive a response from the Soundbar. (Disconnection time may differ, depending on the Bluetooth device)
- When the Soundbar is disconnected from the Bluetooth device, the Soundbar will display "BT DISCONNECTED" on the front display.
NOTES
- In Bluetooth connection mode, the Bluetooth connection will be lost if the distance between the Soundbar and the Bluetooth device exceeds 10 meters.
- The Soundbar automatically turns off after 5 minutes in the Ready state.
More About Bluetooth
Bluetooth is a technology that enables Bluetooth-compliant devices to interconnect easily with each other using a short wireless connection.
- A Bluetooth device may cause noise or malfunction, depending on usage, if:
- A part of your body is in contact with the receiving/transmitting system of the Bluetooth device or the Soundbar.
- It is subject to electrical variation from obstructions caused by a wall, corner, or office partition.
- It is exposed to electrical interference from same frequency-band devices including medical equipment, microwave ovens, and wireless LANs.
- Pair the Soundbar with the Bluetooth device while they are close together.
- The further the distance between the Soundbar and Bluetooth device, the worse the quality is. If the distance exceeds the Bluetooth operational range, the connection is lost.
- In poor reception areas, the Bluetooth connection may not work properly.
- The Bluetooth connection only works when it is close to the unit. The connection will be automatically cut off if the Bluetooth device is out of range. Even within range, the sound quality may be degraded by obstacles such as walls or doors.
- This wireless device may cause electric interference during its operation.
Method 2. Connecting via Wi-Fi (Wireless Network)
- Connect a single Soundbar to Wi-Fi to access a variety of music streaming services and Internet radio. Connect multiple Soundbars to Wi-Fi to use grouped playback or stereo sound mode.
- To connect a Soundbar to a mobile device via a wireless network (Wi-Fi), the Samsung Multiroom app is required.

text_image
Mobile deviceThe initial connection
- Press the → (Source) button on the right side of the Soundbar or on the remote control to select "WIFI" mode.

text_image
WIFI- Install and launch the Samsung Multiroom app on your mobile device (e.g. smartphone or tablet).

flowchart
graph LR
    A["Mobile Device"] --> B["Get IT ON Google Play"]
    B --> C["Android"]
    D["Download on the App Store"] --> E["iOS"]
    F["Hand icon"] --> G["Icon: Pie Chart with musical note"]
    style A fill:#f9f,stroke:#333
    style D fill:#ccf,stroke:#333
    style F fill:#cfc,stroke:#333
- Follow the instructions in the app screen on the mobile device to connect the Soundbar to Wi-Fi.
Installing an additional Soundbar when Samsung wireless speakers are already in use
- On the Home screen of the Samsung Multiroom app, select Settings (💡) at the top, and then select "Add Speaker".

text_image
[Samsung] R3 My Phone ... < SETTINGS Add Speaker Alarm- To connect the Soundbar to 2 Samsung wireless speakers and configure a surround sound system, follow the steps shown below. (You cannot set up a surround sound system using one audio device and one Soundbar.)
① Touch≡to go to the list of all speakers.
② Touch: on the right of the Soundbar model name.
③ Touch Surround Setup. Select Done after dragging the speaker to the desired location.
④ The Surround connection is complete.

- To connect an additional SWA-9000S (not supplied), disconnect the Samsung wireless speakers from the Soundbar to disable the surround sound system. (If connecting the surround speakers without disconnecting SWA-9000S, sound is played via both the Samsung wireless speaker and the Surround speaker.)
07 CONNECTING AN AMAZON PRODUCT
Connect and use with an Amazon product (Amazon Echo)
Use an Amazon Echo product to control your speakers and enjoy music services provided by Amazon Echo.
- Install SmartThings app to your mobile device.

flowchart
graph LR
    A["Mobile Device"] --> B["GET IT ON Google Play"]
    B --> C["iOS Android"]
    C --> D["Download on the App Store"]
    D --> E["SmartThings app"]
- Launch the app and follow the instructions on the screen to register (add) your Soundbar in the app.
• Automatic pop-up may not be available in some mobile devices.
If this is the case, select and complete "Add device" from the app menu. Your Soundbar is now added to the app.

flowchart
graph LR
    A["Start with a network icon"] --> B["Connect: Start building your connected world by adding This application, and other devices."]
    B --> C["Add device: Start building your connected world by adding This application, and other devices."]
    C --> D["Supported Devices: Supported Devices and supported Devices"]
    D --> E["Now to use: Additional useful features: USB, USB, USB, USB"]
    E --> F["Add device: Add device to Samsung Soundbar"]
    F --> G["Add device: Add device to Samsung Connect?"]
    G --> H["Add device: Add device to Samsung Soundbar?"]
    H --> I["Add device: Add device to Samsung Connect?"]
    I --> J["Add device: Add device to Samsung Soundbar?"]
    J --> K["Add device: Add device to Samsung Connect?"]
    K --> L["Add device: Add device to Samsung Soundbar?"]
    L --> M["Add device: Add device to Samsung Connect?"]
    M --> N["Add device: Add device to Samsung Soundbar?"]
    N --> O["Add device: Add device to Samsung Connect?"]
    O --> P["Add device: Add device to Samsung Soundbar?"]
    P --> Q["Add device: Add device to Samsung Connect?"]
    Q --> R["Add device: Add device to Samsung Soundbar?"]
    R --> S["Add device: Add device to Samsung Connect?"]
    S --> T["Add device: Add device to Samsung Soundbar?"]
    T --> U["Add device: Add device to Samsung Connect?"]
    U --> V["Add device: Add device to Samsung Soundbar?"]
    V --> W["Add device: Add device to Samsung Connect?"]
    W --> X["Add device: Add device to Samsung Soundbar?"]
    X --> Y["Add device: Add device to Samsung Connect?"]
    Y --> Z["Add device: Add device to Samsung Soundbar?"]
    Z --> AA["Add device: Add device to Samsung Connect?"]
    AA --> AB["Add device: Add device to Samsung Soundbar?"]
    AB --> AC["Add device: Add device to Samsung Connect?"]
    AC --> AD["Add device: Add device to Samsung Soundbar?"]
    AD --> AE["Add device: Add device to Samsung Connect?"]
    AE --> AF["Add device: Add device to Samsung Soundbar?"]
    AF --> AG["Add device: Add device to Samsung Connect?"]
    AG --> AH["All Devices: All Devices + Device + Device + Device + Device + Device + Device + Device + Device + Device + Device + Device + Device + Device + Device + Device + Device + Device + Device + Device + Device + Device + Device + Device + Device + Device + Device + Device + Device + Device + Device + Device + Device + Device + Device + Device + Device + Device + Device + Device + Device + Device + Device + Device + Device + Device + Device + Device + Device + Device + Device + Devices"]
Launch App Add speakersAuto pop-up
- In SmartThings app, change your Soundbar name to one that can be recognized by your Amazon device.
(Example: Samsung, Soundbar, Living Room, Family Room, Bedroom, Office, etc.)

CAUTION
- Amazon devices may not recognize names that contain elements such as special characters.

flowchart
graph LR
    A["Input Image"] --> B["Add scene: All Devices"]
    B --> C["Select speakers: [AV"] Samsung with Edit/Name Button]
    C --> D["Change name: Device name, [AV"] Samsung, Location, Shortcut on dashboard]
    D --> E["SaveSelect Edit: Cancel, Save, Doctor reader, Living room, Location, Shortcut on dashboard"]
- In Alexa app, search "Samsung Wireless Audio" in Skills and select "ENABLE".
- Skip this step if you have the Skills set up already.

flowchart
graph LR
    A["Amazon Alexa app"] --> B["Select Skills"]
    B --> C["Search"]
    C --> D["Enable"]
- From Smart Home tap in Alexa app, complete "Discover Device".

flowchart
graph LR
    A["Amazon Alexa app"] --> B["Select Smart Home"]
    B --> C["Select Devices Discover device"]

    subgraph "Select Smart Home"
        D["Home"] --> E["How Planning"]
        E --> F["Music & Games"]
        F --> G["Lists"]
        G --> H["Barrington & Navia"]
        H --> I["Sells"]
        I --> J["Smart Home"]
        J --> K["Things to Try"]
        K --> L["I love you"]
        L --> M["Features, image, text"]
        M --> N["User feedback"]
        N --> O["Help/Help & Help"]
        O --> P["Home Tools"]
        P --> Q["Remove card"]
        Q --> R["Timer set for"]
    end

    subgraph "Select Devices Discover device"
        S["Smart Home"] --> T["Groups"]
        T --> U["Devices"]
        U --> V["Scenes"]
        V --> W["Configure Smart Home"]
        W --> X["Smart Home Skills"]
        X --> Y["I enabled"]
    end

    A --> B --> C --> D --> E --> F --> G --> H --> I --> J --> K --> L --> M --> N --> O --> P --> Q --> R --> S --> T --> U --> V --> W --> X --> Y --> Z["Discover"]
    end

    style A fill:#f9f,stroke:#333
    style B fill:#ccf,stroke:#333
    style C fill:#cfc,stroke:#333
    style D fill:#fcc,stroke:#333
    style E fill:#cff,stroke:#333
    style F fill:#ffc,stroke:#333
    style G fill:#cfc,stroke:#333
    style H fill:#fcc,stroke:#333
    style I fill:#ffc,stroke:#333
    style J fill:#cfc,stroke:#333
    style K fill:#fcc,stroke:#333
    style L fill:#ffc,stroke:#333
    style M fill:#cfc,stroke:#333
    style N fill:#fcc,stroke:#333
    style O fill:#ffc,stroke:#333
    style P fill:#cfc,stroke:#333
    style Q fill:#fcc,stroke:#333
    style R fill:#cfc,stroke:#333
    style S fill:#fcc,stroke:#333
    style T fill:#cfc,stroke:#333
    style U fill:#fcc,stroke:#333
    style V fill:#cfc,stroke:#333
    style W fill:#cfc,stroke:#333
    style X fill:#cfc,stroke:#333
    style Y fill:#cfc,stroke:#333
08 CONTROLLING YOUR SOUNDBAR WITH AN AMAZON DEVICE
- Use voice commands to enjoy musics available on your Amazon device.
- The Amazon Echo service you can use with your speakers is limited to musics. Other services provided by Amazon Echo, such as news and weathers, can be accessed on your Amazon Echo product.
• This feature may not be available in some countries.
- This service is provided by Amazon and can be terminated at any time, Samsung does not assume responsibility of service availability.
Use voice commands to control speakers.

Trigger + Command + Speaker name
Use the Speaker name you used when adding it to Alexa app.
| Action Voice Command | |
| To search an audio device added to theSmartThingsaccount connected to theAmazon Alexaaccount | "Alexa Discover devices" |
* Use voice commands for speakers named "Living room"
| Action Voice Command | |
| To set the volume level to 5 | "Alexa Set the volume to 5 on Living room" |
| To increase the volume level | "Alexa Volume up on Living room" |
| To mute the sound "Alexa Mute on Living room" | |
| To listen to radio station named KISS FM | "Alexa Play Kiss FM on Living room" |
| To play the next song | "Alexa Next song on Living room" |
| To stop the audio | "Alexa Stop on Living room" |
| To turn the audio on "Alexa Turn on Living room" | |
| To turn the audio off "Alexa Turn off Living room" |
09 USING THE REMOTE CONTROL
How to Use the Remote Control

text_image
1 2 3 4 VOLBASS SOUNDBAR 5 6 7 8 9 10 SURROUND SMART MODE SOUND MODE| 1 | Power | Turns the Soundbar on and off. |
| 2 | Sound Control | You can select from TREBLE, SYNC, REAR LEVEL, or REAR SPEAKER ON/OFF.To adjust the TREBLE volume, select Sound Control TREBLE, and then use the Up/Down buttons to adjust the volume within the -6 to +6 range.Press and hold the (Sound Control) button for about 5 seconds to adjust the sound for each frequency band. 150Hz, 300Hz, 600Hz, 1.2KHz, 2.5KHz, 5KHz, and 10KHz are selectable (Left/Right) and each can be adjusted to a setting between -6 to +6 (Up/Down).If the video and audio between the TV and your Soundbar are not synchronised, select SYNC in Sound Control, and then set audio delay between 0~300 milliseconds by using the Up/Down buttons.If surround speakers (not supplied) are connected, select REAR LEVEL and use the Up/Down buttons to adjust the volume within the -6 to +6 range.The REAR SPEAKER function can be turned ON/OFF by using the Up/Down buttons.Audio Sync is only supported in some functions. |
| 3 |  Surround Surround | The Surround Sound function adds depth and a sense of space to sound.Each time you press this button, ON and OFF alternate.ON : Play sound over all the speakers.OFF : You can hear the sound of the original source channel from several speakers. |
| 4 |  SOUND MODE SOUND MODE | You can select the desired sound effect by choosingSTANDARD,MUSIC,CLEAR VOICE, SPORTS, or MOVIE.Select the “STANDARD” mode if you want to enjoy the original sound.DRC (Dynamic Range Control)Lets you apply dynamic range control to Dolby Digital tracks. If you press and hold the SOUND MODEbutton while in standby mode, DRC (Dynamic Range Control) turns on or off. With the DRC turned on, loud sound is reduced. (The sound may be distorted.) |
| 5 |  Source Source | Press to select a source connected to the Soundbar.BT PAIRING modeTo turn on “BT PAIRING” mode in “BT” mode, press and hold the→(Source) button for more than 5 seconds. See page 15 for details.Auto Power Down FunctionThe unit turns off automatically in the following situations.-D.IN / WIFI / BT Mode: If there is no audio signal for 5 minutes.-HDMI Mode: If there is no audio signal for 15 minutes.-AUX Mode:-If the Audio (AUX) Cable is disconnected for 5 minutes.-If there is no KEY input for 8 hours when the Audio (AUX) Cable is connected. (Auto Power Down function can be turned off only in that case.)-To turn off Auto Power Down function, while in “AUX” mode, press and hold the►II button for 5 seconds. “ON-AUTO POWER DOWN” / “OFF-AUTO POWER DOWN” appears on the display. |
| 6 |  Play / Pause (BT/Wi-Fi) Play / Pause (BT/Wi-Fi) | Press the►II button to pause a music file temporarily.If you press the button again, the music file plays. |
| 7 |  Up/Down/Left/Right Up/Down/Left/Right |  Press the indicated areas to select Up/Down/Left/Right.Press Up/Down/Left/Right on the button to select or set functions.RepeatTo use the repeat function, press theUpbutton.Music SkipPress theRightbutton to select the next music file. Press theLeftbutton to select the previous music file.Anynet+ / Auto Power LinkYou can turn Anynet+ and Auto Power Link on or off.Anynet+ and Auto Power Link are controlled by theRightandLeftbuttons respectively.- Anynet+ : If the Soundbar is connected to a Samsung TV through an HDMI cable, you can control your Soundbar with the Samsung TV's remote control. Press and hold theRightbutton for 5 seconds to toggle Anynet+ ON and OFF.- Auto Power Link : If the Soundbar is connected to your TV through a digital optical cable, the Soundbar can automatically turn on when you turn on your TV. Press and hold theLeftbutton for 5 seconds to toggle Auto Power Link ON and OFF.- Anynet+ / Auto Power Link are set to ON by default. Press the indicated areas to select Up/Down/Left/Right.Press Up/Down/Left/Right on the button to select or set functions.RepeatTo use the repeat function, press theUpbutton.Music SkipPress theRightbutton to select the next music file. Press theLeftbutton to select the previous music file.Anynet+ / Auto Power LinkYou can turn Anynet+ and Auto Power Link on or off.Anynet+ and Auto Power Link are controlled by theRightandLeftbuttons respectively.- Anynet+ : If the Soundbar is connected to a Samsung TV through an HDMI cable, you can control your Soundbar with the Samsung TV's remote control. Press and hold theRightbutton for 5 seconds to toggle Anynet+ ON and OFF.- Auto Power Link : If the Soundbar is connected to your TV through a digital optical cable, the Soundbar can automatically turn on when you turn on your TV. Press and hold theLeftbutton for 5 seconds to toggle Auto Power Link ON and OFF.- Anynet+ / Auto Power Link are set to ON by default. |
| 8 |  SMART MODE SMART MODE | Automatically optimises sound effects to suit the scene currently playing.The mode turns on or off each time the button is pressed. |
| 9 | BASS |  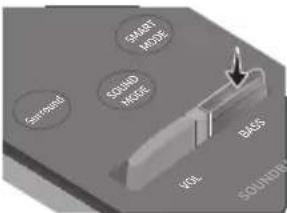 Push the button up or down to adjust the BASS volume within the -6 to +6 range.To set the BASS volume level to 0, press the button.When a Subwoofer (not supplied) is connected, the BASS button switches to the Subwoofer Key. Push the button up or down to adjust the subwoofer volume either to -12 or within the -6 to +6 range. To set the subwoofer volume level to 0, press the button. Push the button up or down to adjust the BASS volume within the -6 to +6 range.To set the BASS volume level to 0, press the button.When a Subwoofer (not supplied) is connected, the BASS button switches to the Subwoofer Key. Push the button up or down to adjust the subwoofer volume either to -12 or within the -6 to +6 range. To set the subwoofer volume level to 0, press the button. |
| 10 |  VOL VOL | 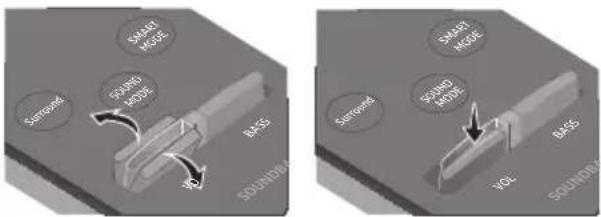 Push the button up or down to adjust the volume.• MutePress the VOL button to mute the sound. Press it again to unmute the sound. Push the button up or down to adjust the volume.• MutePress the VOL button to mute the sound. Press it again to unmute the sound. |
Adjusting the Soundbar volume with a TV remote control
Use the TV menu to set the TV speaker on a Samsung TV to external speakers. (For more information, see the TV's user manual.)
- After installing the Soundbar, you can adjust the Soundbar's volume using the IR remote control that came with a Samsung TV. (If you do not want to use this function, when the Soundbar is on, press and hold the Surround button for 5 seconds. "OFF-TV REMOTE" appears in the Soundbar's display and the function turns off.) To adjust the volume using only the Samsung TV remote control, press and hold the Surround button for more than 5 seconds until "SAMSUNG-TV REMOTE" appears in the Soundbar display.
- Each time the Surround button is held for 5 seconds, the mode switches in the following order: "SAMSUNG-TV REMOTE" (Default mode) → "OFF-TV REMOTE" → "ALL-TV REMOTE".
- To adjust the Soundbar volume with the remote control that came with a TV made by a third party manufacturer, turn the Soundbar on, press and hold the Surround button for 5 seconds ("OFF-TV REMOTE" appears on the Soundbar's display), release the Surround button, and then press and hold the Surround button again for more than 5 seconds. ("ALL-TV REMOTE" appears on the Soundbar's display.)
- This function may not be available, depending on the remote control.
- Manufacturers supporting this function:
VIZIO, LG, Sony, Sharp, PHILIPS, PANASONIC, TOSHIBA, GRUNDIG, Hisense, RCA
Using the Hidden Buttons
| Hidden Button | Reference page | |
| Remote Control Button Function | ||
| Surround | TV remote control On/Off | page 27 |
| [cozz] (Source) | BT Paring | page 15 |
| [x6GG] (Play / Pause) | Auto Power Down On/Off(AUX mode) | page 25 |
| Left Auto Power Link | ON/OFF page 7 | |
| Right | Anynet+ ON/OFF | page 26 |
 (Sound Control) (Sound Control) | 7 Band EQ | page 24 |
| SOUND MODE | DRC ON/OFF (Standby) | page 25 |
Output specifications for the different sound effect modes
| Effect Input | Output | |||
| Except Wireless Rear Speaker Kit | Include Wireless Rear Speaker Kit | |||
 Surround Surround | ON | 2.0 ch | 2.0 ch 4.0 ch | |
| 5.1 ch 3.0 ch | 5.0 ch | |||
 SOUND MODE SOUND MODE | STANDARD | 2.0 ch | 2.0 ch 4.0 ch | |
| 5.1 ch 3.0 ch | 5.0 ch | |||
| MUSIC | 2.0 ch | 2.0 ch 2.0 ch | ||
| 5.1 ch 3.0 ch | 5.0 ch | |||
| CLEAR VOICE | 2.0 ch | 3.0 ch 5.0 ch | ||
| 5.1 ch 3.0 ch | 5.0 ch | |||
| SPORTS | 2.0 ch | 3.0 ch 5.0 ch | ||
| 5.1 ch 3.0 ch | 5.0 ch | |||
| MOVIE | 2.0 ch | 3.0 ch 5.0 ch | ||
| 5.1 ch 3.0 ch | 5.0 ch | |||
- Samsung Wireless Rear Speaker Kit can be purchased separately. To purchase a Kit, contact the vendor you purchased the Soundbar from.
10 INSTALLING THE WALL MOUNT
Installation Precautions
• Install on a vertical wall only.
- Do not install in a place with high temperature or humidity.
- Verify whether the wall is strong enough to support the product's weight. If not, reinforce the wall or choose another installation point.
• Purchase and use the fixing screws or anchors appropriate for the kind of wall you have (plaster board, iron board, wood, etc.). If possible, fix the support screws into wall studs.
• Purchase wall mounting screws according to the type and thickness of the wall you want to mount the Soundbar on.
- Diameter: M5
– Length: 35 mm or longer recommended.
- Connect cables from the unit to external devices before you install the Soundbar on the wall.
- Make sure the unit is turned off and unplugged before you install it. Otherwise, it may cause an electric shock.
Wallmount Components

text_image
25mmWall Mount Guide

natural_image
Two technical illustrations of screw components: a pulley and a threaded screw (no text or symbols)Holder-Screw (2 EA) Screw (2 EA)

natural_image
Simple line drawing of a mobile phone slot (no text or symbols)Bracket-Wall Mount (2 EA)
- Place the Wall Mount Guide against the wall surface.
• The Wall Mount Guide must be level.
- If your TV is mounted on the wall, install the Soundbar at least 5 cm below the TV.

text_image
TV 5 cm or more- Align the Paper Template's Centre Line with the centre of your TV (if you are mounting the Soundbar below your TV), and then fix the Wall Mount Guide to the wall using tape.
- If you are not mounting below a TV, place the Centre Line in the centre of the installation area.

text_image
Centre Line- Use a sharp object, such as a pen or pencil, to mark the holes' positions, and then remove the Wall mount Guide.

text_image
Diagram showing a mechanical or electrical component with labeled parts and directional arrows, including a circular element and a pointer.- Using an appropriately sized drill bit, drill a hole in the wall at each marking.
- If the markings do not correspond to the positions of studs, make sure you insert appropriate anchors or mollies into the holes before you insert the support screws. If you use anchors or mollies, make sure the holes you drill are large enough for the anchors or mollies you use.
- Push a screw (not supplied) through each Holder-Screw, and then screw each screw firmly into a support screw hole.

natural_image
Diagram showing a screw being inserted into a pin, with motion arrows indicating direction (no text or symbols)- Install the 2 Bracket-Wall Mounts in the correct orientation on the bottom of the Soundbar, using 2 Screws.

natural_image
Mechanical assembly diagram showing a screw being inserted into a bracket with a circular arrow indicating rotation (no text or symbols)- When assembling, make sure the hanger part of the Bracket-Wall Mounts are located behind the rear of the Soundbar.

text_image
Rear of Soun - + → + ←Right end of Soundbar
- Install the Soundbar with the attached Bracket-Wall Mounts by hanging the Bracket-Wall Mounts on the Holder-Screws on the wall.

natural_image
Diagram showing a beam being reduced from a flat surface, with arrows indicating force direction (no text or symbols present)- Slide the Soundbar down as shown below so that the Bracket-Wall Mounts rest securely on the Holder-Screws.
- Insert the Holder-Screws into the wide (bottom) part of the Bracket-Wall Mounts, and then slide the Bracket-Wall Mounts down so that Bracket-Wall Mounts rest securely on the Holder-Screws.

flowchart
graph TD
    A["Step 1: Initial state"] --> B["Step 2: Increase or decrease"]
    B --> C["Downward arrow"]
    C --> D["Step 3: Final state"]
Assembling the Holder-Cable
As shown in the image, use the supplied Screw to fix the Holder-Cable to the Soundbar, and then use the Holder-Cable to organise any cables.

text_image
Holder-CableInstalling the Holder Foot
If you are not mounting the Soundbar on the wall, use the 2 provided screws to attach the 2 Holder Feet to the bottom of the Soundbar as shown below.
- Note that the stands of certain Samsung TVs are designed to provide a fixed place for the Soundbar. To finalise the installation of the Soundbar, you place the Holder Feet of the Soundbar on the legs of the stand.

natural_image
Diagram showing a mechanical component with screw fasteners inserted into a car intake, with an inset close-up highlighting the component (no text or symbols present)
text_image
Place Soundbar11 SOFTWARE UPDATE
When the Soundbar is connected to the Internet, software updates automatically occur even when the Soundbar is turned off.
- To use the Auto Update function, the Soundbar must be connected to the Internet. The Wi-Fi connection to the Soundbar will be terminated if its power cord is disconnected or the power is cut off. If the power is cut off, turn on the Soundbar and reconnect it.
12 TROUBLESHOOTING
Before seeking assistance, check the following.
The unit will not turn on.
Is the power cord plugged into the outlet?
→Connect the power plug to the outlet.
A function does not work when the button is pressed.
Is there static electricity in the air?
→Disconnect the power plug and connect it again.
Sound dropouts occur in BT mode.
→See the Bluetooth connection sections on pages 9 and 15.
Sound is not produced.
Is the Mute function on?
→ Press the VOL button to cancel the function.
Is the volume set to minimum?
→Adjust the Volume.
The remote control does not work.
Are the batteries drained?
→Replace with new batteries.
Is the distance between the remote control and
Soundbar main unit too far?
→ Move the remote control closer to the Soundbar main unit.
Cannot connect to the TV.
If connected via a wired network
→ Check if the cable is connected correctly. (Check the port name to make sure that the cable is connected to the correct port.) (See the corresponding page regarding each connection method.)
→ Press the → (Source) button on the right side of the Soundbar or on the remote control to check if the mode is correct.
If connected via a wireless network
→Connected via Bluetooth
- Switch the Soundbar to "BT PAIRING" mode, and then use the TV to search again. (See page 9 for details.)
→Connected via Wi-Fi
- Check if the TV is a compatible model.
- Only Samsung smart TVs released after 2014 are supported.
- Check if the TV is connected to Wi-Fi.
- If the TV is not connected to Wi-Fi, use the network menu on the TV to establish a connection. (See the TV user manual.)
- Check if the Soundbar is connected to Wi-Fi.
- When connected, the Soundbar is found in the list of speakers when
Samsung Multiroom app is run on the mobile device (e.g. smartphone or tablet). (See page 18 for details.)
- Check for a DFS channel.
- If your wireless router (Wi-Fi) is using a DFS channel, you cannot establish a Wi-Fi connection between the TV and Soundbar. Contact your Internet service provider for details.
13 LICENCE

DOLBY
AUDIO
Manufactured under license from Dolby Laboratories. Dolby, Dolby Audio, Pro Logic, and the double-D symbol are trademarks of Dolby Laboratories.


Digital Surround
For DTS patents, see http://patents.dts.com. Manufactured under license from DTS Licensing Limited. DTS, the Symbol, DTS in combination with the Symbol, and DTS Digital Surround are registered trademarks or trademarks of DTS, Inc. in the United States and/or other countries. © DTS, Inc. All Rights Reserved.

The terms HDMI and HDMI High-Definition Multimedia Interface, and the HDMI Logo are trademarks or registered trademarks of HDMI Licensing LLC in the United States and other countries.

Spotify®
- The Spotify Software is subject to third party licences found here: www.spotify.com/connect/third-party-licenses.
- For more information about Spotify Connect, please visit www.spotify.com/connect
14 OPEN SOURCE LICENCE NOTICE
For further information on Open Sources used in this product, please visit the website: http://opensource.samsung.com
15 IMPORTANT NOTES ABOUT SERVICE
- Figures and illustrations in this User Manual are provided for reference only and may differ from actual product appearance.
• An administration fee may be charged if either
(a) an engineer is called out at your request and there is no defect with the product (i.e. where the user manual has not been read).
(b) you bring the unit to a repair centre and there is no defect with the product (i.e. where the user manual has not been read).
- You will be informed of the administration fee amount before a technician visits.
16 SPECIFICATIONS AND GUIDE
Specifications
| GENERAL | Weight | 6.5 kg |
| Dimensions(W x H x D) | 1160.0 x 80.0 x 168.0 mm | |
| Operating Temperature Range | +5°C to +35°C | |
| Operating Humidity Range | 10 % ~ 75 % | |
| HDMI Video | 1080p, 1080i, 720p, 576p, 480p2160p@24/25/30Hz 4:4:42160p@60/50Hz 4:2:0 | |
| Speaker | Woofer x 6, Tweeter x 3, 4ohm | |
| Supported play formats | LPCM 2ch, Dolby AudioTM (supporting Dolby® Digital), DTS | |
| Wireless device output power | Wi-Fi max transmitter power | 100mW at 2.4GHz -2.4835GHz, 5.15GHz-5.35GHz & 5.47GHz-5.725GHz |
| BT max transmitter power | 100mW at 2.4GHz - 2.4835GHz | |
NOTES
• Samsung Electronics Co., Ltd reserves the right to change the specifications without notice
• Weight and dimensions are approximate.
- For more information about the power supply and power consumption, refer to the label attached to the product. (Label: Bottom of the Soundbar Main Unit)
Precaution : The product will restart automatically if you turn on/off Wi-Fi/Ethernet.
| Overall Standby Power Consumption (W)(All the network ports are “ON” condition) | 4.0W | |
| Wi-Fi/Ethernet Port deactivation method | Press Wi-Fi SETUP button on the product for 30 seconds to turn Wi-Fi/Ethernet On / Off. | |
| Bluetooth Port deactivation method | Press SPK ADD button on the product for 30 seconds to turn Bluetooth On / Off. | |
- Hereby, Samsung Electronics, declares that this equipment is in compliance with Directive 2014/53/EU.
The full text of the EU declaration of conformity is available at the following internet address: http://www.samsung.com go to Support > Search Product Support and enter the model name.
This equipment may be operated in all EU countries.
The 5GHz WLAN(Wi-Fi or SRD) function of this equipment may only be operated indoors.


[Correct disposal of batteries in this product]
(Applicable in countries with separate collection systems)
This marking on the battery, manual or packaging indicates that the batteries in this product should not be disposed of with other household waste at the end of their working life. Where marked, the chemical symbols Hg, Cd or Pb indicate that the battery contains mercury, cadmium or lead above the reference levels in EC Directive 2006/66.
If batteries are not properly disposed of, these substances can cause harm to human health or the environment.
To protect natural resources and to promote material reuse, please separate batteries from other types of waste and recycle them through your local, free battery return system.

Correct Disposal of This Product
(Waste Electrical & Electronic Equipment)
(Applicable in countries with separate collection systems)
This marking on the product, accessories or literature indicates that the product and its electronic accessories (e.g. charger, headset, USB cable) should not be disposed of with other household waste at the end of their working life. To prevent possible harm to the environment or human health from uncontrolled waste disposal, please separate these items from other types of waste and recycle them responsibly to promote the sustainable reuse of material resources.
Household users should contact either the retailer where they purchased this product, or their local government office, for details of where and how they can take these items for environmentally safe recycling.
Business users should contact their supplier and check the terms and conditions of the purchase contract. This product and its electronic accessories should not be mixed with other commercial wastes for disposal.
For information on Samsung's environmental commitments and product specific regulatory obligations e.g. REACH, WEEE, Batteries, visit:
http://www.samsung.com/uk/aboutsamsung/samsungelectronics/corporatecitizenship/data_corner.html
natural_image
Illustration of a person sitting on a sofa using a laptop (no text or symbols visible)РЪКОВОДСТВО НА ПОТРЕБИТЕЛЯ
natural_image
Illustration of a person sitting on a sofa next to a desk with a laptop (no text or symbols visible)
ПЪЛНО РЬКОВОДСТВО
text_image
Diagram illustrating the step-by-step disassembly of a remote control device into a battery, showing internal components and polarity.natural_image
Circular gray button with a play symbol and double arrow icon (no text or numbers)text_image
Diagram showing a smartphone connected to a remote device via Bluetooth, with a monitor displaying a battery and control buttons.text_image
[Samsung] R3 My Phone ... SETTINGS Add Speaker Alarmflowchart
graph LR
    A["Start device"] --> B["Add device"]
    B --> C{Add device has been found. Add this device to Samsung Connect?}
    C -->|Never| D["Add device"]
    C -->|Latest| E["Add device"]
    D --> F["Registering device..."]
    E --> F
    F --> G["Add device"]
    G --> H["Add device"]
    style A fill:#f9f,stroke:#333
    style H fill:#bbf,stroke:#333
natural_image
Two technical illustrations of screw components: a pulley and a threaded screw (no text or symbols)natural_image
Simple line drawing of a mobile phone slot (no text or symbols)Скоба за монтаж на стена (2 бр.)
text_image
Standard CNCnatural_image
Diagram showing a screw being inserted into a pin, with motion arrows indicating direction (no text or symbols)natural_image
Mechanical component with screw and mounting base, showing rotational motion (no text or symbols)natural_image
Diagram showing a beam being reduced from a flat surface, with arrows indicating force direction (no text or symbols present)natural_image
Diagram showing a mechanical assembly with a screw inserted into a component, and a close-up of the component being inserted (no text or symbols present)
Manufactured under license from Dolby Laboratories. Dolby, Dolby Audio, Pro Logic, and the double-D symbol are trademarks of Dolby Laboratories.

dts®
Digital Surround
For DTS patents, see http://patents.dts.com. Manufactured under license from DTS Licensing Limited. DTS, the Symbol, DTS in combination with the Symbol, and DTS Digital Surround are registered trademarks or trademarks of DTS, Inc. in the United States and/or other countries. © DTS, Inc. All Rights Reserved.

The terms HDMI and HDMI High-Definition Multimedia Interface, and the HDMI Logo are trademarks or registered trademarks of HDMI Licensing LLC in the United States and other countries.

Spotify®
natural_image
Illustration of a person sitting on a sofa using a laptop (no text or symbols visible)KORISNIČKI PRIRUČNIK
Pogledajte ovaj priručnik za sigurnosne upute, instalaciju proizvoda, komponente, povezivanje i specifikacije proizvoda.

natural_image
Illustration of a person sitting on a couch next to a desk with a laptop (no text or symbols)
POTPUNI PRIRUČNIK
Potpunom priručniku možete pristupiti putem web-centra službe za korisnike skeniranjem QR koda. Kako biste vidjeli priručnik na vašem računalu ili mobilnom uređaju preuzmite ga s mrežne stranice u obliku dokumenta. (http://www.samsung.com/support)
natural_image
Three mechanical component images: a handle, a clip, and a screw (no text or symbols)Držač kabela Potporne nožice (2 komada) Vijak
(za potporne nožice : 2 komada)
(za držač kabela : 1 komada)
- Za komponente za postavljanje Soundbara na zid pogledajte stranicu 29.
- Upute za uporabu Držač kabela potražite na str. 31.
- Dodatne komponente ili kabele možete kupiti putem Samsungovog servisnog centra ili Službe za korisničku podršku tvrtke Samsung.
- Izgled dodatnog pribora može se malo razlikovati od gornjih crteža.
Umetanje baterija prije upotrebe daljinskog upravljača (AA baterije X 2)
text_image
Diagram illustrating the step-by-step disassembly of a remote control panel into a battery, showing internal components and charge distribution.02 PREGLED PROIZVODA
Prednja ploča / Ploča na desnoj strani uređaja Soundbar

text_image
Namjestite proizvod tako da logotip SAMSUNG bude na vrhu. Desna strana uređaja Soundbar 1 2 3 4| 1 | ZaslonPrikazuje status proizvoda i trenutni način. | |
| 2 | Gumb -/+ (Glasnoća)Prilagođava glasnoću.• Prilikom prilagođavanja razine glasnoća se prikazuje na prednjem zaslonu uređaja Soundbar. | |
| 3 | Gumb (Izvor)Odabir načina unosa izvora. | |
| Način unosa Zaslon | ||
| Optički digitalni ulaz D.IN | ||
| Unos ARC (HDMI OUT) | D.IN → TV ARC (Automatska pretvorba) | |
| Unos AUX AUX | ||
| Unos HDMI HDMI | ||
| Način Wi-Fi WIFI | ||
| Način BLUETOOTH BT | ||
| • Za uključivanje načina „BT PAIRING” promijenite izvor u način „BT”, a zatim pritisnite i držite gumb (Izvor) duže od 5 sekundi. | ||
| 4 | Gumb (Napajanje)Uključuje i isključuje napajanje. | |
- Kad priključite kabel napajanja, tipka napajanja radi još 4 do 6 sekundi.
- Kad uključite napajanje ove jedinice, početak reprodukcije zvuka kasnit će 4 do 5 sekundi.
- Ako želite uživati u zvuku koji se reproducira samo putem uređaja Soundbar, zvučnike televizora morate isključiti u izborniku Postavke zvuka televizora. Pogledajte priručnik TV-a koji je isporučen uz TV.
Donja ploča uređaja Soundbar

text_image
POWER OUT (For TV) POWER IN DIGITAL AUDIO IN (OPTICAL) WIRELESS AUX IN HDMI IN HDMI OUT (TV-ARC) Wi-Fi SETUP SPK ADD| 1 | POWER OUT (For TV)Priključite kabel za napajanje televizora Samsung povezanog sa sustavom Soundbar i montiranog na zid pomoću kompleta za zidnu montažu (WMN300SB – nije isporučen). |
| 2 | POWER INSpojite kabel za napajanje izmjeničnom strujom sustava Soundbar. |
| 3 | DIGITAL AUDIO IN (OPTICAL)Povežite na digitalni (optički) izlaz vanjskog uredaja. |
| 4 | WIRELESPriključite hardverski ključ za bežičnu vezu kojim se sustav Soundbar bežično povezuje sa surround zvučnicima i subwooferom (surround zvučnik, subwoofer i hardverski ključ za bežičnu vezu prodaju se zasebno).Utičnica WIRELESS nije kompatibilna s USB uređajima.Dostupnost subwoofera ovisi o području. Dostupnost možete provjeriti na http://www.samsung.com/support. |
| 5 | AUX INPovežite na analogni izlaz vanjskog uredaja. |
| 6 | HDMI INUnosi digitalne video i audio signale istovremeno pomoću kabela HDMI.Povežite na izlaz HDMI vanjskog uređaja. |
| 7 | HDMI OUT (TV-ARC)Povežite s priključkom HDMI (ARC) na televizoru. |
| 8 | Wi-Fi SETUP / SPK ADDPovežite se s bežičnom mrežom (Wi-Fi) putem aplikacije Samsung Multiroom. |
natural_image
Circular gray button with a play symbol and double arrow icon (no text or numbers)- Auto Power Link postavljeno je na ON prema zadanim postavkama.
(Za isključivanje ove funkcije isključite Auto Power pomoću Soundbara.) - Ovisno o povezanom uređaju Auto Power Link možda neće raditi.
- Ova je funkcija dostupna samo u načinu „D.IN”.
Povezivanje televizora pomoću kabela HDMI

flowchart
graph TD
    A["TV"] --> B["HDMI IN (ARC)"]
    B --> C["Kabel HDMI (nije priloženo)"]
    C --> D["Donji dio uređaja Soundbar"]
    D --> E["HDMI OUT (TV-ARC)"]
    E --> F["Desna strana uređaja Soundbar"]
    B --> G["Spojite u priključak HDMI IN (ARC) na televizoru."]
    E --> H["Spojite u priključak HDMI OUT (TV-ARC) na glavnoj jedinici Soundbar."]
    F --> I["TV ARC"]
- S uključenim Soundbarom i TV-om priključite kabel HDMI (nije priložen) kao što je prikazano na slici.
- „TV ARC” se prikazuje u prozoru zaslona glavne jedinice Soundbar i zvuk televizora se reproducira pomoću Soundbara.
- Ako se zvuk televizora ne čuje, pritisnite gumb ➞ (Izvor) na daljinskom upravljaču na desnoj strani Soundbara kako biste promijenili način u „D.IN”. Na zaslonu se prikazuju „D.IN” i „TV ARC” u nizu i zvuk s televizora se reproducira.
text_image
[Samsung] R3 Q My Phone ... SETTINGS Add Speaker Alarm- Da biste povezali Soundbar s 2 bežična zvučnika Samsung i konfigurirali sustav surround zvuka, slijedite dolje navedene korake (Sustav surround zvuka ne možete postaviti pomoću jednog audiouređaja i jednog sustava Soundbar).
① Dodimite da biste otvorili popis svih zvučnika.
② Dodirnite desno od naziva modela sustava Soundbar.
③ Dodirnite Surround Setup. Odaberite Done nakon što ste povukli zvučnik na željeno mjesto.
flowchart
graph LR
    A["Start building your connected world by adding. This application, and other devices."] --> B["Add device"]
    B --> C["Add Now"]
    C --> D["Registering device..."]
    D --> E["Add Device"]
Pokrenite aplikaciju Dodajte zvačkiškočni prozor
flowchart
graph LR
    A["Aplikacija Amazon Alexa"] --> B["Adobe: a red square with 'smart home' icon"]
    B --> C["Adobe: a red square with 'smart home' icon"]
    C --> D["Adobe: a red square with 'devices' icon"]
    D --> E["Adobe: a red square with 'devices' icon"]
    E --> F["Adobe: a red square with 'devices' icon"]
    F --> G["Adobe: a red square with 'devices' icon"]
    G --> H["Adobe: a red square with 'devices' icon"]
    H --> I["Adobe: a red square with 'devices' icon"]
    I --> J["Adobe: a red square with 'devices' icon"]
    J --> K["Adobe: a red square with 'devices' icon"]
    K --> L["Adobe: a red square with 'devices' icon"]
    L --> M["Adobe: a red square with 'devices' icon"]
    M --> N["Adobe: a red square with 'devices' icon"]
    N --> O["Adobe: a red square with 'devices' icon"]
    O --> P["Adobe: a red square with 'devices' icon"]
    P --> Q["Adobe: a red square with 'devices' icon"]
    Q --> R["Adobe: a red square with 'devices' icon"]
    R --> S["Adobe: a red square with 'devices' icon"]
    S --> T["Adobe: a red square with 'devices' icon"]
    T --> U["Adobe: a red square with 'devices' icon"]
    U --> V["Adobe: a red square with 'devices' icon"]
    V --> W["Adobe: a red square with 'devices' icon"]
    W --> X["Adobe: a red square with 'devices' icon"]
    X --> Y["Adobe: a red square with 'devices' icon"]
    Y --> Z["Adobe: a red square with 'devices' icon"]
    Z --> AA["Adobe: a red square with 'devices' icon"]
    AA --> AB["Adobe: a red square with 'devices' icon"]
    AB --> AC["Adobe: a red square with 'devices' icon"]
    AC --> AD["Adobe: a red square with 'devices' icon"]
    AD --> AE["Adobe: a red square with 'devices' icon"]
    AE --> AF["Adobe: a red square with 'devices' icon"]
    AF --> AG["Adobe: a red square with 'devices' icon"]
    AG --> AH["Adobe: a red square with 'devices' icon"]
    AH --> AI["Adobe: a red square with 'devices' icon"]
    AI --> AJ["Adobe: a red square with 'devices' icon"]
    AJ --> AK["Adobe: a red square with 'devices' icon"]
    AK --> AL["Adobe: a red square with 'devices' icon"]
    AL --> AM["Adobe: a red square with 'devices' icon"]
    AM --> AN["Adobe: a red square with 'devices' icon"]
    AN --> AO["Adobe: a red square with 'devices' icon"]
    AO --> AP["Adobe: a red square with 'devices' icon"]
    AP --> AQ["Adobe: a red square with 'devices' icon"]
    AQ --> AR["Adobe: a red square with 'devices' icon"]
    AR --> AS["Adobe: a red square with 'devices' icon"]
    AS --> AT["Adobe: a red square with 'devices' icon"]
    AT --> AU["Adobe: a red square with 'devices' icon"]
    AU --> AV["Adobe: a red square with 'devices' icon"]
    AV --> AW["Adobe: a red square with 'devices' icon"]
    AW --> AX["Adobe: a red square with 'devices' icon"]
    AX --> AY["Adobe: a red square with 'devices' icon"]
    AY --> AZ["Adobe: a red square with 'devices' icon"]
    AZ --> BA["Adobe: a red square with 'devices' icon"]
    BA --> BB["Adobe: a red square with 'devices' icon"]
    BB --> BC["Adobe: a red square with 'devices' icon"]
    BC --> BD["Adobe: a red square with 'devices' icon"]
    BD --> BE["Adobe: a red square with 'devices' icon"]
    BE --> BF["Adobe: a red square with 'devices' icon"]
    BF --> BG["Adobe: a red square with 'devices' icon"]
    BG --> BH["Adobe: a red square with 'devices' icon"]
    BH --> BI["Adobe: a red square with 'devices' icon"]
    BI --> BJ["Adobe: a red square with 'devices' icon"]
    BJ --> BK["Adobe: a red square with 'devices' icon"]
    BK --> BL["Adobe: a red square with 'devices' icon"]
    BL --> BM["Adobe: a red square with 'devices' icon"]
    BM --> BN["Adobe: a red square with 'devices' icon"]
    BN --> BO["Adobe: a red square with 'devices' icon"]
    BO --> BP["Adobe: a red square with 'devices' icon"]
    BP --> BQ["Adobe: a red square with 'devices' icon"]
    BQ --> BR["Adobe: a red square with 'devices' icon"]
    BR --> BS["Adobe: a red square with 'devices' icon"]
    BS --> BT["Adobe: a red square with 'devices' icon"]
    BT --> BU["Adobe: a red square with 'devices' icon"]
    BU --> BV["Adobe: a red square with 'devices' icon"]
    BV --> BW["Adobe: a red square with 'devices' icon"]
    BW --> BX["Adobe: a red square with 'devices' icon"]
    BX --> BY["Adobe: a red square with 'devices' icon"]
    BY --> BZ["Adobe: a red square with 'devices' icon"]
    BZ --> CA["Adobe: a red square with 'devices' icon"]
    CA --> CB["Adobe: a red square with 'devices' icon"]
    CB --> CC["Adobe: a red square with 'devices' icon"]
    CC --> CD["Adobe: a red square with 'devices' icon"]
    CD --> CE["Adobe: a red square with 'devices' icon"]
    CE --> CF["Adobe: a red square with 'devices' icon"]
    CF --> CG["Adobe: a red square with 'devices' icon"]
    CG --> CH["Adobe: a red square with 'devices' icon"]
    CH --> CI["Adobe: a red square with 'devices' icon"]
    CI --> CJ["Adobe: a red square with 'devices' icon"]
    CJ --> CK["Adobe: a red square with 'devices' icon"]
    CK --> CL["Adobe: a red square with 'devices' icon"]
    CL --> CM["Adobe: a red square with 'devices' icon"]
    CM --> CN["Adobe: a red square with 'devices' icon"]
    CN --> CO["Adobe: a red square with 'devices' icon"]
    CO --> CP["Adobe: a red square with 'devices' icon"]
    CP --> CQ["Adobe: a red square with 'devices' icon"]
    CQ --> CR["Adobe: a red square with 'devices' icon"]
    CR --> CS["Adobe: a red square with 'devices' icon"]
    CS --> CT["Adobe: a red square with 'devices' icon"]
    CT --> CU["Adobe: a red square with 'devices' icon"]
    CU --> CV["Adobe: a red square with 'devices' icon"]
    CV --> CW["Adobe: a red square with 'devices' icon"]
    CW --> CX["Adobe: a red square with 'devices' icon"]
    CX --> CY["Adobe: a red square with 'devices' icon"]
    CY --> CZ["Adobe: a red square with 'devices' icon"]
08 UPRAVLJANJE SUSTAVOM SOUNDBAR PUTEM UREĐAJA AMAZON
natural_image
Two technical illustrations of screw components: a pulley and a threaded screw (no text or symbols)Vijak (2 komada)
Vijak držača
(2 komada)

natural_image
Simple line drawing of a mobile phone slot (no text or symbols)Zidni nosač (2 komada)
text_image
Diagram showing a device with a screen and a pen, labeled with 'unlabeled' and 'yes' indicators.natural_image
Diagram showing a screw being inserted into a pin, with arrows indicating direction (no text or symbols)natural_image
Mechanical assembly diagram showing a screw being inserted into a housing component with a circular arrow indicating rotation (no text or symbols present)natural_image
Illustration of a remote control device with buttons and power symbol (no text or labels)natural_image
Diagram showing a beam being reduced from a flat surface, with arrows indicating force direction (no text or symbols present)natural_image
Diagram showing a mechanical assembly with a screw inserted into a component, and a close-up of the component being inserted (no text or symbols present)
text_image
Postavljanje sustava Soundbar11 AŽURIRANJE SOFTVERA
Kada je Soundbar povezan s internetom, softver se ažurira automatski, čak i kada je Soundbar isključen.
- Da biste upotrijebili funkciju Auto Update (Autom. ažur.), proizvod mora biti povezan s internetom. Bežična veza sa sustavom Soundbar prekinut će se ako se kabel za napajanje sustava isključi ili ako dođe do prekida napajanja. Ako se napajanje isključi, uključite sustav Soundbar i ponovno ga povežite.
12 RJEŠAVANJE PROBLEMA
Manufactured under license from Dolby Laboratories. Dolby, Dolby Audio, Pro Logic, and the double-D symbol are trademarks of Dolby Laboratories.

dts
Digital Surround
For DTS patents, see http://patents.dts.com. Manufactured under license from DTS Licensing Limited. DTS, the Symbol, DTS in combination with the Symbol, and DTS Digital Surround are registered trademarks or trademarks of DTS, Inc. in the United States and/or other countries. © DTS, Inc. All Rights Reserved.

The terms HDMI and HDMI High-Definition Multimedia Interface, and the HDMI Logo are trademarks or registered trademarks of HDMI Licensing LLC in the United States and other countries.

Spotify®
- Softver Spotify predmet je licence treće strane koju možete pronaći ovdje: www.spotify.com/connect/third-party-licenses.
- Za više informacija o softveru Spotify Connect posjetite stranicu www.spotify.com/connect
14 OBAVIJEST O LICENCI ZA UPORABU SOFTVERA OTVORENOG KODA
Za dodatne informacije o otvorenom kodu korištenom u ovom proizvodu, posjetite: http://opensource.samsung.com
15 VAŽNA NAPOMENA VEZANA UZ SERVIS
- Slike u ovom korisničkom priručniku služe kao samo kao referenca i mogu se razlikovati od stvarnog izgleda proizvoda.
- Moquća je naplata administrativne pristojbe u slučaju
natural_image
Illustration of a person sitting on a sofa using a laptop (no text or symbols visible)UŽIVATELSKÁ PŘÍRUČKA
natural_image
Illustration of a person sitting on a sofa next to a laptop and desk (no text or symbols)
KOMPLETNÍ PŘÍRUČKA
text_image
Diagram illustrating the step-by-step disassembly of a battery into a motor, showing charge distribution and polarity changes.02 POPIS VÝROBKU
natural_image
Circular play button icon with double arrow symbol (no text or numbers)text_image
[Samsung] R3 My Phone ... SETTINGS Add Speaker Alarmflowchart
graph LR
    A["User Hand Icon"] --> B["Add Device"]
    B --> C["Add Device to Add Device"]
    C --> D["Registering Device to Registered Device"]
    D --> E["ALL Devices ADD DEVICE"]
natural_image
Two technical illustrations of mechanical components: a pulley and a screw (no text or symbols)natural_image
Simple line drawing of a mobile phone bracket (no text or symbols)text_image
Control Unit Usernatural_image
Diagram showing a screw being inserted into a pin, with arrows indicating direction (no text or symbols)natural_image
Mechanical assembly diagram showing a screw being inserted into a bracket with a circular motion indicator (no text or symbols)natural_image
Diagram of a device with power and signal icons (no text or labels)natural_image
Diagram showing a beam being reduced from an angle to a flat surface, with arrows indicating direction of motion (no text or symbols present)flowchart
graph TD
    A["Top: Device icon"] --> B["Downward arrow"]
    B --> C["Bottom: Device icon with downward arrow"]
Manufactured under license from Dolby Laboratories. Dolby, Dolby Audio, Pro Logic, and the double-D symbol are trademarks of Dolby Laboratories.

dts
Digital Surround
For DTS patents, see http://patents.dts.com. Manufactured under license from DTS Licensing Limited. DTS, the Symbol, DTS in combination with the Symbol, and DTS Digital Surround are registered trademarks or trademarks of DTS, Inc. in the United States and/or other countries. © DTS, Inc. All Rights Reserved.

The terms HDMI and HDMI High-Definition Multimedia Interface, and the HDMI Logo are trademarks or registered trademarks of HDMI Licensing LLC in the United States and other countries.

Spotify®
natural_image
Illustration of a person sitting on a sofa using a laptop (no text or symbols visible)BENUTZERHANDBUCH
natural_image
Illustration of a person sitting on a couch next to a desk with a laptop (no text or symbols visible)
VOLLSTÄNDIGES HANDBUCH
natural_image
Diagram showing three stages of battery charging process: open, open with internal components, and closed (no text or symbols)02 PRODUKTÜBERSICHT
natural_image
Circular play button icon with a double arrow symbol inside, no text or labels present.text_image
[Samsung] R3 My Phone Q ... SETTINGS Add Speaker Alarmflowchart
graph LR
    A["User Input"] --> B["Connect App"]
    B --> C["Add device: Start building your connected world by adding This application, and other devices. Supported Devices"]
    C --> D["Now to use: Discover verbal lecture"]
    D --> E["Add device: Add new"]
    E --> F["Add device: Add new"]
    F --> G["Registering device: Audio is being registered to your Samsung account. After the device is registered, setup will be complete."]
    G --> H["All Devices: ADD DEVICE with [Av"] Samsung]
flowchart
graph LR
    A["Amazon Alexa-App"] --> B["Smart Home auswählen"]
    B --> C["Devices auswählen Gerät finden"]

    subgraph Smart Home auswählen
        D["Home"] --> E["Things to Try"]
        E --> F["I love you"]
        F --> G["Features, help me like"]
        G --> H["User feedback"]
        H --> I["Smart Home Skills (inferred)"]
        I --> J["Groups"]
        I --> K["Scenes"]
        I --> L["Configure Smart Home"]
        I --> M["Smart Home Skills (inferred)"]
    end

    subgraph Devices auswählen
        N["Smart Home"] --> O["Groups"]
        O --> P["Devices"]
        P --> Q["Scenes"]
        Q --> R["Configure Smart Home"]
        R --> S["Smart Home Skills (inferred)"]
        S --> T["Devices"]
        T --> U["Enable smart home skills to control devices with Alexa, if you've already enabled your skill, discover devices below."]
        U --> V["SMART HOME SKILL"]
        V --> W["Discover"]
        W --> X["ALEXA SMART HOME"]
    end
08 STEUERN IHRER SOUNDBAR MIT EINEM AMAZON-GERÄT
text_image
100mm C25text_image
Diagram showing a device with a screen and a pen, labeled with Chinese text and symbols.natural_image
Diagram showing a screw being inserted into a pinhole, with arrows indicating direction (no text or symbols)natural_image
Mechanical assembly diagram showing a screw being inserted into a housing component with a circular base (no text or symbols)natural_image
Diagram showing a mechanical component before and after cutting, with arrows indicating motion direction (no text or symbols)flowchart
graph TD
    A["Step 1: Top Section"] --> B["Step 2: Bottom Section"]
    B --> C["Downward arrow"]
    C --> D["Downward arrow"]
Manufactured under license from Dolby Laboratories. Dolby, Dolby Audio, Pro Logic, and the double-D symbol are trademarks of Dolby Laboratories.


Digital Surround
For DTS patents, see http://patents.dts.com. Manufactured under license from DTS Licensing Limited. DTS, the Symbol, DTS in combination with the Symbol, and DTS Digital Surround are registered trademarks or trademarks of DTS, Inc. in the United States and/or other countries. © DTS, Inc. All Rights Reserved.

The terms HDMI and HDMI High-Definition Multimedia Interface, and the HDMI Logo are trademarks or registered trademarks of HDMI Licensing LLC in the United States and other countries.

Spotify®
www.spotify.com/connect/third-party-licenses.
www.spotify.com/connect
14 BEKANNTMACHUNG ZU OPEN SOURCE LIZENZEN
natural_image
Illustration of a person sitting on a couch next to a desk with a laptop (no text or symbols visible)
TÄIELIKUST KASUTUSJUHENDIST
text_image
Diagram illustrating the step-by-step disassembly of a remote control device into a battery, showing charge states and polarity.02 TOOTE ÜLEVAADE
Soundbari esipaneel / parempoolne paneel

natural_image
Circular play button icon with no text or symbolstext_image
Bluetooth-seadetext_image
[Samsung] R3 My Phone ... SETTINGS Add Speaker Alarmflowchart
graph LR
    A["Start with a network icon"] --> B["Connect: Start building your connected world by adding This application, and other devices."]
    B --> C["Add device: Start building your connected world by adding This application, and other devices."]
    C --> D["Supported Devices: Supported Devices and supported Devices"]
    D --> E["Now to use: Additional useful features: USB, USB, USB, USB"]
    E --> F["Add device: Add device to Samsung Soundbar"]
    F --> G["Add device: Add device to Samsung Connect?"]
    G --> H["After the device is registered, setup will be complete."]
    H --> I["Registering device: Audio is being registered to your Samsung account."]
    I --> J["All Devices: All Devices and Device Added Device"]
Käivitage rakendus Kölarite lisamineAutomaatne hüpikaken
flowchart
graph LR
    A["Input Image"] --> B["ALL DEVICES"]
    B --> C["Add scene"]
    C --> D["[AV"] Samsung]
    D --> E["You can only delete your own devices that are in locations that you."]
    E --> F["EXIT"]
    F --> G["[AV"] Samsung]
    G --> H["Device name: [AV"] Samsung]
    H --> I["EXIT"]
    I --> J["CANCEL"]
    J --> K["SAVE"]
    K --> L["Muutke nime"]
    L --> M["CANCEL"]
    M --> N["SAVE"]
    N --> O["SalvestaValige Edit"]
- Leidke rakenduse Alexa jaotises Skills valik „Samsung Wireless Audio“ ja valige „ENABLE“.
flowchart
graph LR
    A["Rakendus Amazon Alexa"] --> B["Valige Skills"]
    B --> C["Otsige"]
    C --> D["Search"]
    D --> E["Luba"]

Legend:
- Rakingus Amazon Alexa
- Amazon
- alexa

    subgraph Valige Skills
        B1["Valige Skills: I love you, I have a new user"]
        B2["Valige Skills: I love you, I have a new user"]
        B3["Valige Skills: I love you, I have a new user"]
        B4["Valige Skills: I love you, I have a new user"]
        B5["Valige Skills: I love you, I have a new user"]
        B6["Valige Skills: I love you, I have a new user"]
        B7["Valige Skills: I love you, I have a new user"]
        B8["Valige Skills: I love you, I have a new user"]
        B9["Valige Skills: I love you, I have a new user"]
        B10["Valige Skills: I love you, I have a new user"]
        B11["Valige Skills: I love you, I have a new user"]
        B12["Valige Skills: I love you, I have a new user"]
        B13["Valige Skills: I love you, I have a new user"]
        B14["Valige Skills: I love you, I have a new user"]
        B15["Valige Skills: I love you, I have a new user"]
        B16["Valige Skills: I love you, I have a new user"]
        B17["Valige Skills: I love you, I have a new user"]
        B18["Valige Skills: I love you, I have a new user"]
        B19["Valige Skills: I love you, I have a new user"]
        B20["Valige Skills: I love you, I have a new user"]
        B21["Valige Skills: I love you, I have a new user"]
        B22["Valige Skills: I love you, I have a new user"]
        B23["Valige Skills: I love you, I have a new user"]
        B24["Valige Skills: I love you, I have a new user"]
        B25["Valige Skills: I love you, I have a new user"]
        B26["Valige Skills: I love you, I have a new user"]
        B27["Valige Skills: I love you, I have a new user"]
        B28["Valige Skills: I love you, I have a new user"]
        B29["Valige Skills: I love you, I have a new user"]
        B30["Valige Skills: I love you, I have a new user"]
        B31["Valige Skills: I love you, I have a new user"]
        B32["Valige Skills: I love you, I have a new user"]
        B33["Valige Skills: I love you, I have a new user"]
        B34["Valige Skills: I love you, I have a new user"]
        B35["Valige Skills: I love you, I have a new user"]
        B36["Valige Skills: I love you, I have a new user"]
        B37["Valige Skills: I love you, I have a new user"]
        B38["Valige Skills: I love you, I have a new user"]
        B39["Valige Skills: I love you, I have a new user"]
        B40["Valige Skills: I love you, I have a new user"]
        B41["Valige Skills: I love you, I have a new user"]
        B42["Valige Skills: I love you, I have a new user"]
        B43["Valige Skills: I love you, I have a new user"]
        B44["Valige Skills: I love you, I have a new user"]
        B45["Valige Skills: I love you, I have a new user"]
        B46["Valige Skills: I love you, I have a new user"]
        B47["Valige Skills: I love you, I have a new user"]
        B48["Valige Skills: I love you, I have a new user"]
        B49["Valige Skills: I love you, I have a new user"]
        B50["Valige Skills: I love you, I have a new user"]
        B51["Valige Skills: I love you, I have a new user"]
        B52["Valige Skills: I love you, I have a new user"]
        B53["Valige Skills: I love you, I have a new user"]
        B54["Valige Skills: I love you, I have a new user"]
        B55["Valige Skills: I love you, I have a new user"]
        B56["Valige Skills: I love you, I have a new user"]
        B57["Valige Skills: I love you, I have a new user"]
        B58["Valige Skills: I love you, I have a new user"]
        B59["Valige Skills: I love you, I have a new user"]
        B60["Valige Skills: I love you, I have a new user"]
        B61["Valige Skills: I love you, I have a new user"]
        B62["Valige Skills: I love you, I have a new user"]
        B63["Valige Skills: I love you, I have a new user"]
        B64["Valige Skills: I love you, I have a new user"]
        B65["Valige Skills: I love you, I have a new user"]
        B66["Valige Skills: I love you, I have a new user"]
        B67["Valige Skills: I love you, I have a new user"]
        B68["Valige Skills: I love you, I have a new user"]
        B69["Valige Skills: I love you, I have a new user"]
        B70["Valige Skills: I love you, I have a new user"]
        B71["Valige Skills: I love you, I have a new user"]
        B72["Valige Skills: I love you, I have a new user"]
        B73["Valige Skills: I love you, I have a new user"]
        B74["Valige Skills: I love you, I have a new user"]
        B75["Valige Skills: I love you, I have a new user"]
        B76["Valige Skills: I love you, I have a new user"]
        B77["Valige Skills: I love you, I have a new user"]
        B78["Valige Skills: I love you, I have a new user"]
        B79["Valige Skills: I love you, I have a new user"]
        B80["Valige Skills: I love you, I have a new user"]
    end
    subgraph Valige Skills
    end
    subgraph Otsige
    end
    subgraph Search
    end
    subgraph Luba
    end
- Toksake rakenduse Alexa jaotises Smart Home valikut „Discover Device“.

flowchart
graph LR
    A["Rakingus Amazon Alexa"] --> B["Valige Smart Home"]
    B --> C["Valige Devices Otsi seadet"]

    subgraph "Rakingus Amazon Alexa"
        A1["amazon alexa"]
        A2["Redacted with hand icon"]
    end

    subgraph "Valige Smart Home"
        B1["Home: 3.0x 1.0x 0.5x 0.2x 0.1x 0.0x 0.0x 0.0x 0.0x 0.0x 0.0x 0.0x 0.0x 0.0x 0.0x 0.0x 0.0x 0.0x 0.0x 0.0x 0.0x 0.0x 0.0x 0.0x 0.0x 0.1"]
        B1 --> B1a["Things to Try"]
        B1 --> B1b["Thanks, I'm good to a"]
        B1 --> B1c["I love you"]
        B1 --> B1d["Thank you with"]
        B1 --> B1e["Check if you need to add"]
        B1 --> B1f["Thank you with"]
        B1 --> B1g["Thank you with"]
        B1 --> B1h["Thank you with"]
        B1 --> B1i["Thank you with"]
        B1 --> B1j["Thank you with"]
        B1 --> B1k["Thank you with"]
        B1 --> B1l["Thank you with"]
        B1 --> B1m["Thank you with"]
        B1 --> B1n["Thank you with"]
        B1 --> B1o["Thank you with"]
        B1 --> B1p["Thank you with"]
        B1 --> B1q["Thank you with"]
        B1 --> B1r["Thank you with"]
        B1 --> B1s["Thank you with"]
        B1 --> B1t["Thank you with"]
        B1 --> B1u["Thank you with"]
        B1 --> B1v["Thank you with"]
        B1 --> B1w["Thank you with"]
        B1 --> B1x["Thank you with"]
        B1 --> B1y["Thank you with"]
        B1 --> B1z["Thank you with"]
        B1 --> B1w
        B1 --> B1v
        B1 --> B1w
        B1 --> B1v
        B1 --> B1w
        B1 --> B1v
    end

    subgraph "Valige Smart Home"
        C1["Smart Home"] --> C2["Groups"] --> C3["Devices"] --> C4["Scenes"] --> C5["Configure Smart Home"]
        C5 --> C6["Smart Home Skills"] --> C7["Enabled"] --> C8["Device"] --> C9["Disable smart home skills to control devices with Alexa, If you've already enabled your skill, discover devices below, SMART HOME SKILL"] --> C9
    end

    subgraph "Valige Devices Otsi seadet"
        D1["Devices"] --> D2["Enable smart home skills to control devices with Alexa, If you've already enabled your skill, discover devices below, SMART HOME SKILL"] --> D3["DISCOVER"] --> D4["ALEXA SMART HOME SKILL"]
    end
08 SOUNDBARI JUHTIMINE AMAZONI SEADMEGA
natural_image
Two technical illustrations of mechanical components: a pulley and a screw (no text or symbols)Hoidikkruvi (2 tk) Kruvi (2 tk)

natural_image
Simple line drawing of a mobile phone bracket (no text or symbols)Seinakinnituskronsteini (2 tk)
1. Asetage Seinakinnitusjuhik vastu seinapinda.
- Seinakinnitusjuhik peab olema loodis.
- Kui teler on seinale kinnitatud, paigaldage Soundbar vähemalt 5 cm telerist allapoole.

text_image
TV Vähemalt 5 cmtext_image
Diagram showing a device with a screen and a pen, labeled with Chinese text and symbols.natural_image
Diagram showing a screw being inserted into a pulley, with motion arrows indicating direction (no text or symbols)natural_image
Diagram of a mechanical component with a screw and circular base, showing rotational motion (no text or symbols)- Kokkupanekul veenduge, et Seinakinnituskronstein riputusosad jääksid Soundbari taha.

text_image
Soundbari tagakülg Heliriba parempoolne ots- Paigaldage Soundbar koos selle külge kinnitatud Seinakinnituskronstein, riputades Seinakinnituskronstein seinal olevatele Hoidikkruvi.

natural_image
Diagram showing a beam being reduced from an angle to a flat surface, with arrows indicating direction of motion (no text or symbols present)- Libistage Soundbari alla, nagu on allpool näidatud, nii et Seinakinnituskronstein toetuksid Kruvihoidikutele.
- Sisestage Kruvihoidikutele Seinakinnituskronstein laia (alumisse) ossa ja seejärel libistage Seinakinnituskronstein allapoole, nii et Seinakinnituskronstein toetuksid kindlalt Kruvihoidikutele.

flowchart
graph TD
    A["Step 1: Initial state"] --> B["Step 2: Increase or decrease"]
    B --> C["Downward arrow"]
Kaablihoidiku paigaldamine
natural_image
Diagram showing a car interior with screwdriver inserted into a slot, and a close-up of the slot being inserted (no text or symbols present)
Manufactured under license from Dolby Laboratories. Dolby, Dolby Audio, Pro Logic, and the double-D symbol are trademarks of Dolby Laboratories.

dts Digital Surround
For DTS patents, see http://patents.dts.com. Manufactured under license from DTS Licensing Limited. DTS, the Symbol, DTS in combination with the Symbol, and DTS Digital Surround are registered trademarks or trademarks of DTS, Inc. in the United States and/or other countries. © DTS, Inc. All Rights Reserved.

The terms HDMI and HDMI High-Definition Multimedia Interface, and the HDMI Logo are trademarks or registered trademarks of HDMI Licensing LLC in the United States and other countries.

Spotify®
- Spotify Software allub muu osapoole litsentsidele, mille leiate siit: www.spotify.com/connect/third-party-licenses.
- Lisateavet Spotify Connecti kohta vt veebisaidilt www.spotify.com/connect.
14 AVATUD LÄHTEKOODI LITSENTSI TEATIS
natural_image
Illustration of a person sitting on a couch next to a computer (no text or symbols visible)
MANUEL COMPLET
text_image
Diagram illustrating the step-by-step disassembly of a battery into a closed casing, showing charge distribution and polarity changes.02 PRÉSENTATION DU PRODUIT
natural_image
Circular gray button with a play symbol and double arrow icon (no text or numbers)text_image
[Samsung] R3 My Phone Add Speaker Alarmflowchart
graph LR
    A["Application Amazon Alexa"] --> B["Home Screen"]
    B --> C["Selectioner Skills"]
    C --> D["Rechercher"]
    D --> E["Search"]
    E --> F["Activer"]

    subgraph Legend
        G["amazon alexa"]
        H["Home Display"]
        I["I Love you"]
        J["Things to Try"]
        K["Settings"]
        L["Help & Purchase"]
        M["User Menu/Sign out"]
        N["Timer set for 00:10"]
    end

    G --> H
    H --> I
    I --> J
    J --> K
    K --> L
    L --> M
    M --> N
    N --> O["Search Engine"]
    O --> P["Search Engine User Interface"]
    P --> Q[Search Engine User Interface User Interface User Interface User Interface User Interface User Interface User Interface User Interface User Interface User Interface User Interface User Interface User Interface User Interface User Interface User Interface User Interface User Interface User Interface User Interface User Interface User Interface User Interface User Interface User Interface User Interface User Interface User Interface User Interface User Interface User Interface User Interface User Interface User Interface User Interface User Interface User Interface User Interface User Interface User Interface User Interface User Interface User Interface User Interface User Interface User Interface User Interface User Interface User Interface User Interface User Intermediate
    G --> H
    H --> I
    I --> J
    J --> K
    K --> L
    L --> M
    M --> N
    N --> O
    O --> P
    P --> Q
Application Amazon Alexa
natural_image
Two technical illustrations of mechanical components: a pulley and a screw (no text or symbols)Vis (2 pièces)
natural_image
Simple line drawing of a mobile phone case (no text or symbols)text_image
TV 5 cm minimumtext_image
Diagram showing a mechanical or electrical component with labeled parts and a pointer indicating direction.natural_image
Diagram showing a screw being inserted into a pin, with motion arrows indicating direction (no text or symbols)natural_image
Diagram of a mechanical component with a screw and circular base, showing rotational motion (no text or symbols)natural_image
Diagram showing a beam being reduced from a flat plate to a rectangular block, with arrows indicating force direction (no text or symbols)natural_image
Diagram showing a mechanical assembly with a screw inserted into a component, and a magnified inset highlighting the insertion point (no text or symbols present)
text_image
Mettez la Soundbar en place11 MISE À JOUR DU LOGICIEL
Manufactured under license from Dolby Laboratories. Dolby, Dolby Audio, Pro Logic, and the double-D symbol are trademarks of Dolby Laboratories.


For DTS patents, see http://patents.dts.com. Manufactured under license from DTS Licensing Limited. DTS, the Symbol, DTS in combination with the Symbol, and DTS Digital Surround are registered trademarks or trademarks of DTS, Inc. in the United States and/or other countries. © DTS, Inc. All Rights Reserved.

The terms HDMI and HDMI High-Definition Multimedia Interface, and the HDMI Logo are trademarks or registered trademarks of HDMI Licensing LLC in the United States and other countries.

Spotify®
natural_image
Illustration of a person sitting on a sofa using a laptop (no text or symbols visible)ΕΓΧΕΙΡΙΔΙΟ ΧΡΗΣΗΣ
natural_image
Illustration of a person sitting on a couch next to a desk with a laptop (no text or symbols visible)
ΠΛΗΡΕΣ ΕΓΧΕΙΡΙΔΙΟ
text_image
Diagram illustrating the step-by-step disassembly of a remote control device into a battery, showing internal components and polarity.natural_image
Circular gray button with a play symbol and double arrow icon (no text or numbers)text_image
[Samsung] R3 My Phone ... < SETTINGS Add Speaker Alarmflowchart
graph LR
    A["Input Image"] --> B["Connect"]
    B --> C["Add device"]
    C --> D["Supported Devices"]
    D --> E["How to use"]
    E --> F["Anovyma εφαρμογής"]
    F --> G["Connect"]
    G --> H["Auto-matn aváδυση παραθύρου"]
    H --> I["Registering device..."]
    I --> J["Audio is being registered to your Samsung account."]
    J --> K["After the device is registered, setup will be complete."]
    K --> L["Proσθήκη ηχείου"]
    L --> M["ALL DEVICES"]
    M --> N["[AV"] Samsung]
flowchart
graph LR
    A["Amazon Alexa"] --> B["Επιλέξτε Skills"]
    B --> C["Avaζήτηση"]
    C --> D["Ενεργοποίηση"]

    subgraph Skills
        E["Home: New Playing, Puzzle & Audio, LRF, Smartphone & Tablet"]
        F["I love you, I have you, I want to try, I want to try"]
        G["Search: Google's 2023 English Language & Social Media"]
        H["Search: Google's 2023 English Language & Social Media"]
        I["Search: Google's 2023 English Language & Social Media"]
    end

    subgraph Avacção
        J["Search: Google's 2023 English Language & Social Media"]
        K["Search: Google's 2023 English Language & Social Media"]
        L["Search: Google's 2023 English Language & Social Media"]
        M["Search: Google's 2023 English Language & Social Media"]
    end

    subgraph Wireless Audio
        N["Search: Samsung Wireless Audio"]
        O["Search: Samsung Wireless Audio"]
        P["Search: Samsung Wireless Audio"]
        Q["Search: Samsung Wireless Audio"]
        R["Search: Samsung Wireless Audio"]
        S["Search: Samsung Wireless Audio"]
        T["Search: Samsung Wireless Audio"]
        U["Search: Samsung Wireless Audio"]
        V["Search: Samsung Wireless Audio"]
        W["Search: Samsung Wireless Audio"]
        X["Search: Samsung Wireless Audio"]
        Y["Search: Samsung Wireless Audio"]
        Z["Search: Samsung Wireless Audio"]
    end

    A --> B --> C --> D --> E
    B --> F --> G --> H --> I --> J --> K --> L --> M --> N --> O --> P --> Q --> R --> S --> T --> U --> V --> W --> X --> Y --> Z --> D --> E --> F --> G --> H --> I --> J --> K --> L --> M --> N --> O --> P --> Q --> R --> S --> T --> U --> V --> W --> X --> Y --> Z --> D --> E --> F --> G --> H --> I --> J --> K --> L --> M --> N --> O --> P --> Q --> R --> S --> T --> U --> V --> W --> X --> Y --> Z --> D --> E --> F --> G --> H --> J --> K --> L --> M --> N --> O --> P --> Q --> R --> S --> T --> U --> V --> W --> X --> Y --> Z --> D --> E --> F --> G --> H --> I --> J --> K --> L --> M --> N --> O --> P --> Q --> R --> S --> T --> U --> V --> W --> X --> Y --> Z --> D --> E --> F --> G --> H --> I --> J --> K --> L --> L --> M --> N --> O --> P --> Q --> R --> S --> T --> U --> V --> W --> X --> Y --> Z
flowchart
graph LR
    A["Εφαρμονή Amazon Alexa"] --> B["Home"]
    B --> C["Things to Try"]
    C --> D["Items, tell me a job"]
    D --> E["I love you"]
    E --> F["How to go to a"]
    F --> G["Show feedback"]
    G --> H["Include your own"]
    H --> I["Show your own"]
    I --> J["Show your own"]
    J --> K["Show your own"]
    K --> L["Show your own"]
    L --> M["Show your own"]
    M --> N["Show your own"]
    N --> O["Show your own"]
    O --> P["Show your own"]
    P --> Q["Show your own"]
    Q --> R["Show your own"]
    R --> S["Show your own"]
    S --> T["Show your own"]
    T --> U["Show your own"]
    U --> V["Show your own"]
    V --> W["Show your own"]
    W --> X["Show your own"]
    X --> Y["Show your own"]
    Y --> Z["Show your own"]
    Z --> AA["Show your own"]
    AA --> AB["Show your own"]
    AB --> AC["Show your own"]
    AC --> AD["Show your own"]
    AD --> AE["Show your own"]
    AE --> AF["Show your own"]
    AF --> AG["Show your own"]
    AG --> AH["Show your own"]
    AH --> AI["Show your own"]
    AI --> AJ["Show your own"]
    AJ --> AK["Show your own"]
    AK --> AL["Show your own"]
    AL --> AM["Show your own"]
    AM --> AN["Show your own"]
    AN --> AO["Show your own"]
    AO --> AP["Show your own"]
    AP --> AQ["Show your own"]
    AQ --> AR["Show your own"]
    AR --> AS["Show your own"]
    AS --> AT["Show your own"]
    AT --> AU["Show your own"]
    AU --> AV["Show your own"]
    AV --> AW["Show your own"]
    AW --> AX["Show your own"]
    AX --> AY["Show your own"]
08 XEIPIEMOΣ TOY SOUNDBAR ME ΣΥΣKEYH AMAZON
natural_image
Two technical illustrations of mechanical components: a pulley and a screw (no text or symbols)natural_image
Diagram showing a screw being inserted into a pulley and then being inserted into a screw, with no text or symbols present.natural_image
Mechanical assembly diagram showing a screw being inserted into a bracket with a rotating knob (no text or symbols)natural_image
Diagram showing a beam being reduced from a flat plate to a curved beam, with arrows indicating force direction (no text or symbols present)flowchart
graph TD
    A["Step 1: Top Section"] --> B["Step 2: Bottom Section"]
    B --> C["Downward arrow"]
    C --> D["Downward arrow"]
natural_image
Diagram showing a screwdriver inserted into a component, with an inset close-up highlighting the tool (no text or symbols present)
Manufactured under license from Dolby Laboratories. Dolby, Dolby Audio, Pro Logic, and the double-D symbol are trademarks of Dolby Laboratories.


Digital Surround
For DTS patents, see http://patents.dts.com. Manufactured under license from DTS Licensing Limited. DTS, the Symbol, DTS in combination with the Symbol, and DTS Digital Surround are registered trademarks or trademarks of DTS, Inc. in the United States and/or other countries. © DTS, Inc. All Rights Reserved.

The terms HDMI and HDMI High-Definition Multimedia Interface, and the HDMI Logo are trademarks or registered trademarks of HDMI Licensing LLC in the United States and other countries.

Spotify®
natural_image
Illustration of a person sitting on a sofa using a laptop (no text or symbols visible)FELHASZNÁLÓI KÉZIKÖNYV
natural_image
Illustration of a person sitting on a sofa next to a desk with a laptop (no text or symbols visible)
TELJES KÉZIKÖNYV
text_image
Diagram illustrating the step-by-step disassembly of a battery into a motor, showing internal components and charge distribution.02 A TERMÉK ÁTTEKINTÉSE
natural_image
Circular play button icon with no text or symbolstext_image
TV - + → ○text_image
[Samsung] R3 My Phone ... SETTINGS Add Speaker Alarmtext_image
DIMENSIONS DensFalikonzol sín

natural_image
Two technical illustrations of mechanical fasteners: a pulley and a threaded screw (no text or symbols)natural_image
Simple line drawing of a mobile phone case (no text or symbols)Fali Konzol (2 db)
text_image
Diagram showing a device with a screen and a pen, labeled with 'unlabeled' and 'on' indicators.natural_image
Diagram showing a screw being inserted into a pulley and rotating around it, with no text or symbols present.natural_image
Mechanical assembly diagram showing a screw being inserted into a housing component with a circular arrow indicating rotation (no text or symbols present)natural_image
Diagram showing a beam being reduced from a flat plate to a curved beam, with arrows indicating force direction (no text or symbols)natural_image
Diagram showing a mechanical assembly with a screw being inserted, including a close-up inset of the component (no text or symbols present)
Manufactured under license from Dolby Laboratories. Dolby, Dolby Audio, Pro Logic, and the double-D symbol are trademarks of Dolby Laboratories.


Digital Surround
For DTS patents, see http://patents.dts.com. Manufactured under license from DTS Licensing Limited. DTS, the Symbol, DTS in combination with the Symbol, and DTS Digital Surround are registered trademarks or trademarks of DTS, Inc. in the United States and/or other countries. © DTS, Inc. All Rights Reserved.

The terms HDMI and HDMI High-Definition Multimedia Interface, and the HDMI Logo are trademarks or registered trademarks of HDMI Licensing LLC in the United States and other countries.

Spotify®
natural_image
Illustration of a person sitting on a sofa using a laptop (no text or symbols visible)MANUALE UTENTE
natural_image
Illustration of a person sitting on a bed next to a desk with a laptop (no text or symbols)
MANUALE COMPLETO
text_image
Diagram illustrating the step-by-step disassembly of a remote control device into a battery, showing charge states and polarity.02 PANORAMICA DEL PRODOTTO
natural_image
Circular gray button with a play symbol and double arrow icon (no text or numbers)text_image
Diagram showing a smartphone connected to a remote device via Bluetooth, with a monitor displaying a plus button and power icon.Dispositivo Bluetooth
text_image
[Samsung] R3 My Phone ... SETTINGS Add Speaker Alarmflowchart
graph LR
    A["Avvia l'app"] --> B["Add device\nStart building your connected world by asking TVA, app names, and other devices.\nSUPPORTED DEVICES\nHow to use\nDownload sound barriers\nBackpack\nBackground\nDevices\nAutomaticing"]
    B --> C["Popup automatico\nA new device has been found.\nAdd this device to Samsung Connect?\nNever\nLATER\n200 NOW\nHow to Use\nDownload sound barriers\nBackpack\nBackground\nDevices\nAutomaticing"]
    C --> D["Registering device...\nAudio is being registered to your Samsung account.\nAfter the device is registered, setup will be complete."]
    D --> E["All Devices\nADD DEVICE\nHome\n[AV"] Samsung\nDashboard\ndecus\nAutomaticing]
flowchart
graph LR
    A["Hand pointing at a microchip"] --> B["Select all devices with [AV"] Samsung]
    B --> C["Edit: Aoki scene with [AV"] Samsung]
    C --> D["Select Selection into a list of devices that can only delete your own devices that are in locations that you can also delete your own devices that can only delete your own devices that can only delete your own devices that can only delete your own devices that can only delete your own devices that can only delete your own devices that can only delete your own devices that can only delete your own devices that can only delete your own devices that can only delete your own devices that can only delete your own devices that can only delete your own devices that can only delete your own devices that can only delete your own devices that can only delete your own devices that can only delete the device name [AV"] Samsung]
    D --> E["Select Selection to a list of devices that can only delete your own devices that can only delete your own devices that can only delete your own devices that can only delete your own devices that can only delete your own devices that can only delete your own devices that can only delete your own devices that can only delete your own devices that can only delete your own devices that can only delete your own devices that can only delete your own devices that can only delete your own devices that can only delete your own devices that can only delete your own devices"]
    E --> F["Select Selection to a list of devices that can only delete your own devices that can only delete your own devices that can only delete your own devices that can only delete your own devices that can only delete your own devices that can only delete your own devices that can only delete your own devices that can only delete your own devices that can only delete your own devices that can only delete your own devices that can only delete your own devices that can only delete your own devices"]
    F --> G["Select Selection to a list of devices that can only delete your own devices that can only delete your own devices that can only delete your own devices that can only delete your own devices that can only delete your own devices that can only delete your own devices that can only delete your own devices that can only delete your own devices that can only delete your own devices that can only delete your own devices that can only delete your own devices that can only delete your own devices"]
    G --> H["Select Selection to a list of devices that can only delete your own devices that can only delete your own devices that can only delete your own devices that can only delete your own devices that can only delete your own devices that can only delete your own devices that can only delete your own devices that can only delete your own devices that can only delete your own devices"]
    H --> I["Select Selection to a list of devices that can only delete your own devices that can only delete your own devices that can only delete your own devices that can only delete your own devices that can only delete your own devices that can only delete your own devices that can only delete your own devices that can only delete your own devices that can only delete your own devices"]
    I --> J["Select Selection to a list of devices that can only delete your own devices that can only delete your own devices that can only delete your own devices that can only delete your own devices that can only delete your own devices that can only delete your own devices that can only delete your own devices that can only delete your own devices"]
    J --> K["Select Selection to a list of devices that can only delete your own devices that can only delete your own devices that can only delete your own devices that can only delete your own devices that can only delete your own devices that can only delete your own devices that can only delete your own devices that can only delete your own devices"]
    K --> L["Select Selection to a list of devices that can only delete your own devices that can only delete your own devices that can only delete your own devices that can only delete your own devices that can only delete your own devices that can only delete your own devices that can only delete your own devices"]
    L --> M["Select Selection to a list of devices that can only delete your own devices that can only delete your own devices that can only delete your own devices that can only delete your own devices that can only delete your own devices that can only delete your own devices"]
    M --> N["Select Selection to a list of devices that can only delete your own devices that can only delete your own devices that can only delete your own devices that can only delete your own devices that can only delete your own devices that can only delete your own devices"]
    N --> O["Select Selection to a list of devices that can only delete your own devices that can only delete your own devices that can only delete your own devices that can only delete your own devices that can only delete your own devices"]
    O --> P["Select Selection to a list of devices that can only delete your own devices that can only delete your own devices that can only double the device name [AV"] Samsung]
    P --> Q["Select Selection to a list of device names including the device name, location, shortcut on dashboard, and save function"]
    Q --> R["Select Selection to a list of device names including the device name, location, shortcut on dashboard, and save function"]
    R --> S["SalvaSelezione Edit"]
text_image
50mm 4.5mnatural_image
Two technical illustrations: a pulley and a screw, shown side by side (no text or symbols)natural_image
Simple line drawing of a mobile phone slot (no text or symbols)text_image
Technical diagram showing a tool interacting with a screen, labeled with dimensions and symbolsnatural_image
Diagram showing a screw being inserted into a housing, with arrows indicating direction (no text or symbols)natural_image
Mechanical assembly diagram showing a screw being inserted into a housing component with a circular base (no text or symbols)natural_image
Diagram showing a beam being reduced from a flat surface, with arrows indicating force direction (no text or symbols present)flowchart
graph TD
    A["Top: Process Step 1"] --> B["Bottom: Process Step 2"]
    B --> C["Downward Arrow"]
    C --> D["Right: Process Step 3"]
text_image
Supporto cavinatural_image
Diagram showing a mechanical assembly with a screw inserted into a component, and a close-up of the component being inserted (no text or symbols present)
Manufactured under license from Dolby Laboratories. Dolby, Dolby Audio, Pro Logic, and the double-D symbol are trademarks of Dolby Laboratories.

dts
Digital Surround
For DTS patents, see http://patents.dts.com. Manufactured under license from DTS Licensing Limited. DTS, the Symbol, DTS in combination with the Symbol, and DTS Digital Surround are registered trademarks or trademarks of DTS, Inc. in the United States and/or other countries. © DTS, Inc. All Rights Reserved.

The terms HDMI and HDMI High-Definition Multimedia Interface, and the HDMI Logo are trademarks or registered trademarks of HDMI Licensing LLC in the United States and other countries.

Spotify®
http://www.samsung.com/it/aboutsamsung/sustainability/environment/our-commitment/data/
DROŠĪBAS INFORMĀCIJA
DROŠĪBAS BRĪDINĀJUMI
LAI SAMAZINĀTU ELEKTRISKĀS STRĀVAS TRIECIENA RISKU, NENOŅEMIET PĀRSEGU (VAI KORPUSA AIZMUGURI). IERĪCES IEKŠPUSĒ NEATRODAS NEVIENA DETAļA, KURAS APKOPE BŪTU JĀVEIC LIETOTĀJAM. UZTICIET APKOPI KVALIFICĒTIEM APKOPES SPECIĀLISTIEM.
natural_image
Illustration of a person sitting on a sofa using a laptop (no text or symbols visible)LIETOTĀJA ROKASGRĀMATA
natural_image
Illustration of a person sitting on a couch next to a computer monitor (no text or symbols present)
PILNĀ ROKASGRĀMATA
text_image
Diagram illustrating the step-by-step disassembly of a battery into a closed casing, showing charge distribution and polarity changes.02 IZSTRĀDĀJUMA PĀRSKATS
natural_image
Circular play button icon with two vertical bars, no text or symbols presenttext_image
TV - + → ○text_image
Diagram showing a smartphone connected to a remote device via Bluetooth, with a monitor displaying a plus button and power icon.Bluetooth ierice
text_image
[Samsung] R3 My Phone ... SETTINGS Add Speaker Alarmnatural_image
Two technical illustrations of mechanical fasteners: a pulley and a threaded screw (no text or symbols)text_image
Diagram showing a device with a screen and a pen, labeled with 'UNLESSING' and 'OPEN' buttons.natural_image
Diagram showing a screw being inserted into a pulley and then being inserted into a screw, with no text or symbols present.natural_image
Mechanical assembly diagram showing a screw being inserted into a bracket with a circular arrow indicating rotation (no text or symbols)natural_image
Diagram showing a mechanical component before and after cutting, with arrows indicating motion direction (no text or symbols)flowchart
graph TD
    A["Step 1: Top Section"] --> B["Step 2: Bottom Section"]
    B --> C["Downward arrow"]
    C --> D["Downward arrow"]
natural_image
Diagram showing a mechanical component being inserted into a curved base, with an inset close-up highlighting the insertion point (no text or symbols present)
12 PROBLÉMU NOVĚRŠANA
Manufactured under license from Dolby Laboratories. Dolby, Dolby Audio, Pro Logic, and the double-D symbol are trademarks of Dolby Laboratories.

dts
Digital Surround
For DTS patents, see http://patents.dts.com. Manufactured under license from DTS Licensing Limited. DTS, the Symbol, DTS in combination with the Symbol, and DTS Digital Surround are registered trademarks or trademarks of DTS, Inc. in the United States and/or other countries. © DTS, Inc. All Rights Reserved.

The terms HDMI and HDMI High-Definition Multimedia Interface, and the HDMI Logo are trademarks or registered trademarks of HDMI Licensing LLC in the United States and other countries.

Spotify®
natural_image
Illustration of a person sitting on a sofa using a laptop (no text or symbols visible)NAUDOTOJO VADOVAS
natural_image
Illustration of a person sitting on a sofa next to a desk with a computer (no text or symbols visible)
IŠSAMUS VADOVAS
text_image
Diagram illustrating the step-by-step disassembly of a remote control device into a battery, showing internal components and charge distribution.02 GAMINIO APŽVALGA
natural_image
Circular gray button with a play symbol icon, no text or symbols presenttext_image
Diagram showing a smartphone connected to a remote device via Bluetooth, with a monitor displaying a plus button and power icon.„Bluetooth“ jrenginys
text_image
[Samsung] R3 My Phone Q ... SETTINGS Add Speaker Alarmflowchart
graph LR
    A["Paleisti program"] --> B["Connect"]
    B --> C["Add device"]
    C --> D["Start building your connected world by adding This appliances, and other devices."]
    D --> E["SUPPORTED Devices"]
    E --> F["Now to use"]
    F --> G["Database: iššokantis langas"]
    G --> H["Device 1: AV SAMSUNG SOUNDBAR"]
    H --> I["A new device has been found. Add this device to Samsung Connect?"]
    I --> J["Device 2: LUTON ADD NEW"]
    J --> K["Device 3: ADD NEW"]
    K --> L["Registering device..."]
    L --> M["Audio is being registered to your Samsung account."]
    M --> N["After the device is registered, setup will be complete."]
    N --> O["All Devices"]
    O --> P["Add Device"]
    P --> Q["Home: [AV"] Samsung]
text_image
250mm Cansnatural_image
Two technical illustrations of mechanical components: a pulley and a screw (no text or symbols)Varžtas (2 EA)
natural_image
Simple line drawing of a mobile phone slot (no text or symbols)text_image
Control Unit Usernatural_image
Diagram showing a screw being inserted into a pin, with motion arrows indicating direction (no text or symbols)natural_image
Mechanical assembly diagram showing a screw being inserted into a bracket with a circular arrow indicating rotation (no text or symbols)natural_image
Diagram showing a beam being reduced from an angle to a flat surface, with arrows indicating direction of motion (no text or symbols present)flowchart
graph TD
    A["Top: Device icon"] --> B["Downward arrow"]
    B --> C["Bottom: Device icon with downward arrow"]
Manufactured under license from Dolby Laboratories. Dolby, Dolby Audio, Pro Logic, and the double-D symbol are trademarks of Dolby Laboratories.

dts
Digital Surround
For DTS patents, see http://patents.dts.com. Manufactured under license from DTS Licensing Limited. DTS, the Symbol, DTS in combination with the Symbol, and DTS Digital Surround are registered trademarks or trademarks of DTS, Inc. in the United States and/or other countries. © DTS, Inc. All Rights Reserved.

The terms HDMI and HDMI High-Definition Multimedia Interface, and the HDMI Logo are trademarks or registered trademarks of HDMI Licensing LLC in the United States and other countries.

Spotify®
natural_image
Illustration of a person sitting on a chair next to a desk with a laptop (no text or symbols visible)
PEŁNY PODRĘCZNIK UŻYTKOWNIKA
natural_image
Four grayscale product images: a remote control unit, a remote control with two USB cable connectors, a U-shaped USB connector, and a coiled cord with two USB connectors (no text or symbols visible)natural_image
Three mechanical component images: a handle, a clip, and a screw (no text or symbols)natural_image
Diagram showing three stages of battery internal structure: open, open with internal contacts, and closed (no text or symbols)02 OPIS PRODUKTU
natural_image
Circular play button icon with two vertical bars, no text or symbols presenttext_image
Diagram showing a smartphone connected to a remote device via Bluetooth, with a monitor displaying a plus button and power icon.text_image
[Samsung] R3 My Phone Add Speaker Alarmflowchart
graph LR
    A["Sensor icon"] --> B["Connect"]
    B --> C["Add device"]
    C --> D["Start building your connected world by adding F/V, appliances, and other devices. SUPPORTED DEVICES"]
    D --> E["How to use: Display client speaker"]
    E --> F["Install Device"]
    F --> G["Device"]
    G --> H["Automatic"]
    H --> I["Connect"]
    I --> J["[AV"] SAMSUNG SOUNDBAR]
    J --> K["A new device has been found. Add this device to Samsung Connect?"]
    K --> L["NEER LETTER ADD NOW"]
    L --> M["After the device is registered, setup will be complete."]
    M --> N["Registering device..."]
    N --> O["Audio is being registered to your Samsung account."]
    O --> P["After the device is registered, setup will be complete."]
    P --> Q["ALL DEVICES ADD DEVICE"]
    Q --> R["[AV"] Samsung]
flowchart
graph LR
    A["Aplikacja Amazon Alexa"] --> B["You can access the Amazon Alexa"]
    B --> C["Where you want to try a smart home"]
    C --> D["Where you want to try a smart home"]
    D --> E["Where you want to try a smart home"]
    E --> F["Where you want to try a smart home"]
    F --> G["Where you want to try a smart home"]
    G --> H["Where you want to try a smart home"]
    H --> I["Where you want to try a smart home"]
    I --> J["Where you want to try a smart home"]
    J --> K["Where you want to try a smart home"]
    K --> L["Where you want to try a smart home"]
    L --> M["Where you want to try a smart home"]
    M --> N["Where you want to try a smart home"]
    N --> O["Where you want to try a smart home"]
    O --> P["Where you want to try a smart home"]
    P --> Q["Where you want to try a smart home"]
    Q --> R["Where you want to try a smart home"]
    R --> S["Where you want to try a smart home"]
    S --> T["Where you want to try a smart home"]
    T --> U["Where you want to try a smart home"]
    U --> V["Where you want to try a smart home"]
    V --> W["Where you want to try a smart home"]
    W --> X["Where you want to try a smart home"]
    X --> Y["Where you want to try a smart home"]
    Y --> Z["Where you want to try a smart home"]
    Z --> AA["Where you want to try a smart home"]
    AA --> AB["Where you want to try a smart home"]
    AB --> AC["Where you want to try a smart home"]
    AC --> AD["Where you want to try a smart home"]
    AD --> AE["Where you want to try a smart home"]
    AE --> AF["Where you want to try a smart home"]
    AF --> AG["Where you want to try a smart home"]
    AG --> AH["Where you want to try a smart home"]
    AH --> AI["Where you want to try a smart home"]
    AI --> AJ["Where you want to try a smart home"]
    AJ --> AK["Where you want to try a smart home"]
    AK --> AL["Where you want to try a smart home"]
    AL --> AM["Where you want to try a smart home"]
    AM --> AN["Where you want to try a smart home"]
    AN --> AO["Where you want to try a smart home"]
    AO --> AP["Where you want to try a smart home"]
    AP --> AQ["Where you want to try a smart home"]
    AQ --> AR["Where you want to try a smart home"]
    AR --> AS["Where you want to try a smart home"]
    AS --> AT["Where you want to try a smart home"]
    AT --> AU["Where you want to try a smart home"]
    AU --> AV["Where you want to try a smart home"]
    AV --> AW["Where you want to try a smart home"]
    AW --> AX["Where you want to try a smart home"]
    AX --> AY["Where you want to try a smart home"]
    AY --> AZ["Where you want to try a smart home"]
    AZ --> BA["Where you want to try a smart home"]
    BA --> BB["Where you want to try a smart home"]
    BB --> BC["Where you want to try a smart home"]
    BC --> BD["Where you want to try a smart home"]
    BD --> BE["Where you want to try a smart home"]
    BE --> BF["Where you want to try a smart home"]
    BF --> BG["Where you want to try a smart home"]
    BG --> BH["Where you want to try a smart home"]
    BH --> BI["Where you want to try a smart home"]
    BI --> BJ["Where you want to try a smart home"]
    BJ --> BK["Where you want to try a smart home"]
    BK --> BL["Where you want to try a smart home"]
    BL --> BM["Where you want to try a smart home"]
    BM --> BN["Where you want to try a smart home"]
    BN --> BO["Where you want to try a smart home"]
    BO --> BP["Where you want to try a smart home"]
    BP --> BQ["Where you want to try a smart home"]
    BQ --> BR["Where you want to try a smart home"]
    BR --> BS["Where you want to try a smart home"]
    BS --> BT["Where you want to try a smart home"]
    BT --> BU["Where you want to try a smart home"]
    BU --> BV["Where you want to try a smart home"]
    BV --> BW["Where you want to try a smart home"]
    BW --> BX["Where you want to try a smart home"]
    BX --> BY["Where you want to try a smart home"]
    BY --> BZ["Where you want to try a smart home"]
    BZ --> CA["Where you want to try a smart home"]
    CA --> CB["Where you want to try a smart home"]
    CB --> CC["Where you want to try a smart home"]
    CC --> CD["Where you want to try a smart home"]
    CD --> CE["Where you want to try a smart home"]
    CE --> CF["Where you want to try a smart home"]
    CF --> CG["Where you want to try a smart home"]
    CG --> CH["Where you want to try a smart home"]
    CH --> CI["Where you want to try a smart home"]
    CI --> CJ["Where you want to try a smart home"]
    CJ --> CK["Where you want to try a smart home"]
    CK --> CL["Where you want to try a smart home"]
    CL --> CM["Where you want to try a smart home"]
    CM --> CN["Where you want to try a smart home"]
    CN --> CO["Where you want to try a smart home"]
    CO --> CP["Where you want to try a smart home"]
    CP --> CQ["Where you want to try a smart home"]
    CQ --> CR["Where you want to try a smart home"]
    CR --> CS["Where you want to try a smart home"]
    CS --> CT["Where you want to try a smart home"]
    CT --> CU["Where you want to try a smart home"]
    CU --> CV["Where you want to try a smart home"]
    CV --> CW["Where you want to try a smart home"]
    CW --> CX["Where you want to try a smart home"]
    CX --> CY["Where you want to try a smart home"]
    CY --> CZ["Where you want to try a smart home"]
flowchart
graph LR
    A["Aplikacja Amazon Alexa"] --> B["Home: New Mapping, Audio & Display, Live, Armrest & Alarm, Data, Smart Home"]
    B --> C["Things to Try: New Mapping, Audio & Display, Live, Armrest & Alarm, Data, Smart Home"]
    C --> D["Items to try: New Mapping, Audio & Display, Live, Armrest & Alarm, Data, Smart Home"]
    D --> E["Timer set for: New Mapping, Audio & Display, Live, Armrest & Alarm, Data, Smart Home"]
    E --> F["Wybierz kartę Smart Home"]
    F --> G["Groups: Smart Home"]
    G --> H["Devices: Smart Home Skills"]
    H --> I["Scenes: Smart Home Skills"]
    I --> J["Configure Smart Home"]
    J --> K["Devices: Smart Home Skills"]
    K --> L["Enable smart home skills to control devices with Alexa. If you've already enabled your skill, discover devices below: SMART HOME SKILL"]
    L --> M["Discover: Smart Home Skills"]
    M --> N["Wykryj urzadzenie"]
08 STEROWANIE LISTWA SOUNDBAR ZA POMOCA URZADZENIA AMAZON
text_image
DIMENSIONS Densnatural_image
Two technical illustrations of mechanical components: a pulley and a screw (no text or symbols)text_image
Diagram showing a device with a screen and a pen, labeled with Chinese text and symbols.natural_image
Diagram showing a screw being inserted into a pin, with motion arrows indicating direction (no text or symbols)natural_image
Mechanical assembly diagram showing a screw being inserted into a bracket with a circular arrow indicating rotation (no text or symbols)natural_image
Diagram showing a beam being reduced from a flat surface, with arrows indicating force direction (no text or symbols present)natural_image
Diagram showing a screwdriver inserted into a car's side panel, with an inset close-up highlighting the component (no text or symbols present)
Manufactured under license from Dolby Laboratories. Dolby, Dolby Audio, Pro Logic, and the double-D symbol are trademarks of Dolby Laboratories.

dts
Digital Surround
For DTS patents, see http://patents.dts.com. Manufactured under license from DTS Licensing Limited. DTS, the Symbol, DTS in combination with the Symbol, and DTS Digital Surround are registered trademarks or trademarks of DTS, Inc. in the United States and/or other countries. © DTS, Inc. All Rights Reserved.

The terms HDMI and HDMI High-Definition Multimedia Interface, and the HDMI Logo are trademarks or registered trademarks of HDMI Licensing LLC in the United States and other countries.

Spotify®
natural_image
Illustration of a person sitting on a sofa using a laptop (no text or symbols visible)MANUAL DE UTILIZARE
natural_image
Illustration of a person sitting on a couch next to a laptop and desk (no text or symbols)
MANUAL COMPLET
natural_image
Diagram showing three stages of battery internal structure: open, open with internal contacts, and closed (no text or symbols)02 DESCRIERI
natural_image
Circular gray button with a play symbol and double arrow icon (no text or numbers)text_image
Diagram showing a smartphone connected to a remote device via Bluetooth, with a monitor displaying a plus button and power icon.text_image
[Samsung] R3 My Phone Add Speaker Alarmflowchart
graph LR
    A["Start with a network icon"] --> B["Connect: Start building your connected world by adding This application, and other devices."]
    B --> C["Add device: Start building your connected world by adding This application, and other devices."]
    C --> D["Supported Devices: Supported Devices and supported Devices"]
    D --> E["Now to use: Additional useful features: USB & USB"]
    E --> F["Add device: Add device to Samsung Connect?"]
    F --> G["Add device: Add device to Samsung Soundbar"]
    G --> H["Registering device: Audio is being registered to your Samsung account."]
    H --> I["After the device is registered, setup will be complete."]
    I --> J["All Devices: All Devices and ADD Device"]
Lansare aplicatie Adăugare-up automat
difuzoare
text_image
100mm 4.20%natural_image
Two technical illustrations of screw components: a pulley and a threaded screw (no text or symbols)Şurub suport (2 EA) Şurub (2 EA)

natural_image
Simple line drawing of a mobile phone slot (no text or symbols)Suport de fixare pe perete (2 EA)
text_image
Diagram showing a device with a screen and a pen, labeled with Chinese text and measurement indicators.natural_image
Diagram showing a screw being inserted into a housing, with arrows indicating direction (no text or symbols)natural_image
Mechanical assembly diagram showing a screw being inserted into a housing component with a circular base (no text or symbols)natural_image
Diagram showing a beam being reduced from an angle to a flat surface, with arrows indicating direction of motion (no text or symbols present)natural_image
Mechanical assembly diagram showing a screw being inserted into a component, with an inset close-up highlighting the insertion point (no text or symbols present)
Manufactured under license from Dolby Laboratories. Dolby, Dolby Audio, Pro Logic, and the double-D symbol are trademarks of Dolby Laboratories.

dts® Digital Surround
For DTS patents, see http://patents.dts.com. Manufactured under license from DTS Licensing Limited. DTS, the Symbol, DTS in combination with the Symbol, and DTS Digital Surround are registered trademarks or trademarks of DTS, Inc. in the United States and/or other countries. © DTS, Inc. All Rights Reserved.

The terms HDMI and HDMI High-Definition Multimedia Interface, and the HDMI Logo are trademarks or registered trademarks of HDMI Licensing LLC in the United States and other countries.

Spotify®
15 NOTĂ IMPORTANTĂ DESPRE SERVICE
natural_image
Illustration of a person sitting on a sofa using a laptop (no text or symbols visible)KORISNIČKI PRIRUČNIK
Pogledajte ovaj priručnik za bezbednosna uputstva, postavljanje proizvoda, komponente, povezivanje i specifikacije proizvoda.

natural_image
Illustration of a person sitting on a sofa next to a laptop and TV (no text or symbols)
KOMPLETAN PRIRUČNIK
Kompletnom priručniku možete pristupiti u Samsung centru korisničke podrške na mreži tako što ćete skenirati QR kôd. Da biste pogledali priručnik na vašem računaru ili mobilnom uređaju, preuzmite priručnik u formatu dokumenta sa internet stranice. (http://www.samsung.com/support)
Dizajn, specifikacije i ekran „Aplikacija“ su podložni izmenama bez prethodnog obaveštavanja.
SADRŽAJI
01 Provera Komponenata 2
text_image
Diagram illustrating the step-by-step disassembly of a remote control device into a battery, showing internal components and charge distribution.02 PREGLED PROIZVODA
Prednji panel/panel sa desne strane uređaja Soundbar

text_image
Pozicionirajte proizvod tako da se SAMSUNG logotip nalazi u gornjem delu. Desna strana uredaja Soundbar| 1 | EkranPrikazuje status proizvoda i trenutni režim. | |
| 2 | Dugme -/+ (Jačina zvuka)Podešava jačinu zvuka.Kada se podesi, nivo jačine zvuka se prikazuje na prednjem ekranu uređaja Soundbar. | |
| 3 | Dugme Izvor)Bira režim ulaza izvora. | |
| Režim ulaza Ekran | ||
| Optički digitalni ulaz D.IN | ||
| ARC (HDMI OUT) ulaz | D.IN → TV ARC (automatska konverzija) | |
| AUX ulaz AUX | ||
| HDMI ulaz HDMI | ||
| Wi-Fi režim WIFI | ||
| BLUETOOTH režim BT | ||
| Da biste uključili režim „BT PAIRING“, promenite izvor na režim „BT“, a zatim pritisnite i zadržite dugme Izvor) duže od 5 sekundi. | ||
| 4 | Dugme (napajanje)Uključuje i isključuje napajanje. | |
natural_image
Circular gray button with a play symbol icon, no text or symbols presentPovezivanje televizora pomoću HDMI kabla

flowchart
graph TD
    A["TV"] --> B["HDMI IN (ARC)"]
    B --> C["HDMI kabl (ne isporučuje se)"]
    C --> D["Donji deo uređaja Soundbar"]
    D --> E["TV ARC"]
    E --> F["Desna strana uređaja Soundbar"]
    style A fill:#f9f,stroke:#333
    style B fill:#ccf,stroke:#333
    style C fill:#cfc,stroke:#333
    style D fill:#fcc,stroke:#333
    style E fill:#cff,stroke:#333
    style F fill:#ffc,stroke:#333
- Kada su uređaj Soundbar i televizor uključeni, povežite HDMI kabl (ne isporučuje se) kao što je prikazano na slici.
-
„TV ARC“ će se pojaviti u prozoru ekrana glavnog uređaja Soundbar i uređaj Soundbar će reprodukovati zvuk sa televizora.
-
Ako se ne čuje zvuk sa televizora, pritisnite dugme (Izvor) na daljinskom upravljaču ili na desnoj strani uređaja Soundbar da biste prešli na režim „D.IN“. Na ekranu se redom prikazuje „D.IN“ i „TV ARC“, a zvuk sa televizora se reprodukuje.
- Ako se „TV ARC“ ne prikazuje u prozoru ekrana glavnog uređaja Soundbar, proverite da li je kabl povezan na odgovarajući port.
- Koristite dugmad za jačinu zvuka na daljinskom upravljaču televizora da biste promenili jačinu zvuka uređaja Soundbar.
NAPOMENE
- HDMI je interfejs koji omogućava digitalni prenos video i audio podataka samo sa jednim priključkom.
- Ako televizor poseduje ARC priključak, povežite HDMI kabl sa HDMI IN (ARC) priključkom.
- Preporučujemo da koristite HDMI kabl bez jezgra ako je moguće. Ako koristite HDMI kabl sa jezgrom, koristite onaj čiji je prečnik manji od 14 mm.
• Anynet+ mora biti uključen. - Ova funkcija nije dostupna ako HDMI kabl ne podržava ARC.
text_image
TV - + → ○text_image
[Samsung] R3 My Phone ... SETTINGS Add Speaker Alarm- Da biste povezali uređaj Soundbar sa 2 Samsung bežična zvučnika i konfigurisali sistem okružujućeg zvuka, pratite korake prikazane u nastavku. (Ne možete da podesite sistem okružujućeg zvuka korišćenjem jednog uređaja za zvuka i jednog uređaja Soundbar.)
① Dodirnite da biste otišli na listu svih zvučnika.
② Dodirnite: sa desne strane sa nazivom modela uređaja Soundbar.
③ Dodirnite Surround Setup. Izaberite Done nakon što prevučete zvučnik na željenu lokaciju.
④ Veza okružujućeg zvuka je potpuna.

flowchart
graph TD
    A["ALBUMS"] --> B["ALL SPEAKERS"]
    B --> C["Soundbar"]
    C --> D["ALL SPEAKERS"]
    D --> E["ALL SPEAKERS"]
    E --> F["ALL SPEAKERS"]
    F --> G["ALL SPEAKERS"]
    G --> H["ALL SPEAKERS"]
    H --> I["ALL SPEAKERS"]
    I --> J["ALL SPEAKERS"]
    J --> K["ALL SPEAKERS"]
    K --> L["ALL SPEAKERS"]
    L --> M["ALL SPEAKERS"]
    M --> N["ALL SPEAKERS"]
    N --> O["ALL SPEAKERS"]
    O --> P["ALL SPEAKERS"]
    P --> Q["ALL SPEAKERS"]
    Q --> R["ALL SPEAKERS"]
    R --> S["ALL SPEAKERS"]
    S --> T["ALL SPEAKERS"]
    T --> U["ALL SPEAKERS"]
    U --> V["ALL SPEAKERS"]
    V --> W["ALL SPEAKERS"]
    W --> X["ALL SPEAKERS"]
    X --> Y["ALL SPEAKERS"]
    Y --> Z["ALL SPEAKERS"]
    Z --> AA["ALL SPEAKERS"]
    AA --> AB["ALL SPEAKERS"]
    AB --> AC["ALL SPEAKERS"]
    AC --> AD["ALL SPEAKERS"]
    AD --> AE["ALL SPEAKERS"]
    AE --> AF["ALL SPEAKERS"]
    AF --> AG["ALL SPEAKERS"]
    AG --> AH["ALL SPEAKERS"]
    AH --> AI["ALL SPEAKERS"]
    AI --> AJ["ALL SPEAKERS"]
    AJ --> AK["ALL SPEAKERS"]
    AK --> AL["ALL SPEAKERS"]
    AL --> AM["ALL SPEAKERS"]
    AM --> AN["ALL SPEAKERS"]
    AN --> AO["ALL SPEAKERS"]
    AO --> AP["ALL SPEAKERS"]
    AP --> AQ["ALL SPEAKERS"]
    AQ --> AR["ALL SPEAKERS"]
    AR --> AS["ALL SPEAKERS"]
    AS --> AT["ALL SPEAKERS"]
    AT --> AU["ALL SPEAKERS"]
    AU --> AV["ALL SPEAKERS"]
    AV --> AW["ALL SPEAKERS"]
    AW --> AX["ALL SPEAKERS"]
    AX --> AY["ALL SPEAKERS"]
    AY --> AZ["ALL SPEAKERS"]
    AZ --> BA["ALL SPEAKERS"]
    BA --> BB["ALL SPEAKERS"]
    BB --> BC["ALL SPEAKERS"]
    BC --> BD["ALL SPEAKERS"]
    BD --> BE["ALL SPEAKERS"]
    BE --> BF["ALL SPEAKERS"]
    BF --> BG["ALL SPEAKERS"]
    BG --> BH["ALL SPEAKERS"]
    BH --> BI["ALL SPEAKERS"]
    BI --> BJ["ALL SPEAKERS"]
    BJ --> BK["ALL SPEAKERS"]
    BK --> BL["ALL SPEAKERS"]
    BL --> BM["ALL SPEAKERS"]
    BM --> BN["ALL SPEAKERS"]
    BN --> BO["ALL SPEAKERS"]
    BO --> BP["ALL SPEAKERS"]
    BP --> BQ["ALL SPEAKERS"]
    BQ --> BR["ALL SPEAKERS"]
    BR --> BS["ALL SPEAKERS"]
    BS --> BT["ALL SPEAKERS"]
    BT --> BU["ALL SPEAKERS"]
    BU --> BV["ALL SPEAKERS"]
    BV --> BW["ALL SPEAKERS"]
    BW --> BX["ALL SPEAKERS"]
    BX --> BY["ALL SPEAKERS"]
    BY --> BZ["ALL SPEAKERS"]
    BZ --> CA["ALL SPEAKERS"]
    CA --> CB["ALL SPEAKERS"]
    CB --> CC["ALL SPEAKERS"]
    CC --> CD["ALL SPEAKERS"]
    CD --> CE["ALL SPEAKERS"]
    CE --> CF["ALL SPEAKERS"]
    CF --> CG["ALL SPEAKERS"]
    CG --> CH["ALL SPEAKERS"]
    CH --> CI["ALL SPEAKERS"]
    CI --> CJ["ALL SPEAKERS"]
    CJ --> CK["ALL SPEAKERS"]
    CK --> CR["ALL SPEAKERS"]
    CR --> CS["ALL SPEAKERS"]
    CS --> CT["ALL SPEAKERS"]
    CT --> CU["ALL SPEAKERS"]
    CU --> CV["ALL SPEAKERS"]
    CV --> CW["ALL SPEAKERS"]
NAPOMENA
- Da biste povezali dodatni SWA-9000S (nije isporučeno), otkačite Samsung bežične zvučnike sa uređaja Soundbar da biste onemogućili sistem okružujućeg zvuka. (Ako povezivanje zvučnika za okružujući zvuk bez otkačinjanja uređaja SWA-9000S, zvuk se reprodukuje putem Samsung bežičnog zvučnika i zvučnika za okružujući zvuk.)
07 POVEZIVANJE AMAZON PROIZVODA
Povežite i koristite sa Amazon proizvodom (Amazon Echo)
Koristite Amazon Echo proizvod da biste upravljali zvučnicima i uživali u muzičkim uslugama koje pruža Amazon Echo.
flowchart
graph LR
    A["Input Image"] --> B["Add Scene"]
    B --> C{Edit}
    C --> D["Device name: [AV"] Samsung]
    D --> E["Device name: [AV"] Samsung with a button]
    E --> F["Device name: [AV"] Samsung with a button]
    F --> G["Device name: [AV"] Samsung with a button]
    G --> H["Device name: [AV"] Samsung with a button]
    H --> I["Device name: [AV"] Samsung with a button]
    I --> J["Device name: [AV"] Samsung with a button]
    J --> K["Device name: [AV"] Samsung with a button]
    K --> L["Device name: [AV"] Samsung with a button]
    L --> M["Device name: [AV"] Samsung with a button]
    M --> N["Device name: [AV"] Samsung with a button]
    N --> O["Device name: [AV"] Samsung with a button]
    O --> P["Device name: [AV"] Samsung with a button]
    P --> Q["Device name: [AV"] Samsung with a button]
    Q --> R["Device name: [AV"] Samsung with a button]
    R --> S["Device name: [AV"] Samsung with a button]
    S --> T["Device name: [AV"] Samsung with a button]
    T --> U["Device name: [AV"] Samsung with a button]
    U --> V["Device name: [AV"] Samsung with a button]
    V --> W["Device name: [AV"] Samsung with a button]
    W --> X["Device name: [AV"] Samsung with a button]
    X --> Y["Device name: [AV"] Samsung with a button]
    Y --> Z["Device name: [AV"] Samsung with a button]
    Z --> AA["Device name: [AV"] Samsung with a button]
    AA --> AB["Device name: [AV"] Samsung with a button]
    AB --> AC["Device name: [AV"] Samsung with a button]
    AC --> AD["Device name: [AV"] Samsung with a button]
    AD --> AE["Device name: [AV"] Samsung with a button]
    AE --> AF["Device name: [AV"] Samsung with a button]
    AF --> AG["Device name: [AV"] Samsung with a button]
    AG --> AH["Device name: [AV"] Samsung with a button]
    AH --> AI["Device name: [AV"] Samsung with a button]
    AI --> AJ["Device name: [AV"] Samsung with a button]
    AJ --> AK["Device name: [AV"] Samsung with a button]
    AK --> AL["Device name: [AV"] Samsung with a button]
    AL --> AM["Device name: [AV"] Samsung with a button]
    AM --> AN["Device name: [AV"] Samsung with a button]
    AN --> AO["Device name: [AV"] Samsung with a button]
    AO --> AP["Device name: [AV"] Samsung with a button]
    AP --> AQ["Device name: [AV"] Samsung with a button]
    AQ --> AR["Device name: [AV"] Samsung with a button]
    AR --> AS["Device name: [AV"] Samsung with a button]
    AS --> AT["Device name: [AV"] Samsung with a button]
    AT --> AU["Device name: [AV"] Samsung with a button]
    AU --> AV["Device name: [AV"] Samsung with a button]
    AV --> AW["Device name: [AV"] Samsung with a button]
    AW --> AX["Device name: [AV"] Samsung with a button]
    AX --> AY["Device name: [AV"] Samsung with a button]
    AY --> AZ["Device name: [AV"] Samsung with a button]
    AZ --> BA["Device name: [AV"] Samsung with a button]
    BA --> BB["Device name: [AV"] Samsung with a button]
    BB --> BC["Device name: [AV"] Samsung with a button]
    BC --> BD["Device name: [AV"] Samsung with a button]
    BD --> BE["Device name: [AV"] Samsung with a button]
    BE --> BF["Device name: [AV"] Samsung with a button]
    BF --> BG["Device name: [AV"] Samsung with a button]
    BG --> BH["Device name: [AV"] Samsung with a button]
    BH --> BI["Device name: [AV"] Samsung with a button]
    BI --> BJ["Device name: [AV"] Samsung with a button]
    BJ --> BK["Device name: [AV"] Samsung with a button]
    BK --> BL["Device name: [AV"] Samsung with a button]
    BL --> BM["Device name: [AV"] Samsung with a button]
    BM --> BN["Device name: [AV"] Samsung with a button]
    BN --> BO["Device name: [AV"] Samsung with a button]
    BO --> BP["Device name: [AV"] Samsung with a button]
    BP --> BQ["Device name: [AV"] Samsung with a button]
    BQ --> BR["Device name: [AV"] Samsung with a button]
    BR --> BS["Device name: [AV"] Samsung with a button]
    BS --> BT["Device name: [AV"] Samsung with a button]
    BT --> BU["Device name: [AV"] Samsung with a button]
    BU --> BV["Device name: [AV"] Samsung with a button]
    BV --> BW["Device name: [AV"] Samsung with a button]
    BW --> BX["Device name: [AV"] Samsung with a button]
    BX --> BY["Device name: [AV"] Samsung with a button]
    BY --> BZ["Device name: [AV"] Samsung with a button]
    BZ --> CA["Device name: [AV"] Samsung with a button]
    CA --> CB["Device name: [AV"] Samsung with a button]
    CB --> CC["Device name: [AV"] Samsung with a button]
    CC --> CD["Device name: [AV"] Samsung with a button]
    CD --> CE["Device name: [AV"] Samsung with a button]
    CE --> CF["Device name: [AV"] Samsung with a button]
    CF --> CG["Device name: [AV"] Samsung with a button]
    CG --> CH["Device name: [AV"] Samsung with a button]
    CH --> CI["Device name: [AV"] Samsung with a button]
    CI --> CJ["Device name: [AV"] Samsung with a button]
    CJ --> CK["Device name: [AV"] Samsung with a button]
    CK --> CR["Device name: [AV"] Samsung with a button]
    CR --> CS["Device name: [AV"] Samsung with a button]
    CS --> CT["Device name: [AV"] Samsung with a button]
    CT --> CU["Device name: [AV"] Samsung with a button]
    CU --> CV["Device name: [AV"] Samsung with a button]
    CV --> CW["Device name: [AV"] Samsung with a button]
- U aplikaciji Alexa, pretražite „Samsung Wireless Audio“ u opciji Skills i izaberite „ENABLE“.
- Preskočite ovaj korak ako ste već podesili opciju Skills.

flowchart
graph LR
    A["Aplikacija Amazon Alexa"] --> B["Izaberite opciju Skills"]
    B --> C["Pretražite"]
    C --> D["Omogući"]
- Sa kartice Smart Home u aplikaciji Alexa, dovršite „Discover Device“.

flowchart
graph LR
    A["Aplikacija Amazon Alexa"] --> B["Izaberite Smart Home"]
    B --> C["Izaberite opciju Devices"]
    C --> D["Otkrij uređaj"]
08 UPRAVLJANJE SOUNDBAR UREĐAJEM POMOĆU AMAZON UREĐAJA
- Koristite glasovne komande da biste uživali u muzici dostupnoj na Amazon uređaju.
- Usluga Amazon Echo, koju možete da koristite sa zvučnicima, ograničena je na muziku. Ostalim uslugama koje pruža Amazon Echo, kao što su vesti i vreme, može se pristupiti putem Amazon Echo proizvoda.
text_image
DIMENSIONS Densnatural_image
Two technical illustrations of mechanical fasteners: a pulley and a screw (no text or symbols)Zavrtanj držača
(2 komada)
Zavrtanj
(2 komada)

Nosača za montažu na zid (2 komada)
-
Postavite Vodicu za montažu na zid na zidnu površinu.
-
Vođicu za montažu na zid mora biti nivelisana.
- Postavite uređaj Soundbar najmanje 5 cm ispod televizora, ako je televizor montiran na zid.

text_image
TV 5 cm ili više- Poravnajte Osa papirnog šablona sa sredinom televizora (ako montirate uređaj Soundbar ispod televizora), a zatim pričvrstite Vodicu za montažu na zid za zid koristeći traku.
- Ako ne montirate uređaj ispod televizora, postavite Osa na sredinu oblasti za montiranje.

text_image
100mm Osa- Pomoću oštrog predmeta, kao što su olovka ili hemijska olovka, označite položaje rupa, a zatim izvadite Vodicu za montažu na zid.

text_image
Control Unit Usernatural_image
Diagram showing a screw being inserted into a nut, with motion arrows indicating direction (no text or symbols)- Montirajte 2 Nosača za montažu na zid u odgovarajućoj orijentaciji na dnu uređaja Soundbar, pomoću 2 Zavrtnja.

natural_image
Mechanical assembly diagram showing a screw being inserted into a bracket with a circular arrow indicating rotation (no text or symbols)- Prilikom sklapanja noseći delovi Nosač za montažu na zid treba da se nalaze sa zadnje strane uređaja Soundbar.

text_image
Zadnja strana uređa - + → ⏻natural_image
Diagram showing a mechanical component before and after cutting, with arrows indicating direction of movement (no text or symbols present)natural_image
Mechanical assembly diagram showing a screw being inserted into a component, with an inset close-up highlighting the insertion point (no text or symbols present)
text_image
Postavljanje uredaja Soundbar11 AŽURIRANJE SOFTVERA
Kada je uređaj Soundbar povezan sa internetom, softverske ispravke se automatski obavljaju čak i kada je uređaj Soundbar isključen.
Manufactured under license from Dolby Laboratories. Dolby, Dolby Audio, Pro Logic, and the double-D symbol are trademarks of Dolby Laboratories.


Digital Surround
For DTS patents, see http://patents.dts.com. Manufactured under license from DTS Licensing Limited. DTS, the Symbol, DTS in combination with the Symbol, and DTS Digital Surround are registered trademarks or trademarks of DTS, Inc. in the United States and/or other countries. © DTS, Inc. All Rights Reserved.

The terms HDMI and HDMI High-Definition Multimedia Interface, and the HDMI Logo are trademarks or registered trademarks of HDMI Licensing LLC in the United States and other countries.

Spotify®
- Softver Spotify je predmet licenci nezavisnih proizvođača koje možete pronaći ovde :
www.spotify.com/connect/third-party-licenses. - Za dodatne informacije o funkciji Spotify Connect posetite www.spotify.com/connect
14 OBAVEŠTENJE O LICENCI OTVORENOG IZVORNOG KODA
Za dodatne informacije o otvorenim izvornim kodovima korišćenim u ovom proizvodu posetite veb lokaciju: http://opensource.samsung.com
15 VAŽNA NAPOMENA O SERVISIRANJU
natural_image
Illustration of a person sitting on a sofa using a laptop (no text or symbols visible)POUŽÍVATELŠKÁ PRÍRUČKA
natural_image
Illustration of a person sitting on a sofa next to a desk with a laptop (no text or symbols)
ÚPLNÁ PRÍRUČKA
text_image
Diagram illustrating the step-by-step disassembly of a remote control panel into battery casing, showing internal components and negative charges.02 OPIS PRODUKTU
natural_image
Circular gray button with a play symbol and double arrow icon (no text or numbers)text_image
[Samsung] R3 My Phone ... SETTINGS Add Speaker Alarmflowchart
graph LR
    A["Spustite aplikáciu"] --> B["Add device"]
    B --> C["Start building your connected world by adding This application, and other devices."]
    C --> D["SUPPORTED DEVICES"]
    D --> E["Now to use: Discover website lecture"]
    E --> F["Outboard"]
    F --> G["Devices"]
    G --> H["Automaticity"]
    H --> I["Connect"]
    I --> J["[AV"] SAMSUNG SOUNDBAR]
    J --> K["A new device has been found. Add this device to Samsung Connect?"]
    K --> L["Device: LATOR, ADD NEW"]
    L --> M["Add to use: Download website lecture"]
    M --> N["Outboard"]
    N --> O["Devices"]
    O --> P["Automaticity"]
    P --> Q["Registering device..."]
    Q --> R["Audio is being registered to your Samsung account."]
    R --> S["After the device is registered, setup will be complete."]
    S --> T["All Devices"]
    T --> U["[Av"] Samsung]
    U --> V["Add Device"]
flowchart
graph LR
    A["Input Image"] --> B["Add score: All Devices"]
    B --> C["Edit: Add score"]
    C --> D["Edit: [AV"] Samsung]
    D --> E["Remove: You can only delete your own device that are in locations that you can go back"]
    E --> F["Delete Device: Cancel Save"]
    F --> G["Zmeňte názov: Device name: [AV"] Samsung]
    G --> H["Cancel: Remove: Shortcut on dashboard"]
    H --> I["Uložte: Cancel Save"]
flowchart
Mobile app development flowchart for Amazon Alexa, covering skills, search, and Povolte steps with hand icons and interface elements.natural_image
Two mechanical components: a pulley and a screw, shown side by side (no text or symbols)Skrutka (2 ks)
Skrutka držiaka
(2 ks)

natural_image
Simple line drawing of a mobile phone slot (no text or symbols)text_image
Diagram showing a device with a screen and a pen, labeled with Chinese text and symbols.natural_image
Diagram showing a screw being inserted into a pulley and then being inserted into a screw, with no text or symbols present.natural_image
Mechanical assembly diagram showing a screw being inserted into a bracket with a circular arrow indicating rotation (no text or symbols)natural_image
Illustration of a remote control device with buttons and power symbol (no text or labels)Pravý koniec zariadenia Soundbar
natural_image
Diagram showing a beam being reduced from a flat plate to a rectangular block, with arrows indicating force direction (no text or symbols present)natural_image
Diagram showing a screwdriver inserted into a device component, with an inset close-up highlighting the insertion area (no text or symbols present)
text_image
Umiestnite zariadenie Soundbar11 AKTUALIZÁCIA SOFTVÉRU
Ked'je zariadenie Soundbar pripojené k internetu, softvér sa aktualizuje automaticky, aj ked'je zariadenie Soundbar vypnuté.
Manufactured under license from Dolby Laboratories. Dolby, Dolby Audio, Pro Logic, and the double-D symbol are trademarks of Dolby Laboratories.

dts
Digital Surround
For DTS patents, see http://patents.dts.com. Manufactured under license from DTS Licensing Limited. DTS, the Symbol, DTS in combination with the Symbol, and DTS Digital Surround are registered trademarks or trademarks of DTS, Inc. in the United States and/or other countries. © DTS, Inc. All Rights Reserved.

The terms HDMI and HDMI High-Definition Multimedia Interface, and the HDMI Logo are trademarks or registered trademarks of HDMI Licensing LLC in the United States and other countries.

Spotify®
natural_image
Illustration of a person sitting on a sofa using a laptop (no text or symbols visible)UPORABNIŠKI PRIROČNIK
natural_image
Illustration of a person sitting on a sofa next to a desk with a laptop (no text or symbols visible)
POPOLNI PRIROČNIK
natural_image
3D rendered mechanical component with a cross-shaped handle and central hole (no text or symbols)Držalo za kabel

natural_image
3D rendered image of a gray mechanical component with a small hole and rounded body (no text or symbols)Noga nosilca (2 kosa)

natural_image
Simple line drawing of a screw (no text or symbols)Vijak
(za nogo nosilca: 2 kosa)
(za držalo za kabel: 1 kos)
text_image
Diagram illustrating the step-by-step disassembly of a remote control device into battery cells, showing charge states and polarity.02 PREGLED IZDELKA
natural_image
Circular gray button with a play symbol and double arrow icon (no text or numbers)flowchart
graph LR
    A["TV"] -->|Bluetooth| B["Remote Device"]
    B --> C["Monitor with + button"]
Osnovna povezava
text_image
[Samsung] R3 My Phone ... < SETTINGS Add Speaker Alarmflowchart
graph LR
    A["Hand icon"] --> B["Connect"]
    B --> C["Add device"]
    C --> D["New to use"]
    D --> E["Download Soundbar Display"]
    E --> F["Registering device..."]
    F --> G["All Devices"]

    subgraph Section1
        B --> H["Add device"]
        H --> I["Add Now"]
    end

    subgraph Section2
        C --> J["Add device"]
        J --> K["A new device has been found"]
        K --> L["Add this device to Samsung Connect?"]
        L --> M["Add Now"]
    end

    subgraph Section3
        F --> N["Registering device..."]
        N --> O["Audio is being registered to your Samsung account."]
        O --> P["After the device is registered, setup will be complete, etc."]
    end

    subgraph Section4
        G --> Q["ALL DEVICES"]
        Q --> R["Add Device"]
        R --> S["[AV"] Samsung]
    end
flowchart
graph LR
    A["Aplikacija Amazon Alexa"] --> B["Izberite Smart Home"]
    B --> C["Izberite Devices Iskanje Naprave"]
    B --> D["Home: New Playing, Music & Games, Ltrs, Homework & Games, Home, Smart Home"]
    B --> E["Things to Try, I love you, Thanks, It is good to it, etc."]
    B --> F["Timer set for"]
    B --> G["Smart Home Skills"]
    C --> H["Groups: Devices"]
    C --> I["Scenes: Configure Smart Home"]
    C --> J["Discover: Alexia SMART HOME"]
08 UPRAVLJANJE ZVOČNIKA SOUNDBAR Z NAPRAVO AMAZON
natural_image
Two technical illustrations of mechanical components: a pulley and a screw (no text or symbols)Držalo vijaka (2 kosa) Vijak (2 kosa)

natural_image
Simple line drawing of a mobile phone slot (no text or symbols)text_image
Diagram showing a control panel with checkmark, radio button, and display indicators labeled 'SET' and 'CTD'natural_image
Diagram showing a screw being inserted into a housing, with motion arrows indicating direction (no text or symbols)- Na spodnji del zvočnika Soundbar z Dvema vijakoma (2) pravilno namestite Dva stenska nosilca (2).

natural_image
Diagram showing a screw being inserted into a mechanical component with a circular arrow indicating rotation (no text or symbols present)natural_image
Illustration of a remote control device with power and signal icons (no text or symbols)natural_image
Diagram showing a beam being reduced from an angle to a flat surface, with arrows indicating direction of motion (no text or symbols present)- Zvočnik Soundbar potisnite dol, kot je prikazano spodaj, tako da se Stenski nosilci varno zasidrajo na Vijake nosilca.
- Vijake nosilca vstavite v širok (spodnji) del Stenskih nosilcev, nato pa Stenske nosilce potisnite navzdol, da se Stenski nosilci varno zasidrajo na Vijake nosilca.

flowchart
graph TD
    A["Top: Device icon"] --> B["Downward arrow"]
    B --> C["Bottom: Device icon with downward arrow"]
natural_image
Diagram showing a mechanical assembly with a screw inserted into a component, and a close-up of the component being inserted (no text or symbols present)
text_image
Postavite zvočnik Soundbar11 POSODOBITEV PROGRAMSKE OPREME
Manufactured under license from Dolby Laboratories. Dolby, Dolby Audio, Pro Logic, and the double-D symbol are trademarks of Dolby Laboratories.

dts
Digital Surround
For DTS patents, see http://patents.dts.com. Manufactured under license from DTS Licensing Limited. DTS, the Symbol, DTS in combination with the Symbol, and DTS Digital Surround are registered trademarks or trademarks of DTS, Inc. in the United States and/or other countries. © DTS, Inc. All Rights Reserved.

The terms HDMI and HDMI High-Definition Multimedia Interface, and the HDMI Logo are trademarks or registered trademarks of HDMI Licensing LLC in the United States and other countries.

Spotify®
- Za programsko opremo Spotify veljajo licence tretjih oseb, ki so na voljo na naslovu:
www.spotify.com/connect/third-party-licenses. - Podrobnejše informacije o funkciji Spotify
Connect najdete na naslovu
www.spotify.com/connect
14 OBVESTILO O ODPRTOKODNIH LICENCAH
© 2017 Samsung Electronics Co., Ltd. All rights reserved.
Contact SAMSUNG WORLD WIDE
If you have any questions or comments relating to Samsung products, please contact the SAMSUNG customer care Centre.
| Country | Contact Centre | Web Site |
| ■Europe | ||
| UK 0330 SAMSUNG (7267864) | www.samsung.com/uk/support | |
| IRELAND (EIRE) 0818 717100 | www.samsung.com/ie/support | |
| GERMANY 06196 77 555 77 | www.samsung.com/de/support | |
| FRANCE 01 48 63 00 00 | www.samsung.com/fr/support | |
| ITALIA 800-SAMSUNG (800.7267864) | www.samsung.com/it/support | |
| SPAIN 0034902172678 | www.samsung.com/es/support | |
| PORTUGAL 808 207 267 | www.samsung.com/pt/support | |
| LUXEMBURG 261 03 710 | www.samsung.com/be_fr/support | |
| NETHERLANDS 088 90 90 100 | www.samsung.com/nl/support | |
| BELGIUM 02-201-24-18 | www.samsung.com/be/support (Dutch)www.samsung.com/be_fr/support (French) | |
| NORWAY 815 56480 | www.samsung.com/no/support | |
| DENMARK 707 019 70 | www.samsung.com/dk/support | |
| FINLAND 030-6227 515 | www.samsung.com/fi/support | |
| SWEDEN 0771 726 786 | www.samsung.com/se/support | |
| POLAND | 801-172-678* lub +48 22 607-93-33** (koszt połączenia według taryfy operatora) | http://www.samsung.com/pl/support/ |
| HUNGARY | 0680SAMSUNG (0680-726-7864) | www.samsung.com/hu/support |
| AUSTRIA | 0800-SAMSUNG (0800-7267864)[Only for Dealers] 0810-112233 | www.samsung.com/at/support |
| Country Contact Centre | Web Site | |
| SWITZERLAND | 0800 726 78 64 (0800-SAMSUNG) | www.samsung.com/ch/support (German)www.samsung.com/ch_fr/support (French) |
| CZECH | 800 - SAMSUNG (800-726786) | www.samsung.com/cz/support |
| SLOVAKIA | 0800 - SAMSUNG (0800-726 786) | www.samsung.com/sk/support |
| CROATIA 072726 | 786 | www.samsung.com/hr/support |
| BOSNIA | 055 233 999 | www.samsung.com/support |
| MONTENEGRO | 020 405 888 | |
| SLOVENIA | 080 697 267 (brezplačna številka) | www.samsung.com/si/support |
| SERBIA | 011 321 6899 | www.samsung.com/rs/support |
| ALBANIA 045 620 | 202 | www.samsung.com/al/support |
| BULGARIA | *3000 Цена в мрежата0800 111 31, Безплатна телефонна линия | www.samsung.com/bg/support |
| ROMANIA | *8000 (apel in retea)08008-726-78-64 (08008-SAMSUNG)Apel GRATUIT | www.samsung.com/ro/support |
| CYPRUS | 8009 4000 only from landline, toll free | www.samsung.com/gr/support |
| GREECE | 80111-SAMSUNG (80111 726 7864) only from land line(+30) 210 6897691 from mobile and land line | |
| LITHUANIA 8-800-77777 | www.samsung.com/lt/support | |
| LAT VIA | 8000-7267 | www.samsung.com/lv/support |
| ESTONIA 800-7267 | www.samsung.com/ee/support | |