SUPF3L - TV Stand SONY - Free user manual and instructions
Find the device manual for free SUPF3L SONY in PDF.
User questions about SUPF3L SONY
0 question about this device. Answer the ones you know or ask your own.
Ask a new question about this device
Download the instructions for your TV Stand in PDF format for free! Find your manual SUPF3L - SONY and take your electronic device back in hand. On this page are published all the documents necessary for the use of your device. SUPF3L by SONY.
USER MANUAL SUPF3L SONY
Thank you for purchasing this product.
To customers
This product should only be installed by licensed Sony service representatives, as it requires at least two people, special care, safety, and technique. Your Statutory Rights (if any) are not affected.
Disposal of this product

natural_image
Symbol of a trash bin crossed out by two diagonal lines (no text or labels)
Disposal of Old Electrical & Electronic Equipment (Applicable in the European Union and other European countries with separate collection systems)
This symbol on the product or on its packaging indicates that this product shall not be treated as household waste. Instead it shall be handed over to the applicable
collection point for the recycling of electrical and electronic equipment. By ensuring this product is disposed of correctly, you will help prevent potential negative consequences for the environment and human health, which could otherwise be caused by inappropriate waste handling of this product. The recycling of materials will help to conserve natural resources. For more detailed information about recycling of this product, please contact your local Civic Office, your household waste disposal service or the shop where you purchased the product.
WARNING
If the safety precautions are not observed or the product is used incorrectly, it may result in serious injury or fire.
This instruction manual shows the correct handling of the product and important precautions necessary to prevent accidents. Be sure to read this manual thoroughly and use the product correctly. Keep this manual available for future reference.
To Sony dealers
Installation of a plasma TV requires two people, special care and technique. When installing a plasma TV, refer to this manual carefully. Sony is not liable for any accidents or damages caused by incorrect installation or handling. Please give this manual to the customer after installation.
On Safety
Products by Sony are designed with safety in mind. If the products are used incorrectly, however, it may result in a serious injury through fire, electric shock, the product toppling over, or the product dropping. Be sure to observe the precautions for safety to prevent such accidents.
CAUTION
Specified products (As of April 2005)
| SU-PF3M SU-PF3L | ||
| Flat-Panel Colour | KDL-W40A12U K | DE-W50A12U |
| Television KLV-W | 40A10E KE-W50A | 10E |
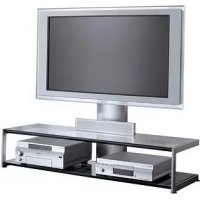
This Floating Stand is designed for use with the specified products above.
For other TVs, refer to their operating instructions to check if this Floating Stand can be used.
WARNING
If the following precautions are not observed, serious injury or death through fire, electric shock, the product toppling over, or the product dropping can result.
This product should only be installed by licensed Sony service representatives.
Installation by other, unlicensed persons may result in serious injury, as the TV and the stand are very heavy.
Do not lean on or hang from the stand.
The stand may topple over and cause injury.
Be sure to take measures to prevent the stand from toppling over.
If you fail to do so, the TV may topple over and cause injury. Anchor the TV to a wall, pillar, etc., to prevent toppling over.
Be sure to install the stand on a solid and flat floor.
Do not install the Floating Stand so that it leans in one direction. If you do so, the Floating Stand may topple over or the TV may fall. This may cause injury.
If you install the stand on a soft surface such as a mat or a carpet, lay a board over the designated location beforehand.
Do not use a cracked stand.
Do not use the Floating Stand if any cracks appear in it. The glass may break and the TV may fall, or the stand may topple over. This may cause injury. Crac
Cracked Stand
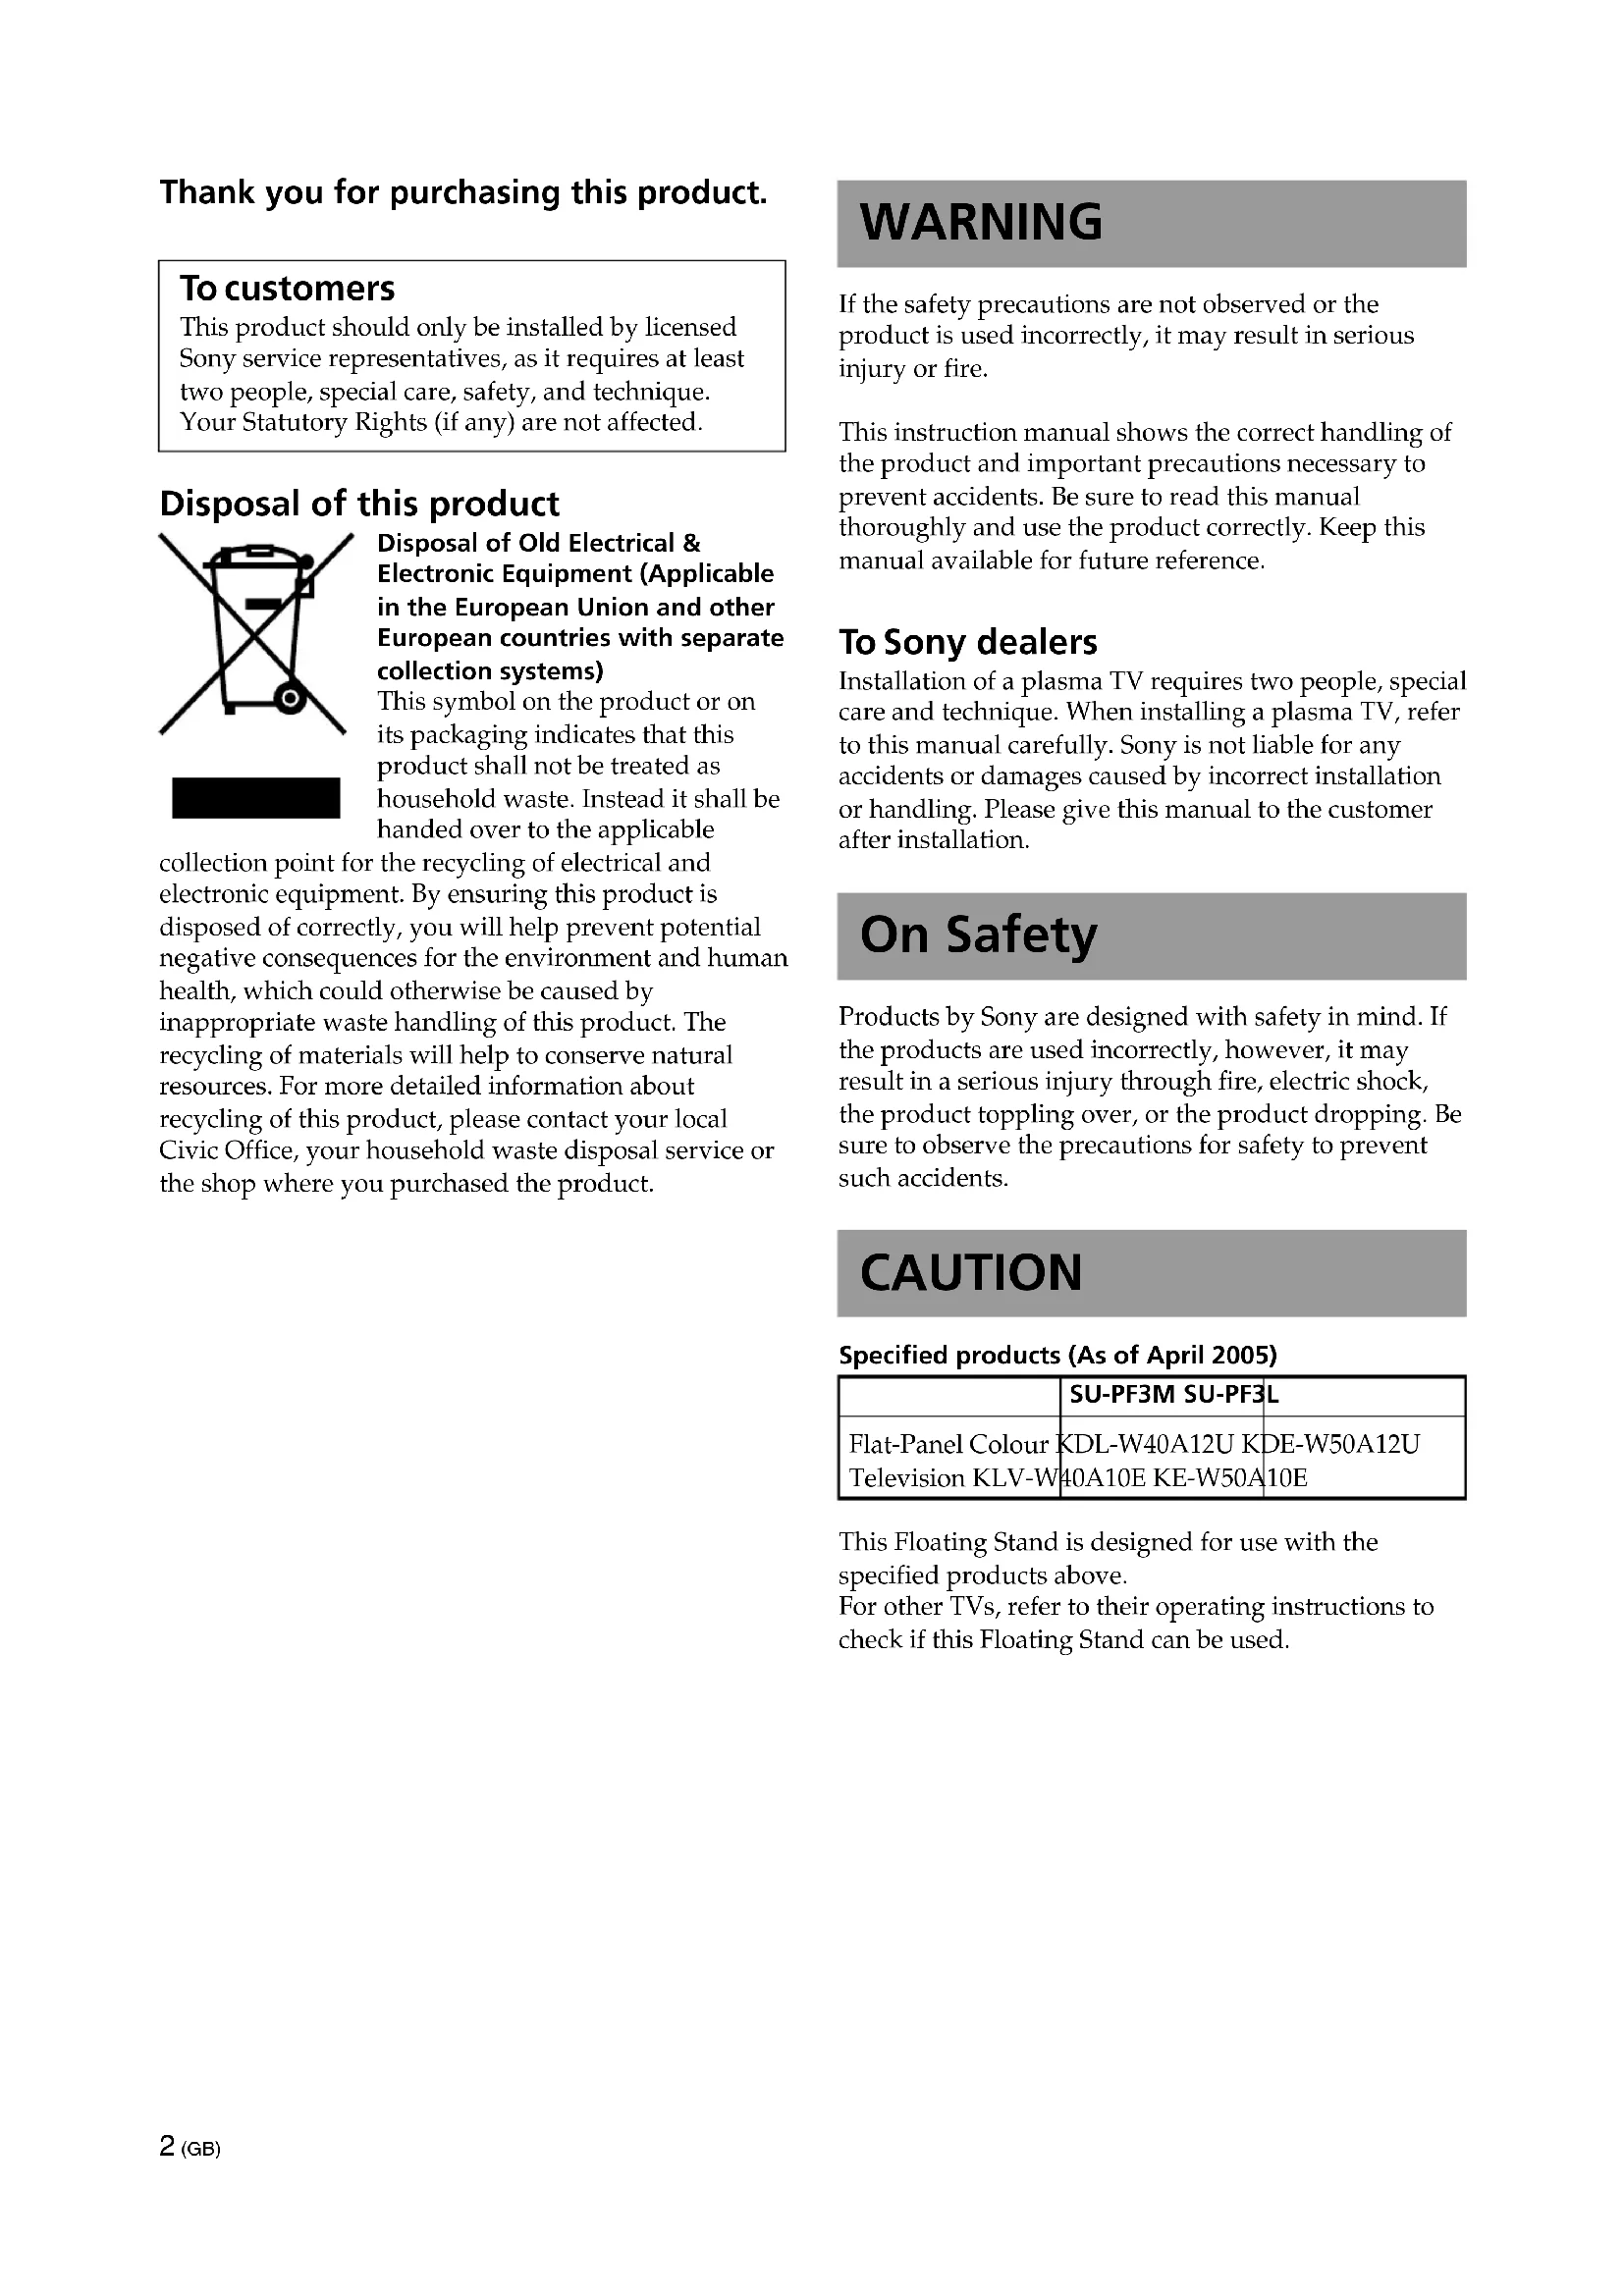
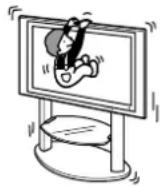
Do not lean on or hang from the TV with the TV installed on the Floating Stand.
The Floating Stand may topple over, or the TV may fall and cause serious injury or death.
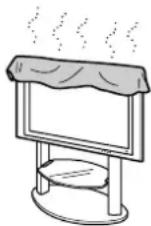
Do not cover the ventilation hole of the TV.
If you cover the ventilation hole (with a cloth, etc.), heat may build up inside and cause fire.
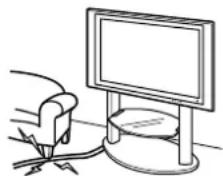
Do not allow the mains lead or the connecting cable to be pinched.
- Do not allow the mains lead or the connecting cable to be pinched when you install the TV on the stand. If the mains lead or the connecting cable is damaged, this may result in fire or electric shock.
- Do not step on the mains lead or the connecting cable when you carry the Floating Stand. The mains lead or the connecting cable may be damaged, and this may result in fire or electric shock.
natural_image
Simple line drawing of a monitor mounted on a stand with a arm seat, no text or symbols presentCAUTION
If the following precautions are not observed, injury or property damage may occur.
Do not install any equipment other than the specified product.
This stand is designed for use with the specified product only. If you install equipment other than specified, it may fall or break, and cause injury.
Be sure to secure the TV.
Secure the TV to the Floating Stand using the supplied screws. If the TV is not installed securely, it may fall, or the stand may topple over, and cause injury.
Do not apply weight to the glass or subject it to any kind of impact.
Do not apply weight to the stand with your hand when installing the TV. Do not hit the stand with hard objects, such as a screwdriver, etc. The glass may break and cause injury.
When carrying the Floating Stand
Trying to move the Floating Stand alone, or without following the proper procedures, may cause injury. To avoid this, be sure to follow the advice given below.
- Be sure that two or more persons carry the Floating Stand only after removing the TV.
- Be careful not to allow your hands or feet to be pinched under the bottom plate.
- Do not grab the glass shelf or woofer speaker when carrying the stand.
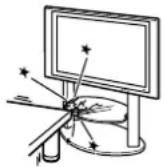
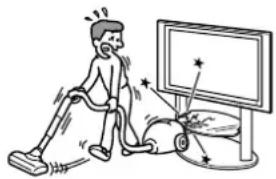
Do not subject the glass to excessive shock.
This stand is made of tempered glass, but care should be taken. If the glass breaks, glass fragments could cause injury, so observe the precautions below.
- Do not hit the glass or drop sharp-pointed objects on the glass. Avoid excessive shock.
- Do not scratch or poke the glass with sharp-pointed objects.
- Do not let hard objects such as a vacuum cleaner hit the edges of the glass.
natural_image
Illustration of a person using a vacuum cleaner to clean or watch TV (no text or symbols present)Notes on installation
Install the stand on a solid and flat floor. Do not allow the stand to be installed at an angle or incline. To avoid this, observe the following precautions.
- If you install the stand on a soft surface such as a mat or a carpet, lay a board over the designated location beforehand.
- Do not install the stand in a place subject to direct sunlight or near a heater.
- Do not install the stand in a hot or humid place, or outdoors.
Notes on use
Cleaning
To keep the stand clean, occasionally wipe the stand with a dry soft cloth. Stubborn stains may be removed with a cloth slightly dampened with diluted detergent. Then wipe the area with a dry soft cloth. Do not use chemicals, such as thinner or benzine, as they damage the finish of the stand.
Magnet influence
This TV contains strong magnet in the speaker unit which generates a magnetic influence. Keep any items that are susceptible to magnetic influence away from the TV speaker.
To Sony dealers
Be sure to thoroughly read the safety precautions described above and pay special attention to safety during the installation, maintenance, checking, and repair of this product.
Be sure that two or more persons do the installation work.
Be sure that two or more persons install the TV on the Floating Stand. If one person does the installation work alone, this may result in an accident or injury. Be sure to keep children away during the installation.
Be careful not to injure your hands or fingers during installation.
Be careful not to injure your hands or fingers when installing the TV on the Floating Stand.
Be sure to install the TV securely following the instructions.
Tighten the screws securely. If the TV is not installed securely, it may fall and cause injury.
natural_image
Simple line drawing of a glass shelf with two handles and a rectangular base (no text or symbols)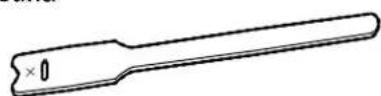
Be sure to have a Phillips screwdriver that fits the screws indicated above prior to the assembly.
* Model SU-PF3M is used for illustration purposes in the installation procedure.
Name Quantity
Floating Stand
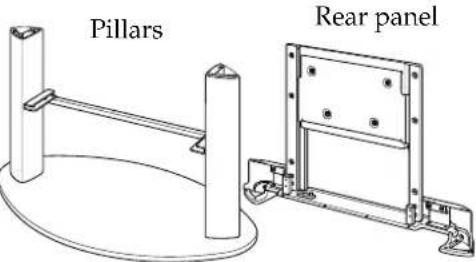
Illustration shown above is SU-PF3M.*
Rear panel securing screw M6 × L25 6

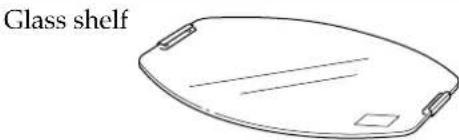
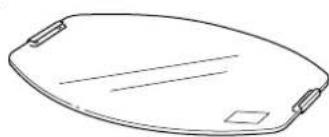
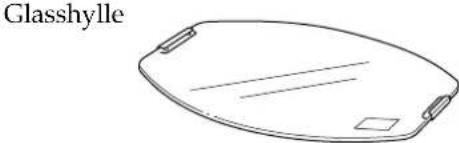
Glass shelf
natural_image
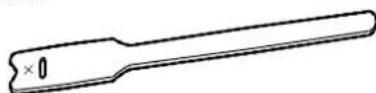
Simple line drawing of a curved tray or container with handles and a small square cutout at the bottom (no text or symbols)Securing screw (for glass shelf)

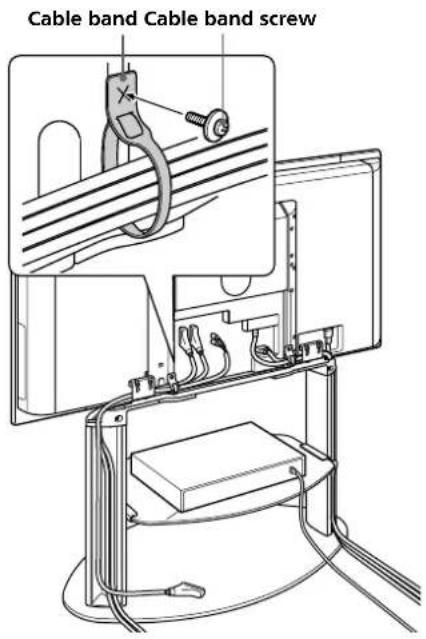
Cable band
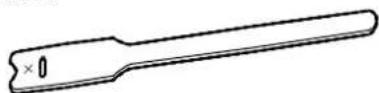
Cable band screw TP4 × 16 2

Assembling the Floating Stand
WARNING
If you allow the mains lead to be pinched under or between pieces of equipment, this may result in a short circuit or an electric shock.
If you stumble over the mains lead or the connecting cable, the stand may topple over and cause injury.
Decide on the installation location and lay the stand down before installing the TV.
Since the TV is heavy, it is recommended that you decide on the installation location and lay the Floating Stand down before installing the TV.
Note
Do not push or pull the Floating Stand while it is on the floor. The rubber footings on the base of the Floating Stand may come off.
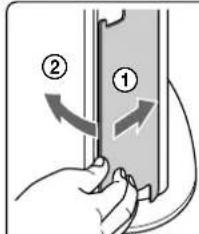
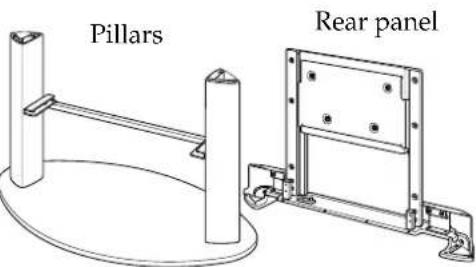
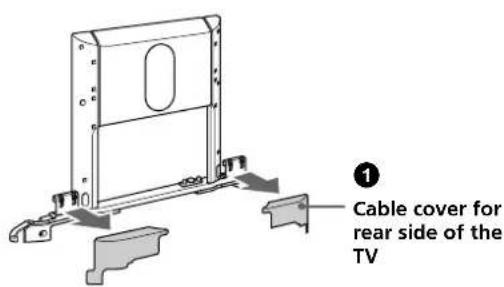
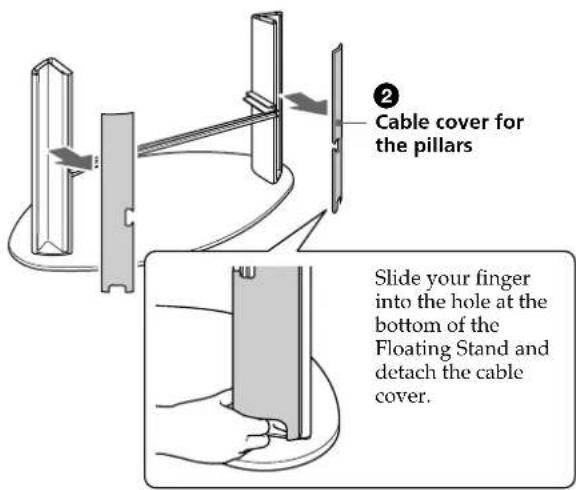
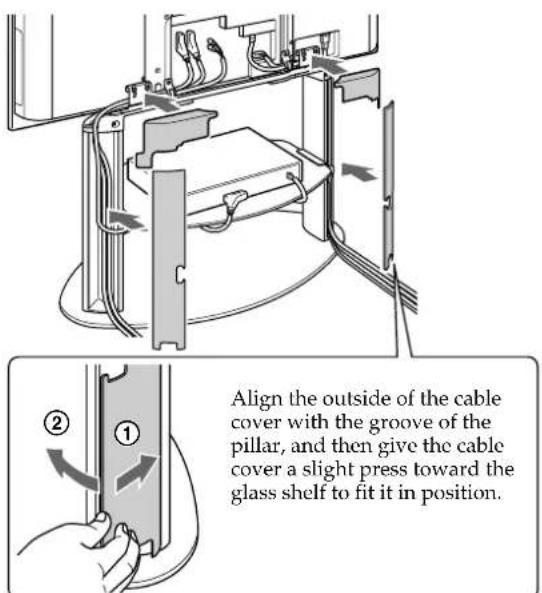
1 Detach the cable covers.
① Pull out the cable covers for the rear side of the TV from the Floating Stand.
② Detach the cable covers for the pillars of the Floating Stand.
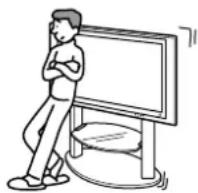
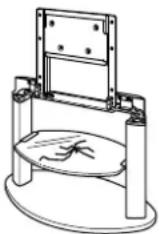
2 Position the rear panel on the pillars and secure on each side with the supplied rear panel securing screws.

natural_image
Technical line drawing of a mechanical assembly with mounting brackets and a circular base (no text or symbols)Installing a TV
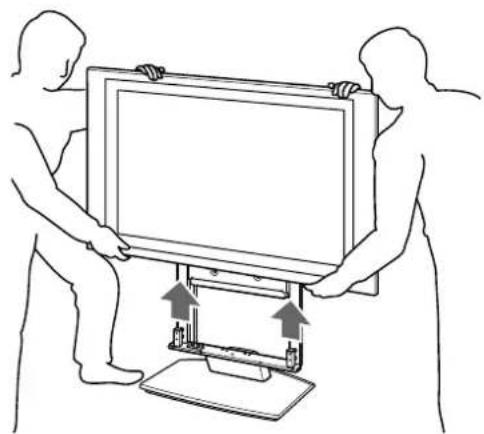
1 Detach the TV from the Table-Top Stand.
1 Remove the screws that hold the TV to the Table-Top Stand.
② Detach the TV from the Table-Top Stand.
natural_image
Line drawing of two people installing a flat-screen monitor on a stand (no text or symbols)2 Place the TV on the Floating Stand.
Insert the TV carefully so that the dowels of the Floating Stand fit into the guides of the TV.
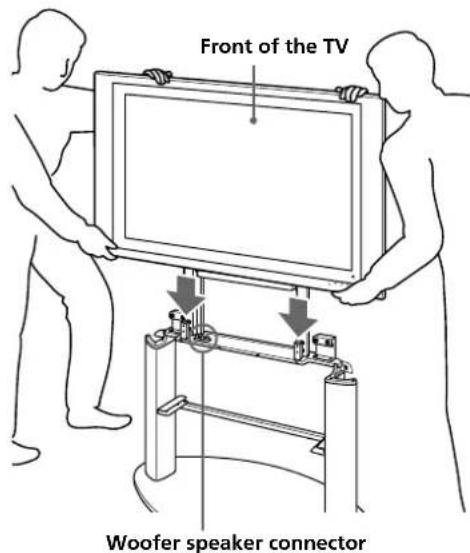
Bottom of the TV
Woofer speaker connector

Notes
- Do not hold the transparent part locating at the lower part of the TV, otherwise your hands may be pinched when installing the TV on the stand.
- Hold the TV from its front side as shown above in the illustration. If you hold the TV from its rear side, you may pinch your hands or fingers between the TV and the stand.
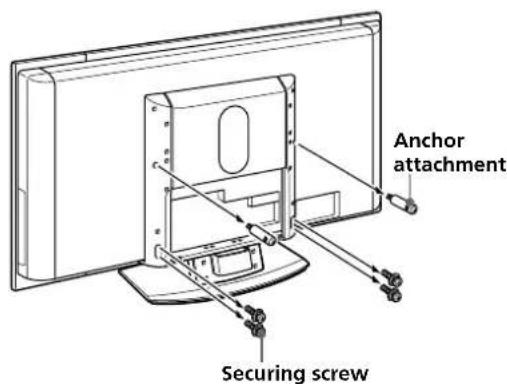
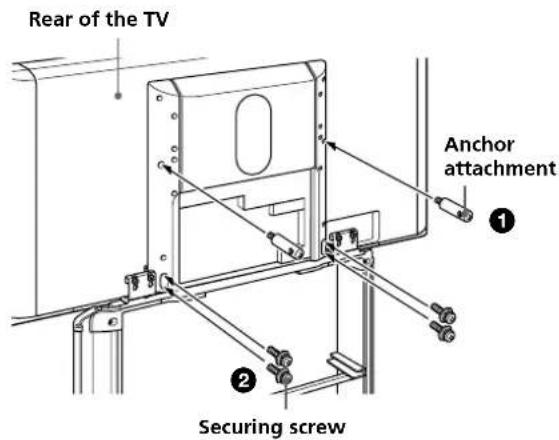
3 Secure the TV.
① Insert the anchor attachments (detached in step ① of procedure 1) in the second screw holes from the top on the left and right pillars of the rear panel and tighten them to secure the TV at the center of its rear.
② Insert the four securing screws (detached in step 1 of procedure 1) in the elongate holes on the lower part of the both pillars of the rear panel and tighten them to secure the TV at the lower part of its rear.
Notes
- Be sure to secure the anchor attachments first, as it will be easier to align the TV securing screws with their screw holes.
- When using an electric screwdriver, set the torque setting to about 1.5 N·m.
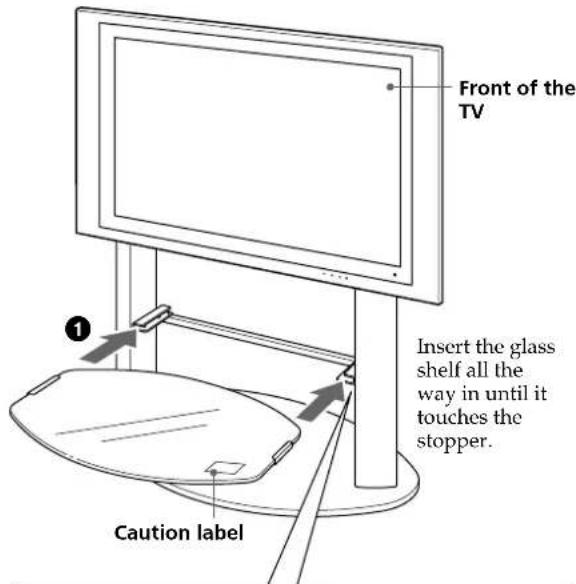
Attaching the glass shelf
1 Attach the glass shelf.
① Insert the glass shelf into the grooves in both pillars of the Floating Stand.
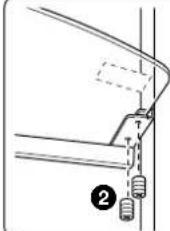
② Secure the glass shelf from beneath with the supplied securing screws (for glass shelf) as shown below.
natural_image
Pure mechanical diagram showing a lever and guide mechanism without any text or symbolsInsert the securing screw so that the cross slot side faces down as shown in the illustration on the left.
Notes
- Insert the glass shelf after installing the TV on the Floating Stand. If you fail to do so, you may hit the glass with the TV during installation and product damage or personal injury may result.
- Attach the glass shelf to the Floating Stand holding the glass shelf with the "caution" label at front right, as shown in the illustration.
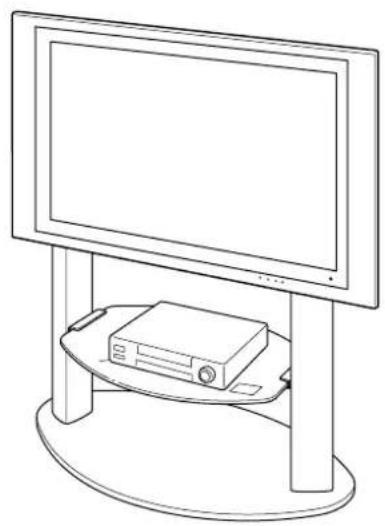
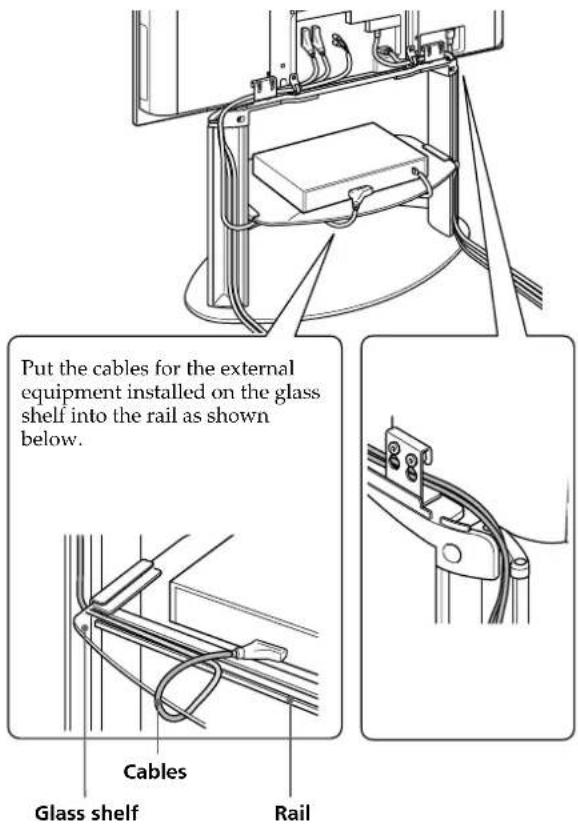
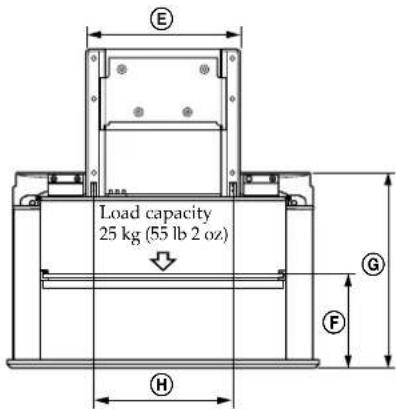
2 Install the VCR, DVD player, etc., on the glass shelf.
natural_image
Line drawing of a flat-screen monitor mounted on a side table with a box on top (no text or symbols)Bundling the cables
1 Connect the mains lead and the connecting cables to the TV.
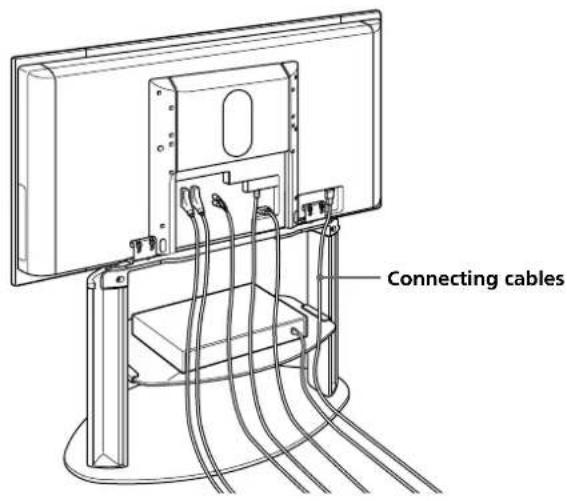
2 Bundle the mains lead and the connecting cables.
1 Attach the cable band to the Floating Stand with the supplied screw (TP4 × 16) and pass the cables through the cable band.
2 Run the cables equally through the openings at the top of the right and left pillars.
③ Place all cable covers back in their positions.
Checking the operation of the woofer speaker
This Floating Stand is equipped with a woofer speaker. Turn on the power of the TV after installing it on the Floating Stand and check if the woofer speaker is operating properly. If the TV is not properly installed, no sound will be heard from the woofer speaker.
Note
The distance between the TV and the wall may affect how the bass sounds from the speaker. If you need to adjust the sound quality (bass frequencies) after installation, change the distance between the stand and the wall or adjust the woofer level setting from the TV's menu option. See the instruction manual of the TV for more details on adjusting the sound quality.
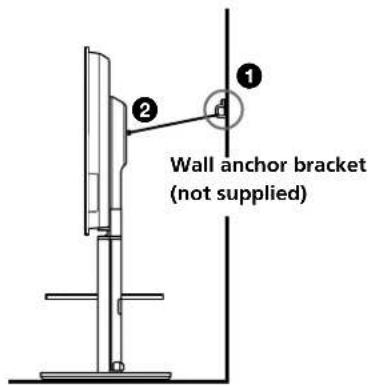
Safety measures to prevent toppling over
WARNING
Be sure to take measures to prevent the stand from toppling over.
If you fail to do so, the TV may topple over and cause injury. Anchor the TV to a wall, pillar, etc., to prevent it from toppling over.
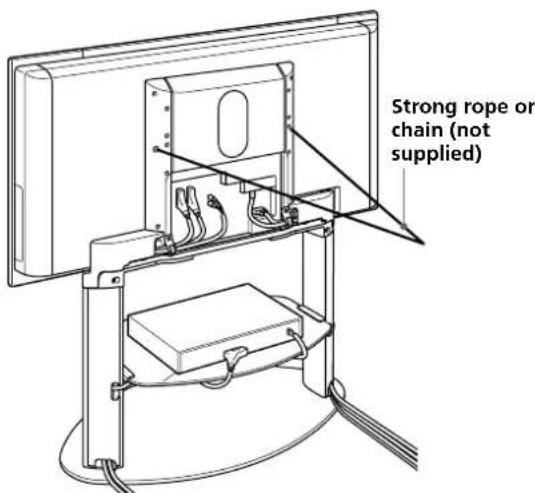
Prepare a commercially available strong rope or chain and wall anchor bracket beforehand.
① Secure the wall anchor bracket to a solid wall or pillar.
② Pass the rope or chain through both holes of the anchor attachments and then tighten the other end of the rope or chain to the wall anchor bracket.
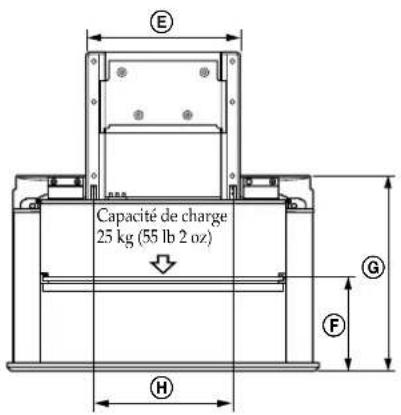
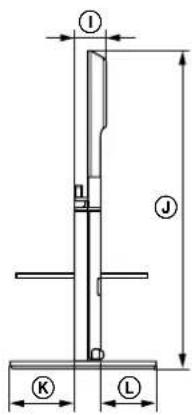
Specifications


| SU-PF3M SU-PF3L | |||
| Dimensions: A mm (inches) B | 975 | (38 1/2) 1115 (45) | |
| 712 | (28 1/8) 852 (33 5/8) | ||
| C | 470 (18 1/2) 470 (18 1/2) | ||
| D | 500 (19 1/8) 520 (20 1/2) | ||
| E | 524 (20 5/8) 524 (20 5/8) | ||
| F | 327 (12 7/8) 327 (12 7/8) | ||
| G | 691 (27 1/4) 691 (27 1/4) | ||
| H | 480 (19) 480 (19) | ||
| I | 115 (4 1/2) 115 (4 1/2) | ||
| J | 1104 (43 5/8) 1189 (46 7/8) | ||
| K | 234 (9 1/4) 244 (9 5/8) | ||
| L | 174 (6 7/8) 184 (7 1/4) | ||
| Weight: kg (oz) 32 (129) 36 (1270) | |||
SPEAKER
Speaker unit 10 cm (2)
Impedance 4 Ω
Max. power 50 W
Design and specifications are subject to change without notice.
natural_image
Symbol of a trash bin crossed with no text or labelsnatural_image
Simple line drawing of a desk with a monitor and chair, no text or symbols presentVORSICHT
natural_image
Illustration of a person using a vacuum cleaner to clean or watch TV (no text or symbols present)natural_image
Technical line drawing of a mechanical assembly with mounting brackets and a circular base (no text or symbols)natural_image
Line drawing of two people assembling a flat-screen monitor (no text or symbols)natural_image
Pure mechanical assembly diagram showing a bracket and mounting detail without any text or symbolsnatural_image
Line drawing of a flat-screen monitor mounted on a side table with a CD and monitor (no text or symbols)Bündeln der Kabel
natural_image
Technical line drawing of a mechanical assembly with no visible text or symbols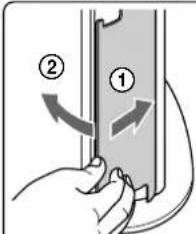
natural_image
Symbol of a trash bin crossed out by two diagonal lines (no text or numbers present)
natural_image
Simple line drawing of a desk with a monitor and armrest, no text or symbols presentLET OP
natural_image
Illustration of a person using a vacuum cleaner to observe a TV (no text or symbols present)natural_image
Technical line drawing of a mechanical assembly with mounting brackets and a central support (no text or symbols)natural_image
Line drawing of two people assembling a flat-screen monitor (no text or symbols)natural_image
Pure mechanical assembly diagram showing a bracket and mounting detail without any text or symbolsnatural_image
Line drawing of a flat-screen monitor mounted on a circular base with a rectangular box on top (no text or symbols)Kabels samenbinden
natural_image
Technical line drawing of a mechanical assembly with no visible text or symbols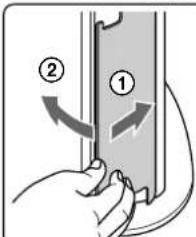
natural_image
Symbol of a trash bin crossed out by two crossed lines (no text or numbers present)natural_image
Illustration of a person using a vacuum cleaner next to a TV (no text or symbols present)natural_image
Technical line drawing of a mechanical assembly with mounting brackets and a circular base (no text or symbols)natural_image
Line drawing of two people assembling a flat-screen monitor (no text or symbols)2 Coloque o televisor no Suporte Flutuante.
Insira cuidadosamente o televisor de forma a que os pinos do Suporte Flutuante encaixem nas guias do televisor.

Parte traseira do televisor

Notas
natural_image
Pure mechanical assembly diagram showing a bracket and spring assembly without any text or symbolsnatural_image
Line drawing of a flat-screen monitor mounted on a side table with a CD and monitor (no text or symbols)Juntar os cabos
natural_image
Simple line drawing of a trash bin with two crossed lines indicating no waste or prohibition (no text or symbols)natural_image
Illustration of a person using a vacuum cleaner next to a TV (no text or symbols present)Installering
natural_image
Technical line drawing of a mechanical assembly with mounting brackets and a circular base (no text or symbols)Installere TV
natural_image
Line drawing of two people assembling a flat-screen monitor (no text or symbols)natural_image
Pure mechanical assembly diagram showing a bracket and mounting detail without any text or symbolsnatural_image
Line drawing of a flat-screen monitor mounted on a side table with a CD and DVD (no text or symbols)Bunting av kabler
natural_image
Symbol of a trash bin crossed out by two crossed lines (no text or labels)
natural_image
Illustration of a person using a vacuum cleaner to observe a TV (no text or symbols present)natural_image
Technical line drawing of a mechanical assembly with mounting brackets and a circular base (no text or symbols)natural_image
Line drawing of two people assembling a flat-screen monitor (no text or symbols)natural_image
Line drawing of a flat-screen monitor mounted on a side table with a CD and DVD (no text or symbols)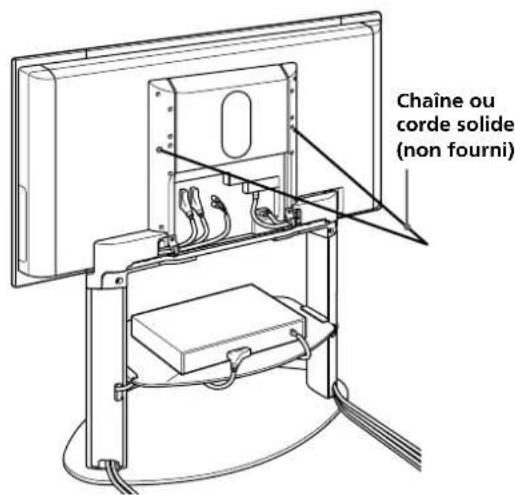
Spécifications

| SU-PF3M SU-PF3L | |||
| Dimensions: A mm (pouces) B | 975 (38 1/2) 1115 (45) | ||
| 72 (28 1/8) 852 (33 5/8) | |||
| C | 470 (18 1/2) 470 (18 1/2) | ||
| D | 500 (19 1/8) 520 (20 1/2) | ||
| E | 524 (20 5/8) 524 (20 5/8) | ||
| F | 327 (12 7/8) 327 (12 7/8) | ||
| G | 691 (27 1/4) 691 (27 1/4) | ||
| H | 480 (19) 480 (19) | ||
| I | 115 (4 1/2) 115 (4 1/2) | ||
| J | 1104 (43 5/8) | 1189 (46 7/8) | |
| K | 234 (9 1/4) 244 (9 5/8) | ||
| L | 174 (6 7/8) 184 (7 1/4) | ||
| Poids: kg (onces) | 32 (1129) 36 (1270) | ||
HAUT-PARLEUR
natural_image
Symbol of a trash bin crossed out by two diagonal lines (no text or numbers present)
natural_image
Simple line drawing of a computer monitor mounted on a stand with cables, no text or symbols presentAVVERTIMENTO
natural_image
Illustration of a person using a vacuum cleaner to clean or watch a TV (no text or symbols present)natural_image
Technical line drawing of a mechanical assembly with mounting brackets and a circular base (no text or symbols)natural_image
Line drawing of two people assembling a flat-screen monitor (no text or symbols)natural_image
Pure mechanical assembly diagram showing a bracket and spring assembly (no text or symbols)natural_image
Line drawing of a flat-screen monitor mounted on a side table with a CD and DVD nearby (no text or symbols)natural_image
Technical line drawing of a mechanical assembly with no visible text or symbols