
SUP50T1 - TV Accessories SONY - Free user manual and instructions
Find the device manual for free SUP50T1 SONY in PDF.

| Product type | TV stand (floor stand) |
| Brand | Sony |
| Model | SUP50T1 (equivalent SU-P50T1) |
| TV compatibility | Sony KE-42MR1 / KE-50MR1 |
| Dimensions (W x D x H) | 600 x 321 x 602 mm |
| Weight | 19.0 kg |
| Main material | Steel (estimated) |
| Color | Black (estimated) |
| Number of people for installation | 2 people minimum |
| Required tools | Phillips screwdriver |
| Recommended tightening torque | 2.45 N·m |
| Package contents | Main console, stand, fixing screws (2), countersunk screws (10), cable tie (1) |
| Main functions | Stable support for flat-screen TV, integrated cable management, wall anchor safety |
| Cable management | Yes, with cable tie and cable protection |
| Safety device | Holes for wall anchor cable, screen fixing screws |
| Maintenance and cleaning | Soft dry cloth; stubborn stains: cloth slightly dampened with diluted dish soap, then wipe with a dry cloth |
| Usage precautions | Do not lean, do not hang, do not block screen ventilation openings, transport without screen |
| Installation required | Assembly with screws, install on a flat and stable surface |
| Warranty | Not specified (see seller's terms) |
| Repairability | Spare parts not listed; contact an authorized Sony dealer |
| Manual available in | French, English, German, etc. (free download) |
Frequently Asked Questions - SUP50T1 SONY
User questions about SUP50T1 SONY
0 question about this device. Answer the ones you know or ask your own.
Ask a new question about this device
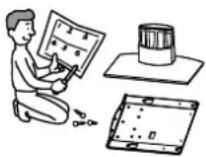
Download the instructions for your TV Accessories in PDF format for free! Find your manual SUP50T1 - SONY and take your electronic device back in hand. On this page are published all the documents necessary for the use of your device. SUP50T1 by SONY.
USER MANUAL SUP50T1 SONY
For Customers and Sony Dealers in Europe
Tabletop Stand
Instructions GB
Thank you for purchasing this product.
WARNING
If the safety precautions are not observed and the product is used incorrectly, it may result in a fire or serious injury.
This instruction manual shows the important precautions necessary to prevent accidents and to promote the correct handling of the product. Be sure to read this manual thoroughly and use the product correctly. Be sure to keep this manual available for future reference.
This Tabletop Stand is designed for use with the Sony Flat Panel Colour Television. Do not use this stand with equipment other than the following product.
Specified product
| Tabletop Stand SU-P42T1 SU-P50T1 | |
| Flat Panel Colour Television KE-42MR1 KE-50MR1 |
On Safety
Products by Sony are designed with safety in mind. If the product is used incorrectly, however, it may result in a serious injury through a fire, an electric shock or by causing the product to topple over. Be sure to observe the precautions for safety to prevent accidents.
For Customers
WARNING
If the following precautions are not observed, there is a possibility of either death or serious injury through a fire, an electric shock or by causing the product to topple over or fall.
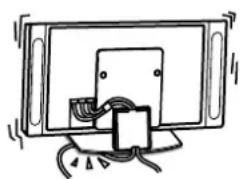
Do not allow the Power Cord or the Display Interface Cable to be pinched.
- Do not allow the Power Cord or the Display Interface Cable to be pinched when you install the Display Unit on the Tabletop Stand. If the Power Cord or the Display Interface Cable is damaged, this may result in a fire or an electric shock.
- Do not step on the Power Cord or the Display Interface Cable when you carry the Tabletop Stand. The Power Cord or the Display Interface Cable may be damaged, and this may result in a fire or an electric shock.
natural_image
Simple line drawing of a TV set with a cable and a small component, no text or symbols present.Be sure to use the securing screws.
If the securing screws are not used, the Display Unit may fall and cause injury when the Tabletop Stand is being carried.
Be sure to install the Tabletop Stand on a flat place.
If the Tabletop Stand is installed at an angle, it may topple over and cause injury or property damage.
Be sure to install the Tabletop Stand on a stable surface.
If you install the Tabletop Stand on an unstable surface, it may lose its balance and topple over or fall off. This may cause injury or property damage.

Be sure to take measures to prevent the stand from toppling over.
If you fail to do so, the Tabletop Stand may topple over during an earthquake and cause injury or property damage. Draw a wire or the like through the holes of the Security Attachments located on the upper part of the Main Bracket and fix the other ends of the wires to the wall to anchor the Tabletop Stand and prevent it from toppling over.
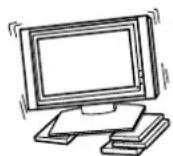
Do not lean on or hang from the Tabletop Stand.
The Tabletop Stand may topple over and cause injury.

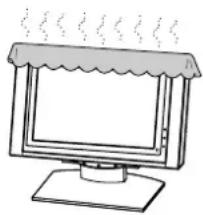
Do not block the ventilating holes on the Display Unit.
If you block the ventilating holes on the Display Unit by covering the top of the Tabletop Stand with a cloth or the like, the Display Unit may become overheated and this may cause a fire.
natural_image
Simple line drawing of a computer monitor with a canopy and steam lines (no text or symbols)Be sure to carry the stand in the manner shown in this manual.
If the Tabletop Stand is carried incorrectly, it may topple over and cause injury.
Do not stumble over the Power Cord or the Display Interface Cable.
If you stumble over the Power Cord or the Display Interface Cable, the Tabletop Stand may topple over and cause injury.
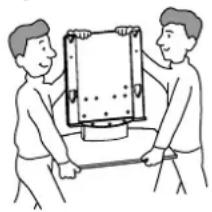
Do not carry the Tabletop Stand with Display Unit installed on it.
Be sure to remove the Display Unit before attempting to carry the Tabletop Stand. If you fail to do so, the Display Unit may fall and cause bodily injury.
natural_image
Two people handling a large rectangular object, possibly a device or container, with no visible text or symbols.CAUTION
If the following precautions are not observed, there is a possibility that the user will suffer injury or that property damage will occur.
Do not install equipment other than the specified product.
This Tabletop Stand is designed for use with the specified product. If you install equipment other than the specified product, it may fall and cause injury or property damage.
Precautions
To keep the stand clean, occasionally wipe the stand with a dry soft cloth. Stubborn stains may be removed with a cloth slightly dampened with watered-down dishwashing detergent. Then wipe the area with a dry soft cloth. Do not use any type of chemicals, such as thinner or benzene, as they may damage the finish of the stand.
Assemble the Tabletop Stand
For Sony Dealers
To Sony Dealers
The following instructions are for Sony Dealers only. Be sure to read safety precautions described above and pay adequate attention to safety during the installation, maintenance and checking of this product.
Be sure that two or more persons do the installation work.
Be sure that two or more persons do the installation work when installing the Display Unit on the Tabletop Stand. If one person does the installation work alone, this may result in an accident or an injury.
Be sure to assemble the Tabletop Stand securely following the instructions in this manual.
If any of the screws are loose or fall out, the Tabletop Stand may lean and topple over, or the Display Unit may fall. This may cause injury or property damage.
Be sure to install the Display Unit securely, following the proper procedure. Be sure to tighten the screws firmly.
If the Display Unit is not installed securely, it may fall and cause injury.
Be careful not to hurt your hands or fingers when assembling the Tabletop Stand.
Be careful not to hurt your hands or fingers when assembling the Tabletop Stand or when installing the Display Unit.
Precautions on the installation
- Be sure to spread packing materials or the like over the floor beforehand when assembling the Tabletop Stand.
-
Install the stand on a solid and flat floor. Do not allow the stand to be installed at an angle or leaning in one direction. To avoid this, observe the following precautions.
-
If you install the stand on a soft surface such as a mat or a carpet, lay a board on the designated location beforehand.
- Do not install the stand in a place subject to direct sunlight or near a heater.
- Do not install the stand in a hot or humid place, or outdoors.
Step 1: Check the parts
For Sony Dealers
• Prepare a Phillips screwdriver beforehand.
• Exercise extreme care to avoid injury when installing the Main Bracket.
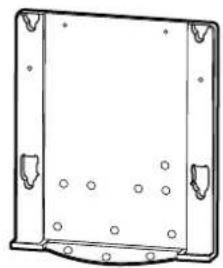
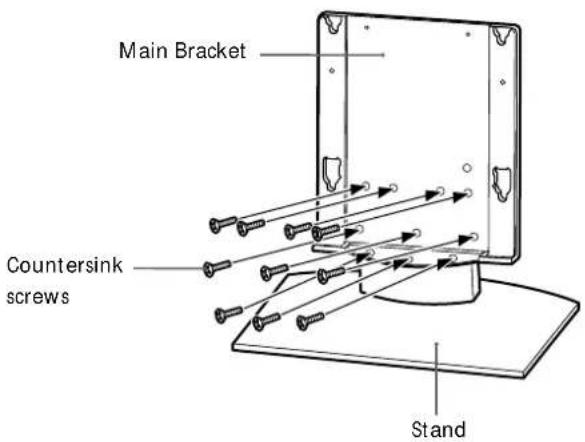
Main Bracket (1 piece) Stand (1 piece)
natural_image
Technical line drawing of a rectangular metal frame with mounting holes and bolt holes (no text or symbols)
natural_image
Simple line drawing of a cylindrical object with internal vertical slots, placed on a flat base (no text or symbols)| Name Quantity | |
Securing screw 2 | |
Countersink screw 10 | |
Cable clamper 1 |
Step 2: Install the Main Bracket
For Sony Dealers
1 Align the Main Bracket over the screw holes on the stand. Then fasten the Main Bracket to the stand using 10 countersink screws.
Be sure that two or more persons hold the parts during this procedure. Tighten the 10 countersink screws once again after screwing them temporarily.
Caution
- Be sure to hold the stand firmly and keep it stable.
- When you use an electric driver to tighten screws, tightening torque must be approx. 2.45 N·m. Do not use impact drivers.
If you use impact drivers or electric drivers with the tightening torque other than 2.45 N·m, you will overtighten the screws. This may destroy parts or screws, cause the Main Bracket to drop off from the stand, leading to any injury.
WARNING
Be sure to complete the installation before connecting the Power Cord to the wall outlet. If you allow the Power Cord to be pinched under or between pieces of equipment, this may result in a short circuit or an electric shock. If you stumble over the Power Cord or the Display Interface Cable, the stand may topple over, and this may result in injury.
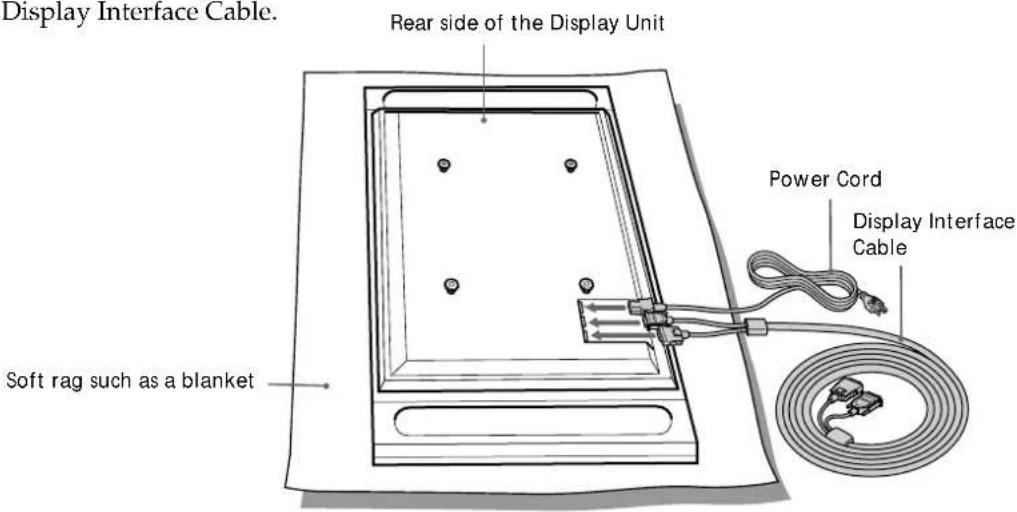
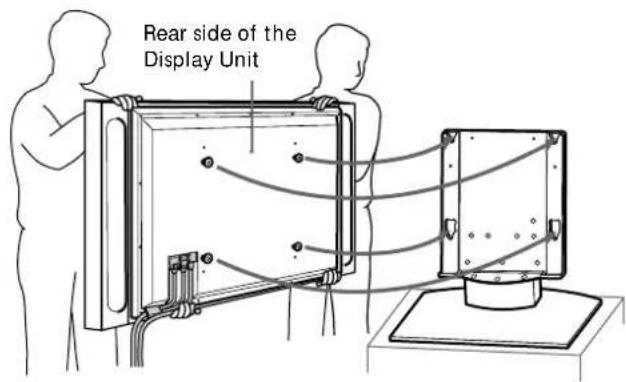
1 Install the Display Unit on the Tabletop Stand.
①Connect the Power Cord and the Display Interface cable to the Display Unit.
Tip
See the instruction manual of the Sony Flat Panel Colour Television (KE-42MR1/KE-50MR1) for more details on connecting the Power Cord and the Display Interface Cable.
1
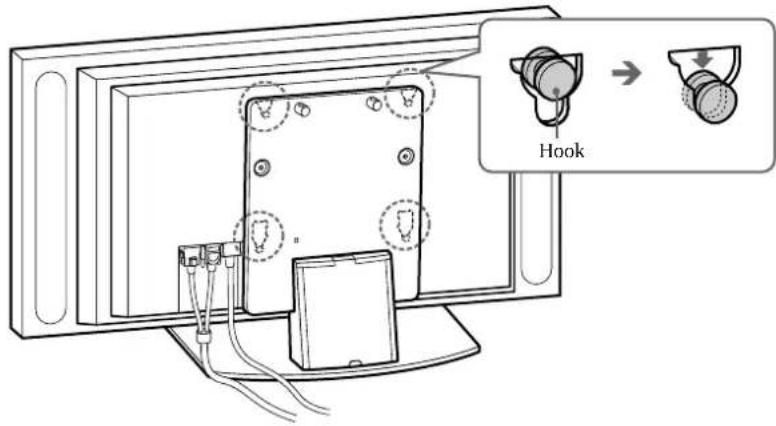
② Be sure that two or more persons hold the right and left edges of the top and the under sides of the Display Unit while fitting the hooks on the rear of the Display Unit into the holes on the fixtures of the stand. Then confirm that the hooks on the rear of the Display Unit are completely inserted into the four holes of the fixtures.
Note
Do not stumble over the Power Cord or the Display Interface Cable.
2
③Slide the Display Unit straight downward until it snaps on.
Notes
- Slide the Display Unit completely down to the bottom. Confirm that the Display Unit is installed on the stand horizontally.
- Be sure to keep the Tabletop Stand stable while installing the Display Unit.
3
2
Attach the Display Unit to the stand with the two securing screws.
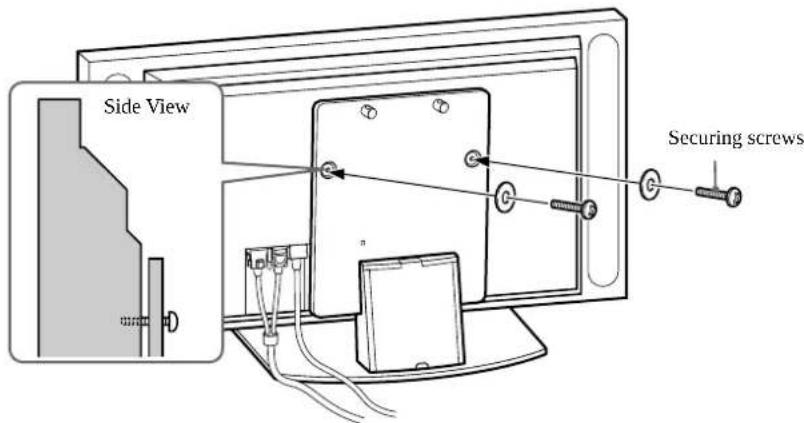
3
Route the Power Cord and the Display Interface Cable through the stand.
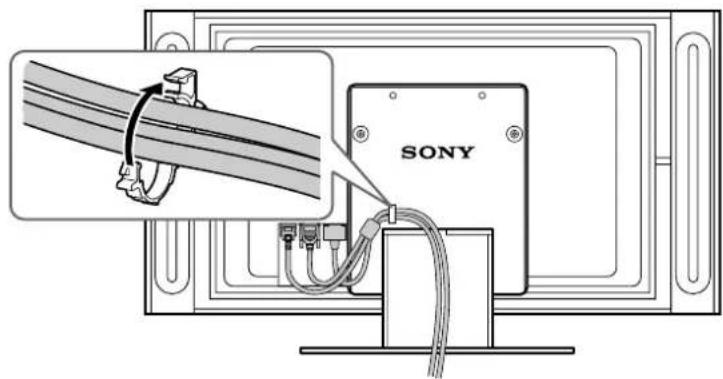
① Attach the cable clamper to the Main Bracket.
1
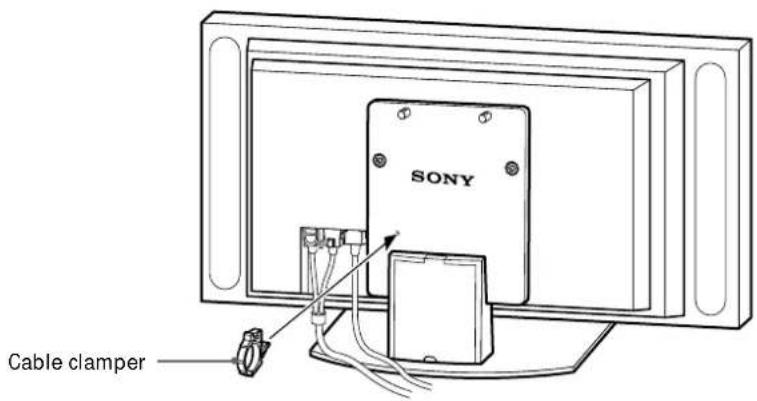
② Draw the Power Cord and the Display Interface Cable through the cable clamper and fix them.
2
③ Remove the Cable Cover from the stand and route the Power Cord and the Display Interface Cable inside the stand.
3
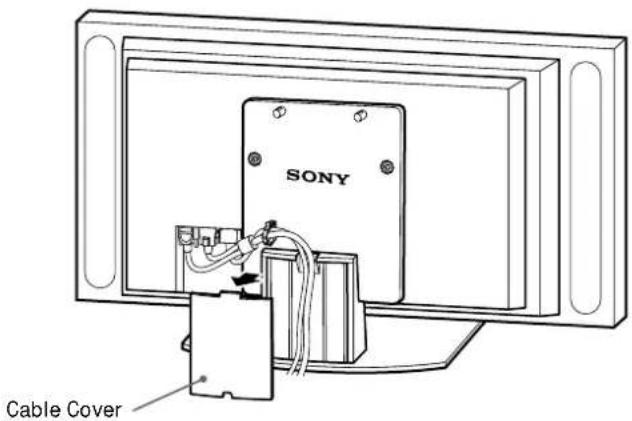
④Reattach the Cable Cover to the stand.
4

4
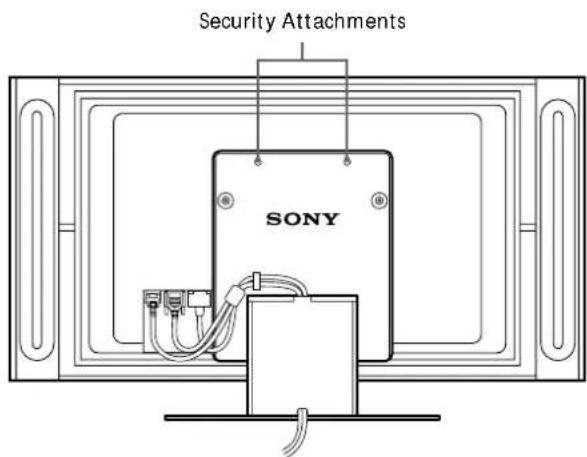
Take measures to prevent the stand from toppling over.
Draw a wire or the like through the holes of the security attachments located on the upper part of the Main Bracket and fix the other ends of the wires to the wall to anchor the Tabletop Stand and prevent it from toppling over.
WARNING
Be sure to take measures to prevent the stand from toppling over. If you fail to do so, the Tabletop Stand may topple over during an earthquake and cause injury or property damage. Draw a wire or the like through the holes of the security attachments located on the upper part of the Main Bracket and fix the other ends of the wires to the wall to anchor the Tabletop Stand and prevent it from toppling over.
Specifications
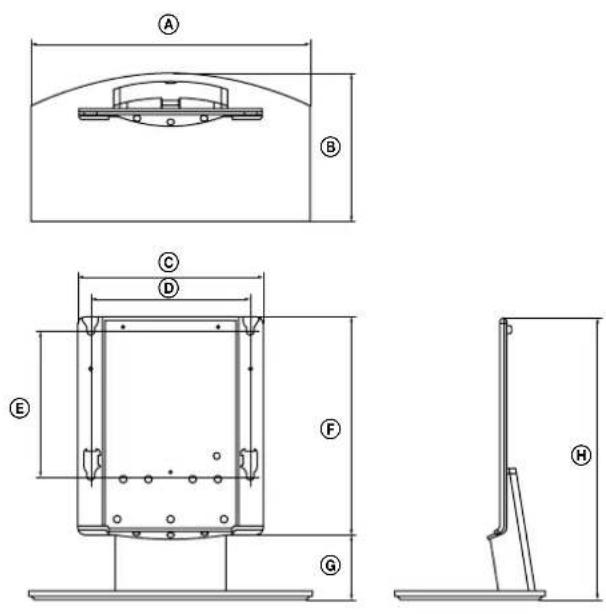
| SU-P42T1 SU-P50T1 | |||
| Unit: (mm) A 500 600 | |||
| B 295 321 | |||
| C 392 | |||
| D 340 | |||
| E 310 | |||
| F 461 | |||
| G 141 | |||
| H 602 | |||
| Weight: (kg) | 16.0 19.0 | ||
Design and specifications are subject to change without notice.
ACHTUNG
natural_image
Simple line drawing of a device with cables and a component, no text or symbols presentnatural_image
Simple line drawing of a computer monitor with a canopy and steam rising from the top (no text or symbols)natural_image
Two people handling a large rectangular object on a pole, possibly a device or machine (no text or symbols visible)VORSICHT
natural_image
Technical line drawing of a rectangular frame with mounting holes and bolt holes (no text or symbols)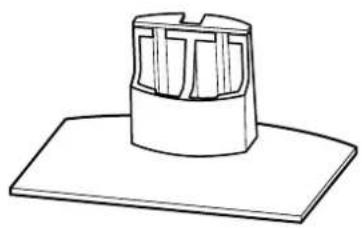
natural_image
Simple line drawing of a cylindrical object with internal vertical grooves, placed on a flat base (no text or symbols)2
natural_image
Simple line drawing of a mounted device with wires and connectors (no text or symbols)natural_image
Simple line drawing of a computer monitor with a canopy and a blank screen (no text or symbols)natural_image
Two people handling a large rectangular object, possibly a device or machine (no text or symbols visible)ATTENZIONE
natural_image
Technical line drawing of a rectangular metal enclosure with mounting holes and internal holes (no text or symbols)
natural_image
Simple line drawing of a cylindrical object with internal vertical slots, placed on a flat base (no text or symbols)4
natural_image
Simple line drawing of a monitor with cables and a cable inserted, no text or symbols presentnatural_image
Simple line drawing of a computer monitor with a roof and side legs, emitting steam (no text or symbols)natural_image
Two people handling a large rectangular object on a table (no text or symbols visible)ATTENTION
natural_image
Technical line drawing of a rectangular metal enclosure with mounting holes and internal ribs (no text or symbols)
natural_image
Simple line drawing of a cylindrical object with internal grid structure, placed on a flat base (no text or symbols)natural_image
Simple line drawing of a monitor mounted on a stand with cables, no text or symbols presentnatural_image
Simple line drawing of a computer monitor with a roof and side legs, emitting steam (no text or symbols)natural_image
Two people handling a large rectangular device (no text or symbols visible)LET OP
natural_image
Technical line drawing of a rectangular metal frame with mounting holes and bolt holes (no text or symbols)
natural_image
Simple line drawing of a cylindrical object with internal vertical slots, placed on a flat base (no text or symbols)natural_image
Simple line drawing of a mounted TV or electronic device with cables and a cable (no text or symbols)natural_image
Simple line drawing of a computer monitor with a canopy and heat pipes (no text or symbols)natural_image
Two people handling a large rectangular object, possibly a device or machine (no text or symbols visible)ΠΡΟΣΟΧΗ
natural_image
Technical line drawing of a rectangular metal frame with mounting holes and circular holes (no text or symbols)
natural_image
Simple line drawing of a cylindrical object with internal grid-like structure, placed on a flat base (no text or symbols)natural_image
Simple line drawing of a monitor with an electrical socket and cable, no text or symbols presentnatural_image
Simple line drawing of a computer monitor with a canopy and a blank screen (no text or symbols)natural_image
Two people handling a large rectangular object on a table (no text or symbols visible)UYARI
natural_image
Technical line drawing of a rectangular metal enclosure with mounting holes and internal holes (no text or symbols)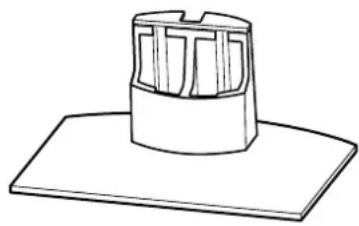
natural_image
Simple line drawing of a cylindrical object with internal vertical slots, placed on a flat base (no text or symbols)natural_image
Simple line drawing of a monitor with cables and a cable inserted, no text or symbols presentnatural_image
Simple line drawing of a computer monitor with a roof and side legs, no text or symbols present.natural_image
Two people handling a large rectangular object with holes, possibly a device or container (no text or symbols visible)PRECAUCIÓN
natural_image
Technical line drawing of a rectangular metal enclosure with mounting holes and internal holes (no text or symbols)
natural_image
Simple line drawing of a cylindrical object with internal grid structure, placed on a flat base (no text or symbols)natural_image
Diagram of a Sony TV studio setup with multiple screens and a central monitor (no text or symbols on the device itself)Especificaciones

| SU-P42T1 SU-P50T1 | |||
| Unidad: (mm) A 500 | 600 | ||
| B 295 321 | |||
| C 392 | |||
| D 340 | |||
| E 310 | |||
| F 461 | |||
| G 141 | |||
| H 602 | |||
| Peso: (kg) | 16,0 19,0 | ||
natural_image
Simple line drawing of a mounted TV or audio device with cable and speaker (no text or symbols)
natural_image
Simple line drawing of a computer monitor with a canopy and steam rising (no text or symbols)Transporte a base como se mostra neste manual.
natural_image
Two people handling a large rectangular object on a table (no text or symbols visible)CUIDADO
natural_image
Technical line drawing of a rectangular metal enclosure with mounting holes and internal holes (no text or symbols)
natural_image
Simple line drawing of a cylindrical object with internal grid structure, placed on a flat base (no text or symbols)natural_image
Simple line drawing of a monitor with cables and a cable connector (no text or symbols)natural_image
Simple line drawing of a computer monitor with a roof and side legs, emitting steam (no text or symbols)natural_image
Two people handling a large cylindrical object on a table (no text or symbols visible)FORSIGTIG!
natural_image
Technical line drawing of a rectangular metal frame with mounting holes and bolt holes (no text or symbols)
natural_image
Simple line drawing of a cylindrical object with internal vertical slots, placed on a flat base (no text or symbols)natural_image
Simple line drawing of a mounted TV with cables and connectors (no text or symbols)natural_image
Simple line drawing of a computer monitor with a canopy and steam rising (no text or symbols)natural_image
Two people handling a large rectangular object with dots, possibly a device or machine (no text or symbols visible)FORSIKTIG
natural_image
Technical line drawing of a rectangular metal enclosure with mounting holes and a curved base (no text or symbols)
natural_image
Simple line drawing of a cylindrical object with internal vertical slots, placed on a flat base (no text or symbols)| Navn Mengde | |
Sikringsskrue 2 | |
Senkskrue 10 | |
Kabelklemme 1 |
Trinn 2: Installere hovedkonsollen
For Sony-forhandlere
natural_image
Simple line drawing of a mounted device with cables and a component (no text or symbols)natural_image
Simple line drawing of a computer monitor with a canopy and steam rising (no text or symbols)natural_image
Two people handling a large rectangular object on a table (no text or symbols visible)WARNING!
natural_image
Technical line drawing of a rectangular frame with mounting holes and circular holes on the sides (no text or symbols)
natural_image
Simple line drawing of a cylindrical object with internal grid structure, placed on a flat base (no text or symbols)natural_image
Simple line drawing of a monitor with cables and a cable (no text or symbols)natural_image
Simple line drawing of a computer monitor with a canopy and a blank screen (no text or symbols)natural_image
Illustration of two people handling a large rectangular object (no text or symbols visible)VAROITUS
natural_image
Technical line drawing of a rectangular metal frame with mounting holes and bolt holes (no text or symbols)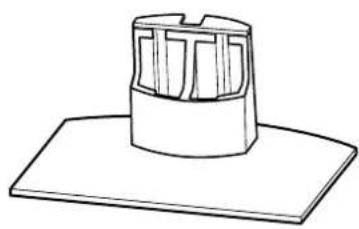
natural_image
Simple line drawing of a cylindrical object with internal vertical slots, placed on a flat base (no text or symbols)Printed on 100% recycled paper using VOC (Volatile Organic Compound)-free vegetable oil based ink.
- For Customers and Sony Dealers in Europe
- Tabletop Stand
- Thank you for purchasing this product.
- WARNING
- On Safety
- For Customers
- CAUTION
- Precautions
- Assemble the Tabletop Stand
- For Sony Dealers
- To Sony Dealers
- Precautions on the installation
- Step 1: Check the parts
- Step 2: Install the Main Bracket
- Align the Main Bracket over the screw holes on the stand. Then fasten the Main Bracket to the stand using 10 countersink screws.
- Install the Display Unit on the Tabletop Stand.
- Tip
- Note
- Notes
- 2
- 3
- 4
- Take measures to prevent the stand from toppling over.
- Specifications
- ACHTUNG
- VORSICHT
- ATTENZIONE
- ATTENTION
- LET OP
- ΠΡΟΣΟΧΗ
- UYARI
- PRECAUCIÓN
- Especificaciones
- CUIDADO
- FORSIGTIG!
- FORSIKTIG
- Trinn 2: Installere hovedkonsollen
- For Sony-forhandlere
- WARNING!
- VAROITUS
Brand : SONY
Model : SUP50T1
Category : TV Accessories