IAN 109976 - Bike accessory CRIVIT - Free user manual and instructions
Find the device manual for free IAN 109976 CRIVIT in PDF.
| Product type | Bicycle saddle with integrated pump |
| Brand | Crivit |
| Model | IAN 109976 |
| Approximate dimensions | 270 x 200 x 150 mm |
| Approximate weight | 600 g |
| Materials | Plastic and polyurethane foam |
| Intended use | Bicycle seat, private use |
| Hardness adjustment | Integrated pump: 3 pumps (soft), 8 (medium), 15 (hard) |
| Air release valve | Yes, to release air |
| Mounting | On seat post 27.2 to 31.6 mm typical, clamp included |
| Recommended tightening torque | 24 Nm on both sides |
| Minimum insertion depth | Observe markings on the tube |
| Safety | Quick release on fork legs, check before each use |
| Maintenance and cleaning | Clean with a damp cloth, do not use aggressive chemicals |
| Storage | In a dry, clean place at moderate temperature |
| Warranty | 3 years, valid for material and manufacturing defects |
| General information | Not suitable for commercial use, eco-friendly disposal |
Frequently Asked Questions - IAN 109976 CRIVIT
User questions about IAN 109976 CRIVIT
0 question about this device. Answer the ones you know or ask your own.
Ask a new question about this device
Download the instructions for your Bike accessory in PDF format for free! Find your manual IAN 109976 - CRIVIT and take your electronic device back in hand. On this page are published all the documents necessary for the use of your device. IAN 109976 by CRIVIT.
USER MANUAL IAN 109976 CRIVIT
alr Cushloned Bike saddLe

text_image
POP online www.fdl-service.comGB IF alr
Cushloned Bike saddLe
Assembly instructions
SE sadeL med Luftkudde
Monteringsinstruktion
FR BF seLLe à
Coussin d'air
Notice de montage
DE AT CH
LuftpoLstersatteL
Montageanleitung
FI
Safety instructions 4 - 5
Risk of injury 4 - 5
Avoidance of material damage 5
Assembly 6 - 7
Inflating 8
Deflating 9
Care, storage 9
Disposal 9
3-years warranty 10 - 11

Congratulations on purchasing this high-quality product. Be sure to familiarise yourself with the assembly instructions prior to use. Please take the time to carefully read through the following assembly instructions and safety notes. Only use the product as described and for the intended use. Please retain these instructions for future reference and ensure that they are passed on to any third party.
Intended use
The item is a seat for bicycles for private use and is not intended for commercial use.
⚠️ Safety instructions Risk of injury!
- Assemble the item correctly and ensure that it cannot slip when riding. Do not adjust the item while riding.
- Quick releases must lie on the dropouts in a closed state. Adjust the quick release so that you feel some resistance when it is in a 90° position and pull it tight. If necessary, consult your specialist dealer.
- Check the item before each use for damage and wear-and-tear. Check that all screws are tight before each use and if necessary, tighten screw connections again. The item may only be used if it is in flawless condition!
- If using a child seat, ensure that all spring washers under the saddle are covered in order to prevent the pinching of fingers.
- Every type of tear or scratch in the areas of the saddle subject to high stress (screw connections) is an indication that the life-span of that part has expired and the part must be replaced.
Avoidance of material damage
- Ensure that the item does not come in contact with sharp objects.
- Protect the item from extreme weather influences such as cold, wetness and direct exposure to the sun.
Assembly
Always adjust the saddle to the appropriate height for you. Observe the marking on the seat post, which marks the minimum insertion depth. The item's fastening screw must be tightened with 24 Newton metres on both sides in order to be securely fastened to the plug seat post.
(Fig. A) Adjust the item horizontally.
(Fig. B) For plug seat posts: Fasten the saddle with the pre-mounted block to the plug seat post.
(Fig. C)
- Remove the fastening screws (a) on both sides with 13' open-end wrench. Remove the distance piece (b), the screw (d), as well as the block (c).
- Subsequently, mount the saddle directly to the patent saddle post.

natural_image
Diagram of a mechanical or fluid system with directional arrows indicating flow or movement (no text or symbols)
natural_image
Diagram of a mechanical device with labeled parts and directional arrows, no readable text or symbols present.
text_image
C 1) 2)a - Fastening screw
b - Distance piece
c - Block
d - Screw

text_image
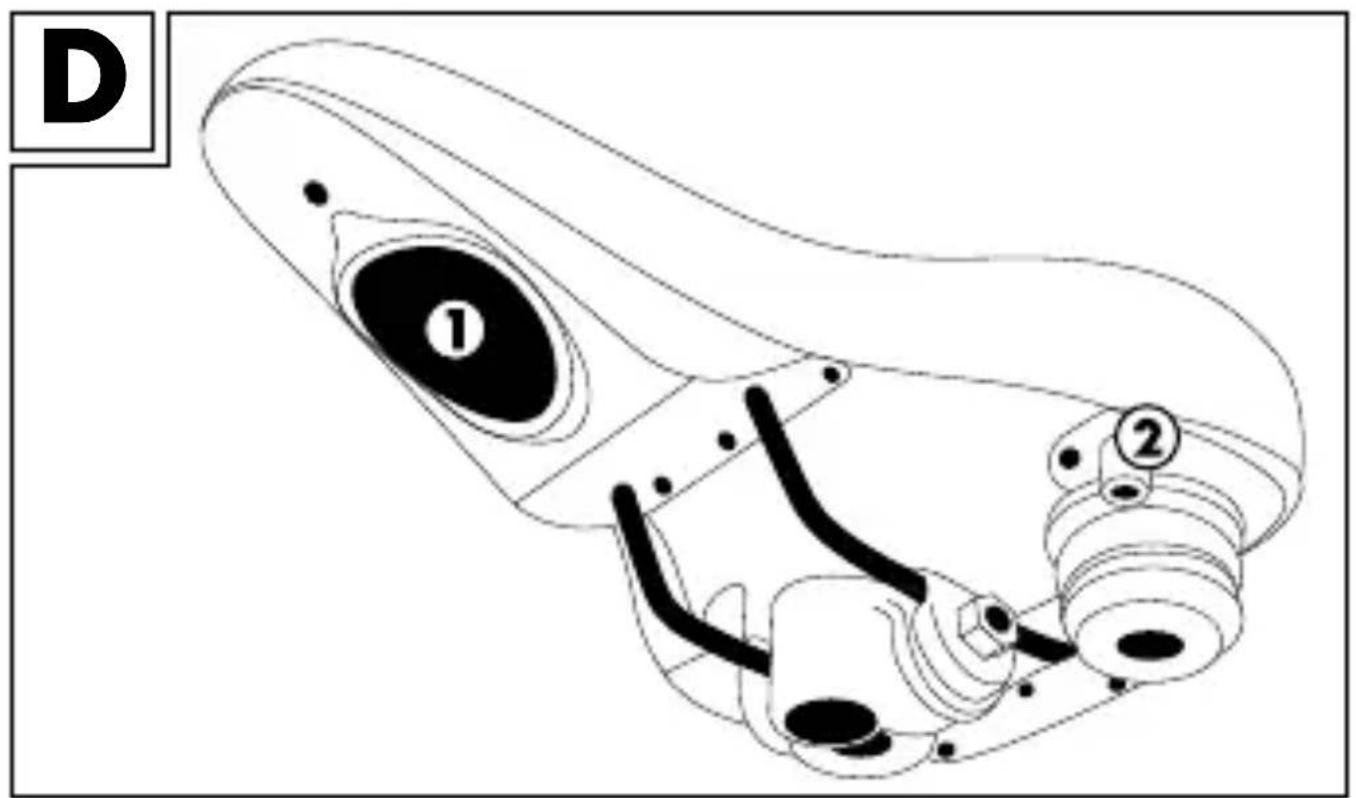
D ① ②Inflating
Push the inflation button (1) until you have achieved the desired degree of hardness (Fig. D).
Standard values:
- Soft - pump 3 x
• Medium - pump 8 x - Hard - pump 15 x
Advice! Please note, the product will deflate over time. In this event, inflate the product per the instructions.
Deflating
Press the air valve (2) (Fig. D).
Care, storage
Also, store the item in a clean dry place at room temperature.
Important! Only clean with a damp cleaning cloth and thereafter, wipe dry.
Disposal
Please dispose of the product and packaging in an environmentally friendly manner, separating different materials for recycling as required!
Dispose of this item through an authorised disposal company or through your local waste disposal facilities - ask your local authority for information if further guidance is required.
Ensure that you comply with all regulations currently in force.
3-years warranty
The product was produced with great care and under constant supervision. You receive a three-year warranty for this product from the date of purchase. Please retain your receipt.
The warranty applies only to material and workmanship and does not apply to misuse or improper handling. Your statutory rights, especially the warranty rights, are not affected by this warranty.
With regard to complaints, please contact the following service hotline or contact us by e-mail.
Our service employees will advise as to the subsequent procedure as quickly as possible.
We will be personally available to discuss the situation with you.
Any repairs under the warranty, statutory guarantees or through goodwill do not extend the warranty period. This also applies to replaced and repaired parts. Repairs after the warranty are subject to a charge.
IAN: 109976

Service Great Britain
Tel.: 0871 5000 720
(£ 0.10/Min.)
E-Mail: deltasport@lidl.co.uk

Service Ireland
Tel.: 1890 930 034
(0,08 EUR/Min., (peak))
(0,06 EUR/Min., (off peak))
E-Mail: deltasport@lidl.ie
All items are also available for purchase directly from our online shop: www.delta-sport.info
Sisällysluettelo
natural_image
Diagram of a mechanical or fluid system with directional arrows indicating flow or movement (no text or symbols)
natural_image
Diagram of a mechanical device with labeled parts and directional arrows, no readable text or symbols present.
text_image
C 1) 2)a - Kiinnitysruuvi
b - Välilevy
c - Pidike
d - Ruuvi

text_image
D ① ②Täyttäminen ilmalla
natural_image
Diagram of a mechanical or fluid system with directional arrows indicating flow or movement (no text or symbols)
natural_image
Diagram of a mechanical device with labeled parts and directional arrows, no readable text or symbols present.
text_image
C 1) 2)a - Fästskruv
b - Avständshållare
c - Klämfäste
d - Skruv
text_image
D ① ②Pumpning
natural_image
Diagram of a mechanical or fluid system with directional arrows indicating flow or movement (no text or symbols)
natural_image
Diagram of a mechanical device with labeled parts and directional arrows, no readable text or symbols present.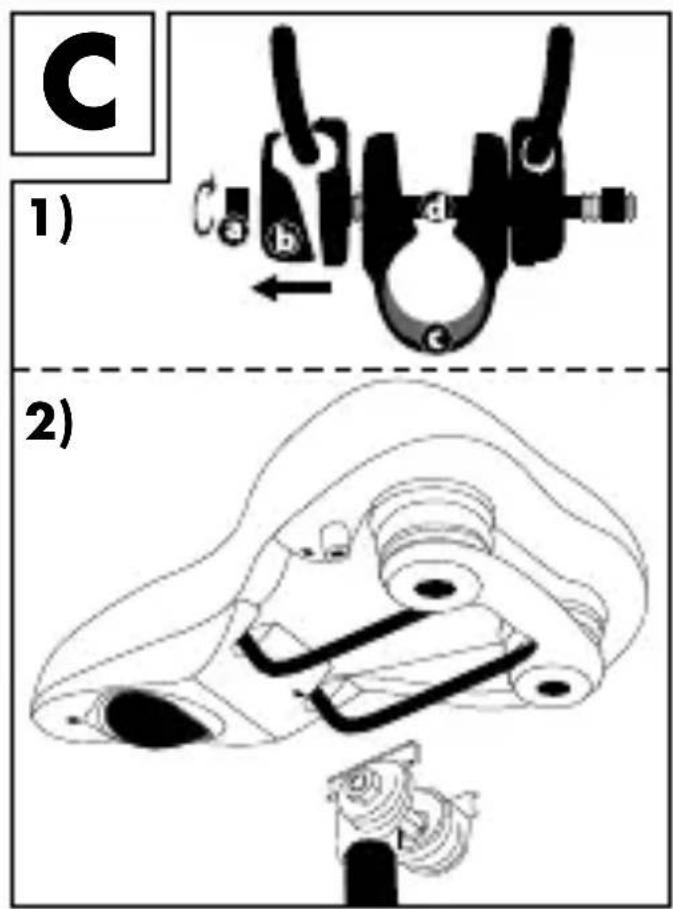
text_image
C 1) 2)natural_image
Diagram of a mechanical or fluid system with directional arrows indicating flow or movement (no text or symbols)
natural_image
Diagram of a mechanical device with labeled parts and directional arrows, no readable text or symbols present.
text_image
C 1) 2)a - Vis de fixation
b - Espaceur
c - Serre-joint
d - Vis

text_image
D ① ②Gonfler
natural_image
Diagram of a mechanical or fluid system with directional arrows indicating flow or movement (no text or symbols)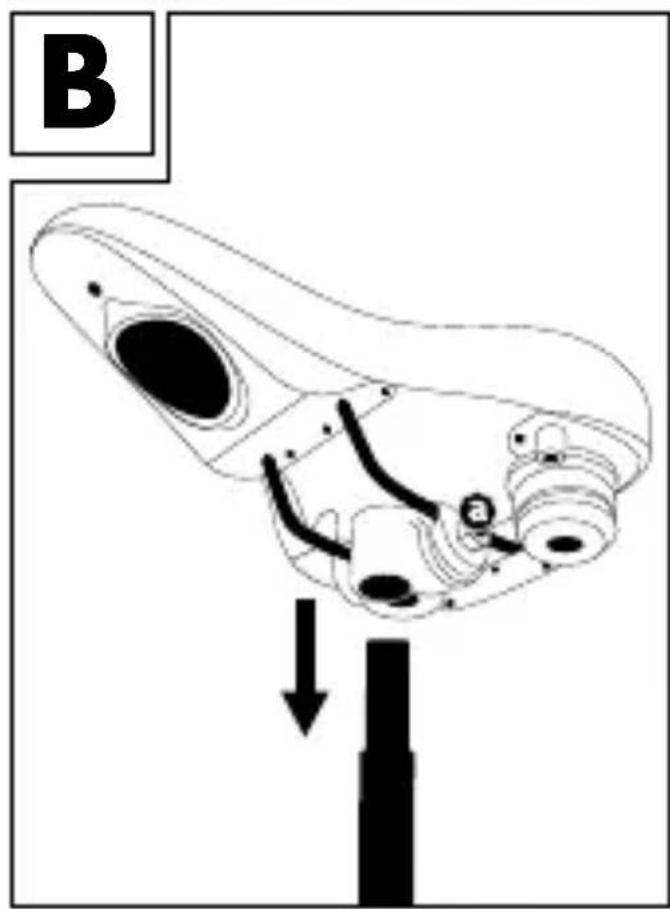
natural_image
Diagram of a mechanical device with labeled parts and directional arrows, no readable text or symbols present.
text_image
C 1) 2)natural_image
Diagram of a mechanical or fluid system with directional arrows indicating flow or movement (no text or symbols)
natural_image
Diagram of a mechanical device with labeled parts and directional arrows, no readable text or symbols present.