IAN 285955 - Tent CRIVIT - Free user manual and instructions
Find the device manual for free IAN 285955 CRIVIT in PDF.
| Product type | Inflatable camping tent for 2 persons |
| Brand and model | Crivit IAN 285955 |
| Exterior dimensions | Approx. 220 x 115 x 230 cm (L x H x D) |
| Folded dimensions | Approx. 50 x 26 x 26 cm (L x W x H) |
| Weight | Not specified, but lightweight category |
| Materials | Polyester, mesh, breathable PE; PE base |
| Water column | Roof: 2000 mm (welded seams); Base: 3000 mm |
| Inflation pressure | 0.5 bar (7 psi) maximum |
| Capacity | 2 persons |
| Category | Camping tent category A (lightweight); performance level category 2 |
| Intended use | Sleeping and staying outdoors in fair weather; not designed for snow or storm |
| Package contents | 1 tent, 1 double-action pump, 1 hose with pressure gauge, 1 spare valve, 12 pegs, 4 guy ropes, 1 repair kit, 3 storage bags, instructions |
| Fire safety | Do not light fire inside; clear exits; follow labels |
| Care and cleaning | Dry brush, rinse with clean water; no chemical cleaners |
| Repair | Use included repair patches for small leaks; spare valve if defective |
| Warranty | 3 years from date of purchase |
| Storage | Store in a dry place, out of the sun; valve closed |
Frequently Asked Questions - IAN 285955 CRIVIT
User questions about IAN 285955 CRIVIT
0 question about this device. Answer the ones you know or ask your own.
Ask a new question about this device
Download the instructions for your Tent in PDF format for free! Find your manual IAN 285955 - CRIVIT and take your electronic device back in hand. On this page are published all the documents necessary for the use of your device. IAN 285955 by CRIVIT.
USER MANUAL IAN 285955 CRIVIT
text_image
www.lidl-service.com PDF online2-MAN TENT
GB IE NI
2-MAN TENT
Instructions for use
FR BE
TENTE 2 PERSONNES
Precautionary measures against fire 8
Assembly 8-9
Inflation 8-9
Attachment 9
Dismantling 9
Folding arrangement 9
Repair, care and storage 9 - 10
Disposal 10
3-year warranty 10
FR BE
With your purchase you have decided on a high-quality product. Get to know the product before you start to use it.
Carefully read the following instructions for use.
Use the product only as described and only for the given areas of application. Keep these instructions safe. When passing the product on to a third party, always make sure that the documentation is included.
Scope of delivery (fig. A)
1 x Tent (with two air chambers) (1)
1 x Double action pump (2)
1 x Hose with manometer (3)
1 x Replacement valve (4)
12 x Tent pegs (5)
4 x Guy ropes (6)
1 x Repair patches (7)
1 x Bag for tent pegs, guy ropes, and repair patches (8)
1 x Bag for double action pump and hose (9)
1 x Carrying bag (10)
1 x Instructions for use
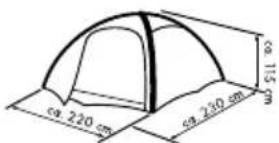
Technical data
Material: breathable polyester/net/PE
Water column: 2,000mm taped seams
Floor: PE - water column: 3,000mm
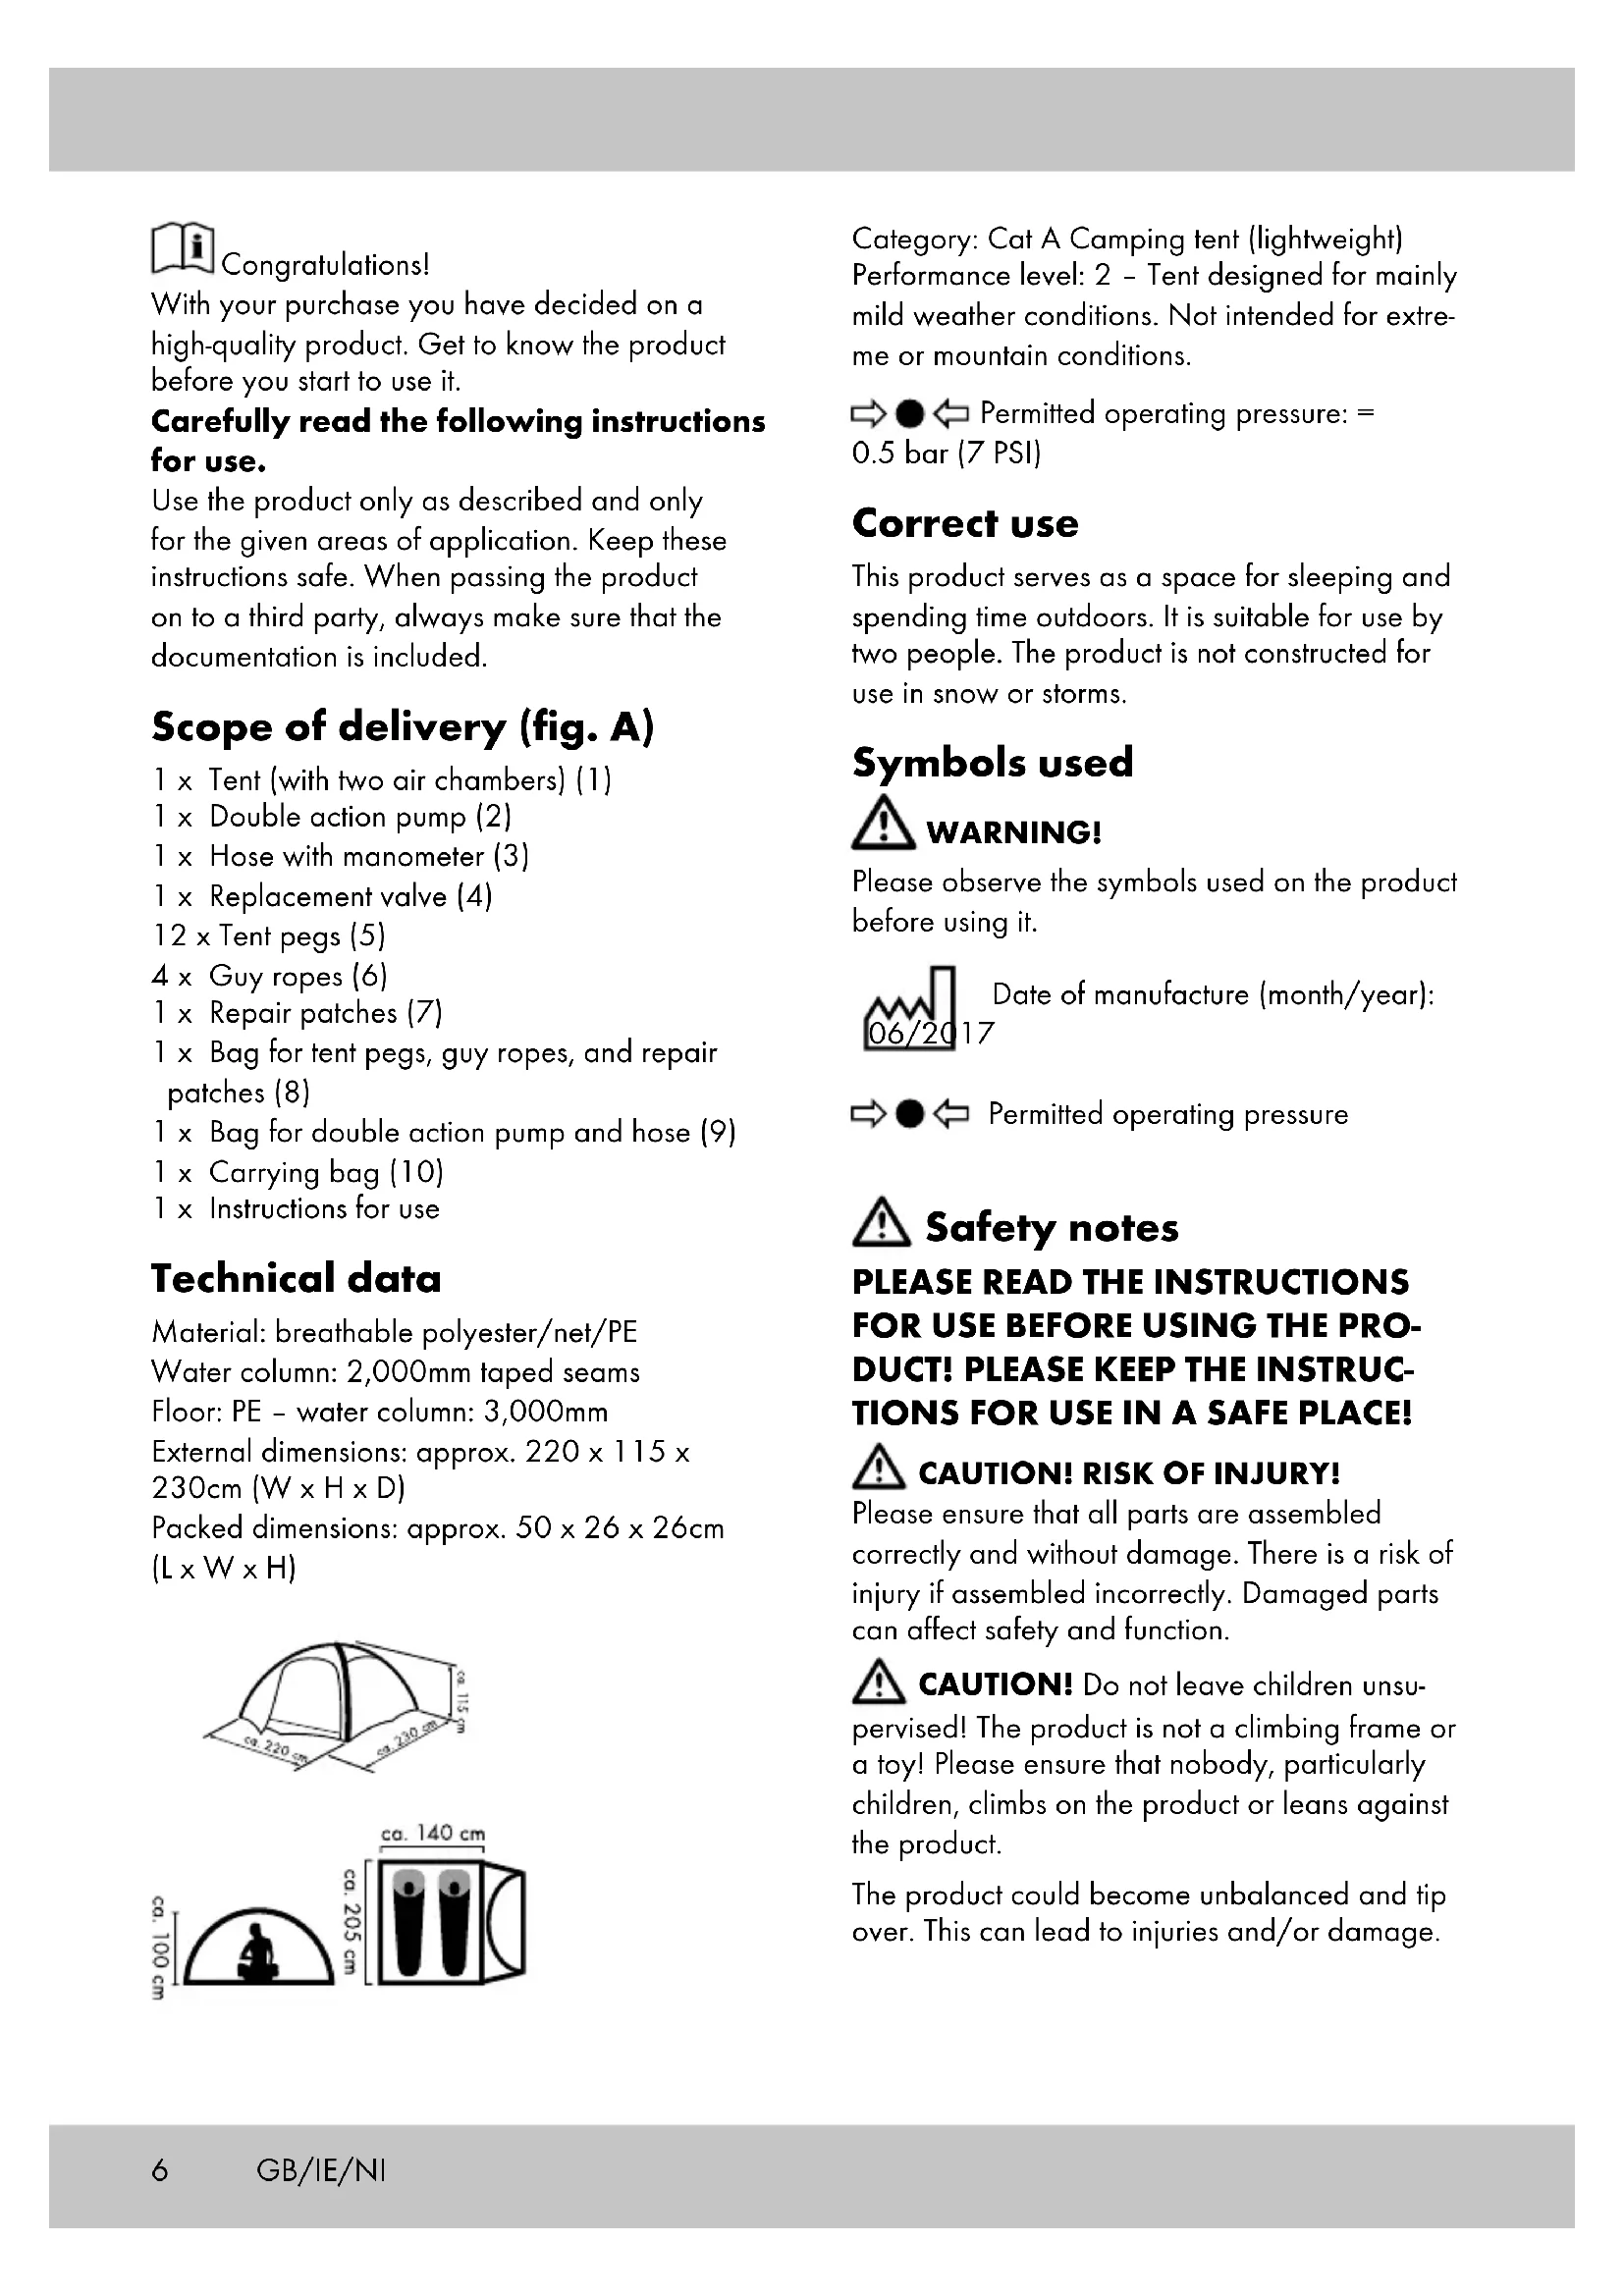
External dimensions: approx. 220 x 115 x 230cm (W x H x D)
Packed dimensions: approx. 50 x 26 x 26cm (L x W x H)
text_image
ca 220 cm ca 230 cm ca 115 cm
text_image
ca. 100 cm ca. 205 cm ca. 140 cmCategory: Cat A Camping tent (lightweight) Performance level: 2 - Tent designed for mainly mild weather conditions. Not intended for extreme or mountain conditions.


Permitted operating pressure: = 7 PSI)
Correct use
This product serves as a space for sleeping and spending time outdoors. It is suitable for use by two people. The product is not constructed for use in snow or storms.
Symbols used

WARNING!
Please observe the symbols used on the product before using it.

Date of manufacture (month/year):


Permitted operating pressure

Safety notes
PLEASE READ THE INSTRUCTIONS FOR USE BEFORE USING THE PRODUCT! PLEASE KEEP THE INSTRUCTIONS FOR USE IN A SAFE PLACE!

CAUTION! RISK OF INJURY!
Please ensure that all parts are assembled correctly and without damage. There is a risk of injury if assembled incorrectly. Damaged parts can affect safety and function.

CAUTION! Do not leave children unsu-
pervised! The product is not a climbing frame or a toy! Please ensure that nobody, particularly children, climbs on the product or leans against the product.
The product could become unbalanced and tip over. This can lead to injuries and/or damage.

CAUTION! RISK OF INJURY!
Never assemble or dismantle the product in strong winds.
- Select the most stable and level surface possible to assemble the product.
- Sandy surfaces reduce stability. Make sure you choose a surface that offers a firm grip for the tent pegs.
- Never hammer the tent pegs into the ground with force! If necessary extend the guy ropes with the help of a loop and place the tent pegs at a different location.
- Check regularly that all connection points are undamaged and check the guy ropes and the stability of the tent pegs.
- An incorrect assembly sequence could cause damage to the product. Any liability is excluded.

CAUTION! RISK OF POISONING D RISK OF DAMAGE TO OPERTY!
Do not light fire inside the product and keep it away from heat sources.
- Precautionary measures against fire are shown on the label that is sewn to the inside of the tent. We recommend you do not remove this label.
- In addition to this familiarise yourself with the fire safety regulations on site (e.g. at the camping ground, tent site).
- Keep the exit free! Do not block the exit with objects.
- All inflatable products are sensitive to cold. Therefore never unfold or inflate the product at temperatures below 15 °C!
- If the air pressure increases in direct sunlight then this must be offset accordingly by releasing air.
- Do not open the zip fastener when the frame is inflated in order to avoid deformation and tearing of the frame.
-
Please ensure that the product is not brought into contact with stones, gravel, or pointed objects – particularly when inflated – and that it does not drag or rub anywhere as this could cause damage to the material.
-
Only insert suitable pump adaptors into the safety valve.
Otherwise the valves could be damaged. - Do not inflate the product too much as there is a risk that the welded seams will tear. Close the valves well after inflating.
- Make sure there is sufficient ventilation when using gas and combustion apparatus outside the product. Otherwise gases could collect inside the product.
- Please ensure that the ventilation openings are open at all times in order to ensure a high rate of air exchange.
Please pay attention to the weather and to atmospheric influences
- When selecting a location please always observe the site conditions and how these could change.
Could the location be flooded if it rains? Pay attention to any possible changes in river level or tides. - Protect the product from strong wind and storms. Place the product where it is best protected from the wind.
- Exchange the normal tent pegs for special storm tent pegs in advance of strong winds. Ask a specialist retailer for information on useful supplementary products.
- Dismantle the product in advance of heavy snow or storm.
- Remove snow from the product. Otherwise the product could collapse under the weight.
- Do not set the product up too tightly as it will not be able to adapt to changing weather conditions and could be damaged.
- Zip fasteners are wear parts and are not covered in the guarantee conditions.
- The polyester material is coated in PU and is thus water-repellent.
- The tent fabrics stretch to different extents in moisture and rain and necessitate the tightening of the guy ropes. When the material tightens again while it dries the guy ropes need to be loosened again in good time.
- Do not use insect spray in or on the product.
- Small leaks at the seams can be fixed with a seam spray and impregnating spray can be used for the tent skin.
Precautionary measures against fire
The following common sense rules must be followed to ensure safe camping:
- Do not position any active electronic devices close to the walls, roof, or curtains.
- Always observe the safety instructions for these devices.
- Never allow children to play near active devices.
- Leave passageways free. Do not block the exits with objects.
- Ask about the fire safety facilities and arrangements on the site.
Assembly
Note: Carry out a trial assembly before starting your journey. Make sure that all the accessories are in place.
Selecting the assembly location
Choose the most level, clean assembly location possible. Avoid dips in the ground.
Remove stones, branches, and other pointed objects in order to prevent damage to the floor of the tent. Use natural lee sites with hedges, rocks etc.
Use the right tent pegs for sandy ground in order to avoid the guy ropes coming loose.
Note: Insert the tent pegs into the ground at a slight angle so that good grip is achieved but no tension is created in the tent skin. The tent material and the suspension points should only be under slight tension so that wind loads can be offset. Please ensure that the product is not subjected to too much tension. Check the tent tension depending on the weather.
Note: Condensation will happen in all tents in principle but it will be particularly prominent if there are large changes in temperature. There will be drops of condensation on the inner wall after a night in the tent. Therefore condensation is not a sign of leaks. Good ventilation will reduce condensation inside the tent.
- Spread the tent (1) out flat on the surface.
- Turn the thread (4a) on the valve (4) in a clockwise direction tightly into the thread opening (1a) on the tent (1) (fig. B).

ATTENTION!
- The recommended operating pressure is 0.5 bar (7 PSI).
- Avoid over-inflation as this could lead to the risk of overstretching or even tearing the welded seams.
- Use standard foot pumps or double action pumps with corresponding attachment options to inflate the product, if necessary with a manometer.
- Do not use a compressors or bottles of compressed air to inflate the product. This can lead to damage.
• Always inflate the product completely. - Do not inflate the product in the vicinity of pointed or sharp objects or on rough or gravelly surfaces.
Inflation (fig. C)

IMPORTANT!
• The area around the valves must always be dry and clean.
- Please ensure that no sand or other contaminants get into the valves.
- Avoid over-inflation of the air chambers as this could bring with it the risk of overstretching or of the welded seams tearing.
- Use the included double action pump to inflate the product. Otherwise only use standard foot pumps or double action pumps with corresponding pump adaptors.
- Do not use a compressor or bottles of compressed air to inflate the product. This can lead to damage to the product.
- Please ensure that the air chambers are inflated evenly.
- Only inflate the air chambers until they feel firm. It should be possible to depress the air chamber easily if you press against it with your thumb.
Note: You will need a pump with a standard connection for the screw valves.
Proceed as follows with both valves:
- Turn the female thread (3a) on the hose (3) onto the thread (2a) on the double action pump (2).
- Insert the end of the hose (3b) into the valve (4b).
- Use the double action pump to pump a maximum 0.5 bar (7 PSI) of air into the air chamber (1b).
- Stop inflating as soon as the manometer displays 0.5 bar or 7 PSI.
- Pull the end of the hose out of the valve and place the valve cover on the valve.
- Tighten the valve cover (4c) in a clockwise direction.
Note: If you do not have a manometer then you can test the correct pressure using your thumb. Press your thumb on the inflated air chambers. The product is correctly inflated if it feels firm and can still be depressed easily with your thumb.
Attachment (fig. D)
- Attach all the loops (1c) on the tent to the ground using the tent pegs (5).
Note: Please ensure that the tent pegs are secured at an angle of 45 degrees.
- Attach the adjustable loop (1d) on the back of the tent using a tent peg.
- Pull on the loose end of the adjustable loop until it is pulled tight.
- Pull the ends of the four guy ropes (6) through the tent loops (1e) and knot them in place.
- Secure the four guy ropes with one tent peg each. The length of the guy ropes can be adjusted using the tightener (6a).
Dismantling (fig. E)
Note: Dismantle the tent in the cleanest and driest condition possible in order to avoid the formation of mildew or mould stains.
Dry the tent immediately if it is dismantled in the rain. Clean all parts thoroughly before packing.
- Remove all tent pegs (5).
- Turn the thread (4a) on the valve (4) anticlockwise out of the thread opening (1a) in order to allow the air to escape from the air chamber (1b).
Folding arrangement
- First fold the tent lengthwise and then lay the outer side that is thus formed into the centre.
Important: The folded dimensions must be the maximum width of the carrying bag.
- Place the tent pegs and the double action pump into the relevant bags (8) (9).
- Place the bag (9) with the double action pump on one end of the tent and then roll it up.
Note: Please ensure that the folded tent is rolled towards the end with the opened valve.
- Lay the folded tent and the bag with the tent pegs into the carrying bag (10) and close it.
Repair, care and storage
Repair
Small leaks or holes can be repaired with the included repair patches (7).
Important! Do not inflate the product for 20 minutes after repair!
Do not use the patches on the seam.
- Allow the air to escape from the product completely.
- Clean the area around the leak thoroughly! The area must be dry and free of grease.
- Remove the patch from the paper, place it on the damaged area, and press it down firmly. If the valve (4) is defective then you can replace it with the replacement valve. In order to do this, proceed as shown in fig. F.
Care
Brush off soiling on the tent skin when dry; clean off with clear water if necessary. Do not use chemical cleaning agents. You should seal the tent seams from time to time. Use standard seam sealants for this purpose.
Tent:

natural_image
Five abstract geometric symbols arranged horizontally, no text or labels presentCarrying bag:

text_image
Image displaying five distinct symbols: a hand holding a cup, an asterisk, a crossed-out square, a crossed-out triangle, and an 'X' symbol.Storage
Store the product in a dry place in order to avoid mildew or weather spots.
If you are not planning to use the product for a long time remove it from the carrying bag and keep it in a dry place where it is protected from direct sunlight.
Keep the valve closed during storage.
Disposal
Dispose of the article and the packaging materials in accordance with current local regulations. Packaging materials such as foil bags are not suitable to be given to children. Keep the packaging materials out of the reach of children.
3-year warranty
The product was produced with great care and under constant supervision. You receive a three-year warranty for this product from the date of purchase. Please retain your receipt.
The warranty applies only to material and workmanship and does not apply to misuse or improper handling. Your statutory rights, especially the warranty rights, are not affected by this warranty.
With regard to complaints, please contact the following service hotline or contact us by e-mail.
Our service employees will advise as to the subsequent procedure as quickly as possible.
We will be personally available to discuss the situation with you.
Any repairs under the warranty, statutory guarantees or through goodwill do not extend the warranty period. This also applies to replaced and repaired parts.
Repairs after the warranty are subject to a charge.
IAN: 285955
GB Service Great Britain
Tel.: 0871 5000 720 (£ 0.10/Min.)
E-Mail: deltasport@lidl.co.uk
IE Service Ireland
NI Tel.: 1890 930 034
(0,08 EUR/Min., (peak))
(0,06 EUR/Min., (off peak))
E-Mail: deltasport@lidl.ie
You can also find spare parts for your product at:
www.delta-sport.com, category Service - Lidl Spare Parts
Service

Tillykke!
www.delta-sport.com, rubrik service - reservedelservice Lidl

Félicitations !
natural_image
Five abstract geometric symbols arranged horizontally: three circles, two triangles, one square, and one cross (no text or labels)Sac de transport :

natural_image
Five symbolic line drawings: a hand holding a crown, an asterisk, a square with a circle, a crossed-out square, and an 'X' (no text or labels)Rangement
natural_image
Five abstract geometric symbols arranged horizontally (no text or labels)Draagtas: