IAN 61303 - Tent CRIVIT - Free user manual and instructions
Find the device manual for free IAN 61303 CRIVIT in PDF.

| Product Type | Beach Shelter |
| Brand | Crivit |
| Model | IAN 61303 |
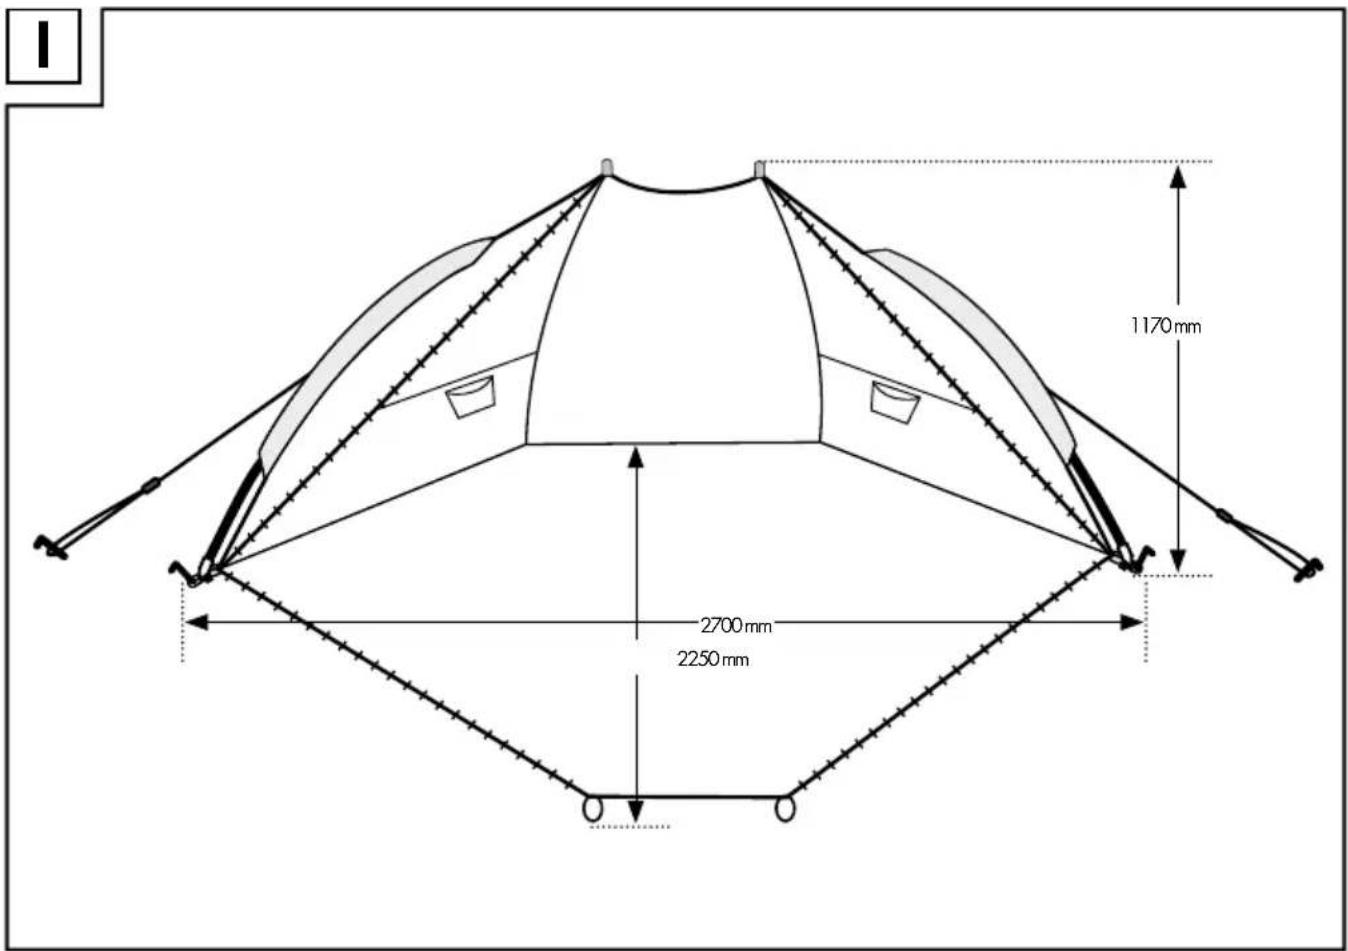
| Dimensions (L x W x H) | 2700 mm x 2250 mm x 1170 mm |
| Material | 100% Polyester (tarpaulin) |
| Pole Specifications | 1 long pole (approx. 3650 mm, Ø 7 mm), 2 short poles (approx. 1850 mm, Ø 7 mm) |
| Included Items | 1 tarpaulin, 3 poles, 4 guy lines, 8 pegs, 1 carrying bag, assembly instructions |
| Intended Use | Protection against wind and sun (not designed for prolonged rain) |
| Safety Warnings | Do not assemble in strong wind; keep children away; no climbing; no fires inside; ensure stability on flat ground |
| Assembly Order | Place tarpaulin flat, insert poles through channels, upright, secure with pegs and guy lines |
| Cleaning Instructions | Use soft sponge and clean water; no washing machine, chemicals, or sharp objects |
| Storage | Store completely dry to prevent mould; fold and roll tarpaulin; keep pegs separate in bag |
| Disposal | Packaging is recyclable; dispose of worn-out product per local regulations |
| Replaceable Parts | Poles and structural parts can be replaced; zips are wearing parts not covered under guarantee |
| Repair Tips | Small seam leaks can be repaired with seam spray; impregnation spray for tarpaulin skin |
Frequently Asked Questions - IAN 61303 CRIVIT
User questions about IAN 61303 CRIVIT
0 question about this device. Answer the ones you know or ask your own.
Ask a new question about this device
Download the instructions for your Tent in PDF format for free! Find your manual IAN 61303 - CRIVIT and take your electronic device back in hand. On this page are published all the documents necessary for the use of your device. IAN 61303 by CRIVIT.
USER MANUAL IAN 61303 CRIVIT
Assembly and safety advice
FI
rantatelta
GB / IE Assembly and safety advice Page 3
Description of parts and features......Page 4
Dimensions and material Page 4
Included items Page 4
Safety advice....Page 4
Assembly
Selecting a Pitch....Page 5
Erecting the Beach Shelter......Page 5
Taking down the Beach Shelter Page 6
Packing up the Beach Shelter......Page 6
Cleaning Page 6
Disposal Page 6
Beach Shelter
- Introduction

Familiarise yourself with the product prior to assembly. Carefully read the following assembly instructions and safety tips.
Only use the product as instructed and only for the indicated field of application. Keep instructions in a safe place. Submit all documents to a third party if distributing the product.
- Proper Use
This product is intended for use as protection against the wind and sun. The material of the beach shelter is not watertight over a prolonged period. It should not therefore be used in the rain. Any use other than that described or any modification of the product is not permissible and may result in injury and / or damage to the product. The manufacturer is not liable for damage caused by improper use. The product is not intended for commercial use.
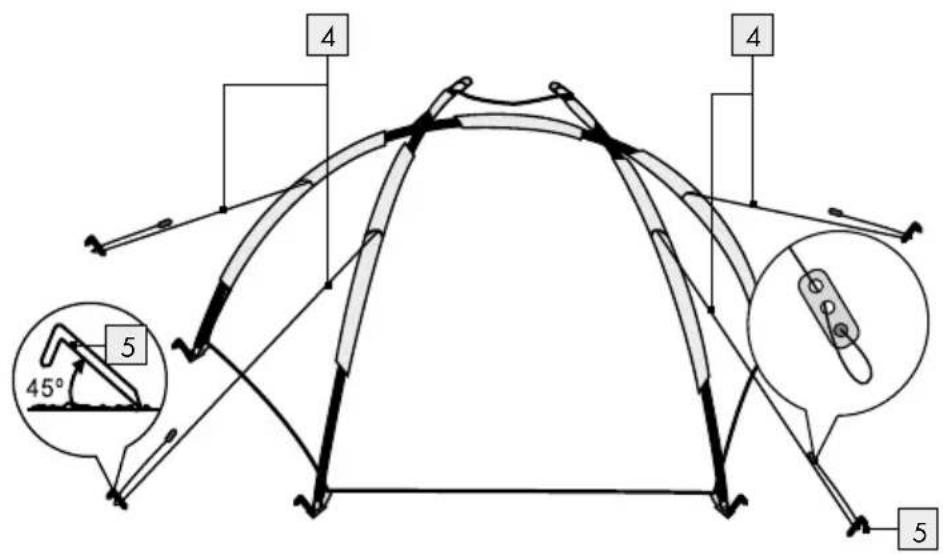
● Description of parts and features
1 Pole 7 mm, approx. 3650 mm (L)
2 Pole 7 mm, approx. 1850 mm (L)
3 Tarpaulin
4 Guy line
5 Peg
- Dimensions and material
The measurements can be taken from Figure I.
Material: 100% polyester
- Included items
1 x tarpaulin
1 x pole ∅ 7 mm, approx. 3650 mm (L)
2 x poles ∅ 7 mm, approx. 1850 mm (L)
4 x guy lines
8 x pegs
1 x carrying bag
1 x assembly instructions

Safety advice


WARNING! RISK OF LOSS OF LIFE OR ACCIDENT TO INFANTS AND CHILDREN! Never
leave children unsupervised with the packaging material or the product. The packaging material presents a suffocation hazard and there is a risk of loss of life from strangulation. Children often underestimate danger. Always keep the product out of reach of children.
⚠️ CAUTION! RISK OF INJURY! Ensure that all parts are undamaged and have been assembled appropriately. Risk of injury exists if assembled incorrectly. Damaged parts can effect safety and function.
⚠️ CAUTION! Do not leave children unattended. The product is not a climbing frame or toy. Make sure that nobody climbs or leans on the product, particularly children. The product could become imbalanced and tip up. This may result in injury and/or damage.
⚠️ CAUTION! RISK OF INJURY! Never under any circumstances assemble the product in a strong wind.
- Select a piece of land that is as flat and firm as possible to erect your beach shelter.
- Sandy surfaces reduce the stability of the beach shelter. Please ensure that the surface provides a firm hold for the pegs.
■ Never knock the pegs into the ground with force! If necessary, the guy lines should only be extended with the help of a loop and the peg positioned in a different location.
The intactness of all connection points and the guy lines should be checked regularly, as should the firmness of the pegs in the ground.
If the beach shelter is erected in the wrong order, this may cause damage to the beach shelter. All liability is excluded in such cases.
⚠️ CAUTION! DANGER OF POISONING AND DAMAGE TO PROPERTY! Do not light any fires within the product and keep it away from sources of heat.
It is not recommended to take away any sewn label.
- Please familiarise yourself with the local fire protection regulations.
Take note of the effects of the weather and climate
- When selecting the location to put up your beach shelter, you should always consider the local situation and how this might change. Will the terrain turn into a lake if it rains? Please take into account any rising rivers and incoming tides.
- Protect the product against strong wind and storms. Place the product in a location that is protected from the wind if possible.
Please ensure that the beach shelter is not too taut when it is erected, as otherwise it will not be able to adapt to changing weather conditions and may be damaged.
■ Zips are wearing parts and do not fall under the guarantee conditions. - Do not pull the pegs out of the ground together with the rings or by the guy lines.
- Do not use any insect spray in or on the beach shelter.
- You should never wash the beach shelter in the washing machine or with chemical cleaners.
■ Always store the beach shelter in a dry location, as otherwise the fabric may become damaged and rust patches occur on the zips and poles. - Replace damaged poles or other structural parts by new ones.
■ Small leaks on the seams can be repaired with a seam spray and impregnation spray can be used for the beach shelter skin.
- Assembly
Tip: If possible you should familiarise yourself with the construction of your beach shelter and erect it before using it for the first time. Check that all parts are present and in perfect condition.
- Selecting a Pitch
The ground should be flat, clean and free of unevenness. Remove any pointed or sharp-edged objects beforehand (e.g. stones, twigs etc.). Please ensure that the beach shelter is positioned in such a way that the open side is protected against the wind.
☐ Note that it is not permitted to erect beach shelters everywhere.
Please consult local bylaws in this respect.
☐ When selecting the site to erect the beach shelter, please remember that you require space for the guy lines 4 in addition to the base area for the beach shelter. You should also ensure that there is also enough space to walk around the beach shelter and that there are no tripping hazards.
☐ Please keep a sufficient distance from other beach shelters.
● Erecting the Beach Shelter
☐ Please ensure that the product is only assembled by skilled individuals.
□ Assemble the product in accordance with illustrations A to H.
Illustration A:
- Place the tarpaulin 3 flat on the ground. The channels for the poles 1 and 2 must be facing upwards.
Tip: If it is windy fix the tarpaulin in place in the ground with the help of the pegs 5.
Illustration B:
- Push the pole 1 carefully through the accompanying channel a.
Illustration C:
- Push the poles 2 carefully through the accompanying channel b.
- Push the front ends of the poles 2 into the tabs provided on the front section of the tarpaulin 3.
- Ensure that all poles (1, 2) have been pushed into the accompanying channels (a, b).
Illustration D, E:
- Set the beach shelter in an upright position and insert the poles (1, 2) into the eyelets on the bottom of the tarpaulin 3.
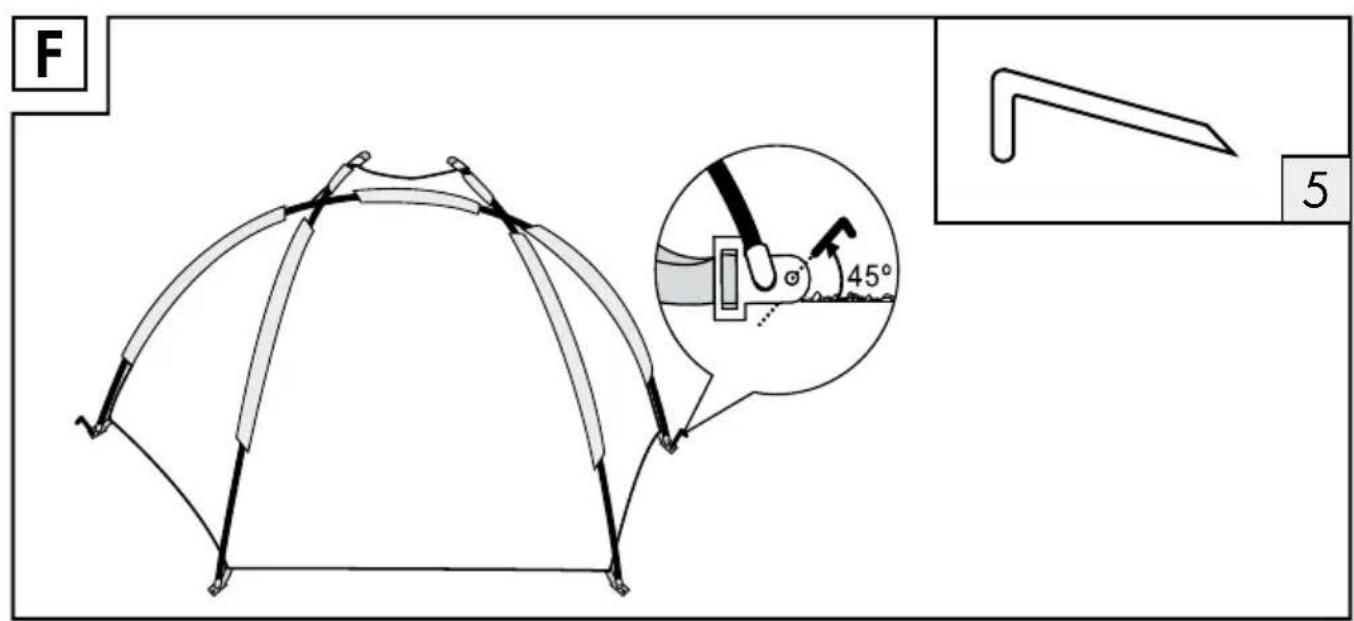
Illustration F:
- Fix the front section of the beach shelter in the ground with the pegs 5. Then grip the rear end of the tarpaulin 3 and pull it apart in such a way that the beach shelter is taut.
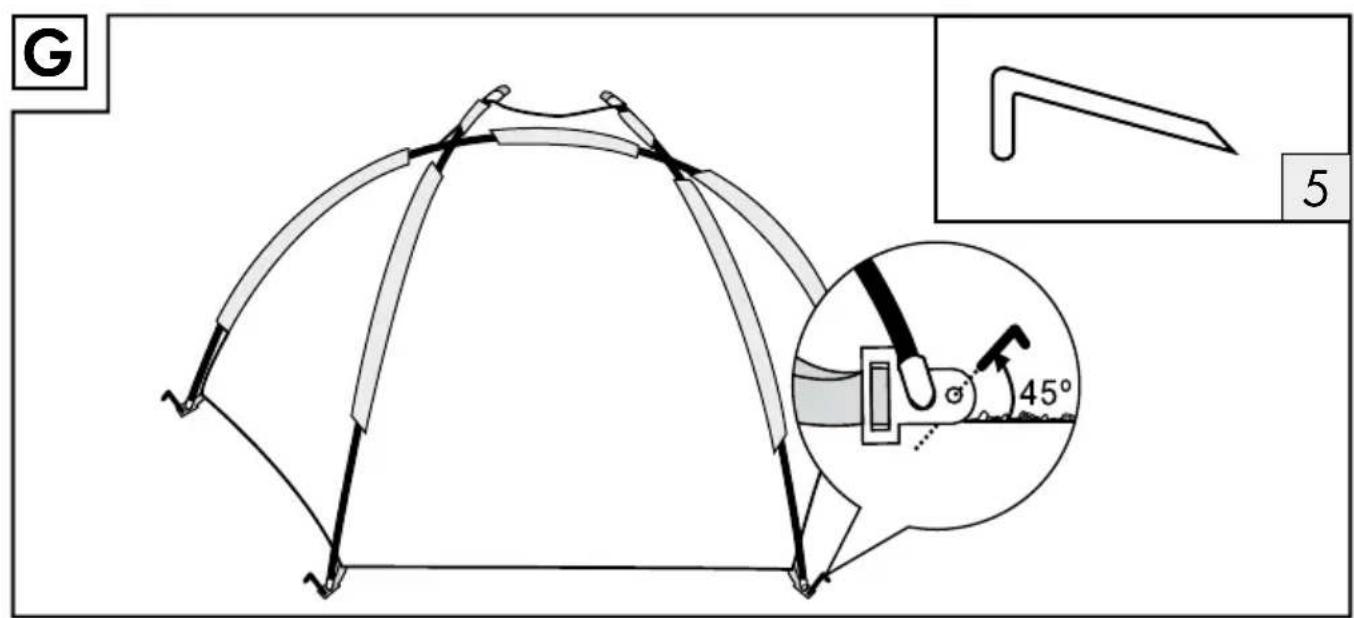
Illustration G:
- Fix the rear section of the beach shelter in the ground with the pegs 5 (always 45°).
Illustration H:
- Now secure the beach shelter with the guy lines 4 and the pegs 5 (always 45°). Do not make the guy lines 4 too tight. If the wind becomes stronger the attachment point and seam of the beach shelter might tear.
● Taking down the Beach Shelter
□ Clean the beach shelter inside and out before you take it down. The beach shelter must be taken down in the reverse order to which it is erected.
● Packing up the Beach Shelter
☐ Please ensure that the beach shelter is completely dry before you pack it together. Otherwise stains and damage to the fabric may result.
☐ Fold the tarpaulin 3 and roll it together.
□ Collect all of the parts carefully together before you pack the beach shelter away. You should count these in order to ensure that none of the parts has been mislaid or become lost.
☐ The pegs 5 and the other individual parts have to be packed separately into the pockets provided. Otherwise the pegs might damage the tarpaulin.
☐ Then pack the rolled-up beach shelter carefully into the carrying bag.
- Cleaning
☐ For cleaning and the removal of any stains you should only use a cleaning agent which is specifically designated for use with this product.
☐ Remove any dirt from the product with a soft sponge and clean water.
□ Never wash the product in a washing machine.
□ Never used petrol, solvent or other cleaning agents.
☐ Do not use any sharp objects, as these will damage the coating.
☐ Allow all parts to dry thoroughly before you pack the product up again. This will prevent the formation of moulds, odours and discolouration.
- Disposal

The packaging is made entirely of recyclable materials, which you may dispose at local recycling facilities.
Contact your local refuse disposal authority for more details of how to dispose of your worn-out product.
Product Description:
Beach Shelter
Model No.: Z30696
Version: 01/2011
Johdanto
1 Stang 7 mm, ca. 3650 mm (L)
2 Stang ∅ 7 mm, ca. 1850 mm (L)
3 Teltdug
4 Line
5 Pløk
- Mål og materiale
Du finder alle målene på ill. I.
natural_image
Diagram of a curved structural frame with diagonal braces and an inset showing a tool interacting with a component (no text or symbols)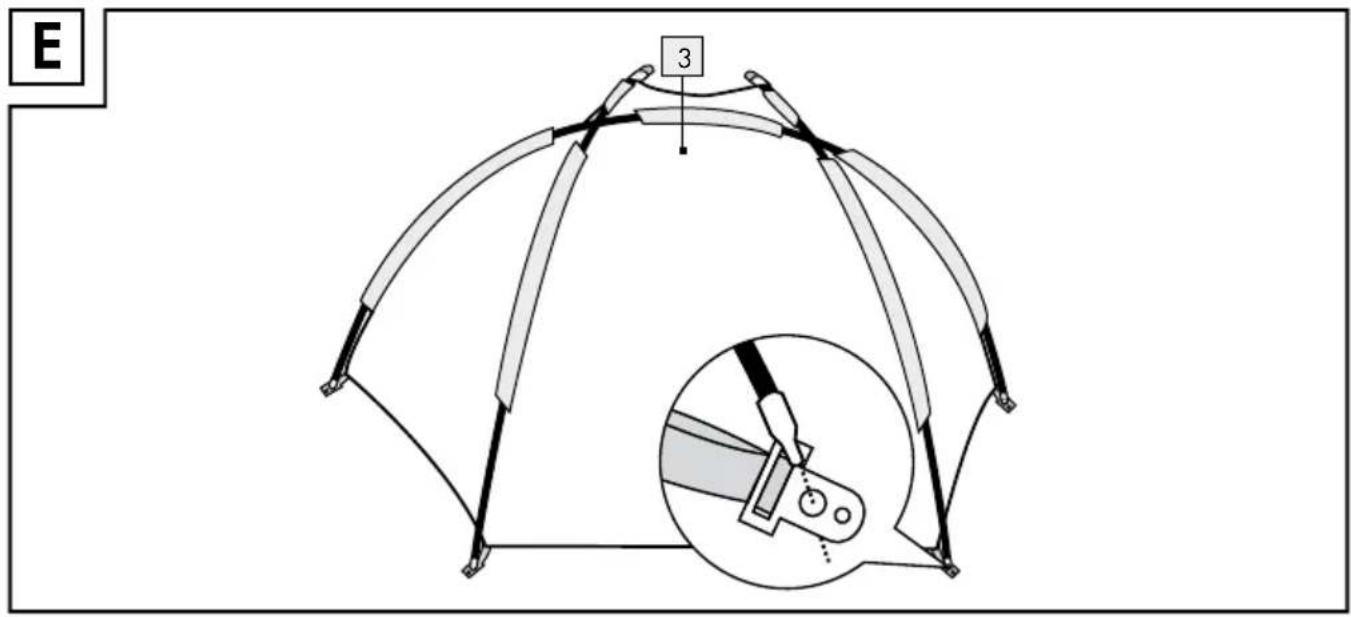
H

IAN 61303
Milomex Ltd.
c/o Milomex Services
Hilltop Cottage
Barton Road
Pulloxhill
Bedfordshire
MK45 5HP
UK
© by ORFGEN Marketing
Last Information Update · Tietojen tila · Informationsstatus
Tilstand af information · Stand der Informationen:
12 / 2010 · Ident.-No.: Z30696122010-3
3