IOB207 - Surveillance Camera DENVER - Free user manual and instructions
Find the device manual for free IOB207 DENVER in PDF.
| Product Type | Wireless Battery-Powered Surveillance Camera |
| Power Supply | 4 AA batteries (not included) or USB 5V DC |
| Video Resolution | 1920 x 1080 pixels @ 15 fps |
| Lens | 120° wide angle (4-layer glass) |
| Night Vision | 9 IR LEDs, range 6-8 meters |
| Motion Detector | PIR (passive infrared), range 8 meters |
| Storage | Micro SD card up to 128 GB or cloud |
| Connectivity | Wi-Fi 802.11b/g/n @ 2.4 GHz (no 5 GHz) |
| Audio | Two-way intercom with noise reduction |
| Wi-Fi Range | 70 meters outdoors, 15 meters indoors |
| Power Consumption | Standby 200 µA, active 200 mA |
| Operating Temperature | -10 °C to 50 °C |
| Storage Temperature | -20 °C to 60 °C |
| Video Compression | H.264 |
| Notification | Within 5 seconds after motion detection |
| Remote Wake-up | Within 5 seconds |
| App | DENVER SMART HOME (iOS and Android) |
| Maintenance and Cleaning | Clean with a soft, dry cloth. Avoid chemical products. |
| Spare Parts and Repairability | Replaceable AA batteries. No internal spare parts available. |
Frequently Asked Questions - IOB207 DENVER
User questions about IOB207 DENVER
0 question about this device. Answer the ones you know or ask your own.
Ask a new question about this device
Download the instructions for your Surveillance Camera in PDF format for free! Find your manual IOB207 - DENVER and take your electronic device back in hand. On this page are published all the documents necessary for the use of your device. IOB207 by DENVER.
USER MANUAL IOB207 DENVER
facebook.com/denverelectronics
natural_image
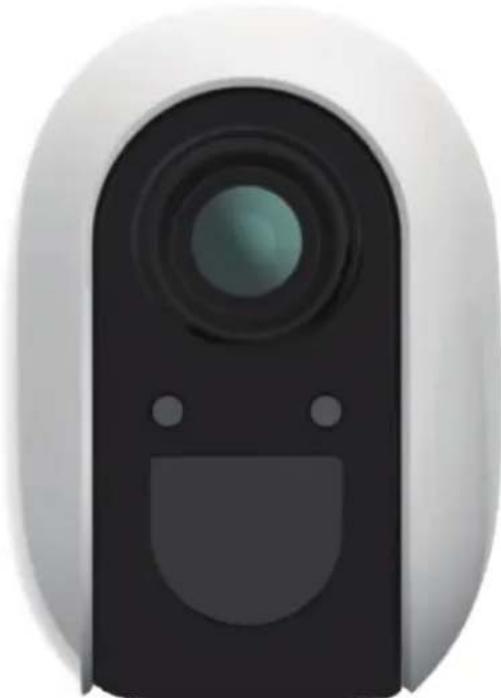
Close-up of a white and black digital camera lens with a circular lens and two side buttons (no text or symbols visible)
natural_image
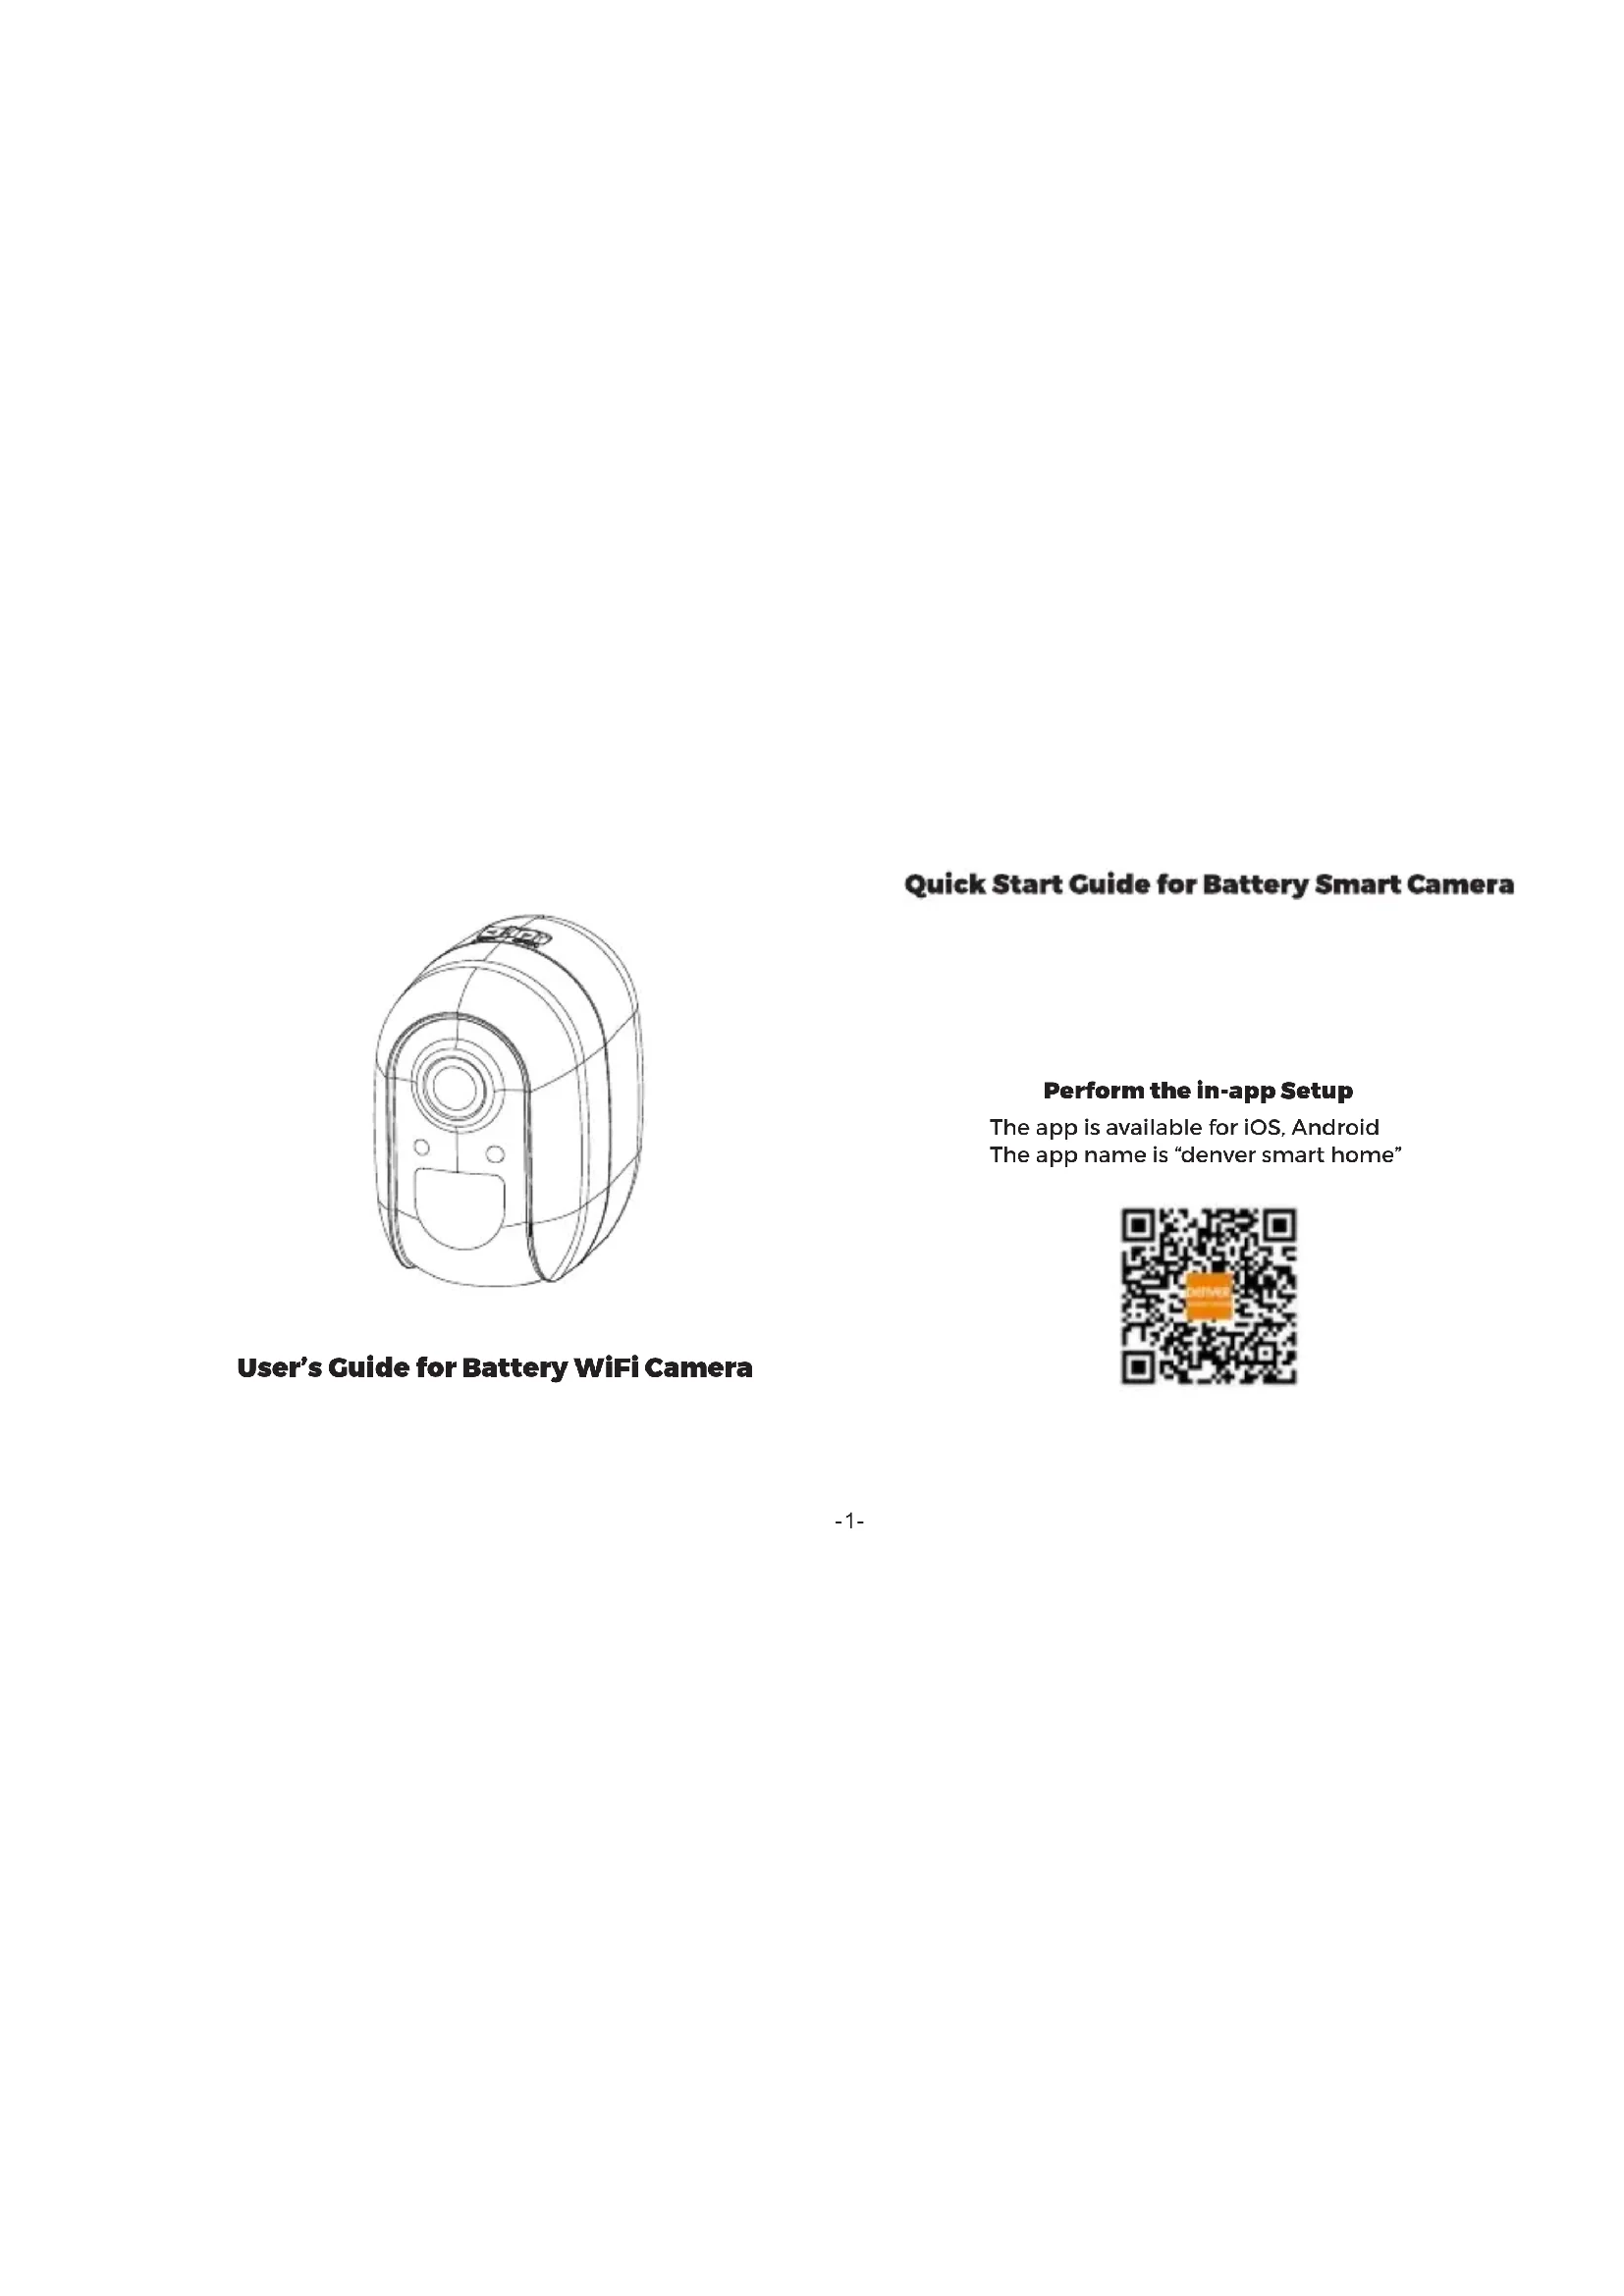
Technical line drawing of a mechanical device with no visible text or symbolsUser's Guide for Battery WiFi Camera
Quick Start Guide for Battery Smart Camera
Perform the in-app Setup
The app is available for iOS, Android The app name is "denver smart home"

1. Account Registration and Login
Please open "DENVER SMART HOME" App, and enter the App main interface. New users need to register by Email or Mobile number, click "Register".
Follow the steps to complete the registration of the account, and login.
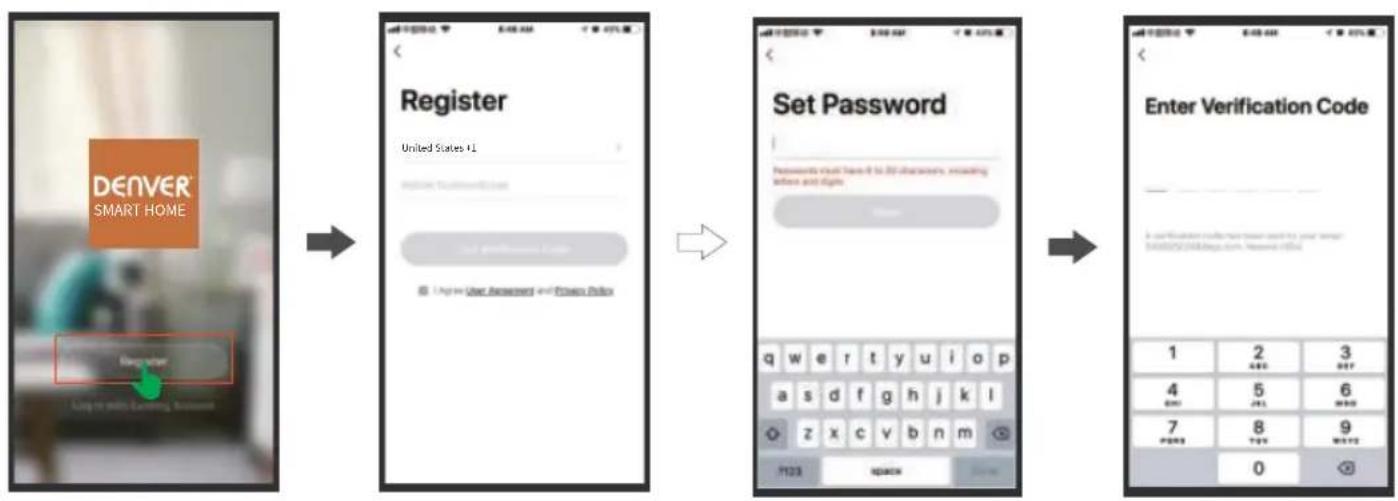
Please log in directly if you already have an account. To input your account and password, click "Log in".
text_image
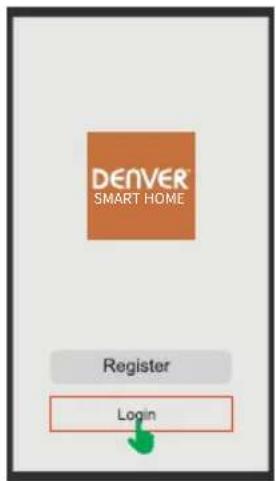
DENVER SMART HOME Register Login
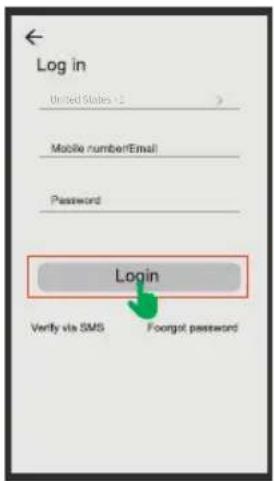
text_image
Log in United States v1 Mobile numberEmail Password Login Verify via SMS Foorgot password2. Add Device
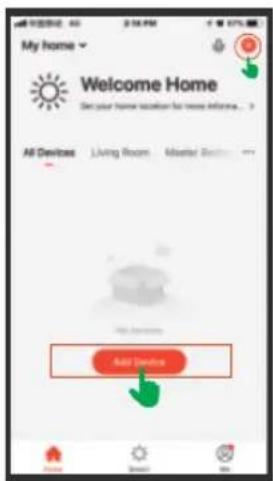
Tap + or "Add Device" to add the device.

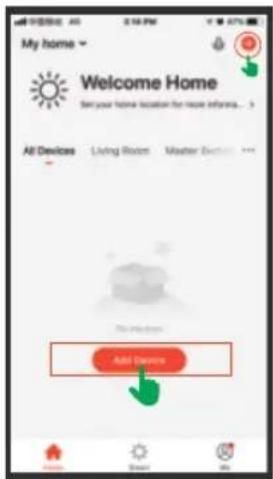
text_image
My home Welcome Home Set your home location for more information... All Devices Living Room Master Back... Add Device
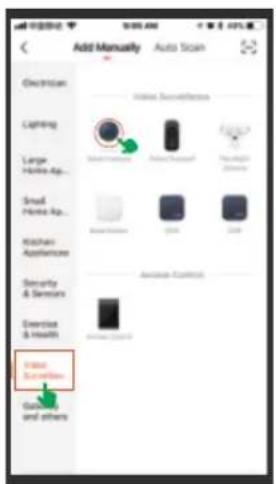
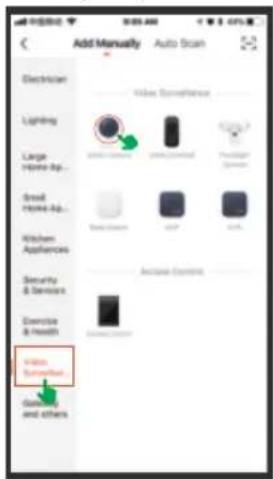
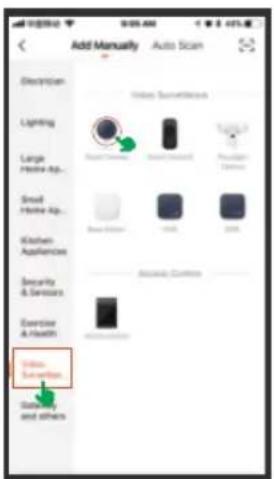
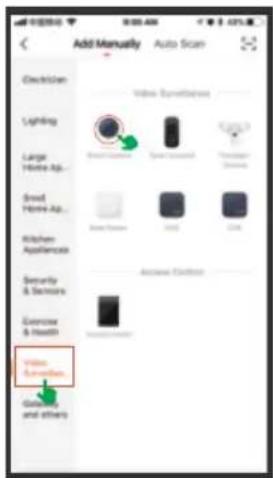
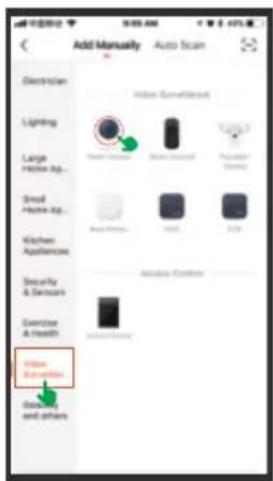
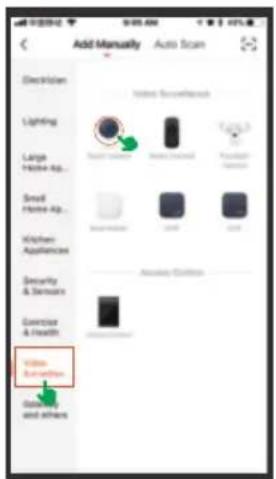
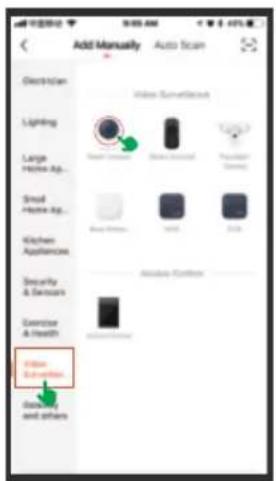
Find the smart camera in the video surveillance list and click it

text_image
Add Manually Auto Scan Electrician Volume Convergence Lighting Large Home Ap... Good Home Ap... Kitchen Appliances Security & Devices Exercise & Health Video Sub Nutted... Gaming and othersNote: The "auto scan" function cannot be supported, please select "Add Manually" and follow up below steps to add the device.
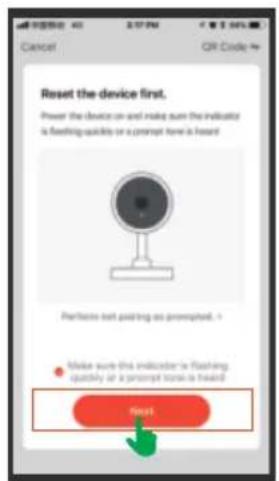
Confirm the red and blue LED flash alternately or a prompt tone is heard.
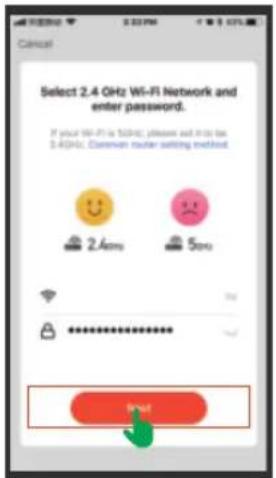
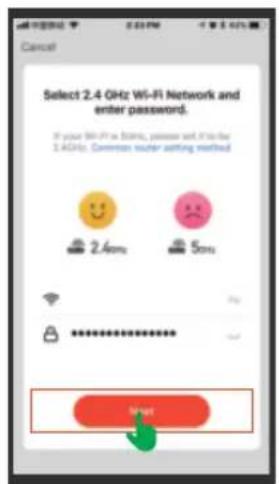
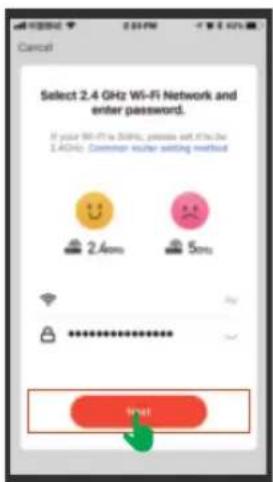
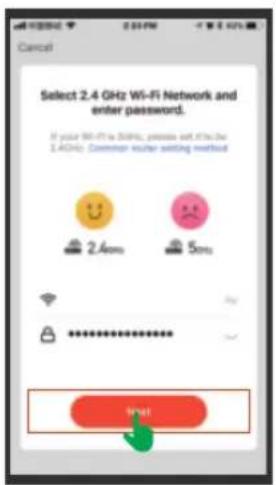
Connect with your home Wi-Fi. 2.4GHz signal type Wi-Fi is required, 5GHz Wi-Fi network can not be used.
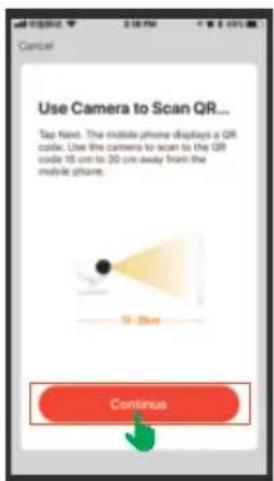
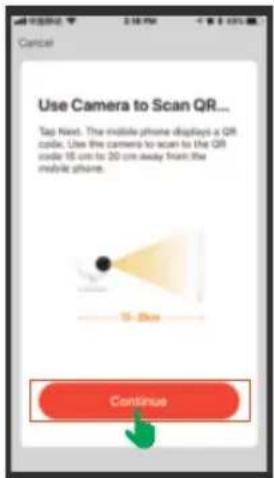
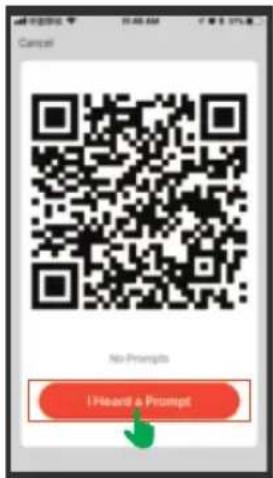
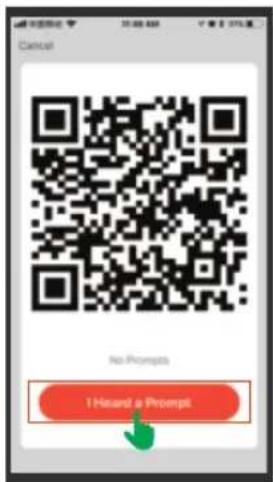
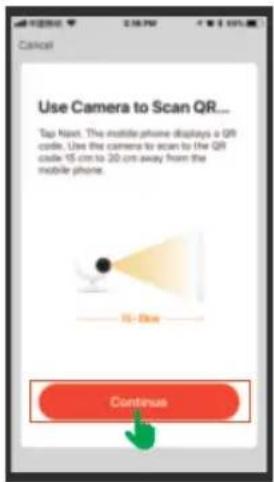
Pairing the camera. The camera lens is aimed at the QR code on the phone screen with a distance of 15cm. It will sound "beep" after the camera recognize the QR code.
text_image
Reset the device first. Power the device on-and make sure the indicator is flashing quickly or a prompt time is heard. Perforin left padding as prompted.

text_image
Select 2.4 GHz Wi-Fi Network and enter password. If your Wi-Fi is 50Hz, please add it to the $40Hz. Canadian router setting enabled.
text_image
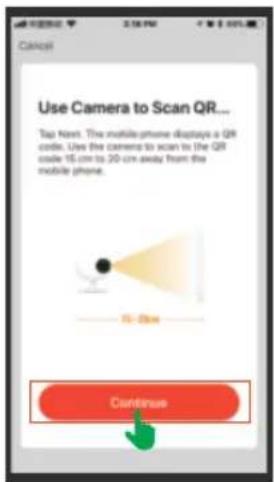
Cancel Use Camera to Scan QR... Tap Next. The mobile phone displays a QR code. Use the camera to scan to the QR code 15 cm to 20 cm away from the mobile phone. 15 - Blue Continue

text_image
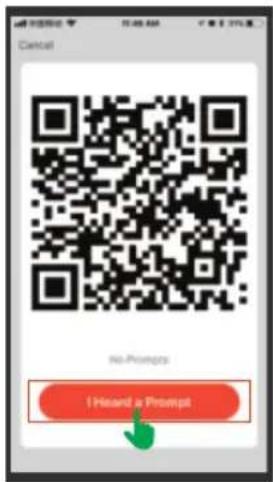
No Prompts I Heard a PromptNote: Allow to access your location if prompted to enable the GPS.
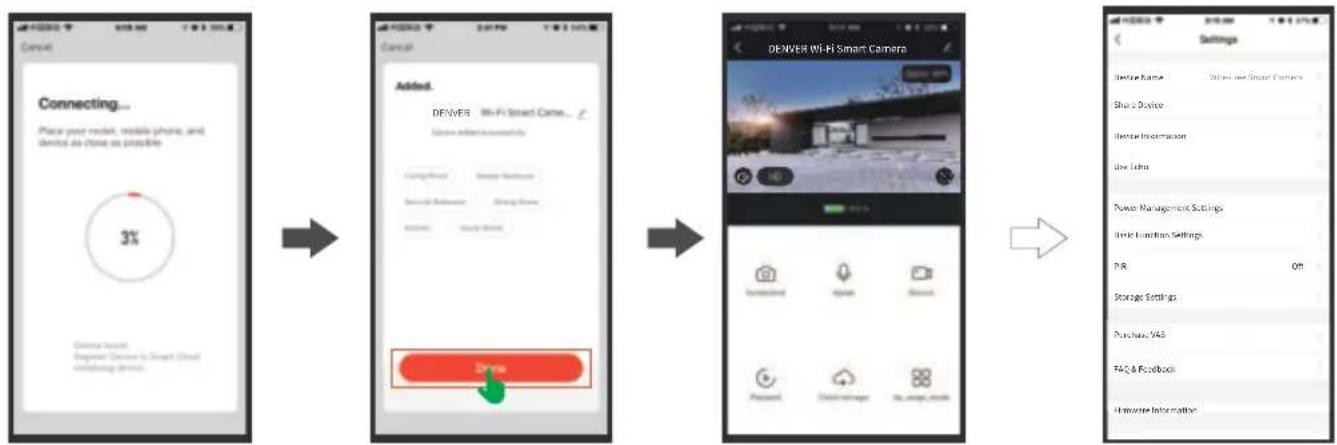
Please click "I Hear a prompt" if you heard it, then will start connecting. The camera is added successfully. You can enter the live video interface.
Settings
Click ☑ to enter the Settings page. There are only a few settings to make, so the process is quick and easy. To start setting up your camera.
flowchart
graph LR
    A["Connecting... <br>Place your router, mobile phone, and device as close as possible"] --> B["Added: <br>DENVER - Wi-Fi Smart Camera... <br>Device added successfully"]
    B --> C["Setting: <br>DENVER Wi-Fi Smart Camera"]
    C --> D["Add: <br>DENVER Smart Camera with a red button icon"]
    D --> E["Settings: <br>Package Settings, Store Management Settings, Watch Function Settings, Print, Storage Settings, Purchase, VAS, FAQ & Feedback, Home Information"]
Product Features
| [02Y2] | 4 size AA specification batteries work regularly for 2 to 3 months |
 | FHD Megapixels collocated with wide-angle lens |
 | Support fast remote wake-up from mobile phones within 5 seconds |
| [30K5] | 2.4G Wi-Fi connection |
 | Support PIR motion detection, when someone hovers at the door, it will send push alerts to your mobile phone immediately |
 | With IR-cut, it can switch automatically and the photos or videos shoot by the camera are clearly visible at both day and night to keep your home and family safe. |
Product Specification Sheet
| Lens | FOV/120° Wide-angle lens (4 layers of glass) |
| Infrared LEDs | 9pcs Infrared LEDs with a flash distance of 6 to 8 meters |
| PIR Motion Sensor | 8 meters PIR distance |
| Storage | Up to 128GB Micro SD card Cloud storage |
| Connectivity | 802.11b/g/n Wi-Fi@2.4G |
| Power consumption | Standby 200uAWorking 200mA |
| Battery | 4 size AA batteries |
| USB | DC 5 V |
| Wi-Fi distance | 70 meters (open space without obstacle) or 15 meters (indoor) |
| Video Compression | H.264 |
| Voice Intercom | Two-way audio with noise cancellation |
| Video resolution | 1920 * 1080@15 fps |
| Notification | Within 5 seconds |
| Device Wakeup Time | Within 5 seconds |
| Working Temperature | -10 ~ 50 °C |
| Storage Temperature | -20 ~ 60 °C |
1. Product Design
text_image
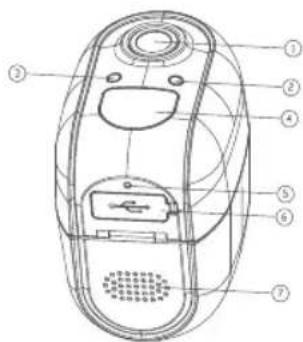
Technical diagram of a mobile phone casing with numbered parts for identificationPicture 1
- Lens
- LED
- Light sensor
- Motion detection sensor
- Mic
- USB interface
- Speaker
text_image
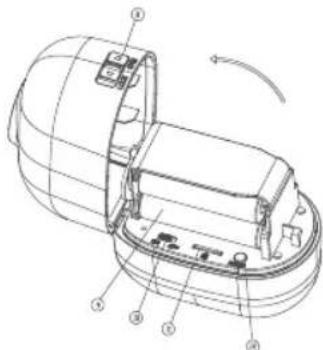
Technical diagram of a mechanical device with numbered components and directional arrow indicating rotation or movement.Picture 2
- Flip Switch
- AA Battery
- Power Switch
- Mirco-SD card
- Reset button
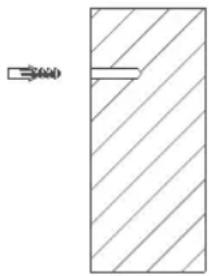
Step1: Install anchors into a stucco, brick or concrete surface. Use the drill bit to drill one hole in your wall and install the anchors. Install the base bracket on the wall.
natural_image
Simple line drawing of a rectangular block with diagonal hatching and a small rectangular element on the left (no text or symbols)Step 2: Please turn the flip switch to "OPEN" and open the cover, then install four pcs AA batteries in it. (Please make sure that the polarity of the battery is correct.) Then put the power switch to "ON" and press the RESET button for 5 seconds. When blue lights light on, the red lights flash slowly, the device is ready to connect to the network. Refer to picture 2.
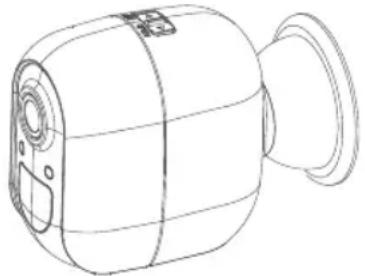
Step 3: Align the device to the base bracket and hold it, then adjust the appropriate angle, the installation is finished
natural_image
Line drawing of a cylindrical device with a flanged handle and internal components (no text or symbols)- The USB interface is only used for power supply.
- When the mobile phone is connected to the home WiFi router, the mobile APP can generate a QR code that includes the name and password of the WiFi router. The product recognizes the QR code through the lens on the product, and the product is automatically connected to the router and server after identification. At this time, the APP also finds the product through the server, and the APP can control the operation of the product through the network.
If there is no WiFi signal, the product can still be triggered to record with the motion detection signal, and the video file can be viewed through the APP when the WiFi is
-8-
Please notice - All products are subject to change without any notice. We take reservations for errors and omissions in the manual.
ALL RIGHTS RESERVED, COPYRIGHT DENVER ELECTRONICS A/S
DENVER®
www.denver-electronics.com

Electric and electronic equipment contains materials, components and substances that can be hazardous to your health and the environment, if the waste material (discarded electric and electronic equipment) is not handled correctly.
Electric and electronic equipment is marked with the crossed out trash can symbol, seen above. This symbol signifies that electric and electronic equipment should not be disposed of with other household waste, but should be disposed of separately.
All cities have established collection points, where electric and electronic equipment can either be submitted free of charge at recycling stations and other collection sites, or be collected from the households. Additional information is available at the technical department of your city.
Hereby, Inter Sales A/S declares that the radio equipment type IOB-207 is in compliance with Directive 2014/53/EU. The full text of the EU declaration of conformity is available at the following internet address: www.denver-electronics.com and then click the search ICON on topline of website. Write model number: IOB-207. Now enter product page, and red directive is found under downloads/other downloads.
Operating Frequency Range:2412MHz-2472MHz Max Output Power:19db
DENVER ELECTRONICS A/S
Omega 5A, Soeften
DK-8382 Hinnerup
Denmark
www.facebook.com/denverelectronics

natural_image
Technical line drawing of a mechanical device with no visible text or symbolstext_image
Log in United States 1 Mobile number/Email Password Login Verify via SMS Foorgot password2. Gerät hinzufügen
text_image
My home Welcome Home Start your home location for new information... All Devices Living Room Master Staff... Add Device
text_image
Add Manually Auto Scan Electrician Index Security Lighting Large Home Ap... Small Home Ap... Kitchen Appliances Security & Sensors Exercise & Health Index Security Guides and otherstext_image
Reset the device first. Power the device on and make sure the indicator is flashing quickly or a prompt time is heard. Perform next padding as prompted.

text_image
Select 2.4 GHz Wi-Fi Network and enter password. If your Wi-Fi is blank, please add it to the 1.0GHz. Common sender answering method.

text_image
Use Camera to Scan QR... Tap Next. The mobile phone displays a QR code. Use the camera to scan to the QR code 15 cm to 30 cm away from the mobile phone. 15-25m Continue

text_image
Cancel No Prompts I Hazard a Prompttext_image
Technical diagram of a mobile phone with numbered components for identificationtext_image
Technical diagram of a device with numbered components and directional arrow indicating rotation or movementnatural_image
Simple line drawing of a vertical rectangle with diagonal hatching and a horizontal line inside, no text or symbols present.natural_image
Line drawing of a mechanical device with a flanged handle and circular ports (no text or symbols)natural_image
Technical line drawing of a mechanical device with no visible text or symbolstext_image
Log in United States v1 Mobile numberEmail Password Login Verify via SMS Foorgot password2. Tilføj enhed
text_image
My home Welcome Home Set your home location for more information... All Devices Living Room Master Back Add Device
text_image
Add Manually Auto Scan Electrician Volume Conherence Lighting Large Home Ap... Good Home Ap... Kitchen Appliances Security & Devices Exercise & Health Video Subscription... Guiding and otherstext_image
Reset the device first. Power the device on-and make sure the indicator is flashing quickly or a prompt time is heard. Perforin left padding as prompted.
text_image
Select 2.4 GHz Wi-Fi Network and enter password. If your Wi-Fi is $50Hz, please add it to the $40Hz. Common router setting method. 2.400% 50%
text_image
Cancel Use Camera to Scan QR... Tap Next. The mobile phone displays a QR code. Use the camera to scan to the QR code 15 cm to 20 cm away from the mobile phone. 15 - Blue Continue
text_image
Cancel No Prompts I Heard a Promptflowchart
graph LR
    A["Connecting... <br>Place your route, mobile phone, and device as close as possible"] --> B["Added <br>DENVER Wi-Fi Smart Camera ... <br>Describe added successfully"]
    B --> C["DENVER Wi-Fi Smart Camera"]
    C --> D["Settings <br>Device Name: Windows User Smart Camera"]
    C --> E["Share Device <br>Device Information <br>Live Echo <br>Power Management Settings <br>Market Function Settings <br>P/B Off <br>Storage Settings <br>Purchase VAS <br>FAQ & Facebook <br>Hardware Information"]
Produktfeatures
text_image
Technical diagram of a mobile phone casing with numbered components for identificationBillede 1
text_image
Technical diagram of a device with numbered components and directional arrow indicating rotation or movementBillede 2
natural_image
Pure diagram of a rectangular block with diagonal hatching and a small rectangular element on top (no text or symbols)natural_image
Line drawing of a cylindrical device with a handle and internal components (no text or symbols)natural_image
Technical line drawing of a mechanical device with no visible text or symbolstext_image
Log in United States < 2 > Mobile number/Email Password Login Verify via SMS Foorgot password

text_image
My home Welcome Home Start your home location for more information... All Devices Living Room Master Room Add Options

text_image
Add Manually Auto Scan Electrician Lighting Large Holes Ap... Small Holes Ap... Kitchen Appliances Security & Sensors Exercise & Health Video Separation Game and others Video Surroundances Smart Locks Smart Locks Smart Locks Audio Audio Audio Comfort Audio Comforttext_image
Reset the device first. Power the device on and make sure the indicator is flashing quickly or a prompt time is heard: Perform next padding as prompted. ? Make sure the indicator is flashing quickly or a prompt time is heard Reset
text_image
Select 2.4 GHz Wi-Fi Network and enter password. If your Wi-Fi is blank, please add it to the 1.0GHz. Common sender answering method.
text_image
Canopy Use Camera to Scan QR... Tap Next. The mobile phone displays a QR code. Use the camera to scan in the QR code 15 cm to 30 cm away from the mobile phone. Continue

text_image
Cancel No Prompts I Heard a Promptflowchart
graph LR
    A["Connecting... <br>Place your route, mobile phone, and device as close as possible"] --> B["Added. <br>DENVER Wi-Fi Smart Camera ... <br>Device version: successful fly"]
    B --> C["Setting"]
    C --> D["Device name: Open Free Smart Camera"]
    C --> E["Share Devices"]
    C --> F["Service Information"]
    C --> G["Use Echo"]
    C --> H["Power Management Settings"]
    C --> I["Basic Function Settings"]
    C --> J["P/R Off"]
    C --> K["Storage Settings"]
    C --> L["Purchase VAS"]
    C --> M["FAC & Feedback"]
    C --> N["Univariate Information"]
Produktfunksjoner
text_image
Technical diagram of a device with numbered components and directional arrow indicating rotation or movement- Bryter
- AA-batteri
- Av/på-knapp
- Micro SD-kort
12.Tilbakestillingsknapp
natural_image
Simple line drawing of a rectangular block with diagonal hatching and a small rectangular element on the left (no text or symbols)natural_image
Line drawing of a cylindrical device with a flanged handle and internal components (no text or symbols)natural_image
Technical line drawing of a mechanical device with no visible text or symbolstext_image
DENVER SMART HOME New user Log to with Existing Accounts

text_image
Register United States +1 Mobile Application 注册 □ Apply User Award or Finance Policy
text_image
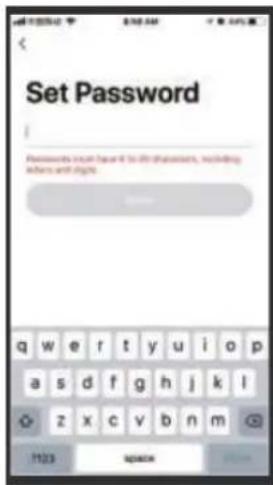
Set Password Passwords include 4 to 50 characters, including where and size.
text_image
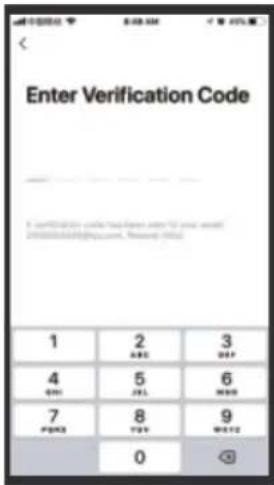
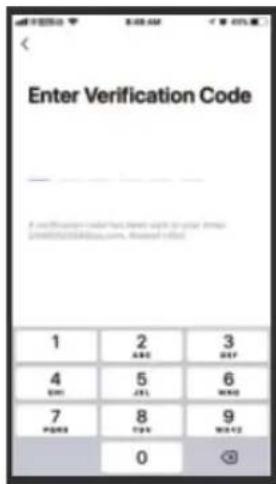
Enter Verification Code 1 2 3 ABC DBP 4 5 6 QMI ZEL MBD 7 8 9 PBAS TDB WNTZ 0text_image
Log in United States 12 Mobile number/Email Password Login Verify via SMS Foorgol password2. Dodaj urządzenie
text_image
My home Welcome Home Get your home location for more information... All Devices Living Room Master Building Add Digital
text_image
Add Manually Auto Scan Electrician Lighting Large Home Ap... Small Home Ap... Kitchen Appliances Security & Sensors Exercise & Health Video Subscriptions Game Tools and otherstext_image
Reset the device first. Power the device on and make sure the indicator is flashing quickly or a prompt time is heard. Perform next padding as prompted.

text_image
Select 2.4 GHz Wi-Fi Network and enter password. If your Wi-Fi is Status, please add it to the 1.4GHz Common user setting method.

text_image
Use Camera to Scan QR... Tap Next. The mobile phone displays a QR code. Use the camera to scan to the QR code 15 cm to 30 cm away from the mobile phone. 15-25m Continue
text_image
Cancel No Prompts I Hazard a Promptflowchart
Smart camera setup flowchart showing connection, adding, editing, and setting steps with device selection and tracking optionsWłasności produktu
text_image
Technical diagram of a mobile phone with numbered parts for identificationtext_image
Technical diagram of a mechanical device with numbered components and directional arrow indicating rotation or movement.natural_image
Simple line drawing of a rectangular block with diagonal hatching and a small rectangular element on the left (no text or symbols)natural_image
Line drawing of a cylindrical device with a flanged handle and internal components (no text or symbols)natural_image
Technical line drawing of a mechanical device with no visible text or symbolstext_image
Log in United States 12 Mobile number/Email Password Login Verify via SMS Footgot passwordtext_image
My home Welcome Home Set your home location for more information... All Devices Living Room Master Device Add Device
text_image
Add Manually Auto Scan Clicklist Lighting Large Home Ap... Good Home Ap... Kitchen Appliances Security & Sensors Exercise & Health Video Connection Guideline and others Video Conclusions Audio Audio Audio Audio Conclusions Audio Conclusions Audio Conclusionstext_image
Reset the device first. Power the device on and make sure the indicator is flashing quickly or a prompt time is heard. Perform net pingling as prompted. > Make score the indicator is flashing quickly or a prompt time is heard. Next
text_image
Select 2.4 GHz Wi-Fi Network and enter password. If your Wi-Fi is 50Hz, please set it at the 2.4GHz Common user setting method 2.4ms 5ms 3m
text_image
Use Camera to Scan QR... Tap Navt. The mobile phone displays a QR code. Use the camera to scan to the QR code 15 cm to 20 cm away from the mobile phone. 15 - 8ms Continuous
text_image
Cancel No Prompts I Heard a Prompttext_image
Technical diagram of a mobile phone with numbered parts for identificationImagem 1 Imagem 2
text_image
Technical diagram of a mechanical device with numbered components and directional arrow indicating rotation or movement.natural_image
Simple line drawing of a rectangular block with diagonal hatching and a small rectangular element on the left (no text or symbols)natural_image
Line drawing of a cylindrical device with a flanged handle and internal components (no text or symbols)natural_image
Technical line drawing of a mechanical device with no visible text or symbolstext_image
Log in United States = 1 Mobile number/Email Password Login Verify via SMS Foorgot password2. Lägg till enhet
text_image
My home Welcome Home Start your home location for home breathing... All Devices Living Room Master School Add Device
text_image
Add Manually Auto Scan Electrician Lighting Large Home Ap... Snout Home Ap... Kitchen Appliances Security & Sessions Exercise & Health Video Streaming Gaming and othersflowchart
graph LR
    A["Connecting... <br>Place your route, mobile phone, and device as close as possible"] --> B["Added. <br>DENVER Wi-Fi Smart Camera ... <br>Device settings successfully"]
    B --> C["Add. <br>Denver Wi-Fi Smart Camera"]
    C --> D["Setup Setup"]
    D --> E["User Interface"]
    E --> F["User Interface"]
    F --> G["User Interface"]
    G --> H["User Interface"]
    H --> I["User Interface"]
    I --> J["User Interface"]
    J --> K["User Interface"]
    K --> L["User Interface"]
    L --> M["User Interface"]
    M --> N["User Interface"]
    N --> O["User Interface"]
    O --> P["User Interface"]
    P --> Q["User Interface"]
    Q --> R["User Interface"]
    R --> S["User Interface"]
    S --> T["User Interface"]
    T --> U["User Interface"]
    U --> V["User Interface"]
    V --> W["User Interface"]
    W --> X["User Interface"]
    X --> Y["User Interface"]
    Y --> Z["User Interface"]
    Z --> AA["User Interface"]
    AA --> AB["User Interface"]
    AB --> AC["User Interface"]
    AC --> AD["User Interface"]
    AD --> AE["User Interface"]
    AE --> AF["User Interface"]
    AF --> AG["User Interface"]
    AG --> AH["User Interface"]
    AH --> AI["User Interface"]
    AI --> AJ["User Interface"]
    AJ --> AK["User Interface"]
    AK --> AL["User Interface"]
    AL --> AM["User Interface"]
    AM --> AN["User Interface"]
    AN --> AO["User Interface"]
    AO --> AP["User Interface"]
    AP --> AQ["User Interface"]
    AQ --> AR["User Interface"]
    AR --> AS["User Interface"]
    AS --> AT["User Interface"]
    AT --> AU["User Interface"]
    AU --> AV["User Interface"]
    AV --> AW["User Interface"]
    AW --> AX["User Interface"]
    AX --> AY["User Interface"]
Produktegenskaper
text_image
Technical diagram of a mobile phone with numbered parts for identificationBild 1 Bild 2
text_image
Technical diagram of a mechanical device with numbered components and directional arrow indicating rotation or movement.natural_image
Simple line drawing of a rectangular block with diagonal hatching and a small protrusion on the left side (no text or symbols)natural_image
Line drawing of a mechanical device with a handle and internal components (no text or symbols)natural_image
Technical line drawing of a mechanical device with no visible text or symbolstext_image
Log in United States <1> Mobile numberEmail Password Login Verify via SMS Foorgof password

text_image
My home Welcome Home Get your home location for home information... All Devices Living Room Master Room Add Device

text_image
Add Manually Auto Scan Electrician Lighting Large Home Ap... Small Home Ap... Kitchen Appliances Security & Security Exercise & Health Video Comparison Data and others Video Comparisontext_image
Reset the device first. Power the device on and make sure the indicator is flashing quickly or a prompt time is heard. Perform net pingling as prompted. > Make score the indicator is flashing quickly or a prompt time is heard. Next

text_image
Select 2.4 GHz Wi-Fi Network and enter password. If your Wi-Fi is 30MHz, please set it at the 2.4GHz Common voucher setting method 2.4ms 5ms Start

text_image
Use Camera to Scan QR... Tap Navt. The mobile phone displays a QR code. Use the camera to scan to the QR code 15 cm to 20 cm away from the mobile phone. 15 - 8ms Continuous

text_image
Cancel No Prompts I Heard a Promptflowchart
graph LR
    A["Connecting... Place your route, mobile phone, and device as close as possible"] --> B["Added: Denver Wi-Fi Smart Camera"]
    B --> C["DENVER Wi-Fi Smart Camera"]
    C --> D["Settings"]
    D --> E["Device Name: WiFi Free Smart Camera"]
    D --> F["Share Devices"]
    D --> G["Service Information"]
    D --> H["Use Echo"]
    D --> I["Power Management Settings"]
    D --> J["Basic Function Settings"]
    D --> K["P/R Off"]
    D --> L["Storage Settings"]
    D --> M["Purchase VAS"]
    D --> N["FAC & Feedback"]
    D --> O["Univariate Information"]
text_image
Technical diagram of a mobile phone with numbered parts for identificationImagen 1 Imagen 2
text_image
Technical diagram of a mechanical device with numbered components and directional arrow indicating rotation or movement.natural_image
Simple line drawing of a rectangular block with diagonal hatching and a small rectangular element on the left (no text or symbols)natural_image
Line drawing of a cylindrical device with a flanged handle and internal components (no text or symbols)natural_image
Technical line drawing of a mechanical device with no visible text or symbolstext_image
DENVER SMART HOME Don't know

text_image
Register United States 11 Sample Recommendation 注册信息 □ Apply User Assessment and Privacy Policy

text_image
Set Password Password to set up to 10 characters, including letters and digits.
text_image
Enter Verification Code 1 2 3 ABC DEF 4 5 6 OK CJK MAX 7 8 9 PAGE TOP NOT 0 OKtext_image
Log in United States 12 Mobile number/Email Password Login Verify via SMS Foorgof password

text_image
My home Welcome Home Get your home location for home information... All Devices Living Room Master Room Add Device
text_image
Add Manually Auto Scan Electrician TVR Conversion Lighting Large Home Ap... Small Home Ap... Kitchen Appliances Security & Security Exercise & Health Video Comparison Data and otherstext_image
Reset the device first. Power the device on and make sure the indicator is flashing quickly on a prompt time is heard. Perform net pingling as prompted. > Make score the indicator is flashing quickly or a prompt time is heard. Next

text_image
Select 2.4 GHz Wi-Fi Network and enter password. If your Wi-Fi is 30MHz, please set it for 2.4GHz Common voucher setting method 2.4ms 5ms * * * * * * * * * Start

text_image
Use Camera to Scan QR... Tap Navt. The mobile phone displays a QR code. Use the camera to scan to the QR code 15 cm to 20 cm away from the mobile phone. 15 - 8ms Continuous

text_image
Cancel No Prompts I Heard a Promptflowchart
graph LR
    A["Connecting... <br>Place your route, mobile phone, and device as close as possible"] --> B["Added. <br>DENVER Wi-Fi Smart Camera ... <br>Device starts at www.nesc.com"]
    B --> C["DENVER Wi-Fi Smart Camera"]
    C --> D["Add"]
    D --> E["Device starts at <br>Register Server to Design Cloud <br>Including device"]
    E --> F["Add"]
    F --> G["Device starts at <br>Register Server to Design Cloud <br>Including device"]
    G --> H["Add"]
    H --> I["Device starts at <br>Register Server to Design Cloud <br>Including device"]
    I --> J["Add"]
    J --> K["Device starts at <br>Register Server to Design Cloud <br>Including device"]
    K --> L["Add"]
    L --> M["Device starts at <br>Register Server to Design Cloud <br>Including device"]
    M --> N["Add"]
    N --> O["Device starts at <br>Register Server to Design Cloud <br>Including device"]
    O --> P["Add"]
    P --> Q["Device starts at <br>Register Server to Design Cloud <br>Including device"]
    Q --> R["Add"]
    R --> S["Device starts at <br>Register Server to Design Cloud <br>Including device"]
    S --> T["Add"]
    T --> U["Device starts at <br>Register Server to Design Cloud <br>Including device"]
    U --> V["Add"]
    V --> W["Device starts at <br>Register Server to Design Cloud <br>Including device"]
    W --> X["Add"]
    X --> Y["Device starts at <br>Register Server to Design Cloud <br>Including device"]
    Y --> Z["Add"]
    Z --> AA["Device starts at <br>Register Server to Design Cloud <br>Including device"]
    AA --> AB["Add"]
    AB --> AC["Device starts at <br>Register Server to Design Cloud <br>Including device"]
    AC --> AD["Add"]
    AD --> AE["Device starts at <br>Register Server to Design Cloud <br>Including device"]
    AE --> AF["Add"]
    AF --> AG["Device starts at <br>Register Server to Design Cloud <br>Including device"]
    AG --> AH["Add"]
    AH --> AI["Device starts at <br>Register Server to Design Cloud <br>Including device"]
    AI --> AJ["Add"]
    AJ --> AK["Device starts at <br>Register Server to Design Cloud <br>Including device"]
    AK --> AL["Add"]
    AL --> AM["Device starts at <br>Register Server to Design Cloud <br>Including device"]
    AM --> AN["Add"]
    AN --> AO["Device starts at <br>Register Server to Design Cloud <br>Including device"]
    AO --> AP["Add"]
    AP --> AQ["Device starts at <br>Register Server to Design Cloud <br>Including device"]
    AQ --> AR["Add"]
    AR --> AS["Device starts at <br>Register Server to Design Cloud <br>Including device"]
    AS --> AT["Add"]
    AT --> AU["Device starts at <br>Register Server to Design Cloud <br>Including device"]
    AU --> AV["Add"]
    AV --> AW["Device starts at <br>Register Server to Design Cloud <br>Including device"]
    AW --> AX["Add"]
    AX --> AY["Device starts at <br>Register Server to Design Cloud <br>Including device"]
    AY --> AZ["Add"]
    AZ --> BA["Device starts at <br>Register Server to Design Cloud <br>Including device"]
    BA --> BB["Add"]
    BB --> BC["Device starts at <br>Register Server to Design Cloud <br>Including device"]
    BC --> BD["Add"]
    BD --> BE["Device starts at <br>Register Server to Design Cloud <br>Including device"]
    BE --> BF["Add"]
    BF --> BG["Device starts at <br>Register Server to Design Cloud <br>Including device"]
    BG --> BH["Add"]
    BH --> BI["Device starts at <br>Register Server to Design Cloud <br>Including device"]
    BI --> BJ["Add"]
    BJ --> BK["Device starts at <br>Register Server to Design Cloud <br>Including device"]
    BK --> BL["Add"]
    BL --> BM["Device starts at <br>Register Server to Design Cloud <br>Including device"]
    BM --> BN["Add"]
    BN --> BO["Device starts at <br>Register Server to Design Cloud <br>Including device"]
    BO --> BP["Add"]
    BP --> BQ["Device starts at <br>Register Server to Design Cloud <br>Including device"]
    BQ --> BR["Add"]
    BR --> BS["Device starts at <br>Register Server to Design Cloud <br>Including device"]
    BS --> BT["Add"]
    BT --> BU["Device starts at <br>Register Server to Design Cloud <br>Including device"]
    BU --> BV["Add"]
    BV --> BW["Device starts at <br>Register Server to Design Cloud <br>Including device"]
    BW --> BX["Add"]
    BX --> BY["Device starts at <br>Register Server to Design Cloud <br>Including device"]
    BX --> BZ["Add"]
    BZ --> CA["Device starts at <br>Register Server to Design Cloud <br>Including device"]
    CA --> CB["Add"]
    CB --> CC["Device starts at <br>Register Server to Design Cloud <br>Including device"]
    CC --> CD["Add"]
    CD --> CE["Device starts at <br>Register Server to Design Cloud <br>Including device"]
    CE --> CF["Add"]
    CF --> CG["Device starts at <br>Register Server to Design Cloud <br>Including device"]
    CG --> CH["Add"]
    CH --> CI["Device starts at <br>Register Server to Design Cloud <br>Including device"]
    CI --> CJ["Add"]
    CJ --> CK["Device starts at <br>Register Server to Design Cloud <br>Including device"]
    CK --> CL["Add"]
    CL --> CM["Device starts at <br>Register Server to Design Cloud <br>Including device"]
    CM --> CN["Add"]
    CN --> CO["Device starts at <br>Register Server to Design Cloud <br>Including device"]
    CO --> CP["Add"]
    CP --> CQ["Device starts at <br>Register Server to Design Cloud <br>Including device"]
    CQ --> CR["Add"]
    CR --> CS["Device starts at <br>Register Server to Design Cloud <br>Including device"]
    CS --> CT["Add"]
    CT --> CU["Device starts at <br>Register Server to Design Cloud <br>Including device"]
    CU --> CV["Add"]
    CV --> CW["Device starts at <br>Register Server to Design Cloud <br>Including device"]
    CW --> CX["Add"]
    CX --> CY["Device starts at <br>Register Server to Design Cloud <br>Including device"]
    CY --> CZ["Add"]
    CZ --> DA["Device starts at <br>Register Server to Design Cloud <br>Including device"]
    DA --> DB["Add"]
    DB --> DC["Device starts at <br>Register Server to Design Cloud <br>Including device"]
    DC --> DD["Add"]
    DD --> DE["Device starts at <br>Register Server to Design Cloud <br>Including device"]
    DE --> DF["Add"]
    DF --> DG["Device starts at <br>Register Server to Design Cloud <br>Including device"]
    DG --> DH["Add"]
    DH --> DI["Device starts at <br>Register Server to Design Cloud <br>Including device"]
    DI --> DJ["Add"]
    DJ --> DE
text_image
Technical diagram of a mobile phone with numbered parts for identificationKuva 1 Kuva 2
text_image
Technical diagram of a mechanical device with numbered components and directional arrow indicating rotation or movement.- Salpa
- AA-paristo
- Virtakytkin
- Micro-SD-kortti
- Nollaa-painike
natural_image
Pure diagram of a rectangular block with diagonal hatching and a small rectangular element on top (no text or symbols)natural_image
Line drawing of a cylindrical device with a flanged handle and internal components (no text or symbols)natural_image
Technical line drawing of a mechanical device with no visible text or symbolstext_image
Log in United States -1 Mobile number/Email Password Login Verify via SMS Foorgx passwordtext_image
My home Welcome Home Get your home location for more information... All Devices Living Room Master Services Add Device
text_image
Add Manually Add Scan Checklist Lighting Large Home Ap... Small Home Ap... Kitchen Appliances Security & Sensors Exercise & Health Video Subscription Data and otherstext_image
Reset the device first. Power the device on and make sure the indicator is flashing quickly or a prompt time is heard. Perform net pingling as prompted. > Make score the indicator is flashing quickly or a prompt time is heard. Next

text_image
Select 2.4 GHz Wi-Fi Network and enter password. If your Wi-Fi is 50Hz, please set it at the 2.4GHz Common user setting method 2.4ms 5ms 3m

text_image
Use Camera to Scan QR... Tap Navt. The mobile phone displays a QR code. Use the camera to scan to the QR code 15 cm to 20 cm away from the mobile phone. 15 - 8ms Continuous

text_image
Cancel No Prompts I Heard a Promptflowchart
graph LR
    A["Connecting... <br>Place your route, mobile phone, and device as close as possible"] --> B["Added. <br>DENVER Wi-Fi Smart Camera ... <br>Device settings successfully"]
    B --> C["Upgrade to <br>New Product"]
    C --> D["Add to <br>New Service"]
    D --> E["Device selection <br>New Product"]
    E --> F["Add to <br>New Service"]
    F --> G["Device selection <br>New Service"]
    G --> H["Add to <br>New Service"]
    H --> I["Device selection <br>New Service"]
    I --> J["Add to <br>New Service"]
    J --> K["Device selection <br>New Service"]
    K --> L["Add to <br>New Service"]
    L --> M["Device selection <br>New Service"]
    M --> N["Add to <br>New Service"]
    N --> O["Device selection <br>New Service"]
    O --> P["Add to <br>New Service"]
    P --> Q["Device selection <br>New Service"]
    Q --> R["Add to <br>New Service"]
    R --> S["Device selection <br>New Service"]
    S --> T["Add to <br>New Service"]
    T --> U["Device selection <br>New Service"]
    U --> V["Add to <br>New Service"]
    V --> W["Device selection <br>New Service"]
    W --> X["Add to <br>New Service"]
    X --> Y["Device selection <br>New Service"]
    Y --> Z["Add to <br>New Service"]
    Z --> AA["Device selection <br>New Service"]
    AA --> AB["Add to <br>New Service"]
    AB --> AC["Device selection <br>New Service"]
    AC --> AD["Add to <br>New Service"]
    AD --> AE["Device selection <br>New Service"]
    AE --> AF["Add to <br>New Service"]
    AF --> AG["Device selection <br>New Service"]
    AG --> AH["Add to <br>New Service"]
    AH --> AI["Device selection <br>New Service"]
    AI --> AJ["Add to <br>New Service"]
    AJ --> AK["Device selection <br>New Service"]
    AK --> AL["Add to <br>New Service"]
    AL --> AM["Device selection <br>New Service"]
    AM --> AN["Add to <br>New Service"]
    AN --> AO["Device selection <br>New Service"]
    AO --> AP["Add to <br>New Service"]
    AP --> AQ["Device selection <br>New Service"]
    AQ --> AR["Add to <br>New Service"]
    AR --> AS["Device selection <br>New Service"]
    AS --> AT["Add to <br>New Service"]
    AT --> AU["Device selection <br>New Service"]
    AU --> AV["Add to <br>New Service"]
    AV --> AW["Device selection <br>New Service"]
    AW --> AX["Add to <br>New Service"]
    AX --> AY["Device selection <br>New Service"]
    AY --> AZ["Add to <br>New Service"]
    AZ --> BA["Device selection <br>New Service"]
    BA --> BB["Add to <br>New Service"]
    BB --> BC["Device selection <br>New Service"]
    BC --> BD["Add to <br>New Service"]
    BD --> BE["Device selection <br>New Service"]
    BE --> BF["Add to <br>New Service"]
    BF --> BG["Device selection <br>New Service"]
    BG --> BH["Add to <br>New Service"]
    BH --> BI["Device selection <br>New Service"]
    BI --> BJ["Add to <br>New Service"]
    BJ --> BK["Device selection <br>New Service"]
    BK --> BL["Add to <br>New Service"]
    BL --> BM["Device selection <br>New Service"]
    BM --> BN["Add to <br>New Service"]
    BN --> BO["Device selection <br>New Service"]
    BO --> BP["Add to <br>New Service"]
    BP --> BQ["Device selection <br>New Service"]
    BQ --> BR["Add to <br>New Service"]
    BR --> BS["Device selection <br>New Service"]
    BS --> BT["Add to <br>New Service"]
    BT --> BU["Device selection <br>New Service"]
    BU --> BV["Add to <br>New Service"]
    BV --> BW["Device selection <br>New Service"]
    BW --> BX["Add to <br>New Service"]
    BX --> BY["Device selection <br>New Service"]
    BY --> BZ["Add to <br>New Service"]
    BZ --> CA["Device selection <br>New Service"]
    CA --> CB["Add to <br>New Service"]
    CB --> CC["Device selection <br>New Service"]
    CC --> CD["Add to <br>New Service"]
    CD --> CE["Device selection <br>New Service"]
    CE --> CF["Add to <br>New Service"]
    CF --> CG["Device selection <br>New Service"]
    CG --> CH["Add to <br>New Service"]
    CH --> CI["Device selection <br>New Service"]
    CI --> CJ["Add to <br>New Service"]
    CJ --> CK["Device selection <br>New Service"]
    CK --> CL["Add to <br>New Service"]
    CL --> CM["Device selection <br>New Service"]
    CM --> CN["Add to <br>New Service"]
    CN --> CO["Device selection <br>New Service"]
    CO --> CP["Add to <br>New Service"]
    CP --> CQ["Device selection <br>New Service"]
    CQ --> CR["Add to <br>New Service"]
    CR --> CS["Device selection <br>New Service"]
    CS --> CT["Add to <br>New Service"]
    CT --> CU["Device selection <br>New Service"]
    CU --> CV["Add to <br>New Service"]
    CV --> CW["Device selection <br>New Service"]
    CW --> CX["Add to <br>New Service"]
    CX --> CY["Device selection <br>New Service"]
    CY --> CZ["Add to <br>New Service"]
    CZ --> DA["Device selection <br>New Service"]
    DA --> DB["Add to <br>New Service"]
    DB --> DC["Device selection <br>New Service"]
    DC --> DD["Add to <br>New Service"]
    DD --> DE["Device selection <br>New Service"]
    DE --> DF["Add to <br>New Service"]
    DF --> DG["Device selection <br>New Service"]
    DG --> DH["Add to <br>New Service"]
    DH --> DI["Device selection <br>New Service"]
    DI --> DJ["Add to <br>New Service"]
    DJ --> DK["Device selection <br>New Service"]
    DK --> DL["Add to <br>New Service"]
    DL --> DM["Device selection <br>New Service"]
    DM --> DN["Add to <br>New Service"]
    DN --> DO
text_image
Technical diagram of a mobile phone with numbered parts for identificationImage 1 Image 2
text_image
Technical diagram of a mechanical device with numbered components and directional arrow indicating rotation or movement.natural_image
Simple line drawing of a rectangular block with diagonal hatching and a small protrusion on the left side (no text or symbols)natural_image
Line drawing of a mechanical device with a flanged handle and internal components (no text or symbols)natural_image
Technical line drawing of a mechanical device with no visible text or symbolstext_image
Log in United States <1> Mobile numberEmail Password Login Verify via SMS Foorgof passwordtext_image
My home Welcome Home Get your home location for home information... All Devices Living Room Master Room Add Device
text_image
Add Manually Auto Scan Electrician Lighting Large Home Ap... Small Home Ap... Kitchen Appliances Security & Security Exercise & Health Video Comparison Data and others Video Comparisontext_image
Reset the device first. Power the device on and make sure the indicator is flashing quickly or a prompt time is heard. Perform net pingling as prompted. Make score the indicator is flashing quickly or a prompt time is heard. Next
text_image
Select 2.4 GHz Wi-Fi Network and enter password. If your Wi-Fi is 30MHz, please set it for 2.4GHz Common voucher setting method 2.4ms 5ms * * * * * * * * * Start

text_image
Use Camera to Scan QR... Tap Navt. The mobile phone displays a QR code. Use the camera to scan to the QR code 15 cm to 20 cm away from the mobile phone. 15 - 8ms Continuous

text_image
Cancel No Prompts I Heard a Prompttext_image
Technical diagram of a mobile phone with numbered parts for identificationFoto 1
text_image
Technical diagram of a mechanical device with numbered components and directional arrow indicating rotation or movement.Foto 2
natural_image
Pure diagram of a rectangular block with diagonal hatching and a small arrow pointing to it (no text or symbols)natural_image
Line drawing of a mechanical device with a flanged top and internal components (no text or symbols)natural_image
Technical line drawing of a mechanical device with no visible text or symbolstext_image
Log in United States 12 Mobile number/Email Password Login Verify via SMS Foorgof password
text_image
My home Welcome Home Get your home location for home information... All Devices Living Room Master Room Add Device

text_image
Add Manually Auto Scan Electrician TVR Conversion Lighting Large Home Ap... Small Home Ap... Kitchen Appliances Security & Security Exercise & Health Video Comparison Data and otherstext_image
Technical diagram of a mobile phone with numbered parts for identificationAfbeelding 1
text_image
Technical diagram of a mechanical device with numbered components and directional arrow indicating rotation or movement.Afbeelding 2