IOB208 - Surveillance Camera DENVER - Free user manual and instructions
Find the device manual for free IOB208 DENVER in PDF.

| Product type | Wireless battery-powered surveillance camera |
| Video resolution | 1920 x 1080 pixels (Full HD) at 15 fps |
| Lens | Wide angle 130°, 4 lenses |
| Night vision | 10 infrared LEDs, range 6-8 meters |
| Motion detection | PIR (passive infrared) sensor, range 6 meters |
| Storage | Micro SD card up to 128 GB (not included) and cloud storage |
| Connectivity | 2.4 GHz Wi-Fi 802.11b/g/n |
| Wi-Fi range | 70 meters outdoors, 15 meters indoors |
| Power supply | 2 x 18650 batteries (included), battery life 3 to 6 months under normal use |
| Power consumption | Standby: 200 µA, active: 200 mA |
| Charging | USB 5 VDC port for recharging batteries |
| Audio | Two-way audio with noise suppression |
| Video compression | H.264 |
| Operating temperature | -10 °C to 50 °C |
| Storage temperature | -20 °C to 60 °C |
| Remote wake-up | Quick, about 5 seconds from the mobile app |
| Mobile app | "DENVER SMART HOME" available on iOS and Android |
| Installation | On wall with base bracket and anchors (included) |
| LED indicators | Charge indicator (red: charging, green: full) and operation indicator |
| Spare parts | 18650 batteries (rechargeable), Micro SD card (not included) |
| Maintenance | Clean with a soft dry cloth. Do not use abrasive products. |
| Safety | Compliant with RED directive 2014/53/EU. Do not expose to water. |
Frequently Asked Questions - IOB208 DENVER
User questions about IOB208 DENVER
0 question about this device. Answer the ones you know or ask your own.
Ask a new question about this device
Download the instructions for your Surveillance Camera in PDF format for free! Find your manual IOB208 - DENVER and take your electronic device back in hand. On this page are published all the documents necessary for the use of your device. IOB208 by DENVER.
USER MANUAL IOB208 DENVER
facebook.com/denverelectronics
User's Guide for Battery WiFi Camera
Quick Start Guide for Battery Smart Camera
Perform the in-app Setup
The app is available for iOS, Android The app name is "denver smart home"

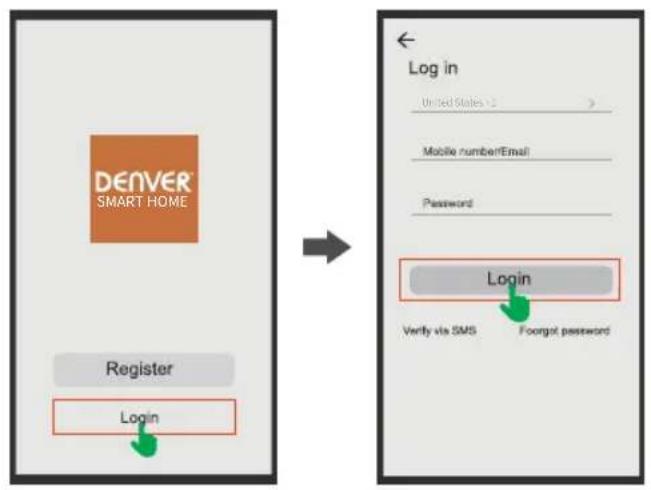
1.1. Account Registration and Login
Please open "DENVER SMART HOME" App, and enter the App main interface. New users need to register by Email or Mobile number, click "Register".
Follow the steps to complete the registration of the account, and login.
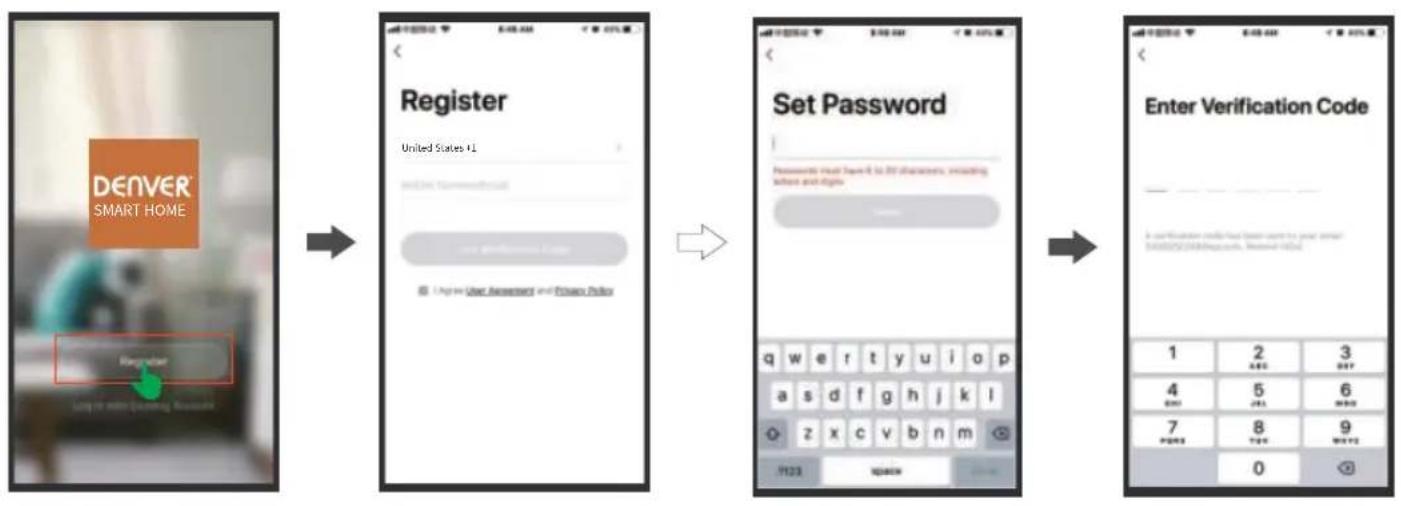
Please log in directly if you already have an account. To input your account and password, click "Log in".
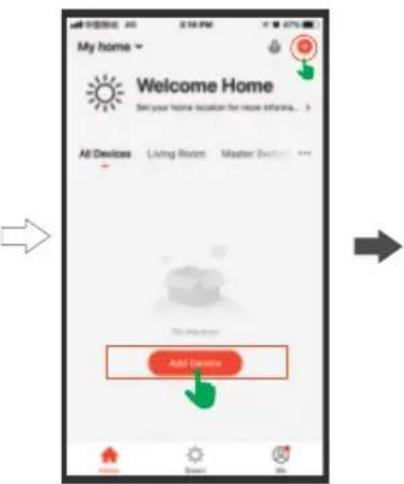
2. Add Device
Tap + or "Add Device" to add the device.
Find the smart camera in the video surveillance list and click it
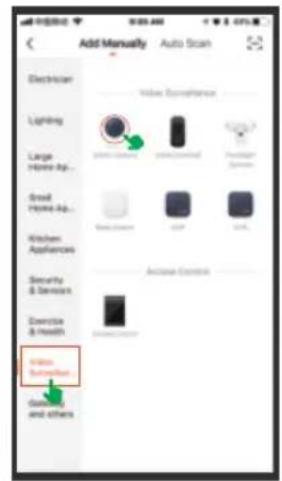
Note: The "auto scan" function cannot be supported, please select "Add Manually" and follow up below steps to add the device.
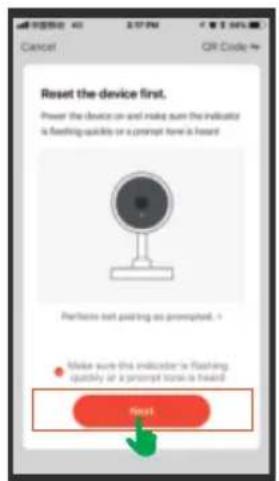
Confirm the red and blue LED flash alternately or a prompt tone is heard.
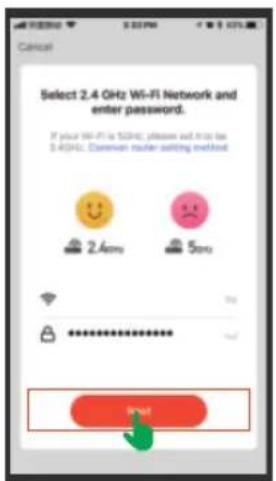
Connect with your home Wi-Fi. 2.4GHz signal type Wi-Fi is required, 5GHz Wi-Fi network can not be used.
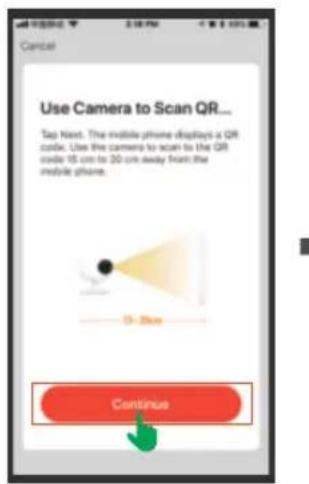
Pairing the camera. The camera lens is aimed at the QR code on the phone screen with a distance of 15cm. It will sound "beep" after the camera recognize the QR code.


Note: Allow to access your location if prompted to enable the GPS.
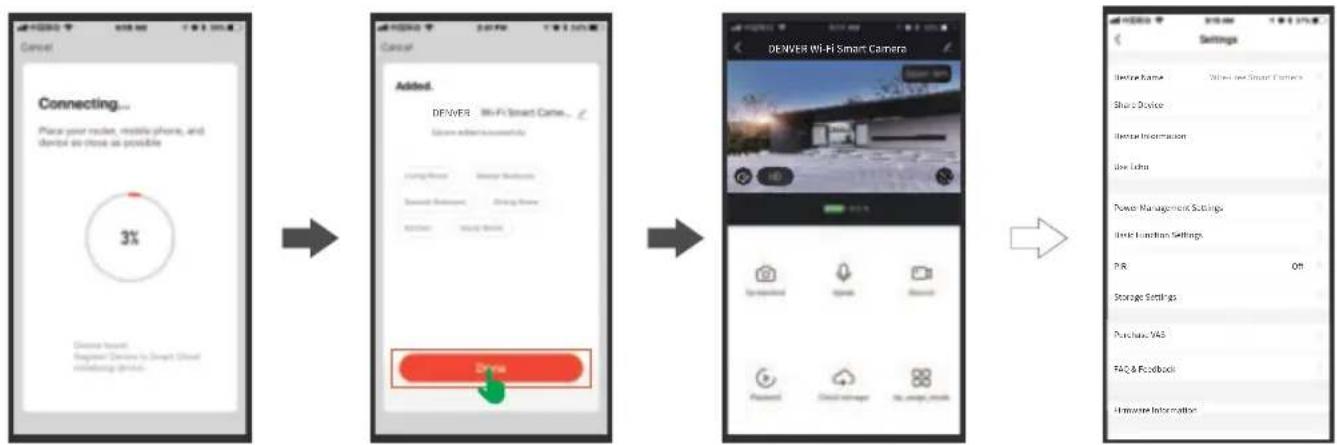
Please click "I Hear a prompt" if you heard it, then will start connecting. The camera is added successfully. You can enter the live video interface.
Settings
Click to enter the Settings page. There are only a few settings to make, so the process is quick and easy. To start setting up your camera.
Product Features
| 2 x 18650 batteries work regularly for 3 to 6 months | |
| HD | FHD Megapixels collocated with wide-angle lens |
| Support fast remote wake-up from mobile phones within 5 seconds | |
| 2.4G Wi-Fi connection | |
| Support PIR motion detection, when someone hovers at the door, it will send push alerts to your mobile phone immediately | |
| With IR-cut, it can switch automatically and the photos or videos shoot by the camera are clearly visible at both day and night to keep your home and family safe. | |
| Support USB charging |
Product Specification Sheet
| Lens | FOV/130° Wide-angle lens (4Glass) |
| Infrared LEDs | 10 pcs Infrared LEDs with a flash distance of 6 to 8 meters |
| PIR Motion Sensor | 6 meters PIR distance |
| Storage | Up to 128GB Micro SD card Cloud storage |
| Connectivity | 802.11b/g/n Wi-Fi@2.4G |
| Power consumption | Standby 200uA Working 200mA |
| Battery | 2 x 18650 batteries |
| USB | DC 5 V |
| Wi-Fi distance | 70 meters (open space without obstacle) or 15 meters (indoor) |
| Video Compression | H.264 |
| Voice Intercom | Two-way audio with noise cancellation |
| Video resolution | 1920 * 1080@15 fps |
| Working Temperature | -10 ~ 50 °C |
| Storage Temperature | -20 ~ 60 °C |
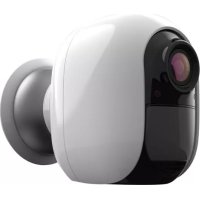
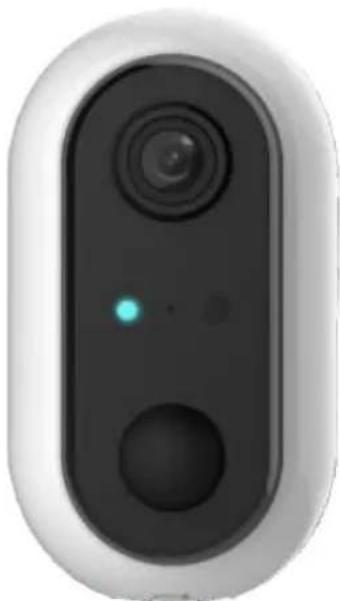
Product Design
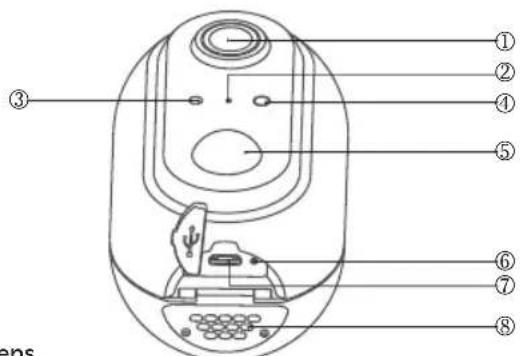
1.Lens
2.Mic
3.Light sensor
- LED
5.Motion detection sensor
- Charge LED
7.USB interface
8.Speaker
Charge LED: Charging in Red; Full in Green.
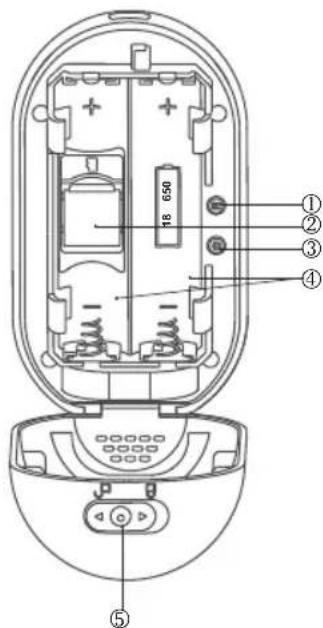
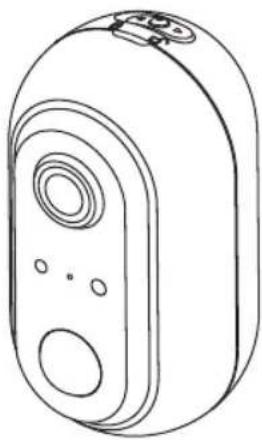
- Reset button
2.Mirco-SD card
3.Power button
4.18650 Battery
5.Flip Switch
Install your camera
Step1: Please turn the flip switch to "OPEN" and open the cover, then install the 18650 batteries and Micro-SD card. (Please make sure that the polarity of the battery is correct). Long press the RESET button until you hear the "system reset" prompt from the camera speaker.
Step 2: Install anchors into a stucco, brick or concrete surface. Use the drill bit to drill one hole in your wall and install the anchors. Install the base bracket on the wall (Picture 1).
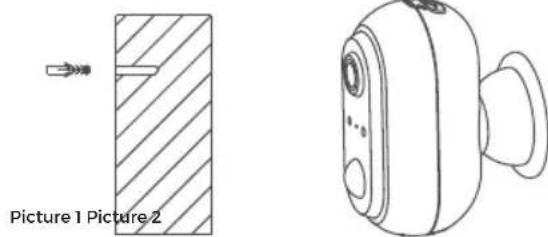
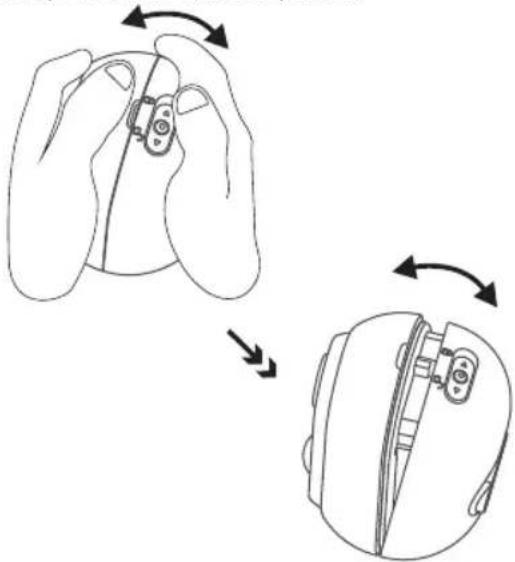
Step 3: Align the device to the base bracket and hold it, then adjust the appropriate angle, the installation is finished (Picture 2).
Notes:
- The USB interface is only used for power supply.
- When the mobile phone is connected to the home WiFi router, the mobile APP can generate a QR code that includes the name and password of the WiFi router. The product recognizes the QR code through the lens on the product, and the product is automatically connected to the router and server after identification. At this time, the APP also finds the product through the server, and the APP can control the operation of the product through the network.
Please notice - All products are subject to change without any notice. We take reservations for errors and omissions in the manual.
www.denver-electronics.com
Electric and electronic equipment and included batteries contains materials, components and substances that can be hazardous to your health and the environment, if the waste material (discarded electric and electronic equipment and batteries) is not handled correctly.
Electric and electronic equipment and batteries is marked with the crossed out trash can symbol, seen above. This symbol signifies that electric and electronic equipment and batteries should not be disposed of with other household waste, but should be disposed of separately.
As the end user it is important that you submit your used batteries to the appropriate and designated facility. In this manner you make sure that the batteries are recycled in accordance with legislature and will not harm the environment.
All cities have established collection points, where electric and electronic equipment and batteries can either be submitted free of charge at recycling stations and other collection sites, or be collected from the households. Additional information is available at the technical department of your city.
Hereby, Inter Sales A/S declares that the radio equipment type IOB-208 is in compliance with Directive 2014/53/EU. The full text of the EU declaration of conformity is available at the following internet address: www.denver-electronics.com and then click the search ICON on topline of website. Write model number:
IOB-208. Now enter product page, and RED directive is found under downloads/other downloads.
Operating Frequency Range:2412MHz-2472MHz
Max Output Power:19db
DENVER ELECTRONICS A/S
Omega 5A, Soeften
DK-8382 Hinnerup
Denmark
www.facebook.com/denverelectronics
Lade-LED:Lader=rodt,
fulladet gronn
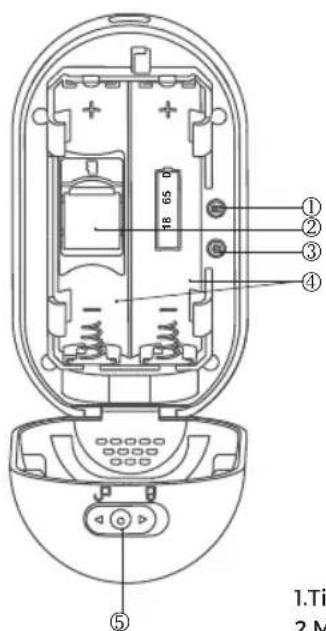
1.Tilbakedillingsknapp
2.Micro SD-kort
3.Av/pa-knapp
4.18650-batteri
5.Bryter
Installere kameraet

m = 311 ;
Lithium battery inside!
- Do not try to open the product!
- Do not expose to heat, water, moisture or direct sunlight!
- Only charge with the original charger supplied with this product!
DENVER ELECTRONICS A/S
Omega 5A Soeften
DK-8382,Hinnerup
Denmark