USER MANUAL CL 3750 CLATRONIC
natural_image
White CATRONC air purifier with digital display showing 22 o'clock (no text or symbols on device body)

natural_image
Line drawing of a portable air conditioner unit with cooling fins and a cup (no text or symbols)
WAARSCHUWING: Brandgevaar!
natural_image
Line drawing of a portable air conditioner unit with cooling pipes and a cup (no text or symbols)
Instellen van de ventilator
natural_image
Line drawing of a portable air conditioner unit with cooling pipes and a cup (no text or symbols)
natural_image
Line drawing of a portable air conditioner unit with cooling fan and water tank (no text or symbols)
natural_image
Line drawing of an air conditioning unit with cooling fan, hose, and cup (no text or symbols)
Chiavi Wi-Fi supportate: WPA/WPA2
Thank you for choosing our product. We hope you enjoy using the appliance.
Symbols in this Instruction Manual
Important information for your safety is specially marked. It is essential to comply with these instructions in order to avoid accidents and prevent damage to the appliance:

WARNING:
This warns you of dangers to your health and indicates possible injury risks.

CAUTION:
This refers to possible hazards to the appliance or other objects.

NOTE: This highlights tips and information.
Contents
Overview of the Components....3
Overview of Buttons, Icons and Indicator Lights ....4
General Notes......41
Special Safety Instructions for this Appliance....41
Handling Batteries....43
Unpacking the Appliance....43
Scope of Delivery....43
Overview of the Components....43
Overview of Buttons, Icons and Indicator Lights ....43
Control Panel 43
Remote Control 43
Notes for Use....44
Putting into Service 44
Location....44
Assembly of Exhaust Pipe 44
Remote Control 44
Power Cord 44
Electric Connection 44
Turning Appliance On/Off 44
Compressor Safety Appliance 44
Information on the App "Smart Life - Smart Living" 44
Information on How to Use the App....44
System Requirement for Use of the App 44
Commissioning via the App 44
Using the Appliance ....45
Operating Modes ....45
Setting the Fan....45
Setting the Temperature....45
"Sleep Mode"......45
Setting the Air Outlet 45
Timer (Automatic Timer) 45
The MIRAGE button....45
Emptying the Water Tank....45
Terminating Operation....46
Winding Device for Power Cord....46
Cleaning 46
Filter....46
Housing 46
Seasonal Cleaning and Storage....46
Troubleshooting....46
Technical Data....47
Notice of Directive Conformity....47
Disposal 47
Battery Disposal....47
Meaning of the "Dustbin" Symbol 47
General Notes
Read the operating instructions carefully before putting the appliance into operation and keep the instructions including the warranty, the receipt and, if possible, the box with the internal packing. If you give this appliance to other people, please also pass on the operating instructions.
- The appliance is designed exclusively for private use and for the envisaged purpose. This is not fit for commercial use.
- Do not use it outdoors. Keep it away from sources of heat, direct sunlight, humidity (never dip it into any liquid) and sharp edges. Do not use the appliance with wet hands. If the appliance is humid or wet, unplug it immediately.
- When cleaning or putting it away, switch off the appliance and always pull out the plug from the socket (pull the plug itself, not the lead) if the appliance is not being used and remove the attached accessories.
- The appliance and the mains lead have to be checked regularly for signs of damage. If damage is found the appliance must not be used.
- Use only original spare parts.
- In order to ensure your children's safety, please keep all packaging (plastic bags, boxes, polystyrene etc.) out of their reach.

WARNING:
Do not allow small children to play with the plastic foil. There is a danger of suffocation!
Special Safety Instructions for this Appliance

Read the instructions!

WARNING: Fire hazard!
The appliance contains a flammable refrigerant!

The service manual is available at the following web address: www.sli24.de In the "Downloads" area, please enter the model name CL 3750.
- Any person who is involved with working on or breaking into a refrigerant circuit should hold a current valid certificate from an industry-accredited assessment authority, which authorises their competence to handle refrigerants safely in accordance with an industry recognised assessment specification.

The service manual is available at the following web address: www.sli24.de In the "Downloads" area, please enter the model name CL 3750.
- Servicing shall only be performed as recommended by the equipment manufacturer. Maintenance and repair requiring the assistance of other skilled personnel shall be carried out under the supervision of the person competent in the use of flammable refrigerants.
WARNING:
- Do not try to accelerate the defrost process.
- Do not use and store the appliance at the following locations:
- Near a fire source.
- An area, where water or oil can splash.
- An area exposed to direct sunlight.
- In the bathroom, the laundry room or next to a swimming pool.
- Do not drill or burn the appliance.
- Remember that refrigerants are odourless.
- The appliance must be set up, operated and stored in a room with a floor area larger than 15m^2 .
CAUTION: Risk of overheating!
- Keep the ventilation slots free!
-
Do not cover the appliance!
-
R 290 is a refrigerant that complies with European environmental directives.
- Do not damage the refrigerant circuit.
- The appliance is intended for indoor use only.
- The appliance must be stored in such a way that it does not get damaged.
- Adhere to the national connection regulations.
- In the event of strange noises, smells and/or smoke emissions, unplug the power plug from the socket.
- Only operate or move the appliance in an upright position.
- Ensure a distance of at least 50 cm between the appliance and any walls or other objects to ensure sufficient air circulation during operation.
- Never use the appliance without the filter.
- Do not leave the appliance unattended for hours at a time. Do not leave your home whilst the appliance is in operation.
- This appliance has been designed for the air-conditioning of residential rooms and must not be used for other purposes.
- Do not operate the appliance in rooms where gas, fuel, oil or other easily flammable liquids are present. Do not use sprays such as paint, pesticides or other flammable materials in that room.
- Do not insert any objects into the openings of the appliance.
- This appliance shall not be exposed to dripping or splashing water and that no object filled with liquids such as vases shall be placed on apparatus.
- Do not move the appliance when the mains cable is connected to the wall socket.
- Always turn off the appliance first using the POWER ⏻ button before disconnecting the mains plug.
- If operation has been interrupted, wait for approx. 3 minutes before restarting the appliance again, in order for the cooling circuit pressure to decrease.
- Do not repair the appliance by yourself. Always contact an authorized technician. If the supply cord is damaged, it must be replaced by the manufacturer, its service agent or similarly qualified persons in order to avoid a hazard.
- Prevent small children from touching the appliance.
-
This appliance can be used by children aged from 8 years and above and persons with reduced physical, sensory or mental capabilities or lack of experience and knowledge if they have been given supervision or instruction concerning use of the appliance in a safe way and understand the hazards involved.
• Children shall not play with the appliance.
-
Cleaning and user maintenance shall not be made by children without supervision.
- Please follow the instructions in the chapter "Cleaning".
• Details of type and rating of fuses: T, 250 V AC, 3,15 A
Handling Batteries
WARNING:
- Do not expose batteries to excessive heat such as sunlight, fire or similar. There is a risk of explosion!
- Batteries are not toys. Keep away from children.
- Do not open batteries by force.
- Avoid contact with metal objects (rings, nails, screws, etc.). There is a risk of short circuit!
- A short circuit could cause the battery to heat up excessively or even to catch fire, resulting in injuries.
- For your own safety, cover the battery terminals with adhesive tape during transport.
- In case of battery leakage, make sure not to rub the liquid into your eyes or mucous membranes. In case of contact, wash your hands and rinse your eyes with clear water. Seek medical attention if any discomfort persists.
CAUTION:
- When not using the remote control for a long period of time, remove the batteries in order to prevent "leakage" of battery acid.
- Different battery types or new and used batteries must not be used together.
- Do not dispose of batteries along with domestic waste. Return used batteries to the relevant collection facilities or your retailer.
Unpacking the Appliance
- Remove the appliance from its packaging.
- Remove all the packaging material such as plastic bags, filler material, cable ties and cardboard packaging.
- Check that all parts are supplied in the package.
Scope of Delivery
1 Air conditioning appliance
1 Remote control
2 Batteries
1 Flexible exhaust pipe
1 Exhaust pipe adapter (Connection on the appliance)
1 Window kit, 2-piece
1 Adapter for the window exhaust kit
1 Water hose
2 Plugs (spares)
Overview of the Components
1 Air outlet (pivoting flap)
2 Control panel with display
3 Housing
4 Water outlet
5 Handle
6 Winding device for power cord
7 Water outlet
8 Mains cable
9 Power plug bracket
10 Exhaust pipe adapter
11 Flexible exhaust pipe
12 Adapter for the window exhaust kit
13 Exhaust pipe connector
14 Filter insert
15 Grid on the air intake
16 Display on the front
17 Remote control
18 Window kit, 2-piece
Control Panel
1 PAN indicator light (fan)
2 COOL indicator light (cooling)
3 DRY indicator light (dehumidifying)
4 Display
5 MEDIUM indicator light (medium fan speed)
6 LOW indicator light (low fan speed)
7 HIGH indicator light (high fan speed)
8 POWER indicator light
9 Wi-Fi indicator light (Wi-Fi connection enabled)
10 📄 BUCKET FULL indicator light (water tank full)
11 POWER @ button (switch appliance on / off)
12 SWING indicator light (oscillating pivoting flap)
13 ⑤ button (air outlet adjust)
14 FAN SPEED button (set fan speed and turn Wi-Fi on)
15 and buttons (adjust temperature or hour)
16 ⚙ SLEEP indicator light (sleep mode)
17 SLEEP button (set "sleep mode")
18 MODE button (set operating mode)
19 MIRAGE button
(switch the display in the front of the appliance on or off)
20 MIRAGE indicator light (display at the front of the appliance)
21 Ⓑutton (set timer)
22 TIMER indicator light (timer operation enabled)
Remote Control
1 Indicator (Wi-Fi connection enabled)
2 Fan indicator (fan)
3 Battery icon
4 Dry indicator (dehumidifying)
5 °C indicator (selected temperature unit)
6 Hr indicator (hours)
7 °F indicator (selected temperature unit)
8 Sleep indicator (sleep mode)
9 - + buttons (adjust temperature or hour)
10 📋 button (set operating mode)
11 ✧ button (set fan speed)
12 °C ↔ °F button (switch between °celsius and °fahrenheit)
13 🎨 button (set "sleep mode")
14 📁 button (air outlet adjust, SWING-mode)
15 ⏻ TIMER button (set timer)
16 ⏻ POWER button (switch appliance on / off)
17 indicaror (adjust the fan to LOW (low fan speed))
indicator (adjust the fan to HIGH (high fan speed))
18 Swing indicator (oscillating pivoting flap)
19 Temperature display (or hour indicator when setting the timer or when using the "fan" or "dehumidifying" operating mode)
20 Ⓤ indicator (timer operation enabled)
21 Cool indicator (cooling)
Notes for Use
△ CAUTION: Important for initial operation or after transport!
Before initial operation, the appliance must stay in an upright position for at least 3 hours in order for the cooling agent to sink. The compressor will be damaged otherwise.
CAUTION:
- When you interrupt the operation with the POWER button, wait for at least 3 minutes before switching the appliance on again.
-
If you want to move the appliance to another location, first empty the water tank!
-
The appliance operates most effectively with a room size up to 70m^3 .
- The flexible exhaust hose and the adapter have been manufactured especially for this appliance. In order to avoid incorrect operation, do not replace the pipe with another pipe.
- The exhaust pipe can be extended up to 150 cm. Do not use any extension.
- Ensure free airflow. Make sure not to kink or bend the exhaust pipe. Any blockage can cause the appliance to overheat.
- Close all windows and doors in order to prevent outside air from entering the room and thus allowing a more effective operation of the appliance.
Putting into Service
Location
- When installing the appliance, make sure to keep a distance of at least 50 cm between the appliance and any walls or other objects.
• The surface must be flat and dry.
Assembly of Exhaust Pipe
i NOTE:
For sliding windows or external roller blinds you may use the supplied window exhaust air kit in a vertical or horizontal orientation. Adjust the length of the seal plate as desired.
- Connect the adapter to the exhaust hose. Place the exhaust hose in a way that the first fin of the hose lays in the rail. Tighten the adapter by turning it clockwise.
- Connect the adapter to the connector on the back of the appliance. To do this, position the exhaust air hose with the adapter in such a way that the label on the adapter is facing up. Turn the adapter all the way towards LOCK.
- Extend the pipe to the desired length.
- Screw the window exhaust air kit adapter onto the end of the exhaust air hose.
- Stick the open end of the pipe into a window.
- Close the window as far as possible. Also lower any external roller blinds, if present, to the end of the pipe.
Remote Control
- Open the battery compartment cover on the back of the remote control.
- Insert 2 batteries of type R03 "AAA" 1.5 V, observing the correct polarity (see markings on the bottom of the compartment)!
- Close the battery compartment cover.
Power Cord
Unwind the power cord from the winding appliance.
Electric Connection
- Make sure the mains voltage you want to use corresponds to the voltage of the appliance. Please check the rating label for detailed specifications.
- Connect the appliance to a properly installed grounded socket. A signal will sound indicating that the appliance is ready for use. The appliance is in standby. The display shows the current room temperature.
Turning Appliance On/Off
- Press the POWER button to turn on the appliance. The pivoting flap is opened automatically. The appliance is pre-set to "Cooling" mode and the temperature is 22 °C. If operation has been stopped without disconnecting the plug, all previously set operating mode and temperature settings will be retained. The control lamps indicate this setting.
- Press the POWER ⏻ button again to turn off the appliance. The pivoting flap is closed automatically.
Compressor Safety Appliance
If operation is interrupted, the safety appliance for the compressor is activated. This prevents operation of the compressor for approx. 3 minutes, in order to relieve the pressure in the cooling circuit. This is not a malfunction of the appliance. Therefore, wait at least 3 minutes, before switching the appliance on again.
The Smart Life - Smart Living app is available for android and iOS.
Scan the corresponding QR code to get directly to the download.
i NOTE:
Depending on the provider, there may be costs involved in downloading the app.

Google Play App Store

This appliance allows you to operate the appliance via your home network. A prerequisite is a permanent Wi-Fi connection to your router and the free app "Smart Life - Smart Living".
You can easily access all functions of the appliance via the app. Since the app constantly improved, we cannot provide a more detailed description here.
We recommend disconnecting the appliance from the power supply when you are away from home to prevent unintentional switching on while you are on the road!
System Requirement for Use of the App
- iOS 8.0 or higher
- Android 4.4 or higher
Commissioning via the App
- Install the "Smart Life - Smart Living" app. Create a user account.
- Activate the Wi-Fi function in the settings of your appliance.
- Place the air-conditioning appliance within a distance of around 5 meters of your router.
-
Press and hold the FAN SPEED button for about 5 seconds. The Wi-Fi indicator light flashes rapidly.
-
Launch the app and select "+".
-
Select the "air conditioner" menu and follow the instructions on the display.
-
Once the appliance has been connected successfully, the Wi-Fi indicator light will be solid. Now you can operate the appliance using the app.
i NOTE:
- The appliance can only be operated with 2.4 GHz routers. 5 GHz routers are not supported.
- The appliance is equipped with only one network connection. It cannot be turned off.
Using the Appliance
- Settings made via the appliance are not transmitted to the remote control.
- As soon as you press a button on the remote control, the appliance will apply the corresponding settings from the remote control.
- Your selection will appear on the display of the remote control.
- The ⏻ and ⬇ buttons must be pressed several times to select the individual functions.
The buttons on the control panel are explained below. The indicator lights show your chosen selection.
Operating Modes
Use the MODE button to select one of the following operating modes:
- Cooling COOL
- Dehumidifying DRY
- Fan
Operating Mode "Cooling"
In this operation mode, you can adjust the fan speed and the temperature as desired.
i NOTE:
To operate the appliance with the compressor, the set temperature must be lower than the current room temperature.
Operating Mode "Fan"
This mode only allows you to set the speed of the fan.
Operating Mode "Dehumidifying"
- This operating mode does not support any further settings.
- The fan speed is preset to the lowest level LOW.
- The appliance will cool the room and extract the humidity from the air.
- When using the mode "Dehumidifying" over an extended period, we recommend permanently connecting the supplied water hose to the upper water drain (see figure). Remove the top plug first. Place the end of the water hose in a container of sufficient size (e.g. a bucket).
natural_image
Line drawing of a portable air conditioner unit with cooling fan and water inlet (no text or symbols)
Setting the Fan
In "Cooling" and "Fan" modes you can set the fan speed with 3 different settings. Press the FAN SPEED button accordingly.
- LOW (low)
- MEDIUM (medium)
- HIGH (high)
Setting the Temperature
- Use the ⊕ or ⊖ buttons in "Cooling" mode to set the temperature.
- Select a temperature between 16^ (61 °F) and 31^ (88 °F).
i NOTE:
Switching between °celsius and °fahrenheit is only possible using the °C ↔ °F button on the remote control.
"Sleep Mode"
- Press the SLEEP button when the appliance is switched on and in the "Cooling" operating mode.
- The fan speed is preset to the lowest level LOW. This cannot be changed.
- The display will switch off after 10 seconds.
- After running for one hour in the "Sleep" mode, the preset temperature will automatically increase by 1^ C. This will be repeated one hour later again. This way, a comfortable room temperature will be achieved.
Setting the Air Outlet
Use the ⏻ button to set the direction of the airflow being emitted.
- Press the ⚙ button multiple times until the pivoting flap is set into the desired position.
Timer (Automatic Timer)
Use the timer function to set the power-on and power-off times of the appliance. Select a time between 1 and 24 hours.
Using the Timer Function for Automatic Power-On
- Press the POWER Ⓞ button to turn on the appliance.
- Select the operating mode, temperature and fan speed for the appliance to operate in or at when powered on at the pre-set time.
- Press the POWER button to turn off the appliance.
- Press the 📄 button. The number of hours flashes.
- You can set the desired number of hours with the buttons and . The setting mode is automatically exited after approx. 5 seconds. Timer operation is activated and the TIMER indicator light illuminates.
i NOTE:
Do not press the button after setting the hours, as the timer operation will not be saved.
Using the Timer Function for Automatic Power-Off
- Press the POWER button to turn on the appliance.
- Press the button during operation. The number of hours flashes.
- Set the timer as described in the above item 5.
i NOTE:
- If you want to deactivate the set timer operation, press the Ⓐ button twice. The TIMER indicator light goes off.
- You may also cancel the timer function at any time by pressing the POWER Ⓞ button to turn the appliance on / off.
Press the MIRAGE button to switch the display located in the front of the appliance on or off.
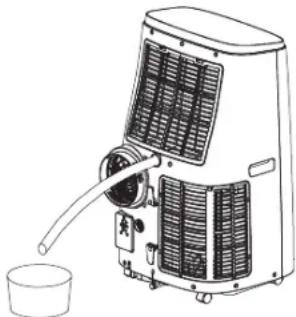
Emptying the Water Tank
The appliance integrates a water tank for collecting condensation. When the water tank is full, the pilot lamp ☐BUCKET FULL lights up. The appliance switches off.
CAUTION:
Do not transport the appliance while the water tank is full. Water could get into the appliance.
In order to continue operation, you need to empty the water tank. For this, you need a floor cloth, a flat bowl with a capacity for approx. 0.5 litre of water and the water hose supplied with the appliance.
- Disconnect the mains plug from the wall socket.
- Place the floor towel and the flat bowl underneath the water outlet. If possible, set the bowl on a lower level than the appliance.
- Remove the bottom plug.
- Connect the water hose to the water outlet of the appliance. Place the end of the hose in the bowl.
- After the water has been discharged, remove the water hose. Use the stopper to close the water drain on the appliance again.
Terminating Operation
- Press the POWER Ⓞ button to turn off the appliance.
- Disconnect the mains plug from the wall socket.
Winding Device for Power Cord
Wind the power cord around the winding device. Insert the plug into the slots provided.
Cleaning

WARNING:
- Always disconnect the mains plug from the wall socket before cleaning!
- Make sure no water enters the openings of the appliance during cleaning. Otherwise this might result in an electric shock or fire.

CAUTION:
- Do not spray the appliance with cleaning agents.
- Do not use a wire brush or any abrasive items.
- Do not use any acidic or abrasive detergents.
Filter
Clean the filter once every 2 weeks, if the appliance is in daily use. If dust in the filter blocks the ventilation, the efficiency of the appliance is no longer guaranteed.
- There is a grille with an internal filter located above the connection for the exhaust air hose at the back of the appliance.
-
Remove the grille from the appliance and the filter from the grille.
-
Vacuum the filter with a vacuum cleaner.
- Clean the filter under running water. If necessary, use a mild detergent.
- Allow the filter to air dry in a shady place.
- Reinsert the filter into the grille once it has dried thoroughly. The recesses point upwards.
- Reinsert the grille into the appliance.

CAUTION:
Do not operate the appliance without filter!
Housing
- Use a vacuum cleaner to clean the ventilation slots.
- Wipe the housing with a slightly damp cloth.
Seasonal Cleaning and Storage
When not using the appliance for a long period of time, proceed as follows:
- Empty the water tank as described above.
- Repeat the steps 2 to 5 from the chapter "Emptying the water tank" with the upper water outlet (top plug).
- Operate the appliance in "Fan" mode for 2 hours in order to dry the inside of the appliance.
- Press the POWER button to turn off the appliance. Disconnect the mains plug from the wall socket.
- Disconnect the flexible exhaust pipe from the appliance.
- Leave both water outlets open.
- Clean the filter and the appliance as described above.
- Cover the appliance with foil.
- Always store the appliance out of the reach of children in a dry, well ventilated place.
Troubleshooting
| Problem Possible cause Solution | | |
| Appliance does not function. No | power supply Check the power connection. | |
| Timer function is activated. | Press the POWER button to turn on the appliance. |
| The ambient temperature is too low or too high. It is recommended to use the appliance at an ambient temperature of 16-35°C. |
| The appliance is defect. | Contact our service department or a specialist. Please consider the enclosed service manual. |
| Appliance does not cool sufficiently. | The appliance is exposed to direct sunshine. | Choose another location or shade the windows. |
| Windows or doors are open. | Close any windows or doors. |
| There are too many people or other heating sources in the room. | Remove portable heaters or switch them off. |
| The filter is dirty. Clean the filter. | |
| The air inlet or air outlet is blocked. | Remove the blockage. Keep the ventilation openings free from obstructions. |
| Appliance too noisy during operation. | The appliance is not in an upright position. | Place the appliance on a flat surface. Avoid vibrations. |
| The appliance switches off during operation. The indicator light flashes red. | The water tank is full. | Pull the power plug. Empty the water tank via the lower water outlet. Then you can use the appliance again. |
| The remote control does not work. | The distance to the appliance is too far. | Move closer to the appliance. |
| You are not holding the remote control towards the sensor. | Hold the remote control so it points to the sensor. Make sure there are no obstacles between the remote control and the sensor. |
| The batteries are dead. | Replace the batteries. |
| Display on the appliance: E1 | Temperature sensor defective. | Contact our customer service or your dealer. |
| Display on the appliance: E2 |
Contact our customer service or your dealer if you encounter any problems that are not listed in the table or if the recommended remedy does not work.
Technical Data
Model: CL 3750
Net weight: approx. 30.8 kg
Power supply: 220-240V\~, 50Hz
Power consumption: 1345W
Networked standby power consumption: 0.8 W
Protection class: I
Energy efficiency class: A
Cooling capacity: 12000 BTU (3.52 kW)
Refrigerant: R290
Maximum permissible operating pressure:
Pressure side: 1.8 MPa
Suction side: 0.6 MPa
Maximum pressure allowed: 3.0 MPa
WLAN
Supported network: 802.11 b/g/n
Maximum radio-frequency power transmitted: 100 mW
Frequency range: 2.4 GHz
Channels: 1-13
Supported Wi-Fi keys: WPA/WPA2
The right to make technical and design modifications in the course of continuous product development remains reserved.
Hereby, Clatronic International GmbH declares that the radio equipment type CL 3750 is in compliance with Directive 2014 / 53 / EU.
Furthermore, the appliance is in compliance with the requirements of the RoHS directive 2011 / 65 / EC.
The full text of the EU declaration of conformity is available at the following internet address: www.sli24.de
In the "Download" area, please enter the model name CL 3750.
Tested for operation in Great Britain.
Disposal
Battery Disposal

As a consumer you are obliged by law to return old batteries / accumulators.
Remove the batteries from the remote control before disposing of the appliance.
Return the batteries to a collection facility for the collection of old batteries or hazardous waste. Contact your local authority for more information.
Meaning of the "Dustbin" Symbol

Protect our environment: do not dispose of electrical equipment in the domestic waste.
Please return any electrical equipment that you will no longer use to the collection points provided for their disposal.
This helps avoid the potential effects of incorrect disposal on the environment and human health.
This will contribute to the recycling and other forms of re-utilisation of electrical and electronic equipment.
Information concerning where the equipment can be disposed of can be obtained from your local authority.
Instrukcja obsługi
natural_image
Line drawing of a large industrial air conditioner unit with cooling fins and a side cup (no text or symbols)
CTC Clatronic Sp. z o.o
Ul. Brzeska 1
45-960 Opole
Usuwanie
Usuwanie baterii

natural_image
Line drawing of a portable air conditioner unit with cooling fins and a cup (no text or symbols)
natural_image
Line drawing of a portable air conditioner unit with cooling fins and a cup (no text or symbols)
natural_image
Line drawing of a portable air conditioner unit with cooling pipes and a cup (no text or symbols)
ضبط المروحة