
CDP-LSA1 - CD Player SONY - Free user manual and instructions
Find the device manual for free CDP-LSA1 SONY in PDF.
| Product type | CD Player |
| Brand | Sony |
| Model | CDP-LSA1 |
| Power supply | AC 230 V, 50/60 Hz |
| Power consumption | 22 W |
| Connectivity | i.LINK S200 (4-pin) |
| Compatible formats | CD, CD TEXT |
| Playback functions | Continuous, random, programmed (25 tracks), repeat (all/1/A-B) |
| Track search | AMS, numeric keys, fast forward/reverse |
| Display | CD TEXT information, adjustable brightness (4 levels) |
| Energy saver | Yes (automatic standby) |
| Remote control | Yes, with CR2025 lithium battery |
| Laser | Semiconductor, wavelength 800 nm, class 1 |
| Cleaning | Soft cloth with mild detergent |
| Safety | Do not open the casing, avoid moisture |
| Included accessories | i.LINK cable (1), remote control (1) |
Frequently Asked Questions - CDP-LSA1 SONY
User questions about CDP-LSA1 SONY
0 question about this device. Answer the ones you know or ask your own.
Ask a new question about this device
Download the instructions for your CD Player in PDF format for free! Find your manual CDP-LSA1 - SONY and take your electronic device back in hand. On this page are published all the documents necessary for the use of your device. CDP-LSA1 by SONY.
USER MANUAL CDP-LSA1 SONY
To avoid electrical shock, do not open the cabinet. Refer servicing to qualified personnel only.
The laser component in this product is capable of emitting radiation exceeding the limit for Class 1.
CLASS 1 LASER PRODUCT LUOKAN 1 LASERLAITE KCLASS 1 LASERAPPARAT
This appliance is classified as a CLASS 1 LASER product.
The CLASS 1 LASER PRODUCT
MARKING is located on the rear exterior.
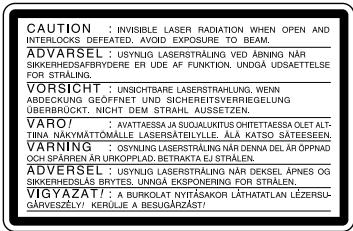
The following caution label is located inside the unit.

A46

Don't throw a battery, dispose it as the injurious wastes.
Precautions
On safety
- Caution — The use of optical instruments with this product will increase eye hazard.
- Should any solid object or liquid fall into the cabinet, unplug the player and have it checked by qualified personnel before operating it any further.
On power sources
- The unit is not disconnected from the AC power source (mains) as long as it is connected to the wall outlet, even if the unit itself has been turned off.
- If you are not going to use the player for a long time, be sure to disconnect the player from the wall outlet. To disconnect the AC power cord (mains lead), grasp the plug itself; never pull the cord.
- AC power cord must be changed only at the qualified service shop.
On placement
- Place the player in a location with adequate ventilation to prevent heat build-up in the player.
- Do not place the player on a soft surface such as a rug that might block the ventilation holes on the bottom.
- Do not place the player in a location near heat sources, or in a place subject to direct sunlight, excessive dust or mechanical shock.
On operation
If the player is brought directly from a cold to a warm location, or is placed in a very damp room, moisture may condense on the lenses inside the player. Should this occur, the player may not operate properly. In this case, remove the disc and leave the player turned on for about an hour until the moisture evaporates.
On adjusting the volume
Do not turn up the volume while listening to a portion with very low level inputs or no audio signals. If you do, the speakers may be damaged when a peak level portion is played.
On cleaning
Clean the cabinet, panel and controls with a soft cloth slightly moistened with a mild detergent solution. Do not use any type of abrasive pad, scouring powder or solvent such as alcohol or benzine.
Replacing the battery in the remote
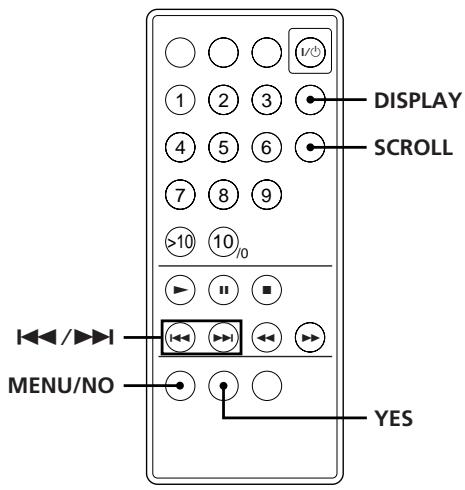
Slide out and remove the battery case and insert a new lithium battery CR2025 with the ^+ side facing up. And then, slide the battery case back in.
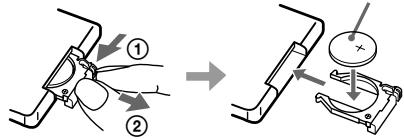
A lithium battery CR2025
① Keep pushing
② Pull out
CAUTION
Danger of explosion if battery is incorrectly replaced. Replace the battery only with the same or equivalent type recommended by the manufacturer. Discard used batteries according to the manufacturer's instructions.
On transport
When transporting the player, be sure to attach the protective bar onto the disc tray, and secure it with adhesive tape as it was at the time you purchased the player. For details about attaching the protective bar, see page 5. Before transporting the player, be sure to remove any CD that may be loaded.
If you have any questions or problems concerning your player, please consult your nearest Sony dealer.
Welcome!
Thank you for purchasing the Sony Compact Disc Player. Before operating the unit, please read this manual thoroughly and retain it for future reference.
About This Manual
The instructions in this manual are for model CDP-LSA1.
Conventions
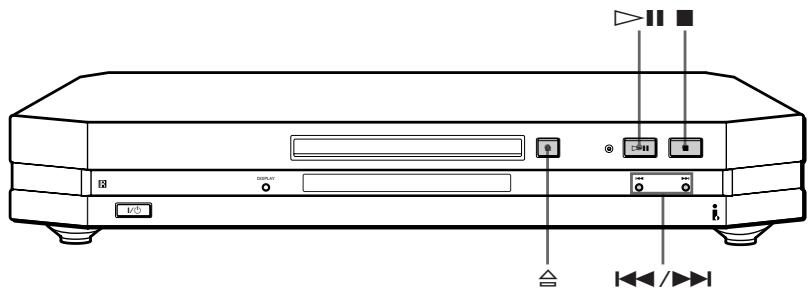
- Instructions in this manual describe the controls on the player. You can also use the controls on the remote if they have the same or similar names as those on the player.
- The following icons are used in this manual:

Indicates that you can do the task using the remote.

Indicates hints and tips for making the task easier.
TABLE OF CONTENTS
Getting Started
Unpacking 4
Hooking Up the System 4
Basic Operations
Playing a CD 6
Playing CDs
Using the Display 8
Locating a Specific Track or a Particular Point in a Track 11
Playing Tracks Repeatedly 12
Playing in Random Order (Shuffle Play) 13
Creating Your Own Programme (Programme Play) 13
Other Functions
Adjusting the Brightness of the Display 15
Setting the Player to Turn Off Automatically
(Power Save Function) 16
About i.LINK 16
Additional Information
Notes on CDs 19
Troubleshooting 19
Specifications 20
Display Messages 20
Index
Index 21
Unpacking
Check that you have received the following items:
- i.LINK connecting cable (1)
- Remote commander (remote) (1)
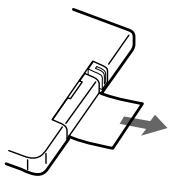
Before using the supplied remote
The supplied remote already contains a battery. Before using the remote, pull out the insulating sheet to allow the power to flow from the battery.
To avoid battery leakage
If you don't use the remote for an extended period of time, remove the battery to avoid possible damage from battery leakage and corrosion.

When to replace the battery
Under normal conditions, the battery should last for about six months. When the remote no longer operates the player, replace the battery with a new one.
Notes on lithium battery
- Keep the lithium battery out of the reach of the children. Should the battery be swallowed, immediately consult a doctor.
- Wipe the battery with a dry cloth to assure a good contact.
- Be sure to observe the correct polarity when inserting the battery.
- Do not hold the battery with metallic tweezers, otherwise a short-circuit may occur.
WARNING
Battery may explode if mistreated.
Do not recharge, disassemble, or dispose of in fire.
Hooking Up the System
Overview
This section describes how to hook up the CD player to a receiver or other components such as an MD deck. Be sure to turn off the power to all components before you start connecting them.
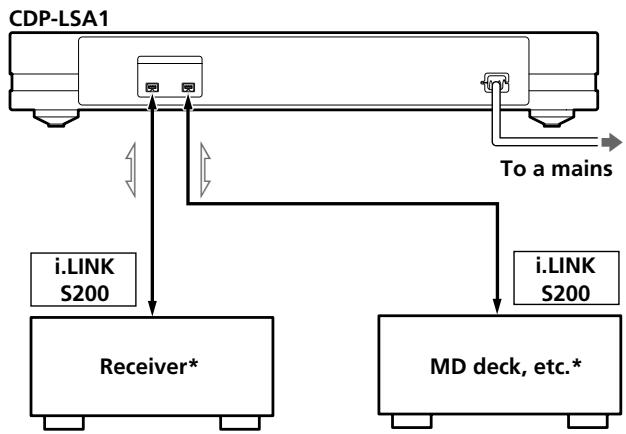
Signal flow
* You can connect components to either i.LINK S200 connector.
What cords will I need?
i.LINK connecting cable (supplied) (1)

Hookups
Connecting the player to a receiver
Connect the receiver to the i.LINK S200 connector with the i.LINK connecting cable (supplied). Make sure all connections are firm. If not, there will be no sound from the speakers.
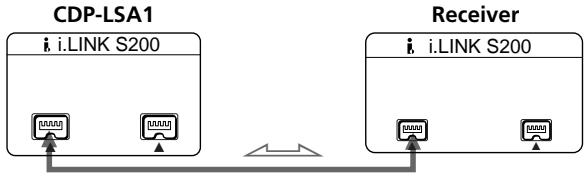
Signal flow
Notes
- Do not connect the mains lead of any component until all the connections have been completed.
- Do not allow any metal object to enter the i.LINK S200 connector as this may short-circuit the connector and damage the components.

The other i.LINK S200 connector can be used to connect other components
The following i.LINK components can be used with the player:
STR-LSA1 receiver
- MDS-LSA1 MD deck
Be sure to use the Sony i.LINK S200 connecting cable (4 pins - 4 pins).

For general information about i.LINK
See "About i.LINK" on page 16.
Connecting the mains lead
Connect the mains lead to a mains.
Removing the protective bar
Remove the attached protective bar and retain it for use when transporting the player at a later time.
When you connect the mains lead to a mains, the disc tray will close automatically after a while.
Where do I go next?
Now you're ready to use your player.
If you aren't familiar with how to play CDs, go to the section "Playing a CD" on page 6.
Then, go to the following sections for other operations.
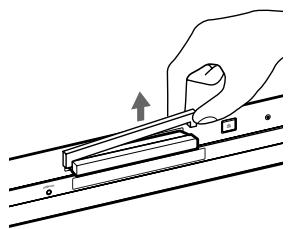
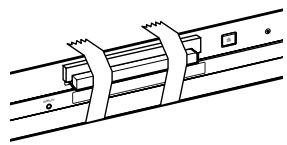
Attaching the protective bar
When transporting the player, be sure to attach the protective bar (which you removed at the time you unpacked the player) onto the disc tray, and use adhesive tape to secure the bar. If you fail to attach the protective bar, the player may be damaged during transport.
1 With the disc tray opened, disconnect the mains lead.
2 Place the protective bar on the disc tray as shown below.
3 Push the disc tray with your fingers to close it.
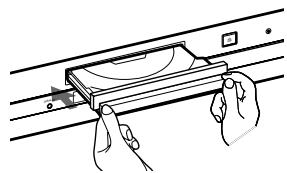
Slowly push both sides of the disc tray as shown above.
4 Secure the protective bar with adhesive tape.
Playing a CD
See pages 4 - 5 for hookup information.
Note
In step 3, do not place more than one CD on the tray at the same time.
If you do so, the discs and/or the player may be damaged.
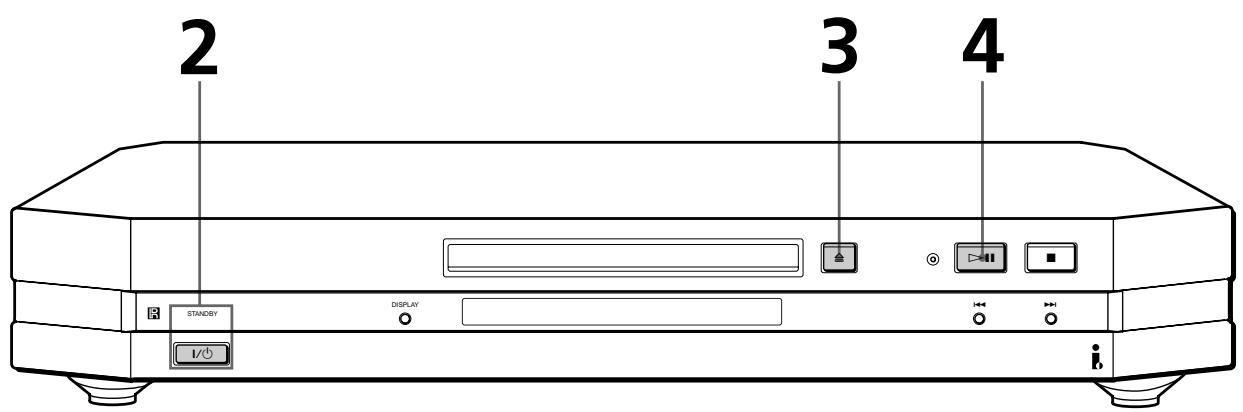
1 Turn on the receiver and select the CD player as the audio source.
2 Press I/ to turn on the player. The STANDBY indicator turns off.
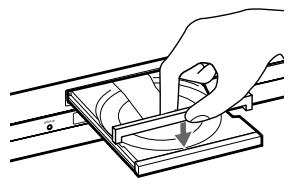
3 Press and place a CD on the tray.
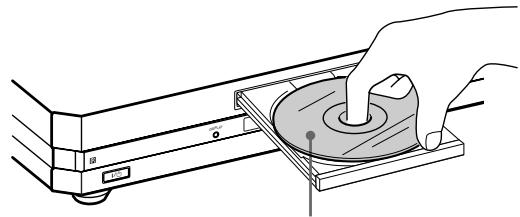
Place the CD with the label side up. When you play a CD single (8 cm CD), place it on the inner circle of the tray.
4 Press The disc tra
The disc tray closes and the player plays all the tracks once each in sequence (Continuous Play).
Adjust the volume on the receiver.
To stop playback
Press ■.
| To | Press |
| Pause | ▷II |
| Resume play after pause | ▷II |
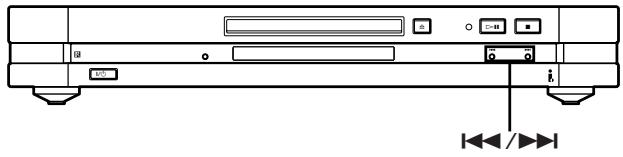
| Go to the next track | ▷I |
| Go back to the preceding track | ◁ |
| Stop play and remove the CD | ≌ |
Using the Display
You can use the display to check a variety of information about the disc.
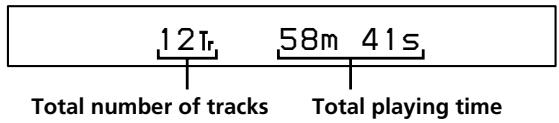
Checking the total number of the tracks and the total playing time of the CD
The total number of tracks and the total playing time appear in the display before you start playing.

If you press DISPLAY in Programme Play mode before you start playing
Each time you press DISPLAY, the display changes as shown below.

- The original display returns a second later, even if you do not press the DISPLAY button.
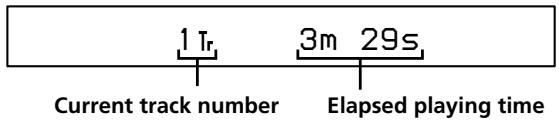
Information displayed while playing a disc
The current track number and elapsed playing time of the track appear in the display while playing a disc.
Checking the remaining playing time
Each time you press DISPLAY while playing a disc, the display changes as shown below.
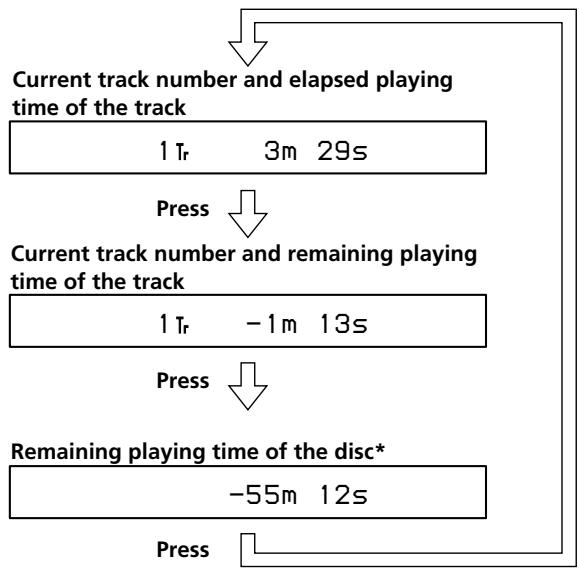
- This does not appear in Programme Play mode or Shuffle Play mode.
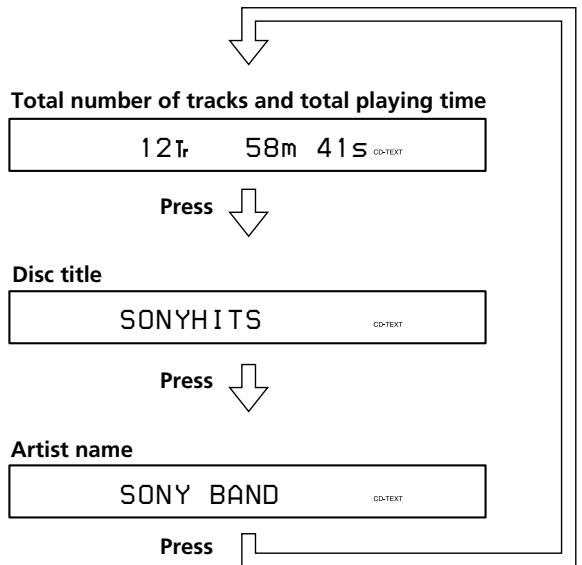
Checking the information on CD TEXT discs
CD TEXT discs contain information such as disc titles and artist names. This information is recorded in empty spaces that are normally unused on conventional CDs. The CD TEXT information of the disc appears in the display so that you can check the current disc tittle, artist name and track tittle. When the player detects CD TEXT discs, "CD-TEXT" indication appears in the display. If the CD TEXT has multi-language capability, "CD-TEXT" and "MULTI" indications appear in the display. To check the information in another language, see "Checking the information on CD TEXT discs in other languages" on page 10.
Each time you press DISPLAY, the display changes as shown below.
- Before you start playing

If you press DISPLAY in Programme Play mode before you start playing
See page 8.
While playing a disc
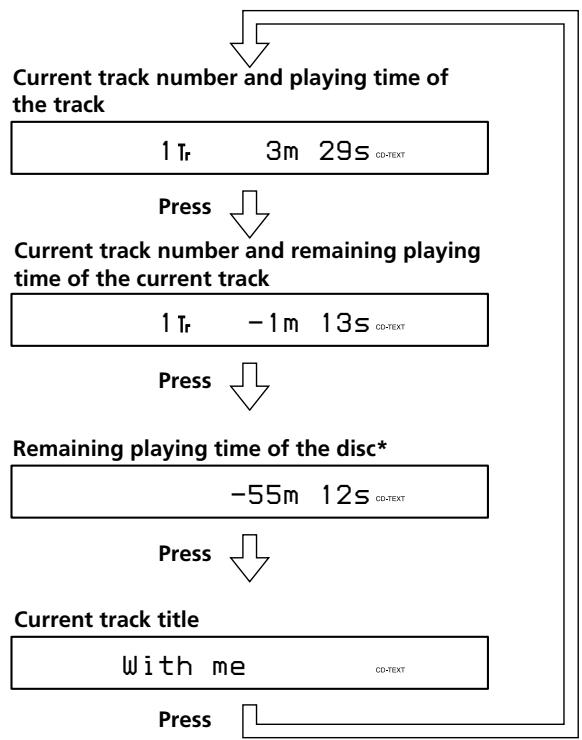
- This does not appear in Programme Play mode or Shuffle Play mode.
If a title or name has more than 14 characters, the first 14 characters will appear in the display after the entire title or name has scrolled across the display once.

You can check a title or name with more than 14 characters Press SCROLL.
The title or name scrolls across the display. Then the first 14 characters will appear in the display.
Notes
- Depending on the disc, the display may not show all the characters.
- This player can display only the disc titles, track titles and artist names. Other information on CD TEXT discs cannot be displayed.
Checking the information on CD TEXT discs in other languages
If the player detects a CD TEXT disc with multi-language capability, "CD-TEXT" and "MULTI" appear in the display. This type of CD allows you to change the displayed language.
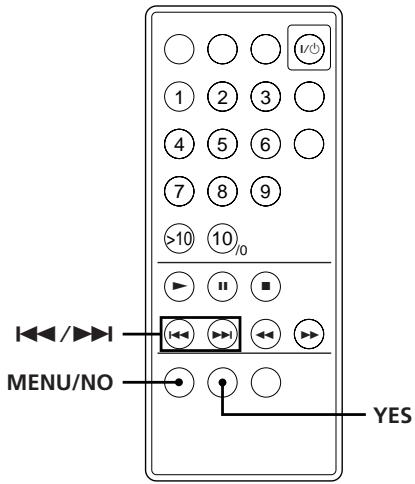
1 Before playing a CD TEXT disc, press MENU/NO. "Select Lang" appears, followed by the display information in the currently selected language.
2 Press YES. "English" flashes in the display.
3 Press / repeatedly until the language you want appears in the display.
4 Press YES to select the language. "TEXT Reading" appears momentarily. Then the display information appears in the new selected language.
5 Press DISPLAY repeatedly until the information you want to check appears (see page 9).
To check the currently selected language while playing a disc
Press MENU/NO while playing a disc.
The currently selected language appears in the display after "Show Lang" is displayed.
To return to the original display, press MENU/NO again.
Notes
- The selected language mode remains in effect even if you turn off the player or disconnect the mains lead from the mains.
- The languages that you can select differ according to the disc.
Other display information
When the player is selected as the audio source by other Sony component featuring the PING function connected through the i.LINK connecting cable,
"▶▶▶" appears in the display of the player.
Note that this indication does not appear when the STANDBY indicator is on.

When the H.A.T.S. indicator lights up
This means the H.A.T.S. function is activated on the receiver.
The H.A.T.S. (High-quality digital Audio Transmission System) function on the receiver causes digital audio signals output from a CD player or another source (e.g., an MD deck) to be momentarily stored in a buffer in the receiver prior to output. This reduces jitter that sometimes occurs during digital audio transmission.
Locating a Specific Track or a Particular Point in a Track
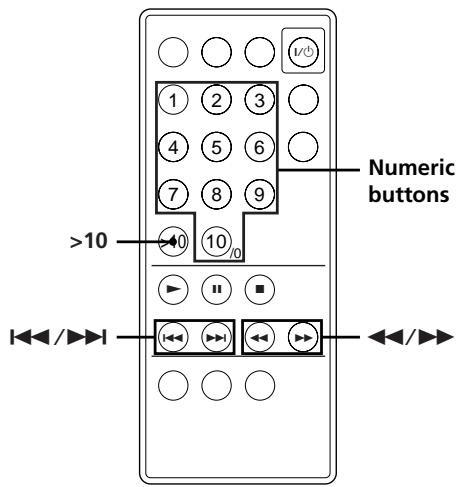
Using the AMS (Automatic Music Sensor) buttons or the numeric buttons on the remote, you can quickly locate any point in a track or any track on the disc while playing a disc.
| To locate | Do the following |
| The beginning of the next or succeeding tracks | Press▶I repeatedly until you find the track. |
| The beginning of the current or preceding tracks | Press▶I repeatedly until you find the track. |
| A specific track directly | Enter the track number with the numeric buttons. |
| A particular point in a track while monitoring the sound | Press down▶(forward) or▶(backward) until you find the point. |
| Quickly a particular point in a track by observing the display | Press down▶(forward) or▶(backward) with the player paused until you find the point. There will be no sound output during this operation. |

To specify a track numbered over 10
Press >10 first, then the corresponding numeric buttons.
To enter "0," press 10 / 0
Example: To enter track number 30
Press >10 first, then 3 and 10 / 0
Note
If you reach the end of the disc while pressing on the remote, "OVER" appears in the display. Press on the remote to go back.
Playing Tracks Repeatedly

You can play tracks repeatedly in any play mode.
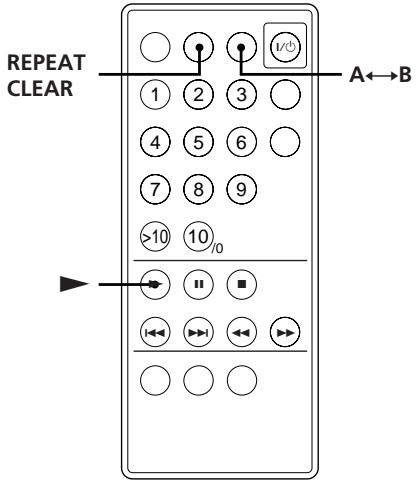
While playing a disc, press REPEAT CLEAR repeatedly until "REPEAT" appears in the display. The player repeats the tracks as follows:
| If the play mode is | The player repeats |
| Continuous Play (page 6) | All the tracks |
| Shuffle Play (page 13) | All the tracks in random order |
| Programme Play (page 13) | The programmed tracks |
To cancel Repeat Play
Press REPEAT CLEAR repeatedly until "REPEAT" and "REPEAT 1" disappear.
Repeating the current track (Repeat 1)
You can repeat only the current track in any play mode.
While the track you want is being played, press REPEAT CLEAR repeatedly until "REPEAT 1" appears in the display.
To cancel Repeat 1
Press REPEAT CLEAR repeatedly until "REPEAT" and "REPEAT 1" disappear.
Repeating a Specific Portion (A←→B Repeat)
You can play a specific portion in a track repeatedly.
This might be useful when you want to memorize lyrics.
Note that you cannot repeat a portion that extends over two tracks.
1 While playing a disc, press A B at the starting point of the portion you want to play repeatedly (point A). "A-" of "REPEAT A-" flashes in the display.
2 When you reach the ending point of the portion (point B), press A B again. "REPEAT A-B" appears and the player plays the specified portion repeatedly.
To cancel A B Repeat
Press REPEAT CLEAR.
Moving the starting point
By moving the starting point, you can change the specified portion to one that immediately follows.
1 Press A B while the player is repeating the specific portion. The ending point B becomes the new starting point A and "A-" of "REPEAT A-" flashes in the display.
2 When you reach the new ending point (point B), press A B again.
"REPEAT A-B" appears and the player plays the newly specified portion repeatedly.

To go back to the starting point A
Press while playing a track with A B Repeat.
Playing in Random Order (Shuffle Play)
You can use this function to "shuffle" tracks and play them in a random order.
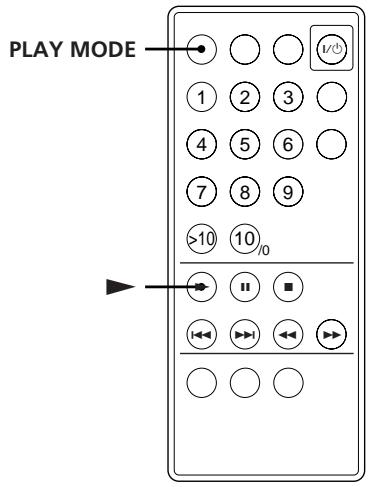
1 Press PLAY MODE repeatedly until "SHUFFLE" appears in the display.
2 Press to start Shuffle Play. The · indication appears while the player is "shuffling" the tracks.
To cancel Shuffle Play
While the player is stopped, press PLAY MODE repeatedly until "SHUFFLE" disappears.
Note
The play mode cannot be changed while playing a disc even if you press the PLAY MODE button.
Creating Your Own Programme (Programme Play)
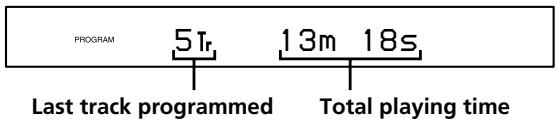
You can make a programme that plays up to 25 selected tracks in the order that you want.
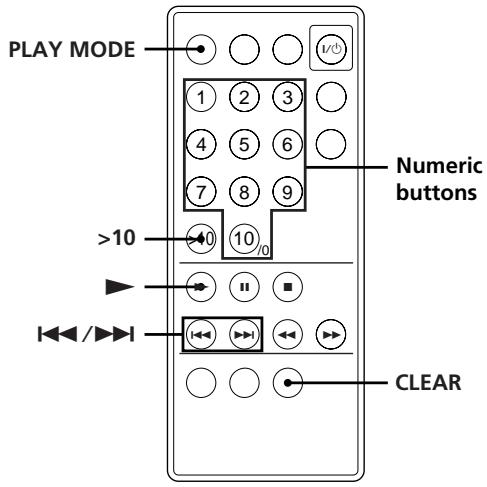
1 Before you start playing, press PLAY MODE repeatedly until "PROGRAM" appears in the display.
2 Use the numeric buttons to enter the track numbers you want to include in the programme, in the order you want.
Example: To programme the tracks 2, 8 and 5. Press the numeric buttons in the order 2, 8 and 5.
To enter a track with a number over 10
Use >10 button (see page 11).
If you enter the wrong track number
Press CLEAR, then enter the correct track number.
3 Press to start Programme Play.
To cancel Programme Play
While the player is stopped, press PLAY MODE repeatedly until "PROGRAM" disappears.

The programme remains in memory until you erase it (see below) or press
The programme is not affected by the ending of the programme or by the selection of another play mode.
Notes
- "--m --s" appears in the display if the total playing time exceeds 100 minutes.
- "Step Full" appears in the display when you try to add a track to a programme which already contains 25 tracks.
- The play mode cannot be changed while playing a disc even if you press the PLAY MODE button.
Changing the track order
You can change the order of the tracks in your programme before you start playing.
| To | Do the following |
| Erase the last track in the programme | Press CLEAR. Each time you press the button, the last track will be erased. |
| Add tracks to the end of the programme | Press the numeric buttons to enter the track numbers you want to add. |
| Erase the entire programme completely | Press down CLEAR until the total number of tracks and the total playing time appear. To create a new programme, repeat the programming procedure. |
Adjusting the Brightness of the Display
You can select one of four brightness levels for the display window. The operation buttons on the player (, , ) turn off when "Dimmer3" or "Dimmer4" is selected.
1 Before playing a disc, press MENU/NO repeatedly until "Setup Menu" appears in the display.
2 Press / until "Dimmer" appears, then press YES.
3 Press / repeatedly to select the brightness level, then press YES.
| When you select | The display is |
| Dimmer1 (default setting) | Fully lit and the operation buttons are on. |
| Dimmer2 | Dimmer and the operation buttons are on. |
| Dimmer3 | Dimmer and the operation buttons are off. |
| Dimmer4 | Turned off and the oepration buttons are off. |
4 Press MENU/NO.
If you do any operation while the display window is turned off The display turns back on (dimly) for several seconds, and then turns off again.
If you make menu settings while the display window is turned off The display turns back on (dimly) during the menu setting.
The brightness level of the display window on the CD player can be linked to that of the receiver's display window
When the i.LINK control function is activated on the receiver, the brightness level of the display window on the CD player is automatically set to that of the receiver's display window regardless of the setting on the CD player.
Setting the Player to Turn Off Automatically
(Power Save Function)
When the Power Save function is on, the player will automatically turn off (change to STANDBY) after several minutes of inactivity.
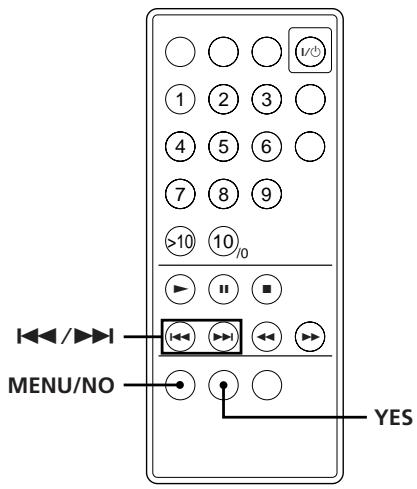
1 Before playing a disc, press MENU/NO repeatedly until "Setup Menu" appears in the display.
2 Press / until "Power Save" appears, then press YES.
3 Press 1 1 / 1 to select the setting, then press YES.
| To | Select |
| Turn on the Power Save function | Power Save On (default setting) |
| Turn off the Power Save function | Power Save Off |
4 Press MENU/NO.
About i.LINK
This section explains the general specifications and major features of i.LINK. Read this section before doing any i.LINK-related operation.
Note that i.LINK connections and operations may vary, depending on the component. For details regarding the connection of i.LINK components to this player, see "Hooking Up the System" on page 4.
i.LINK functions
i.LINK is a serial digital interface that supports the bidirectional transmission of audio and video signals, commands, and even component status information. All that is needed to hook up i.LINK components are i.LINK connecting cables. Audio and video components connected within an i.LINK configuration can be used to perform a wide range of operations and data exchanges that is sure to expand as the number and variety of i.LINK components grow.
Since i.LINK allows data to be transmitted from one component to other components to which it is not directly connected, there is no need to pay attention to connection order. However, due to differences in characteristics or specifications, operation of or data exchange with certain i.LINK components may not be possible, even when they are connected.

What is i.LINK?
i.LINK is a trademark proposed by Sony Corporation and accepted by companies throughout the world as an easy-to-remember name for the IEEE 1394 world standard of the Institute of Electrical and Electronics Engineers.
i.LINK connections
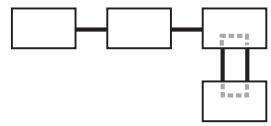
The use of i.LINK cables to connect i.LINK components as shown below is called a "daisy chain" configuration.
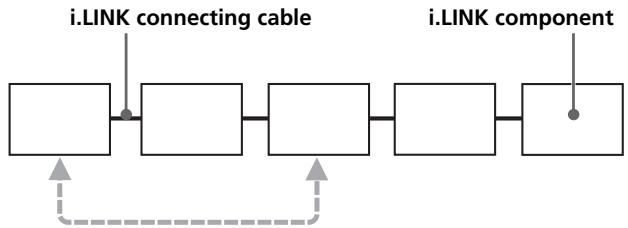
Data can be transmitted between any two components even if they are indirectly connected.
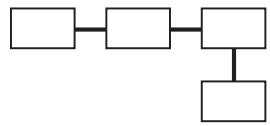
Branch connections
- Any i.LINK component with three or more i.LINK connectors can serve as a branch point.
- Up to 63 i.LINK components can be connected in a single configuration. However, the maximum number of components that can be daisy-chained in a single route is 17 (i.e., a maximum of 16 i.LINK connecting cables in a row). Each i.LINK cable used in a single route is called a "hop." For example, there are 6 hops in the route between A and C in the illustration below, and 3 hops in the route between A and D.

Each route between A and B; A and C; A and D; B and C; B and D; and C and D in the illustration above can have 16 hops (i.e., 17 components).
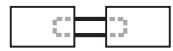
Loop-connection
A signal output from one component is transmitted to all other components. A loop connection should thus be avoided to prevent the return of a signal to its source.

Correct
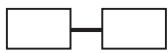
Incorrect (looped)


Notes
- Some i.LINK components (such as personal computers) do not transfer signals when they are turned off. Refer to the operation manual of each component to be connected before you hook them up.
- The maximum transmission rate of an i.LINK component is printed near its i.LINK connector. The indications S100, S200, and S400 refer to maximum transmission rates of 100, 200, or 400 Mbps*, respectively. The actual transmission rate may be faster or slower, depending on the differences in transmission rates and specifications among the connected components.

What is Mbps?
"Mbps" is an abbreviation for megabits per second. It indicates the amount of data transmitted per second. For example, a rate of 200 Mbps means 200 megabits of data are transmitted in one second.
Establishing a LINC
Before an audio signal can be transmitted between i.LINK components, a "LINC" must first be established between the receiving component (of the audio signal) and the sending component. Establishing a "LINC" means establishing a logical path for the transmission of digital audio signals between the two components. Each logical path has an ID number. Since the component that sends an audio signal must output the signal to a path, and the component that receives the signal must input it from the same path, the path must be mutually known by both components. During the establishment of a LINC, the following communication occurs between the two i.LINK components.
Example
A component establishing a LINC with a CD player in order to receive an audio signal from the CD player
① The component that will receive an audio signal from the CD player sends a request and path information to the CD player to establish a transmission path for the audio signal.
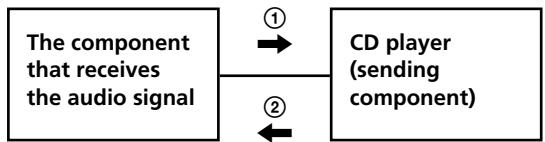
(2) The CD player responds to the component, agreeing to the establishment of a LINC.
The digital audio signal transmission becomes possible only after the communication described above has occurred and a LINC has been established.
Notes on CDs
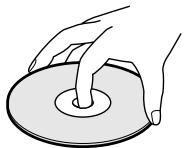
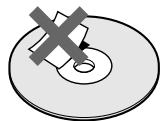
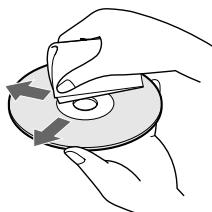
On handling CDs
- To keep the disc clean, handle the disc by its edge. Do not touch the surface.
- Do not stick paper or tape on the disc.
- Do not expose the disc to direct sunlight or heat sources such as hot air ducts, nor leave it in a car parked in direct sunlight as there can be considerable rise in temperature inside the car.
- Do not use any commercially available stabiliser and/or disc protector. If you do, the disc and the player may be damaged.
After playing a disc, store it in its case.
On placing CDs on the disc tray
- Make sure the disc is positioned securely on the tray's circle. If not, it may damage the player or the disc.
On cleaning
- Before playing a disc, clean it with a cleaning cloth. Wipe the disc from the centre out.
- Do not use solvents such as benzine, thinner, commercially available cleaners or anti-static spray intended for vinyl LPs.
Troubleshooting
If you experience any of the following difficulties while using the player, use this troubleshooting guide to help you remedy the problem. Should any problem persist, consult your nearest Sony dealer.
There's no sound.
Check that the player is connected securely.
Make sure you operate the receiver correctly.
Use the i.LINK connecting cable for 200 Mbps transmission rate.
The CD does not play.
There's no CD inside the player ("No Disc" appears). Insert a CD.
Place the CD on the disc tray with the label side up correctly.
Clean the CD (see page 19).
Moisture has condensed inside the player. Remove the disc and leave the player turned on for about an hour (see page 2).
The remote does not function.
Remove the obstacles between the remote and the player.
Point the remote at the remote sensor on the player.
Replace the battery in the remote with a new one if it is weak (see page 2).
Specifications
Compact disc player
| Laser | Semiconductor laser (λ = 800 nm) |
| Emission duration: continuous |
Inputs/Outputs (i.LINK S200)
| i.LINK connector | 4 pins - 4 pins (S200) |
General
| Power requirements | 230 V AC, 50/60 Hz |
| Power consumption | 22 W |
| Dimensions (approx.) (w/h/d) |
430× 70× 315mm
incl. projecting parts
| Mass (approx.) | 4.6 kg |
Supplied accessories
| i.LINK connecting calbe (4 pins - 4 pins) (1) |
| Remote commander (remote) (1) |
Design and specifications are subject to change without notice.
Display Messages
The following table explains the various messages that appear in the display.
| Message | Error code(s) | Cause and/or remedy |
| CANNOT LINC | C78:11/C78:12 | The player cannot establish a LINC with a component because of an existing LINC between the player and another component. Cancel the LINC between the player and the other component. |
| BUS FULL | C78:15 | The signal bus within the i.LINK configuration is full and no more signals can be output from the player. Cancel the LINC between the component and the player. |
| LOOP CONNECT | C78:03 | The i.LINK connection is looped. Check the connection (see page 17). |
| NEW CONNECT | — | An i.LINK component has been connected to or disconnected from the i.LINK configuration. Wait several seconds for the indication to turn off. |
Index
A, B
A B Repeat 12
AMS 11
Automatic Music Sensor. See AMS
C, D, E, F
CD TEXT 9,10
Connecting 4
Continuous Play 6
H
Handling CDs 19
Hookups 4
overview 4
I, J, K
i.LINK 16
L, M, N, O
Locating
by monitoring the sound 11
by observing the display 11
directly 11
using AMS 11
P, Q
Playback
Continuous Play 6
Programme Play 13
Repeat Play 12
Shuffle Play 13
Programme 13
changing 14
R
Remaining playing time 8
Remote control 4
Repeat 1 12
Repeating
a specific portion 12
all tracks 12
the current track 12
s
Searching. See Locating
Selecting the language 10
Setup menu
Dimmer 15
Power Save 16
Shuffle Play 13
T
Total playing time 8
Troubleshooting 19
U, V, W, X, Y, Z
Unpacking 4
Names of controls
Buttons
A B 12
CLEAR 13,14
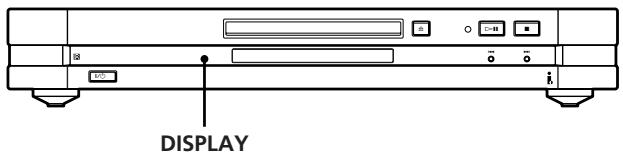
DISPLAY 8,9
MENU/NO 10,15,16
Number 11, 13, 14
PLAY MODE 13
REPEAT CLEAR 12
SCROLL 9
YES 10, 15, 16
6,7,12,13
6,7,12,13
17
7
11
7,11
6,7
10 11,13
Switch
1/6
Connector
i.LINK S200 4,5
Others
Disc tray 6
Display 8-10,15
H.A.T.S. indicator 10
Mains lead 5
STANDBY indicator 6
19
AVERTISSEMENT
- Ampli-tuner STR-LSA1
- Platine MD MDS-LSA1
Dimensions (approx.) (l/h/p)
430× 70× 315mm
parties saillantes comprises
Poids (approx.)
4,6kg
Accessoires fournis
(Power Save-Function) 16
- Receiver STR-LSA1
MD-Deck MDS-LSA1
Presione REPEAT CLEAR.
P, Q Programa 13 combio 14