TSA001 - Saw TRITON - Free user manual and instructions
Find the device manual for free TSA001 TRITON in PDF.

| Product type | Precision circular saw |
| Brand | Triton |
| Model | TSA001 |
| Blade size | 235 mm (9¼") |
| Blade bore | 16 mm or 25 mm (with spacer) |
| Bevel adjustment | 0° - 45° |
| Cutting depth at 90° | 84 mm |
| Cutting depth at 45° | 61 mm |
| Net weight | 8.0 kg |
| Insulation class | Double insulation |
| No-load speed | ≥ 4500 RPM |
| Parallel guide | Yes, removable from both sides |
| Micro depth adjustment | Yes, 6 mm range |
| Pre-set bevel stops | 0°, 15°, 22.5°, 30°, 45° |
| Arbor lock | Yes, for blade change |
| Dust extraction port | Yes |
| Shoe | Aluminum |
| Included blade | Tungsten carbide |
| Integrated wrench | Yes, retractable |
| Blade guard | Spring-loaded |
| Carbon brush maintenance | Replacement required if < 6 mm |
| Warranty | 12 months against manufacturing defects |
| Table use | Compatible with Workcentre and Triton Saw Table |
Frequently Asked Questions - TSA001 TRITON
User questions about TSA001 TRITON
0 question about this device. Answer the ones you know or ask your own.
Ask a new question about this device
Download the instructions for your Saw in PDF format for free! Find your manual TSA001 - TRITON and take your electronic device back in hand. On this page are published all the documents necessary for the use of your device. TSA001 by TRITON.
USER MANUAL TSA001 TRITON
Operating and Safety Instructions

Thank you for purchasing this Triton product. These instructions contain information necessary for safe and effective operation of this product.
Please read this manual to make sure you get the full benefit of its unique design.
Keep this manual close to hand and ensure all users of this product have read and fully understand the instructions.
CONTENTS
Specifications 2
Symbols 2
Know your product 3
Safety 4
Assembly 5
Operation 7
Maintenance 8
Guarantee 9
SPECIFICATIONS
| Part no: TSA001 | |
| Voltage: | EU - 220V - 240V AC, 50/60Hz, 9.1A |
| JP - 100V - 110V AC, 50/60Hz, 15A | |
| USA - 120V AC, 60Hz, 14A | |
| Speed: | EU - 4100min-1 |
| JP - 3900min-1 | |
| USA - 3900min-1 | |
| Blade size: | 235mm / 9¼" |
| Blade arbor: | 16mm or 25mm / %" or 1" |
| Bevel adjustment: | 0° - 45° |
| Cut depth: | 90° - 84mm / 3.3" 45° - 61mm / 2.4" |
| Insulation class: | Double insulated |
| Net weight: | 8.0kg / 17.6lbs |
Protect your hearing
Always use proper hearing protection when tool noise exceeds 80dB.
SYMBOLS
ENVIRONMENTAL PROTECTION
Waste electrical products should not be disposed of with household waste. Please recycle where facilities exist. Check with your local authority or retailer for recycling advice.

Always wear ear, eye and respiratory protection
Conforms to relevant EU legislation and safety standards

Double insulation

use before viewing and adding the full operating instructions
KNOW YOUR PRODUCT


- Dust Port
- Rear Pivot Lock
- Aluminium Baseplate
- TCT Blade
- Ripping Guide
- Inner & Outer Sighting Notches
- Blade Angle Trimmer
-
Bevel Calibrations
-
Bevel detent latch
- Motor
- Onboard Spanner
- Fence Guide
- Saw Alignment Slot
- Micro Adjustment Knob
- Height Adjustment Assembly
- Spindle Lock
SAFETY INSTRUCTIONS

WARNING. Read all safety warnings and instructions. Failure to follow these instructions may result in electric shock, fire and/or serious injury.
Save this instruction manual for future reference.
1. WORK AREA SAFETY
a. Keep work area clean and well lit. Cluttered and dark areas invite accidents.
b. Do not operate power tools in explosive atmospheres, such as in the presence of flammable liquids, gases or dust. Power tools create sparks which may ignite the dust or fumes.
c. Keep children and bystanders away while operating a power tool. Distractions can cause loss of control.
2. ELECTRICAL SAFETY
a. Power tool plugs must match the outlet. Never modify the plug in any way. Do not use any adapter plugs with earthed (grounded) power tools. Unmodified plugs and matching outlets will reduce risk of electric shock.
b. Avoid body contact with earthed or grounded surfaces such as pipes, radiators, ranges and refrigerators. There is an increased risk of electric shock if your body is earthed or grounded.
c. Do not expose power tools to rain or wet conditions. Water entering a power tool will increase the risk of electric shock.
d. Do not abuse the cord. Never use the cord for carrying, pulling or unplugging the power tool. Keep the cord away from heat, oil, sharp edges or moving parts. Damaged or entangled cords increase the risk of electric shock.
e. When operating a power tool outdoors, use an extension cord suitable for outdoor use, this will reduce the risk of electric shock.
f. If operating a power tool in a damp location is unavoidable, use a residual current device (RCD) protected supply, which will reduce the risk of electric shock.
3. PERSONAL SAFETY
a. Do not use power tools while you are tired or under the influence of drugs, alcohol or medication. A moment of inattention while operating power tools may result in serious personal injury.
b. Always use safety equipment: wearing eye protection, dust mask, non-slip safety shoes, hard hat and hearing protection used in appropriate conditions will reduce personal injuries.
c. Avoid accidental starting. Ensure the switch is in the 'Off' position before plugging in. Carrying power tools with your finger on the switch or connecting to power with the switch on the 'On' position invites accidents.
d. Remove any adjusting key or wrench before turning the power tool on. A wrench or a key left attached to a rotating part of the power tool may result in personal injury.
e. Do not over-reach. Keep proper footing and balance at all times. This enables better control of the power tool in unexpected situations.
f. Wear suitable clothing and footwear. Do not wear loose clothing, neckties, jewellery, or other items which may become caught. Wear non-slip footwear or where appropriate, footwear with protective toe caps. Long hair should be covered or tied back.
g. If devices are provided for the collection of dust particles, ensure these are connected and properly used. Use of these devices can reduce dust related hazards.
4. POWER TOOL USE AND CARE
a. Do not force the power tool. Using the correct power tool for your application will be safer and produce better results at the rate for which it was designed.
b. Do not use the power tool if the 'On/Off' switch is not working correctly. Power tools that cannot be controlled by the switch are dangerous and must be repaired prior to use.
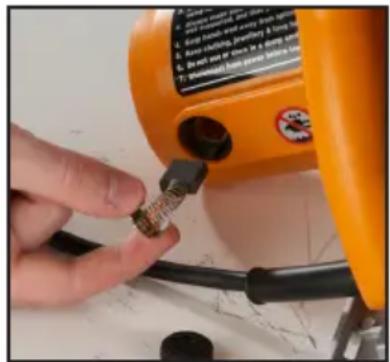
c. Disconnect the plug from the power source before making any adjustments, changing accessories or storing power tools. Such preventive safety measures reduce the risk of starting the power tool accidentally.
d. Power tools are dangerous in the hands of untrained users. Store power tools out of reach of children, and do not allow persons who are unfamiliar with the product or these instructions to operate the power tool.
e. Maintain power tools. Check for misalignment, binding or breakage of moving parts, and any other condition that may affect the operation of
the power tool. If damaged, have the power tool repaired before use. Accidents are caused by poorly maintained power tools.
f. Keep cutting tools sharp and clean. Properly maintained cutting tools with sharp cutting edges are less likely to bind and are easier to control.
g. Use the power tool, accessories and tool bits in accordance with these instructions and in the manner intended for the particular type of power tool, taking into account the working conditions and the work to be performed. Failure to use the tool for its intended purposes could result in a hazardous situation and may invalidate the warranty.
5. SERVICE
a. Servicing of your power tool must be carried out by a qualified technician, using only identical replacement parts, ensuring that safety of the power tool is maintained.
ASSEMBLY
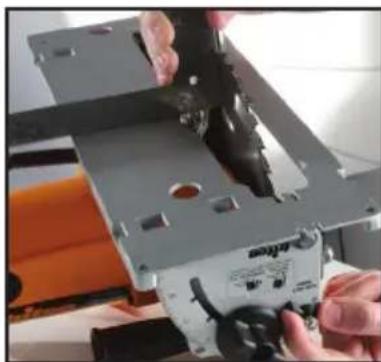
FITTING THE SAW BLADE
- Only use 235mm blades, with a kerf between 2.2 and 3.5mm , designed for circular saws with a no load speed rating of at least 4500min^-1 . Do not fit high speed steel blades or abrasive discs to this tool. The use of incorrect accessories may invalidate the warranty.
- Do not fit inferior blades. Regularly check the blade is flat, sharp and free of cracks or defects.

- Ensure the saw is disconnected from power.
-
Unscrew the handle half a turn to release the spanner from the storage position, as shown. Press the Spindle Lock (16), loosen and remove the blade retaining bolt and outer flange washer from the arbor shaft.
-
With the saw set at full cut depth, retract the guard and fit the blade neatly onto the shaft against the inner flange washer.
Note that the 25 - 16mm reduction bush must fit neatly in the arbor hole. The blade teeth must point in the same direction as the arrow on the fixed guard housing. - Replace the outer flange washer and retaining bolt and tighten with the spanner while depressing the spindle lock. Do not over-tighten. Return the spanner to the storage position and tighten the handle.
- Regularly check that the retaining bolt is tight.
NOTE: The arbor is fitted with a 16 - 25mm diameter spacer bush, which must be removed if fitting a blade with a 16mm arbor.

ADJUSTING CUT DEPTH
- Loosen the depth adjustment lever and lift the back of the saw away from the baseplate until the approximate depth is achieved. Push down on the lever to lock, but do not over-tighten.
- The lever is spring-loaded on a splined shaft. To adjust the lock and unlock positions (if necessary) simply pull the lever towards the hand-grip of the saw, rotate it slightly as required, and allow it to spring back to the normal position.

- For fine depth adjustments, lock the saw at the approximate depth and then turn the Micro-Adjustment Knob for (14) the exact depth. The adjustment range is 6mm . If insufficient, reset the main depth adjustment, and fine tune again. (If the micro adjuster feels too loose or too tight, adjust the nut tension.)
Note: The micro-adjustment knob must be set to full depth to achieve the 84mm maximum depth of cut.

SETTING BEVEL ANGLES
- Bevel angles can be set anywhere within the range -1^ to 46^ . Pre-set stops are available at 0^ , 15^ , 22.5^ , 30^ and 45^ for quick, accurate bevel settings.
- Loosen the front and rear bevel knobs and depress the Bevel Detent Latch (9). Pivot the saw to the angle you require. Then release the detent latch. A small movement of the saw motor will
allow the latch to pop up into the detent position. Tighten both knobs.

- When selecting other angles, leave the detent latch disengaged by pushing it down and back towards the motor, into the 'lock-out' position. Firmly tighten both knobs when required angle has been established.
FINE TUNING BLADE ANGLE & STOPS
- The calibration scale and bevel detent positions can be fine-tuned by + / - 1^
- Set the saw at 0^ with the bevel detent latch engaged.
- Loosen the pivot clamping knob at the rear, and the Nyloc nut on the blade angle trimmer. (Use the open end of the blade spanner). Adjust the trimmer left or right - until the blade is square to the baseplate or to the Triton table. Tighten the rear knob and Nyloc nut after any adjustments. Note: For full trim range adjustment ensure the blade depth is set 2 - 3mm below maximum, for motor clearance. Full depth can be re-set once the adjustment has been made.
RIPPING GUIDE
- The Ripping Guide (5) can be used on the left or the right of the blade, as shown. Using the guide provides accurate cuts without the need to work 'free-hand' following pencil lines.
- Locate the guide into the mounting slots at the front of the baseplate and tighten the thumb screw to lock it at the desired cut width. For maximum width setting, the thumb screw can be relocated to the inner or outer clamp location.

SIGHTING NOTCHES
- Two sets of sighting notches near the front of the baseplate provide guidance when performing 'free-hand' cuts following a pencil line. Use the longer, narrower notches for 90^ cuts and the shorter notches for 45^ cuts. Sight along either edge of the notch, depending on which side of the line you wish to cut.
- Use the second set of notches, closer to the saw blade, to confirm the alignment of your saw during the cut.

OPERATION
- Rest the front of the baseplate on the workpiece with your pencil mark aligned with the correct sighting notch. Ensure the blade is not touching the workpiece.
- Hold the saw firmly with both hands, as shown, and press the trigger. When the saw motor reaches full rotational speed, guide the saw smoothly along the cut line.
- Maintain a consistent feed rate - too fast may put excessive strain on the motor, too slow may burnish your workpiece. Avoid any sudden movements of the saw.
- When cutting veneered board or wood less than 20mm thick, set the blade to protrude 5 - 10mm through the work. This will reduce splintering. When cutting thicker wood, set the blade to maximum depth to reduce kickback.
-
Wherever possible, avoid 'free-hand' cutting. It is much safer and more accurate to cut with the saw guided by a clamped-on batten, or by fitting the saw to a Triton Workcentre or Compact Saw Table. When cutting 'free-hand', mark out a straight cutting line, which can be used as a guide, avoiding the possibility of the saw drifting during operation.
-
To avoid movement of the workpiece, use clamps wherever possible. Never perform any cuts on a workpiece held in the hand.
Large panels and long pieces must be well supported close to both sides of the cut to avoid pinching and kickback. Ensure the saw is positioned with the wider part of the baseplate resting on the larger piece, or on the piece with the best support. - Prevent kickback by ensuring that you move the saw in a straight line. Ensure that your blade is in good order and that the cut does not close in on the blade. If necessary, use a wedge or 3mm spacer in the cut to prevent it closing. Release the trigger if the saw gives any sign of stalling but do not remove the saw until the blade stops spinning.
- Avoid cutting nails, screws etc. by inspecting your workpiece and removing any fasteners prior to cutting.
-
If unusual noise or odour occurs during operation stop the saw immediately and contact an authorised Triton Saw Repair Centre.
-
Do not operate the saw upside down unless securely mounted and guarded in a reputable saw bench (eg. a Triton Workcentre or Triton Compact Saw Table).
SAW BENCH MOUNTING ALIGNMENT
The Triton Precision Power Saw has been specifically designed to easily fit all model Triton Workcentres (MK3 and Series 2000), and Compact Saw Tables. Follow the saw mounting and alignment procedures outlined in the instruction manual for the bench you have purchased.
SERIES 2000 WORKCENTRES
If you have a Series 2000 Workcentre with a Serial No. of 335,000 onwards, the saw slide chassis is made of pressed steel, painted silver. It has facilities for attaching two alignment caps for easy mounting and positioning of the Triton Precision Power Saw.
The cams (which are included with the Workcentre slide chassis) allow the front and rear of the saw to be side-shifted by up to 1.5mm in either direction to ensure perfect alignment with the overhead guard support and the rip fence.
TRITON COMPACT SAW TABLES
The Triton saw is easily fitted to all Triton Compact Saw Tables. Compacts with a Serial No. of 8,000 onwards can utilise the above-mentioned saw alignment feature. The alignment cans are included with the Compact Saw Table. This feature cannot be used on Compacts with a Serial No. less than 8,000.
MAINTENANCE
- Regularly check that the saw arbor, arbor washers and bore reducing spacer are clean, and free of built-up gum deposits or caked-on sawdust. Check that the faces of the arbor washers are smooth and free from burrs. Check that the blade retaining bolt is correctly tightened.
- Check the operation of the spring-loaded guard. It must close quickly and without scraping against any part of the machine. Remove the blade and clean accumulated sawdust or wood slivers from the guard area.
- Occasionally check the tension of the Micro-Adjustment Knob, (13) and if necessary tighten or loosen the Nyloc nut near the base of the assembly.
- The saw ventilation slots should be kept clean and clear of any foreign matter. Use a lightly dampened cloth to wipe the saw clean - do not use solvents.
- Regularly check the saw blade for flatness. Use of the saw with a buckled blade places excessive load on the motor and gearbox assembly, and may affect your warranty.
BRUSH REPLACEMENT
- The carbon brushes are a consumable item which should be inspected periodically and replaced when worn.
- With the saw disconnected from power, unscrew the brush caps located near the end of the motor. Remove the brushes by pulling carefully on the protruding springs, as shown. If either of the brushes are worn to less than 6mm long, they must both be replaced using genuine Triton replacement brushes - available from Authorised Triton Saw Repair Centres.
- Regularly check that the blade is free from a build-up of gum resins or sawdust. If necessary clean with a solvent such as WD40, RP7 or mineral turpentine.
- The tungsten carbide teeth should be checked regularly for sharpness and tooth breakages, and repaired or re-sharpened as required. Note that when re-sharpening, the bevel angles on the front of the teeth should be retained.
GUARANTEE
To register your guarantee visit our web site at www.tritontools.com* and enter your details.
Your details will be included on our mailing list (unless indicated otherwise) for information on future releases. Details provided will not be made available to any third party.
PURCHASE RECORD
Date of Purchase: //
Model: TSA001
Retain your receipt as proof of purchase
Triton Precision Power Tools guarantees to the purchaser of this product that if any part proves to be defective due to faulty materials or workmanship within 12 MONTHS from the date of original purchase, Triton will repair, or at its discretion replace, the faulty part free of charge.
This guarantee does not apply to commercial use nor does it extend to normal wear and tear or damage as a result of accident, abuse or misuse.
- Register online within 30 days.
Terms & conditions apply.
This does not affect your statutory rights
As gat diameter 16 mm of 25 mm
Verstek snede afstelling 0^ - 45^
Zaagdiepte 90^ - 84mm
45^ - 61 mm
Tension: 220V - 240V AC, 50/60Hz, 9.1A
Vitesse: 4100 min
REEMPLACEMENT DES CHARBONS
Ofre soumise a conditions.
Conforms to relevant EU legislation and safety standards.

to relevant Australian and safety standards.


forms to relevant USA legislation, safety standards.
LISTED
DECLARATION OF CONFORMITY
The Undersigned: Mr Darrell Morris as authorized by: TRITON Declare that:
PRODUCT CODE: TSA001 DESCRIPTION: 235mm Circular Saw
Electric power: 220 - 240V AC, 50/60Hz, 9.1A
CONFORMS TO THE FOLLOWING DIRECTIVES: EN 60745-2-5: 2010 EN 60745-1: 2009 /A11: 2010 Tested by TUV in Taiwan
EN55014-1:2006+A1:2009·EN55014-2:1997+A1:2001+A2:2008·EN61000-3-2:2006+A1:2009+A2:2009·EN61000-3-3:2008
Tested by TUV in Shanghai
THE TECHNICAL DOCUMENTATION IS KEPT BY TRITON
NOTIFIED BODY: TUV
PLACE OF DECLARATION: Jinhua, Zhejiang
EG-VERKLARING VAN OVEREENSTEMMING
De Ondergetekende: Mr Darrell Morris Gemachtig door: TRITON Declare that:
TYPE/ SERIENR: TSA001 NAAM/MODEL: Cirkelzaag 235mm
Stroom:220-240VAC,50/60Hz,9.1A
VOLDOET AAN DE VEREISTEN VAN DE RICHTLIJN: EN 60745-2-5: 2010 - EN 60745-1: 2009 /A11: 2010 Tested by TUV in Taiwan
- EN55014-1:2006+A1:2009 - EN55014-2:1997+A1:2001+A2:2008 - EN61000-3-2:2006+A1:2009+A2:2009 - EN61000-3-3:2008
Tested by TUV in Shanghai
DE TECHNISCHE DOCUMENTATIE WORDT BEWAARD DOOR TRITON
KEURINGSINSTANTIE: TUV
PLAATS VAN AFGIFTE: Jinhua, Zhejiang
DECLARATION DE CONFORMITE CE
Le sousigné: Mr Darrell Morris autorisé par: TRITON Declare that:
TYPE/SERIE NO: TSA001 NOM/MODELE: Scie Circulaire 235mm
Courant electrique:220-240V AC,50/60Hz,9.1A
SE CONFORME AUX DIRECTIVES SUIVANTES: EN 60745-2-5: 2010 EN 60745-1: 2009 /A11: 2010 Tested by TUV in Taiwan
EN55014-1:2006+A1:2009·EN55014-2:1997+A1:2001+A2:2008·EN61000-3-2:2006+A1:2009+A2:2009·EN61000-3-3:2008
Tested by TUV in Shanghai
LA DOCUMENTATION TECHNIQUE EST ENREGISTREE PAR TRITON
ORGANISMES NOTIFIES: TUV
ENDROIT DE LA DÉCLARATION: Jinhua, Zhejiang
Tested by TUV in Shanghai
Tested by TUV in Shanghai
CORPO INFORMATO: TUV
POSTO DI DICHIARAZIONE: Jinhua, Zhejiang
DECLARACION "CE" DE CONFORMIDAD
El abajo firmante: Mr Darrell Morris Autorizad por: TRITON Declare that:
TIPO Y NO SERIE: TSA001 MODELO/NOMBRE: Sierra Circular 235mm
Energia elctrica:220-240V AC,50/60Hz,9.1A
SE HALLA EN CONFORMIDAD CON LA DIRECTIVA: EN 60745-2-5: 2010 EN 60745-1: 2009 /A11: 2010 Tested by TUV in Taiwan
EN55014-1:2006+A1:2009·EN55014-2:1997+A1:2001+A2:2008·EN61000-3-2:2006+A1:2009+A2:2009·EN61000-3-3:2008
Tested by TUV in Shanghai