ELPMB29 - Video projector EPSON - Free user manual and instructions
Find the device manual for free ELPMB29 EPSON in PDF.
User questions about ELPMB29 EPSON
0 question about this device. Answer the ones you know or ask your own.
Ask a new question about this device
Download the instructions for your Video projector in PDF format for free! Find your manual ELPMB29 - EPSON and take your electronic device back in hand. On this page are published all the documents necessary for the use of your device. ELPMB29 by EPSON.
USER MANUAL ELPMB29 EPSON
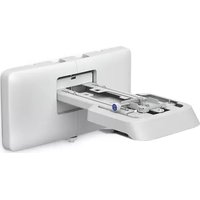
Interactive Table Mount
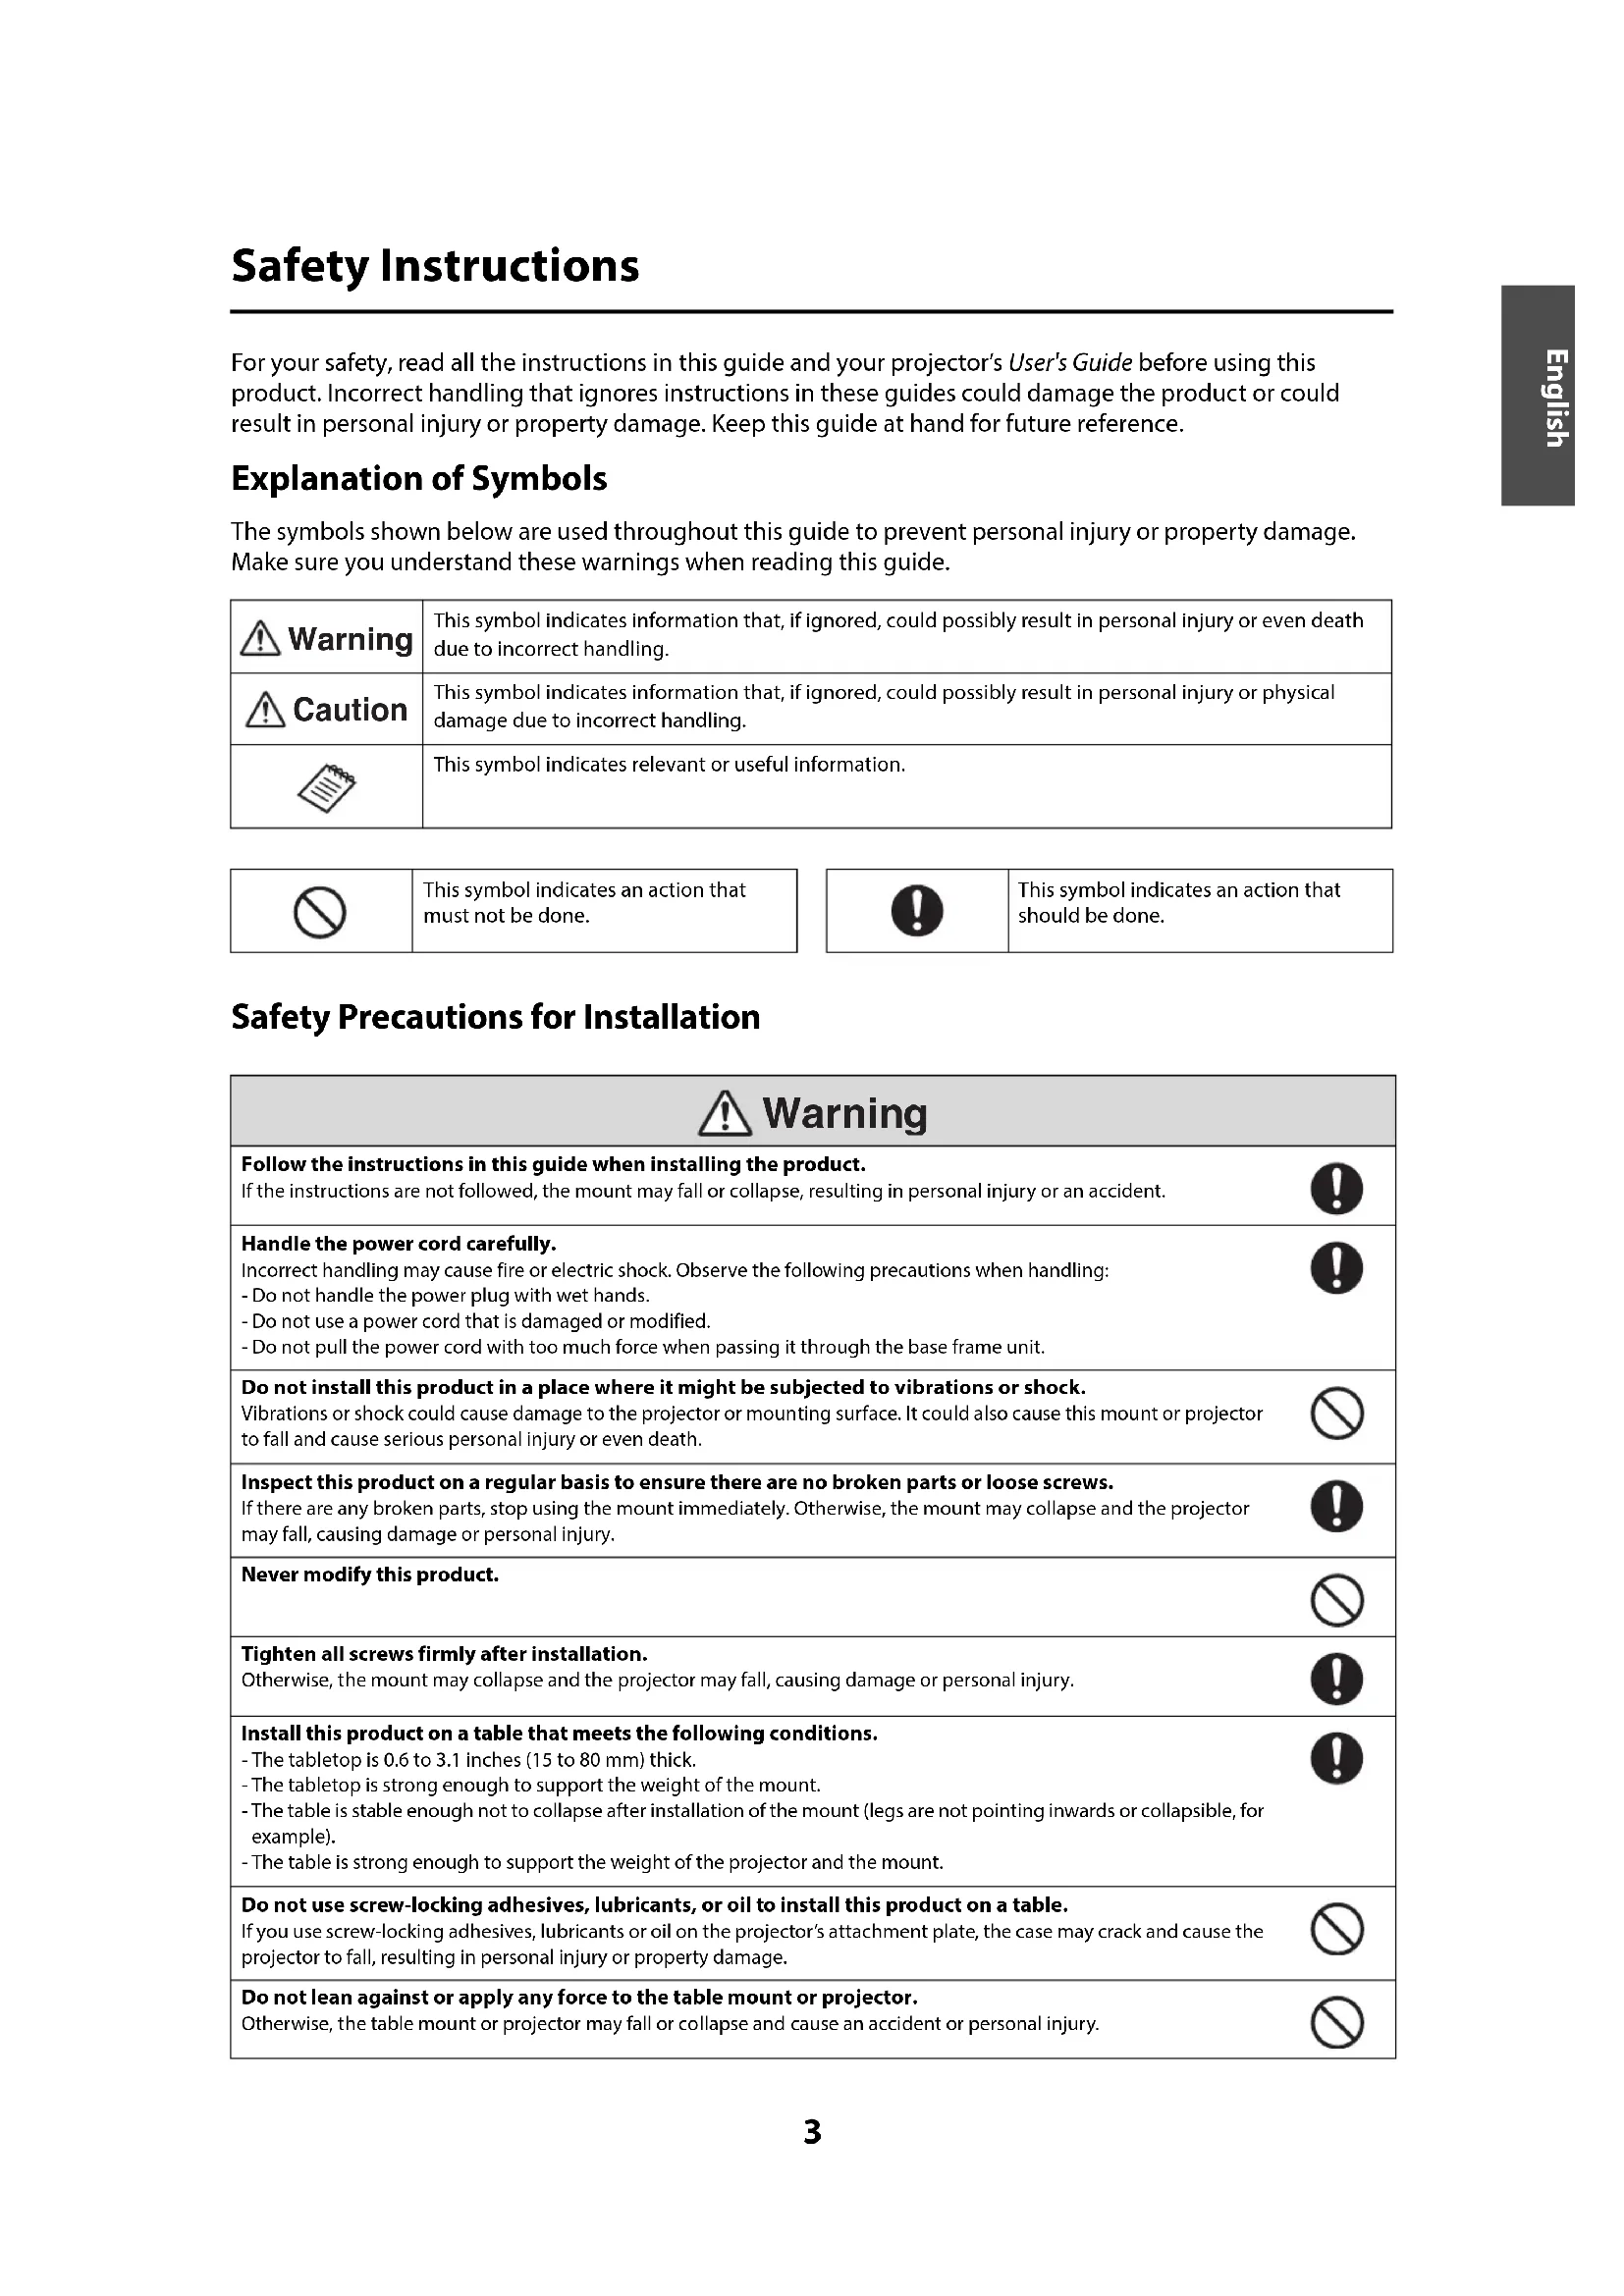
For your safety, read all the instructions in this guide and your projector's User's Guide before using this product. Incorrect handling that ignores instructions in these guides could damage the product or could result in personal injury or property damage. Keep this guide at hand for future reference.
Explanation of Symbols
The symbols shown below are used throughout this guide to prevent personal injury or property damage. Make sure you understand these warnings when reading this guide.
| Warning | This symbol indicates information that, if ignored, could possibly result in personal injury or even death due to incorrect handling. |
| Caution | This symbol indicates information that, if ignored, could possibly result in personal injury or physical damage due to incorrect handling. |
| This symbol indicates relevant or useful information. |
| ⊗ | This symbol indicates an action that must not be done. |
| ! | This symbol indicates an action that should be done. |
Safety Precautions for Installation
| Warning | |
| Follow the instructions in this guide when installing the product. If the instructions are not followed, the mount may fall or collapse, resulting in personal injury or an accident. | ! |
| Handle the power cord carefully. Incorrect handling may cause fire or electric shock. Observe the following precautions when handling: - Do not handle the power plug with wet hands. - Do not use a power cord that is damaged or modified. - Do not pull the power cord with too much force when passing it through the base frame unit. | ! |
| Do not install this product in a place where it might be subjected to vibrations or shock. Vibrations or shock could cause damage to the projector or mounting surface. It could also cause this mount or projector to fall and cause serious personal injury or even death. | × |
| Inspect this product on a regular basis to ensure there are no broken parts or loose screws. If there are any broken parts, stop using the mount immediately. Otherwise, the mount may collapse and the projector may fall, causing damage or personal injury. | ! |
| Never modify this product. | × |
| Tighten all screws firmly after installation. Otherwise, the mount may collapse and the projector may fall, causing damage or personal injury. | ! |
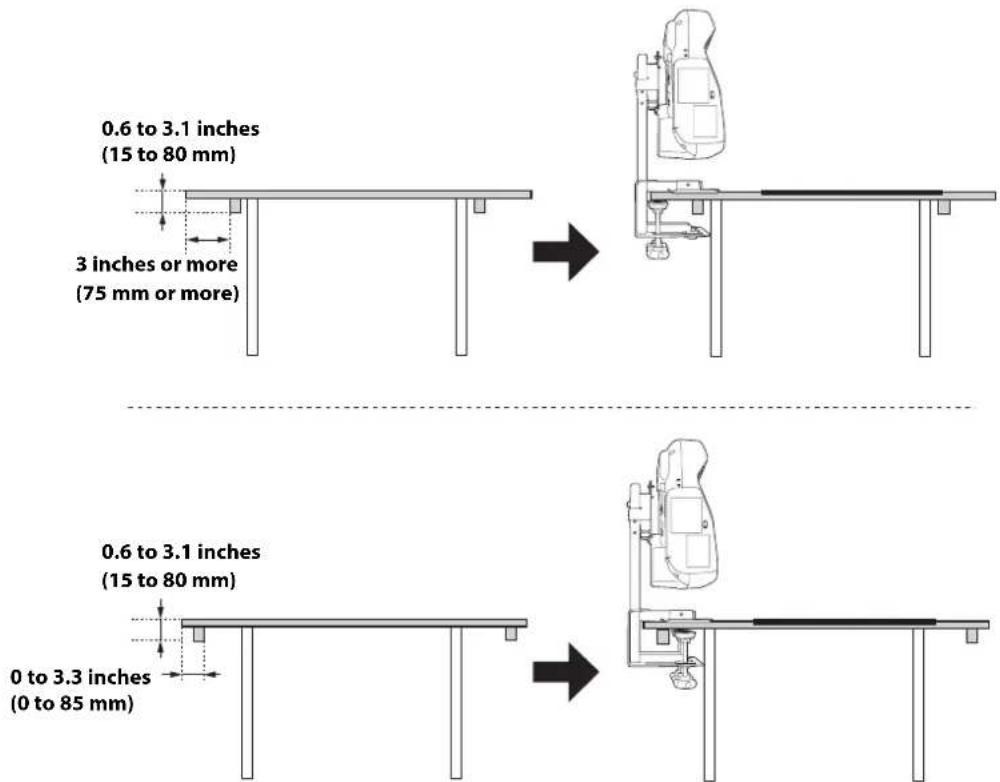
| Install this product on a table that meets the following conditions. - The tabletop is 0.6 to 3.1 inches (15 to 80 mm) thick. - The tabletop is strong enough to support the weight of the mount. - The table is stable enough not to collapse after installation of the mount (legs are not pointing inwards or collapsible, for example). - The table is strong enough to support the weight of the projector and the mount. | ! |
| Do not use screw-locking adhesives, lubricants, or oil to install this product on a table. If you use screw-locking adhesives, lubricants or oil on the projector's attachment plate, the case may crack and cause the projector to fall, resulting in personal injury or property damage. | × |
| Do not lean against or apply any force to the table mount or projector. Otherwise, the table mount or projector may fall or collapse and cause an accident or personal injury. | × |

Caution
Do not install this product in a location where the operating temperature for the projector may be exceeded.
Such an environment may damage the projector.

About This Guide
This guide describes how to install the following projectors on a table using the Interactive Table Mount (ELPMB29):
- BrightLink® 475Wi/475Wi+/480i/485Wi/485Wi+
- BrightLink 575Wi/575Wi+/585Wi/585Wi+/595Wi/595Wi+
BrightLink Pro 1410Wi
Note: BrightLink model availability varies by country.
Package Contents
0
2
3
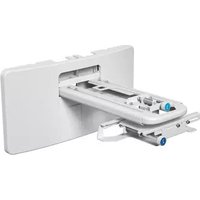
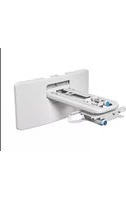
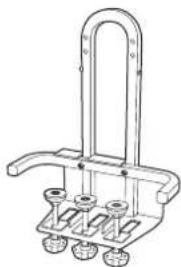
Base frame unit with adjuster bolts
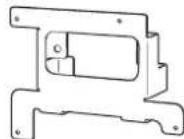
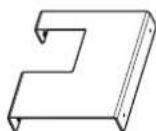
Attachment plate
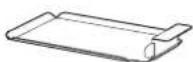
3 Accessory tray
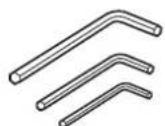
Hexagon wrenches (for M3, M4, and M8)
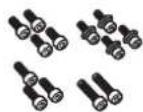
6 Bolts
Touch Unit attachment plate for finger touch models
4
5
6
Bolts
| Shape Name Quantity Application | |||
| M3×8mm hexagon socket head cap bolt for finger touch models | 2 For m | mounting the Touch Unit attachment plate on the Touch Unit. | |
| 2 For m | mounting the Touch Unit attachment plate to the base frame unit. | ||
| M4×12mm hexagon socket head cap bolt with washer and spring washer | 4 For m | mounting the attachment plate to the projector. | |
| M4×8mm hexagon socket head cap bolt 1 For mounting the tray to the base frame unit. | |||
| 2 Used | as stoppers. (Pre-installed in the base frame unit in mount position 2.) | ||
| M8×35mm hexagon socket head cap bolt 2 For mounting the attachment plate to the base frame unit. | |||
Have the necessary tools ready before you begin the installation.
Specifications
| Item Specification Note | |
| Weight Approx. 16.75 lb (7.6 kg) | |
| Maximum load capacity 14.3 lb (6.5 kg) | |
| Forward/backward adjustment range of the adjuster bolt | 3.1 inches (80 mm) Distance between the edge of the table and the center of the bolt: 1.4 to 4.5 inches (35 to 115 mm) |
Table Requirements
Install the mount on a table that meets the following conditions.
- The tabletop is strong enough to support the weight of the mount.
- The table is stable enough not to collapse after installation of the mount.
The table is strong enough to support the weight of the projector and the mount.
The table surface is a light color such as white.
The tabletop is 0.6 to 3.1 inches (15 to 80mm ) thick.
The tabletop is larger than the minimum sizes below.
See the projection distance table on page 7 for the image size.
Minimum table sizes for BrightLink 475Wi/475Wi+/485Wi/485Wi+/575Wi/575Wi+/585Wi/585Wi+/595Wi/595Wi+/BrightLink Pro 1410Wi
| Mounting position | Image size (diagonal) | Rectangular table |
| ① | 65 inches (1651 mm) 47.6 × 55.8 inches | (1210 × 1417 mm) |
| ② | 60 inches (1524 mm) 44.5 × 52 inches | (1130 × 1321 mm) |
Minimum table sizes for BrightLink 480i
| Mounting position | Image size (diagonal) | Rectangular table |
| ① | 60 inches (1524 mm) 48.4 × 49.3 inches | (1230 × 1252 mm) |
| ② | 56 inches (1422 mm) 45.7 × 46.1 inches | (1160 × 1172 mm) |
- If any obstacles exist on the bottom side of the tabletop, the distance between the edge of the table and the obstacle must be at least 3 inches (75 mm) or the obstacle must be within 3.3 inches (85 mm) from the edge of the table.
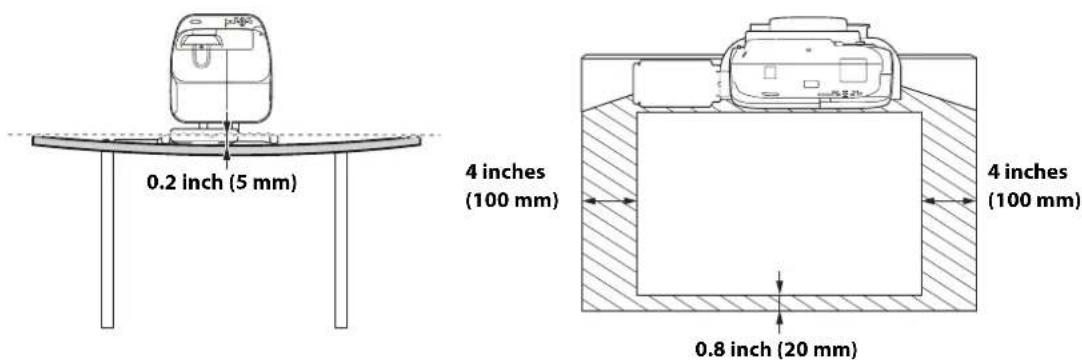
- For finger touch models, set up the Touch Unit on a flat, smooth, unwarped surface with no more than 0.2 inch (5 mm) of unevenness on the screen surface. Make sure there are no obstacles, such as cables, or protruding items in the shaded areas in the following figure. The Touch Unit will not operate correctly if anything is obstructing the infrared signal.
Determine the image size and the position of the projector
(1) Determine the position according to the image size. There are two positions to choose from: ① and ② shown in the following illustration.
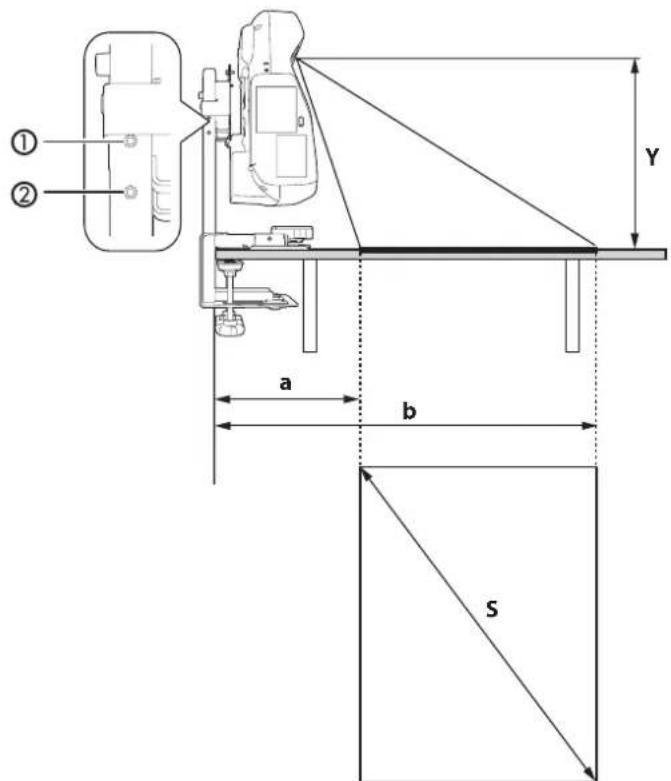
Diagonal Image Sizes for Mounting Positions 1 and 2
BrightLink 475Wi/475Wi+/485Wi/485Wi+/575Wi/575Wi+/585Wi/585Wi+/595Wi/595Wi+/ BrightLink Pro 1410Wi
| Mounting position (Y) | Image size (S) Distance | between the edge of the table and the bottom of the screen (16:10) (a) | Distance between the edge of the table and the top of the screen (16:10) (b) | ||||||||
| Aspect ratio 16:10 | Aspect ratio 4:3 A | Aspect ratio 16:9 | |||||||||
| Wide (max) | Tele (min) | Wide (max) | Tele (min) | Wide (max) | Tele (min) | Wide (max) | Tele (min) | Wide (max) | Tele (min) | ||
| ① | 15 in. (380 mm) | 65 in. (1651 mm) | 48 in. (1219 mm) | 57 in. (1448 mm) | 43 in. (1092 mm) | 63 in. (1600 mm) | 47 in. (1194 mm) | 11.0 in. (280 mm) | 15.4 in. (390 mm) | 45.3 in. (1150 mm) | 40.9 in. (1040 mm) |
| ② | 13.8 in. (350 mm) | 60 in. (1524 mm) | 45 in. (1143 mm) | 53 in. (1346 mm) | 40 in. (1016 mm) | 59 in. (1499 mm) | 45 in. (1143 mm) | 10.2 in. (260 mm) | 14.6 in. (370 mm) | 42.1 in. (1070 mm) | 38.6 in. (980 mm) |
Diagonal Image Sizes for Mounting Positions 1 and 2 BrightLink 480i
| Mounting position (Y) | Image size (S) Distance | between the edge of the table and the bottom of the screen (16:10) (a) | Distance between the edge of the table and the top of the screen (16:10) (b) | ||||||||
| Aspect ratio 16:10 | Aspect ratio 4:3 A | Aspect ratio 16:9 | |||||||||
| Wide (max) | Tele (min) | Wide (max) | Tele (min) | Wide (max) | Tele (min) | Wide (max) | Tele (min) | Wide (max) | Tele (min) | ||
| ① | 15 in. (380 mm) | 57 in. (1448 mm) | 42 in. (1067 mm) | 60 in. (1524 mm) | 45 in. (1143 mm) | 55 in. (1397 mm) | 41 in. (1041 mm) | 9.8 in. (250 mm) | 14.6 in. (370 mm) | 45.7 in. (1160 mm) | 41.7 in. (1060 mm) |
| ② | 13.8 in. (350 mm) | 53 in. (1346 mm) | 40 in. (1016 mm) | 56 in. (1422 mm) | 42 in. (1067 mm) | 52 in. (1321 mm) | 38 in. (965 mm) | 9.4 in. (240 mm) | 13.8 in. (350 mm) | 42.9 in. (1090 mm) | 39.0 in. (990 mm) |

- You can change the image size using the projector's Tele and Wide buttons.
- You can adjust the projection position using the projector's Image Shift feature.
(2) The mount ships with M4 × 8 mm hexagon socket head cap bolts (x2) secured in position
② . To use mount position remove the bolts from position before attempting to mount the projector as shown on page 13.
M4 × 8 mm hexagon socket head cap bolts
Mount positions
Assemble the parts
(1) Mount the attachment plate on the projector using M4 × 12 mm hexagon socket head cap bolts (4 bolts with washer and spring washer).
Attachment plate
M4 × 12 mm hexagon socket head cap bolts (with washer and spring washer)
(2) Mount the tray on the base frame unit using an M4 × 8 mm hexagon socket head cap bolt. You can mount the tray on either the left or right side of the base frame unit.
Accessory tray
M4×8mm hexagon socket head cap bolt
You can place the pen tray supplied with the projector on the accessory tray.
Temporarily mount the base frame unit
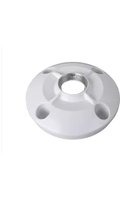
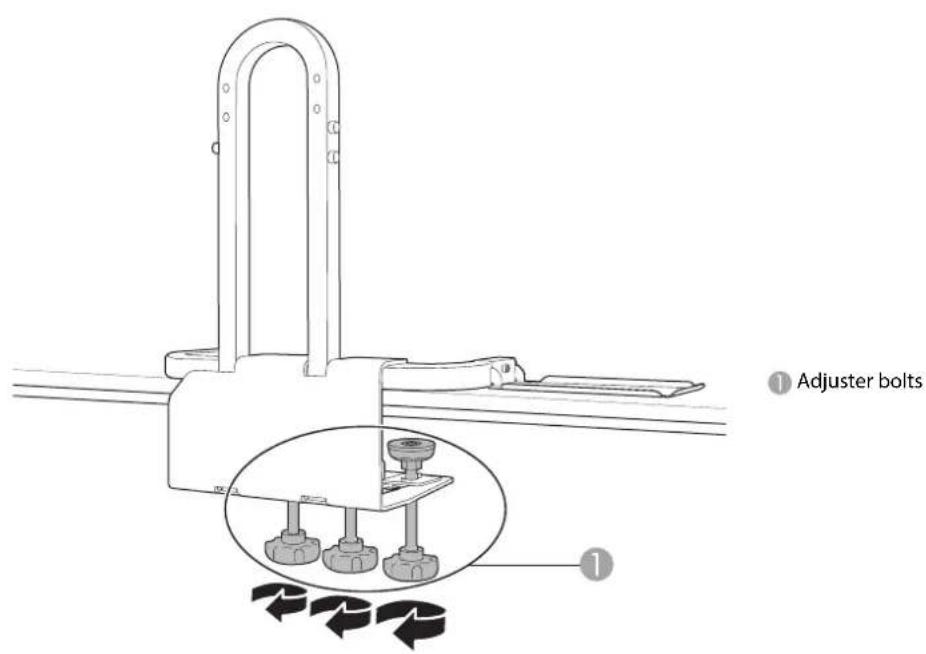
(1) Loosen the adjuster bolts (× 3) to fit the thickness of the tabletop so you can attach the base frame unit to the tabletop.
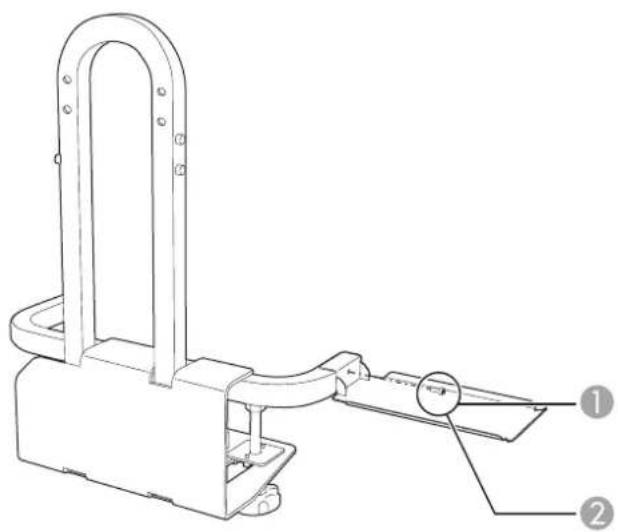
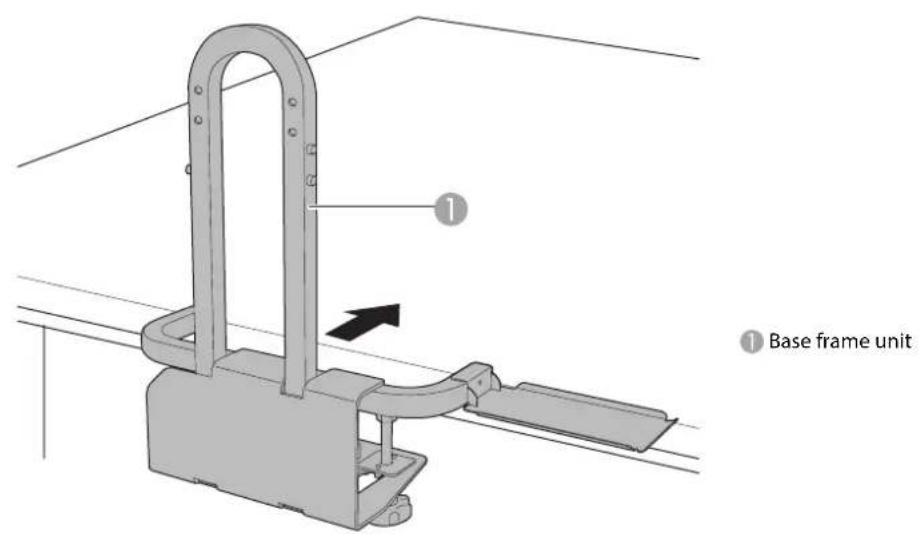
(2) Attach the base frame unit to the table by sliding it onto the edge of the table.
(3) Fix the adjuster bolts on a flat surface on the bottom side of the tabletop temporarily. Slide the adjuster bolts forward or backward if there are any obstacles on the underside of the table.
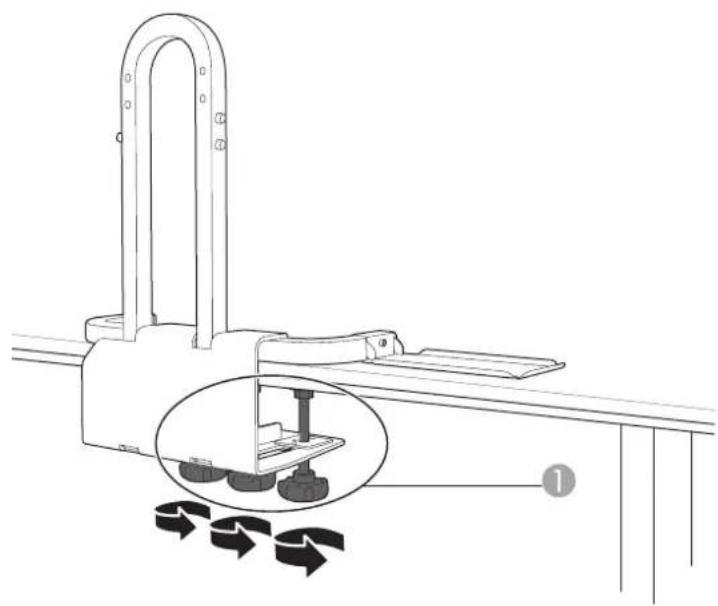
Adjuster bolts
Each adjuster bolt requires a flat surface with at least 2.4 inches (60 mm) in diameter.
Warning
- Tighten all adjuster bolts firmly after installation. Otherwise, the mount may collapse and the projector may fall, causing damage or personal injury.
Only tighten the adjuster bolts on the flat surface of the underside of the table.
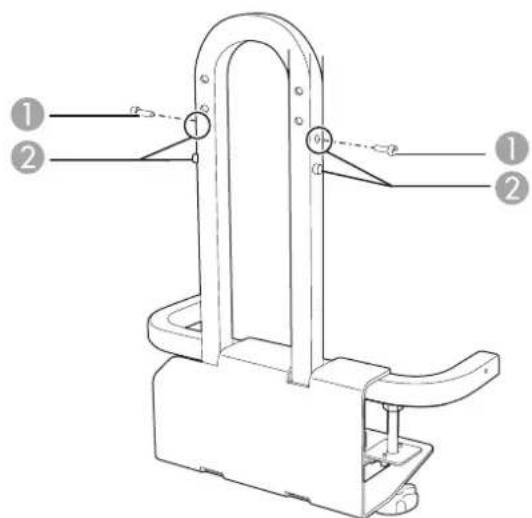
Install the Touch Unit attachment plate (finger touch models only)
(1) Mount the Touch Unit attachment plate on the Touch Unit using M3 × 8 mm hexagon socket cap bolts (×2).
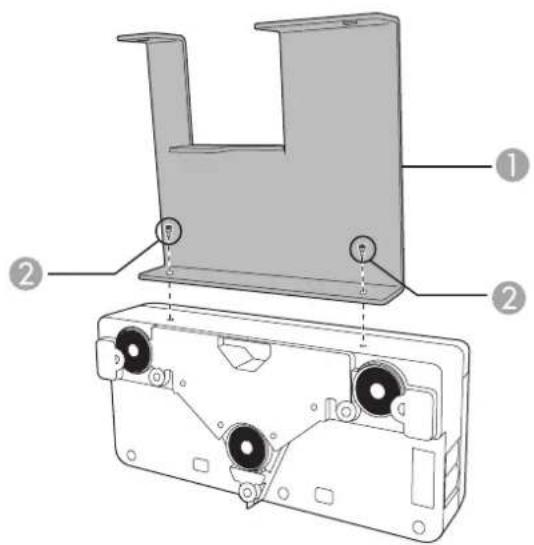
Touch Unit attachment plate
M3×8mm socket cap bolt
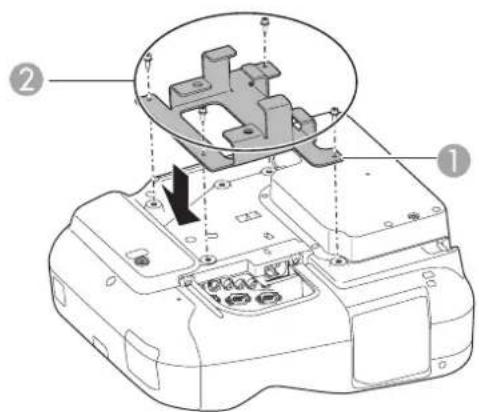
(2) Mount the Touch Unit attachment plate on the base frame unit using M3 × 8 mm hexagon socket cap bolts (× 2) .
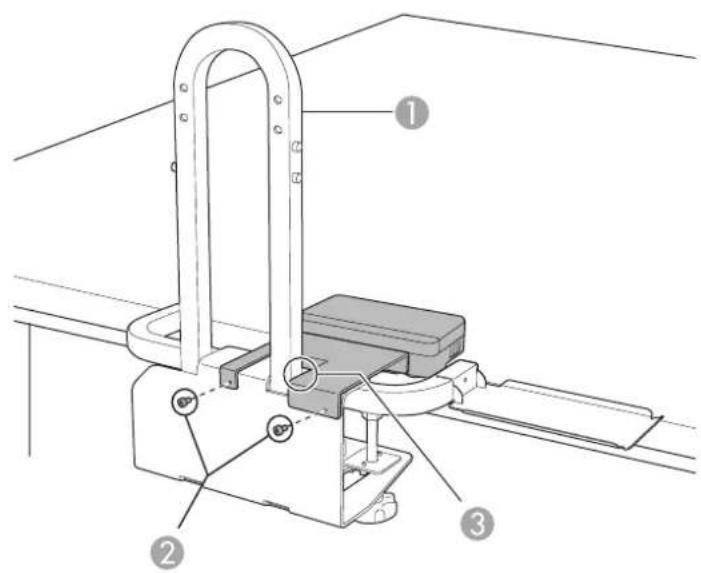
1 Base frame unit
M3×8mm socket cap bolt
Mount so that the Touch Unit attachment plate is flush with the side of the U-shaped arm.
(3) Attach the connection cable that is supplied with the Touch Unit to the Touch Unit.
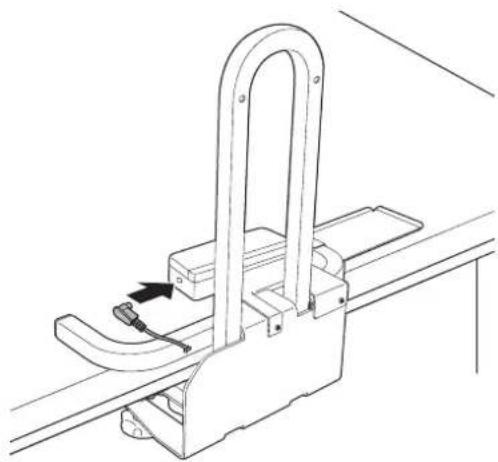

For more information on using the Touch Unit, see the projector's Installation Guide and User's Guide.
Secure the projector to the base frame unit
(1) Slide the attachment plate mounted on the projector onto the U-shaped arch from the top. It stops at mounting position ① . Fo2formation on setting the mounting position, see page 8.
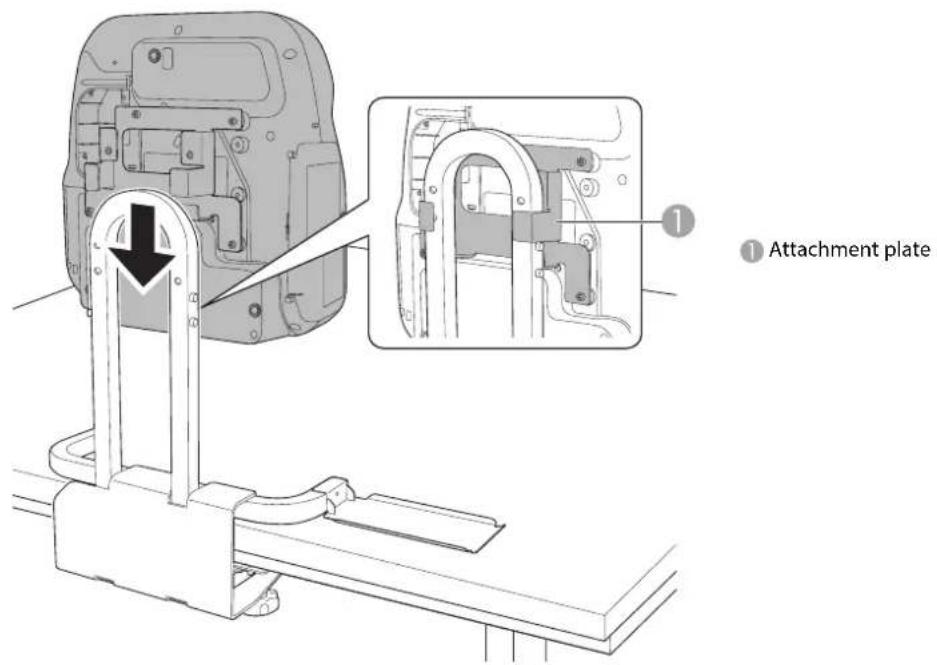
Caution Do not place anything under the projector. It may damage the projector during the mounting process.
(2) Secure the projector with M8 × 35 mm hexagon socket head cap bolts (× 2) .
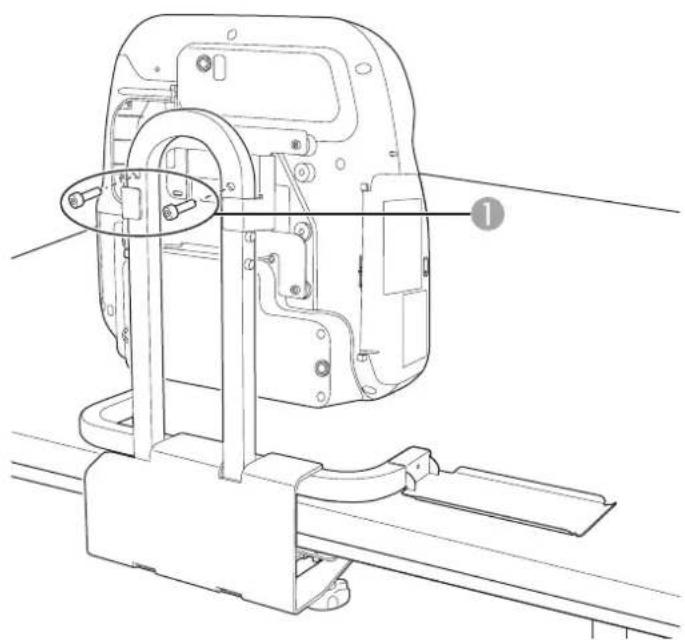
M8×35mm hexagon socket head cap bolts
Determine the position for attaching the table mount
(1) Align one side of the U-shaped arch on the base frame unit with the estimated center line of the projected image to align the center of the lens and the center of the image.
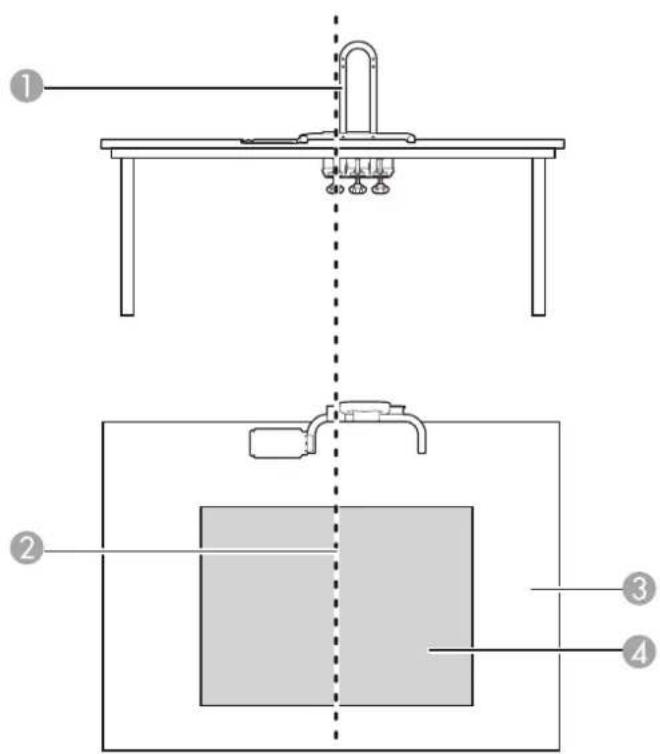
U-shaped arch
Center of the image
Table
Projected image
(2) Tighten the adjuster bolts that were temporarily fixed as shown on page 10. Make sure you tighten the adjuster bolts with equal force.

Warning
Tighten all screws firmly. Otherwise, the projector or the mount may fall and cause personal injury or damage.

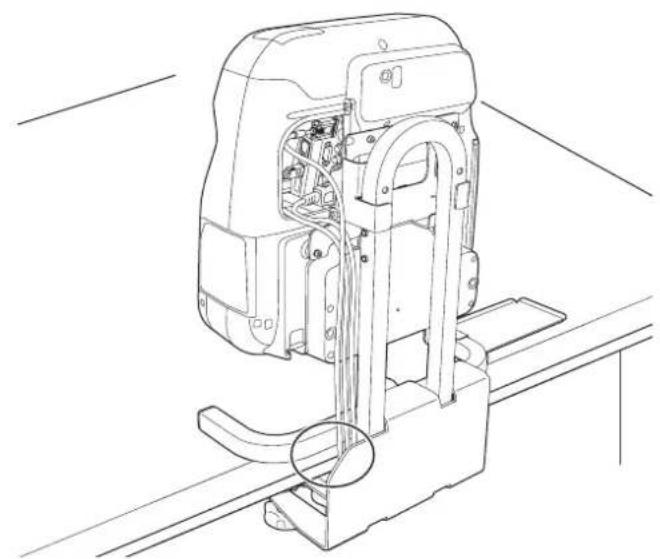
- When you have completed the projector installation, connect the necessary cables. Use the cutout on the base frame unit so that the cables do not stick out.
- For adjusting the image and more details on the projector, refer to the online User's Guide at epson.com/support/brightlinkdownloads (US) or epson.ca/support/brightlinkdownloads (Canada).
- Make sure the table does not wobble after you have installed the projector.