
DLM530Z - Lawn mower MAKITA - Free user manual and instructions
Find the device manual for free DLM530Z MAKITA in PDF.
| Product type | Cordless lawn mower |
| Brand | Makita |
| Model | DLM530Z |
| Cutting width | 534 mm |
| Cutting height | 20 - 100 mm (10 positions) |
| No-load speed | 2,300 min⁻¹ |
| Maximum speed | 2,800 min⁻¹ |
| Travel speed | Non-motorized (manual push) |
| Power source | 2 x 36 V lithium-ion batteries (compatible with Makita BL18 series) |
| Grass bag capacity | Not specified (grass bag included) |
| Net weight | 35.5 - 39.3 kg (depending on batteries) |
| Dimensions (L x W x H) | 1,630-1,715 x 590 x 990-1,095 mm |
| Sound power level | 90.4 dB(A) |
| Sound pressure level | 78.1 dB(A) |
| Vibrations | ≤ 2.5 m/s² (uncertainty K=1.5 m/s²) |
| Protection rating | IPX4 |
| Electronic functions | Constant speed control, soft start, electric brake |
| Operating modes | Normal and noise reduction |
| Cutting system | Straight blade or pivoting blades (depending on accessories) |
| Maintenance | Clean with water (do not use pressurized water) |
| Safety | Safety key, battery lock, electric brake, overload/overheat protection |
| Spare parts | Replacement blades available (ref. 191D52-7, etc.) |
| Repairability | Makita authorized service center |
| Package contents | Lawn mower, grass bag, safety key, manual (batteries and charger not included) |
Frequently Asked Questions - DLM530Z MAKITA
User questions about DLM530Z MAKITA
0 question about this device. Answer the ones you know or ask your own.
Ask a new question about this device
Download the instructions for your Lawn mower in PDF format for free! Find your manual DLM530Z - MAKITA and take your electronic device back in hand. On this page are published all the documents necessary for the use of your device. DLM530Z by MAKITA.
USER MANUAL DLM530Z MAKITA
1. Base plate and individual mower blades.
2. Individual mower blades only.
Due to our continuing program of research and development, the specifications herein are subject to change without notice.
Specifications may differ from country to country.
The weight may differ depending on the attachment(s), including the battery cartridge. The lightest and heaviest combination, according to EPTA-Procedure 01/2014, are shown in the table.
Applicable battery cartridge
BL1815N / BL1820 / BL1820B / BL1830 / BL1830B / BL1840 / BL1840B / BL1850 / BL1850B / BL1860B
Some of the battery cartridges listed above may not be available depending on your region of residence.

WARNING: Only use the battery cartridges listed above. Use of any other battery cartridges may cause a battery and/or fire.

WARNING: Do not use a corded power supply such as battery adapter or portable power pack with this machine. The cable of such power supply may hinder the operation and result in personal injury.
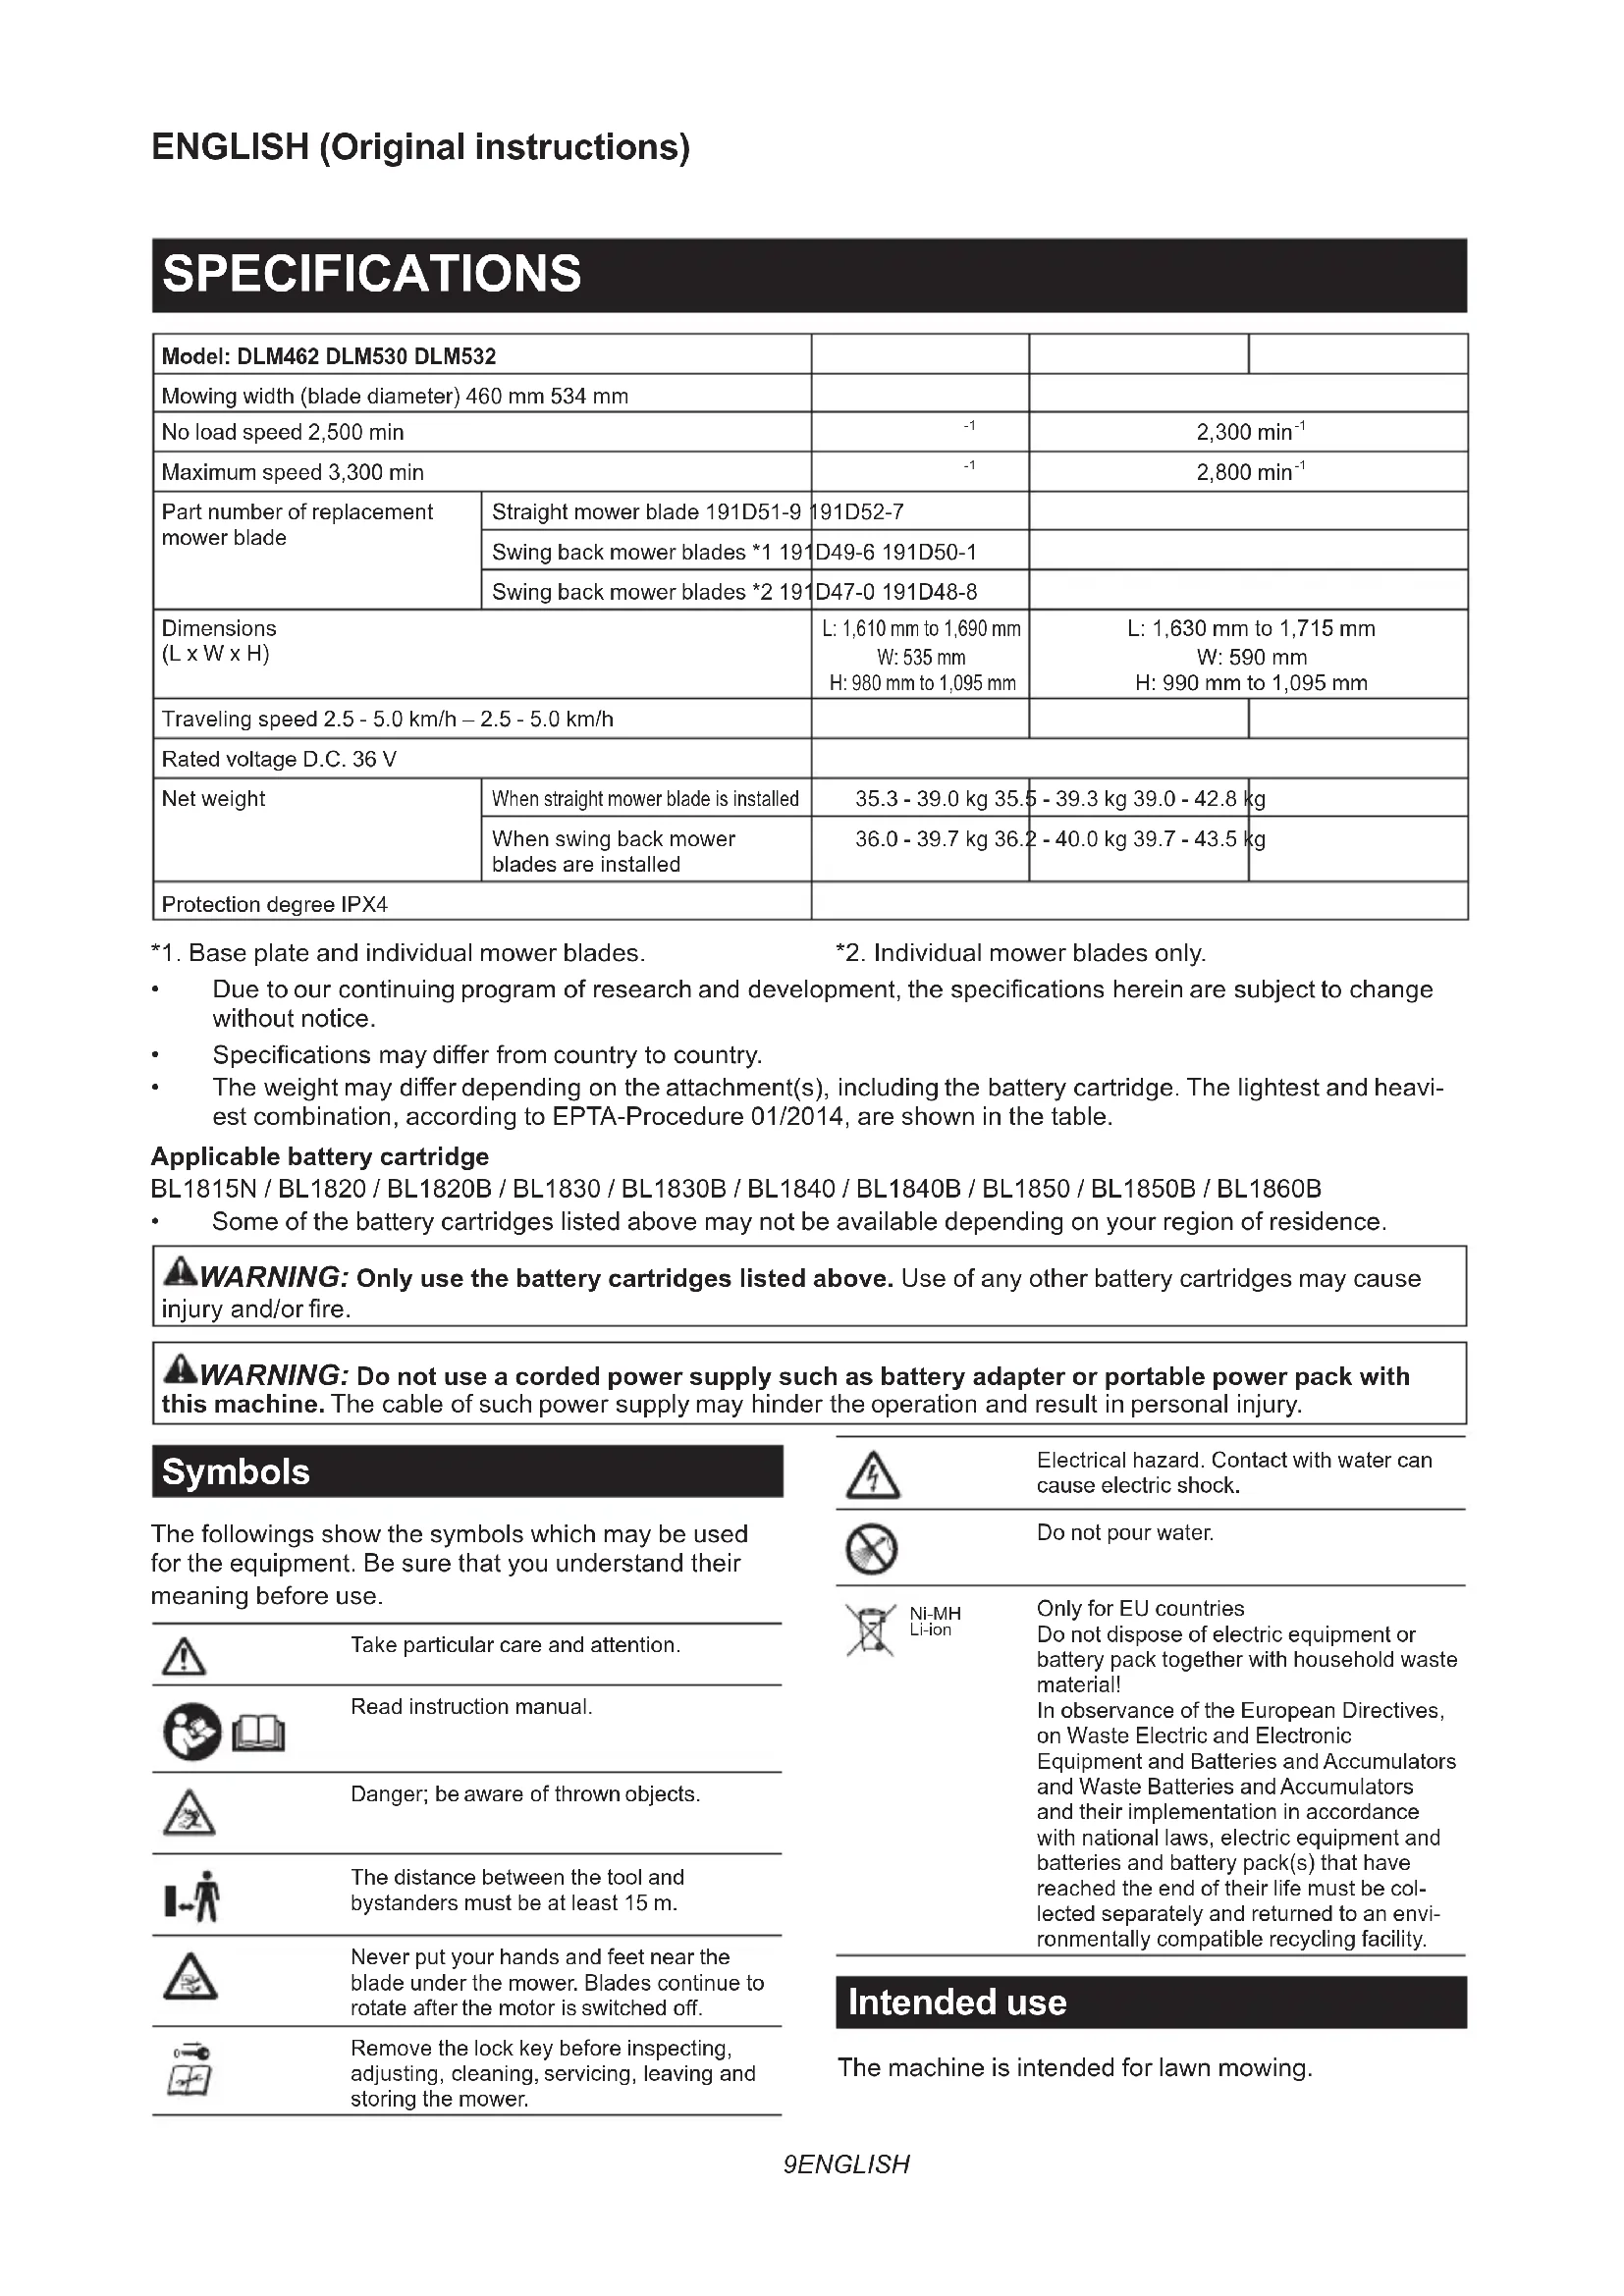
Symbols
The followings show the symbols which may be used for the equipment. Be sure that you understand their meaning before use.
| Take particular care and attention. | |
| Read instruction manual. | |
| Danger; be aware of thrown objects. | |
| The distance between the tool and bystanders must be at least 15 m. | |
| Never put your hands and feet near the blade under the mower. Blades continue to rotate after the motor is switched off. | |
| Remove the lock key before inspecting, adjusting, cleaning, servicing, leaving and storing the mower. |
| Electrical hazard. Contact with water can cause electric shock. | |
| Do not pour water. | |
| Ni-MH Li-ion | Only for EU countries Do not dispose of electric equipment or battery pack together with household waste material! In observance of the European Directives, on Waste Electric and Electronic Equipment and Batteries and Accumulators and Waste Batteries and Accumulators and their implementation in accordance with national laws, electric equipment and batteries and battery pack(s) that have reached the end of their life must be collected separately and returned to an environmentally compatible recycling facility. |
Intended use
The machine is intended for lawn mowing.
Noise
The typical A-weighted noise level determined according to EN60335-2-77:
NOTE: The values have been measured with the mower equipped with the straight mower blade.
Model DLM462
Sound pressure level (LpA):82.7dB(A) Sound power level (LWA):90.9dB(A) Uncertainty (K):3dB(A)
Model DLM530
The noise level under working may exceed 80 dB (A).
NOTE: The declared noise emission value(s) has been measured in accordance with a standard test method and may be used for comparing one tool with another.
NOTE: The declared noise emission value(s) may also be used in a preliminary assessment of exposure.

WARNING: Wear ear protection.
WARNING: The noise emission during actual use of the power tool can differ from the declared value(s) depending on the ways in which the tool is used especially what kind of workpiece is processed.
WARNING: Be sure to identify safety measures to protect the operator that are based on an estimation of exposure in the actual conditions of use (taking account of all parts of the operating cycle such as the times when the tool is switched off and when it is running idle in addition to the trigger time).
Vibration
The vibration total value (tri-axial vector sum) determined according to EN60335-2-77:
NOTE: The values have been measured with the mower equipped with the straight mower blade.
Model DLM462
Vibration emission (a_h):2.5m / s^2 or less Uncertainty (K): 1.5~m / s^2
Model DLM530
Vibration emission (a_h):2.5m / s^2 or less Uncertainty (K): 1.5~m / s^2
Model DLM532
Vibration emission (a_h):2.5m / s^2 or less Uncertainty (K): 1.5m / s^2
NOTE: The declared vibration total value(s) has been measured in accordance with a standard test method and may be used for comparing one tool with another.
NOTE: The declared vibration total value(s) may also be used in a preliminary assessment of exposure.
WARNING: The vibration emission during actual use of the power tool can differ from the declared value(s) depending on the ways in which the tool is used especially what kind of workpiece is processed.
WARNING: Be sure to identify safety measures to protect the operator that are based on an estimation of exposure in the actual conditions of use (taking account of all parts of the operating cycle such as the times when the tool is switched off and when it is running idle in addition to the trigger time).
EC Declaration of Conformity
For European countries only
The EC declaration of conformity is included as Annex A to this instruction manual.
SAFETYWARNINGS
IMPORTANT SAFETY INSTRUCTIONS

WARNING: Read all safety warnings and instructions. Failure to follow the warnings and instructions may result in electric shock, fire and/or serious injury.
Save all warnings and instructions for future reference.
Training
- Read the instructions carefully. Be familiar with the controls and the proper use of the mower.
- Never allow children or people unfamiliar with these instructions to use the mower. Local regulations can restrict the age of the operator.
- Never operate the mower while people, especially children, or pets are nearby.
- Keep in mind that the operator or user is responsible for accidents or hazards occurring to other people or their property.
- Children should be supervised to ensure that they do not play with the mower.
- Physical condition - Do not operate mower while under the influence of drugs, alcohol, or any medication.
Preparation
- While operating the mower, always wear substantial footwear and long trousers. Do not operate the mower when barefoot or wearing open sandals. Avoid wearing clothing or jewelry that is loose fitting or that has hanging cords or ties. They can be caught in moving parts.
-
Before use, always visually inspect the mower for damaged, missing or misplaced guards or shields.
-
Be sure the area is clear of other people before mowing. Stop mower if anyone enters the area.
- Do not insert the lock key into mower until it is ready to be used.
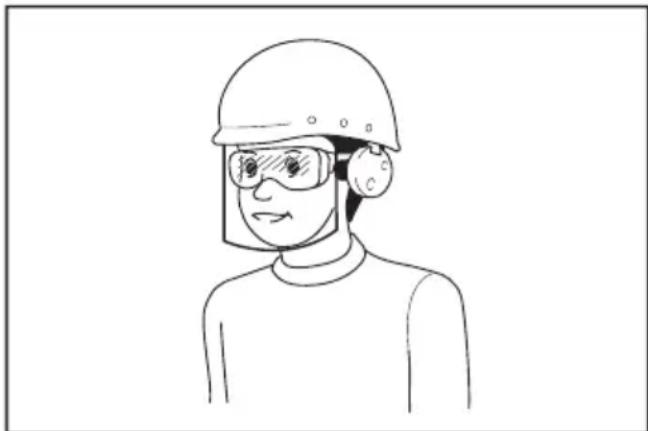
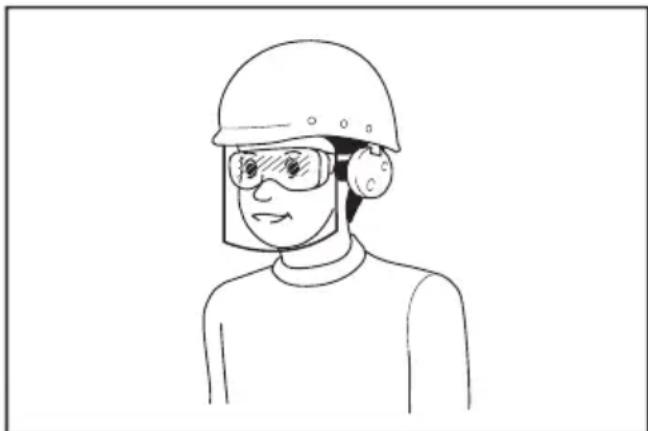
- Always wear protective goggles to protect your eyes from injury when using power tools. The goggles must comply with ANSI Z87.1 in the USA, EN 166 in Europe, or AS/NZS 1336 in Australia/New Zealand. In Australia/New Zealand, it is legally required to wear a face shield to protect your face, too.
It is an employer's responsibility to enforce the use of appropriate safety protective equipments by the tool operators and by other persons in the immediate working area.
- Check the blades or blade bolts carefully for cracks or damage before operation. Replace cracked or damaged blades or blade bolts immediately.
- Remove foreign matters such as rocks, wire, bottles, bones and large sticks from the work area before mowing to prevent personal injury or damage to the mower.
- Objects struck by the mower blade can cause severe injuries to persons. The lawn should always be carefully examined and cleared of all objects prior to each mowing.
- Watch for holes, ruts, bumps, rocks, or other hidden objects. Uneven terrain could cause a slip and fall accident. Tall grass can hide obstacles.
- Do not insert or remove the lock key in the rain.
- Use personal protective equipment. Always wear eye protection. Protective equipment such as a dust mask, non-skid safety shoes, hard hat or hearing protection used for appropriate conditions will reduce personal injuries.
Operation
- Do not overreach. Keep the balance at all times. Always be sure of the footing on slopes. Walk, never run.
-
Stop the mower and remove the lock key, and make sure that all moving parts have come to a complete stop:
-
whenever you leave the mower,
- before clearing blockages or unclogging chute,
- before checking, cleaning or working on the mower,
- after striking a foreign object. Inspect the mower for damage and make repairs before restarting and operating the mower,
-
whenever the mower starts vibrating abnormally.
-
Never operate the mower with defective guards or shields, or without safety devices, for example deflectors and/or grass basket, in place.
- Avoid using the mower in bad weather conditions especially when there is a risk of lightning.
- Wear eye protection and stout shoes at all times while operating the mower.
- Operate the mower only in daylight or in good artificial light.
- Switch on the mower carefully according to instructions and with feet well away from the blade(s).
- Take care against injury to feet and hands from the mower blades.
- Always ensure that the ventilation openings are kept clear of debris.
- Mow across the face of slopes, never up and down. Exercise extreme caution when changing direction on slopes. Do not mow excessively steep slopes.
- Use extreme caution when reversing or pulling the mower towards you.
- Stop the blade(s) if the mower has to be tilted for transportation when crossing surfaces other than grass, and when transporting the mower to and from the area to be used.
- Do not tilt the mower when switching on the motor, except if the mower has to be tilted for starting. In this case, do not tilt it more than absolutely necessary and lift only the part, which is away from the operator. Always ensure that both hands are in the operating position before returning the mower to the ground.
- Do not put hands or feet near or under rotating parts. Keep clear of the discharge opening at all times.
- Do not transport the mower while the mower is turned on.
- Avoid operating the mower in wet grass.
- Always keep a firm hold on the handle.
- Don't grasp the exposed cutting blades or cutting edges when picking up or holding the mower.
- Keep hands and feet away from rotating blades. Caution - Blades coast after the mower is switched off.
- Stop operation immediately if you notice anything unusual. Switch off the mower and remove the lock key. Then inspect the mower.
- Never attempt to make cutting height adjustments while mower is running if the mower has cutting height adjustment feature.
- Release switch lever and wait for blade rotation to stop before crossing driveways, walks, roads, and any gravel-covered areas. Also remove the lock key if you leave the mower, reach to pick up or remove something out of your way, or for any other reason that may distract you from what you are doing.
-
If the mower strikes a foreign object, follow these steps:
-
Stop the mower, release the switch lever and wait until the blade comes to a complete stop.
- Remove the lock key and the battery cartridge.
- Thoroughly inspect the mower for any damage.
-
Replace the blade if it is damaged in any way. Repair any damage before restarting and continuing to operate the mower.
-
Do not start the mower when standing in front of the discharge opening.
- If the mower starts to vibrate abnormally (check immediately)
-inspect for damage,
- replace or repair any damaged parts,
- check for and tighten any loose parts.
- Never direct discharged material toward anyone. Avoid discharging material against a wall or obstruction. Material may ricochet back toward the operator. Stop the blade when crossing gravel surfaces.
- Do not pull the mower backwards unless absolutely necessary. When you are compelled to back the mower from a fence or other similar obstruction, look down and behind before and while moving backwards.
- Shut the motor off and wait until the blade comes to a complete stop before removing the grass catcher. Beware that the blades coast after turn off.
- When you use the machine on muddy ground, wet slope, or slippery place, pay attention to your footing.
- Avoid working in poor environment where increased user fatigue is expected.
- Do not use the machine in bad weather where visibility is limited. Failure to do so may cause fall or incorrect operation due to low visibility.
- Do not submerge the machine into a puddle.
- When wet leaves or dirt adhere to the suction mouth (ventilation window) due to rain, remove them.
- Do not use the machine in the snow.
- If the cut-off grass is wet, it is likely to be clogged inside of the machine. Check the condition of the machine regularly, and remove the adhered grass as necessary.
- When operating the machine, pay attention to piping and wiring.
- Do not use a corded power supply such as battery adapter or portable power pack with this machine. The cable of such power supply may hinder the operation and result in personal injury.
Maintenance and storage
- Replace worn or damaged parts for safety. Use only genuine replacement parts and accessories.
- Inspect and maintain the mower regularly.
- When not in use, store the mower out of the reach of children.
-
Keep all nuts, bolts, and screws tight to be sure the equipment is in safe working condition.
-
Check the grass basket frequently for wear or deterioration. For storage, always make sure the grass basket is empty. Replace a worn grass basket with a new factory replacement for safety.
- Use only the manufacturer genuine blades specified in this manual.
- Be careful during adjustment of the mower to prevent entrapment of the fingers between moving blades and fixed parts of the mower.
- Check the blade mounting bolt at frequent intervals for proper tightness.
- Always allow the mower to cool down before storing.
- When servicing the blades be aware that, even though the power source is switched off, the blades can still be moved.
- Never remove or tamper with safety devices. Check their proper operation regularly. Never do anything to interfere with the intended function of a safety device or to reduce the protection provided by a safety device.
- Do not leave the machine unattended outdoors in the rain.
- Do not wash the machine with high pressure water.
- When washing the machine, be sure to remove the battery and lock key and close the battery cover, and pour water toward the bottom of the machine to which the blade is attached.
- When storing the machine, avoid direct sunlight and rain, and store it in a place where it does not get hot or humid.
- Perform inspection or maintenance in a place where rain can be avoided.
- After using the machine, remove the adhered dirt and dry the machine completely before storing. Depending on the season or the area, there is a risk of malfunction due to freezing.
Battery tool use and care
- Recharge only with the charger specified by the manufacturer. A charger that is suitable for one type of battery pack may create a risk of fire when used with another battery pack.
- Use power tools only with specifically designated battery packs. Use of any other battery packs may create a risk of injury and fire.
- When battery pack is not in use, keep it away from other metal objects, like paper clips, coins, keys, nails, screws or other small metal objects, that can make a connection from one terminal to another. Shorting the battery terminals together may cause burns or a fire.
- Under abusive conditions, liquid may be ejected from the battery; avoid contact. If contact accidentally occurs, flush with water. If liquid contacts eyes, additionally seek medical help. Liquid ejected from the battery may cause irritation or burns.
-
Do not use a battery pack or tool that is damaged or modified. Damaged or modified batteries may exhibit unpredictable behaviour resulting in fire, explosion or risk of injury.
-
Do not expose a battery pack or tool to fire or excessive temperature. Exposure to fire or temperature above 130^ may cause explosion.
- Follow all charging instructions and do not charge the battery pack or tool outside the temperature range specified in the instructions. Charging improperly or at temperatures outside the specified range may damage the battery and increase the risk of fire.
Electrical and battery safety
- Do not dispose of the battery(ies) in a fire. The cell may explode. Check with local codes for possible special disposal instructions.
- Do not open or mutilate the battery(ies). Released electrolyte is corrosive and may cause damage to the eyes or skin. It may be toxic if swallowed.
- Do not charge battery in rain, or in wet locations.
- Do not charge the battery outdoors.
- Do not handle charger, including charger plug, and charger terminals with wet hands.
- Do not replace the battery in the rain.
- Do not wet the terminal of battery with liquid such as water, or submerge the battery. Do not leave the battery in the rain, nor charge, use, or store the battery in a damp or wet place. If the terminal gets wet or liquid enters inside of battery, the battery may be short circuited and there is a risk of overheat, fire, or explosion.
- After removing the battery from the machine or charger, be sure to attach the battery cover to the battery and store it in a dry place.
- Do not replace the battery with wet hands.
Service
- Have your power tool serviced by a qualified repair person using only identical replacement parts. This will ensure that the safety of the power tool is maintained.
- Never service damaged battery packs. Service of battery packs should only be performed by the manufacturer or authorized service providers.
SAVE THESE INSTRUCTIONS.
WARNING: DO NOT let comfort or familiarity with product (gained from repeated use) replace strict adherence to safety rules for the subject product.
MISUSE or failure to follow the safety rules stated in this instruction manual may cause serious personal injury.
Important safety instructions for battery cartridge
- Before using battery cartridge, read all instructions and cautionary markings on (1) battery charger, (2) battery, and (3) product using battery.
-
Do not disassemble or tamper the battery cartridge. It may result in a fire, excessive heat, or explosion.
-
If operating time has become excessively shorter, stop operating immediately. It may result in a risk of overheating, possible burns and even an explosion.
-
If electrolyte gets into your eyes, rinse them out with clear water and seek medical attention right away. It may result in loss of your eyesight.
-
Do not short the battery cartridge:
(1) Do not touch the terminals with any conductive material.
(2) Avoid storing battery cartridge in a container with other metal objects such as nails, coins, etc.
(3) Do not expose battery cartridge to water or rain.
A battery short can cause a large current flow, overheating, possible burns and even a breakdown.
- Do not store and use the tool and battery cartridge in locations where the temperature may reach or exceed 50^ (122^) .
- Do not incinerate the battery cartridge even if it is severely damaged or is completely worn out. The battery cartridge can explode in a fire.
-
Do not nail, cut, crush, throw, drop the battery cartridge, or hit against a hard object to the battery cartridge. Such conduct may result in a fire, excessive heat, or explosion.
-
Do not use a damaged battery.
-
The contained lithium-ion batteries are subject to the Dangerous Goods Legislation requirements.
For commercial transports e.g. by third parties, forwarding agents, special requirement on packaging and labeling must be observed.
For preparation of the item being shipped, consulting an expert for hazardous material is required. Please also observe possibly more detailed national regulations.
Tape or mask off open contacts and pack up the battery in such a manner that it cannot move around in the packaging.
- When disposing the battery cartridge, remove it from the tool and dispose of it in a safe place. Follow your local regulations relating to disposal of battery.
- Use the batteries only with the products specified by Makita. Installing the batteries to non-compliant products may result in a fire, excessive heat, explosion, or leak of electrolyte.
- If the tool is not used for a long period of time, the battery must be removed from the tool.
- During and after use, the battery cartridge may take on heat which can cause burns or low temperature burns. Pay attention to the handling of hot battery cartridges.
- Do not touch the terminal of the tool immediately after use as it may get hot enough to cause burns.
-
Do not allow chips, dust, or soil stuck into the terminals, holes, and grooves of the battery cartridge. It may result in poor performance or breakdown of the tool or battery cartridge.
-
Unless the tool supports the use near high-voltage electrical power lines, do not use the battery cartridge near a high-voltage electrical power lines. It may result in a malfunction or breakdown of the tool or battery cartridge.
- Keep the battery away from children.
SAVE THESE INSTRUCTIONS.
CAUTION: Only use genuine Makita batteries.
Use of non-genuine Makita batteries, or batteries that have been altered, may result in the battery bursting causing fires, personal injury and damage. It will also void the Makita warranty for the Makita tool and charger.
Tips for maintaining maximum battery life
- Charge the battery cartridge before completely discharged. Always stop tool operation and charge the battery cartridge when you notice less tool power.
- Never recharge a fully charged battery cartridge. Overcharging shortens the battery service life.
- Charge the battery cartridge with room temperature at 10^ - 40^ (50°F - 104°F). Let a hot battery cartridge cool down before charging it.
- When not using the battery cartridge, remove it from the tool or the charger.
- Charge the battery cartridge if you do not use it for a long period (more than six months).
ASSEMBLY
WARNING: Always be sure that the lock key and battery cartridge are removed before carrying out any work on the mower. Failure to remove the lock key and the battery cartridge may result in serious personal injury from accidental start-up.
WARNING: Never start the mower unless it is completely assembled. Operation of the machine in a partially assembled state may result in serious personal injury from accidental start-up.
Installing the handle
NOTICE: When installing handles, position the cords so that they are not caught by anything between the handles. If the cord is damaged, the mower switch may not work.
- Align the holes in the lower handle with the holes in the mower body, and then tighten 4 bolts temporarily.
Fig.1: 1. Lower handle 2. Bolt
2. Firmly tighten 4 bolts which were temporarily tightened in step 1 using box wrench 13.
3. Align the hole in the lower handle with the hole in the upper handle, then insert the bolt from inside, and then tighten the nut from outside with box wrench 13. Perform the same procedure on the other side.
Fig.2: 1. Bolt 2. Lower handle 3. Nut 4. Hole
- Upper handle
CAUTION: Hold the upper handle firmly so that it does not drop off your hand. Otherwise, the handle may fall and cause an injury.
- Attach the holders to the handle.
Align the protrusions on the holder with the holes on the handle so that the protrusions fit in the holes. Position the cords as shown in the figure.
Fig.3: 1. Cord 2. Holder
Removing the mulching plug
- Open the rear cover.
Fig.4: 1. Rear cover - Remove the mulching plug while holding down the lever.
Fig.5: 1. Lever 2. Mulching plug
Installing or removing the grass basket
To install the grass basket, follow the steps below.
- Open the rear cover.
Fig.6: 1. Rear cover - Hold the handle of the grass basket, and then hook the grass basket on the rod of the mower body as shown in the figure.
Fig.7: 1. Rod 2. Handle 3. Grass basket
To remove the grass basket, open the rear cover, and then remove the grass basket by holding the handle.
Attaching the mulching plug
- Open the rear cover, and then remove the grass basket.
Fig.8: 1. Rear cover 2. Grass basket - Attach the mulching plug while holding down the lever, and then release the lever to lock the mulching plug.
Fig.9: 1. Lever 2. Mulching plug
Attaching the discharge attachment
For DLM530/DLM532
-
Open the rear cover, and then remove the grass basket.
Fig.10: 1. Rear cover 2. Grass basket -
Attach the mulching plug while holding down the lever, and then release the lever to lock the mulching plug.
-
Open the right side cover, and then attach the discharge attachment.
Fig.11: 1. Lever 2. Mulching plug
Insert the hooks of the discharge attachment under the rod of the right side cover.
Fig.12: 1. Right side cover 2. Discharge attachment
FUNCTIONAL DESCRIPTION
Installing or removing battery cartridge
CAUTION: Always switch off the machine before installing or removing of the battery cartridge.
CAUTION: Hold the machine and the battery cartridge firmly when installing or removing battery cartridge. Failure to hold the machine and the battery cartridge firmly may cause them to slip off your hands and result in damage to the machine and battery cartridge and a personal injury.
CAUTION: Make sure that you lock the battery cover before use. Otherwise, mud, dirt, or water may cause damage to the product or the battery cartridge.
CAUTION: Always install the battery cartridge fully until the red indicator cannot be seen. If not, it may accidentally fall out of the machine, causing injury to you or someone around you.
CAUTION: Do not install the battery cartridge forcibly. If the cartridge does not slide in easily, it is not being inserted correctly.
NOTE: The machine does not work with only one battery cartridge.
To install the battery cartridge;
- Pull up the locking lever, and then open the battery cover.
Fig.13: 1. Battery cover 2. Locking lever - Align the tongue on the battery cartridge with the slot on the machine, and then slide the cartridge until it locks in place with a little click.
Fig.14: (1) Battery port 1 (2) Battery port 2 (3) Battery cartridge
NOTE: Install at least 2 battery cartridges to battery port 1 or battery port 2.
- Insert the lock key in the place shown in the figure as far as it will go.
Fig.15: 1. Lock key - Close the battery cover and push it until it is latched with the locking lever.
To remove the battery cartridge;
- Pull up the locking lever and open the battery cover.
- Pull out the battery cartridge from the machine while sliding the button on the front of the cartridge.
- Pull out the lock key.
- Close the battery cover.
Switching the battery cartridges
Fig.16: 1. Battery selection switch
The machine uses 2 battery cartridges for operation at a time. Up to 4 battery cartridges can be installed to the machine. Before operating the machine, select the battery port 1 or battery port 2 by turning the battery selection switch.
NOTE: If only 2 battery cartridges are installed to the machine, be sure to select the battery port to which the battery cartridges are installed using the battery selection switch.
Machine / battery protection system
The machine is equipped with a machine/battery protection system. This system automatically cuts off power to the motor to extend machine and battery life. The machine will automatically stop during operation if the machine or battery is placed under one of the following conditions:
Overload protection
When the battery is operated in a manner that causes it to draw an abnormally high current, the machine automatically stops and the main power lamp blinks in green. In this situation, turn the machine off and stop the application that caused the machine to become overloaded. Then turn the machine on to restart.
Overheat protection
When the machine or battery is overheated, the machine stops automatically and the main power lamp lights up in red. In this case, let the machine and battery cool before turning the machine on again.
Overdischarge protection
When the battery capacity is not enough, the machine stops automatically and the main power lamp blinks in red. In this case, remove the battery from the machine and charge the battery cartridges or change the battery cartridges to fully charged ones.
Indicating the remaining battery capacity
Only for battery cartridges with the indicator
Fig.17: 1. Indicator lamps 2. Check button
Press the check button on the battery cartridge to indicate the remaining battery capacity. The indicator lamps light up for a few seconds.
| Indicator lamps Remaining | capacity | ||
| Lighted Off | Blinking | ||
| 75% to 100% | |||
| 50% to 75% | |||
| 25% to 50% | |||
| 0% to 25% | |||
| Charge the battery. | |||
| The battery may have malfunctioned. | |||
NOTE: Depending on the conditions of use and the ambient temperature, the indication may differ slightly from the actual capacity.
Control panel
The control panel has the main power switch, the mode switching button, and the indicator of remaining battery capacity.
▶ Fig.18: 1. Battery indicator 2. Mode switching lamp 3. Main power lamp 4. Check button 5. Mode switching button 6. Main power switch
Main power switch
WARNING: Always turn off the main power switch when not in use.
To turn on the machine, press the main power switch. The main power lamp lights up in green. To turn off the machine, press the main power switch again.
NOTE: If the main power lamp lights up in red or blinks in red or green, refer to the instructions for machine/battery protection system.
NOTE: This machine employs the auto power-off function. To avoid unintentional start up, the main power switch will automatically shut down when the switch lever and drive lever (if equipped) are not pulled for a certain period after the main power switch is turned on.
Mode switching button
You can switch the operating mode by pressing the mode switching button. When the machine is turned on, the machine starts up in the normal mode. When you press the mode switching button, the machine shifts to the noise reduction mode and the mode switching lamp lights up in green. In the noise reduction mode, you can decrease the noise at mowing. When you press the mode switching button again, the machine returns to the normal mode.
Indicating the remaining battery capacity
Press the check button to indicate the remaining battery capacities. The battery indicators correspond to each battery.
| Battery indicator status | Remaining battery capacity | |
| On | Off | |
| 50% - 100% | ||
| 20% - 50% | ||
| 0% - 20% | ||
NOTE: The indicator lamps for remaining battery capacity is just for a reference. The actual battery capacity may differ depending on the usage conditions.
NOTE: Before you press the check button to indicate the remaining battery capacities, stop the machine.
Switch action
WARNING: Before installing the battery cartridge, always check to see that the switch lever actuates properly and returns to the original position when released. Operating the machine with a switch that does not actuate properly can lead to loss of control and serious personal injury.
NOTE: The mower does not start without pressing the switch button even the switch lever is pulled.
NOTE: Mower may not start due to the overload when you try to mow long or dense grass at a time. Increase the mowing height in this case.
This mower is equipped with the lock key and handle switch. If you notice anything unusual with either of the lock key or switch, stop the operation immediately and have them checked by your nearest Makita Authorized Service Center.
For DLM462/DLM532
- Install the battery cartridges. Insert the lock key, and then close the battery cover.
- Select the battery cartridges used for operation by turning the battery selection switch.
- Press the main power switch.
- Pull the switch lever toward you while holding down the switch button. Release the switch button as soon as the motor starts running.
Fig.19: 1. Switch button 2. Switch lever
NOTE: If the lock key is not inserted, the power lamp blinks in green when you pull the switch lever.
- While holding the switch lever, push the drive lever forward and hold it to drive the rear wheels.
Fig.20: 1. Drive lever
NOTE: You can drive the rear wheels by pushing the drive lever forward and hold it without pulling the switch lever.
- Release the drive lever and the switch lever to stop the machine.
For DLM530
- Install the battery cartridges. Insert the lock key, and then close the battery cover.
- Select the battery cartridges used for operation by turning the battery selection switch.
- Press the main power switch.
- Pull the switch lever toward you while holding down the switch button. Release the switch button as soon as the motor starts running.
Fig.21: 1. Switch button 2. Switch lever
NOTE: If the lock key is not inserted, the power lamp blinks in green when you pull the switch lever.
- Release the switch lever to stop the motor.
Adjusting the mowing height
WARNING: Never put your hand or leg under the mower body when adjusting the mowing height.
WARNING: Always make sure that the lever fits in the groove properly before operation.
The mowing height can be adjusted in the range of between 20mm and 100mm .
Remove the lock key, and then pull the mowing height adjusting lever outward of the mower body and move it to your desired mowing height.
Fig.22: 1. Mowing height adjusting lever
The table below shows the relationship between the number on the mower body and the approximate mowing height.
| Number Mowing height | |
| 1 20 mm | |
| 2 26 mm | |
| 3 32 mm | |
| 4 39 mm | |
| 5 47 mm | |
| 6 55 mm | |
| 7 63 mm | |
| 8 74 mm | |
| 9 86 mm | |
| 10 100 mm | |
Hold the front grip or the lower handle with one hand, and then move the mowing height adjusting lever with the other hand.
Fig.23: 1. Mowing height adjusting lever 2. Lower handle 3. Front grip
NOTE: The mowing height figures should be used just as a guideline. Depending on the conditions of the lawn or the ground, the actual lawn height may become slightly different from the set height.
NOTE: Try a test mowing of grass in a less conspicuous place to get your desired height.
Grass level indicator
Grass level indicator shows the volume of mowed grass. When the grass basket is not full, the indicator floats while the blades are running.
Fig.24: 1. Grass level indicator
When the grass basket is almost full, the indicator does not float while the blades are running. In this case, stop the operation immediately and empty the basket.
Fig.25: 1. Grass level indicator
NOTE: This indicator is a rough guide. Depending on the conditions of inside of the basket, this indicator may not work properly.
Adjusting the handle height
CAUTION: Before removing the bolts, hold the upper handle firmly. Otherwise, the handle may fall and cause an injury.
The handle height can be adjusted in two levels.
- Remove the upper bolts of the lower handle using box wrench 13, and then loosen the lower bolts.
Fig.26: 1. Upper bolt 2. Lower bolt
- Adjust the handle height, and then tighten the upper and lower bolts firmly.
Adjusting the traveling speed
For DLM462/DLM532
Fig.27: 1. Speed lever
The traveling speed can be adjusted with the speed lever. To decrease the speed, pull the lever toward you, and to increase the speed, turn the lever forward.
Using mulching plug
The mulching plug allows you to return the cut grass to the ground without gathering the cut grass in the grass basket. When you operate the machine with the mulching plug, be sure to remove the grass basket.
NOTICE: When using the machine with the mulching plug, make sure that the total length of grass after cutting is 30mm or more, and the cut length is 15mm or less.
Fig.28: (1) 30mm or more (2) 15mm or less
Using discharge attachment
For DLM530/DLM532
The discharge attachment allows you to discharge the cut grass to the ground from the right side of the machine without gathering the cut grass in the grass basket. When you operate the machine with the discharge attachment, be sure to install the mulching plug and remove the grass basket.
Electronic function
The machine is equipped with the electronic functions for easy operation.
- Constant speed control of blade rotation
- Electronic speed control for obtaining constant speed. Possible to get fine finish, because the rotating speed is kept constant even under load condition.
- Soft start at driving
- The soft-start function minimizes start-up shock, and makes the machine start smoothly.
- Electric brake
- This machine is equipped with an electric brake. If the machine consistently fails to quickly stop the mower blades after releasing the switch lever, have the machine serviced at Makita Authorized Service Center.
OPERATION
Mowing
WARNING: Before mowing, clear away sticks and stones from mowing area. Furthermore, clear away any weeds from mowing area in advance.
WARNING: Always wear the safety goggles or safety glasses with side shields when operating the mower.
CAUTION: If the cut grass or foreign object blocks up inside of the mower body, be sure to remove the lock key and battery cartridge and wear gloves before removing the grass or foreign object.
NOTICE: Use this machine for mowing lawn only. Do not mow weeds with this machine.
Fig.29
Firmly hold the handle with both hands when mowing. The mowing speed guideline is approximately 7 to 14 meters per 10 seconds.
Fig.30
The center lines of the front wheels are guidelines to mowing width. Using the center lines as guidelines, mow in strips. Overlap by one half to one third the previous strip to mow the lawn evenly.
Fig.31: 1. Mowing width 2. Overlapping area
- Center line
Change the mowing direction each time to prevent the grass grain pattern from forming in just one direction.
Fig.32
Periodically check the grass basket for mowed grass. Empty the grass before it becomes full. Before every periodical check, be sure to stop the mower then remove the lock key and the battery cartridge.
NOTICE: Using the mower with the grass basket full prevents smooth blade rotation and places an extra load on the motor, which may cause breakdown.
Mowing a long-grass lawn
Do not try to cut long grass all at once. Instead, mow the lawn in steps. Leave a day or two between mowings until the lawn becomes evenly short.
Fig.33
NOTE: Mowing long grass to a short length all at once may cause the grass to die. The cut grass may also block up inside of the mower body.
Emptying the grass basket
WARNING: To reduce a risk of accident, regularly check the grass basket for any damage or weakened strength. Replace the grass basket if necessary.
- Release the switch lever and drive lever (for DLM462/DLM532), or release the switch lever (for DLM530).
- Remove the lock key.
- Open the rear cover and take out the grass basket by holding the handle.
Fig.34: 1. Rear cover 2. Handle 3. Grass basket
- Empty the grass basket.
MAINTENANCE
WARNING: Always be sure that the lock key and battery cartridge are removed from the mower before storing or carrying the mower or attempting to perform inspection or maintenance.
WARNING: Always remove the lock key when the mower is not in use. Store the lock key in a safe place out of reach of children.
WARNING: Wear gloves when performing inspection or maintenance.
WARNING: Always wear the safety goggles or safety glasses with side shields when performing inspection or maintenance.
NOTICE: Never use gasoline, benzine, thinner, alcohol or the like. Discoloration, deformation or cracks may result.
To maintain product SAFETY and RELIABILITY, repairs, any other maintenance or adjustment should be performed by Makita Authorized or Factory Service Centers, always using Makita replacement parts.
Maintenance
- Remove the lock key and battery cartridges, and then close the battery cover.
- Put the mower on its side so that the mowing height adjusting lever comes to the upper side. Clean grass clippings accumulated on the underside of mower deck.
- Pour water toward the bottom of the machine to which the blade is attached.
NOTICE: Do not wash the machine with high pressure water.
- Check all nuts, bolts, screws, etc. for tightness.
- Inspect moving parts for damage, breakage, and wear. Damaged or missing parts should be repaired or replaced.
- Store the mower in a safe place out of the reach of children.
For DLM462/DLM532
NOTICE: Do not pour water to the area shown in the figure. Pouring water to the motor unit may cause a malfunction of the machine.
Fig.35: 1.Area where water should not be poured
Carrying the mower
When carrying the mower, hold the front grip and rear grip with two people as shown in the figure.
Fig.36: 1. Front grip 2. Rear grip
Storing
Store mower indoors in a cool, dry and locked place. Don't store the mower and charger in locations where the temperature may reach or exceed 40^ .
Removing or installing the mower blade
WARNING: The blade coasts for a few seconds after releasing the switch. Do not start any operation until the blade comes to a complete stop.
WARNING: Always remove the lock key and battery cartridge when removing or installing the blade. Failure to remove the lock key and battery cartridge may cause a serious injury.
WARNING: Always wear gloves when handling the blade.
Removing the mower blade
For models equipped with straight mower blade
- Put the mower on its side so that the mowing height adjusting lever comes to the upper side.
- To lock the blade, insert the pin into a hole on the mower body.
- Turn the bolt counterclockwise with box wrench 17.
Fig.37: 1. Mower blade 2. Pin 3. Box wrench
- Remove the bolt, and then mower blade.
Fig.38: 1.Blade support 2.Mower blade 3.Bolt 4.Protrusion
NOTICE: When installing the mower blade, make sure that the protrusions on the blade support fit in the holes in the mower blade.
For models equipped with swing back mower blades
- Put the mower on its side so that the mowing height adjusting lever comes to the upper side.
- To lock the base plate, insert the pin into a hole on the mower body through a hole on the base plate.
- Turn the bolt counterclockwise with box wrench 17.
Fig.39: 1. Pin 2. Base plate 3. Box wrench
4. Remove the bolt, and then base plate.
Fig.40: 1.Blade support 2. Base plate 3.Bolt 4.Protrusion
NOTICE: When installing the mower blades, make sure that the protrusions on the blade support fit in the holes in the base plate.
-
To remove the individual mower blade, turn the bolt counterclockwise with box wrench 17 while holding the base plate.
Fig.41: 1. Base plate 2. Mower blade 3. Box wrench -
Remove the nut, washer, spring washer, mower blade, and bolt in order.
▶ Fig.42: 1. Bolt hole 2. Bolt 3. Mower blade 4. Spring washer 5. Washer 6. Nut
NOTICE: When tightening the nuts to install the individual mower blades, apply 30 N·m as tightening torque.
NOTICE: When installing the individual mower blade, be sure to attach the spring washer in the direction as shown in the figure.
NOTICE: When installing the individual mower blade, be sure to insert the bolts into the bolt holes shown in the figure.
Installing the mower blade
WARNING: Install the mower blade carefully. It has a top/bottom facing.
WARNING: Tighten the bolt clockwise firmly to secure the blade.
WARNING: Make sure that the mower blade and all the fixing parts are installed correctly and tightened securely.
WARNING: When you replace the blades, always follow the instructions provided in this manual.
NOTICE: After installing the mower blades, remove the pin from the mower body.
To install the mower blades, perform the removal procedure in reverse.
TROUBLESHOOTING
Before asking for repairs, conduct your own inspection first. If you find a problem that is not explained in the manual, do not attempt to disassemble the machine. Instead, ask Makita Authorized Service Centers, always using Makita replacement parts for repairs.
| State of abnormality Probable cause | (malfunction) Remedy | |
| Mower does not start. Two battery cartridges are not installed. Install two charged batteries. | Battery problem (under voltage) Recharge | battery cartridges. |
| the battery cartridge. If recharging is not effective, replace battery cartridge. | ||
| The lock key is not inserted. Insert the lock key. | ||
| Battery selection switch is not in the correct position. | Select the battery port to which the battery cartridges are installed using the battery selection switch. | |
| Motor stops running after a little use. | Battery's charge level is low. | Recharge the battery cartridge. If recharging is not effective, replace battery cartridge. |
| Cutting height is too low. Increase the cutting height. | ||
| Cut grass is clogged in the mower. Remove the clogged grass from the mower. | ||
| Motor does not reach maximum RPM. | Battery cartridge is installed improperly. Install the battery cartridge as described in this manual. | |
| Battery power is dropping. Recharge the battery cartridge. If recharging is not effective, replace battery cartridge. | ||
| The drive system does not work correctly. | Ask your local authorized service center for repair. | |
| Mower blade does not rotate:→ stop the mower immediately! | Foreign object such as a branch is jammed near the blade. | Remove the foreign object. |
| The drive system does not work correctly. | Ask your local authorized service center for repair. | |
| Abnormal vibration:→ stop the mower immediately! | Blade is imbalanced, excessively or unevenly worn. | Replace the blade. |
OPTIONAL ACCESSORIES
CAUTION: These accessories or attachments are recommended for use with your Makita machine specified in this manual. The use of any other accessories or attachments might present a risk of injury to persons. Only use accessory or attachment for its stated purpose.
If you need any assistance for more details regarding these accessories, ask your local Makita Service Center.
- Mower blade
- Makita genuine battery and charger
NOTE: Some items in the list may be included in the product package as standard accessories. They may differ from country to country.
SPÉCIFICATIONS
Symboles
ACCESSIONS EN OPTION
WAARSCHUWING: Draag gehoorbescheming.

VEILIGHEIDSWAARSCHUWINGEN
BELANGRIJKE
VEILIGHEIDSVOORSCHRIFTEN

OPMERKING: Breng minstens 2 accu's aan in occupoort 1 of occupoort 2.
OPTIONELE ACCESSOIRES
Móvo yia xwpe ts Eupwnns
H oumuoppwong EK Tepiaaβavetai w
Papaptna A oTo npov yxεipidio odnyiwv.
IPOEIAOIOIHSEI AΦAΛEIA
ZHMANTIKEOADHIGEAΦAIA
A NPOEIAONOIHSH: Aiaaote oaes TIG TPOeI- 0toinoeis yia nva aqaleia kai oaes tig onyiec. H nponn twv TPOeIOToiAnewkai onnyiw MTOpei va kataanfgei e neektpoTAnxi, TUPKayia n/ KAI Obaapo Tpaumatio.
UlaTe oaes TIG POeIOToIOeIc KAI TIG Oanyies yia eAovtikn npaTouTn.
Ekraiaeuaon
- Aiaaote Tc odnyie c npoeKTiké Egoikeiwothe ie t a xeiipotnpia kai tn owtn xpnon nns unxavnc ykazov.
- Mny apnve Tne naiia n atoua tou dey ywpi Gouv autes tic onyies va xnpoiotioov tn mnxavn Ykaov. Mtopei va utapxei Tepiopios nAikias ia to xeipiotn bacei totikuv kavoviouiv.
- Mn xepiEeTe Tn Tn unxavn ykaov otav aaaa atoqa, EIDIKA TAIIa n Katoikidia, piokoVTai oE KOTIVn aTIOtaon.
- Na θμασε οτι Μεχρισης έ Μχροσης είναι utεύθυνος για atuxήματη κινδύνους τοῦ φιστανται αλλα ατομα ηι διοκτησία τούς.
- Ta naiδiα θα πρεπεν α επηnpouvτai για εξασφαλιοτεί Οι δεν naiζουν με τη μηχανή γκαζόν.
- KataoTaon -Mn xeipieote Tn mXavn yKaoov utro Tnv eTnpeia vapKWTIKwv, aAkoa n aAww qapakwv.
PnoeToia
- KaTao xeiipioo tro nuxavnc ykaov va oopate naVTA KAATAAa UTOOBnata KAI paKpu TAVTEoVI.Mn xeipceote tn unxavnykaov gUTOALUToI n e avoikt aovtaiia.ATPOEUYETe va oopate poxa n KOUMnpata Tou eivai xaap a hexouv Kopobovia n OKOIVIA TOU kpemovtai. MTopei va TIAOTUV OSTA KIOUVEA epn.
- PIV Tn xpno, navva eTtEwpeite OTTKa Tn mXavynkaov ia pooataeutika n kaLmuatae Znui, nou aeitouv n exouv totoeetnei avbaogeva.
- Bebaiowte oTOnv Tepioxn dev utapxouva aataoapaniv kevinote va koupuee To ykaov. 2hote n mnxavn ykaov av eioaekai KaTIOc OTnv Tepioxn.
- Mny EIOayayETo KAEiOaOaIaONs Otn mXavn YkaZov MEXPI va Eiva EToIIN yPOn.
- Na φopáte πávτa προσαteutiká yuaia yia va πρoσa-TEUETE ta maia oac ató tpaumatioó odav xpnoiotoeite nλeKtpiKa εpyaia. Ta πρoσateutiká yuaia πpétnei va oumuopφwovvtai μe to πρotutno ANSI 287.1 otic HNA, to πρotutno EN 166 σtnv Eupwnη to πρotutno AS/NZS 1336 σtnv Auotppaia/Nεa Znλavδia. Σtnv Auotppaia/Nεa Znλavδia, attaieitai atto vómo va φopáte kai πpω w πidα yia tvπoσaia tou pooiwou ca.
O epyoBOTc exei TnV eUeuvv a EITIaAaleTn Xpnoi Kaataaannou PPOOTATEUTIKOU EOTIAOu OaPaeiaac anTOUC xEPIOTcTou epyaieiou kai aTO aAAA atoua Tou pioKovTAtnv aeON TEPIOXn epyaiaC.
- Piv aTn aeitoupyia, va eEvxTe TPOE- KTKa Tc IaueS n Ta uoulovia Aauw yia paiaata n Znua. Na avtkaoiotate aoeowc Tic paioeves c kATEOTpaumvecs auec n moulovia aauw.
- ATOUAPUVE T EVA UIAK OITWC TETPEG, KALOW DIA, MTOUKAIA, KOKAa KaI EYALA EULA aTIO TIV TEPIOXn EPyaoia c PIV aTIO TO KoUPeMa Tou YKaOv YIA TNY aTNOuyn TPOoWNIKOu TpaUaTI- Oou n TPOkAnos Znuiac oTN uNxav YKaOv.
- Ta avtikeiEv oTa oToia exei TPOoKpouoei n LapaTn mnxavns ykaZov mTopei va Tpoka- Aeouv Ooapop Tpaumatioo o avpwouoc. PpTeiv aEetazete TPOeKTiKa to ykaOv kai va aTOpakpuve oA ta avtikeiEv Tou eMTOdiQouv TPIV aTto KAe Koupepa Tou ykaZov.
- PpOeXETYia TpuTc, auAki, Eoykwuata, TETpeC n aAa KpuP aavtkeiEvA.To avooi- ooppo edaoos mTOpEVA pokaeei atuxnua Oia0nnc kai TTwOns.To yAo ypaoiDi mTOpEVA kpueEPTODia.
- Mny toTOnoTeTe n aqaipeite To KkEiδi aαφaI- onc stn bpoxn.
- Na xpnoiopoieite atoikó eotlaiouo npoota- oiaç. Na φopate πavta ppoataia μatwv. Eav xpnoiopoite TO owtO TPOOATEUKO eotlaiouo, OTWCS TPOOWTIDA kata ts CKovnc, avioIAOTIKA TTATOUTOA aqalaeic, KpavoN TPOOATEUTKO akons, avaloya ME TIG OUVTHKc, 0aEiwTe i kivduvoTtPoknong TPOOHTIKWTPaupatiowv.
Aeioupyia
- Mny TeVTwveote UTepeoikKa. Na OTekeote Tavtoe IOopponmeva. Na EIOte Tavta BepaioI OTExTe KaIo TATnma OE TAAyieC. Na TEPnataTe, va mnu TpeXeTe TOTe.
- Σαμαποτε ηνηχανγκαζόν καβγαλτο κλειδι ασφαλισης, καβεβαιωθείτε στι ύλα τα κΙνουμενα ερην εχούν ακινητοποιθει πλήρως:
- καθε φρα του ατομακρύνεσε ατό τη μχανη γκαζόν,
- πριν καθαρίσετε εμπόδια ἡξεφράξετε τη χούν,
- πριν ελέγξετε ἡ καθαρίσετε τη μχανη γκαζόν η πριν εκτελέσετε εργασίες σε αὐτή,
- Μετά από την πρόσκρουση σε ξένο αυτικείμενο. Επιθεωρόπετε τη μχανη γκαζόν γία την ὄπαρξη ζημις και πραγμοτοιπότε TIG Επιδιορθωσείς πριν τήν επανεκκίνηση και τήν υποŋ TŋS,
- ΟΤΟTE n μχανη γκαζόν αρχίσει να δονείαι μη φύσιολογία.
- Mn xepiEeote Tn unxavyn ykaov e EaatTwpatikaa PPOoTateutika n kaumuata n XwpicTis diataeic aoaaleia, ia npaddeiyma, dia-taeic napektpotnc n/kaia kai kaaltheta ypaoiou, stn theon touc.
- ATOPOUYETINXPONTNSunxavns ykaov o aoxnues kaipikeosuvthkecs, EIDiKa otav utapXeIKVbUoC KepauuWv.
- Na φopáte πávτa προστateutiká μαtiów kai avθεktiká παπóúTóA otav xεipíζεOTE tη μnxavn ykaζov.
- Na xεiπεσετη μnxavγκαζóv μovo ortav éxει ακομα φως εξω ἡ Με καλό τεχνntó φωτισμό.
-
EvpyoToinote PPOeKtikα Tn unxavnykaov σuφwva με TIC oynyies KAI με Ta TIObia oac μakpiα aTTO TIC λaues.
-
Na προεχετε ωσεν α μην τραμαισετε τα πόδια και τα Κέρια σας από τις λάμες της μήκα-νής γκαζόν.
- Na βεβαιωνεοτε πάντα στίοι Μπές εξαερισμου εἰναι καθαρές.
- Na KIVNATE KA TAIATOS TNS PPOOQNS TNS PAAYIAC, TOTE PPoS TA ETTAVW N KATW. Na EIOTE IIAITEPA TPOOEKTIKOI OTAV AALACETE KATEU-THUVON SE PAAIECS. MNV KOUPEUETO YKAZOV OE EGAIPETIKA ANOTOUECS PAAYIECS.
- Na eioTe iiaitepea TPOoEKTikoI otav KIVEiote TPOc Ta Niaw n TpaBATE n mXavn YkaCov TPOc To Hepocsigma.
- OI auec npetie va eivai akivntooinnevec otav npetie va yeipete TN uXavn ykaov ia metapopakata nT obieuon etiaveiw EKTOS ATO Ykaov kAI KATA T N Etaopapns mXavn ykaov aTROAIPoC TIV TEPIOxN OTou Xpnoipotoine i.
- Mn yepve Tn unxavnykazov otav evpyoTIOIE TE TO MOTEP, EKTOC AV TPETEVA YEPVE Tn unxavnykaZOV YIA TNV EvapgN. Ze autn TNV TEPITIWOn, mV n T yepve TPEPIOATEPO aTo o0o eivai aTolutwC aTAPaIITNO KAI VA ONKWvETe MVO To TMJua TPO Bpioketai paKpia aTo To xepiOTn. Na EsaopaLizETe NAVTA OTI KAI ta Duo xepia Bpiokovtai OTN LEIToupyIKn Theon TTPIV ENIOTpeyETe Tn unxavnykazov oTo Edeltaqos.
- Mn aZeTe Ta Xepia n Ta Tóbia Oac KovTa n KAtw aTTOPEIOTpeOμεva μépn. Meivete paKpiα aTTo avoiyμa EKKévwoŋc Kaθe OTiyμn.
- Mn Μεταφέρετη μήχανή γκαζόν ενώ εἰναι ευργοποιμένη.
- Anopeuyete To Xeipioo Tns unxavns ykaov 8pvevo ykaov.
- Na kpatate navta tn nOtαεpá.
- Mny TIAVETE TIC EKTEeIEVEc LAeC KOTnC n Ta KOTTIKA Akpa OTAV ONKWVETe N Kpatate Tn unxavn ykazov.
- Diatnpeite ta xepia kai ta nodia oac paekia ano TIC TEPiOTPeOeVEs λaues. Ipooox - OI λaues ouvexicouv va TEPiOTpeovtai teta nV atvepyoToinon Tns mXavns ykaqov.
- AiaKoWTE aEeOwC Tn AEitoupyia av TnaptnpnoTe OTiOnTne aovvNIOTo. 2bnoTe Tn unXavnyKaZov KAI ByaIte To KAEiDi aOpaAionS. Tn OuvExia, EITeepnoTe Tn unXavn yKaZov.
- Mny EITIXEIPNOETIOTe va KAVETe puOmuEIC TOU uouc KOINc Evw n uXavn yKaoov Bpi- OKetai e LEIToupyia, OTNV TEPiTTWOn TOU n uXavn yKaZov diaTei duvatoTnta puOmuNc Uouc KOINc.
-
AΦnoTe To moXIo δiakOttn Kai TEPiEvete μexpi va Otaupatnoe i n TEPiOTpOoH Tn λaUac πiv diaoxioeTE iwiTikouc dpouoc, TzOobpoia,dpouoc kai OTIOAodnTne TEPioxn Tou eivai kaUmuevn e xalikia. Etnoç Byalte To kLeiDi aopalionc av aTOUaKpuVtheta aTo tn mXavnykov, av OKuVEte yia va TIAoTe n va aTOUaKpuVEte kati aTo pTPOTa oac n Yia OTIOVOBnTote allo loyo TOU mTopei va aTIOIaei Tnv TPOooxN oac aTo auto Tou KAVETE.
-
Av n unxavn ykaov xTuTnoe i e eva xevo avtkeiemevo, aKoAouhntote Ta Engs hmuata:
-
Σβποτε Πη μnxavγκαζόν, αφησε Φι Μχλό διακόπηιŋ και περιμένετε μέχρινα σταματήσει πλήρωςν περιστέρεται λάμα.
-ByaTe To kEiDi aOphiAionc KAI TnV KaeTa μTatapiac. -
Eπθεωρησe καλa η μnxavγκαζóv γia tuxóv ημια.
-Avtikataohtote Tn lapaav exei unootei Znmu a e otioovhntote tpoTo. EtnkeuaoTe kae Znmu a piv Tnv eTavaevapg n kai ouvexiote va xpnoioutoie Te n mxavn ykaov. -
Mny EvepyoToie Tn uXavyn kauov otav oTekeote npoota aTo to avoiya EKKevwongc.
-
Av n unxavn ykaov apxioe i va doveitai e aouvnto Tpoto (eEyTe aeoos)
-επιθεωρήσεγίαζημία,
-avTikataoTnote n ETTIOKEUaOte Ta KATEOTpaumuepn,
-éyTe yia xaaapá épn kal oipTe Ta avaoya.
- Mny kateutheta To UAIKO EKKEVWONG TPOC Kaveva atofo.ATOPOUYETN V EKKEVWOn UAIKOU ENAVO TEIOXHOEMTIO.To uAIO MU Pei va avannoeTIPOC TOV Xeiipnt.N Taumntote TN laa otav TEPVATEENIPAEIEcE YAJIki.
- Mny TpaBnEte Tn mnxavn ykaov Tpoc ta Tiaw EKTOS av evai anoIutw atapaitno.
Otau eioe avaykaoEvoi va eivnoeTe Tn unxavn ykaov npoc ta tiow ato qpaxtn n aalnpopoio eptiodio, kaitse katw kai npoc ta tiow tpiiv eakivnthei npoc ta niow aala kai evu eakivste poc ta tiow. - ΣβησE TO μοτέρ KAI περιμενΕTE VA σΤαμαπθει VA KIVEITAI EVTEλως η λάμα πΠΙν βγαλεTE TOV Ουγκραπρα χορταρίου. Προσχετε επεδόν οΙ λάμες περισρεφεται ελεύθερα μετά το σβήσιμο.
- Otav xpoiopoioite to mnxavna o e 1aotwn edaooc, bpeymuevcs kiaoeic n oai- 0 npo epoc, va npoeexte to natma ocac.
- Anopeuyete va epyaceote o KaKo TepiAALov, onou avapevetai auqnevN kOtwn Tou xpnotn.
- Mn xpnoiopnoite To mnxavma e aoxnue Kaipike ouvtheta, otav n opatotnta evai Tepiopiouevn. Av dev npnaete autn tvnpoietoioan, mtopeia v npoknthei TTwaon h avthetaouevn aeitoupyia loyw xamns opatotntac.
- Mnu Bpuizete To unxavna oAakkoBα.
- Otav n xwma koAouv oTo 0rto avappoonns (napaBupo eaepiOou) Aoyw bpoxn, aqaipeote Ta.
- Mny xpoiooioeite to unxavna oTo xiovi.
- Av To Koumuévo Ykaçov Eivai BpEyévo, Eivai Tlthavó va φpaéi OTO EOWTEPIKO Tou μnxavnμatoc. Na λéyyxete Tnv KAATAOaON Tou μnxavnμatoc TAKTIA, KAI αφaipéOTE TO TPOOKoAAmμévo ypaosi OTWCS ATIeITAI.
- IpooEgTe Touc oWAnves Kai Ta Kaawdi KaTa To XeipioTo Tou mXavnAtosc.
- Mny xpoiooieite nekpiik npoxn e Kaawdo, oTWC TPOOAPOyea PATAWv npoptnn nekpiik npo0oToN, e auto to mnxavna.To kaowio teoiac nekpiokns npoxnC mTpei va duokolpsi tN aeitoupyia kai va Tpokaeeipaupatioo.
Uvtnpnon kai aTOnkeuon
- Avtikataotnte ta apuEv a n kateotpaumu eva epn yia aovaaia. Na xpnoiuotioiteMuovo vvnoia avtaaaktiKa Eaptnmuata KAI aEouap.
- Eπεωρησε κα συντηρησε η μnxavn yka-ζόv TAKTIKA.
- Otav xpnoiopoioieitai, aTOnkkeoTe Tn mXavn ykaov paKpia aTROaia.
- Aatnpie Ophi ta Ta Taa, ta moulovia kai Tic BiEcs yia va ebaiwte otio Egoanoc piokeTai o aopaln aeitoupyikn kaataaon.
- Na λέγχετούνα το καλάθι γρασίδιου για φθόρα ἡ Αποβάθμιση. Kaṭa Σην αποθήκευση, να φροντίζετε πάντα ωοτε το καλάθι γρασίδιου να εἰναι ἀδειο. Na αντικαίσιτάτε ενα φθαρμένο καλάθι γρασίδιου με ευνα καίνουργιο εργοστασικό ανταλλακτιός, για λόγους σαφαλείς.
- Na xpnoiopoioite movo yvnoies alecs tou kataoKEuaotn Tou kathetaovtae auto to Exyxipidio.
- PooexeKataTn diapkeia puoioeuw ot n unxavn ykaov ia tvn aTPOuyn TAYIEUoNG daKTULWy MTeaTu wV KIOUeuvw Aauw KAI twv Otaepowpepovtns unxavns ykaov.
- ELeyTe OE TAKIka diaotnmuata av To mToulovi OTEpewo ncauac evai kala ophiyevo.
- Na aφηνετe παντa ημnxavγκαζον va kpuωσει πριν ηην ατοθήκευση.
- Kata tv EKTEeON epyaow oepis otis , va yywpiZeTe oTI oi mTopei va ouvexizouv va kivouvtai npoti n TpopoDooia aTVEpyoTOINkE.
- Noté unv aipieite n npapiaiceticoukeuec aoaaleiac.Na eayxete taktikatn owtn aeitoupyia touc.Mnv kavete troTe tntota yia va npaeubeite me tny npoopicioeyn aeitoupyia iaocukeun caoaaieiac n va ueote nvy pootaia Tou npexetai ano ia oukeun aoaaleiac.
- Mny aqnvete To unxavna xwpi c ttnpnon e EeWTEPIKoC Xwpouc Otn Bpoxn.
- Mny TlAevTe To mnxavnmae vepo uynannc nieons.
- Otav πλένετο Μιχαύνημα, φροντίσεν ααφαιρεσετην μπαταρία και τλείδι ασφαιός καθως και νλείσετε Μαλυμμα μπαταρίων, και πίσεν ερό προς Ματω μέρος του μιχαύνηματος στου εἶναι συνδεδεμένη n λάμα.
- Otav aTNOthnkeEte To mnxavnu, va aTOnpeu-yETe Tnv aMeon nAIOBoAn kai Tn Bpoxn, kai va To aTOnkneOeTe oE eva epoc otou dEv utapXei TOnlu zEOTn kai Uypaia.
- EKTEAeote Tc epyaiec eTIOEwponngkai ouvtnpnOg cE eva hpcog otou mTOpei va aTOPOeuxtheta n pOxH.
- Meta tn xponon tou mnxavnauoC, aqaipeote to ppooskoanmuevoxwua kai oTeywuote to mxa-vnaEvteawc Tpv Tnv antohkeuon.Avaoya me Tnv ETOxH n Tnv TEPIOXH, UAPxEIKivduvoC dualeitoupyiac loywTaywauoC.
Xpnoi Kaipovtida mntatapiow
- Na επαναφορτιζετις μπαταρίες μόνο με το φορτισή που καθοριζεται από τον κατασκευασή. Evac φορτισής Σου εῖαι καταλληλος για μια συγκεριμένη μπαταρία μπορείν αδημιουργήσει κύνδυνο πυρκayίας ὄταν χρησιμοτοίειαι με μια αλλη μπαταρία.
- Na xpoioioieite nektpika epyaia mvo u EIOkkaoipoevec matapiec.Hxnoan kaoe aaans pataipac mtopei va onioupynosei kivuvo Tpaupatou n npkayiac.
- Otav xpnoiopoieitai n kaotea matapipw, biatnpoTE tnaakpi aT oalaa metaalika avtikeiueva, 6TWC suvbETnpec, Kepuata, kleiia, kappia, bides n alaa miKpa metaalikavtikeiueva, e Ta otioia mTopei va dnioupyytheoiovdeon an tov evav akpoektn otovalov.To paxukkawma twv akpoektw Tc mTataicac mTopei va Tpokaeei Eykaupata n TUPKayia.
- YTO OUVKcKATaXpOng, MTopei va Eaxtheta UPO aTTOV MTATApia. Na aTOpeUYET NVEAeEAV OUbeta ETTaAPN KATA ATOG, EKTAAuVE TVEPO.EAV TO UPO ep0E 0E ETAIPuTIA, AVZNTNOE KAI IATPIK BONIEA.To UPO TOU EAYeai aTO TIV MTATApia MTOpE i VA TPOKAALoei ePteioo n EYkauata.
- Mn xnpoiopoioite iia kaoetataatapiw n epyaieio Tou exei kataotpapei npoTTOinthetai. OI kateopaupeves npoTToIOUVEs μTATAPIEC μTOpEVA TAPOUIAZouv aTPOβAETTN ΘuPTEPiOPa TOn Tou exe wc aTOTeEAOpa TTUPKAYIA, EKPnSg N Kivduvo Tpaumatoou.
- Mny ekthetae Tnv kaeta mataipivv n to epyaiao e TUPKAYI a uTepbOIA uynan thepoukpaia. H ekean otny TUPKAYI a otn thepuokpaa avw twv 130 ^ C pTOpEva TPOKaAe- oEkpNg.
- Akolouhote oles TIG odnyies fopionc kai mnv opioete nV KAeTa aTAPWv n To epyaleio EKTOG TOU 0epoKpaiaKOU eupouc Tous KaOpiEaT OIG odnyies.H avthetaevn fopion n npofpion oE 0epoKpaieC EKTOG TOU kaOpiEvou Eupouc MTOpei va TPOkAeoei Znui aTIV mTATApia KAI VA AuNooi Tov Kivduvo TUPKayiac.
HAekpiki aoeaia kai ooeaia mataipias
- Mn aToppiTTETe TnV mTatapi(ies) OTn QWTIA. To kEaI μTopei va ekpavei. ZuβouAeuteITE touc totIKOUC KwOikEc yia TTtavEc EIOKECs OdyieC aToppiyns.
- Mn aToppiTTETe kai mny kataoTppeTe Tny mTatapia(ies). O nAektpoAunTs Tou EKAuEtaivai diBpwtIKoc kai mTopei va TpokaAeoei Znmuia oTa maia n oTo depua. Se TEPiTTwOnkataTOOnc, mTopei va eivai tosikó.
- Mn φoptiζετην μπαταρία σην βροχή, αλλα ΜUTE Ε UYPες τοῦθεσίες.
- Mny φoptiζετη μπαταρία σε εξωτερικό χύρο.
- Mny xeiipieoTe Tov ophiotn, ouptepiaa aVouévou Tou ophiotn, kai touc akpoedKTEG ophiotn BpEyeva Xepia.
-
Mny aaaaet e Tnv matapia oT npoxh.
-
Mny p x TOV TNO TNC NATAPIAC UPO, ONTWC TO VEPo, KAI MN BUIcETe TNV MTATAPCA UPO. Mny aNVETe TNV MTATAPCA OTN BPOXn, KAI MNV FOPTiE, XPOIIOIOIEITE n aTOnkEUE TE TNV MTATAPCA OE VWTO N BPeyEvO MEPOs. Av o TALOC BpEXTEI EIOEALERUPO STO EOWTEPIKo TNG MTATAPCA, N MTATAPIA TUPOEVA BPaxUKu- KLwaei KAI VA UTAPXEIKIVDUVOCS UTPEPepaavons, TUPKayiaC n EkPNSns.
- Apou aapaieoTe TnV matapia aTo uNxavna n To V optioT, povtiote va ouvdoeteto KaLmuMa matapiw vToV matapia kai va Tnv aTOeOeTe OE teyvopeos.
- Mny aaaa zet e Tnv matapia e peyeva xepia.
ερβi - Na φροντίζετο σέρβις του ηλεκτρικόν εργα-λείου σας γινεται πό αρμόδιο επάγγελμα-tία ρησιμοτοιώντας μόνο γνήσια ανταλλα-Kτικό. ἀτοι θα εἰότε σίγουροι γία τη διαπήροι ητός αφάλείας του ηλεκτρικόν εργαλείου.
- Mny ekteleite TOTe Epyaoies oepic 6 KATE- Otpaueves Kaotec mataipw.OI epyaoie C epic Tuv KAETW VITATAPIWv a TpETEVA EKTEAOVTAI MOV aTTO VOKATAOKEUAOTn aTTO Egouiootnevouc TAPOXOUc oepic.
Eik.24: 1. Evodign oarhug ypaoiou
Otav to kala0i ypaoiou evai oxedov ymuTo, n evdiogn dev aiwpitai ooo aeitoupyouv oi auec. 2e autn tvn ppiTwn, diakoyte aoeowt n aeitoupyia kai adeiaote to kala0i.
Eik.25:1.EvOeIgOaθμnγpaoiδiou
IAPATHPHsH:Autn n evdiEiEivai evac TPOxepoc odnyoc.Avaoya mTc ouvNkEc oTo eawTepiKo Tou kaalaiou, autn n evdiEiEiMTOpei va mN aeitoupyei
Póthiən Tou χous λαβns
A PPOsOxH: Piv aPaipeoTe Ta mToulaovia, KpatnoTe KaTaNv avw AaBn. dIaOpetiká, n λaBn MTopei va TcEoi kai va TpokAneipauatiooC.
To uoos laa nus mtnopei va puthetaiae o duo einnieea.
3-11-8, Sumiyoshi-cho,
Anjo, Aichi 446-8502 Japan

- Applicable battery cartridge
- Symbols
- Intended use
- Noise
- Model DLM462
- Model DLM530
- Vibration
- Model DLM532
- EC Declaration of Conformity
- For European countries only
- SAFETYWARNINGS
- IMPORTANT SAFETY INSTRUCTIONS
- Save all warnings and instructions for future reference.
- Training
- Preparation
- Operation
- Maintenance and storage
- Battery tool use and care
- Electrical and battery safety
- Service
- SAVE THESE INSTRUCTIONS.
- Important safety instructions for battery cartridge
- Tips for maintaining maximum battery life
- ASSEMBLY
- Installing the handle
- Removing the mulching plug
- Installing or removing the grass basket
- Attaching the mulching plug
- Attaching the discharge attachment
- For DLM530/DLM532
- FUNCTIONAL DESCRIPTION
- Installing or removing battery cartridge
- To install the battery cartridge;
- To remove the battery cartridge;
- Switching the battery cartridges
- Machine / battery protection system
- Overload protection
- Overheat protection
- Overdischarge protection
- Indicating the remaining battery capacity
- Only for battery cartridges with the indicator
- Control panel
- Main power switch
- Mode switching button
- Switch action
- For DLM462/DLM532
- For DLM530
- Adjusting the mowing height
- Grass level indicator
- Adjusting the handle height
- Adjusting the traveling speed
- Using mulching plug
- Using discharge attachment
- Electronic function
- Mowing
- Mowing a long-grass lawn
- Emptying the grass basket
- MAINTENANCE
- Carrying the mower
- Storing
- Removing or installing the mower blade
- Removing the mower blade
- For models equipped with straight mower blade
- For models equipped with swing back mower blades
- Installing the mower blade
- TROUBLESHOOTING
- OPTIONAL ACCESSORIES
- ACCESSIONS EN OPTION
- VEILIGHEIDSWAARSCHUWINGEN
- BELANGRIJKE
- VEILIGHEIDSVOORSCHRIFTEN
- OPTIONELE ACCESSOIRES
- IPOEIAOIOIHSEI AΦAΛEIA
- ZHMANTIKEOADHIGEAΦAIA
- UlaTe oaes TIG POeIOToIOeIc KAI TIG Oanyies yia eAovtikn npaTouTn.
- Ekraiaeuaon
- PnoeToia
- Aeioupyia
- Uvtnpnon kai aTOnkeuon
- Xpnoi Kaipovtida mntatapiow
- HAekpiki aoeaia kai ooeaia mataipias
- Póthiən Tou χous λαβns
Brand : MAKITA
Model : DLM530Z
Category : Lawn mower