GourmetVAC 480 - Vacuum packaging machines CASO - Free user manual and instructions
Find the device manual for free GourmetVAC 480 CASO in PDF.
Document temporarily unavailable
The manual is currently being transferred to our new server. It will be accessible again in a few hours. Thank you for your patience.
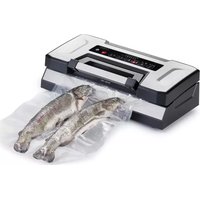
| Product type | Vacuum packaging device |
| Model | GourmetVAC 480 |
| Article number | 1387 |
| Power supply | 220-240 V ~ 50 Hz |
| Power consumption | 160 W |
| Dimensions (L × H × D) | 41 cm × 11 cm × 21 cm |
| Net weight | 3.017 kg |
| Color | Black / Silver |
| Housing material | Durable plastic |
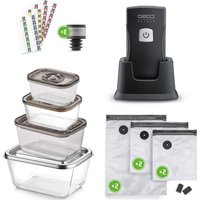
| Main functions | Automatic vacuum sealing (dry/wet), sealing only, adjustable vacuum level, V-Memory function, marinating, vacuum sealing for containers |
| Included accessories | 10 bags (20×30 cm), 1 roll (30 cm × 3 m), 1 roll (20 cm × 3 m), vacuum hose, user manual |
| Compatible bag type | Special vacuum sealing bags and rolls, suitable for sous vide cooking and microwave up to 70°C |
| Control panel | Touch control with LED progress display |
| Removable vacuum chamber | Yes, easy to clean |
| Built-in cutter | Yes, for cutting rolls |
| Automatic lid lock | Yes, during operation |
| Safety | Automatic shut-off, overheating protection, locked lid |
| Cleaning | Exterior with damp cloth; vacuum chamber and seal removable and washable with soapy water |
| Warranty | 24 months |
| Usage | Domestic and semi-professional (hunting, fishing, amateur cooking) |
Frequently Asked Questions - GourmetVAC 480 CASO
User questions about GourmetVAC 480 CASO
0 question about this device. Answer the ones you know or ask your own.
Ask a new question about this device
Download the instructions for your Vacuum packaging machines in PDF format for free! Find your manual GourmetVAC 480 - CASO and take your electronic device back in hand. On this page are published all the documents necessary for the use of your device. GourmetVAC 480 by CASO.