GIGA 750 BK - Cooker CATA - Free user manual and instructions
Find the device manual for free GIGA 750 BK CATA in PDF.



| Product type | Gas hob with electric oven and grill |
| Brand | CATA |
| Model | GIGA 750 BK |
| Category | Cooker |
| Internal oven dimensions | Width 43.5 cm, Depth 40 cm, Height 32 cm |
| Oven volume | 56 liters |
| Power supply | 220-240 V ~ 50/60 Hz or 50 Hz |
| Total power | 1.8 kW |
| Gas connection | Natural gas G20 (20 mbar) or LPG G30/G31 (28-30/37 mbar) |
| Oven burner | Gas, 2.5 kW (LPG) or 2.6 kW (natural gas) |
| Top burner (grill) | Gas, 1.7 kW (LPG) or 1.5 kW (natural gas) |
| Main functions | Baking, electric or gas grill, rotisserie, timer |
| Control type | Rotary knobs, digital clock, timer |
| Oven light | Halogen bulb 25 W, type E14 |
| Door material | Glass |
| Oven interior coating | Enamel |
| Maintenance and cleaning | Regular cleaning with non-abrasive products, no metal scouring pads |
| Safety | Thermocouple, automatic shut-off, child safety lock |
| Spare parts and repairability | Interchangeable nozzles, door gasket, bulb, original spare parts required |
| General information | Professional installation, possible adaptation to different gases |
Frequently Asked Questions - GIGA 750 BK CATA
User questions about GIGA 750 BK CATA
0 question about this device. Answer the ones you know or ask your own.
Ask a new question about this device
Download the instructions for your Cooker in PDF format for free! Find your manual GIGA 750 BK - CATA and take your electronic device back in hand. On this page are published all the documents necessary for the use of your device. GIGA 750 BK by CATA.
USER MANUAL GIGA 750 BK CATA
| I3+(28-30/37) | I3B/P(30) | I3B/P(37) | I3B/P(50) | I2H | I2E | I2E+ | I2L | |
| II 2H3B/P | ✓ | ✓ | ||||||
| II 2H3 | ✓ | ✓ | ||||||
| II 2H3 | ✓ | ✓ |
MANUAL DE INSTRUCTIONS
Forno a gás
GÁS NATURAL (N) G30/G31 (LPG)
| I3+(28-30/37) | I3B/P(30) | I3B/P(37) | I3B/P(50) | I2H | I2E | I2E+ | I2L | |
| II 2H3B/P | ✓ | ✓ | ||||||
| II 2H3 | ✓ | ✓ | ||||||
| II 2E+3+ | ✓ | ✓ |
9. MANUTENÇAO EXTRAORDINALA
Thank you for choosing our product.
We advise you to read this manual carefully. It contains all necessary instructions for maintaining unaltered the appearance and functional qualities of the appliance.
Table of Contents
- PRECAUTIONS FOR USE
- DISPOSAL INSTRUCTIONS-OUR ENVIRONMENT POLICY
- SAFETY PRECAUTIONS
- INSTALLING THE APPLIANCE
- ADAPTING TO DIFFERENT TYPES OF GAS
- DESCRIPTION OF FRONT PANEL CONTROLS
- USING THE OVEN
- CLEANING AND MAINTENANCE
- EXTRAORDINARY MAINTENANCE
- TECHNICAL SPECIFICATIONS
Precautions for Use
1. PRECAUTIONS FOR USE
THIS MANUAL IS AN INTEGRAL PART OF THE APPLIANCE. TAKE GOOD CARE OF IT AND KEEP IT TO HAND THROUGHOUT THE OVEN'S LIFE CYCLE.
WE URGE YOU TO READ THIS MANUAL AND ALL THE INFORMATION IT CONTAINS CAREFULLY BEFORE USING THE APPLIANCE. ALSO KEEP THE SET OF NOZZLES PROVIDED IN A SAFEPLACE. INSTALLATION MUST BE CARRIED OUT BY QUALIFIED STAFF IN COMPLIANCE WITH THE RELEVANT REGULATIONS. THIS APPLIANCE IS INTENDED FOR HOUSEHOLD USE AND COMPLIES WITH THE EEC DIRECTIVES CURRENTLY IN FORCE. THE APPLIANCE IS BUILT TO PROVIDE THE FOLLOWING FUNCTION: COOKING AND HEATING FOODS; ALL OTHER USES ARE CONSIDERED TO BE IMPROPER.
THE MANUFACTURER DECLINES ALL LIABILITY FOR USES OTHER THAN THOSE STATED ABOVE.
NEVER USE THIS APPLIANCE FOR HEATING ROOMS.
NEVER USE PACKAGING RESIDUES UNATTENDED IN THE HOME. SEPARATE THE VARIOUS PACKAGING MATERIALS BY TYPE AND CONSIGN TO THE NEAREST SEPARATE DISPOSAL CENTRE.
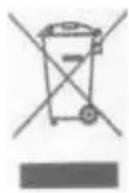
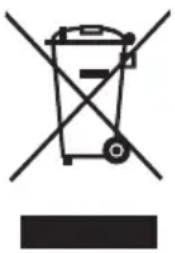
Meaning of crossed -out wheeled dustbin:
Do not dispose of electrical appliances as unsorted municipal waste, use separate collection facilities.
Contact you local government for information regarding the collection systems available.
If electrical appliances are disposed of in landfills or crumbs, bhazardous substances can leak into the groundwater and get into the food chain,damaging your health and well-being.
When replacing old appliances with new ones, the retailer is legally obligated to take back your old appliance for disposals at least free of charge.
NEVER OBSTRUCT THE OPENINGS AND SLITS PROVIDED FOR VENTILATION AND HEAT DISpersAL.
THE NAMEPLATE MUST NEVER BE REMOVED.
NEVER USE METAL SCOURING PADS OR SHARP SCRAPERS; THEY WILL DAMAGE SURFACES.
USE ORDINARY NON-ABRASIVE PRODUCTS WITH THE AID OF WOODEN OR PLASTIC UTENSILS IF NECESSARY. RINSE THOROUGHLY AND DRY WITH A SOFT CLOTH OR CHAMOIS LEATHER.
DO NOT ALLOW SPILLS OF FOODS WITH HIGH SUGAR CONTENT (E.G.JAM) TO DRY INSIDE THE OVEN. IF THEY DRY FOR TOO LONG, THEY MIGHT DAMAGE THE ENAMEL COATING INSIDE OF THE OVEN.
The manufacturer declines all responsibility for injury or damage caused by failure to comply with the above regulations or deriving from tampering with even just one part of the appliance and the use of non-original spare parts.
The environment - Disposal instructions
2. DISPOSAL INSTRUCTIONS - OUR ENVIRONMENT POLICY
Our products are only packaged using non-pollutant, environment-friendly, recyclable materials. We urge you to cooperate by disposing of the packaging properly. Contact your local dealer or the competent local organizations for the addresses of collection, recycling and disposal facilities.
Never leave all or part of the packaging lying around. Packaging parts, and especially plastic bags, may represent a suffocation hazard for children.
Your old appliance must also be disposed of properly.
Important: deliver the appliance to your local organization authorized to collect scrapped appliances.
Proper disposal allows the intelligent recovery of valuable materials.
Before scrapping your appliance it is important to remove doors and leave shelves in position as for use, to ensure that children cannot accidentally become trapped inside the oven during play. Also, cut the power supply lead and remove it and the plug.
Safety Precautions
3. SAFETY PRECAUTIONS
SEE INSTALLATION INSTRUCTIONS FOR SAFETY REGULATIONS FOR ELECTRIC OR GAS APPLIANCES AND FOR VENTILATION FUNCTIONS.
IN YOUR INTEREST AND TO ENSURE YOUR SAFETY, BY LAW ALL ELECTRIC APPLIANCES MUST ONLY BE INSTALLED AND SERVICED BY QUALIFIED STAFF, IN ACCORDANCE WITH THE RELEVANT REGULATIONS.
OUR APPROVED INSTALLATION ENGINEERS GUARANTEE YOU A JOB WELL DONE.
GAS OR ELECTRIC APPLIANCES MUST ALWAYS BE DISCONNECTED BY SUITABLY SKILLED PEOPLE. THE PLUG TO BE CONNECTED TO THE POWER SUPPLY LEAD AND THE RELATIVE SOCKET MUST BE OF THE SAME TYPE AND COMPLY WITH THE RELEVANT REGULATIONS.
THE POWER SUPPLY SOCKET MUST BE ACCESSIBLE EVEN AFTER THE APPLIANCE HAS BEEN BUILT-IN.
IMMEDIATELY AFTER INSTALLATION, CARRY OUT A QUICK TEST ON THE APPLIANCE FOLLOWING THE INSTRUCTIONS PROVIDED LATER IN THIS MANUAL. IF THE APPLIANCE FAILS TO OPERATE, DISCONNECT IT FROM THE ELECTRICAL MAINS AND CONTACT YOUR NEAREST SERVICE CENTRE. NEVER ATTEMPT TO REPAIR THE APPLIANCE.
NEVER PLACE FLAMMABLE OBJECTS IN THE OVEN: IF IT SHOULD ACCIDENTALLY BE SWITCHED ON, THIS MIGHT CAUSE A FIRE.
THE APPLIANCE BECOMES VERY HOT DURING USE. TAKE CARE NEVER TO TOUCH THE HEATING ELEMENTS INSIDE THE OVEN.
THE APPLIANCE IS INTENDED FOR USE BY ADULTS. KEEP CHILDREN AT A SAFE DISTANCE AND NEVER ALLOW THEM TO PLAY WITH IT.
WHEN THE GRILL IS IN OPERATION, ACCESSIBLE PARTS MAY BECOME VERY HOT: KEEP CHILDREN AT A SAFE DISTANCE.
BEFORE THE APPLIANCE IS PUT INTO OPERATION, ALL THE LABELS AND PROTECTIVE FILMS APPLIED INSIDE OR OUTSIDE MUST BE REMOVED.
AFTER EACH USE, ALWAYS CHECK THAT THE CONTROL KNOBS ARE TURNED TO 0(OFF).
The manufacturer declines all responsibility for injury or damage caused by failure to comply with the above regulations or deriving from tampering with even just one part of the appliance and the use of
non-original spare parts.
Instructions for the Installer
4. INSTALLING THE APPLIANCE
Installation must be carried out by a qualified engineer in compliance with the relevant regulations.
4.1 Electrical connection
The nameplate must never be removed.
The appliance must be connected to earth in compliance with electrical system safety regulations.
If a permanent connection is used, the appliance's power supply line must be fitted with an omni polar breaking device with contact gap of at least 3mm , located in an easily accessible position close to the appliance itself.
If a socket and plug connection is used, check that they are of the same type. Do not use reducers, adapters or junctions since they may cause overheating or burns.
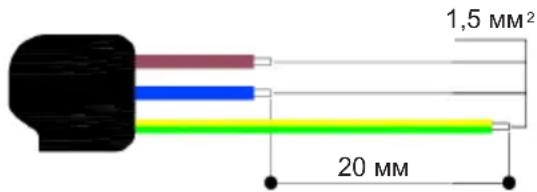
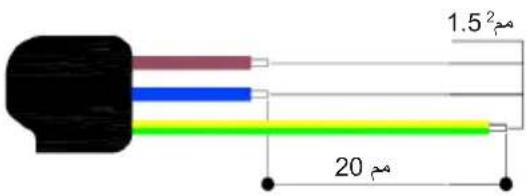
Operation at 220-240 V\~: use a type H05RR-F three-wire cable
(Cable of 3 × 1.5 ~mm^2 ).
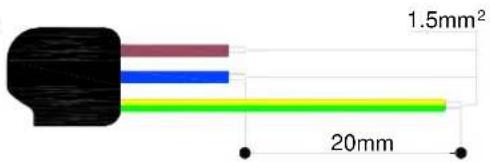
The earth wire (yellow-green) must be at least 20mm longer than the other wires at the end for connection to the appliance.
The manufacturer declines all responsibility for injury or damage caused by failure to comply with the above regulations or deriving from tampering with even just one part of the appliance.
4.2 Positioning the oven
Only a qualified person in compliance with the instructions provided install the appliance. The manufacturer declines all responsibility for improper installation, which may harm persons and animals and damage property.
Important: - The power supply to the appliance must be cut off before any adjustments or maintenance work is done on it;
Air duct is supposed to use in Ventilation;
- cabinets with a veneer exterior must be assembled with glues which can withstand temperatures of up to 100^ .
Installation of Built-in Ovens
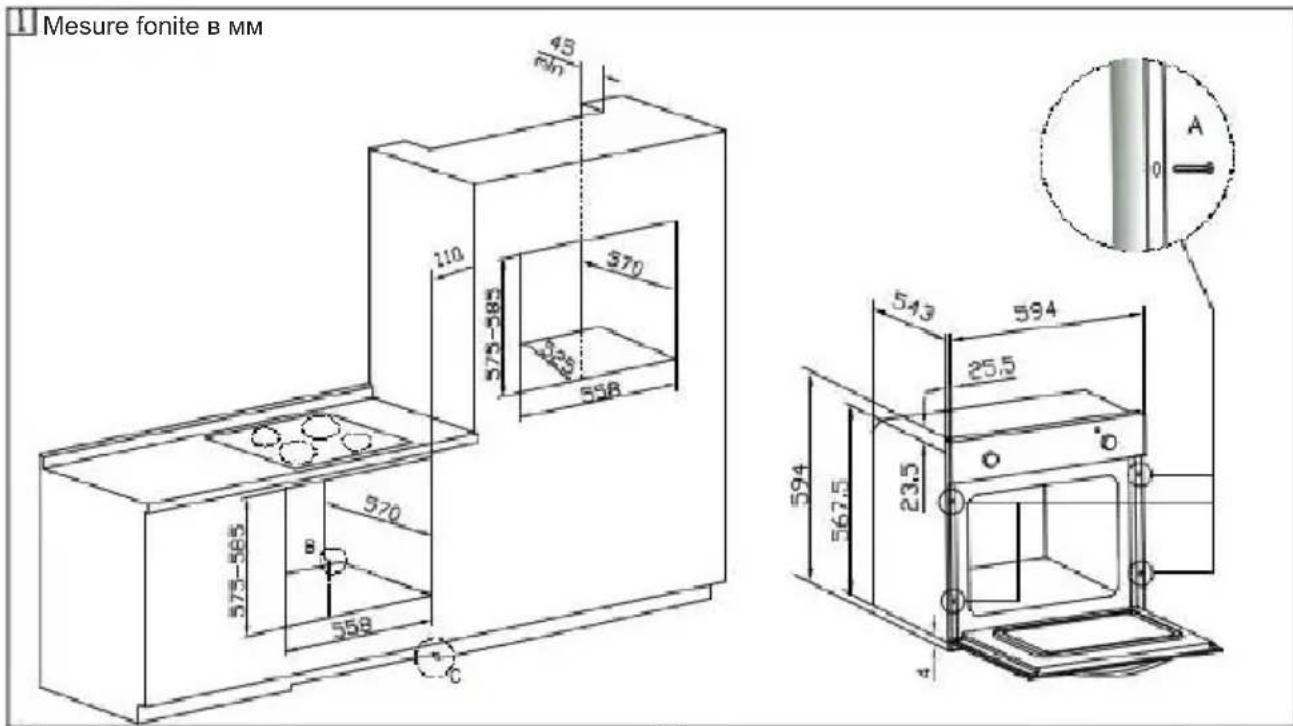
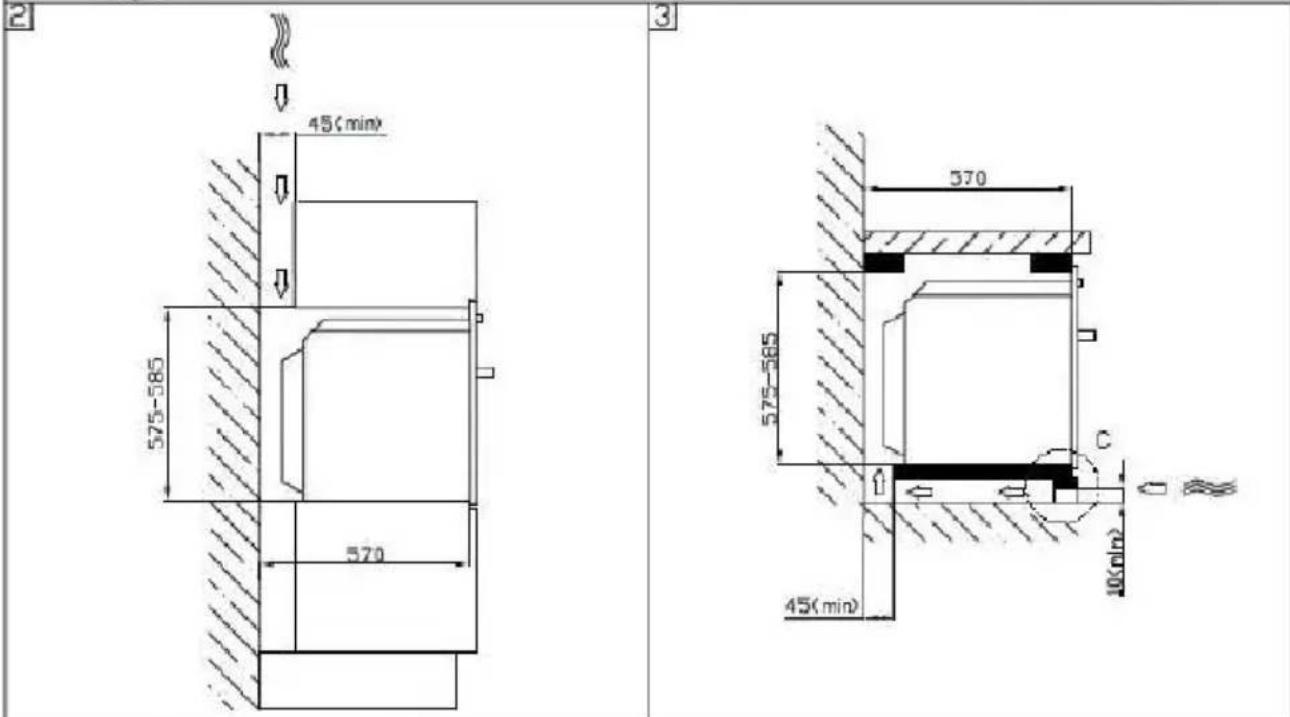
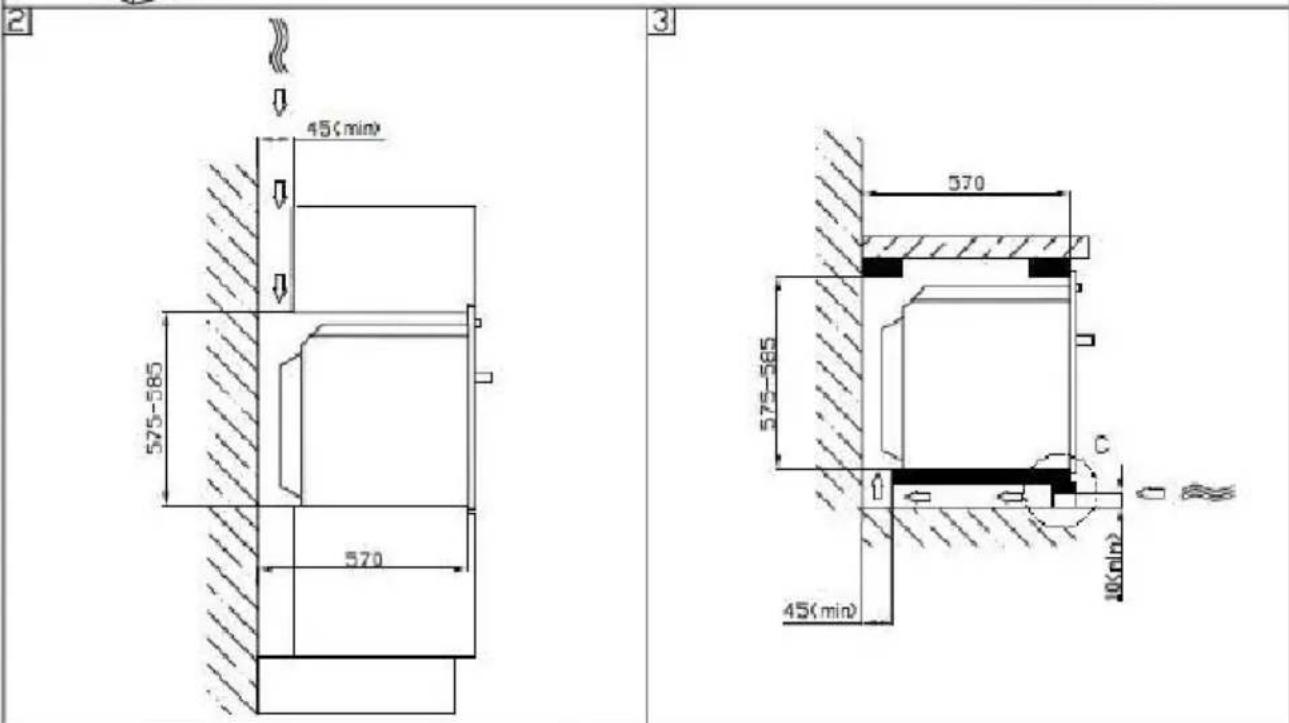
In order to ensure that the built-in appliance functions properly, the cabinet containing it must be appropriate. The appliance is designed for built-in installation (class 3) in cabinets of any heat-resistant material. Comply with the dimensions shown in figures 1, 2 and 3. When installing under worktops, comply with the dimensions shown in figure 1-3. When installing under worktops incorporating hobs, a gap of at least 110mm must be left from any side wall, as shown in figure 1. When installing in tall units, comply with the dimensions shown in figure 1-2, bearing in mind that the top/rear of the unit must have an opening 45mm deep. Screw the 4 screws A into the inside of the frame (fig.1). For installation under tops, make sure that the rear/bottom of the unit has an opening similar to that shown in figure 1 (B), and that the front/bottom of the unit has an opening an aperture of at least 45× 560mm similar to that shown in figure 1-3 (C), or the aperture similar to window shade,
make sure that aperture area of at least 45 × 560mm . See the instructions supplied with the hob for the relative positioning and fixing procedures.
In compliance with current safety standards, contact with the electrical parts of the oven must not be possible once it has been installed.
All parts, which ensure the safe operation of the appliance, must be removable only with the aid of a tool.
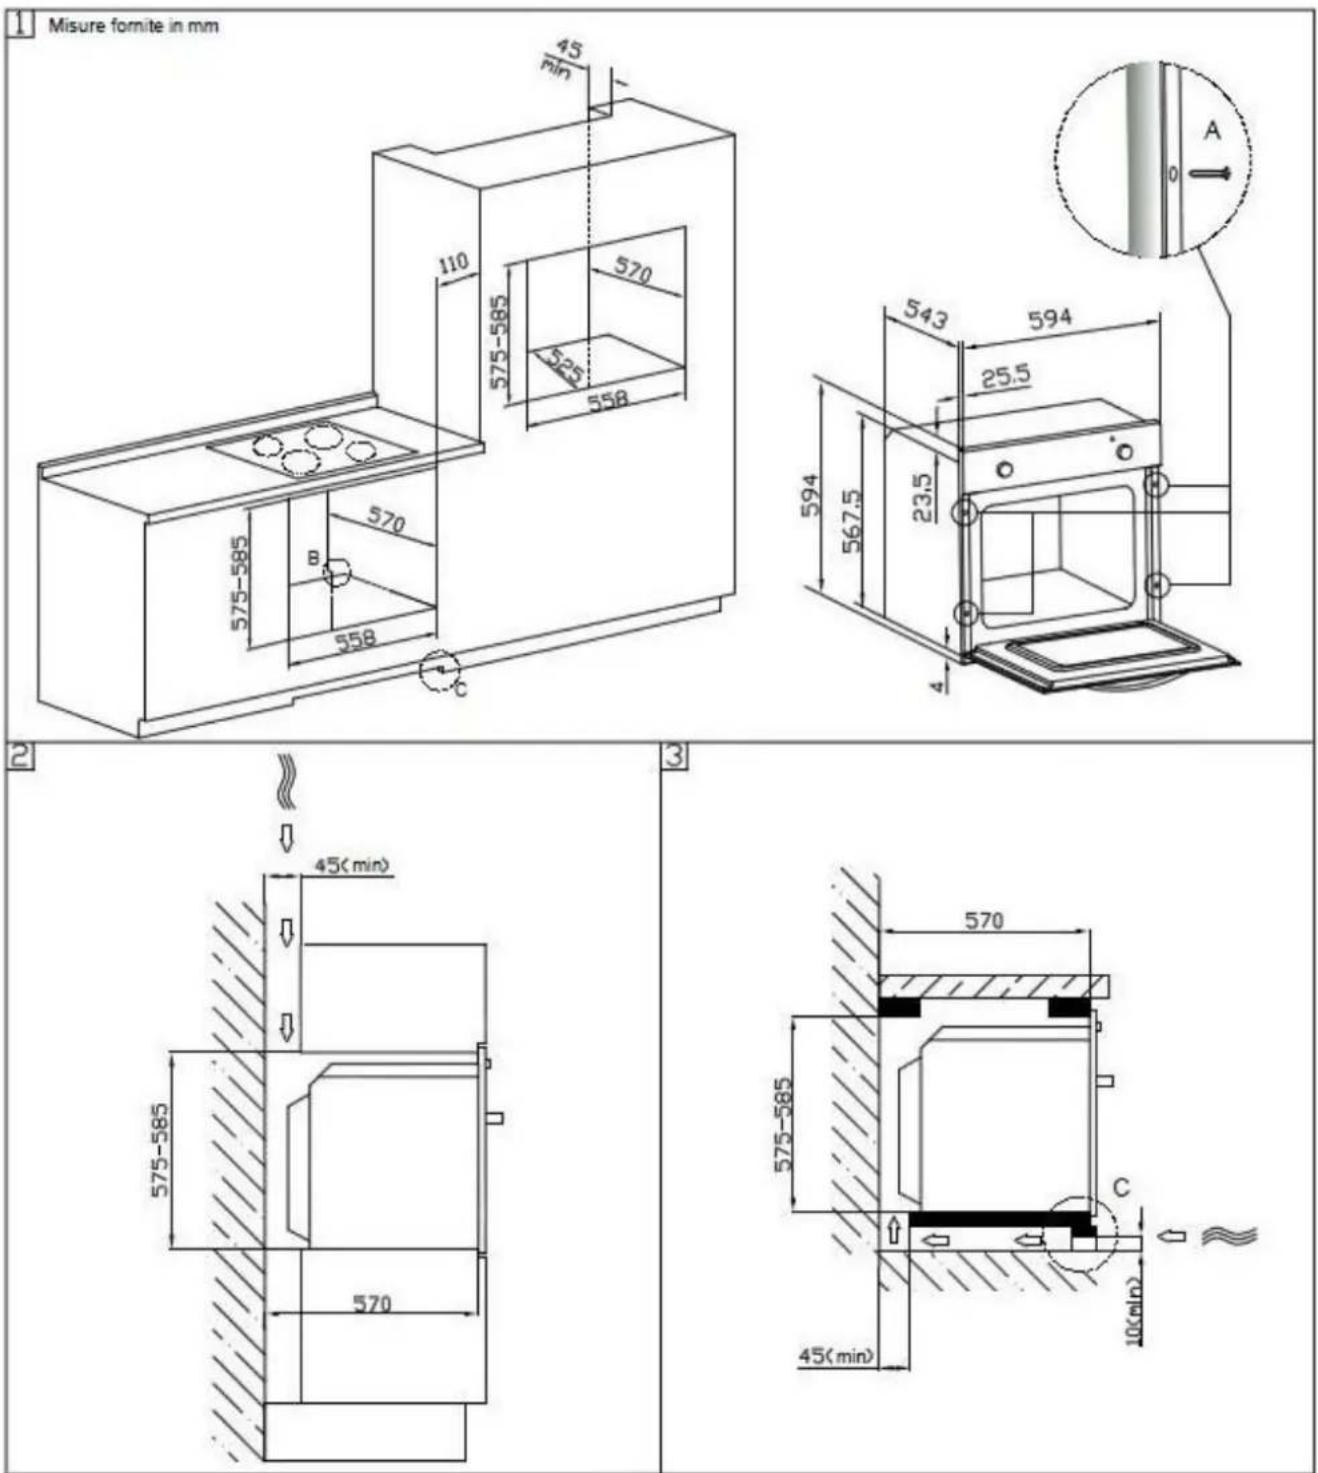
Never use the door for leverage when inserting the oven in the cabinet. Never apply excessive pressure to the open door.
4.3 Room ventilation
The appliance may only be installed in a permanently ventilated room as specified by the relevant regulations. The air flow into the room where the appliance is installed must be sufficient for proper gas combustion and room ventilation. The air intakes, protected by gratings, must be of suitable size (see relevant regulations) and located so that they cannot be even partially obstructed. The kitchen must be kept properly ventilated to disperse the heat and humidity produced by cooking processes: in particular, a window should be opened or the speed of any fans increased after prolonged use.
4.4 Combustion gas discharge
Combustion gases must be discharged by means of hoods connected to a flue with reliable natural draught, or a fan extraction system. An effective extraction system requires careful design by an authorized specialist, and must comply with the regulation distances and positions. After installation, the engineer must issue a certificate of compliance.
4.5 Gas connection
Connection with copper pipe:
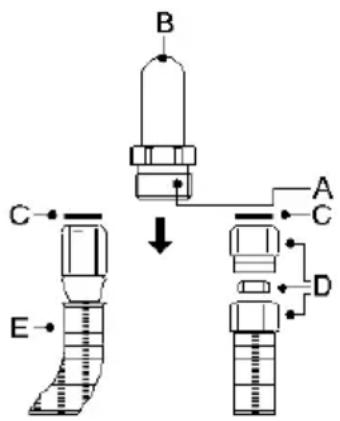
The connection to the gas supply mains must be made so that no stresses or strains of any kind are applied to the appliance. The connection can be made using the adapter unit D with two conical elements, always fitting the gasket C supplied.
Connection with steel hose:
Use only continuous-wall stainless steel hoses compliant with the relevant regulations, and always fit the gasket C supplied between the fitting A and the hose E.
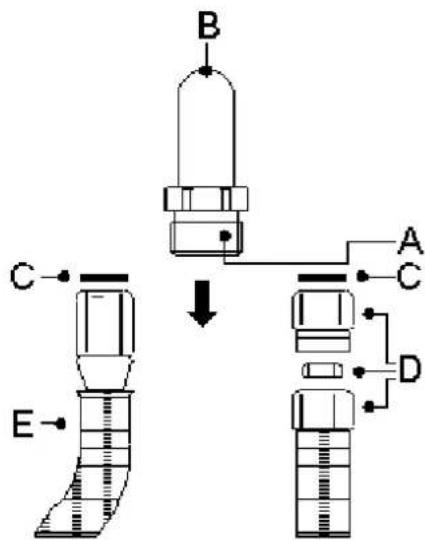
When connecting with a hose, ensure that the total length of the pipeline is not more than 2
metres;also Ensure that the hoses do not touch moving parts and are not crushed.
5. ADAPTING TO DIFFERENT TYPES OF GAS
Before carrying out the operations described below, disconnect the appliance from the electricity supply.
The appliance is tested with G20 (2H) natural gas at the pressure of 20 mbar. If it is to be used with other types of gas, the burner nozzle has to be changed and the gas valve adjusted. To replace the nozzle, proceed as described below.
5.1 Adjusting the oven burner
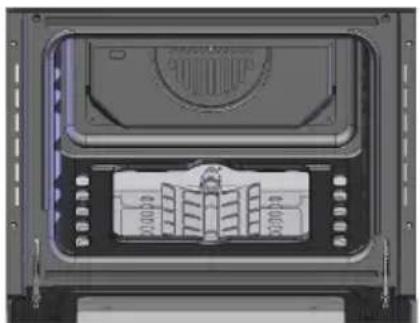
To adjust the oven burner, open the oven door and proceed as follows:
- Remove all accessories (pans, shelves and any steel runners);
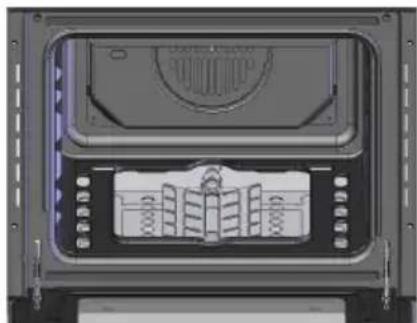
- Lift the oven bottom plate and extract it so that the inside of the oven is as shown in the picture.
5.1.1 Adjusting the minimum setting
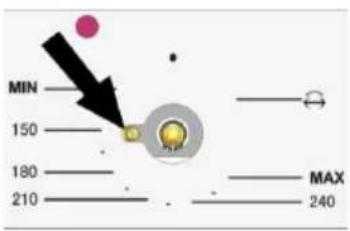
The oven thermostat has a screw for regulating the minimum setting, accessed by removing the thermostat knob. When the type of gas used changes, the minimum setting must be adjusted as follows:
Light the oven burner and keep it operating at the highest setting for 10/15 minutes with the door closed.
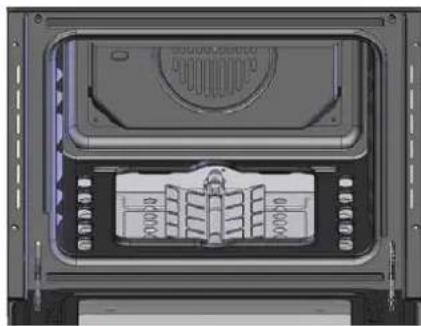
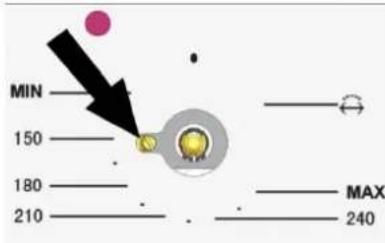
Then turn the knob to the minimum temperature setting, remove the knob and use a straight-head screwdriver to adjust. Firstly, turn the knob in clockwise direction tightly then anticlockwise to adjust the flame. For natural gas you should turn one of a circle while 1/8 circle for LPG.
- When using bottled gas, the adjuster screw must be turned fully clockwise. The diameter of the by-pass is stated in point"5.2 Burner and Nozzle Data Tables".
- When using town or natural gas, adjust the screw so that when the thermostat knob is turned from the maximum to the minimum setting, the flame always remains stable and uniform. Close the oven door and check that the burner remains on at the minimum setting.
5.1.2 Changing the nozzle
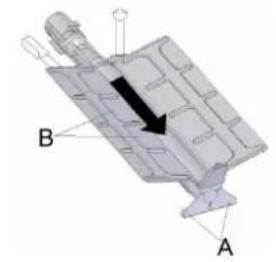
- Undo the oven burner fixing screws A.
- Move the burner B outwards until the nozzle is accessible.
- Use a 7 socket wrench to change the nozzle, fitting the one for the type of gas to be used (see point "5.2 Burner and Nozzle Data Tables").
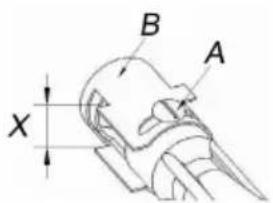
5.1.3 Adjusting the oven burner primary air flow
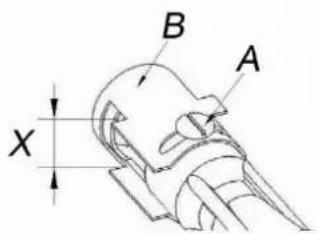
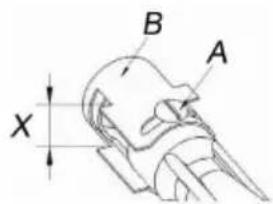
- Undo the adjuster screw“A”of the air regulator sleeve;
- Turn the regulator sleeve "B" into the position for the
type of gas to be used, consulting the table below;
- Tighten the adjuster screw and restore the seals;
- When the operation is complete, reassemble the burner correctly.
NATURAL GAS (N)
G30/G31 (LPG)
X= 4mm
10mm
When the operation is complete, replace the nameplate on the back of the oven with the one provided for the new type of gas.
In compliance with current safety standards, adapting to different types of gas must be has gas lore of professional can but operation.
5.2 Burner and Nozzle Data Table
| GAS CATEGORY: I3+(28-30) I3B/P(30) I3B/P(37) I3B/P(50) | ||||||
| TYPES OF GAS: | ☐G30 | ☐G31 | ☐G30 | ☐G30 | ☐G30 | |
| GAS PRESSURE(mbar): | 29 | 37 | 29 | 37 | 50 | |
| HEATINPUT(Hs) | Top burner:1.7kW(124g/h)Bottom burner:2.5kW(182g/h) | Top burner:1.7kW(124g/h)Bottomburner:2.5kW(182g/h) | Top burner:1.7kW(124g/h)Bottomburner:2.5kW(182g/h) | Top burner:1.5kW(109g/h)Bottomburner:2.5kW(182g/h) | ||
| INJECTOR SIZE | Top :0.65mmBottom :0.77m m | Top :0.65mmBottom :0.77m m | Top :0.65mmBottom :0.71m m | Top :0.50mmBottom :0.65m m | ||
| GAS CATEGORY: | I2H | I2E | I2E+ | I2L | ||
| TYPES OF GAS: | ☐G20 | ☐G20 | ☐G20 | ☐G25 | ☐G25 | |
| GAS PRESSURE(mbar): | 20 mbar | 20 mbar | 20 | 25 | 25 | |
| HEAT:INPUT(Hs) | Topburner:1.5kWBottomburner:2.6kW | Topburner:1.5kWBottomburner:2.6kW | Topburner:1.5kWBottomburner:2.6kW | Topburner:1.5kWBottomburner:2.6kW | ||
| INJECTOR SIZE | Top :0.93mmBottom :1.18m m | Top :0.93mmBottom :1.18m m | Top :0.93mmBottom :1.18m m | Top :0.93mmBottom :1.18m m | ||
| VOLTAGE / FREQUENCY : AC220-240V/50-60HzELECTRIC POWER : 1.8kW | ||||||
| I3+(28-30/37) | I3B/P(30) | I3B/P(37) | I3B/P(50) | I2H | I2E | I2E+ | I2L | |
| II2H3B/P | ✓ | ✓ | ||||||
| II2H3+ | ✓ | ✓ | ||||||
| II2E+3+ | ✓ | ✓ |
| Burner | Rated heat capacity (kW) | BOTTLED GAS - G30/G31 28/37 mbar | ||||
| Nozzle diameter 1/100 mm | By-pass 1/100 mm | Reduced heat capacity (W) | Flow-rate g/h G30 | Flow-rate g/h G31 | ||
| Oven | 2.5 | 77 | 41 | 700 | ||
| Burner | Rated heat capacity (kW) | NATURAL GAS - G20 20 mbar | ||||
| Nozzle diameter 1/100mm | Reduced heat capacity (W) | |||||
| Oven | 2.6 | 118 | 700 | |||
18!
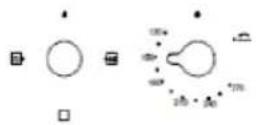
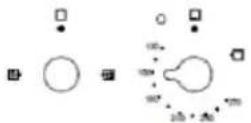
6. DESCRIPTION OF FRONT PANEL CONTROLS
All the cooker's control and monitoring devices are placed together on the front panel. The table below provides the key to the symbols used.
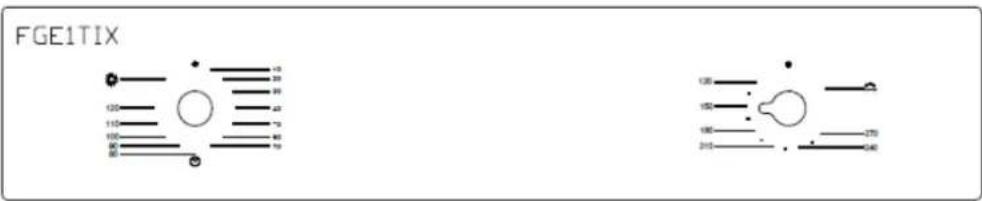

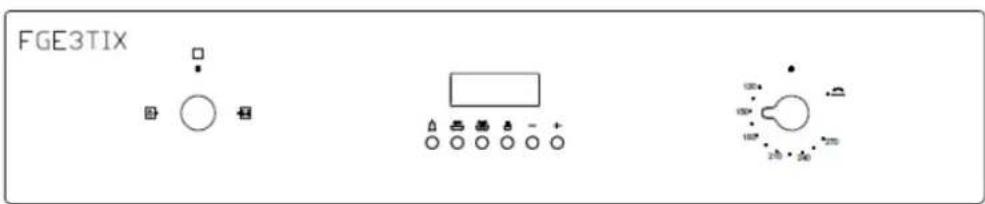
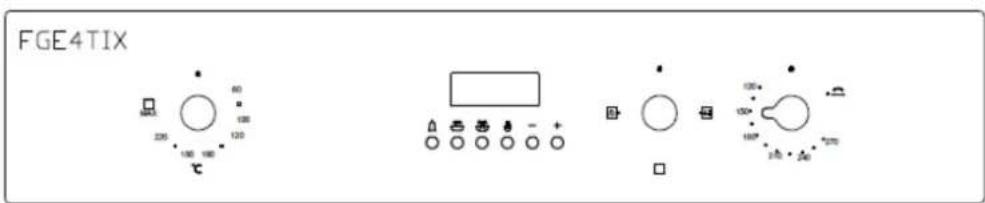
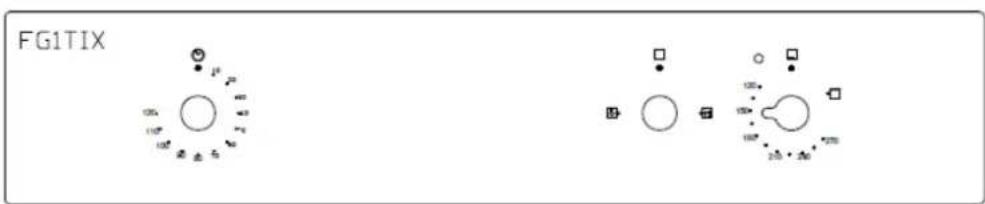
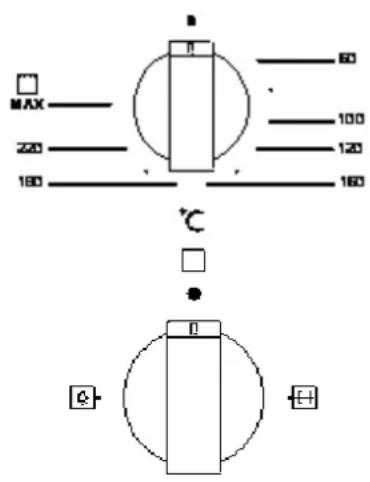
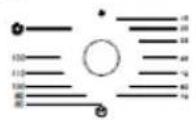
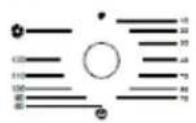
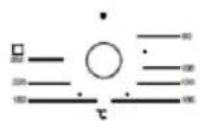
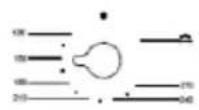
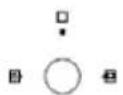
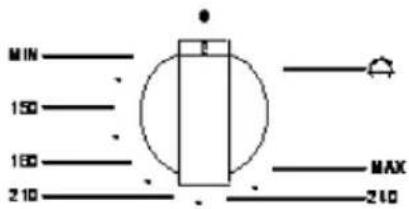
THERMOSTAT KNOB
(ON SOME MODELS ONLY)
This knob lights the gas burner inside the oven. The cooking temperature is set by turning the knob anticlockwise to the value required, between Min. and Max.
For instructions for lighting the gas oven, refer to point"7.3 Using the Gas Oven".
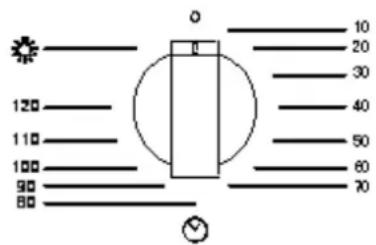
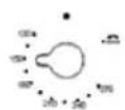
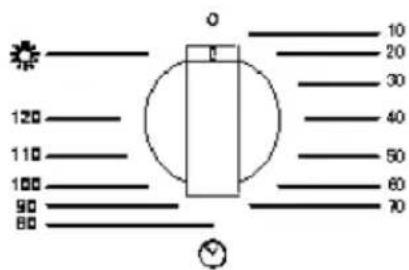
TIMER KNOB
(ON SOME MODELS ONLY)
To use the timer, set the buzzer by turning the knob clockwise. The numbers correspond to minutes (maximum 120 minutes). Setting is on a gradual scale and intermediate positions between the numbers can be used. The end of cooking buzzer does not turn off the oven.
The setting turns on the light inside the oven during normal operation (without timer).
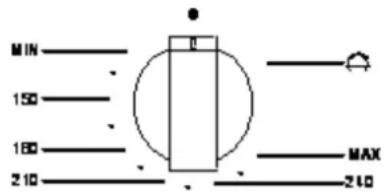
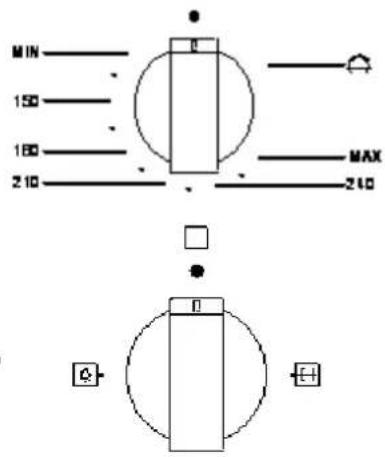
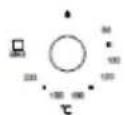
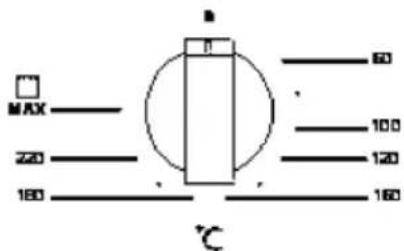
THERMOSTAT KNOB
(ON SOME MODELS ONLY)
The cooking temperature is set by turning the knob clockwise to the value required, between Min. And Max.
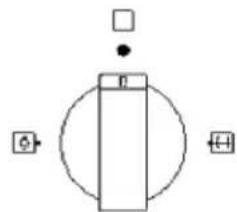
FUNCTION SWITCH KNOB
(ON SOME MODELS ONLY)
The setting turns on the light inside the oven during normal Operation.
The setting turns on the light and the turnspit inside the oven during normal operation.
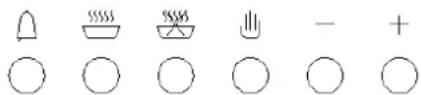
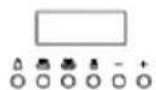
6 KEYS ELECTRONIC TIMER (ON SOME MODELS ONLY)
Digital clock
- Showing time: (0:00-24:00) and minutes.
- The screen shows 3 glittery number and "AUTO" if the power is on.
In order to set the correct time, press the button first, then + or - button to carry forward or backward the figure until the exact time shows.
88·88
Manual operation setting(only available on the electric grill)
Press the button to remove the flashing of "AUTO".
If "auto" is flashing (automatic or semi automatic program has been set), press button to remove "AUTO" and then the manual operation process is on.
Automatic setting (set the time of full automatic starting and ending, only available on the electric grill)
- press button, set roast time;
- press button, set roast finish time;
- set temperatures and roast modes by turning the thermostat knob and selector knob.
After the above setting, "AUTO" will be glittering, which means the roast process of the oven is set.
For example: if roast time takes 45 minutes and expect it will end at 14:00.
Press, the roast time is to be 45 minutes;
Press, the roast is set to end at 14:00.
After the above setting, the screen shows the real time(hour、minute)and flashing "AUTO", it means the set roast process is memorized automatically.
When the clock turns to be 13:15 (or between 13:14-13:15), the oven will start automatically.
In the roast time, and "AUTO" will be always flashing.
when the clock turns to be 14, the roast has been finished automatically. The alarm will ring and "AUTO" will flash, press the button and the ringing will stop.
Semi-automatic setting (set the time of automatic starting and ending, only available on the electric grill)
A. set the time limit of roast (10 hours maximum):
press the button to set the time of roast:
the oven starts immediately, and "AUTO" will flash. After the roast is finished, the roast operation process will be shut automatically. Then "AUTO" flashes, the alarm rings. The ringing will stop after the button is pressed.
B. Set the time of ending (23 hours 59 minutes maximum):
press the button to set the time of ending:
the oven starts immediately, and "AUTO" will flash. When the set time of ending is reached, the roast process will shut automatically. Then "AUTO" flashes, the alarm rings. The ringing will stop after the button is Pressed.
when the related button is pressed, the set roast process will be displayed. Whenever the button is pressed, and set backward the time to "0", the set roast process will be cancelled. When button is pressed again, the oven will revert to the manual operation process.
Timer
23 hours 59 minutes can be set as maximum.
TO set the time, press the button, and then + or - button, until the required time is shown on the screen.
After the setting, the correct time (hour, minute) and the button will show on the screen. When the button is pressed the time displaced will be seen. When the set time is reached, disappears and the alarm will ring again. To stop the alarm, press the button.
Notice: after pressing the related button, setting is supposed to be done in 5 seconds. In case of blackout, the set process as well as the real time (hour, minute) will disappear. After the power is on again, three "0" and "AUTO" shows on the screen, the oven will automatically reset.
7. USING THE OVEN
7.1 Precautions and General Advice
When the oven and grill are used for the first time, they should be heated to the maximum temperature for long enough to burn off any oily residues left by the manufacturing process, which might contaminate foods with unpleasant smells.
To avoid unpleasant contact with any steam inside the oven, open the door in two stages: hold it open just a little (about 5 cm) for 4-5 seconds, then open it completely. If you have to check or carry out other procedures on food during cooking, leave the door open for a short time to prevent a drop in the oven temperature which will impair the cooking results.
7.2 Cooling fan system (on some models only)
The appliance is equipped with a cooling system which comes into operation a few minutes after the oven is lit. Operation of the fan generates a normal air flow which comes out above the door and may continue for a short time even after the oven is turned off.
7.3 Using the gas oven
7.3.1 Electronic spark ignition
Completely open the oven door and press the thermostat knob while turning it anti-clockwise to the maximum temperature setting; this automatically activates the electric spark ignition device. Once the burner has ignited,
keep the knob pressed down for a few seconds to allow the thermocouple to heat up.
If the burner has not lit after 15 seconds, stop trying, leave the oven door open and wait 1 minute before trying again.
7.3.2 Lighting the burner by hand
Completely open the oven door and turn the thermostat knob.

Anti-clockwise. Place a lit match close to the end of the flame pipe A in the centre of the bottom of the oven and press the thermostat knob. Once the burner has ignited, keep the knob pressed down for a few seconds to allow the thermocouple to heat up and check that the burner has lit properly through the inspection hole B.
The cooking temperature is set by turning the knob clockwise to the value required, between 50^ and 231^ .
If the burner accidentally goes out, turn the knob to the off ( ) position and wait t least one minute before trying to relight it.
7.4 Using the grill
- To turn on the electric grill function, simply turn the gas oven thermostat knob to the position.
- To turn on the gas grill function, turn the gas oven thermostat knob to the position.
WARNING: THE GAS OVEN AND THE GRILL/ ROTISSERIE CANNOT BE USED SIMULTANEOUSLY.
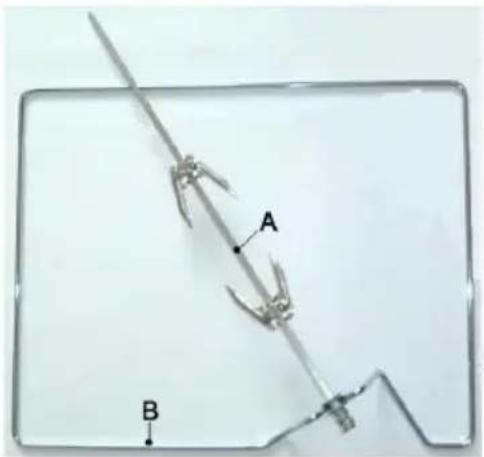
7.4.1 Operation of the grill + rotisserie
Fit the spit rod into the rotisserie bushing and select grill function ( In gas grill model, you must turn FUNCTION KNOB to The
position).
7.4.2 Using the rotisserie in cookers with normal oven
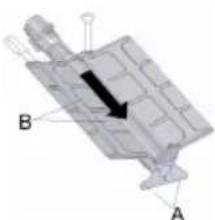
Place the rotisserie shelf "B" on the second pair of runners
from the bottom and fit the rod "A" into the hole in the back of the oven.


7.5 Attention
Grilling processes must never last more than 60 minutes.
- In enameled models, grill and grill + rotisserie cooking operations must be carried out with the door ajar on the first catch and the knob guard supplied fitted into the top of the oven cavity.
- Accessible parts may be very hot during and after use of the grill; keep children well away from the appliance.
- During rotisserie cooking operations, one of the pans supplied with the cooker should be placed in the bottom of the oven, on the bottom runners, to collect any grease and fat produced.
- When using the oven, remove all unused pans and shelves from its interior.
- During cooking, do not cover the bottom of the oven with aluminum or tin foil, and do not place pans or trays on it; this may damage the enamel coating. If you wish to use greaseproof paper, position it so that it does not interfere with the hot air circulation inside the oven.
8.CLEANING AND MAINTENANCE
Before carrying out any operations, disconnect the appliance from the electricity supply.
Never use a jet of steam for cleaning the inside of the oven.
8.1 Cleaning stainless steel
To keep stainless steel in good condition, it must be cleaned regularly, after each time the cooker is used, after leaving it to cool down.
8.2 Routine daily cleaning
When cleaning and caring for stainless steel surfaces, always use only specific products which do not contain abrasives or chlorine-based acids.
Instructions for use: pour the product onto a damp cloth and wipe over the surface, then rinse thoroughly and dry with a soft cloth or chamois leather.
8.3 Food stains or spills
Never use metal scouring pads or sharp scrapers; they will damage surfaces.
Use ordinary non-abrasive products with the aid of wooden or plastic utensils if necessary.
Rinse thoroughly and dry with a soft cloth or chamois leather.
Do not allow spills of foods with high sugar content (e.g. jam) to dry inside the oven. If they dry for too long, they might damage the enamel coating inside of the oven.
8.4 Cleaning the oven
To keep the oven in good condition, it must be cleaned regularly, after allowing it to cool down.
Remove all removable parts.
Clean the oven shelves with hot water and non-abrasive detergents rinse and dry.
8.5 Cleaning the door glazing
The glass in the door should always be kept thoroughly clean. Use absorbent kitchen roll; remove stubborn dirt with a damp sponge and ordinary detergent.
9. EXTRAORDINARY MAINTENANCE
Occasionally, the oven will require minor servicing procedures or the replacement of parts subject to wear and tear, such as gaskets, light bulbs, etc. The specific instructions for each procedure of this kind are provided below.
Before carrying out any operation involving access to live parts, disconnect the appliance from the electricity supply.
9.1 Replacing the Oven Lamp
- Disconnect the oven from the power supply by means of the omnipolar switch used to connect the appliance to the electrical mains; or unplug the appliance if the plug is accessible;
- Remove the glass cover of the lamp-holder;
- Remove the lamp and replace with a lamp resistant to high temperatures (300^) with the following
characteristics:
Voltage: 220-240V
Wattage: 25W
Type: E 14
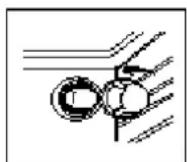
- Replace the glass cover and reconnect the oven to the mains power supply.
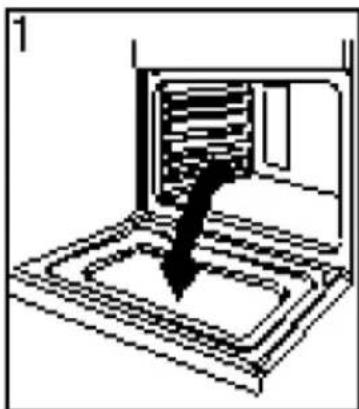
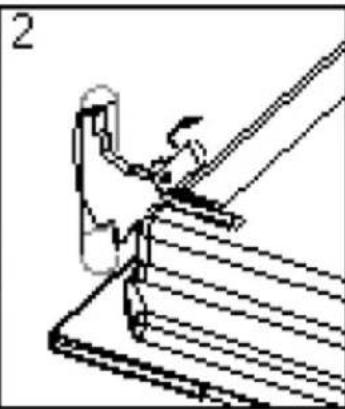
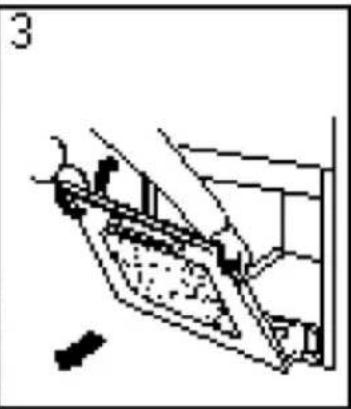
9.2 Removing doors
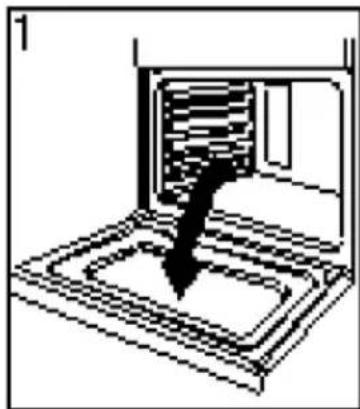
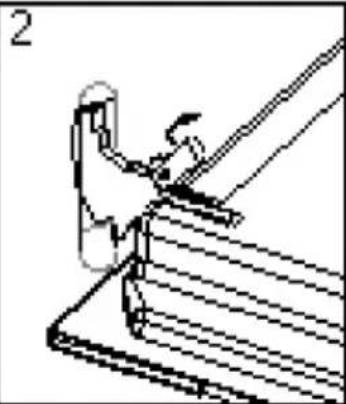
For a more thorough clean, you can remove the oven door. Proceed as follows:
- Open the door fully;
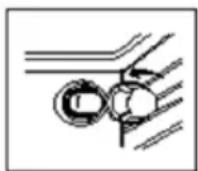
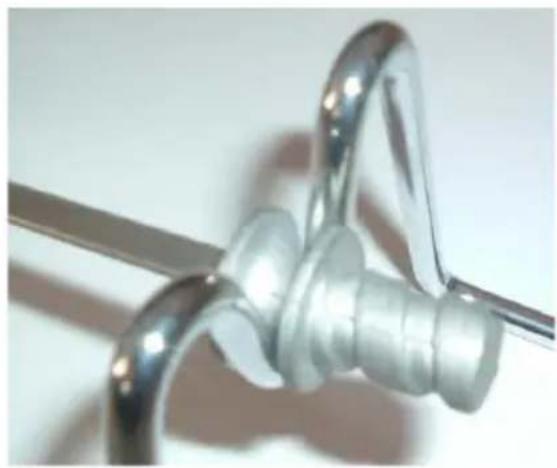
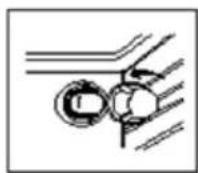
- Lift up and turn the small levers situated on the two hinges ;
- Grip the door on the two external sides,shut it slowly but not
Completely;
Pull the door towards you, pulling it out of its seat;
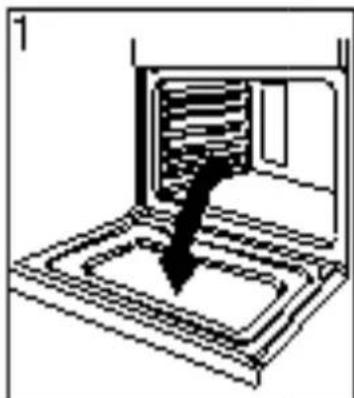

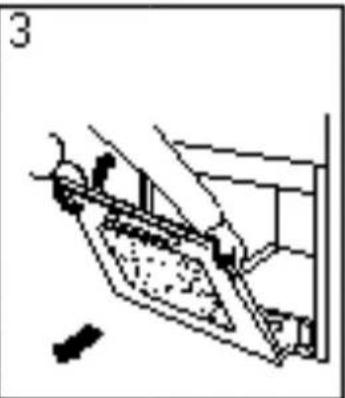
Reassemble the door by following the above procedures backwards.
9.3 Removing the gaskets
To allow thorough cleaning of the oven, the door gasket can be removed. Before removing the gasket, remove the oven door as described above. Once the door has been removed, lift the tangs at the corners as shown in the figure.
10. TECHNICAL SPECIFICATIONS
Inner dimensions of the oven :
Width 43.5cm
Depth 40cm
Height 32cm
Inner Volume of the oven 56 litres
Voltage and Frequency of Power Supply: 220-240V 50 / 60Hz or 50Hz
MANUEL D'UTILISATION
Fouràgaz
GAZ NATUREL (N) G30/G31 (GPL)
X=4mm10mm
| I3+(28-30/37) | I3B/P(30) | I3B/P(37) | I3B/P(50) | I2H | I2E | I2E+ | I2L | |
| II 2H3B/P | ✓ | ✓ | ||||||
| II 2H3 | ✓ | ✓ | ||||||
| II 2E+3+ | ✓ | ✓ |
1. MEPbI IPEIOCTOPOXHOCTN IPN 3KcIIYATAUIN N3dEJNA
DAHHOE PUKOBOCTBO YBJIETCJ HEOTbEMJIEMO JACTbIO KOMJIIEKTA UCTPOICTBA. XPAHNTEPUKOBOCTBO B HADEXHOM I DOCTUHNOM MECTE B TEUEHNE BCEFO CPOKA CJUYKBI PEUN.MBI HACTOATEJBHO PEKOMEHJYEM O3HAKOMITbC R C 3TIM PYKOBODCTBOM IN BHIMATEJBHOIN3yHTB BCIO PPIBEDEHHYIO B HEM INHOPMALIO NEPED HAYALOM NCIOLBJOBAHNYCTPOICTBA.TAKKE XPAHNTE BXODAII B KOMJIIEKT UCTPOICTBA HABOP FOPCYHOKB HADEXHOM MECTE. YCTAHOBKY 3TOGO UCTPOICTBA CLEUYET IPOIN3BOIDITc NOMOUIKBAINIΦIUPOBAHNO IEPCOHAJA C COBJIODEHENEM IPIPMEHIMbIX HOPM INPABNI.3TOUCTBO IPEIN3HAUHEO DJIYDOMAUHEIO IPIPMEHENIA IN3FOTOBJEHO B COOTBETCTBNIC TPEBOAHNIM DEICTBYUQNX DNPEKTNBE3C. UCTPOICTBO IPEIN3HAUHEO DJIY BInONHEHNACLENYIOUX ΦYNKCU: IPIPOTOBJEHNE IN PA30FPEB NIIU. INCNOJ3OBAHNEUCTBO DJIY LIOBbIX DPyTHX CEJIEN 3APPESEHO.
I3TOTOBNTJIb YCTPOINCTBA HE HECET OTBETCTBEHHOCTN 3A NCIIOJIb3OBAHNE YCTPOINCTBA B CEJAX,OTNIUHbIX OT YKA3AHHbIX BblJE.
KATEGOPUHECKN 3APPEUETCNRIOJIb3OBAHNE UCTPOICTBA IJRA OBOPTEBA NOMEUHNI. HE OCTABLITTE YACTN YNAKOBKN B DOME BE3 BHIMAHNRA. PA3DEJNTE YNAKOBOUHbIE MATEPNAJIbI NO TINY IN OTIPABbTE INX B bINJKAIIshN CNEUJAIBHbI UENTP NO YTINN3AUHN OTXODOB.
3NaueHne cIMBOJb B VnIe nepeuepeKHyToro KpctOM MycOpHoro 6aka Ha KoIecax.
He donyckaetcay ytniun3npoBaTb 3neKtpnueckne yctpojCTBa BmecTe C npyHIMN 6bITOBbIMN OTXODAMN, nCNOJb3yIte.
dner 3toro cneuaJIbHbIe cnyk6bl no ytniun3aun.
O6paTntecb B MeCThble opraHbI ynpabJIeHnI dIy noJIyueHn IINΦopMaIuN OTHOcITbHo cyIeCTByUoIx BO3MOXHOCTeYtIIN3aIuN.
KATEGOPUeCKN 3APPEUaETcR 3AKPbIBATb OTBEPCTnI INPOPE3N, INPEHHA3HAueHHbIE IJIBAHTINLAUNI N OTBODA TENLA.
HE DONYCKAETCCHIMATb NACNOPHYO TABINUky.
HE DONYCKAETCRA NCIOJIb3OBAHNE YNCTRux FYEOK ININ OCTPbIX CKPEKOB, KOTOPBIE MOYT NOBPEIITb IOBEPXHOCTU YCTPOICTBA.
IcPb3yIe ObHIE HEA6PA3INBHe BEECTBA C DEPEBRAHbIMN IIN PJIACTIKOBbIMN INHTPYMEHTAMN INPHEO6XODIMOCNT. TATEJIbHO INPOMbIBaIte BOIOI INPOTIPAAITE HACYXOC NOMOIO MRAKOI BETOUI INI 3AMUIN.
HE DONYCKAITE BbICbIXAHNIA NIIUEBbIX PPOyKTOB C BbICOKIM COEPRJAHnEM CAXAPA (HAPRIMEP, JXEM), IONABUHX BHYTPb PEuN. IPNI DINTeJIbHOM BbICbIXAHIN OHN MOYT IOBPEdITb 3MAJIINPOBAHHOE NOKPbITNE BHYTPN PEuN.
I32omobumelb He 6epem Ha ce6a omeemcmeehnocmb 3a mpaembl uU noepexkdeHua, noLyuHhie ecnecdmeue hapuueHn npueedeHHbx eblwe npaeun uU eb3aHHbIe EMewameJIbcmEOM pa6omy IIO6o0 omdeJbHOz y3la ycmpoucmea, a makke e cnyae uCnoNb3O8AHn HeopuzuHaJIbHbIX 3anaChbIX qacmeu.
Oxpana okpykaIOSei cpebl - yka3aHnno ytnln3aun
2. YKA3AHNЯ NO YTNIN3ALUNN N3DEENN — NOJNTNUKA KOMNAHNI NO 3AUHTE OKPYKAIOUJIEN CPEIbI
Для уразкови наших Идени применяютс с тько HeToKcHbIe, 3KoIorNueckn 6e3OanChbIe, pprOdHbIe ДпгВtopиного Использованя матерпалы. Мbl habстялбно прзыBaem BAC coDeiCTBOBaTb B Bonpoce HadJIeKaUeYyTNIN3aunu ynapOKOBuHbIX MaTePnaNoB. O6paTntecb K BaIeMy IokaIbHOMy ToproBOMy npedctabNTeIIO nIIIN B COOTBeTCTByIOUzne peRHOHaNbHbIe opraHn3aunu ДпЯ ПОЛУЧЕнЯ aIpecoB ueHTpOB no c6bpy, nepepaBoTke N yTNIN3aunu.
He octabnTe ynaKOBky noJIHOCTbIO nIIN qactuHBO B MeCTax npoxkBaHnA JIOeN. YnaKOBOUHbE MaTePnAJIbI, B OcO6eHHoCTn IPiactuKOBbIE MeuKN, Co3daOT onaCHocTb UdyuSeHn A DnA DeTeN.
CTapbIe HeHyKbIe ycTpoIcTb TaKke CneDyET yTuNIn3uPoBaTb HAdnEkaUIM 6pa3OM.
Baxhoe 3amehne. OCTaBbTe yctpoiCTBO B IokaIbHbI ueHTp, npedHa3HaueHHbI dIra c6opa Bbl6poWeHHbIX 6bITOBbIX np6opOB.
IpaBnblbHa yTtJIN3aunna I03BOJIaTe paUHOaHbHO nCNOJb3OBaTb MaTePnaJIbI, n3 KOTOpbIX COCTONT yCTPOINCTBO.
Ipeed ytni3auee yctpojctBa Heo6xOIMO cHrTb DBepr N ocTabNTb Paooyem noJoxeHn, 3TO ncklouHT BO3MOXHOCTb CnyaHOro nonaHaHn deTeB neyb BO Bpemr irp. POMIMO 3TOrO, oTpexkTe n y6epnte ceTeBOI shyp I BNPKy.
MepbI ppeOcToPOxHocTn
3. MEPbI IPEIOCTOPOXHOCTN
ПРавиJA TEXHINKI BE3OJACHOCTNДЯ эЛКТРИСЕСКИ X I GA3OBbIX bblTOBbIX ПИБОРВ, A TAKKE YKA3AHNЯ NO UCTPOJCTBY BEHTINJIACU, PIPBEDEHbI B PYKOBOJCTBE NO MOHTAXY.
COrJIaCHO 3AKOHODATEIbCTBy, BCE 3NEKTPnueCKNe YCTPOJCTBA DOnJHbI YCTAHABINBATb
I O6CJyKINBATb NCKIIOHTeBHO KBANNPOBAHbIE CNEUAAJIACTbI, C COBJIODEHNEM
ПРИМЕНIMbIX HOPM И ПAPВЛ. 3TO B BAUIX INHTEPECAX IN HEOBXODIMO ДЯ OБECNEUEHIN
BAUJEI 5E3ONACHOCTN.
HAUII CEPTINUICIPOBAHHIE TEXHNIIO MOHTAXKY KAYECTBEHHO BbINOJIHRT YCTAHOBKY BAJEY UCTPOICTBA.
OTKJIIOUeyHHe Ia3OBbIX ININ 3JIeKTPnueCKnx YCTPOIcTB IOJXHO O6r3AteJIbHO BblONHrTbcra
COOTBETCTBYIOUIMOBPA3OMNOIROTOBJEHHbIMCNELNAJNTAMN.
BUNIKA I COOTBETCTBYIOUJAR PO3ETKA IJI NOIKNIQUEHNK 3JEKTPNUECKO CETN DOLXHbI BbITb
ODHO TINN OTBEATb TPEBOAHnIM PIPMEHmBIX HOPM INI PABNIJ.
PO3ETKA 3NEKTPNUECKO CETN DOJXHA BbITB IOCTYPHA DAXE IOCNE BCTPANBAHNA YCTPOICTBA.
HE TAHHTE 3A CETEBOI UHYP IIN3BNEUHRA BUNK N3 PO3ETKN.
3A3EMJIENI 3EETB.
HEMEJIENHO NOCJE YCTAHOBKN BbINONHITE BbICTPYIO NPOBEPKY UCTPOICTBA COJIACHO
HHTPYKUJAM, INPBEDEHHbIM DAJIEE B 3TOM PYKOBOCTBE. ECJN YCTPOICTBO HE PA5OTAET, OTCOEINHITE ERO OT 3JEKTPNUECKOJ CETN IOBAPITNECB B BLJKAIIIN CEPBCHBI CEHTP
HE NbITAITECBOPTPEMOHTIPOBATyUCTPOICTBO.
HIN PNI KAKNX OBCCTOATEJBCTBAX HE KNAITE TROPUOHE MATEPNAJIb BHYTPB PEUN: ECJN PEUYBUDET CNYAHIHO BKJIIOUeHA, 3TO MOKET PNIBECTN K IOXAPY.
IPN PABOTE YCTPOICTBO CINbHO HAFPEBAETC. COJIIOAITE OCTOPOXHOCTb, HE KACAITECb IOPaHx YACTeBHYTPN PEuN.
3TO YCTPOICTBO HE IPEHHA3HAUEHO IJI NICNOJIb3OBAHN JETbM. DEPJNTE DETEN HA 6E30PACHOM PACCTOHN IN HE PA3PEJAIte IM INPATb C PEnbIO.
PPI PABOTE IPIJI YOCTUHbIE YACTN MOYT CINbHO HAFPEBATcR. DEPKITE DETEN HA E3ONACHOM PACCTOHN.
IPEEDNCIOJIb3OBAHnEMIeHNCHIMITE BCE HAKJEIKN 3AUHTHYIOJIeHKU,IPNIKJIEEHHYIO BHTPNIIIN CHAPXKNIeH.
ПОСЛЕ ИСПОЛБОВАНИЙ YБЕДИTEСБ B TOM, УТО BCE РУЧКИ YПРавLEНЯ YCTAHOBЛЕHBI B ПОLOЖЕни 0 (OTКЛ.).
I3zomobumelb He 6epem Ha ce6n oemcmeenhcmb 3a mpaMbl unu noepexdeHna, nolyeHHbIe cneodcmue hapyuhenu npuedehhbx 6biwe npaeun unu 6bi3eaHbIe Emeawamelbcmbom 6 pa6omy IIO6o0 omdehlhozo y3na ycmpoucmea, a maKe 6 cnuyae ucnolb308aHua HeopuzuHaNbHbIX 3anaChbIX qacmeu.
Инструкции目前国内 yctaHOBuzika
4. YCTAHOBKA YCTPOINCTBA
YCTaHOBky 3Toro yCTpoiCtBa DoJxH NpOIN3BOiNTb KBaIINΦNcIPoBAHHb I TexHnK C CO6JIIODeHNEM BCex npIMeHMbIX HOpM n npaBnI.
4.1 3neKmpuueckoe nooknoueHue
He donyckaetc CHMaTb nacnopTyu Ta6nHy.
To yctpoicBO dOJXHO 6bITb 3a3eMJIeHO B COOTBeTcTBUN C Tpe6oBaHnA M K CnCTeMaM 3a3eMJIeHnA 3JIeKtpnuecknx YcTPOiCTB.
Pn nCnOJIb3OBAHmN NOCToHHOrNo NOKIkuYeHnB CENNIITAHnYcTpoiCTBa CneDyET yCTaHOBTb NaKeTHbI BvIKIOuAteJIb, pa3MeCTNB erO B DOCTyIHOM MeTe B HeNOcpeIDCTBeHHo 6JIN3OCTN OT DAHHORo 6bITOBoro np6oba, PnI 3OTM 3a3Op MEXdy KOHTAKTAMN BvIKIOUaTeJIa DoJIxHe COCTABJIrTb He MeHee 3 MM.
Ipn nCnOJIb3OBaHnn po3ETKn n BnIKn y6eIntecb B TOM, YTO OHN OndHO Ttna. He dOnyckaetcra NcNoJIb3OBaHne nepexoHnKOB, aAnTepOB uNn TpoHnKOB, KOToPbIe MOryT Bbl3BaTb nepeRpeB uNn npoxkOrn.
3Kcnpyaataa npn HanpaxeHnn 220-240 B nepemehoro ToKa: nCnonb3OBaTb TpeXKnBHyk Ka6enb Tnna H05RR-F (Ka6eJb 3 x 1,5 MM²).
IpoBODHK 3a3emnHn (XeJITo-3eHOro CBeTa) DoJIxH 6bITb NO MeHbWe Mpe Ha 20 MM dINHHeepyRnx IpoBODNKOB Ha pa3deHaHHOM KOHe Ka6eJ npN pOdkluoyEH N yCTpOHTBy.
I3roTOBnTeNb He 6epet Ha ce6a OTBeTCTBeHHocTb 3a TpaBMbl NIN NOBpeKdEHNr, NOnyHeHbIe BCJeDCTBne HApUWeHnnpIBeDEHHbIX Bbiue npabIn NIN BbI3BaHHbIe BMeuATeJIbCTBOM B pa6Otu IIOboro OTdeNBHO r3Ja yCTpOiCTBa.
4.2 Pa3MeueHue neyu
YcTaHOBky 3Toro yCToPcTBa MoKET npOn3BODnTb TOnbKO KBaHnΦnCuNPOBaHHbI CneuaJIInCT
B COOTBETCTBIM C PnBBeDEHHbIMN IHCTpyKcIaMNI. N3rTOBNTJIb NOJHOCTbIO CHIMaET C Ce6r OTBETCTBEHHOCTB 3a TpaBMbl IIOdAM M XJBBOTHbIM, a TaKKe BO3MOXHbIyUeep6, KOToPbIe pON3OuIN BCJeDCTBHe HEnpaBUNBoH OYCTaHOBKN.
Baxhoe 3ameuahne.
-пегд bblonнemл IO6bIX pa6OT no perynpoBke nIIN texHnueckomy obcnykubHIO yCTpoiCTBa cneNyET OTKJIQUHTb yCTpOietBO O T 3JIeKTPnuecko CETN.
- TnCCTeMbI BEHTINJRAUIN CIEyET NCOJb3OBA Tb BEHTNJRAUHOHHb KaHaJI.
- O6nIOBaHHbIe IINOHOM IkaΦbI DoJXHbI CObIpaTbcra C NcNoJIb3OBaHNem Kne, BbIePknBaHOuNIM temepaTypo 100°C.
YcTaHObKa neeB BCTpoEHHOro Tuna
Дя обесеньяHopмально pa6otbI yctpoiCTBa шkaф,В KOTOpBи BCTpoeHa Neyb,ДОнжeH IMeTb NaIpeXaIyU KOHCTpyKcIIO.
3TO yctpoiCTBO npedHa3HaueHO dIy BcTpaHbHn (KJacc 3) B WkaΦbl, n3rOToBHeHHbIe H3 IIO6bIX TENIOCTOKHX MaTePnaIOB. CneDyeT co6IIOdaTb pa3Mepbl, npIBeDEHHbIe Ha pnc. 1, 2 n 3. Pn y cTahOBKe cH3y pa6oey NOBepxHocTN, cNe dyET BbIepKaTaB pa3Mepbl, noka3aHHbIe Ha pnc. 1-3. Pn y cTahOBKe cH3y pa6oey NOBepxHocTN, Ha KOTOpoi pa3MeSeHa PIIITa, pacCToRHeNo Do IIO60B 6OKOB0 CTeHN DOnJIHO COCTABNtB He MeHee 110 MM, KaK Oka3aHO Ha pnc. 1. Pn y cTahOBKe B BbICokHe WkaΦbl co6IIOdaIte pa3Mepbl, npIBeDEHHbIe Ha pnc. 1-2, npINHMaBo BVHMaHne, YTO B BerXHe/3aHHe uactn WkaΦa Heo6XoDmO OCTaBNTb Ppoe M rIy6HnOH 45 MM. 3akpyTnte 4 BNHTa
A BO BHYTPENHIOU qacTb paMbI (pnc. 1). Ipn yCTaHOBKe CHN3y pa6Ouei NOBepXHOCTu y6eINTEcB TOM, YTO 3aHNJ/ HIXHJY qACtB shkaΦa IMeET npoEM, KAK NOKa3aHO Ha pnc. 1 (B), a nepeHJr/HIXHJry qAcTb shkaΦa IMeET OTBepCTne pa3Mepom He MeHee 45× 560 MM, KAK NOKa3aHO Ha pnc. 1-3 (C), IIIN npoem, aHaONuHbI npoEmy B OKOHHO ITope, Ipn 3TOM pa3Mep npoema DOJIkeH COCTABnTb He MeHee 45× 560 MM. Iopraok paCNOJOKeHry yCTpoiCTB OTHOCHTeBHO Dpyr dpyra n 3akpenneHn npuBeDeH B pyKOBOdCTBe, NoCTabnEOM C PIIITOn.
Cornacno Tpe6oBaHm DeiCTByuix CTaHapTOB 6e3onachocTN, nocne yctahOBKn neu doCTyn K 3neKtpnueckm YactrM DoJKeH 6bTb NCKJIooHeN.
Bce y3nbl, KOtOpbIe o6ecneuBaHOT 6e3OnaChyU pa6Otu yCTpoiCTBa, DOJXHbI CHIMaTbCra TOnbKO C NOMOuBIO INCHTpymENTOB.
He donyckaetc ycnolb30BaTb DBepb Ira 6aIahCnpOBKn npn ycTaHOBKe neu Ha ee MeTo B ukaΦ. He npnaraTe Upe3MepHoro ycIIINK OTKpbITOn DBepn.
4.3 Behmulau nomeu Hen
Corgnacno Tpe6oBAnm npimEnmbix Hopm n npaBn, yctanOBky uCTpoiCTBa cneDuET npOn3BOndToIbKO B Tex nomeueHnx, kOTOpbIe o6opudobahbl stTaTHoN CSTeMoB BeHTnlau. PpTOK Bo3dyxa B nomeueHne C yCTaHOBneHHbIM yCTPOiCTBOM DoJxeh 6bITb DOCTaTOUHbIM dJa obecneueHna HndLeXaUeTo CropaHnra 3a a npOBetPribAHn pomeuHn. Ipoembl dJa 3abopa Bo3dyxa, OchauHhble ceTKamn, DOLKhbI IMeTB DOCTaTOUHoe ceueHne (cM. npimEnMbIe HOpMbI n npaBnla), a ux paCNoLoXeHne DOJXHO NCKJIouHaTb DaJce YactNUHoe 6bnkpovabHn. Heo6xoDIMO o6ecneuMbI NOCTOHNHyO XopoWyIO BeHTnlaUcIO KxHn dJa OTBOda TeNJa N ydaJIeHn Bnarn, o6pa3yUoUxxCsR B npoUeCE pnproTOBHeHn PNI: B qACTHOCTN, CJIeDuET OTKpbITb OKHO INI IOBbICNTb CKOPocTb BpaSeHn BEHTNJrTOPB ONdTIeNBHom ICNOJIb3OBAHn Neu.
4.4 Omod npodykmoe c2opauha 2a3a
OTbO ra30o6pa3HbIX npOdyKTOB cTropaHnI DOJIxKeH OcyUeCTBIAITbcra C NOMOu BbITJXHO KOLNaKa,
PnICoeDInHeHHOMy K DbIMOBOMy KaHaIy C HAdexKHOECTBeHHoT TAgOr IIN K PnHyDInTeHBoN CnCTEme
BbITJxKn. Co3dAnHe 3ΦΦeKTHBHO BbITJxKHOcCTEmbl Tpe6yeT TuaTeHBoN Ipopabotkn cepTuΦuIpOBaHbIM
CneuJaNtOM, pRn 3TOM Heo6xOIMO CO6JIOnaTb BCE npedymOTpeHHbIe HopMaTHBbIe paCCTOHN I NOLOKeHnI.
PiocNe 3aBepSeHnY yCTaHOBKn BeHTNJrAun TexHnK DOJIxKeH BbIdaTb cepTuΦNKaT COOTBeTCTBnI.
4.5 Nodknoyehue K 2a3o8ou cemu
PoiKJIouHeHcI NMOUHO MeHOn Tpy6bl.
IopKluOeHne K ra3OBoM aRnCTpaNc CJeDyET BbINOJHnTb TaKIM o6pa3OM,
YTO6bl NCKLIOHTb pa3HO rOpaHa rpy3Kn IIN HAnpJxKeHna K yCTpoiCTBy.
IopKluOeHne MOXHO BbINOJHnTb C NOMOuB IOpeXoJHnKa D c DByma
KOHUeCKmM 3JIeMeHTAMn, C O6ra3aTeJbHo yCTaHOBKO JPOKJaDKn C,
NoCTabJIaEMoB BMecTe C yCTpoiCTBOM.
IopknloueHHe c nOmoBcTaNbHoro 7nHaHa.
CneNyET nCnoIb3OBaTb TOnbKO 6ecWOBHbIE CtaNbHbIE UHaHn, OTBeuHOUne
Tpe6oBaHnAmpmehnMbIX CTaHApTOB, N O6ra3aTeNbHO yCTaHOBtB
IOCTaBJIReMyIO BMeCTe C yCTpOINCTBOM PpOKJaIKy CMexkDyΦHTNHROM
A IN UIaHROM E.
При подклочен c Использоваимem Шанг Heo6xodmo y6eHTbc8,ЧTo cyMMapHа Длина Лини He doJnxHa npeBbIaTb 2 M, a TAKKe пият b Мрbl, YTO6bl ShaHr He kacalcЯ DBHXyuxcxЯчTei N He 6bl pa3dablen.
5. PEGYINPOBKA B CJUYAE INPIMEHEHNA RA3A DPYROTO TUNA
Ipeed BbinoHHeHem OnncAHHbIX Hxke onepaun OTKJIIOHTe yCTPOINCTBO OT 3JIeKTPnuecko CeTN.
YcIpoIcTBo 6bIIO nCbIaHO c npipOndHbIM ra30M G20 (2H) npi daBneHN 20 M6ap. Ppi Heo6xOdImocTn pa6oTbI neu Ha r3e dpyrOTo Tnna cIeNyET 3aMeHITb fOpcyHky ropeKn I OTperyInpObaTb ra3OBbI KJIanAH. IpopJok 3aMeHbI fOpcyHKn OINcaH HIXe.
5.1 Pezylupo8ka zopeIku neyu
Дянстюкri ropeknneu OTkpOte DBepb neu N BbINOHNTe CNeDyUcne DeiCTBn:
-
ɪЗBsɪkeɪTe BCE BCnOMOraTeNbHbIe πρɪHaɪdJIeXHoCTN (ɪpɒTɪBHI, ΠΟJIKN I BCE CTaJIbHbIe HappaBJIyIoUηe);
-
NODHMMTE HIXHNI JNCT N IN3BNEKNTe eRO, TAK YTO6bl NOLYUHTb DOCTYN K BHYTpeHHM qACTm PINTb, KAK NOKa3aHO Ha pncyHke.
5.1.1 HactpoKa MmHmMaIbHoN TeMnepaTpybI
Tepmoctat neu nmeet perynipobohb BnHT yCTaHOBK MInImaIbHOI Temnepatpyi.Дяdoctyna K hemy Heo6xOIMCnrytB pyky tepmoctata.Ipr cMeHe Tnpa ra3a cneyuET Otperynpobatb MnImaJIbHyTOmpepatypcneyuOIM o6pa3OM.
- Побхгinte ropeky peu n daite peu npa6oTaB b TeueHne 10-15 MInyT npn 3akpbIToI DBepn,

3aTeM NOBepHnTe pyky B NOJoxeHne MHNMaJIbHOI TeMnepaTpybl, CHIMITE pyky I BbINOJIHnTe peryIpOBky C NOMOuIoo UINueBOI OTBepTKN. Chayala NOBepHnTe pyky no yacoboi cTpeIke do ynopa, 3aTeM npOTNB Yacoboi cTpeIKn dJa perynpOBKn PIAmeHi. Ppi HcnoJIb3OBaHHn npipOndHoro ra3a Heo6xOdmo NOBepHyTB Ha ODN H o6OpOT, a DnA CxKJXeHHoro ra3a Ha 1/8 o6opota.
- Пи Использовань 6аалонногу ra3a cneуET nobepHyt b perynipobOчьи BnHT no yacoboi CTpeIke do ynopa.Диаметр 6aunaca yka3an B pa3dene 5.2 «Tabицаданьix dny ropelok n φopcyHOK».
- Пи Испоьзовани 6ытOBО rHn npRoHOrO ra3a OTperuNpyTe BHT TAKIM o6pa3OM, YTO6bl nIamЯ BCERda OCTabaNoCb cTa6HbIM n OdHOpOHyBIM npn NobopoTe pyKn TepMOCTaT aT MAKcMaNbHOrO NOJoxeHn K MInHMaJIbHomy. 3akpoTe DBepb neH n y6eINTEcB B TOM, YTO TpeKlKa OCTaETcB NIOJoxeHn MInHMaJIbHOrO ypOBHЯ ropeHn.
5.1.2 3aMeHa fOpcyHKn
OTBepHnTe BnHTbI KpeJIeHnR ropeJIKN neuA.
BbIDBnHbTe ropeKy B hapKy TaK, UTo6bl MoKHO 6blIO n3BneH φopcyKnY.
3aMeHHTe fOpcyHKy c nOMOuTOpOBOrKIOU7,yCTaHOBnTe fOpcyHKy dIy IcNoJIb3yEMOrTo Tnna ra3a (cM. pa3dEn «Ta6nua daHHbIX dIra ropeNOKfOpcyHOK»).
5.1.3 PerynipoBka pacxOda nepBnuHoro Bo3duxa dIra ropeIkn neu
OTBepHnTepeynpoBOHyBnBVHTABTyIKNBO3dyuHOropeyIraTopa.
- Повернite втулку ретуларopa B в полженье, которoe cootbetCTbyet TINy
инользуемо ra3a corlacho ta6лпсе Нхke.
3aTHepepynnpoBOHbINBHTN yCTaHOBtne npoklaKn Ha MeTO.
- Посné заBERSEHЯ ONEPAUIN BbINOJNHTe c6Opky rOpelKN HaIJIeXaUIM O6pa3OM.
| I3+(28-30/37) | I3B/P(30) | I3B/P(37) | I3B/P(50) | I2H | I2E | I2E+ | I2L | |
| II 2H3B/P | ✓ | ✓ | ||||||
| II 2H3 | ✓ | ✓ | ||||||
| II 2E+3+ | ✓ | ✓ |
MaKcImaJIbHO MoXHO yCTaHOBnTb 23 Yaca 59 MMHyT.
8.2 TekyuzaeKeedHeHaOucmka
Pn ouicke n yxoJe 3a noBepxHocTMy n3 HepXaBeOuIe cTaII Heo6xOIMo IcNoIb3OBaTb TOnbKO CneuaNbHbIe BeIecTBA, He coedePkaIue a6pa3INbIix qactNt u NkCnot Ha oChObe Xnpa.
Hnctpykun no ouncTke:HaHeCHTe YnCTaUee BeueCTBO Ha BnaXHyTO TpAnky I npOTpuTe NOBepxHocTb, nocJe Yero TuaTeNbHO IpomOnTe NnpOcyuNte C NOMoCbIO MmKoI CaJIpeTKn IJIN 3amUn.
8.3 PmHa u nomeku om nuueebix npodykmoe
He donyckaetcna cnoIb3ObaHne yncTaux ry6ok nnn ocTpbix ckpe6koB, KOtOpbie Moryr noBpeDnTb nobepxHOCTNu ycTpoiCTBa.
IcnoIb3yIte o6bIuHbIe Hea6pa3uBhIe BeIecTBA C DepeBraHHbIMN IJI NIIaCTIKOBbIMN IHCTpyMeHTamn npn Heo6xoDmOCTn.
TtataTeIbHO npomOte BooH n npotpTe hacyxO NOMOsbIO MrgKO BetoU INn 3aMUN.
He donyckaIte BbicbixaHn I nIeBbIX npOdyKTOB C BbICOKIM COepeXaHnEM caxapa (HaNPmep, Jxem), nonabux BHytpb neu. Ppi dIITeNbHOM BbcbixaHn OH N MOryT NOBpeiNtB 3MaJInpOBaHHoe NOKpbITne BHytpn neu.
8.4 Oucmka neyu
Iynoepxahn neu B xopoewem coctoAHn cJe dyet peryraHPO Ounlaatb ee Nocne octbHaHn.
N3BNEKNTE BCE CbEMHbIe Yactn.
OuHCTnTe NOLIK Nechc NOMOJIbIO TOpAYe BOJbI Nea6pa3INBbIX YNCTaIINxCpeDcTB IN PocCyJInTe.
8.5 Oucmcka cmeeknHno yacmu deepu
CTeKnO DBeRn CneDyET Bcerda NpDdEprKINBaTb B IideaIbHO YNCTOM COCToHNI. NcnoJIb3yIte BnITbIBaIOUne 6ymaxHbIe NpIoTeHua, ydaJIeHHe CTOnKnx 3aIrp3HeHNI pON3BOJNTe C NOMOuBIO BnaXHo Iy6Kn I O6bIHyIX MOUxxCpeIcTB.
9. BHENJIAHOBOE OBCJYKINBAHNE
HOrda Tpe6yETc BbIOnHrTb He3HaUHTeNbHbIe Oepaunn no 06ClyKbAHIO neu nn 3aMeHe
6bICTpon3HaUHbAeMbIX aactei, TAKNX KAK npOKlaIaKn, IaMNoChn T. n. HInke npBedeHbI cneuaJIbHbIe
yka3aHnno BbIIOJIHeHnIO TaKnx npOeDyp.
Ipeod bblnoHHeM nIObIx opeaui, KOzda ocuyecmnaemcra docmyn K mokoeedyum Yacmam,
omknuoyeme ycmpoucmeo om 3neKmpueeckou cemu.
9.1 3aMeHa IaMnbl OceueHua neyu
- OTKNIOHTe neb OT 3NEKTPnuecko CETNC NOMOUBI NO NAKETHO BbIKHQUATEJI, KOTOpB yCTaHOBneB V cENI NOkNIOUeHnY UcTPOUICTBA K CETN, INN IN3BNeKNTe BUNKy IN3 PO3ETKN, ECIN ECTb BO3MOXHOCTb.
CHIMITEcKnHHyKpbIky,yCTaHOBneHHyHa naTpOHe NaMnbl.
- BbikpyTte lamny n 3aMeHnTe ee lamnoi, paccHTaHHoHa pa6Otu npu BbICOKo TeMnepaType (300^) CO cIeDyUOIMN XapaKTePncTnKaMn.
■ HanpjaKeHne: 220-240 B
MoHocTb:25BT
Tun: E 14
BepHnTe cTeKnnHHyO KpbIuKy Ha MeTo I NoDknUHTe NeYb K 3JNeKtpNuYeCKoN ceTn.
9.2 Chmue deepeu
IJIa 6OJIe eTtUaTeJIbHO ONUCTKMOXHO CHaTb DBep neu. BbINOJHnTe cNe dyUoune DeiCTBna:
-
NOHOCbHO OTKpoIe DBepb;
-
NOHNMTe BBepx n nobepnTe He6oBbIne pbuarn, yCTaHOBnEHHbIe Ha DByx NtTJX;
BO3bMITE DBebp 3a DBe HApYKHbIe CTOpOHbI, MeDnEHHO 3aKpOHTe ee, Ho He Do KOHua;
NOTAHNTe DBepeK Ce6e H CnHmTe ee c NocaoHOro MecTa.
YctahOBka DBeprHa MeCTO OcyuIeCTBJIaTcR B NopJKe, O6paTHOM ONHCAHHOMy Bblwe.
9.3ДeMoHmaxnpoKnaadoK
Iπa 6oJee TuaTeJIbHOuN OUcTkn Neu MoXHo CHTb npOKnAky DBeHn.
Ipeed n3BneueHnem npoknaKn cHIMNTe DBepb neu, kak onncAo Bblwe. Iocne demontaxa DBeprnOndHMNTe J3bUKN B yrrax, kak noka3aHo Ha pucyHke.
10. TEXHNUECKNE XAPAKTEPNCTUKN
BhytpenHne pa3mepbI neu:
Unpna 43,5cm
Tny6nHa 40cm
BbICota 32 cm

1800W
BhytpenHHn o6bem neu 56 nHTpoB
HanpexHe n yactota nctouhka nntaHa:
220-240B\~50/60Tu nn 50 Tg
BEDIENUNGSANLEITUNG
Gas-Backofen
ERDGAS (N) G30/G31 (LPG)
X=4mm 10mm
| I3+(28-30/37) | I3B/P(30) | I3B/P(37) | I3B/P(50) | I2H | I2E | I2E+ | I2L | |
| II 2H3B/P | ✓ | ✓ | ||||||
| II 2H3 | ✓ | ✓ | ||||||
| II 2E+3+ | ✓ | ✓ |
| I3+(28-30/37) | I3B/P(30) | I3B/P(37) | I3B/P(50) | I2H | I2E | I2E+ | I2L | |
| II 2H3B/P | ✓ | ✓ | ||||||
| II 2H3 | ✓ | ✓ | ||||||
| II 2E+3+ | ✓ | ✓ |
(CSAK NEHANY MODELLEN)
(CSAK NEHANY MODELLEN)
FUNKCIÖ KAPCSOLÖGOMBJA
(CSAK NÉHÁNY MODELLEN)
GAZ ZIEMNY (N) G30/G31 (LPG)
X=4mm10mm
| I3+(28-30/37) I3B/P(30) I3B/P(37) I3B/P(50) | 12H I2E I2E+ I2L | |||||||
| II 2H3B/P | ✓ | ✓ | ||||||
| II 2H3 | ✓ | ✓ | ||||||
| II 2E+3+ | ✓ | ✓ | ||||||
MANUAL DE INSTRUCTIONSI
Cuptor cu gaz
| I3+(28-30/37) | I3B/P(30) | I3B/P(37) | I3B/P(50) | I2H | I2E | I2E+ | I2L | |
| II 2H3B/P | ✓ | ✓ | ||||||
| II 2H3 | ✓ | ✓ | ||||||
| II 2E+3+ | ✓ | ✓ |
a a a a a a a a a a a a a a a a a a a a a a a a
J
1.1
aill lwlwll g jalil 2
aXlllbllyal.3
jLJI 4
J 5
aalai aaglln jalic 6
j 7
aill 8
aill.9
4.10
1
1
1 1 1 1 1 1 1 1 1 1 1 1 1 1 1 1 1 1 1 1 1 1 1 1 1 1 1 1 1 1 1 1 1 1 1 1 1 1 1
0e 8gssll kss s jai clalnol ag gaa aai all Jia
jaiy jaiy jaiy jaiy
Juaia jaii jao jaij gacaiaiy, gaii iaiai aiaiil 100 Jiaai jiaai jao jao jao jao jao

jz-1i jgii
aie aie 1iie jie jie jie jie jie jie jie jie jie jie jie jie jie jie jie jie jie jie jie jie jie jie jie jie jie jie jie jie
3.6jgill gaiil aaii jglu cloglae Ugall aalal agsall Jgss
g 1
a1 = 23,an + 1 = an - an - 1
y 1
aJall aayy yagill aygill aygill ay
Aaai j 1
y
a a a a a a a a a a a a a a a a a a a a a a a a a a a a a a a
gssll gssll sio! gssill ciaal dlae gie Jaaall pialol oelsl lil aal all annally
alall 1alall lalll 1alall 1alall
Aas jusl gle aygall aagll yll sgl lss gill jia
J 1
aalall aalglg yjglg yjyl gge jy glalgl gdlal gglg yjglg yj
Aa a a a a a a a a a a a a a a a a a a a a
Lalba aalbai gji iayu kuaa 4o jiy uall Jauai chei
y
a y 11 d 11 j 11 a 11 j 11 a 11 a 11 a 11 a 11 a 11 a 11 a 11 a 11 a 11 a 11 a 11 a 11 a 11 a 11 a 11 a 11 a 11 a 11 a 11 a
aillua jsrjai
-
-
-
-
-
-
-
- 1.
-
-
-
-
-
-
y
a
jiee eae aee ae aee ae ae ae ae ae ae ae ae ae ae ae ae ae ae ae ae ae ae ae ae ae ae ae ae ae ae ae ae ae ae ae ae ae ae ae ae ae ae ae ae ae ae ae ae ae ae ae ae ae ae ae ae ae ae ae ae ae ae ae ae ae ae ae ae ae ae ae ae ae ae ae ae ae ae ae ae ae ae ae ae ae ae ae ae ae ae ae ae aa
Jgaiiaai 1
j j 111111111111111111111111
Sall lal aol
j 100000000000000000000000000000000000000000000
Aadaiy jie jie jia phanwlg
i
[\therefore \left( {x + y}\right) \left( {x - y}\right) = 0]
aill 11 11 11 11 11 11 11 11 11 11 11 11
4.1
aaii jil 1
a 1
Jusll Jusie g a 3 jauil juaill jaaai jaaai aal al
Aaai jll i jii jg aai
a 1
i
H05RR-F 240 220
.(20 × 1.53 L
J 20 J (j)
J 1
y 1
aal 1
:
eae aie eae aeae aeae aeae aeae aeae aeae aeae aeae aeae aeae aeae aeae aeae aeae aeae aeae aeae aeae aeae aeae aeae aeae aeae aeae aeae aeae aeae aeae aeae aeae aeae aeae aeae aeae aeae aeae aeae aeae aeae aeae aeae aeae aeae aeae aeae aeae aeae aeae aeae aeae aaee
gagll jgiy ggyll alldi i
100 11 11 11 11 11 11 11 11 11 11 11 11 11 11 11 11 11
a aal j 1
Aaiiaiaaill jll jll jll jll jll jll jll jll
J 3,21 Jkll f g aaglalglaa.5y y 3 (3) j 100 110 110 110 110 110 110 110 110 110 110 110 110 110 110 110 110 110 110 110 110 110 110 110 110 110 1
| x - 1| = | 1|
j j j j j j j j j j j j j j j j j j j j j j j j j j j j j j j j j j j j j j j j j j j j j j j j j j j j j j j j j j
Lolai sclauag lal jSay jjll jai jai gale 5ji gill

y
4.3
gai C gaiy jaiy jaiy jaiy D jaiy
yall a ggs pluily yagill
C 1
EaA aaii C
yabjnl 2 2 y jy y gblg 1gbln 1gsl
gaae aeg
1521 10 aaloo eolgj8 jgsi 5
y j 1
a 20 g2
aagaaagall gaaal gaii jiaai jiaai plao
5.1
100
:()
.
5.1.1
iie i
yLs gai jie jia 11111111111
.
A jll aaiy aaiy aaiy aaiy aaiy aaiy
5.2"abill 17
.
j5.1.3
Jalil "A" Jall jlll jlll 3
olj jllg jlll lllllllllllll
aaiy jll jannl bjry sly
(N)G30/G31(
X=410
jglg jgl ggl glgdl lglgglgglgglgglgglgglgglg
Jalll aae 1y jll yj 8e 8e Jaiell jll g jie kill p j i jil lall kll jnal
| I2L | I2E | I2E | I2H | (50)I3B/P | (37)I3B/P | (30)I3B/P | (28-30/37)I3+ | |
| ✓ | ✓ | II 2H3B/P | ||||||
| ✓ | ✓ | II 2H3 | ||||||
| ✓ | ✓ | +II 2E+3 |
aol81 aogll pss jolic aog.6
aieiie i 1
FGE1TIX

FGE21X
FGE3TIX
FGE4TX

FG1TIX
C
(baii jiall jy)
1 7.3" 7.3
C
(baii jll j
()g 120 120
a
()
aallll llllll 00000000000000000000000000000000000000000
aagaae
(b)
aaii iia aiee e 1

a

6
(baijll
A
(0:00-24:00):
aillie "gai" 3
1
juaaal jai jia
BB 88

W

山

+

(a)yglgai (jao)
"
y 1
()
1
ealglgai 1 gnnnnae p3 2
Lgblgblgblgglgglgglgglgglgglgglgglgglgglgglgglgglgglgglgglgglgglgglgglgglgglgglgglgglgglgglgglgglgglgglgglgglgglgglgglgglgglgglgglgglgglgglgglgglgglgglgglgglgglg
13:15 13:14 13:15 13:15
5555 1
14 14
心
()
:(a#1 10)
5513 1
1
j 1
(59aow23)
eaiiie
1
1
"0" 156
i 1
594e23
1
aaii aaii 100000000000000000000000000000000000000000
jzjj jzjj
7.5
60
j 1
j j j j j j j j j j j j j j j j j j j j j j j j j j j j j j j j j j j j j
aiee aee
a 1
2
.
ailll llll 1 1 1 1 1 1 1 1 1 1 1 1 1 1 1 1 1 1 1 1 1 1 1 1 1
jell jj j j j j j j j j j j j j j j j j j j j j j j j j j j j j j j j j j j j j j j j j j j j j j j j j j j j j j
aIg 8
y j 1
1201 p91 1201 8.1
a a a a a a a a a a a a a a a a a a
alal 1 aiei lai kaiy iay gai
ailll aiee eae ae aee aee aee aee aee
jall 12
8.4
1 4
a1j1a1j1a1j1a1j1
aiaaa aaii aaiie aaiii
8.5
y 1
aillil 9
alj 1sulallll jay jy yu yu yu yu yu yu yu yu yu yu yu yu yu yu yu yu yu yu yu yu yu yu yu yu yu yu yu yu yu yu yu yu yu yu
.
ailllgljooo jg1 Juaol gao oJg00000000000000000000000000000000000000
9.1
j 15 j 15 j 15 j 15 j 15 j 15 j 15 j 15 j 15
1
:aillshu
a 300 a
240 220
25:
E14:
. 4y≤123
Lal 1
:山山
:juaalall
LdS
jiaai jao

aSe aayjaoeol jgssll ccljyI glls
9.3
a a a a a a a a a a a a a a a a a a
Jss 1
a.aaaii 10
:
43.5
40
32

1800W
56
aalbl 1gji jaaai jllg aibgl
50 50/60~220-240
cataC
CNA group
CATA ELECTRODOMÉSTICOS, S.L.
c/ Ter, 2 - 08570 TORELLO (Barcelona) SPAIN
Tel. +34 938 594 100 - Fax +34 938 594 101
www.cnagroup.es - e-mail: cna@cnagroup.es

- MANUAL DE INSTRUCTIONS
- Forno a gás
- MANUTENÇAO EXTRAORDINALA
- Table of Contents
- Precautions for Use
- PRECAUTIONS FOR USE
- THE NAMEPLATE MUST NEVER BE REMOVED.
- The environment - Disposal instructions
- DISPOSAL INSTRUCTIONS - OUR ENVIRONMENT POLICY
- Safety Precautions
- SAFETY PRECAUTIONS
- Instructions for the Installer
- INSTALLING THE APPLIANCE
- Electrical connection
- Positioning the oven
- Installation of Built-in Ovens
- Room ventilation
- Combustion gas discharge
- Gas connection
- Connection with copper pipe:
- Connection with steel hose:
- ADAPTING TO DIFFERENT TYPES OF GAS
- Adjusting the oven burner
- Adjusting the minimum setting
- Changing the nozzle
- Adjusting the oven burner primary air flow
- Burner and Nozzle Data Table
- DESCRIPTION OF FRONT PANEL CONTROLS
- THERMOSTAT KNOB
- (ON SOME MODELS ONLY)
- TIMER KNOB
- FUNCTION SWITCH KNOB
- KEYS ELECTRONIC TIMER (ON SOME MODELS ONLY)
- Digital clock
- Manual operation setting(only available on the electric grill)
- Automatic setting (set the time of full automatic starting and ending, only available on the electric grill)
- Timer
- USING THE OVEN
- Precautions and General Advice
- Cooling fan system (on some models only)
- Using the gas oven
- Electronic spark ignition
- Lighting the burner by hand
- Using the grill
- WARNING: THE GAS OVEN AND THE GRILL/ ROTISSERIE CANNOT BE USED SIMULTANEOUSLY.
- Operation of the grill + rotisserie
- Using the rotisserie in cookers with normal oven
- Attention
- 8.CLEANING AND MAINTENANCE
- Cleaning stainless steel
- Routine daily cleaning
- Food stains or spills
- Cleaning the oven
- Cleaning the door glazing
- EXTRAORDINARY MAINTENANCE
- Replacing the Oven Lamp
- Removing doors
- Removing the gaskets
- TECHNICAL SPECIFICATIONS
- MANUEL D'UTILISATION
- Fouràgaz
- MEPbI IPEIOCTOPOXHOCTN IPN 3KcIIYATAUIN N3dEJNA
- I3TOTOBNTJIb YCTPOINCTBA HE HECET OTBETCTBEHHOCTN 3A NCIIOJIb3OBAHNE YCTPOINCTBA B CEJAX,OTNIUHbIX OT YKA3AHHbIX BblJE.
- Oxpana okpykaIOSei cpebl - yka3aHnno ytnln3aun
- YKA3AHNЯ NO YTNIN3ALUNN N3DEENN — NOJNTNUKA KOMNAHNI NO 3AUHTE OKPYKAIOUJIEN CPEIbI
- MepbI ppeOcToPOxHocTn
- MEPbI IPEIOCTOPOXHOCTN
- Инструкции目前国内 yctaHOBuzika
- YCTAHOBKA YCTPOINCTBA
- 3neKmpuueckoe nooknoueHue
- Pa3MeueHue neyu
- Baxhoe 3ameuahne.
- YcTaHObKa neeB BCTpoEHHOro Tuna
- Behmulau nomeu Hen
- Omod npodykmoe c2opauha 2a3a
- Nodknoyehue K 2a3o8ou cemu
- PoiKJIouHeHcI NMOUHO MeHOn Tpy6bl.
- IopknloueHHe c nOmoBcTaNbHoro 7nHaHa.
- PEGYINPOBKA B CJUYAE INPIMEHEHNA RA3A DPYROTO TUNA
- Pezylupo8ka zopeIku neyu
- HactpoKa MmHmMaIbHoN TeMnepaTpybI
- 3aMeHa fOpcyHKn
- PerynipoBka pacxOda nepBnuHoro Bo3duxa dIra ropeIkn neu
- TekyuzaeKeedHeHaOucmka
- PmHa u nomeku om nuueebix npodykmoe
- Oucmka neyu
- Oucmcka cmeeknHno yacmu deepu
- BHENJIAHOBOE OBCJYKINBAHNE
- 3aMeHa IaMnbl OceueHua neyu
- Chmue deepeu
- 9.3ДeMoHmaxnpoKnaadoK
- TEXHNUECKNE XAPAKTEPNCTUKN
- BEDIENUNGSANLEITUNG
- Gas-Backofen
- ERDGAS (N) G30/G31 (LPG)
- (CSAK NEHANY MODELLEN)
- FUNKCIÖ KAPCSOLÖGOMBJA
- (CSAK NÉHÁNY MODELLEN)
- GAZ ZIEMNY (N) G30/G31 (LPG)
- MANUAL DE INSTRUCTIONSI
- Cuptor cu gaz
- J
- 1
- i
- cataC
Brand : CATA
Model : GIGA 750 BK
Category : Cooker