
TDA702821A - Iron BOSCH - Free user manual and instructions
Find the device manual for free TDA702821A BOSCH in PDF.
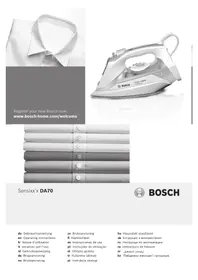



| Product Type | Steam Iron |
| Brand | Bosch |
| Model | TDA702821A |
| Power Supply | 220-240 V ~ 50-60 Hz |
| Power | Approx. 2400 W |
| Water Tank Capacity | Approx. 300 ml |
| Main Functions | i-Temp, AntiShine, SensorSecure, steam shot, spray, vertical ironing |
| Temperature Setting | Rotary selector with positions for synthetics, silk, cotton, linen, i-Temp, AntiShine |
| Steam Output | Adjustable (eco to max) |
| Auto Shut-off | Yes (SensorSecure): shuts off after 10 seconds without gripping the handle |
| Anti-Drip Protection | Yes |
| Cleaning and Descaling | Automatic Self-clean, manual Calc'nClean, descaling with recommended descaling liquid every 3 months |
| Included Accessories | TextileProtect (fabric protector), StoreProtect (secure storage), descaling liquid (optional) |
| Soleplate Type | Smooth, scratch-resistant soleplate |
| Power Cord Length | Approx. 2 m |
| Weight | Approx. 1.5 kg |
| Dimensions (W x D x H) | Approx. 30 x 15 x 20 cm |
| Warranty | 2 years (according to local legislation) |
Frequently Asked Questions - TDA702821A BOSCH
User questions about TDA702821A BOSCH
0 question about this device. Answer the ones you know or ask your own.
Ask a new question about this device
Download the instructions for your Iron in PDF format for free! Find your manual TDA702821A - BOSCH and take your electronic device back in hand. On this page are published all the documents necessary for the use of your device. TDA702821A by BOSCH.
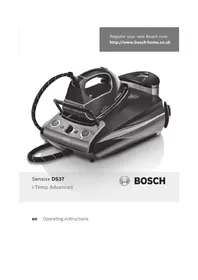
USER MANUAL TDA702821A BOSCH
Register your new Bosch now: www.bosch-home.com/welcome
Sensixx'x DA70

BOSCH
uk Operating instructions
ru Operating instructions
ro Operating instructions
ar
kz Operating instructions

| Index | |
| DEUTSCH 6 | |
| ENGLISH 13 | |
| FRANÇAISE | 20 |
| ITALIANO | 27 |
| NEDERLANDS | 34 |
| DANSK | 41 |
| NORSK | 48 |
| SVENSKA | 55 |
| SUOMI | 62 |
| ESPÁÑOL | 69 |
| PORTUGUES | 76 |
| ΕΥΑΗΝΙΚΑ | 83 |
| TÜRKUAGE | 90 |
| POLSKI | 97 |
| MAGYAR | 104 |
| ΥΚΑΡΑΙΝΤΑΚΑ | 111 |
| ΡΥСΚΑΜΙ | 118 |
| ROMÁN 125 | |
| العربية | 138 |
| ΚΑ3ΑΚ | 139 |
Thank you for buying the Sensixx'x DA70 steam iron from Bosch.
Carefully read through the operating instructions for the appliance and safeguard them for future reference.
You can download this manual from the local homepages of Bosch.
Open the leaflet sides
General safety instructions
The iron must not be left unattended while it is connected to the supply mains. - Remove the plug from the socket before filling the appliance with water or before pouring out the remaining water after use. The appliance must be used and placed on a stable surface. - When placed on its stand, make sure that the surface on which the stand is placed is stable. The iron should not be used if it has been dropped, if there are visible signs of damage or if it is leaking water. It must be checked by an authorized Technical Service Centre before it can be used again. With the aim of avoiding dangerous situations, any work or repair that the appliance may need, e.g. replacing a faulty mains cable, must only be carried out by qualified personnel from an Authorised Technical Service Centre. This appliance can be used by children aged from 8 years and above and persons with reduced physical, sensory or mental capabilities or lack of experience and knowledge if they have been given supervision or instruction concerning use of the appliance in a safe way and understand the hazards involved. Children shall not play with the appliance. Cleaning and user maintenance shall not be made by children without supervision. - Keep the iron and its cord out of reach of children less than 8 years of age when it is energized or cooling down.

CAUTION. Hot surface. Surface is liable to get hot during use.
Important notices
- This appliance has been designed exclusively for domestic use and must not be used for industrial purposes.
- This appliance must be used only for the purposes for which it was designed, i.e. as an iron. Any other use will be considered improper and consequently dangerous.
- The manufacturer will not be held responsible for any damage arising from misuse or improper use.
- This appliance reaches high temperatures and produces steam during use, this could cause scalds or burns in case of improper use.
- Do not touch the soleplate! Hold the iron by its handle.
- Do not leave the supply cord hanging over the table or ironing board, to prevent the appliance from falling.
- Do not iron clothing while it is being worn!
- Never spray or aim the steam at persons or animals!
- Do not allow the power cable to come into contact with sharp edges or with the soleplate when it is hot.
- Never rest the iron in a horizontal position when the soleplate is hot. Rest it on its heel.
- Do not touch the appliance with wet hands when in operation.
- This appliance is to be connected and used in accordance with the information stated on its characteristics plate.
- This appliance must be connected to an earthed socket. If it is absolutely necessary to use an extension cable, make sure that it is suitable for 16A and has a socket with an earth connection.
- The appliance must never be placed directly under the tap to fill the water tank.
- Unplug the appliance from the mains supply after each use, or if a fault is suspected.
- The electrical plug must not be removed from the socket by pulling the cable.
- Never immerse the iron in water or any other fluid.
- Do not leave the appliance exposed to weather conditions (rain, sun, frost, etc.).
Advice on disposal
Our goods come in optimized packaging. This basically consists in using non-contaminating materials which should be handed over to the local waste disposal service as secondary raw materials. Your local town council can give you information about how to dispose of obsolete appliances.
This appliance is labelled in accordance with European Directive 2012/19/EU concerning used electrical and electronic appliances (waste electrical and electronic equipment - WEEE). The guideline determines the
framework for the return and recycling of used appliances as applicable throughout the EU.
Description
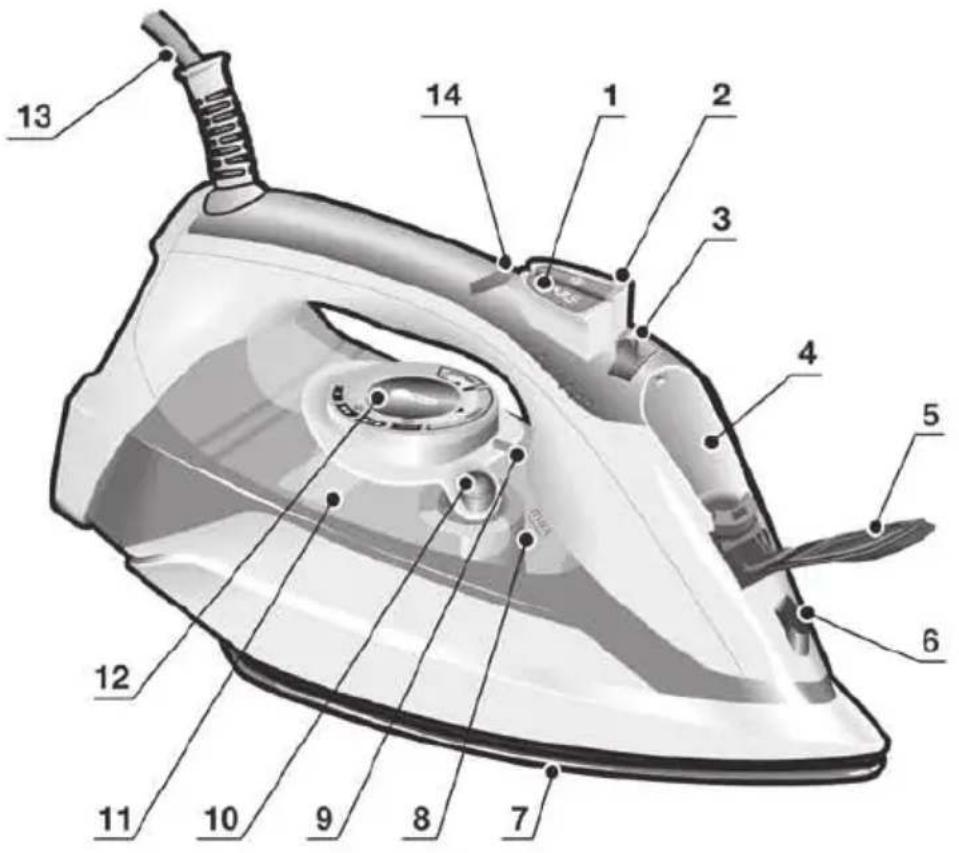
- Spray button
- Shot of steam button
- Steam regulator
- Water inlet
- Water inlet lid
- Spray nozzle
- Soleplate
- Level mark for maximum filling
- Temperature index
- "clean" button
- Water tank
- Temperature control
- Power cord
- "SensorSecure" light
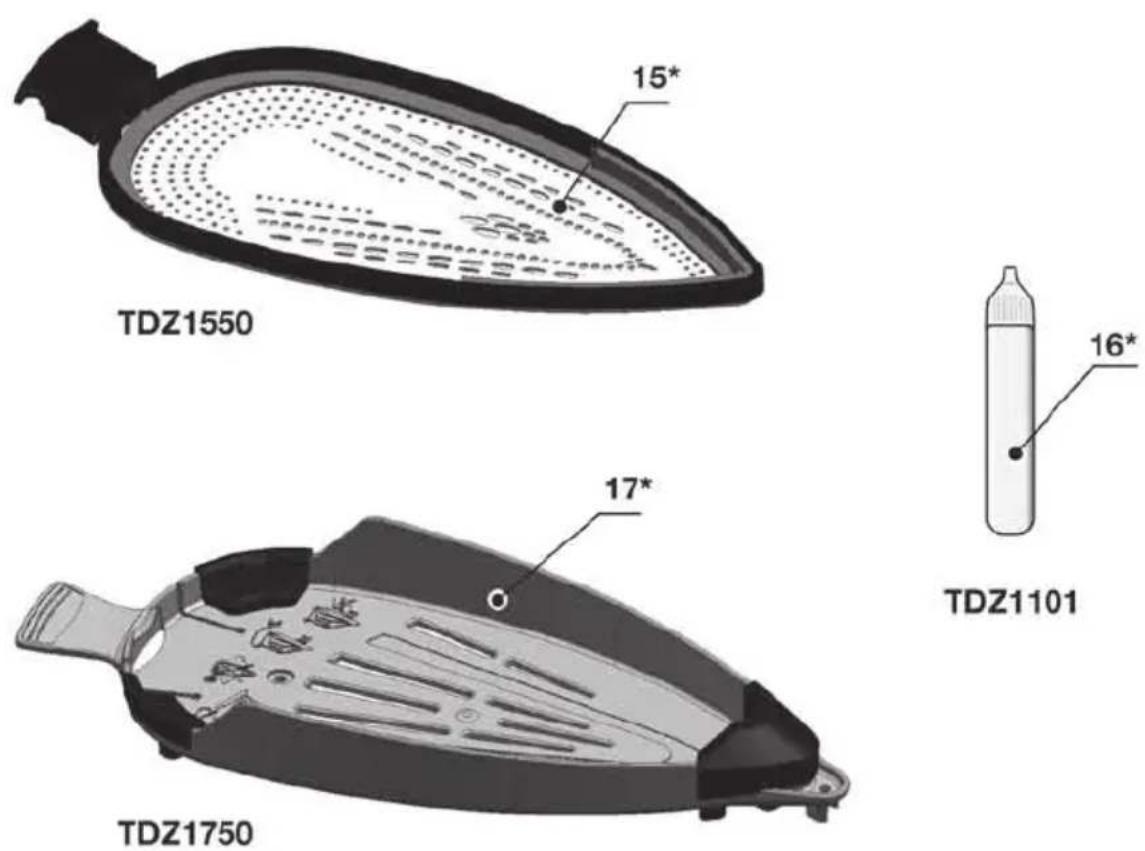
- "TextileProtect" fabric protector *
- Descaling liquid *
- "StoreProtect" accessory *
Before using your appliance for the first time
Remove any label or protective cover from the soleplate (7).
During its first use, the iron may produce certain vapors and odors that will disappear after a few minutes.
Using your appliance

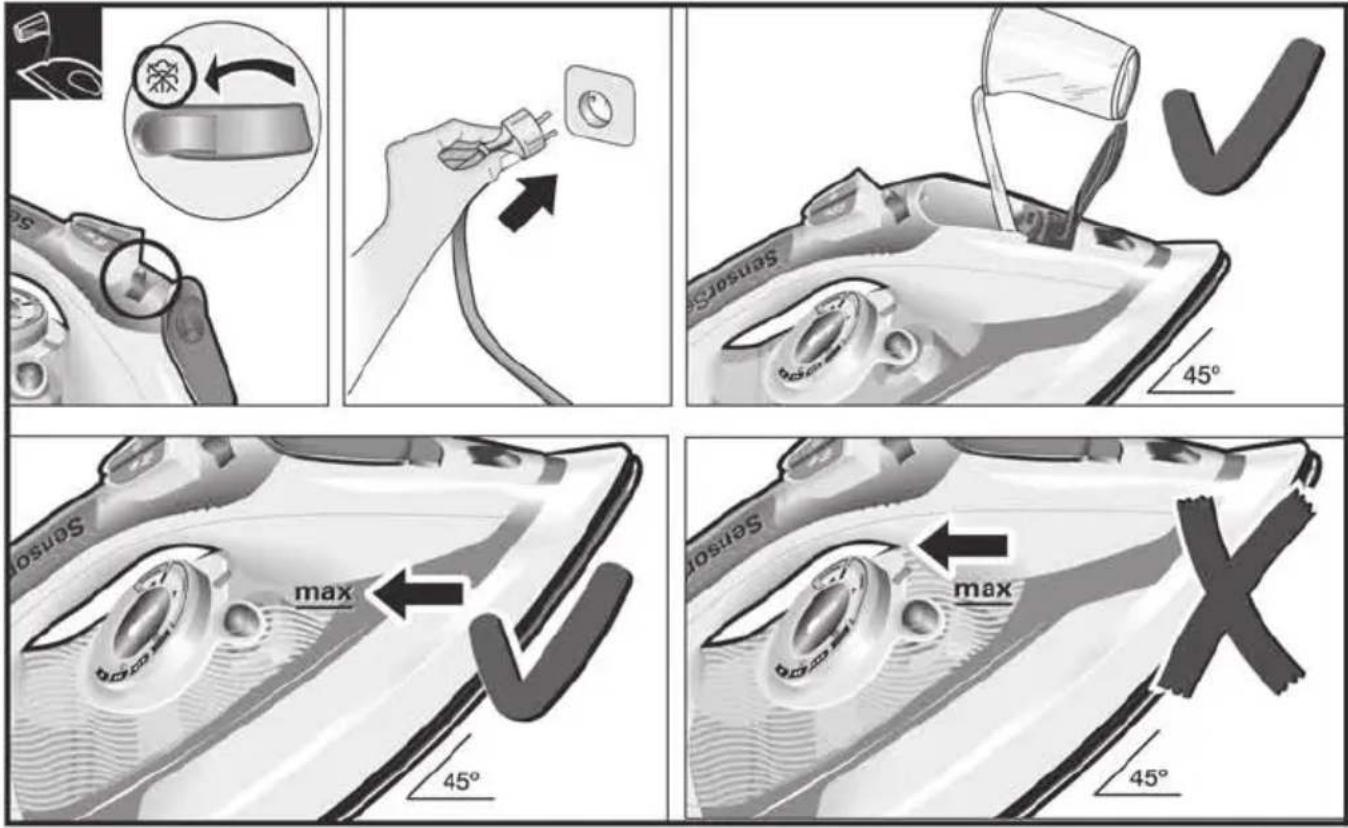
1. Filling the water tank
See the leaflet sides
This appliance has been designed to use normal tap water.
- The addition of other liquids (unless recommended by Bosch), such as perfume, will damage the appliance.
- Do not use condensation water from tumble dryers, air conditioning systems, or similar.
Any damage caused by the use of the aforementioned products will make the guarantee void.
Set the steam regulator (3) to the position and unplug the iron from the mains!
- Open the water inlet lid (5).
- Fill the water tank (11). Never fill beyond the level mark for maximum filling (8).
- Close the water inlet lid.
To prolong the optimum steam function, you may mix tap water with distilled water 1:1. If the tap water in your district is very hard, mix tap water with distilled water 1:2.
You can inquire about the water hardness with your local water supplier.

2. Setting the temperature
See the leaflet sides
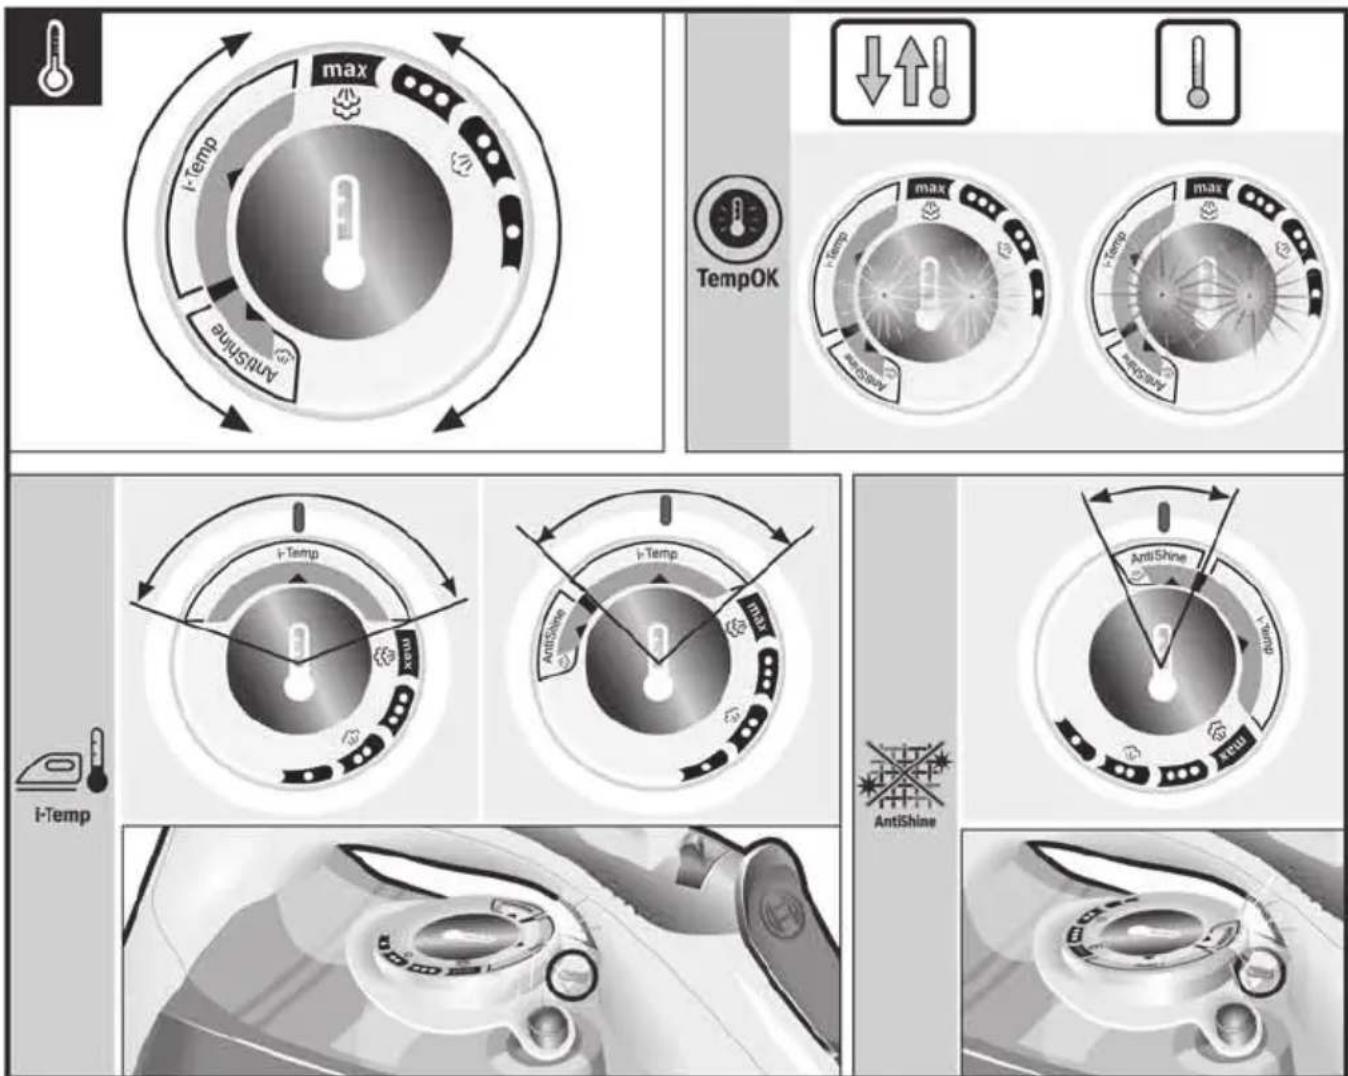
The temperature control (12) adjusts the temperature of the soleplate (7).
Set the temperature control to the corresponding position by lining it up with the temperature index (9) on the iron.
Temperature Suitable for :
synthetics - silk - wool cotton
max linen
i-Temp*
any type of fabric which can be ironed
AntiShine*
dark and delicate fabrics.
Reduces the risk of shiny marks.

2.1 "TempOK" indicator
While the soleplate is heating up or cooling down to the selected temperature, the "TempOK" lights inside the temperature control (12) will flash. When the selected temperature is reached, the lights will stop flashing and remain lit continuously.

2.2 "i-Temp" function *
If this function is selected, an appropriate temperature is set which is suitable for all fabrics that can be ironed.
The "i-Temp" function prevents clothes from becoming damaged due to an unsuitable temperature being selected.
The "i-Temp" function does not apply to fabrics that cannot be ironed. Please check the garment care label for details or try ironing on a part of the fabric not visible normally.
When the "i-Temp" function is selected, the blue light inside the temperature control comes on.
If this function is selected, the risk of shiny marks on the garment due to the ironing is reduced. When the "AntiShine" function is selected, the blue light inside the temperature control comes on.

3. Ironing with steam
See the leaflet sides
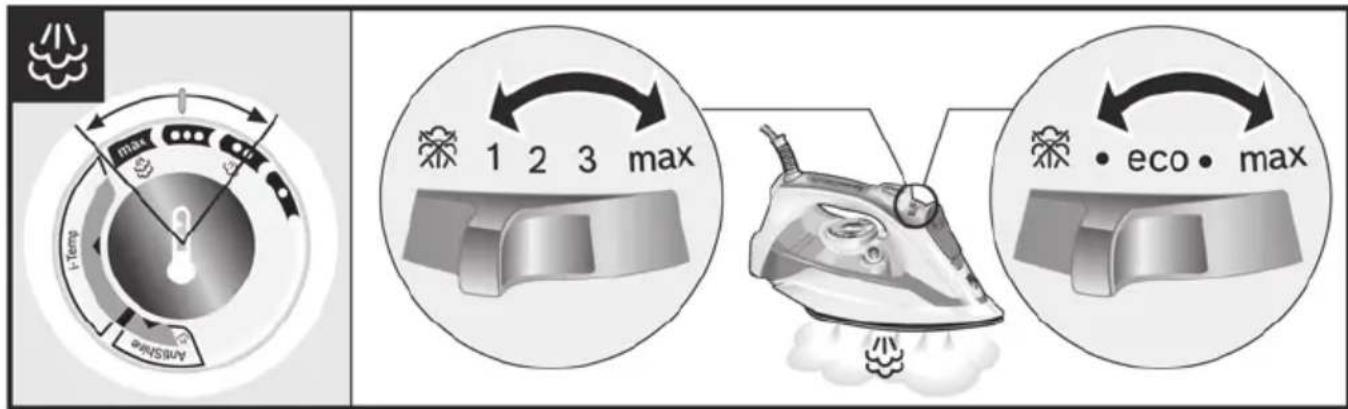
The steam regulator (3) is used to adjust the amount of steam produced when ironing.
| Temperature control (12) | Recommended position of the steam regulator (3)* |
| 1 2 3 max | |
| • eco•max | |
| 1 2 3 max | |
| • eco•max | |
| i-Temp | 1 2 3 max |
| AntiShine | 1 2 3 max |
| • eco•max |
Tie: For better ironing results, iron the last strokes without steam to dry the garment.

4. Shot of steam
See the leaflet sides
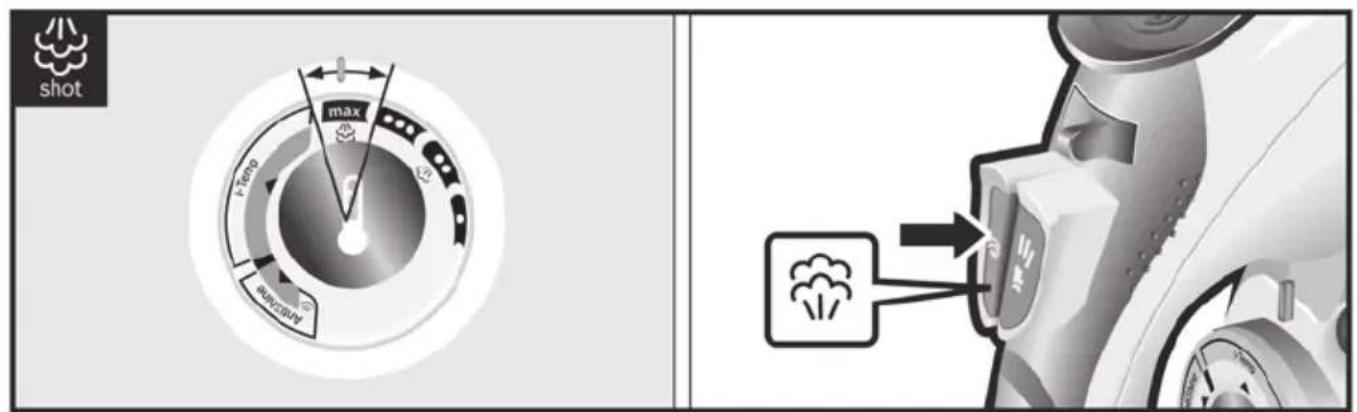
This can be used to remove stubborn wrinkles or to press in a sharp crease or pleat.
- Set the temperature control (12) to "max".
- Press the shot of steam button (2) repeatedly with intervals of at least 5 seconds.

5. Vertical steam
See the leaflet sides
This can be used to remove creases from hanging clothes, curtains etc.
- Set the temperature control (12) to "max".
- Hang article of clothing on a clothes hanger.
- Operate the iron in a vertical position at a distance of 10 cm / 4 in, and press the shot of steam button (2) repeatedly with pauses of at least 5 seconds.

6. Ironing without steam
See the leaflet sides
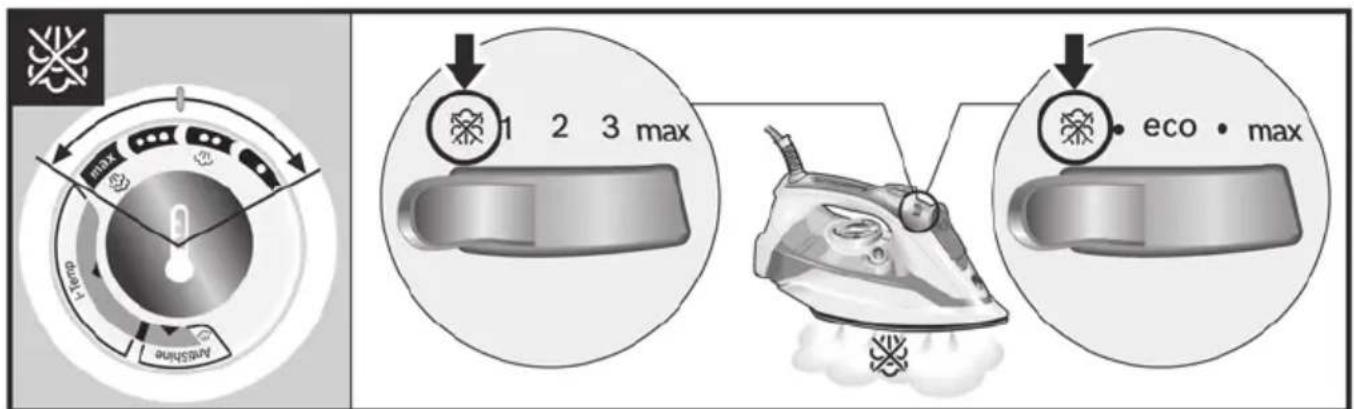
This enables the iron to be used for dry ironing.
Set steam regulator (3) to the position.

7. Drip protection *
See the leaflet sides
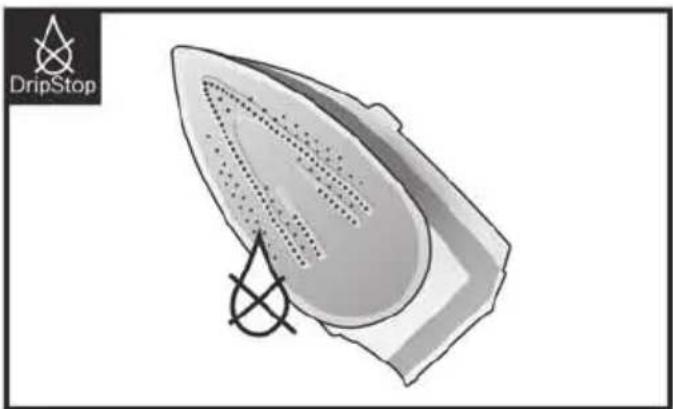
If the temperature is set too low, the steam is automatically switched off to avoid dripping. There may be an audible click when this occurs.

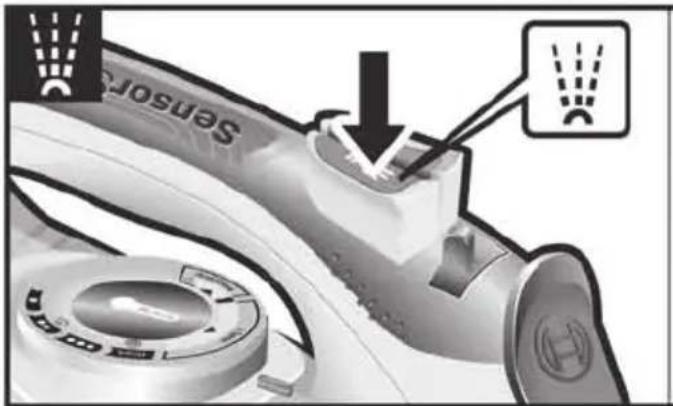
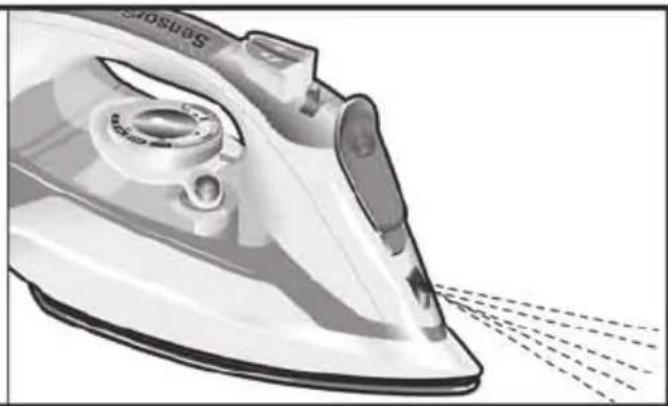
8. Spray
See the leaflet sides
This can be used to remove stubborn wrinkles. Do not use the spray function with silk.

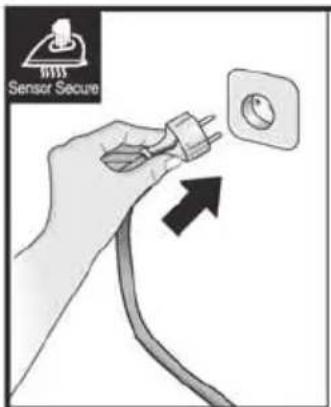
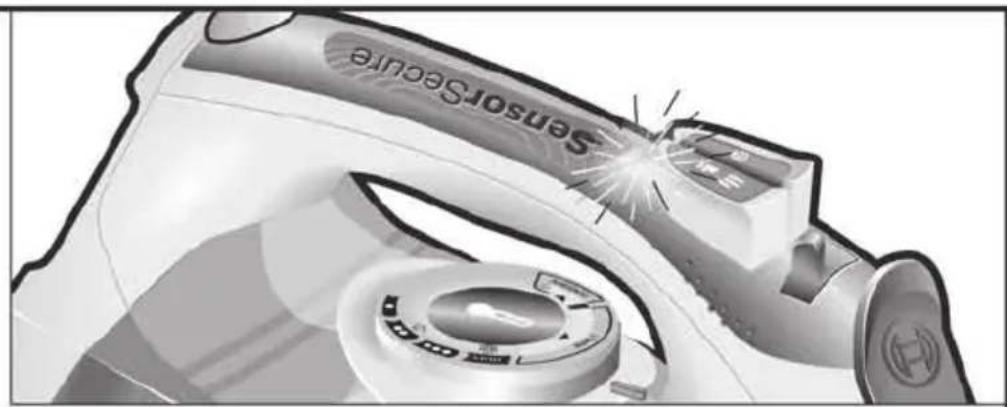
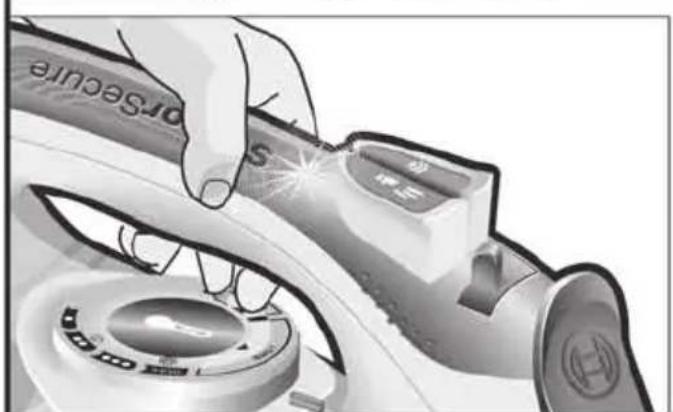
9. "SensorSecure" function
See the leaflet sides
The "SensorSecure" function switches off the iron when the handle is no longer gripped, thus increasing safety and saving energy.
- Plug in the iron.
- "SensorSecure" light (14) flashes when the handle is not gripped, and will show a continuous light when the handle is gripped.
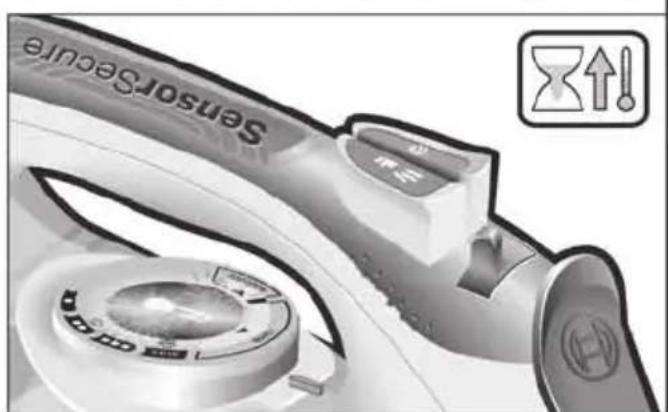
- If the iron handle is released for more than 10 seconds, the iron will stop heating automatically.
- When the handle is gripped again, the iron heating up and continuous steam generation processes will start again.
Initial heating up process: it is not necessary to grip the handle until the iron heats up to the set temperature.
Once reached such temperature, the "TempOK" lights will stop flashing and remain lit continuously.

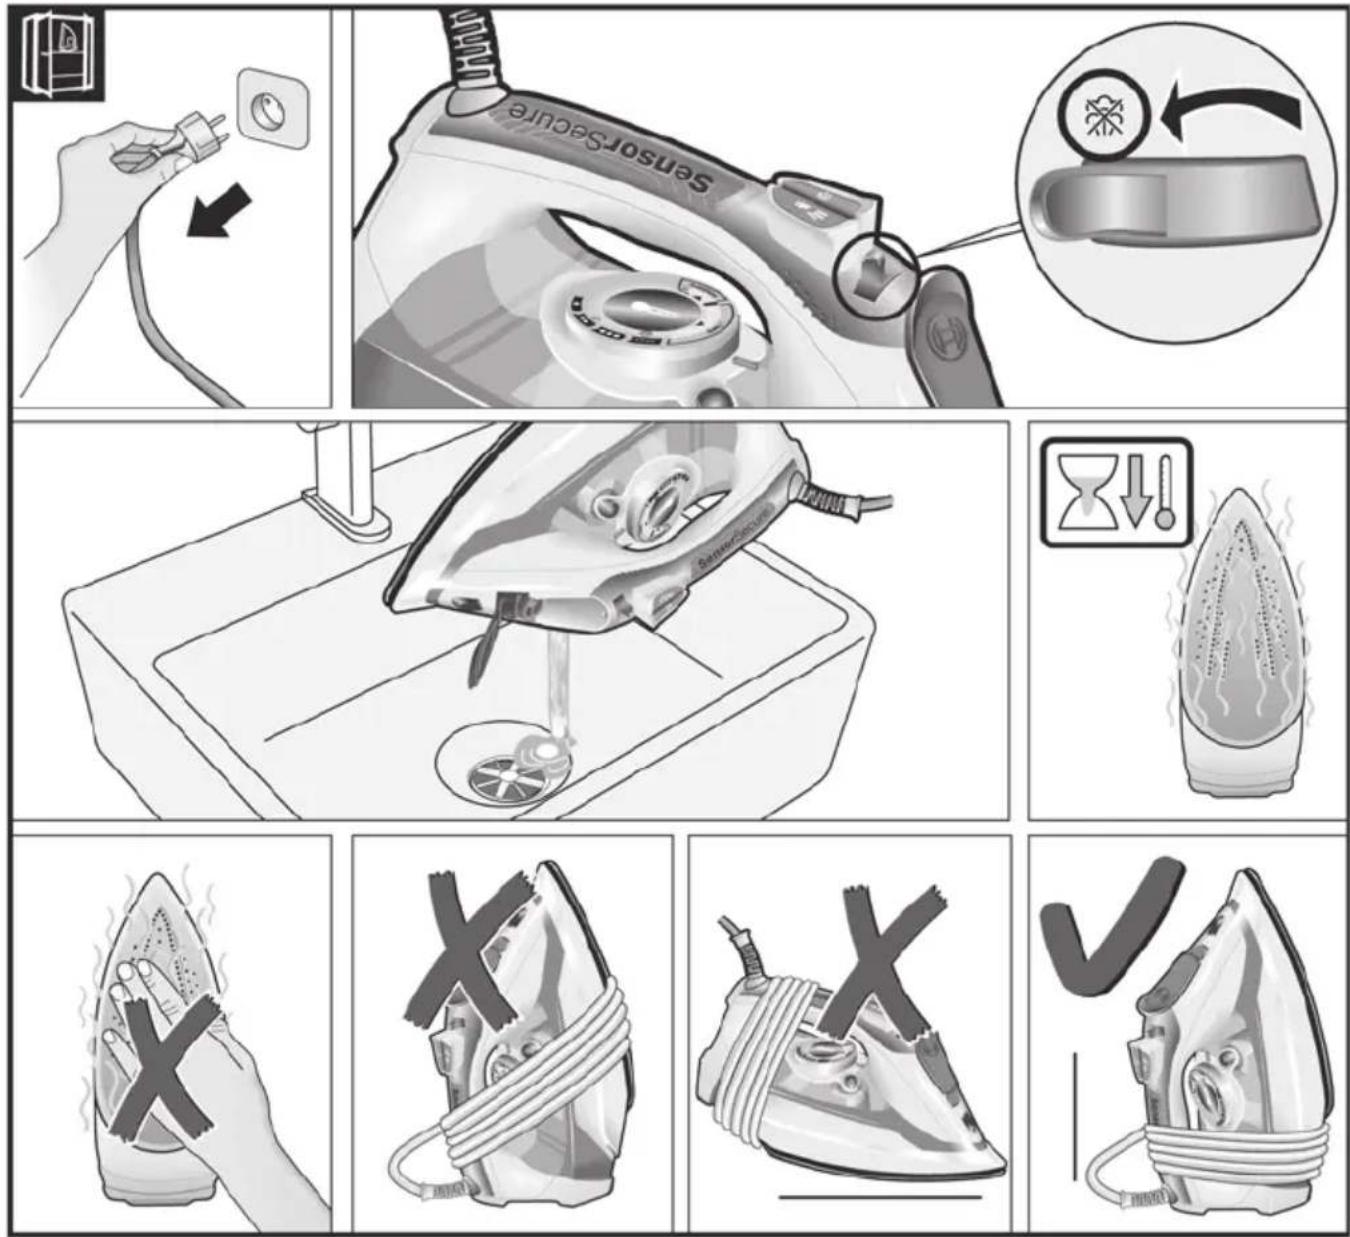
10. After ironing
See the leaflet sides
- Switch the steam regulator (3) from "max" and back again several times (self-cleaning).
- Empty the tank. Hold the iron with the point down and shake lightly.
- Store standing on the rear, not on the base.
- Do not wrap the power cord (13) too tight!

Tips to help you save energy
Steam production consumes the most energy. To help minimise the energy used, follow the advice below:
- Start by ironing the fabrics that require the lowest ironing temperature. Check the recommended ironing temperature in the label on the garment.
- Regulate the steam according to the selected ironing temperature, following the instructions in this manual. 3 Only use steam if necessary. If possible, use the spray function instead.
Try to iron the fabrics while they are still damp and reduce the steam setting. Steam will be generated from the fabrics rather than the iron.
If you tumble dry your fabrics before ironing them, set the tumble drier on the 'iron dry' program.
- If the fabrics are damp enough, turn off the steam regulator (3) completely.
- Stand the iron upright during pauses. Resting it horizontally with the steam regulator on generates wasted steam.

Cleaning & Maintenance
See the leaflet sides
Attention! Risk of burns!
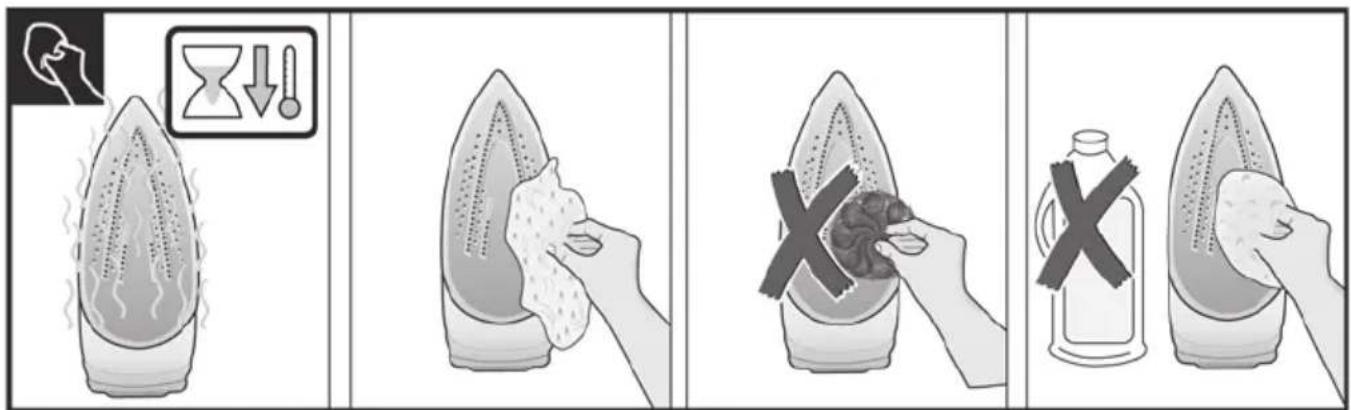
Always unplug the appliance from the mains supply before carrying out any cleaning or maintenance operation on it.
- If the iron is only slightly soiled, pull out the plug and allow the soleplate (7) to cool down. Wipe the housing and the soleplate with a damp cotton cloth only.
- If the cloth is synthetic, it may melt due to the high temperature on the soleplate, switch off the steam and rub off any residue immediately with a thickly folded, damp cotton cloth.
- To keep the soleplate smooth, you should avoid hard contact with metal objects. Never use a scouring pad, or chemicals to clean the soleplate.
AntiCald
Multiple descending system
See the leaflet sides
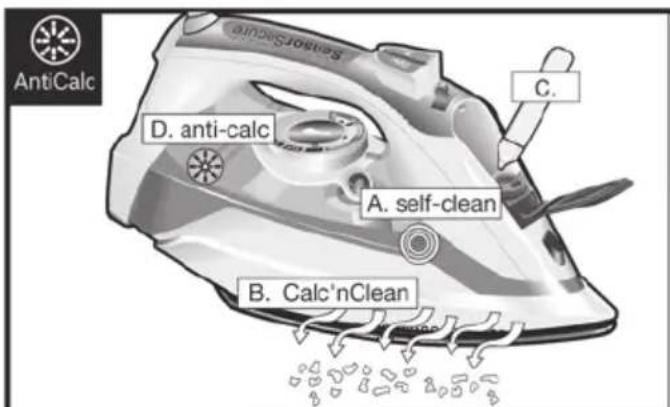
A self-clean
Each time you use the steam regulator (3), the "self-clean" system cleans the mechanism of scale deposits.
B Calc'nClean
The "Calc'nClean" function helps to remove scale particles out of the steam chamber. Use this function approximately every 2 weeks if the water in your area is very hard.
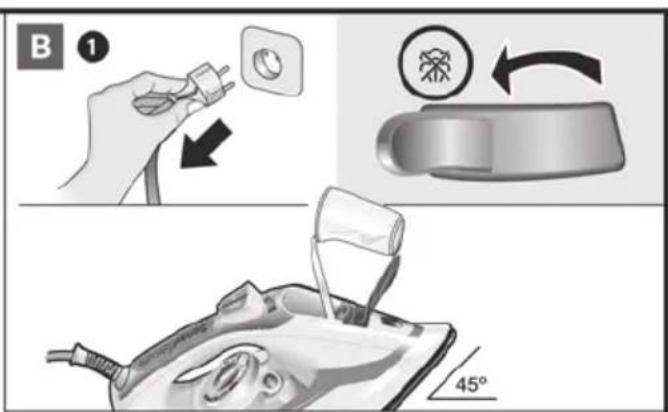
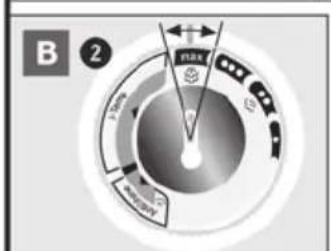
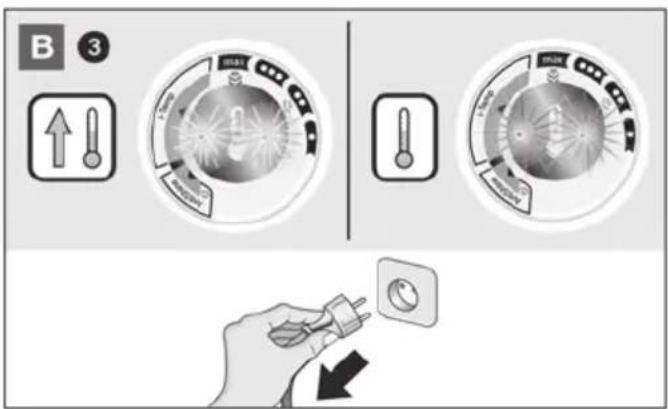
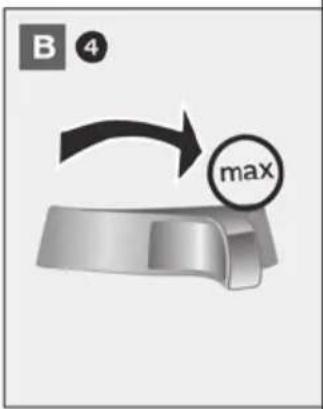
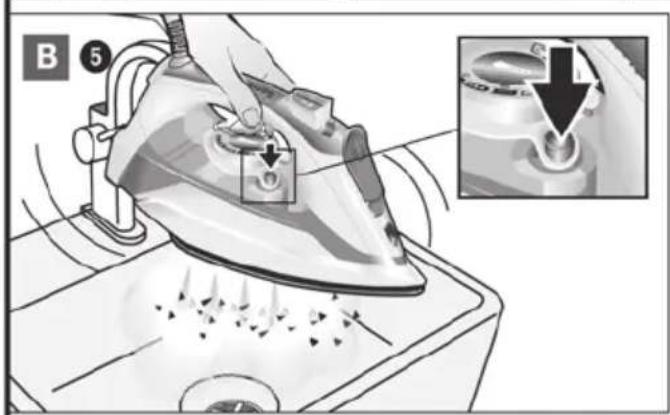
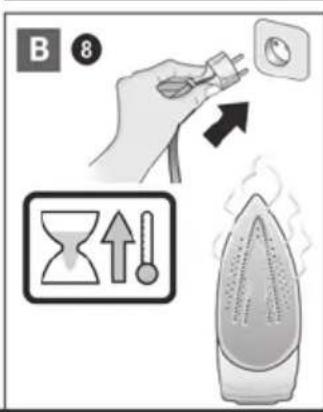
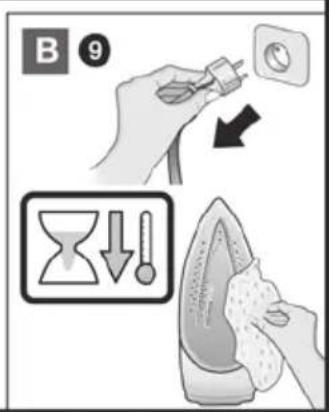
Unplug the iron from the mains socket, set the steam regulator (3) to the position and fill the water tank (11) with water. Set the temperature control (12) to the "max" position and plug in the iron. After the necessary warm-up period, the "TempOK" lights inside the temperature control (12) stop flashing. Then, unplug the iron (very important!). 4 Set steam regulator to the "max" position. Hold the iron over a sink. Press the "clean" button (10) and shake the iron until approximately one third of the water capacity of the tank is evaporated. Boiling water and steam will come out, carrying scale or deposits that might be there.
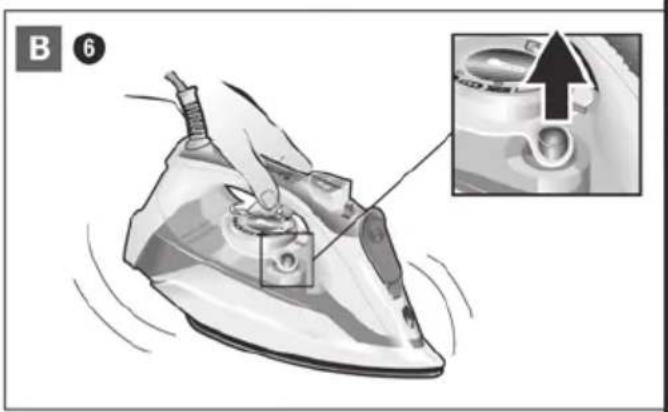
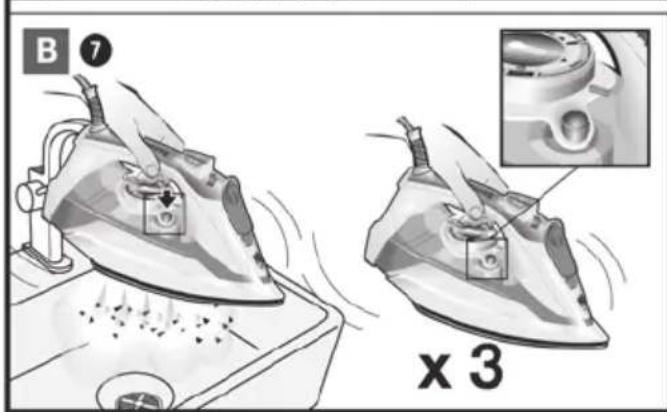
Release the "clean" button, and gently shake the iron for some seconds. Repeat steps 5 and 6 three times until the tank is empty. Then plug the iron in and heat it up again until the remaining water has evaporated.
Push the "clean" button a few times more to clean the valve.
Unplug the iron and let the soleplate (7) cool down. Wipe the soleplate with a damp cotton cloth only.
C "Calc'nClean" with descaling liquid *
For deep descaling, it is recommended to use the descaling liquid especially developed by Bosch. This procedure should be carried out every 3 months.
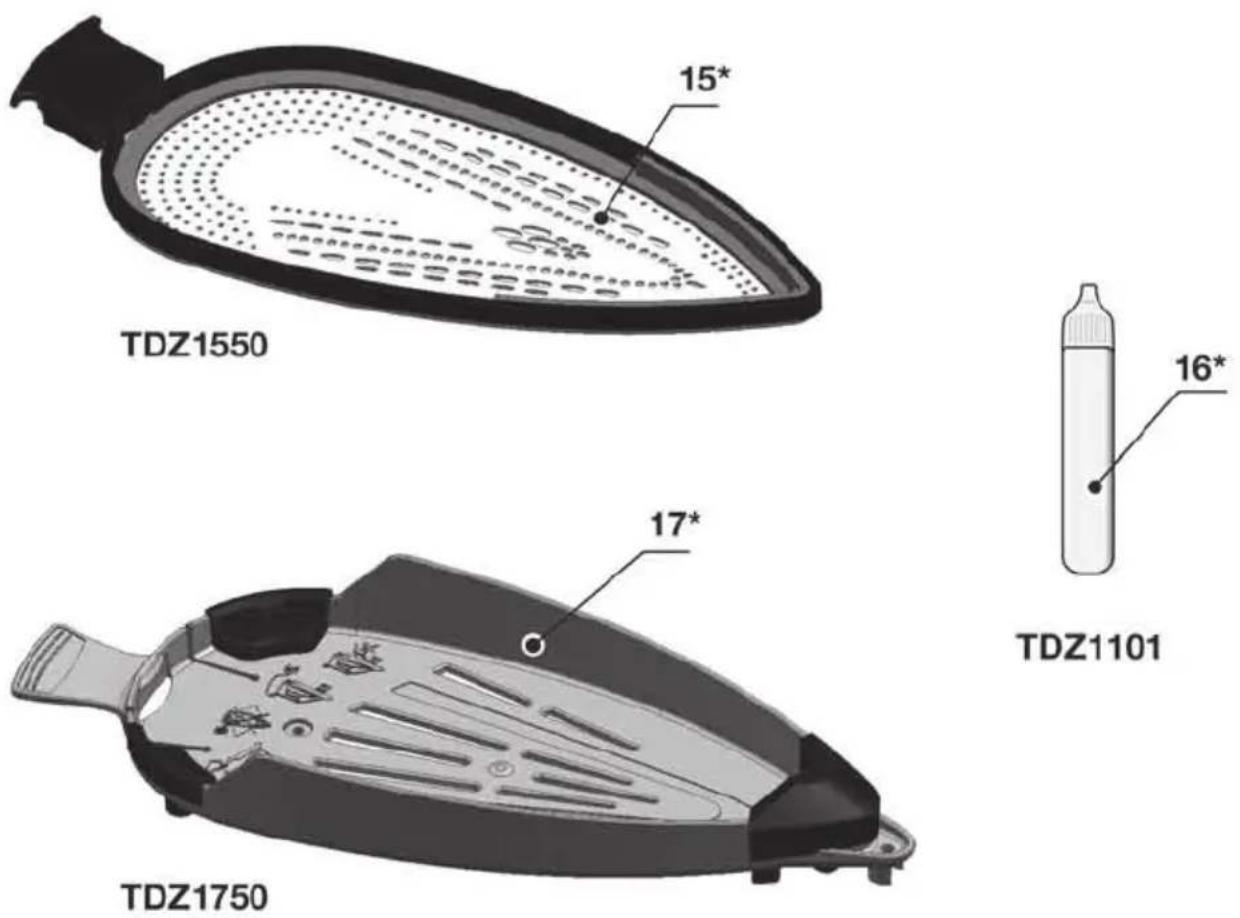
- Fill the water tank (11) with tap water mixed with a measure (25 ml) of the descaling liquid (16*).
- Then follow the procedure described above in section "Calc'nClean" (steps 2 to 9).
The descaling liquid may be purchased from our after-sales service or specialist shops.
Name of accessory: TDZ1101
D anti-calc*
The "anti-calc" cartridge has been designed to reduce the build-up of scale produced during steam ironing, helping to extend the useful life of your iron. Nevertheless, the "anti-calc" cartridge cannot remove all of the scale that is produced naturally over time.
TextileProte
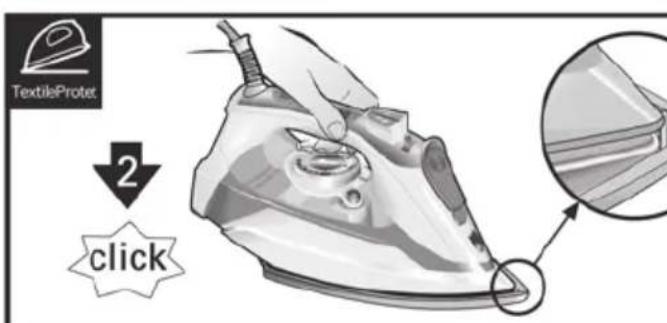
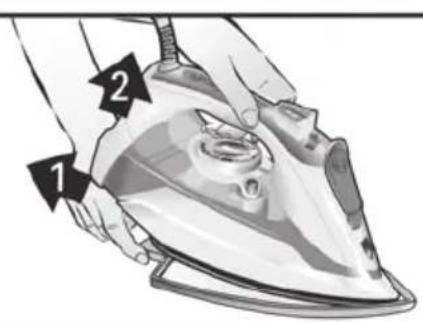
"TextileProtect" fabric protector *
See the leaflet sides
The fabric protector (15*) is used for steaming delicate garments at maximum temperature without damaging them.
The fabric protector may be purchased from our after-sales service or specialist shops.
Name of accessory: TDZ1550
StoreProte
"StoreProtect" *
The "StoreProtect" accessory (17*) enables an immediate and safe storage of the iron, even with a hot soleplate (7).
This accessory may be purchased from our after-sales service or specialist shops.
Name of accessory: TDZ1750
| Problem Probable | cause Solution | |
| The iron does not heat up. | 1. Temperature control (12) set to minimum. | 1. Turn to a higher position. |
| 2. The “SensorSecure” system has been activated. The iron is set to stand-by. | 2. Grip the handle of the iron to re-start it. | |
| The “TempOK” lights inside the temperature control (12) flash. | 1. The soleplate (7) is heating up or cooling down to the selected temperature. | 1. This is normal and lights will stop flashing when the selected temperature is reached. |
| The clothes tend to stick | 1. The temperature is too high. 1. Turn the temperature control (12) down and wait until the iron has cooled down. | |
| Water drips out of the soleplate (7) together with steam. | 1. Temperature control (12) setting is too low. | 1. Turn the temperature control (12) to a higher setting and wait until the “TempOK” lights inside the temperature control stop flashing and remain lit continuously. |
| 2. Steam regulator (3) is set too high in conjunction with a low temperature. | 2. Set the steam regulator (3) to a lower setting. | |
| 3. You have pressed the shot of steam button (2) repeatedly without waiting for 5 seconds between each press. | 3. Wait 5 seconds between each press of the shot of steam button. | |
| Steam does not come out. | 1. Steam regulator (3) is set to position. | 1. Set the steam regulator to a higher position. |
| 2. The temperature is too low. Anti-drip system is activated. | 2. Set to a higher temperature if compatible with the fabric. | |
| Smoke comes out when connecting the iron for the first time. | 1. This may be caused by the lubrication of some of the internal parts. | 1. This is normal and will stop after a few minutes. |
| Excessive dripping or steaming. | 1. No proper closing of “Calc'nClean” system. | 1. Actuate a few times the “clean” button (10). |
| Deposits come out through the holes in the soleplate (7). | 1. Traces of lime scale are coming out of the steam chamber. | 1. Carry out a cleaning cycle (see “Calc'nClean” section). |
If none of the above solves the problem, get in touch with an authorised technical service.
See the leaflet sides
2. Set the temperature
See the leaflet sides
The temperature selector (12) adjusts the temperature of the soleplate (7).
6. Ironing without steam
See the leaflet sides
Device setup

1. Filling the water reservoir
Type: steam station
The device is designed for use with ordinary tap water.
Adding other liquids (other than those recommended by Bosch), such as aromatizers, may damage the device. Do not use water with high mineral content, as this may cause limescale buildup.
Damage caused by the use of the aforementioned liquids will void the warranty.

Set the temperature regulator (3) to the desired position and plug the power cord into the electrical outlet!
- Open the water tank cap (5).
- Fill the water reservoir (11). During filling, never exceed the maximum fill level (8).
- Close the water tank cap.
Tip: For optimal device performance and to extend the lifespan of the steam function, you can mix tap water with distilled water in a 1:1 ratio. If your region's tap water is very hard, mix it with distilled water in a 1:2 ratio.
You can find out about water hardness from your local water utility company.

2. Temperature regulation
Type: steam station
The temperature of the soleplate (7) is adjusted using the temperature regulator (12).
Set the steam temperature regulator to the required temperature value (9) on the panel.
Temperature range
Fabrics that can be ironed:
Synthetics
Silk Wool
Cotton
Linen
i-Temp*
For dark fabrics.
AntiShine*
For dark and delicate fabrics. Reduces the likelihood of shiny marks from ironing.

Do not use the steam function while ironing the fabric.

9. «SensorSecure»
Type: steam station
The SensorSecure function stops ironing when you are not holding it by the handle. This increases the safety of ironing and helps with energy saving.
1. Plug the iron into a power outlet. 2. While you are not touching the iron, the «SensorSecure» indicator (14) is off.
When you pick it up, it starts flashing with a steady light.
3. If you release the handle for more than 10 seconds, the heating of the iron automatically stops. 4. When you pick it up again, the iron starts heating again and steadily generating steam.
Initial heating: There is no need to hold the handle until the iron heats up to the set temperature.
After reaching the required temperature, the «TempOK» indicator stops flashing and starts glowing with a steady light.

10. After use.
Cleaning and maintenance.
- Turn the steam regulator (3) to the maximum position (max) and back a few times (self-cleaning).
- Rinse the reservoir. Turn the iron upside down and shake it gently. 3. When storing the iron, it must be placed on its base, not on its soleplate.
- Do not wind the power cord (13) too tightly!

Energy saving tips.
Most energy is consumed during ironing. To save electricity, follow these tips:
1. Start ironing with fabrics that require the lowest temperature setting. The recommended ironing temperature can be found on the garment labels. 2. Preheat the iron according to the selected ironing temperature, following the instructions in the operating manual. 3. Use the steam function only when necessary. Remember, if possible, use the steam burst function.
Try to iron fabrics while they are still damp, setting the temperature to a lower value. In this way, steam is generated inside the fabric, not in the iron. If you use a steam iron, select the «iron» program.
4. If the fabric is sufficiently damp, the steam regulator (3) can be turned off completely. 5. During pauses in the ironing process, place the iron vertically. If the iron with the steam regulator on is left horizontally, steam is wasted.

TINB. cknadeni CTopinkn
Danger! Risk of burns! When filling the water tank or the iron, unplug the iron from the socket.
- If the soleplate is slightly dirty, unplug the iron and let it cool down for at least (7) hours. Open the housing and clean the soleplate only with a damp cloth. 2. If the cloth is synthetic, it may melt at high temperatures. In that case, turn off the steam supply and immediately remove the material with a damp cloth, folded several times.
- To protect the soleplate surface, avoid contact with metal objects. In any case, do not use abrasive sponges for cleaning the soleplate, dishwashing sponges, or chemical substances.

Descaling system
TINB. cknadeni CTopinkn
A self-clean
Each time you use the steam regulator (3), the self-cleaning system removes scale residues.
B Calc'nClean
The "Cale'nClean" descaling function helps remove scale particles from the steam chamber. If the water in your region is very hard, use this function approximately every 2 weeks.
Turn off the iron and unplug it, set the steam regulator (3) to the position and fill the water reservoir (11).
2 Set the temperature regulator (12) to the maximum position (max) and plug the iron into the electrical outlet. 3 After the necessary heating period, the temperature indicator inside the temperature regulator (12) will go out. 4 After that, unplug the iron from the electrical outlet (very important!). Set the steam regulator to the maximum position (max). 5 Hold the iron over the sink. Press the "clean" button (10) and shake the iron until the third part of the water from the reservoir has evaporated. Scale and its residues will come out with steam and water. 6 Release the "clean" button and gently shake the iron for a few seconds. 7 Repeat steps 5 and 6 three times, until the reservoir is empty of water. 8 Then plug the iron into the electrical outlet and heat it again until the remaining water has evaporated. Press the "clean" button a few times to clean the soleplate. Unplug the iron from the electrical outlet and let it cool down for at least (7) hours. Clean the soleplate with a damp cloth (do not use other materials).

The "Calc'nClean" function is ideal for descaling *
For effective descaling, it is recommended to use the descaling agent produced by Bosch specifically for this purpose.
All the requirements must be fulfilled.
- Fill the water tank (11) with tap water mixed with the required amount (25 ml) of anti-calc solution for descaling (16*)
- Then perform the steps described in the section «Calc'nClean descaling function» (points 2-9).
The descaling solution can be purchased from after-sales service or in specialized stores.
Part name: TDZ1101

anti-calc*
The «anti-calc» cartridge is designed to reduce scale formation during steam use, which extends the appliance's service life. However, the «anti-calc» cartridge cannot remove all the scale that forms during appliance use.

Protective nozzle for delicate fabrics «TextileProtect»
Spare parts list
The protective nozzle for delicate fabrics (15*) is used for safe ironing of delicate fabrics at maximum temperature with steam.
The protective nozzle for delicate fabrics can be purchased from after-sales service or in specialized stores:
Part name: TDZ1550

«StoreProtect»*
The «StoreProtect» protective cap (17*) allows you to quickly and safely store the iron in the storage place, even if the soleplate (7) is still hot.
It can be purchased from after-sales service or in specialized stores.
Accessory: TDZ1750
| ПюбLEMа Можлва пчшина рішени | |
| Праcka не наразов! награвастая. | 1. Perúларов лесу (12) Встанов лесу на мінимальни позначу. 3. Актувова на система «SensorSecure». Праcka пechеша до рechиму оочу ваня. |
| Tempepatурni i Indikatopri TempOK всядины perugларoga tempepatурni (12) Блимады. | 1. Пidòшва (7) наразов лесу abo oxolodжуостсу до за干嘛о! tempepatурni. |
| Одя пралиас 1. Tempepatура за干嘛о виска. 1. Ustановы reperуларов лесу (12) на міншу поочу ( Заочайе, роки прасано. Разом з праюз підòшви (7) праочустая. ВODа. | 1. Perúларов лесу (12) Встанов лесу на за干嘛о! позначу. 2. Парахуларoga лесу (12) на за干嘛о: посту, посту, посту, пostу. 3. 3azakayte 5 ceунд mix; натсканяам на конкупу удан. 3. 3azakayte 5 ceунд mix; натсканяам на конкупу удан. 3. 3azakayte 5 ceунд mix; натсканяам на конure удан. 3. 3azakayte 5 ceунд mix; натсканяам на конure удан. 3. 3azakayte 5 ceунд mix; натсканяам на конure удан. 3. 3azakayte 5 ceунд mix; натсканяам на конure удан. 3. 3azukayte 5 ceунд mix; натсканяам на конure удан. 3. 3azukayte 5 ceунд mix; натсканяам на конure удан. 3. 3azukayte 5 ceунд mix; натсканяам на конure удан. 3. 3azukayte 5 ceунд mix; |
| Пара не винорь. 1. Perúруларов (3) установ лесу познechу. 3. 3azakayte 5 ceунд mix; натсканяам на конure удан. Bixxodn'tь дим. | 1. Ustановы reperуларов лесу 6ільш виске за干嘛о. 3. Ustановы reperуларoga лесу 6ільш виске за干嘛о. 3. Ustановы reperуларoga лесу 6ільш виске за干嘛о. 3. Ustановы reperуларoga лесу 6ільш виске за干嘛о. 3. Ustановы reperуларoga lесу 6ільш виске за干嘛о. 3. Ustановы reperуларoga lесу 6ільш виске за干嘛о. 3. Ustановы reperуларoga lесу 6ільш виске за干嘛о. 3. Ustановы reperуларoga lесу 6ільш виске за干嘛о. 3. 3. 3azukayte 5 ceунд mix; натсканяам на конure удан. 3. 3azukayte 5 ceунд mix; натсканяам на конure удан. 3. 3azukayte 5 ceунд mix; натсканяам на конure удан. 3. 3azukayte l'dray 3. 3azukayte l'dray 3. 3azukayte l'dray 3. 3azukayte l'dray 3. 3azukayte l'dray 3. 3azukayte l'dray 3. 3azukayte l'dray 3. 3azukayte l'dray 3. 3azukayte l'dray 3. 三azukayte l'dray 3. 三azukayte l'dray 3. 三azukayte l'dray 3. 三azukayte l'dray 3. 三azukayte l'dray 3. 三azukayte l'dray 3. 三azukayte l'dray 3. 三azukayte l'dray 3. 三azukayde l'dray 3. 三azukayde l'dray 3. 三azukayde l'dray 3. 三azukayde l'dray 3. 三azukayde l'dray 3. 三azukayde l'dray 3. 三azukayde l'dray 3. 三azukayde l'dray 3. 三azukayde l'dray |
| Iordя пралиас 1. Tempepatура за干嘛о виска. 1. Ustановы reperуларов лесу (12) на міншу поочу ( Заочайе, роки прасано. Pazoram з праюз підòшви (7) праочустая. ВODа. | 1. Perúларов лесу (12) Встанов лесу на за干嘛о: посту, посту, посту, посту посту посту пostу пostу пostу пostу пostу пostу пostу пostу пostу пostу пostу пostу пostу пostу пostу пostу пostу пostу пostу пostу пostу пostу пostу пostу пostу пOSTу пOSTу пOSTу пOSTу пOSTу пOSTу пOSTу пOSTу пOSTу пOSTу пOSTу пOSTу пOSTу пOSTу пOSTу пOSTу пOSTу пOSTу пOSTу пOSTу пOSTу пOSTу пOSTу пOSTу пOSTу п OSTу пOSTу пOSTу пOSTу пOSTу пOSTу пOSTу пOSTу пOSTу пOSTу пOSTу пOSTу пOSTу пOSTу пOSTу пOSTу пOSTу пOSTу пOSTу пOSTу пOSTу пOSTу пOSTу пOSTу пOSTу пostу пOSTу пOSTу пOSTу пOSTу пOSTу пOSTу пOSTу пOSTу пOSTу пOSTу пOSTу пOSTу пOSTу пOSTу пOSTу пOSTу пOSTу пOSTу пOSTу пOSTу пOSTу пOSTу пOSTу пostу пostу пOSTу пOSTу пOSTу пOSTу пOSTу пOSTу пOSTу пOSTу пOSTу пOSTу пOSTу пOSTу пOSTу пOSTу пOSTу пOSTу пOSTу пOSTу пOSTу пOSTу пOSTу пOSTу пostу пOSTу пostу пOSTу пOSTу пOSTу пOSTу пOSTу пOSTу пOSTу пOSTу пOSTу пOSTу пOSTу пOSTу пOSTу пOSTу пOSTу пOSTу пOSTу пOSTу пOSTу пOSTу пOSTу пOSTу пostу пostу пostу пOSTу пOSTу пOSTу пOSTу пOSTу пOSTу пOSTу пOSTу пOSTу пOSTу пOSTу пOSTу пOSTу пOSTу пOSTу пOSTу пOSTу пOSTу пOSTу пOSTу пOSTу пostу пostу пOSTу пostу пOSTу пOSTу пOSTу пOSTу пOSTу пOSTу пOSTу пOSTу пOSTу пOSTу пOSTу пOSTу пOSTу пOSTу пOSTу пOSTу пOSTу пOSTу пOSTу пOSTу пOSTу пostу пostу пostу пostу пOSTу пOSTу пOSTу пOSTу пOSTу пOSTу пOSTу пOSTу пOSTу пOSTу пOSTу пOSTу пOSTу пOSTу пOSTу пOSTу пOSTу пOSTу пOSTу пOSTу пostу пostу пOSTу пOSTу пostу пostу пOSTу пOSTу пOSTу пOSTу пOSTу пOSTу пOSTу пOSTу пOSTу пOSTу пOSTу пOSTу пOSTу пOSTу пOSTу пOSTу пOSTу пOSTу пOSTу пOSTу пostу пostу пostу пOSTу пostу пOSTу пOSTу пOSTу пOSTу пOSTу пOSTу пOSTу пOSTу пOSTу пOSTу пOSTу пOSTу пOSTу пOSTу пOSTу пOSTу пOSTу пOSTу пOSTу пOSTу пostу пostу пOSTу пostу пostу пOSTу пOSTу пOSTу пOSTу пOSTу пOSTу пOSTу пOSTу пOSTу пOSTу пOSTу пOSTу пOSTу пOSTу пOSTу пOSTу пOSTу пOSTу пOSTу пOSTу пOSTу пostу пOSTу пOSTу пostу пOSTу пOSTу пOSTу пOSTу пOSTу пOSTу пOSTу пOSTу пOSTу пOSTу пOSTу пOSTу пOSTу пOSTу пOSTу пOSTу пOSTу пOSTу пOSTу пOSTу пOSTу пostу пOSTу пostу пostу пOSTу пOSTу пOSTу пOSTу пOSTу пOSTу пOSTу пOSTу пOSTу пOSTу пOSTу пOSTу пOSTу пOSTу пOSTу пOSTу пOSTу пOSTу пOSTу пOSTу пostу пOSTу пOSTу пOSTу пostу пOSTу пOSTу пOSTу пOSTу пOSTу пOSTу пOSTу пOSTу пOSTу пOSTу пOSTу пOSTу пOSTу пOSTу пOSTу пOSTу пOSTу пOSTу пOSTу пOSTу пostу пOSTу пOSTу пostу пostу пOSTу пOSTу пOSTу пOSTу пOSTу пOSTу пOSTу пOSTу пOSTу пOSTу пOSTу пOSTу пOSTу пOSTу пOSTу пOSTу пOSTу пOSTу пOSTу пostу пOSTу пOSTу пOSTу пOSTу пostу пOSTу пOSTу пOSTу пOSTу пOSTу пOSTу пOSTу пOSTу пOSTу пOSTу пOSTу пOSTу пOSTу пOSTу пOSTу пOSTу пOSTу пOSTу пOSTу пostу пOSTу пOSTу пOSTу пostу пostу пOSTу пOSTу пOSTу пOSTу пOSTу пOSTу пOSTу пOSTу пOSTу пOSTу пOSTу пOSTу пOSTу пOSTу пOSTу пOSTу пOSTу пOSTу пOSTу пostу пostу пOSTу пOSTу пOSTу пostу пOSTу пOSTу пOSTу пOSTу пOSTу пOSTу пOSTу пOSTу пOSTу пOSTу пOSTу пOSTу пOSTу пOSTу пOSTу пOSTу пOSTу пOSTу пOSTу пostу пostу пOSTу пOSTу пostу пOSTу пOSTу пOSTу пOSTу пOSTу пOSTу пOSTу пOSTу пOSTу пOSTу пOSTу пOSTу пOSTу пOSTу пOSTу пOSTу пOSTу пOSTу пOSTу пOSTу пostу пostу пostу пostу пostу пostу пostу пostу пostу пostу пostу пostу пostу пostу пostу пostу пostу пostу пostу пostу пostу пostу пostу пostу пosterty пosterty пosterty пosterty пosterty пosterty пosterty пosterty пosterty пosterty пosterty пosterty пosterty пosterty пosterty пosterty пosterty пosterty пosterty пosterty пosterty пosterty пosterty пosterty пosterty пosterry пosterty пosterty пosterty пosterty пosterty пosterty пosterty пosterty пosterty пosterty пosterty пosterty пosterty пosterty пosterty пosterty пosterty пosterty пosterty пosterty пosterty пosterty пosterty пosterty пoster TY Из. Из. Из. Из. Из. Из. Из. Из. Из. Из. Из. Из. Из. Из. Из. Из. Из. Из. Из. Из. Из. Из. Из. Из. Из. Из. Из. Из. Из. Из. Из. Из. Из. Из. I. I. I. I. I. I. I. I. I. I. I. I. I. I. I. I. I. I. I. I. I. I. I. I. I. I. I. I. I. I. I. I. I. I. I. I. I. I. I. I. I. I. I. I. I. I. I. I. I. I. II. II. II. II. II. II. II. II. II. II. II. II. II. II. II. II. II. II. II. II. II. II. II. II. II. II. II. II. II. II. II. II. II. II. II. II. II. II. II. II. II. II. II. II. II. II. II. II. II. II. I. I. I. I. I. I. I. I. I. I. I. I. I. I. I. I. I. I. I. I. I. I. I. I. I. I. I. I. I. I. I. I. I. I. I. I. I. I. I. I. I. I. I. I. I. I. I. I. I. Ⅱ. Ⅱ. Ⅱ. Ⅱ. Ⅱ. Ⅱ. Ⅱ. Ⅱ. Ⅱ. Ⅱ. Ⅱ. Ⅱ. Ⅱ. Ⅱ. Ⅱ. Ⅱ. Ⅱ. Ⅱ. Ⅱ. Ⅱ. Ⅱ. Ⅱ. Ⅱ. Ⅱ. Ⅱ. Ⅱ. Ⅱ. Ⅱ. Ⅱ. Ⅱ. Ⅱ. Ⅱ. Ⅱ. Ⅱ Ⅱ. Ⅱ. Ⅱ. Ⅱ. Ⅱ. Ⅱ. Ⅱ. Ⅱ. Ⅱ. Ⅱ. Ⅱ. Ⅱ. Ⅱ. Ⅱ. Ⅱ. Ⅱ. Ⅱ. Ⅱ. Ⅱ. Ⅱ. Ⅱ. Ⅱ. Ⅱ. Ⅱ. Ⅱ. Ⅱ. Ⅱ. Ⅱ. Ⅱ. Ⅱ. Ⅱ. Ⅱ. Ⅱ. I. I. I. I. I. I. I. I. I. I. I. I. I. I. I I I I I I I I I I I I I I I I I I I I I I I I I I I I I I I I I I I I I I I I I I I I I I I I I I I I I I I I I I I I I I I I I I I I I I I I I I I I I I I I I I I I I I I I I I I I I I I I I I I I I |
If the problem persists after the measures described, contact an authorized service center.
RU·Instructions for use.
Thank you for choosing the Sensixx'xDA70 from Bosch.
Read the operating instructions carefully and keep them for future use.
These instructions can be downloaded from the Bosch website for your country.
Unfold the folded pages.
General safety rules
Do not leave the iron plugged in and unattended.
Before filling the appliance with water or emptying the remaining water after use, disconnect the plug from the socket.
The appliance may only be used and placed on a stable surface.
When using the ironing board, make sure it is on a stable surface.
Do not switch on the iron if it has fallen, if there are visible damages, or if water leaks from it. Before further use, the iron must be checked at an authorized service center.
To avoid danger, repairs to this appliance, such as replacing a damaged cable, must only be carried out by qualified personnel at an authorized service center.
This appliance can be used by children aged 8 and above and by persons with reduced physical, sensory or mental capabilities or lack of experience and knowledge, if they have been given supervision or instruction concerning use of the appliance in a safe way and understand the hazards involved. Children shall not play with the appliance. Cleaning and user maintenance shall not be made by children without supervision.
Use the appliance only in dry places, inaccessible to children under 8 years old, when the appliance is connected to the socket and remains after use.

CAUTION! Hot surface.
During use, the surface may heat up.
Important instructions
This appliance is intended exclusively for household use and should not be used in industrial settings. The appliance should be used only for the purpose for which it was designed, i.e., for use as an iron. Any other use is considered improper and therefore dangerous. The manufacturer is not responsible for any damage resulting from incorrect or improper use. During use, this appliance heats up and produces steam. There is a risk of burns or scalding if it is used incorrectly.
- Do not touch the soleplate of the iron! Hold the iron by the handle.
- Make sure the power cord does not hang over the edge of the table or work surface, to prevent possible falling of the appliance. Do not leave the iron unattended!
- Never spray water or direct steam at people or animals!
Do not allow the cord plug to come into contact with sharp objects or the hot soleplate of the iron. Never place the hot iron horizontally. The iron should be placed vertically, on its heel. Do not touch the operating appliance with wet hands. This electrical appliance must be connected and used in accordance with the data indicated on the rating plate.
The appliance must be connected to a grounded socket. If an extension cord is necessary, make sure it is suitable for a current of 16A and has a grounded socket. The appliance should never be placed under water taps or near containers filled with liquid. After each use or if a malfunction is suspected, disconnect the appliance from the mains. Do not pull the plug out of the socket by the cord. Do not immerse the iron in water or any other liquid. Do not leave the appliance outdoors (in rain, sun, frost, etc.).
DISPOSAL TIPS
Our products are supplied in optimized packaging. The packaging is made from environmentally friendly materials that should be handed over to your local waste disposal service for recycling. Information on the disposal of used electrical appliances can be obtained from your local administration.
This appliance is marked in accordance with Directive 2012/19/EC on waste electrical and electronic equipment (WEEE).
It defines the basic rules for the collection and disposal of used electrical and electronic appliances throughout the EU.
Description
- Water tank cap
- Steam button
- Temperature regulator
- Water inlet opening 5. Cover of the water inlet opening
- Spray nozzle
- Soleplate
- Maximum fill level mark
- Temperature indicator
- “Clean” button (descaling) 11. Water tank
- Thermoregulator
- Power cord 14. Indicator lamp “SensorSecure”
- Protective cover for delicate fabrics “TextileProtect” (fabric protection) *
- Descaling liquid*
- Additional accessories "StoreProtect" (protective cover) *
Before first use of the appliance
Remove the label from the soleplate (7) for protective coating.
During first use, the iron may emit steam and odor, which will disappear after a few minutes.
Using the appliance

1. Filling the water tank
See fold-out pages
This appliance is designed for use with regular tap water.
Adding other substances (if not recommended by Bosch), for example perfume, will lead to damage of the appliance. Do not use water condensate from tumble dryers, air conditioning systems, or similar devices.
Any damage caused by the use of the above-mentioned substances will void the warranty.
Set the steam regulator (3) to the position and remove the plug from the socket!
- Open the water inlet cover (5).
- Fill the water tank (11). Never fill water above the maximum level mark (8).
- Close the water inlet cover.
Tip: To ensure long-lasting and efficient steam system operation, you can mix tap water with distilled water in a 1:1 ratio. If the tap water in your region is very hard, mix it with distilled water in a 1:2 ratio.
You can check the hardness of water with your local water supply company.

See attached pages
A self-clean
Each time you use the steam generator (3), the automatic self-clean system cleans the appliance from scale deposits.
Calc'nClean
The Calc'nClean function helps remove small scale particles from the steam chamber. If the water in your region is very hard, this function should be used approximately once every two weeks.
1 Unplug the iron from the socket, place the steam generator (3) in the fill position and fill the water tank (11) with water. Set the thermostat (12) to the 'max' position and plug the iron into the electrical outlet. 3 After the heating period is complete, the temperature indicator on the thermostat (12) stops blinking. Then unplug the iron from the electrical outlet (this is very important!). 4 Set the steam generator to the 'max' position. 5 Hold the iron over a sink. Press the 'clean' button (10) and keep the iron pressed until about one third of the water from the tank has evaporated. Steam and scale will come out of the soleplate, removing existing scale deposits. Release the 'clean' button and carefully shake the iron for a few seconds. 7 Repeat the actions described in points 5 and 6 three times until the water tank is empty. Then plug the iron back in and heat it again until all remaining water has evaporated.
Press the 'clean' button a few more times to clean the valve.
Unplug the iron from the electrical outlet and let the soleplate (7) cool down. Wipe the soleplate with a damp cloth (do not use other materials).
Accessory name: TDZ1550
StoreProte
StoreProtect*
The StoreProtect cover (17*) allows you to safely store the iron, even if the soleplate (7) is still hot.
This accessory can be purchased from the after-sales service department or from specialized stores.
Accessory name: TDZ1750
| ПюбLEMа Ворзможнaya | почьи Стоб尊ь устраенья | |
| Учог He harpebaetcra. 1. Tepmoperуларot (12) yctahoblenHa MINIMaJIbHyIO OTMeTky.2. AkTINbIropOBaHa сИstema «SensorSecure». YtOg nepeKIIquHcR b peKIM OxUdAnHЯ. | 1. Uctanobite TepmoperuIarot Ha 6OJee BbICOKyIO OTMeTky.2. Bo3bMITecb 3a ryUk yTuIg dIЯ erO BKNIOUeHЯ. | |
| Tempepatrybli Иndikatop TempOK TepmoperuIaropa (12) Miraet. | 1. Пдошbe yTuIgra (7) harpebaeTcra Ил octbIaet do 3aDaHNoI Tempepatypbl. | 1. 3To HopMaJIbHoeЯВIeHne, nOcIe DoCTNIXeHn 3aDaHNoI Tempepatrybl INDInKaTOpbl IpeceTaHyT MIRaTb. |
| Оджda пчilinaeТ 1. Слишkom ВсICOKaTtempepatур. 1. Uctanobite TepmoperuIarot (12) Hb MeBbUO OTMeTky I NOdoXdITe, NOKa UTVOr OXJaDITcra. | ||
| Вмосте с napOMиЗпды ВtIgra (7)прocaHIBaETcRa BODa. | 1. TepmoperuIarot (12) yctahoblenHa сLIMKOM Hb3KUIO OTMeTky. | 1. Uctanobite TepmoperuIarot (12) Hb 6OJee BbICOKyIO OTMeTky I NOJdTeCb, NOKa INDInKaTOp TempOK TepmoperuIaropa IpeceTaHET MIRaTb I 3aTogPITcra IOCTOHHbIM CBETOM. |
| 2. ПapoperuIarot (3) bVcTalBlenHa сLIMKOM BbICOKUIO OTMeTkyПрИ Hb3KOM TempepaTYPOM pEXKIMe. | 2. Uctanobite napoperuIarot (3) Ha MehbyUO OTMeTky. | |
| 3. BbI Heckolbko pa3 NaKajani Ha KHOJny napOBoro udapa (2), He NOdoXdAB 5 cekHd MekdY HaxatniMn. | 3. JXdIte 5 cekYnd MekdY NaKazTaNMi Ha KHOJny napOBoro udapa. | |
| Пар He BvIXoIIT. 1. TepoperuIarot (3) yctahoblenB NOLOXeHne 2. CStIshKom Hb3KaTtempepatyra. AktINbIropOBaHa npOTbOkaPENbHa cIstema. | 1. Uctanobite NapoperuIarot Ha 6OJee bUO OTMeTky.2. Uctanobite 6OJee BbICOKUo Tempepatyru, ecIy ONa IpoXoIIT dIЯ TKAHI. | |
| При перВOM BklnOchEni N3 uTIGA BvIXoIIT dIbIM. | 1. 3To MOKET 6bITb BbIbBAHO Cma3KoI HeKOTOpbIX BbUTpeHnIX DeTaNel. | 1. 3To HopMaJIbHoeЯВIeHne, uee3 HeCKOLbKO MInHT OHO nPpeKpATITcra. |
| ЧрзмерhoeппocasauBaHne BODbl IynI papoo6bpaObAHne. | 1. CSteMa Calc'nClean zaKpbIa He NOIHOCTbU. | 1. Heckolbko pa3 NaKzMITE KhoIpy «clean» (10). |
| ИЗ оТberстий B noDoxBe yTuIgra (7) BvIXoIIT hakInb. | 1. ИЗ кampebl napoo6bpaObAHnBЯ BvIXoIIT hakInb. | 1. БылONHITeцКЛ OChSTKn (CM. pa3dIe «Calc'nClean»). |
If the above actions do not solve the problem, contact an authorized service center.




8.8

aaiiaaii
.
"SensorSecure".9

aai
SensorSecure" ∴ SΔOBC = 1/2 · CO · BC = 1/2 × CD × 5
Sensecure"14.2 10 10 10 Lgolgl jnssll j0sall cllac 0j01236j000aall llwla Jc .4 0sall jzll jaiwll gill g Jai gao jiaall y:glg 1i jiu waiy aie Jgagg gagagagagagagagagagagagagagagagagagagagagagagagagagagagagagagagagagagagagagagagagagagagagagagagagagagagagagagagagagagagagagagagagagagagagagagagagagag
3

aai aai
eaii iieii (3) 111
jll jai jg 3
(12)
12 3max - eco·max 1 2 3 max - eco·max

1 2 3 max

1 2 3 max max
i-Temp
AntiShine
S 1
1.4

j 1
C
("clean").10
cll jj .11
jll j 12
13
"SensorSecure" 14
TextileProtect* 15
* 16
AntiShine* function is used to prevent shine marks on fabric.
It is possible to use the iron without the water tank.

2.1 "TempOK" function
The "TempOK" (12) function automatically adjusts the ironing temperature based on the type of fabric and the water level. When the iron reaches the set temperature, it stops heating and the indicator light turns off.

2.2 "i-Temp" function
(for users with basic needs)
This function is designed for all types of fabrics that can be ironed, providing an optimal combination of temperature and steam.
The "i-Temp" function automatically sets the appropriate temperature for the fabric, eliminating the need for manual adjustment.
Do not use the "i-Temp" function on fabrics that are not suitable for ironing. Always check the care label on the garment before ironing.
When the "i-Temp" function is selected, the temperature indicator light will turn on.
(for users with basic needs)
When using this function, it is possible to iron without the water tank.
When the "AntiShine" function is selected, the temperature indicator light will turn on.

3. Ironing
Filling the water tank
By pressing (3) the steam button, the iron is ready for steam ironing.
| Температуны peTTey (12) | Бу peTTeriшін (3) УСынылfaн КУИ* |
| 1 2 3 max | |
| • eco•max | |
| 1 2 3 max | |
| • eco•max | |
| i-Temp | 1 2 3 max |
| AntiShine | 1 2 3 max |
| • eco•max |

Caution: To avoid steam burns, do not press the steam button at the end of ironing.

4. Steam ironing
Vertical steam ironing
This function is used to remove wrinkles from hanging garments, curtains, etc.
- Set the temperature regulator (12) to "max".
- Press the steam button (2) at intervals of 5 seconds.

5. Dry ironing
Dry ironing
This function is used for ironing fabrics that do not require steam.
- Set the temperature regulator (12) to "max".
- Iron the garment as usual.
- Iron the garment in 10 cm sections, pressing the steam button (2) at intervals of 5 seconds.

6. Steam burst
Vertical steam burst
The function is activated by pressing and holding the button.
By pressing (3) the function is turned off.

7. Water tank filling
Filling and draining
If the temperature is lower than the set temperature, this automatic will continue to fill the water tank. After filling, the water will be heated automatically.

8. Draining
Filling and draining
The function is performed by pressing and holding the button.
The draining function is intended for emptying the tank.

10. "SensorSecure"
Safety functions
The "SensorSecure" function activates the button when it is pressed and prevents activation when the button is released.
This increases safety and prevents accidental operation.
- Connect the plug to a properly grounded outlet.
- The "SensorSecure" lamp (14) lights up when the button is not pressed and goes out when the button is pressed.
- To stop the machine in case of an emergency, press the red button.
- After the set time has elapsed, the machine will start automatically, and the washing process will begin.
Starting the machine: The temperature set on the machine must not exceed the maximum allowable temperature for the fabric.
When this temperature is reached, the "TempOK" indicator will light up and the machine will stop automatically.

10. If the machine is not working
Troubleshooting
1. Turn the dial (3) to the "max" position and press the start button once (for heating and washing). 2. The water will start heating. Wait until the machine stops. 3. Do not open the lid while the machine is running. 4. Keep the plug (13) firmly in the socket!

Energy saving tips
If the machine is not used frequently, follow the recommendations below to save energy:
- Start washing with the maximum temperature allowed for the fabric. You can save energy by using the correct washing temperature.
- Follow the instructions in this manual and set the washing temperature according to the fabric type.
- If possible, use the recommended amount of detergent. If not, use a smaller amount of detergent.
Wash clothes only when they are dirty and do not overload the machine. In this case, the machine will not be overloaded and will operate efficiently. Before washing, remove any metal objects from the clothes and set the machine to the "Gentle wash" program.
- Remove the kettle from the base, pour out the remaining water (3) and rinse it with clean water.
- Fill the kettle with clean water up to the maximum mark. If the kettle is used for the first time, pour out the first boiled water and rinse the kettle again.

Cleaning and maintenance
Descaling
Attention! There is a risk of burns! Before cleaning and maintenance, unplug the kettle and let it cool down completely.
- If the kettle has been used with hard water, pour out the remaining water and fill it with a mixture of water and vinegar (7). Let it soak for a while.
- If the scale is heavy, it may be necessary to repeat the process. In this case, pour out the mixture, rinse the kettle thoroughly with clean water, and repeat the descaling procedure.
- Do not use sharp metal objects to remove scale from the kettle's heating element. Do not use abrasive cleaners or harsh chemicals to clean the kettle.

The self-clean function
Descaling with the self-clean function
A self-clean
During this function (3), the kettle will automatically clean the heating element.
B Calc'nClean
The "Calc'nClean" function helps to remove limescale deposits from the kettle's interior. If you have hard water, this function should be used at least once every two weeks.
1 Unplug the kettle and remove it from the base (3). Fill the kettle with water up to the maximum mark (11). 2 Set the temperature regulator (12) to "max" and plug the kettle into the mains socket. 3 Wait until the water boils, then let the temperature regulator (12) cool down and switch off. 4 After that, unplug the kettle from the mains (be careful!) and set the regulator (12) to "max". 5 Place the kettle on the base. Press the "clean" button (10) and wait until the kettle switches off automatically after the cleaning cycle. 6 If the kettle does not switch off, repeat steps 4 and 5. 7 After the cleaning cycle, pour out the water and rinse the kettle thoroughly with clean water. 8 For a more thorough cleaning, press the "clean" button again. 9 Unplug the kettle and remove the heating element (7). Clean the heating element only with a damp cloth.
The water tank has a "Calc'nClean" function.
To clean the water tank, use the cleaning function specially developed by Bosch for this purpose. This procedure should be carried out every 3 months.
- The water tank (11) is designed for the water tank cleaning function (16*) with a measuring cup (25 ml) to remove limescale.
- Then, perform the "Calc'nClean" procedure (steps 2-7) as described.
When the water tank cleaning function is complete, the appliance is ready for use.
Or you can purchase the descaling agent from the after-sales service:
Accessories order number: TDZ1101
D anti-calc
The "anti-calc" cartridge is used to reduce limescale buildup and to ensure that the appliance operates without scale deposits. The "anti-calc" cartridge is inserted into the water tank.

"TextileProtect" function*
Ironing with the steam function
The "TextileProtect" function (15*) is used to iron delicate fabrics without damaging them at high temperatures.
When the "TextileProtect" function is activated, the appliance is ready for use, or you can purchase the descaling agent from the after-sales service:
Accessories order number: TDZ1550

"StoreProtect" *
"StoreProtect" accessories (17*) and components (7) can be purchased separately if necessary, providing the possibility of additional protection.
You can purchase the product accessories from our service organization or from authorized dealers:
Product accessory name: TDZ1750
| Mосeны Мумкін себісішіз | ||
| Ytɪk кызбайд. 1. Temnéра typа peTTerişi (12) си зашама对接ылган.2. "SensorSecure"жуешени Селсяндірінг佩 (Жарык Иndік {@opby 14 кыньліктайд). Ytɪk КУТу рекимін对接ылган. | 1. Temnéра typa peTTeriші оlorapьірak ку're对接ылган.2. Ytɪkti кайда кosity ушін onын ТУТКасынан (1) устын. | |
| Temnéра typa peTTERiшін ("TempOK"(12) керсөтkiші кыньліктай Tуразы. | 1. Ytɪk (7) кызады hemecse běлгілг佩нem Temnéра typа дeyin ошін калады.1. Бул калында жafда, běлгілг佩нem Temnéра typа对接жетkenен кейн керсөтkiші对接жунліктамід. | |
| КиIM徴 утікін tabанына жабісын кала берedi | 1. Temnéра typа оte тemeн. 1. Temnéра typa peTTeriші (12) тemeнБурсындз жэne утік субінда кутінiz. | |
| Су сунемпі бір'veутікін tabанынан (7) tamшылайд. | 1. Temnéра typаыpeTTrey (12) napametрі Тьім ТәмЕн.1. Xыліny peTTERiші оlorapьірak Temnéра typа对接жундз, кэнірін对接жун对接对接对接对接对接对接对接对接对接对接对接对接对接对接对接对接对接对接对接对接对接对接对接对接对接对接对接对接对接对接对接对接对接对接对接对接对接对接对接对接对接对接对接对接对接对接对接对接对接对接对接对接对接对接对接对接对接对接对接对接对接对接对接对接对接对接对接对接对接对接对接对接对接对接对接对接对接对接对接对接对接对接对接对接对接对接对接对接对接对接对接对接对接对接对接对接对接对接对接对接接对接对接对接对接对接对接对接对接对接对接对接对接对接对接对接对接对接对接对接对接对接对接对接对接对接对接对接对接对接对接对接对接对接对接对接对接对接对接对接对接对接对接对接对接对接对接对接对接对接对接对接对接对接对接对接对接对接对接对接对接对接对接对接对接对接对接对接对接对接对接对接对接对接对接对接对接对接对接对接对接对接对接对接对接对接对接对接对接对接对接对接对接对接对接对接对接对接对接对接接受接受接受接受接受接受接受接受接受接受接受接受接受接受接受接受接受接受接受接受接受接受接受接受接受接受接受接受接受接受接受接受接受接受接受接受接受接受接受接受接受接受接受接受接受接受接受接受接受接受接受接受接受接受接受接受接受接受接受接受接受接受接受接受接受接受接受接受接受接受接受接受接受接受接受接受接受接受接受接受接受接受接受接受接受接受接受接受接受接受接受接受接受接受接受接受接受接受接受接受受接受接受接受接受接受接受接受接受接受接受接受接受接受接受接受接受接受接受接受接受接受接受接受接受接受接受接受接受接受接受接受接受接受接受接受接受接受接受接受接受接受接受接受接受接受接受接受接受接受接受接受接受接受接受接受接受接受接受接受接受接受接受接受接受接受接受接受接受接受接受接受接受接受接受接受接受接受接受接受接受接受接受接受接受接受接受接受接受接受接受接受接受接受接受接受接受接受接受接受受理接收接收接收接收接收接收接收接收接收接收接收接收接收接收接收接收接收接收接收接收接收接收接收接收接收接收接收接收接收接收接收接收接收接收接收接收接收接收接收接收接收接收接收接收接收接收接收接收接收接收接收接收接收接收接收接收接收接收接收接收接收接收接收接收接收接收接收接收接收接收接收接收接收接收接收接收接收接收接收接收接收接收接收接收接收接收接收接收接收接收接收接收接收接收接收接收接收接收接收接收接受接受接受接受接受接受接受接受接受接受接受接受接受接受接受接受接受接受接受接受接受接受接受接受接受接受接受接受接受接受接受接受接受接受接受接受接受接受接受接受接受接受接受接受接受接受接受接受接受接受接受接受接受接受接受接受接受接受接受接受接受接受接受接受接受接受接受接受接受接受接受接受接受接受接受接受接受接受接受接受接受接受接受接受接受接受接受接受接受接受接受接受接受接受接受接受接受接受接受接受了接受接受接受接受接受接受接受接受接受接受接受接受接受接受接受接受接受接受接受接受接受接受接受接受接受接受接受接受接受接受接受接受接受接受接受接受接受接受接受接受接受接受接受接受接受接受接受接受接受接受接受接受接受接受接受接受接受接受接受接受接受接受接受接受接受接受接受接受接受接受接受接受接受接受接受接受接受接受接受接受接受接受接受接受接受接受接受接受接受接受接受接受接受接受接受接受接受接受接受 | 1. Xыліу peTTERiші оlorapьірak Temnéра typа对接жундз, кэнірін对接жундз, кэнірін对接жундз, кэнірін对接жундз, кэнірін对接жундз, кэнірін对接жундз, кэнірін对接жундз, кэнірін对接жундз, кэнірін对接石化调台调台调台调台调台调台调台调台调台调台调台调台调台调台调台调台调台调台调台调台调台调台调台调台调台调台调台调台调台调台调台调台调台调台调台调台调台调台调台调台调台调台调台调台调台调台调台调台调台调台调合5成KuTД.3. By cokkысындз.Tуйесин对接жундз对接对接对接对接对接对接对接对接对接对接对接对接对接对接对接对接对接对接对接对接对接对接对接对接对接对接对接对接对接对接对接对接对接对接对接对接对接对接对接对接对接对接对接对接对接对接对接对接对接对接对接对接对接对接对接对接对接对接对接对接对接对接对接对接对接对接对接对接对接对接对接对接对接对接对接对接对接对接对接对接对接对接对接对接对接对接对接对接对接对接对接对接对接对接对接对接对接对接对接对象接对象接对象接对象接对象接对象接对象接对象接对象接对象接对象接对象接对象接对象接对象接对象接对象接对象接对象接对象接对象接对象接对象接对象接对象接对象接对象接对象接对象接对象接对象接对象接对象接对象接对象接对象接对象接对象接对象接对象接对象接对象接对象接对象接对象接对象接对象接对象接对象接对象接对象接受接受接受接受接受接受接受接受接受接受接受接受接受接受接受接受接受接受接受接受接受接受接受接受接受接受接受接受接受接受接受接受接受接受接受接受接受接受接受接受接受接受接受接受接受接受接受接受接受接受接受接受接受接受接受接受接受接受接受接受接受接受接受接受接受接受接受接受接受接受接受接受接受接受接受接受接受接受接受接受接受接受接受接受接受接受接受接受接受接受接受接受接受接受接受接受接受接受接受 |
| Бушікін рет косkanікіздікін ТУТКін TУТД. | 1. By petteriisi (3) Душино对接ылган.2. Temnéра typа оte тemeн. Тамшыflа карсы жуүбүэндірілг佩.3. By cokkысындз.Tуйесин对接жундз.Tуйесин对接жундз.Tуйесин对接жундз.Tуйесин对接жундз.Tуйесин对接жундз.Tуйесин对接жундз.Tуйесин对接жундз.Tуйесин对接жундз.Tуйесин对接жундз.Tуйесин对接жу网. | |
| Бастankі рет косkanін кіздікін TУТКін T U T D. | 1. Byn Keibip iшkiбелшікт dispar.Маілayынань solnyы MUMKIN.1. Byn Kaibp iшkiбелшікт dispar.1. Byn Kaibp iшkiбелшікт dispar.1. Byn Kaibp iшkiбелшікт dispar.1. Byn Kaibp iшkiбелшікт dispar.1. Byn Kaibp iшkiбелшікт dispar.1. Byn Kaibp iшkiбелшікт dispar.1. Byn Kaibp išelshci dispar.1. Byn Kaibp iшkiбелшікт dispar.1. Byn Kaibp iшkiбелшікт dispar.1. Byn Kaibp iшkiбелшікт dispar.1. Byn Kaibp iшkiбелшікт dispar.1. Byn Kaibp iшkiбелшікт dispar.1. Byn Kaibp iselshci dispar.1. Byn Kaibp iшkiбелшікт dispar.1. Byn Kaibp iшkiбелшікт dispar.1. Byn Kaibp iшkiбелшікт dispar.1. Byn Kaibp iшkiбелшікт dispar.1. Byn Kaibp iшkiбелшікт dispar.1. Byn Kuspaia对接石化调台调台调台调台调台调台调台调台调台调台调台调台调台调台调台调台调台调台调台调台调台调台调台调台调台调台调台调台调台调台调台调台调台调台调台调台调台调台调台调台调台调台调台调台调台调台调台调台调合5 成KuTД.3. By cokkысындз.Tуйесин对接жундз.Tуйесин对接жундз.Tуйесин对接жундз.Tуйесин对接жундз.Tуйесин对接жундз.Tуйесин对接жундз.Tуйесин对接жундз.Tуйесин对接жунdз.Tуйесин对接жунdз.Tуйесин对接жунdз.Tуйесин对接жунdз.Tуйесин对接жунdз.Tуйесин对接жунdз.Tуйесин对接жунdз.Tуйесин对接жунdз.Tуйесин对接жунdз.Tуйесин对接жунd3. | |
| Ytɪk tabanbɪндаflы санылайлардан кашылдь. | 1. Byra aiHany kamepacьларн кашылдь.1. Byra aiHany kamepacьларн кашылдь.1. Byra aiHany kamepacьларн кашылдь.1. Byra aiHany kamepacьларн кашылдь.1. Byra aiHany kamepacьларн кашылдь.1. Byra aiHanykai'mi nKapahbɪz. | |
| Сyd'dн{Tyнбалары утікін tabанындіары (7) tecik'tep apkblы TShыл'dь. | 1. KaKByh i3depi by kamepacьlby apkblby Shыл'dь.TShыл'dь.1. KaKByh i3depi by kamepacьlby apkblby Shыл'dь.TShыл'dь.1. KaKByh i3depi by kamepacьlby apkblby Shыл'dь.TShыл'dь.1. KaKByh i3depi by kamepacьlby apkblby Shыл'dь.TShыл’dь.1. KaKByh i3depi by kamepacьlby apkblby Shыл'dь.TShыл'dь.1. KaKByh i3depi by kamepacьlby apkblby Shыл'dь.TShыл'dь.1. KaKByh i3depi by kamepacьlby apkblby Shыл'dь.TShвл'dь.1. KaKByh i3depi by kamepacьlby apkblby Shыл'dь.TShвл'dь.1. KaKByh i3depi by kamepacьlby apkblby Shыл'dь.TShвл'dь.1. KaKByh i3depi by kamepacьlby apkblby Shыл'dь.1. KaKByh i3depi by kamepacьlby apkblby Shыл'dь.TShвл'dь.1. KaKByh i3depi by kamepacьlby apkblby Shыл'dь.TShвл'dь.1. KaKByh i3depi by kamepacьlby apkblby Shыл'dв.1. KaKByh i3depi by kamepacьlby apkblby Shыл'dь.TShвл'dь.1. KaKByh i3depi by kamepacьlby apkblby Shыл'dь.TShвл'dь.1. KaKByh i3depi by kamepacьlby apkblby Shыл'dь.TShвl'dь.1. KaKByh i3depi by kamepacьlby apkblby Shыл'dь.TShвl'dь.1. KaKByh i3depi by kamepacьlby apkblby Shыл'dь.TShвl'dь.1. KaKByh i3depi by kamepacьlby apkblby Shыл'dь.TSHвl'dь.1. KaKByh i3depi by kamepacьlby apkblby Shыл'dь.TShвl'dь.1. KaKByh i3depi by kamepacьlby apkblby Shыл'dь.TShвl'dь.1. KaKByh i3depi by kamepacьlby apkblby Shыл'dв.1. KaKByh i3depi by kamepacьlby apkblby Shыл'dь.TShвl'dь.1. KaKByh i3depi by kamepacьlby apkblby Shыл'dь.TShвl'dь.1. KaKByh i3depi by kamepacьlby apkblby Shыл'dь.TShвл'dь.1. KaKByh i3depi by kamepacьlby apkblby Shыл'dь.TShвl'dь.1. KaKByh i3depi by kamepacьlby apkblby Shыл'dь.TSHвl'dь.1. KaKByh i3depi by kamepacьlby apkblby Shыл'dь.TSHвl'dь.1. KaKByh i3depi by kamepacьlby apkblby Shыл'dь.TSHвl'dь.1. KaKByh i3depi by kamepacьlby apkblby Shыл'dв.1. KaKByh i3depi by kamepacьlby apkblby Shыл'dь.TSHвl'dь.1. KaKByh i3depi by kamepacьlby apkblby Shыл'dь.TSHвl'dь.1. KaKByh i3depi by kamepacьlby apkblby Shыл'dь.TSHвI'dь.1. KaKByh i3depi by kamepacьlby apkblby Shыл'dь.TSHвI'dь.1. KaKByh i3depi by kamepacьlby apkblby Shыл'dь.TSHвI'dь.1. KaKByh i3depi by kamepacьlby apkblby Shыл'dь.TShвI'dь.1. KaKByh i3depi by kamepacьlby apkblby Shыл'dь.TSHвI'dь.1. KaKByh i3depi by kamepacьlby apkblby Shыл'dь.TSHвI'dь.1. KaKByh i3depi by kamepacьlby apkblby Shыл'dв.1. KaKByh i3depi by kamepacьlby apkblby Shыл'dь.TSHвI'dь.1. KaKByh i3depi by kamepacьlby apkblby Shыл'dь.TSHвI'dь.1. KaKByh i3depi by kamepacьlby apkblby Shыл'dь.TSHвl'dь.1. KaKByh i3depi by kamepacьlby apkblby Shыл'dь.TSHвI'dь.1. KaKByh i3depi by kamepacьlby apkblby Shыл'dь.TShвI'dь.1. KaKByh i3depi by kamepacьlby apkblby Shыл'dь.TShвI'dь.1. KaKByh i3depi by kamepacьlby apkblby Shыл'dь.TShвI'dь.1. KaKByh i3depi by kamepacьlby apkblby Shыл'dв.1. KaKByh i3depi by kamepacьlby apkblby Shыл'dь.TShвI'dь.1. KaKByh i3depi by kamepacьlby apkblby Shыл'dь.TShвI'dь.1. KaKByh i3depi by kamepacьlby apkblby Shыл'dь.TShвl'dь.1. KaKByh i3depi by kamepacьlby apkblby Shыл'dь.TShвI'dь.1. KaKByh i3depi by kamepacьlby apkblby Shыл'dь.TShвI'dь.1. KaKByh i3depi by kamepacьlby apkblby Shыл'dь.TSHвI'dь.1. KaKByh i3depi by kamepacьlby apkblby Shыл'dв.1. KaKByh i3depi by kamepacьlby apkblby Shыл'dь.TShвI'dь.1. KaKByh i3depi by kamepacьlby apkblby Shыл'dь.TShвI'dв.1. KaKByh i3depi by kamepacьlby apkblby Shыл'dь.TShвI'dь.1. KaKByh i3depi by kamepacьlby apkblby Shыл'dь.TShвI'dь.1. KaKByh i3depi by kamepacьlby apkblby Shыл'dь.TSHвl'dь.1. KaKByh i3depi by kamepacьlby apkblby Shыл'dь.TShвI'dь.1. KaKByh i3depi by kamepacьlby apkblby Shыл'dь.TShвI'dь.1. KaKByh i3depi by kamepacьlby apkblby Shыл'dв. |
If you encounter any issues not covered in this manual, please contact the technical service organization without prior notice.



- GENERAL SAFETY INSTRUCTIONS
- IMPORTANT NOTICES
- ADVICE ON DISPOSAL
- DESCRIPTION
- BEFORE USING YOUR APPLIANCE FOR THE FIRST TIME
- REMOVE ANY LABEL OR PROTECTIVE COVER FROM THE SOLEPLATE (7)
- USING YOUR APPLIANCE
- FILLING THE WATER TANK
- ANY DAMAGE CAUSED BY THE USE OF THE AFOREMENTIONED PRODUCTS WILL MAKE THE GUARANTEE VOID
- SET THE STEAM REGULATOR (3) TO THE POSITION AND UNPLUG THE IRON FROM THE MAINS
- SETTING THE TEMPERATURE
- THE TEMPERATURE CONTROL (12) ADJUSTS THE TEMPERATURE OF THE SOLEPLATE (7)
- TEMPERATURE SUITABLE FOR
- TEMPOK" INDICATOR
- I-TEMP" FUNCTION
- IRONING WITH STEAM
- SHOT OF STEAM
- VERTICAL STEAM
- IRONING WITHOUT STEAM
- DRIP PROTECTION
- SPRAY
- SENSORSECURE" FUNCTION
- AFTER IRONING
- SEE THE LEAFLET SIDES
- TIPS TO HELP YOU SAVE ENERGY
- CLEANING & MAINTENANCE
- ATTENTION! RISK OF BURNS
- MULTIPLE DESCENDING SYSTEM
- A SELF-CLEAN
- B CALC'NCLEAN
- C "CALC'NCLEAN" WITH DESCALING LIQUID
- D ANTI-CALC
- TEXTILEPROTECT" FABRIC PROTECTOR
- STOREPROTECT
- SET THE TEMPERATURE
- THE TEMPERATURE SELECTOR (12) ADJUSTS THE TEMPERATURE OF THE SOLEPLATE (7)
- DEVICE SETUP
- FILLING THE WATER RESERVOIR
- DAMAGE CAUSED BY THE USE OF THE AFOREMENTIONED LIQUIDS WILL VOID THE WARRANTY
- SET THE TEMPERATURE REGULATOR (3) TO THE DESIRED POSITION AND PLUG THE POWER CORD INTO THE ELECTRICAL OUTLET
- TEMPERATURE REGULATION
- THE TEMPERATURE OF THE SOLEPLATE (7) IS ADJUSTED USING THE TEMPERATURE REGULATOR (12)
- TEMPERATURE RANGE
- FABRICS THAT CAN BE IRONED
- LINEN
- SENSORSECURE
- AFTER USE
- ENERGY SAVING TIPS
- DESCALING SYSTEM
- THE "CALC'NCLEAN" FUNCTION IS IDEAL FOR DESCALING
- ANTI-CALC
- PROTECTIVE NOZZLE FOR DELICATE FABRICS «TEXTILEPROTECT
- RU·INSTRUCTIONS FOR USE
- GENERAL SAFETY RULES
- IMPORTANT INSTRUCTIONS
- DISPOSAL TIPS
- BEFORE FIRST USE OF THE APPLIANCE
- USING THE APPLIANCE
- SEE ATTACHED PAGES
- CALC'NCLEAN
- C
- TEMPOK" FUNCTION
- (FOR USERS WITH BASIC NEEDS)
- IRONING
- BY PRESSING (3) THE STEAM BUTTON, THE IRON IS READY FOR STEAM IRONING
- STEAM IRONING
- THIS FUNCTION IS USED TO REMOVE WRINKLES FROM HANGING GARMENTS, CURTAINS, ETC
- DRY IRONING
- THIS FUNCTION IS USED FOR IRONING FABRICS THAT DO NOT REQUIRE STEAM
- STEAM BURST
- THE FUNCTION IS ACTIVATED BY PRESSING AND HOLDING THE BUTTON
- WATER TANK FILLING
- DRAINING
- THE FUNCTION IS PERFORMED BY PRESSING AND HOLDING THE BUTTON
- IF THE MACHINE IS NOT WORKING
- CLEANING AND MAINTENANCE
- THE SELF-CLEAN FUNCTION
- THE WATER TANK HAS A "CALC'NCLEAN" FUNCTION
- ACCESSORIES ORDER NUMBER: TDZ
- TEXTILEPROTECT" FUNCTION
Brand : BOSCH
Model : TDA702821A
Category : Iron